Part nostalgia-bomb, part note-taking and part FAQ, what started in GameTrailers as a video game blog is now on Blogger. This blog is a look back at video games, both popular and obscure, from the video game industry's infancy all the way to the previous console generation.
With Zeromus defeated, the world is at peace once again...
After the battle with Zeromus, FuSoYa explains that while evil will always exist, it will be overcome as long as people continue to band together. Golbez tells FuSoYa that he will be joining him, since he cannot return to the Blue Planet after all that he has done. Cecil forgives Golbez, and from here, the ending sequence plays.
One born from the mouth of a dragon, rising towards the heavens with Light and Darkness, a sleeping promise shall awaken. Veiled in the light of eternity, Mother Earth shall be blessed with mercy and salvation. The moon has begun to seek its own light. One man, separated from his world by the stream of time, sleeps...
The Magic Ship returns to its original resting place in the sea near Mysidia, and Palom and Porom continue to learn magic. Palom continues to brag about the adventure that has just been taking place.
Edge becomes the new rules of Eblan, and still has feelings for Rydia.
Rydia goes back to the Land of Phantom Beasts.
Yang heads back to Fabul, and he and his wife become the new king and queen.
Edwards heads back to Damcyan to help with the rebuilding efforts.
In the underworld, the dwarfs' tanks are scrapped as there is no more war, and word has spread that Rosa and Cecil are marrying and becoming the new rulers of Baron.
Kain refuses to attend Cecil and Rosa's wedding, saying that he shamed Dragoons everywhere and that has some atonement to do before they can meet again. He goes to Mt. Ordeals to test himself in hopes that his own father's spirit will forgive him if he is to surpass him as a Dragoon.
Suddenly, a form of pure darkness known as Zeromus comes out of Zemus' body and rocks everyone. Golbez tries to kill Zeromus, who has been strengthened by hatred, but Zeromus absorbs Meteo. Golbez then tries to use the Crystal at FuSoYa's suggestion, but Zeromus declares that if one who has chosen the path of darkness were to use the Crystal, it would fail to shine, and would only return to the darkness. Zeromus immediately defeats Golbez and FuSoYa.
Meanwhile, at the Tower of Mysidia, the people of Mysidia use the prayer to pray for Cecil and his party along with other NPCs that have been encountered by the party. Back on the moon, Cecil gets up and takes the Crystal from Golbez, and everyone at Mysidia - including some people who aren't there, such as Edward and the now-deceased Tellah - send their strength and spirit to bring everyone in Cecil's party back to full HP and MP. The battle with Zeromus now begins.
Use the Crystal to reveal Zeromus' true form. From there, have Edge throw the Dart, have Kain use Jump, have Rydia summon Bahamut and have Cecil use physical attack. Big Bang does a lot of damage, so make sure Rosa uses Cure 4 on the party when it hits. Zeromus always shakes before casting Big Bang, so have your best healing spells (and Rydia's Sylph summon) ready when that happens. Black Hole will dispel any buffs such as Haste, but it isn't that much of a big deal.
Zeromus has 65,000 HP, but gets a full health refill at around 16,000 HP, and you can tell when it happens when Zeromus changes its attacks up and starts using attacks like Meteo. If you can keep up the healing and the powerful attacks every round, Zeromus will go down, but not before declaring that it will return as long as evil lurks in the hearts of men.
The Gysahl's Flute summons the Fat Chocobo anywhere in the game when you use it. At least you don't have to be in the Magic Ship anymore.
To beat Phase, equip Edge with the Thunder Claw and attack him with it. Phase will cast Reflect on itself and bounces spells off itself and onto your party. Have Kain repeatedly Jump, and have Rydia cast Quake. Cast Reflect on someone, then cast Holy on that person to bounce it onto Phase to do 9,999 damage per turn. This shouldn't take long.
Rydia will learn Meteo at Level 60, but Bahamut is a lot more reliable and cost-effective.
The Zemus Breth has a lot of HP. You're better off running away. Also run away from the Zemus Mind, who will try to kill your party off as quickly as possible.
At the end of this area, you'll finally catch up with Golbez, FuSoYa and Zemus. Golbez and FuSoYa will fight Zemus, and both of them cast Meteo at the same time is enough to destroy him...almost. Zemus' soul comes back to try to destroy everyone...
Equip Rosa with the Sage Staff and Edge with the Flame Claw before going into the room with the two chest. You'll fight two Lunasaurus. Have Kain Jump the one in the back, and have Cecil and Edge wail on the one in the front. Rosa can attack the one in the back with Artemis Arrows if you so choose, but she'll be healing more often. Have Rydia summon Bahamut to hit both Lunasaurus enemies with Mega Flare. The Lunasaurus will be attacking with Flame repeatedly, but if you can keep everyone's HP high, you should be good to go.
Beating the two Lunasaurus will give you access to two Ribbons. Give one to Rosa and another to Edge; Rydia will still need her Gold Band and Rosa and Edge will need the defense.
In this game, stat gains are fixed up until Level 70; past 70, they will be random and can go either up or down. So be careful.
When you approach the Masamune, you'll face Tidarithian, which will hit you with Big Tsunami and Flare. Have Rydia use Sylph and Rosa use Cure 4, and have Kain use Jump on every turn. Have Cecil and Edge attack normally. If you need to, throw a Hell Wind Shuriken. When you beat Tidarithian, the Masamune will be yours. It's the best sword in the game for Edge, so give it to him. It can also cast Fast when used as an item and increases Agility by three.
Near the end of the cave part of this area, there is an invisible bridge to the west that you have to cross in order to get anywhere.
You'll then see a warp tile. Once you do, the path will be very straightforward and will also lead to a chest that contains another Defense Ring that you'll want to give to Rosa.
After the save point, you'll have another boss to contend with when you find another sword. You'll face the Dark Bahamut, who will cast Mega Flare before you can even cast Reflect. Cast Reflect as quickly as possible, and have Rydia summon Ashura and Sylph with the hope of healing everybody. Have Rosa cast Cure 4 on everyone, just in case. Have Kain attack with Jump and have Cecil and Edge attack with swords after using a Bacchus' Wine or a Berserk spell on them. You'll get Ragnarok for winning this battle, and it is Cecil's most powerful weapon. It also increases his Vitality by 15.
The Minerva Jumpsuit prevents the Paralyze ailment and increase Strength, Agility and Vitality by 15, but decreases Wisdom and Will by 15.
To beat Plague. equip Kain with the Gunge Lance, Rosa with the Sage Staff and Edge with the Full Moon. Plague will cast Death Sentence at the start of the battle. Kain and Edge will use regular attacks. Have Rydia summon Bahamut to cast Mega Flare, and have Rosa cast Holy. You'll win the battle and get the Holy Lance.
The Crystal Armor is great for Cecil and is one of the strongest armors in the game, and protects against all status ailments, including Berserk. You may want to keep the Genji Armor around for him.
The Allemagne is susceptible to projectile weapons, and loves to cast Death Sentence, which causes a timer to appear above whoever it is casted upon, which kills the player upon reaching zero.
If you come across multiple Red Dragons, have Rydia summon Leviathan and Edge use Suiton to take them all down.
The White Robe is the best armor in the game for Rosa and increases her Will by 15.
The Rilmarder is weak to Lightning and continuously casts Libra on itself. If you cast Bolt 3 on it and do maximum damage, it will castle Haste on itself and cast Bolt 3 on everybody until the whole party dies. Instead, use other attacks, then use Bolt 3 to finish it off. (In the Western Super Nintendo version, it is known as Tricker for this very reason.)
The Crystal Helmet is great for Cecil and increases Will by three.
The Red Fang isn't too special, but the room that contains it is the only area where you can fight Pink Puffs if you use the Alarm. When you fight them, the Chocobo music plays, and the Pink Puffs will automatically Bersek one of your party members. If you beat them, there is a slight chance that you can win the Pink Tail, and if you give it to the dwarf that collects tails, you can get Adamant to use to get the Adamant Armor at Kukuro's house. It boosts all stats by 15, gives you near perfect evade and magic defense, and protects against all status ailments.
The Dragon Helmet is for Kain, as is the Dragon Mail and Dragon Gauntlet. Equip them all on Kain; they're the best stuff you can get for him.
The BlueDragon has no elemental weakness. Cast your most powerful spells on it, and have Rydia cast Flare and Rosa cast Holy.
The Zombiesaur is weak to fire, and will also try to Curse your party members. The Artemis Arrows work very well against them, too.
The Gold Dragons are similar to the Silver Dragons, though they do have a counter-attack. Take them out first in case they're paired with Silver Dragons.
You'll also get the White Fang in one of the treasure boxes in this dungeon.
The Stardust Rod increases Wisdom by 15. Give it to Rydia.
The Red Dragon is weak to ice, so cast Ice 3 on it if you can.
The Crystal Shield is better than the Aegis Shield for Cecil and increases Will by 3.
The Defense Ring increases Vitality by 15 in addition to doing wonders for defense.
On the moon, head to the Mansion of the Lunarians. Before you do anything else, hand Kain's new Genji equipment to Cecil, and give all of Cecil's Diamond equipment to Kain along with the Defender and the Aegis Shield, since Cecil won't be the one Jumping around. From here, go to the teleporter title in the room with the eight Crystals and step on it. You'll head to the Core.
The Dark Gear increases Agility by three, and is better than the Genji Armor for Edge.
The Sage Staff increases Will by 15, and is a huge boost for Rosa. Keep the Artemis Arrows around for Dragon enemies.
The floating katana is a boss fight. Heal your party and cast Levitate on everyone before interacting with the katana. You'll fight the White Dragon. Beserk Edge and Cecil with a Bacchus's Wine, have Rydia summon Bahamut, have Kain use Jump and have Rosa cast Cure 4 on everyone. WhiteDragon will cast Slow and will eventually attack you with Earthquake, but that's what casting Levitate before the battle is for. By beating the WhiteDragon, you'll get the Murasame for Edge, which is much more powerful than and increases Strength, Vitality and Wisdom by five and decreases Agility and Will by five. Keep the Full Moon boomerang around for flying enemies.
The Fire Bute is one of the most powerful whips, but it decreases Wisdom and Will by 5 while increasing Strength, Agility and Vitality by five.
From where you fought the Four Feinds, go north. You'll fight off the core of the Giant.
Destroy the DefenseSys (the lower-right orb). Have Rydia summon the Sylphs to destroy it immediately while attacking the other two Orbs. From here, you can attack the ControlSys with your strongest physical attacks and summons. The Attack Sys (the upper-right orb) will cast Reflect on the ControlSys so it can cast Laser on it and hit the whole party. From here, do not destroy the AttackSys before destroying the ControlSys, or else the ControlSys will cast Globe 199 and do some immense damage.
After destroying the core, the giant will be stopped, then Golbez storms in. FuSoYa confronts him and tries to get Golbez to remember who he is. Golbez comes to his senses, and it is revealed that Golbez really is Cecil's brother and that he was controlled by Zemus. Golbez plans to end everything by fighting Zemus on the moon, and FuSoYa goes with him. Before Cecil can go after Golbez, the Giant of Bab-il begins to collapse. Suddenly, Kain shows up, this time back to his senses again, and helps Cecil and company get out as the giant explodes.
Back on the Magical Ship, Kain announces that he is back to his senses again, and Edge nearly attacks Kain for summoning the giant, but Rosa reminds him that Kain was also under Zemus' control while explaining to Kain what is going on. Edge is still reluctant to trust Kain in case he loses control again, but Kain tells him to kill him outright if he becomes evil again.
Rydia and Rosa tell Cecil they want to go, but Cecil tells them to stay here while he, Edge and Kain take on Zemus themselves, as there is no guarantee that they will come back alive, with Edge telling Rydia to be a good little girl and Rydia telling Edge she would hate to be him if he weren't kidding, saying he would end his reproductive years rather quickly. Edge, Kain and Cecil fly to the moon after they leave, then it is revealed that Rosa and Cecil never left. Rosa refuses to move unless Cecil takes him with her. Cecil reluctantly lets her come with them, then Rydia shows up and tells Rosa that she knew this would work and says that this is everyone's fight. You'll then be back on the moon. (I swear this whole part of the story is absolutely crap - I mean, it's pretty obvious from the get-go that everyone has their reasons to fight here - and is an even worse idea than Budget rental jetpacks. Why on earth would you tell the only women in your party - as well as the source of your strongest magical attacks and healing throughout most of the game - to go home and "let the men do it because we might not come back alive?" This accomplishes absolutely jack shit for the story - as you'll see later - and was not even necessary, even in the DS and Steam PC versions. As a matter of fact, it was so unnecessary that even Wikipedia itself refuses to acknowledge it.)
(By the way, if you go back to Blacksmith Kukuro's house in the underworld, you can buy Shurikens, HellWind Shurkines and Yoichi Arrows in case you really need any.)
The Last Arm is weak to Thunder. The Electromagnetic Field casts Stop on whoever it is cast on, and Nuclear Explosion is a self-destruct attack on one party member that Last Arm does upon being destroyed.
The Machine Dragon (MachDragon) is a tough enemy with powerful spells that can damage the whole party tremendously. Have FuSoYa cast Tornado to make the battle easier.
The Giant Soldier (GiantSoldr) can be cut down to size with the Ogre Axe and the Fairy Claw. Amazingly, using both the Fairy and Thunder Claw with Edge does not do more damage, so you're better off using just the Fairy Claw.
Once you reach the save point, use the Alarms from the Searchers to summon MachDragons and GiantSoldrs to get loads of experience. You'll want Rydia to reach Level 55 and learn Flare, which will be useful in the next area. When you're done, Cecil should be in the high 50s, with everyone else at Level 55 or above.
When you reach the end, you'll face the Four Fiends again, even though you've already beaten them all before. They reveal that Lord Zemus has revived them, then Rubicante fully restores your HP and MP before you battle them all one by one again.
For Scarmiglione, have Rydia cast Fire 3 once on him. As you do this, Berserk both Edge and Cecil while Rosa and FuSoYa use strong Cure Spells. For Rubicante, cast two Ice 3 spells on him. For Cognazzo and Barbariccia, cast Bolt 3 on them until they die.
After you beat the Four Fiends, you won't be hearing from them again.
When you head back to Earth on the Magic Ship, you'll find out that the Giant of Bab-il has finally been set loose on the Blue Planet. Suddenly, tanks are seen firing at the Giant. Somehow, King Jiott and his men are now above ground, and Yang and the Sylphs are there with them. Cid, now recovered, is also here with a fleet of airships to fend off the Giant of Bab-il along with the Mysidia village elder and Polom and Porom, who are now no longer stoned. Edward is also captaining one of the ships.
A fierce battle ensues, and the Giant of Bab-il is confused. Cecil and company get close to the Giant in an attempt to destroy it from within, and make their way inside the giant from the top.
All the enemies here are weak to thunder, and are also immune to just about every single status ailment there is.
The Searcher and MachSoldier are weak to thunder. The Searchers are on the ground, so you can hit them with Quake. You can also steal Alarms repeatedly from Searchers, and if you use one outside of battle, you can summon rare enemies.
The MachCannons are also weak to thunder, but they can be taken care of rather easily.
The IronSolder (Iron Soldier) is also weak to thunder and can also be destroyed with Quake, even though it has more HP than the other enemies and can also pack a punch.
The Ogre Killer is an axe that can be bought in Tomra, but can also be found in the Tower of Bab-il. It deals quadruple damage to Giants, and will work wonders against the Demon Soldiers.
As you go through the Cave of the Phantom Gods, you will eventually enter a fixed mini-boss battle with the Behemoth, and you'll have to do this a few times on your way to the end of the third basement floor. Casting spells on it will cause it to counter-attack with Maelstrom, which will nearly wreck your entire party. Instead, Berserk Cecil and have him hack away at the Behemoth with super-strong attacks. The Behemoth will counter-attack by hitting Cecil every time, but the more damage you do in less time, the fewer counter-attacks the Behemoth will perform before it dies. Since the Behemoth has a low speed, you'll be able to cut it to ribbons in this fashion, anyway. Using Rydia's Mist summon really helps, too.
The Skull Dragons are weak to Fire, so cast Fire 3 on them. As for the Dark Wizard, just Piggy them and take them out as quickly as possible. You can also use Break on the Dark Wizard, but you'll have more luck casting Piggy instead.
At the end of the third basement floor, you'll be met by two purple-haired children. They are surprised by Cecil being half-Lunarian and wondering what business you possibly have with the God of the Phantom Beasts, who is just ahead.
Be ready to equip the Artemis Arrows and Yoichi Bow on Rosa for what you're about to do. When you talk to the God of the Phantom Beasts, he will be surprised by your prowess before challenging you. He then transforms into Bahamut, whom you will then have to fight.
Bahamut has a count-down. Before he counts down to zero, use the Light Curtain and/or cast Reflect on everybody. Once Bahamut hits zero, he will cast Mega Flare. If it hits someone who has Reflect cast upon them by any means, it will hit Bahamut. From here, have Rosa attack with the Yoichi Bow and Artemis, have FuSoYa cast Flare, and have Rydia cast Tsunami. As for Cecil and Edge, have them hit hard with their strongest attacks. As long as you have Reflect up, this battle is doable. Beating Bahamut will allow Rydia to summon Bahamut in battle at any time, and with high Wisdom and Will, Bahamut will be able to pack a punch.
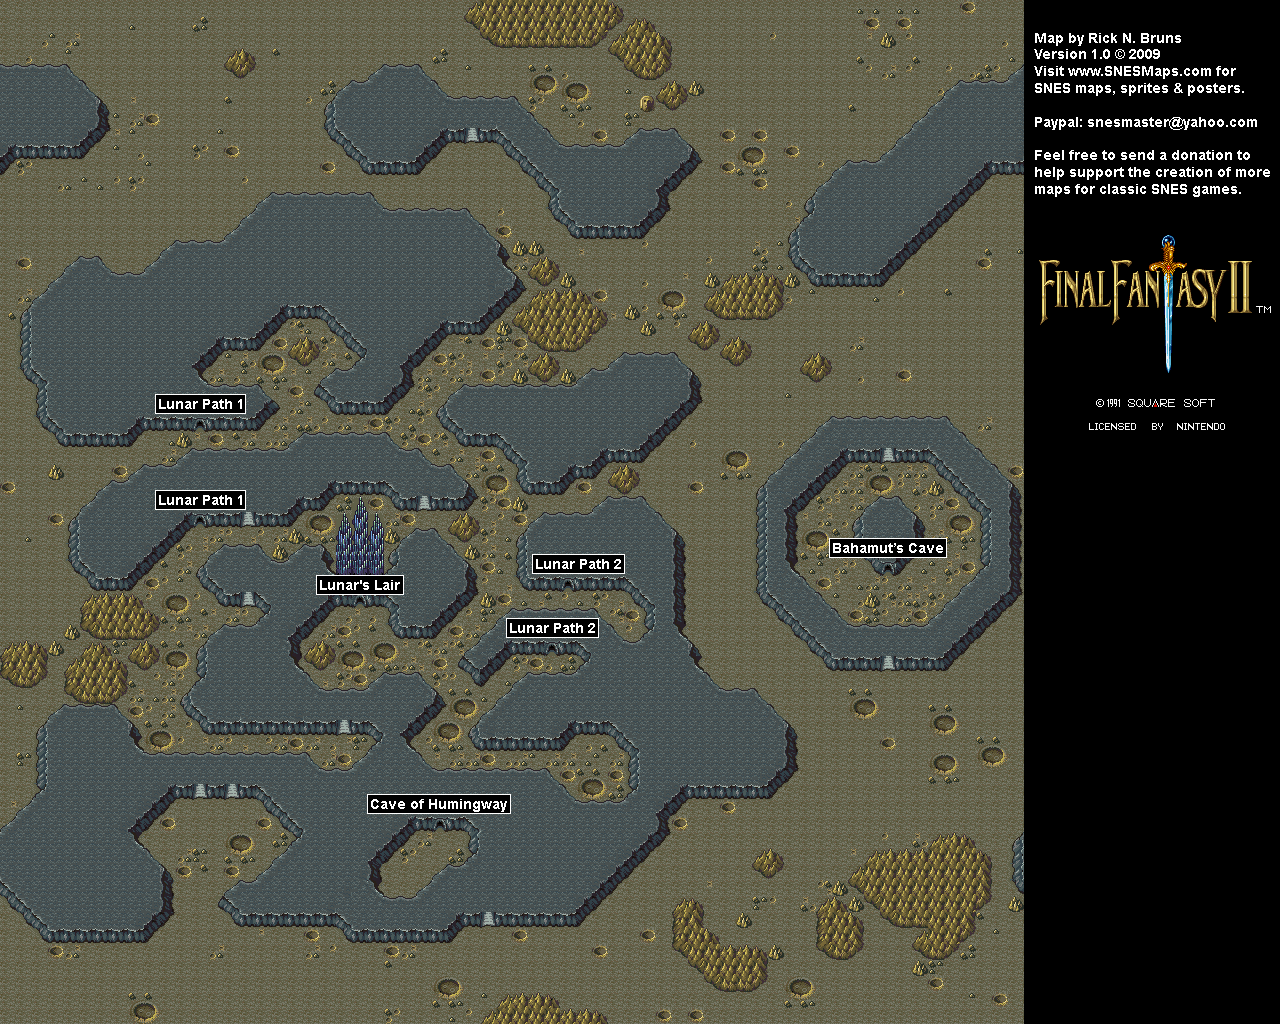
There is a staircase north of where you met FuSoYa. You can find 280 Gil by pressing A on the stairs, and if you go up it, you'll find eight more crystals, revealing that the Moon has its own Light and Dark Crystals. By interacting with them, you'll learn that they keep Zemus sealed in the moon's core. You can get on the teleportation title to enter the core, but you won't get very far as a barrier will stop you.
Before you go back to the Blue Planet, there is an octagon-shaped area on the lunar surface. Land on the north end of it with the Magical Ship, then enter the cave in the center. This is the Cave of the Phantom God.
The Genji Gauntlet (aka Genji Glove) can be equipped by Edge, and gives him a lot of much-needed physical defense. Give the Rune Ring to FuSoYa to increase his Wisdom and Will.
The DarkWizard is weak to Piggy, and the Moon Goddess is weak to Mini. You'll want to cast Piggy on the former to stop their spells. The latter are easy to kill, and you can also steal Artemis Arrows from them. Steal at least 80 of those with Edge's Sneak command; you'll need those for Rosa a little later on to deal quadruple damage to the dragon-type enemies near the end of the game.
There is a secret passage just to the east of the start that leads to a Genji Shield, though it won't be better than the Aegis Shield for Cecil.
The Silver Dragon are weak to Mini, and you can also kill them with Quake.
The Genji Armor is one of the best armors in the game for Edge, and it works wonders for his defense.
The Demon Soldiers here don't continuously cast Stone Gaze. They are weak to the Tornado spell, and are impervious to just about any status ailment you can throw at them. They also attack with laser beams and flamethrowers and have a lot of HP.
The Genji Helmet is another useful piece of armor for Edge that will work wonders for his defense.
The Procaryotes and Eucaryotes are run-of-the-mill enemies that have the potential to Poison you, but if you cast Quake on them with Rydia, you'll be able to beat them and get a Golden Apple.
The Abyss Worm is weak to Fire, and the Dark Grenade (Dk. Grenade) is another Bomb enemy that you can get the Bomb summon from. If you hit a Dark Grenade with a weak Bolt spell, the Dark Grenade will cast Chain Explosion, which allows it to take other surrounding enemies with it.
The Moon Curtain reflects magic for longer than the Light Curtain, and the Stardust is used to cast a weak version of Meteo.
The Luna Virus and the Puddings are vanilla enemies, though the Puddings have physical defense.
You'll be going in and out of the lunar surface world en route to the crystal palace, but the corridors look exactly the same. You'll eventually reach the crystal palace.
The tile to the far right of the entrance restores your MP, while the tile to the far left restores your HP and cures status ailment.
There is a hidden chest to the south of the HP/status ailment tile that contains two Demon Soldiers that love to cast Stone Gaze a whole lot. HCBailly doesn't even consider them important.
By approaching the altar in the center room, you will be welcomed by an old man named FuSoYa, guardian of the Lunarians. He explains that the Lunarians are people from a long-destroyed planet between the fourth and fifth planet of the solar system, and in their planet's final days, they built a ship and traveled to the main characters' world. They were forced to hibernate to survive, but when it was clear that the creatures of the third planet - also known as the Blue Planet - were still evolving, they created another moon and kept on sleeping. Unfortunately, one of the Lunarians refused to sleep and wanted to purge the third planet of all living beings so the Lunarians could settle there, even going so far as to create the Tower of Bab-il to give mankind the power to destroy itself. Even though FuSoYa forced him into a slumber, the man's mind was still awake, and his psychic powers were ever-increasing and became powerful enough to destroy living things. That man is now sealed below, and uses his powers to control those with a dark soul. That man is Zemus, and the man in his control is Golbez.
FuSoYa then explains that the Crystals are the Lunarians' source of energy, and Zemus used their power to operate the Dimensional Elevator in the Tower of Bab-il. With all eight Crystals gathered, the elevator will bring down mankind's doom: the Giant of Bab-il. Thankfully for us, the rest of the Lunarians did not share Zemus' beliefs, and wanted to wait until the people of the Blue Planet were advanced enough to be able to speak with them, in order to share their culture.
As for the Magical Ship, KluYa, FuSoYa's younger brother, made the ship to go to the Blue Planet. KluYa, having fallen in love with the planet, wanted to aid in its evolution, which in turn lead to the creation of the Devil Road, the handing down of the technology to build airships, and the founding of Mysidia, where the legends taught there would make the Lunarians' dream a reality. However, it was also on the Blue Planet that KluYa fell in love with a woman on the planet and had two children. One of them was Cecil, while the other one was Golbez, meaning that Golbez and Cecil are brothers.
Cecil then learns that the voice that he heard on Mt. Ordeals was that of KluYa's spirit, and FuSoYa notices the resemblance between Cecil and a young KluYa. He also learns that he has the power to stop Zemus, and that he must return to the Tower of Bab-il to stop the giant from being unleashed. FuSoYa then joins the party, having the ability to neutralize the barrier surrounding the tower (which explains why the tower is glowing at this point in the game).
FuSoYa has every White and Black spell in the game, though he only has 190 MP. He can also cast Meteo and Flare. Replace the Energy Staff with the Fairy Rod to boost his Wisdom to power up his Black Magic, and move him to the back row along with Rydia and Rosa.
Head back to Kukuro's house in the southeast corner of the underworld. You'll be able to get the Holy Sword Excalibur now that you have the Magical Ship. Equip it on Cecil; he will need the attack power.
Be ready to equip Ruby Rings, as you're going back to the Sylph Cave in the northwest corner of the underworld.
Head back to the Sylphs' house and use the Frying Pan on Yang to wake him up. Yang will finally come to, and tell you that the Sylphs saved him from death. The Sylphs also offer their aid by becoming a summon for Rydia, and when called upon, they absorb a small amount of enemy health and give it to the party.
Talk to Yang's wife again. Hand her the Frying Pan, and you'll get the Meat Cleaver in return. Believe it or not, it is one of the best weapons in the game. You can only use it as an item in battle, and it deals 9,999 HP worth of damage to anyone you throw it at.
Head back to Baron Castle, since you've met the Phantom World.
Head back to the hidden throne where you found the ghost of King Baron. Now that you've been to the Phantom World, King Baron will show up again, and reveal that he became the soul of a Phantom Beast upon death. He offers aid as a summon for Rydia, but you must beat him first.
You'll then face Odin. Have Edge cast Raijin, have Rosa use the Blue Fang, and have Rydia cast Bolt 3. The faster you kill Odin, the less likely that your party will be wiped out. When you win, you'll be able to summon Odin in battle with Rydia.
There are rejuvenating chambers that act as a free inn to the south as well as a Fat Chocobo.
The helm at the north end of the ship lets you fly around like you would with the two airships from earlier in the game, while the red crystal is the Crystal of Flight that will take you to the moon when interacted with.
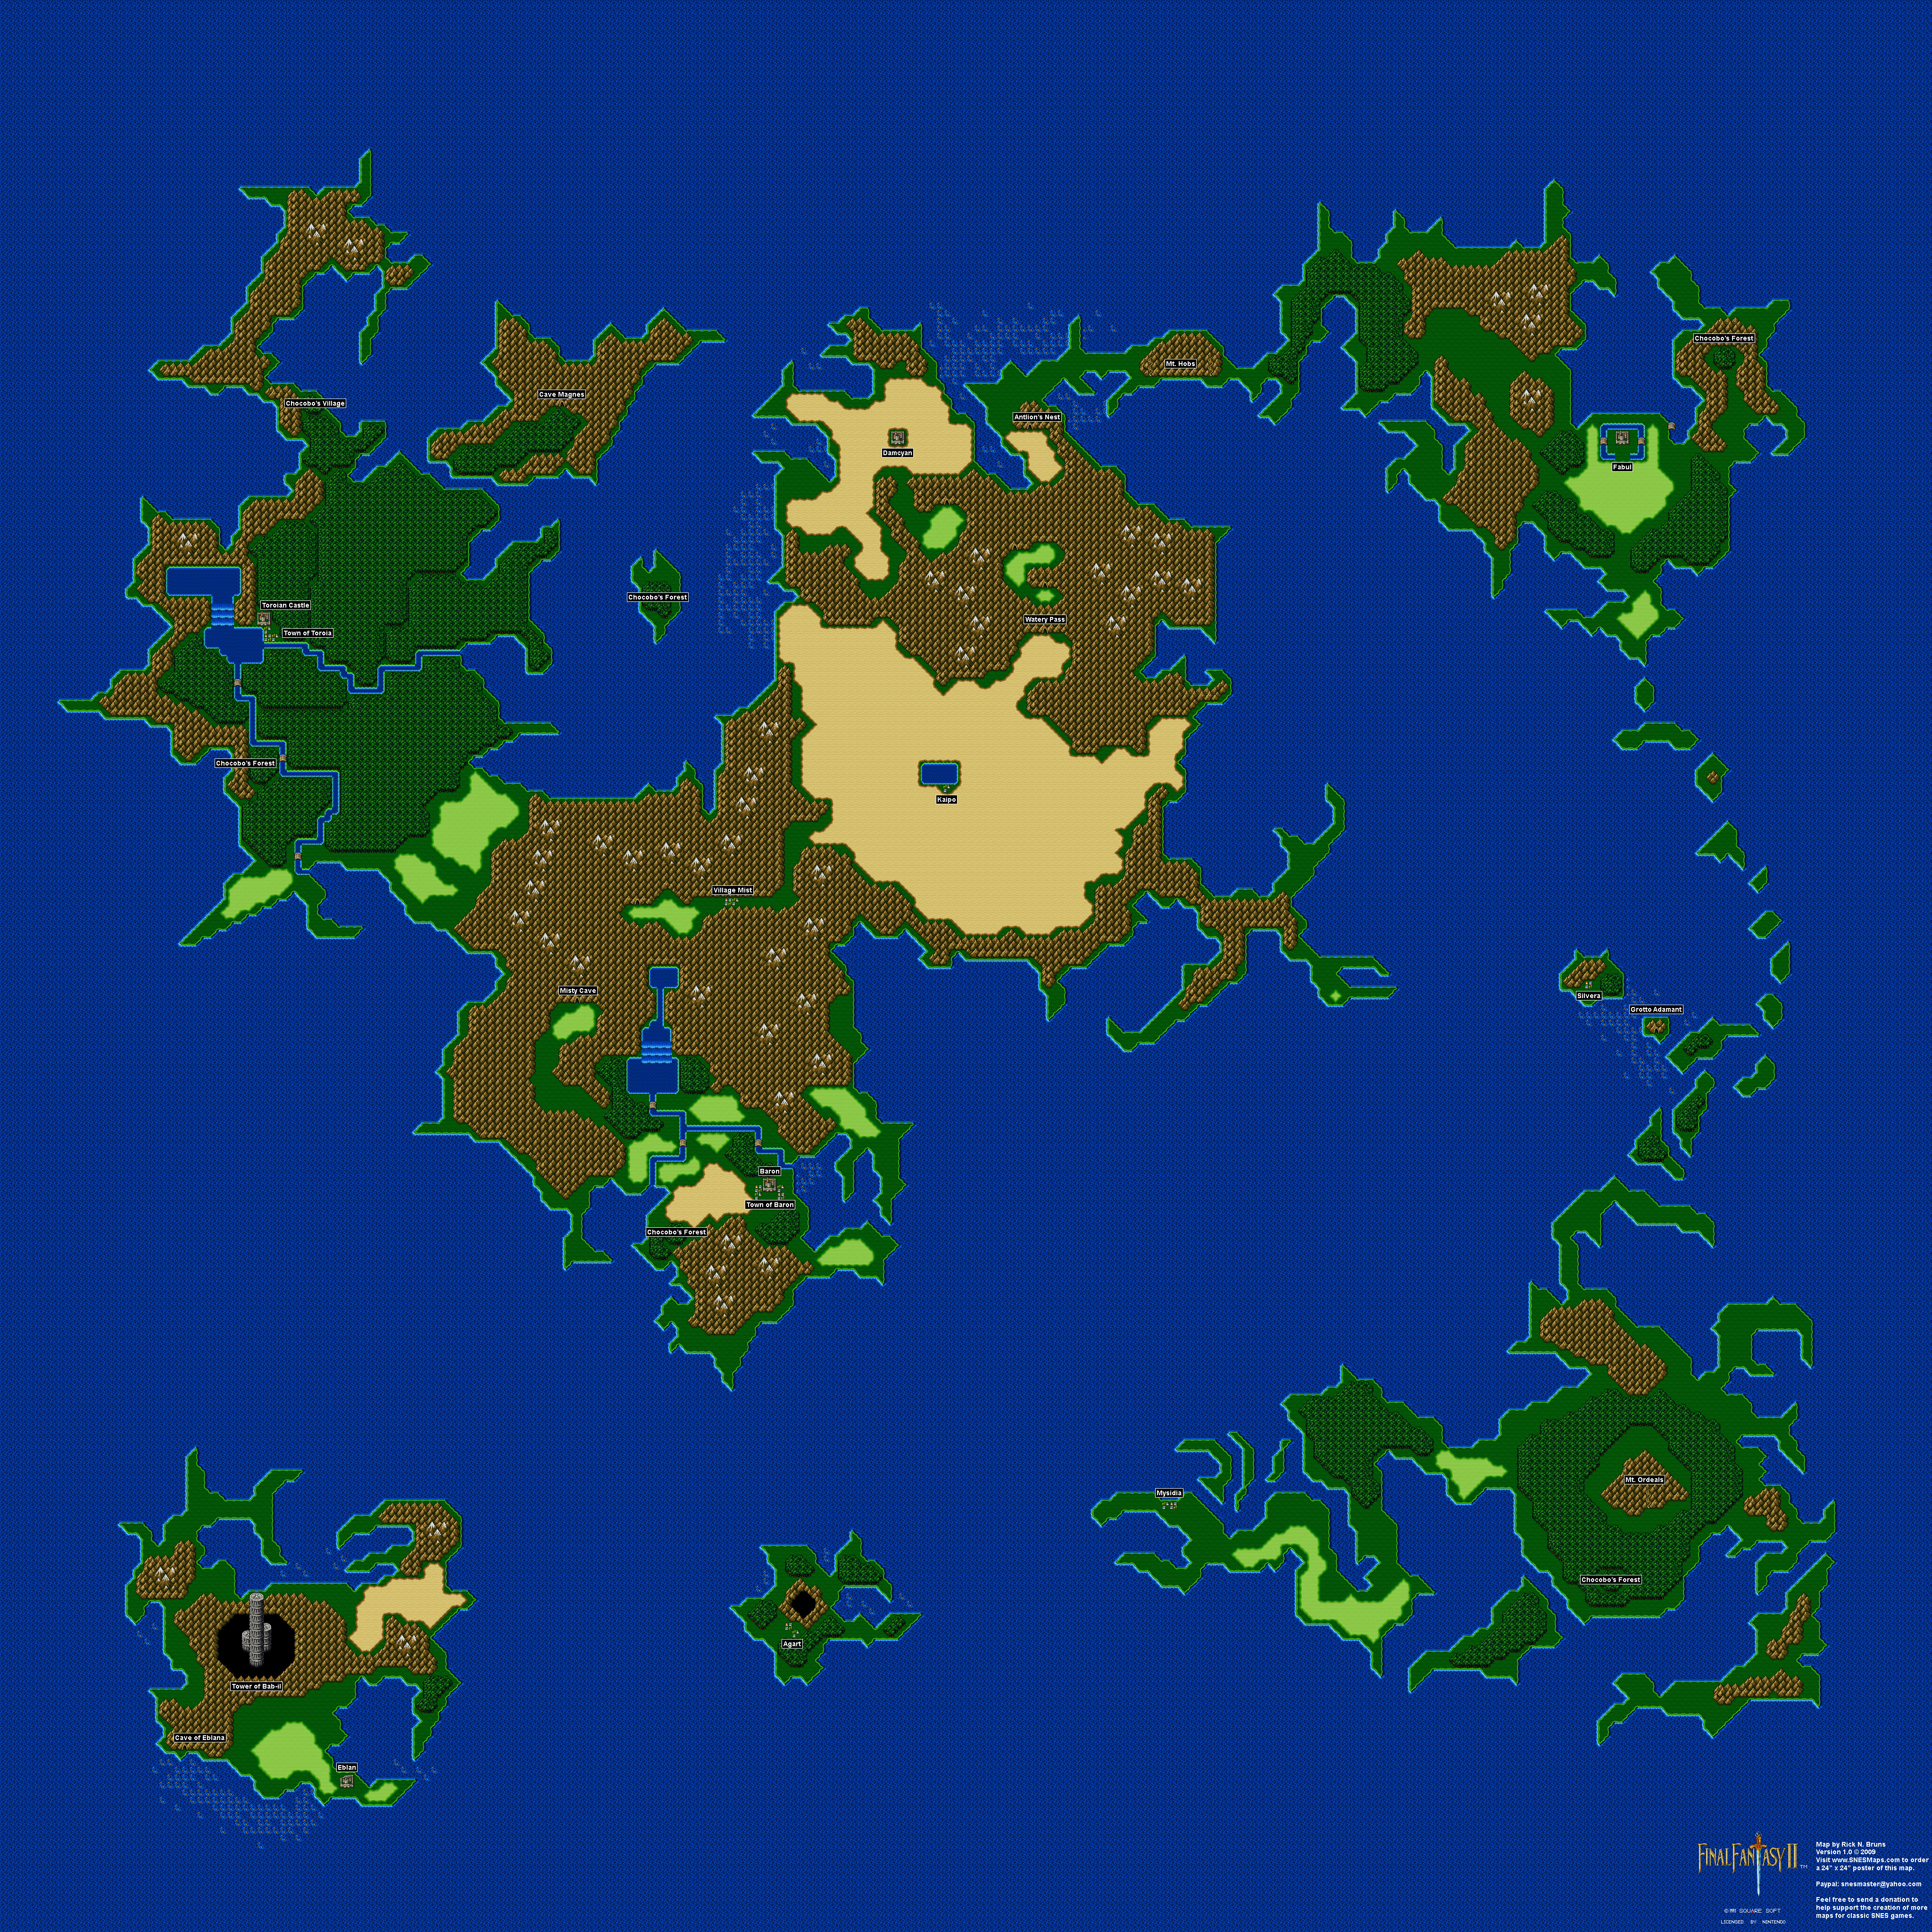
There isn't much to the lunar world. South of the castle is the Cave of Hummingway, which is surrounded by mountain. Park the Magic Ship there and go inside.
There are a ton of Hummingways that look like Namingway, and one of them sells things when you talk to them. The Flute allows you to summon the Fat Chocobo anywhere in the world, but at this point, you have one on the magical ship.
One of them is actually a Namingway, strangely enough.
The Hummingways at the north have speial palletes, and the one on the left mentions the Namingway that went to the earth.
From here, get on the mountain area and land north of the castle that you see. You'll be heading there next.
Talk to King Jiott. With Golbez in possession of all eight Crystals, the only hope is the legend of the Magical Ship. According to King Jiott, it was a huge ship used long, long ago. There is the legend of "one born from the mouth of a dragon," Cecil recognizes this as the Mysidian Legend, and regards the town of Mysidia. Jiott finally learns that Mysidia actually exists above ground, and Cecil mentions the village elder praying for his sacred light. Jiott and Cecil both realize that the elder of Mysidia is trying to bring back the magic ship, and Cecil now has to head back to Mysidia.
With all possible paths back to the surface gone, Cid shows up and announces that he has attached a drill to the nose to the Falcon to get back to the overworld. During a cutscene where the drill is attached to the airship - and Edge tries to hit on Rydia before Cid and Edge argue - Cid collapses. At the medical room, Cid mentions that he cannot fight with the party. Nevertheless, you'll be able to make it back to the surface.
Teleport out of the castle and get on the Falcon, then head to the hole where you entered. You'll be back in the surface world.
Talk to the guy in red. He will tell you that his father loves mining down here and that he also loves collecting animal tails. Talk to the guy in blue and give him the Rat Tail. In return, you'll get some Adamant.
From here, go back underground and head back to Blacksmith Kukuro's home in the southeast corner of the underworld.
Talk to Kukuro in the upstairs bedroom and give him the Adamant. He will take the Legendary Sword and forge it. You will have to come back later to get your new sword.
When you enter the town, you'll automatically head back to the Tower of Prayer after talking with the Elder. You'll see the Mysidian Legend, then you'll be at the tower where the elder and some wizards pray for the light to summon the magic ship. A whirlpool will form in the sea near Mysidia, and the Magical Ship will rise from the depths.
The Elder will then tell you that a voice came to him, and that is is asking Cecil to come to moon as it has so much to tell Cecil about himself as well as his father. He also mentions that the Magical Ship is a vessel to the moon, and aside from a switch to control normal flight, there is also a Crystal of Flight that lets the ship go to the moon at will.
Before getting on the ship, there are still things we can do. Head to Fabul and talk to Yang's wife.
Find Yang's wife and talk to her. When she finds out that Yang is unconscious in the Cave of Sylphs, he hands you the Frying Pan of Love and to hit him with it to wake him up.
At the fourth basement floor, there is a hidden treasure in front of the left-hand rope leading downwards. By fighting off six Dream Evils (turn 'em into Toads!), you'll be able to access a rope that leads nowhere new.
At the fifth basement floor, you'll finally find the Crystal Room. You'll be able to take the Crystal, but as you leave the fifth floor, the wall will try to close in on you.
To beat the Demon Wall, have Edge throw the Hell Wind Shuriken as an item. Have Rydia summon Leviathan, have Kain use Jump and have Rosa Berserk Edge. If you don't beat the Demon Wall in time, all your party members will start dying one by one, but you should be able to beat this one.
Unfortunately, you'll have to leave the fifth basement floor to use Teleport or Warp. You'll only be able to warp back up to the first floor, and when you get back to the entrance, Golbez's presence shows up once again. Kain is brainwashed by Golbez once again and steals the last Crystal, then runs off while Golbez boasts about opening a way to the moon.
When you approach the door at the beginning, use the LukaKey on it to enter.
The Miss Vampire (Miss Vamp.) and Evil Heads can be easily destroyed with Fire 3.
The ropes act as paths to different platforms. Thankfully, the ropes are not one-way.
Some of the doors are monsters known as Assault Doors. Their Dimension 9 attack will outright kill one of your allies, but you can have one character revive that person while Cecil attacks with the Avenger to cut it to ribbons. If you deal too much damage to it in one round (over 4000+), another enemy will come out of the door. Usually it is a Chimera-type enemy, but it can also be a Yellow Dragon.
The Kotatsu seems useful, but it's less powerful than the Full Moon boomerang.
Save the Light Curtain for later. It acts a free Reflect for whoever uses it in battle.
The Light Sword is for Cecil, but you're better off with whatever you have equipped on him at this point.
The Hell Wind Shuriken is a very good weapon; save it for later.
The Dark Hood gives Edge a little more defense, but it also boosts his strength, vitality and agility all by three.
The Marid and the NagaRusher are basically vanilla enemies.
The Silence Bell casts Silence on an enemy when used.
I knew I'd be bringing Ukes of Hazzard back on the blog someday! This time, we've got not one song, but two! The first is "Melody of the Lute," which Edward plays to break the magnetic abilities of the Dark Elf.
The other song is "Red Wings Over Baron," which is the very first song you hear when you start a new game.
At this point, you'll want Edge's level to be in the low 40s and everyone else's in the high 40s. Rydia should have Bolt 3 at this point.
At the shops, you'll want to buy two Aegis Shields - one for Kain and one for Cecil. Be sure to give Kain the Defender, as it is stronger than the Blizzard Spear and increases Vitality by 15. For Rosa, get the Energy Staff, which increases her Will by 10, to replace the bow and arrows. Buy two Light Robes, one for Rosa and one for Rydia, as they increase Wisdom and Will by 5. Save the Yoichi Bow and the Fairy Rod for later. Do the same for the claws.
At the library between the shops, you'll meet Namingway, but you'll also learn about some of the summons in the game. You'll also learn that the Monster Dictionary shows the true nature of monsters that Libra does not work on, there used to be only one moon, and that there is a Phantom Beast God who surpasses even the King who can only be harmed by casting his power back onto himself. Another book will mention that a great ship came from the moon to the Earth, but not sleeps deep in the belly of a dragon.
The warp tile in the library leads to the King and Queen's room. By talking to Queen Ashura, you'll be able to test your strength to see if you are worthy of her health.
To beat Ashura, have Rosa cast Reflect on Ashura to keep Ashura from casting healing spells on herself. Have Rydia summon Titan, and have Edge throw the Blood Spear. Both actions will cause massive damage. Keep having Kain Jump every round as well. She may be able to deal some good physical damage, but yours will be even better and she won't be able to heal herself as long as you keep the battle quick.
By beating Ashura, Rydia will learn the Ashura summon. Heal your party, equip the Thunder Claw on Edge, then talk to the King. You'll be able to battle him.
To beat King Leviathan, keep having Kain jump and use a Bacchus' Wine on Edge. Cast Rydia's Bolt 3, and have Rosa cure everyone with Cure 4. Big Tsunami will do a lot of damage, but as long as everyone receives Cure 4, you should be fine. By beating Leviathan, Rydia will be able to summon him in battle.
At this point, you can leave the room, and while you're at it, you can cast Teleport to get all the way out of the cave.
The Belfegoyle isn't exactly the toughest enemy in the world, and they are weak to projectiles like boomerangs and arrows.
There is a secret path in the left-hand wall of the third floor, and one of the paths leads to a Poison Axe and a Forged Kitana. The Poison Axe isn't anything to write home about, but the Forged Kitana is a great weapon for Edge.
The Arache keeps casting Quake, but if you've cast Levitate, this can't harm you.
The Bloody Red is weak to projectiles.
The Fiend - a little red demon - will counter-attack with Charm, but if you cast Toad or Mini on them, you
There is a warp tile on the third floor. It will take you to the fourth floor.
The secret path on the right-hand wall leads to a chest containing five Satanites. Get to Rydia's turn as quickly as possible and cast either Toad or Mini on them. If you can hit all of them with it, the battle becomes much easier.
Beating the Satanites gives you the Defender Sword for Cecil. Save it for later.
The fourth floor is the Phantom World. When you talk to the monsters here, you'll find out that they are good and that they have been waiting for Rydia to return. You'll also hear about the Phantom King, who rules over the Phantom World.
There is a hidden area on a tile north of the chest with the 6000 Gil. The Yoichi Arrows and the Yoichi Bow are powerful are here, but you may find the bow more important than the arrows.
One of the monsters is a Chocobo...and the Chocobo talks! To the west are two Bombs, and they talk, too.
At the Inn, you'll learn that if you cast Levitate, you can escape Titan's wrath.
To the west of the inn is a room with a save portal.
One of the monsters will mention that unless you can defeat Lady Ashura, the Phantom King will not listen to you.
The Rat Tail is a useful item, and you'll have to step on the warp tile leading to the town from the north to get it.
At this point, it's time to level grind before going further. Be sure that Rydia learns Bolt 3.
The dead end near the save point houses a hidden passage that leads to an Elfin Bow. It's a little better than the Killer Bow and increases Wisdom by five, so hand it to Rosa.
The Flame, Ice and Lightning Arrows are arrows for the bow weapons that obviously have elemental properties to them.
The Mage Masher inflicts Silence on enemies and does quadruple damage against Wizards, but it has a low hit percentage.
You'll eventually find a building inside the cave. When you go in, you'll meet the Sylphs...and Yang! It turns out that Yang is still alive, but unconscious, even though he was sealed in a room that exploded. If you go upstairs, you'll find a path back to the overworld. It's time to head to the cave just north of Tomera.
Once again, you'll have to cast Levitate to avoid the glowing brown areas. Also, when you enter, Rydia will tell you that the Phantom World itself is not too far down from the start of this cave.
The Summoners can summon Lightning Dragons (Lit.Dragon), which can cast some pretty powerful lightning spells. Kill the Summoners as quickly as possible to stop the summoning, but focus on the Lit.Dragons if you want to focus on leveling up your party. They can also summon Goblins - an enemy from the beginning of the game - which can allow you to get the Goblin summon. As for the Lit.Dragons, they are immune to nearly everything, so hit them with the most powerful attacks you have.
The ToadyWitch has a ton of HP and will cast Toad on herself to try to turn you into Toads with Toad, while the Toady Toads will also turn your party members into toads with Toad. Have Edge cast Suiton to get rid of them. Also, if you cast Toad on the ToadyWitch, the Toady Toads can't turn you into toads with Toads. Confusing, I know.
The Fairy Rod increases Wisdom by five. Hand it to Rydia.
The Red-Fang does a strong fire attack to all enemies.
The Full Moon is a boomerang that Edge can equip, and is better than the boomerang we had before.
The White-Fang does a strong ice attack to all enemies.
The Avenger is a two-handed sword for Cecil that increases his Vitality by a whole bunch and automatically Berserks him, increasing his attack power by 50%.
The Blue Fang does a strong thunder attack to all enemies.
The Medusa Arrows Petrifies enemies upon hitting them.
Here, you'll learn that Kukuro is the best blacksmith in the world, but he has lost his will to work and is now sleeping in his bedroom. If you talk to Kukuro, he tells you that he cannot find the legendary ore Adamant.
One of the jars in the house contains a Remedy, while another contains a Hi-Potion.
The bookcase in Kokuro's bedroom contains a Soma Drop, which increases the MP of whoever uses it by 10.
To the right of the stairs leading up is a secret passage to a chest containing 1000 Gil.
In the southwestern corner of the underworld map is the village of Tomera.
You'll learn here that the cave to the northwest leads to the Phantom World, and that there are timid Sylphs in another cave to the far northwest.
At the Tool Shop, you can buy Remedys in case you need them.
One house in the northwest corner contains a bunch of chests, one of them containing the Monster Picturebook. They cast Scan (also known as Peep or Libra, which allows you to see how much HP an enemy has as well as their weaknesses) when used in battle.
Get another Ashura Blade for Edge, and equip Rosa with the Mute Arrows and the Killer Bow. You can also get a Chain Whip for Rydia, but the Apparition Rod is Better. Also, get the Diamond equipment for Kain and Cecil. Save the Diamond Gauntlets for later; the Ruby Rings will still be later. The Rune and Ruby Rings are better than the Diamond Rings at this point in the game.
From here, there are three places you go. Besides the Sealed Cave, there is the cave to the Phantom World and the Cave of Slyphs all the way to the northwest. There is a thin strip of land in the far west where you can meet up with rare enemies, such as Lomwings, Gorgons and Tarantulas.
One of the enemies inside is the Marlboro (Molbol), who has the Bad Breathe attack. If it's a status ailment in the game, it will afflict you with it; as a matter of fact, the attack hits you will multiple status ailments at once. If you are immune to any of the status ailments at any given time, however, the attack will fail. This is where the Ruby Rings come in for Kain and Cecil, as they cannot equip Rune Rings. You can cast Piggy on them to make them stop using the attack, though Rydia's Titan summon can also get rid of them.
The glowing green tiles will take 50 HP off all your party members if you step on them, but if Rosa casts Levitate on them, they won't be able to hurt you at all. You will have to cast Levitate again every time you enter a new floor.
The Dream Evils cast Fire 2 repeatedly, but don't Mute them. Use the Apparition Rod on them and cast Mini on them to make them easier to deal with. They are also susceptible to Toad, which is even better. Do not cast fire spells on them, however; they will absorb the damage and get HP back.
After falling down the pit, you'll be back in the lower section of the Tower of Bab-il.
The door on the next level down will have a Claw of Hell if you walk up to it (but not into it) and press A.
The Mithril Golem are not weak to Ice unlike other Golems, so have Kain used Jump and have Edge attack with the Fairy Claw. They're not too tough.
The Queen Lamia isn't too different from the regular Lamia.
You'll eventually find an enemy airship. There are qualms by the party about taking it, thinking they could be falling for a trap, but Edge says there is no reason to be alarmed. After the party calls it the Falcon, they take off, and the airship comes out of the ground. It won't be able to fly over lava on the underworld map, but you'll still be able to head back to the Dwarf military base, drink from the Pot of Life, and then head back to the castle.
Once you leave the Tower of Bab-il, you can't go back, as Golbez has bombed the bridge to the entrance.
By talking to the two red dwarfs in the first floor, you'll find out that Cid is recovering in the medical room.
Go back to the throne room. King Jiott asks his daughter Luka to bring him her necklace, as a key is hidden inside. He gives it to Cecil to unlock the Sealed Cave to the southwest. Just remember to talk to King Jiott again to get it.
One of the Dwarves in the throne room will tell you that near the sealed cave is the town of Tomera, where more Dwarves live. You'll also hear a rumor that a path to the Phantom Road is in the underworld.
At the medical room, you'll find Cecil asleep in a bed, alive and well, and all of the dwarves in the room complain about him. Cid and Edge argue, then Cecil mentions the airship they stole, saying that they need modifications. Cid suddenly gets up to get to work, then you'll be at the airship. Cid and two dwarves will put a Mithril coating on the airship, and Cid puts Edge to work. Cid will then return to bed and goes back to sleep afterwards.
At this point, Edge's level should be in the mid-30s while everyone else's should be near the low-40s.
The door to the right of the save point leads to the last floor, and in the center of the room is Rubicante. Head to the west before you go there to get 82,000 gil that can be very easy to miss. Before you face Rubicante, equip the IceBrand on Cecil and equip the Ice Claw on Edge
When you reach the center of the room, the Queen and King of Eblana show up, but they have been changed into monsters. Just like in the Paladin battle, do nothing. Edge will wonder what has happened to his parents, and the battle will eventually be over. The Queen and King will eventually regain their consciousnesses long enough to tell Edge that they have become monsters, do not want to live like this, and that they must die while they are still sane. The two of them eventually die, then Rubicante shows up.
You'll learn from Rubicante that Lugeie experimented on the king and queen of Eblana, then Edge confronts Rubicante. Rubicante explains that this was all Lugeie's own doing and that he had nothing to do with it, and that he wants to fight fairly. Edge does not buy it, but Rubicante tells him that humans will never attain true power as long as they are tangled up in emotions. Edge's rage unlocks two new spells: Suiton and Raijin. Rubicante notices how anger gives humans strength, then declares that not even ice will penetrate his cloak of flames. He heals the party fully, then the battle begins.
Use a Bacchus' Wine on Edge, and have Kain use Jump. Wait until Rubicante opens his cape to start blasting him with Ice 3 from Rydia. Even if it is closed however, any physical attacks with an ice elemental attached to it will still go through and do damage. The one attack to watch out for is the Flame Dragon attack, which will hit one party member for immense damage. Be ready to heal if Rubicante casts it.
After beating Rubicante, Rubicante realizes that your teamwork is what made Cecil and company powerful and allowed them to beat Golbez, then salutes them as he dies. Edge finally avenges his parents, then the Chamberlain of Eblana and his men show up only to find out the battle is over. Edge then gets up to speed on what Cecil and company has been through so far, then realizes that Rubicante was just a lowly pawn. The Chamberlain reminds Edge of his royal duties, but Edge explains that the whole world is in danger, not just Eblana. The Chamberlain lets him go, and tells the party to watch over him and make sure he doesn't get himself killed. The Chamberlain and his men then leave, then Edge joins the party for real.
To the north is a Crystal room, but as soon as you enter, you'll fall into a pit. It's not over yet.
Equip Edge with the Rune Ring, as it will be better than the Power Wrist defense-wise and boost his Wisdom and Will, which will positively affect his ninjitsu as it protects against Silence. You can also equip Yang's claws on Edge to boost his attack as well as give his physical attacks elemental properties.
There is a secret passage to the west of where you find Edge that will take you to a chest with a Dry Ether.
The path north of where you found Edge takes you to the upper section of the Tower of Bab-il.
Edge will be able to pass through the wall to the west when you go as far north as you can at the beginning. This will allow you to access the rest of the path.
The Remedy Bombs can drop the Bomb summon. They will explode and deal a lot of damage if you do not kill them as quickly as possible.
The Ice Warrior will counter with Bio if you use a physical attack and Reflect if you use a magical attack. If you cast Piggy on them, however, they won't be able to cast either spell The Sorcerer will summon enemies such as Mad Ogres and Yellow Dragons if you don't kill him fast enough, so kill him first. The Sorcerers are also high in experience for this point in the game, and you can use Rosa's Mini spell to make their attacks less effective.
The chest in the center of the second floor contains four Mad Ogres. Take out the one in the front row, then cast Mini on the rest. Winning this battle gives you the Ogre Killer, an ax that is slightly more powerful and will deal more damage to Ogre-type enemies. Equip it on Cecil.
The Lilith's Kiss charms an enemy with a Confuse spell.
The Ashura Blade is for Edge, and is stronger than the Kunai that he currently has.
Be sure to level Edge - and the rest of your party - up a bit before the end of this area, as you'll want to make Edge more powerful and get Rydia to learn Ice 3.
At the weapon shop, get a Boomerang. Even though nobody can equip one yet, you'll meet someone who will.
At the armor shop, get the Black Robe for Rydia. For some reason, it increases your Will by five, not your Wisdom.
You'll be able to talk to the survivors in the makeshift town, and you can find a Potion in two of the jars near them. You'll find out that someone known as the "Young Master" has promised to kill the bad guys. You'll also hear that even though he is foul-mouthed and temperamental, he is an honorable man and is digging a passage to the Tower of Bab-il to avenge his parents, the King and Queen, who have been captured...though he may do something rash.
You'll eventually find a passage to the Tower of Bab-il. You'll find a few chests in this area with some healing items in them as you go through it. One will contain a Bomb Spirit; another will contain Shurikens. By talking to the downed soldiers, they will tell you to stop the Young Master, as he may go too far in his efforts and do something he might regret as he goes after Rubicante.
To the right of the save point is a hidden passage leading to the Blood Sword, which can absorb enemy health by decreases all stats by five points. To get it, however, you'll have to face two Steel Golems. Cast Ice 2 and use Kain's Jump command to take them out.
At the end of the path, you'll meet the Young Master...and Rubicante! You'll find out the Young Master is Edge, and that he is a ninja. You'll see the two men fight, but Rubicante wipes Edge out before leaving him to survive so they can fight again. Cecil and company check on Edge, and the bickering between Edge and Cecil gets so heated that Rydia has to tell them to shut up or else the lives of everyone they have lost will be in vain.
Rosa heals Edge with Cure 2, then Edge joins the party.
If you go into the lower area on the west side of the castle, head back towards the door and turn right before entering it again, you'll find a hidden passage to one of the treasure chests in the room.
Equip the Ice Spear on Kain before taking on the Steel Golem and the Skulljars. The Steel Golem is weak to ice; the Skulljars are weak to fire. Rydia can kill the Skulljars easily by summoning Ifrit.
The Slumber Sword puts enemies to sleep, but it is also a powerful throwing weapon.
The second floor has two Bacchus' Wines in jars as well as Mute Arrows that inflicts Mute on enemies.
The Bomb Spirit is more powerful than the Bomb Fragment and allows you to use Exploder to deal damage equal to your HP on an enemy. Of course, you'll kill the party member that uses it, so be ready to revive them.
The path to the Right Tower has a hidden passage behind the left column in the upper-left corner. Kuar's Whiskers is an instant death item that kills whoever you target with hit with it.
Go right when you go up the stairs to hit the switch. You'll find an Exit, an Ether, a pair of Hermes Shoes in a jar. To get the chest next to the hole, you'll have to find a hidden passage. You'll get monsters, however. The Kuar and Lamia have nasty counter-attacks if you don't destroy them in one hit. Have Rydia use the Apparition Rod on them to hit them all with Piggy. Using Kain's Jump command can make quick work of the Kuars.
The Blood Spear reduces all base stats by five and drains HP from opponents, but it's not a very good weapon due to the stat decreases.
The basement has two Ethers and a chest with monsters. The Mad Ogres are immune to Piggy and Toad, but you can Mini them. Have Rosa try to cast Mini on them to keep them from using most of their spells. You'll get another Silver Apple for your efforts.
That's everything for Eblana Castle. Take the Hovercraft over the shoals near the castle to get to the Eblana Cave.
The Shurikens are a weapon that you'll be needing pretty soon.
The Bloody Bats are weak to fire.
When you make it to the basement, you'll find out that there are humans. These are the people of Eblana, and they are now living in the cave now that Eblana has been decimated.
Outside of the control room, Yang will tell the party to tell his wife to live for him, then sacrifice himself to destroy the Giant Gun controls. From here, the door will be broken and unable to open.
Head back down to the first floor. When you reach the entrance again, you'll be met by Golbez, who is itching for a fight. The bridge will be destroyed, and Cecil and company are forced to fall. Thankfully, Cid manages to catch you with the Enterprise, which is now fixed and operational. Cid gets up to speed on Yang's fate, and is introduced to Rydia, but that is short-lived as one of the Red Wings' ships have caught up to them.
Cid tells Cecil to take the wheel, and plans to bomb the entrance back to the upper world shut so that the Red Wings will be trapped. He also tells Rosa to talk to his apprentices at Baron Castle, then leaps off and seals the entrance into the underworld. Cecil and company manage to make it out in time.
Back in the upper world, Cecil makes up his mind to head to Baron, which will thankfully be nearby.
Back at Baron Castle, go inside and head into the east wing of the castle, and talk to the guys in blue in the corner outside. One of them will tell you that Cid has told them to hook something to the Enterprise. You'll see them upgrade the Enterprise, and you'll finally be able to pick up the Hovercraft by flying directly over it and pressing A. By dong this, you'll be able to go to the cave of Eblana by the Tower of Bab-il. Cecil tries to explain what has happened to Cid, but his apprentices are convinced that he will not die that easily.
The hovercraft will be more than likely in front of Mt. Ordeals, so head there if you have to find it. From there, you can take the hovercraft close to the Tower of Bab-il. There is a destroyed castle nearby. Enter it.
There is quite a bit of treasure in this deserted, destroyed castle. To the sides of the throne room are hidden walls leading to staircases leading to other things. Some of the treasure chests also have monsters. Be ready to equip Cecil and Kain's old flame armor, since they will be useful here.
The Unicorn Corn heals the status of everyone in the party, while the Alarm Clock will wake up everyone in the party who is suffering from the Sleep ailment.
-LunarSubterraneanValley.png)
-MansionOfTheLunarians.png)
-GiantOfBab-il.png)
-CaveOfTheGodOfPhantomBeasts.png)
-LunarCorridors.png)
-SylphCave.png)
-Fabul.png)
-Fabul(Detailed).png)
-BaronCastle.png)
-BaronCastle(Detailed).png)
-MagicShip.png)
-Hummingway'sCave.png)
-CastleOfDwarves.png)
-CastleOfDwarves(Detailed).png)
-AdamantCave.png)
-BlacksmithKukuro'sHouse.png)
-Mysidia.png)
-Mysidia(Detailed).png)
-SealedCave.png)
-CaveOfPhantomBeasts.png)
-TomeraVillage.png)
-TomeraVillage(Detailed).png)
-TowerOfBab-il-LowerSection.png)
-TowerOfBab-il-UpperSection.png)
-PassToBab-il.png)
-EblanaCave.png)
-EblanaCastle.png)
-EblanaCastle(Detailed).png)