For most of the game, Left and Right move left and right, Down looks down, Up looks up, B jumps, and holding Y allows you to run. Donald Duck takes a second before moving faster. Keep that in mind. Also, A lets you perform an action, and that differs depending on where you are in the game.
The game begins with Donald Duck and Daisy Duck (no relation) walking in the city when they come across a hat shop and a hat that Daisy really likes. Donald finds out that the hat is really expensive, and Daisy realizes that she could never afford it herself. Donald, having no money, decides to do some odd jobs to get the hat for Daisy's birthday that is coming up. (Press A to cycle through the text in cutscenes.)
You'll then have a choice of four jobs, and you'll need to collect $300 for the hat. You can beat this part in two levels, and the most you can do before getting all the money is three. I will go ahead and do all four jobs for the purposes of this Let's Play and blog series.
Time Attack! Go! Go - $120
This is the hardest job out of the four. It is an obstacle course that you'll have to beat in a very limited time in order to win the game and beat the money. Despite being the hardest job of the four, it gives the least amount of money.
When you choose this option, you'll be on a game show with an obstacle course, and Goofy will be the host. Donald will find out that he has to beat the course record set by Huey and get to the finish line in one minute or less. If you need to give up at any time, you can press A and select "yes" when the game asks if you want to give up. This will cost you a life, however.
To get past the trapezes that you have to swing on, you'll need to jump into them, then press B when Donald's legs are all the way out in front of him in the direction that he is facing. You'll need to do this for the first and third set of trapezes (which I call rods here), but for the second set, you'll also have to hold forward on the Control Pad while pressing B at the same time as with the other sets.
The yellow pools of liquid will slow you down, and the pools of water contain sharks that will stun you for a moment before knocking you into the air due solely to Donald avoiding being eaten. There is at least one dead end where you'll have to use the shark to get over the wall.
The blocks with the arrows will send you in the direction where they are pointing when you touch them, and it can be to your benefit if the direction is right. (I don't mention these in the Let's Play, so they're getting mentioned here.)
If you run down a slope, you'll pick up some major speed, and if you keep running forward, you'll run up the wall. This will come in handy later.
Whenever you complete a level, you'll get a password. The first two spaces are always characters, while the second two spaces are generic places.
Paperboy - $140
Your task in this level is to ride a bike all over town and put notices in all the mailboxes. Hold Right on the D-Pad to speed up, press B to jump, and press A near a mailbox to put the notice in the mailbox. If a mailbox is open and has a yellow arrow pointing down above it, that means you have yet to put the notice in the mailbox. Some of the residents also live in air balloons, and you'll need to get up to the baskets where the people in the balloons are to give out the notices.
If you keep going all the way to the right and take the lowest path at the start (which is the brown brick building with the fancy door), you'll go all the way to a wall that Donald will keep riding up in order to get to the balloon people. If you bounce off the tops of the balloons, you can get to other balloons if you can control Donald's speed correctly. This will allow you to give notices to the other balloon people.
If you pass a doghouse with eyes in it, the dog inside will chase after you. Hold Right to speed up and get past the dog, but keep an eye out for mailboxes. There is also a guy in a red convertible driving around, and you only see him in one specific spot. Be ready to jump over him with the B button.
To go up a hill, you have to jump onto it. You can then go up the hill from there.
Once you deliver all of the notices, you'll complete the level.
Chicken will restore health. A chicken leg will restore one hit, two chicken legs restore two hits, and a whole chicken restores a whole bar. You'll have two levels of health in the health bar in the upper-left corner: a yellow one and a red one. Eventually, you'll be able to get a third blue level a little bit later. Next to your health is the amount of lives you have left. At the upper-right corner will sometimes be something like the amount of time you have left in Time Attack! Go Go! or how many things you have to deal with for a certain objectives, such as how many notices you have left to deliver on the bicycle stage.
Birdnapped
In this job, Grandma Duck will tell Donald that her canary Pippi has escaped her cage and that Pete has taken her, and promises to take care of her and never let her go. Donald decides to sneak into Pete's house and take Pippi back. Grandma Duck warns Donald about Pete's guard dog Butch, and that if any noise is made, Butch will wake up and go after him. In order to stop things from making noise, you'll need to press A while near them so that Donald shushes them. How that's supposed to work, I have no idea.
Once you get in the house, be ready to shush alarm clocks and radios. Watch the Butch icon in the upper-right corner so that you don't wake Butch up. When you see the gap in the floor, jump over it so you don't make noise with the cat and the mouse.
On the second floor, you can head to the left for an extra life. Use the hooks to get the extra life, then get out of there and head to the right. If you run into the toaster, it will shoot toast out. The toaster cannot be shushed, and if it moves, it's instant death.
When you see the stacks of bottles and kitchen wares or the vase on a fork, be ready to press A whenever they move to shush them. Jump up near the toaster near the end to swing and jump over it. From there, you'll reach Butch. You'll free Pippi, but it will wake him up. Thankfully, Donald will get out of the house automatically and avoid Butch to get the job done.
Window Cleaner
Here, you'll be cleaning the windows of a multi-floor building. Press A in front of the dirty windows to clean them, and press Up and Down on the gondola at the far left to switch floors. As you jump from window to window, watch out for kids throwing baseballs and people throwing random things out of the garbage. Some of the windows will not have windowsills at all, and you may have to move back to . In case you need to, you can move while washing a window to avoid being hit by things. Sometimes you'll find ladders that take you between floors, but thankfully the gondola automatically keeps track of where you are.
Be careful near the top of the building, as there will be someone flying around on an airplane. If you can get to the airplane and grab onto it with Up, you can keep yourself from being blown away by the airplane. If you're on the lower level at that ladder, you can jump low and grab the ladder to save yourself; if you're on the higher level, you'll have to keep moving right to avoid being blown off.
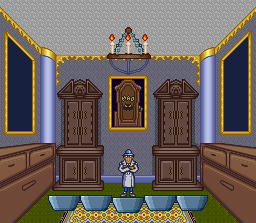
When you get the money for the hat, Donald will find out that the hat is sold out. A mysterious old man shows up and tells Donald that he can still get the hat if he heads to the clock tower and gets rid of all the ghosts. Donald fails to question this all. At the clock tower, you'll need to hit light switches to get rid of the ghosts, who will only show up if the gears in the clock tower move. If you can hit the switch at the top of the clock tower, you can get rid of all the ghosts and the hat is yours.
Clock Tower
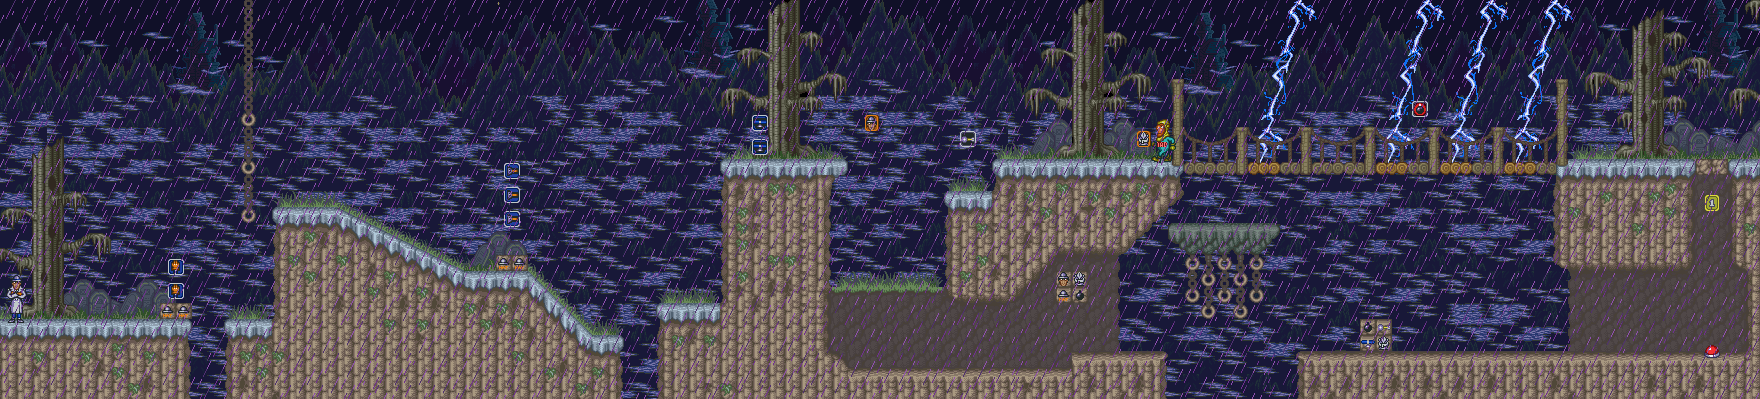
Along the way to the top, you'll need to swing on the bars in the background while avoiding moving on the gears in the background. If you walk around on the gears long enough, a ghost will appear and start chasing you. Thankfully, if one is following you, can jump on a nearby yellow switch to shine a light on the ghost and defeat it.
On the upper levels, you'll have to hang onto hooks on tracks. You can rid some to the end, but there is at least one that you'll have to jump off before the end of the track.
The shards of glass are spikes.
The whole turkey (chicken?) replenishes four hits.
When you hit the switch at the top of the tower, you'll light up the entire tower and continue to the next area.
Once you beat the clock tower stage, you'll find out that the old man is invisible underneath his brown coat, and that he is the king of a magic kingdom that you've just opened the portal to by getting rid of the ghosts. Much to Donald's chagrin, Donald will have to do more to get the hat that he desires for Daisy, as he will now have to help the king get his kingdom back from his minister, who has kicked him off the throne, cast a spell on him that made him invisible and unable to cast magic, and has proclaimed himself the Dark King. From here, Donald will be sent into the magic kingdom.
Village
You'll end up in the village. The Dark King's minions are out of control, and if Donald can defeat the boss leading them around, they will leave. From here, you can hold A to become invisible for a short time, but you will not be able to move while hiding under the king's hat.
If you see a minion with a shovel near a tree, there is a hole nearby. The ground where the hole is will look a little bit different, and you can jump over the hole if you know where it is. The hole does damage you, so you don't want to fall into it.
The guys in green robes and hats are wizards that shoot magical projectiles. They take two hits to defeat.
Aside from running back and forth, the minions will also trip you with ropes, blow fire at you from behind a campfire and also throw apples down from tree branches. You can easily defeat them all by jumping on them.
The boss is a red-and-yellow guy who will pop out of the barrels to throw rocks at you. Hold A to protect yourself from the rocks if you cannot get to the guy and jump on his head in time. Also, watch out for the spikes that will periodically pop out of one of the barrels, as they will hurt you if you land on them. After enough jumps, you'll beat the boss.
You'll then find out that in order to get to the castle and face the Dark King, you'll need to get your hands on a flying ship. Unfortunately, the ship is hidden by the Dark King's four bosses, and in order to find it, you will have to defeat the four bosses, then sneak on it when the four bosses report their failure to the Dark King.
From here, you can pick the next four levels in any order you want. I pick the order the game gives me.
Snow Area
In this level, you'll need to race a rabbit to the end of a race track
To run up the walls, just run down the slopes. When you run down the slopes, you'll get more speed and momentum. Keep holding Y and Forward and you'll run up the wall.
Be ready to jump the gaps after the first wall you have to run up; if you miss, you'll have to go back to try the jumps again, and it's possible to lose the race and a life here just because of this one part.
From here, keep holding Y and Right. You may get bounced into the air by hidden springs, but if you keep going, you can get through this.
Cliff Area
For the first section: Jump onto the first brown cork you see on the right to get launched up, then take the leaf platforms moving up and down to your left to the left and get on the red cork. You'll be rocketed to two extra lives; grab them! From here, head to the right and take the next cork.
For the second section: Keep heading to the right at first. Take the wind hole at the lower-right corner of this area, then keep going right until you reach a red cork. Jump on it, then get the full health. Go further to the right and stand on the left platform to activate the next cork, then jump on the next cork.
For the third section: Keep heading left and take the leaf platforms that move up and down along the way. Take the brown cork after the branch you have to land on, then keep making your way up. The red cork will take you to the boss.
Along the way, there are flying vultures that take two hits to defeat. They can divebomb you if you're not careful.
The boss is a lion with a hammer. Whenever he drops the hammer, he will run to the hammer to get it back. Take this opportunity to jump on his head as much as possible. When you jump on him, he will be stunned for a little while, and you'll need to wait for the boss to get un-stunned before you can jump on him again. If you can get the timing down, you can beat the boss before he can pick up his hammer once.
If the boss strikes the ground with his hammer, corks will fly up from the cliffs in the background and rain down on you. Hold the A button to hide in the king's hat and avoid taking damage from the corks. Sadly, you can't move while hiding under the hat, but you don't really need to with how attacks from bosses in this game work. When the boss hits the ground with the hammer, one of the columns under the ground will break, and if they all break, the platform will fall and you'll lose a life.
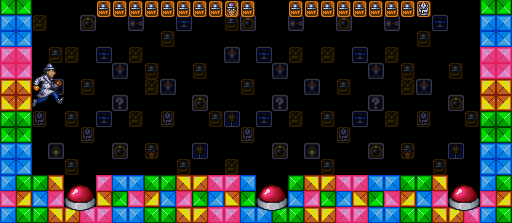
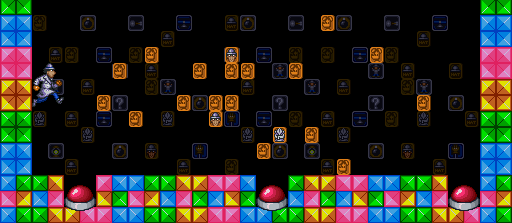
Cave Area
For this area, stay behind the wall to avoid the rock, then walk into the gap and hits the switch. Jump up the nearby platforms, then jump to the right. Hit the switch to the right, jump your way up, take out the wizard and go right and then down into the mirror.
Jump on the mirror in the next area and take it. If you need health, jump over the mirror to get the chicken legs.
Walk into the gap next to you to activate a platform and continue to the right. Take out the wizard while avoiding the spikes, then climb up the ladder and walk through the wall on the left. Jump on the see-saw to be launched upwards, and go right when you are. Hit the switch at the end to find another mirror. Touch the mirror.
Go left, then go up the ladder that you immediately see. Go right, jump on the mirror, then touch it.
After the drop down, run down the slope and into the wall. You'll knock a mirror down. Touch it.
Drop down and head right, then hit the switch to drop the mirror down. Touch the mirror.
Go right. Jump over or defeat the mirror, then use the see-saws to launch yourself upwards. Touch the mirror that drops down at the top. You'll face the boss.
The boss is a green ghost that moves in the opposite direction that you do, and if you try to jump over it, it will go under you. Use this to your advantage and have the stalactites that drop down from the ceiling hit the boss while avoiding them yourself. After enough hits, the ghost will die.
Forest Area
In this area, the forest will constantly rotate you move in any way onto a slope through the magic of Mode 7.
Head to the right and jump on the bug, then jump the gap and jump over the brambles as you continue to the right. When you have a choice between left and right, keep going right and walk through the wall. Watch out for the bee and be sure to jump on it when it is low enough to get some health back if you need it. Keep going right until you reach the tree stump, then jump on the stump. This will open up a gate below you. From here, continue right and fall through the floor. If you hold Left on the drop, you'll land on an island with an extra life. After getting the extra life, jump to the right towards land to get off the island. (I looked for this in the longplay, but I forgot where it was and I spent more time in the maze than I should have as a result.)
You can now go left at that fork and go past where the gate was. Just be sure to avoid the brambles. Keep going left and go through the wall you see. From there, keep going left. Get the chicken legs for health if you need it. When you see the three yellow flowers above you, you're at another fork. Go right towards the yellow flowers, then keep going right. You'll reach another fork. Keep going right, as going left leads to going around in circles. You'll find a bush. When you walk into it, you'll soon enter it and face another boss.
You'll be rotated around a large planetoid. Be ready to avoid or jump on the bees, and when you see the light green head with the white eyes, jump on it. You'll have to run in the direction that you are forced to go, which will change every so often. After enough hits, the planetoid gets smaller. After more hits, it gets even smaller. After a few more hits, this boss is down.
The Final Battle
Once you beat the fourth boss, you'll be heading to the castle.
While the ship will fly around and have its platforms, you'll want to stay on the clouds. Watch out for the clouds with faces, as they will blow you back and damage you.
Always jump from the edges of the cloud platforms, or else you won't make it.
When the storm clouds start brewing, stay on the white clouds, and watch out for the cloud enemies.
Eventually, you'll have to get on the platforms of the ship and stay there, then get to the right when the level stops moving to get past this first part. (As you take the ship downwards, there will be lights, but they won't harm you in any way. Also, the rabbit boss that we raced is also commandeering the ship, and he is completely bandaged up even though we did not hurt him in any way whatsoever.)
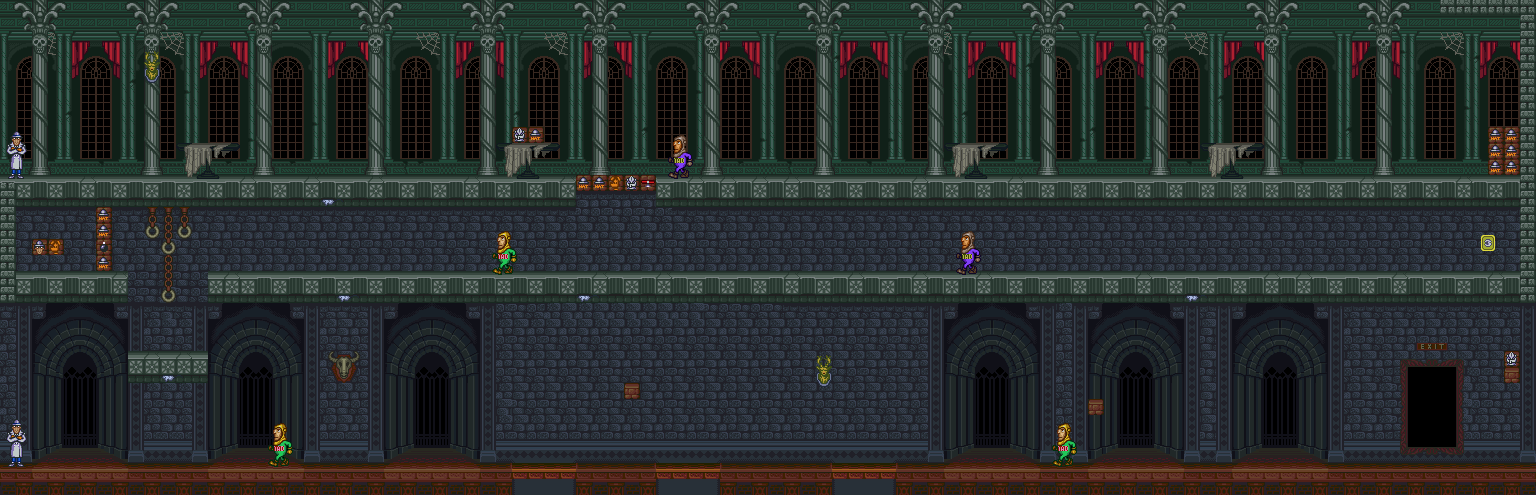
Once you get to the castle, you'll get a "this is it" cutscene between Donald Duck and the king of the magic kingdom, then you'll get into the castle itself.
For the second section, just make your way to the right. The enemies here, including the wolves, can be jumped on easily. As long as you are good with your jumps and watch out for the small square platforms falling when you land on them, this section shouldn't be too much trouble.
For the third section, there will be two halves of a room separated by a giant wall. When you jump on a platform, you'll teleport to the same-colored platform on the other side of the wall. Keep in mind that you can hop straight up to go back to the other side in a pinch if you need to. At the same time, there will be fire rising from the bottom of the room, and you do not want it to touch you at all. If you know what you're doing, you can get a few pick-ups on the way out.
To beat the clown boss, hide in the hat with A when the clown come towards you and when the clown stops to throw balls at you, then jump on his head before he starts moving again.
For the fourth section, start moving to the right immediately. The giant fish in this area will close their teeth on the brown platforms. Look for a gap where there aren't any teeth on the top, then stay there until the jaws move again. Some platforms will be on the top, but others will be on the bottom and can still be used. There will also be blue fish jumping back and forth, but they are easy to avoid and defeat.
To beat the boxing kangaroo boss, be close to him so he does the wind-up punch, then jump on his head when he is about to lunge forward. He can also jump around, and when he does, be sure to run under him when he does the big jump.
For the fifth section, you will be blown back to the left at the start. Also, we have to hang on and jump off hooks. For the first part, stay on the high road whenever possible. If you stay to it, you'll be able to get an extra life. You'll then be able to drop down, get some health and then enter another part where you'll be blown to the right. Again, get as high as you can and stay there. You'll find health and a 1-up in addition to the exit.
You'll then face the Dark King. The real king's hat will bounce around, and you can jump on it to get a big jump that will allow you to leap high into the air and direct yourself onto the top of the Dark King's head to jump on him. There are platforms here, but the Dark King's projectiles will destroy them eventually. Use the platforms for some speedy hits if you can, then start using the king's hat. The orange projectile will home in on you, while the blue one travels in a specific direction. After enough hits, you'll take on the Dark King's second form.
During the second phase, the Dark King will have two attacks: the falling blocks and the projectiles. When the Dark King hits the walls, you'll need to avoid the blocks that fall from the ceiling. As for the projectiles, there are two. If there is just one light from one of his hands, it will be a homing projectile. If there are three lights, it is a fire projectile that will drop down and travel to the opposite side of the room that you'll need to avoid. Wait for a hand to lower down, then jump on it and make a jump for the Dark King's head. If you can keep it up and land on the other hand after each jump, you can get a lot of hits on the Dark King. Just make sure not to touch the lights from the magic spells before the magic spells launch, as those lights can still damage you.
After you do enough damage to the Dark King, you'll beat him for good. The real king will be his regular self again, you'll head back home with the hat, and you'll win Daisy's heart! You've won!


