Thursday, April 30, 2020

PrinceWatercress plays StarTropics - Part 1 of 12


Our hero Mike is heading to Crescent Island, or C-Island, to meet his uncle Dr. Jones at his laboratory while on vacation. Little does he know that a grand adventure is about to begin...

Chapter 1: Prelude


West of the helipad where you start at is the village of Coralcola, which is the only place that you can go to in the meantime. Once there, you can talk to everybody by walking up to them with the Control Pad and pressing the A button. By talking to people, you'll learn that Dr. Jones has been solving some sort of strange puzzle and that shooting stars have come down from the sky recently.

You'll eventually want to enter the hut in the northwest corner of the village and talk to the village chief. Chief Coralcola will tell you that Dr. Jones has been abducted, and that you are the only hope of saving him. Select "Yes" when asked if you are going to save him, and the chief will give you a yo-yo. This will be your main weapon throughout the game.

After talking to everyone in the village including the chief, you can go to the hut in the northeast corner of the village that is being guarded. Since you've talked to the chief, the guard will recognize you and you can enter the island tunnel.

Once you enter, you will meet the chief's sister, who is the village shaman. She will tell you that Dr. Jones was abducted because he found a secret in the lost ruins, and warns you to be careful.
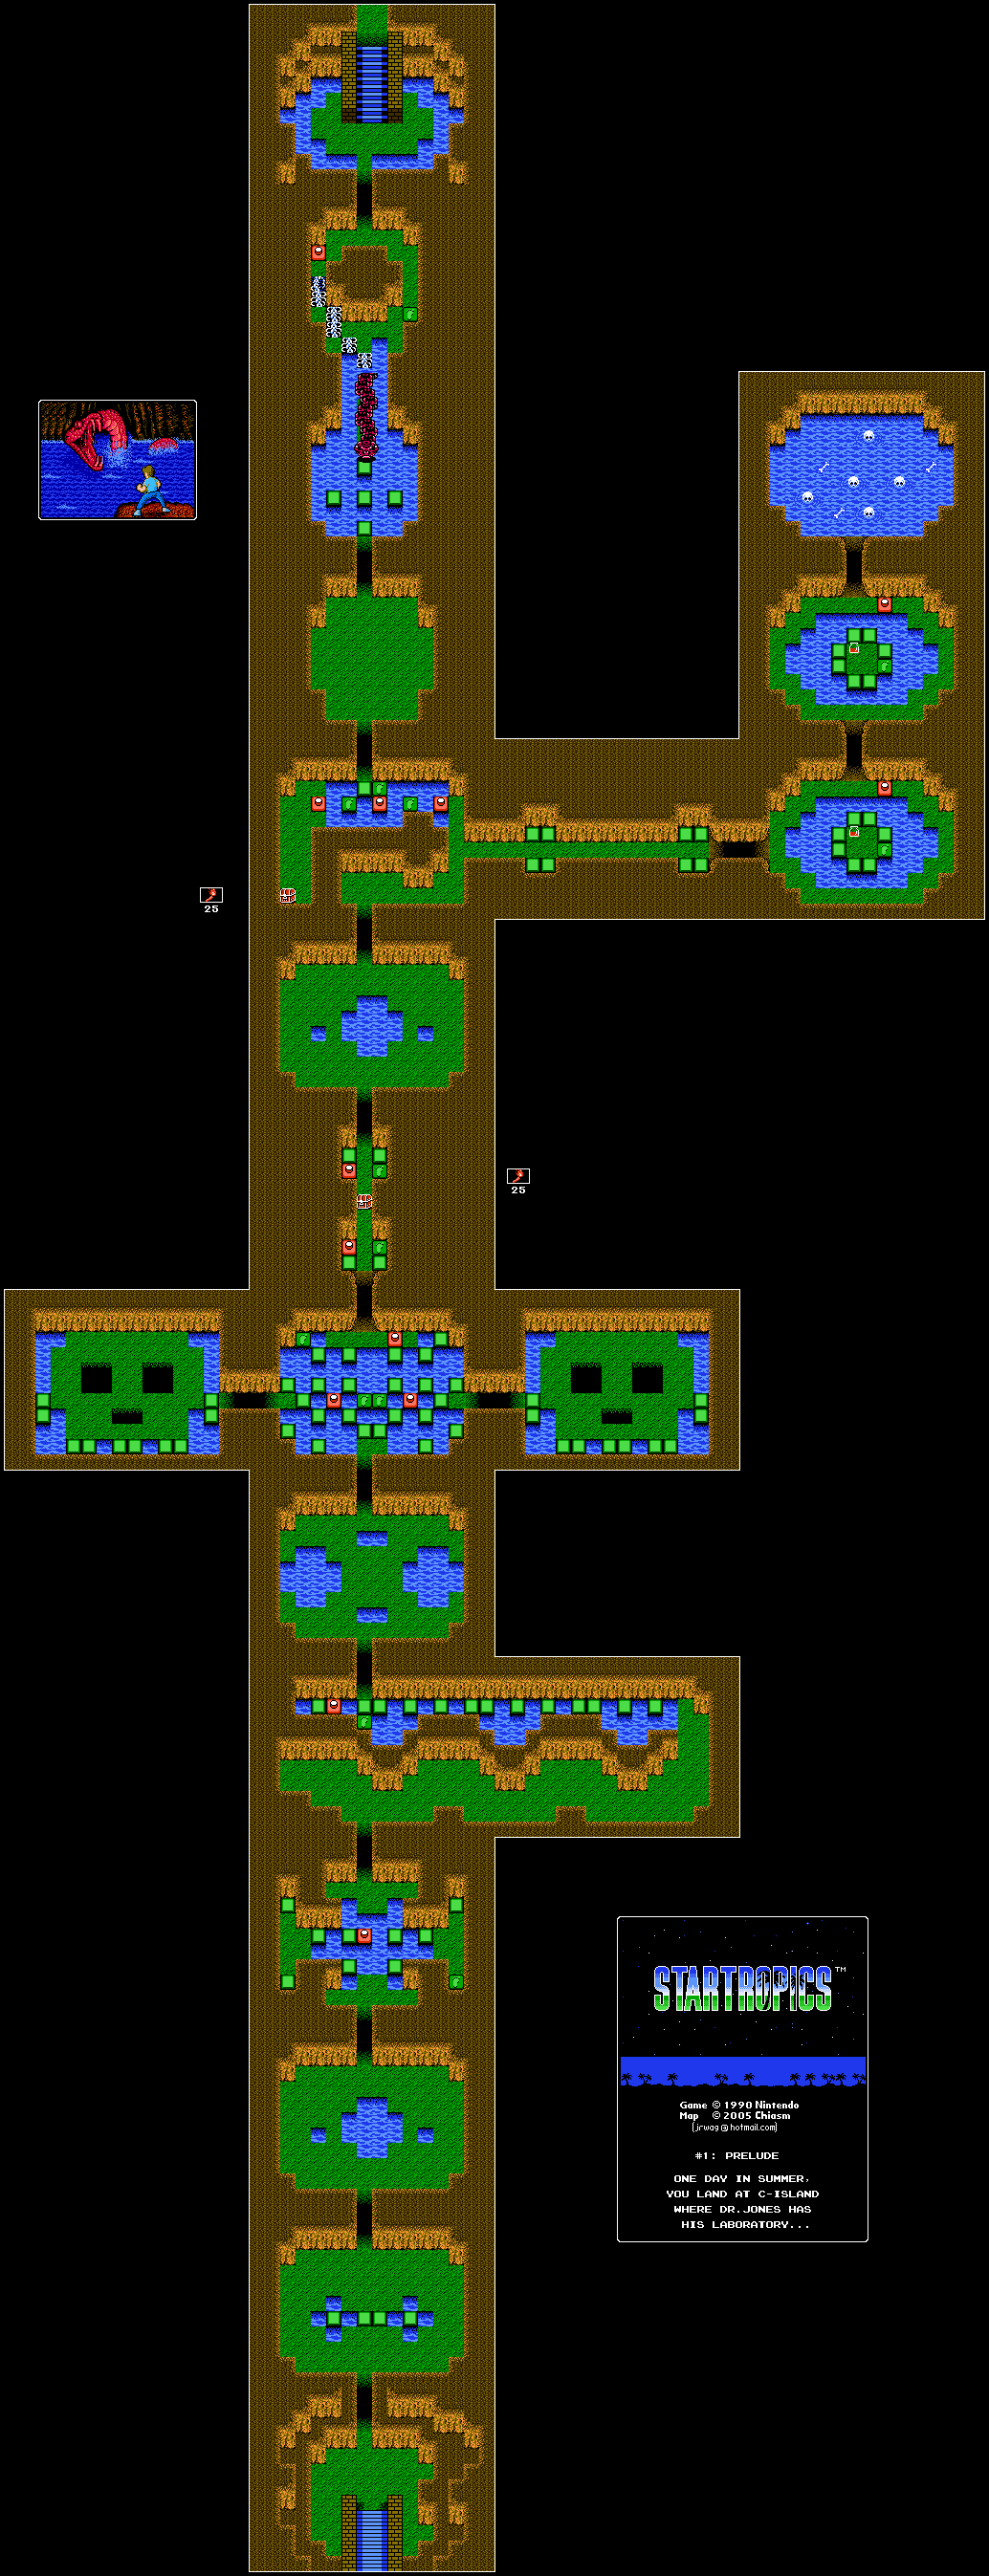
Island Tunnel


At the bottom of the screen, you have your inventory (including the yo-yo), your current health, the amount of potions you have, the amount of stars you have and the amount of lives you currently have. If you lose all your lives, the game is over and the shaman will revive you, allowing you to try the current dungeon. Beware if that happens; you will only have so much health if you are brought back from the dead.

The Control Pad lets you move around, while B lets you attack with the yo-yo and A lets you jump. When you are on the block-like platforms surrounded by platforms, you can jump one-block gaps. Any larger, and you'll fall into the water, which instantly kills you. (Why can't Mike swim?) If you die, you're going to have to start over from an earlier point, and you will lose any weapons and items that you had other than your yo-yo and with less than full health. The movement in this game is very grid-based. By pressing a direction, you'll face it, and by pressing it again, you'll move one space in that direction. This makes it easier to aim the yo-yo at times.

The first enemy you'll meet is the slugs. They move very slowly, and they fall quickly to the yo-yo. If you're at least two spaces away, you can hit them even if they're between grid spaces.

In case you get trapped in a room full of enemies, you'll have to defeat all the enemies in order to get out and continue through the dungeon.

Enemies will rarely drop hearts. If you pick up a heart, it will refill one heart of your health. Collecting five stars will refill your health.

By jumping onto tiles, whether they are surrounded by water or not, you may uncover a hidden switch that is signified by a picture of a foot that pops up when you jump onto it. This will cause a button to pop up somewhere else, and if you jump onto that button, you may open up a door to another room somewhere. Some doors will close behind you, forcing you to go forward, so be careful.

The rat takes more damage that the slug and moves a little faster, but it's still easy to kill.

The torch is a throwing weapon, and you can switch between it and the yo-yo by pressing Select. You only have a limited amount of them, so save them for when you need them.

The bats fly around diagonally and are pretty slow. They eventually slow down and come to a stop, giving you an even better chance of hitting them.

The cobras face a certain direction, and rush at you when you are directly in their line of sight. Sidestep them and hit them twice to get rid of them.

Before entering the boss room, there is a switch you can trigger. Go back to the east end of the room. You'll trigger another door to the east as you do. Inside is a potion you can jump to. Grab it, then go north. There will be another room to the north with another potion that you can open up by jumping on tiles to find a switch, and you can go there grab as well. There is another switch that opens another door here, and if you go north again, you'll jump into the water and die as the game's means of punishing you for being too greedy. So don't do that.

It should be mentioned that items you find in one dungeon will not carry over to the next, so if you have anything left over after completing a dungeon, you won't be able to take it with you.

After fighting some more bats and snakes, you'll fight a giant snake. Equip the torches. When the snake opens its mouth, throw a torch or two at it, then jump to the side to avoid being cooked by the fireballs it spits out. If you lose too much health, you can pause the game and press Up or Down to see more of your inventory, From there, you can select your potion and press Start to use it. When the snake turns bright red, the snake is history. Go north and go switch hunting so you can get out of here.

Once you're back on the overworld map, you'll get points depending on how well you did in the dungeon (which are useless), then you'll be able to explore some more. You'll now need to move north and talk to the guy on the beach. This is Baboo, Dr. Jones' assistant. He will tell you about Dr. Jones' submarine, Sub-C, and tells you that the code to start the submarine is 1492. You'll have the ID code. He tells you more, but is afraid to say anything and lets you head to the lab.

When you head to the lab, you'll be in Sub-C, and you'll see Nav-Com, the navigational computer of Sub-C that looks a lot like R.O.B. the Robot. You'll input the ID code, then you'll end the chapter and head to Chapter 2. You'll leave C-Island as the villagers see you off, and the adventure continues.

Gex - The OST


Here's every track from the game, including the one for The Project, which doesn't even appear on the sound test!

Wednesday, April 29, 2020

PrinceWatercress plays Gex (PS1) - Part 15 of 15


Now that we've beaten Planet X, let's get the real ending this time!

When the battle begins, Rez sends a fly into a teal-colored hive. You have to get to this hive, tail whip it to break it, and eat the fly inside, then use it against Rez. It works much like a firefly power-up, but you only get one shot, and if you miss, you have to get another one. If it hits, you'll do damage to Rez.

When Rez throws the projectile, it will sail over your head on the way to the upper-left corner. Wait for it to come down to your level before jumping to avoid it, much less at all.

When the television screens come down, climb the wall to them, then jump from one to another to the other side before they explode. Take care not to fall down to where Rez is moving back and forth. Stick to the wall, tail whip the hive, eat the fly, then spit it at Rez as he flies to the upper-right. Stay on the lower-right corner as Rez flies to the upper right and shoots his first salvo of projectiles. When they all disappear, hold the run button and climb up to avoid the second salvo. You'll then have to jump from one television screen to another, hit the hive, eat the fly and spit the projectile at Rez again.

When Rez is glowing, he is invincible and you won't be able to hit him.

If Rez turns into a fast-spinning tornado, run under him when he is in the air to get away. He bounces four times before the attack stops.

When Rez sends the projectiles down from the top of the room at the left side of the boss chamber, go all the way to the left to avoid the first set of projectiles, then jump over Rez on the way to the right and use the console as a safe spot before jumping over Rez again. From here, the projectiles that rain down alternate between columns, and there will be safe spots between the spots where the projectiles land.

There is another variant of the raining projectiles where the projectiles track your current position. Just stay on the move and they won't hit you.

If Rez shoots laser beams out of his eyes, he's near-death. Just get on the wall to avoid them completely.

After four hits, Rez goes down. This time around, because we've completed Planet X, we get the secret ending, which contains a ton of concept art and stuff that was conjured up when the game was being made.

Also, if you move around after beating Rez, the game might freeze and you'll never get the ending. You'll be forced to reset and beat this boss battle all over again just to get it.


PrinceWatercress plays Gex (PS1) - Part 14 of 15


We've got two levels left...and thanks to a glitch, the last one becomes a total cakewalk.

The Web


Constant electric beams kill; while intermittent electric beams damage. If the beam nodes are purple, they are intermittent; if they are gray, they are constant.

Make your way to the right. Drop straight down and do not touch the beams as you drop. You'll get three hints: "Helicopter platforms are steerable," "Helicopter platforms will keep running even after you have gotten off," and "To park a helicopter platform, place against a wall." You'll soon see a helicopter platform, and the three hints will start coming into play immediately. To steer the helicopter platform, just press one of the four cardinal directions on the Control Pad. Make sure not to touch any constant beams or fly into the ceiling; both of these scenarios will cost you a life. Be sure to constantly move back and forth to avoid the intermittent beams while in the maze-like areas after the start. It will take some practice to get movements down to move through the beam-laden paths like a pro, but it can be done.

At one point, you will have to go to the right, and there will be a right arrow made up of golden flies next to a down arrow made of golden flies. If you've been playing the maze area correctly. there will be a helicopter platform where the right arrow is. Street the platform left, then steer it right and immediately jump off before you get hit by the nearby constant beams by jumping straight up before moving to the left. If you don't do this part, you will be stuck later and forced to start back at the checkpoint.

After the second checkpoint, you'll have to switch between steering a helicopter platform to the right and climbing across ceilings to avoid being shocked or stuck. At the other end, take the far right portal, then hit the checkpoint before grabbing the remote. From here, there will be two helicopter platforms - one on the left and one on the right. Get on the left one, go up a bit, then hold Right before jumping to a solid wall. The helicopter platform will fall. Climb under the wall to the platform on the right. Get that one moving up by holding Up on the Control Pad, then use the "jump straight up and move" strategy to get back to the left platform and have it move upwards too. From here, you'll constantly be switching between platforms - and holding Up as soon as you get on one - whenever there is a gap in the middle, and if one of them drop, you'll be forced to hit a constant beam to start over. This one takes some practice, but it can be done.

There will be two portals at the top. Take the left one to go to the exit. You're done.

There is another path at the start. Go past the helicopter platform and climb downt he left wall. You'll find a hidden path leading to another section leading to some secrets and eventually another helicopter platform leading to a checkpoint. You'll have to watch what you're doing as you go further down, sticking to walls and ceilings where necessary. but it will lead to a portal that leads to the long horizontal corridor with the helicopter platform and the constant floor and ceiling beams.

There is another passage shortly after the beginning of that maze to the left that leads to four extra lives. If you take the nearby portal, it takes you to the last two parts with the helicopter platforms.

Clothesline


You'll be taking a platform to the other side.

Y'know, you could actually try to dodge all of these low bridges...or you could take advantage of a glitch in Gex's hitbox and hold Down for the entire level to get through the entire level quickly and easily.

Which would you rather do?

Once you get to the end, jump to the right immediately. You'll find a hint telling you to check out the ending, too. Go grab the VHS tape to save your progress.

Tuesday, April 28, 2020

PrinceWatercress plays Gex (PS1) - Part 13 of 15


These are possibly the toughest levels in Planet X yet.

Newton's 4th Law


For some reason, this level is not playable in the PAL version.

Go to the left at the start, watching out for the electrical barrier as you break both blocks. Slide down to the left, then hit the camera switch to your left with the tail to open the nearby door. Do not climb up the wall to hit another camera after that, instead, go ahead and climb to the next camera switch. Hit it from the right three times, then go to the left of it and hit it one more time.

Navigate through the water-filled corridor up ahead. In the gap in the water, go through the left wall. You'll be on an invisible bridge. Run to the left to avoid falling through the breakaway floor into the spikes, then break your way through the blocks on the way down, making sure not to hit any electrical barriers. You'll find a flea for our efforts. Make your way back to the water-filled path and go down.

Go to the left of the camera switch at the bottom and hit it three times. This gets rid of both barriers up ahead. Hit the camera switch going down the hill once, then hit the camera switch down the next hill once. On the next hill, hit the camera switch twice. If you need to, tail bounce on the camera switches. You've reached the checkpoint.

Run straight to the left to get the remote. When you make it back down, run to the right and keep on running while keeping from getting shocked. At the up arrow made out of golden flies, you'll be in invisible water. Keep tapping the jump button to keep going up. then go right at the top. Aoid getting shocked. At one point you can go through a path in the poison water below to find three extra lives and a trip back to before you went back into the water at this point. When you make it out of the water, you'll find a VHS tape and the exit.

The Project


This level has a song that is not in the sound test, but is thankfully easily available on the Internet.

This level is also a maze, and there is a trick to it. You want to go towards the groups of golden flies that are odd numbers. For example, if you're at a fork in the road and one direction has two and the other has five, you go towards the group of five and move forwards from there. Thankfully, there will always be a choice between an "even-numbered" path and an "odd-numbered" path. Always follow the "odd-numbered" path.

If you go to the left, you'll find the remote followed by the exit further to the left; if you go to the right, you'll just find the exit.

PrinceWatercress plays Gex (PS1) - Part 12 of 15


We have two more levels in Planet X to go through in this entry, and I make the second of the two look easier than it actually is. I lost a good few lives practicing the jumps.

Bombs Away


The beginning of the level is simple enough. Just make sure you get the flea power-up if you don't get anything else. After this, you'll suddenly be in a chasm full of guys shooting bombs at you as you drop down. Stick to the wall and tail whip everybody on your way down. You'll find the remote. From here, you'll have to make your way up and take out all the bomb shooting enemies as you make your way up to the exit. If you go right through the wall at the top, you'll find a grasshopper, three extra lives and super speed. Be sure to grab those if you need to before going left.

To the left of the top of the bombing area is an arrow made of golden flies. If you drop down where the arrow is, stick to the side of the platform and climb onto the underside, a portal will show up. Drop down and enter it to end the level.

Head To Head


The question mark at the beginning will tell you to tail bounce on the robots in the acid pools to get past them. That's the only hint you'll need, as you'll be doing that through the entire level. You can jump on the robots more than once even if they're speeding up and getting away from you after being tail bounced, which is useful. If you fall into the acid pools, it's instant death. It doesn't get difficult until after you reach the checkpoint. If you can make the last few jumps over the acid pools, you'll get seven extra lives for your effort.

Monday, April 27, 2020

PrinceWatercress plays Gex (PS1) - Part 11 of 15


Welcome to Planet X, the hidden sixth world. Can you complete these eight short but challenging stages?

Now that the secret remote that we pieced together from all of the bonus stages is whole, we can use it to head to a secret world. Just pull it out and use it, and you'll enter 

Planet X


There are eight levels, and there are plenty of teleporters on the map to take you to the islands that make up this area.

Saucer Section


The question mark at the beginning will tell you to "ride the wall." Jump up to the translucent wall and stick to it like you would any other background wall, and you'll be able to stick to it as it moves. As you go, you will have to avoid UFOs while following the golden flies and making sure that the center of Gex's body does not touch anything.

The UFOs at the beginning just fly forward, while the huge UFOs afterwards move up and down. You'll see the small UFOs again, but they will be moving in a circle. You'll find a remote for another level there, be sure to pick it up. Finally, you'll have big ships that just move forward. After that, you'll reach the exit.

Free Fall


Here, you'll falling straight down. Follow the trail of golden flies to avoid running into electrical barriers. When you see strange patterns being made by the golden flies, get to the center to pick up another remote. From there, stay there until the end.

Unused level in Gex: Deep Cover Gecko


So apparently, there was an unused level that was in one of the old trailers for Gex: Deep Cover Gecko, the third game in the trilogy. As you can see, there was quite a bit of progress for this one, but they eventually scrapped this and made another Western level instead.

According to the video description, the three missions (which are found in the game's code) would have been as follows:

Use the gatling gun, shoot 7 targets
Break into the bank, blow the safe
Kill the 5 ghost cowboys

Cheats such as a "moon jump" are also used to allow for more exploration.


I know this is for the third game in the series and not the second, but given that I've played all three games in the trilogy, this was too good to pass up and share.

Sunday, April 26, 2020

PrinceWatercress plays Gex (PS1) - Part 10 of 15


Here it is...the final battle with Rez...almost. We're not done yet...

Rez' Lair


When the battle begins, Rez sends a fly into a teal-colored hive. You have to get to this hive, tail whip it to break it, and eat the fly inside, then use it against Rez. It works much like a firefly power-up, but you only get one shot, and if you miss, you have to get another one. If it hits, you'll do damage to Rez.

When Rez throws the projectile, it will sail over your head on the way to the upper-left corner. Wait for it to come down to your level before jumping to avoid it, much less at all.

When the television screens come down, climb the wall to them, then jump from one to another to the other side before they explode. Take care not to fall down to where Rez is moving back and forth. Stick to the wall, tail whip the hive, eat the fly, then spit it at Rez as he flies to the upper-right. Stay on the lower-right corner as Rez flies to the upper right and shoots his first salvo of projectiles. When they all disappear, hold the run button and climb up to avoid the second salvo. You'll then have to jump from one television screen to another, hit the hive, eat the fly and spit the projectile at Rez again.

When Rez is glowing, he is invincible and you won't be able to hit him.

If Rez turns into a fast-spinning tornado, run under him when he is in the air to get away. He bounces four times before the attack stops.

When Rez sends the projectiles down from the top of the room at the left side of the boss chamber, go all the way to the left to avoid the first set of projectiles, then jump over Rez on the way to the right and use the console as a safe spot before jumping over Rez again. From here, the projectiles that rain down alternate between columns, and there will be safe spots between the spots where the projectiles land.

There is another variant of the raining projectiles where the projectiles track your current position. Just stay on the move and they won't hit you.

If Rez shoots laser beams out of his eyes, he's near-death. Just get on the wall to avoid them completely.

After four hits, Rez goes down. You'll get your ending...but we aren't done yet...

Also, if you move around after beating Rez, the game might freeze and you'll never get the ending. You'll be forced to reset and beat this boss battle all over again just to get it.

PrinceWatercress plays Gex (PS1) - Part 9 of 15


Here we are with the last world of the game. We're just a few stages away from that battle with Rez. Get ready!

Rezopolis

Rez Knight Fever


You'll be going through tubes that suck you in and shoot you out to get around, and you'll also have to do a bit of climbing 

The pools of water are instant death, and the only way to get past them is by tail bouncing off the bubbles that slowly rise upwards out of them. The bubbles can hurt you, so be careful with them.

The Rez Knights charge back and forth, and they can also charge through the breakable blocks, making the level easier.

There are plenty of lightning bug power-ups in the first half of the stage; use them to take out the television enemies.

There is a maze of pipes and platforms after the second checkpoint. The remote is next to the third checkpoint, and above that is a portal that leads to two extra lives.

From the third checkpoint, you'll have to hold directions on the Control Pad to get through certain parts of the tube. This is the only way you'll be able to make it to the exit. Be ready to break some blocks from underneath, avoid a television enemy and bounce off a bubble near the end to get to the exit.

Also, the "static blobs" are enemies, so get rid of them before continuing.

On The Move


Besides the jumping TV's, you'll also have to deal with conveyor belts. Thankfully, there are orange chevrons pointing in the directions that the conveyor belts will carry you. There will also be a lot of spikes that you'll have to avoid, and these and the conveyors will be working hand-in-hand to make getting around difficult.

The gray barrels that spawn out of the machines above the conveyor belts will explode when you touch them, so stay away from them.

Past the second checkpoint, there will be an area where two bubbles spawn close to one another. Climb up and use those bubbles to get to the portal leading to the final bonus area. Here, you'll have to destroy as many barrels as possible in Street Fighter II while also contending with conveyor belts. This one is really hard to get a perfect score on, but unlike the others, if you can get a minimum of 27 barrels, the game gives you the message "Close Enough" and gives you the final remote piece anyway. (I did not know this when I played this, so this was my first time finding out.)

After this, getting through the level gets tougher, since you will have to tail bounce off - and completely avoid - the bubbles as you make your way to the exit, especially as you move across upside-down conveyor belts to get to the exit.

Saturday, April 25, 2020

PrinceWatercress plays Gex (PS1) - Part 8 of 15


The desync is due to me not chopping off that silent, non-moving part after the bonus stage footage. This is what happens when I don't check my work when editing. To quote R-Truth, "This is on me. My bad."

Chop Chop


The TVs are now propelled by rockets. When you can, let them come to you.

The samurai geckos will slash at you up close. Be sure to take them out from a distance with firefly power-ups if you can. You'll have to play the waiting game on the last set of them near the end.

The laundry baskets act as trampolines in this level. Just watch out for spikes later on as well as the spinning daggers throughout the level.

The gold lion statues do not sink when you stand on them; the stone platforms, on the other hand, do.

Toxic Turtle


Get on the wall and climb up. Tail bounce on him when he comes your way. He will then bounce back and forth wildly. Get on the wall to avoid him. When he stops spinning and bouncing, hit him again. As you keep hitting him, watch out for the projectiles he spits and the tail bombs that he drops. As you deal damage, Toxic Turtles will get bigger and bigger. After enough hits, you'll get a strange looking remote. It's not over yet...

You'll be back at The Dome. This time, the dome will explode, revealing a door. Go in, and you'll be in Rezopolis. Use the remote you got from Toxic Turtle here to get the first level opened up.

PrinceWatercress plays Gex (PS1) - Part 7 of 15


Only seven parts in, and we're now in the fourth world of the game!

Kung Fuville

Sumo City


The sumo wrestlers fall down when they get hit, and they act as trampolines to get you to higher areas.

The thunder gods will float back and forth and shoot lightning at you if they see you.

The firecrackers explode when you stand on them, and you'll have to use them as platforms to reach some areas.

The daggers will spin around on the walls and will hurt if they touch you.

The one-eyed flying bats just fly back and forth.

The fish enemies are actually piranhas, and you'll see more of them in a future level.

The green water does hurt you if you land in it. The red water is instant death.

The dragons head statue shoots a fireball forward.

The bonus game portal is near the end. Tail bounce to the left off a one-eyed flying enemy to get to the platform where it is located. Here, you'll have to make a mad dash around the room to collect 150 silver flies, and if you can do just that, you can get a remote piece.

Fish Bait


You'll be spending a lot of time in the water in this level. Besides the piranhas from earlier that will now spawn out of nowhere in some areas, there are electric eels that are dangerous to the touch as well as slow-jumping TV enemies.

To get around in the water - especially in the spiky areas - you'll have to tap the jump button to move. For those spiky areas, you'll have to get into a bit of a rhythm.

Later in the level, there are areas where the water changes from blue to green, and if you're in the water when it turns green, you will get hit. Thankfully, there are safe spots that are easy to look for and get to throughout these sections that will protect you when the water gets poisonous.

The octopus enemies will travel around a specific path, but they can easily be taken down with a tail whip.

Friday, April 24, 2020

PrinceWatercress plays Gex (PS1) - Part 6 of 15


As soon as we're in the third world of the game, we're out. Well, it was fun while it lasted.

Jungle Isle

Feeding Frenzy


Aside from a jungle remote, you have a remote that looks like a pagoda. Wild.

The television enemies here are on wheels, and they also shoot fireballs towards you as well. Duck when fighting them. Some of the piranhas will jump out of the water, and you'll also have gorillas that will move towards you and hit you. The spiders on the background walls move in simple patterns, and can easily be defeated with a tail whip.

The rafts can be used to travel across the water. Even if you move far away, the game will remember where it is and you can wait for it to come back when and if you need to. If you fall into the water, keep jumping to stay afloat

The wooden bridges have some weak points that will crumble if you stand on them.

When on background walls, watch out for spikes. There are the ones that will pop out of the walls, but there will also be bamboo pole-style spikes every once in a while on the tops and bottoms of platforms, as well.

When you reach the checkpoint, go underneath the nearby bridge and head left into the wall. You won't be able to see it, but you will hear a portal. Press up to enter the bonus area. Here, flies will come down and you will have to catch them. This is the first one I ever did as a kid. To ensure you catch all thirty silver flies and get the secret remote piece, just walk; don't run. If you need to, use your tail whip to extend your hitbox and get the flies you can barely get to.

At the exit, you can climb up the wall to the right, then keep holding Up and Right and jump to jump over the wall (try not to die inside the wall). There will be a bunch of flies and a 1-Up, as well as a portal that takes you back to the VHS tape in the level.

Congo Chaos


The big gray blocks can be tail whipped. The yellow block platforms crumble when you stand on them. When you jump on the big block on the floor, the rest of the level will start...and it will be auto-scrolling. Don't get crushed, watch out for the spikes on the trails (which is definitely reminiscent of Super Mario World) and watch where you're going, as you can accidentally get caught in walls due to the climbing mechanics not exactly playing well with the auto-scrolling. (I actually got caught in a wall and died because of that. Seriously.)

The drums can be used as trampolines to get to higher areas.

New enemies include Indiana Jones lizards who whip at you with their tails as well as indigenous people with masks and spears. The Indy lizards are easy, but you may want to use the Lightning Bug power-ups to spit lightning at the spear guys from a distance, as you may get hit at least once trying to tail whip them.

There are multiple paths that you can take at certain points.

There is another portal that you can find if you get on the ceiling where all those spike balls are, and it will lead you to the bonus area.

After the super speed power-up, take the low road after all the background walls you have to climb up and down. You'll find an alternate path that will take you through the water and take you behind the exit. From here, you can explore the area again without worrying about the auto-scrolling, as the auto-scrolling will stop. The high road has more spike balls on tracks, for those wondering.

Jungle Gym


When you start the level, the game tells you "Climb To The Top." This is actually what you're supposed to do.

In this level, you're jumping snf climbing to the top of a wall while trying to avoid a giant snake-looking thing with wings on its head that jumps around through the holes in said wall. If the snake's head touches you in any way, you will get hit. Be sure that you are not in front of any holes in the wall for too long, either, and watch them to see where the boss will jump out from next. At first, you will be jumping, though you may have to climb to get to where you need to go or to save yourself.

Halfway up the wall, you'll find a grasshopper power-up. If you eat it, take care not to get hit; otherwise, you'll have to utilize running jumps to get to the most narrow of platforms, which can be quite difficult as it is possible to slide off them after jumping on and not realize you did until it's too late.

When you reach the top, grab the remote that is up there. A gorilla will show up and knock some boulders down, forcing the snake thing down to the water at the bottom and crushing it.

CGR Undertow reviews Gex


There's not going to be a whole lot to do with the intermissions, sadly, but I did manage to find CGR Undertow's review of the game.

Thursday, April 23, 2020

PrinceWatercress plays Gex (PS1) - Part 5 of 15


This level is optional, but it sure is fun.

Knock! Knock!


Believe it or not, this level is completely optional. You don't have to beat it, you don't have to play it and you don't even have to unlock it. There aren't even any remotes here. If you do play it, however, you'll have a slightly more difficult yet very fun stage.

There are doors throughout the stage, and pressing Up in front of one will open it up. Some will contain brick walls, train passages or showering women in typical 20th century American cartoon fashion, but others will contain portals that you can enter by pressing Up a second time. When that happens, you'll go between the daytime area where you start at to the nighttime area. You will have to go between them in order to complete the level. If you find a camera, hit it so it turns purple. You'll have to hit a camera switch in case you can't seem to find a way to get any further.

Arrows made of golden flies will lead the way. As you play through the level, you'll be able to figure out where you need to go pretty easily, although there are alternate paths.

If a piano falls onto the ground and you walk all over it, you'll get musical notes to play.

Some spikes poke in and out of the floors and ceilings, especially near the end of the level.

PrinceWatercress plays Gex (PS1) - Part 4 of 15


It didn't take long to complete the second world in the game at all. We're not done yet, though...


Rock It!


The question mark icon at the start gives you the hint of "An arrow points down at the desert!" Remember that for later.

For the majority of this level, you're going to have to ride on rockets. If you accidentally touch the front, nose cone end of a rocket (or a rocket's explosion), it will hurt you. Also, there will be plenty of Star Trek, Star Wars and even Elton John references here and there.

The yellow alien guys with the green stripes on their stomachs attack with a "Yikes!" reaction complete with Tex Avery-style eye bulge-outs, and 

By standing on the tail end of the blue rockets, you can get the rocket to angle upwards and go slightly higher, and by standing on the front end, you can make it tilt downwards and go slightly lower.

The UFO enemies fly around in short patterns, and if you happen to be under them, they will hit you from above with a boxing glove.

If a rocket travels upwards, you can stick to the side like any other wall in the game. As for the ones traveling downwards, stay away from them and their explosions.

For the stack of rockets travelling parallel of one another, you want to stick onto the ceiling with the golden flies and make your way right from there, or else you'll get trapped above a bottomless pit and die.

When you see the arrow made of golden flies pointing down from the hint from earlier, follow it downward. Hit the camera switch with your tail whip, then go right. You'll find four extra lives and a remote. You'll find another remote from going through the level normally. One opens up an extra level, while the other opens up Flatulator, which is the next boss battle.

Near the end, you'll have to stick to the bottom of a rocket and then drop down to another rocket underneath in order to get to the exit.

The Flatulator


This boss battle is against a thin, ugly washed-up superhero who drinks a bunch of gunk out of a giant cooler and turns into a fat, ugly washed-up superhero. Wait for him to fart himself towards you, then jump over him. Avoid any anvils that drop down when he collides with the wall. Jump over him when he charges at you again and avoid anvils. Keep doing this until he flies into the air.

When he flies into the air, climb up the wall and onto the ceiling, and tail whip the strings that are holding the anvils hanging from the ceiling so that they fall on The Flatulator. After long enough, you'll be knocked off the celing and you'll have to avoid The Flatulator's charges again. If you manage to hit him with three anvils quickly enough, you'll get a health ball to refill one of your hit points with, too.

After hitting The Flatulator with three anvils in quick succession three times, you'll get a remote for the next world, which is a jungle world. You'll be able to start the third world in the game right away!

Wednesday, April 22, 2020

PrinceWatercress plays Gex (PS1) - Part 3 of 15


I miss a remote piece by one frame, then find a secret bonus area that I never even knew existed. Get the popcorn for this one, folks.


New Toonland

Twin Towers


There are two halves to this level: green and purple. Green is the left side, and purple is the right side.

The holes in the background wall cannot be crawled through. You'll have to jump to get past them.

When you see flashing bubbles with exclamation marks on them while climbing walls, do not stand under them. Falling pianos, safes and anvils will come down and hit you.

The maces on the ceilings swing back and forth.

The carrots crunch their way into non-existence when you stand on them.

New enemies include Chippendale chipmunks that take two tail whips to kill and boxing gloves that shoot out of green boxes at regular intervals. The boxing gloves cannot be destroyed.

Jagged edges on the floors are spikes, though they are not instant death.

The blue ball with the grasshopper gives you higher jumps, and lasts until you get hit.

The bonus area is out of the way. There is a purple platform you can stand on that will move you to. Drop down where the golden make a down arrows, and the portal will be there.  For this bonus level, you'll have to jump into and bounce off the sides of the walls and pick up all the silver (platinum?) flies. Be careful and don't go too fast, as you may miss some flies and you may go up when you want to go down. This is especially true when I miss the last fly by one frame.

I got so mad that I accidentally found a secret area full of couches underneath where I found the bonus area. Turns out, the two golden flies underneath the platform hint at something, and this is that something. You hold X before landing on the couches to get higher, and if you land between the couches, you'll be forced out of the area.

In the couch area, there is a place where you eventually have to go, and you have to go wall climbing to get to it. You'll find a portal there, and this leads to a portal maze. Each room will have three portals. One portal kicks you out, while the lets you continue through the maze. Thankfully, it's the same pattern every time. To get out, it's right, left, left, left, and right, and the last room gives you a grasshopper power-up and an extra life.

If you make a running jump to the left of the maze portal - which you must have the grasshopper power-up active in order to make, you can find even more couches to bounce on. Thankfully, there are no portals to boot you back out of the room, and if you go all the way to the left, you'll find a couple of extra lives in the sky and a portal between the last two couches that will boot you back out of the room.

There is a glitch involved with this secret area: if you enter it, Gex's vocals stop for as long as you're in the level or until you lose a life.

The remote to the next area is above that whole area near where you find the bonus and secret areas. The remote will always be on 

The stars are trampolines, but they don't take you upwards as much as the couches do. Once you see them, you'll start seeing night sky instead of a daytime one, and you'll have free reign between the two different-colored halves of the stage. It won't be long until you reach the exit, regardless of which half of the level you go to.

Pow!


There is a second, green remote that looks like a jungle. A jungle world, perhaps.

The yellow firefly gives you a three-way lightning shot that will kill anything it touches.

There are new enemies here. The purple guys with the green hats roll around in a wheel in groups of four, and when hit, they split up and go after you. They can also throw joke presents that can do damage when solo. Some of the TV enemies now have tank treads and can go up slopes and walls, but they go down as easily as ever. There are also superhero geckos that fly around and go after you when you're close enough.

The TNT sticks are like the carrots, but they blow up and cause damage with their explosions.

The level is one big maze of destructible blocks and portals. If you know where to go, you can find hard-to-reach power-ups and even a hidden wall that leads to a bonus area. There is also a brief maze area separate from the rest of the level.

There is also a VHS tape in this area. The cartoon level remote can easily be found as you make your way to the level exit. As for the jungle remote, it is below where the checkpoint is. Just explore the area the portal leads you to and you'll find it. Interestingly, if you go all the way to the bottom after entering the path to the jungle portal and go right, you can go right through a fake wall and find the bonus area again. Further to the right is the main level area.

PrinceWatercress plays Gex (PS1) - Part 2 of 15


The first world is over already, but it's not going to get any easier from here on out.

Tomato Soup


If you see a blue console below a TV, it's a VCR. That means that there is a VHS tape in the level, and if you pick it up, you'll get a password after clearing the level (unless you're on 3DO, then you'll be able to save your game). The one here will be at the very end of the level, but they will be in more out-of-the-way places later in the game.

There are two new enemies. The first is the killer tomato that bounces forward and splat rather nicely when they are killed. The second is the gargoyle that flies back and forth and spits a fireball downwards every so often.

The spike pits with the skeletons in them are instant death.

At one point, there is a background wall maze, and you'll have to hit cameras to open a path to a flea power-up. It will also be over a pit of instant death water.

Disco Inferno


Unlike the other levels, there is a second remote, and it looks different from all the skeleton head remotes you've picked up so far. Unlike those remotes, this one opens up a whole new 

The torches are fire demons that will pop in and out of the torches every so often to throw a fireball at your current position.

The blue firefly gives you an ice breathe. Firing the ice projectile will encase the enemy it touches in a block of ice. If you attack the block of ice, you'll destroy the enemy, but if you leave the enemy be, it will revive.

Interestingly, if you use the ice breathe against the torch enemies, you'll instantly kill them from a distance instead of freezing them.

There are instances in this stage where some platforms hanging off the edge of a floor will crumble when you stand on them, so don't be on them for long.

There is an area with three 1-Ups that is seeming unreachable. You have to jump into the water to the immediate left to fall through a fake wall to get there.

As long as you're walking on the breakable walls, you can't destroy them. If you do a tail whip while holding the Control Pad towards them while on them, then you can break them...and that an lead 

Spin-n-Puke


We found both remotes, and if we use the different-looking remote that cycles the color spectrum, we'll open up the next world automatically. But we still have one more skeleton remote, and if you use that, you'll suddenly create a bridge to a TV. None of that was ever there before. This leads to the level boss.

The area will scroll back and forth while skull heads rotate in a pile in the background. You'll then see what looks like the girl from Poltergeist summoning skulls around here. Hit her while avoiding the skulls, the spike pits on the ground and a crushing death at the hands of the level design itself. There are health pick-ups as the area scrolls back and forth, but there's only a few and you need to preserve your health here, as you only have three hits.

After hitting the girl floating in the center of the screen three times, she turns into a zombie and starts projectile vomiting to the sides. You obviously want to avoid the vomit as you hit her three more times. After three more hits, she dies and leaves a remote for the next world. Grab it to end the bonus level and get a password. If you have any health left at the end, you'll get extra lives based on how many hit points you have left. Sadly, you cannot replay boss levels.

Tuesday, April 21, 2020

PrinceWatercress plays Gex (PS1) - Part 1 of 15


Here's some backstory as to how this happened.


And now here's the game!

Uh-oh...after Gex has set up his own perfect hideaway for watching all the TV that he wants, he gets pulled into the TV world by an evil entity known as Rez, who wants to make Gex into a gecko mascot forever. Gex obviously isn't in the mood for this, and now he has to utilize his gecko skills as well as his quick, quote-packed wit to run the gambit through several long-time TV stand-bys such as the Saturday morning cartoon, the horror movie marathon and the late-night kung fu flicks to get to Rez's domain, give Rez the what-for and ultimately obtain his freedom and get back to the real world he's trying to escape from from within.

The Dome


You'll start out in the overworld. Use the Control Pad to move to a TV and press X in front of it if the picture on it is working. Only one is working, and you're right in front of it, so press X.

Cemetery


Well, there's only one TV working here, so go to it and press X.

Frankie and Heli


Left and Right let you walk, Down lets you duck and look down, Up lets you look up. Square lets you eat things with your tail, Circle lets you Tail Whip, X lets you Jump and holding L1 lets you run in conjunction with Left and Right.

From left to right, the HUD consists of your score, your current amount of lives, the current amount of flies you have and your health. If you lose all your health, you lose a life.

Tail whipping question marks give you hints.

The two enemies you'll meet here are Frankie and Heli. Frankie is a Frankenstein's gecko monster that slowly walks forward, while Heli is a flying television that explodes a few seconds after being hit when its timer counts down to zero, hitting anything close to it. Both enemies can easily be tail whipped.

The sets of stone blocks can be tail whipped to get them out of your way.

Golden flies act like coins. Collecting 100 gives you a 1-Up.

Powerballs gives you one health point if you whip them, but if you eat them with S. The first one you'll see is the teal ball with the worm, which is the centipede. The centipede gives you super speed for either a limited time or until you get hit. Don't forget that you can hold Up and press Square to eat stuff above you.

When you leap into a wall, Gex can climb on it. Use the Control Pad to climb around. You can still tail whip and eat things while eat things while wall climbing.

The ladybug gives you full health.

The dagger-like spikes do not kill you instantly, and neither do 

If you see a static-filled portal, press Up in front of it to go through it. You can find ways to enter other areas or even other areas cut off from the rest of the level. You may even find bonus areas, such as the one that is unique to the Cemetery: a bonus game where you have to whip skulls being spit out upwards by a tree so they hit ten Frankies. If you defeat all ten Frankies before time runs out (the timer is in the lower-left corner), you'll get a part of a secret remote. You can find the bonus level multiple times, and if you find and play it again after getting the secret remote piece, you'll get extra lives depending on how well you do.

Speaking of remotes, you'll have to explore the level in order to find them. The remotes will be easy to find now, but they'll be a little more difficult to track down later.

The butterfly gives you an extra life.

The camera acts as a continue point when you tail whip. If you die, you'll start over at the last camera you tail whip.

Holding Down and X in mid-air allows you to tail bounce on enemies and blocks, and holding X after hitting something with the tail bounce allows you to bounce up slightly afterwards.

Jump and press Up to stick to background walls. Use the Control Pad to climb in eight directions. Once again, you can still tail whip and stick out your tongue to eat things while climbing on background walls.

The pools of water are instant death, so don't fall into them.

The big TV with the word "exit" in its static-filled screen is the level exit. Press Up in front of it to clear the level and get a bunch of bonus points based on how well you did as well as a one-liner from Gex courtesy of comedian Dana Gould.

Now that you're back on the overworld, press Select to open the remote menu, then use the Control Pad and X to select a remote. Using a remote will turn on another TV, which opens up another level to enter. When a level is completed, its screen will be nothing but static, but you can go back to levels you've already cleared and play them again if you desire.

Grave Danger


There are some floors that will fall away, and they are indicated by black gravestones, so be careful. The graves act as trampolines when you stand on top of them.

If you haven't found the bonus area, this is where you will first meet the tree stumps that spit the skulls upwards. The skulls hurt, but you can tail whip them and send them into other enemies.

The chainsaw slashers are pretty fast, but you can hit them with a simple tail whip.

The roange ball is a flea, which refills . The red ball with the fly is a red firefly. The red firefly gives you the ability to spit fireballs with Square. The firefly power-ups act as extra hits and have their own icon on the health meter, and if you get hit, you'll lose the power-up instead of one of your hits.

There is a platform above two Helis, and the only way to get to it is to tail bounce off the Helis. If you can get to it, you'll get a portal you can enter that leads to some golden flies as well as a 1-Up. There will also be another portal to the bonus game, which you can use to re-try getting the secret remote piece or play again for extra lives.

Hitting cameras will activate things and change the scenery, allowing you to enter areas you won't be able to access before. They go from yellow to purple to signify they are activated. Hit them and look around to see what happens.

The white ball with the worm is the caterpillar, which gives you temporary invincibility. The white ball with the gecko paw replenishes one hit no matter what.

The skull bridge will get you over a whole pool of water, but it will fall into the water when it can't go any further, so get off once it stops.

Bloody Wolf - The OST


Here it is: every music track from Bloody Wolf for the TurboGrafx-16 and PC Engine. Enjoy.

Monday, April 20, 2020

PrinceWatercress plays Bloody Wolf (TG-16) - Part 4 of 4


The final boss is hard as nails. Just remember you have infinite continues, get your movements down and never give up.

Stage 7


The building shortly after the start contains a hostage who will tell you to watch out for the marshes and that you may need the fins. You'll also find a bazooka as well as some body armor. It will save you from taking damage a few times against the next boss.

The scuba drivers come out of the water and shoot at you. Thankfully, they have a little snorkel that they use before they surface, and if your aim is good enough (or you can get close enough to stab them), you can take them out before they surface.

The second building in the stage contains grenades and Food. Food recovers only one unit of health.

When you see the five flamethrower guys, take out the two at the bottom so you can get rid of the rest.

The third building contains a flamethrower and Muscle Emphasis Tablets. The hostage here tells you that the enemy headquarters is nearby, but there is still more marshland. More enemies will show up as you go north from this building. Watch your back.

The boss here is a swamp boat with a turret. The flamethrower will make quick work of the wooden roof on the right side of the boat if you have it; otherwise, you'll be doing a lot of dodging and you'll be shooting and stabbing a whole bunch of enemies coming at you from behind.

Stage 8


You'll be able to get a motorcycle at the start. Use it to mow down enemies, then get off when you see a truck. Destroy everybody, save the  hostage to get a Cross, which saves you from taking a hit at random (from what I've read). The box contains more grenade. Afterwards, there is another truck to the right. Beat up all the guys in the truck and rescue the two hostages, one of which warns you of the doors that trap you with infra-red beams. If you don't have the Infra-Red Goggles from Stage 6, you won't be able to see the beams. Also, break the box to get Muscle Emphasis Tablets.

After the second trucks, go north to climb the fence. Once you enter the door all the way to the right, you're in the base proper.

Keep jumping to get past the infra-red beams. If any touch you, the floor will collapse beneath your feet, and if you're above the pit, you will die. You'll then face another tank just like the one in Stage 6. The way to beat it is the same, but this time, debris will fall from the top of the screen whenever the tank fires a missile, and you'll have to avoid that as well.

After you face some enemies, you'll have to face Knife Killer again. Guess what? You can use your gun and kill him in one shot this time. After this, free the hostages. One of them will tell you that the enemy has brainwashed the first character you played as, and that he is on watch duty in a nearby room. One of them will refill your health completely, too.

The next room has more infra-red beams, but also robots that shoot electric barriers that you can't get past unless you destroy the robots. If you double back a bit too much near the end, you can have two robots on top of you instead of one, and you'll probably be forced to use a continue. Thankfully, continues are infinite.

You'll then have to face the first character you played as in a one-on-one battle. Just like with the High Commander, you are forced to use only your knife. When your comrade runs at you with the knife, jump away. Stay away from his bazooka shots, the resulting explosions and the grenades. After three bazooka shots, he will throw a grenade before charging at you twice again. When you stab on the first charge, jump away and stay away during and after the second charge, or else you're going to get hit. When you finally beat your comrade, walk up to him. He will come back to his senses, and you'll be able to play as him again with all of the second character's items in his inventory. Go through the door to the north.

You'll then take on some more infra-red beams as well as some soldiers. If you can, trip the infra-red beams to keep the more difficult soldiers at bay. You'll then be in a corridor. Take out the all-black soldiers with grenades, and do the same with the flamethrower guys if you can. If you know what you're doing, you can take out multiple all-black soldiers at once with one grenade. Also, you can shoot down the flamethrower guys with the gun safely.

You'll then take on the High Commander again, and this time, you can use your gun. It's hard to tell due to all the videos in this Let's Play being 30 FPS (I wouldn't do 60 FPS until Looney Tunes in Carrot Crazy), but the High Commander teleports everywhere and attacks from all angles, and it can be very difficult to anticipate where he is going.

The battle starts with the High Commander moving around in a circle and shooting fireballs every so often. It will take some practice, but you'll be able to anticipate when he will shoot the fireballs the more practice you get in with this boss battle. After three fireballs, he throws eight boomerangs in eight directions. Take out as many as you can, as they will eventually return to where the High Commander originally threw them.

At half health, the High Commander will be on his knees before leaping away and moving very quickly all over the room. Again, it is hard to tell exactly what he is doing due to all the videos being 30 FPS, but that's what he's doing, and he will attack you as he moves around in a way as translucent, see-through clones move around that seems to violate the space-time continuum. When you get him down to one hit, he goes even faster. You'll really have to buckle down and just watch the screen to see where he goes, and if you can somehow stab him with your knife at this point, more power to you.

When you eventually beat the High Commander, the High Commander will fall and you will get a million points. But there's even more! Go through the door to the north and fight off all the grenade-tossing soldiers and blaze a path past them all to the north end of the room. If you die at this point, you won't have to face the High Commander again, thankfully. Soldiers will surround you, but the helicopter that shows up kills all the enemy soldiers and saves you. The second character will save you, then you'll find out that you have to save the President again. Our heroes bow out this time. But hey, you've beaten Bloody Wolf! Congratulations!

PrinceWatercress plays Bloody Wolf (TG-16) - Part 3 of 4


So, there's a reason why Stage 5 is the only stage of its kind in the game...it's made exclusively for the console port. Still wish there was another stage or part in the game like it, though.


Stage 5


Unlike the other levels of this game, this one lets you go in any direction you want in what is basically one large screen. You can even double back if you need to. 

Now that you're playing as the second character, you've lost all your stuff, such as the key, the flippers and even health extensions, and you'll have to get them all back by entering buildings and breaking boxes to find stuff.

Instead of a boss, you'll have to travel all over the level while dealing with a limitless supply of enemies that always come after you and rescue all the hostages. Once you rescue all twelve hostages, you'll head to the next level. Some are out in the open, while some are in buildings and others are in threes that you'll have to climb in order to rescue them. When you rescue a hostage, you'll be told how many are left.

When you reach the trees on the far north side, enemies can't spawn. Take out any nearby enemies before climbing trees before rescuing hostages, and watch out for robot enemies shooting out electric barriers, as the electric barriers will take off three units of health. Just keep jumping when you're in the foliage, as it will slow you down considerably.

One building has an enemy known as the Knife Killer, and you're forced to fight him with only your knife. Keep your distance, and make sure he doesn't jump into you. Let him come to you when it comes to stabbing him. Be sure to take the Medicine from the nearby box after you beat him. One of the three hostages in the building will tell you that your first character has been moved to the base's headquarters twenty miles northeast.

When in doubt, use the fins you find her to avoid enemies in the water where you start. Also, if you keep jumping to where you need to go, you can move faster and off-screen more enemies.

Stage 6


This stage is very short. The first building contains six boxes, and the upper-left boxes contains the Infra-Red Scope, which you'll need for later in the game. The hostage here tells you to use the raft, which you'll soon have no choice but to use.

As you ride the raft, be ready to fight off enemies that land on the raft from above, and try not to get shot at. When you make it back to land, enter the building to the left. The upper box holds a Key for locker boxes and the bottom one has Medicine. DO NOT DESTROY THE BOX WITH THE MEDICINE. YOU WILL NEED IT.

To beat the tank, watch where the cannon in the center is aimed, and move around to avoid the spread shots from the side turrets. Make sure you are slightly off center while shooting at the tank so the tank's missiles don't shoot out and hit you. If you watch what you're doing, you can make this battle look pretty darn easy.

Sunday, April 19, 2020

Battle Rangers - The Longplay


Here it is: the arcade version of the game. There are a lot of differences between this and the TG-16 port, as you can see.

PrinceWatercress plays Bloody Wolf (TG-16) - Part 2 of 4


Before publishing this blog entry, I took a quick look at Battle Rangers, the arcade version of this game. Turns out, there are a LOT of differences between the two versions. There was a stage added (I'll mention it when I get to it, which is very soon), and the stages are not only in a different order, but also vastly different between the arcade and console versions.

Stage 3


You'll find Powerful Grenades at the start.

Watch out near the cliff edges. If you fall off any edges, it's instant death.

Watch out for the logs. You can destroy the logs for big points, but you're better off jumping over them as they can take off three units of health.

Afterwards, you'll find a series of cage. The second cave has a hostage who tells you about the key as well as a bazooka and Muscle Emphasis Tablets. The first cave after the barbed wire you have to jump over contains a shotgun and a flamethrower. The flamethrower is a secondary weapon that burns enemies to a crisp. The second to last cave contains two hostages and flash bombs, another secondary weapon that stuns all enemies for a few seconds.

Another cave soon after contains a hostage who tells you to watch out on the bridges as well as Medicine. The bridge afterwards contains pits that will be instant death if you move into them, and you'll have to deal with two pits as you face the Big Sniper.

Wait for the Big Sniper to jump in order to shoot him. You can only hit him as soon as he lands after jumping. When he charges up his laser, be ready to jump to avoid being shot at it. Watch where he jumps and keep your distance to jump the lasers, and you should do okay.

Stage 4


You're now in the enemy camp. Go up to the wall and keep going up to climb the wall. Stay away from the center to avoid being shot at, and keep moving.

After the climb, enter the first building you see and take out everybody to get Muscle Emphasis Tablets. 

The second building you can enter has five hostages, and one of them tells you that the President is being held in a building somewhere in the enemy camp. Another one tells you that the High Commander is in the asylum and to watch out for him. You'll also find a shotgun, a bazooka and grenades.

The motorcycle guys are back and they will move in and out.

Tread carefully when you enter the base. There will be a lot of soldiers. The flamethrower soldiers face and shoot one direction while walking downwards across the side of the screen. Stay to one side, as the flamethrowers have limited range.

Use the grenades to take out the enemies that your machine gun can't reach.

The all-black soldier takes a lot of damage from a grenade. Hit him with a grenade, then keep shooting him to kill him. He explodes when he dies, so keep your distance at all times.

You'll soon face the High Commander. He will disable your gun with his boomerang, forcing you to fight him with your knife. You can't even use your grenades; this fight is knife-only. Get up close at the start of the battle and keep attacking with the knife to knock away as many boomerangs - that will return and come after you eventually - as possible. If you hear some sort of charging up sound, get away from him; he will shoot a fireball at you that you'll want to get away from. Thankfully, the boss can only fire in eight directions and the fireballs don't home in on you.

When you beat the High Commander, this is where the game ends...on the arcade version. Turns out, you have to talk to the President in order to get him to follow you out. Your life will get refilled, but it's not over yet. You're still forced to use your knife against the enemies on the way back, but you can use your grenades this time. If you see any soldiers show up, stop progressing and take them out. When you make it to the cliff's edge, the chopper will show up to extract the President, but not you, as the chopper only has room for one other person. After the President is helped out of the enemy base, the enemy surrounds your current player and takes him hostage. You'll now have to play as the other one - who you can also name - and rescue the first guy. Now you see why there's no two-player mode!

Saturday, April 18, 2020

PrinceWatercress plays Bloody Wolf (TG-16) - Part 1 of 4


I didn't know this until after I played through the game, but apparently there was an arcade version of this game known as Battle Rangers, which has "Bloody Wolf" as part of the subtitle. Turns out this was the only port.

You start the game by picking one of two characters. Both characters control the same and have no strengths or weaknesses over the other. This is followed by inputting up to five characters for a code name. Unlike the arcade version, the default code names for the two characters are Snake and Eagle, respectively, if you put in all A's. Up and Down let you cycle through letters, numbers and symbols, while Button II confirms and Button I is the backspace function.

You'll then get your mission: rescue the president, who has been kidnapped by the enemy.

Stage 1


You'll be in a top-down perspective of sorts. The Control Pad lets you move around, while Button II lets you shoot and Button I lets you jump. Run lets you throw grenades, and Select lets you pause the game.

The heads-up display shows your score, your code name, your current weapon and the amount of secondary weapons such as grenades, the special items that you have, and your current health. If you lose all your health, the game is over and you'll be forced to continue. Thankfully, continues are infinite in this game.

Jump over the barbed wires to get over them. Thankfully, they don't hurt you.

The red barrels are explosive and will take out any nearby enemies when they explode.

You can enter some buildings by walking into the doorways, but watch out for enemies. Also, you can find hostages this way. Be careful not to shoot them, as you can get power-ups and hints from them. If you approach any boxes from any side other than the south one, you can use your knife to open it with Button II and find what's inside. Interestingly, your character goes from holding a gun to holding a knife if you're close enough to stab something.

You can find weapons other than the default machine gun that you start with. The shotgun has a wide multi-bullet shot that can take out multiple enemies.

When you get hit, you get stunned, but you get no audio confirmation, so it's hard to tell if you get hit sometimes.

By walking into the back of trucks, you can climb up them. You can climb up a truck after the start and rescue the hostage on the roof to get a key, which allows you to open some boxes with locks on them.

The green soldiers simply shoot at you, but the blue soldiers shoot five or six bullets at once in multiple directions. The red enemies shoot but also move towards you.

You can get motorcycles from enemies, but the fuel will run out as you spend time on the motorcycle or get hit while on the motorcycle. When the fuel runs out, the motorcycle will flash. Get off immediately by pressing Run and run away from the motorcycle, or the explosion will instantly kill you. The best part about the motorcycles is that you can run into enemies to kill them.

The Muscle Emphasis Tablets will increase your maximum health by one unit. You can have up to six units of health, and if you reach the maximum, you can get a full heal either way..

You'll eventually be forced to enter a building and face the Shotgun Man. (Sadly, the "You! Invaders! Get you the hot bullets of shotgun to die!" line didn't make it to the home port.) After pressing Button I to get through the dialogue, keep your distance to avoid his bullets and return fire when you can. Also, do not jump; the bullets love to violate the laws of perspective and they will still hit you even if you jump. After you hit him three times, you'll have to fight some armored soldiers along with the boss. Take out the armored guys with your grenades, and shoot at the boss when you get a clear shot. After a few more shots, the Shotgun Man will die and his armored cronies will run away.

You'll then be able to continue through the rest of the level. If you need to, walk into ladders to climb them and rescue some hostages. One hostage will tell you that the President's is being held close by.

The Bazooka is an explosive weapon that can take out multiple enemies and pack a punch. Be careful when using it; you can accidentally blow up boxes with power-ups with them if you're not careful.If you take a weapon while carrying one, you'll replace the current weapon you have and you won't be able to get it back; if you find another one of the weapon that you currently have, you'll get more ammo for it.

The brown soldiers flash, and if you touch, they will go kamikaze and explode for quite a bit of damage.

You can enter the inside of some trucks and find things this way. The one in the third section contains some Medicine, which refills all your health.

To beat the submarine, anticipate where the shots go and shoot at the sub while it is surfaced. When it goes back down, go all the way to one side and avoid the missiles, which will open holes in the ground that you will kill you if you accidentally jump into them. I stay to the left for the first salvo, then leap to the right so the hole doesn't become a big problem. The sub will then surface and the attack pattern will begin anew, and you'll be able to whittle down the enemy's health bar, which replaces your special item inventory throughout the boss fight. If the sub goes down to fire missiles again, stay close to the hole made by the last salvo of missiles and jump away from the hole to get away from the new set when it is fired. It won't be long until you take the submarine down.

Stage 2


We are now in the jungle where the President is being held.

Entering enemies will clear the current area of all on-screen enemies, so when you come back out, the coast will be completely clear when you return.

The armored soldiers are normal enemies at this point. Wait for them to shoot, then get in close and knife them by pressing Button II when in close to kill them instantly. You may have to use other weapons such as grenades and bazookas to take out groups of them.

The first hut contains a hostage as well as an armored soldier. The hostage tells you to use your knife (which you'll always have) on the armored soldiers in case you haven't figured it out already.

Powerful Grenades are, well, more powerful grenades. Thankfully, they do not completely replace your regular grenades, which you'll get back when these things are all used up. These more powerful grenades have explosions that cover more ground and last longer when they hit the ground after they are thrown.

There is a robot shortly after the start. It has an eight-way shot, but the shots are slow. It explodes pretty well when it is destroyed

Trees can be climbed just like ladders. The first guy you see in a tree will give you the fins, which are useful in deep water. Just press Button I when you're in a body of water, and you can dive underwater temporarily. If you have the fins, however, you can move faster while doing so, allowing you to more effectively escape from enemies.

In the next building you can enter, you'll find out the President has been moved into the enemy headquarters, and you'll also get Medicine.

When you approach the nearby river, a huge guy with a flamethrower will jump out. Stay away from the center of the screen when approaching this area so you don't get hit immediately, and watch for his bullets as well as the fireballs that he will toss around. If you have to, throw grenades at him. After three hits, he jumps into the water, moves around, and pops back out once he is lined up with you. Stay on the move so you don't get burnt by the flamethrower, and keep fighting him like you always have.

You'll be able to go north, then east across the river. Stop progressing and take out enemies as soon as you see them. Thankfully, the river doesn't have a current that pushes you around. When you go east, you'll be able to sneak up on some enemies to the north and stab a few of them up close to make things easier when you get back on dry land. From here, you'll travel north into forest. Once again, stop progressing when you notice enemies, and take out the enemy forces as you go. Some enemies will throw grenades, so be careful.

You'll then reach a cliff edge, where you will face a helicopter. Anticipate where the machine gun bullets go as they fire in a spread pattern so you can tell where to stand without getting hit, then stay on the move to avoid being hit by the helicopter's missiles. Afterwards, the plane will lower and shoot its machine gun again, starting the attack pattern anew. All the while, return fire when possible by firing diagonally. Sometimes the helicopter will go off-screen. Use this as an opportunity to shoot at the helicopter, as the helicopter will come back on the same side of the screen where it went off-screen on.