Part nostalgia-bomb, part note-taking and part FAQ, what started in GameTrailers as a video game blog is now on Blogger. This blog is a look back at video games, both popular and obscure, from the video game industry's infancy all the way to the previous console generation.
In this entry, we complete the rest of Level 4 and take on a familiar foe.
Level 4-4
You'll be on what appears to be an airship in storage when you begin this level. In the middle, you'll see Kabuus on top of each other. When you get close, they'll fade out before reappearing behind you and charging towards you. Fly into the air and you'll be able to avoid them. The second section is in a forest of grape trees. (I think. I dunno.) You'll be dealing with a few chicks flying around, but that's about it.
Swallowing the Wheel and using it to go down the hills makes the third section easier, since you'll be able to mow down enemies on your way to the door at the bottom. You'll need it to enter the door on the left and get the 1-up near it, and you're not gonna get a second chance unless you start the level over.
You'll fight a new mini-boss in the next section: a pill-bug that rolls around. He'll send some miniature clones of himself at you, which you'll have to use as ammunition. Be careful if you're flying above him, because he can jump to the ceiling here. Swallowing him will give you the Throw ability, which allows you to inhale enemies and then throw them at the touch of the B button. By holding diagonal directions before throwing, however, you can throw enemies diagonally It makes getting through the last, simple section even easier. You can use the Control Pad to guide your throws.
Arena
You'll face Bugzzy in this place in case you need Back Drop or a Maxim Tomato.
Level 4-5
The masked guy throws you another lollipop again at the beginning. Grab it and run like hell. Enter the first door you see, which has some Gordos flying around as well as spikes on the floor. If you enter the door in the star blocks midway through the bottom half of this section, you'll find a 1-up. Now, let's go back, go past the rock, and enter the second door. This is the second section.
The second section is just the entrance to a castle, so go into the door and fight Meta Knight's little buddies. After that, you'll be in a huge, open hallway with some enemies. Getting the Fireball ability here makes it a tad easier. The final section is a real test. Fly carefully past the Gordos to make it to the goal.
Level 4-6
The first section is bomb block fun. Destroy the bomb blocks and take down everybody in your way. You'll find an easy-to-access Pep Brew here if you need it. When you enter the door, you'll fight the alarm clock guy again. Take Mike if you need it after you finish him off, then enter the next section, which is a dark room. You should be able to find a secret room here if you get the Light ability here. But you can still find it without the Light ability, as it is after the first wall you have to jump over in the beginning of this section. Just jump over it, then go all the way to the left and press Up. This leads to a switch that opens up the Warp Star room in Level 4.
You'll be back in the first section, in that upper-right hand corner that you weren't able to access before.
The next room has the Stone power-up if you need it. You can use it to destroy the stumps in the ground. Hit the one at the top, then hit the one under the door before you hit the one in the middle. Boom. 1-Up.
Another verical section here for the last section. The color scheme here is actually pretty nice. Just a short ladder climb to the door. There's another Pep Brew nearby if need it.
Level 4 Boss
Oh, crap, it's Kracko!
Swallow the Hi-Jump guy, then jump for dear life. When you reach the top of this level, you'll finally take this guy on.
Avoid his thunderbolt attack as he moves from left to right, and use the Hi-Jump ability to jump straight into him and cause some damage. If you lose it, use the guys with the capes he spits out every so often as ammunition. Another classic hold-over from Kirby's Adventure.
A duck walked up to the lemonade stand and he said to the man running the stand OH WAIT WRONG VIDEO
Level 4
Grape Garden
Level 4-1
The first section is a side-scrolling romp through the clouds. It's pretty easy, really. The second section is a vertical section that will have you jumping to the top. It's just as short and as easy as the first one.
The third section looks like there's nothing...until you go to the right. Be prepared to swallow the little U.F.O. that flies by to get another ability exclusive to this game: the UFO ability. Kirby will turn into a UFO, and the more you hold down the B button, the more you'll charge up your shot. The maximum charge deals quite a bit of damage.
The fourth section is really easy if you're the U.F.O. Just fly around, don't let anything touch you, and shoot down all the enemies and star blocks you can. Love the Aurora Borealis action going on in the background. If you destroy a lot of the star blocks as the U.F.O., you'll find a switch that opens up the Egg Catching game for Level 4.
The last section is straightforward. Just follow the path and take down the enemies. Sadly, if you complete the stage with the U.F.O. power-up, you'll lose it when you exit, as the game will not allow you to take it with you between stages.
Crane Game
On higher difficulty levels, the crane moves faster when you hold the A button. Also, even the small Kirbys will be harder to take into the drop chute, as even those will fall out of the crane's grasp.
Level 4-2
Level 4-2 stars out in a castle. If you're expecting something like Castle Lololo from Kirby's Dream Land...well...
To get to the door in the first section, destroy the bomb block. That's all you have to do. (Kwife trying too hard to figure this out for minutes on end is hilarious, by the way.) From there, avoid the Poppy Bros. Jr. and get to the next door.
Follow the path in the third section. You'll find a door hidden by star blocks near the end, which has a Maxim Tomato in it if you need it.
The fourth section has you defeating enemies while avoiding spikes. There is a Pep Brew here, but you'll have to carefully navigate between spikes in order to get to it. When you make it to the end of this part, you'll face two Poppy Bros. Sr. at the same time. Fly to the top of the room and you might get one of them to jump to the other side and stay there, so you can inhale two bombs at the same time and send it back as an even powerful star blast. (This also made its debut in Kirby's Adventure, by the way.) And that's it!
Level 4-3
Swallow the fire guy, then run to the fuse that's in the ground and use the Fire ability on it. Run to the cannon and jump into it. You'll find a one-up. You'll then return to the cannon so you can enter the next section.
Prepare to fly for your life on the other side. There are all sorts of blimps in the air, and you'll need to be careful as your navigate your way through the skies. Make your way to the lower-right hand corner of the second section, and you'll find the switch for the level. This will unlock the Level 4 Museum. (If you've lost any health, hitting a switch will completely refill it, so remember that.) From there, head back through the door and float near the bottom of the section to the left. You'll find the entrance to the third section. Here, you'll be fighting against the current to the Warp Star. Take care of the flying guys as you progress, since they take up quite a bit of space. From there, it's a quick flight to the goal.
There is a room to the left of where the switch is in as well as where you're supposed to go in the second section, and if you have Hammer, you can break the crates here to get the Maxim Tomato.
Museum
Here, you can get Sleep and Ball. With Ball, you can turn into a ball with B and hold A to keep bouncing. If Kirby is flashing while he is bouncing, he will destroy enemies in his ball form.
Take the Warp Star to the door and enter. You'll fight more of the Meta Knight's flunkies before you can continue on.
The next section is another room with more enemies, followed by a vertical section where the wind lifts you upwards as soon as you start flying. Avoid the cannons and Gordos as you make your way up. You'll find a Maxim Tomato, a 1-Up and a Pep Brew here, and as long as you're not flying, they're pretty easy to acquire.
Quick Draw
The door with the cowboy hat above it takes you to the Quick Draw mini-game.
Press the A button as soon as the screen tells you to fire to win this battle. If you can make it past Dedede in the final battle, you'll get three extra lives. If you fail against him, you get one.
If you fire too early twice, the game is automatically over.
The sign on the cactus to the left is the timer. The smaller the number is, the better your reflexes are.
Yes, this is the mini-game that the Samurai Kirby mini-game from Kirby's Super Star is (somewhat) based off of.
This one has four difficulty levels just like the other mini-games...and the harder difficulties can get insane and try your patience.
Level 3-5
There's a lollipop in the first room, so go grab it and enter the next section. Dash through it and it'll make the tower rotation part here a breeze. You won't be touching many enemies here if you keep running like a dog is chasing after your ass, but better safe than sorry, right?
The snowman in the third section gives you the Freeze ability if you swallow him. Other than that, there's not much else to say about this part.
The fourth section is another mini-boss fight. This time, you'll be fighting Bonkers. He'll try to hit you with a hammer and throw explosive coconuts at you. Avoid him and his hammer attacks, and use the coconuts he throws at you as well as the stars he creates from hitting the ground with his hammer as ammunition. You can swallow him to get the Hammer ability after you finish him off. It obviously lets Kirby carry a hammer that is not only effective against enemies, but also has the ability to pound down posts much like Stone can.
The fifth and final section is just some power-ups. If you got the Hammer ability earlier, you can use the hammer on the wooden post to get them. Enjoy your Maxim Tomato, as well as your 1-up!
Level 3-6
If you swallow an ability star and an enemy with an ability at the same time, the ability star has precedence. If you swallow two enemies with abilities at the same time, you'll get Mix, and if you either press A or wait for the ability roulette at the bottom of the screen to stop on its own, you ca get a random ability. Waiting for it on its own at certain points in the game can give you abilities that may come in handy based on your current location.
You can get the Laser ability in the first room if you need it. It comes in handy in the next section. Run away from the Gordo and don't let those walking bombs touch the ground! You don't want to anchored to the earth in any way when they blow up!
The third section is another vertical section. It's pretty easy, but you can find another Maxim Tomato here if you need the health.
The fourth section is some more rotating tower action. Nice.
The fifth section has a hidden door near the star blocks. Go in, shoot an air pellet at the bomb block, then fly to the door and make it to the top of the room as you do so. This way, you can avoid the wall the bomb block makes when it explodes. From there, enter the next doorway and hit the switch. The Level 3 Egg Catcher game is yours.
The sixth section is dark. If you can swallow the glowing enemy here, you'll get another ability exclusive to this game - Light - which lights up the dark room. You'll be able to find an easy-to-miss door here if you use it. I also show off Cutter here, which lets Kirby throw boomerangs.
The seventh and last section is a narrow, vertical section. Swallowing the Hi-Jump guy makes this a little faster.
Level 3 Boss
Oh, crap! It's Mr. Shine and Mr. Bright!
When Mr. Shine (the moon) is in the air, he'll send a star shower after you. Use them as ammunition, but don't let them hit you. As you do, avoid the sun's fireballs.
When Mr. Bright (the sun) is in the air, he'll try to hit you with a giant, scorching sunbeam. Stay away from it and inhale the stars that come out when it hits the ground. Avoid Mr. Shine as he rolls towards you and throws boomerangs at you.
When you take one of them out, they'll still be in the air to hound you, but they won't be able to come back down to fight you again.
We start the third level in this entry, and this time around, we're introduced to secret areas.
Level 3
Butter Building
All right! A new level!
Level 3-1
After entering the building in the first section, you'll come across a room with bomb blocks that send enemies crashing down on you when you destroy them and the wall tiles along with them. Spit an air pellet at it. That way, you'll have plenty of time to move out of the way. You'll be able to get the Stone ability again in this room.
You'll fight the alarm clock guy again, then go through the door. You'll see the exit above you in the next section...but for now, just follow the lower path. When you enter the door here, you'll see a switch, but you won't be able to reach it quite yet. Go ahead and enter the door to the left of it, then head towards the goal.
When you head back to the map, the door will stay orange. Here's how to get to that switch: go back to the room with the switch, and go down from the start. You'll notice two star blocks. Destroy them and you'll find a door. Destroy the bomb block, go into the next door, and you'll be next to the switch. Congrats, you now have access to the Level 3 Arena!
Arena
You can fight Wheelie and get Wheel here.
Level 3-2
It's a climb to the top in Level 3-2.
You'll be making another vertical climb in the first section. Take down all the enemies and make your way to the top.
The second section is pretty interesting. As you move to the right, the tower actually rotates. For a game that uses the more common (and less expensive) MMC3 mapping chip, this is actually pretty interesting. I'm surprised this wasn't done on the NES a year or two prior to the game's release. After you walk a certain distance, a part of the tower wall explodes and you'll get a door you can go through. Be careful not to accidentally walk off the tower.
The third section is a narrow, vertical corridor. Watch out for enemies on the way up, especially the stone guys. Also, the background here looks like something from the 80s that has yet to be dragged by the hair, kicking and screaming, into the next century.
The fourth section is another vertical section with spikes lining it. Avoid them as you make your way to the top, and fly over the Gordos at the top of this section. The door to the left at the start contains Wheelie if you want to use Wheel throughout this room.j
The fifth section is a room with two penguins which give you the Freeze ability if you swallow one of them. To get the power-ups in this room, slide into the bomb blocks, get the item, then fly back up for dear life.
You'll fight Bugzzy, the pro wrestling beetle in the next room. Avoid him as he comes towards you and inhale the tiny beetles he sends at you for ammunition. When you swallow him, you'll get the Back Drop ability (which is pretty hard to get). It didn't appear in any other Kirby games, and was upgraded into what became known as the Suplex ability in Kirby Super Star] (which, interestingly enough, you also got from Bugzzy). With Back Drop, you get stars when you inhale an enemy, and when you catch an enemy, you can press one of four directions on the Control Pad. Up does a Backbreaker, Down does a piledriver, away with the suplex and forward is a power bomb. If you press a direction or a button while holding an enemy in mid-air, you'll cast the enemy straight downwards.
A doorway will appear above the ladder when you beat Bugzzy...and that's it for Level 3-2!
Level 3-3
You'll be avoiding those flying guys again as you climb the ladders in the first section. It seems kind of confusing with all the like colors in this room, but it really isn't.
More tower rotation action appears in the second section. I still find this amazing even now.
The third and last section is vertical and full of doors. Just go into the highest door you can reach, take down the star blocks, and enter the next door. It's easy.
As you use these doors, you'll enter a purple vertical section that's a mirror image of the room you were just in. The third door in the purple room takes you to a hidden 1-up (watch out for the spikes!) while the fourth door should take you to a Maxim Tomato if you need it.
In Stage 1-2, if you go to the Warp Star in the first section and get move slightly to the left enough to off-screen it, you'll find a secret set of Star Blocks spelling out "HAL."
Also, you can select "Exit Stage" if you go back to a level you've already completed.
Level 2-4
Yay. Clouds.
The door shortly after the beginning of the first section has a 1-Up in it, so go in there and get it; it's not that hard. There's also a Maxim Tomato tucked around some star blocks if you need that, as well.
The second section is another mini-boss fight. The blue guy that move around slowly is a sentient rock (more or less). Swallowing him gives you the Stone ability, which allows Kirby to turn into a rock and become impervious to enemy attacks and contact damage. This is most useful when in the air and above an enemy. You can also roll down slopes! Whee!
Anyway, you'll meet an alarm clock with feet. He runs and jumps around before ringing his bells and sending notes at you. Inhale one of the notes and you'll be able to spit it back at him. When you swallow him, you'll get the Mike ability. You can use it up to three times before it finally disappears, and it clears out all the enemies currently onscreen.
The Mike ability will work especially well in the next section, where you'll take on those happy floating bomb guys. (Happy Floating Bomb Guys. That is probably one of the dumbest things I have ever written in these blogs. I apologize.)
If you use the Mike ability up completely before entering the next doorway, you'll be able to get the 1-Up here. Just inhale the round guy in this room and swallow him to get the Laser ability. Then, fire it into one of the small slope near the walls and the laser will bounce upwards, hitting the bomb block and sending the 1-Up down to where you are.
The next section gives you another chance to get the Laser power-up with the same guy. He'll fly around, try to line up with you, then fire a laser before floating away. If you get the Laser ability and enter the doorway after the beginning of this section, you'll find a room with a Pep Brew in it. Once again, shooting the Laser into the angled flooring will send it in the enemies easily.
From here, it's some more flying (and more cannon-dodging) to the goal.
Arena
The door with the crossed battle axes above it is the Arena. Here you can take on a mini-boss and get an ability (if you swallow the guy afterwards) as well as a Maxim Tomato if you win.
This one has the walrus guy. (Heh, heh, WalrusGuy.) Same as ever.
Level 2-5
The first section is full of cannons and Waddle Dees. Avoid the cannons and take out all the enemies as you make your way to the right. If any cannons on parasols land, the parasol will start flying towards you, and you can swallow it for the Parasol ability, which allows you to hit things with a parasol and also block attacks from above should they land on the parasol.
The second section is a little easier. There are some wheels you can try to swallow to get the Wheel ability, which you can use to take the lower of the two doorways, which leads to a Pep Brew. Just remember not to press B until you've gotten past the Gordo. You can also fly over the Gordo and not get hit.
The sleeping guys give you the Sleep ability when swallowed. The Sleep ability does absolutely nothing, as it just makes Kirby sleep for a few seconds before he wakes up or get hits by an ability.
The third section takes place in the clouds. Here, you'll meet some weird flying guy with a cape as well as a parasol that tries to follow you and explode in your face. The guy with the cape gives you the Hi-Jump ability, and if you press B, Kirby will jump high into the air and flash. While he's flashing, he can plow through enemies that are above him. You can actually go into one of the houses, whose window looks like (and acts like) a door. You'll find this house right before Sir Kibble. You can get the Fire ability from the enemies in this easy-to-miss room.
The next section has those guys in the capes again. Swallowing one of them will give you Hi-Jump, which will let you power your way through enemies and star blocks. You can even use it on some of the bosses! Just be careful with those bomb guys.
The next section begins with a Poppy Bros. Jr. riding on a Maxim Tomato. If you inhale the guy, you'll be able to keep the tomato. (Yes, you can damage the Maxim Tomato and lose it.) From here, it's just some open space that you can walk to the goal from.
Warp Star Station
Well, now that you have two worlds you can switch back and forth between, you can use the Warp Star Station whenever it's available. Just pick the number you want to go to, go to the Warp Star below it, and you'll instantly backtrack to that world. It works even better when you have multiple worlds cleared.
With the Warp Star Station, you won't have to walk through a bunch of maps to look for the ability you want.
Level 2 Boss
Paint Roller seems to be some prototype of Arty, who would debut in Kirby's Dream Land 3. Avoid her while keeping an eye out for the stuff he draws that comes to life. The Waddle Dees, parasols and cars that he draws can be inhaled and spat back out at him for damage.
She will also hang onto walls for a brief moment to jump from the lower level to the higher level, so be on the lookout for that.
In this entry, we wrap up Level 1 before going on to Level 2.
Level 1-4
The first section has you climbing upwards into a tree. You'll fight Chilly the Walrus here. Avoid him as he tries to slide and dash into you and wait for him to throw an ice cube at him, then inhale it and spit it back at him. Like all the mini-bosses, he isn't very difficult. You can swallow him after you beat him to get the Freeze ability, which creates a frost barrier that freezes any enemy who touches into it into an ice cube that can be sent at other enemies. It also turns Kirby blue.
The second section is even easier if you have the Freeze ability, since you can freeze enemies, turn them into ice cubes and then send them flying to the right and dashing so they'll destroy anyone that's ahead.
The third section is another vertical section. The spiky guy can only be destroyed when he's not spinning. You can also inhale him and swallow him to get the Needle ability, which causes needles to come out of Kirby that will stab any enemy that comes into contact with them. Destroy the star blocks and treat the opening behind it like a door to enter section 4.
Not long after you start the fourth section, some guy in a mask will throw a lollipop your way. Take it, then run like hell to the other end. You'll be invincible as long as your flashing and the special music that comes with it is playing. There's also a 1-Up between two cannons if you need it.
Level 1 Boss
The boss here is Whispy Woods. Yeah, the tree that everybody and their dog knows about. Nothing to it: wait for the apples to drop out of the leaves and spit them back at the tree while staying away from the air pellets he spits out. This time, he spits two or four in quick succession at a time, and they're a little harder to avoid than in Kirby's Dream Land.
When you beat him, grab the wand that comes out. This is a piece of the Star Rod, which Dedede split into several pieces and hid throughout the world. Why? We don't know. All we know is that we did. Now go grab it.
Level 2
Ice Cream Island
Level 2-1
This world is like Float Islands. Treat the coconuts on the palm trees like enemies, since they explode when they try to fall on you.
The first door you see not only has a Pep Brew (which restores two points of your life) hidden underneath some star blocks, but also a Waddle Dee with a parasol waiting for you as soon as you enter. Eat him to get the Parasol ability, which lets you whack people with an umbrella and slowly float downwards a la Mary Poppins. When you leave this room, you'll be above the door you entered.
Scarfy from Bubbly Clouds in Kirby's Dream Land make an appearance near the end of the first section. Take him out by flying and spitting an air pellet at him. Inhaling him will just make him mad and chase after you, before he explodes after a few sections.
The second section gives you another sword guy (and another parasol!) as well as a new enemy: a walking bomb with a skull painted on it. If you manage to swallow it, you'll get the Crash ability. Don't be on the ground (or near a wall or ceiling) when he falls off an edge and lands on the ground...he will explode and try to take you with him for a unit of damage.
The third section introduces you to the spinning top enemy that will give you the Tornado ability - an ability that never made it into any other Kirby game until much later on. Press B, and Kirby will spin at high speeds into the air, destroying anything in his path. When he stops spinning and drops down, however, you won't be able to control Kirby during his descent.
Egg Catcher
This one is pretty simple: press A to catch the eggs in Kirby's mouth...but don't catch the bombs!
The more you catch, the better the prize you'll get. If you catch enough eggs, you can get a 1-Up, but you can get five extra lives if you can somehow get all 30 of them!
This mini-game gets more and more batshit insane later on. Three-star difficulty is just...nuts.
Level 2-2
After you enter the door at the beginning, you'll start to actually play the level. The bomb block destroys all the wall tiles next to it when struck in any way. You'll soon find a Warp Star in front of a wonderful-looking ocean (which still looks good even today) which will take you to the nearby desert.
There are some enemies you can steal the abilities of inside the stone steps, which will prove useful against the mini-boss you're about to face: a sentient, Kirby-sized tire. He'll try to run into you, but if you avoid his ramming attacks, you'll be able to hit him while he's either turning around or spinning in place on the ground. When he spins in place, he'll also send out a miniature tire at you, which you can inhale and send back at him for intense damage.
Swallowing him will give you the Wheel ability, which will prove quite useful in the rest of this section. When you use it, Kirby will turn into a wheel that will run down any enemies in his path, and you can change direction with Left and Right on the Control Pad. Just avoid any pits you come across.
The next section is just a simple room. There's a Pep Brew if you need it, but other than that and a few enemies, that's about it.
Level 2-3
The first section is just some simple flying. Just fly all the way to the right and enter the door to the next section.
The second section is just as simple. If you get the Sword ability from this room, you'll be able to break the bomb blocks to the left near the entrance to the next section.
The third section is just some simple swimming. When you enter the door at the other side, you'll be at the other side of the second section. Another simple fly-by. If you can hit the bomb block at this part, you can get the 1-up that's hidden in the water in the wall.
The next section has you meeting with that guy in the mask again. Yeah, it's the Meta-Knight. Unfortunately for you, he sends some of his flunkies after you. As you inhale them, others will come to take their place until the Enemy life meter runs out. Inhaling one of his minions and spitting him into another makes this a little simpler, since you take care of two enemies at one time. They'll throw weapons at you, so be careful.
When you beat them all, you'll get the door to the fifth section of this level. If you need it, there's a Pep Brew near the beginning of this part that you can easily get to. That's it for Level 2-3.
Ability Museum
The Level 2 Museum has the Laser and the Fire power-ups. Nice. The Laser ability lets you fire a laser beam which can also bounce upwards off slopes, which can be useful sometimes.
After so many years, I finally make a guide of my own playthrough of the game, and I finally cover this awesome game. About time.
Level 1
Vegetable Valley
Good lord, the game looks beautiful.
In case anyone cares, the entire game is six megabits.
First things first: if you swallow and enemy and Kirby starts flashing when he has it in his mouth, you can swallow that enemy and steal their ability. Even though it's taken for granted now, this was the first game in the series where this tactic made an appearance.
In this game, the inhabitants of Dream Land are unable to dream, and the Star Rod has been removed from the Dream Spring by King Dedede. Dedede has split the rod up and given the pieces to his friends, and now Kirby has to get them back.
Level 1-1
This isn't a difficult level by any stretch of the imagination.
Left and Right lets you move around, and double-tapping in either direction lets you run. A lets you jump, and B lets you inhale. If you inhale and enemy and press Down, you can assimilate that enemy's ability and use it yourself with B. Pressing Select can rid of the power, but if you swallow the star you toss back, you can get the power back.
Holding Up lets you fly around, and pressing B lets you spit out an air pellet.
Holding Down and pressing A lets you slide. This can be a useful move sometimes.
The Beam ability allows Kirby to shoot a beam at an arc, and if anything runs into the beam, it gets destroyed.
Pressing Up in front of a door allows you to enter it.
When you're in the second section, you'll learn that having Kirby stand on a steep slope causes him to slide back down (sometimes). The third and last section also has a little pool of water where you can learn the basics of swimming (kind of). Just use the Control Pad. You can keep jumping to keep going up.
The tomato with the M is a Maxim Tomato. This will completely refill your health if you come in contact with one.
Remember, certain enemies cause Kirby to flash when he inhales them into his mouth. Experiment and see which enemies have what abilities! Waddle Dee (the guy with the one eye) has Beam, while the pig-creatures have the Fire ability. If you get hit with an ability, it will be knocked out of Kirby, and you'll either have to get it back by swallowing the star that comes out of him or go without and try to get another one.
The bonus game at the end of the level (signified by the doorway with the stars across the edges) can either get you more points (which don't seem to serve any purpose in this game) or a 1-Up if you can manage to reach the top. Press A at the right time to launch Kirby up as far as you can. (I usually manage to make it only to 2, for some reason.)
Crane Fever
The door with the Kirby doll dangling from above it is the Crane Fever mini-game. You can only do it once per world per session (unless you save your game and turn it off, then you can play it again).
Hold the A button down until it's where you want it to go (read: above the Kirby doll). The regular one is a 1-Up, while the big one is a 2-Up (not a 3-Up like I said in the video). You only have two chances.
Also, when you see the mini-game explanation screen, be sure to pay attention to the number of stars at the lower-right hand corner of the rules. The more stars there are, the harder it becomes. Right now, we only have one star, but as the number of stars increases, the crane will become harder to control.
Level 1-2
As you clear stages, you'll uncover more parts of the map and place a flag near the level you just finished. If a completed level's door is white with an orange star, you've completed the level. If it's still orange with a white star, you need to find a switch in order to reveal even more of the map than usual and invert the door colors.
Anyway, you'll meet the Gordo at the beginning of this level. These black, flying sea urchins (or whatever they are) are indestructible and act as the moving "spike" creatures of the Kirby universe. Fun. Get rid of the star block to cause it to fly into the sky and never return.
The star blocks act as ammunition for Kirby in case he doesn't have an ability. Just inhale one and let it loose at a nearby enemy. You'll also meet the Cappies. Inhale them once to carry their mushroom cap-like heads in your mouth, then spit them at the guy that was underneath. Sir Kibble (the boomerang throwing guy in the Roman centurion-like knight's helmet) has the Cutter ability.
You will see a Warp Star at the end of the first section. Move Kirby into it and see where it takes him!
The second section is somewhere up in the mountains (I guess). You'll also meet your first mini-boss: Poppy Bros. Sr. If you have an ability, he's easier to take down. He's just like he was in Kirby's Dream Land: he just jumps around and throws bombs, and sometimes he dashes. When you've finished him off, you can swallow him for the Crash ability, which is a one-time-only ability that allows you to destroy everything onscreen. If he falls down, he'll explode, and if you're on the ground when that happens, you'll take damage.
The fire ability lets you breathe fire forward, burning any enemies it touches. The Spark ability allows you to shoot sparks out of Kirby's body that can damage, but Kirby won't be able to move until you let go of the B button.
The third section is pretty easy, and the fourth one is just a short climb to the goal. When standing in front of a ladder, you can hold Up to climb up. From there, you can use Up and Down to climb up or down respectively, and jump off the ladder to the side to get off. You can swallow the guy with the sword to get the Sword ability, which is pretty awesome. With this ability, you can swing a sword at enemies. (The ranged projectile thing didn't happen until Kirby Super Star, however.)
Level 1-3
You'll meet a new, indestructible hazard here: the cannons, which are known as Shotzos. They'll shoot at you at predetermined rates and patterns...so pay attention before you try to go past one. The cannonballs they shoot disappear after traveling a certain distance. These things aren't hard...but later...
Anyway, you can take care of the ones on top of the star blocks by getting rid of said blocks. You'll meet Kabuu, a spinning Easter Island head that jumps around, trying to get in your way at the end of this section.
The red balls at the beginning of the second section have the Fireball ability, which let you fly forward for a second like a huge...well...fireball. You'll meet Sparky again at the end of this section if you want Spark again, too.
The third section has you going down and swimming through some water. The fish with the eye patch will follow you around if he sees you, which makes him somewhat of a pain in the pants. It's not for very long, though. If you press B while in the water, you can attack with a water gun, which can damage any underwater enemies you come into contact with.
The fourth section is more easy street. You'll find a Maxim Tomato at the very end, though I don't know why you would need it at this point unless you're having a little bit of trouble.
Ability Museum
The door that appears to the left of Stage 1-3 when you complete it is the Ability Museum. Go inside, inhale the enemy you find there, and take the power-up. You'll find some of the abilities in the game here more easily than usual, and a few of them will have you going back to the world they're in just to use it to get past a certain spot at times. Check them out.
World 1 gives you the Sword power-up. Thank you, HAL, for giving us instant access to one of the awesome abilities early in the game.
Controls
Control Pad:
Left and Right: Move around (double tap to run)
Up: Fly, enter doors
Down: Swallow (while holding an enemy in mouth)
used to move around in any direction underwater/certain parts of the game
A button: Jump
B button: Inhale enemy/spit enemy out, use ability (if ability is equipped), air gun (if underwater), spit out air (while flying)
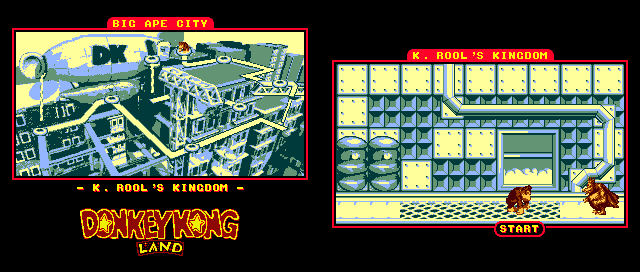
For the first part of the battle, King K. Rool will throw his crown at you. Jump on his head when he throws his crown at you, then run to the other side of the room. Jump over him, then wait for him to throw the crown again and jump on him. After six hits, you'll trigger the second part of the battle.
There is a glitch where you can jump on K. Rool at the exact instant he throws his crown, and if you do that, you'd better be ready to jump over the crown, because he will still throw it afterwards. It is possible to get all six hits in by timing it just right so that you can get all your jumps in the moment he starts throwing every single time.
In the second part of the battle, jump over K. Rool, then start running towards him when he runs. He jumps over you when you are close enough to him - it is not just a random jump. After a few pounces, he will start throwing his crown before running behind it. Be ready to jump over him when that happens. He will then keep throwing the crown and running behind it, and he will be faster with each successive hit. After another six hits, you've beaten Donkey Kong Land with 100%! Congratulations! Enjoy your underwhelming ending!
The conveyor belt ropes are introduced, and by looking at them, you can tell whether they are going up or down. You may have to avoid Zingers while sliding downwards or Slippas that slide down the ropes as you make your way up.
Close to the end, there will be a series of ropes where Zingers will be in your way. When you get here, get as high as you can. You'll find the barrel cannon that leads to the level's lone bonus area, where you can get the N.
In this level, the button from the coin mini-game is back...but you'll be seeing it multiple times, and every time you see it, jumping on it will control the angle that a nearby barrel cannon will be facing by spinning the barrel clockwise.
Shortly after the K, you'll have to aim a barrel downwards and jump in. You'll get the first bonus area, where you can get the O.
After the continue point, aim the barrel you see afterwards to the right and jump in. You'll enter the second bonus area, where you can get the N.
The oil drums finally come alight just like they did in Donkey Kong Country in this level. It may not seem that way at first, but soon after the start, some of them are ablaze, and there will be others where the fire goes in and out of the oil drum. Wait for the flame to start going straight down before jumping.
There is a tire to the left of the rope where you find the O. If you can superjump to it at the bottom of the rope and leap further to the left, you'll enter the first bonus area, where you can get four extra lives.
The second barrel involves throwing a TNT barrel at an oil drum on a platform after the second continue point. If you can pull it off, you can go up another rigging area where you can get a few extra lives if you're quick enough.
In this stage, the Kong letters show up very frequently. When you collect a whole set, you can jump on the checkerboard cylinder at the end of a section of the level to turn the Kong letters into platforms that you can use to get across a pit.
The bonus area here isn't until near the end. You'll see a long line of bananas arcing downwards to the right, and if you jump to where it ends, you'll get a rope that you can climb to the last K and a bonus coin.
When you get the last set of Kong letters in this level, you'll be able to save your game, like always.
In this level, you'll be firing yourself out of barrel cannons...a lot. Some are automatic, some are not. Some of them rotate part of the way, some of them rotate a complete 360 degrees. You'll have to be patient with your shots so you can get through this level. You'll also have to bounce off of tires from barrel cannons as well.
The first bonus area is a rope in the ground just after the start, just before the K. It's a coin mini-game.
The second bonus area is at the end. Instead of going right to the exit, go left and superjump. You'll find the second bonus area, where you can get the G.
It's another mountain cliff level, but this time you're going left to right the entire time. Watch out for enemies while jumping from one platform to the next, as enemies will suddenly pop up and rocks will keep dropping down.
The first bonus area is after the first pair of rocks dropping down. Drop down and follow the trail of bananas to get to it and get the O with Expresso.
After the area with the Zingers flying between the platforms, there will be a flying pig. Leap off it to the right as it goes to the right to find the second bonus area. You can get the G here.
If you drop down past the exit to the right, you'll find twelve bananas.
The third clouds area is not only the easiest, with the main gimmick being the clouds that disappear when you jump onto them, but also the most fun.
You'll finally see Expresso outside of a bonus area here, and soon after you get him, there will be a barrel cannon leading to the first bonus area. The two bananas will signify where to drop down and a little bit to the left. You can get some bananas and three bonus coins here.
Just before the N, there is a cloud that you must stand on, and if you stay on it, you'll drop to the second bonus area. Unlike the first one, the two bananas that signify where you need to stop are located on the cloud before the one you need to wait on. It's a coin mini-game.
The mole boss will come out of one of the three holes on the ground, then wait before throwing his hat at you. Only his hat can hurt you; if you leap on him before he throws it, you're only knocked back. As you keep jumping on him, this battle gets faster and faster, and you'll have to time your jumps more and more so that you can land on him almost as soon as he comes out of the ground. Eventually, you'll be able to take him down and move on to the final world of the game.
Love the city themes for some of the last world's stages; it's a shame Country didn't do this.
The first bonus area is right at the start. Use the balloon that moves up and down as it inflates and deflates to jump to the right when it goes as far up as it can. If you can stay on the platforms here, you can get a ton of bonus coins.
As mentioned earlier, the gimmick for the stage is the balloons that move up and down as they inflate and deflate. They serve as platforms for this stage, and you'll have to not only time your jumps well, but also position yourself very well to get through the stage.
Just before the G, there will be a barrel cannon leading to the second bonus level. Jump onto the third balloon and wait for it to go all the way up before jumping up and to the right to go in. You'll have to deal with the Sky High Caper platform again to get four bonus coins and the N, but at least this part isn't mandatory to attempt.
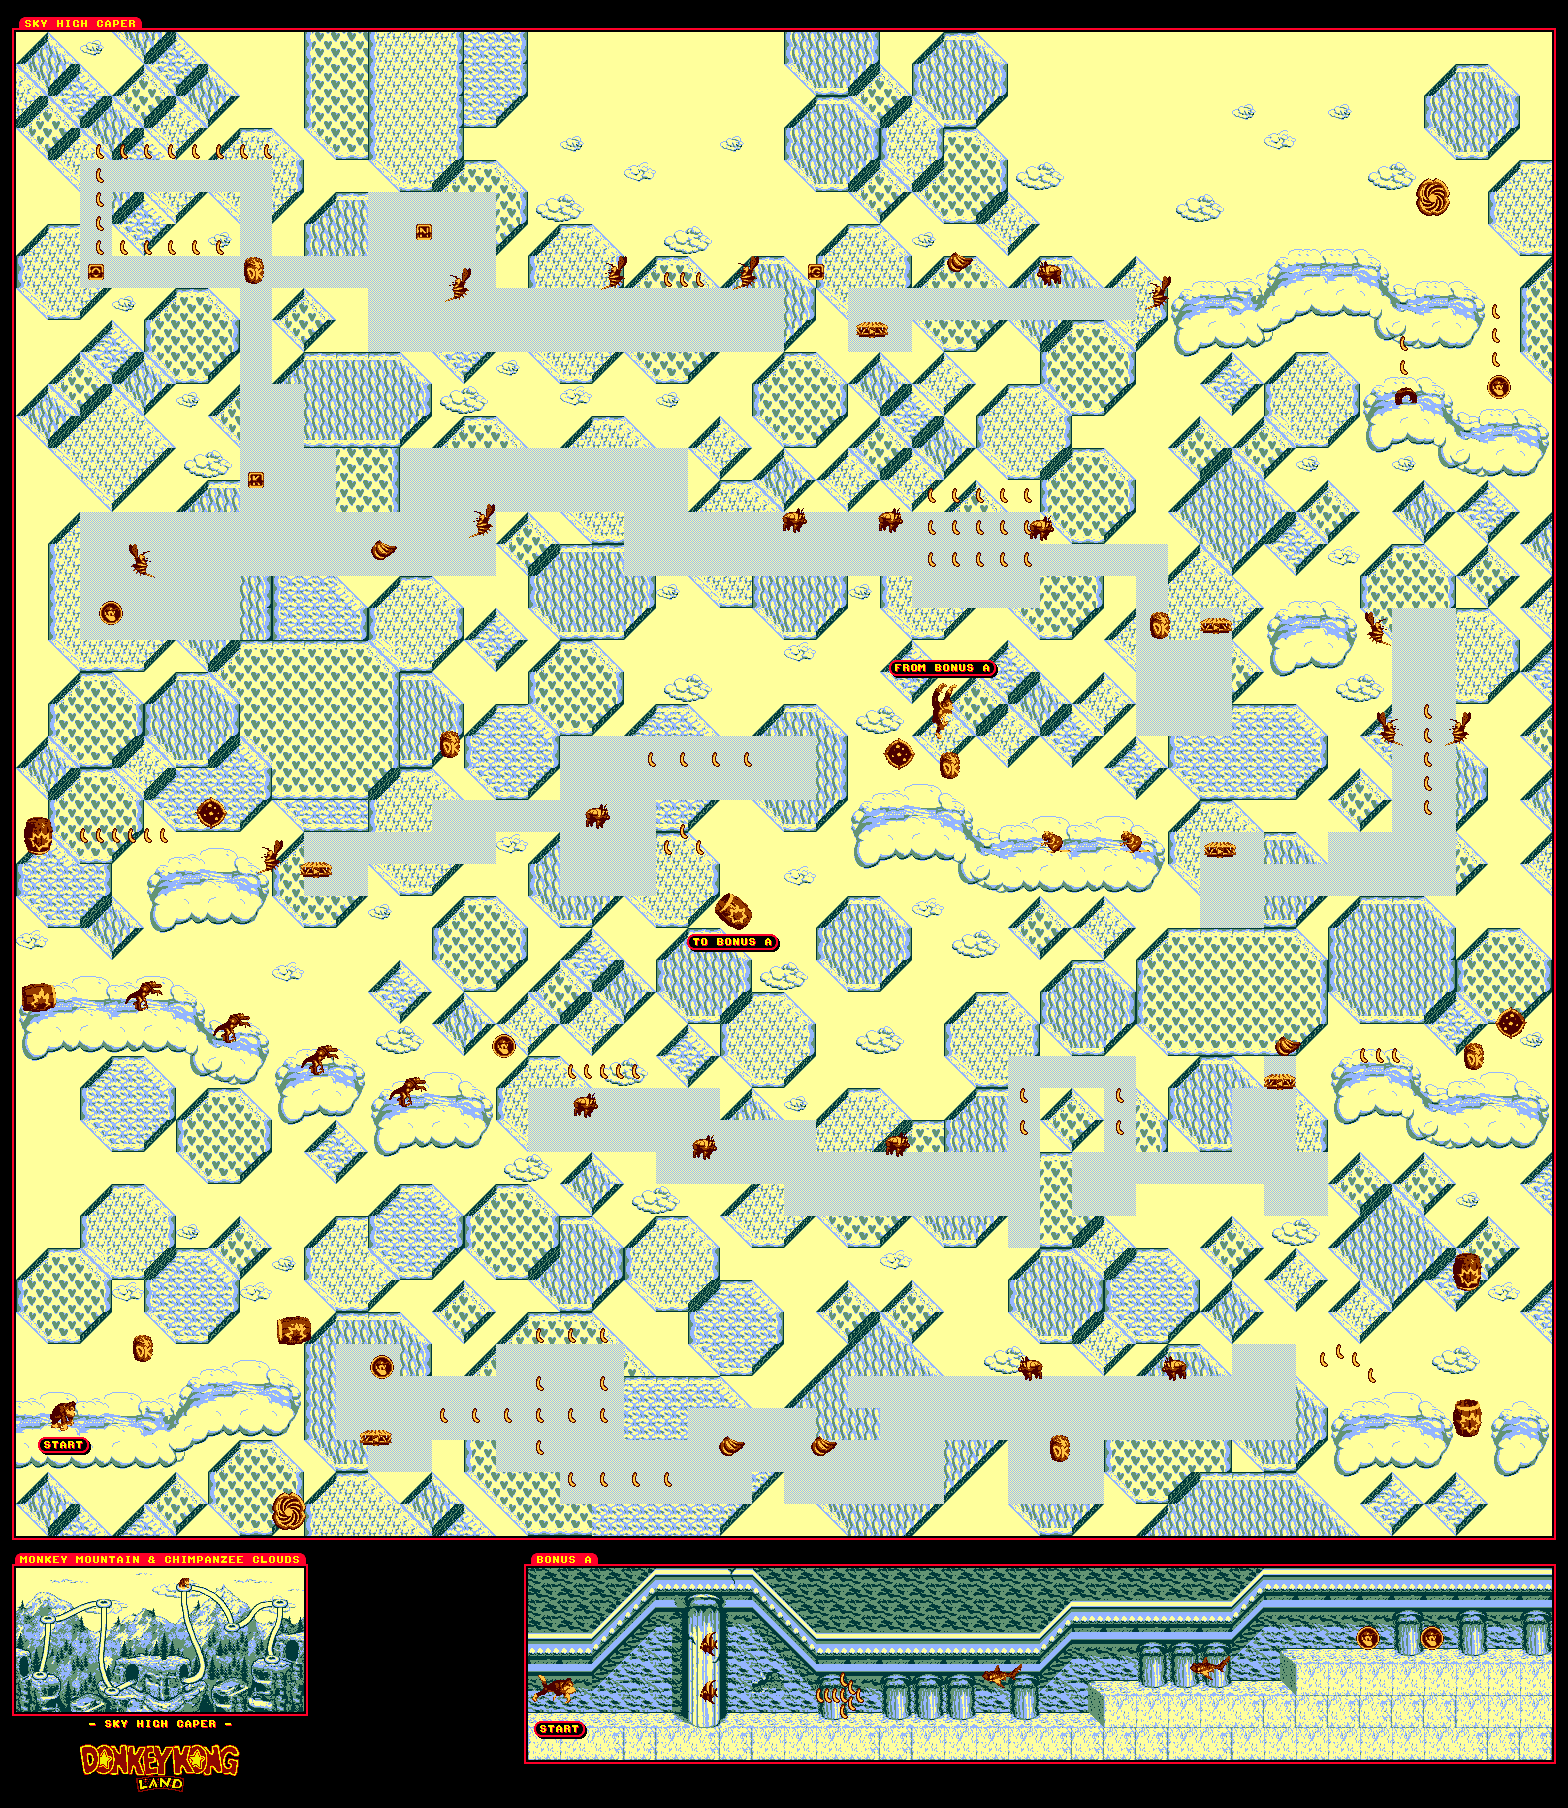
Welcome to the first of three cloud levels...and they are doozies.
The gimmick for this one is platforms on tracks. Stay on the platform, jump over the Zingers and make sure you don't fall to the bottom.
There is a barrel to the right that you can jump to on the second platform. A superjump will allow you to reach it easily and get the O.
The second bonus area is after the checkpoint. When you see the flying pigs, you're there. Jump off the two flying pigs to the right and get in the barrel cannon. When you get back, duck under the flying pig, then jump to get the G. Jump on the cloud platform near the end to reach the goal.
For some reason, the barrel cannon to the left at the start refused to spawn when I started the level. It takes you to the K, four banana bunches and a 1-Up.
When you see the pit with two Mincers and the platform that moves over them after the start, drop down between the Mincers to enter the first bonus area and get a bunch of bananas.
When you make it past the long pit after the N, drop down where the Mincer is going up and down. There will be a steel keg to the right. Grab it, then go back down and throw it into the right wall to enter the second bonus area, which is a coin mini-game.
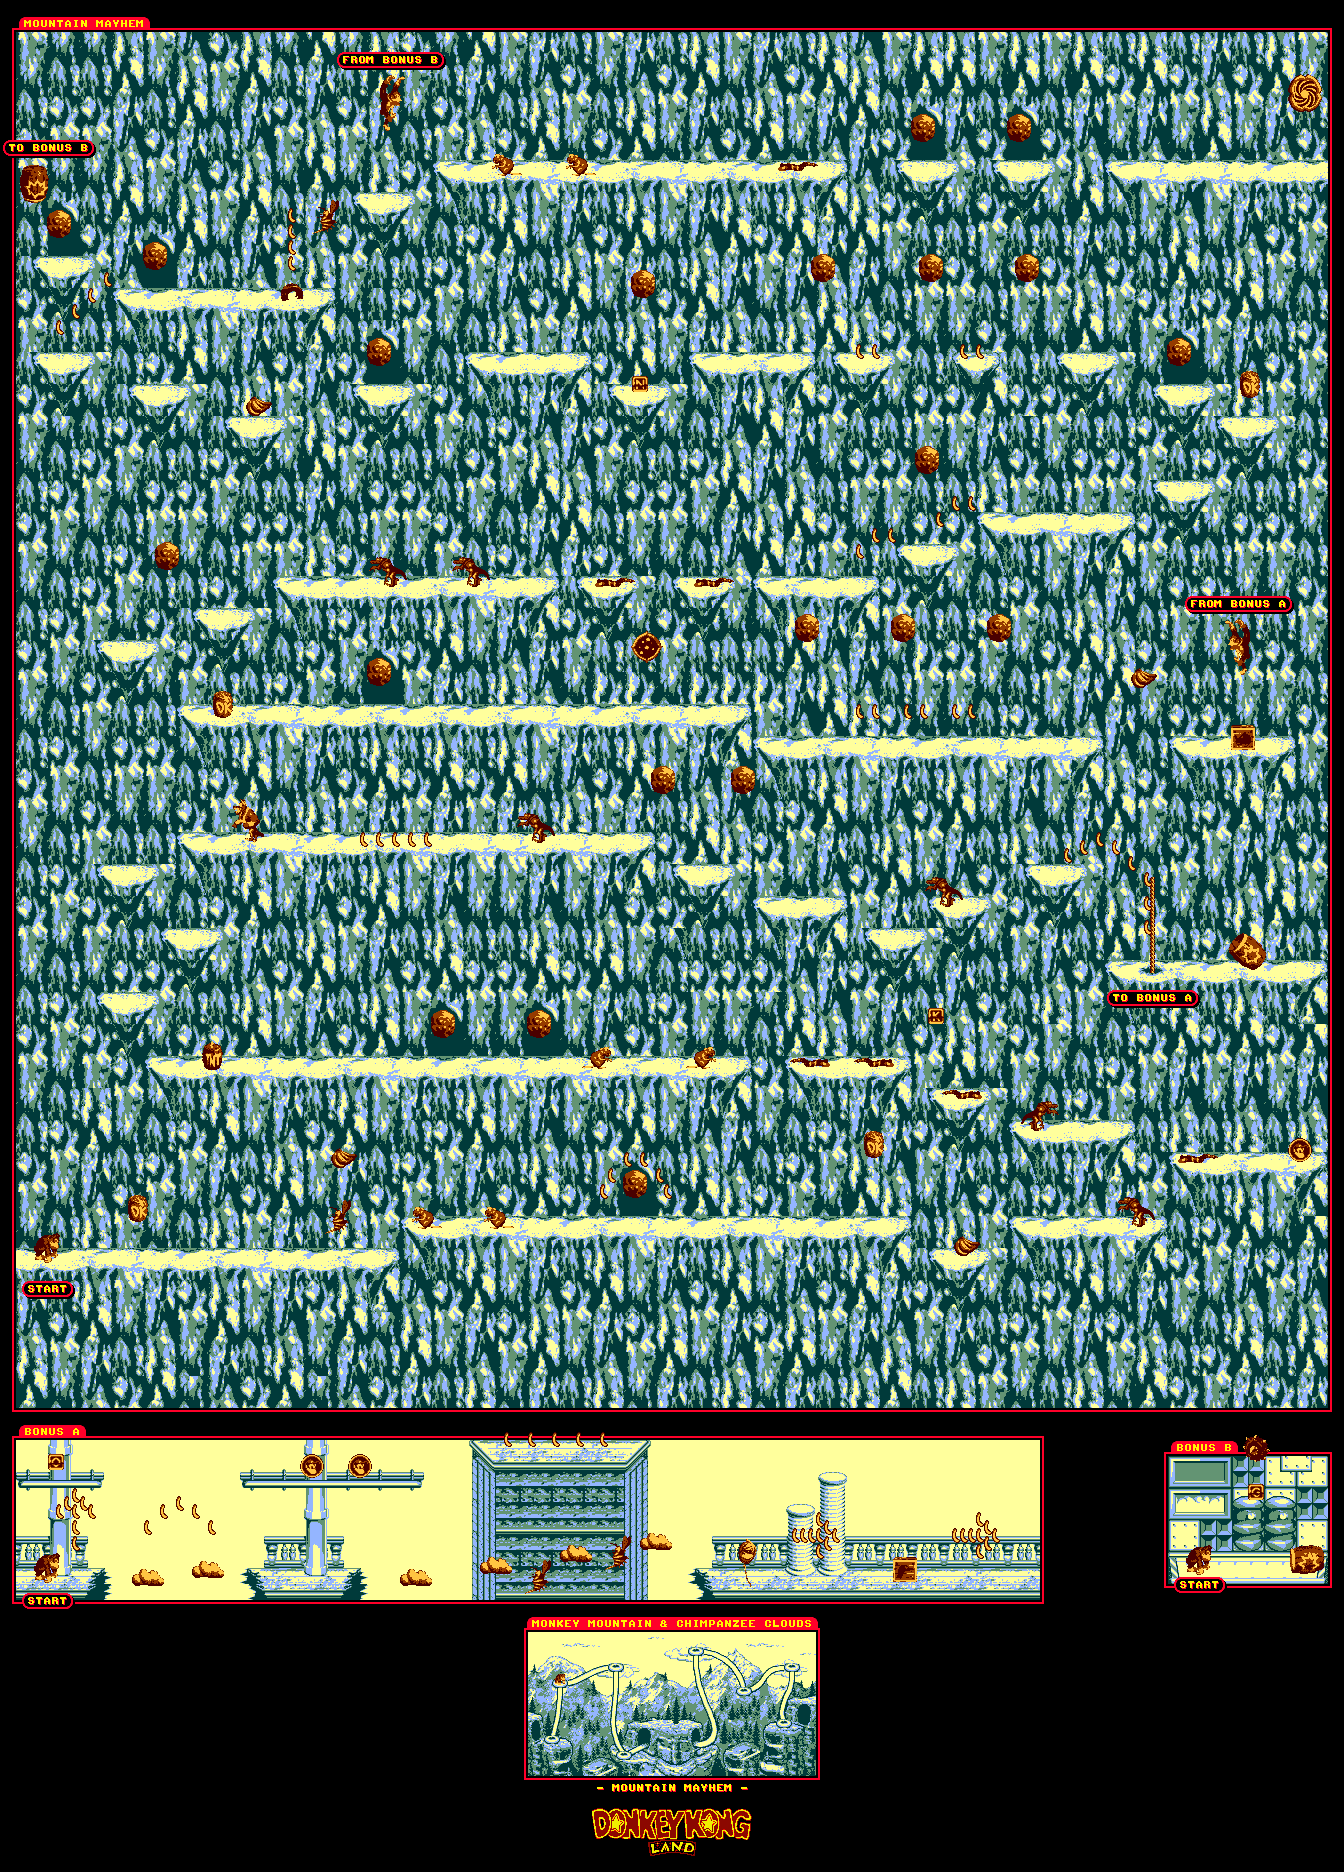
The platforms here move around in pre-determined zones. When you jump on the platform, or when the platform hits the end of a zone, the direction the platforms goes - which is signified by the arrow on the center of the platform - moves counter-clockwise (right, up, left, down). In certain parts of the zones, you'll be going down some pretty linear paths, but your reaction time will have to be good to get the platform to go where you want to go.
The pigs are the worst part of this stage. You may have to roll/cartwheel into them to get rid of them. Be ready to jump right back onto the platform and get the platform re-situated and moving the way you want it to again afterwards. If you hold the B button during this level and let go of it at any time, pause the game, hold down the B button, then un-pause so you don't roll off the platform.
Shortly after the second checkpoint, there will be a banana path that arcs downwards to the right. If you follow it, you'll find the stage's lone bonus area where you can swim for some bonus coins. Just lay low so you can get past all the enemies.
When you see the K, you're nearly at the end. At this point, the worst is over. To the right of the goal is a line of bananas, and if you follow it, you'll find a bonus coin.
Oh, and if you get the first platform in the level down and to the left at the beginning of the platform zone, then superjump to the left, you'll find a secret exit that allows you to skip everything.
The tornadoes - which are known officially as Swirlwinds - are here in greater numbers.
Just jump on one, then keep going in the direction you want.
To get the K, face away from the nearby Swirlwind to get it to come to you, then jump over the Swirlwind and get it.
There is a lone banana above one of the Swirlwinds, and if you use the Swirlwind to get to it, you'll enter the lone bonus area. Here you can get the G.
The boss here is a Clambo. To beat him, just position yourself in front of the shell that will be in one of the corners of the room, and when the Clambo moves back and spits a pearl at you, move out of the way so that the pearl bounces off the shell and hits the Clambo. After enough hits, you'll win the battle.
Move the tire at the start to the right to get the K. It's your first movable tire of the game! After some crawling by just moving right, move the second movable tire you see to the right to the first area where you can stand up. Jump up and to the left to enter a barrel cannon that takes you to the first bonus area. Here, you can use Rambi to beat up some Kritters and get some bananas.
Before the N, there is a movable tire you can move. Move it to the left first so you can take it down the normal path, then take it to the right and over the pits until you see a line of bananas. Leap into it with the movable tire to enter the second bonus area, where you can get the G.
Here, you will see falling rocks every so often. You want to make sure that you avoid them, as there is no way that they can be destroyed. Some of them also drop down between ledges, so take care not to rush through the stage too fast.
The first bonus room is hinted at with a line of bananas leading downwards. Leap on the clouds, avoid the Zingers and use Expresso to bounce off a Zinger to get some bonus coins. Unlike Donkey Kong Country, he can bounce off Zingers this time around.
You can use Rambi, but it is not recommended if you're not confident in your jumping skills, even if he does provide an extra hit.
Going left near the end will reveal a barrel cannon leading to the second bonus room. Get the G and get out.
The spinning pots will endlessly spit out Slippas. Also, the tornadoes will slowly follow you around, and if you keep jumping on it, you can keep bouncing on top of it while it moves where you move. If you see any pots rolling towards you, jump over it.
One of the spinning pots has a tire under it, and if you throw a barrel at it, you'll be able to launch yourself up into the bonus area. If you can make it to the end, you can get the O.
You'll also be able to pick up a bomb at the end. This opens up more of the second world.
Krusha makes his Donkey Kong Land debut here, and you'll have to either jump on him with Donkey Kong or throw a barrel at him to get rid of him.
There will be a lot of Kritters jumping at you or back and forth, so you'll want to be careful.
The sole bonus area here is near the end. You'll see the top of a barrel cannon, and if you jump into it, you'll enter a very deep brown-colored area where you can plow through Kritters with Rambi.
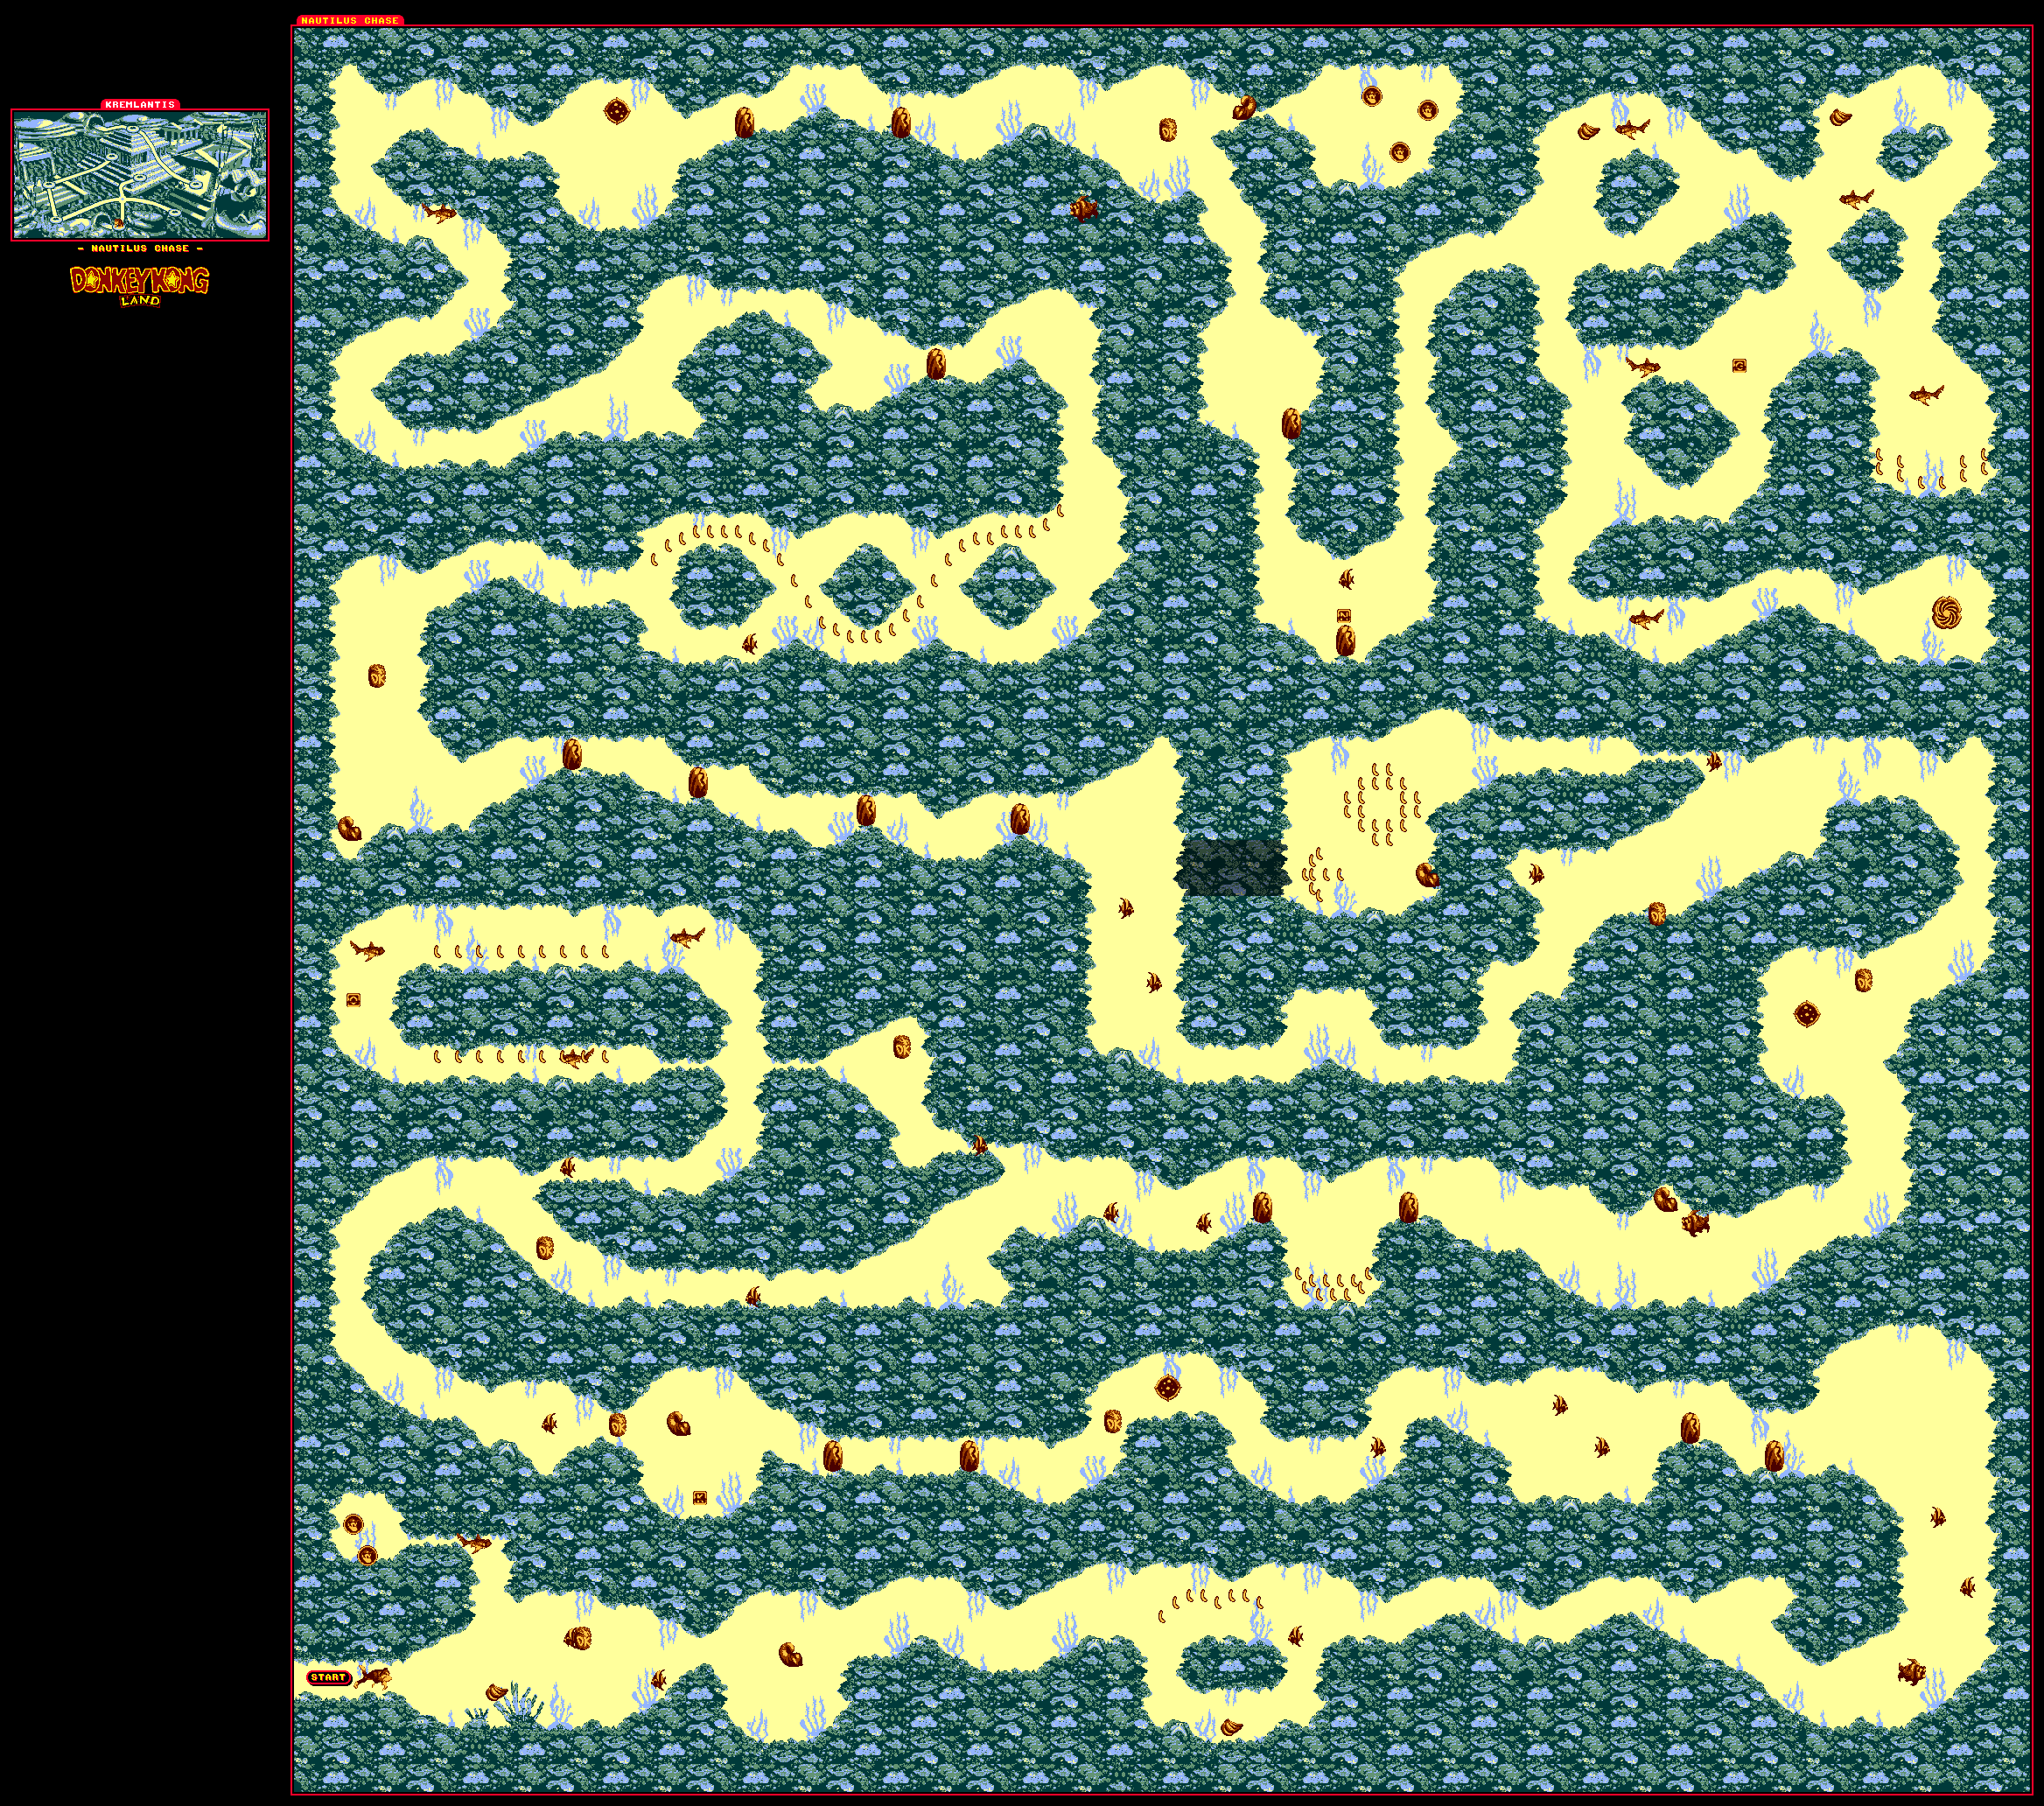
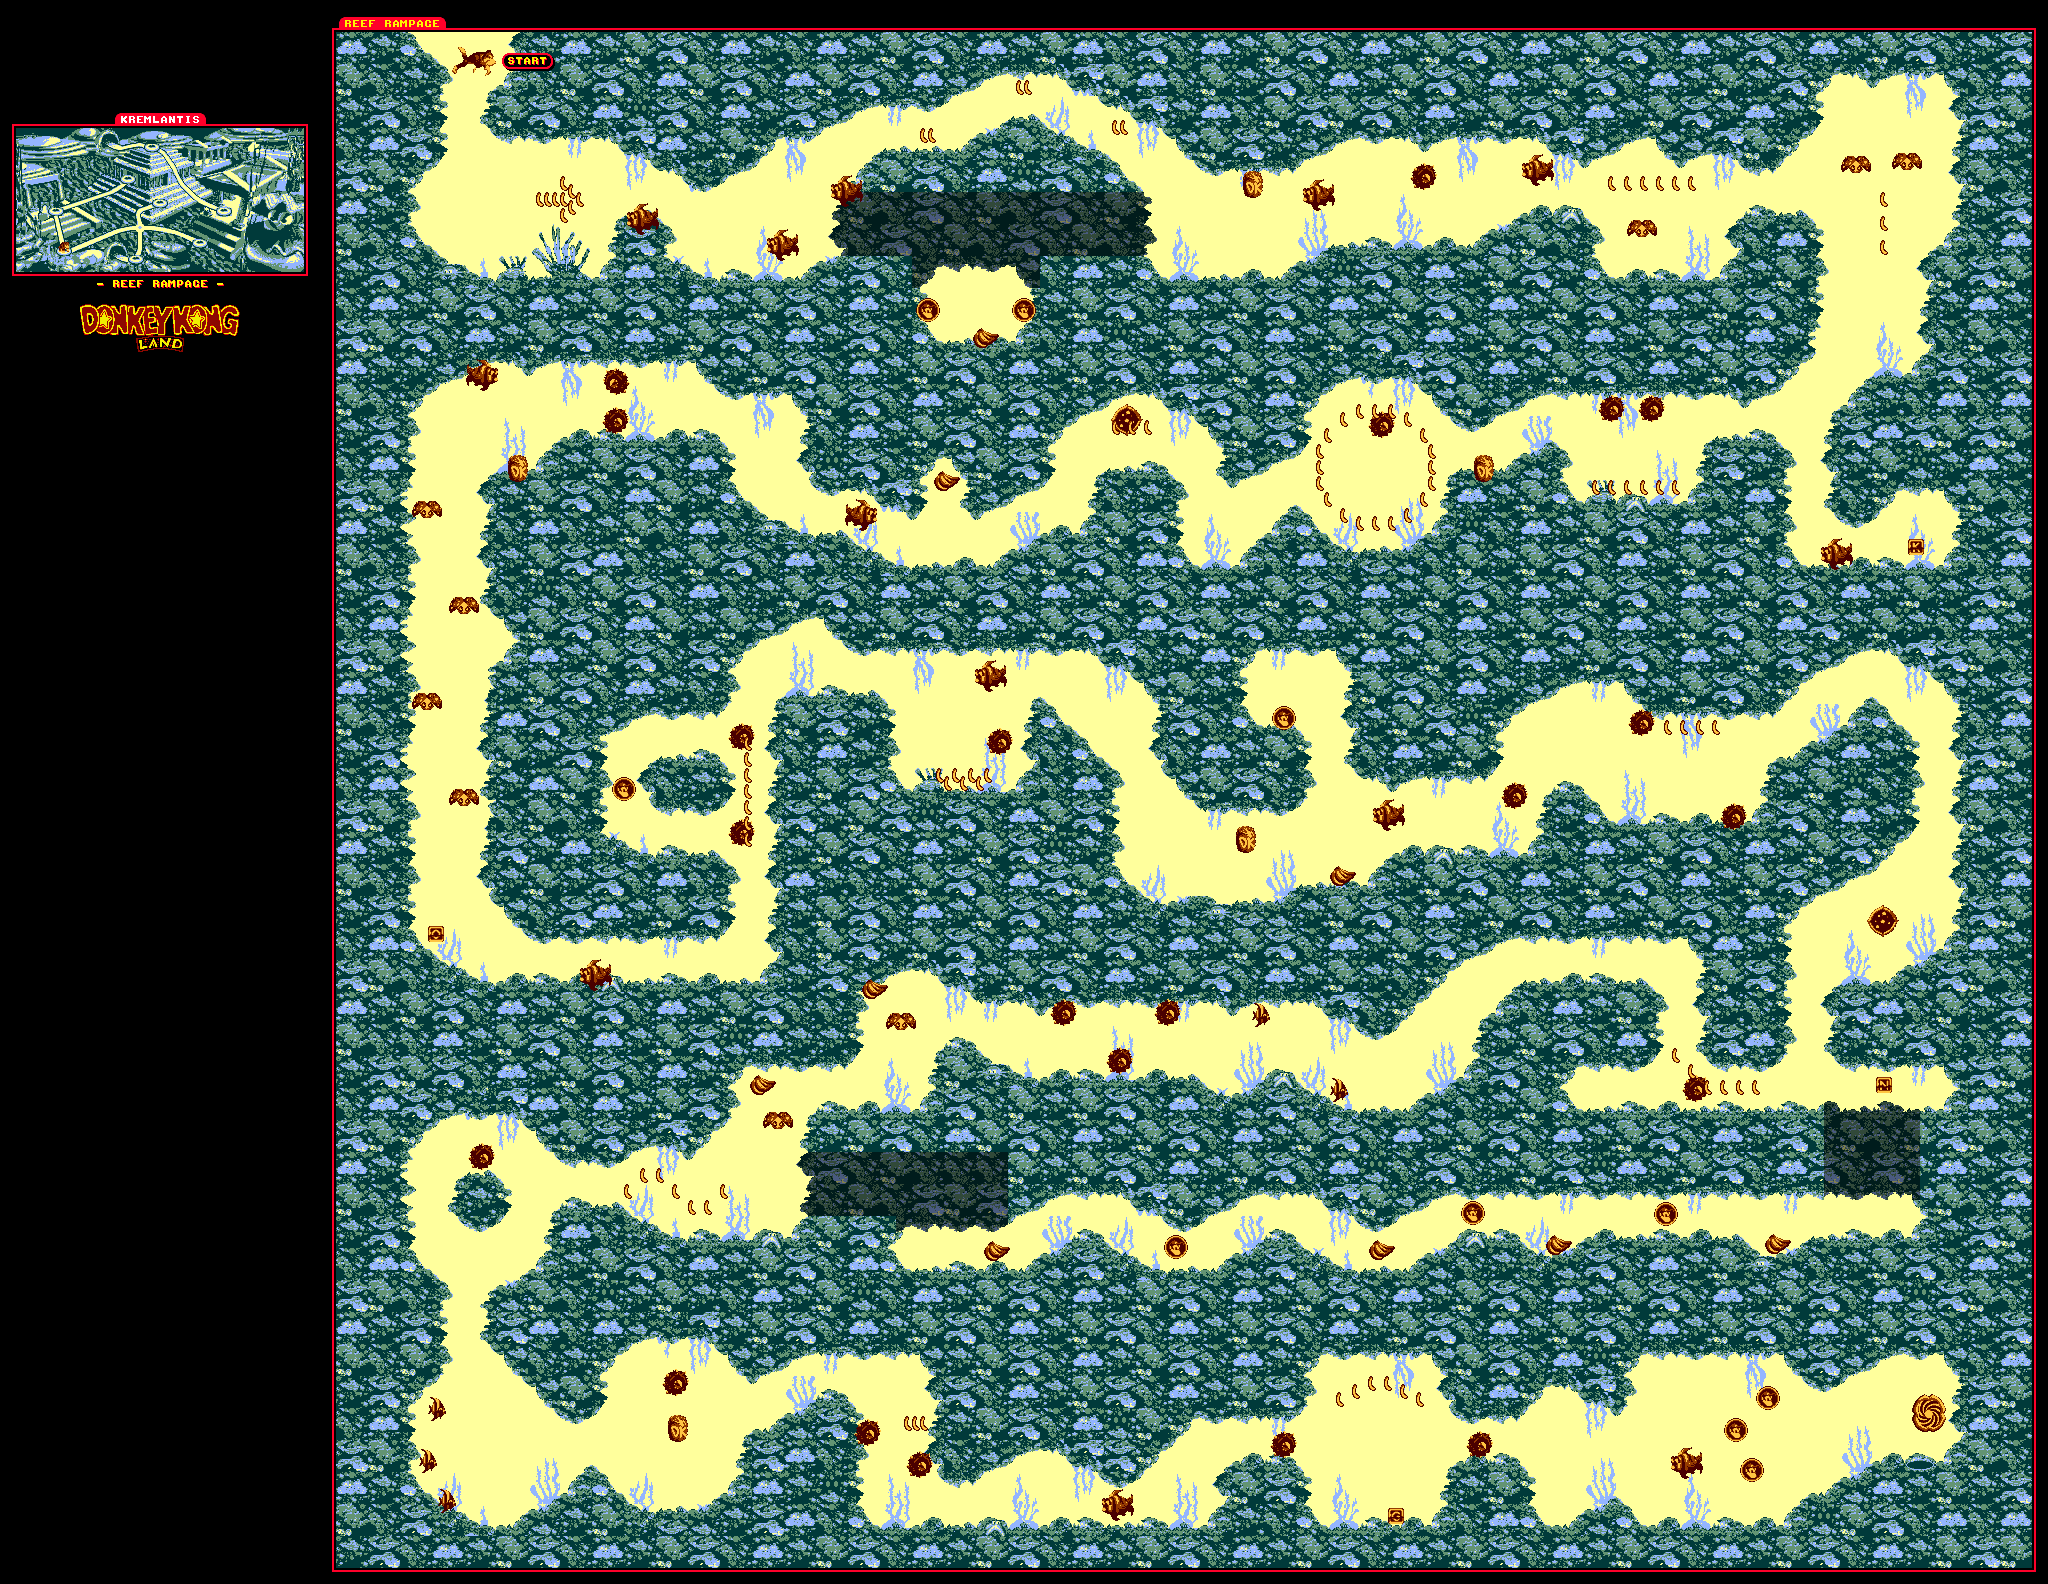
There is a level called "Kremlantis" in the world called "Kremlantis." Kremlantisception.
There are a couple of enemies that you'll meet here: small angelfish that swim back and forth and have rather nice frames of animation, bigger fish that sometimes move up and down as they move back and forh, and clam enemies that descend downwards before slowly clapping their way back up. You won't be able to destroy any of them.
It should be mentioned that Donkey Kong is a much bigger target than Diddy is, so be careful if you're swimming around with him.
If you swim right past the exit portal, you'll find some bananas and two bonus coins as well as a second portal.
Instead of swimming from left to right, you'll be going all around and you'll be in a more natural environment compared to the sunken ancient temple of the last stage.
There are two secret passages: one in the wall just past the banana arrow pointing right at the start, and another one just below the N. When you take the first one, go down midway through to find two bonus coins. When you take the second one, just keep swiming left and you'll avoid a whole set of Mincers as well as two clams while picking up three bonus coins and four bunches of bananas. This is where you'll start seeing the Mincers in a main level setting. You can't destroy them; all you can do is avoid them. Sometimes they are stationary, other times they move around in patterns that you'll have to figure out. No matter what, they are dangerous, and touching them never ends well.
At the start, you can bounce off the flying pig to land on top of the column at the start, then jump in a barrel cannon to soar across the stage to the first continue point.
If you take the low road after the first continue point, you can get a 1-Up.
In this stage, there are areas where Slippas will spiral down the ropes, and if you run into them, they will take one of your Kongs out of commission. Even worse, there are times where if you drop past the bottom of the screen while dying, you lose a life as well as your other Kong. (This gets fixed in the sequels.) If you make your way to the top of the ropes, you won't have to deal with these Slippas some of the time.
The first bonus area is after the O. Look for a bunch of bananas below the left edge of a platform, then drop down. You'll enter a bonus area with two bonus coins and a bunch of bananas.
The second bonus area is inside what looks like a grate in the floor, and if you leap into it from high enough, you'll reveal the rope below. Ride it up to another area with a few bonus coins.
Before the G, you can bounce to the left off a tire to find a bunch of bananas as well as a continue point that's possible to miss. Hitting that continue point is essential in case you die near the end.
The first bonus area is below where the first rope ends. If you have to, jump onto the ground after that rope, then roll off the edge and get underneath it to get to the barrel cannon and find a few coins and Mincers.
You'll see the steel keg for the first time here, and just like in Donkey Kong Country, you can jump on top of it to ride it.
Necky makes his debut in this stage, and he will through nuts at you just like in Donkey Kong Country, so hurry on past.
After the checkpoint, take the low road. The barrel cannon will take you to the second bonus area, which is a coin mini-game.
After the second bonus game, you can throw the steel keg into the wall for a tunnel. Sadly, this is the only time the game (or series) does something like this.
Launch yourself to the left out of the barrel cannon with A at the start. You'll find the first bonus area, which is another coin mini-game.
After this, you'll have to jump into some barrel cannons that automatically move one way to the other and press A to launch yourself from one barrel cannon to another once you're all lined up.
The Klap-Traps make their debut here. Never roll into them; they will bite you and you will lose a Kong.
At the barrel cannons immediately after the checkpoint, wait for the third barrel cannon to go low after going as high as it can go before launching yourself out of it. You'll enter another barrel cannon that takes you a screen full of bananas that spell out the word "KONG" as well as the N.
After this, you'll have more barrel cannon, and this time, Zingers are involved. There will also be a barrel cannon that spins around, and if you can time your shot right, you can launch yourself to the right. These barrel cannons are easy (but still heart attack inducing), but they get harder later on.
Wait for the manta ray to drop to your level, then jump on him. The manta ray gets faster and faster, but you'll always enter with both Kongs when you go into this stage and you'll usually be able to hit him. When you beat the boss, you'll get a few banana bunches as a reward before going to the next stage.
If you leap to the barrel cannon to the left of the start, you can get two bonus coins and a 1-Up.
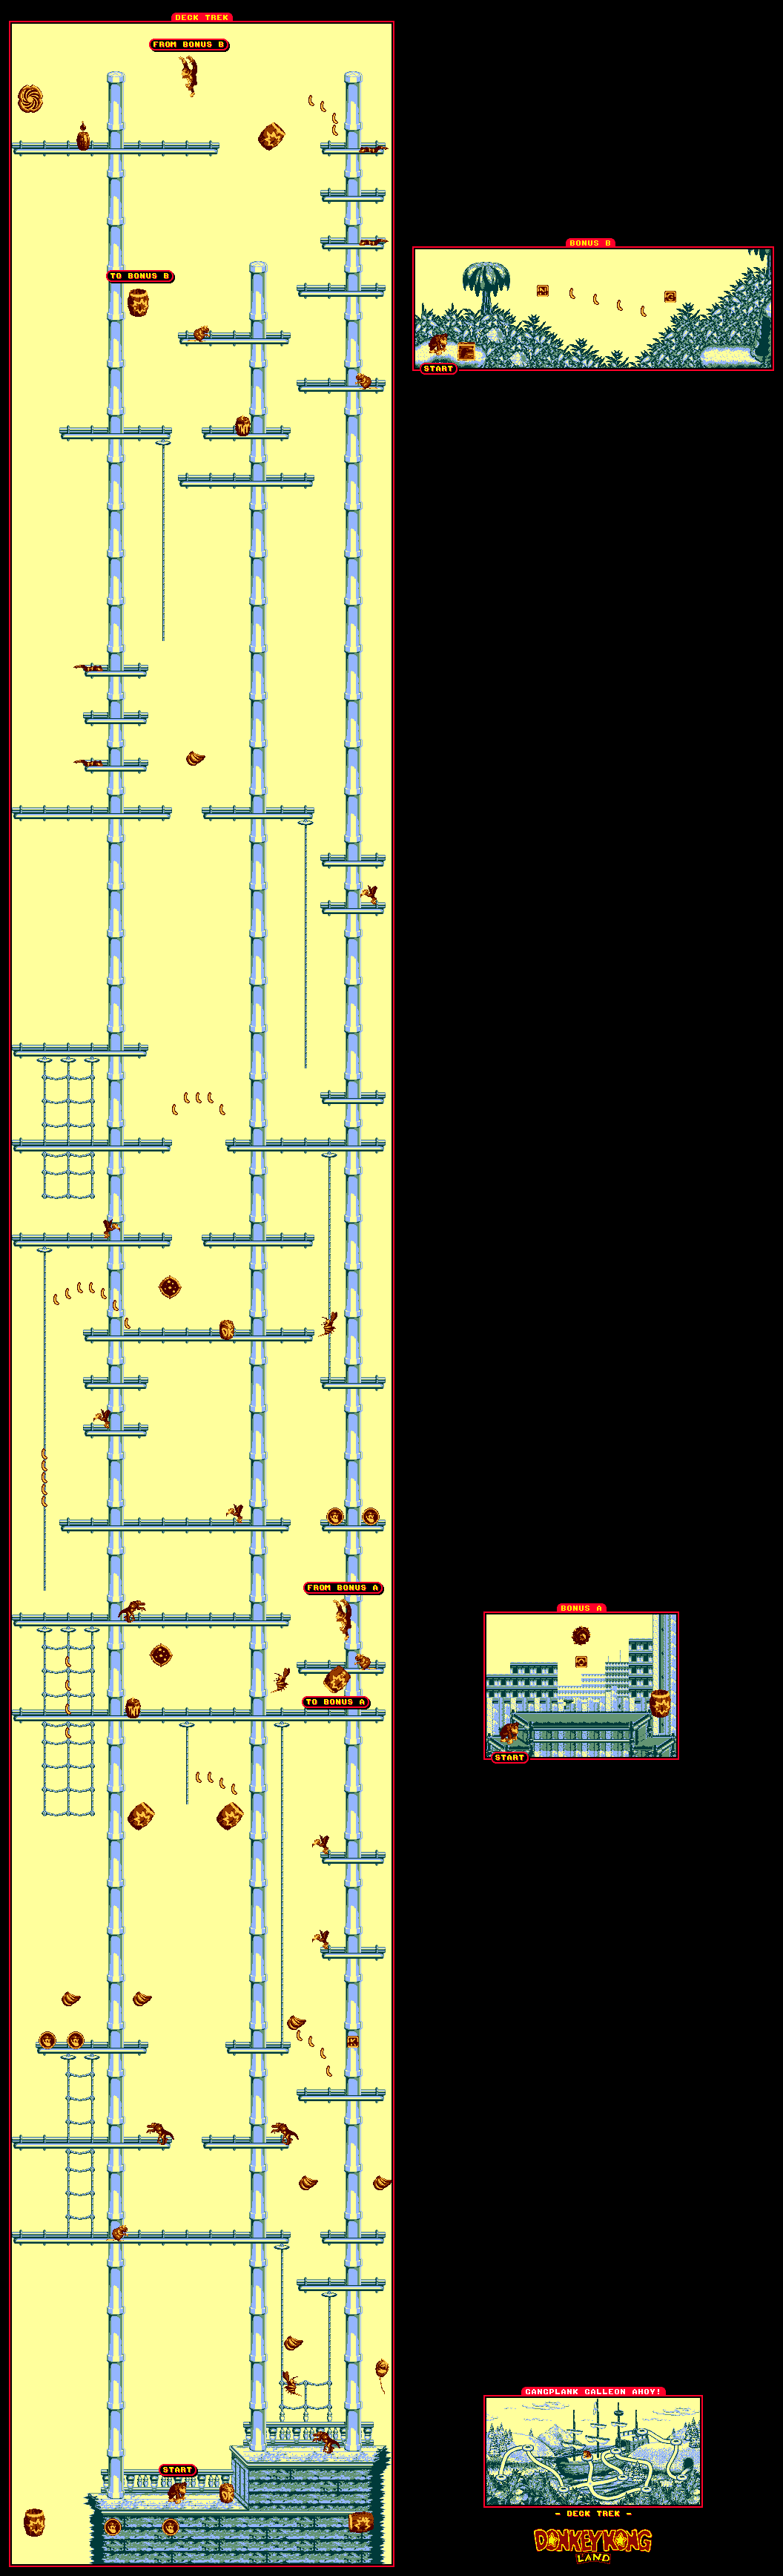
There are plenty of ropes to climb up. The rat guards at the top end of all the ropes cannot be jumped through.
Just like in Donkey Kong County, you can do a superjump. To perform a superjump, run up to the edge of a platform, then quickly let go and tap the B button to roll off. After tapping the B button to roll, you want to hold the button after that tap, and jump forward with A and the Control Pad. There's the superjump.
There is a new enemy here: the Mini-Neckys that spit nuts. Thankfully, they're easy to deal with.
Immediately to the right of the first continue point is a barrel cannon. Jump in, and you can get the O while avoiding the Mincers that fly around in a circle.
Near the end is a barrel cannon to the left of a Gnawty. Jump into it and use Expresso to get the N and G. Just keep going right, jump to the right off the edge of the cliff and keep pressing A to keep flapping to the other side.
At the end, there is a bomb. You have to pick it up before you can enter the portal, and when you go back to the overworld map, you can blow up a rock in the path when you walk into it.
This time around, there are ropes that hang off a non-existent ceiling and move left and right when you grab onto them. Watch out for Zingers, and be on the look-out for power-ups.
The first bonus area is just below the O, before the checkpoint. It's a bonus coin mini-game. Don't jump off from a high height to get into the barrel; instead, drop off the bottom or get there from the ground near the checkpoint.
The second bonus area is right after the N; just jump in the pit between the two snow platforms and there you go. Here, you'll swim around and collect bananas and bonus coins.
If you keep going right at the exit, you'll find more bananas and a second portal. The second portal doesn't lead to anything special.
The first bonus stage is to the left of the start after you drop down. It's another coin mini-game.
You'll meet a new enemy: Army the Armadillo. He rolls around in an attempt to hit you, and he takes one jump from Donkey or two jumps from Diddy to defeat. Wait for him to stop rolling to deal your damage, and avoid him until then. Holding a barrel in front of you can also help
The second bonus stage is after the O and before the checkpoint, and you'll have to land on a mound in the ground to reveal the rope that takes you to it. You'll find six bonus coins here.
The third bonus stage is soon after the checkpoint. There are two tires, and to the right of the second one is a Barrel Cannon you can drop into. Get into the Barrel Cannon to get the N.
After the third bonus stage, you'll have to use the tires to get over pits as well as Zingers. Just remember to hold A before bouncing upwards to get more height.

.png)
.png)
.png)