Monday, November 30, 2015

HCBailly plays Final Fantasy II - Part 30 of 44


Our quest continues in a cave near Mysidia, where we hunt for the Crystal Rod!

All maps by Paco, except for the overworld map by Rick Bruns.


Black Mask Cave


The DeathGod item casts Fear 10 on all enemies in the battle.

When you reach the room with the Black Mask, you'll face Big Horn, the Black Mask's guardian.

If you've powered up Toad or Mini, use it on Big Horn. You'll have a good sporting chance of taking him out in an instant. If not, just get your best equipment on and pound him with spells. He's not really that hard if you know what you're doing.

When you beat Big Horn, you'll be able to get the Black Mask. You'll then be able to teleport out of the cave in the back of the room.

Now that you have the Black Mask, you're probably wondering what to do with the Black Mask, since the game never really tells you where the "face of a drone" is. You'll have to head to the Mysidia Cave south of Altea.

Mysidia Cave


You'll meet up with the Bombs on the way to the Mysidia Cave. They explode and damage you if you don't kill them first.

You'll also meet the Cocatrices (Coctrice) on the way there, too. Thankfully, they're not as bad, as you can evade their attacks if they try to Stone you.

The Puddings are weak to Fire. Joy.

The Black Armor increases your Agility by 10 points.

HCBailly plays Final Fantasy II - Part 29 of 44


For an entry that was really easy to do, there was a lot of green, men in masks, and talk about HCBailly being a Boy Scout.

All maps by Paco.

Black Mask Cave


There is an item called Valium. I kid you not. It puts monsters to sleep, not you.

One of the stairways takes you to a field full of guys in red masks. Aside from them confirming that the Black Mask is indeed here, there's not much point to this place where people derp around in red masks who say that their mask is the best when their mask looks just like everyone else's. (One of the guys here sells stuff, but it's all completely useless.)

For some strange reason, Aero is Poison-elemental and not Wind in this game. Weird.

Garlic is used to damage undead. The Life spell does a hell of a better job than the minute amount of damage Garlic does, though.

Sunday, November 29, 2015

HCBailly plays Final Fantasy II - Part 28 of 44


Oh, boy. As we make a little bit of headway on breaking the seal on Mysidia Tower, the game stops throwing curveballs at us for a moment.

All maps by Paco, except for the overworld map by Rick Bruns.


Mysidia


Ask around, and you'll find out that the Black Mask is on a small island in the middle of the sea.

There is a bookcase in the house in the lower-left corner of the town. If you go to it and use some of your keywords, you'll get some nice background information on the game, including why Ultima was sealed. You'll also find out that both Masks will lead you to the "Rod of Legend," whatever that is. If you've asked around town, you'd know that the "Rod of Legend" is really the Crystal Rod, which you need in conjunction with the Masks to break the seal on Mysidia Tower. It is guarded by the Goddess Statue enshrined near the town.

"The White Mask's destiny lies with a maiden of solid stone...Black with the likeness of a drone." Remember this for later.

The staircase in the ground takes you to the Goddess Statue. Place the White Mask on the statue's face. Although nothing will happen at this point, it's still important that you do this.

The weapons in the Weapon Shop are pretty powerful. If you're mastering a certain weapon type, buy it.

The Thief Gloves in the Armor Shop boost Agility as well as Defense.

There's a lot of magic to buy in the Magic Shop. Change is pretty good (and breaks the game) when you've leveled it up enough. 

When you're ready, leave the town and head south until you find a very small island in the middle of nowhere, in the southern part of the map. It's near absolutely nothing and contains nothing but mountain and a cave entrance, so you'll know it when you see it.

Black Mask Cave


The enemies here are less powerful than what you've been fighting, so you get a bit of a break here.

The Mallows (the red blobs) are weak to Lightning while the Jellys (the yellow blobs) are weak to fire. You will be using these spells to kill them off as physical attacks have no effect on them.

HCBailly plays Final Fantasy II - Part 27 of 44


We get some powerful new equipment and amble our way into Mysidia...

All maps by Paco, except for the world map by Rick Bruns.


Castle Phin Basement


The Blood Sword is really useful for battle. Despite having absolutely no attack power, hitting an enemy with it will drain its HP. The amount you get is directly proportional to the strucken enemy's max HP. This is really good for bosses, as it makes it easier to keep one of your party members alive.

The chest with the Orhacon Knife contains Great Chimeras (GChimera). These guys can be somewhat powerful, and even though they can cast Fire 7 like the regular Chimeras, they can also cast Breath, which can Stone your entire party if you're unfortunate enough.

Besides being the most powerful knife weapon you've come across, the Orhacon is also super-effective against Water-based enemies.

The fifth door leads to the White Mask. There's no boss fight here (amazingly), so just head behind the chest and step on the teleport pad to leave the castle.

Overworld Map


Head south and west. You don't really get many clues on where Mysidia is, so you just have to hunt it down. Go south from Phin, then head west until you see the crescent-shaped mountain range. This is Mysidia Tower, but you won't be able to enter it yet. Go south and hit land, then go southwest until you see a small town. This is the town of Mysidia.

The Werewolves are a bit powerful, but you can take them on now. There's nothing really special about them.

Saturday, November 28, 2015

HCBailly plays Final Fantasy II - Part 26 of 44


We journey into the Phin castle basement to find the White Mask...

All maps by Paco.

Castle Phin


Head to the upper-right corner of the throne room and press A at the wall. Use the Say command and you'll be able to access the hidden passage.

Castle Phin Basement


The Suckers can drain your MP with their physical attacks.

The Brains can cast Fog and Mute on you, while the Changers can cast Change to swap stats with one of your party members, making that specific person much easier to kill. That's not good, as they basically have less than you.


The Mantises are somewhat powerful, but thankfully they don't have any special attacks or anything to worry about.

The Flame Shield will cut the amount of damage dealt from Fire-based spells dramatically.

HCBailly plays Final Fantasy II - Part 25 of 44


Now that we're done here in Phin, let's get some more supplies and get some more information.

All maps by Paco, except for the overworld map by Rick Bruns.


Castle Phin


Talk to Hilda, and she'll tell you that she's worried about Minh, as he hasn't returned since he made a trip to Mysidia. You'll be able to Learn the Mysidia phrase from her. Ask her about Mysidia. Apparently, this tower contains some powerful magic that may turn the tide in the war against the Empire. You'll need to break two masks in order to dispel the magic barrier that blocks it. Learn the Mask phrase and asks Hilda about it. You'll learn that the White Mask is hidden in the basement of this castle, and you'll be able to Learn yet another phrase - Ekume. This is the chant that opens the basement door. If you ask her about the phrase, though, she won't know where the door is.

Talk to Gordon again while you're at it. He'll tell you about Minh, and he'll also tell you that the Ultima spell is hidden in Mysidia Tower. Learn the Ultima phrase, then ask him about it. If you ask Gordon about Ekume, he'll tell you that Paul the Ninja might know more about this castle.

Now that the castle has been regained by the rebel army, the monsters will be gone and you'll be free to get all the treasure in Castle Phin. Some of the chests will still contain forced encounters if you open them, though.

The Sorcerers are in the chests with the Aura spellbook, and they can be pretty nasty: along with Fire 8, they can cast Deth 6 (Death) on your entire party if you're not careful. The Deth spell is like the Doom spell in the later games.

Phin


While you're in the town, get Quartz Plates for your party. They're just 1000 Gil apiece and they're really light.


The house in the lower-left corner of town is Paul's house. Ask him about Ekume. He'll tell you to check the upper-right corner.

Unlike future games, Mini (which is in the magic shop in Phin) and Toad (in one of the chests in Castle Phin) are considered instant death spells (Black magic type and White magic type, respectively). They're also the most accurate of the instant death spells as well. They can also be multi-targeted, which can effectively make the game a lot easier and sometimes even break the game in some parts.

Friday, November 27, 2015

HCBailly plays Final Fantasy II - Part 24 of 44


Finally! Phin will be ours!

All maps by Paco, except for the overworld map by Rick Bruns.


Arena


Press A on the steel bars only to find out you won't be able to break the bars. Paul the Ninja will show up. He'll distract the guard and kill him as soon as he turns his back, then he'll let you free.

There is an invisible wall just west of the chest with the Antidote, which lets you reach the treasure room with ease.

When your reach the other jail cells, you'll find the real Princess Hilda. Firion will tell Gordon to take Hilda and run. Leave the Arena and head back to Altea.

Altea


Head to Altea, and you'll hear news from the people that the rebel army has finally decided to take Phin back. The Princess and Gordon are holding camp there...what are you waiting for?!?

Camp


The camp will be just west of Gatea.

You'll find out that the monsters are causing confusion, making it easier to take the castle. Wait, I thought the Paramekium Empire had the monsters under control?

Castle Phin


Well, it's just a short canoe trip ahead to the north to Castle Phin.

Go north and you'll find Layla. Talk to her and she'll rejoin your party.

Keep going north. You could take the treasure now, but when you retake the castle, the monsters will disappear.

Gotus is sitting on one of the thrones. Talk to him to start a boss battle.

Gotus isn't very difficult, and you'll be fighting him (and some of his clones) later on. Put your magic users in the back row, and Curse him if you can. From there, just keep on smacking him around.

His Drink attack is basically like Berserk. He can drop the Baccus Wine, which works just like Berserk, but he can also drop the Ripper Knife. If he does, keep it. It's really powerful.

HCBailly plays Final Fantasy II - Part 23 of 44


In this episode, we find out the Princess has been kidnapped. Again.

All maps by Paco, except for the overworld map by Rick Bruns.


Altea


Head back to Altea. You'll find out that the Princess has been acting strange and that she's locked herself in her room. This room is south of the King's room. Go inside and talk to Hilda. She'll want to speak to Firion. Your party leaves, but Firion finds out that this isn't Hilda. At all. It's a monster, and your party comes back to help Firion fight it.

The Queen Lamia (Q.Lamia) can be pretty tough. She can put you to Sleep with her physical attacks, and she can also Confuse and Blind you. The Blind attack is pretty evil: it's Blind 16. If she lands it early in the battle, you're in for one hell of a fight. Don't even try to Curse her, because it won't work. Just keep your party's HP high and use Bsrk to power up your party. From there, hit the Queen Lamia hard.

When you beat her, one of the rebels will find out and let you know there's a tournament in Paramekia where Hilda is the prize. Apparently, she got kidnapped and we have to save her again!

Gordon asks for your help, and Layla leaves to organize the rebellion. Layla leaves your party and is replaced by Gordon.

Talk around, and you'll find out that the Emperor himself is showing at the tournament. You'll also find out that Paramekia is south of Kashuon, and that the desert surrounded it is full of monsters. There is an arena underneath Paramekia, and a jail underneath the arena. You'll also find out Minh has disappeared...

Anyway, head to the Chocobo Grove south of Kashuon again. Catch a Chocobo so you can go south to Kashuon without being caught off guard by a bunch of monsters. From there, head east to find the Arena.

Arena


When you approach the Emperor, your path will be blocked and you'll have to fight a monster in order to get Hilda back.

You definitely want to Curse the Behemoth as quickly as possible if you can. If you have Bsrk powered up enough, you'll be able to do some major damage to it.

When you beat the Behemoth, the Emperor will have you come forward to claim your prize. When you do, you'll be surrounded by the Dark Knight and three Captains. They'll lock you in a jail cell.

Thursday, November 26, 2015

IT'S THANKSGIVING


have a knucker

HCBailly plays Final Fantasy II - Part 22 of 44


Glad we're done here. This is probably the hardest part of the game.

All maps by Paco.


Cave of Dist


The Poison Toads can Envenom you with their physical attacks. Aside from that, they're not really that difficult.

The chest with the Knight Armor spawns a battle with four Adamantoises. Four. Get your magic ready and be sure to Curse them before they can do some real damage in!

The Dragon Bean (DrgnBean) deals damage to all enemies on the battlefield.

When you reach the four doors, take the third one. You'll then find a monster guarding the Spring of Life. Talk to it to start the battle against the Chimera.

To beat the Chimera (or Chimeras, as you might get more than one unlike HCBailly), Curse it first. Then, wail on it. If you're fighting multiple Chimeras, curse them all before you do anything, and keep your party's HP high. They have 750 HP, so taking one down is possible in a few turns.

The Chimeras can cast Fire 7, which can be pretty powerful and hellaciously life-ending if you haven't Cursed them prior.

When you beat the Chimera(s), go up to the Spring of Life and use the Egg. 

Wednesday, November 25, 2015

HCBailly plays Final Fantasy II - Part 21 of 44


In this episode, we finally find out what the Hiryuu is saying and head back into the cave.

All maps by Paco.

Cave of Dist


Alright, we got the Pendant. Time to head back to the castle.

Castle Dist


Talk to the Hiryuu again. You'll find out that the poison has spread quickly, and he won't live much longer. Mention the Dragoons. You'll learn about the Dragoon known as Richard, who went on a journey to find the forbidden magic, Ultima. Mention the Hiryuu, and he'll give you an egg and tell you to submerge it in the Spring of Life in the cave to the north.

Cave of Dist


The Souls are even weaker than the Red Souls. They're really easy to kill.

The chest with the Magic Cane in it contains Green Souls (G. Soul). All these guys do is cast Cure 6 on you. Weird. I guess it helps if you've somehow managed to survive taking down two Gigases at one time. 

Also, that joke just wrote itself.

Anyway, the Magic Cane is the most powerful Cane you'll find yet, and it can cast Bolt 5 when used as an Item in battle. It also has a smaller Magic Penalty than the Were Cane, which is pretty nice.

The Revenants are the nasties undead creatures you'll meet at this point in the game. With 240 HP, it'll take a little bit of work to take them down. A powerful Fire attack on all of them at once does help, though, as does a well-powered Life spell. Just don't let them strike you, as they'll leech HP out of you.

The Green Ogre (G. Ogre) is just tougher than an Ogre. Nothing special, really.

If you see a small gap in the bridge and you walk into it, you'll fall down to the level below.

HCBailly plays Final Fantasy II - Part 20 of 44


We check out Dist and get some new stuff! Also, we die!

All maps by Paco.

Castle Dist


When you enter the castle, you'll be hounded by a kid. As you talk to him, he'll run away. You'll meet the kid and his mom. The kid now knows you're the good guys, and the husband of the family has been killed by the Empire. They're the only survivors. To make matters worse, the last Hiryuu is here, but they can't understand what it's saying unless they had the man's pendant, which is somewhere nearby.

Mention the Dragoons to them. You'll find out the Empire poisioned the water of the Hiryuu and killed all but one. The Hiryuu have to be alive to keep the Dragoons from dying out. The last Hiryuu will be behind the door next to them.

The ElderIQ can only be used during battle, and it increases your Intelligence to 99 until the end of the battle. The Heart does the same thing, except it works on your Soul.

If you're needing a sword, the Winged Sword is for you.

The Crucifix cures the Curse Status, much like EchoScn cures Mute, EyeDrop cures Blind and Antidote works on Poison.

"Stone" is actually Stun. It's a mistranslation.

The pendant won't be anywhere in the castle, and you'll have to go into the cave up north.

Cave of Dist


This cave isn't too long, but you can run into some Gigases if you're not fortunate enough.
If you can't inflict Curse on them, you're screwed. Even worse, you might have to fight two at once.

The Pendant is really easy to find. Go all the way to the right at the start, take the stairs down and press A at the pile of bones.

Tuesday, November 24, 2015

HCBailly plays Final Fantasy II - Part 19 of 44


We take on a bunch of pirates (again) and head towards new territory!

All maps by Paco, except for the overworld map by Rick Bruns.


Altea


Go to the King's room. The King will make Gordon the Commander in Chief of the Rebel Army. He'll ask Minh to lift the forbidden seal, and Minh obliges.

The King will ask you to find the Dragoons. Their home in Dist have been destroyed, but there may be a few survivors. He then passes away.

Talk around. You'll find out Dist is on a distant island in the eastern sea.

Talk to Gordon in the throne room to Learn a new keyword: Dragoon. Ask him about Dragoons, and he'll tell you that they are the only ones to understand the language of Hiryuu. Learn "Hiryuu." A Hiryuu might still exist.

It'll take a while to head down to Dist, since you can't walk to it. Head to Palm.

Palm


When you head to Palm, you'll see a girl near the entrance. Talk to her. This is Layla, and her ship is about to head over there. She'll wait outside the town for you.

Leave Palm and head to the ship that's directly east of the town. In the middle of your voyage, she tells you to give her all your stuff and she'll spare you. She then sics her entire crew on you.


The Pirates are really, really easy. When you beat them all, she gives up and asks you to kill her quickly. 


Your party has other ideas, and ask her to join your party. She agrees.

The Gold Hairpin she has equipped is really useful, so put it in your inventory if you actually want to power her up. It increases the wearer's Agility by 10 and has no Magic Penalty.

Equip weapons into her left hand in case you give her a shield, so her attack power doesn't seriously suffer. If you have the Gouche knife, equip it on her. She also has a Bolt spell that will come into play against a few creatures.

The isle of Dist is just east of Bofsk.

HCBailly plays Final Fantasy II - Part 18 of 44


In this entry, we take down the Warship! But our quest is far from over...

All maps by Paco.

Warship


The Trident is stronger than the Mithril Spear, so if you're needing a good spear weapon...

The Gouche increases your Evade when equipped.

To beat the Gigas inside the chest with the Ice Shield, hit him with the Ancient Sword first. If you can Curse him, you'll be able to stand a much better chance. From there, use Bsrk on your physical-attack based characters, and keep everybody alive!

The Panthers can inflict Envenom on your party, and they can be pretty strong too, so take them out as soon as possible.

The maze leads you to the engine room. Throw the Sun Flame into the engine and the Dark Knight will show up. Maria will notice that he sounds somewhat familiar before you escape back to Altea.

Monday, November 23, 2015

HCBailly plays Final Fantasy II - Part 17 of 44


In this entry, we enter the Warship and free Hilda and Cid.

All maps by Paco, except for the overworld map by Rick Bruns.


Warship


Go up to the guard blocking the path from the top of the stairs and use the Pass when you talk to him. This will get him out of your way.

Don't talk to any of the other captains here, as they can still annihilate you.

The Stunners are yellow Wererat palette swaps, and they can Stun you with their physical attacks.

Walk to the right through the wall to get the Sleep Sword.

The Thief Gauntlets have a huge Soul penalty, but they also increase your Agility by 10. Give it to a party member that's more focused on physical attacks than magic.

In the Famicom version, if you have another item that increases a certain stat and one of your equipped items is already boosting that stat, you won't be able to boost it any more with that second item.

Just correspond with the bars of the prison cell like you would a person, and you'll crack straight through them. Talk to Cid, and he'll tell you to throw the Sun Flame into the engine of the Warship. He'll escape along with Hilda (who is wearing a pink dress now).

HCBailly plays Final Fantasy II - Part 16 of 44


In this entry, we cover the long and arduous walk to the Airship.

Overworld map by Rick Bruns.


While you're in town, sell all your excess inventory. You'll probably have quite a few things on your person that you won't need at this point after all that exploring and storyline progression.

Soldiers start appearing as random encounters now. Fight them like you did the first time.

You can win a Blink (BLNK) spell book from the Ogre Mages.

It should be mentioned that the Mages sometimes drop Magic Canes in addition to books for the Beserk (BSRK) spell. If you get one and you have somebody mastering Canes in your party, equip it as an item. It can cast Bolt 5 when used as an item.

The Wizard Ogres (WzOgre) can be fought against like you did the Mages. Take them out as quickly as possible, as they can Blind your entire party and cast Blink on themselves.

Sunday, November 22, 2015

HCBailly plays Final Fantasy II - Part 15 of 44


We get the Egil Torch - and the Sun Fire! - but our problems are far from over!

All maps by Paco, except for the world map by Rick Bruns.


Castle Kashuon


The chest with the Gold Armor contains new monsters: Mines. They're just like the Balloons, except their physical defense is really high. You're better off using Fire or a powered-up offensive spell on them.

When you make it to the chest with the Egil Torch, you'll meet up with the Sun Fire, the torch's guardian.

The Red Soul absorbs all magic (even spells like Cure and Heal), and it also has high physical defense, so your weapons will barely make a dense unless they're really powered up. If you attack it with the Ancient Sword, though, you'll be able to Curse the Red Soul if the sword connects, and you'll be able to weaken its physical and magical defense and offense. It'll be smooth sailing from there.

Once you beat the Red Soul, you'll be able to get the Egil Torch. Use Exit to get out of there (don't forget to heal!), then go back in and go to the Sun Fire to light the torch. When you leave the castle again, you'll see the Warship chasing after Cid's Airship.

Chocobo Forest


Use the Choboco grove directly south of the castle to get back to Poft. When you catch a Chocobo, you'll have to leave the grove, then walk up to the Chocobo and take a ride on it. This will make it easier to head on down there without running into any random encounters. When you want to get back on foot, just press the A button. The Chocobo will apparently run away, and it will walk on mountains and water in the process. wut

Poft


Head back to Poft, and the people will tell you to return to Altea.

Altea


Go back into the rebel base. Ask around, and you'll find out Princess Hilda was on the Airship to meet you at Kashuon, and that the Empire has her. 

HCBailly plays Final Fantasy II - Part 14 of 44


We head to Kashuon to hunt for the Egil Torch! What horrors will we face as we climb the next rung on the ladder to taking out the Empire?

All maps by Paco, except for the overworld map by Rick Bruns.


Castle Kashuon


Not only are the monsters past the first floor even tougher, you'll also have to fight the Adamantoise as a random encounter.

To open the locked doors, use the Goddess Bell.

You'll find Gordon shortly after you enter the castle. He'll join your party so you can help him get past the strong monsters and find the Egil Torch.

Gordon may seem pretty weak, and he only has 64 HP and 5 MP, but his stats are pretty good. At least you got that going for you. Which is nice.

Give Gordon the Silver Armor, the Mithril Shield and the Battle Axe, and let him learn Ice with the Ice book. There, now he's slightly more useful.

The Cure book you find here will come into play later on.

The Wererats can Envenom you with their physical attacks, but if you finish them as soon as possible, you won't have to worry about that very much.

The Wraiths can drain your HP with their physical attacks. They also have high magic defense, but if you've powered up your spells, you can still use your magic to destroy them easily.

If you come across an Adamantoise, use your most powerful magic spells against it.

The Were Cane (or Were Bane in future versions) is even more powerful than the Mithril Cane, so if you have somebody mastering Canes, this is worth picking up.

The Ghasts can Paralyze with their physical attacks.

Saturday, November 21, 2015

HCBailly plays Final Fantasy II - Part 13 of 44


In this entry, we get the Goddess Bell only to fall straight into a trap!

All maps by Paco, except for the overworld map by Rick Bruns.


Snow Cave


One of the rooms isn't empty! Joy! Going inside will take you into a room full of beavers. (Yes, we're talking to beavers.) There is one standing still in the upper left corner of the room, and Guy will be able to know what he's talking about.

Ask this beaver about the Goddess Bell and you'll find out it's beyond the right-hand wall. Explore the wall and you'll eventually find out part of the wall is fake, and you can walk through it.

The red monster in the next room protects the Goddess Bell. Talk to it, and you'll start a boss battle.

To beat the Adamantoise (Adamanti), just use the IceWind on it. That's it.

Once you beat the Adamantoise, use the A button on the wall and you'll get the Goddess Bell.

When you try to use Exit, you won't be able to do anything because of an energy field in the Snow Cave. If you exit normally, however, you'll come face to face with Borgan.

To beat Borgan, use Fire and any equipped Mithril weapons on him. The less you have equipped on your characters, the better.

After you beat Borgan, a giant boulder will roll toward you. Josef will try to stop the boulder from killing you, and sacrifices himself in the process.


Salamando


When you return to Salamando, everyone will know that Josef is dead. Another woman will look after his daughter Nellie.

One of the people will tell you about the Chocobo Forest south of Kashuon.

Poft


Head to the pub and talk to Cid's assistant, so you can take the Airship to Kashuon. From there, just head out of the town and enter the Airship. You'll be there in a flash!

HCBailly plays Final Fantasy II - Part 12 of 44


As we make your way through the Snow Cave, we pick up some pretty useful items.

All maps by Paco.

Snow Cave


The IceWind casts a Level 16 Ice spell on all enemies. It can be potentially devastating when used against the right enemies. Be sure to keep the Ice book you find later in the cave handy, too.

The Icicles aren't pretty bad enemies, despite being more vulnerable to Fire than to regular weapons.

The Battle Axe will come in handy later on in the game.

The DuelHeads are pretty tough. Keep your HP high as you take these guys on, as they can take out over half of one of your characters' HP in a heartbeat.

Life is more likely to work outside of a battle than during one? Well, that sucks. Then again, HCBailly forgot to un-equip stuff prior to casting Life, which explains everything.

The chest containing the Ancient Sword contains a Shadow. The Shadow can cast the Blindness status on you, which drops your accuracy. They're not that difficult to get rid of if you've powered up Fire or any of your other spells.

The Ancient Sword is worth getting. Even though it has a low hit percentage, it inflicts the Curse status ailment on the target if it actually connects. It's best to place it in a character's item slot.

Friday, November 20, 2015

Indian Incredible Hulk


Here's that video HCBailly mentioned in the last entry, by the way.

HCBailly plays Final Fantasy II - Part 11 of 44


We take on the frozen north and enter new horizons that will take us into who-knows-where! Also, Josef has hair after all.

All maps by Paco, except for the overworld map by Rick Bruns.


Salamando


If you mention the Goddess Bell to Josef, he'll tell you it's in the north around the snowy mountain range. You'll need the Ice Cave to get there, and Josef has hidden it in a secret chamber in the Semite Cave, which he's marked. He'll then join your party.

Josef not only has an item named Garlic (which casts Garlic3 when used in battle, which damages the undead), he also has some very powerful fists.

Semite Cave


Yep, it's pretty simple. Just head to that blue tile we disregarded earlier and use the A button on the walls. Since you have Josef in your party, he'll press a small rock on the wall. You'll be able to go through the wall and get the Ice Sled in the next room.

The Snow Field

Prepare to use Fire around this area, as the monsters here are tougher than what you've seen so far.

The Snowmen are very weak enemies.

Snow Cave


The Grenades are like the Balloons, except they have an even higher defense. Cast Fire on it (or the whole lot of them) as soon as possible. If you have Fire, having it at Level 4 before you enter the Snow Cave is well-advised.

The Ghoul (as well as the Zombie and the Deadhead) can both be taken out with the Life spell. That's good, as the Ghoul can Paralyze you with their physical attacks. The Zombie and the Deadhead are also in the Semite Cave, but for some reason HCBailly never met up with them there.

Thursday, November 19, 2015

HCBailly plays Final Fantasy II - Part 10 of 44


Before we can fight the Dark Knight, he escapes. What now?

All maps by Paco, except for the overworld map by Rick Bruns.


Bofsk Sewers


You'll meet the Dark Knight near the end of the second room. After you talk to him, he'll escape...and so will Borgan. When you follow them, they'll fly away in the Warship.

Head back into the sewers and go to the right. Go through the door and open the chest ot get the Pass for the Warship. You'll be able to warp out of the sewers with the six-point star tile to the east.

Bofsk


You'll find out that the Warship is heading towards Poft.

Palm


When you head to Palm, you'll find out that the Warship has already struck and that a lot of people have died.

Talk to Cid again. Mention the Airship, and he'll tell you that it's powered by the Sun Flame, much like the Warship. Learn "Sun Flame," then ask him about it. Controlling any sort of vehicle with it is rather tricky, as having too big a flame can spell disaster. He'll also want you to destroy the Warship when you mention the Warship to him.

Altea


When you head back to Altea, you'll find out that Altea wasn't spared either. Head back to the rebel base and talk to Hilda. Her father's health has gotten worse, and more townspeople are dead. Minh will leave the party to comfort and help heal her father.

Mention the Warship to her. She'll tell you that the towns won't survive another attack, and Kashuon's gates will only open if you can find the Goddess Bell in a cave far to the north. Mention the Sun Flame to her as well. You'll find out it's Kashuon's emblem, and you'll be able to see it on the castle's first floor. The Sun Flame might be able to destroy the Warship, but you'll have to find a way to remove it.

Go to the King's room and talk to Minh. Mention the Sun Flame to him, and you'll find out about the Egil Torch, which can transfer the power of the flame. Talk to the King, and you'll find out that Scott was sealing Kashuon's gate to protect the Sun Flame. You'll also be able to learn the "Goddess Bell" phrase. Go ahead and Learn it, then say it to the King. Only the Kashuon royal family knows where the Goddess Bell is. If you mention the GOddess Bell to Minh, he'll tell you that Gordon knows its whereabouts. Too bad Gordon fled...

Go to Hilda and mention the Goddess Bell to her. She'll tell you that Josef has mentioned it before, and that you should head to Salamando.

Talking to the people here will bring you some new information: Cid might know the weakness of the airship, and Prince Gordon has disappeared.

HCBailly plays Final Fantasy II - Part 9 of 44


We create the Mithril weapons and head down to the Bofsk sewers in an attempt to destroy the Warship!

All maps by Paco, except for the overworld map by Rick Bruns.


Salamando


When you head back to Salamando and talk to the people. you'll find out that the men are back and that you should take the Mithril to Hilda in Altea. Sure, why not?

Talk to Josef first. You'll find out that the Dark Knight has taken charge, and that the Warship has been built ahead of schedule thanks to him.

You'll also find out about the Ice Sled, which lets you travel in the snow. Remember that blue stone tile in the Semite Cave? We'll have to head back to it to get the Ice Sled.

You should definitely get the Life spell once you have the Gil for it. It'll come in handy later on, especially once you've leveled it up a lot. Not only will you be able to replenish a lot of HP on downed party members, you'll be more successful at killing undead monsters with it.

Altea


Take the Mithril to Hilda. She'll tell you to take it to Tabul, so go to Tabul in the weapon shop. Give him the Mithril by choosing "Item" and then the Mithril, and he'll make the equipment. A second shopkeeper will appear next to the first one. Talk to him, and you'll be able to buy Mithril weapons. According to HCBailly, we'll be finding a Mithril Spear and a Mithril Cane soon. That's nice.

There's also a second shopkeeper at the armor shop, too. You'll also be able to buy Mithril armor here as well. It's less expensive than the weapons, so go for this stuff first.

Talk to Prince Gordon again. He'll be surprised that you found the Mithril. If you mention the Warship, he'll ask if there's anything he can do to help. You won't be able to do anything for him for now, though.

Go to the castle, and you'll get your next mission: head to Bofsk and destroy the Warship. If you talk to Hilda, she'll tell you about the Dark Knight that has recently joined the Paramekian Empire. Mention the Warship, and she'll tell you there's a group in Bofsk that's trying to sabotage it.

Bofsk


The townspeople will now talk to you. They'll tell you that you need a Pass to get on the Warship. 


The guy standing around in the middle of the town is that corrupt jerk Borgan.

One of the helmeted guys south of Borgan is one of the rebels. Mention "Wild Rose" to him and he'll tell you who he is. He'll tell you to head through the sewers behind him to reach the Warship. Mention the sewers and he'll finally disappear, letting you through.

Bofsk Sewers


There's not a lot to this sewer. The Long Sword will come in handy.

Also, there are two fake walls in the first room.

Wednesday, November 18, 2015

HCBailly plays Final Fantasy II - Part 8 of 44


We take on our first boss and get the Mithril!

All maps by Paco.

Semite Cave


Finally, we get some new enemies.

The Slimes are susceptible to both Fire and Ice. That's good, as their physical defense are just really, really high.

You'll soon see three doors. Enter the left one. You'll find the prisoners, as well as Paul! (So that's where he went when he disappeared from Altea.) Looks like he's helping the rebellion free all the slaves from Borgan's grasp, which include Nellie, Josef's daughter. Once you talk to him, all of the slaves (and Paul) will disappear. From there, you'll be able to go to the right and go down the stairs.

The Balloons are weak to both Fire and Bolt. You want to finish them all off as soon as possible when you see them, as they'll blow up and damage one of your party members with Blast.

There are two doors on the last floor. Again, enter the left door to fight the boss. Before you do that, though, walk across the bridge to the west.

When you open the chest with the Exit spell, you're trigger a fixed encounter. The Land Turtle (LandTrtl) is weak to Ice. If you have the Ice spellbook from earlier in the dungeon equipped on a character as an item, it can then be used as an item to cast a Level 8 Ice spell that damages all enemies. This will kill the Land Turtle really quickly. 

Unlike other Final Fantasy games, casting the Exit spell drains the HP of the caster. The higher the level of Exit, the less it'll drain. It won't drain very little unless you really level it up.

Once you go through the left door, you'll finally take on your first boss: the Sargeant. Put everyone except Minh in the back row. Have Minh cast Blnk on himself (it will raise his Evade), and use Black Magic to take the Sargeant down. Having Level 3 Fire works well here. This guy has a Bow attack like the Soldiers, but with Minh having a high evade and everyone else in the back row, the Sargeant still won't be able to pose much of a threat.

Once you beat the Sargeant, you'll finally be able to open the chest behind him and get the Mithril.

The Zombie and the Deadhead are also in the Semite Cave, but for some reason HCBailly never meets up with them here. You can easily destroy them with a powered-up Life spell.

HCBailly plays Final Fantasy II - Part 7 of 44


Well, at least it's better than the Anti-Semite Cave.

All maps by Paco, except the overworld map by Rick Bruns.


Salamando


The Anti spell attacks enemies' MP, while the Life spell revives fallen allies (much like a Phoenix Down). The Life spell is probably the most useful purchase you can make at the Salamando magic shop.

Semite Cave


Disregard the blue rock near the entrance for now.

Unlike the last game, chests are open after you open them.


There will be four doors to choose from shortly after you go down the stairs. Take the one on the far left, as the rest take you to a dead end where you're very likely to fight monsters before you can leave, as these rooms have extremely high encounter rates. Another beginner's trap.

Tuesday, November 17, 2015

HCBailly plays Final Fantasy II - Part 6 of 44


In this episode, we find out that Bofsk is a slavery pit and that the Heal spell gets better as you level it up.

All maps by Paco, except for the overworld map by Rick Bruns.


The Vampire Thorns are nothing to worry about. They can Poison you, but they only have 20 HP.

The Green Goblins (G.Goblin) aren't that hard if you've brought Fire to Level 2. Just cast it on all of them and almost all of them will be killed. They have an attack called Bow that will strike you for considerable damage even if the target character is in the back row, but if you lay waste to them as quickly as possible, you won't have to worry about it very much.

The Soldiers are almost impossible to kill with regular weaponry. If you have Level 2 Fire, you'll be able to kill them in one hit. If you prolong the battle, though, you'll be able to get much-needed weapon experience.

Bofsk


Don't even bother talking to any of the people here, they're like zombies and won't tell you anything.

The armor salesman sells Bronze armor as well as the Silver plate mail. You'll be needing this armor later on, as it has a higher defense value and low weight.

One of the townspeople will just be standing there in the middle of the town. This is the Dark Knight. He doesn't respond to any of your key words, though.

The Peep spell in the Magic Shop works like the Besuna spell in the first game. It cures temporary status ailments. Heal cures permanent status ailments depending on its level. Level 1 lets you cure Blind and Envenomed, while Level 2 lets you cure Dumbfounded (permanent version of Mute). Level 3 cures Curse, Level 4 cures Toad, and Level 5 cures Stone. Work on this spell often, and it'll eventually come in handy when you really need it, especially when it comes to carrying items (unlike other Final Fantasy games, the inventory places two of the same items in different slot instead of placing, say, all your Potions or Phoenix Downs in the same inventory slot). Be sure to remove both weapon and shield before casting it, so you can contribute a higher Soul level to the spell.

Remember, whenever you gain a level with a weapon, unequip and then re-equip it to get your character's status to change accordingly.

The Sprinters have high evade, but if you have a Level 2 weapon equipped, they're a lot easier to destroy physically.

Salamando


When you enter the town, you'll notice that all the townspeople outside (all three of them) are women. All of the men have been forced to mine Mithril in the Semite Cave to the southwest.

The girl is standing next to Josef's house. Go in the house to talk to Josef and say "Wild Rose." He'll know you're part of the rebellion and not the Empire. Say "Mithril" and he'll tell you that Mithril still hasn't been recovered from the Semite Cave. He knows about the Warship, but he can't tell you anything about Cid's Airship.

HCBailly plays Final Fantasy II - Part 5 of 44


In this installment, we meet the very first Cid and get the first of a couple of fourth party members that won't be with us for the entire game.

All maps by Paco, except the overworld map by Rick Bruns.


Altea


Go back to the throne room and show the Ring to Princess Hilda. She tells you to keep the Ring and that you're the only ones brave enough to save the world now. She then tells you to retrieve the legendary ore of Mithril to make better equipment for the rebel army. Learn "Mithril," then say it to learn that Phin's armor is made of Mithril. You'll have to find Josef in the town of Salamando to figure out where it may be found. She'll also direct you to talk to Minh, who will show you how to get there.

Minh, thankfully, will be standing right next to her. He'll join your party and give you a canoe. Minh is a White Wizard.

Talk to Hilda again. She'll tell you that many of the residents of Phin were forced by the Empire to work on the Warship. Use the Learn command on the word "Warship." Say it to Hilda, and she'll tell you that it's even more powerful than Cid's "Airship." Learn "Airship" while you're at it, too. Mention the Airship, and she'll tell you about Cid, the leader of the White Knights of Phin, who built the airship. He was forced to leave and fled to Poft, where he sells charter flights.

If you talk to the old man at the right side of the room, he'll tell you to stop by Palm on your way to Salamando, as they take people to Salamando by ship.

Talk to the King again. Say "Wild Rose" to him, and you'll let him know that Duke Borgan betrayed them. Say "Mithril," and he'll tell you that there may still be some Mithril ore in the Semite Cave.

Talk to people around town again. You'll find out that you can take a ship to Poft from Palm and walk to Salamando from there.

Remember that unlike the last game, you can't battle monsters while swimming in rivers and lakes with the canoe and/or ship.
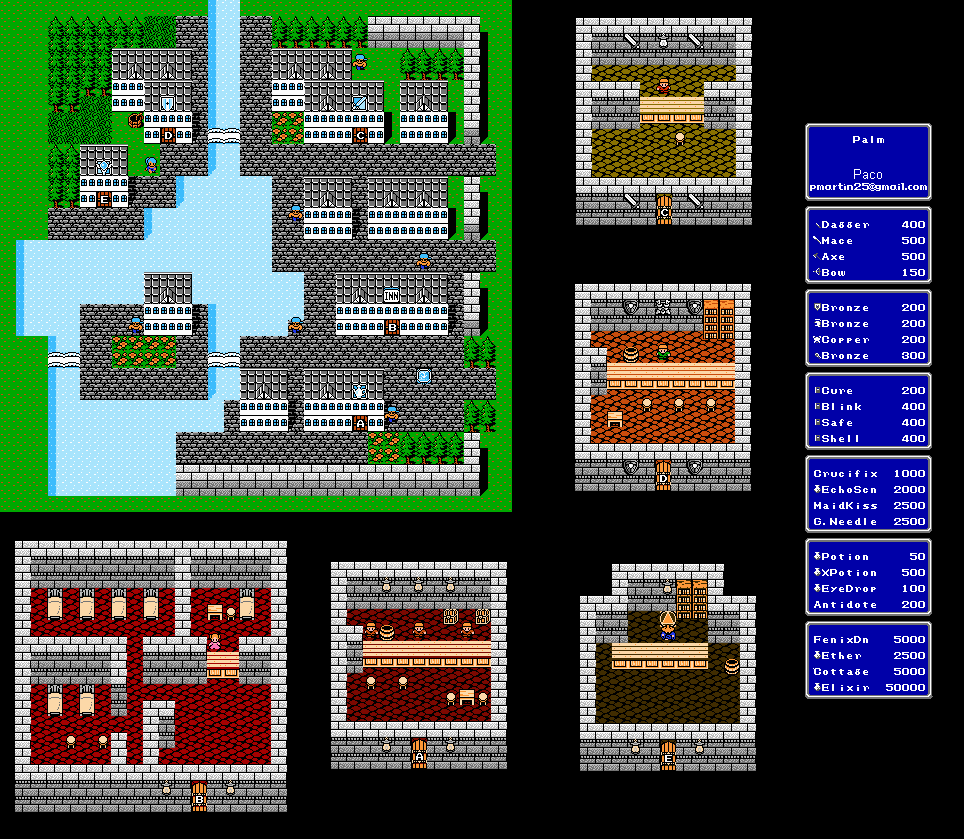
Palm


You could talk to the pirate near the entrance to take a ship to palm for a few Gil, but don't do that. Instead, walk around town and talk to everyone.

You could get the weapons here, but they're only slightly better that you have now. Thankfully, you'll find more powerful stuff than what's here pretty soon.

Get the Bronze Shield for your primary three characters, and hand Minh one of your Bucklers. If you haven't already, un-equip everything from him except the Bronze Armor and the Cane weapon that he has.

Shell increases your Magic Defense, Blink increases your Evade and Safe increases your Defense. Cure is from the White magic shop in Altea, and we all know what that does.

Poft


Salamando is to the north, and Bofsk lies to the east.

Cid is located in the town pub, if you're looking for him.

The shops here sell the same things as in Palm, so there's really nothing of interest here item-wise.

If you talk to Cid, he'll tell you to talk to his assistant (who's sitting next to him) to pay for passage on the Airship. If you mention the Warship to him, he'll call it a piece of shit. OMG SWEARING

Monday, November 16, 2015

HCBailly plays Final Fantasy II - Part 4 of 44


We finally get on our way to Phin, fighting a few monsters offscreen and getting some information.

All maps by Paco, except for the overworld map by Rick Bruns.


Altea


As you talk to everybody here, you'll meet up with Prince Gordon of Kashuon. His brother Scott was captured by the Empire, and he considers himself to be a coward for some reason. You'll also learn about Tobul, the blacksmith of Altea who seems to be in hiding right now.

If you enter the weapons shop, talk to the old man and use the "Wild Rose" phrase, you'll find out he's Tobul.

On The Road


Goblins give the most Gil. Get rid of them as soon as you can.

The Hornets can Poison you, but that's about it. There is a second version of Poison called Envenom. Even though Envenomed shows up as being "Poisoned," it's permanent and not temporary. If you're Envenomed, don't expect it to just go away. You won't see this until later on, though. (You'll be able to tell which one is which during battle, which kinda helps.)

Just north of Phin is Gatea. Let's head there.

Gatea


As you talk to the people, you'll find out that Phin is just beyond the lake. Apparently, it's not that far off. As expected, Phin is overrun by the Empire's minions, and the bar at the edge of the town houses a dying man who somehow escaped the Empire's grasp.

When you leave Gatea for Phin, hug the lake and go clockwise around it. Don't go too far north on your way there, or you'll run into some enemies that will kill you nearly instantly. (It's like a beginner's trap.)

Phin


Do not talk to the men in purple, whatever you do. They are the Captains, and they can lay waste to you. Instead, make your way to the bar. You'll meet up with some random encounters on the way here, but it's nothing you haven't handled before.

Go to the bar and talk to the guy hiding behind the counter.

LOL PASSWORD

Say the "Wild Rose" phrase to him and he'll tell you there's a passage behind him that leads to the dying man. You'll find three chests that contain Potions. You'll find out that the dying man is Scott, Prince Gordon's brother. He tells you to go to Prince Gordon and tell him to be brave, and that Phin was taken because Duke Borgan betrayed them and is now a General for the Empire. He mentions that he loves Princess Hilda, but not to tell her that so she won't be heartbroken. He gives you the engagement ring that was meant for Hilda, and then he dies.


The Ring lets you look at the World Map much like in the last game: press B and Select at the same time.

HCBailly plays Final Fantasy II - Part 3 of 44


Tutorial. Again. Yay.

Strangely, stuff gets a little complicated here, but not too much.

All maps by Paco.

Here is how HCBailly is going to prepare (which means that my strategies/note-taking/whatever will be based off of his prep - go figure): Maria will be Black Mage, Guy will be the Sword Wielder, and Firion will be in control of all the White magic. Give everyone a shield, and stick to one weapon type (unless you really love levelling up). Spears and canes are the best weapons at the beginning, since they're pretty easy to get your hands on. While they're powerful, axes have low hit percentages, just like in the first game...which can cause problems.

Items not only weigh you down and cause your Evade to drop, they also cause Intelligence and Soul to drop as well during battle. The heavier your equipment and weapons, the higher the "Int./Soul Penalty" or "Magic Penalty" will be. This will effect the hit rate and amount of damage spells can do.

You have two item slots per character. This not only lets you circumvent Magic Penalties at times (you can put your Shield here to raise your Intelligence and Soul where necessary and still have it on that character), you can also make it easier to switch between items and weapons and whatnot if it's only useful in specific situations.

Press Select while not in battle to configurate your front and back rows. The back rows take less damage, but they deal less damage against enemies. If you lose your entire front row, the back row becomes the front row.

Magic and bows can hit anyone, but all the other kinds of weapons can only hit the front two rows.

Monsters drop random amounts of Gil, making money gainage harder. You're more likely to get 12 Gil (or a common item) than you would 50 Gil (or a less common item) from an enemy at the beginning.


Unequip everything from all three characters, and give Gus the Broad Sword. Buy a Javelin for Firion, and sell off everything else. You'll want to give Gus and Maria a Buckler, and you'll also want to give Maria a cane, too.

For spells, get Fire. The quicker you level this up to Level 2 (yes, spells have levels), the more damage you can do to large groups of enemies early on. Bolt looks tempting, but enemies that are weak to it are also weak to other spells. Same with Ice, as there are only two mini-bosses where you'll really need it and the enemies that are weak to ice don't show up until later in the game, when you'll be strong enough to deal with them through other means. Cure will come in handy later on.


In your inventory, just select the book and select who you want to learn the spell. They'll learn the spell just like that.

Sunday, November 15, 2015

HCBailly plays Final Fantasy II - Part 2 of 44


Tutorial. Yay.

Duel wielding does not work in the original version, unlike the later ones. Of course, the difficulty of the Famicom version balances this out, as you can equip both a weapon and a shield.

Equipping a shield will raise your Evade. Evade influences how high your agility can get and whether or not you'll strike first, and it also does wonders if you're not equipped with either your fists or a bow and arrow weapon.

The number to the left for evade is the evade count, which determines how many chances per turn you'll have to avoid an attack, and the percentage is the probability of you missing it on each chance. The hit percentage works kinda like evade, except it applies to attacks.

When your Power (Pwr.) rating goes up, you'll have to un-equip and then re-equip your weapon and shield in order to get the game to recalculate your strength with that weapon. This is a glitch in the game that is only unique to the Famicom version. Ditto with your armor to recalculate the Evade. Agility (Agi.) makes you faster, but you should pay more attention to Evade. 

Vitality (Vit.) dictates how many HP you'll gain when you level up. If your Vit. is 10, you'll gain 10 HP. Intelligence (Int.) adds not only to the damage of your Black Magic spells but also Black Magic hit percentage. Soul is the same as Int., but for White Magic.

The Weapon Skill is basically experience with eight different types of weapons. You start out with Level 1 on each one, but as you use each weapon, you'll gain experience for it until it levels up after 100 Experience Points. The more you attack, the more you gain. It's better to strike at stronger monsters, as you can gain more experience from them than weaker monsters. The maximum level is 16.

For shields, the higher the level, the higher your Evade will become when you equip a shield.

HCBailly plays Final Fantasy II - Part 1 of 44


I'd recommend watching this first. The Q and A is pretty much done, but trust me, this pretty much tells you "Hey, this is different from the first game!"


Finally! A Final Fantasy sequel on the PrinceWatercress blog!

This time around, we have actual characters and a slightly more complex plot. The game is still the same, though: buff up and kick evil's ass.

All maps by Paco.


The kingdom of Phin has been razed to the ground in the Paramekium Empire's lust for power, which has been made reality by the summoning of Hellspawn. Four young teens from this kingdom are fleeing to Althea. In time, they will be the world's last hope...

The names of the characters you'll be naming are (in order) Firion, Leon, Maria and Guy.

You'll immediately start the game in battle mode, fighting against four Dark Knights (DkKnight). Firion looks kinda like the Fighter, and the rest of our characters look pretty awesome as well. We're gonna die, so don't worry about winning. It's part of the storyline.

Altea


The game then takes you to some shrine or something. A woman named Hilda has found you while fleeing Phin, and she has decided to go ahead and heal you with the help of another young healer. They head out for a meeting just before you wake up. When you go down the stairs, you'll reunite with Maria and Guy, but Leon was nowhere to be found.

Firion and the others will meet Hilda, who turns out to be the a princess of some sort. She is reluctantly to let you join the rebel army, but she lets you stay in Altea. She tells you about the Wild Rose, the crest of Phin and the secret password of the rebel army. You'll be able to learn the password in the next few seconds: select "Learn" to learn the password, then you can use "Say" to use the term whenever necessary. Say it to Hilda and she'll tell you that Phin stands and that it's a good place to start hunting for Leon, but it has grown dangerous since the Empire seized it.

The young man who brought you here with her is Minh. He'll tell you to head towards Phin. If you say "Wild Rose" to him, he'll tell you to use the password on others. Try that out. Who knows what will result?

You'll learn about the lake city of Palm, which you cannot access until you get a Canoe.

You'll also find out that the King was critically injured, and that after Hilda fled to Altea, she picked up the pieces and became new leader of the rebel movement. Outside of the rebel base, you'll meet Paul, the world's greatest thief. He does not steal from rebels, and Phin is his hometown.

Saturday, November 14, 2015

The Music of Mario's Time Machine for Super Nintendo


Here you go...the entire soundtrack for Mario's Time Machine for Super Nintendo.

Popoman100 plays Mario's Time Machine for Super NES - Part 7 of 7


The true ending.

Remember what I said about there being three endings?

Well, if you return all five things on all three floors from left to right, and you complete all the time periods in one shot, you'll get the best ending. Bowser gets squished by a dinosaur foot! Hell yes!

If you only do one of these things, you'll get an ending just like it, but the dinosaur foot doesn't squash Bowser.

If you fail to do both things, or if you take more than one attempt to complete the levels, you'll get the worst ending, where Bowser escapes to Paradise and chillaxes in style.


You can find all three endings here.

Friday, November 13, 2015

Popoman100 plays Mario's Time Machine for Super NES - Part 6 of 7


Another trip to Golden Age England here, a trip to Ancient Egypt there, and we'll finally finish this off!

Skull - Stratford-upon-Avon, 1601


Romeo and Juliet, Hamlet, King Lear, Othello, Macbeth -- these are only just a few of the famous characters immortalized by the greatest playwright and poet in English literature, William Shakespeare. Born over 400 years ago in 1564, Shakespeare's plays are still performed throughout the world. Shakespeare wrote during England's "Golden Age," a time when Queen Elizabeth I was generously supporting the arts. It is said that Shakespeare wrote a play just for her.

An actor as well as an author, Shakespeare is known to have written some 37 plays. Among them were histories, such as "Richard III" and "Henry V," comedies, such as "The Taming of the Shrew" and "Twelfth Night"; and tragedies, such as "Hamlet" and "Romeo and Juliet." Most of Shakespeare's plays were first performed at the open-roofed Globe Theatre where bad weather could cancel a performance. Shakespeare lived until 1616, having made a modest fortune. He was buried in the village where he was born, Stratford-upon-Avon.

Royal Staff - Alexandria, 47 B.C.


Upon their father's passing, Cleopatra and her brother were named to rule the kingdom of Egypt. However, Cleopatra's selfish brother, Ptolemy XII, didn't want to share the throne, so she banished his sister to the capital city of Alexandria. It was up to the Roman ruler, Julius Caesar, who served as Egypt's guardian, to restore Cleopatra to the throne. Thus, a second coronation was held for the queen in the year 47 B.C.

Meanwhile, Caesar fell deeply in love with Cleopatra, and she eventually bore him a son named Caesarion. However, on March 15th, 44 B.C., Julius Caesar was done away with by members of the Roman senate. One of Rome's new leaders, Marc Antony, had once been an officer in Caesar's army. Cleopatra, who had a penchant for powerful rulers, soon married Antony and bore him three sons. A Roman civil war soon followed in which Antony's forces were defeated in a great sea battle. Soon after, both Antony and Cleopatra took their own lives.