Friday, June 30, 2023

PrinceWatercress plays Ax Battler: A Legend of Golden Axe - Part 1 of 7


Here it is: the Golden Axe RPG in all its glory!


Long, long ago, the gods gave a gift to mortals. This gift was the Golden Axe. Legends say that the world will bow down to whomever takes the axe in hand. Countless battles took place among mortals to gain possession of the axe. Finally the king became full of sorrow and hid the axe deep in his castle where no one could find it. Peace once again returned to the world.

After many years had passed and the name of the axe as forgotten, an army of evil warriors destroyed the castle and stole the Golden Axe. The peace-loving king called on a young warrior to regain the axe. In doing so, he entrusted the fate of the world to the warrior Guided by love and courage, the warrior started on his lonely journey.

His name was...Ax Battler.
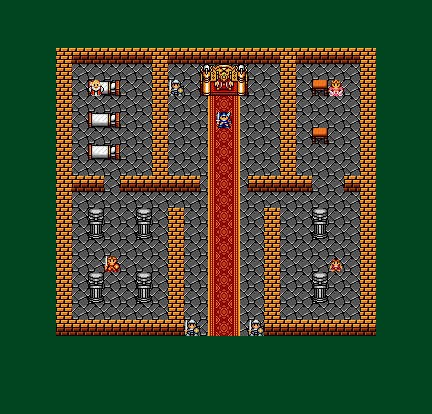
Firewood Castle


The game starts with the evil forces attacking the castle. The King asks his men to summon Ax Battler, the only man who can take ax back. Ax Battler already knows what to do. From here, you're free to move around.

The D-Pad lets you move around, while Button 2 lets you open the command menu (which allows you to talk to people, use items and search nearby) and select one of the three aforementioned options. To close the menu, press Button 1. Pressing Start will allow you to see how much life you have, how many vases you have collected, look at your magic (and how many vases you need to cast a spell) and see what special attacks you have.

The guard to the left of the king mentions a town south of the cave, and another guard to the right of the entrance will say it is to the east. Another NPC will tell you to talk to people in towns, and another still will tell you that there are monsters outside of the castle.


Going through the south end of the castle leads to the overworld. Use the D-Pad to move around. You can access the command window with 2.

If you hear frantic music at any point, that means you have just entered a random battle. During battle, you can move left and right and crouch down with the D-Pad, press 2 to jump, press 1 to attack and Start to use your magic.

The Barbarians will slowly move forward, but you can easily kill them with your sword. Just stand there and keep swinging, and you will easily beat them. By beating enemies, you will be able to get magic vases to power up your spells, and you can see how many items you have in the status screen when you press Start.

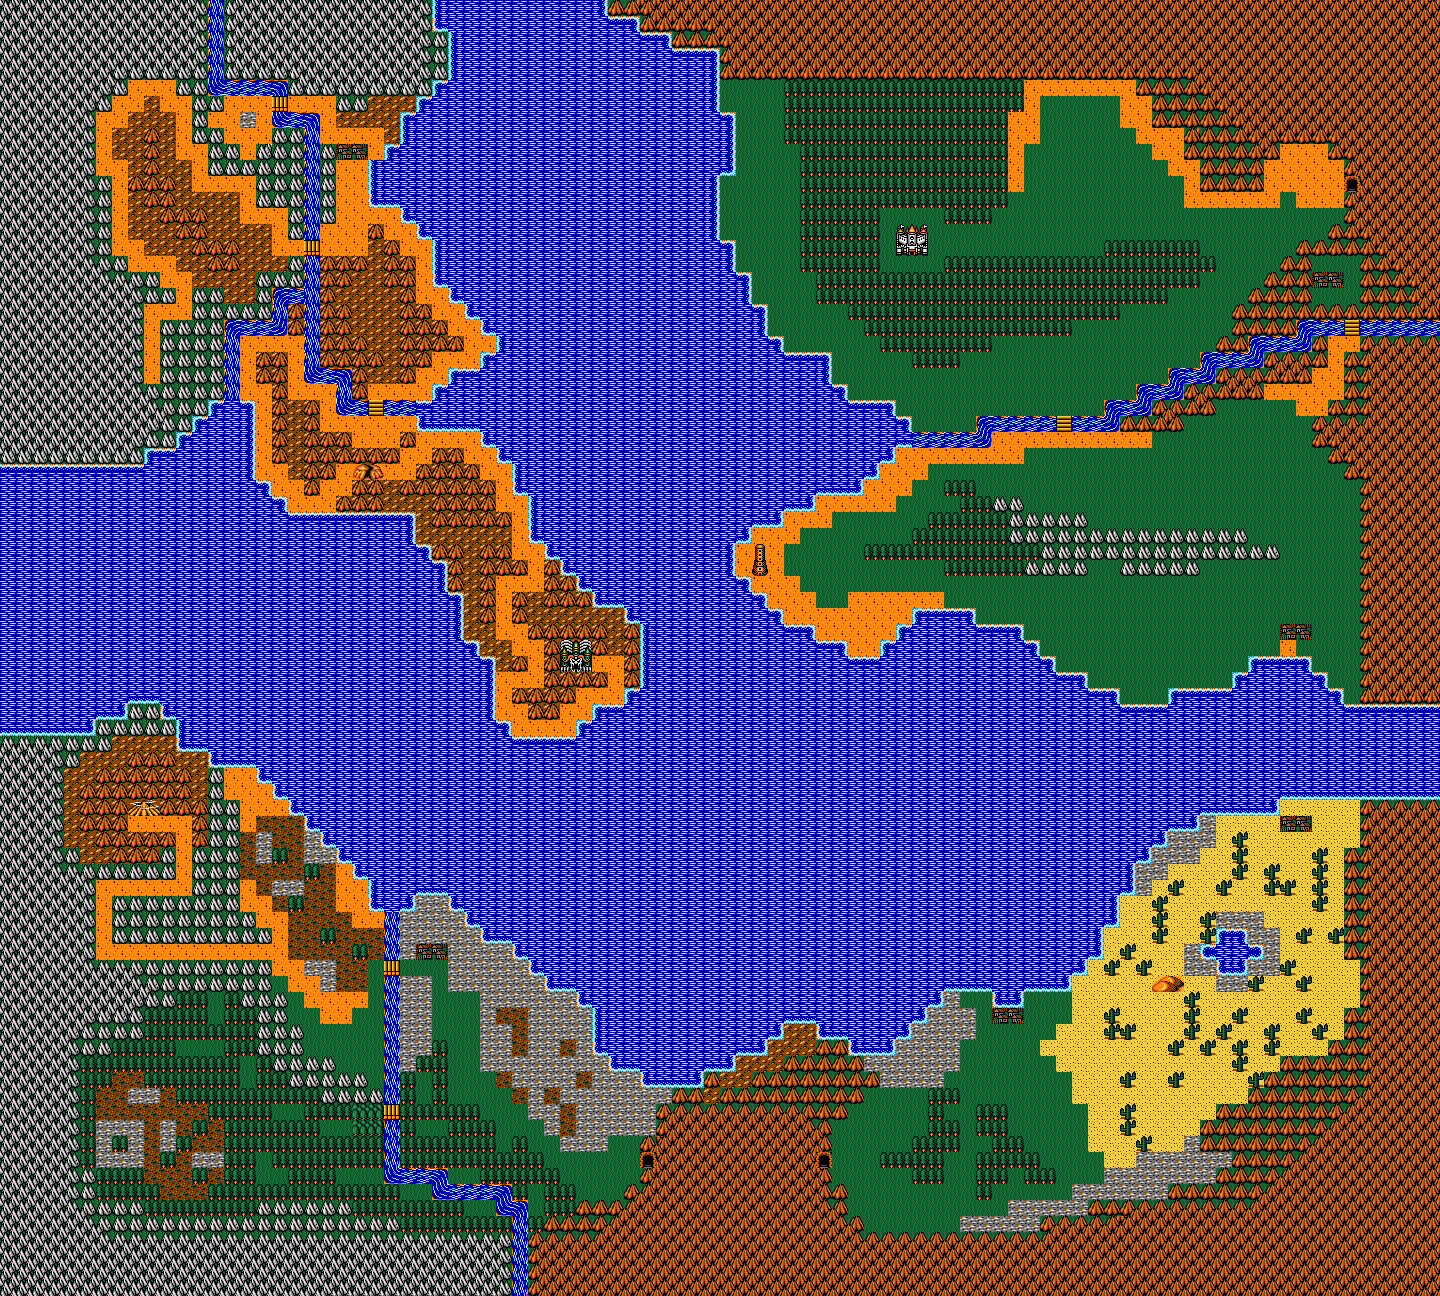
Your first destination is the cave to the east.
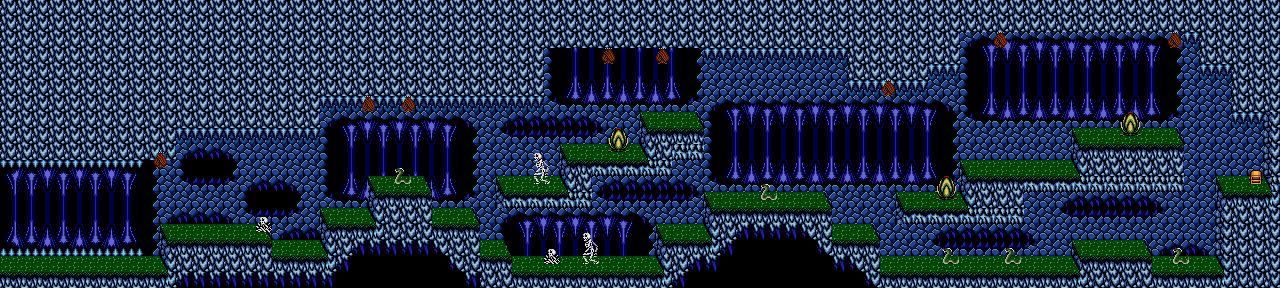
Spooky Cave


In the cave, you'll be in a side-scrolling mode much like with the random battles on the map. You'll be facing bats, snakes, skeletons and fireball spitting flowers, but they aren't too hard. The flowers will go down in a couple of hits, and as long as you watch where you're going, you'll know when the bats are going to swoop down in an effort to hit you. Enemies will respawn, so if you're forced to backtrack, you'll have to face them all over again.

You're better off getting away from the bats. You'll need to crouch down to hit the snakes. As for the flowers, back off and wait for them to spit projectiles, then move in and strike.

Your health will be in the lower-left hand corner, and as you take damage, the bars will turn from blue to orange to non-existent. When you lose all your bars, the game is over.

When you reach the treasure chest in the cave, you will automatically leave. Inside the chest is a bomb, which you'll need for later.

From the cave, you will want to go southwest to the bridge. Whenever you get on a bridge, you will automatically enter a battle with a random enemy. Skeletons can be pretty powerful, and they will knock you back - and probably out of the battlefield. To avoid this, hit the skeleton, move left so you don't get struck, then turn around and hit it again. Keep moving left and hitting the skeleton after it attacks until it falls. If you miss, the skeleton will leap back, then charge at you. Hit the skeleton during the charge. You'll then need to move left to avoid getting hit again, then move back towards the skeleton after the attack and strike. The skeleton will drop two vases when defeated.

If you get struck by an enemy, you will automatically retreat. 

If you walk onto a bridge, you will automatically trigger an enemy encounter no matter what. Take advantage of this to get practice on enemies and get more magic vases.

From the bridge, stay near the river and head east. When you see sand, go north. You'll find the town that the guards were talking about. Go to the item menu and use the bomb on the mountain to enter the town.
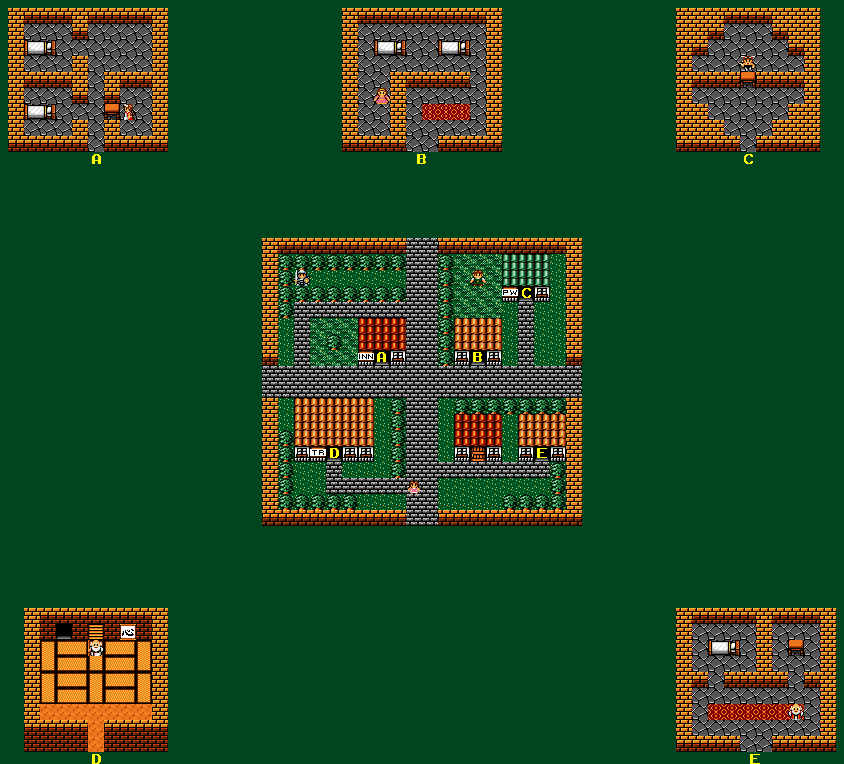
Firewood City


The building with "INN" on it is the inn. The magic vases not only act as magic power, but they also double as currency for the game. By paying for a room, you'll be able to fully replenish your health.

The three magics - earth, thunder and fire - can be casted by pressing Start. You can select your magic while in a town or on the overworld map, but only in those two types of locations. Earth is the weakest, while Fire is the strongest, meaning that the more magic vases a spell costs, the more powerful it will be. Keep in mind that you can only carry a maximum of 31 vases.

The building with "PW" on it is the password room. Going in here and talking to the bunny girl (Japanese bunny girls in a Golden Axe game? Weird...) will give you a password to use when you want to come back from the game. Be sure to carry the password and keep it in a safe place. Thankfully, it is only 16 characters long and split into four sections.

One of the people in town well tell you about a tower to the west, and that you should undergo training before going there.

The building with "TR" on it is a training room. By going in here, you can fight a monster in battle and learn a new ability if you win.

The Neo Bar. (Neo Barbarian) is a nastier version of the Barbarian, and has more health. Thankfully, you can fight him just like you did the Barbarian.

By beating the Neo Barbarian, you'll be able to perform a High Jump. By holding Up on the D-Pad and pressing 2, you can jump higher.

To beat the Amazon, wait for the Amazon to jump towards you, then move forward just a little bit and swing the sword. When you hit her, move forward and swing again. Keep doing this until she dies.

Thursday, June 29, 2023

PrinceWatercress plays Tiny Toon Adventures: Wacky Stackers - Part 11 of 11


We close out this Let's Play with Survival Mode. See you next Let's Play.


Survival

In this mode, you'll be dropping and clearing eggs, making chain combos and even getting coins to get as much points as you can and also see how long you can survive. The game starts out slow, but it slowly gets faster and faster. This mode may be just for fun, but it's still a fun mode.

You can get up to four coins in this mode, and the coins are the same as in Puzzle Mode: Dizzy Devil, Plucky Duck, Gogo Dodo and Furrball, in that order.

And that's it for Tiny Toon Adventures: Wacky Stackers!

Wednesday, June 28, 2023

PrinceWatercress plays Tiny Toon Adventures: Wacky Stackers - Part 10 of 11


Now that Puzzle Mode is over, let's play the other modes that I can show off!


If you press Up, Down, Left, Right, R on the title screen, you'll get some sort of date on the upper-right corner. October 5, 2001? Only thing I can think of.

VS. COM

In this mode, you're playing against a computer controlled opponent. By creating combos, you can dump eggs on the computer opponents' playfield in the lower-right corner. Whoever has their playfield fill up with eggs first loses. It's like Puyo Puyo, except with eggs and the Tiny Toons license.

There are eight power-ups, and they are as follows

One Coin: Dizzy Devil - He takes out the bottom two rows of eggs.

Two Coins: Elmyra - Her envelope causes you and the computer to switch fields. This can be particularly nasty at times.

Three Coins: Plucky Duck - He flushes out the bottom four rows of eggs.

Four Coins: Babs Bunny - She gives you a shield that protects you from attacks for a short while.

Five Coins: Gogo Dodo - His UFO clears out all the eggs in the center columns.

Six Coins: Montana Max - The opponents' field will go dark, and Max's flashlight will bounce around the walls, giving only a limited view.

Seven Coins: Furball - His dynamite destroys all the eggs in the top four rows.

Eight Coins: Buster Bunny - His freeze rays makes it harder to make combos. You'll need to clear eggs to thaw out out the frozen ones, then you'll have to remove the thawed-out eggs the old fashioned away.

Multiplayer mode is the same as VS. COM except with up to three human players. You can switch between your opponents' fields in the lower-right with the R button.

Tuesday, June 27, 2023

PrinceWatercress plays Tiny Toon Adventures: Wacky Stackers - Part 9 of 11


Just five more puzzles until Puzzle Mode is over! Get ready!


Sweetie Bird

Here comes a new challenger! Sweetie Bird shows up as a bonus challenge, and these five puzzles are the toughest of all. If you beat them, you'll beat Puzzle Mode for good.

Puzzle 1

Drop double red horizontally. Drop the next two sets of eggs vertically so that yellow is on the bottom and you get rid of the bottom yellow egg line. Drop the next two sets of eggs vertically so that yellow is on the top and you get rid of the middle yellow egg line. Drop double grey horizontally. Drop double red horizontally. Drop double yellow horizontally to remove the top yellow egg line. Quickly press B to drop the double red eggs vertically, or it's game over. From here, drop the double egg sets vertically until you reach the egg rainbow. Drop green and yellow horizontally so that you get rid of both. Drop the pink and yellow eggs horizontally in the center so that pink is on the left and red is on the right. Drop the grey and blue eggs so that blue is on the left and grey is on the right. From here, drop double red with red and drop double pink with pink.

Puzzle 2

Drop the green and red eggs horizontally as they are. Drop the double red eggs horizontally. From here, you'll need to make chain combos to get rid of green and red, then you'll have to do it again with blue and yellow. When you get two coins, call Plucky to get rid of some of the side eggs. From here, you'll have to make chain combos with pink and grey as well as red and yellow. Call Plucky a second time to finish the puzzle.

Puzzle 3

Drop double green horizontally. Drop double yellow horizontally. This will get rid of almost all the yellow eggs as well as the green eggs on the side. This gives you a coin. Drop the next two sets vertically so that yellow is on the bottom, and get rid of the yellow eggs. From here, keep dropping the pink and blue sets of eggs horizontally to create a chain combo and get a second coin. From here, drop the two double sets of grey eggs vertically on the grey eggs that are already there, one on the left and one on the right. From here, you'll need to place the red and grey eggs vertically so that grey is on the bottom, and get rid of both sets of grey eggs and make a chain combo with the red ones afterwards. This gives you a third coin. Press L to call Gogo Dodo and get rid of the big green egg that is left.

Puzzle 4

Drop double green vertically to the right. Drop double red vertically to the left. Drop the grey and green eggs horizontally as is. Drop the green and yellow eggs horizontally as is. Drop the grey and yellow eggs horizontally as is. Drop double grey horizontally to get rid of the grey eggs and drop double red horizontally to get rid of the red eggs.

Puzzle 5

Hold right as you drop double blue horizontally all the way down, then use the next set of double blue to get rid of blue. Rotate the grey and green eggs so that green is on the left and grey is on the right, and move it all the way to the right while getting them all the way down. You'll then have to make a chain combo with the grey and green eggs that you get. This also gets rid of the red eggs to the right and nets you two coins. Drop double blue vertically to the right next to where the lone blue egg is. Drop double yellow all the way down horizontally and move it to the left at the bottom to get rid of the yellow eggs. Drop double red all the way down horizontally and move it to the left at the bottom to get rid of the red eggs. Drop double grey vertically to the left where the other two grey eggs are. From here, call Plucky. 

You'll have one pink egg left. Drop double grey horizontally all the way down and place it to the right of the pink egg. From here, drop the pink and grey eggs horizontally as they are all the way to the left. Drop double grey vertically on the grey eggs to get rid of them all, then place double pink with the pink ones that are left. You've beaten Puzzle Mode! Enjoy your ending!

Monday, June 26, 2023

PrinceWatercress plays Tiny Toon Adventures: Wacky Stackers - Part 8 of 11


In this entry, we face the King of the Dodos, but we're not done yet...


King of the Dodos

This game-exclusive character has five puzzles to beat, and they're the toughest yet!

Puzzle 1

Drop the double yellow eggs horizontally in the center, and do the same for the double red. From here, drop double grey horizontally in the center, double green horizontally in the center, and drop double yellow vertically on the right and double blue vertically on the left.

Drop double red horizontally in the center, then drop the other double red egg set vertically. Double double yellow horizontally in the center, drop double pink horizontally in the center, then drop the next two sets of eggs vertically so grey is on top so you can get rid of the grey eggs.

From here, drop the yellow and pink eggs horizontally in the center as they are to create a chain combo. From here, you can easily get rid of the rest of the eggs. Just make sure you do a chain combo with grey and yellow at the end.

Puzzle 2

Drop double blue vertically to the left. Drop double green vertically to the right. This causes a chain combo. Drop double blue horizontally to get rid of them, then get rid of the green eggs for another chain combo. Call Plucky with L to get rid of everything below the grey eggs, then drop the next three sets of eggs horizontally without rotating them to clear the playfield.

Puzzle 3

Drop the red and pink eggs horizontally in the center so that red is on the left and pink is on the right. Drop the pink and green eggs horizontally one space to the right of center so that pink is on the left and green is on the right. (The fifth column should be six eggs high, with the top three all being green.) Keep double grey horizontal and keep holding left until it is all the way to the left then drop. From there, drop the yellow and pink eggs vertically so that yellow is on the top and pink is on the bottom, and place them on the pink eggs. This will give you enough chain combos for four coins. From here, press L to call Furball, so he can throw firecrackers at the top four rows of the playfield and get rid of the blue eggs in the corners.

Puzzle 4

Drop the double red eggs horizontally. Drop the double yellow eggs horizontally. Drop the double red eggs horizontally. Make long vertical lines with the green and grey eggs to get rid of them.

Drop the double red eggs vertically in the center. Do it again with the next set of double red eggs, then drop the double yellow eggs on the other yellow eggs to create a chain combo and clear the playfield. This one is simple compared to everything else here, but it can still throw you off.

Puzzle 5

Hold Right with the first set to drop yellow with yellow and green with green. Immediately hold right to drop pink with pink and grey with grey.

Drop the double red eggs horizontally in the center. Drop the double blue eggs horizontally in the center. Drop the double red eggs horizontally in the center. Drop the double blue eggs horizontally in the center. Drop the double red eggs horizontally in the center. All this allows you to stack up to the pink and yellow eggs, and you'll need to rotate the yellow and pink eggs quickly so you can get rid of them.

From here, quickly rotate the double red eggs so you can drop them vertically in the center. From here, you can easily drop the double color egg sets that you get vertically until you get grey and green. When that happens, rotate the grey and green eggs so that grey is on the left and green is on the right, then drop them in the lower-right corner. 

After this, you'll need to drop the double red eggs horizontally on the ones in the center to make a big egg. From here, drop the double green eggs horizontally down and to the right of the big red egg. This will net you a coin. Press L to call Dizzy Devil and get rid of the two eggs that are left. You're almost done.

The reason I say almost is that Sweety Bird shows up as a bonus challenge, and the puzzles there are the toughest yet. Stay tuned!

Sunday, June 25, 2023

PrinceWatercress plays Tiny Toon Adventures: Wacky Stackers - Part 7 of 11


The kid gloves have finally come off...


Little Beeper

The puzzles continue, and it won't be long until we reach the end.

Puzzle 1

Drop the double green eggs flat in the center. Keep the red and green eggs as they are and drop them in the center, then drop the red and green eggs after this vertically on the right so that red is on the bottom.

From here, drop the red and yellow eggs as they are so red is on the left and yellow is on the right, then rotate the next set of red and yellow eggs so you drop them horizontally and clear some red eggs, followed by the green ones.

You'll then need to a chain combo with the red and yellow eggs. Once you do that, call Plucky with L to get rid of all the eggs that are left.

Puzzle 2

Rotate the red and yellow eggs so that they are horizontal and red is to the left, then hold Left as it drops down. You'll then need to make a chain combo with the red and yellow eggs. If you get three coins, you did it right.

Next, keep the double grey eggs flat and hold Left as they drop. Get rid of the grey eggs, then get rid of the yellow eggs by keeping the double yellow eggs flat while dropping them next to the ones that are already there. From here, press L to call Gogo Dodo and get rid of the green eggs.

Puzzle 3

Drop the green and pink eggs so the pink egg is dropped in the upper right corner and the green egg falls to the lower right. Drop the blue and red eggs so the the red egg is dropper in the upper left corner and the blue egg falls to the left. 

From here, you'll need to drop the yellow and grey eggs so that you have two vertical lines - one yellow and one grey - in the making. Drop the double red eggs so that you get rid of the red eggs in the center right. Drop the double pink eggs so that you get rid of the pink eggs in the center left.

Drop the double yellow eggs vertically above the grey egg line you just made. Drop the double grey eggs vertically next to the double yellow that you just dropped. Drop the next set of double yellow eggs vertically to the left above the double grey that you just dropped. Drop the next set of double grey eggs vertically to the right of the double yellow eggs that you just dropped. Basically, you should be "criss-crossing" these double color egg sets in order to make a path to the top of the playfield.

From here, rotate the pink and red eggs so that you can remove the pink and red eggs in the upper left and upper right corners. From here, it's time to start making fully vertical lines to get rid of the yellow and grey egg lines that you've made, one by one. Finally, you can get rid of the blue and green eggs at the bottom.

Puzzle 4

Drop the double green eggs horizontally in the center. Do it again. This gets rid of the green eggs. Move the double pink eggs once to the right and drop them horizontally. Move the double grey eggs one to the left and drop them horizontally. Keep the pink and yellow eggs horizontally as they are and move them all the way to the right, then drop. This gets rid of the yellow eggs.

Rotate the grey and red eggs so that they are vertical and grey is on the bottom, then drop them in the third column (where the grey egg to the right of the two red eggs are). Move the pink and red eggs to the other pink eggs and make a big pink egg, then rotate the grey and red eggs so that they are vertical and grey is on the bottom. Get it to the second column and drop the grey egg on top of all the other grey eggs. This will give you two coins. Press L to call Plucky and get rid of all the other eggs.

Puzzle 5

Keep the double green eggs flat and move them all the way to the left, then drop. Make the double yellow eggs vertical and hold Left.

Keep the double green eggs flat and move them all the way to the right, then drop. Make the double yellow eggs vertical and hold Right.

From here, rotate the green and yellow eggs so that green is on top and yellow is on the the bottom, then move to the fourth column. Rotate the next set of green and yellow eggs so that yellow is on top and green is on the bottom, and place them on top of the eggs you just placed in the fourth column. This starts a chain combo.

From here, use the double green eggs to get rid of the green eggs on the left, which in turns removes yellow as part of a second chain combo. Finally, press L to call Plucky and get rid of all the eggs on the bottom.

Saturday, June 24, 2023

PrinceWatercress plays Tiny Toon Adventures: Wacky Stackers - Part 6 of 11


At this point, some of the puzzles can be a bit nasty if you're not careful.


Hamton J. Pig

The puzzles here are easy when you figure them out, but a beast if you don't.

Puzzle 1

Lay the double pink eggs straight in order to get rid of them. For the grey and blue eggs, lay them vertically so that blue is on the bottom, so you can get rid of both sets of blue.

For the double yellow eggs, lay them vertically, one set on one side and one set on the other, to get rid of all the yellow eggs. From here, you can get rid of the green eggs.

Lay the double red eggs so that one lands in the blank space next to the red egg on the right while the other stays on a grey egg. With the red and grey eggs, you'll need to set them up so that you can start a chain combo, first with the grey, then with the red.

Puzzle 2

Lay the blue and green eggs flat so that blue lands on blue and green lands on green. Lay the yellow and grey eggs down next to it so that yellow is on the left and grey is on the right. You'll have to do this twice.

Get rid of the blue eggs to start a chain combo, then get rid of the green eggs to start another chain combo. From here, call Plucky with the L button to get rid of the eggs that you can't get to.

Puzzle 3

Lay the double blue eggs vertically to the far right. Lay the double red eggs vertically to the far left. Lay the two sets of double pink eggs flat in the center to get rid of them.

With the pink and blue eggs, drop it vertically with blue on the bottom at the far right to get rid of the blue eggs, which starts a chain combo. With the pink and red eggs, drop them vertically so that red is on the bottom at the far left ot get rid of the red eggs, which starts another chain combo. Press L to call Plucky and get rid of the two pink eggs that are left.

Puzzle 4

Drop the green and blue eggs flat as is. Drop the double blue eggs flat as is. Drop the double green eggs vertically to the left, then get rid of the blue eggs first to start a chain combo.

After this, keep holding right for the next two sets of eggs (yellow and red), then rotate the next two sets of eggs (also yellow and red) so that red is to the left and keep holding left to drop them. Your reflexes need to be good for these four drops. Also, you'll need to press L when you get two coins so you can get the eggs in the corner before you clear out the red and yellow eggs, or else it's game over.

Puzzle 5

Drop the pink and red eggs vertically on the far right so that red is on the bottom. Drop the green and red eggs vertically on the far left so that red is on the bottom. Drop the grey and red eggs vertically next to where you dropped the green and red so that red is on the bottom. This starts a chain combo with green, grey and red.

Drop the green and red eggs so that red is on the right and gets rid of the red eggs on the right while the green egg drops to where the blue ones are. This starts another chain combo. Get rid of the blue eggs, then press L to call Plucky and get rid of all the eggs that are left.

Friday, June 23, 2023

PrinceWatercress plays Tiny Toon Adventures: Wacky Stackers - Part 5 of 11


Easy mode is over. Let's do this.


Shirley the Loon

The kid gloves finally come off. If you don't know what you're doing, the last puzzle will mess you up.

Puzzle 1

Get rid of the pink eggs on the right so that the yellow egg falls on the yellow egg underneath. Do the same with the green eggs on the left. Drop the red and yellow eggs on the right horizontally, so you get rid of the yellow eggs. Do the same with the blue and yellow eggs on the left side so that the yellow eggs there are also gone.

Lay the red and grey eggs on the right so you get rid of the red eggs on the right, then lay the blue and grey eggs on the left so you get rid of the blue eggs. This will simultaneously get rid of the blue and grey eggs. You can then remove the green eggs.

Puzzle 2

Lay double red vertically away from the green eggs. Lay double blue vertically on top of them. Line up red and blue so that both colors are still grouped with each other, then make a chain combo with blue followed by red. You'll get a coin. You'll then have to do this again. Once you get two coins, press L to call Plucky and get rid of everything except the green eggs at the top. You'll then have to make chain combos with red and blue again until you get two coins so you can finally get rid of the green eggs.

Puzzle 3

You can either get rid of the green eggs on the sides, or you can lay one pair of double green on each side. You'll then have to make chain combos with red and yellow until you get two coins. Once you get a coin, call Dizzy. This helps get rid of a big yellow egg. If the green eggs are still there, they'll be gone, too. You'll then have to do chain combos with blue and grey. Once you get a coin, call Dizzy. You'll get rid of the other big yellow egg.

Puzzle 4

Leave the red and green eggs flat as they are and hold Left until they drop. Leave the blue and yellow eggs flat as they are and hold Right until they drop.

Leave the double yellow eggs flat as they are and hold Right until they drop to get rid of the yellow eggs. Leave the double red eggs flat as they are hold Left until they drop to get rid of the red eggs.

Rotate blue and green so that you can drop them flat and get rid of both colors. Drop the double red eggs vertically to clear the playfield.

Puzzle 5

Lay the double blue eggs vertically on one side, then do the same on the other side with the other pair of blue eggs.

Lay the double pink eggs vertically on one side, then do the same on the other side with the other pair of blue eggs. The pink eggs should be on top of the blue eggs. You'll need to be quick about this, or this one is over.

Drop the double red eggs flat. Drop the double yellow eggs flat. Drop the double pink eggs flat to get rid of the pink eggs. From here, you'll need to get rid of one of the sets of blue eggs so that the red eggs will make a horizontal line. You'll also have to get rid of the other set of blue eggs so that the yellow egg is with the other yellow eggs. Finally, make a chain combo with red and yellow. If you make a big egg with yellow, you've messed up. For best results, do not rush through this puzzle.

You've just completed the hardest puzzle so far. 

Thursday, June 22, 2023

PrinceWatercress plays Tiny Toon Adventures: Wacky Stackers - Part 4 of 11


If you know what you're doing, you can get through Concord Condor's puzzles pretty easily. It doesn't mean he needs to be such a jerk about it, though.


Concord Condor

After going through Chain Combo University with Fifi, how is this one gonna play out? Swimmingly, if you know what you're doing.

Puzzle 1

Get rid of the yellow eggs first. From there, get rid of the red eggs with a horizontal line combo. This will get rid of the red eggs as well as the green, and give you a coin. Press L to call Dizzy and get rid of all that is left.

Puzzle 2

Drop the two pairs of red eggs horizontally to create a big red egg. Lay the double green eggs flat, then get rid of the grey eggs. This will also get rid of the green eggs along with it. Drop the blue eggs vertically, then drop the green eggs vertically.

Puzzle 3

Place the blue and pink eggs vertically on the far right so the pink egg is on the bottom. From here, drop the blue and grey eggs vertically on the far left so the grey egg is on the bottom.

From here, drop the red and yellow eggs vertically with the red on top and the yellow on the bottom where the yellow eggs on the top are. Then, drop the red and green eggs vertically with the red on the top and the green on the bottom where the green eggs on the top are. Rotate the green and yellow eggs so you can get rid of the green and yellow eggs on the top and cause a chain combo with the red ones.

Get rid of the blue eggs, then press L to get Dizzy to get rid of the rest of the eggs. You're done here.

Puzzle 4

Drop the pink and red eggs so that red is on the left and pink is on the right. Drop the next set of eggs exactly as is.

Drop the green and grey eggs flat as is, then drop the double green eggs vertically on the right.

Drop the grey and yellow eggs vertically on the right so the grey egg is on the bottom.

Drop the green and yellow eggs vertically on the left so the yellow egg is on the bottom.

From here, you can get rid of the green eggs, then the blue eggs. You're done.

Puzzle 5

Drop the first set of double red eggs horizontally, then drop the second set of double red vertically. Drop the blue and yellow eggs horizontally so yellow is on the left and blue is on the right. You'll get a coin from the chain combo. Press L to summon Dizzy Devil and get rid of the three big yellow eggs on the bottom. You're done.

Wednesday, June 21, 2023

PrinceWatercress plays Tiny Toon Adventures: Wacky Stackers - Part 3 of 11


Welcome to Chain Combo University!


Fifi la Fume

It's time for the difficulty to rise up just a little bit more...

Puzzle 1

For this one, you'll need to make chain combos. Drop the first three egg pairs as they are, then press B to drop the fourth one vertically so you get rid of the yellow first, followed by the red. You'll then need to do this again. Once you get two coins, press L to call Plucky and get rid of the eggs at the bottom.

Puzzle 2

Make chain combos. Get rid of the green first, followed by the red. Do this with both sides. From here, you'll have to do this again, this time with two columns' worth of space. When you get all four coins, press L to call Furball and blow up all the big eggs up top.

Puzzle 3

Once again, you'll have to make chain combos with green and red. When you get three coins, press L to get rid of the yellow eggs. Done. Pressing L with three coins calls Gogo Dodo, who sucks up everything in the two center columns of the playfield to clear them out completely.

Puzzle 4

Set up the pink and blue eggs so that you have two of one color on the bottom and the two of the other color on top of them. Lay the red eggs, the blue eggs and the green eggs flat. This get rid of the green eggs. Drop the blue eggs vertically, then drop the red and yellow eggs down vertically so you get rid of the yellow eggs.

You'll get a red egg and a blue egg. Get rid of the red eggs. Then, get rid of the yellow eggs that are left. Drop the blue eggs vertically on the blue egg at the top, then drop the pink eggs vertically so can get rid of all the eggs.

This one is tough to do if you don't know what you're doing.

Puzzle 5

Make chain combos with the green and red eggs. When you get two coins, press L as soon as possible to get rid of all the big eggs, then you can get rid of the pink eggs.

If you mess it up and only get one coin, you can use the pink eggs to get rid of a big egg for a saving throw, then press L to get Plucky to flush out whatever is left. Either way, you win.

Tuesday, June 20, 2023

PrinceWatercress plays Tiny Toon Adventures: Wacky Stackers - Part 2 of 11


Now that the first puzzle mode round is done, it's time to play the second. It's not that much harder, honestly.


Bookworm

Bookworm is a step up from Calamity Coyote, but only slightly.

Puzzle 1

Drop the blue eggs horizontally. Drop the grey eggs horizontally. Rotate and move to the right so that you can create a chain combo with the red eggs followed by the green, then rotate and move to the left so that you can do the same with the pink eggs followed by the yellow.

Puzzle 2

Make a combo with the red eggs. This will get rid of them followed by all the grey eggs.

Puzzle 3

Drop the green eggs horizontally, then drop the blue eggs horizontally. Drop the grey eggs vertically, first on one side and then the other. Drop the red eggs vertically so you can clear them.

Puzzle 4

Press A and let the first pair of eggs drop to clear the green eggs. This will create a chain combo with the blue eggs and leave just the pink and red eggs left. From here, you'll need to make a chain combo with the eggs on the left. Drop the red eggs vertically next to the pink eggs on the right, then press A and drop the next pair of eggs with the red eggs at the bottom. From here, set up another chain combo with the pink and red eggs that you have left. This should give you your fourth coins. Press L to summon Furball and throw dynamite at the upper half of the playfield, destroying the two red eggs in the corner and clearing the puzzle.

Puzzle 5

Drop the red eggs vertically in the empty column. From here, rotate the red and yellow eggs so you can drop them vertically and clear the red and yellow eggs. This will get rid of the big blue egg and give you a second coin. Press L to summon Plucky, which will get rid of all the eggs on the lower half of the playfield. This will get rid of the green eggs and complete the puzzle.

Monday, June 19, 2023

PrinceWatercress plays Tiny Toon Adventures: Wacky Stackers - Part 1 of 11


There's not much on this game on the Internet as far as I can tell. Let's change that!


Tiny Toon Adventures: Wacky Stackers is a Puyo Puyo clone made for the Game Boy Advance back in 2001. At this point, Tiny Toon Adventures had been irrelevant for some time, and there had not even been anything new in the franchise for about half a decade. This makes it all the more odd that this game came out with the Tiny Toons license, making it one of the last games to have it. Did it really need the license? Not really. But that's just the first issue with the game. Read on.

There are a few modes with this game: Vs. Com, Survival and Puzzle. There is also a multiplayer mode that goes along with it. I start with the Puzzle Mode, since people are probably going to be looking for the solutions for that.

Puzzle Mode lets you play up to two, five or eight stages. Playing eight gives you the real ending. When you start, Buster and the gang go to a stadium in Wackyland to see people tackle Puyo Puyo-style puzzles in a tournament hosted by the King of the Dodos (an original character for this game), and the difference between the official Warner Bros. art and the art made for the game by the developer is both striking and obvious. If you ask for an explanation, pay attention: you'll see how some of the puzzles in this game get completed.

Puzzle Mode is fun, but it has a few big, glaring flaws. There is no password system and therefore no way to continue back from where you left off, so if you're playing Puzzle Mode, you'd better be ready to complete it in one sitting. Second, if you fail a puzzle, you only have five continues, and if you use them all, you're going all the way back to the first puzzle of the game. The fact that there are continues makes the trial and error nature of completing some of the puzzles much worse than it already is, and the lack of passwords and limited continues is the exact opposite of what Yoshi's Cookie on Super Nintendo did, which makes this game look completely undesirable once you're played older - and better - puzzle games from the 1990s.

The first opponent is Calamity Coyote. Guess what? His puzzles are really easy.

As far as the controls go, Left and Right move the eggs, and holding Down drops them. B rotates the eggs counter-clockwise, while A rotates clockwise. If you have coins, you can press L to use a special ability to get rid of some eggs.

When you chain four eggs next to each other in some sort of line, you'll eliminate them. If you put them in a square formation away from any other like-colored eggs, they will form one big egg. If you create a line of eggs around it, you'll eliminate the big egg and automatically get a coin for it. Making a big egg is not the same as clearing a group of four eggs in Puzzle Mode.

The white number to the left is how many moves you have left. When you run out before clearing all the eggs, the game is over and you're forced to quit or use a continue before the timer runs out. 

Calamity Coyote

Puzzle 1

Just drop the blue eggs in the horizontal nature that they are in. Done.

Puzzle 2

With this puzzle, you can set it up so that you can get rid of the red eggs first, then get rid of the blue ones. 

When the blue eggs drop to be cleared after the red eggs clear, that creates a chain combo. Chain combos will give you coins that allows to perform special abilities which I will mention when the time comes.

Puzzle 3

Get rid of the green eggs on the left. This will create a chain combo that gives you a coin. From there, by using your other move, you can then press L before the eggs at the top disappear to summon Dizzy Devil. Dizzy Devil will eat up all the eggs on the bottom two rows of the playfield, allowing you to empty the playfield easily.

Puzzle 4

Get rid of the red eggs on the far left to get rid of all the eggs in one move.

Puzzle 5

Clear the red eggs at the bottom. This will cause a chain combo with the blue eggs. Use Dizzy Devil to get rid of the rest of the eggs before you get a game over.

Sunday, June 18, 2023

PrinceWatercress plays Bugs Bunny & Taz: Timebusters - Part 23 of 23


It's now time to beat the Count, get the Time Gem and ultimately save the day!


0:45 - The first crate.

1:04 - Stay away from the suits of armor as you walk under the  chandeliers to get them to come down. One of them leads to a switch Taz has to spin on to open up access to the gold gear on the other end. Behind the gold gear is a switch. Kick it to get into the rest of the castle.

2:37 - A vampire with a giant feather.

From here, get Taz on top of the pot, then kick the vampire and grab the feather that the vampire character dropped and tickle the three dragons quickly. Switch to Taz, then get on the platform when the pot lid rises up to grab a gold gear, jump on a button to bring down a bubble gum machine, and hit two switches to remove the locks on the door leading further into the castle.

4:26 - The bubble gum machine allows you to enter the cubby holes above for some gears as well as the second crate.

6:32 - The third crate is to the left of the stairs. 

7:18 - Here is a pattern that you'll need to remember sooner rather than later. The skull candles have a different colored base, and if you light them in the right order, you'll open something up.

8:06 - The final out-of-time character.

9:06 - The fourth crate. Apparently it was here after all.

9:57 - Grabbing the torch and lighting the skulls. Watch out for the hands in the floor that smack you, and be ready to jump when you see them so the torch doesn't get smacked away from you. Lighting the skull candles in the proper order opens up the final area.

14:15 - Getting the crystal gear in the Ghost Town. We need to grab this before we complete the game.

16:07 - The fifth crate. Apparently it was here after all.

16:55 - Meeting the Count.

18:06 - To beat the Count, you'll need to jump on the tile that he pulls out of the ground. The Count will then fly through a window. Find the broken window and get Taz near it, then jump off Taz with Bugs to find a gargoyle. Teleport Taz to the gargoyle, then switch to Taz and push the gargoyle to the coffin.

The Count will return and break another window in the process. Keep on the move to avoid the swoop attack, then run to him when he lands and kick him. Get to the next broken window and move the gargoyle over to the coffin.

On the third phase, the Count will be on a chandelier. Wait for the shadow of the chandelier to appear where you are, then move away from it and kick the Count when he comes down. Go to the newly broken window and move the gargoyle to the coffin.

On the fourth phase, the Count will dive three more times. Kick him when he is on the ground, then get to the last gargoyle and push it to the coffin. You'll open up the coffin and find the Time Gem.

Daffy will go for the Time Gem, but Taz and Bugs teleport away with it before he can get to it. Taz and Bugs head back to Granwich, and everything is as it should be again. As for Daffy, the Count has his way with him, but he is teleported back to Granwich, albeit in a much smaller size. The entrances to the eras are now closed, and normalcy is restored! Congratulations!

Saturday, June 17, 2023

PrinceWatercress plays Bugs Bunny & Taz: Timebusters - Part 22 of 23


Just one more area to take on before we face our final boss...and this area isn't half bad!


1:13 - The first out-of-time character for Zootopia, as well as the first crate.

1:51 - By hitting the bell, you can enter the next area.

2:19 - The second crate.

2:48 - By shooting a carrot at the sign, you can move the sign so that it will point at a gate and then open it. Keep in mind that you cannot teleport your currently unplayable character into the individual gated rooms; you have to get both characters into an area manually.

3:30 - The third crate.

4:08 - You'll need to float all the way up here with Taz to find the fourth crate and one of the switches. To activate a switch, jump on it.

5:46 - Getting to the top of the cage and getting the second out-of-time character. Knock him down with a carrot with Bugs, and have Taz on top of the cage to get him afterwards.

7:45 - For this area, you can move the cages on the buttons with Taz. The fountain will spout less water as you go. Jump into the opening of the fountain with Bugs like you would a rabbit hole, and you'll find the final crate and another switch to jump on.

9:19 - Dive into the pool and get to the switch before you run out of time to get the third switch.

10:22 - For this area, you'll need to use Taz to float to the other side (and all the items in mid-air) and hit the final switch. It is now night, and when that happens, things get a lot spookier. You'll end up back at the beginning.

12:52 - When the enemies break out, hit them twice to take them out. Also, all of the gates will be open now, and you can teleport the other character where you need to again.

13:32 - Hit the bird on the other side with a carrot with Bugs, then get Taz to the other side with the bubble gum to get the gear.

14:25 - Throw bombs into the water to get rid of the piranhas to get everything in the clams. As long as you keep moving, you won't get hurt.

15:08 - Monster fighting time.

15:37 - You'll be fighting more monsters here. Also, where'd the coffins come from?

17:38 - Using the bubble gum machine one last time to get the boss coin and the last of the collectibles. Summon Bugs over here and hit the small plants on the ground to produce a shrinking pill, then throw the shrinking pill at the plants to shrink them for a limited time, then quickly get to the Boss Coin to complete the level and get out.

Friday, June 16, 2023

PrinceWatercress plays Bugs Bunny & Taz: Timebusters - Part 21 of 23


Now that we're finally done with the last hub world, it's time to check out the rest of the Transylvanian Era, starting with the Haunted River, which will chew you up and spit you out if you're not careful.


1:10 - When you enter the Haunted River, you can move the raft with the D-Pad. Press X to jump, and hold Circle to crouch. Love how Taz acts as the "motor" for the raft here.

The trick to crouching is to hold Circle ahead of time in order to ensure that you don't run into anything you're supposed to crouch under.

As you go, you'll need to watch out for spears that pop out of the walls, the claw-like tree branches that swipe at you and the bats that fly out. Those will damage you, but the crocodiles and the whirlpools will instantly destroy your raft and cost you a life.

Sometimes, there will be stalactites that fall from the ceiling and stalagmites that are in the way. Both of these things damage you, which is surprising considering that the stalactites seem like they should destroy your raft on contact.

When you reach the big whirlpool, you'll get the second boss coin.

1:49 - The first crate.

2:53 - The second crate.

4:08 - The third crate.

4:28 - The fourth and fifth crates.

11:20 - And now, the hazards of trying to find places when everything looks the same.

Thursday, June 15, 2023

PrinceWatercress plays Bugs Bunny & Taz: Timebusters - Part 20 of 23


In this entry, we clean up the Ghost Town in preparation for the last of the areas that we need to go to.


1:08 - Messing with the blue guy. From here, we get him to the brain transfer machine, then we break the nearby blue gear boxes and enter the blue cathedral.

2:49 - There's not much different going on with this one. Be prepared to punch for blocks and rocks. Punch your way through to get past the double rocks.

4:45 - Fun with the yellow guy. Once we reach the yellow cathedral, we can punch the gold gear boxes for things.

6:49 - The yellow cathedral. This is the easiest of the three cathedrals. Once we complete the three cathedrals, we can get the boss coin.

9:27 - It's time to play The Rugby Game for just 25 carrots. Run towards the ball to pick it up, and press Square to shoot the ball into the goal. You'll need to kick the ball between the hands of the demon statue to the right. Hold Square down for a stronger shot. Press Square when not in possession of the ball to tackle. Once you score five points, you'll get the last of the gears for the Ghost Town that you can get for now.

From here, we head back to the raft on the water.

Wednesday, June 14, 2023

PrinceWatercress plays Bugs Bunny & Taz: Timebusters - Part 19 of 23


In this entry, we get the fourth and final era of the game in full swing.


0:58 - Our introduction to the Transylvanian Era. Daffy meets Dracula, then drinks a potion that makes him a giant monster for no reason.

2:46 - The first of five crates is at the start. Also, break the coffins for items and collectibles. Just watch out for arms that may pop out of them to hit you with a hammer.

3:25 - The first out-of-time character in the Transylvanian Era. Shoot a carrot at him in first-person mode, then kick him.

4:18 - The second crate.

6:05 - The third crate, and a big brute. Be ready to run if they chase after you. 

6:40 - This machine can be used to switch brains with the big brutes and control them. We'll take advantage of that later.

6:51 - The fourth crate, and another big brute. If you don't get their attention, kick them!

9:36 - The brutes do not play around!

10:27 - We look for the red guy, but the red guy finds us. We then have to lead him to the brain transfer machine and play as the guy. You can only do brain transfers with Bugs. While playing as one of this big, beefy guys, Square punches, X jumps and Circle performs a charge attack. You cannot go anywhere past the hub world while playing as one of these guys.

The big red guy can break the red church bell door as well as the gold boxes in the immediate vicinity.

13:12 - You'll want to break any blocks that are nearby and grab any gears that you see. You can punch the rocks, and if you are in the punching animation, the rocks cannot hurt you. When you reach the top, punch the bell. You'll leave the area automatically and light up a window on the bell tower.

15:26 - Here, we learn how to float into the air with a bubble gum bubble with Taz. As Taz, attack the bubble gum dispenser with Square, then grab the gumball that pops out and eat it with Triangle. You'll be able to float slowly into the air, but this does not last forever, and the bubble will pop and you'll eventually fall back down.

To blow the bubble, you'll need to press the X button. When you press X, you'll hear Taz blow air into the bubble. When he stops blowing air, that's your cue to press X again. This will allow you to get into the air as much as possible and get as much air time as you can. You can also control Taz with the D-Pad, but watch where you're going, as it is possible to pop the bubble because you went somewhere that the game does not want you to go while blowing a bubble gum bubble. 

The rooftop here has a few gears as well as the fifth and final crate for the Transylvanian Era hub world. You'll also find the second out-of-time character for the hub world as well; thankfully, you can press L1 to teleport Bugs over to the roof to take care of him.

Tuesday, June 13, 2023

PrinceWatercress plays Bugs Bunny & Taz: Timebusters - Part 18 of 23


In this entry, we finally beat Babba and head off to the Transylvania Era.


1:37 - This lion head is where you ultimately need to go.

2:15 - Shoot a carrot into the lion's mouth in order to raise a pillar near the big lion head.

2:46 - Break the rock with Taz to find an air stream. Use the helicopter spin that Bugs has on the stream to reach the first crate and a gold gear.

3:35 - Wait for the flames to die down before shooting carrots into the lions' mouths.

3:51 - The second crate.

5:44 - Four more lion heads. Watch for the piranhas! Also, the third crate.

6:21 - The final out-of-time character. I hit the guy with the super spin that Taz has, and I have Bugs below in case he goes down the rabbit hole.

7:06 - Here, you'll need to match the corresponding tiles to receive  a reward, and you'll have three chances before the lions here eat you. Thankfully, the tiles are always in the same spot every time, and it's pretty easy to memorize where they are all going to be, as you have four different sets of three for the patterns here, anyway. You'll get a gold gear for completing it.

8:04 - Another pillar to set up. This time, the lion heads shoot out bats you need to avoid and watch out for.

9:40 - Hit the switch at the bottom, then swim around to get the rings for a gold gear.

10:30 - The fourth crate.

11:27 - The fifth and final crate.

14:07 - Have Taz spin on a button to open the mouth of the nearby lion, then shoot a carrot into the lion's mouth with Bugs.

14:53 - The entrance to the boss complete.

15:14 - Meeting Babba.

15:42 - To beat Babba, get Bugs on a button, then switch to Taz and get Babba to run into an anvil shadow (or in this case, a treasure chest shadow). The buttons lower gongs, and you'll need to throw Babba into the gongs by picking him up with Taz like you would Bugs and throwing him into the gongs. When the gong is fully in view, you can simply look towards the gong and throw to do some damage to Babba.

After three hits, Babba will perform a pin strike. Stay away from him when he does that so you don't get hit.

Once you do this four times, Babba goes down, but Daffy will run off with the Time Gem. There's one more era to go: the Transylvania Era. From here, we can head back to Sunset Alleys, get the crystal gear, and head back to Granwich to go to the Transylvanian Era.

Monday, June 12, 2023

PrinceWatercress plays Bugs Bunny & Taz: Timebusters - Part 17 of 23


It may be blazing how and I may be seated in front of a box fan, but we're going to get through these mini-mazes to get the third and final Boss Coin for the Arabian Era.


2:15 - By moving into the magic flute, you'll need to press the buttons in the sequence in front of you. Once you do that, the front gate opens.

Be careful with some of the pots; some of them contain snakes that will strike at you. Thankfully, there's plenty of carrots to go around.

3:23 - The first crate.

3:57 - A guy kills himself. The anvil from above killed him, but he has to be lured into the shadow of the anvil in order for the anvil to kill him. Also, there are three buttons that open up their own individual gates. You'll have to go through short, maze-like paths in order to get to these gates and see which gate is connected to which switch.

6:13 - The blue switch to the right operates this gate. Here, we need to go into the doorway, but there are a few things to find outside.

6:28 - The first out-of-time character for this location.

7:01 - The second crate.

7:21 - Here, you'll need to play as Taz, pick up Bugs and throw him into the four rings. When you do that, you'll unlock the next melody that you need to play with the nearby flute. By playing the melody, you'll get a rope that comes out of a basket that leads to a pearl. You'll need all three pearls to complete this area.

7:56 - The third crate.

10:18 - Well, he tried.

10:54 - The fourth crate.

12:07 - This time, we press the red switch. You'll need to get Taz in here to push the crate with the arrow. Beneath it is a rabbit hole; open it up with Taz, then hit all the nearby blocks from underneath with Bugs. This will uncover the melody for this area. Playing the melody here will give you another rope to climb to the second pearl. Don't forget the gold gear!

12:54 - The fifth and final crate.

15:18 - The yellow switch in the center leads here.

18:20 - The second out-of-time character for this area.

18:40 - There is a balloon carrying an anvil above the man with the music box. Wait for the man to stand where the anvil's shadow is, then fire a carrot at the balloon from first-person mode with Bugs to pop the balloon and knock the man out with the anvil. If you approach the man afterwards, you'll see the next melody at the top of the screen; playing this will net you the third and final pearl as well as the boss coin.

Sunday, June 11, 2023

PrinceWatercress plays Bugs Bunny & Taz: Timebusters - Part 16 of 23


We do another racing level, but thankfully, this one is much easier compared to The Shield Race.


1:09 - In "The Carpet Chase," you'll have to make it past the other guy on the magic carpet to get the magic lamp back. If you can do that, you'll get a boss coin.

If you can get all the banners, you'll get 25 gears at the end.

Pressing Square lets you throw rocks at enemies, such as the guys walking around on the arch and the guys flying around near ground level.

There are a lot of walls and arches that can cause instant death if you run into them.

Just like with "The Shield Race," the ACME crates are easy to reach. If it's not on an arch outside, it'll be on the ground inside. Also, just like in "The Shield Race," I'm not timestamping the crates, since they're super easy to get to.

Saturday, June 10, 2023

PrinceWatercress plays Bugs Bunny & Taz: Timebusters - Part 15 of 23


In this entry, we free the rest of the genies and complete Sunset Alleys. All that's left is the other two areas.


0:59 - The Super Spin opens up The Taz Mahal Challenge, which you must pay twenty carrots to play. Here, you'll have to power up Taz's Super Spin and hit all the monkeys that are coming out of the vases when they appear as they appear before the Super Spin runs out. You must do this for three rooms. The first room has four vases, the second room has five, and the third room has six. Be sure to break stuff in the corners in each room. Completing each room will net you gears. 

5:05 - You guessed it...The Soccer Game is another twenty-carrot sports game. Square kicks the ball when you have it, and tackles your opponent when you don't. You'll need as much distance between you and the other two guys as possible, and you'll need a little bit of distance to kick the ball so that it goes over the goalie or bounces off of him and over.

10:06 - In the Fire Temple, use the tiptoe and helicopter spin so you don't break the cracked platforms on the way to the Water Genie. There is a shield you can pick up, but you can get to the genie and the gears rather easily. 

11:18 - The Genie Temple, the Boss Coin and the last of the gears you can get in Sunset Alleys for the moment are all nearby.

Friday, June 9, 2023

PrinceWatercress plays Bugs Bunny & Taz: Timebusters - Part 14 of 23


In this entry, we rescue three of the genies before taking some belly dancing lessons.


0:50 - In the Wind Temple, you'll need to create a path leading to the Earth Genie by spinning on the buttons with Taz. From here, you'll need to use Bugs' helicopter spin to land on the first tornado you create, then jump from tornado to tornado to get to the Earth Genie. Don't forget to break everything around here for gears.

6:13 - In the Water Temple, you'll need to throw bombs in the pool at the start to get rid of the piranhas. Once again, don't forget to break vases for things. After this, get both characters on the switch to open a gate, then swim to the other side with Bugs. You'll find the Fire Genie on the other side.

10:22 - In The Earth Temple, you'll need to dig holes with Taz, then put him on the pillars so that Bugs can bump them up and get Taz to the next part. Once again, there are vases you can break for gears and other pick-ups, including gears, so make sure to take a good look around. You'll find the Water Genie on the other side.

14:05 - "The Baladi Lessons" is the "Simon Says" section of the Arabian Era and has Taz and Bugs belly dancing. You'll need to pay twenty carrots to play this. Once again, you'll get a gold gear for completing it.

Thursday, June 8, 2023

PrinceWatercress plays Bugs Bunny & Taz: Timebusters - Part 13 of 23


The Arabian era has the most confusing layout out of all the hubworlds, but getting all of its gears is possible.


0:27 - Instead of Hassan, we get Babba.

1:58 - Here, Taz learns the Super Spin. Hold down Square to charge it up, then release it so you can spin for an extended amount of time. 

Also, be ready to avoid attacks from enemies before jumping on them and attacking them to get rid of them.

3:10 - The out-of-time characters are from the last world of the game, but getting to them is anything but easy. You'll need to run into them and attack them before they jump into a rabbit hole and end up at the other one nearby. The Super Spin usually does the trick.

3:40 - There are things in wells. Also, Taz can barely jump out of them.

3:59 - The first crate.

4:14 - Here, Bugs can throw a carrot in first-person mode. Hold L2 and R2, then aim the crosshairs that are now at the center of the screen at the target and press X. This does use a carrot from your collection, so shoot wisely.

6:24 - The second crate.

7:20 - The third crate.

10:52 - The boss door and the fourth crate.

11:30 - The other out-of-time character in the hubworld.

12:35 - The fifth and final crate.

14:24 - The Spinning Plate Challenge. You'll need to pay 20 carrots to play this. You'll need to grab a plate by lining yourself up with a shadow, then go to a pole and press X to place it there. Failure to catch a plate costs you one of your three chances. From there, you'll have to kick the plates to keep them spinning until the timer expires, and if any of them fall, that also costs you one of your three chances. The first wave has you spinning three plates, the second has six and the third has all nine poles occupied.

For the first two waves, you'll want to keep all the plates near each other so you can easily run around in a circle and hit them all. As for all nine plates, use an "S" pattern. If you can complete all three waves, you'll get a lot of gears out of the deal.

Wednesday, June 7, 2023

PrinceWatercress plays Bugs Bunny & Taz: Timebusters - Part 12 of 23


At this point, we're halfway through the game! With the Viking era out of the way, it's time to head to the Arabian era.


0:32 - As you go through Elmer's Domain, there are doors off to the side that you can get to. Spin the mirror around so you can get the gold gear. Look around the room for stuff to break, too.

2:18 - Have you ever tried bowling? Charge up Bugs Bunny's roll in order to take out the Viking guards here.

3:21 - Get both characters on the button, then summon Taz to get on top of the column for a gold gear. Check the corners, too. The first crate is also here.

4:58 - Position the higher mirror so it faces upstairs, then turn the one on the floor to open the door. The second crate will be here.

5:51 - Platforming!

7:31 - The third crate.

7:50 - The fourth crate. Be sure to explore this part of Elmer's Domain fully, because...

8:19 - ...if you reach the top, you'll find the last out-of-time character and an extra life.

8:45 - Get Bugs on the bottom of the see-saw, then get Taz on the top part. This will bring Bugs to a switch so you can get another gold gear.

9:55 - Stand in front of the targets as the Vikings charge at you. When you break one, head to the next target. 

10:38 - The fifth and final crate.

11:15 - Bugs and Taz meet Elmer Fuddenson. To beat him, get in front of the statue that Elmer is standing on top of and press the buttons, preferably without getting shocked. Thankfully, Elmer speaks before he shoots the lightning down at you, and staying on the move prevents you from getting zapped. By pressing the buttons, you can lower Elmer down, then kick him after he swings the hammer to take it and strike one of the triangle buttons in the center. You'll need to be quick with this, otherwise, you'll have to do the previous statue all over again.

The yellow buttons can be jumped on, but other buttons require different techniques to trigger. The green button has to be spun on with Taz. The brown buttons have to be hit from underneath with Bugs (dig the hole with Taz to ensure you can do this). The blue ones need to be stood on so that Elmer can inadvertently strike them with the lightning.

Once you beat Elmer, you'll be able to continue to the Arabian era. From here, get the crystal gear in the hubworld, then head to the next world.

Kid Icarus: Of Myths and Monsters - The OST


Here's all of the music from Of Myths and Monsters in one playlist.

Tuesday, June 6, 2023

Brickroad plays Kid Icarus: Of Myths and Monsters - Part 4 of 4


In this video, Orcos is defeated, then the long wait for Uprising begins.


World 4


The guys on the floor that look like old men will throw projectiles upwards and forwards. Also, the bees will fly at you, and when they hit you, they will fly around in circles.

The first door is at the top, above the chalice. It takes you to an information room. The person inside will tell you to use hammers to find doors.

Search the bottom of the maze afterwards to find a hot springs chamber.

After the first lava pit is a shop. After the third lava pit is a bat chamber. Past all the thorns, spikes and lava you'll need to avoid is a sacred training center. Underneath the training center is a path leading to another hot spring. You'll need to break the wall after the last lava pit to get to it.

In World 4, if you can complete a sacred training center, you can get one of the sacred weapons. The best way to complete them in World 4 is just go all the way to the top and stay up there with your wings. The second and third options will be the treasures you need if you have just the wings. The plain looking arrow actually lets you fire lasers, while the armor is, well, armor.

The black and white masks that fly up and down will split in half, with the split halves flying at you once you shoot at it. Shoot at the halves to destroy them for good.

You'll need to break through the walls to get to another shop. Further to the right is another hot spring and another bat chamber, but once again, you'll need to break walls to get to them.

The enemy soldiers move up and down as they fly towards you. Watch out for the arrows that they fire.

Before the spike maze, there is yet another hot spring chamber you'll need to break the nearby wall with hammers to get to. At the end of the spike maze is another training chamber. Just before the exit, buried in bricks, is one more hot spring.

You'll then face Orcos. For the first phase, you'll need to stay away from Orcos as he flies around and avoid the fireballs from his three-way shots. Make sure to keep your health high you can deal more damage  Orcos from a distance, and keep a good eye on where he flies.

Once you do enough damage, you'll face the second phase, which is a giant Orcos. You'll need to get up and shoot him in the face, but you'll need to avoid the many attacks first. There are the fireballs that split into an eight-way spread shot, you'll have the fireballs that fire upwards from the tail, and you'll have the multiple bats that fly from his hand. After all that, you'll get a chance to shoot Orcos in the face. Stay in the air with the big fireballs, and go all the way down for the tail fireballs. As for the bats, just stay up top while shooting at or staying out of the way of them. Just like with the last phase, keep your health at two bars or higher or else you'll have to get closer to do damage.

After you do enough damage, Orcos is defeated for good and Palutena is saved. You'll then see all of the game's enemies as you fly into the air before getting too close to the sun and losing your wings because of it. You've just beaten Kid Icarus: Of Myths and Monsters!