Believe it or not, there was a second Kid Icarus game. It was also the last one we had for years until Uprising came out for the 3DS.
Goddess Palutena, the ruler of Angel Land, had a vivid dream of an evil force invading their beautiful world.She called the valiant warrior, Pit, and sent him into a program of intense training for the upcoming attack.Pit must now find the three sacred treasures hidden in Angel Land.Be brave, Pit!Your long mission is just beginning!
This game is the sequel to Kid Icarus. Amazingly, despite the original game being released on the Famicom Disk System, this game did not get released officially in Japan until 2012, as the series proved more popular in the West than it did there. This time around, the main antagonist is the demon Orcos (based on the underworld god Orcus who punished broken oaths), who has invaded Angel Land.
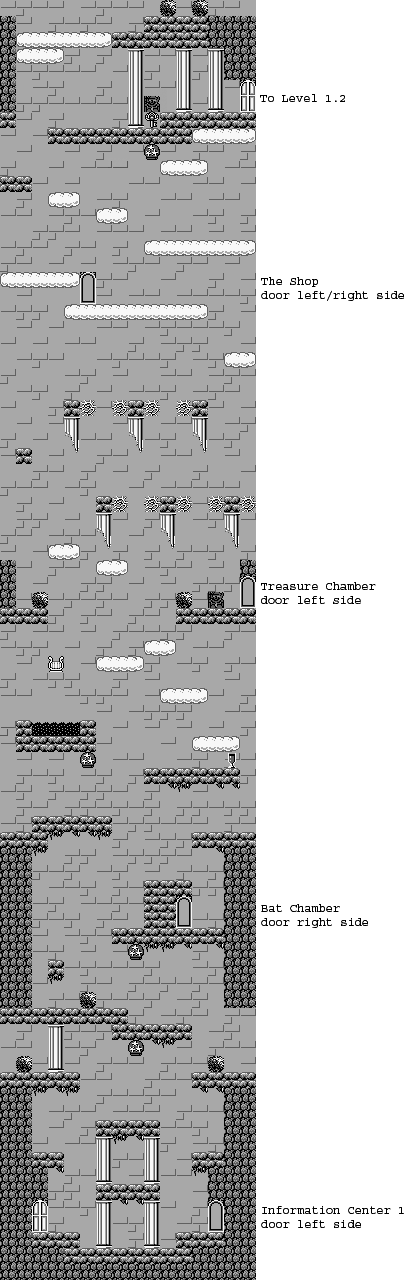
World 1-1
The game plays much like its NES counterpart, but you can flap Pit's wings in mid-air to slow him down as he descends by double-tapping the jump button A. As always, Left and Right moves around, you can duck with Down, aim upwards with Up, and fire arrows (and use hammers) with B. You can also use the D-Pad to look around where you are if you pause the game with Start, and if you press Start again, you'll enter the item menu that was present in the first game. A, B, Select and Start simultaneous resets the game, but also saves your progress, and if you hold Left, Select and B on the title screen, you can erase your saved game.
Also, the vertical stages in this game play much like the ones in the NES game, but due to the screen size and resolution of the Game Boy, going in one direction continuously eventually allows you to loop around the stage endlessly.
The door at the start contains a man who will tell you that you can break some walls with hammers to find secrets. Once you exit a room, you can't re-enter it unless you have a key.
The little serpent-looking creatures are back as normal enemies, and you can beat them up for hearts and points. You'll need the hearts and points in order to get stronger and be as prepared as you can for the final battle, as well as to buy items that will make getting through the game easier, so destroy your enemies and get those hearts! The snake enemies will keep popping up, but they won't pop up infinitely and you'll eventually run out. Take out as many as you can to get started at getting stronger.
The door after the upside-down jar full of tiny serpents is your first bat chamber. Fight off the bats for points and hearts as well as the occasional powerups, such as the half chalice that will refill some health. A full chalice will refill even more.
The skulls will fly at you and will give you five hearts for each one you kill.
Once again, the harp temporarily turns enemies into hammers for as long as you have the audio cue playing in the background.
The next door leads to a treasure chamber. Thankfully, there is a way to uncover everything without getting the God of Poverty to pop up and cause you to lose everything else, and it's covered early in AstroBlue's guide on GameFAQs (just Ctrl + F and look for "Treasure Chamber," it's pretty early in the guide). Also, you don't have to shoot all the jars to get all the items. Here, you can get quite a few hearts and hammers if you know what you're doing. Just keep in mind that it takes five hearts to shoot a pot down and break it; if you have less than five, you won't be able to break one.
Watch out for the thorns as you jump from platform to platform, as they will hurt.
You'll soon find a shop. While things such as the hammer (which let you free soldiers and find secrets), chalice (health re-fills), Waters of Life (the bottles that provide auto-revives) are here, you'll also find a key. The key allows you to re-enter any room you've already visited once. The numbers below each item show how many hearts you need to buy an item. Also, if you press Down, you can get a different set of three items every time you do, so if you need health or a hammer, you can keep pressing Down until what you want is for sale.
The next room is the exit. When you enter the exit room, your score for the current level will be tabulated into your total score. You can also save your game from this room before heading to the next stage. You'll need 4,350 points for your first health extension, so fight off those enemies!
Palutena's Key is in the statue at the end, and can be found near the exit of all the normal, non-dungeon areas. The key will usually be found in a statue. Finding and grabbing it will re-open all the doors in the area.
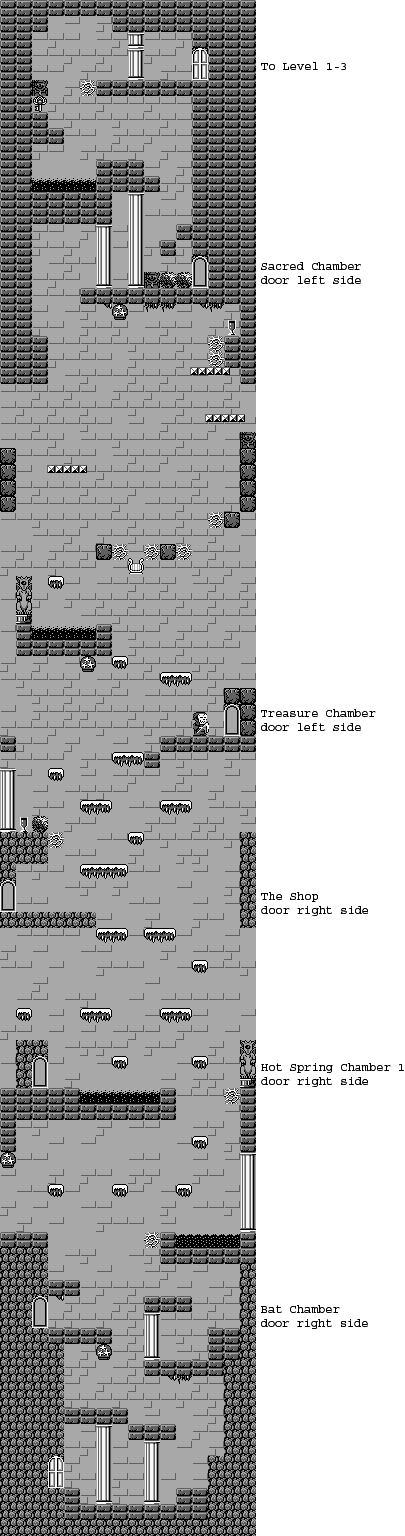
World 1-2
The first door is another bat chamber. Once again, fight the enemies that you meet here for health, hearts and hammers.
The black liquid is lava that hurts you, so don't fall into it.
The second door, on the other hand, has white liquid that acts as a hot spring. Stay in the hot spring to quickly - as opposed to slowly in the first game - refill all your health.
The third door is another store.
Once again, the Grim Reaper enemies show up, and if they see you, they will send Mini-Reapers at you and the music will change while they are panicking. You can destroy the big Reaper for a full heart and the smaller ones for some smaller extra hearts. The door near him will contain another treasure chamber.
Once again, there are moving platforms. Watch them as they move so you can land on them.
If you can get into the door blocked by the solidified Centurion soldier with a hammer, you'll find a sacred chamber where you can get an arrow power-up. By fighting enemies, entering doors, collecting hearts and doing the best you can, you can power up your arrows for stronger attacks.
The monsters that pop up out of the ground to spit fireballs pop up near the exit, and once again, you can fight them before you leave for more points and hearts.
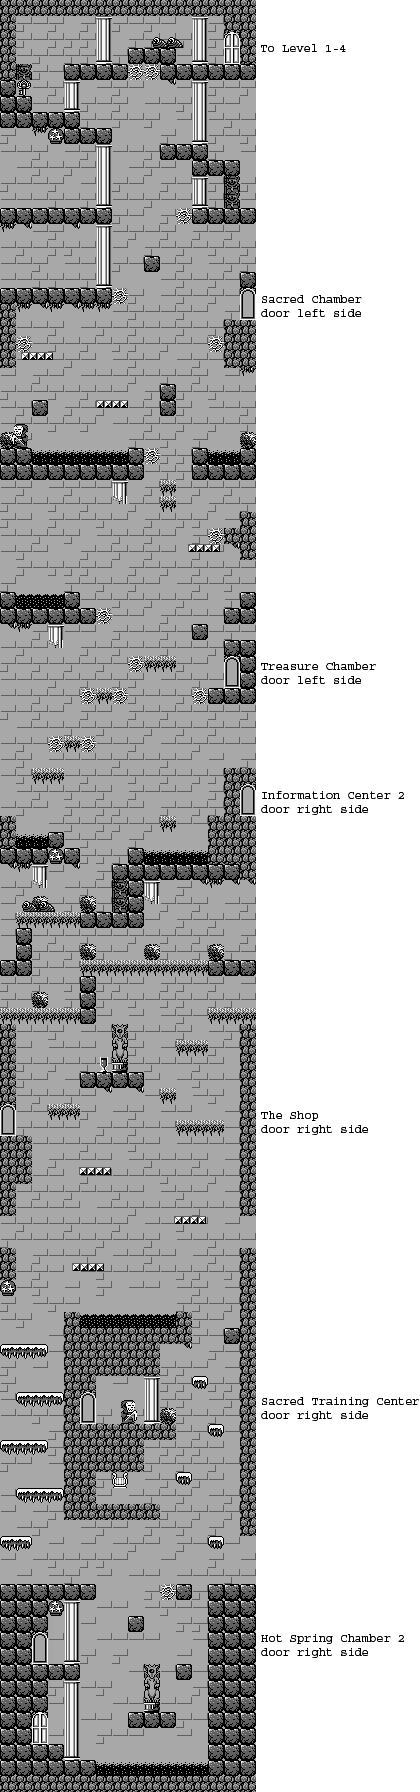
World 1-3
The first door is just above where you start and it contains a hot spring. You'll need two hammers to break the wall hiding the door leading into it; as a matter of fact, you'll need hammers to break the wall where it is hidden behind. If you can do that while you have low health, it is worth it. Since you don't regain health when you progress between levels, this is useful. In order to use this hot spring, you'll need to jump to a high platform and float over the totem enemies that shoot at you. When you land in the hot spring, the totem enemies will disappear.
The next door is behind the first Grim Reaper and contains a Sacred Training Center. Here, you'll be in one of those rooms where you shoot down those spinning tiles, and if you do well enough, you can get a choice between one of the extra weapons: the fire arrow, which gives you flaming arrows if you have at least two blocks of health; the long bow, which extends the distance of your arrows as long as you have at least three blocks of health; and the protective crystals that act as a revolving shield and show up if you have at least four blocks of health. It helps to get them early. For best results, come in with high health, stay in the center and keep shooting upwards. Also, stay out of the lava.
The leaping enemies can be easily taken out and you can easily anticipate where they are going to jump.
The door to the left of the full chalice takes you to another shop. Amazingly, the chalice will re-spawn when you come back.
The worms with the one eye will duck to avoid your shots. Take them out from a further distance to hit them.
The next door hints at the hot spring at the start that was mentioned earlier. If you need to go back, keep in mind that you can drop down from certain platforms (the ones that don't look like solid blocks) by holding Down and A.
If you die, you'll have to use one of your credits to get back in the game. When you run out of credits, the game is over, and you'll have to restore from the last area you saved from.
Shortly after that door is another treasure chamber.
The door after the second Grim Reaper contains another area where you can power up your arrows again if you're doing fine. You should be at arrow strength 3 (out of 6) at this point
The wall made of the two statues near the exit contain two half chalices, which you can get for health.
World 1-4
.gif)
The last stage of every world is a labyrinth. Just like in the first game, you'll have the map, the torch and the pencil to map out your progress, show your position on the map and see where you've already been respectively, but once again, the Internet has made them obsolete, so you might as well use that if you need to.
Once again, the Eggplant Wizards show up, and if the eggplants they throw at you hit you, you'll be hit with the Eggplant Curse, which turns you into an eggplant with legs. You won't be able to attack, and you'll need to find a hospital to remove the curse and turn back to normal (which is thankfully at no cost). Thankfully, the Eggplant Wizards are easier to fight.
If you go off the beaten path, you can find rooms that contain hot springs
To get out, you'll need to go right, up, up, left, down, left, up, up, up, right, right, right, down, down and then right from the start.
Some of the statues will contain the usual power-ups, but they can also contain monsters.
Most of the enemies are pretty simple to figure out. The mouth enemies just move back and forth, and the ghosts will move from right to left in diagonals. The slimes can move up and down and stick to floors and ceilings.
The narrow gap on the way to the end can only be entered if you're eggplanted and hit with the curse, and the path leads to the hospital. Of course, you'll need to take another way around to get back to where you need to go, and you'll have to be careful not to get eggplanted again.
The boss here is the Minotaur, who throws skulls in groups of four at an arc. Avoid the skulls and shoot at him with your arrows. The more powerful your arrows are, the better. Every once in a while, he will turn into a fireball and teleport somewhere else in the room, and you'll need to find him to attack him again. You'll have to move back and forth to avoid the skulls and hit him when you can, as appealing as it is to get right up to him and mash the B button to do even more damage (which you'll only want to do if your health is high). This makes it easier to play it safe.
Once you beat the Minotaur, it's on to World 2.
No comments:
Post a Comment