Part nostalgia-bomb, part note-taking and part FAQ, what started in GameTrailers as a video game blog is now on Blogger. This blog is a look back at video games, both popular and obscure, from the video game industry's infancy all the way to the previous console generation.
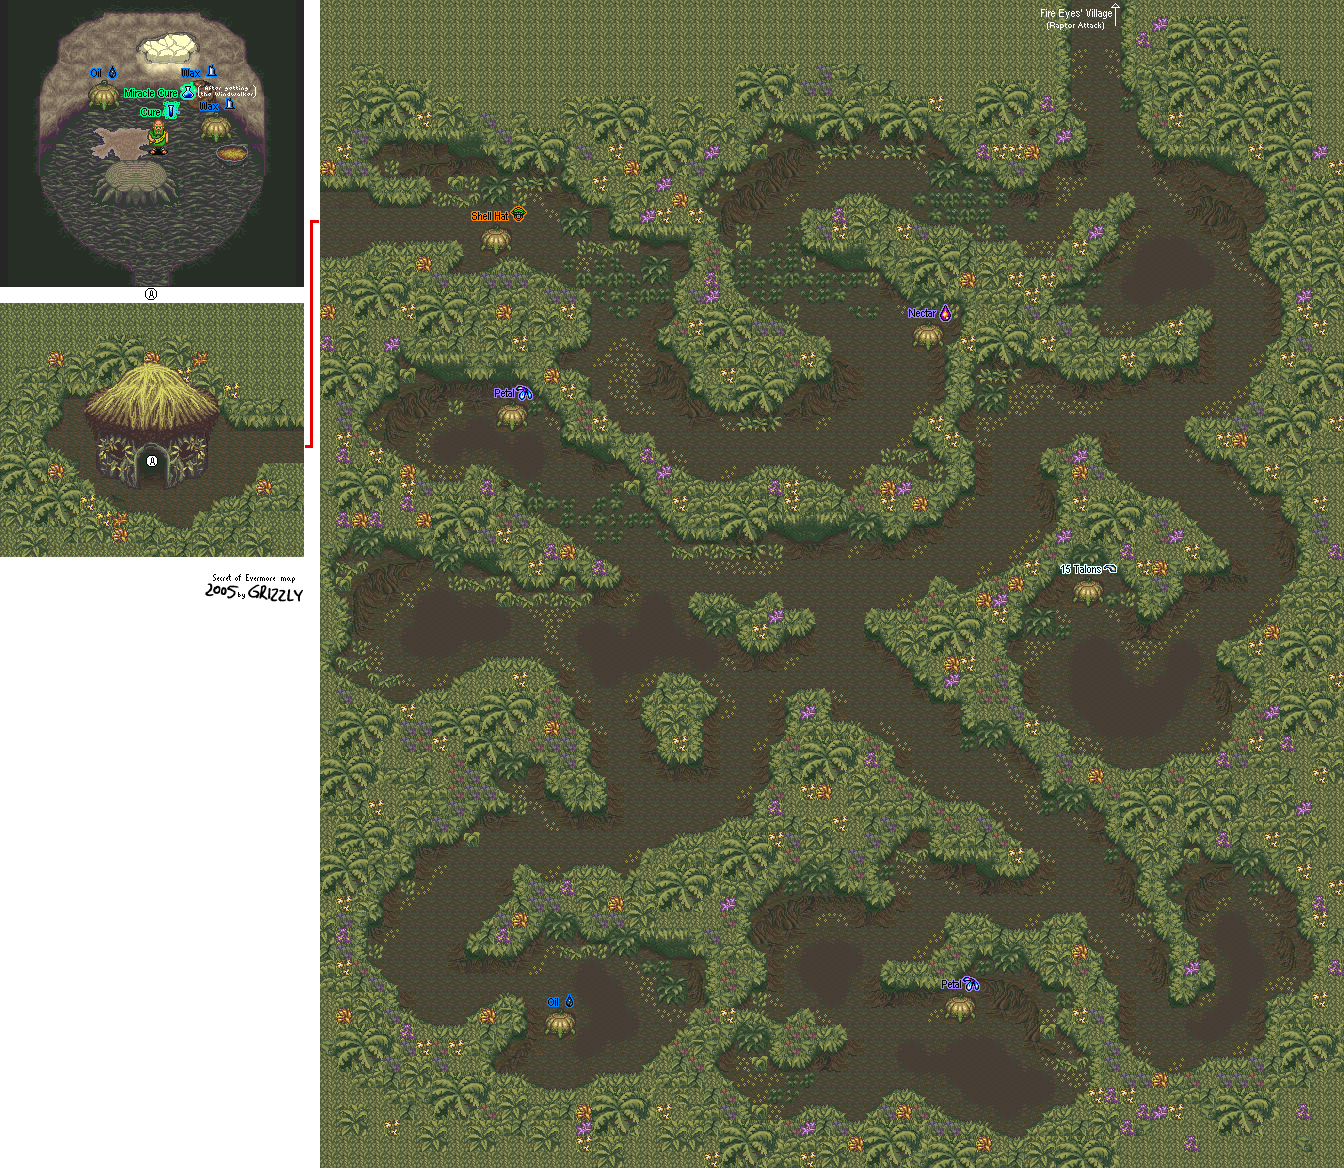
When you head west, you'll appear at the big field with the Skelesnails. Chop the underbrush down with the axe and you're out of there. Now go and head back to the village. If you chop up more of the underbrush here and go north, you'll just go to a useless (for now) area. It's possible to find some alchemy ingredients here if you cut the plant life down around here, so it wouldn't hurt to go here at the moment.
Fire Eyes's Village
Head back to Fire Eyes's hut. She'll tell you that the village is facing a new crisis: the volcano north of the village is cooling down, and she wants you to find out what's causing this. She'll also tell you about her uncle, who lived on the mansion on the hill back in Podunk, where she is also originally from. She'll also tell you about his machine which took people to a world of their own design. Not surprisingly, since she liked all things prehistoric, she was taken here. Something obviously went wrong, as the few hours she spent here has now become a few decades.
That's not all. She'll also give you a few Call Beads, which allow you to cast some powerful spells. Hold on to these for much later. You may never know when you'll need them. Then she'll give you a demonstration of her powers which explains why they call her "Fire Eyes."
Also, remember the gourds I told you not to touch? Go to them now. One of the gourds will have a Call Bead instead of a Biscuit. Also, some guy will show up that you can talk to. He'll give you the Defend formula.
Defend
1 Clay, 1 Ash
This will temporarily increase your defense, so level it up!
Jungle
Go back through the jungle area south of the village. Cut down the underbrush whenever you see it. Not only will you find some more monsters and alchemy ingredients (as well as a free Shell Hat in a gourd), you'll also find Strong Heart's hut. Go in and he'll give you another spell: Cure. Equip this, it acts as a Alchemy version of the Essence item.
Cure
2 Roots, 1 Oil
You can also purchase some ingredients from him, too.
If you talk to Strong Heart as The Dog, you'll get a free Leather Collar.
Time to go north of the village after all that leveling up.
The Carniflowers are palette swaps of the Wimpy Flowers, with one noticeable difference: if they hit you, they can eat you and do some extra damage before spitting you back out. Hitting them with 100% strikes from the ax will help, as will using the weapon you'll get later on. If your ally hits you out of it, it won't do as much damage.
You'll see a rock blocking the path into a cave. This is the entrance to the volcano, and it's blocked to you for the time being. You won't be able to do anything about that yet. If you go west from here, you'll be able to find an armor seller that sells better stuff that what you'll find at the village. Take advantage of this, you'll need it.
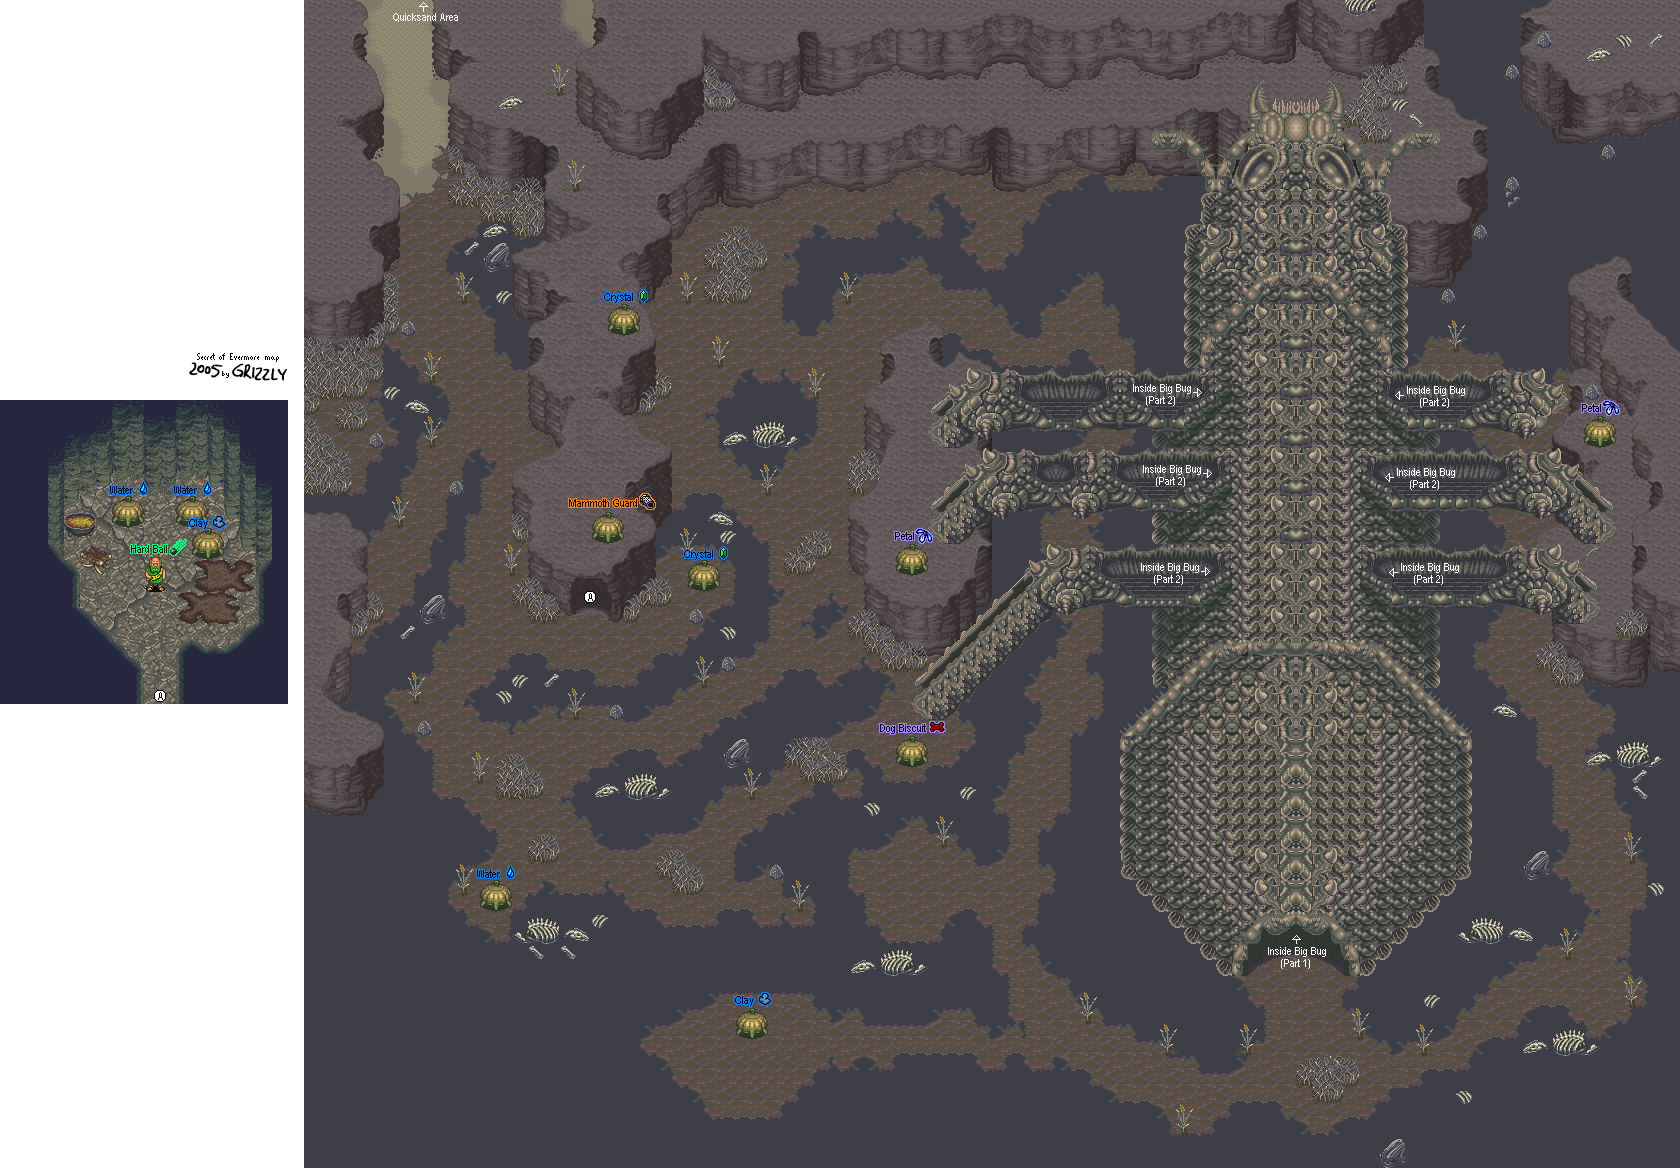
Going north from the rock will take you to the Mammoth Graveyard.
Once you make it to the other side of the maze, you'll be able to traverse this jumble of simple corridors. Take the side doors first, they have important items that you'll need for the incoming boss fight.
To beat this thing, you'll have to wait for the chest cavity of this big red bug to open up. From there, go in and smack the heart around with spells and powered-up Bone Crusher shots.
If you have The Dog at Attack Level 3, switch to him, hold B to power your attack all the way up, and let the heart have it. Keep track of the Kid's health all the while. If you can somehow manage to pull that off, you can shell out quite a bit of damage.
Thraxx has a stomp attack as well as an Acid Rain spell. Both can do some damage, especially the Acid Rain attack. The stomp attack also causes both characters to be knocked back, which makes staying near Thraxx's Heart a bit of a pain at times.
There will be maggots all over the floor. Let The Dog go after them while you stick it to Thraxx's Heart with the kid. If you need experience points, go for the arms. They can be destroyed...just remember to stay away from them as they can deal a good amount of damage, too.
When you beat Thraxx, you'll get the Spider's Claw. Attack the cocoon that is standing where Thraxx once was, and you'll rescue Strong Heart. He'll give you 10 Wax and 10 Oil for saving him, then he'll head back home.
Walk through the hole where Strong Heart walks out of and follow the path. Be sure to go south before you reach the exit, and you'll find a Mammoth Guard in one of the two gourds. Equip it, since it's a step up from the Vine Bracelet. When you reach the northeastern corner of the path at the Quick Sand Field, go east through the wall. You'll find four gourds. Loot those and continue east. You'll find another alchemist who gives you Acid Rain.
Acid Rain
1 Ash, 3 Water
This alchemist also gives you the chance to buy ingredients as well as to save your game. If you need Clay to power up Hard Ball a little more, buy it, because he's got it. Be sure to look in the gourds near him, you'll find Water and Ash to give your leveling up of Acid Rain a head-start.
Now that you have the Jaguar Ring, you can use the Jaguar Ring to move past the quicksand holes after they sink back out of existence (and move away from one if it pulls you in). You can only run as long as you have energy. When your strike energy is at 100%, you have the maximum running distance (just like Secret of Mana). The only real difference is instead of running in only one direction like in Secret of Mana, you can fully control where you run.
Take the time to explore the area, pick up any alchemy ingredients that The Dog sniffs out and open up any gourds that you can find. It's worth it.
Sometimes, enemies will leave a pile of dust or goo or bones behind. Go up to it, press the B button and you'll get an item. Sometimes it's a petal, sometimes it's a few extra pieces of money. You never know what you'll find, so pay attention as enemies will randomly drop some extra spoils.
This area is comprised of several screens, but it's not so easy to get lost.
The Maggots are pretty easy to beat up if you strike them at 100%. The Tar Skulls hang out in the tar pits where you can't get close to them, and will lunge at you if you're close enough. If you strike at them at 100%, you'll be able to reach them better. If you kill one, have the dog sniff around nearby. You'll be able to find Oil and Clay doing this.
There is a cave near the beginning. Go inside.
Bugmuck Cave
When you enter this cave, the man inside will talk to you. He isn't Strong Heart, but he does know him and says that he saw him go towards the big bug a few days ago. He gives you another alchemy formula, Hard Ball.
Hard Ball
1 Crystal, 1 Clay
Unless you search near the Tar Skulls, you won't find very much Clay. Since you don't have the maximum of 8 carryable spells yet, go ahead and equip it.
The man will also sell you alchemy ingredients if you need them, and you can save your game here.
After all that farming for experience and gold, we make it to the bug maze. You'll eventually find a large cave further into the Bugmuck. Go in.
Here, you'll have to follow a specific path in order to make it into the doorway on the other side. Some of the bridges, however, will fall apart before you can cross them, and some of them wait until after you've crossed them to keep you from conveniently going back.
If you get trapped and are unable to move any farther, go to the nearest side wall of the maze. You'll slide all the way back down to the beginning and you'll be able to start over.
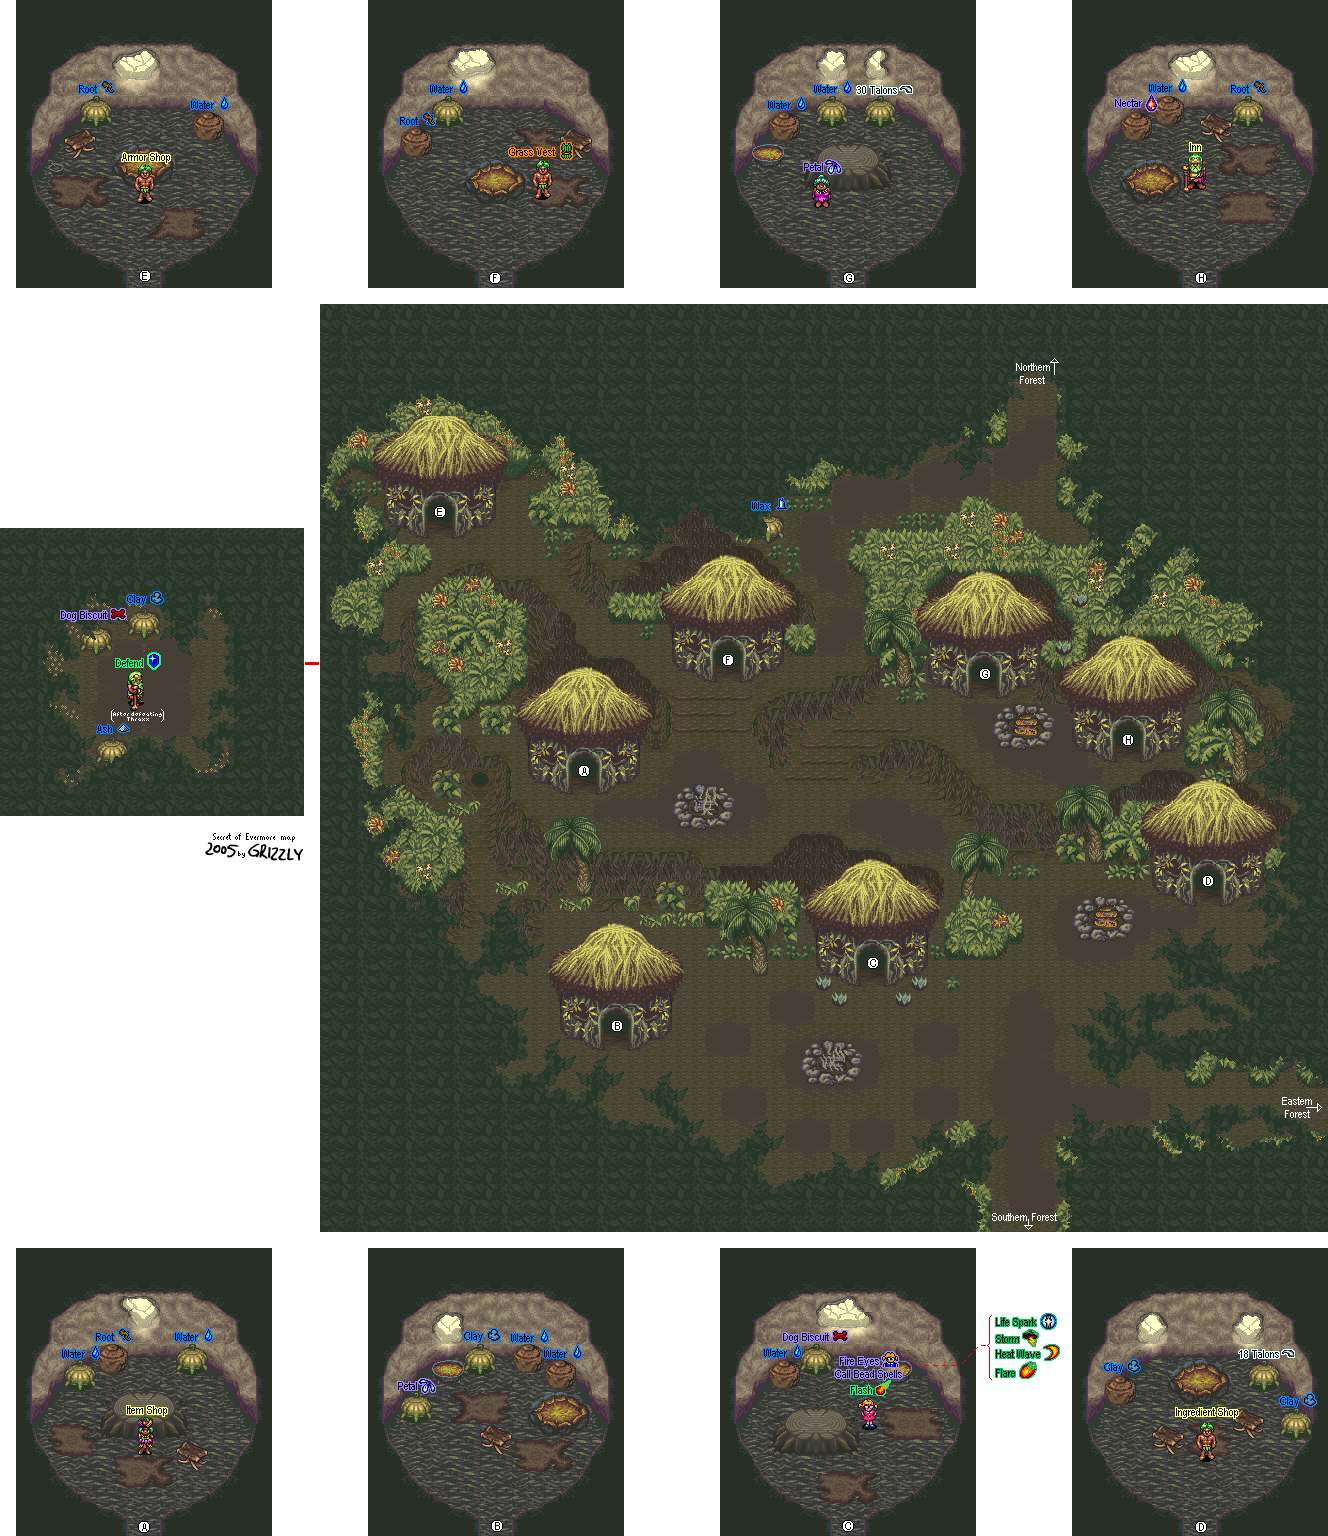
Once you're in the village, you'll be able to save your game at the inn (in the northeast corner of the village), and also look through the houses and open whatever pots and gourds you can find. Open them all, you'll need what's in them. Also, check the fire pits for Ash.
If you take control of The Dog and talk to people, they'll react differently than they would with the kid. This is pretty interesting, and in some cases it's a bit helpful.
There is an opening into another area to the west, but don't take anything over there. You'll see why later.
There's a store a bit to the left of the inn. You'll be able to find some items that you need here. Just remember that you can only carry six of any specific item.
Further northwest is the armor seller. The armor here is very weak - it's all made of grass - but it's still better than the armor you have right now. Which is nothing. Hey, at least you have an excuse to farm experience and talons a little later on.
The hut just south of the inn will be the first place in the game that sells alchemy ingredients. Don't worry about that just yet. For now, just take the stuff that's in the gourds inside and head back out.
The hut in the center of the village is Fire Eyes' residence. You'll find out that she is Professor Ruffleburg's niece, Elizabeth, as well as the project that has everyone involved - and you - stranded in what appears to be an alternate world.
Fire Eyes's Hut
Fire Eyes will give you Flash before you leave to fulfill your first mission: find Strong Heart in the Bugmuck, east of the village. Equip it before you leave.
Flash
1 Wax, 2 Oil
This is a purely offensive spell that lets you do some more damage than you usually could at this point. The alchemy ingredients store will now be able to sell you ingredients for this and future spells...provided you have enough Talons, of course.
Fire Eyes's Village
Before you go, talk to the guy in the house near the armory. He'll give you a free Grass Vest.
You'll meet a new enemy here: the Skelesnails. These things will try to leap towards you and hide in their shells on the way down for their tackles to have maximum impact.
Use this area to power up the Flash spell, get experience for both characters, and get money. You'll still run out Skelesnails eventually, but at least you'll have some money to recharge at the Inn when necessary, get armor for both characters and maybe...just maybe...get a good stockpile for Flash.
One of the holes takes you to the cave that is separated from the rest of the level. If you go in and buy an item, you'll get the Jaguar Tooth, which allows you to run by holding the A button. It also comes with a nifty royal purple pouch, which lets you carry other Charms as well as Trading Items (those won't come into play until much later).
A major experiment is about to conclude...however, it goes awry...
Thirty years later...
A boy and his dog happen to come across the abandoned laboratory where the experiment took place. They are transported to a strange place...
The boy tries to find his dog after he chases a cat, but he loses track of the dog. Thinking that he went into the abandoned house nearby, he heads inside only to find a bunch of crates and a teleporter. He also find his dog, who chews on some wires. The teleporter zaps him into another area...
A robot butler sends the boy into a room...and our adventure begins...
Robot Battle
All right, once you're in the room and The Boy's HP appears (I'll refer to the heroes as The Kid and The Dog, since you'll want to name them something different), you finally have control of the game.
Go up to the pod near the stairs and you'll get the Bazooka. When you grab it, two Guardbots will pop out of the portholes below. Wait for your attack meter to hit 100%, then let 'em have it!
When you beat them, you'll enter the porthole for an escape pad of some sort, and you'll find your dog in the cockpit. Unfortunately, you won't be able to control it, and you'll crash-land somewhere...
When you crash land, you'll end up in a jungle. The escape pod is shot and the bazooka is lost to you, but you find your dog...or at least, you assume it's your dog. You throw a stick to prove it's your dog, but he comes back with a dinosaur bone. This is the Bone Crusher, and it's not only your first sword but also your first weapon.
The Dog has only one attack, and it's a lunge attack. It can be powered up to Level 3, but once it's powered up, it can do some immense damage, especially later in the game.
Walk around the jungle and attack the Wimpy Flowers and Mosquitos. If you find any gourds, pick up the stuff inside. You'll usually find Petals and Essence, but it's better than nothing.
If you see any overgrowth on the ground, just ignore it. It's nothing more than an obstacle that you won't be able to get past at this point.
If you ever see the dog stand somewhere and sniff continuously, head down there and press the B button. You'll pick up an alchemy ingredient. You'll need these for later, so grab as many as you can.
It should be mentioned that if The Kid dies, the game is over. Even if The Dog is still alive, you must keep The Kid's health above 0 at all times.
Press and hold the L or R button to let The Dog sniff around. If he walks somewhere when he does this, keep holding it. Walk up to where he stops, hold the Control Pad near the wall and press B to find an alchemy ingredients. Don't worry, these things will come into play later.
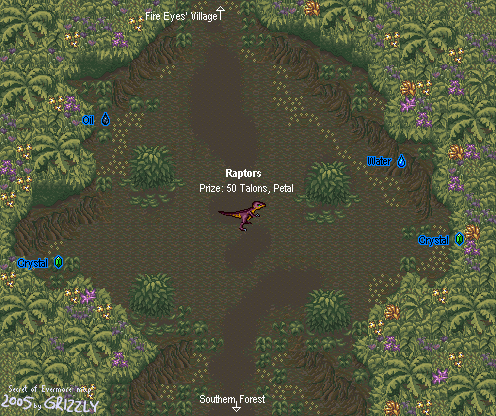
You'll only see this part of the jungle once. When you make it to the north exit of the jungle, you'll come across four bushes. Touch the leaf that falls in the center of this area and you'll trigger the boss battle.
Stay out of the center. That way, you won't be attacked when the Raptors jump out at you. When they come towards you, be ready to swing. If your attack is at 100%, you'll be able to do some double-digit damage.
The first three raptors have 40 HP, but they are beatable. When you defeat the first three, the music gets faster and so does the last Raptor, who has 80 HP. Thankfully, if you stand in one of the corners, you can see him coming and smack him whenever possible.
If you beat them, you'll get 50 Talons and a Petal. The Petals heal 40 HP, while Talons act as the currency of the land you're currently in.
If you die before you can do it, no worries. This is the only battle in which you can die and still continue on. You'll end up at the inn afterwards. Just don't make a habit of it.
This game definitely saves the best for last! At least there isn't a boss run.
Scene 7
The Penguin's Lair
Section 1 (beat-'em-up)
You'll be dealing with basically every enemy you've met in the beat-'em-up sections ever.
First, it's bomb-carrying dark green Thin Clowns and Bikers, then Fat Clowns and Fire Clowns, and finally Knife Throwers and Sword Swallowers. You'll have the blue and green Thin Clowns interspersed throughout all of these groups, too.
The Penguin has an army of his namesakes packing heat in the foreground and background. They'll be firing rockets from both sides, throwing you into a three-front battle. Block the rockets to take less damage from them, just in case they come for you, as they're impossible to avoid once you're right under them. Otherwise, switch to the grappling hook and swing around so the rockets end up being way off when it comes to tracking you.
Whenever you see a lone green Thin Clown cartwheel onto the screen after you finish off a slew of enemies, you're at the end of an attack wave. Beat him down to continue on.
You'll get a Small Heart and an extra Bat Test Tube at the very end when you reach Arctic World. You'll also be dealing with three Sword Swallowers at one time, and if you don't bob and weave with these guys, you'll have a hard time with The Penguin's last line of defense.
Section 2 (side-scrolling)
You'll be facing the Duck Vehicle. You'll have to jump onto the platform underneath the duck, then walk back. After doing this a couple of times, it will shoot rockets. As you throw Batarangs at this things, block the rockets (unless you're far enough away from them and can still hit the vehicle, which is painfully hard to do). You'll want to lose as few lives to this thing as possible.
Section 3 (beat-'em-up)
You'll fight The Penguin once more. Also, the inside of the duck is bigger than the duck himself. I'm assuming that's the inside, because I've never watched the movie. How does this work?
Don't dally around when he starts walking around, otherwise he'll hop forward and sidestep as he shoots at you with his umbrella machine gun. If you grab him and throw him to the ground, stay away from him when he's on the ground. He'll leap back up when he gets up, and if you're right in his path, he'll grab on and bite you.
After you do some damage to him, he'll start flying around. Stay away from him and don't even bother trying to attack him as he flies around leaving a movement trail behind him, as he'll be an invincible human battering ram at this point. He'll fly around in a diamond-shaped pattern. When he runs half a diamond, he'll throw umbrellas on the ground, then he'll cover the rest of the distance and fly around a little more when he reaches the top of the "diamond," giving you a chance to hit him and/or grab him for a quick combo. When he's flying around fast enough for him to smack into you, go the opposite direction he's going. If he's going clockwise, go counter-clockwise, and vice-versa. Punch him a few times and do the two headbutt-throw combo. This way, you'll hit him out of his off-screen flying attack and he'll be walking around on the ground again, ready to repeat his pattern.
If he does manage to fly off the screen, throw a Bat Test Tube down just before he can hit you. This will let you get past the attack without getting hurt, as it's really tough to see coming and dodge since you won't be able to tell which side of the screen he'll reappear at.
When you beat The Penguin, you've saved Gotham City! The Penguin's evil tirade is finally over! You did it!
Also, the replay of Super Back to the Future Part II would not happen for another year or so, due to my set-up for recording Let's Plays being very limited at the time. So you get another game after this instead.
This is perhaps the hardest scene in the game before the last level, and you're going to find out why really, really quickly.
Scene 6
Circus Train
Section 1 (beat-'em-up)
You're going to be dealing with Fat Clowns at the beginning. Grouping them up and trying to deal damage to two of them at the same time works well here.
The background will eventually change from the outside world to the inside of a tunnel. You'll start seeing a biker moving in and out of the background tossing bombs onto the top of the train. Whatever you do, don't be near the background or in the flight path of the bombs. If you do the former, you'll most likely be performing the latter as well. If you're in the bombs' flight paths, you'll instantly get hit as soon as the bomb touches you. Once again, cheapness at its finest. You could stop the biker with a Bat Test Tube, but it's just going to come back at the same exact time interval, so it's not even worth it just to keep the biker from throwing one bomb. You'll be dealing with a lot of Knife Throwers and dark green Thin Clowns that carry bombs, adding an even more explosive element to this slice of the ride.
You'll eventually end up back outside the tunnel, but you'll also have to jump over arches positioned over the tracks. The arches will sweep you off your feet and cause damage, but it will cause instant death to any enemies who touch them...except the blue Thin Clowns, who will jump over them even if they're facing you. Apparently even the blue ones have a special talent. If you can somehow stun them in time, the arches will still kill them...but I wouldn't even recommend doing this on Mania unless you got the timing of the arches' appearances down to a science.
When the background is covered by a building, you're nearing the end. You'll be dealing with Fire Clowns, Sword Swallowers and Knife Throwers. You'll be dealing with two waves of them, then you'll finally get a chance to refill all of your health with a Big Heart before the train stops, signifying the end of the first section.
Section 2 (beat-'em-up)
When you get off the train, you'll immediately be in a boss fight. This time, you'll be facing an organ grinder. The Organ Grinder will have blue Thin Clowns flanking him throughout the battle until you get rid of them all. At the outset, the Organ Grinder will try to get in close and whack you with his organ. If you can throw Thin Clowns into him or - even better - knock his head into that of a Thin Clown, good for you. You'll be doing a lot of throwing just to keep the Thin Clowns off your back. If you need to, use a Bat Test Tube whenever you're cornered by the boss and the Thin Clowns.
When you get the Organ Grinder down to a light green health bar, he'll switch tactics. Instead of trying to go after you, he'll run away from you, and quickly! He'll go to one side of the screen and try to shoot you down with the machine gun hidden in his organ. Since he won't even use close-range attacks at this point, it's a lot easier to get close to him as he's running away from you (walking into him diagonally really helps). From there, you can do some headbutts and throws on him until he's dead. Just remember to sidestep whenever his machine gun pops out.
When you beat this scene, you'll finally come upon the old Gotham City Zoo...and Arctic World! You're at The Penguin's Lair now, and your adventure is just about over. It's just you, even more clown lackeys, and The Penguin.
This level looks just like the end of the cutscene before the first level, minus the Batsignal. Here, you'll be racing down the streets of Gotham City taking down (and avoiding) the many bikers in your path.
Press Y repeatedly to shoot at enemies. Holding Up and Down on the Control Pad allows you to speed up and slow down. While there isn't any noticeable speed difference if you're standing still, it allows you to make faster turns when you're sped up and narrower turns when you're slowing down. Holding Up while turning works wonders, as you will find out, as it allows you to avoid enemy rockets with the greatest of ease. Holding Down works well when getting between rows of bikers.
You'll first see bikers leaping out from behind the Batmobile on their bikes. They can easily be shot down and destroyed if you're quick enough.
When the bikers are coming straight at you in rows, stay in the center line of the road so you can avoid them all and take as little damage from colliding into them as possible.
The bikers that show up ahead of you and ride forwards will turn back every so often and fire a couple of rockets before you're able to pass by them. The easier the difficulty you're playing on, the more likely you are to destroy them before the game allows you to pass by them. You're better off just focusing squarely on avoiding all of their rockets on Mania, since these bikers have light green energy bars and can be pretty relentless with their attacks.
The purple Batman icons show up in lulls in the action, and you'll see a few of them twice. You'll get 500 points if you can pick one up, which is 300 more than what you'll get out of the bikers, so try to pick up as many as you can. Once you pass by the first wave of Batman icons, you'll see the pattern of bikers you see at the beginning begin again.
You don't want to die in this scene. If you do, you'll be sent back to an earlier point in the level. If you die against the boss, you'll have to start the entire fight over.
The boss in this level is the Campain Vehicle. (Yeah, just one in over a million Batman puns.) This vehicle has two guys hanging onto the back of it that are not only firing rockets at you from the back, but also flinging firecrackers at you! The rockets can be avoided as they normally would be, but you'll have to get all the way to the side to avoid the firecrackers, assuming you stay in the center as much as possible between attack waves. All the while, you'll be shooting down the Campain Vehicle while avoiding bikers. When you get the Campain Vehicle down to the normal yellow energy bar, it will start firing more rockets at you than normal. Weave around while avoiding the bikers, and keep mashing the Y button to make your way to victory!
When you beat this scene, Batman's reputation is restored while The Penguin's true intentions to bring bedlam to Gotham City are revealed. He begins an initiative to kidnap all of the first-born sons in the city, and it's up to Batman to save the children!
I should have known that the part where the grappling hook pulls a piece of the building out came from the movie. Kudos to Konami for letting the player do that!
The enemy placement in the first section of this scene is completely random. You could face from four to as many eight blue Thin Clowns in the very beginning, and the way they enter the screen will either be down from the ceiling or from the side of the screen. I finished off enemies as soon as they appeared and got eight Thin Clowns as a result, but I'm not sure if either speed is a contributing factor or it's completely random.
The enemy placement on the way to the door is also random. Sometimes you'll have three Fat Clowns drop from the ceiling at once, and sometimes you won't. Either way, throwing enemies into the background wall is a huge help.
The second section can actually be memorized compared to the first. You'll be dealing with Fire Clowns and Sword Swallowers. Once again, you can throw enemies into the background wall if you need to.
Section 2 (beat-'em-up)
You'll now commence the second battle with Catwoman. This is basically the same battle as the one from the end of Scene 3; the only differences are that you cannot throw Catwoman into the background wall (probably because the wall was programmed to be empty space due to the Ice Princess being tied up in the chair in the background) and Catwoman does not perform the speedy V-patterned attack that made the first battle aggravating. The same strategies apply, and she still has the same annoying kick, dashing scratch and whip attacks. Yes, the dashing scratch can still hit you on the very last frame. Don't use your Bat Test Tubes against Catwoman, as you'll need the three that you have for what happens next.
Section 3 (side-scrolling)
You'll then hit the rooftops and face The Penguin for the first time. The Ice Princess from the Gotham City Christmas celebration is being held hostage again, this time on a building ledge. You'll be pelting The Penguin with Batarangs as he flies around, but take care not to get hit yourself, which is all too easy to do in some cases!
The Penguin will start by throwing umbrellas down. About a second after they hit the ground, they'll explode. Stay away from the umbrellas and stay on the move, and when Penguin's feet are around the same level as Batman's head, duck. He will hit you from running into you.
When he floats in place above you, he'll start throwing umbrellas to the side. He'll throw four in the easiest difficulties, but from Hard on he'll add one more depending on what difficulty you're playing on. In Mania, he throws seven. To avoid them, the pattern is to duck, duck, duck, jump, duck, jump, duck. Feel free to cut the end of as much as you need to, as this pattern never changes on the easier difficulties save for the number of umbrellas he throws. When he flies further up and off the screen, be prepared to either pelt him with Batarangs when he shows up from either side of the screen. You'll have to hit him several times to be able to duck under him in time, so if you can't, feel free to throw down a Bat Test Tube. Be prepared to lose at least one or two lives.
When you beat The Penguin, he'll throw an umbrella down in front of the Ice Princess. When it opens, bats will come out of it and will push the Ice Princess off the building. The Penguin will succeed at turning the people against Batman, but things aren't what they seem...
This scene is actually quicker and easier to get through than what you've seen so far. It's also really fun until CATWOMAN.
Scene 3
On The Prowl
Section 1 (side-scrolling)
You'll be going up buildings in a window-washer's scaffold. As you go up, Thin and Fat Clowns will be smashing through windows to get a piece of you. Stay away from them and knock them off with Batarangs while they're still in the air.
When the scaffold stops, use the grappling hook to go to the right and catch a ride on another scaffold. There'll be more clowns this time compared to the last, but it's not really that much harder.
Section 2 (side-scrolling)
This time around, you'll be walking on rooftops. You don't want to mess around after the beginning and near the end, because it's a long way down and it's instant death if you plunge.
The windowsills shortly after the beginning will crumble when you stand on them. Keep on moving like normal and you'll make your way through before you can plunge down the bottomless pit and lose a life.
If you can make it to the top platform, great. That's where you want to go, as you can completely refill your health meter and get an extra Bat Test Tube there. Even if you don't need the health, pick up the health pickup anyway. It gives you points regardless.
If you dropped down from the edge of the building you started from, you'll find a Bat Test Tube to your left. You definitely can't miss it.
The Bazooka Clowns appear here. They're much easier, since all they do is fire their rockets and jump around. Since you can duck, do just that and pound them with Batarangs.
You'll eventually go up on a large steel girder. Watch out as you go up, as bombs will drop along with Thin Clowns and Bazooka Clowns. Two Tall Clowns will also show up for the ride as well. Better enjoy fighting them, because this is the last time you'll see them in-game.
Once the ride stops, you'll be able to go to the right, use the grappling hook to get over the bottomless pit, and make your way to the boss fight. Don't forget to pick up the big heart that's just at the bottom as you go.
Section 3 (side-scrolling)
This is the first of two fights with Catwoman in the game. When she gets near, punch her first and then do the two-headbutts-and-a-throw combo. Watch out when she's doing her backflips, as she'll do a nasty attack where she zips across the screen in a V-Pattern. In the lesser difficulties, she zips from one side of the arena to the other twice, but on other difficulties, she'll do it three or four times. On Mania, she'll do it five times. It's usually in a V-pattern, but it's still best to keep an eye on her and move up and down accordingly.
Her cat scratch, kick and whip attacks all have some range. Use your punches to stun her so you can inch your way forward and put her in a grab combo. Her cat scratch is the worst of the three attacks, as she dashes forward whenever she performs it and you can be hit even at the last frame, which can be another embarrassing cheap hit/death source.
When she's near death, unleash all the Bat Test Tubes you have on her. She should be able to go down then.
When you beat Catwoman, she'll jump off the building and escape without a scratch. She'll then join forces with The Penguin to help him create a trap that Batman can't resist...
By the way, I mention this in the first Let's Play: there are two versions of the game's ROM. In the first one, Catwoman doesn't leap off the building until after you get your bonus points. In the second (which I use here), she leaps off after you defeat her. The copyright screens on both versions are very similar save for one detail.
In the first section, you'll start dealing with a bunch of Thin Clowns. For the second set, you'll meet a new type of Thin Clown: the brown ones. These guys juggle bowling pins and will throw them at you, but if you hit them with a Batarang they'll instantly lose all their ammo while stunned and will be forced to come at you like all the other Thin Clowns. Be sure to toss the enemies into the background wall when you can!
When you come out of the bridge, you'll meet the dark green Thin Clowns. They're just like all the other ones, but some of them will carry and throw bombs. If one is standing still with a bomb, just get the entire bomb on the screen and stay away to force them to throw the bomb just before it explodes. Some of them also walk towards you with bombs. If that happens, throw a Batarang to stun them and force them to drop the bomb. The bomb will land on the floor with a boom, giving you free damage on the clown and any souls stupid enough to be right next to it when it lands.
I found after completing the first LP of this game that if they do manage to throw the bomb, you can pick it up with the Y button and press it again to throw it. It can still blow up in your hands much like in the enemy's, so be cautious.
You can throw enemies into fences, benches and signposts to cause some pain along with collateral damage. The signposts make an interesting "pwung" sound when you slam an enemy into them, which I like a lot.
The Fat Clown here will have a light green health bar, so you'll have to pummel it a little more than usual. It also has some AI, as it will jump onto the park bench and jump again from the bench, trying to crush you from above. Stay on the move when this happens, as you can't hit the Fat Clown out of this attack.
Some Bikers will just breeze on by, while others will move back and forth trying to kill. You should always try to throw a Batarang at them regardless for the points. The ones that do the former will show up after certain waves of opponents are destroyed or when you reach a certain part of the scene. The hard part about those types of Bikers is getting down their time of appearance to a science, but it can definitely be done.
The Knife Throwers have the smallest amount of HP, but they have a close-ranged knife stab attack that's hard to predict coming as well as the ability to throw knives from the other side of the screen. This is faster and harder to see than the Bazooka Clowns' ammo, believe it or not.
Section 2 (side-scrolling)
You'll now be in a department store. Hit the Thin Clowns before they can slide down the escalator railing, and keep still so you can keep an eye out for the Fat Clown bouncing down behind him. You'll be doing this twice. After three more Fat Clowns, you'll come across two pairs of elevators. The first pair has a Thin Clown in each one, while the second pair contains two Thin Clowns in the elevator to the right.
You'll earn more points by throwing a Batarang into an enemy in the side-scrolling sections, as opposed to punching them at close range (200 points vs. 100). Keep that in mind.
When you make it to the Circo Porto, the windows will break and the whole department store will be set ablaze! You'll have to go right and use the Grappling Hook to get past the flames on the ground, taking out Tall Clowns and Fat Clowns as you go. Watch out for fire dropping from the ceiling as well as falling lumber from the ceiling, as it will be also on fire and fall to the ground when you're just under it. You'll have to press A repeatedly to get past the huge pit of fire and also trick that piece of ceiling lumber into falling. When you reach the Tall Clown at the end, avoid the torches he throws while they're in the air and wait just next to him. The floor will collapse, giving you the chance to move back and finally nail him with some Batarangs.
Section 3 (beat-'em-up)
You'll meet a new enemy here: the Sword Swallowers. They'll slash at you with their swords, and their weapons cause hellacious damage! If you throw a Batarang at them, they'll simply repel it by swinging at it, nullifying any attempts to stun them. You'll have to bob and weave to get close to them without getting hurt.
Sometimes, if you're far away enough from them, they'll perform their sword-swallowing trick. If you hit them with a Batarang while they're doing this, not only will it connect, but you'll also get points and land some damage on them!
You'll be dealing with the Sword Swallowers as well as some Bazooka Clowns at the beginning of this section. With the power behind their attacks, this is a dangerous combination! Be ready to move around as you take these guys and throw them into one another. You'll want to do as much damage as possible in the shortest amount of time here.
You'll then be dealing with both Sword Swallowers and Fat Clowns. This is a bit easier, since you can easily throw enemies into each other.
When you reach the intersection of this cold, empty street, you'll be dealing with some Thin Clowns. They'll all be of the light green, dark green, and blue varieties, and some of the dark green Thin Clowns will come out with bombs.
After this, you'll deal with a few more Thin Clowns before fighting the Tattooed Strongman, who rips up the newspaper he's reading and comes straight at you. Believe it or not, this guy is really easy if you keep walking diagonally at him and do a bunch of grab combos. When you toss him to the ground, you'll want to go down and forward before going up and forward once you're close enough to him to grab him. He'll have some blue Thin Clowns to back him up. If you can grab the boss and one of the clowns and bump heads, great. That's a lot of time you'll save against this guy. Also, don't be afraid to use up your Bat Test Tubes if you're near death here.
So I decided to play this game again, since my commentary got a little better at this point. Unfortunately, I didn't do any practice runs because I didn't think I would need to and I was horribly out of practice as a result...and it shows later on.
Just like in the 1992 movie of the same name, you'll be playing as Batman and taking down The Penguin. Catwoman is also prowling around, and her intentions aren't quite clear. It's up to you to beat The Penguin, defeat the Red Triangle Circus Gang and its horde of clown thugs and bring peace back to Gotham City!
Scene 1
Ambush In Gotham Plaza
Section 1 (beat-'em-up)
When you start the game, two bikers will ride past you after you show up. You'll only get enough time to throw a Batarang at one of them to get some points right off of the bat, so be sure to do it.
In the first section, you'll be able to move around like in other beat-'em-ups, particularly Final Fight.
The Thin Clowns come in two varieties in the first level: light green and blue. The green ones can cartwheel all over the place, making them immune to attacks (including Batarangs) and letting them move around the screen in a mere second. The blue ones cannot. Regardless, use a boomerang to stun them to give yourself enough time to get close and whack them.
Speaking of whacking things, the controls in the game are great. You can carry an enemy while grabbing one for a short time, which allows you to either headbutt and throw them into enemies or run into another enemy and grab two at once, giving you the ability to knock their heads into one another to cause some massive damage. You can also switch between throwing the Batarang and swinging around on the grappling hook and kicking enemies, but the latter item costs a little bit of energy to use. Pressing B and Y simultaneously will perform a super attack that covers what's in front of you and behind you, but it also uses a little bit of energy to perform.
Punching an enemy three times, grabbing them and headbutting them twice before throwing them onto the ground gives you the most possible points from an enemy. With an extra life awarded every 50,000 points, you're going to need all the points you can get! (Just remember that you can't stockpile past nine lives.)
Walking into an enemy lets you grab them. Press Y to do the headbutt. Hold a direction on the Control pad before pressing the Y button, and you will throw them. While having an enemy grabbed, you can walk around with the enemy in your hand for a short time before Batman lets go. If you grab another enemy during that time, you'll grab them both. Press Y, and you'll butt both enemies head-first into each other.
The Bikers move around on bikes and try to run you over. While you could jump kick them to damage them, the best thing to do is either throw an enemy at them or hit them with a Batarang to get rid of them in one hit. If they run into an explosion caused by another bike, they'll also be dethroned off their chariots of death if they ride right into the explosion.
The Bazooka Clowns carry around bazookas, and their rockets pack a punch! Blocking them lessens the damage a little bit and keeps you from being knocked to the floor, but tricking them into either firing at another enemy or grabbing an enemy and using it as a human shield works wonders. As you can see, they're prone to performing friendly fire on their comrades constantly. They are also the only enemies that can destroy destructible props on the ground such as garbage cans with their attack. They can also perform hit and runs - shoot an enemy (or you) and then run away after they hit a target.
If there is a wall in the background, you can hold Up and press Y to throw the enemy into the wall. (I say Up and A, but it's really Up and Y. So much for talking and playing at the same time.) You can do this to cause some damage to store windows and other enemies, and it also gives you more points compared to just throwing the enemy onto the floor. Of course, if any enemies are in the path of the enemy you're throwing into the wall, they'll get knocked to the wall with him. Stuff like this and the ability to knock two enemies' heads together are why Game Informer has mentioned this as #10 on their best movie-to-game adaptations of all time back in 2011, as well as the best Batman game before Arkham Asylum. Now that's what's up.
The Fire Clowns have two attacks: a trident stab as well as a fire-breathing attack. Both not only involve fire, but they also have some range. Stunning them with the Batarang and staying on the move against these guys works well, but just be careful not to run straight into their attacks or their attack range if they're standing still. The grappling hook works well against these guys, now that I think about it. Too bad I rely exclusively on the Batarang.
The Fat Clowns are slightly more powerful and have more health than the Thin Clowns. They can also be extremely cheap, as they can keep punching even while you're on the floor while you're next to them, causing you to stand back up and rise straight into their one-two combo to be knocked back onto the floor. This can also be the source of many cheap deaths.
The Batman logos give you extra points. The color dictates how many points you'll get, with white giving the least, then light purple, then light red, then dark red giving the most.
Small hearts refill a little bit of your health, while the big hearts completely refill your health meter. Since I'm playing on Mania, hearts you may see in certain parts of the game on Easy through Special difficulties won't appear in certain spots. I think there's only four to six hearts in the entire game if you're playing on Mania.
Section 2 (side-scrolling)
Unlike the Final Fight segments, here you'll be moving left and right only. You'll throw Batarangs with the Y button, but you can use the grappling hook with A. Since you can use it to hang around but not attack, you won't have to sacrifice energy to use it. Of course, you can still punch enemies if you're close enough to them.
The Thin Clowns will come out in an endless stream, so go ahead and take advantage of that if you need to get another extra life, since you don't have a time limit anywhere in the game.
The Tall Clowns juggle torches, and send some to the floor in an attempt to burn you. The torches won't hurt you after they've touched the ground. To defeat these guys, you'll have to hit them anywhere from the waist up, meaning that you'll have to respond with Batarangs after they throw torches sometimes. The Tall Clowns will only appear in the side-scrolling segments of the game.
The Fat Clowns just bounce around from one side of the screen to the other. There's only two in this segment, but they're annoying for something that takes only two Batarangs to kill.
When you stop seeing the Thin Clowns coming at you, you're near the end of the level. The boss here is the Stun Gun Clown. He'll move toward you and jump at you before shooting out the stungun after he hits the ground. Hit him with Batarangs as he comes at you, then walk under him when he jumps. He'll miss with the stun gun completely, giving you more time to pelt him with Batarangs, particularly if you duck down to throw them after he lands. After doing this twice, he'll do a rolling attack. You can't jump over it, so hit him out of it by blocking and pressing X. This lets you use one of your Bat Test Tubes, which works as a screen-clearing attack in both the beat-'em-up and side-scrolling segments. From here, he'll repeat the attack pattern again. He'll be close to dead at this point if you've been piling on the Batarangs.
Believe it or not, you can shoot the grappling hook forward by holding Left and Right and then pressing A. While this could probably be used to avoid the Stun Gun Clown's rolling attack, you're better off just using the Bat Test Tube to hit him out of it anyway. At least it lets you make a hole in the wall at the right end of this area.
When you complete a scene, you'll get 5,000 bonus points no matter what.
Batman will meet Selina Kyle, while The Penguin gets together with department store tycoon Max Shreck to discredit the Mayor, setting the stage for some hardships in Batman's newest quest...
I'm still trying to figure out what kind of ending this is.
Stage 3: OXOX Hotel
Holy cow, the Kuro Blaster just tears through the mid-boss. While you may not be able to use it efficiently against the end boss, though, you'll still be able to easily tear through it with your now-upgraded weapons.
Stage 4: White Laboratories
Drop down the pit at the beginning and destroy the wall to the right with fire. You're now in the third glitch area, where the floors are lined with work and glitched-out birds fly by. Stay on the muddy floor so that you don't get killed at the bottom, and make your way to the right. Nothing like glitch trains that fire moles and ground that hurts when you land on it.
Head to the right once you make it out of the elevator, and destroy the dresser enemies. You'll then go through a bunch of doors followed by a walk through a cutscene and a glitched out resort. If you see four enemies try to fly around you in circles, that's a glitched-out version of the final boss. GET OUT OF THERE!
The third Kuro Blaster power-up is on the beach if you want it. Head to the right and you'll see an interesting in-game character roll call that looks like it's straight out of a late-1970s/early 1980s crime drama like T.J. Hooker or something. You'll then head back to the title screen.
By the way, if you die in a glitch area, you end up in a glitch hospital where you get woken up by a talking phone that sounds like the president.
Now that we are in Omake Mode, we can get the Kuro Blaster again!
Stage 1: Hinterland Fort
(continued)
The Kuro Blaster really works wonders on the boss here.
Also, instead of a stack of work, you have to destroy negativus legatia-type creatures to open the teleporters.
Stage 2: Greenery Zone
The stage is the same as ever, but you now that little gray guy who acts as a platform slowly walking back and forth. Once again, the Kuro Blaster is totally overpowered.
Stage 3: OXOX Hotel
Now that you have the jetpack, fly to the right at the beginning. Jetpack to the right, then approach the blue shopkeep. You'll drop down a shaft, then you'll be in an empty room. Head to the right. You're in another glitch area.
Keep heading to the right. You'll be dealing with a multitude of hazards, such as snowballs and platforms that seem solid but aren't. When you reach the area with the green background, drop into the hole on the right. From there, head to the right and talk to the other shopkeep. He'll keep uttering the same Japanese character over and over again. You'll drop down to a store. Go the right. Fight off the glitch wind as you climb to the top and then head to the right. Shoot down the yellow squares to get the second Kuro Blaster icon and upgrade it, then go to the right to return to the title screen.
Yes, you can get the Kuro Blaster in Omake Mode. It is New Game Plus for Zangyou Mode after all.
Remember the bridge in the the second section? If you've gotten the Fire weapon upgraded enough to break the discolored parts of the bridge with the shield, you'll be able to go under the bridge and into a very dark area located underneath the skeleton. You'll need to add to your maximum health if you plan to go down there, as it's made to look glitchy on purpose and the sound is reminiscent of the hum of an Atari 2600 game. After dealing with enemies that glitch out, very small platforms, a floating mole, black backgrounds, an empty safe and a chest containing one coin (among other things), you'll make it into a glitched out office building. Go left, use the jetpack to go up and move further to the left to get the Level 1 Kuro Blaster.
Go all the way to the left to exit the area, and the game. You'll have the Kuro Blaster when you restart.
When you finally beat the large flying salesman head, the head will explode and split into several salesman. You'll then see a bunch of those black creatures sleeping. Keep making your way to the right, and make sure you don't fall into a pit. You'll eventually come across a platform with a table. A red phone will materialize on it. Pick up the phone.
Back at OXOX Commerce, someone will wake up to the sound of the phone. The work turns black and white before disappearing. The frog wakes up outside of the power station, and heads off, avoiding the media as they want to question him.
Back at the resort, the item salesman apologizes for all the trouble caused, and that everything is back to normal. The president voices her opinion on the Work Producing Machine, the frog returns, and everyone is finally able to relax.
After the ending, if you press a button several times, the item salesman will ask if you were satisfied with your playthrough. Say no and you'll play Omake Mode, which is the Zangyou Mode's New Game Plus mode. You're back to yellow, and you have no money and only one hit point, but you get to keep all of your weapons.
The mastermind behind the work producing machines is finally revealed!
Stage 7: Destination
(continued)
Apparently you can stand on the front edge of the boss and do some major damage. You'll more than likely take damage from doing this, but it's worth sacrificing a hit or two to deal some major destruction.
When you beat the boss, a couple of those black creatures pop out of the explosion and flee. Follow them outside.
Section 13 leads back outside. If you can pull off a nice wrap-around jump at the beginning, you can get the 1-up here. Be on the lookout for floating black spheres with blue auras through this and future sections of the stage, as they aggressively fly at you when shot and can also split into two. You may get a bunch of coins from one of them when that happens.
To enter Section 14, get on top of the stack of work on the left at the end of Section 13 and jump straight up. You'll be in the air as you enter the next section. Jump up with the jetpack and you can grab the ladder. There are green platforms that move back and forth as well as light brown enemies that stick to the wall and shoot at you.
Section 15 has a much darker sky. This leads to Section 16, where you'll meet the black creatures, the Work Production Machine salesman...and the salesman's manager. The salesman flies away, and you'll hear the manager taking an order. When he hangs up, he faces you, his clothes torn and his soul a shadow of his former self. It's the boss of OXOX Commerce.
The OXOX Commerce manager will soon be hanging on strings, shooting blobs with sea green auras at you while surrounding himself with spinning shields. Those shields then converge into one big one that he shoots at you. He then flies to the other side, shooing out spinning projectiles that stay in place. Shoot down as many as you can (and get the coins if you can, too), and avoid the ones you can't destroy when they turn red and are sent straight at you. From there, he repeats the pattern. When the OXOX Commerce manager is defeat, he changes from black to green and falls unconscious as the strings disappear. He then falls asleep as desks and cabinets fall into a stack leading into the sky. Jump up the stack to climb a ladder leading to an office in a black cloud. It's the Work Production Machine salesman. He speaks to you in the same manner as the President, then it's time to fight.
Keep shooting at the salesman at the start, then he'll turn around and download an enemy. Watch the monitor to see what he sends at you. When his back is turned, you can't hurt him.
The black creatures with red eyes jump around. Take down as many as you can before he turns around, then hit the salesman again.
The pot hanging off a spring sends down pots from the ceiling. Some of them contain fish that leap out.
The spiked pufferfish are indestructible. Use the platforms that pop out of the ground to avoid them.
The large black creatures with the red eyes and mouth will come at you, and also jump up towards the ceiling when you try to jump over them, attempting to hit you in the process.
When you beat the salesman, he'll fly away and you'll follow him on a floating platform. He now has red eyes and wings. He will make four clones of himself. Avoid them as they come at you, and damage them as much as you can. Remember, you only have a few platforms to land on up here, so be careful.
The platforms will then be in the center. The four salesmen will then circle you, shooting projectiles at you. Shoot upwards while avoiding these projectiles, and you'll eventually take three of them down. The last one remaining will circle the screen fast, tossing document shurikens at you that you can also shoot down. After enough damage, you'll beat the salesman...but it's not over yet.
You're now in an auto-scrolling segment with flying salesman heads that fly at you but also fall asleep when you kill them. You'll be fighting a large flying salesman head surrounded by black telephone. Shoot at the head, and whenever you come across a blue telephone on a platform, pick up that phone to take down one of the black telephones surrounding the boss, making it more open to attack. Watch out for the black telephone projectiles, the small flying salesman heads and the laser beams that can come out of the boss' eyes.
If you die on this part of the stage, you're doing the entire battle with the salesman all over again. Be careful.
If you game over on Stage 7, you'll be told if you want to continue by a blue trash bag. If you shoot the blue trash bag and the surrounding work after selecting "Yes," you'll meet the item guy. If you have the cash, go get some health upgrades if you need them. Oh, and the big hearts refill three hits.
After six stages, we reach a new destination, but it's not over yet...
Stage 6: Train Station
(continued)
When you reach the end of the train station, leap on the cart being pushed by the birds to start the next boss battle. Turns out, the birds on the pushcart are penguins, and the clock boss now has a TV monitor for a head. Even though you're on the smaller pushcart instead of the much larger train, this guy fights somewhat similar to the original version of this boss...except you'll have to move under him while it's in the air and you'll have to jump over it when it charges at you. Be careful moving left and right, because the penguins aren't exactly the best at tracking your horizontal movement.
Avoid or shoot down the gears it shots down, move underneath it when it jumps to the other side, and jump over it while avoiding the projectiles the birds hoots out while it charges back to the left. Keep shooting this thing in the face to do damage.
At half health, the boss' face turns pink. When that happens, you'll see a new attack: the boss shooting gears that then act like boomerangs as the boss moves away. Shoot down the gears before they return your way.
After the battle, you'll get a cutscene with the cat, Pink and the President at the resort. Apparently the cat thought you would be here by now. A news report comes in: the work producing machine is now wreaking havoc at the nearest substation, and the black creatures are taking over the Work Producing Machine, which has now come to life! The electricity goes out...
Stage 7: Destination
Stage 7 is now a brand new stage. Instead of appearing back at the office, you'll reach the resort.
If you can get on the roof at the start and go all the way to the left, you can get the 1-Up located there. Also, the nearby trash bag contains a coin. Shooting down the seagull nets you 10 coins.
In the second section, you'll meet a bunch of white enemies that look like frog heads that make a lot of noise as they jump around. Thankfully, it doesn't take much to destroy them. If you keep to the top route with your jetpack, you can go right and get over 300 coins!
In the third section, you'll meet the penguin pushcart again. Get on, and shoot down whatever you can so you don't take a lot of damage. Be ready for those jumps! You can continue to take the pushcart to the seventh section if you wish.
The fourth section has fish leaping up from under the bridge trying to hit you. The fifth section has a 1-Up underneath the bridge. These two sections have a lot of fish that you'll have to contend with if you take the lower level. The sixth section has a shop. The seventh section has these spider-tank enemies that will shoot out lightning as well as their own eyes, with the eyes going up at a really high angle before coming down. If you can shoot down the eyes successfully, you can sometimes get 50 coins from one.
The seventh section has dragon enemies that slowly move up from the water and shoot fireballs into the air. (If you've taken the lower path in the fifth section, you've probably met this enemy already.) You can shoot them anywhere to get rid of them.. Also, there have been seagulls since the third section, some that just fly to one side and others that drop stuff at you. Be sure to look under the water for some more gold.
The eighth section is the resort entrance. The box enemies here can shoot homing projectiles at you, so keep an eye on the sky for any projectiles if they peep out to shoot any.
The ninth section goes further into the resort. At this point, the box enemies are out and about in much greater numbers. If you've upgraded the fire weapon at least twice, the flame shield will be able to protect you.
The tenth section leads into a building. Before you destroy the cabinet enemy, jump onto it, leap up and go right. Go all the way to the right to find a hidden ladder. Climb up it for a neat treasure stash before entering the next section, which leads to the substation.
The twelfth section is you versus the Work Production Machine. If you have the Lazer Uzi, you'll be able to do a lot of damage. Shoot at the claws, and don't let them or the balls the machine shoots out hit you. When you do enough damage to the claws, they fall to the ground and become spikes in the next phase.
For the next phase, the machine will shoot out books from its top. Shoot at its mouth when it is opened, and watch where the books are going so you can avoid them. Avoid or shoot the blue books that come out of its mouth.
For the third phase, the armor will be blown off. Shoot at the black mass to damage. Double-jump over it when it charges at you, and avoid or shoot down the books that drop from the ceiling. You cannot damage the boss when it is red and charging. Run under it when it jumps towards you. Watch out for its homing projectiles that bounce off the floor, too. and make sure you have the flamethrower equipped so it also produces a shield when you shoot so you can instantly deal with them. Also, the claws that act as floor spikes from the last phase will be wiped out when the boss charges into them.
We've finally caught up to the bad guys, but we've got to take the train again.
When you beat the boss of Heichi Plateau and enter the teleporter, one of the black creatures that follows the Work Production Machine guy around goes in with you. Hmmmm...
When you make it back, you'll find out that overtime is over. However, the cat still finds some work. The cat finds out it's from OXOX Commerce, and as he looks at it, the frog notices the black creature and chases it to the teleporter. The creature makes it to the switch first and sends the frog to the Train Station.
Stage 6: Train Station
You can jump on the rubber duck that you land on at the beginning of the stage to move it around.
Watch out when you begin the stage. Look around carefully to see where you can go next, and watch out for the floating negativus legatia enemies that blend in with the walls. Thankfully, you can see their eyes. Watch out for the red drops that come down from the ceiling, as they can damage you.
The platforms in the third section fall away when you step on them, and only the small squares stay put. Take your time on these platforms.
Go left when you enter the water in the beginning of the fourth section to find a 1-Up.
You'll face a boss in the fifth section. The boss here is a giant robotic flan covered in armor. There are platforms that lower every so often, and they will help you get to the top of the metallic flan and destroy the small flan creature at the top of it. Kill that off, then shoot at the flan itself when its armor open, and avoid or shoot down its projectiles.
Near the end of the sixth section, you'll find a hidden 1-Up just under the exit. Also, the chains act as barriers to the sparks that move around here.
The seventh section is a shop entrance.
The eighth section leads you back outside. There are parts of the ceilings in the train cars where you can jump onto the tops of the trains, and there are more of those black flying creatures with the blue eyes.
The ninth section is the inside of the train station. Shoot at the lockers in the walls to get some major cash, and even a 1-Up. Also, the chains acting as barriers that keep the sparks moving around in a specific area now remind me of World 7-2 from Super Mario Bros. 2/Doki Doki Panic so much it's not even funny.
The tenth section has a guy throwing ticket punch and leads to the train itself.
It's time to face the negativus legatia boss again...
Stage 5: Heichi Plateau (continued)
The tenth section is another expansive room. Make a beeline for the upper-left corner for 138 coins. Then, make your way to the upper-right, and destroy everything with fire if you need to.
You can knock the snow platforms off by bumping them from underneath with your head.
The eleventh section is a windy section. The wind will be blowing with you instead of against you, and while this helps with the jumping over the pits with the jetpack, this also leads to blocks being blown around from the left-hand side as well as the TV enemies also coming at you from the left-hand side.
The twelfth section is even more of this, but with negativus legatia-type enemies raining down on you and even wider pits. In case you do get blown to the next section, you can still come back and get to the ladder above the exit. This leads to a hidden room with both shopkeeps and a chest containing 125 coins. One of the shopkeeps will be drinking some tea in honor of a hard day's work.
The thirteenth section is an ice maze. You'll have to feel your way around and destroy a few things while avoiding sparks and trying to get the 1-up that can plainly be seen. Using the bubble weapon will really help with telling the real platforms from the fake ones.
The fourteenth section has those flying platforms above a bottomless pit again. Be sure to destroy the work when you reach the top so you can find safety at the top of this section.
The fifteenth section also puts your jetpacking skills to the test as well. Get rid of some of the work to get the 1-up.
The sixteenth section has an enemy in a drawer you can kill, as well as a falling light.
The seventeenth section is the giant negativus legatia boss. The fight is more or less the same as the first time.


.gif)
.png)