Part nostalgia-bomb, part note-taking and part FAQ, what started in GameTrailers as a video game blog is now on Blogger. This blog is a look back at video games, both popular and obscure, from the video game industry's infancy all the way to the previous console generation.
Three bullets. Two ducks. One chance to get them both. Ready?
Game B has you going for two ducks at once instead of one. This makes for some interesting scenarios when you make it to, say, Round 9.
I kinda regret not playing Game B back in the day. It's a bit different from Game A in the fact that there's little (if any) margin for error, especially once you reach the point where you have to shoot down 7 or 8 ducks to clear the round.
Hey, guys! Let's bust out the Zapper and shoot things!
Good ol' arcade experience from Nintendo here. Just shootin' ducks.
This is basically going to be a very short blog series, since everybody and their dog knows about this game (they'd better), and it doesn't have an ending.
As you go farther, you'll have to shoot more ducks down to get to the next stage (until you have to be perfect in order to not game over) and aim more carefully as the ducks get faster.
In Game A, you shoot one duck at a time. It's simple at first, but as mentioned earlier, the farther you get, the faster and harder to shoot the ducks become.
Anyway, bonus points for him not only mentioning the 2010 Census, he also mentions A&W restaurants, which I haven't eaten at in forever. Oh tjord, they have too few locations, and they're all spread out.
This just gives you a letter from Fleecum Banker saying you'll never earn enough money. Nothing more.
Pointing Finger
This is just a waste of a day.
In thirty days, either the banker will take the orphanage back, the orphanage pays their rent, the orphanage makes rent and also gets repaired, or the last ending happens but there's enough money for the Stooges to marry the orphanage owner's three daughters. Thankfully, TheUtilityMan one of the better endings! And no credits. Wonderful.
The slapstick continues as The Three Stooges continue to raise money for the orphanage!
Help Wanted: Waiters
To play this, press A or B to throw a pie, then a certain direction to choose which Stooge will throw it. Left is Moe, Up and Down is Curly and Right is Larry. To duck, press that character's direction.
Since Moe is to the left and Curly is on the right...that makes remembering the D-Pad controls a bit of a snap.
If you can throw pies at these guys and last long enough, you can earn $1200! Nice!
The game looks and feels confusing, but once you get some practice in this game can get you a load of cash. You have five hits before the game prematurely ends.
Safe
The "Safe!" space takes you a security company, where a safe falls on Curly. You'll either return the safe and get some money, or you'll have to pay for the safe. :(
Question Mark
This either leads you to money, a letter from Fleecum Banker, or nothing at all.
Shortly before blog #400 on the old GameTrailers blog, the new Three Stooges movie came out. Not surprisingly, it took me until a few days before the movie's release to come to the thought of doing a guide for this, since I forgot about the game's existence. Derp.
Anyway, the Three Stooges have to raise money to...get this...save an orphanage. I know, right? If I didn't know any better, I'd say the Farrelly Brothers played this game on way more than one occasion. At least we won't see some chick in a nun bikini or reality TV hijinx here.
If Ma's Orphanage does not pay the rent within 30 days, the banker will repossess the place and the woman in charge will lose everything.
Playing the Game
Each event counts as one day. You much get as much money as you can within 30 events, all of which are based on the classic Three Stooges movies. The endings range from the banker repossessing the orphanage to...well, I'd rather not spoil what the best ending is.
Anyway, on with the show.
Boxing
The mousetrap acts as a "spin again" space. Sadly, if you lose one of it, you lose one of your fingers. You have four fingers or "lives," and if you lose them all, the game is over.
Landing on the trophy with the word "Boxing" under it will take you to the boxing match.
You have to beat the champion, Killer Killduff, within six rounds. To do that, you'll have to get Larry to run to the radio shop so Curly can hear "Pop Goes The Weasel." Then, you have to make your way back before the end of the sixth round, as indicated by a timer.
If you can make it back before the end of the match, you'll earn $500.
Help Wanted: Doctors
If you land on the space that says "Help Wanted: Doctors," you'll go to the hospital.
Your mission here is to collect as many red crosses as possible in 100 seconds. Use Up and Down to control your speed, and move left and right to avoid obstacles.
If you make it to the operating room at the end of the board, your remaining time will be multiplied by $15, then added to the medical supplies ($5) you pick up.
Your best bet at getting the most money is to stay directly behind the doctor that's in front of you. Getting good at this game will get you a lot of money if you keep getting this one.
Money
The $ symbol takes you to a bag of money, which can range from $100 to $1000. At least there's no work involved.
Trivia
The "Trivia" square is just that: trivia. Answer a question right and you get $200 for it. Thankfully, Sailor Amaya made a list of every trivia question in the game, which you can find here.
This is obviously the easiest game if you've watched the Stooges's antics over and over again.
Cracker Eating Contest
The trophy with the word "Cracker" underneath it is the cracker eating contest. You'll earn $10 per cracker and $50 per bowl.
Use the Control Pad to guide you to crackers, and press A or B to eat it. You'll want to be quick and accurate, as the oysters in the soup are very much alive and will eat them out from under you. If you can keep them from eating the last cracker in the bowl long enough, you can get some serious cash out of this one.
The Stooges' Antics
If you land on the space with the Stooges causing bodily harm to each other, you'll enter the Stooges mini-game. Sadly, you earn no money from it. However, the cursor becomes either faster or slower on your next move, so play it well.
Pressing different combinations causes Moe to do different stuff. If you hit Larry or Moe, you get more time to make your next move. If you miss, you get less.
This guy has three forms and can be particularly nasty at the beginning if you don't know what to do.
First Form
You'll have to hit him when the missile pod door below his head is open. Rush up to him at the very beginning of the fight, use Liner, then get out of the way. When he takes damage, rush him again and do the same thing. Do this three times...and quickly! Basically, the way this works, you'll take the missile down and hit him right when he launches another one. You'll have to be quick if you want to do this. At least you won't have the rare possibility to deal with a stray missile while he enters his second form.
Kikoskia's strategy involves dropping the bombs in an L pattern and staying out of the way while the missile gets destroyed, while the boss walks into it and fires the missile just before the explosion disappears. It takes a little more time, but it's not as high-risk. He can also fire lasers at you if you're too close.
He will fire lasers at you in this form if you're close enough, making for some cheap deaths. And if you die here, you have to start all the way back at the boss's first form.
Second Form
When he launches his fist at you, hit him with an explosion while they're still flying around. Again, it's another three hits.
At this point, the battle's much easier.
Third Form
It's just his head now.
All you have to do is hit him while he fires those four corner lasers. You can also hit him when he shakes, as it's part of his attack.
Three more hits and you're done! Enjoy the one-screen ending!
Hit the boss twice with your bombs, then get away! He'll blow up like a bomb before he re-inflates his body. When he's trying to re-inflate, nail him before he gets back up.
Don't forget, he speeds up after he inflates again, so speed up yourself, too.
Level 7
Short fuses again. Also, awesome music.
Also, there's a hidden Easter egg in this world, but I've never seen it.
I swear, the Level 4 boss is hard. But the best is yet to come!
Level 4
(continued)
Beating the Level 4 boss givs you Liner. Double-tapping the A button will drop a line of bombs. The more extra bomb power-ups you collect, the better this works.
Level 5
The vents shoot gas that paralyzes you (much like the Trouncer ability) when hit with a bomb blast. Watch out!
Once again, grab all the power-ups you can find and blow him up while his mouth is open from his attack. Yeah, that strategy again.
he stands there for a few seconds before he attacks, so bear this in mind. (HURR!)
When you beat him, you'll get The Trouncer. You'll be able to knock enemies into a wall and stun them when you dash into them. Perfect for planting a bomb right on them and setting them up for a trap they won't get out of!
Level 4
Warp holes return, and this time bombs blow up about two seconds after you plant them.
Same strategy, but this time it's even tougher due to the enemy's attack variation and the short fuses. You'll (obviously) have to hit it when it's smiling, but that'll take some speed...and skill!
If you fail to damage it during its attack, you'll have to destroy all the leaves and then go for the kill again. Time is definitely a factor if you're in this predicament, which is all the time unless you really know what you're doing.
2:06 - I'm not even going to ask why the CPU thought this was a good idea.
Level 2 Boss
This one's a tad trickier. Here you have to time your explosions so that it hits the spinning top while its projectile attack is sill out. Grab as many power-ups as you can, then go for it. Your kick ability will probably come in handy here.
Beating him will give you Dashin'. Hold B, then move. You'll be able to run faster now.
Level 3
Bomb-guiding blocks on the floor will make this faster and more intense tahn earlier. Kick a bomb towards one, and the block will guide it in the direction the arrow on it indicates.
1:18 - This is probably the only thing I like about this level. If your timing is impeccable, you can blow someone up as soon as they come out of a warp.
2:02 - Once again, the AI leaves something to be desired.
2:16 - In Round 2, the teleporters are placed in a non-linear fashion. Once again, the direction you (or your enemies) enter the warp is key...
2:36 - ...and this is exactly what I'm talking about. Entering the Warp Hole in the upper-right from the left takes you here no matter what...and in this case it led this Bomberman into a trap.
Anyway, this is a rather interesting game in the series. Hudson Soft developed it, but Nintendo horned in when it came time to release it on American shores, hence why Wario is in it. It's not bad, though, and if you have the Super Game Boy and the Super Nintendo Multi-Tap, you could do multi-player (while having more than one person to enjoy the improved explosion sounds with).
Each level is a best of three, and you must defeat all the enemies to move on. THere are three rounds in each level, and as you go further in, the playing field gets smaller. After three stages, you fight a boss before proceeding to the next level. You can play as Wario or Bomberman, fighting the character you didn't pick throughout the game.
The levels are always the same, but the blocks you must blow up are randomly generated. At the end of the first five levels, you get an ability.
Level 1
Nothing unusual here. This is as normal as you're going to get. Until you get abilities, you won't be able to do very much.
The power-ups through the stages are simple. The fireballs with the smiley faces increase your explosion radius, the bombs let you drop more bombs, while the skulls basically curse you, doing anything from keeping you from dropping bombs, nullifying your explosion extensions, or keeping you from using one of your abilities. You can increase both your explosion radius and the number of bombs you can drop up to four times.
The power-ups also double as walls, in a way - if a bomb blows them up, they not only take power-ups with them, they stop the blast radius from extending past where they stand.
The boss is simple enough. Just hit him dead center with your explosions three times. It gets harder later on, though. Just avoid the three spinning enemies it shoots out, as well as is spit attack (which only goes straight down).
Beat him to get the Kicks ability. You'll be able to kick a bomb by moving into it. The B button halts the kicked bomb.
The next room is it - the final boss battle with the Kingpin. I'm surprised the carpet doesn't catch on fire when he throws his cigar down.
The Kingpin is huge. He actually takes up about half the screen! The Bogarts here are his flunkies at the beginning, but his next two have guns. Throw enemies at him, break the furniture to get weapons you can use against him, and when the game allows you to, try to shoot Kingpin with your gun. Unless you're saving your bombs for a high score (the bombs give you a 20K bonus for each one you have left at the end of the stage when you win), use your bombs when you're low on health. His slap has some range, and he'll also attack you with his cane. His leap attack (in which he tries to sit on you - what the crap, seriously, Capcom?) is also pretty dangerous, too. He can grab and throw you if you're too close, and he'll also smoke a cigar and breathe the smoke on you! What a jerk!
One of the more interesting ways to beat him is to trap him in a corner and use your super on him. You'd better be ready to avoid his grab attack, though.
Of course, the most interesting way to do it is shown in the final battle ad nauseum. Just throw him, roll up to him, throw him again, roll up to him, throw him again, rinse, lather, repeat.
When it's all over, the King Hotel collapses. Enjoy your ending, as well as two digitized photos that didn't appear in the Western version. I think it's easy to figure out why both of them were omitted when the game came to the West.
Richard Fisk is hiding in the King Hotel. It's time to bring him to justice.
Last Stage: Final Punishment
Kingpin is hiding in the King Hotel, and with a well-placed rocket launcher shot, you'll bust your way in and give Kingpin and whatever's left of his goons what's coming to them!
You'll fight a bunch of enemies with guns before kicking your way through several walls. When you destroy the last wall, you'll set off an alarm, and enemies will flood the room.
There are suit of armor around that you can get some devastating Lances from, and the columns in the foreground are actually breakable if you're close to the bottom of the hallway.
At the end of this section, you'll fight Scully again. Same rules apply here. Also of note - the Saxon here carries nunchaku. Thankfully, you have immediate access to weapons this time around, so this battle is definitely easier.
When you beat him, you'll bust down the elevator doors and drop to the roof of the elevator inside. As you fight off the thugs, bundles of dynamite will drop down. You can use them as weapons if you want, and throwing them away from your general area makes sense, but don't get so greedy for points that you unintentionally blow yourself up.
You can also break the glass walls for points. Also, there's another new enemy here - a green version of Gaillee named Jigsaw, who also carries an M-16. Like Gaillee, Jigsaw only appears in one-player mode. When you beat him, you'll knock out a steel panel in the ceiling and enter a control room.
You'll beat up some more enemies, both armed and unarmed, before you reach a dead end. Along the way, you'll find some nice power-ups in the crates (including two M-16s!) before you fight four ninja girls and a Gus at the end.
The Kingpin has you where he wants you...or does he?
Stage 5: Kingpin's Wrath
Kingpin has had enough of your meddling in his affairs, and has somehow managed to find your hideout.
Jagger is pretty full of himself now that he's located you. Thankfully, your gun is enough to shut him and his cronies up. So much for the first section.
The second section takes place in the sewers. More low-level baddies here. You'll meet Hawke, who is basically Saxon in blue pants. Doors 1 and 3 have bad guys while Door 2 has nothing. Wow-Cat is a red version of Red-Lamp, and he's just as nuts. Grab the flamethrower before you go to the next section.
The third section has you fighting Gus and Red - the latter being a red version of Gus. After you take them out, you'll face four Pretty Boys. One of the barrels where the first fight here takes place gives you another Lance, which is pretty nice. You'll find a flamethrower at the second one.
The fourth section will take you into the wilderness. If you picked up the flamethrower before entering the fourth section, you'll definitely be able to power through a lot of thugs at the beginning. Thugs will come in through the trees...but they're weak anyway. The Yun Lee here has some nunchaku, so watch out when he swings it around.
When you see oil drums rolling toward you, try to break all of them - the rewards are worth it, as you can replenish your health, get more weapons, and get a lot of points.
You'll meet Mizuri, Midori and Luna at the end again. Unlike the other foods, the Meat you'll find nearby refills your entire health bar regardless of how much you have left.
When you beat them, you'll come across an old log cabin...and Guardroid2! Even though it has armed goons accompanying it, the same tactics from last time still apply. You can even shoot at the boss this time!
Your journey takes you into the criminal underground - literally - leading you to a huge opium poppy field and a mobile factory in an underground cave in Arizona.
Looks like a lot of stuff is going to get destroyed.
And no, I'm not changing this description, because it's awesome.
Stage 4: Death on Rails
The first section is really simple. Grab everything in the crates and shoot up all the bad guys.
The second section has you getting on the underground train. As soon as you jump on, the train will leave its station, giving you a full invitation to tear everything up.
You'll find a bag of cement almost as soon as you get on the train. It may be a slow weapon, but if you're on a roll here or you just don't give a crap, it makes an interesting weapon. You'll also meet another ninja chick - Luna.
As soon as you finish off all the enemies here, you'll leap onto the roof of the train. Punching the rods on the roof will cause them to explode in a matter of seconds. You'll meet another new enemy on the roof - Bakosu, a variant of Leon with a longer health bar. You'll also find another new weapon - the Bizen Orafune, a katana that slices up your opponents.
Anyway, when you're finished on the roof, you'll drop down to the lower level of another train car to take on another Gus as well as a bunch of Bakosus. The knives they carry will work quite well against Gus, and if you got the flamethrower before you entered this segment of the train, that will work well against him too.
When you're done with all of them, you'll expose the inside of the train car and come face to face with Bushwacker. Of course, the only question on my mind is - why is there a country fireplace inside the car, as well as a lounge seat, a bearskin rug and a suit of armor near the controls? I can understand if that's where you put the coal that powers the train, but I don't see a coal bin, either. Maybe I'm nuts?
Anyway, Bushwacker is very powerful. His arm can transform into a rocket launcher, he can both punch and grab you, and he has an amazingly high leap. Throwing enemies at him, as always, works best.
You may meet another enemy here if you defeat enough regular enemies here. Misa is just like the other ninja girls, but she has her brown hair in a tight bun as well as - you guessed it - a longer life bar. Talk about efficiency.
If you destroy the suit of armor, you can take the lance from it. This is a very good weapon, as it does a nice amount of damage when you throw it into an enemy, especially Bushwacker!
When you beat him, you'll leave an exploding train as a going-away present for the Kingpin.
I have never seen that many men get shot so quickly as soon as they have come out of a car. With a pistol. In a video game. During gameplay.
Stage 3: Waterfront Warfare
Our heroes will soon find out that the Kingpin's drug trade is blossoming on the ship docks. Time to put the local drug trade on ice!
If you can destroy the cars, enemies won't be able to pop out of them, and you'll get more points.
Trench is a red variation of Cool, while Jagger is Jack in a blue shirt. They aren't just mere sprite re-colors, though; these guys have bigger life bars. Gus fights like Scully, but he's a tad weaker. He's far from a pushover, though, so be careful and fight him like you would Scully.
Another new weapon shows up at the beginning: a boomerang. Even though it can be used eight times, recovering it after you throw it is a little tricky.
Gaillee is another man with a machine gun and has just as much HP as Gus. He only shows up if you're playing a one-player game. He's slower than Cool and Trench, but he's as tall as Gus and he can pack a punch. When you beat him, you can pick up his M-16 and shoot enemies with it.
When you reach the corner, you'll meet the Pretty Boy robots. The red ones have half the HP of the gray ones. When they show up, your character will pull out his gun. As you chip away at them, their human-like masks will deteriorate, then their metallic heads will get knocked off, followed by their torsos. When they become a pair of walking Pretty Legs, finish them off with a few more shots to get rid of them. You'll want to avoid their extending arms as you fight them off, as they are their only attack.
The robot heads, also known as Pretty Heads, can be used as single-use weapons. Watch out when they flash, however - they'll explode, damaging anyone near it, including you. There's also a piece of Cheese here if you need the health.
In the second section, you'll break into a building and fight some more flunkies. There's a pizza here if you still need some health.
After fighting all the enemies, you'll drop down and fight Bone Breaker - part man, part mechanical tank. The crates he crashes into give you a rock, an extra Bomb and a baseball bat, which help if he gets near you.
Keep your distance, as there are gun-toting enemies and Pretty Bots here, and take him out with your gun. His flamethrower may not have much range, but his rockets reach a little further, so watch it if you're picking at Bone Breaker from the other side of the screen. If you need to knock him back, use a jump kick.
When you finish him off, his upper half will be knocked off of his chariot...which blows up. Sucks to be you!
Bonus Stage
This one is just really easy. Just keep shooting an keep the cursor near you. If any barrels stray, get those, then get the ones near you as quickly as possible. It takes practice, but once you pull it off, you'll be getting easy perfects on this in no time.
Let's play another beat 'em up involving Marvel superheroes, a wide variety of weapon pick-ups...and guns!
I could have used the original version of the playthrough along with its videos, but Blogger decided to be ass and not let me use the videos despite the fact that they are available. What the hell. So you get the Japanese version with a Japanese player doing crazy stuff while being a lot more careful. This time around, it's not just one credit, it's no deaths.
This playthrough shows off even more of the game than last time. If an item contains an item, it gets destroyed. Bosses are made to look easy. Most importantly, enemies are taken out very, very efficiently.
Stage 1: Back to the War
The stage titles are different if you play as Nick Fury, but I'm using the Punisher stage names because that's who the player is using. This is the Japanese version and I used the English translation that Capcom actually gave us for these, and I'm not changing the titles.
In the first section, there are a bunch of money bags and some destroyable objects lying around. When you have to stop to fight enemies, you can also move backwards up to a certain point. You're not stuck in the one screen unlike other beat 'em ups - you really have some room to move, which is a nice breath of fresh air.
When you beat up all the enemies, Bruno will show up, spot you, and run away.
In the second section, you'll give chase only to come across some armed enemies. When enemies with guns show up, your character will automatically pull the gun out. Pressing the attack button, of course, fires the gun. The cross hairs make it easier to tell where you're aiming, even though most of it involves simply facing the enemy and opening fire. You can also shoot unarmed foes as long as you have the gun out. When you kill all the armed enemies in the vicinity, you'll put the gun away. When robotic enemies show up later on, you'll use the gun on them as well.
The pistols that the Jacks and Jaggers carry just give you points...though there are other projectile/gun weapons in the game you can use.
When you pick up a weapon, there will be a usage counter above your number of bombs remaining. When that number hits zero, the weapon breaks and can't be used again. Weapons you'll see here are tires, knives, and a baseball bat.
I forgot to mention the enemies, didn't I? Max, Dean and Chrys are just your standard flunkies, Jack tries to shoot you with his pistol, Leon carries knives, Shone wears a hat and usually carries a weapon, and Yan Lee is your stereotypical karate guy.
You can also pick up an enemy when he's down. From there, you can throw him into other enemies or jump and smash him into the ground, which is pretty interesting to pull off.
You also have some special attacks in this game. Pressing Attack and Jump simultaneously gives you a super attack that attacks all the enemies right near you in exchange for a bit of health. You'll also flash pink for a short time while using it, rendering you temporarily invincible. There's also a grab special as well as an air slam special. Nice.
Also, if you double tap the joystick in any direction, you can roll. This helps you avoid a lot of attacks and can be a lifesaver, and you can also perform a kick attack that sends enemies flying back while in a roll if you need to.
If you press Down, Up and attack, you'll do an attack that surrounds your enemy in blue flames. There is a jump kick that also sets your opponent ablaze in blue fire, but it turns out this jumping kick is Japan-only, and removed from the Western versions.
In the third section, you'll break through a school bus window and face Bruno's goon, Scully. If you have enough health, you can trap him near a wall, use the super attack repeatedly and finish him off easily. Otherwise, throw enemies into him and weave your way diagonally towards Scully - don't go straight towards him as his attacks have some range and his kick seems to home in. Don't get knocked down, either, as his ground kick does a lot of damage.
If you press both buttons in mid-air, you'll use one of your bombs. To replenish your bombs, find hand grenades throughout the stages. Also, why Scully is the same size as a regular enemy when he's on fire, I'll never know.
At the end of every stage, you'll get a bonus for beating the boss. You'll get 300 points for every second left on the clock, a random number of points of every unit of health left, 5000 points for every bomb you have left, a random number of points for every weapon pick-up you've used, food you've eaten, containers you've destroyed and valuables you've collected. The more items you pick up and the more weapons you use, the more points you get for the item bonus at the end of each round.
You'll interrogate Scully, and find out that Bruno is in Castle Pantaberde in Florida. After that, the Punisher will shoot him (if you're playing as Nick Fury, you'll just knock him out). All the while, the bus driver will give you the thumbs up. Bus driver, y u no be perturbed by the situation?
During the run of the first stage, the player actually picks up a barrel and somehow manages to carry it all the way to the boss just so he could have health for the fight...and dominate the game from the get-go. That's incredible.
Stage 2: Raid on Pantaberde
You'll sneak into Castle Pantaberde through the drain pipe of the swimming pool. Then you'll come out through the pool and set off the alarms, sending a bunch of goons straight for your throat.
New items and weapons include rings, battle axes, and cheese.
You'll also meet Rusking (another version of Shone), Saxon (a white, blonde-haired American version of Yun Lee) and two ninja chicks, Mizuri and Midori. The ninja girls carry swords, and not only do they have a spin attack and a jump kick, they also run very fast and teleport in and out. They also drop rings when they're defeated, which is actually very nice. Pick them up as soon as you see them, as they're worth a lot of points.
When you're done with the enemies in the first section, you'll smash through the window. You'll be in for some more gunplay in here, as you'll fight off two Jacks as well as some new bad guys with guns: Cool (the guy who peeked his head out the door in Stage 1; his machine gone does some fast damage), B. Hannigan and Luis Allegre (guys in suits and hats that sometimes use pistols; other times they'll use their fists), and Kolsky (he wears a suit but not a hat; he appears with the gun sometimes, other times he uses his fists)
There are also three jail cell doors on the wall. Breaking the first one frees a girl named Barbara who will refill some of your health, the second one has nothing and the third one has another girl.
Dylan is yet another weak thug, and is easy to deal with. Red-Lamp is something else. This guy not only grabs any weapon he can get his hands and use it against you, he'll also grab rings as well. He'll go for the flamethrower, and (thankfully) whenever he fires a shot from a gun or hits you with a weapon, it won't count towards the number of times that weapon can be used if you can get it away from him. If he picks up a ring, you'll have to kill him to get him to drop it. You'll also find a hammer off one of the enemies, which makes for a nice, fast weapon.
When you bust through the door after finishing off all the enemies, you'll meet Bruno and his goons again. A laser will fire from behind them, killing all four of them. You'll then have to face a giant robot known as the Guardroid.
The Guardroid will rush at you if you're far enough away, and it'll also jump in an attempt to shake the ground and knock you off your feet, causing damage. Its attacks are staggered, but they hurt. When it spins its head, roll out of the way and to the side, as it'll shoot lasers both in front of it and behind it. The lasers have shadows, and if you touch those shadows or are general in their paths, you'll take damage. When it's down to quarter health, nail it with some bombs. It's over.
Wait around in the library until Mordack appears. When he does, he'll retire to his bed and sleep. Go into the room and grab his wand (it's near the bed), then go right and get out. Go right again, and go up the stairs. You'll see a machine. Put the wand on the right tray and Mordack's wand on the left one. Toss the cheese into the machine's liquid. The power from Mordack's wand goes into Crispin's wand. Take Crispin's wand again, then you'll go downstairs again. Mordack will pop up, and he's not too happy. He'll try to zap you, but Cedric (who comes to you with great news only to show up at the wrong place at the wrong time) gets hit instead, turning to stone and falling to the ground. Mordack is really ticked off that you messed up his wand, and turns into a wyvern so he can kill you. Use the wand on Graham...quickly!
It's those four icons again! Choose the lower-right icon to change Graham into a tiger. He'll automatically give Mordack a hard time. Mordack will then change into a giant dragon, similar to what you saw at the beginning of your trip into Mordack's domain. Use the wand on yourself again, and this time select the upper-right icon. You'll turn into a rabbit. You can now dodge the fireballs.
After several failed attempts to fry you and make you his dinner, Mordack will turn into a poisonous snake. Use the wand again, and choose the upper-left icon. You'll become a lizard and fight Mordack off once again. Mordack will then set himself ablaze in a last-ditch effort to kill you. Use the wand and choose the lower-left icon. You'll change back into King Graham and summon rainwater to come and wash Mordack away. Good riddance.
Cassima and Crispin will show up. Crispin will de-miniaturize the castle and your family, de-stone Cedric, and sends everyone (including Cassima) back to their rightful homes.
The arrow at the bottom of the screen shows which direction you're facing. If you're looking at Graham's back and the arrow isn't pointing up, you're not facing north.
Instead of using compass directions, I'll use normal directions like I've been doing the entire guide. Here is where to go:
You'll meet a beast. Use the tambourine on it and it'll run away, dropping something on its way out. It's a hairpin. Take it, because you're going to need it for what's happening next.
You'll come across a door. Unlock the door with the hairpin.
You'll now be in the evil wizard's house. Go to the left shelf and grab the bag of dried peas, then go up and into the next room. Give her the locket. She'll introduce herself as Princess Cassima of the Green Isles. Her father sent her there anyway and forced her to work as a scullery girl until she marries Mordack. Graham promises to save her when he rescue his family. Go right.
While you're here in Mordack's castle, don't stand around for too long. Otherwise, Mordack will find you and kill you. If you save your game every time you enter a new room, you won't have the problem of getting killed again while you retrace your steps.
In this room, you might meet a black cat. This is Manannan; he will send Mordack after you if he sees you or you walk onto its tail, killing you. Leave and re-enter until it isn't there, then go right to the next room. Go through the other door on the left (it's below the one you came in here in) then get out when you see a large blue beast. Let it grab you; it'll throw you in a dungeon. Use the eye on the mousehole and you'll find a piece of cheese inside. Use the fishhook on the mousehole to get it.
Since you found Cassima's locket and gave it back to her, she'll open up a secret compartment in the wall. Use the hand on the opening. You're in the labyrinth again. Go down, then follow Cassima. You'll reach the door again. Retrace your steps and you'll see the beast again before you're right back where you started from. Use the bag of dried peas to trip it up and make it disappear.
You'll see Manannan the cat in the next room. Throw the fish at him to distract him (he won't be able to help himself) then use the brown sack that the peas were in to trap him. Yeah, he definitely won't screw with you again. Go through that other door on the left, then go up. Go left, and you'll find Mordack's bedroom. Gee, I guess he sleeps very well at night.
Go down and you'll find the library. Use the hand on the open book on the bottom of the screen, and the game shows you four symbols. What do they mean? Stay tuned for the conclusion!
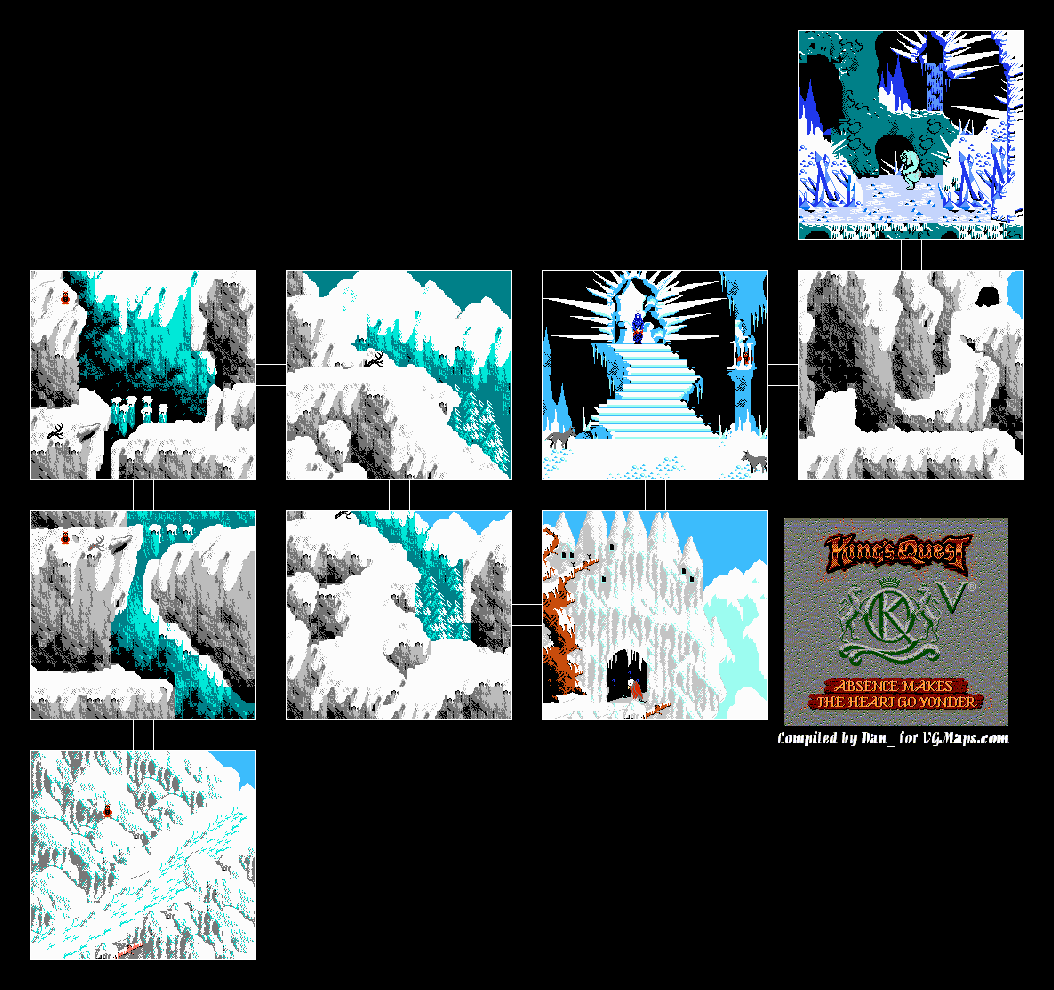
In this installment, we deal with a pair of mischievous man-eating harpies and meet a mermaid! Could this possibly get any better?
You are now in the two-headed roc's nest. Pick up the shining object next to you - it's a golden locket. Since you fed the eagle, he'll show up in the nick of time to rescue you and drop you off in yet another part of Serenia - his home, perhaps?
Anyway, pick up the iron bar. Then go down, and then ring the bell at the house that looks like the fore of a half-buried ship. (Hey, don't look at me, that's what it looks like it's converted from.) It turns out the old man in the house is hard of hearing. Go back up, and head towards the shore on the right side of the screen. The boat has a hole in it, so plug it up with the beeswax before you get in.
When you're finally sailing the seas, go down one screen and right three. Going anywhere else will kill you via giant squid. (Nice way to tell me I'm going the wrong way by having a giant squid grab my boat and drag it down underwater with me, game.) Before you can do anything, a harpy carries you and Cedric off to her sister. They introduce themselves as Minotta (the one who got you) and Cruleena (her sister). Quickly use the harp and you'll distract them - Minotta will take the harp and Cruleena will chase after her. Once they're gone, grab the shiny object next to King Graham - it's a fishhook. Go left, and pick up Cedric. Graham will take him to the boat. Before you leave, pick up that flashing object. It's a shell!
Get back on the boat and keep going left. You'll end up back at the old man's house. Ring the bell and give him the shell. (o hay that rhymes) He'll let you bring Cedric into the house and heal him with a few poultices. Then, he'll call out a mermaid named Pearl who will lead you to Mordack's island.
Once you're there, pick up that yellow object near the wall before going in. Use the crystal shard on one of the statues after you go inside to reflect their magic back at them.
Go around the front door by taking the path to the left. Don't fall! You'll come across an iron grate. Open it with the iron bar, then goi inside it by using the hand on it. Next time...maze time!
First things first - put the cloak on so the cold won't kill you. Select the cloak, then press A when the arrow is on Graham. You'll put it on.
Go right, and you'll reach a supposed dead end. Use the rope on the rock overhang poking out of the cliff side. DO NOT USE IT ON THE BRANCH NEXT TO IT, YOU WILL DIE.
When the game tells you Graham is getting hungry, eat the leg of lamb. When you're ready to climb the rope, use the hand on it.
Next is the columns between the cliffs. Take the upper path (the lower path kills you) and move the arrow below Graham when you're almost at the other side to make it to the other side. Go right.
A wolf will kidnap Cedric on the next screen. Use the sled on the slope to go after him!
Go right and talk to the eagle. He's hungry and cannot fly. Give him the rest of the leg of lamb, then he'll thank you before flying off. Go into the cave, and you'll displease Queen Icebella. Play the harp by using it on Graham to stop the wolves and move her heart into freeing you. She wants you to remove a yeti from her crystal cave before she can release you. Sir Greywolf will show you to the cave.
On the next screen, go to the cave in the upper-right corner, and be careful not to fall over the edge. To keep from dying, hug the wall.
Once you're in the cave, select the pie. Throw it at the yeti and he'll fall over the edge. Go up to the crystals blocking the doorway in the center of the screen and use the cobbler's hammer on it. You'll get a crystal that will come into play later.
Go back to Sir Greywolf. Queen Icebella, now knowing who you are, will hold her promise and release you. Greywolf will show you out again and ask you to follow the path east. When you take it, a two-headed roc gets you...


