Part nostalgia-bomb, part note-taking and part FAQ, what started in GameTrailers as a video game blog is now on Blogger. This blog is a look back at video games, both popular and obscure, from the video game industry's infancy all the way to the previous console generation.
To be quite honest, I didn't expect this Let's Play to do as well as it did.
If you grew up in the 1980s and 1990s - even if you did not necessarily have computer games - then it is more than likely you know who/what Carmen Sandiego is, and that the same could be said if you were alive during that time in general. For those of you who were born afterwards, consider this your primer for one of the most popular educational series of all time.
Where In The World Is Carmen Sandiego? is an edutainment game that saw its origins on computers in the mid-1980s, and had you play a detective working for the Acme Detective Agency that had you globetrotting around the world catching criminals are returning stolen landmarks. Your job was to take the information left by the person you are tagging and use it to figure out where they went next. That information, being an edutainment game, consists of things such as a verbal description of the national flag of your destination or what currency they are converting their money to, and if you needed help, you had to consult the almanac that came with every copy of the game. You also have to collect information about your suspect, such as what gender they are, what color their hair and eyes are, as well as their hobby, and put it through the ACME computer in order to get a warrant. Not only must you have a warrant to arrest the suspect, but the information must be correct, and both of those criteria must be met or else the suspect will walk free. All this...and you had to get it all done before a certain deadline or else the case is a bust.
But was it any good?
You bet your sweet ass it was!
It ended up being so good that, thanks to its captivating gameplay that always it launched several computer game, console game and board-game spin-offs, such as Where In The U.S.A. Is Carmen Sandiego?, Where In Time Is Carmen Sandiego?, Where In Space Is Carmen Sandiego? through the next couple of years until Broderbund, which owned the right to the series, was bought out by The Learning Company in the late 1990s. There was an animated series, Where On Earth Is Carmen Sandiego?, that aired on the Fox Kids Saturday morning block back in the 1990s that, if I remember correctly, won a Daytime Emmy Award for Outstanding Children's Animated Program in 1995 (beating out Animaniacs and the animated series for Aladdin and The Little Mermaid in the process), which I admit I never really watched as a kid due to being big into video games at the time. Thankfully, I rectified that when the show appeared on Yahooligans! in the mid-2000s along with a bunch of other cartoons produced by DIC that I watched along with it, and I ended up enjoying it. There was also a game show based on the original game on PBS in America, as well as one that aired after it ran its course based on Where In Time, and I also watched both back in the day.
But we're going all over the place at this point. I think it's about time we played the game.
You start by entering the language you'll be playing in, then you will be inputting your name, your gender, and in the case of the consoles, your password in case you're playing from where you left off from last time. Press Start to start a new game. You'll get your case and you'll be told what has been stolen and from where, and you'll also be told the gender of the suspect reported at the scene of the crime, where you will start the mission.
You have four buttons here: "Options," which brings up the options menu, the plane that lets us fly to one of a few locations, a magnifying glass that lets us select from one of three locations to ask for clues, and the computer, which lets you put in info for the warrant and go through criminal dossiers. Whenever you fly in the plane, go to places for clues, or print out a warrant, that uses up some of your time, so you will have to use your almanac whenever you need to, memorize stuff and commit it to memory as you go along (and you'll be doing that with some things), and playing wisely. You also go to sleep near the end of a day of the week as well, which costs you about eight hours, and since you start at 9 AM on Monday and have to get results by 5 PM on the following Sunday, you'll have to play wisely - and obviously learn things - if you want to win at Carmen Sandiego.
The cases will always play out at random, so your cases will not play at all like mine. You'll get different missions at different points in the game, the locations you go to will always be different, the suspect will always be a different person. In other words, no case plays the same way twice.
I'll use my first case as an example. By scrounging up clues in Budapest, I find out that our suspect is writing a paper on volcanoes of the world, is interested in the history of Danish colonies, and is looking for Viking artifacts. We also learn that she arrived in a convertible, and that part about the convertible can be input into the "Vehicle" section of the warrant as well as her gender.
I decided to guess on the info I have and select Reykjavik, Iceland for my destination. Thankfully, when I go look for clues, I find a V.I.L.E. henchman, which means I am on the right track. If one does not show up, then that means nobody will give you clues and everybody will tell you that they have not seen your suspect, and if that happens, you have to go back to your previous location and then fly somewhere else...and that takes time. Thankfully, that didn't happen, and I get more clues for the next place I need to go to as well as more things to put in the warrant. At this point, I have three things about the suspects to place in the warrant, allowing me to narrow the suspect down to one person and create a usable warrant that will allow me to arrest that suspect at the final destination of the case. You'll know you've reached it when you see things such as an ax or a knife being thrown. When that happens, you will not get any clues when you use the magnifying glass menu, and if your warrant hasn't been filled out, you will fail, as you will not get any more details on your suspect here...so pay attention to what people say and fill the warrant out with the information when you get as soon as you get it.
V.I.L.E., by the way, is the main antagonist group set up by Carmen Sandiego, the master thief and the title character of this series. You'll be putting quite a few members of V.I.L.E. away before you can get your hands on Carmen.
The missions start out pretty easy and pretty short, but the fact that you will probably have never played this game before will even out the difficulty. As you get through the game, get smarter and get better, you'll rise through the ranks of the ACME Detective Agency and the cases will get longer, and while that feels like evening out the difficulty on paper, it does get harder. Sure, you'll know stuff, but there will be less room for error because you will be hitting more locations before you nab your suspect and one wrong move can be the difference between solving the case and not making the deadline.
After you complete one mission, you are promoted from Rookie to Sleuth, and you'll have to complete four more to get promoted again. You'll also get a case-sensitive passcode to save for when you want to play the next case later. Be sure to write it down and keep it where you can find it.
Anyway, with each case, I will be adding more and more to all the information you will need for every location in the game. This list will be small now, but wait until I do more cases and add more blog entries to this series...it will be more all-encompassing.
By the way, Brazil no longer uses cruzados as its currency, as it had already stopped using them when this 1993 console port came out. and by the time this game was coming out, they were on the way to switching from the short-lived cruziero real to the real as part of the Plano Real to stabilize the Brazilian economy.
Round 13 is full of Bullet Bills that come out from both the left and right sides of the screen. Eventually, you will have to deal with Bullet Bill coming out of the bottom of the screen, leading to as many as six Bullet Bills being on screen at one time. The faster and more carefully you get through here, the better. Getting the invincibility power-up constantly helps here as well.
Round 14 takes you back to the castle. This time around, there are pipes in the lava you can stand on, and there are also platforms that crep in and out of the lava. Podaboos are strangely absent up until halfway through the stage.
Near the end, jump off the first rising platform to the right when it reaches its highest point, then make running jumps over the pits so you don't get trapped with a bunch of Podaboos.
Round 15 has us out of the castle, and looks a lot like Rounds 1 and 2 except with more slopes. Compared to everything we've come across so far, this round is really easy. Strangely, the boss is a Sledge Brother this time, but he fights the exact same way.
Round 16 goes back to the castle, and debuts the fireballs that bounce around the screen at 45 degree angles. They eventually disappear after going from one side of the screen to the other, but you can also destroy them with your fireballs if you are Fire Mario. This time around, you will have to fight more than one boss; you'll face three, and the last is a Sledge Brother. All of the hazards and obstacles you've seen in the castle stages will appear one last time here.
When you make it outside, you'll face the Sledge Brother. When you beat him, you've beaten Super Boy III! You've finally rescued the Princess! Enjoy your picture of Mario and the Princess!
There's an awful lot of pipes Koopas in Round 9. Remember that three hits will do the Koopas in, and be careful with the platforms here, as they will fall immediately when you stand on them.
Round 10 has a lot of platforming and pits. Take your time and do not run as you go through this round, and you should be able to make it through okay. Also, you'll get a free life from five of the face icons all placed in one spot as soon as you make it to solid ground.
Round 11 has even more platforming and pits than previous, and this time, the blocks that move back and forth to become three-block-long platforms as they expand and contract start showing up here. Again, take your time, and be sure to land on the center of the expanding/contracting platforms unless you want to land in a bottomless pit. You'll get even more Dragon Coins/faces at the end here, too.
Guess what? You're doing even more on Round 12. The checkerboard platforms from Round 9 return here, but they move back and forth and don't fall under your weight. There's only one problem: as long as you are on these platforms, the camera does not move with you until you're on top of blocks or solid ground again. When that happens, move to the left so you move back to the center of the screen.
It's time to play more of Super Boy III, and once again, we're back in castle. Interestingly. There's more of them, and even more hazards!
Rounds 5-8 are the first of a few castle stages in the game. Get close to the Thwomps to get them to drop down, then start moving under them as they go back up. A few of the Thwomps will shake before they go down, so pay attention to the Thwomps and wait for them to go down.
You don't want to fall into lava, obviously.
The Hammer Brothers will start shooting fireballs out of their mouths in Round 5. They are still easy to beat, but you will have to be more careful.
Round 6 is the debut of the Podaboos, which move more like they do in the official Mario games this time around. Also, ? Blocks start acting as platform to get you across long lava pits, and the logs return in these sections, too.
Round 7 is the debut of the spike columns that go in and out of the floor. There is a part near the end where there are blocks above narrow spike pits. You have to jump so that your head hits the blocks, allowing you to land on the floor between the spikes. Otherwise, you'd better be ready to move.
In Round 8, everything you've been exposed to in the last three stages are all thrown into one final castle level...at least for a while. At the long lava pit, you will want to walk above the set of five blocks, or else you won't make it to the checkpoint. Ditto for the pair of blocks after that.
Despite me saying that my microphone sounds better, it doesn't. It really doesn't. And I regret using that clip-on microphone like a desk microphone. At least it's not that bad, but still...
If you were expecting Super Boy III to be the same as the first two games, you're mistaken. The game is programmed differently, and instead of being based on Super Mario Bros. 3, it's based on Super Mario World...very, very loosely. For the purposes of this blog series, I'm going to assume you've already played the original Super Mario World.
Instead of worlds, you have rounds, and you have sixteen in all to get through to beat the game.
The controls are the same as ever: 1 to jump, 2 to run. This time, however, power-ups are much easier to get. The flower even bounces on the ground twice. If you can get the fire flower and keep the power-up for it, every power-up you find afterwards is some sort of Pepsi logo-looking thing that makes you invincible for a few seconds...and if you're good, you'll be getting it often. You have a bean that makes you Super Mario, a flower that makes you Fire Mario, and then the Pepsi logo, in that order.
The squares with the faces are the Dragon Coins of this game. Collecting five will give you a 1-Up, and if you know what you're doing, you'll get a ton of them. You can also get an extra life by picking up 50 regular coins, which are the circles with the "10" on them. Unlike the first two games, there are checkpoints, so you don't get sent all the way back to the beginning of the round when you die.
You'll definitely see some familiar enemies, including Rexes, Banzai Bills, Nippers that act as Jumping Piranha Plants that never go into their pipes, and a Hammer Brother. The Hammer Brother is at the end and acts as a boss. You can jump on him multiple times, but you're better off fighting him with the fireball if you can find the Fire Flower. The end-boss Hammer Brother is simple at the beginning, but he can turn around and go after you if you're behind him for long enough.
If you're wondering why slanted things like slopes and the giant diagonal pipes are all jagged, it is to ensure that Mario can stand on them. Unfortunately, you have to jump up slopes.
Round 2 introduces the Koopas, which get kicked when defeated and touched. If you attack them a third time, you will kill them. You will also meet the Monty Moles, which will jump out of the
The platforms in Round 3 move downwards and to the right when you stand on them. You can use this movement to your advantage, but you have to move along with them or else you will slip off them and die.
The logs in the water in Round 4.will sink the longer you stand on them. Also, be careful near the water, because if you fall in, you won't be able to avoid losing a life. Also, watch out for the black spiked balls that bounce towards you.
...and we end the same way the end the first game...no princess, and back to the start. Fun.
In World 4-1, be sure to get as many coins as you can at the beginning. Be careful, though, as there are two spots near the end where flying Buzzy Beetles with no feet come at you. Strangely, they never show up in the game again.
Run through World 4-2 as quickly as possible. You'll barely have enough time to get through it.
World 4-3 has islands and bridges, but at least the Cheep-Cheeps don't show up again.
World 4-4 is super easy compared to the final stages of the other worlds. You don't even have to run through it. When you get to the end, the game simply says "End." Second verse, same as the first!
And now it's time for World 3. Guess what? The Cheep-Cheeps are back.
World 3-1 is simple enough, but World 3-2 brings back the Spinys and Lakitu. Be patient with Lakitu when he shows up, and move right when he stops dropping Spinys, which always fall down and to the right. Be sure to take the high road in World 3-2 whenever possible.
In World 3-3, the Cheep-Cheeps are back; however, this level is easier compared to 2-3 due to there being more platforms. Be sure to wait for enemies to move off the screen if you need to.
World 3-4 is a little easier than the last two castle levels, especially once you know what to do with those big pits with the two Podaboos in them.
While Samsung released all of the Sega consoles in South Korea, Hyundai did the same for Nintendo. The NES became the Comboy, the Super NES become the Super Comboy and the Game Boy became the Mega Comboy because Samsung was already using the "Game Boy" name.
It's now time for World 2...which is more of the same.
In World 2-1, take your time to make it from one platform to another. Watch out for the Buzzy Beetles that re-debut here, too. Have the second Koopa Paratroopa at the end fly away before making your way to the end.
In World 2-2, the Cheep-Cheeps are back. Once again, you will want to get extra height and distance off the Cheep-Cheeps when you can as well as rush through the level. At least it's not as bad as Super Boy I, but it's still a bit hectic.
In World 2-3, take your time after the platform with the Goomba and you should be fine.
In World 2-4, be slow with the Podaboos and fast with the platforms. After the first platform, get both Podaboos to show up at the big pit, then make a long running jump with 1 held down the entire time when the first Podaboos goes downward. It's all downhill from there.
Yep, we're playing the sequel to Super Boy. Guess what? It's just like the first game. You press (and not hold) 2 to run and 1 to jump, and the jumps are still floaty. Also, the game is just as crazy as ever, and is based on the Japanese sequel that is known as The Lost Levels in America. If you've played the first game, you know what to expect here...all the way down to the random-as-all-hell appearance of power-ups. The only difference is that enemies can pass through coins now.
As soon as you start the first world, you get to see bit and pieces of World 1-1 from the actual Lost Levels game as well as some original level design...if you can call it such. As a matter of fact, the part with all the ? blocks from World 1-1 is repeated at the beginning of World 1-2! At least you can walk on the ceiling in World 1-2 to skip a few parts of the level.
World 1-3 is your usual tree platforming, and World 1-4 is your usual castle level. At the long pit with two Podaboos in 1-4, make a long jump when both Podaboos are on the screen, and make sure you hold 1 the entire time, or else you won't make it. Make a running jump over Bowser to get past him. At least the game no longer says "SORRY NOTHING" when you make it over the bridge.
World 4 is just as much of a breeze, and it is also the last world in the game.
World 4-1 is the debut of Lakitu, and it is the only time he shows up. He just flies from right to left, and if you can anticipate where the Spinys are going to land, you can get through this stage very quickly.
World 4-2 is an abridged version of the Famicom original's World 4-2, though there are plenty of pits.
World 4-3 is more platforming as well as more Spinys, but once again, you don't have to deal with a whole lot.
World 4-4 is a super-simple maze. Take the upper path first, then drop down to the lowest level after you see the lava and go right. Jump over Bowser. You've beaten this god-awful Mario clone...but guess what? There's a sequel...
After some more history, we dive right into World 2!
Believe it or not, beloved consoles such as the Nintendo Famicom and the Sega Master System were sold in South Korea. However, due to a South Korean ban on Japanese products in response to Japan treating them like dirt throughout the 20th century, South Korean manufacturers had to sell the products in their names in order to get through the embargo. Hyundai would handle Nintendo's consoles from the NES to the Nintendo 64 while Samsung would handle everything on Sega's side from Master System all the way to the Dreamcast.
Due to the fragile relationship between Japan and Korea, the majority of the games were in English and there was no attempt, if at all, to translate anything into Korean.
World 2-1 starts - and ends - simply enough. Just make sure you are careful near the end so you don't fall into any pits.
World 2-2, however, is where it starts getting weird. The Cheep-Cheeps act really weird. Instead of jumping to one side, they float to the top and bounce off anytihng on the way up. Wait for them to disappear if you need to before continuing on. If you can do so, keep holding down the jump button (which is Button 1, in this case) to bounce off a Cheep-Cheep and get some additional air time and skip even more of the stage. This is easier said than done, since it is not easy to pull off.
Once you reach World 2-4, you won't have to deal with the Cheep-Cheeps anymore. Thankfully, this area is easier than World 1-4.
Of all the Master System games to start out with...
Super Boy I is a pretty bad Mario clone from 1989 that was originally "programmed" by South Korean "developer" Zemina. It was later ported over to the Sega Master System.
The MSX was an attempt at an operating system standard by Microsoft to create a single industry standard in Japan, so that numerous computers in that country would have the same OS and therefore be interchangeable with one another. If a software program worked on the MSX unit of one manufacturer, it would work on an MSX unit of any other manufacturer - all one had to do was look for the MSX logo on the unit. MSX computers were manufactured by numerous companies throughout the world such as Philips, Spectravision, Yamaha, Goldstar and many more.
Until July of 1987, there were no copyright laws in South Korea for computer programs. As a result, it was easy to get away with bootlegging games and programs. Even when some were put in place, they only applied to the program code and not the intellectual property as a whole. In other words, you could make your own Super Mario Bros. clone with your own programming and it would have been perfectly legal because there was nothing protecting the IP. As a result, numerous games were recreated to go through the loophole in computer code copyright law at the time, and Super Boy is just one of those games.
The game was very easy to port from MSX to Sega Master System, as well.
World 1
The game is much like Super Mario Bros. You have your Goombas and your Koopas, but some things are different. You only need to press the run button (Button 2) once while moving in order to keep running, and jumps are pretty floaty - you'll get plenty of hangtime. Also, you never know when you will get a power-up, as they are placed in random ? Blocks all the time.
Also, the whole game is basically "run to the right and get to the goal as fast as you can," and there is no way to gain any extra lives. There are no continue points in any of the levels, and if you lose all your lives, you're going back to World 1-1. There is a Fire Flower, but good luck finding it as well as using it, as the fireballs explode when they hit the ground.
World 1-1 looks much like the same level from the Nintendo original, and so does World 1-2 (though there is no warp zone). Koopas do not stay in their shells after being stomped; instead, they die after one hit.
The coins act like solid objects that only Mario can go through. Weird.
Also, the Podaboos simply move up and down even if they are not in lava. I have to do World 1-4 twice because as soon as I hit one and wait, I strangely manage to glitch the Podaboo locations.
Go slow at the beginning, make it past the first pit, then you will want to time your movements carefully and keep your jumps low so that you don't get hit. After that, make one big
As for Bowser, you have to jump over him. Shooting fireballs at him with Fire Mario - assuming you can even get Fire Mario - will not work.
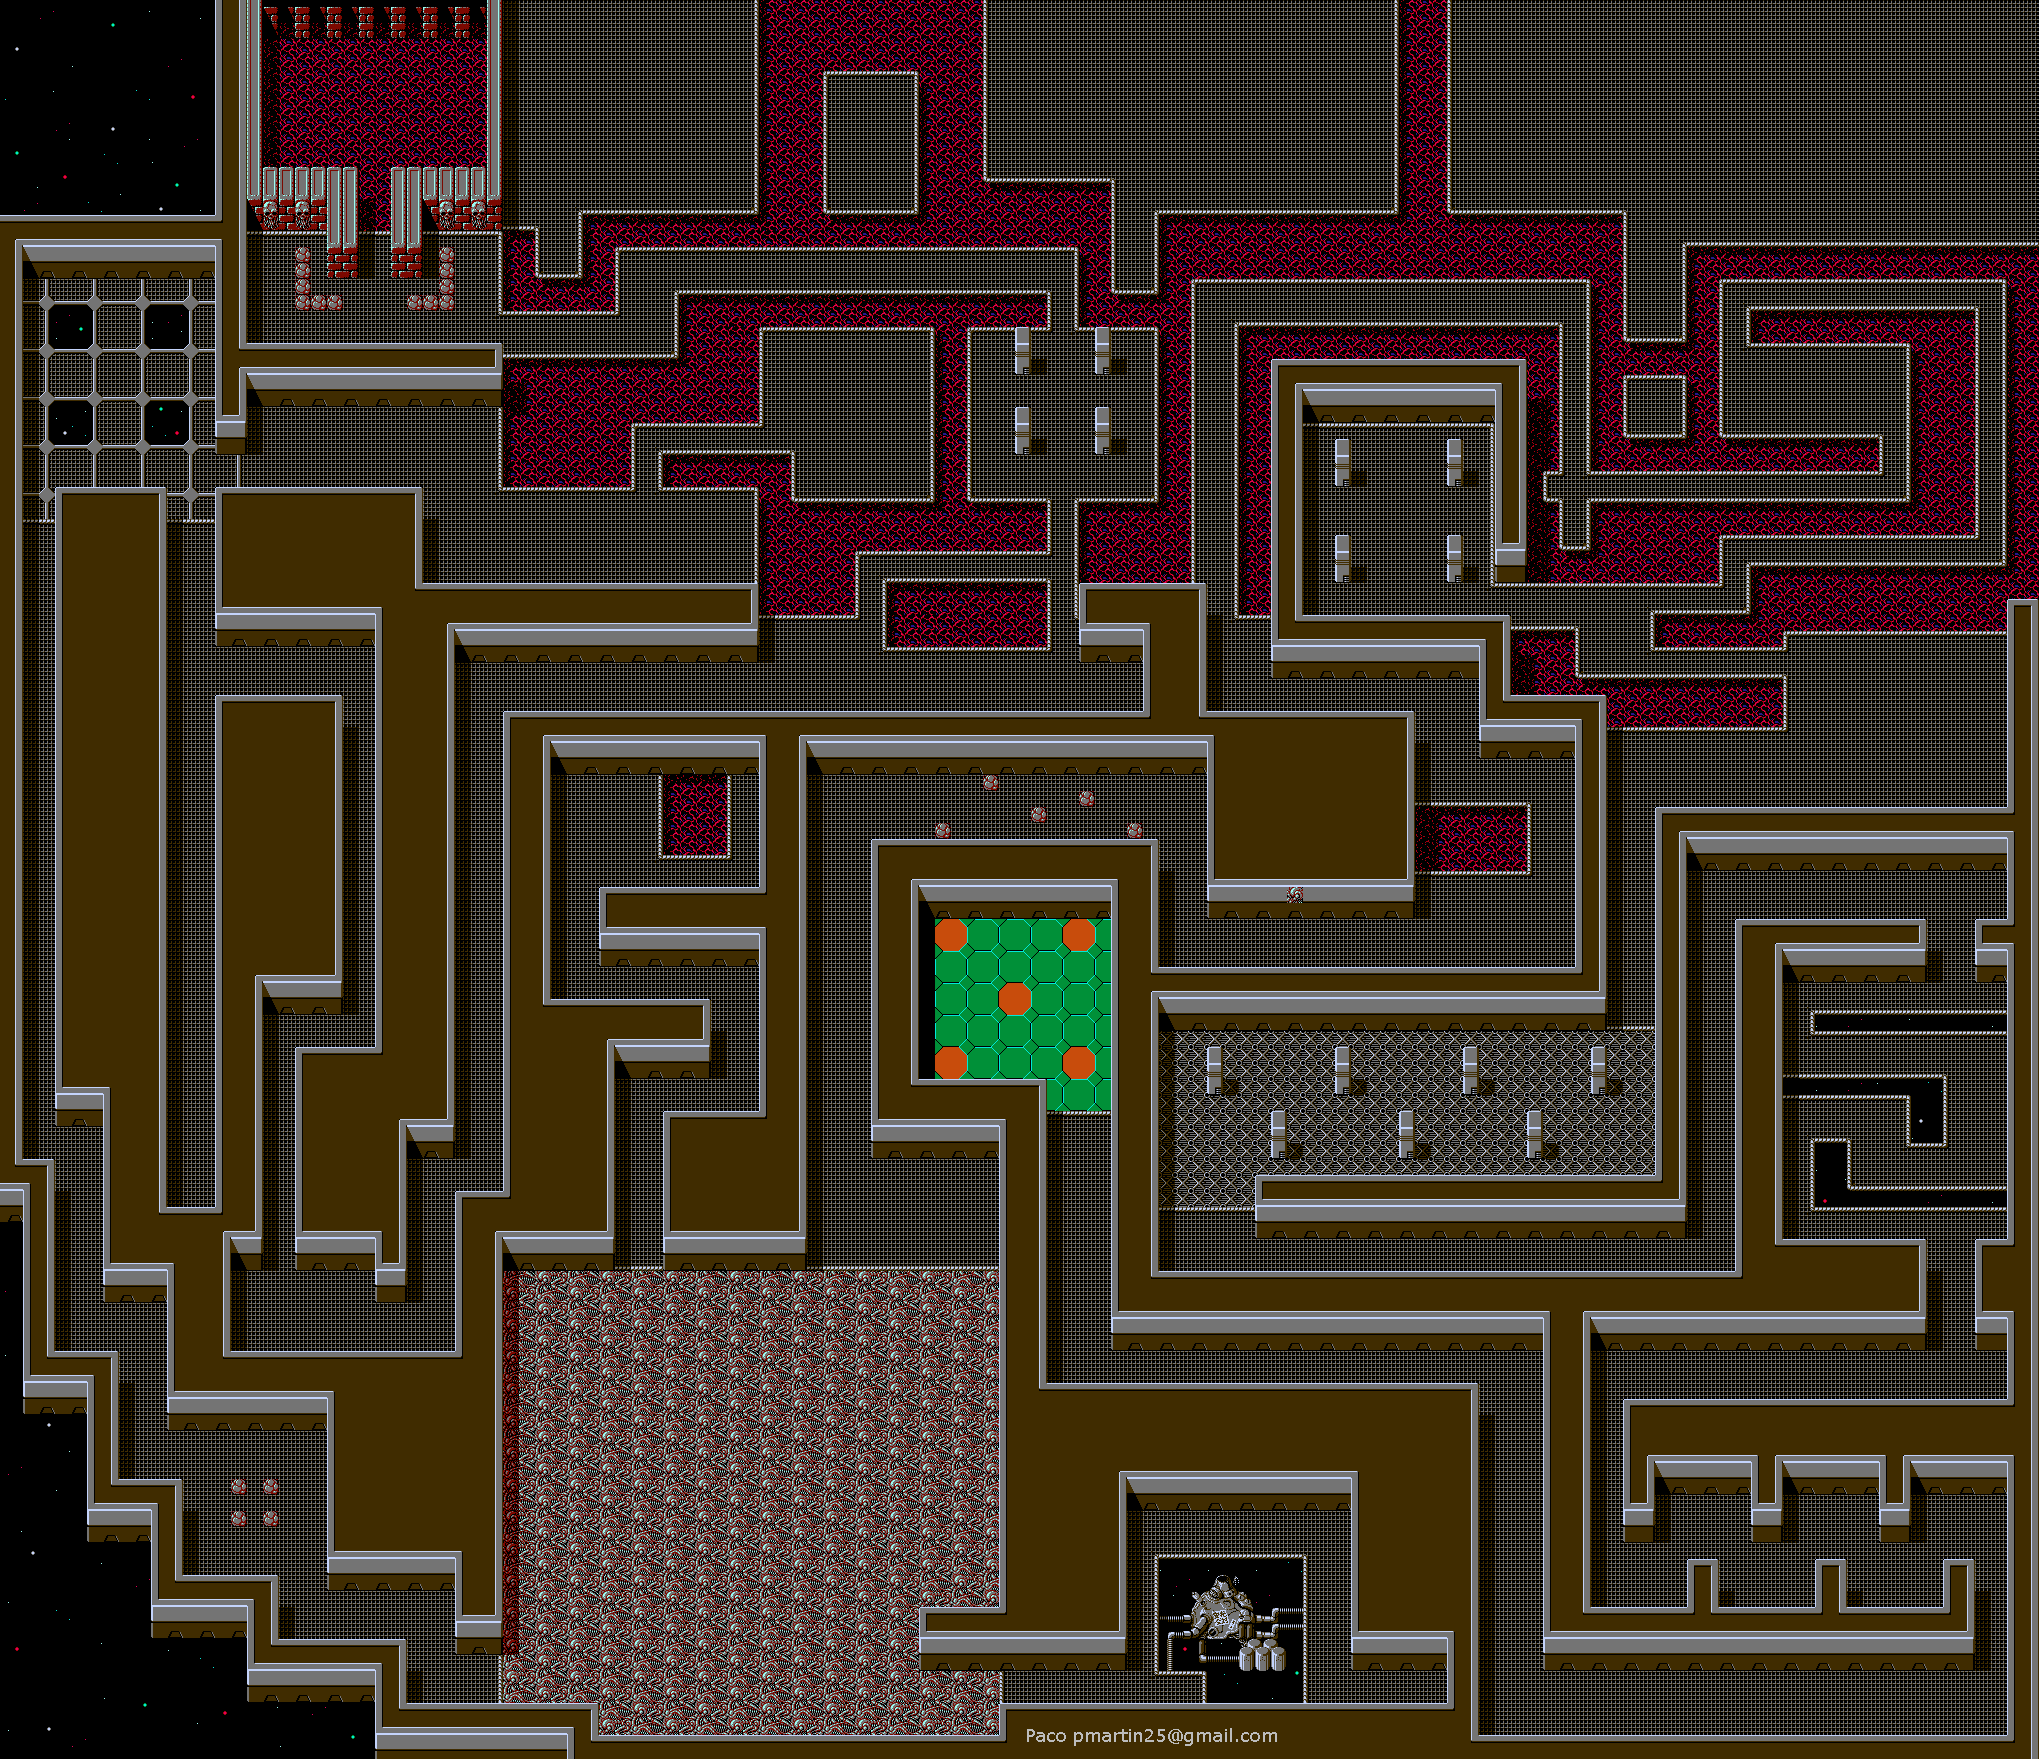
After the lass overworld boss, you'll be to the upper left of the building you were just in. The only way to go from here is north. You'll take an enemy-free path down the sewers to the island in the center of the overworld. Walk up to the tombstone in the center of this island and you'll instantly be whisked into the UFO.
The pink aliens with one eye will jump over your shots like no tomorrow, so use your gun or hit them with a Noose. The whip will not work.
The green spiked monsters are just like the slimes.
The brown monsters with the green orb on their heads (which look a lot like bird's nests with a green egg in them) shoot a three-way bubble shot at you. Hit them with a Level 4 whip, so you can take them out in two hits.
The floating eye with the three brown things rotating around them shoot three green projectiles in a triangular pattern in addition to the three-way bubble shot. A Noose is the best way to get past them.
If you need to, use a Noose to get out of tight spots. They don't work against bosses, so feel free to use one when necessary.
The green monsters that swing their arms around can be easily destroyed with a Level 4 whip.
The boss here is some sort of evil robotic thing. I can't even tell what it is. Use your Invisibility potions and destroy the turret in the center with the Level 4 whip, then stand a bit south of the center of the right side of the screen. If the brown balls it shoots at you don't touch you at all, you're standing in the right spot. From these, pound the boss itself with missiles (if the target isn't locking on to either part of the turret you destroyed, you're doing it right).
When you beat the boss, you did it! Gomez is safe, and so is the rest of the city! Enjoy your ending!
Items
All items except for Light Bulb, Keys and Money will replenish after you beat a boss.
Money: Equip and use them at Hot Dog Stands to refill a unit of health, at five Money units for each one.
Gun Upgrades: Blue ones power-up your gun, while pink ones downgrade.
Whip Upgrades: These work the same way as the Gun Upgrades, they just say "Whip" instead of "Gun."
Light Bulbs: These light your way through the sewers. Equip one and you'll have light until you go back above ground.
Keys: Used to open doors above ground. Enter the locked houses to get more power-ups.
TNT: Equip them, then lay one on the ground and wait for it to explode. Anything near it will be taken out.
Vice Grips: Some enemies will slow down Fester considerably with their attacks. When that happens, equip and use a Vice Grip. You'll be at regular speed in no time!
Potions: These will fully replenish your health when you use one.
Invisible Potions: Use these to temporarily turn Fester invincible. Not "invisible." Invincible.
Missiles: With the Missiles, you can lock onto any enemy you want and hit them from anywhere. This will send out a couple of missiles that will fly around and eventually hit the enemy. You can even lock on through walls and grab stuff you want with the Whip.
Nooses: Enemies hounding you? Use a noose and blow away all the enemies currently on the screen. These do not work on bosses.
When you go above ground at the end of this sewer path, you'll find a hole in the dock. This leads to another sewer path.
Be careful with this next path, as the munch spheres will be coming out in full force. They'll even keep spawning if you stand in certain parts of the path.
If you haven't gotten your weapons fully powered up yet, now would be a good time to do so.
The boss here is some dinosaur-like creature with both a shield and a gun. You could use your missiles here, but you're going to be taking a lot of damage, so use your Invisibility potions and smack him around with the whip if you've got it fully powered-up. If you're forced to use the gun because the whip isn't powered up, be sure you're firing into his gun hand so you can do some damage, as he never lowers the shield and the gun will have no effect against it. If you run out of Invisibility potions, use your Missiles.
You'll get another Clue, but you'll find out there's still one more Clue to find...and another boss to kill off. Go ahead and enter the sewer entrance near the exit you just came out of and get over there already!
You'll get a huge yet straightforward path at the other side of the sewer path. The house you'll see here finally has Mama (Ah, so that's her name!), who will give you Nooses. These items are screen-clearing bombs, and they can come in handy if you're in a bit of a spot. Even funnier, you get a really nice picture of Lurch (he finally shows up) before everything gets destroyed. That picture actually looks really nice for any NES game. Just remember that you can't use the Nooses to destroy bosses.
You'll see the Addams Family Mansion on this path. You'll have to stand above the house (or behind it, depending on how you're viewing the top-down perspective) and walk into the bushes near the upper-left corner of the house. When you can't go west any further, go south. You're there.
Enter the house, and you'll get a monochrome brown-colored picture of the Addams Family (minus Thing and including Gomez, strangely, along with a moose whose antlers wave back and forth). Leave the screen, and you'll have your second and last health upgrade. Now you can take the path as normal and enter the sewers.
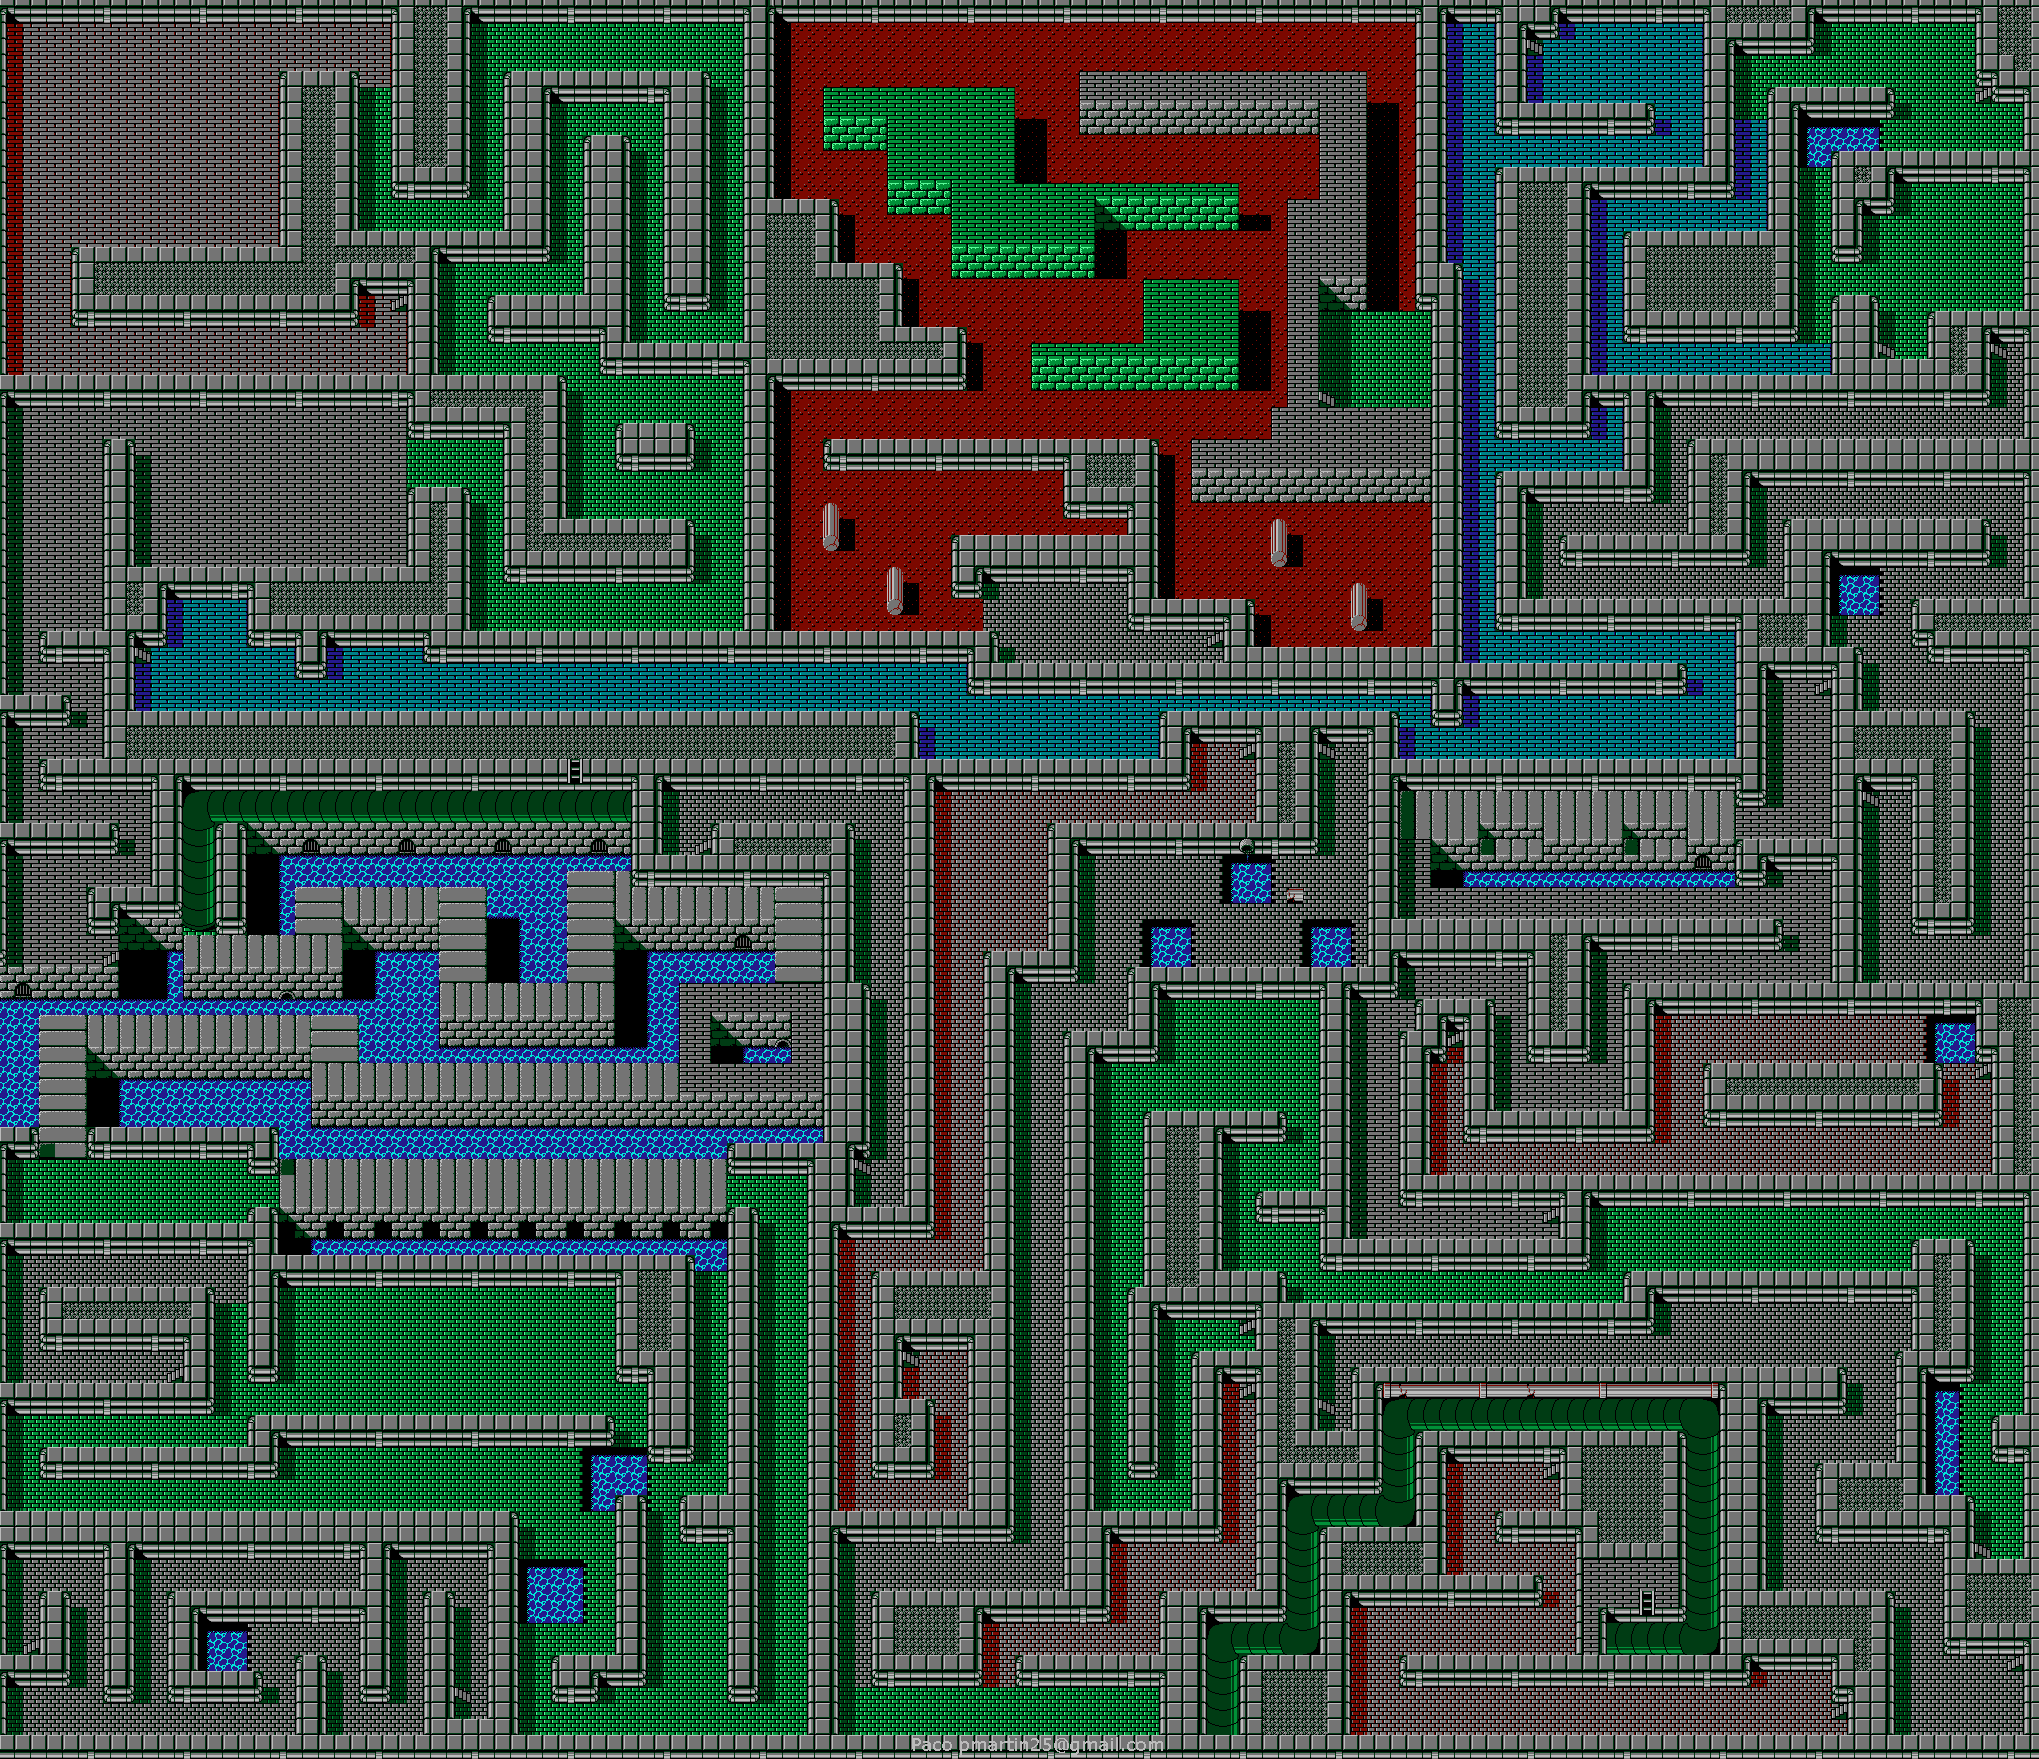
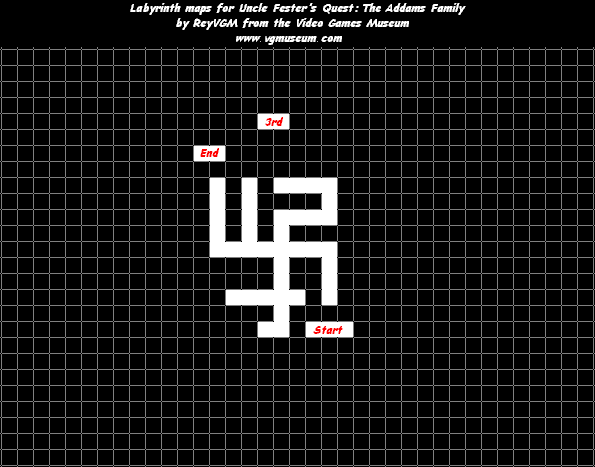
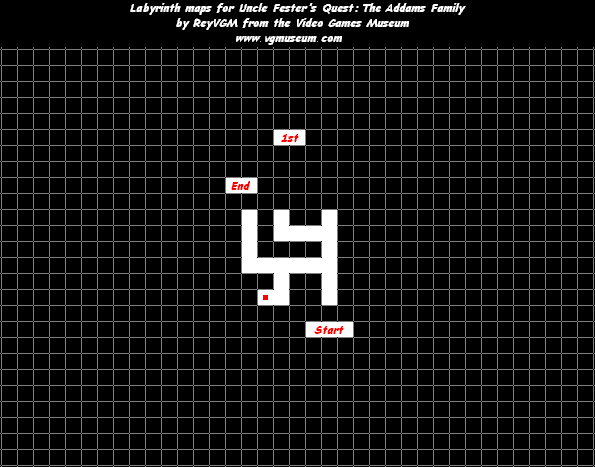
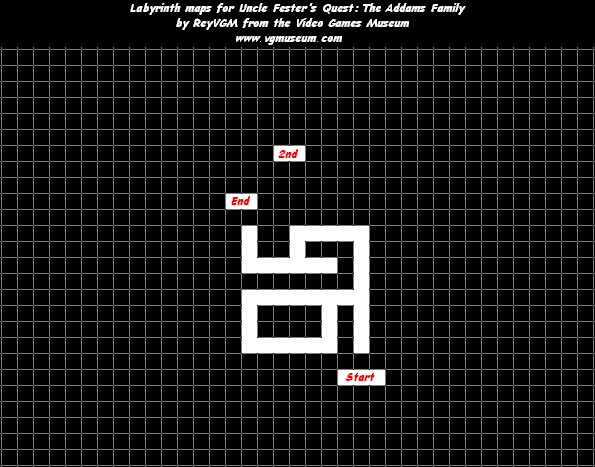
The sewer path here is more of a maze than the others, but it's not that hard. At least it's easier to identify on the sewer map I placed in these entries compared to the rest of the path, due to the dirt brown floor that you'll be seeing in it.
The boss here is yet another dinosaur. Aside from another gun that does a three way shot, it also spits fireballs out of its mouth that go straight forward. He's really hard to dodge, so use your fully-powered up whip and keep using your Invisibility potions. He'll go down in no time.
When you check your Clues, you'll find out that Gomez is on a UFO!
Items
All items except for Light Bulb, Keys and Money will replenish after you beat a boss.
Money: Equip and use them at Hot Dog Stands to refill a unit of health, at five Money units for each one.
Gun Upgrades: Blue ones power-up your gun, while pink ones downgrade.
Whip Upgrades: These work the same way as the Gun Upgrades, they just say "Whip" instead of "Gun."
Light Bulbs: These light your way through the sewers. Equip one and you'll have light until you go back above ground.
Keys: Used to open doors above ground. Enter the locked houses to get more power-ups.
TNT: Equip them, then lay one on the ground and wait for it to explode. Anything near it will be taken out.
Vice Grips: Some enemies will slow down Fester considerably with their attacks. When that happens, equip and use a Vice Grip. You'll be at regular speed in no time!
Potions: These will fully replenish your health when you use one.
Invisible Potions: Use these to temporarily turn Fester invincible. Not "invisible." Invincible.
Missiles: With the Missiles, you can lock onto any enemy you want and hit them from anywhere. This will send out a couple of missiles that will fly around and eventually hit the enemy. You can even lock on through walls and grab stuff you want with the Whip.
Nooses: Enemies hounding you? Use a noose and blow away all the enemies currently on the screen. These do not work on bosses.
I'm going to keep posting the items list at the end, because knowing which item does what in this game is very, very essential. Just refill whenever possible and make the best use of your gear.
Anyway, it's time to go to the sewers. The sewers are much easier as you progress, but they're going to get a little more difficult from here. The spheres with the munching mouths that move around can go through the walls as they go straight at you. When you see them, shoot them immediately, as they can be quite a pain to deal with.
You'll now be near the upper-right corner of the overworld map. Go south until you hit the pavement, then turn north when you go towards the fork in the road. (If you need energy and have the money, so south to find a Hot Dog Stand. Be careful if you go south, as there are giant spider enemies that will require TNT to take down effectively.) Go north, and you'll see a path into some forest to the east. Take it and follow the path to the next set of stairs. As you go down there, those munching spheres will show up and try to ruin your day again. Be glad you have a powerful weapon.
For this set of sewers, you'll meet a new enemy: the snails. When you shoot them down, they'll turn into slimes. Once again, this can be a headache due to the power-up piles that the slimes can leave, and you definitely want to keep the gun power-up you have. When you come out, you'll be near a house. Go into this house, and Morticia will finally hand you the whip. Finally! Don't use it yet, though, as it's only at power level 1 and does next to no damage right now. Power it up to the maximum (level 4) before using it.
For the whip, Level 1 is normal, Level 2 is a chain whip, Level 3 is a morning star and level 4 is a flame whip. Nice. As you power it up, the range and strength increases. You can not only attack through walls with the whip, but also get items with it. The latter ability is a double-edged sword, as you can accidentally grab a downgrade while fighting enemies.
When you're back in the overworld, go straight down. You'll find another set of stairs.
Remember, if Fester touches a power-up anywhere below head level, he's got it. Keep that in mind while avoiding weapon downgrades.
You'll meet another boss who looks like an anthropomorphic Triceratops in a Speedo with a whip in each hand. Use your Invisibility potions to get in front of this guy and wail away at him with your gun. If you run out, refill your health and push this guy to the top of the screen, moving back and forth as you do so and shoot at him. When he's at the top, just move left and right and avoid the whips. He always alternates between whips, and the raised arm will indicate which whip he'll attack with, which is a very good tell if you need to know what direction not to go in to keep from get smacked.
If you have a fully-powered Whip at this point (which is amazing considering you'll need a little bit of patience to do that), you can take this boss out even faster. Enjoy your clue, which still makes it somewhat ambiguous as to where Gomez might be.
You'll be at the upper-left corner of the building, and there's another extremely short path back to the sewers.
The whip is great against the slimes when it's at Level 4. Just like the TNT, the slimes won't multiply when hit with the whip. At least the chances of stepping back and causing the slimes to re-spawn are cut down to zero.
When you cross the stairs at the end, you'll be at the very upper-right corner of the overworld. The house has Thing again, and he'll have Missiles. (Where's Lurch? I haven't seen him yet. Same with the grandmother, whose name escapes me at the moment.) You can now hit any of those pesky enemies from anywhere on the screen! From here, take the wooden dock and keep going south. You'll take a path back to the sewers.
You can see signs for Sunsoft and the Sun Club along the way here. Sun Club was their Japan-only magazine, which (of course) showed off their releases among other things. There's another one that seems to say "UTB Team," but I have no idea what that is.
The boss here is a knight demon. If you have the whip fully powered-up, you can whack away at him without having to wait for the boss to expose himself. Otherwise, you'll have to wait and whack him with the Missiles. For best results, move all the way north to move the boss all the way north, then use the missiles. This ensures that more missiles hit the boss. If you have Invisibility potions and you're out of Missiles, use those to get some good damage on him with the gun. When he lowers his defenses, he also swings his swords and shoots out a three way shot.
If you have to use the Missiles, just move back and forth across the screen. Just remember that when the boss rears the sword back, he's about to strike.
Once you beat the boss, you'll be to the right of the building, right next to another sewer entrance. You'll also get a better idea of where Gomez is.
Items
All items except for Light Bulb, Keys and Money will replenish after you beat a boss.
Money: Equip and use them at Hot Dog Stands to refill a unit of health, at five Money units for each one.
Gun Upgrades: Blue ones power-up your gun, while pink ones downgrade.
Whip Upgrades: These work the same way as the Gun Upgrades, they just say "Whip" instead of "Gun."
Light Bulbs: These light your way through the sewers. Equip one and you'll have light until you go back above ground.
Keys: Used to open doors above ground. Enter the locked houses to get more power-ups.
TNT: Equip them, then lay one on the ground and wait for it to explode. Anything near it will be taken out.
Vice Grips: Some enemies will slow down Fester considerably with their attacks. When that happens, equip and use a Vice Grip. You'll be at regular speed in no time!
Potions: These will fully replenish your health when you use one.
Invisible Potions: Use these to temporarily turn Fester invincible. Not "invisible." Invincible.
Missiles: With the Missiles, you can lock onto any enemy you want and hit them from anywhere. This will send out a couple of missiles that will fly around and eventually hit the enemy. You can even lock on through walls and grab stuff you want with the Whip.
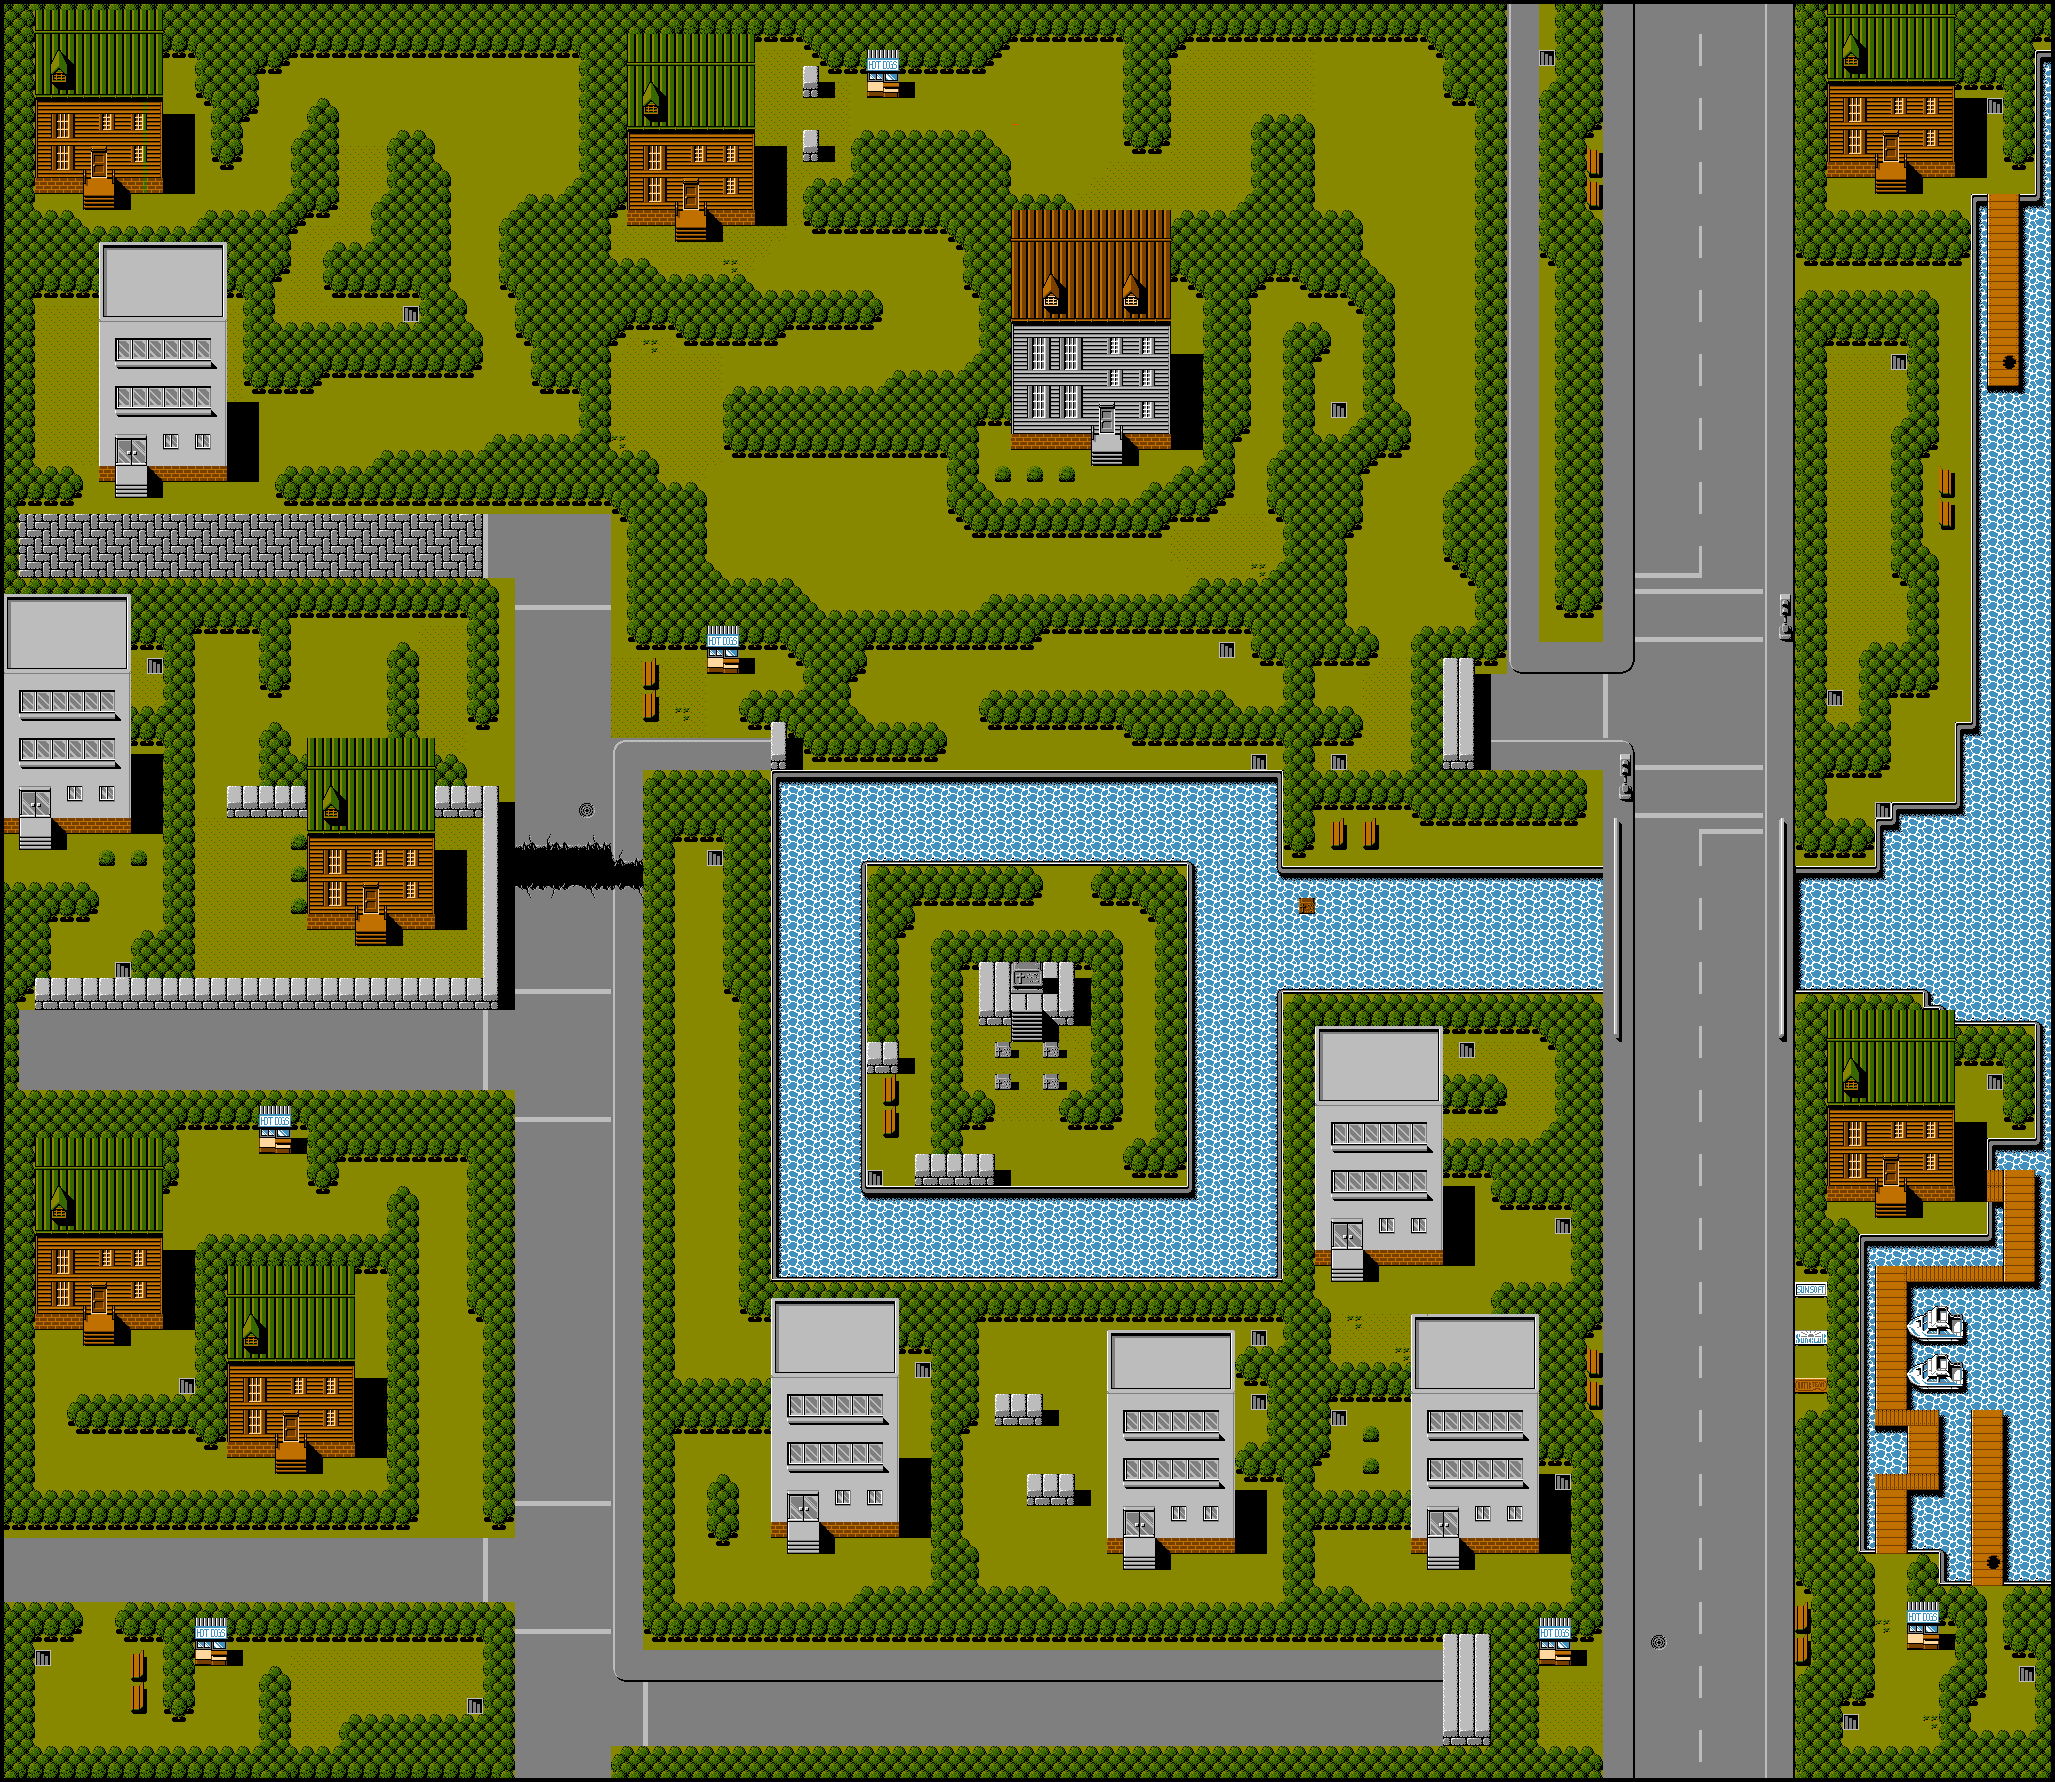
You start out in the center left part of the city. Get used to how this part looks, because you'll return her every single time you die and you'll have to inch your way back to where you were.
The gun has eight levels of power. For the first two, you have the standard yellow pellet. Upgrading it makes it go faster and further, but it's still not very powerful. Next, you'll get the orange crescents. These have two levels of power and distance, but they can get caught on the walls unless you're standing in the right area.
Ditto for the next two, which are black balls that circle around as they go forward. Unlike the crescents, they're even worse with running straight into walls.
The final weapon is a bunch of pink triangles. They cover a wide area and they travel in a double-helix pattern that's more reliable than all the other weapons, so max out your gun power as soon as possible. You can power that weapon up just one more time before you're finally maxed out, and this will turn the double helix shot into an even better triple shot that doesn't arc around at all.
You can go to the inventory screen to see what level your gun is at any given time. Same for your whip later in the game, as you'll soon find out.
In this game, you have two hits before you die. You can find two extra hits to add to your maximum health, but that's as far as the game will allow you to upgrade it. Still, the health upgrades are a big help.
The frogs jump toward you, and sometimes they can be the death of you. They can also attack you with their tongues, which have a bit of range to them. If your weapon keeps hitting the walls, either use the whip (which you won't be able to do yet) or either re-position yourself or run away. Hugging the east wall in a narrow vertical corridor or the south wall in a narrow horizontal corridor usually helps. Also, try advancing slowly so enemies like the frogs that slowly but surely jump forward will go down. That's nice, especially when the re-spawn rate for monsters is so instantaneous and unnecessary that it's brutal at times.
The purple things on the ground that look like grapes can be destroyed easily. Just don't be stupid enough to walk into them. They're really good for filling up on money, light bulbs, keys and weapon upgrades.
The orange heads that float in place won't bother you until you shoot them. When you shot them, flies come out. You'll have to take out both the heads and the flies to move on.
For the houses north of where you begin, Pugsley (whose name is spelled wrong) gives you TNT, while Wednesday gives you Vice Grips. Don't even bother re-entering to get more, as you automatically get the maximum you can carry for each weapon when you get them from a house.
The staircases that lead down lead to the sewers, which you'll be entering a lot. We'll be entering from the staircase just east of the house where Pugsley gives you the TNT. Use a Light Bulb to illuminate the sewers, then equip TNT in case you need to get past a slime. The slimes multiply when you shoot them, but either shooting really, really fast or using a TNT will take care of that. (At least the slimes leave a lot of pick-ups you can use).
The heads here will now travel along the ground. You'll have to shoot them down this time, even though they leave larvae that crawl around on the ground and turn into flies after a few seconds. If anything is right in front of your gun, it's going to get hit.
The rats just hug the walls and go straight in one direction until they hit a wall, before they change direction again. They're pretty easy to take out.
Use the item button to go up the ladder, and you'll finally be above ground again. You'll now be north of the un-crossable pit just north of the start.
The pink frogs spit three fireballs, one straight and two diagonally. The green ones will lash their tongues forward. The blue frogs and the red frogs will just lap towards you.
Go to the house in this area so Thing can give you Potions. Get as many as you can, since these will fully replenish your health, unlike the Hot Dog Stands.
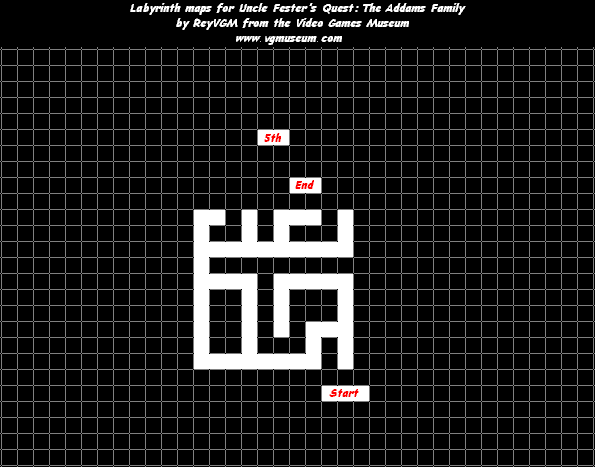
The tall grey building in this area is your first first-person-shooter style segment. Of course, you won't be shooting anything in these section because there's nothing in them to hurt you. That's good.
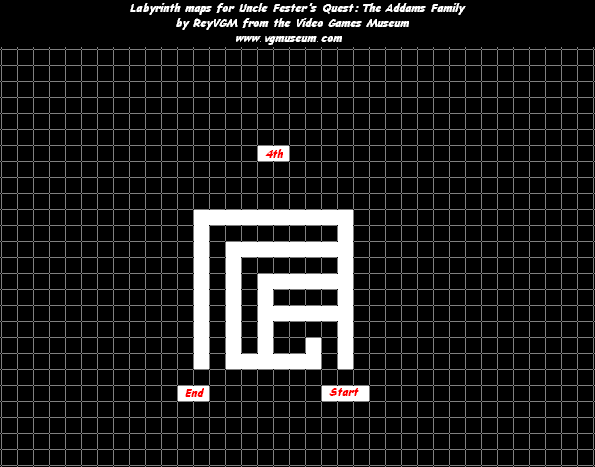
Anyway, there's not much to this building...except. Except if you go forward, turn left, go forward, then turn left again at the first junction you see, you'll reach a dead end. Go forward at this dead end and you'll get your first health upgrade. Yay! Now you can get out of there. Don't believe me? Use this map from ReyVGM. You're welcome.
The black monsters that look like a cross between a flea and a daddy longlegs will jump whenever you shoot at them. Just keep plugging away as they jump while moving back and forth and you'll eventually kill them.
The house north of the tall grey building in this area has Thing in it (how does he go between the two houses so fast?), and in this house he'll give you Invisible Potions. These will turn Fester invincible for a short time. Not invisible. Invincible.
You're finished here, so go back east and then turn south to hit the sewers up again. Follow the path, and enjoy the freedom of the most powerful gun power-up in the game. The frogs will go down in record time compared to the weaker gun shots.
When you reach the staircase at the end, you'll be west of the house where Thing gives you the Potions. Enter the house and use this map by ReyVGM to get around. At the end, you'll fight a boss.
Whenever you enter a boss room, you'll get an invincibility flash. Consider this your few-seconds-long head start to align yourself properly and shoot at the boss without impunity. Anyway, this guy will attack with his extending arms, and they have some range. He always attacks left, right, right, both with his arms, then he moves around until he can immediately hit you with the left arm before repeating the sequence. Just bait him into attacking and stay on the move, and you'll do fine against him.
When you beat the boss, you'll be in an alcove next to the upper-right corner of the building. In it will be another sewer entrance.
When you check your inventory, you'll notice there is a white rectangle on the left side of the Clue window on the upper-left. When you get all the clues, you'll find out where Gomez is.
Items
All items except for Light Bulb, Keys and Money will replenish after you beat a boss.
Money: Equip and use them at Hot Dog Stands to refill a unit of health, at five Money units for each one.
Gun Upgrades: Blue ones power-up your gun, while pink ones downgrade.
Whip Upgrades: These work the same way as the Gun Upgrades, they just say "Whip" instead of "Gun." You won't be able to make use of these until you get the whip later in the game.
Light Bulbs: These light your way through the sewers. Equip one and you'll have light until you go back above ground.
Keys: Used to open doors above ground. Enter the locked houses to get more power-ups.
TNT: Equip them, then lay one on the ground and wait for it to explode. Anything near it will be taken out.
Vice Grips: Some enemies will slow down Fester considerably with their attacks. When that happens, equip and use a Vice Grip. You'll be at regular speed in no time!
Potions: These will fully replenish your health when you use one.
Invisible Potions: Use these to temporarily turn Fester invincible. Not "invisible." Invincible.
For the final video, we send this off with an explanation of the Montreal Screwjob, which ended the New Generation Era at last and properly ushered in the Attitude Era, dragging wrestling out of the 1980s kicking and screaming.
Here's the explanation courtesy of reddit user Johnny_Holiday, in case you don't feel like clicking the link:
Bret gets a contract from WCW who will pay him much more than WWF at the time. Bret went to Vince and told him that he would resign with WWF if they made him any offer. Vince didn't make one. Bret was the champion at the time and Vince asked him to drop the title to Shawn on his way out at Survivor Series. Bret's contract expired that Sunday at midnight so it was the last chance to get it off of him. Bret says that he doesn't want to lose the title in Montreal but is willing to sign a one day extention to drop it the next night on RAW.
Vince and Bret went back and forth about it all the way up to a few hours before the main event started. Eventually they agreed to a finish: HBK would apply the sharpshooter while the ref was out. Bret would then reverse it (which had never been seen from that position at the time) into his own sharpshooter. The ref comes to and sees HBK submitting (this wasa time before tapping out was a thing, that's very important). Bret then drops it the next night on Raw.
At this point, Vince has had so many people jumping to WCW and screwing him over in the process. Alundra Blayze had left the WWF with the women's title and dropped it in the trash on WCW. Vince of course was parinoid that Bischoff might try something like that with the WWF title and Bret, so of course he wasn't going to allow it to happen.
What went down: The match goes as planned. Earl gets knocked out and HBK applies the sharpshooter. Vince comes out and is the visual cue for Earl to get up. Earl looks at HBK and Bret, pretends to ask Bret if he gives up and immediately calls for the bell saying it was a submission. You can see Bret about to reverse the hold when the bell rings. Vince even shouts at the time keeper to ring the bell because no one knew that it was going to happen.
They cut the PPV quickly after that but Bret spits on Vinces face and destroys the commentary table. He then spells out WCW with his finger and walks out. He goes backstage and punches Vince in the face. The next night on RAW, Vince gives the famous "Bret screwed Bret" interview while sporting a black eye.
And with that, this video series - and blog series - comes to a close. This one was amazing to do, and maybe one of these days I'll do something with this sort of presentation again with one of the other LJN games. Until then...
We got a few more feuds from the first half of 1993.
The first one I do is Yokozuna and Bret Hart...the one that lasted about a whole year! Yokozuna would be the one to take the WWF Championship from Bret at WrestleMania 9 (and subsequently lose it to Hulk Hogan before taking it back at King of the Ring). It would be a whole year until Bret would take the title back at WrestleMania 10 in 1994, and at that point, Yokozuna would never be in the main event picture again (though he would win the tag team titles with Owen Hart).
The other one I do is "The Nature Boy" Ric Flair vs. Mr. Perfect, which ended on the third-ever episode of Raw. When Mr. Perfect's back went out, he could not team with Flair at Survivor Series 1992. When The Ultimate Warrior got himself fired a second time due to steroid use, WWE decided to turn Mr. Perfect into a good guy and have him team with "Macho Man" Randy Savage, having him turn against Flair and Bobby "The Brain" Heenan. Savage and Perfect would win by disqualification, and Perfect and Flair would continue to feud until the beginning of 1993, with the feud ending in a "Loser Leaves WWF" match that Perfect won. This was due to Flair wanting to go back to World Championship Wrestling, which he did.
And now for some feuds that were taking place in the first half of 1993, around the time that this game was released.
In this episode, I play a few matches that actually happened as part of storylines in the first half of 1993.
The first one I do is "The Heartbreak Kid" Shawn Michaels vs. Tatanka, which took place at WrestleMania 9 and was for the WWF Intercontinental Championship. The match ended with Tatanka winning, but only by count-out, which meant that the title did not change hands.
Also from WrestleMania 9 is Mr. Perfect vs. "The Narcissist" Lex Luger. This match was Luger's WWE debut, and Luger won this one even though Mr. Perfect was in the perfect position for a rope break. As I mentioned earlier, "The Narcissist" did not last long, and Lex Luger ended up being the "Made In The USA" babyface from July until he left the WWE in 1995.
...and here's what you've been waiting for: the Royal Rumble mode!
Before continuing, it should be mentioned that Yokozuna was actually billed as being from Polynesia! What time and watching a zillion old episodes of WWF Superstars will do for you.
In the Royal Rumble mode, it's an over-the-top-rope battle royal with no referee and all characters in the game taking part in one match. Since there is no referee, you can easily choke out and eye gouge your opponents. Also, the only health gauge you are going to see is your own, so it is easy to keep an eye on your health.
If your opponent is weak and you manage to get the grapple bar filled up on your side near the ropes, you can toss your opponent out. Just make sure that the outline of the bar itself is glowing green on your end when you do that (Super Nintendo version only), as that means that you can toss your opponent out by winning the tie-up and attempting an Irish Whip.
There can only be six men in the ring at any given time (which is weird, given that Triple Tag Team Match still allowed only for four), and in order to get more participants to show up, some guys must be eliminated.
The last person remaining is the winner of the Royal Rumble match.
Instead of being a main match mode, it is more or less a sub-type of match. You can do a Brawl for either One-On-One, Tag Team or Triple Tag Team. Brawl is a fight to the finish with no rules, no pinfalls, no referees and no count-outs. You can choke out or eye gouge your opponents without any repercussions, and you can also use the steel chair. Just don't be surprised if your opponent immediately retreats upon you grabbing the chair.
The brawl ends when one person gets their life bar completely emptied. Also, in the Tag Team and Triple Tag Team modes, you can take advantage of the fact that everyone goes outside when you and your opponent go outside to keep everyone from ganging up on each other and even have your tag team partner(s) do some of the dirty work for you, as only the legal men in the match can be knocked out (yes, tagging in and out still applies even though rules are thrown out the window in Brawl).
Triple Tag Team Mode is just the same as Tag Team Mode, but you have three people to play as and three people to select from. The game only shows four characters: two on your team, two on the opponent's. If you press Select on Super Nintendo or A, B and C simultaneously (Mode on a 6 Button Controller) on Genesis/Mega Drive, you will magically switch up the two men in reserve.
Wow, I messed up on the button commands during the Genesis part and I didn't notice until long after I uploaded this. Whoops.
Now that all the characters between both versions have been shown off, it's time to show off other modes besides One On One.
Tag Team Mode is your usual 2-on-2 tag team match. If you need to switch, just press the punch button while holding the Control Pad towards your tag partner when near them. Also, if the opponent gets too close to your side, your partner can grab them and you can get some free shots in. Keep your opponents close to your side, don't let them tag out and keep piling on the pain to sail your way to victory!
Just one more character to show off...and this guy got pushed straight to the moon for well over a year.
Yokozuna had his best year in 1993 and 1994. He would beat Bret "The Hit Man" Hart for the WWF Championship months after his debut on the October 31, 1992 episode of Superstars, having the first match in the history of WWE Raw against Koko B. Ware and winning the 1993 Royal Rumble. He would lose the title to the returning Hulk Hogan, regain it from Hogan in Hogan's last televised match for nine years at King of the Ring thanks to a fireball from a photographer's camera, and hold it until WrestleMania 10 when he would lost it back to Bret after slipping off the ropes during the Banzai Drop. In the meantime, he would be the first opponent from Lex Luger's sudden face turn (which I still want to think was meant for Hogan). Afterwards, he would never reach those heights again, though he would be a tag team champion with Bret's brother "The King of Harts" Owen Hart.


