Part nostalgia-bomb, part note-taking and part FAQ, what started in GameTrailers as a video game blog is now on Blogger. This blog is a look back at video games, both popular and obscure, from the video game industry's infancy all the way to the previous console generation.
You'll have to deal with birds as you make your way to the first door. The suit of armor carrying the spear just slowly moves forwards. If you hit them from behind, they will turn around and
The ropes with the spiked balls at the bottom will rise when you climb on them. Jump off to where you need to go before you either get carried into the spikes or get hit by the spiked ball. For the set of three in a row, you'll want to jump into the third one, then quickly jump your way to the other side. When you reach the platform on the other side, walk back and forth so Christopher Belmont is back on the center of the screen. Dor the set of four in the road, leap into the middle of the first rope, then quickly hop your way left from one rope to another.
The spiked floor after the checkpoint will go up and down. Stay at the top of the rope, then jump off to the next rope when the floor descends.
Some of the spiked ball ropes will be pulley. When you get on the first rope, you will definitely want to jump to the other side, because the ropes will not stop moving or change directions once you latch on. Watch out for ceiling spikes, too, and don't touch the mechanism at the top as it will instantly kill you.
The rope elevators will change directions every few seconds. The machines that move the ropes up and down will kill you if you touch them.
The boss here is a pair of skulls that extend from the wall and shoot their spinal cord segments to the left side of the screen as they transfer from one skull to the next. For best results, stick to one of the two skulls, watch out for the spinal cord segments and don't get hit by the projectiles that are shot out by the upper skull. I usually stick to the bottom skull.
After conquering all four castles, a fifth one will come out from beneath the lake. This is Dracula's Castle...
Welcome to Plant Castle, which is full of ceiling spikes, those eyeballs from the original game and a boss that is strangely made a bit easier in the Western version.
The ceiling spikes are instant death, so don't jump into them.
The eyeballs will blow up the bridge portions under them if they happen to be on the bridge. when you hit them.
In the room full of ropes, climb up the one on the far left so the skeleton that is sliding down does not take you by surprise.
The big bat splits into two smaller bats when you hit it, and those smaller bats will be moving when they show up.
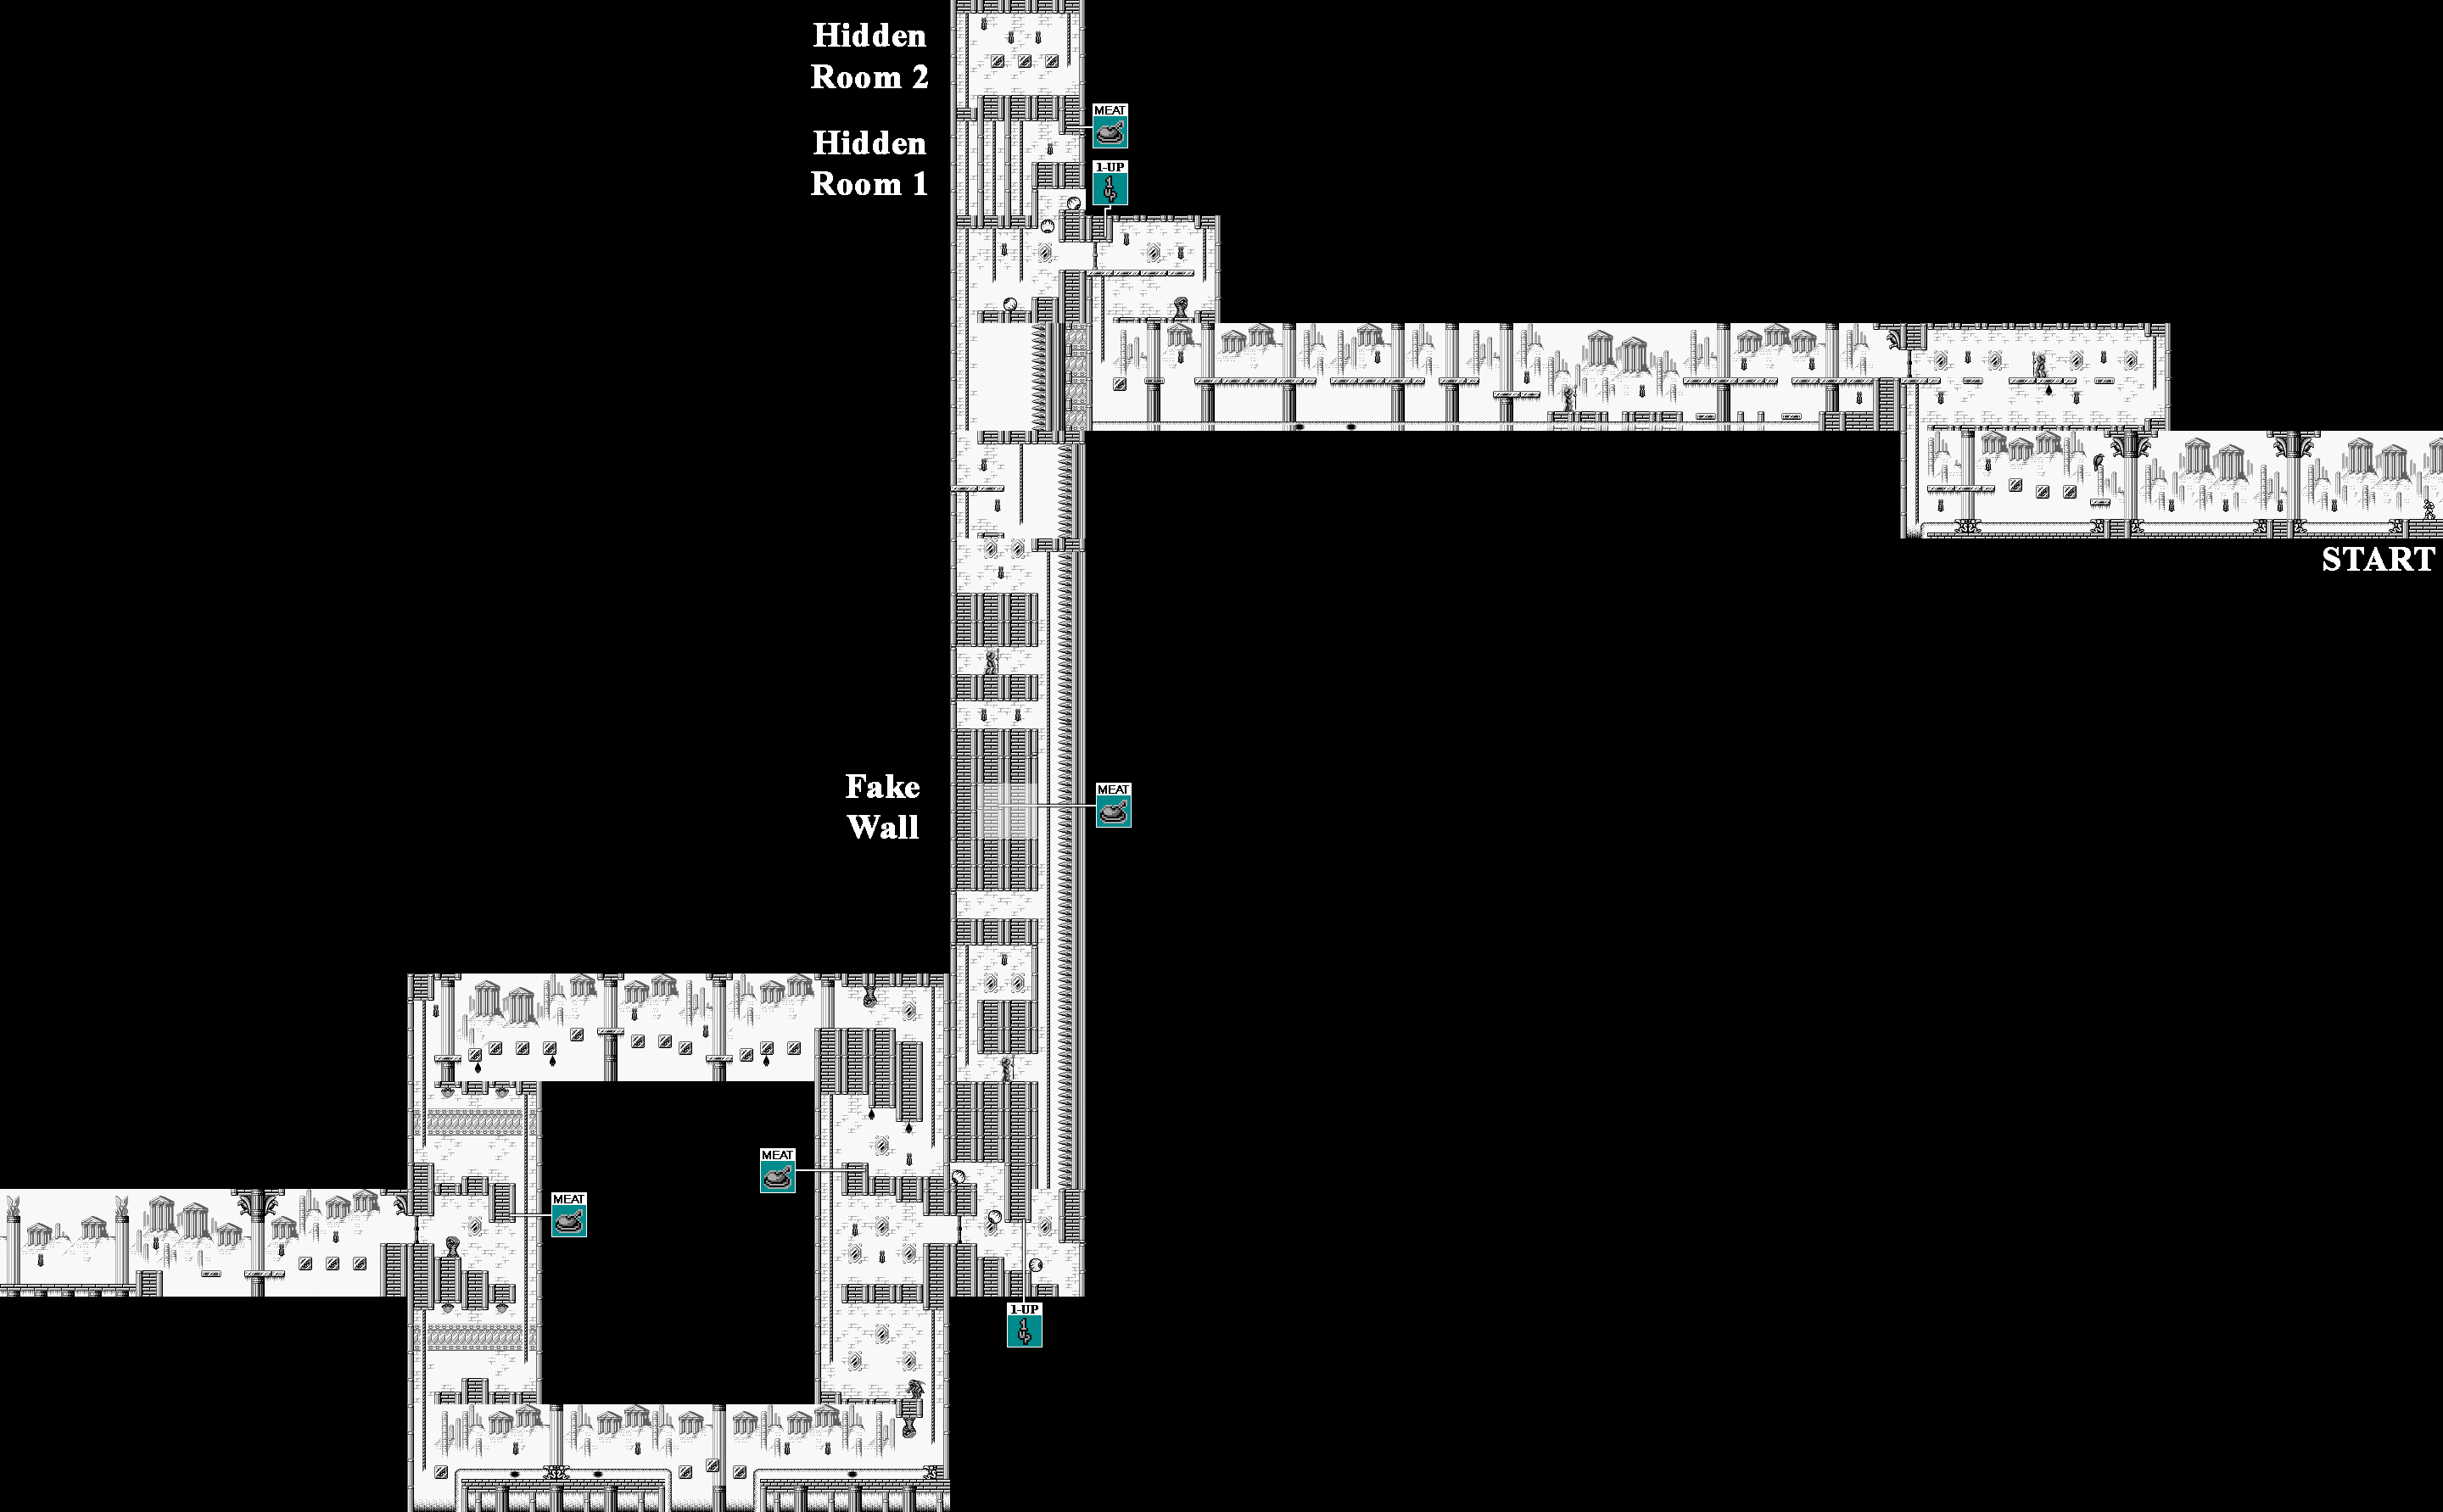
The wall above the door leading to the second outdoor bridge section contains wall meat. You must hit the wall segment with the whip itself; whip projectiles will not uncover it. At that section, stick tot he bridge; the plant growth on the low road will slow you down. You'll eventually have to go down; make sure the monsters there don't power down your whup. You'll find more wall meat above the next door.
The spiders that spit projectiles also create ropes you can climb on with their web strands; make sure the spiders come down rather low before whacking them.
The boss is a pair of statues. Get on the platform in the center quickly, then hit the statue heads when they put their tridents down. Having the ax makes this easier, as you can hit them from below. (Take that, Japanese version!) The whip can destroy the projectiles that the statues spit out. When the statue walls move away, they will be harder to hit unless you have a projectile, but they will eventually move back towards the center. Thankfully, both statues share the same energy bar, so as long as you're hitting a statue in the face, you'll be all right.
At the beginning, you'll fight mud men that drop from the ceiling. After one hit, they fall apart, but they die on the second hit. The bats will always fly around in random diagonal directions.
Keep an eye on the holes in the walls, as some frog creatures will leap out of them. The best way to take them out is by hitting them while they are still in the holes, but if they come out, you can hit them while ducking as they jump back and forth. The projectile power-up for the whip will make fighting them even easier.
When you reach the spike walls, watch for the the circles in the walls to flash twice. That is your cue to jump onto the top of the spikes that protrude out. By getting the timing down, you'll be able to get to the top of the room without being stabbed to death.
There will be another spike wall on the way down. Jump to the left before you reach the rope. There will also be a third one after that. For this one, you'll want the top spike to extend to the right. When it starts shooting out, get on it and hurry right, and jump to the platform where the other rope is when you're done. You can either get there as soon as you drop into the room, or you can wait and watch the pattern of the wall spikes before doing it then.
When you reach the area with the stalactite ceiling, be careful when hitting the candles. If you hit all the candles that are currently on the screen, you will make the room dark and the worm enemies will move back and forth. You'll have to progress to get another candle to show up, which will light the room back up and make the worms stop moving. Next time, be more careful with the candles, will ya?
You'll also meet the rolling eyeballs when you reach the rope leading downwards. If you hit them, they will explode.
When you reach the spiked crusher that moves up and down, you can get on top of the spike trap, duck down near the column and hit the column with the whip until the trap falls so you can continue on. If you have the projectile power-up for the whip, this is even easier, since you can destroy the column from the rope without having to kneel on top of the trap to begin with.
After a dagger demon, you'll be in the chamber lead to the boss. Drop down the rope, then try to hit as many of the candles as you can for some stuff. From there, you're in the boss battle room.
The boss here is a big demon with a sword. Strike twice with the whip, move back to keep from being slashed at by the demon's sword, and keep going until the boss' armor comes off. At this point, the boss will jump around and shoot energy beams out of the sword. If you have the Holy Water, you can climb all the way up the rope, use the Control Pad to get Christopher to face the center of the room then keep throwing Holy Water from the top of the rope to hit the boss from above. Just make sure you have plenty of health if you do this; you will be taking hits.
If not, or if you have low health, keep in mind that the demon will land either on the left side, the center of the room and the right side when it jumps around, and that you'll have to ready to move under the demon as it jumps and duck underneath the projectiles in order to avoid them. However you do it, it won't be long until you beat this boss.
Dracula has arrived. Dracula is looking to be re-born ever since his castle was destroyed as a result of his battle with Christopher. 15 years later... A ceremony is held honoring Soleiyu, the son of Christopher, who will be the next vampire hunter. Dracula has been waiting for thist ime because in order to return to Earth, he must use the power of Soleiyu. The next day 4 castles appear while Soleiyu disappears into the fog. And now, a new battle must begin.
When you start the game, you'll be able to play through the four castles in any order you like. I'm going to go where the game's bat-shaped cursor happens to fall on.
Left and Right on the Control Pad let you move around, and Down lets you duck. A lets you jump, and B lets you strike with your whip.
The P gauge at the bottom of the screen indicates your health, and the E meter is the health meter for the boss at the end of the stage. To the right of that is a space for your sub-weapon, and to the right of that is the amount of hearts you have as well as the time you have left in the stage. To get hearts and sub-weapons, you'll have to hit candles with your whip and take what comes out, just like in other Castlevania games.
Hitting candles not only gives you coins for bonus points, but hearts for sub-weapons and the sub-weapons themselves. Unlike Castlevania: The Adventure, you can hold Up and B to use one of two sub-weapons, should you get them: the holy water and the ax. The Holy Water is thrown down and the fire it produces can harm enemies, while the ax has a narrow upward arc that takes out airborne enemies. (The ax replaces the cross boomerang from the Japanese version to up the challenge on the Western versions.) You'll need hearts to use the sub-weapons, of course, and they don't use that many, but it still pays to stock up on them. Small hearts are worth one heart, while the big hearts are worth five hearts.
By pausing the game, you can see how many lives you have left as well as your current score. You'll get your first points-based extra life at 50,000 points.
The water at the beginning pushes you to the left or right. When the eyes on the statues where the water flows glow, the flow of the water will switch directions.
The crows will dive at you. If you need to, duck first, then smack them when they make their way back.
Holding Down and the A button allows you to slide down ropes much more quickly.
The crystal blocks will break under your weight and eventually shatter after you stand on it long enough.
The orbs will power up your whip. The first one turns the leather whip into a chain whip, and the second one lets you shoot fireballs. Unlike Castlevania: The Adventure, the only enemy that can take away your whip power-ups are the monsters that stick to the floors and ceiling and spit fireballs that bounce off walls, floors and ceilings. If they or their projectiles hit you, your whip will power down once and you will hear a sound that will confirm that.
When you're above the water that makes up the bottomless pit in one section; monsters will leap up in front of you in an attempt to run into you and knock you back.
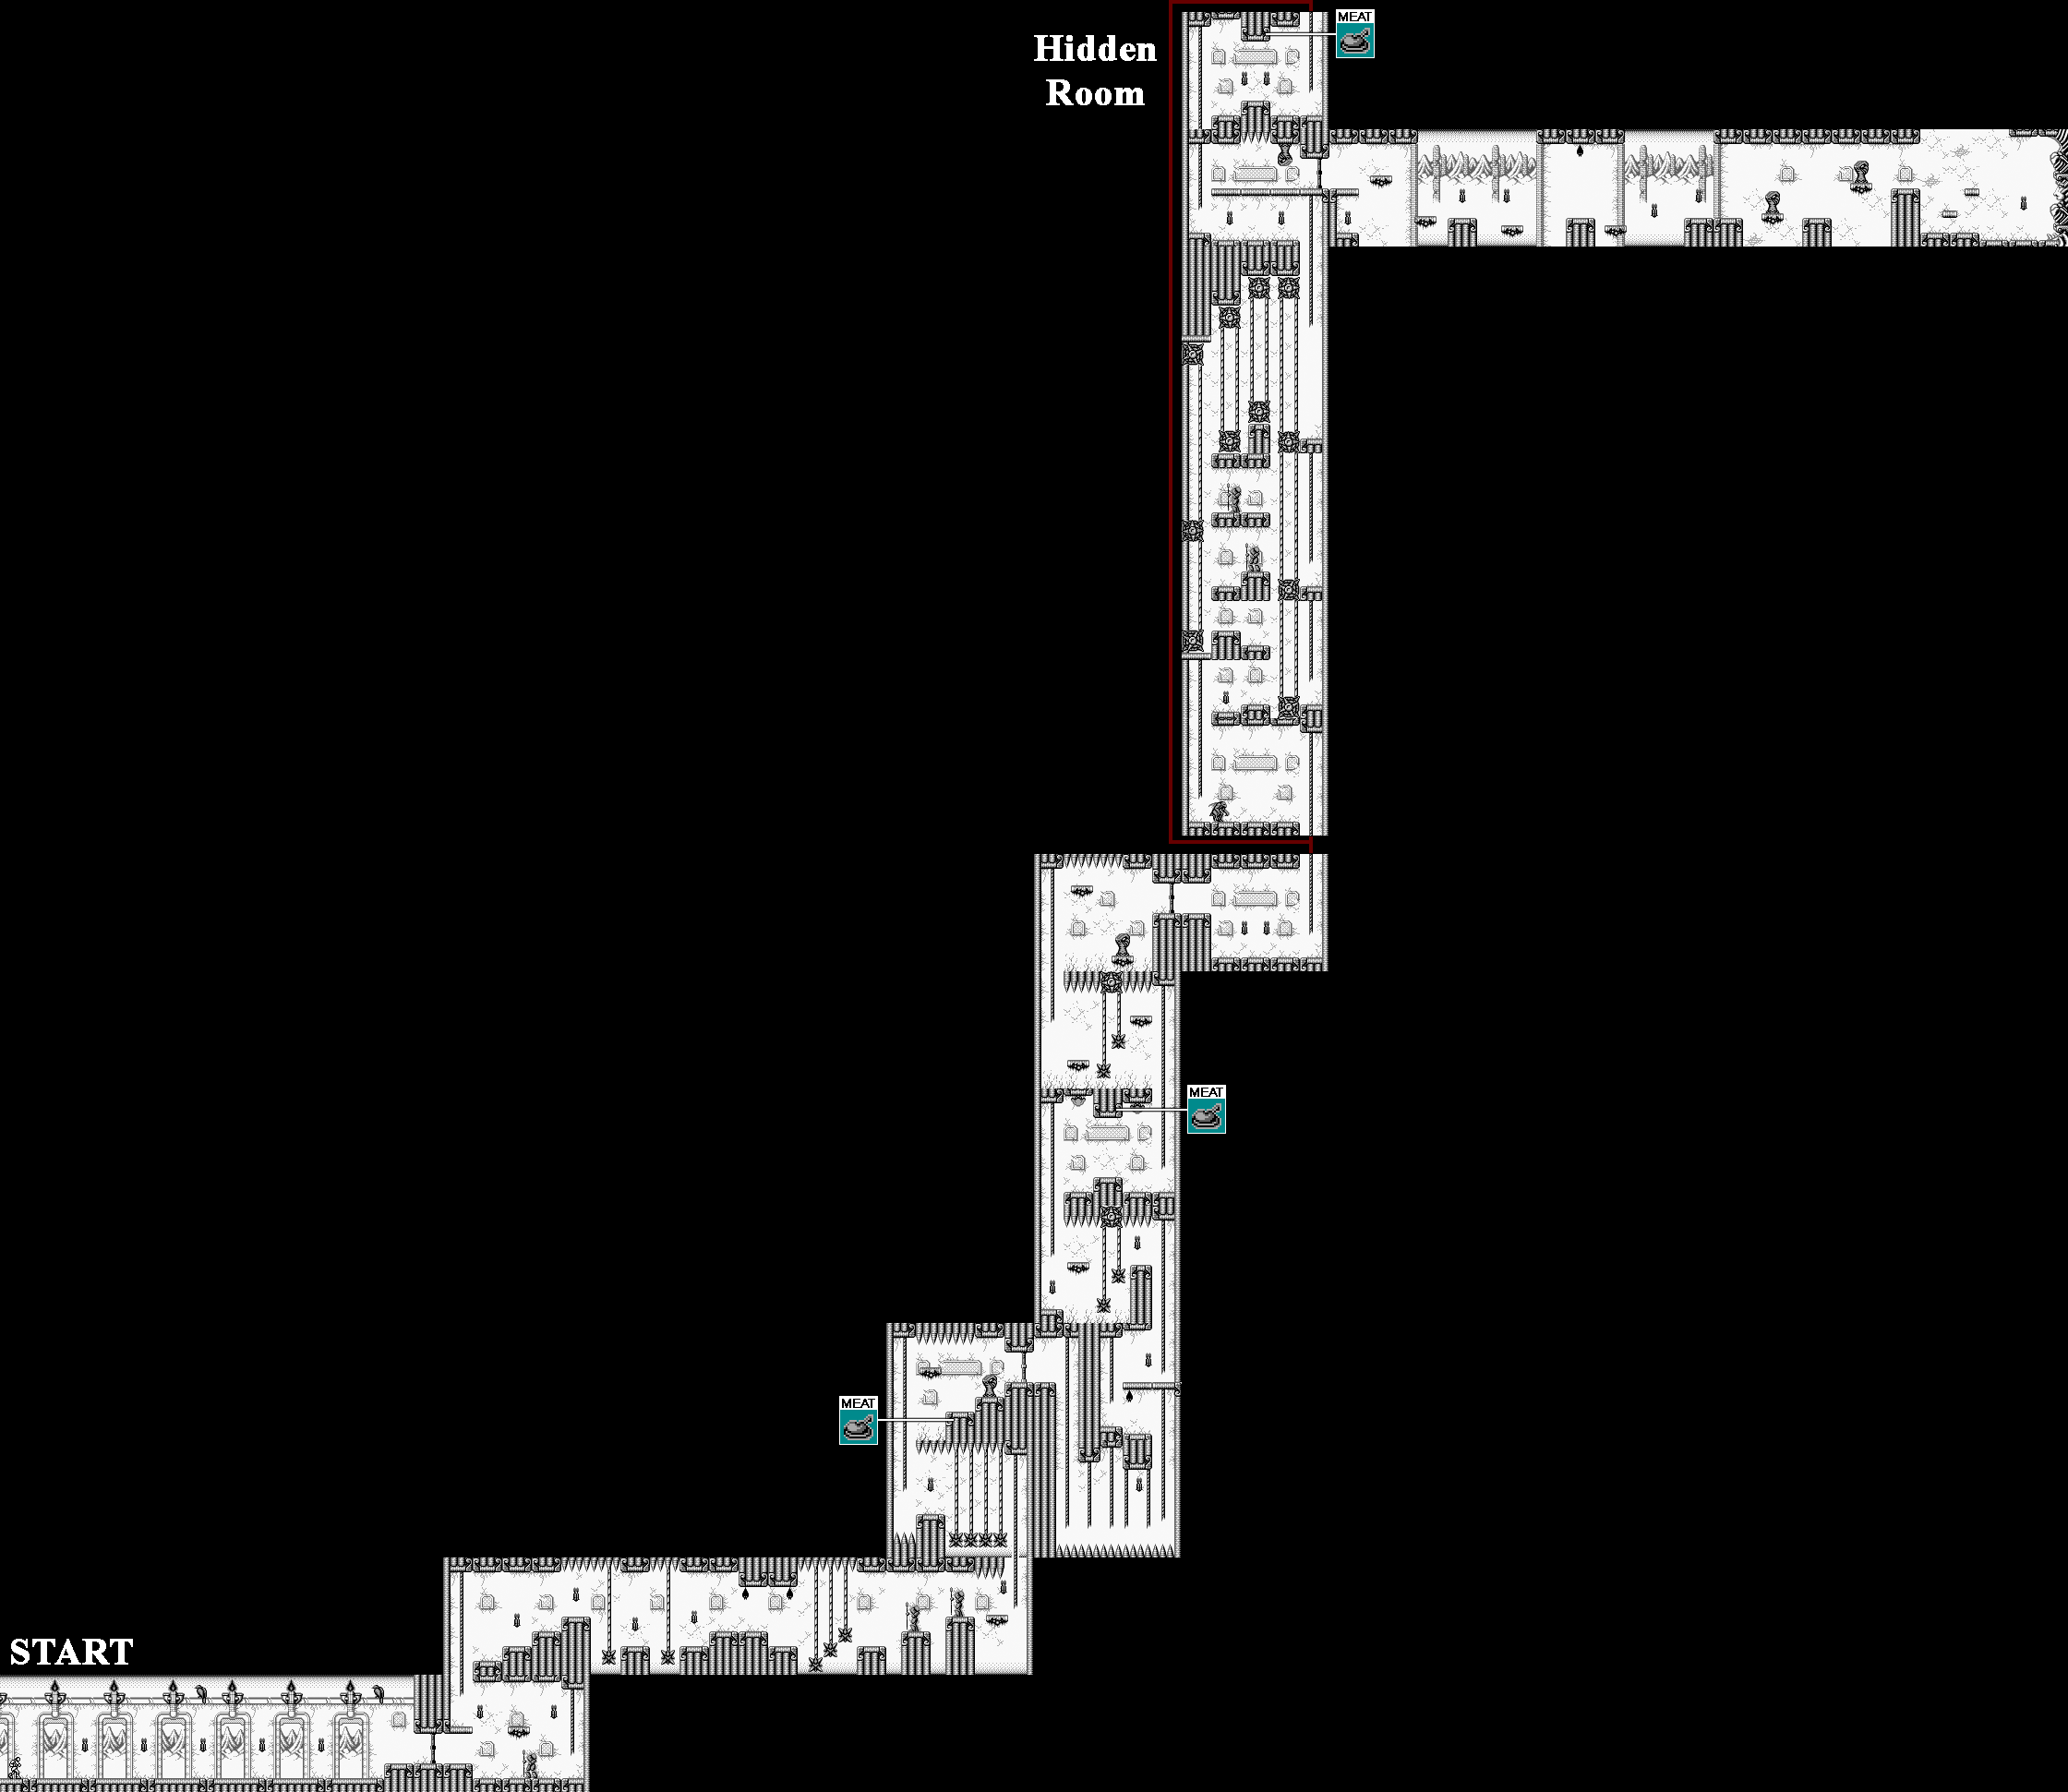
When you near a door, hit the ceiling above it. You might find hidden health or 1-Ups.
The spike walls will move back and forth, and you'll want to make your move when these walls are not closing in.
As you get close to the end, you'll see a demon with wings that will jump high and throw daggers downward. If you can get it so he jumps back and forth over you, do it. You'll be able to hit him with the whip on the way down and the daggers he throws won't hurt you.
The jellyfish enemies will "swim" towards you after they drop down.
Near the end, you'll be in a loop. The enemy that will power down your whip will be near the door that leads to the boss. There is a candle where the boss battle takes place, and if you strike it, an orb will come out. Touch the orb to start the boss battle.
The boss here is a wizard that turns into a gem and controls a dark cloud. Get a few hits in while the gem is still on-screen somewhat, then get away to the side so the lightning and the trail of energy that it leaves behind on the ground can't hit you. This is a very easy boss and can easily be beaten with the whip, and it won't be long until you beat him and make this castle crumble. When the orb shows up, instead of dropping down to be collected like in other games, the orb goes up into the sky.
Well, I finally made a longplay for this one. Will I ever make one for the Medium and/or High speeds? Not sure. Maybe one day. Also, no music, since I can imagine listening to the same thing for long enough would drive one stir crazy, so feel free to listen to something else in the background while watching this!
To access Rounds 11 through 99, go to Action Mode. Set the Round to 10, the Speed to Hi and the Music Type to Off, then put the cursor on "Round" and press L, R, Start and Select on Controller 2 simultaneously.
For the rounds past 10, you'll have all-new pieces replacing the cookies - Goombas, Boo Buddies, Mushrooms, Piranha Plants, a reference to Yoshi aka Mario & Yoshi - as well as a Koopa shell. The Koopa shell can only be removed with a Yoshi Cookie. Good luck with these rounds!
When you beat Round 10, Mario chases after the cookie and ends up in a Yoshi and Mario-style Mount Rushmore rock formation. Mario and Yoshi both catch the cookie, and the credits roll. If you beat all ten rounds in one sitting on the highest speed, Peach and Bowser show up, too, and you'll get a code to access Rounds 11 through 99 in Action Mode.
You know, this video is proof that if you want to survive Action Mode, you're better off making the first combo that comes to your mind and alternate between making rows and making columns whenever you can on the later levels. If you try to count all the cookies and clear the stages by cookie count in the later levels, you can really stress yourself out. Besides, the game doesn't punish you for playing it wrong, and I need to remember that for whenever I make a proper Action Mode longplay (yes; I have yet to do it during the making of this blog entry).
When you beat Round 5, Mario chases after the cookie, but Yoshi eats it.
So apparently, there is an unused intro from the prototype of the Super Nintendo version that never was used in the final version. Even more interestingly, it was kept hidden away in the final version, and can be uncovered with a little bit of work.
"An alternate, unused opening sequence has been discovered in the final SNES version of Yoshi's Cookie. It contains a copyright screen with Mode 7 animation not present in the used copyright screen, and a title screen which more closely resembles the ones seen in the NES and Game Boy versions. Change the first byte in the ROM from 92 to 80 to see this. Alternatively, you can use the Pro Action Replay code 008000:80. The title screen portion of this also matches the one found in the prototype cartridge owned by MrMark0673."
Now it is time for Action Mode. Play through the stages, clear all the playfields. Simple as that.
Action Mode is quite possible the easiest mode to play. You can start at any of the ten rounds, and you can change the speed of the cookies that come down in the playfield. You can make this as easy or as difficult as you want, and if you know what you're doing, you can clear stages in seconds. Because of this, there isn't really much of a need to post strategies for Action Mode. If not, you can always wait for more cookies to come down so you can make bigger combos and clear the playfield.
This mode is pretty simple: use the A button and the Control Pad to move the rows and columns around and move cookies into lines. The more cookies you have, the more points you get. If you remove multiple lines of cookies at once, you'll get bonus score multipliers for every line in the combo. An entire row or column must all be one kind of cookie in order to be cleared, and as you remove lines of cookies, the rows and column will get smaller, and you'll need fewer cookies to complete combos. When you empty the playfield, you'll move on to the next stage.
If you run out of moves, cookies will come down from the corners of the playfield. You can hold the B button to speed the cookies up. If the playfield is completely flooded with cookies, the game is over.
There are ten stages for every round, and you get a nice little animation when you clear a round.
As you play, Mario and Yoshi will be moving levers, which is a nice touch. After making five combos with a certain type of cookie, you can get a Yoshi cookie. The Yoshi cookie acts as a wild card and can be combined with any set of the same cookies, be it a row or a column.
When you beat Round 1, Mario will chase after a cookie, and he'll be able to catch it.
Oh, man. Doing this one was absolutely nasty. I ended up setting the handicap all the way up because doing it legitimately was THAT hard.
Blue Bowser was absolutely brutal. I couldn't even beat him with Yoshi, and out of nine full games against him, I could only win three non-consecutive rounds. I had to set the handicap to 20 in order to even get wins here.
When you beat all four of the tougher opponents, you'll get the ending for VS Mode.
Petition to have Peach in a blue dress happen more often? Anybody? *crickets*
Blue Peach was a hard battle. I had to switch to Bowser in order to make my attacks last longer, since Yoshi wasn't cutting it and Peach was running rings around me when I was playing as him.
I don't really know what to put here other than that I like Red Yoshi. So I'll just put that here in the area where the bold, italicized text is.
Red Yoshi is best approached with Bowser, since you want your attacks to last as long as possible and Bowser's high strength will cancel out Yoshi's high defense.
It's time for the first match against the extra opponents. Beware: the AI gets much better when you go for the harder mode.
Yoshi is a good character to use against "Green Mario," since his high defense makes it so that his attacks don't last for very long. Just make sure you get those combos in as quickly as possible; the computer doesn't play around.
Just when you thought you were done with VS Mode...
Bowser has stronger attacks than everyone else - and as a result, last twice as long - but his timer is faster than everyone else's. He's more or less the "Expert Mode" character, but if you know what you're doing, you can destroy your opponents.
When you beat all four characters once in one sitting, you'll unlock different-colored versions of the four characters for your opponents. When that happens, you'll unlock a code higher difficulty for VS Mode. Set Mode to COM, then press L, R, X and Start at the same time to unlock the different-colored characters who will have much better AI than normal. If you hear a "Yoshi!", you've performed the code correctly.
Expect these blog entries to be pretty darn short.
Peach/Princess Toadstool has a normal attack rating and a normal time limit rating, but she has a weak defense, which makes attacks last twice as long on her compared to everyone else. On the other hand, she has a very quick message speed, so she doesn't have to wait for the right attack. The best strategy with Peach is to hit hard with events quickly and often.
And now it's time for another VS match, this time against Yoshi, who is very good to play with if you're just starting out.
Yoshi has an average attack, but he has high defense. Because of them, Panic, Blind and Slave only last half as long on him as they do against the other characters. He also has a slightly slower message speed than Mario does.
Also, if you come back to VS mode after a session of it, you can press Start when it comes time to put in your initials so you don't have to put them back in manually.
For the next couple of videos, we'll play the VS mode. Here, puzzle solving is eschewed for hot and heavy line-making action. Fill up your gauge before the opponent does, and time your clears so you can give the other person a hard time!
This time around, we're playing VS Mode, which is a one-on-one competitive mode that can be played against the computer or with a friend.
You can set the time speed as the points handicap for both players, and you can switch between one of three songs or turn the music type altogether.
You can then choose between four characters: Mario, Yoshi, Peach and Bowser.
There are four stats, ATT (attack), DEF (defense), MES (message speed) and Time Limit (LIM).
Attack defines how long events last when you hit your opponent with one. The higher the rating, the longer it lasts.
Defense dictates how long you last when an opponent hits you with an event. The higher the rating, the shorter it lasts.
Message dictates how quickly the messages on the status bar below your picture changes. The status bar dictates which event you'll be able to send at your opponent at the given moment. The higher the rating, the slower they cycle.
Limit dictates how quickly the time limit fuse burns. The higher the rating, the slower the fuse burns.
Mario is a middle-of-the-road character with no strengths or weaknesses, and his fuse burns slowly.
When you choose a character, you can give them initials, or you can press Start to stick to default initials for the character you've chosen.
The gameplay screen is simple. Player 1 is on the left and Player 2 is on the right. The three squares next to your character signify how many wins you've gotten (and is shown with crowns that show how many wins out of three that you've gotten), and the black bar below your character is the status window. The status window shows events, which will be listed shortly. The brown rope is the fuse that acts as the timer, and as you line cookies up, it will refill. If it goes all the way down, you lose. If someone is low on time - either you or your opponent - you'll hear a beeping nose indicating that somebody is running out of time. Below all that is the playfield, and the dark vertical bar next to the playfield signifies how many points you have. Fill it up first and you win a round. The first person to win three rounds wins the game. At the very bottom is the time speed that you selected in the game options.
The playfield is a 5x5 square containing cookies. and you'll usually have five of one of the different cookies in the game.As you line up cookies, you will get Yoshi cookies, which are cookies shaped like Yoshi's head. If you make one line, you'll get one cookie, but if you chain two or more together somehow, you can get five. When you line five of them up, whatever is in your status window is the event that you'll start. The game helps you out even further by having your character hold out an X if it is an event you don't want to trigger, or an O if it is something that will benefit you. You'll see the name of the person who will be affected followed by the event in question, and while you can tell from that, the picture of your character holding out an X or O helps out a lot.
The events are as follows:
Panic: Scrambles the cookies around on the playfield of the player dictated in the status bar.
Blind: Covers up the center of the playfield of the player dictated in the status bar, making it harder to see what to do for whoever is afflicted by this status.
Slave: Allows you to move the cookies of the other player, assuming that the event hits the other player in the first place. If you hit yourself with it, nothing happens.
+3: Gives the person dictated three points.
-3: Takes three points away from the person dictated.
-7: Takes seven points away from the person dictated.
Move the fourth row to the left three times. After the cookies clear out, move the fourth column down once, then move the final column down once. After more cookies clear out, move the third column up once and you're done.
Round 10-2
Password: 01NBV7M
Move the seventh row to the right twice and the sixth row to the left once. Then, move the second row to the left twice and the second row to the left once. (Do not move the third row first or else you will fail.)
Round 10-3
Password: .Z0BV55
Move the fourth row to the right once, then move the third column down once and the fourth column up once.
Round 10-4
Password: TW5DVG2
Move the second row to the left twice. Move the sixth row to the right three times. From there, move the seventh row to the left, and you're done.
Round 10-5
Password: 512DV5J
Move the seventh row to the right once. Move the fifth row to the left once. Move the third row to the right once. Move the first row to the left once. From there, go to the fifth column, move it up once, then down once.
Round 10-6
Password: XQ9DV6R
Move the first column up twice, then move the second column down once. Move the sixth column up once, the move the seventh column down twice. Move the fourth row left once, then move the fifth row right once.
Round 10-7
Password: T7TDV0W
Move the fourth column up four times, then move the fifth column three times. Move the sixth column up twice, then move the seventh column up once. You're done.
Round 10-8
Password: ?G6DV7J
Move the eight row to the right once. (If you move it left, you will fail.) Then, move the first column up once. After some cookies clear, move the second column down once and the sixth column down once. More cookies will clear. Move the fourth column up down once, then up once.
Now that you have much fewer cookies, you can move the second column of what remains either up once or down once. After that, move the top row right twice. After that, you can move the top row again in either direction, or you can do one of two things with the bottom row: move it left once with one move to spare, or move it right twice and use all your possible moves. Either way, you win.
Round 10-9
Password: 1!DDV05
Move the eighth column down three times, then move the third row to the left once. Move the second row to the left once, then move the first row to the left once. You're done.
Round 10-10
Password: H6BDV42
Move the first column down once. Move the eight column up once. Move the first row left once. Move the fifth row left once. Move the third row right once. Move the seventh row right once. You just beat Puzzle Mode!
Move the fifth row right once, the sixth column down once, and the sixth row right once. From here, move the fifth row right once, then move the fourth row until you run out of moves.
Round 9-2
Password: MB!6V4J
Move the third row to the left three times. After that, move the fourth column down three times. Move the fourth row to the right twice, and you're done.
Round 9-3
Password: !2P6V0M
Move the third column up twice, then move the sixth row right once. Move the seventh row to the right once, then move the third column up once.
Round 9-4
Password: FJK6V6R
Move the seventh row to the left twice. Move the fourth row to the left three times. Move the first column down once, and you're done.
Round 9-5
Password: R4?BVY2
Move the seventh column up once, then move the sixth column down once. Move the first row to the left once, move the first column down once, then move the seventh row right once.
Round 9-6
Password: L3WBV7R
Move the second row to the right twice. Move the fifth row right twice. Move the third row to the left twice, then move the fourth column down.
Round 9-7
Password: C87BV52
Move the second row to the left once, move the fifth column up once and move the fourth row to the right once. You're done.
Round 9-8
Password: 9?3BV4M
Move the second row to the right three times. Then, move the sixth row to the right three times. Move the fourth row to the left twice, and you're done.
Round 9-9
Password: 0.6BV0?
Move the second column up once, then move the fifth column down once. Move the third column up twice, then move the fourth column down three times. You're done.
Round 9-10
Password: .HDBV7V
Move the third row to the right once. Move the sixth row to the right once. Move the fourth column down three times. After that, move the fourth row to the right row.
Move the fifth row to the left once, then move the fourth column up twice.
Round 8-2
Password: W656V45
Move the fifth column up once, the second row to the right once, and the fourth column up once.
Round 8-3
Password: L3J6VYR
Move the fourth column down once, the fifth column down once, and the top row to the left once.
Round 8-4
Password: 1SR6V7J
Move the second row to the right once. Move the second column up once, then move the fifth column down.
Round 8-5
Password: YM76V0J
Move the fourth row to the left three time, then move the third column down.
Round 8-6
Password: WGT6VGJ
Move the top row left once, the fifth column down once, and the third column up once. From here, move the third row to the right.
Round 8-7
Password: K.Y6VY?
Move the fourth row to the left once, the third column up once, the fourth row to the left once, and the second row to the right once.
Round 8-8
Password: 8JF6VGW
Move the third row to the left once, the top row to the right once, the second column down once and the fourth column up once.
Round 8-9
Password: D3C6VLV
Move the top row to the left once, the bottom row to the right once, the third column down once, the second row to the right once, and the fourth column down once.
Round 8-10
Password: 66.6V42
Move the bottom row left twice, move the second column down twice, and the first column down twice. You're done.
I really like the background here. Kinda nice that Bullet Proof Software re-used some from Super Mario World but also made some original backgrounds based on them, too. As for the puzzles, I had to look a few up for this one.
Round 7
Round 7-1
Password: MWH?VL2
Move the third column up once, the first column down one and the fifth column down once.
Round 7-2
Password: LB3?V7W
Move the bottom row to the right once, then move the middle column up once. After that, you can make any move you want.
Round 7-3
Password: 8CY?V0R
Move the top row to the right twice. After that, move the third column up once, then move the top row to the right one more time.
Round 7-4
Password: .H6?V4R
Move the second column up once, move the fourth column up once. You can then move the second column either up or down, follow by moving the third column up or down.
Round 7-5
Password: QXF?V5V
Move the top row to the right, then move the second column up. You can then make any move you want.
Round 7-6
Password: 46C?VG2
Move the second row to the right once, then move the first column down once.
Round 7-7
Password: 78.?V52
Move the second column up once, then move the third row to the right. Move the fourth column down, and everything will be lined up for elimination.
Round 7-8
Password: M.1?VGR
Move the top row to the right once, then move the third column up once. Move the fifth column down, and you're down.
Round 7-9
Password: 8_8?V0V
Move the second column up once. move the fourth column down once, then move the fourth row to the left.
Round 7-10
Password: .0P?V4V
Move the second column up once, then move the fifth column down once. From there, move the first column up twice. You're done.
Move the first column up once, move the top row to the left once, then move the last column down once. From there, move the bottom row to the right.
Round 6-2
Password: Z7BSV5V
Move the second row to the left once, then move the last column up twice. Move the last row to the right once, then move the last column up. Move the second column down, then move the third column down. You're done.
Round 6-3
Password: F08SVLV
Move the bottom row to the right once, then move the first column up once. Move the third row to the right once, then move the bottom row to the right once.
Round 6-4
Password: 3JPSV42
Move the top row to the right once, then move the bottom row to the left once. Move the second column up once, then move the second column down. Move the third column down, and you're done.
Round 6-5
Password: 99LSVY5
Move the second column up once, then move the last column down. From here, move the second column down once and move the bottom row to the right.
Round 6-6
Password: 2Q0SV6R
Move the second column down once, then move the third column down once. After you get rid of some cookies, perform those two moves again. You're done.
Round 6-7
Password: KWV?V0R
Move the fourth row to the right once. From there, move the second column down once, then move the fourth column up once.
Round 6-8
Password: 16J?VGJ
Move the fourth row to the left twice, then move the second column up once, and move the third column up once.
Round 6-9
Password: F8W?V5J
Move the fifth column up once, then move the bottom row to the right. You're done.
Round 6-10
Password: H.G?VGW
Move the bottom row to the right twice, then move the fifth column up.
Y'know, I'm surprised I was able to do this well so far without having to look very much up, if at all. But the best is yet to come...
Round 5
Round 5-1
Password: Y5MSV02
Move the second column up once, the fourth column up once and the last column up once. You can also move the first column down once, the third down once and the fifth down once. The choice is yours.
Round 5-2
Password: 772SV7J
Move the bottom row right once, the first column down once, and the top row to the left once.
Round 5-3
Password: GZWSVYJ
Move the first column up once, move the middle row to the left once, and the last column up once. It doesn't look like it will clear at first, but it will.
Round 5-4
Password: J?GSV6?
Move the first column up once, the middle row left once and the first column up once. You're done.
Round 5-5
Password: VW9SVYJ
Move the third row right once, then move the first column down once. You're done.
Round 5-6
Password: N.HSV4V
Move the top row to the right once, move the first column up once, then move the last column down. Move the bottom row to the left, and you'll clear everything out.
Round 5-7
Password: 1!TSVLV
Move the top row to the right twice, move the second column down once and move the third column down once.
Round 5-8
Password: CTYSV42
Move the third column up once, then move the second row to the left once. Move the third column up once, and everything will clear and you'll get rid of all the hearts.
Round 5-9
Password: 3Q6SVYW
Move the third column up once, then move the second row right until you run out of moves.
Round 5-10
Password: RLCSV7M
This one's huge.
Move the sixth row to the right once, then move the second row to the right twice. Everything will clear out in a spiral pattern.
After this round, the difficulty picks up. Good luck.
Round 4
Round 4-1
Password: MR6JVYJ
Move the last column up one, then move the top row to the right. Move the top row to the left, and you're done.
Round 4-2
Password: LXQJV6?
Move the top row to the left, then move the third column up. Move the last column down once. From here, you can either move the top row to the left or you can move the bottom row to the right.
Round 4-3
Password: B1DJVY5
Move the fourth column and move it up twice. That's all.
Round 4-4
Password: 621JV65
Move the second column down once, them move the top row to the left. You can then move the last column either up or down.
Round 4-5
Password: 3BBJV52
Move the last column down once, move the top row to the left, then move the last column down again.
Round 4-6
Password: 7!!JV4R
Keep the crosshairs in the lower-right corner. Move the last column down once, move the bottom row to the left once, move the last column down twice, then move the bottom row to the left until you get the flower cookies lined up.
Round 4-7
Password: MYPJVY2
Move the fourth row to the left twice, then move the top row to the right.
Round 4-8
Password: _C_JV45
Move the second column up once, then move the last column down.
Round 4-9
Password: !TKJVL5
Move the first column down once, then move the top row to the left. This gets rid of the jewel cookies. Move either row left or right. You're done.
Round 4-10
Password: 13VSV72
Move the fifth row to the right once, then move the second row to the left. Move the fourth column down one, then move the third column up. You're done.
The difficulty hasn't gone up yet, so you'll get some more easy puzzles here.
Round 2
Round 2-1
Password: 54TLVY2
Move the second column up once, followed by moving the third column down once.
You can also move the first column down once, then move the third column up once.
Also, you could move the first column up once, then move the second column down once. The choice is yours.
Round 2-2
Password: 0JYLV6W
Move the second column up once, then move the fifth column down once.
Round 2-3
Password: NH4LVYV
Move the bottom row to the right once, then move the third column up once.
Round 2-4
Password: BX6LV65
Move the top row left twice or right twice.
Round 2-5
Password: Z6QLV52
Move the left-most column up once, and move the right-most column up once.
Round 2-6
Password: FLDLV4J
Move the fourth column down twice. This one is simpler than it looks.
Round 2-7
Password: HZZLV0W
This is a more complex version of 2-3. Move the fourth column down one, then move the bottom row to the left twice. Move the fourth column up twice or down twice, and you're done. When the bottom row is all hearts, you're in the clear.
Round 2-8
Password: R?XLVGJ
Move the fourth column up once, then move the fifth column down once. Move the top row to the right once. You're done.
Round 2-9
Password: 0M8LV0V
Move the fifth column up one, then move the third column down until you run out of moves.
Round 2-10
Password: B!PLV6?
Move the second row to the right once, then move the middle column down once.
Nintendo may not have published this one, and this one seems to be forgotten nowadays, but I had this one as a kid. I didn't beat Puzzle Mode until I got older, but I've done it now and I've got all the solutions!
It's time for a puzzle game with everybody's favorite Nintendo dino, Yoshi! Move cookies that look alike into rows and columns, and get them off the game screen. You can play alone, or with a friend!
There are three modes to this game: Action, VS and Puzzle. I'm starting with Puzzle to show off the controls and to get it out of the way.
Round 1
When you start the game, you can start anywhere from Round 1 to Round 10. You can also input You'll have a map that you'll have to fill out as you go through
First things first, the controls: The Control Pad moves the crosshairs that you have for a cursor around. Holding A causes lines to appear to the sides of, below and above your crosshairs, and pressing directions on the Control Pad while holding A lets you move horizontal and vertical lines of cookies around so you can get a series of cookies that all look alike lined up to be removed from the screen. Cookies at the end of a line, either vertical or horizontal, are still connected on both ends, and wrap around in the direction that the line is moved.
There are five shapes for the cookies: Hearts, Flowers, Diamonds, Donuts and Checkerboard.
In Puzzle Mode, you also have a big number that shows how many moves you have, as well as the amount of time it is currently taking to complete the puzzle. The time is just there for show and is not important. The current round and stage will be at the top of the screen.
If you use all your moves before all of the cookies are removed, the game is over and you'll have to restart the puzzle. If you make a mistake, press L to go back one move, or press R to restore the puzzle to its original state and get all of your moves back.
When I talk about rows and columns, I go from left to right. "Column" is used for a vertical line of cookies. The first column is the left-most column of cookies on the board. When I talk about rows, I go from top to bottom. "Row" is used for a horizontal line of cookies. The second row will be the one below the top row.
Round 1-1
Just move the right-most column up or down.
When you complete a stage, you will get a password.
Round 1-2
Password: KHVLV4W
You can either move the top row to the left, or you can move the bottom row to the right. The choice is yours.
Round 1-3
Password: _35LV0W
You can move the middle row in either direction.
Round 1-4
Password: LD?LV4J
You can move the bottom row to the left twice or to the right twice.
Round 1-5
Password: 8KMLV52
You can move either column up or down once.
Round 1-6
Password: X5JLV7W
You can move the second column up twice, or you can move it down twice.
Round 1-7
Password: .P2LV0R
Move the middle row to the right, then move the top row to the left.
Round 1-8
Password: C2WLV6R
Move the second column up or down once, then move the fourth column up or down once.
Round 1-9
Password: TC9LV0J
Move the top row to the left once, the second row to the left once, and the third row to the left once. Move the last column up, and you're done.
Round 1-10
Password: RHHLV4J
Move the second row to the right once. Move the second column down once, then go to the last column and move it up to complete Round 1.
By completing a round, you will uncover a piece of the Puzzle Mode map.
You'll need 60% coolness to reveal the cage and complete the stage.
It's back to the beach for one more stage. Just like every other stage, there is no boss to fight; there's just you, the coolness meter and the cage. Unlike Shell Shock, however, you're going to jumping on bubbles and to balloons a lot more often to get as many cool points as possible and get out of the stage.. There are also giant versions of other things, too, such as a boombox, radios, a volleyball net and 7-Up cans (which have spots behind them).
The same enemies from Shell Shock return here. Take them out at the bottom and hit the checkpoint, then go up the beach chair, and look around for cool points and use them to get to the rest of the level. Check the bottle near the cage for the last few spots.
Once you beat this stage, you'll finally beat the game. Congratulations!
You'll need 60% coolness to reveal the cage and complete the stage.
This stage is a return to the "inside of the house" theme from Off The Wall. Most of the same enemies and hazards from there - and the act of jumping around behind foreground pipes for spots - are back.
A new enemy that can be met here are the lightning bolts that bounce back and forth. Believe it or not, they go down with six projectiles.
Be sure to go past the cage to jump on balloons and get the last bit of cool points that you need.
Dock And Roll
You'll need 60% coolness to reveal the cage and complete the stage.
It's back to the docks. The crabs, the ropes, the bees, the jacks, the fish, the inchworms and the clams are all making a return appearance, but you'll also have to deal with bottomless pits.
Like in Pier Pressure, be sure to jump straight up in the pillars you can walk through for hidden spots. This is probably one of the easier stages to get 100% coolness in.
We're now going through the level themes in reverse order, and the train now replaces the wading pool. Honestly, I wish the background didn't move that fast; it's a really bad distraction even for me.
Wound Up
You'll need 60% coolness to reveal the cage and complete the stage.
Whaddya know? We're back in the toy store. Once you make it through Radical Rails, the level themes go in reverse order.
You'll see a lot of the same enemies, hazards and things to interact with from Toying Around, but there are some new things, such as some pencil platforms and pencil goblins that spin around where the erasers are supposed to be. Also, the planes from Wading Around are back, and in greater numbers.
There are some spots in the level that you can shoot at and magically cause.
When you see the "staircase" of big boxes, you're near the end. If you walk into the last stack of boxes, you can jump straight up and get some free stuff on the way to the top.
As always, walk into big boxes to see if you can find any hidden stuff.
Loco Motive
You'll need 60% coolness to reveal the cage and complete the stage.
The train here replaces the wading pool in the reverse order. As fun as the train is, the background moves so fast that it can mess with your focus and your ability to see platforms.
Enemies here include yellow toy robbers with shotguns, yellow wind-up birds that drop egg bombs downwards, evil coal miners who throw coal at you ...and the background. Seriously, it is so fast that it actually messed with my eyesight.
Be sure to walk through the train cars to find all those spots. The train couplings are solid, believe it or not, and it's also the only way to get the flask of 7-Up in the lower-right corner of the level. If you fall off the train, you'll fall into a bottomless pit and you'll lose a life.
Once you make your way to the right on the train, you'll have to jump up and do a lot of platforming. Guess what? The UFO platforms are back, and the background will still be moving at an abnormally high speed, nearly wrecking your focus in the process.
You won't be able to trigger a checkpoint until you're near the top. Once you see it, hit it; you do not want to do all that platforming again.
...and with this, we are now officially halfway through the game.
Toying Around
You'll need 60% coolness to reveal the cage and complete the stage.
This time around, you're in a toy store. Enemies here include wind-up chattering teeth, bouncing slime balls that split into several smaller balls, toy robots that shoot projectiles as they walk back and forth and toy race cars.
There are thumbtacks littered around the stage, but at least they're easier to jump between this time around.
Be sure to look behind things like boxes, shoes, toy cars, stacks of coins, spools of thread, dice and playing cards for hidden spots, 7-Up logos and clocks. Also, try to go through big boxes to search for hidden passage. You may find health pick-ups and maybe an extra life.
The UFO platforms are in this stage, but they are not as numerous as before.
The shoelaces act like ropes that you can climb up and down on.
The gray ball with the red spots cannot be destroyed. Just jump over it.
Radical Rails
You'll need 60% coolness to reveal the cage and complete the stage.
There are no enemies here; instead, there area a lot of slopes that you'll have to jump up and slide down to find all the spots in. There are also a ton of tumbes that will take you upwards if you walk into them. There are not a lot of clocks here, so get to where you need to go for spots and coolness points and get there fast.
At the top of the stage, look for sparkles. You'll grab a 7-Up icon for more coolness. At the bottom of the stage, there will be a conveyor belt that will take to the right to the tubes. One of them will lead you to the cage.
Can I just take a moment to state that the pajama mice are the most endearing enemies in this game? Thanks.
Off The Wall
You'll need 60% coolness to reveal the cage and complete the stage. Be careful when shooting around the cage to take out enemies; you may accidentally hit the lock and end the level.
Aside from spiders on the ceiling, mice in pajamas that throw cheese, you'll also have to avoid mouse traps that will send you flying, barbed wire, nails in the floor, thumbtacks...and the level itself! The level itself is a bit of a maze, and while there are hands pointing you where to go, you'll have to look all around if you want to be 100% cool.
The mouse traps will send you flying backwards if you jump onto the trigger tab.
If you can stand behind a metal pipe, jump straight up when behind it. You'll probably find a hidden spot.
As long as a mouse in pajamas is not on-screen, they cannot throw cheese at you.
At this point in the game, I have my first of a few time overs; in case you run out of time, you will lose a life, but you'll go back to your last checkpoint with full time and all enemies previously defeated gone for good.
Wading Around
You'll need 60% coolness to reveal the cage and complete the stage.
You'll start in a wading pool. The water will serve as a bottomless pits, and lily pads, toy boats and rubber ducks will act as platforms. Be ready to shoot down the frogs so they don't spit at you.When it's time to make your way up, you'll have your proper introduction to the smaller bubbles, which take you upwards. When Cool Spot starts fighting his way out from inside of the bubble, you won't have much time left and you'll have to land on a platform. Using the Control Pad while in the bubble will allow you to get to areas you wouldn't be able to reach otherwise, however so keep that in mind.
Once you're out of the pool, you'll have to jump quickly off UFO platforms to avoid being dumped back into the wading pool, and you'll have to jump around on rocket ships to avoid sliding off of them. The blimps are the safest platforms; you can rest on those. The one enemy you'll see once you're out of the pool are the model airplanes that will try to drop bombs on you. Destroy them with your projectiles as quickly as possible. At this point, the only real problem you're going to have is keeping track of where you've been and which direction you're supposed to go where, but as long as you're able to go upwards, you're good.
This game is pretty fun, even if it's a bit unorthodox in some ways such as not having any bosses.
At the start of the game, you get a brief overview of what to do: release other Cool Spots from cages by throwing projectiles at the locks. Collect 1-Up icons for extra lives, and flasks of 7-Up for health. Collect 7-Up logos and spots to increase your Cool Meter; having the meter at 100% will net you a big point bonus. Also, follow the hands that point in the direction you need to go.
Shell Shock
You'll need 60% coolness to reveal the cage and complete this stage.
The controls are very simple: Left and Right let you move around, Down lets you duck and look down, Up lets you look up, B lets you fire projectiles and C lets you jump. I keep jumping a lot because jumping is faster than walking, and Cool Spot is pretty slow unless you go left or right for a second.
Aside from your Cool Meter, your lives, your score, the amount of time you have left and the high score, you also have a picture of Cool Spot himself on the HUD at the top of the screen. As you take damage, the picture of Cool Spot will peel off the HUD; after enough damage, it will peel off completely and you will lose a life. Also, if you run out of time (indicated in the upper-right hand corner), you will immediately lose a life. It should be mentioned that you'll get an extra life every 75,000 points.
The crabs will lean out of the holes to pinch, but you can take them down with projectiles. Thankfully, the projectiles are fast and you have an unlimited amount of them. The dragonflies will shoot projectiles, but you can aim your projectiles at them with the control pads. The hermit crab uses their shells for defense, but they are vulnerable when they come out. After one hit, they lose their shell and are in their underwater; after another hit, they are defeated.
Be sure to look high and low for spots in this level; you'll find some in the cushions of the deck chair shortly after the start. and there is a set of balloons above the start that you can grab onto the strings of in an attempt to get from one balloon to another. If you reach this point, you can jump onto the bubbles to bounce off them and towards another balloon. Thankfully, the bubbles re-spawn.
The Cool Spot flag acts as a checkpoint that you can return to if you lose a life, and the clock adds 30 seconds to your time.
When you have a high enough percentage on the Cool Meter, you can find the cage and shoot the lock on it to free the imprisoned Cool Spot inside. After completing a stage, you'll get a bonus for all the unused time that you have, and you'll also get points for how many points you have on the Cool Meter at the end of the stage. All the while, Cool Spot will be dangling on a balloon, and the more points you get, the higher it will go. If you do very well, you'll get a 1-Up here.
Bonus Level
If you do really well in a stage - 85% coolness or more - you can get a bonus level. Here, you'll bee inside a bottle of 7-Up. Bounce off bubbles to pick up 7-Up logos and spots, and collect the letters that spell "UNCOLA" to get continues. (If you're playing the European Mega Drive version, you'll be spelling out the word "VIRGIN" instead, as Virgin Games published and developed the game.) Usually, the lettes will be at the very top; you just have to figure out how to get to them. If you can get 100% coolness, you can get an extra life and bonus points for every second left on the clock. Thankfully, there are a few clocks you can pick up to increase your time spent in here.
The bonus levels start off easy, but as you go, there will be mines that will explode when you run into them and damage you, and if you either die or run out of time in the bonus level, you get kicked out.
If you collect all six "UNCOLA"/"VIRGIN" letters, you'll stop going to the bonus areas, as the game will know you've completed them all.
Pier Pressure
You'll need 60% coolness to reveal the cage and complete the stage.
You can climb on the ropes in this dock. Just jump into them and hold Up or Down. Thankfully, when on ropes or in the air, you can fire projectiles in eight directions by aiming with the Control Pad. If you run into the knot, the knot will act as a wall that you cannot move through.
Enemies here include inchworms that go up and down the ropes, crabs that move back and forth. bees that fly erratically and can get you when you least expect them to, yellow fish that stick their heads out of water puddles and spit projectiles at an angle and clams that spit projectiles at you and are only vulnerable to attack when they open up.
Do not attack enemies through walls; some of them will leave 7-Up flasks for health, and if you off-screen them, they disappear forever.
If you see an opening in a pillar, you can walk through it. Be sure to jump straight up while inside these pillars; you may find spots.
Hazards include splinters in teh wooden platforms throughout the level as well as metal jacks that are littered throughout the stage.
The nails stuck to the walls act as platforms, and you can stand on them if you can jump onto them.

