Showing posts with label part 18. Show all posts

Monday, February 2, 2026

PrinceWatercress plays Super Mario Odyssey - Part 18 of 92


We're done in the Wooded Kingdom, so let's take a look at the Lake Kingdom and see what's happening down there.


Believe it or not, there is a tree near the big wall at the start that contains some Hint Art. If you look at it, you'll find out that there is something in some brown bushes north of the Trace-Walking Koopa.

Broodals over the Lake


When you make it to the Lake Kingdom, you'll find out that the Lochlady Dress has already been stolen by Bowser and that the Broodals are here.

If you pay attention to symmetrical areas and throw your hat at places where things should be, you can find some surprises sometimes.

By throwing your hat at zippers, you can control the zippers and use the left analog stick to open areas up. This will open new paths as well as reveal other things, including Power Moons.

In the underwater path leading to the spiky waterway, you can throw your hat at the seaweed enemies to get rid of them. Also, if you throw your hat at a Cheep Cheep, you'll be able to breath water indefinitely as long as you keep that form, which makes it easier to backtrack and find things you missed as well as things you need. You can hold the jump button to swim, but you can also jump out of the surface of the water to jump onto land. You won't be able to hold the form for long on land until you turn back into Mario, so be sure to find some water to land back into, if you can help it.

You can breathe in the glass dome areas. Just keep in mind that you'll be underwater when you leave those areas. One of those areas is the Water Plaza, which has two levels that you can swim to and from to access both levels. The first level has a pit you can only access as a Cheep Cheep, while the second level has a locked door that requires a swimmer's costume you can complete here through the shops.

When you enter the area where the Broodals are at, you'll face Rango. To beat Rango, hit his hat with your own, then jump on it and land on his head on the way down. Avoid Rango as he jumps around, then repeat the process. After three hits, Rango will go down, and you'll get Power Moon #1.

With Rango defeated, you'll be free to leave the Lake Kingdom, but the geography of the kingdom will have changed, too, and you'll also be free to collect more Power Moons and Regional Coins.

Power Moons

Wooded Kingdom


50. Found with Wooded Kingdom Art - You'll need to head back to the Sand Kingdom and move past the Inverted Pyramid in the sky and find two brown bushes near the edge. These will be the two bushes north of the Trace-Walking Koopa. If you ground pound near them, you'll find the Power Moon. You must find the Hint Art for this first before you can get it.

Lake Kingdom


1. Broodals over the Lake - Defeat Rango at the Water Plaza Terrace (see above).

2. Dorrie-Back Rider - Near the Water Plaza, you'll find Dorrie. There will be a Power Moon on Dorrie's back, which you can jump up to grab.

3. Cheep Cheep Crossing - Above and behind the Underwater Entrance checkpoint are some alcoves, one of which contains a Power Moon. This is easy to get with a Cheep Cheep.

5. What's in the Box? - At the top of the Water Plaza on the way to the Broodals, there is a land platform with three crates. One of them contains a Power Moon, and you'll need to swim your way to the other side to get it.

8. Treasure in the Spiky Waterway - Go right at the spiky waterway when you enter the path leading to the Water Plaza. You'll find a treasure chest containing a Power Moon. 

12. Moon Shards in the Lake - There are five Moon Shards located around the Water Plaza. One of them will be behind some crates, while another will be behind some iron bars. Possess a Cheep Cheep so you can take your time finding these Moon Shards and unlocking the Power Moon.

13. Taking Notes: Dive and Swim - Near the Odyssey, there is a note underwater. Grab it, then swim around and get all the notes before time expires to get this Power Moon.

14. Taking Notes in the Cliffside - There is a pipe leading to an 8-bit area on the west side of the Water Plaza area. Enter it, then hit the treble clef and grab all the notes with the help of the platform to get this Power Moon.

17. Our Secret Little Room - Past the entrance to the Water Plaza are a couple of alcoves. One of them contains a hidden Lochlady, and if you talk to her, she gives you a Power Moon.

19. Shopping in Lake Lamode - Buy the Power Moon at the  Crazy Cap shop in the Lake Kingdom.

22. Unzip the Chasm - There is a zipper hiding a hat door. Going inside leads to an area where you'll need to open up some zippers and create some platforms out of the wall. It will all lead to this, and by using the zipper near the gold key, you can get of all the nearby gold Goombas, but you can give yourself a straight shot to this Power Moon.

Regional Coins


Tuesday, December 9, 2025

PrinceWatercress plays Brave Fencer Musashi - Part 18 of 33


In this video, we go off the beaten path for a few things before taking on the next boss.


There is yet another person you can rescue.

Now that you have the Water Scroll, you can cross the Water and find some stairs that lead to the area to the left of the path to Hell's Valley. There, you'll find a chest with 200 Drans.

Head back to the three poles leading to the actual mountain. Use the Water Scroll to head to the left and find another Bincho Field. Here, you'll free Doctor Tung (Doctor). He'll heal you if you meet him at the castle. If you talk to him at the Castle, he will refill your HP and BP and cure Poison, should you have it. Further to the left is another spot where you can find a Minku.

Head back to the area of the forest close to Steamwood and follow the stream of water with the Water Scroll. You'll find another Minku.

Friday, November 7, 2025

PrinceWatercress plays Legacy of Kain: Soul Reaver - Part 18 of 28


Can you believe we're getting yet another glyph in this video?


Be ready to fight enemies as soon as you enter the nearby skull. You'll soon climb some walls before having to start...

2:21 - ...the climb. Phasing into the spiritual realm will cause the wooden platform here to become gnarled. You'll then have to head back to the material realm and took a good look around to get even higher. You'll eventually see a spiral staircase, and that will help you get just a little bit higher so you can get...

6:20 - ...here. You'll have to float over the gap to another platform leading into another cave. Near the cave entrance, you'll need to use your kinetic energy projectile while in first-person mode to push a block with a gold circle out of the way. You're supposed to go over there, but I forgot. We'll be heading there in the next video. Nevertheless, I go below where all that is and activate another teleporter. Pushing the block away will allow you to go back to that cave entrance and...

9:50 - ...push some blocks around. You can use your projectile to push blocks from a distance if you need to. As you're pushing blocks into the correct position, you'll notice a statue.

You'll also notice that there is one block that does not have a design on any of its faces. You'll need this block out of the way. Also, another block that does have a design will be in an area you'll need to high jump to.

Pushing all of the blocks into place will award you with the Stone Glyph, which lets you petrify all on-screen enemies. You'll also get two more eldritch energy points.

Monday, September 15, 2025

PrinceWatercress plays Woody Woodpecker in Crazy Castle 5 - Part 18 of 18


...and with this, the game - and the Crazy Castle series - comes to a close.


Fairy Stage 4


The lever near the car activates and deactivates the barrier on the right end of the rollercoaster track. You'll need to deactivate the barrier there, press A at the car to go in, make your way to the left and press a switch to activate the barrier at the center. You'll then have to ride the car, get dropped down at the center, then press the switch you see after you drop down to mess with all of the barriers. This will drop the barrier at the left end. With the center barrier down and the right barrier up, you'll be able to get to the top-left of the stage and get to the last of the items and head down to the final switch. Pull it to bring the center barrier down to get to the exit.

As you do all of this, you'll want to avoid the enemies and open up all of the doors to get the keys and power-ups throughout. 

Fairy Stage 5


The boss is a clown who flies around and spits projectiles downwards at you in addition to ramming into you. He can move around pretty quickly, can show up when you least expect it, and has an awful laugh that is more creepy than anything else.

The red-white-and-blue straws act as pipes that can be used to get to other places more quickly.

There is health left of the exit as well as the dark yellow layer of the ice cream cone.

When you beat the stage, the Crazy Castle comes down, and you'll get the treasure of Crazy Castle...which is Winnie Woodpecker, making the ending a carbon copy of the fourth handheld game. The fairy world has been saved, Woody is with Winnie and the game ends. You just beat Crazy Castle 5!

Sunday, June 15, 2025

PrinceWatercress plays Math Rescue - Part 18 of 19


The Asteroid Belt can be a little tricky for younger gamers, but thankfully you can climb up or down on the asteroids if you need to look up or down.


Level 13: The Asteroid Belt


You're going to be jumping around in this level...a lot. If you know what you're doing, you can get all the Gruzzles to fall all the way to the bottom of the level and never have to deal with them again. If you're wondering where that is, it's slightly below the exit door. 

You can climb up and down on the asteroid platforms, and that can help you look up and down if you need to. 

Level 14: Exploring the Caves


Compared to The Asteroid Belt, this level is much more pleasant.

There is a warp before the "8" and "9" near the start.

If you don't find something leaping into the center of the underside of an arch near the start and moving around, try leaping into an arch from the side. You'll find a warp for your efforts.

Saturday, May 24, 2025

PrinceWatercress plays The Grinch (PS1) - Part 18 of 22


In this entry, we finally head underwater.


Back at Wholake, the Marine Mobile will be waiting for you at the start. When you press Triangle to get in, you'll be underwater. The D-Pad lets you steer, ascend and descend; X lets you accelerate, Square lets you accelerate faster, Circle lets you jump to the surface, and R1 lets you dive back into the water from the surface. You can always go back to the Gadgets menu while the game is paused to refer back to the controls if you need to.

There is a fish that you can talk to, and he will ask you to collect ten pearls in 45 seconds for a "twin-end tuba," whatever that is. If you accept, be ready to line yourself up with the pearls while moving as quickly as possible to get all ten pearls within the time limit using both of the acceleration buttons. Moving the Marine Mobile around feels very machine-like, and it takes a little while to get used to. If you can pull it off, you'll get one of the sleigh parts.

The sea cows will eat the kelp on the ocean floor, and you can bump into them. They are much like the turtles from Sunny Beach in Spyro 2: Ripto's Rage, and if you bump into them so that they are near another bunch of kelp, they will go to that kelp and eat it. This will allows you get the giftboxes and other things trapped in the kelp, including one of the parts for modifying the Marine Mobile. Just be careful when doing it, as it is possible to accidentally glitch a sea cow into a wall. If that happens, leave and re-enter the area.

Thankfully, accelerating into giftboxes with turbo speed here will break them. Be careful when running into things; if you hit walls at turbo speed, you'll take damage.

There are flashing things swimming around, and despite what I initially thought, they actually don't hurt you. They serve another purpose, but I don't know what that purpose is...yet.

Be sure to ascend to the surface of the water; you'll be able to find more giftboxes up there. Hitting the R1 button to do a surface jump will destroy the giftboxes suspended in mid-air. You'll need to check the surface for one of the blueprint pieces for the Grinch Copter, which you should have all the pieces for and should immediately build once you have them all. The Grinch Copter allows The Grinch to fly around in the air for as long as he has Rotten Eggs to power it, and it can allow him to destroy giftboxes suspended in mid-air.


Saturday, February 15, 2025

PrinceWatercress plays Wario Land II - Part 18 of 51


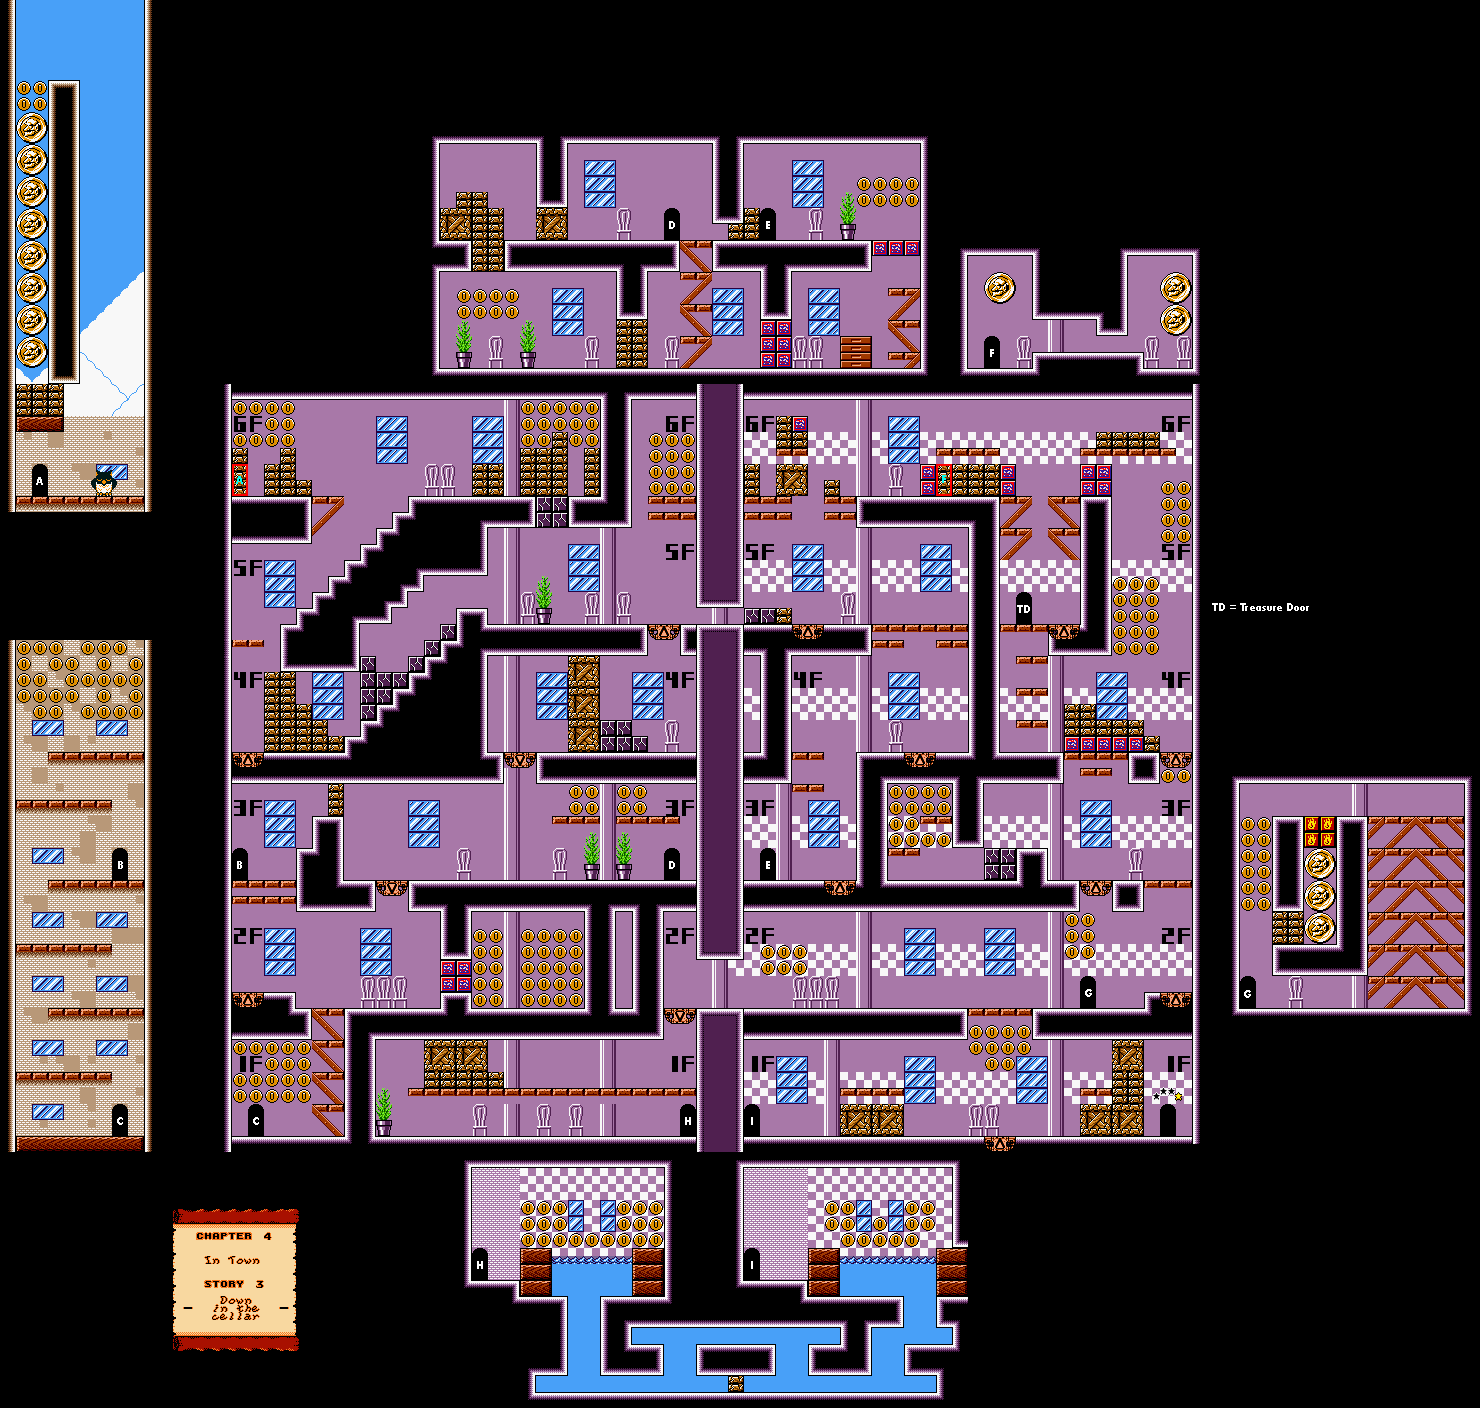
The fun with this level is two-fold. Not only are you running around just to see how to get everywhere, but you'll have to eat cake and get fat just to get the platforms that take you down to the lower levels to work.


Chapter 4: In Town

Story 3: Down in the cellar


There are two kinds of platforms: those that take you up and those take you down. The ones that go up are easy to use, but to use the "down" platforms, you'll need to stand on them after eating a cake from one of the chefs and turning into Fat Wario. While you're Fat Wario, however, you won't be able to use the "up" platforms. You'll have to be normal size to get them to work. And for the love of Pete, don't forget that you can hold Up and jump to perform a high jump even as Fat Wario. That was embarrassing.

The treasure room is on the fifth floor on the right half of the building, and you'll have to get there to win a yo-yo.

The enemies that look like beetles will shock you with an electrical projectile if he sees you. You'll want to stay out of sight and not be level with him, and you'll also want to hit him from behind to get rid of him.

The guy with the hammer will turn you into Spring Wario if he hits you with the hammer. Hold A while in spring form to jump higher than normal. Spring Wario only lasts for a limited time; you'll become normal Wario again after that short period of time.

There are plenty of doors that you can enter throughout the building. Not only will you need them to find all the coins, but you'll also need them to get from one side of the building to the other.

The exit is on the first (lowest) floor. You'll need to reach the floor on the left half of the building with a chef and Fat Wario on a "down" elevator, then go through the water room to get to the other half of the building and get to the exit.

Tuesday, November 26, 2024

PrinceWatercress plays Great Greed - Part 18 of 28


Let's spend time in town and see what we need to do next.


By talking around in the Village of Pint, you'll find out that Pint used to be a soldier of Greene, and that his wife passed away ten years ago. Some people think that Pint and Marcela make for a good pair, as Pint is in love with Marcela. As for Marcela, she randomly ended up at Pint's home one day. Also, when the snow falls here, it is black (probably due to the pollution).

You'll also meet the doctor in a house in the west side of town. If you talk to him, he will tell you about the hot spring in the northwest forest, which will be able to help heal your leg in storyline.

At the magic shop, you can get Freeze 4, which is the strongest Freeze magic in the game. At the armory, get the Badcut, the Steel Armor (which is better than even the Chrome Armor), the Steel Shield (unless you have the Alloy Shield, then don't), and the Steel Helm (which is stronger than even the Chrome Helm).

There are new monsters outside of the town. Dish Pan give 173 Experience and 459 Gold when defeated, and if you're in the high-30's as far as levels go, they won't be too much trouble, even if they are weak against Freeze Magic and can cast Speed to make themselves faster in battle.

Bambobif is a stronger version of Bamboobe. It is strong against Freeze magic and cast Fire 1 and Fire 2. They give 169 Experience and 624 Gold when defeated, but they also have a chance of dropping Chain Armor. If you get it, equip it, as it's better than what you can get in Caviar Village.

Monday, September 16, 2024

PrinceWatercress plays Chrono Trigger (Super NES) - Part 18 of 70


Our quest to repair the Masamune takes us to prehistoric times...but when we get there, we have trouble.


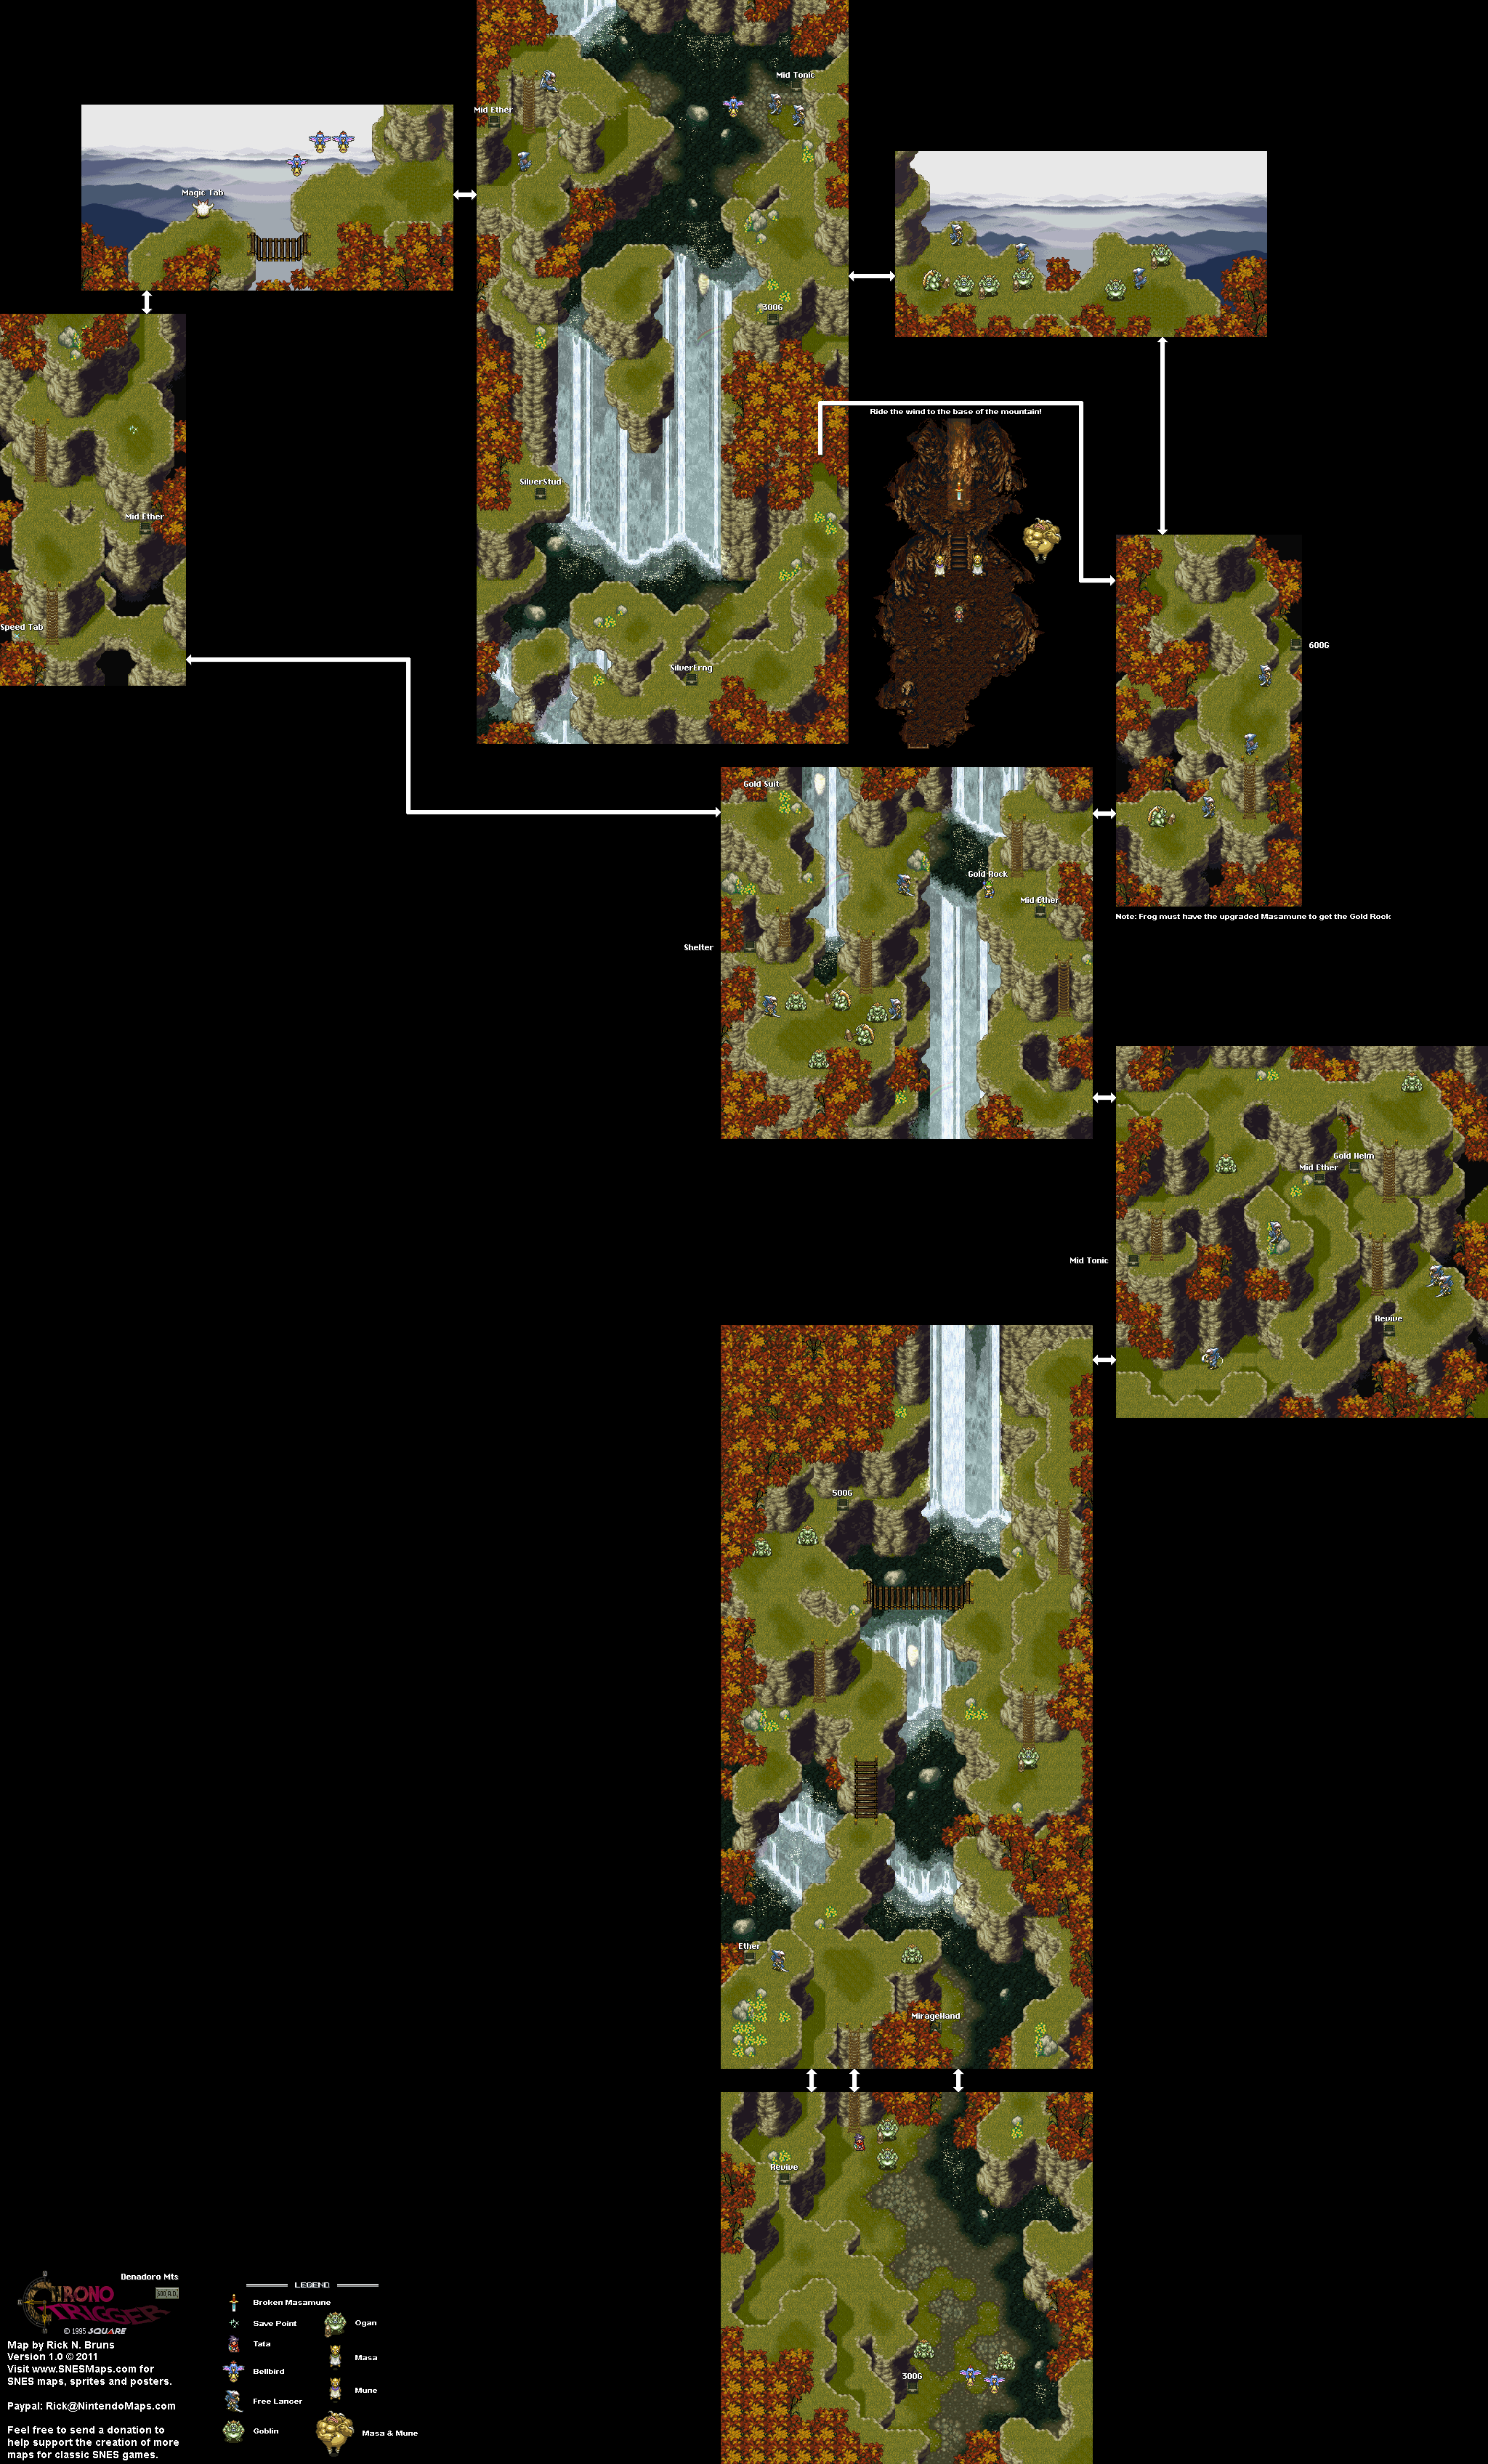
Just before the cave that leads to the Masamune and just before the half-ladder you have to drop down from to reach it, there is a chest with a Gold Suit hidden behind a tree branch that is barely visible. Up until I made this guide, I never even knew it was there.

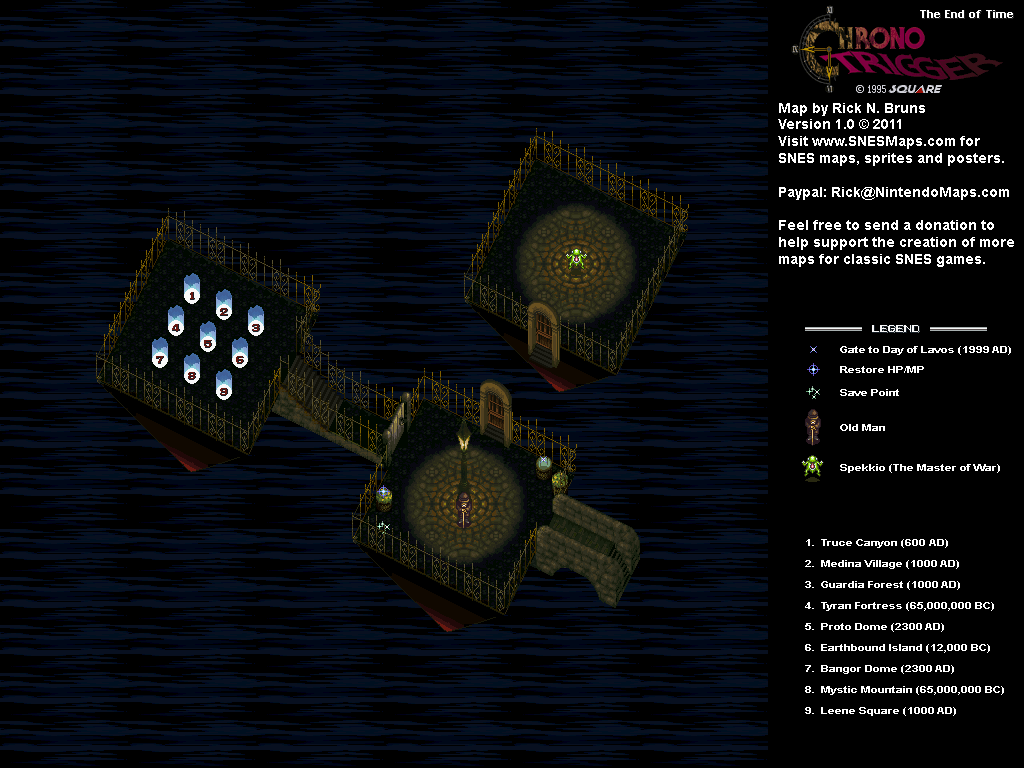
From there, I head back to the End of Time, then head back to Medina Village in 1000 AD and Melchior's Hut.


Once you're back in Medina Village, head west to Melchior's Hut and talk to Melchior to ask him about the Masamune. He will tell you that it is a long story regarding his involvement in the creation of the Masamune, then tells you that you will need the Dreamstone to fully forge it, as it is the material that the sword is made of. Unfortunately, the Dreamstone is long gone and was only widely available a long time ago, and the only way to get one is to go back to prehistoric times. At long last, we have a reason to go back to prehistoric times.

Head back to The End of Time and head back to 65,000,000 B.C.


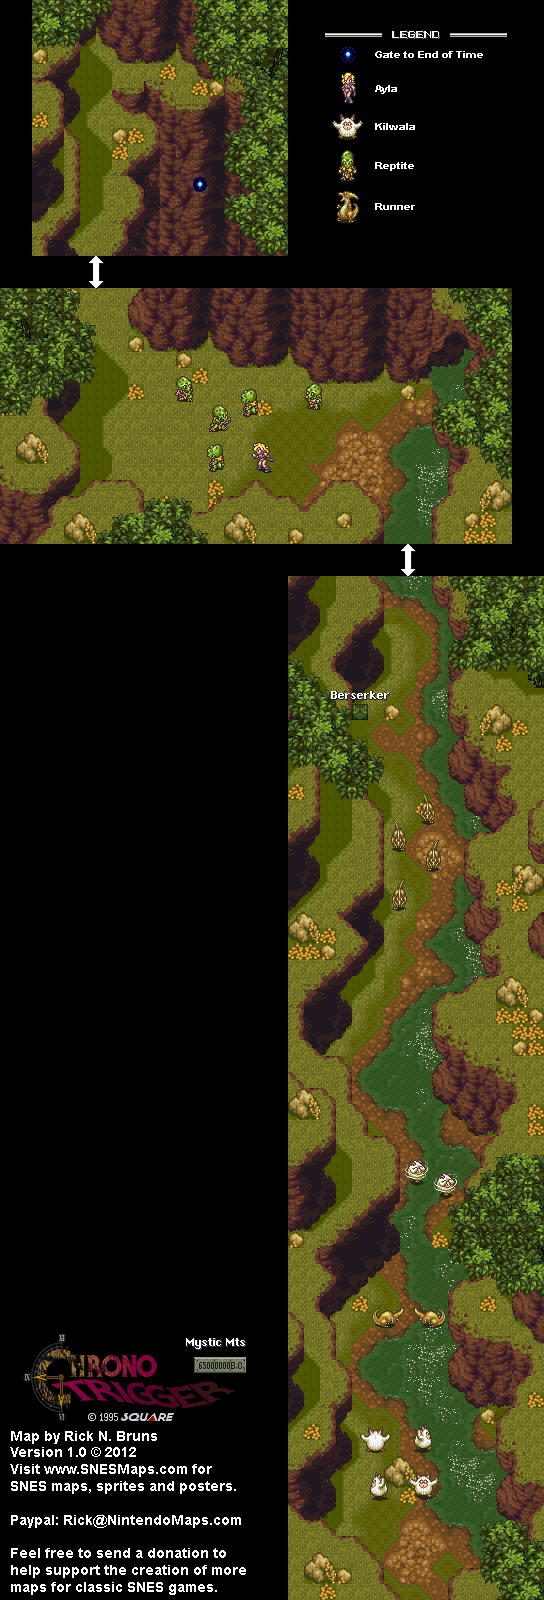
When you drop down from the portal in the Mystic Mountains this time, you'll be surrounded by green, reptilian humanoids known as the Reptites. As long as you use strong multi-target spells, they're not hard to beat up. Just remember that they can throw dirt clods at you in an attempt to put you to sleep.

Eventually, you'll have more Reptites than you can find. Suddenly, a strong cavewoman with blonde hair will show up and lower the numbers a bit, then you'll have another wave of Reptites to fight. Once you take them down, you'll soon meet the cavewoman herself: Ayla, the chief of the nearby Ioka Village. After your party gets to know her better, she'll ask you to follow her down the mountains to the nearby village.

From here, the rest of the area is the same as it was the first time we were here, since we've been here before. It should be noted that if you fight all the enemies before you reach the exit, Ayla will show up and complain that you're too slow.


From here, you'll want to go to the chief's hut. You'll be able to talk to Ayla, who will throw a party in your honor.

At the party, you'll be able to talk to your allies as well as Ayla. Obviously, you want to talk to Ayla to advance the plot, but if you have Marle in your party, you can do some optional dancing, and if you have Lucca in your party, you'll be able to drink some soup out of a large stone bowl. If Robo is in your party, he will be laying there, unable to do anything because of all the flies buzzing about.

If you talk to Kino - the other caveman with the blonde hair and grey hides like Ayla's - he will be confused as to why Kino is throwing a party for you, as you are not from the village. Keep this in mind for later if you talk to him.

Keep talking to Ayla. You'll find out that she is currently part of the war between the humans and the Reptites to see who will survive, and that she will fight until her last breath on the humans' side, and if she were to die, Kino would take her place as chief due to him being a man. She will eventually produce a Dreamstone. In order to get it, you'll need to beat Ayla in a soup eating contest. Accept the contest, then press the A button rapidly in order to easily beat Ayla. If you lose, you'll get the chance to try again. (It should be noted that in the original Super Famicom version, the soup was actually alcohol.)

After the soup eating contest, you'll get the Dreamstone, and you'll party into the night. You'll wake up in the morning, but when you do, you'll notice that there are strange footprints everywhere and that the Gate Key is missing. Your party will immediately head to the Chief's Hut. Talk to Ayla, and you'll wake her up and tell here what is going on. Ayla will join your party and take residence in your party's second slot for as long as you're looking for the Gate Key, and you'll get a chance to put who you need to put in the third slot.

Before you head anywhere, you'll want to go to the hut to the east of the Chief's Hut in order to trade for weapons and armor, now that the chief knows you. You'll be able to trade with the Petals, Horns, Fangs and Feathers that you get from winning battles, with certain monsters giving you certain trading items. You'll need three of one trading item combine with three of another to get different items. Here's what you can get at the trading hut:

Petal + Horn = Ruby Gun (Lucca)
Petal + Fang = Sage Bow (Marle)
Petal + Feather = Stone Arm (Robo)
Horn + Fang = Flint Edge (Crono)
Horn + Feather = Rock Helm (everyone) 
Fang + Feather = Ruby Vest (everyone)

You'll want to get all of the weapons, and you'll also want to get Ruby Vests and Rock Helms for everyone not named Ayla (unless you have the Meso Mail, in that case, don't give it to whoever has it equipped). Not only is this the best armor you can get in the game right now (unless you want to go into the Dactyl Nest for the Meso Mail at this rate, in that case, be my guest), but the Ruby Vest will cut all fire damage by 50%.

You'll also want to not get them for Ayla, who will come equipped with both of these armors as well as a Magic Scarf for an accessory (even though she cannot learn magic, being born before the age of magic). She also fights with her fist and does not need any weapons to equip, and she is one of the more powerful party members in the game alongside Crono and Robo.

If you need to sell your old stuff off, one of the people in the trading hut will be able to buy it off you, as he will also sell you healing items in exchange for your money.


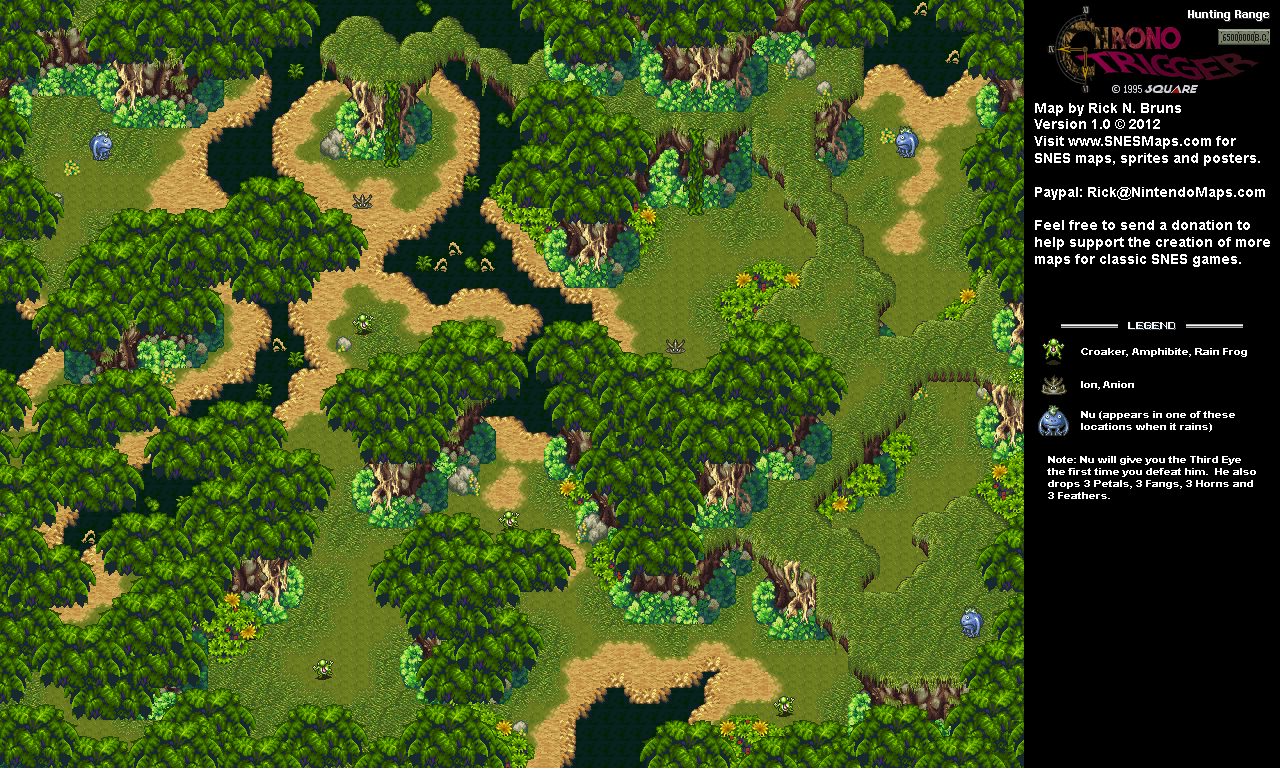
If you need to get any trading items for whatever reason, go ahead and go to the hunting range north of the village and fight enemies until you have what you need. It's also good for getting tech points for Ayla, as she starts with no techs.

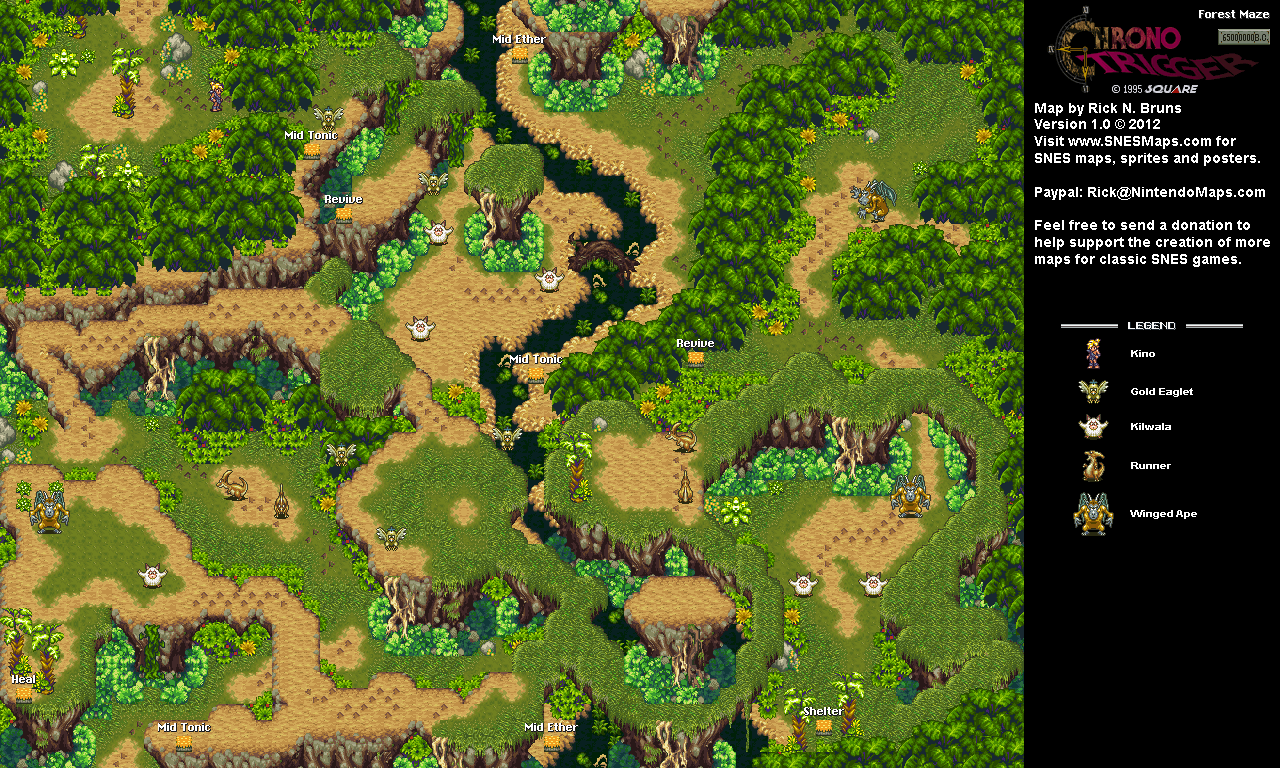
By talking to the people in the other huts, you'll find out that the Reptites can be tough and hard to beat. You'll also find out that they went to their lair in the Forest Maze in the south after they came to the meeting site and stole the Gate Key. You'll need to head there.


When you enter the Forest Maze, you'll find Kino. When you approach him, you will find out that he stole the Gate Key because Ayla likes Crono - who he does not like - even though Ayla likes Kino best. Ayla tells Kino that this is wrong and demands Kino apologize - which he does - and return the Gate Key, which he can't because the Reptites took it from him. From here, you'll have to follow the footsteps into the maze, which the game allows you to go through now.

Monday, June 10, 2024

PrinceWatercress plays Ratchet and Clank: Going Commando - Part 18 of 54


We take care of some business on Planet Dobbo in this entry.

First | Previous | Next | End

0:05 - Thugs-4-Less gets a call from somebody who has more or less outbid our former thief friend. 

4:35 - On our way across the other path in Dobbo that we need to take, we'll need to use the Dynamo to get across the water in addition to taking out a tank.

11:27 - Easy experience.

14:56 - Well, that was inadvertent.

17:35 - Keep this vent in mind for later.

18:34 - Oh, look. A Megacorp Games qualifier.

Here, you'll be Giant Clank again, and you'll need to defeat the leader of Thugs-4-Less in order to qualify. Just like last time, the left stick moves, Circle fires missiles, Square punches, Triangle fires a Bomb Strike, X does a high jump, and L2 and R2 strafe.

You'll need to destroy the helicopters that fly around as well as the buildings for health and missiles, and if your opponent loses all their health before you do, you win! The orange arrow in the top center of the screen will tell you where he is, and if you need to avoid his missiles, be sure to jump. If the screen turns red, be ready to walk to the side to avoid his Bomb Strike. If you need help, bust up the planes that keep spawning in.

If you defeat this guy with only your fists and no other weapons, you'll get a Skill Point for it. If you destroy all the buildings, you'll get another Skill Point for it.

Once you beat this guy, you'll unlock the coordinates for Joba, where the Megacorp Games are taking place.

Skill Points:

Robo Rampage: Destroy every building in the city as Giant Clank during the Thugs-4-Less leader battle.

Dukes Up: Defeat the Thugs-4-Less leader as Giant Clank using only the punch attack.

Controls:

As Ratchet:

Control Pad/Left Analog Stick: move
Right analog stick: move camera

X:
  • Jump and double jump (hold button after double jump to use Heli-Pack or Thruster Pack)
  • Wall jump (near certain walls)
Square: strike with wrench
Circle: pull out/shoot currently equipped gun
Triangle: 
  • quick select (hold and use in conjunction with Control Pad or left stick to switch guns; menu can be customized in Quick Select on the pause menu
  • double tap to switch between two most recently equipped weapons/items
  • interrupt on-screen messages

Select: open map
Start: Pause menu
  • Control Pad: select option
  • X: confirm option choice

L1:
  • center camera behind Ratchet (tap button to center)
  • first-person view (hold button and use left stick or D-Pad to look around; let go of L1 to move camera back behind Ratchet)
  • Square: wrench boomerang
  • Circle: fire gun
  • R1/R2: zoom in and out (Pulse Rifle only)
L2/R2: strafe (hold while moving)
L3: see health and Bolt totals
R1/R2: crouch (hold down)
  • Square: wrench boomerang
  • X: high jump
    • long jump (hold crouch button and jump while running to perform)
R3: open map

In water:
  • Square: dive and descend
  • X: surface and ascend
  • R1: accelerate with Hydro-Pack

As Clank:

Control Pad/Left Analog Stick: move
Right analog stick: move camera

When hanging off platforms:
  • Control Pad/Left Analog Stick: move
  • Forward+X: vault up
  • Back+X: drop down

Square: punch
X: Jump (press and hold in the middle of a jump to glide with Heli-Pack)
Triangle: command menu (hold and use in conjunction with Control Pad or left analog stick to choose commands)

Saturday, May 18, 2024

DeceasedCrab plays Earthbound - Part 18 of 53


In this entry, we save the captured Mr. Saturns and take on Master Belch.


You'll have to fight another Slimy Little Pile before you can enter the treasure room northwest of the conveyor belt.

The Vital Capsule increases the Vitality of whoever uses it by one. The HP-Sucker can be used to drain an enemy's HP and transfer it to the user. The Calorie Stick replenishes 60 HP.

The room southwest of the treasure room will always contain a butterfly that can be used to restore PP. You can enter the room over and over again to refill your PP and heal up without having to use any items.

When you start seeing light green puddles of slime on the floor, you're near where you need to be. One of the Slimy Little Piles near the door will demand you say the password before you have to fight it, assuming you even run into it.

At the end, you'll soon encounter Master Belch, who you will have to fight. Use the Fly Honey to make Master Belch go nuts and eventually to sleep. Use Freeze magic to solidify him whenever you can, as well as powerful attacks like Rockin' Beta and Bottle Rockets.

Paula will learn Magnet Omega at Level 24, which lets you steal PP from all on-screen enemies during battle.

When you beat Master Belch, he will tell you that Master Giygas has moved the Mani Mani statue to Fourside, which will beat at Giygas' mercy. Behind the door that Master Blench guarded are a few Mr. Saturns as well as a path to to the hot spring in Saturn Village. You will have saved the kidnapped Mr. Saturns!


Go ahead and use the hot spring to heal up your HP and PP and wash the gunk off your body, then go up to the Mr. Saturn near the cup of coffee on the nearby tree stump and drink the cup of coffee. You'll get a message from the game congratulating you on getting this far before telling you that you will have to pass through the desert to get to Fourside.

One of the Mr. Saturns will give you a Cup of Lifenoodles, a Mr. Saturn coin and a Stag Beetle. The Cup of Lifenoodles will revive one person, the Mr. Saturn coin will greatly increase the defense of whoever equips it, and the Stag Beetle is a stag beetle that can stun one enemy.

If you head towards the cave north of the cup of coffee, the photographer will show up to take another picture. That cave will lead to the Milky Well.


The Tough Mobile Sprout and Struttin' Evil Mushrooms are tougher versions of the Mobile Sprout and Mushroom enemies you've met earlier, but you shouldn't have too much trouble with them. The green monster with the leaf spear is a Ranboob.

The Coin of Slumber increases both defense and luck.

Wednesday, May 8, 2024

PrinceWatercress plays Drill Dozer - Part 18 of 28


This route was fun, believe it or not.


Area 4 Secret Area: Metal City Highrise


There are two paths we'll be taking in Area 4's secret area: the top path and the bottom path. We'll be taking the bottom path.

The bottom path has a ton of screw gates. Before you can get to them, you'll need to watch where you're going on some moving platforms. 

To get to the treasure chest that contains the Stinky 'Shroom, you'll need to launch yourself backwards as you latch onto the screw gate, then latch onto the rubber blocks and launch yourself backwards off the block at second gear.

For the rubber block before the big gap with the moving platform, you'll need to get to third gear, then launch yourself off just before the moving platform appears, then be ready to duck to avoid the block on the other side.

For the screw gate before the set of rubber blocks, you'll need to drill the bottom screw first, then launch yourself towards the blocks at second gear.

Near the end, you'll need to bring the screw gate further to the left, then drill the other screw in the opposite direction and launch yourself off to the right as soon as you hit third gear. It works better if you get the left screw all the way to the left, as you'll have more time on the other side.

At the end of this route, you'll get the Eternal Top.

Friday, March 15, 2024

PrinceWatercress plays Ka-Blooey - Part 18 of 25


It's not getting any easier. At this point, the notes that I was taking was really helping out with remembering everything I had to do in every level.


Level 91

Go to the switch near the start (referred to here as "Switch 1") and hit it. Go to the lower left corner. Detonate the small bomb on the way there. Go right, detonate the small bomb, then go back left. Go to the column where the mine was, then go up on the ice, detonate the small bomb and go back down. Detonate the bomb near the mines, then move down. Take the red guy into the next mine to detonate it. Go to where the mine was, go up, detonate the small bomb, then go left. Go back to the start, travel to the switch south of the second cracked tile (referred to here as "Switch 2"), hit it, go right, detonate the small bomb near the mine, go up, detonate the other small bomb, then go back to the start. Hit the switch south of the third cracked tile (referred to here as "Switch 3"), then detonate the bomb in the lower right corner. Go back to Switch 1, hit it, go back to the start, detonate the left-most bomb and move left.

Level 92

Go left, then detonate the small bomb. Go left, then up. Get the red guy out of the ground, hit the switch, then move right to the small mine. Go right, down, right and detonate the small bomb, then go down. Go right, then hit the switch. Go right, up, right, right, then down. Detonate the small bomb, and make sure you blow up the enemy as you move back up. Go down to the nearby switch and hit the switch. Go right, right, up, right, then right. Hit the switch. Go left, detonate the small bomb, then go down. Go right twice, then move the medium aerial bomb to the upper right slot tile and enter the nearby teleporter. Go right twice, hit the switch, go up, then right, hit the switch, then go down twice, detonate the small bomb and go left across the into the teleporter you just spawned. Detonate either medium bomb with the blue guy.

Level 93

Detonate the small aerial at the start and move right. Head left, get rid of the spinning balls enemy by waiting on the cracked tile and moving down when the enemy approaches, then hit the switch on the far left side of the level to summon a small aerial bomb to the immediate right. At the nearby slot tiles, leave the upper left slot tile bare. Travel to the switch on the upper right corner and hit it. Go back to the small aerial bomb and detonate it. Summon the small aerial bomb again with the far left switch, then go to the switch near the mines and hit it to replace it with a large aerial bomb. Go to the small bomb in the north center part of the map and detonate it. Go back to the small aerial bomb, leave the upper right slot tile bare again as you place a medium bomb in the upper left tile, then hit the switch north of the slot tiles to replace the other switch with a teleporter. Detonate the small aerial bomb when the swell bomb is at medium and move up. Detonate the medium bomb, then enter the teleporter.

Level 94

Go down, detonate the small bomb, then go back up. Go to and hit all four switches. Go south from the lower right switch and detonate the small bomb, then detonate the small bomb near the small mine. Detonate the small bomb near the large mine, then return to and hit all four switches. From the lower right switch, move down, right, down, right, right, then up. Detonate the small bomb, then step left. Detonate the small bomb in the upper right corner and move down.

Level 95

Enter the teleporter at the start. Move the medium bombs on the slot tiles one tile down - to the corners - and detonate the small bomb before entering the next teleporter. Hit the nearby switch, then take the blue guy to the teleporter. Detonate the medium bomb near the teleporter. Detonate the small bombs.

Tuesday, October 24, 2023

Jerry Martin plays Strong Bad's Cool Game For Attractive People - Part 18 of 53


In this entry, we get the Homestarmy reinstated. Business is about to pick up.


You'll be back at Marzistar. Talk to Strong Sad to insult him. (You'll need to do this before reinstating the Homestarmy.) 

You can place Tony Stoney on the Poopslovakia display on the map.

If you talk to Homestar and ask him about The King of Town, Homestar will say that he does not like how The King of Town's castle undresses him with its eyes, and when Strong Bad asks what will happen if The King of Town invades, Homestar will call for the militia, then realizes he does not have one when Strong Bad asks him if he does. This leads Homestar to reinstate the Homestarmy.

From here, click on the wooden bowl and spoons. Homestar will say that the Homestarmy needs lots and lots of soldiers, and by that, he means exactly five. He also mentions that the draft was abolished. Click on the game board wheel to ask about the draft, and Homestar will reinstate the draft.

You'll then get the Peace Draft wheel. The wheel will land on Coach Z, who gets drafted into the Homestarmy first. Marzipan will be angry with Homestar and split with him, and Marzistar splits into East Marzistar and East Homezipan, but Homestar doesn't seem to care. Meanwhile, Strong Bad will be unimpressed with who is in the Homestarmy, and says that someone will have to whip them into shape. That someone is, of course, him. From here, click on everyone from left to right to yell at them and get them fired up, then the Homestarmy will spring into action, then Homestar will write a letter to Marzipan despite the two of them having broken up. You'll find out that a week has passed, that The Cheat and Coach Z are traitors, that The King of Town has put up no fight whatsoever, that Marzipan and Homestar are still on the outs, and that Strong Bad is the new King of Town and that he hates the new job.

If you click on the butter on the right side of the throne, you'll find the King's Beard.

If you use the lighter on the unlit candle holder, you'll light the candle.

If you click on the fish skeleton (which is called the Ex-Fish) three times, you'll get the Darwin paper for the Teen Girl Squad comic.

Enter the room to the right. You'll find The King's laptop, which doubles as a toaster. Strong Bad will unplug it, and a spare crown will come out. You can click the crown to make it part of your outfit. Strong Bad will then read the e-mail from the beginning of Episode Two again and realize that the e-mail was an elaborate ruse to de-throne the King of Town, and Strong Bad decides to put The King of Town back on the throne.

OUTFITS:
- Eye Patch: Inside cereal box in kitchen
- Camo Pants: Inside dryer
- Strong Badia Shirt: Use Black Metal Detector just outside Strong Badia.
NEW! King's Beard: Check the right side of King's fridge throne
NEW! Crown: Unplug King's computer and check on top of it

CALLING STRONG SAD NAMES:
- Talk to Strong Sad (Before escaping)
- Talk to Strong Sad about fence twice (Before escaping)
- Examine Shower (Before escaping)
- Use Pillow on Strong Sad (Before using on statue)
- Use the Fake Sword on Strong Sad (Before taking over Bleak House)
- Talk to Strong Sad about Strong Badia (Before taking over Bleak House)
- Talk to Strong Sad about Strong Badia twice (Before taking over Bleak House)
- Talk to Strong Sad about Bleak House (Before taking it over)
- Talk to Strong Sad about Strong Badia (after usurping Bleak House)
- Use Fake Sword on Strong Sad at Homsar Reservation (before taking it over)
- Use Tuning Fork on Strong sad at Homsar (before throwing in hole)
NEW! Talk to Strong Sad at Marzistar (before reinstating Homestarmy)

ALGEBROS MANUAL PAGES:
- Page 3: Under box near the fence.
- Cover: Check Strong Bad's mailbox.
- Page 2: Check Marzipan's mailbox.
- Page 4: Check under the box in Pompomerania.

FLAGS:
- Concessionstan Flag: Check bush near Concession-Stantinople.
- Strong Badia Flag: Check brick wall.
- Bleak House Flag: Check under box on Strong Sad's bed.
- Cheat and Tirerea Flag: Check Tire after giving medal to The Cheat.
- Homsar Reservation Flag: Check Mysterious Bush at Homsar Reservation.
- Marzistar Flag: Use the Black Metal Detector near the garden on Marzistar.
- Pompomerania Flag: Order Bull Honkey twice in a row.
- Country Flag: Use Black Metal Detector near the big Country flag in Country.

TEEN GIRL SQUAD CARDS:
- Tar Pit: Check Strong Sad's books in Bleak House.
- Egg: Use lighter on the barred window in Bleak House.
- Alien: Use Black Metal Detector near cave in Homsar Reservation.
NEW! Darwin: Check the Ex-Fish at King of Town's castle three times.

SETTING THINGS ON FIRE:
- Maps & Minions Box
- Smoke Detector
- Strong Bad's bed 
- Strong Sad's flag 
- Strong Sad's bill of rights 
- Strong Sad's constitution
- Mysterious Bush in Homsar Reservation
- Kimono
- Lone Skull #1
- Lone Skull #2
- Pile of Skulls
NEW! Unlit Candle Holder

Tuesday, June 13, 2023

PrinceWatercress plays Bugs Bunny & Taz: Timebusters - Part 18 of 23


In this entry, we finally beat Babba and head off to the Transylvania Era.


1:37 - This lion head is where you ultimately need to go.

2:15 - Shoot a carrot into the lion's mouth in order to raise a pillar near the big lion head.

2:46 - Break the rock with Taz to find an air stream. Use the helicopter spin that Bugs has on the stream to reach the first crate and a gold gear.

3:35 - Wait for the flames to die down before shooting carrots into the lions' mouths.

3:51 - The second crate.

5:44 - Four more lion heads. Watch for the piranhas! Also, the third crate.

6:21 - The final out-of-time character. I hit the guy with the super spin that Taz has, and I have Bugs below in case he goes down the rabbit hole.

7:06 - Here, you'll need to match the corresponding tiles to receive  a reward, and you'll have three chances before the lions here eat you. Thankfully, the tiles are always in the same spot every time, and it's pretty easy to memorize where they are all going to be, as you have four different sets of three for the patterns here, anyway. You'll get a gold gear for completing it.

8:04 - Another pillar to set up. This time, the lion heads shoot out bats you need to avoid and watch out for.

9:40 - Hit the switch at the bottom, then swim around to get the rings for a gold gear.

10:30 - The fourth crate.

11:27 - The fifth and final crate.

14:07 - Have Taz spin on a button to open the mouth of the nearby lion, then shoot a carrot into the lion's mouth with Bugs.

14:53 - The entrance to the boss complete.

15:14 - Meeting Babba.

15:42 - To beat Babba, get Bugs on a button, then switch to Taz and get Babba to run into an anvil shadow (or in this case, a treasure chest shadow). The buttons lower gongs, and you'll need to throw Babba into the gongs by picking him up with Taz like you would Bugs and throwing him into the gongs. When the gong is fully in view, you can simply look towards the gong and throw to do some damage to Babba.

After three hits, Babba will perform a pin strike. Stay away from him when he does that so you don't get hit.

Once you do this four times, Babba goes down, but Daffy will run off with the Time Gem. There's one more era to go: the Transylvania Era. From here, we can head back to Sunset Alleys, get the crystal gear, and head back to Granwich to go to the Transylvanian Era.

Tuesday, April 11, 2023

PrinceWatercress plays Sly Cooper: Thieves In Time - Part 18 of 48


Now that we have Sir Galleth rescued, let's get his cane back and put it to good use, shall we?


Cane Swipe


You'll have to play as Sly to get this job started.

Once again, you'll be reminded of the Archer Costume once you're out of the hideout.

The safe is here. You're welcome. Inside is Sir Raleigh's Frog Hat. This keeps you from taking damage from falling in water, much like the Water Safety from the first game.

When you start the mission, a drawbridge will come down. This is your first glimpse at the Black Knight, who is guarding Sir Galleth Cooper's cane along with a group of minions on the way to the Blacksmith's Shop. As the Black Knight and his minions walk around with the cane, you'll need to get pictures of the Black Knight as well as the case that the cane is contained in.

The Black Knight has a red light instead of a yellow one. You'll also need to get in front of the The Black Knight to get the best picture of it. Once you get this photo, get to higher ground and take a picture of the cane case. After getting both photos, you'll need to take out the guards. Even if you have Silent Obliteration (which you definitely should have at this point), killing one guard will alert the other, and this is a pretty easy way to get caught out. When the other guard stops looking around, take the other guard out, then catch up with the cane case. Sly will hack in, and this leads to another Alter Ego mini-game. Once you beat it, you'll get Sir Galleth's cane back.

Eye In The Sky


Now that you have the cane back, you can play as Sir Galleth just in time for this mission.

Sir Galleth's stealth slam is his cane/lance going right into the enemy's back.

As Sir Galleth, you'll need to destroy the Black Knight's balloons, which act as surveillance tools that can keep track of everything going on from high up in the air. These balloons will have to be destroyed if the Cooper Gang is to have any chance of stopping what is going on in the medieval era. To do that, you'll have to use the Catapult Crash technique to get up buildings and reach the balloons, and you won't be able to use this technique until you start this job. To use it, you'll need to hold R2 to charge the Catapult Crash up, then press X while still holding R2 to launch yourself upwards and reach other areas that you can spire jump to. If you need to disconnect from the hook for whatever reason, press Triangle.

Use the radar and the L3 button to find the three towers that you will need to climb in order to get to the balloons. You'll need to use the Catapult Crash in order to get past the wooden platforms that are in your way, as the Catapult Crash is both speedy and powerful enough for Sir Galleth to zoom right through them. You'll also want to pay attention to for gaps that you can get through. If you see anything yellow while charging up the Catapult Crash, it is something that you can automatically latch onto while vaulting yourself upwards.

Once you're just underneath a balloon, you can use the Catapult Crash to slash right through it and take it down. After you take out all three balloons, the job is done.

Achievements:

Zenny, Gil or Just Loot: Open the safe in Episode 4.

Collectibles:

Sly Mask #35 - Once you start "Eye In The Sky," you can get this Sly Mask with Sir Galleth and the Catapult Crash.

Sly Mask #36 - Remember the tower that led to the tent in "Juggling Act?" If you keep riding on the rope here, you can get to this Sly Mask. Sir Galleth's Catapult Crash also makes it easy to get to this collectible.

Sly Mask #37 - There is another Sly Mask at the roof of the tavern.

Sly Mask #38 - The first tower leading to a surveillance balloon in "Eye In The Sky" has a platform with a Sly Mask on it.

Sly Mask #39 - The second tower also has a Sly Mask. Take out the balloon, then drop down slightly to find it.

Controls:

Left analog stick: move
Right analog stick: move camera
X: Jump and double jump (hold X on second jump for hover jets as Bentley)
Square: attack
Circle: 
  • interact (usually with anything that has sparkles) (Sly)
  • steal from enemies (from behind) (Sly, Bentley, any of Sly's ancestors)
Triangle:
  • knock enemies upwards (from behind; press Square to slam enemies down for stealth slam) (Sly, any of Sly's ancestors)
    • press Circle after knocking enemy upward to perform Silent Obliteration (Sly; replaces Stealth Slam; must buy on ThiefNet)
    • press Square for Stealth Slam (any of Sly's ancestors)
  • spin attack (hold to charge) (Sly)
  • throw bombs (Bentley)
  • Thunder Flop (in mid-air) (Murray)
  • spin attack (hold to perform) (Murray)
    • control with left stick (must buy on ThiefNet)
  • Raging Inferno Flop (in air; Murray; must be bought on ThiefNet)
  • charge attack (Sir Galleth)

L1: 
  • bomb aim (Bentley)
  • smoke bomb/flash bomb (Sly; must buy on ThiefNet)
  • aim/strafe mode (Carmelita; must hold button down)
    • left analog stick: move
    • R1: shoot (can only shoot in strafe mode)
L2:
  • hold for costume select menu (Sly)
    • hold down to stay in menu; use D-Pad or left stick to make selection
  • hold for weapon select menu (Bentley)
    •  hold down to stay in menu; use D-Pad or left stick to make selection
  • hold for fist select menu (Murray)
    • hold down to stay in menu; use D-Pad or left stick to make selection

L3: activate compass
R1: run (hold while moving to perform)
  • Paraglide (Sly; in air; must buy on ThiefNet)
  • Adrenaline Burst (Bentley; double tap to activate; must buy on ThiefNet)
  • Clothesline (Murray; double tap and steer with left stick; must buy on ThiefNet)
R2:
  • Trigger Bomb (Bentley; must have bomb on field to detonate manually; must buy on ThiefNet)
  • Catapult Crash (Sir Galleth; hold to charge)
    • X: press while holding R2 to perform Catapult Crash
    • Triangle: press while holding R2 to disconnect from hook
R3: Binocucom
  • Right analog stick: move
  • Left analog stick: zoom in and out
  • R1: take picture (when applicable) (Sly, Bentley)

Start: pause menu
Select: map
  • Left analog stick: zoom in and out, switch between map and status
  • Right analog stick: move map
  • Circle: back

Monday, February 20, 2023

PrinceWatercress plays Blood Omen: Legacy of Kain - Part 18 of 41


We now take a shortcut to the Lost City of the Werewolves for a ton of secrets.


3:02 - We head straight west to head to...

3:23 - ...this teleporter. Going in leads to...

3:54 - ...the Lost City of the Werewolves. You'll only be able to enter this place under a full moon, and we're pretty close t one. From here, we wait.

8:17 - We're in. Watch out for werewolves as you make your way into a building to the immediate east.

9:23 - We need to open a door on the west side of this square-shaped hallway. The two buttons in the northwest and northeast corners of this icy rooms are secrets (see below).

10:39 - Be ready to beat up some enemies and open chests for items. There is a snake statue here; you'll want to walk into it to trigger a secret (see below).

12:31 - From here, leave the building, then go all the way south. From here, go east and enter the first building that you see. 

14:08 - Take the first east corner and walk into the serpent statue. From here, go west, then take out the Will 'o Wisps. Go to both ends of where the door is and hit both buttons that are ahead. They will open the door and they will count as secrets (see below).

15:46 - Hey, cool! A bunch of pick-ups. Just remember that the zombies here do get back up after you kill them with weapons.

17:37 - From here, enter the building to the immediate north.

18:36 - Hit the button near you when you enter for another secret. Use Control Mind on the soldier here and get him north past the moving spikes (watch them carefully) and the spiked ball to hit another button and trigger another secret.

20:15 - From here, you'll want to go south (assuming you didn't accidentally kill the guard and have to re-enter the room like I did and enter the now-open door to the east to find a teleporter. You'll have to enter it as the soldier, obviously.

20:44 - Follow the lit paths and step on the switches. There are seven of them in all, and they are all secrets. The teleporter at the end takes you to the top of the building for a few more pick-ups, and you can press X to switch back to Kain with everything you've collected here.

Secrets

33 and 34. - We need to open a door on the west side of this square-shaped hallway. The two buttons in the northwest and northeast corners of this icy rooms are secrets.

35. - Walking into this serpent statue triggers a secret.

36. - This serpent statue is a secret.

37 and 38. - The two switches on the sides here open the door here, and are secrets.

39. - Hit the button near you when you enter for another secret.

40. - Use Control Mind on the soldier here and get him north past the spikes (watch them carefully) and the spiked ball to hit another button and trigger another secret.

41 - 47. - Follow the lit paths and step on the switches. There are seven of them in all, and they are all secrets.

Tuesday, January 24, 2023

PrinceWatercress plays The Bugs Bunny Crazy Castle 4 - Part 18 of 27


Just when you thought Stage 10 was done...


Stage 10-5

Not much to mention here, so I will mention what I said about the longer levels making this game a little harder to like and what holds the game back. Looking back, I still feel that way. The game is the most accessible one in the series, but the longer levels you see later on drag it down.

Also, you have to use a platform to get to one specific door with a key. The teleporter you have to use to reach it is only accessible by pipe.

Stage 10-6

The Gossamers in this level are just as annoying as ever. At least the layout isn't as confusing compared to the last level.

Monday, December 5, 2022

PrinceWatercress plays Spyro the Dragon - Part 18 of 21


In this entry, we wrap up the Dream Weavers' world before heading to Gnasty Gnorc's domain.


Icy Flight

You'll be taking care of the lighthouses first. From there, you'll be dealing with the helicopters and the trains at the exact same time. You'll finally be dealing with the golden crates afterwards.

You'll be making some hard turns to get some of these things as quickly as possible, so practicing this level a few times is recommended.

As for my route, I work on the lighthouses and the crates at the same time, then go for the barrels on the trains and the helicopter guys at the same time. It's doable, but you really have to optimize your flight path to make it work and you can't miss anything.

Jacques

A lot of the enemies stand on platforms and carry a flower, waiting for you to get close so they can smack you. Nothing a flame can't take care of. Also, those guys with the clocks that you have to hit to raise some platforms are back, and you'll be using their "services" to roam through this level and find all the treasure before you meet up with Jacques. As for the guys in metal armor with the claws, you'll have to charge into them. You'll also be doing this to get one of the two dragons in this level, too.

The key is located in a cave that can only be accessed through a large platform. To climb up it, you'll have to flame the two guys with the clocks near it in quick succession so you can make it to the top. From there, you can just glide on in. The key chest is near the tunnel that leads to Jacques.

Jacques takes one hit to die, but he's really quick. Flame him when he's on the boxes, otherwise he'll toss them at you.

When he dies, he'll drop four purple gems at a total of 100 gems, and there'll be three more at the exit that will total 75.

From here, it's time to go to the balloonist near the portal to Jacques's domain and head to Gnasty's world.

Wednesday, September 7, 2022

PrinceWatercress plays Jak and Daxter: The Precursor Legacy AGAIN - Part 18 of 18


Once again, we save the world from Gol and Maia...and in fewer videos, too.


0:49 - There was a Scout Flier to the right of the start and I missed it. Fifth one it is!

2:22 - The other one I missed was near the Launchers. Sixth one it is!

3:33 - The spinning platforms leading to the end.

3:59 - The last collectibles! All the way at the end, you can break the generator to get one last Power Cell and free Samos the Green Sage. Despite your efforts, however, Gol and Maia show up and fly off in the robot. Once you take the elevator, refill your health, then get on the platform to face Gol and Maia.

7:37 - The first form. Get some Yellow Eco, then jump and shoot the eyes of the robot to stop that laser. Get to the Blue Eco vent, then get to the launcher. When Gol and Maia shoot that missile, JUMP.

8:52 - The second form. This time around, the silo is slightly open. Gol and Maia will throw Green Eco into the Dark Eco inside the silo to create some deadly lurkers. Grab the Yellow Eco and shoot the crap out of them, then get to the Blue Eco vent when it activates and use the launcher to avoid another missile.

9:35 - The third form. Jump over the shockwaves of the Red Eco balls as you gather Yellow Eco to jump up and shoot Gol and Maia's robot in the face. When the Blue Eco vent activates after you shoot the robot in the face enough times, you know what to do.

12:38 - What.

12:52 - The fourth form. Gol and Maia will shoot Yellow Eco at you from the robot's laser cannon. Gather up the Yellow Eco and shoot at that cannon, and run away after a few shots so you don't get blasted.

13:37 - The four towers near the silo create the legendary and rare White Eco. As useful as it is in changing Daxter back, you'll have to grab it for yourself and use it to beat Gol and Maia once and for all. All you have to do is just grab a cluster of White Eco on the ground without getting hit by any of Gol and Maia's UFOs, and the battle is over.

22:54 - If you don't have 100 Power Cells, you'll have to get that many before you can see what is behind the nearby door. If and when you do, however, you'll get this. See you next blog series.