Saturday, December 31, 2022

PrinceWatercress plays Dungeon Explorer (Warlock Class) - Part 2 of 8


Compared to the Bullbeast, Gutworm was really easy.


Now that you can access the other staircase at the start of the first dungeon, you can now push the rock to the left to access it. You'll find an ax and a crown for your stats along the way, and you'll eventually be at Melba Village.

The people of Melba Village are happy that you have beaten the Bullbeast, but warn that the Gutworm lurks below. You'll also find out about the Ruvid Statue that you'll have to destroy to get to Baron Castle.

To the south of the village is several blue slime generators as well as the nearby Ruvid Statue. You'll have to go down the stairs near the blue slimes; the Ruvid Statue will have to wait.

In this dungeon, there will be plenty of flamethrower statues that you'll have to keep your distance while destroying them. This is where your ability to aim your attacks diagonally will be put to the test for the first time. Also, the gaping spiral-shaped openings that open and close are enemy generators.

The winged boots increase your speed.

Some floors may move you slowly in a certain direction. These floors act like conveyor belts, so watch where you're going. Thankfully, you can move against them, though it will take some effort, depending on your agility.

Aside from the soldiers (the red ones of which shoot projectiles at you). there are also gray pillbug-like enemies that will fire at you and also drop white potions.

Flames hurt. Be careful when grabbing stuff near the flames moving in a circle, and definitely be careful and get rid of the flamethrower statues from an angle whenever possible to take them out safely at this point.

The blue potion will give you some health back.

To beat the Gutworm, get the most distance you can between you and the boss as you shoot at it. If it gets closer to you, move elsewhere and start attacking again. 

Now that you've taken care of the Gutworm, there are two stairways you can take at the end of the dungeon. One takes you to the Ruvis Statue so you can destroy it (destroying it is tied to your password) and the other one takes you to uncharted territory. Take out the Ruvis Statue first, then go back through the tavern and then through the dungeon again to get to the new land if you have to. Otherwise, just go back through the stairs you came out from and go to the new land. Also, some of the people of Melba Village will have new things to say once you defeat the Gutworm and destroy the Ruvis Statue.

If you decide to do the former, the King will tell you to go through Melba Village and enter Baron Castle to defeat the Grimrose before giving you a Black magic charge and a White magic charge.

If you see a stream with two bridges, then congratulations! You're in the new land! Continue east and go through the stairs for another dungeon.

Friday, December 30, 2022

PrinceWatercress plays Dungeon Explorer (Warlock Class) - Part 1 of 8


Long long ago, there was a small and civilized country named Oddesia. This was a land of peace and harmony where people helped their neighbors and life was happy and tranquil.

The symbol of Oddesia's prosperity was the ancient and mysterious ORA Stone. The ORA was special because it controlled the power of the people's will. Whoever held the stone ruled the country and its citizens.

One day, unfortunately, aliens from another world heard of the stone's magic. These were wicked men with evil powers of their own. They wanted the stone so they could dominate the people. However, one man saw this danger and hid the ORA Stone so no one could ever find it. Terror reigned as the aliens became master of the dungeons and vented their aggression on the people.

The King of Oddesia saw the ruins of his once proud country and made a desperate plea for someone brave enough to defeat the aliens and retrieve the stone.

One day a visitor came to town and offered the trouble King his help. The King and his country placed their fate and only hope in this brave and gallant stranger. Thus the search for the ORA Stone begins...


If you let the game's attract mode run past the story, you can see all of the eight character classes, their attacks, their magic and their starting stats.

Here, we'll be playing as the Warlock. Their White magic is the Stunner, while their Black magic is the Silencer. The Stunner briefly stuns all on-screen enemies, while the Silencer attacks all on-screen enemies. The Warlock has pretty even stats.

When you press Run to start the game, you'll see the opening cutscene of some of the playable characters looking over the land where the adventure will take place. You'll then be in the town's tavern. Hold the Run button until the number of times the word "OK!" appears matches the number of players you want to play with shows up. (We'll just be doing one-player mode for this Let's Play.) From here, you can choose your character class, or inputting a password. We'll be playing a new game as as the Warlock. Button I confirms, Button II backs out, and the Control Pad chooses. You'll then have your character.

The Control Pad lets your character move in eight directions. Button I lets you use your currently equipped magic (assuming you have a charge for it), Button II does your regular attack and can be aimed by holding it down with a direction on the Control Pad (you cannot attack and move at the same time), and Select lets you switch between the White magic and the Black magic with a red arrow pointing downwards showing which one you currently have equipped. Pressing Run pauses the game and lets you choose between the current password, your current status and your current status level with the Control Pad and Button I. The password changes as you do things, so always make sure to check your password and write it down (thankfully, it's ten letters) for later use in case you have to turn the TurboGrafx-16 off.

The tavern is the inn, and is the place you go to if you need to heal, as healing your character is hard to do in-game. You'll always start here when you start a new game or continue a previous game. Once you leave the tavern, you'll be in the town. Unlike other games, you only talk to people as soon as you enter their house, and they only have one or two lines of dialogue. By talking to people, you'll find out that the King wants to see you in the rear room of Axis Castle to the north. You'll also learn about colored crystals that increase your stats, treasures that will help you fight, and that the devil himself Natas (which is "Satan" backwards) is looking for the ORA Stone.

The side rooms of the castle aren't of much use...yet. There is a multiplayer battle mode in the side rooms if you go north after entering them, but I cannot show it off due to playing solo. Instead, enter the bigger opening in the center, then go north and meet the King. Press Button I to go through the text slowly, or press Button II to go through the text more quickly. The King will tell you to go to the Loch Dungeon south of the castle, and that his man Judas (yeah, this sounds ominous) will be waiting there for you. He will then give you one charge of White Magic (signified by a white bottle with a W on it) and one charge of Black magic (indicated by a green skull with a B on it). Be sure to talk to the King when you complete a task, as he will always give one charge of each magic when you get your next task.

The Warlock's White Magic is Stunner, which stops enemies briefly, while the Black Magic is Thunderbolt, which does a random amount of damage to all enemies.

From here, leave the castle and go south. The slime here can be defeated easily, and the man in the house will tell you that Melba Village will be to the west from the dungeon. Enter the stairs to go into the dungeon. Judas will be there, and will tell you that the King has sent him to tell you that Bullbeast is near and that he is mad. From here, you're on your own. Be ready to destroy anything that monsters come out of, as those are enemy generators. If it isn't obvious at this point, you're playing a clone of Gauntlet...but a rather good one. From the slime generator, go down the stairs going down to move further.

From here, you'll meet guys in gray armor who are a little bit faster than the slimes, but not impossible to deal with. Be careful when fighting enemies from a distance, as they can drop items. Unlike Gauntlet, where only one errant hit can destroy an item, it takes a few hits to destroy one, but even then it can be easy to destroy an item in this way. The blue potion briefly repels monsters away from you for as long as your character is flashing, and the blue winged boots increase your Agility. The gold ring refills your HP and give you a few extra HP beyond your maximum to work with.

Thankfully, the dungeon layouts are pretty linear, and you can easily tell where you need to go and you are easily able to find your way to where you need to get to. 

The purple floating eyeballs go down in one hit. The axe will increase your Attack. Rocks can be destroyed with your regular attack, and in the case that they can't, they can be pushed by just walking into them.

If there are too many enemies on-screen and you're spending too much time near enemy generators, a blue fireball will eventually appear. It can go through walls and wreck your health if it hits you, and while you can destroy it, it does take a little bit of work to do so.

The green lizard men tend not to move towards you, and it is really easy to off-screen them and have them disappear. The crown increases your Intelligence.

You'll eventually meet Bullbeast. Stay on the move and run around the room in a circle, don't get cornered, and remember that the Bullbeast can only attack in diagonal directions. As far as hitting him goes, hit him when you have a bit of distance between yourself and the Bullbeast. When you beat him, a magic crystal will show up and switch between four different colors. Orange is Agility, light blue is Attack, purple is Strength and green is Intelligence. Match the color up with the stat that you want, and grab the crystal while it is that color. Keep this and the colors of the status gauges in mind if you want to increase a specific stat. When you pick up a crystal, you'll not only refill your health, but you'll also increase your level, change your password and get some extra health to build on what you already had. You'll then be able to return to the first room of the dungeon after a little more exploration and head to Melba Village with the staircase to the west.

In case you die, you do have a few continues, which are indicated by the icons that look like torches (flowers?) at the top of the heads-up display at the bottom of the screen. Once you use them all, it's game over and you'll have to put in a password and get back to where you died. Keep in mind that any stat-boosting items that aren't crystals (such as crowns, axes, will not be saved to your password, and that you will have to get them all over again if you continue from a password.

If you go back to the King after beating Bullbeast, The King will tell you about Melba Village and the terrible Gutworm that lives nearby in addition to giving you a Black magic charge and a White magic charge.

Thursday, December 29, 2022

PrinceWatercress plays Demon's Crest - Part 14 of 14


It's the battle you've all been waiting for: the Dark Demon!


When you put in that password you got after beating the game with 100% items, you'll be back in the game. You'll have to refill your vellums and urns, but you'll have a new form: the Ultimate Gargoyle, which is a purple-and-blue version of the Legendary Gargoyle and combines all of the forms. With this form, you can hover in mid-air, charge like the Ground Gargoyle, ascend in mid-air like the Aerial Gargoyle, go underwater and swim perfectly horizontally like the Tidal Gargoyle, and have double health like the Legendary Gargoyle. If you need to headbutt something in the background, hold Up and press A.

Unlike the other forms in the game, however, you can charge your shot! I did not know this until the day of the video's upload, but you can hold Y and charge up your shot, then let go of the button when the charging animation around Firebrand speeds up and shoot a more powerful shot. (thanks kirbysaas)

If you talk to the green demon near the fountain in the city as the Legendary Gargoyle, he will thank you for freeing demonkind from Phalanx's rule.

When you go back to the map, you'll notice that there is a new area in the upper-right quadrant of the map. This was not here, and it is the lair of the Dark Demon: the true final boss of the game.

Dark Demon's Lair


There are no enemies here, so all you really have to worry about is getting to the doorway at the end and headbutting it open without hurting yourself on the spikes.

Once you go into that doorway at the end, you'll face the Dark Demon.

Stay as the Ultimate Gargoyle at all times and keep a Ginseng and the Fang Talisman equipped. Having five Ginsengs is a must. Don't even bother refilling your vellums; you won't need them for this battle. Aside from a lightning ball that follows you around (you can destroy it, but the Dark Demon will just summon another one), the Dark Demon has bone projectiles that go in four directions and a crush attack. If you see the body stop and absorb a purple light, get to the ground and stay below it so that the waterfall of poison that comes down doesn't hurt you. In its initial form, you can only hit the upper body.

Eventually, you'll see another form that has two wings that only stays in the center. Be ready to shoot directly at the head, and watch out for the debris that drops down from the top and the swirling projectiles that rush in from the right side of the screen. If this form shoots a lightning ball, the lightning ball will hit a part of the wall and/or floor and turn it into spikes for the remainder of the battle. This form can also phase in and out every so often, making it so that your projectiles will pass through him briefly.

This battle is definitely a battle of attrition, and I found myself using four out of my five Ginseng potions. If you can manage to pile on the projectiles and the damage, so much the better.

When you beat the Dark Demon, you'll get the best ending. The Dark Demon's power was derived from all of the crests, including the Crest of Infinity made by combining the six crests, and once again, Firebrand casts the crests aside and throws them into the sea before looking for another powerful opponent. You just beat Demon's Crest!

Wednesday, December 28, 2022

PrinceWatercress plays Demon's Crest - Part 13 of 14


It's time for the final battle with Phalanx to see who is the real master of the Demon Realm. But we're not done yet...


Remember where we fought Phalanx earlier and got the bad ending? Well, that tower is back, and if you enter it this time, you'll enter Area VII. Welcome to Phalanx's fortress.

Area VII: Front Hall


Use the Aerial Gargoyle to make your way across the hall and avoid the spikes. The demons on the ceiling crossbows fire downwards, and while you can destroy them, I find it easier to move past them, anyway, as they're not much of a threat.

Be careful near the stained glass windows, however, as the harlequin enemies can duck under your projectiles with a slide attack and throw balls at you. Thankfully, the balls don't bounce when they hit the floor; they just disappear. Unless they are standing perfectly still, they are invulnerable to your attacks and your attacks will pass right through.

At the end, you'll face the Hippogriff yet again. You shouldn't have any problem with the Hippogriff at this point.

Area VII: West Bell Tower


When you get here, turn into the Aerial Gargoyle and get to the top as quickly as possible to avoid the ghosts and axe throwers. When you reach the bell tower, turn into a form that lets you headbutt, then headbutt the bell and wait. When the bell stops ringing, the final life extension of the game will fall out.

Area VII: Balcony


Become the Aerial Gargoyle and fly your way through this area, fending off the bony pterodactyls along the way. When you reach the end, drop down and head to the left before leaving. There is a part of the floor you can drop to in order to get the Fang Talisman, the final talisman in the game. This talisman allows you to do double damage with whatever weapon you have.

Area VII: East Bell Tower


If you need health, headbutt the bell and wait before you drop down. You'll get a full refill. Now just watch out for the flying skulls and axe throwers.

Area VII: Hall of Souls


Zombies will come out of the iron maidens in the background, but you can easily destroy them with the Ground Gargoyle's projectiles.

You'll fight the Grewon again at the end. The same strategies from Area VI apply, but now you have the Fang Talisman to do more damage in less time with, so keep that equipped.

After beating the Grewon again, head straight to the next area. There's nothing above the path, so don't even bother wasting your time.

Area VII: Phalanx


In the next area, you'll face Phalanx.

The first part of the battle is the same as before, but this time, you can play as the Legendary Gargoyle and equip the Fang Talisman. Stay just behind him, and watch out for the fireballs that he drops, which bounce around. If you're at just the right distance, he will drop down and will either shoot projectiles and dive at you. When he's at your level, hit him with projectiles.

After enough damage, he will use the Crest of Heaven, and this time, it will work. The arena will also flood with water, so be ready to play as the Tidal Gargoyle. His strategies will be the same, but this time, you'll be moving around in water that rises and sinks at regular intervals, and the fireballs that drop down and bounce from before don't really go anywhere in the water.

You'll be playing as the Tidal Gargoyle more often than not, but if you can get the chance, you can get in the air when the water is at its highest, turn into the Legendary Gargoyle, then hover and get a shot or two in before switching back to the Tidal Gargoyle. Also, coming in here with five Ginsengs really helps.

Eventually, the water will sink and never return, and the battle will be like before. When this happens, switch to the Legendary Gargoyle. This time, Phalanx will have some new attacks, such as a black hole attack that will try to suck you in and do damage (mash the D-Pad and Y to get free), the ability to blow you backwards with his wings into the spike walls and a fireball that moves backwards before curving around to hit you from out of nowhere.

Once you beat Phalanx a second time, however, the battle will not be over yet. Phalanx will combine the powers of the Crest of Heaven with all of your crests to get the Crest of Infinity and transform into something even more monstrous. You'll be riding on a lava platform where you'll ultimately meet his true form, then the battle begins.

Stay as the Legendary Gargoyle at all times, and keep the Fang Talisman equipped at all times. Be ready to heal with a Ginseng, as it is the only item of use in this battle. Use the platforms that move from left to right to get a good footing, and be ready to shoot Phalanx in the face when it is not covered, as it is his only weak spot. The orbs that move around and try to fly to your current position to hit you can be negated by one of your own attacks, but you'll need to avoid the lightning bolts that Phalanx shoots directly at you with his upper claws, which he also uses to protect his face regularly. Phalanx's attacks can and will destroy the platforms that spawn with frightening regularity, so be ready to hover and stick to the sides of the platforms throughout the battle. If any energy emanates from Phalanx's mouth, move out of the way of the blue laser that he will spit out. If you fall into the lava, get out of it immediately.

Once you beat Phalanx will all abilities, talismans, vellums, urns and health extensions collected up to this point, Phalanx will be defeated once and for all. Phalanx will toss the crests to the sea...

After "The End" fades out, you'll get a password. Be sure to write it down. You'll need it for what's ahead, as you're not done yet...

Tuesday, December 27, 2022

PrinceWatercress plays Demon's Crest - Part 12 of 14


There's not much left to pick up. Let's get it all, then finish up Area VI.


Area V


I get the health extension here now. It's up at the fork.

Also, when you take the path that takes you to the Crawler after you beat the Crawler, there will be a very large opening in the ceiling that wasn't there before, which the Crawler made before you battled it. At the end of that path is another life extension.

From here, we head to Area VI.

Area VI: Crevasse


This time around, head all the way to the right. You'll head to another area.

Area VI: Grewon


If you keep to the sky here, you'll find a platform with a pile of skulls on it. If you tackle the skull pile with the Ground Gargoyle, you'll find the fifth and final vellum of the game.

To beat the Grewon, don't come here without the Crest of Time, the Hand Talisman, five Ginsengs and a ton of health. Keep your distance and hit the Grewon from far away with the Legendary Gargoyle's projectiles. Whenever the Grewon glows green, the Grewon is invulnerable. The Grewon will be pretty aggressive and will try to pounce on you every chance it gets, so mind the invulnerability windows and switch between the Legendary and Aerial Gargoyles to get higher in the air if you need to. Interestingly, you can use Death on it.

When you beat the Grewon, you'll get Demon Fire for the Fire Crest. This is the most powerful projectile in the game, and it moves pretty quickly, too.

Monday, December 26, 2022

PrinceWatercress plays Demon's Crest - Part 11 of 14


In this area, we get one more vellum and one last urn, then we explore Area VI for the first time.


Area IV


I forgot something in the area where we faced Arma.

Head back down the tornado, then head to the outside area of the spire. Go all the way to the top and go to the upper right corner for a vellum.

And with that, it's time to head to Area VI for the first time. It is in the mountains in the northeast quadrant.

Area VI: Crevasse


This area has ice physics, so keep in mind that you can slip and slide around if you keep moving on the ground. Thankfully, moving around in the air in this game is pretty easy.

If you fly straight up from the start with the Aerial Gargoyle form, you'll find the fifth and final urn.

If you stick to the ground, you'll meet the skull throwing enemies and the skull piles from the Boneyard in Area II. If you stick to the air, you'll be hounded by those skeletal pterodactyl enemies from earlier areas that fly everywhere.

You can use the Claw power-up to stick to the spiky parts of the walls, but it's made obsolete by the Crest of Wind and the ability to ascend with the Aerial Gargoyle. Also, the 

Near the end, go all the way up and to the right to find a hidden temple entrance.

Area VI: Ice Spire


Here, you'll be using the Aerial Gargoyle to make your way up and take out your enemies on the way. At the end, there are two doors. The left leads to a life extension in a pot. The right lets you continue on. Headbutt the ice encasing the door openings to enter them.

Area VI: Ice Corridor


Use the Ground Gargoyle to bash through the frozen skeletons in your path, and use the Aerial Gargoyle to get over the spikes and take out the enemies.

At the ice bridge, you'll face the Flier again. Once again, tear it apart with the Aerial Gargoyle form. The battle is just like it was in Area IV. You'll automatically go to the next section once you fully refill your health after the battle.

Area VI: Dark Tower


Much like the Catacombs in Area II, you'll be spitting Fire at the candles to lighten them up while dealing with the bats that fly around in the dark. You'll also have a few slime enemies that go down easily to projectiles, and the zombie hands return to grab you from below the spike pits. Due to this being a more open area, you'll be switching between Fire and the Crest of Wind constantly. 

There is a fork in the road where you can go up or left; go up to find the Armor Talisman, which cuts the amount of damage you take in half when equipped.

Heading to the upper-right corner of the maze takes you to the third and final battle with Arma.

Area VI: Arma


For this battle, equip the Armor Talisman, a Ginseng and the Crest of Wind.

Arma fights much like he does in the second battle, but he does more damage now than he ever did. The Aerial Gargoyle form will negate the effects of the tornado, so always keep it active. Arma has a new attack in the form of silver projectiles that look like lizards and fire straight towards you, but they are easy to avoid and if you are directly across from Arma, you can descend, ascend, fire, and repeat until he stops firing to keep him in a bit of a pattern. Don't let those projectiles hit you, though. They hurt.

When you beat Arma this time, you'll beat him for good. You'll also get the Crest of Time, which allows you to become the Legendary Gargoyle. As the Legendary Gargoyle, you'll take half damage automatically without the Armor Talisman equipped, as your health bar will be green and your health itself will be doubled.

If you go back to the green demon in the city as the Legendary Gargoyle, he will recognize Firebrand and beg for mercy.

Sunday, December 25, 2022

PrinceWatercress plays Demon's Crest - Part 10 of 14


In this entry, we put the Water Crest to good use.


Area II


Now that you have the Water Crest, you can go underwater as the Tidal Gargoyle. Use B to ascend in the water, and hold A to swim in a straight line. All the way to the right will be an urn.

Area III


Now that we are here with the Wind Crest, you can use the Aerial Gargoyle to get the urn if you haven't already. Also, the Aerial Gargoyle's projectile can cut the vine walls between some of the tree branch projectiles.

There are two ways to get to where we need to go: breaking the blocks at the bottom of the Scula Cave with the Tidal Gargoyle's projectile, or through the doorway at the end of the underwater area in the riverbank. Both of these doorways lead to a life extension.

Area V: Entrance


This time around, we'll be taking the underwater route at the bottom now that we have the Water Crest. Break the blocks blocking the entrance with the Tidal Gargoyle's projectiles to get in.

Area V: Underwater Path


The path here is pretty linear. Make use of the A button to avoid running into the spikes on the ceilings and floors. Going up at the fork in the road takes you to a life extension, but I don't get it yet.

Area V: Holothurion's Lair


Once again, you'll be using the A button to avoid running into the spikes.

To beat Holothurion, equip the Hand talisman and keep firing at its head. It will suck you towards it and also blow you away, and it will also fire off brown projectiles from its back that will be moved around by the currents made by the sucking and blowing action, so you'll need to move away accordingly and also avoid being sucked into Holothurion's body itself with the A button. Holothurion will turn a more reddish hue when it is close to death. Beating Holothurion gives you a life extension.

Saturday, December 24, 2022

PrinceWatercress plays Demon's Crest - Part 9 of 14


In this entry, we head back to familiar ground that ends up not being quite so familiar before heading to one of the two new areas that have now opened up.


Area III


When you head back to Area III after beating the Flame Lord, the trees that had the fireballs dropping out of them will be gone. You'll also be able to get a health extension that you weren't able to get your hands on before.

With that out of the way, let's check out Area V.

Area V: Entrance


When you start this area, there are two roads you can take: the underwater road that leads into another underwater area, and the tops of the pillars rising out of the water that take you somewhere else on dry land. Since we can't go underwater (yet), we're taking the top route. Aside from the mermen that you've faced before, you'll also have to tangle with the skeleton birds from Area IV again. This is where the Aerial Gargoyle form will make things easier and allow you to blow the skeleton birds away. Just don't be under them; they will drop some sort of slimy projectile downwards than can do damage.

Area V: Temple


Aside from the spike-filled paths that you'll have to fly through with the Aerial Gargoyle, you'll also have to charge through the gryphon statues with the Ground Gargoyle. One of the statues you'll have to charge through will contain a health extension; you can't miss it.

After the health extension, there is a part of the floor with a slight dip in it; jump over it so you don't fall through a hidden hole. Thankfully, the Aerial Gargoyle form makes this a non-factor.

As you make your way through the end, a monster will crash through the ceiling. Make your way to the right and keep going, and you'll eventually take on the Crawler.

To beat the Crawler, you can use either the Buster or the Aerial Gargoyle and shoot at the eye when it is opened. The Crawler can throw monsters at you that you can destroy, and some enemies will also spawn out of its head and fly around like the armored ghosts. Thankfully, these enemies can easily be destroyed. If you see the screen shake, watch the skies for falling debris and stay away from it.

After you take out the Crawler, you'll get the Crest of Water, which gives you the Tidal Gargoyle form and allows you to breath in water.

Friday, December 23, 2022

PrinceWatercress plays Demon's Crest - Part 8 of 14


In this entry, we take care of business again in Area IV before going for a hard-to-get health extension.


Area IV


Now that you've got the Crest of Wind, you can become the Aerial Gargoyle. As the Aerial Gargoyle, you can press A while hovering to ascend a little bit. This makes getting around in the first section a little easier.

Remember that wall made of square blocks on the right on the way up? I move through the wall to get the turn there now.

As the Aerial Gargoyle, you can tear the flying enemies apart with one blast.

If you go right instead of entering the whirlwind, you'll face the Flier. The pot you find before heading right will refill your health before the battle. The Flier will fly around, sometimes in patterns, and can also throw its arms at you like a boomerang. If you fight this thing as the Aerial Gargoyle, your Y button projectiles will tear this thing apart as you shoot it in the face. The Flier is also one of the few bosses you can use the Death spell against.

Beating the Flier will get you the Claw ability for the Fire crest. With this ability, you can spit projectiles that can stick to walls and cover up wall spikes, which allows you to stand on wall spikes temporarily.

Back on the overworld map, if you look at the map, you may notice a lake between the two stores with the pink roofs in the northwest quadrant of the map. If you dive into it, you'll find the Level 3 Trio the Pago game, where you'll have to headbutt a lot of skulls before all eight torches burn out. If you win this, you'll get the hardest health extension to obtain in the game. (Sadly, there is no Level 2 game.)

Thursday, December 22, 2022

PrinceWatercress plays Demon's Crest - Part 7 of 14


Hey, a new area opened up! Let's head over there and...oh. Well, that was a bad idea.


East of Area III and North of Area IV is a building that wasn't there before. If you go to it now, you can fight Phalanx early.


To beat Phalanx, stay just behind him, and watch out for the fireballs that he drops, which bounce around. If you're at just the right distance, he will drop down and will either shoot projectiles and dive at you. When he's at your level, hit him with Buster.

If you can get him down to a noticeably more reddish shade, use a Death vellum to finish him off.

When you beat Phalanx, Phalanx tries to use the Crest of Heaven, but fails and dies. Firebrand returns to the Demon Realm, which soon falls into anarchy. With that, we get the worst possible ending.

Wednesday, December 21, 2022

PrinceWatercress plays Demon's Crest - Part 6 of 14


In this entry, we go hunting for power-ups before tackling Area IV.


Area II: City


Now that you can break the blocks blocking the door in the upper-right corner of the city with Buster, you can buy spells here. There is a new spell here called Death, which kills all on-screen enemies and damages some bosses. Not surprisingly, it ends up being the only spell in the game that I use.


Area II: Catacombs


When you enter this area, go down and hit the square blocks with Buster. Inside the pot is another vellum.

Area II: Dark Catacombs


In this area, go down and to the left until you find some square-shaped blocks. Break them with Buster to get a health extension.

Area II: Boneyard


Believe it or not, you can charge into the piles of skulls early in this section with the Ground Gargoyle. One of the skull piles contains another health extension.

We're done getting stuff, so let's head to Area IV, which is in the lower-right quadrant of the overworld map.

Area IV: Gryphon Spire


This is where your hovering skills are going to be put to the ultimate test. Watch out for the spikes on the floor and ceiling, and keep an eye on the monsters that rocket out of the walls and stick out their tongues.

There are some blocks you can break with Buster to make it easier to stick to the walls and also open up a safe spot. There is an item to collect beyond the safe spot, but I didn't know it was there at the time. I come back for it later.

The columns with the faces will move up and down. You can hang off the side of them like you can the walls, and you'll need to watch where you are so you aren't sent into spikes.

Area IV: Sky


Here, you'll also be tested on your hovering skills. Equip buster to get past the armor ghosts. As for the flying bird-like skeleton beasts, you won't be able to fight them just yet, so get past them however you can.

If you fall down the pit, you'll end up at the beginning instead of dying.

At the end, you have a choice between going into the nearby tornado or going to the right. I enter the tornado.

Area IV: Bridge


If you drop into the tornado near the end, you'll face the Hippogriff. Same strategies apply, but use the Buster this time. You'll make this a little bit faster. After this, grab the full health refill and head to the right.

Area IV: Spire and Chasm


You can use your hover to cross the rotating platforms. This is good, especially when you have to deal with the ghosts from the bridge area in Area II.

You cannot hang off the purple pulsating walls, so don't.

The doorways to the right take you to the chasm. Here, you'll have flying skulls that try to home in on your current position as well as brown spinning spiked blocks that will try to hit you. If you drop all the way to the bottom and go to the left, you can headbutt the statues to get the Crown talisman, which increases the chance of a money drop when you defeat enemies when equipped.

Your main goal is to go all the way to the top of the indoor spire area. When you reach the end, you'll face Arma again. Arma fights much like he did last time, but he has a new attack where he crates a tornado that can push you back. If you get caught in it, keep shooting at Arma while trying to get out of the tornado, as the tornado inadvertently makes it easier for you to hit him.

Beating Arma gives you the Crest of Air, which allows you to turn into the Aerial Gargoyle and fly.

Tuesday, December 20, 2022

PrinceWatercress plays Demon's Crest - Part 5 of 14


I went here way too early...and yet I somehow got the best pattern on the boss. HOW.


Area III: Thorn Grove


At the bottom of the level, there is a doorway covered in dirt. Headbutt the opening to open it up, then go in.

Area III: Underground Dyke


The enemies here will spit projectiles at you, so be ready to hit them with Buster. Also, the water will rise and fall. Since you don't have a means of being in the water without getting hurt, use the platforms and your hover ability to stay above water, and watch out for ground and ceiling spikes. You'll also have the fish to contend with as well.

If you stay high, you'll find a bunch of blocks with a pot behind it. Breaking the pot will net you another vellum.

Eventually, you'll be able to rise to the top at the end and enter another section.

Area III: Scula Cave


Once again, use the platforms and your hover ability to stay up high.

Eventually, you'll face the Scula. Stay close to the body and keep hitting it with Buster. Whenever it throws its head, be ready to jump over and hover above the body so you don't get hit when the Scula retrieves its head.

The Scula can also jump around and try to land on you. Get away from it when it does that so you don't get squashed.

When the body is gone, the head remains. Change into the Ground Gargoyle and keep hitting it with the Y button projectile on the ground when it lands. You'll keep knocking it back and on the ground, and the head will eventually fall. Beating the Scula will score you another health extension.

Monday, December 19, 2022

PrinceWatercress plays Demon's Crest - Part 4 of 14


We've been to Area III before, but this time, we'll be doing even more! As for the Flame Lord, you'll be in for a battle about as difficult as the one with Belth if you're not careful.


Area III: Thorn Grove


Since we've went here before for the urn, this area should be a little familiar at this point.

Area III: Riverbank


There are platforms in and above the water to take you to the other side. The sides of these spinning platforms spit projectiles, however, so you'll have to be on the lookout for that. There are mermen here, but if you jump up to near the top of the area, you won't have to deal with them. You'll just have to deal with the one-eyed bat enemies that drop down out of the trees.

Area III: Burning Forest


When you enter this area, a bunch of fire-based creatures show up and burn the area. Watch out for the fireballs that fall from above (look for the plumes of fire that shoot out beforehand), and watch the ground for dirt being shifted around so you can tell where the roots are and destroy them from a distance.

The armored ghosts will lose their armor if you hit them with Buster; however, they will move faster if you do that.

Near the end, there are blocks you can break with Buster. Break them and headbutt the closed-off opening so you can enter it and get the Skull talisman, which makes enemies more likely to drop health pick-ups after being killed if you equip it. Talismans will appear in the third slot in the upper-right corner when equipped.

At the end, you'll meet the Flame Lord. Equip the Buster and wail away at it as it stands there and shoots flame birds upwards that will turn into fireballs and drop down. When it turns into a dog form, back away and be ready to fire at it again.

After enough damage, you'll enter the second phase of the battle where you face a flying skull. When it moves around back and forth in mid-air, it will drop fireballs every so often. Avoid those and shoot the Flame Lord from a distance. Be ready to keep away from the Flame Lord when it dives at you. Above all else, come with plenty of Ginseng potions and be ready to use one when you're down to two hit points left.

Defeating the Flame Lord will give you the Tornado ability for the Fire Crest. The Tornado ability allows you to shoot tornadoes with Y that you can then stand on like platforms to reach other areas. As cool as this is, there will be other abilities that will quickly make it obsolete.

Sunday, December 18, 2022

PrinceWatercress plays Demon's Crest - Part 3 of 14


In this entry, I reveal some new stuff about the game that is pretty crucial to beating it, and we also take an alternate path in Area II.


Area II: City


I learned some stuff since last time.

Believe it or not, you can headbutt the windows. This allows you to get a lot of G.P., and once you break as many windows as you can, you can head left to leave, come back, and all of the windows will be repaired and ready to be busted open again.

You can also headbutt the doors to open them, and press Up to enter. The man in the door in the lower-right corner will tell you about the talismans and how they can give powers, while the door in the lower-right corner is a spell shop. Unlike the spell shop we saw last time, however, we can buy the Death spell, which kills all on-screen enemies and damages some - but not all - bosses. Because of that, it is the most useful spell in the game.

There is a door in the upper-right corner behind the wall, but you can't break the wall yet.

Area II: Bridge


Believe it or not, there is a door behind the statue at the end of this area. If you tackle it from the right side, you'll push the statue aside and reveal the door. Press Up in front of the door to go in.

Area II: Catacombs


The enemies that crawl across the ground will spit at you if they see you, but they move pretty slowly. The Ground Gargoyle's projectile attack wipes them out in one hit.

The flaming skulls split into multiple fireballs when destroyed. Use the Ground Gargoyle's projectile to wipe them out immediately.

The statue to the right of the entrance can be destroyed with the charge attack. Keep that in mind for the end, when you have to destroy it to get to the next area.

Along the way, you'll have to contend with the one-eye bats from the jungle. Like in Area III, it will take two fireballs to kill them, and they wake up if you get too close.

Area II: Dark Catacombs


This area is a short maze, but the hazards inside of it can differ depending on whether it is light or dark. Use the Fire ability to light the torches and chandeliers, and use the Ground Gargoyle's charge attack to break the walls.

If the cave is lit up, ghosts will pop up, and your Fire ability will not be able to take them out. If the cave is dark, the bats on the ceiling will start flying around, and while you can take them out, they can latch onto you and drain your HP.

Area II: Pit of Ovnunu


At the end, you'll face Ovnunu. You'll have to make your way to the top, and if you can destroy the pot on the way up, you can refill all of your health.

When you reach the top, you'll fight Ovnunu. When the eyes come out, hit them with fireballs, and don't let them surround you. Sometimes they will fly in and out of Ovnunu's slimy body, but at least you can stand on the body and the eyes don't heal themselves.

After you destroy the small eyes, you'll face the big eye. When the eye opens wide, get away from its line of sight so you don't get hit by the acid shot.

By beating Ovnunu, you get the Buster technique for the Fire Crest. This is a larger, more powerful projectile that breaks certain walls and does more damage to enemies. You can shoot two projectiles at once with this technique, and you'll be using this in place of Fire to fight enemies and bosses.

Area II: City

Now that you can break the brick wall, you can go to the potion shop in the upper-right corner. Here, you can buy Ginseng, which recovers all health when equipped and used with the X button. This potiion is even better than Herb and even Elixir, and I end up using it and the Death spell exclusively soon enough.

Area I


If you've beaten a boss before, you don't have to fight it again.

In the last section of Area I, there were some square-shaped blocks in the cliff. You can break through them with Buster, and if you walk through where the blocks once were, you'll find a health extension.

Saturday, December 17, 2022

PrinceWatercress plays Demon's Crest - Part 2 of 14


In this entry, we get a few items and take on a boss that we shouldn't really be taking on this early in the game.


When you get out of Area I, you'll be on the overworld map. You can fly forward with Up, turn with Left and Right and brake with Down. Holding Y lets you land. As long as you're looking in the general direction of your destination, you won't have a hard time landing in places.

If you press Start, you'll see an overhead view of the map, Use Left and Right on the Control Pad to move the red circles to point in the direction you want to go, then press Start again and hold Up until you get to where you want to go.

Our next destination is Area II. Area II will be the walled city to the west of Area II. As we face that direction, there will be a house with a blue roof. We'll enter that first.

Trio The Pago - Level 1

For 5 G.P., you can play a mini-game. Here, you'll need to headbutt twelve skulls before all eight torches go out to win a prize. The trick to this is jumping up and pressing A at the right to them to hit the skulls, especially at the right height, as you stay in place when Firebrand thrusts his head towards the background. You'll have to headbutt on your way up to hit the skulls on the top rope. It takes some practice, but it can be done. The faster you do this, the more money you get (5 G.P. for each torch remaining).

Before I head to the city, I want to go into Area III, which is the skeleton just north of the cathedral. 

Area III: Thorn Grove


There is an urn near the end of the first area. Since the brambles on the ground do not kill you upon contact, you can walk and climb up them to get to the urn.

The flying enemies with one eye take two hits to kill.

There is an easier way to do this, but we don't have the abilities needed to do it like that. I'll mention it later.

If you lose all your health, you'll die (and see Firebrand turn into a skeleton), and you'll have the choice of starting the current section over, going back to the overworld map, or ending the game to get a password. We're going back to the overworld map and entering that walled city, but first, we're checking out the shops with the red roofs to the north of Area III.

The shop to the west is the magic shop. Shadow increased your defense, Hold stops enemies briefly, Imp summons an imp that attacks enemies for you but requires a steady stream of money to keep on-screen (and employed), and Shock summons an earthquake that damages enemies on the ground. You must have one empty vellum sheet to buy a spell.

The shop to the east is the potion shop. Mercury teleports you back to the beginning of the level, Sulfur teleports you to the overworld map and works much like Exit from the Mega Man X series, Herb replenishes five hit points, and Elixir automatically revives you with five hit points assuming you have it equipped on the pause menu.

To use a vellum or an urn with a spell or potion in it, equip it and press X. You must choose between a vellum and a potion for the equippable item in the second inventory slot on the upper-right corner of the screen; you cannot equip one of each.

Area II: City


Unlike other levels, you can head left to go back to the overworld map. This will be useful later.

By heading right, you can destroy pots for coins. 

The Ground Gargoyle shoots a projectile that travels across the ground, and while you can't fly, you can charge at things by holding A. If you shoot the projectile in the air, it will stay airborne.

If you talk to the green demon near the fountain, you'll find out what's going on. This is how you find out about the names of Firebrand and Phalanx, the main protagonist and antagonist of the game, respectively.

Heading further to the right takes you to the broken bridge.

Area II: Bridge


The flame statues can shoot fire upwards a little bit to make themselves unsafe to stand on, and they can also spit fireballs to the sides. Be careful near them.

There are mermen underneath the water below the bridge. If they put their arms down, you're close enough to them. Shoot them down as they make their way up to the surface, and avoid the projectiles that they spit before they get back into the water. Also, don't go into the water, as you will drown and lose all your health bit by bit if you stay in it for too long. You won't be able to rectify that until later.

The ghosts take two hits, but they constantly spawn and make spooky noises. Get them out of your way and move on.

Area II: Boneyard


The enemies here will throw skulls at you. You can destroy the skulls with your fireballs, but you want to destroy the skull-throwers, obviously. If you get close enough to them, they will run at you.

Watch out for the hands that reach up from below the ground. If you get grabbed, mash the D-Pad and the Y button to break free. If you stay on the ground too long, a zombie-like skull will show up and try to eat you.

The armored ghosts will fly forward if you push them back by attacking from the front, but if you attack them from behind, you'll kill them.

The boss here is Belth. You should wait until you have more abilities and items before taking this guy on, but if you want to take him on right away, here's what to know:

Whatever you do, don't let yourself get cornered. Hover over him if you can, but make sure he doesn't have his hand up so you don't get hit in the process. Also, have both urns filled with the Herb potion. When shooting fireballs at him, keep your distance, and hover over him after he jumps if you can to keep yourself from being cornered. Belth can pack a punch, especially early on in the game. If Belth gestures to you to move forward, stay away and be ready for the dashing slice that he performs immediately afterwards. Beating Belth gives you a health extension.

Friday, December 16, 2022

PrinceWatercress plays Demon's Crest - Part 1 of 14


This is one of the first games that I learned about when I started reading video game magazines back in the mid-1990s. It's also one of Capcom's more unsung games, even though it is in the same vein as the two Gargoyle's Quest games.


Legend says the world was once divided into two different lands. One realm was ruled by humans and the other was ruled by demons.

One day, six magical stones fell from the sky into the Demons' Realm. Inscribed on the stones were the crests of fire, earth, air water, time and heaven.

Soon the demons began to fight over these magical crests and the realm erupted into civil war.

Finally, the red demon defeated all the others and collected five crests.

Not satisfied with the Crests of Fire, Earth, Air, Water and Time, the red demon challenged the demon dragon for the Crest of Heaven.

After a long and desperate battle, the red demon slayed the dragon and gained the final crest. But the price of victory was high. The red demon was critically wounded.

"I have defeated the red demon! I shall reign supreme! With the power of the crest, both the demon world and the human world are mine!"

From here, you play as the red demon, Firebrand, and you must take the crests back and defeat Phalanx, who has taken over the demon world.

Area I: Colosseum


When you star the game, you'll be facing the demon dragon Somulo. Left and Right let you move, B lets you jump, and pressing B in mid-air lets you hover. Down lets you drop down from a hover, while Left and Right let you move left and right in the air. Y lets you attack. Head all the right to the dead end.When Somulo lowers his head, jump up and hit him in the head. If he spits any fireballs, avoid them as well as the flames that they create should they hit the floor. It won't be long until you drop Somulo.

When you leave the colosseum, you'll see the heads-up display. The four red circles in the upper-left corner are your health, and if you lose them all, you die. On the upper right is your current attack, item and talisman. (Those other two will be explained later.)

Head to the right, and Somulo will stick his head out. From here, you'll need to hover to avoid the fireballs, face Somulo and shoot him with fireballs with the Y button. Somulo will go down for good this time, and his head will turn into a jewel with a red gem. This is a life extension; grab it to extend your health meter by one point. The most points you can have is twenty.
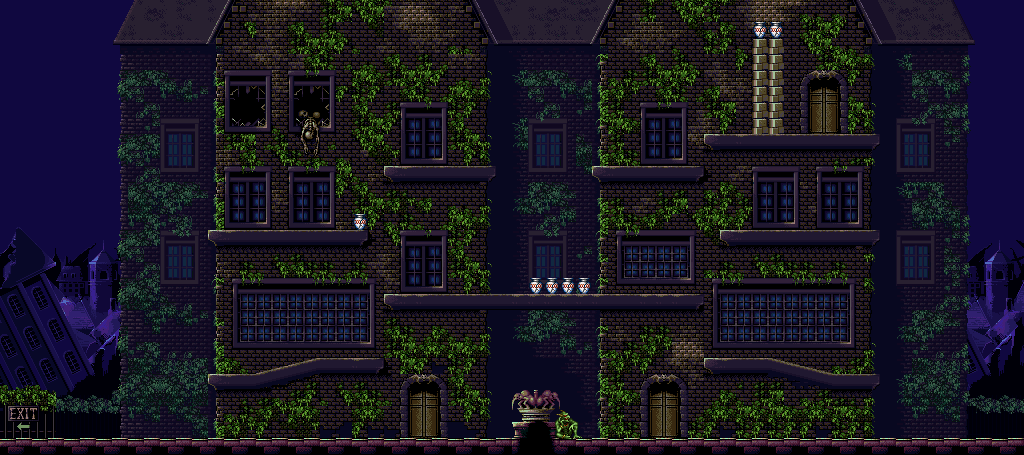
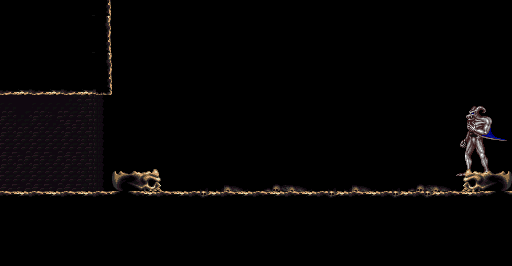
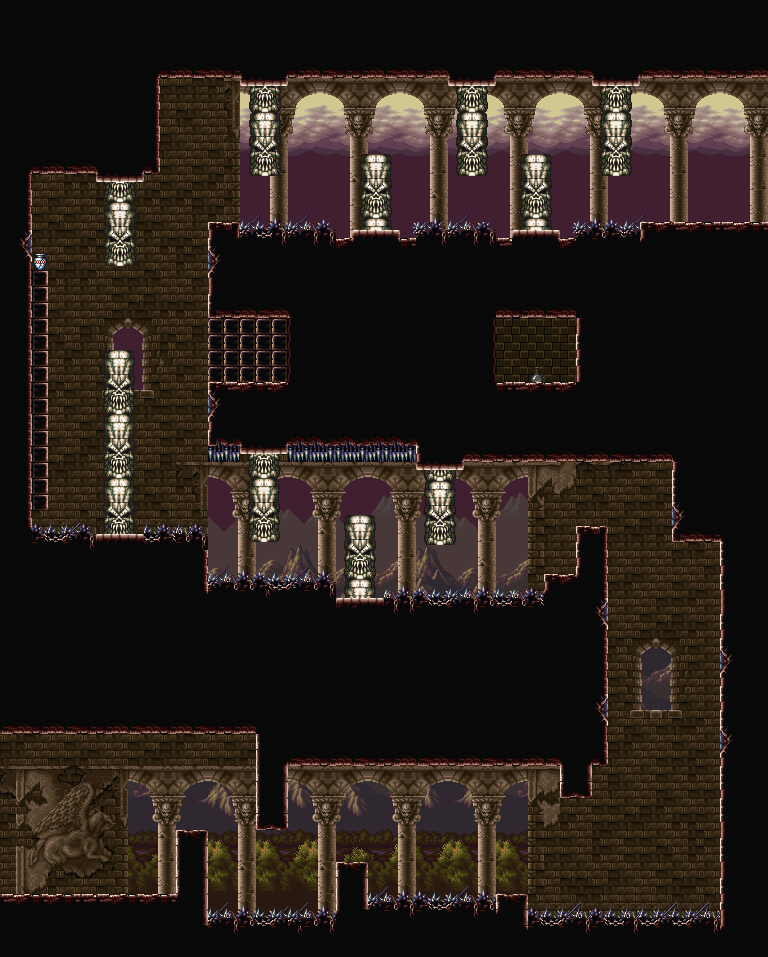
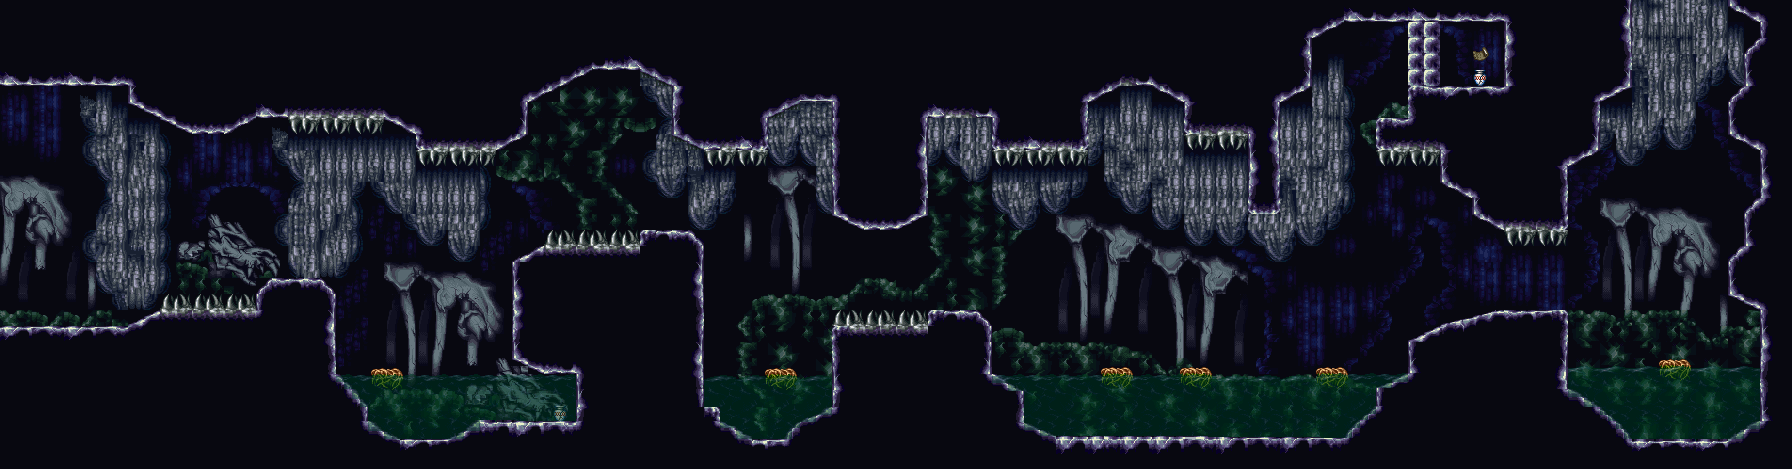
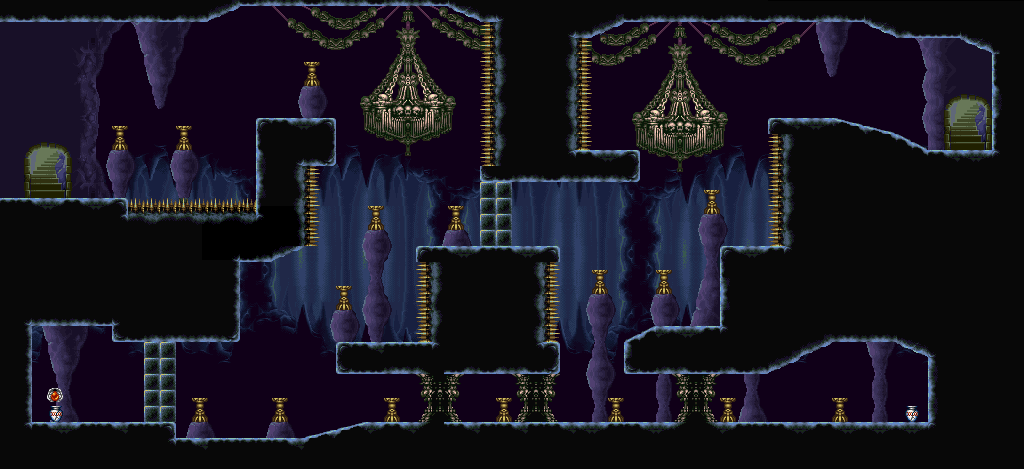
Area I: Cemetery


When you enter this location for the first time, Firebrand - the Red Arremer that you're playing as - will headbutt a statue. You can press A to headbutt with Firebrand, though the A button will have different functions at different times. (More on that later.)

By headbutting statues, you can get coins (small gold is 1 G.P., medium silver and 5 G.P. and large skull is 20 G.P.) that make up GP, the currency of the game. You can have up to 999 G.P. You can also find small orbs with flames in them. Small flame orbs replenish one hit point, while a big flame orb will replenish them all.

Enemy can do contact damage in this game, so be careful. The white sheet ghosts take one hit, but they re-spawn. They only patrol a certain area, though. The guys with the axes will jump around and throw axes upwards, and they take two hits to kill.

One of the statues contains a sheet of vellum when you break it with the headbutt. The vellum allows you to store a magic spell that you can use against enemies. There are five sheets of vellum in the game. (More on that later.)

The pots contain random things, but you'll need to make sure that your fire projectile can reach and break them. Right now, you have the Fire technique, and it is just a small fireball that does minimal damage and only allows for one projectile at a time. You'll get better things along the way, though.

When you pause the game, you can see how many G.P. and crests you have as well as how many techniques, spells, potions and talismans you have. Everything will be explained in time. For now, you just have Fire for fire power. You'll be able to use and switch between other powers and items as you go through the game.

At the end of the cemetery, you'll meet the Hippogriff. Headbutt the statue to start the battle, then start shooting fireballs at it. The Hippogriff can dash at you, but you can stay out of its way and shoot fireballs at it when it is away from you. It will also go high into the air and shoot feathers downwards into the air. If you pay attention to where the feathers go, however, you can easily avoid them.

Sometimes the Hippogriff will return to the ground and turn back into a statue. Headbutt the statue to get the battle going again.

Bosses will turn more of a red hue when you do enough damage to them. If that happens, you're getting closer to beating the boss.

Once you do enough damage, the Hippogriff will turn back into a statue and glow. Headbutt the statue to defeat it and get a health extension.
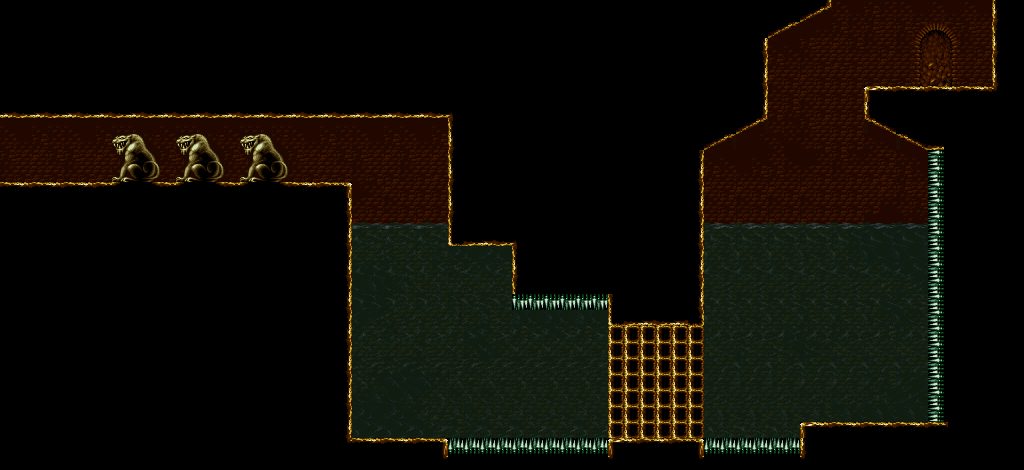
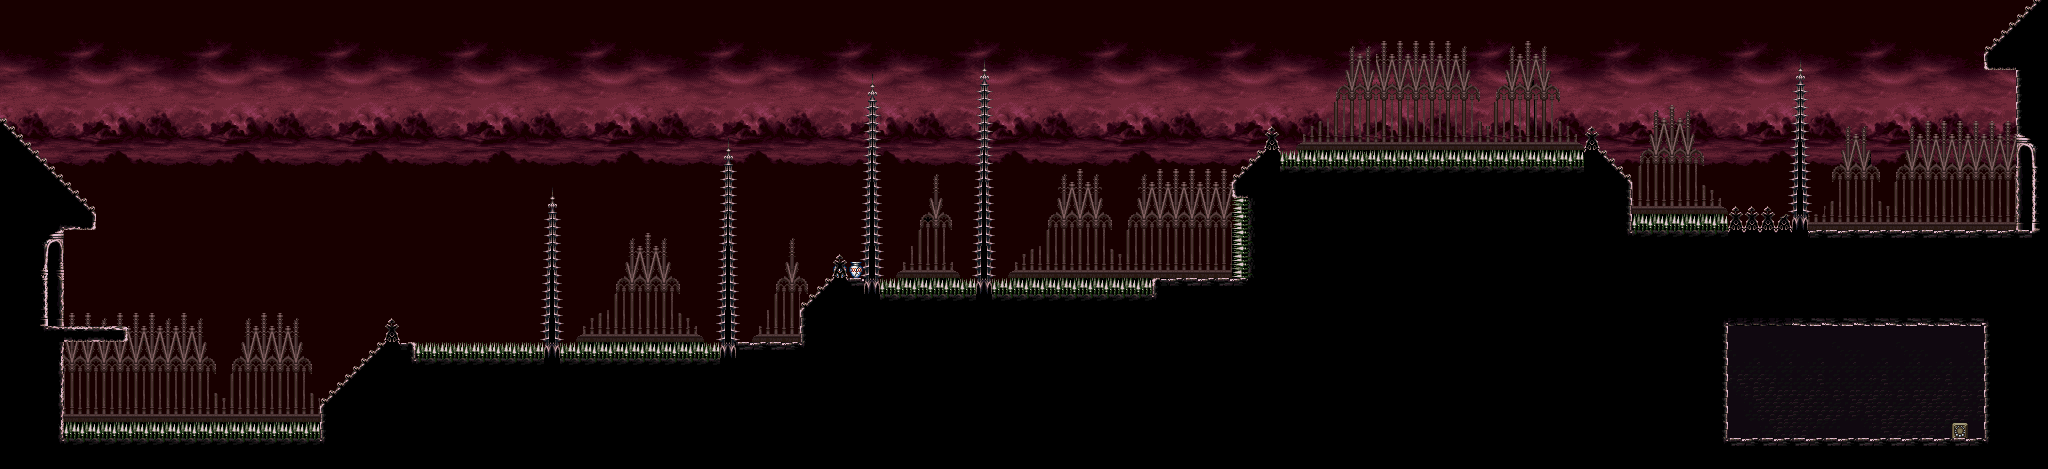
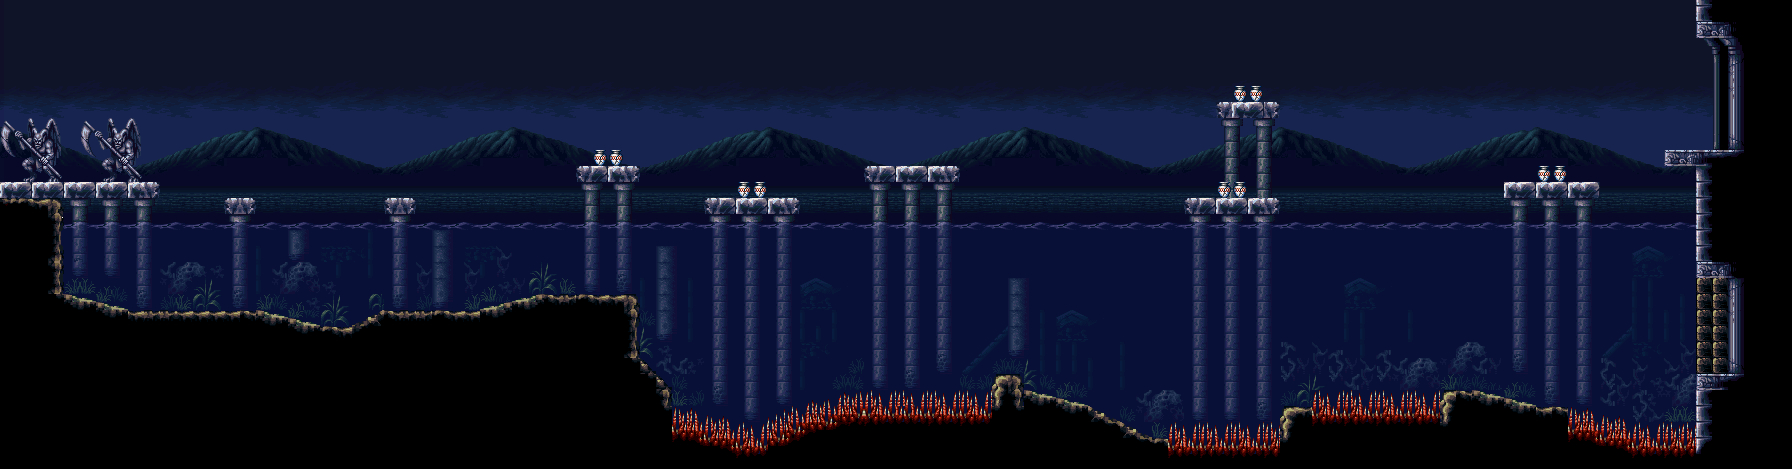
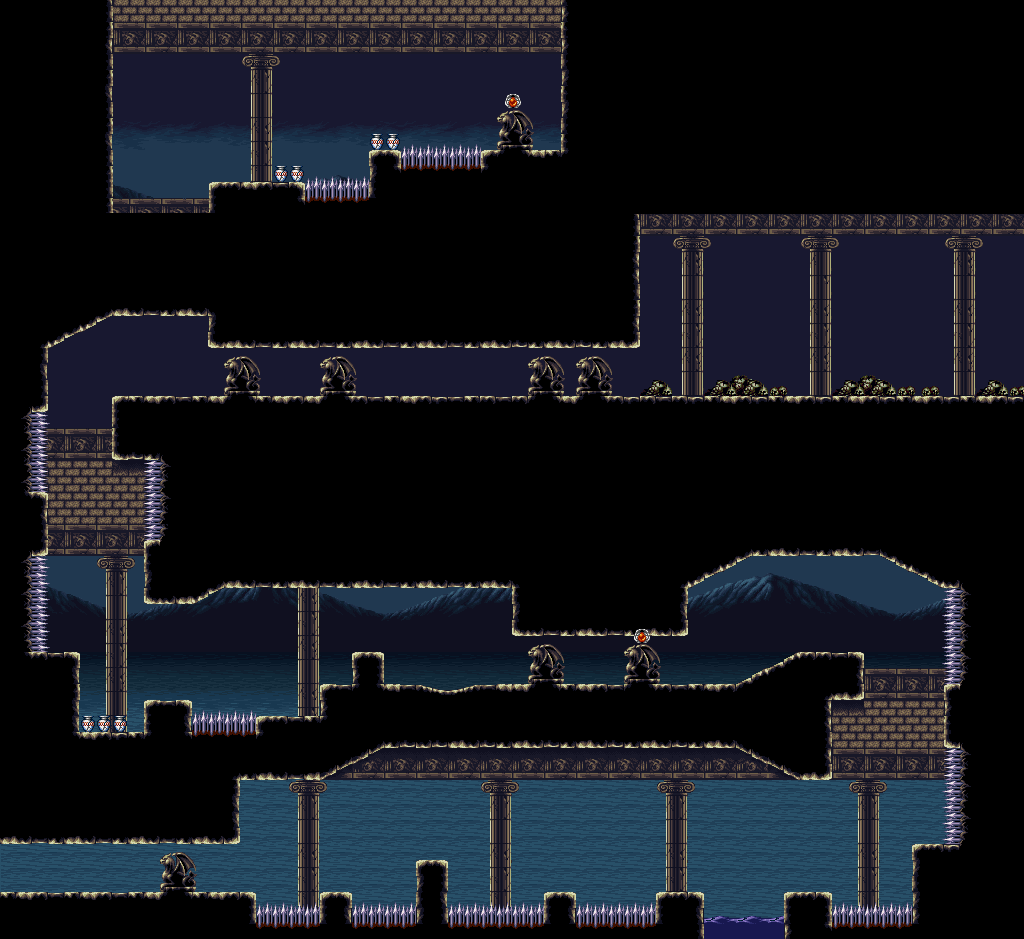
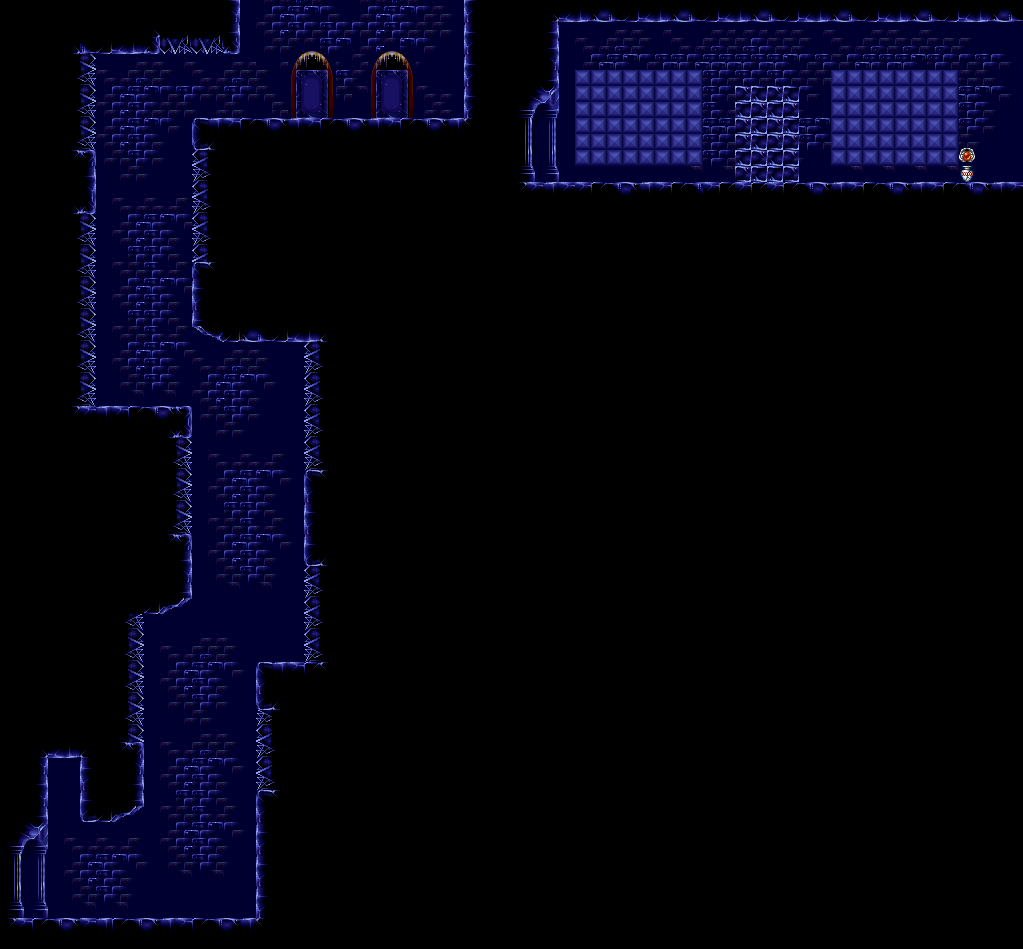
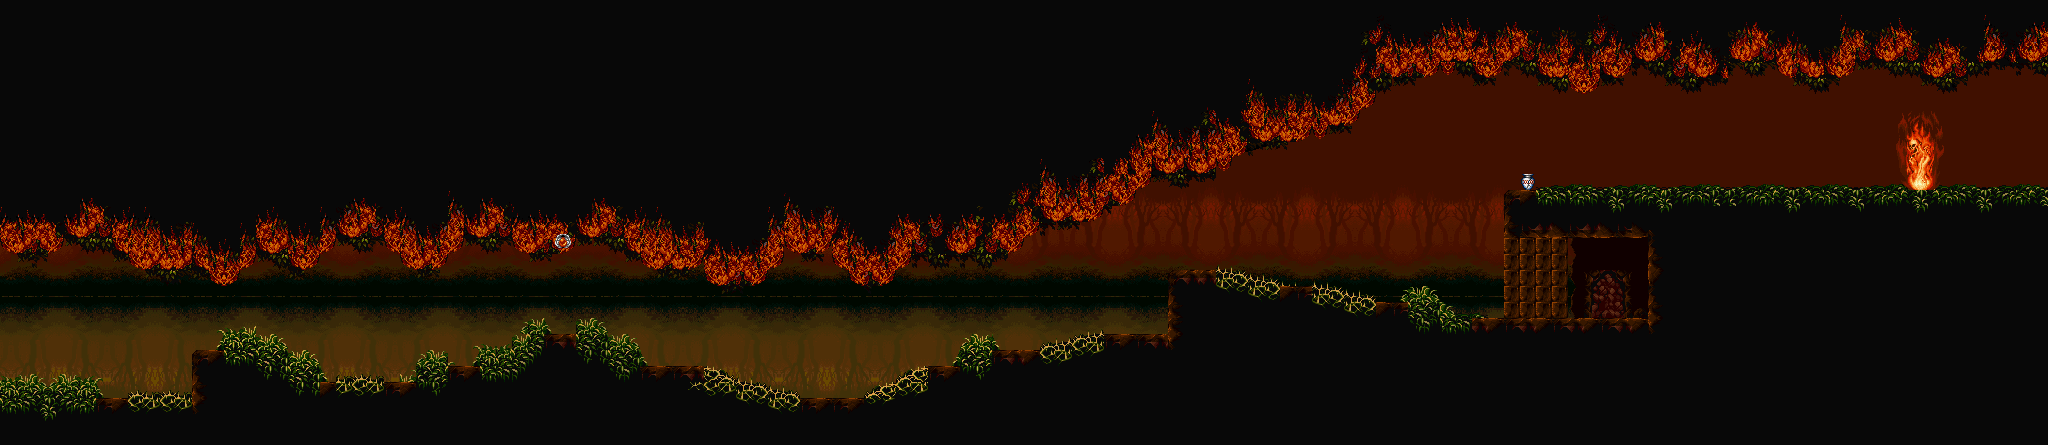
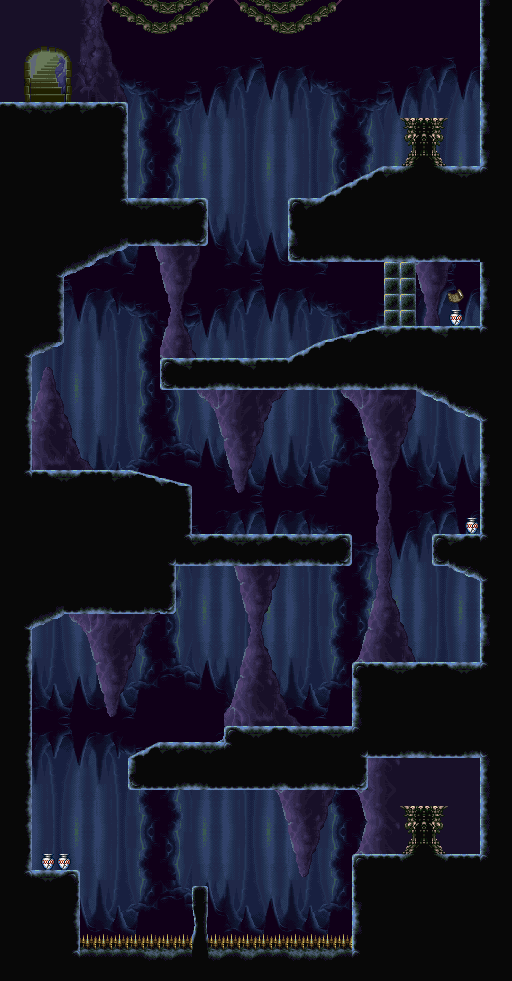
Area I: Slope


In this area, your hovering abilities will be put to a basic test. The pillars crumble when you step on them, so you'll need to jump with B, press B again in mid-air, then use Left and Right to move while in mid-air. While in mid-air, you can't go any higher than you already are. Pressing Down will allow you to drop down, but you can press B to start hovering again while still in mid-air, just in case. As you go, avoid the spikes, and watch out for the spiders and axe throwers.

If you jump into a wall, you'll be able to stick to it. When that happens, you can jump off the wall at anytime and attack enemies, but keep in mind that Firebrand will always be looking away from the wall and will fire in that direction whenever you press Y. Also, when on a moving platform, Firebrand's arm and feet will be in different positions depending on how you're stuck to the side of the platform, and there are three different poses for just such an occasion: right foot on wall, left foot on wall and both feet on wall.

Near the end, there will be a platform. If you drop down and head left, you'll find an urn. The urn will allow you to store a potion that you can use at any time. (More on that later.)
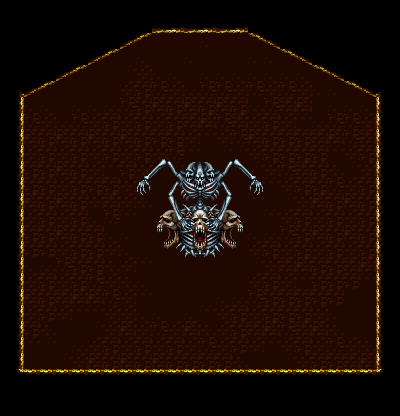
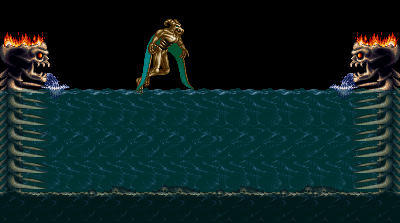
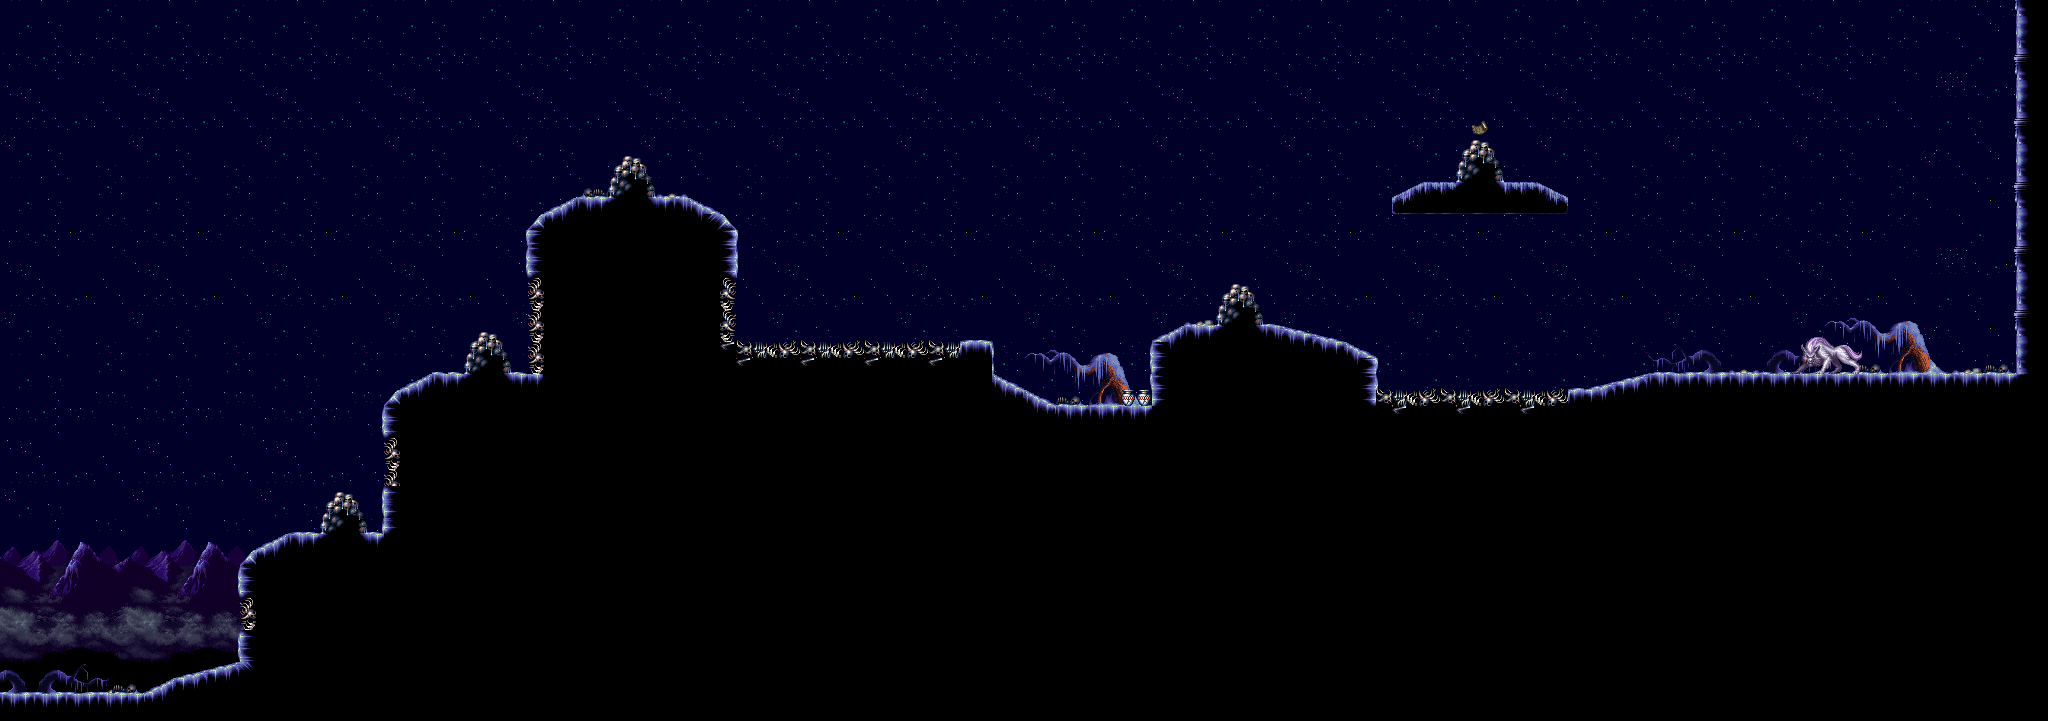
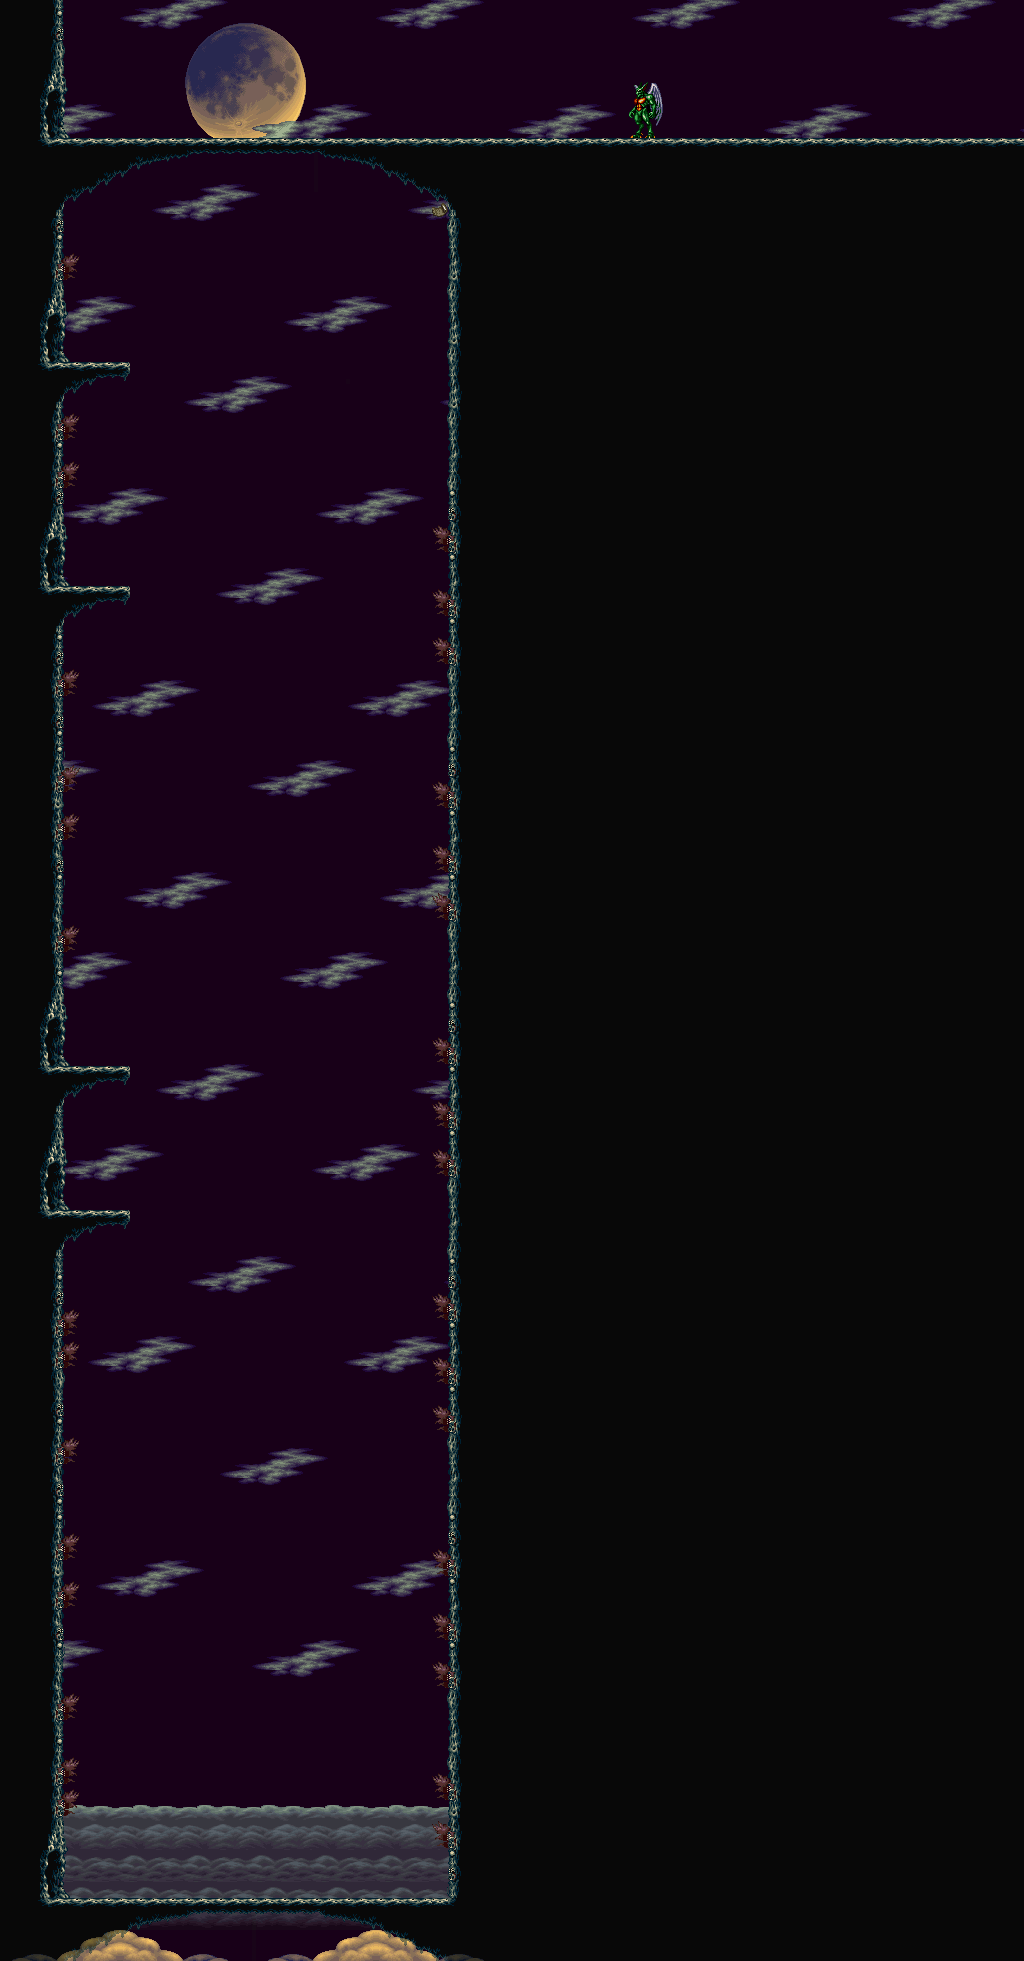
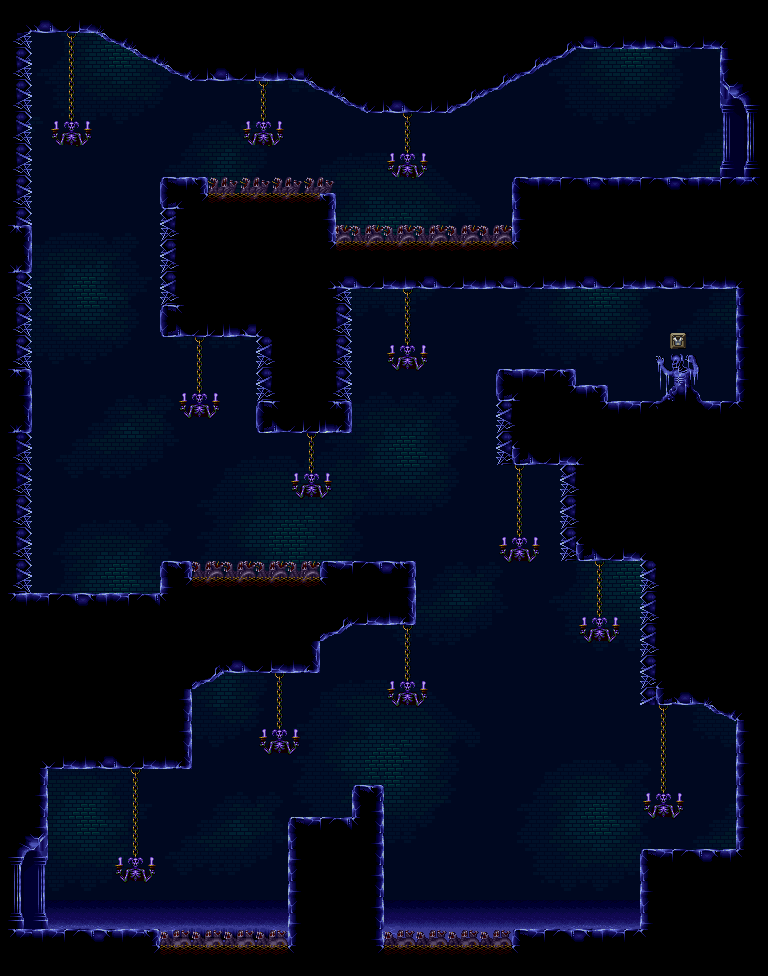
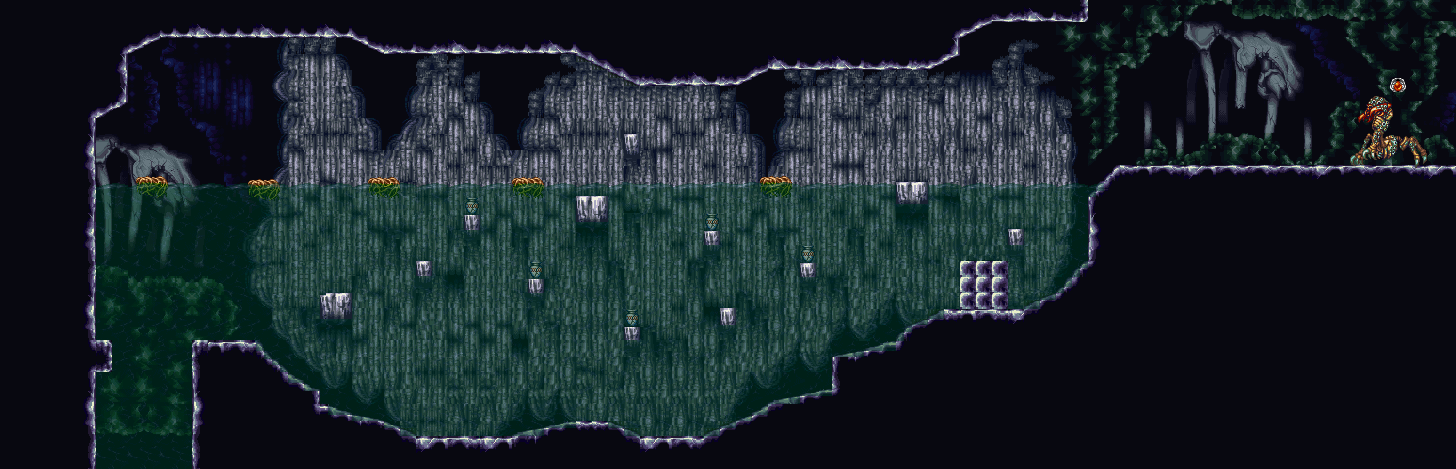
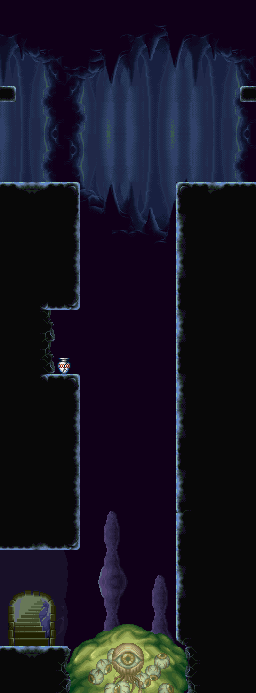
Area I: Abyss


Here, you'll be putting your ability to stick to walls to the test. Be ready to hover when the moving platforms get close. Besides the spiders, there are also cracked walls where spikes are located. You don't want to expose those, as they will hurt you.

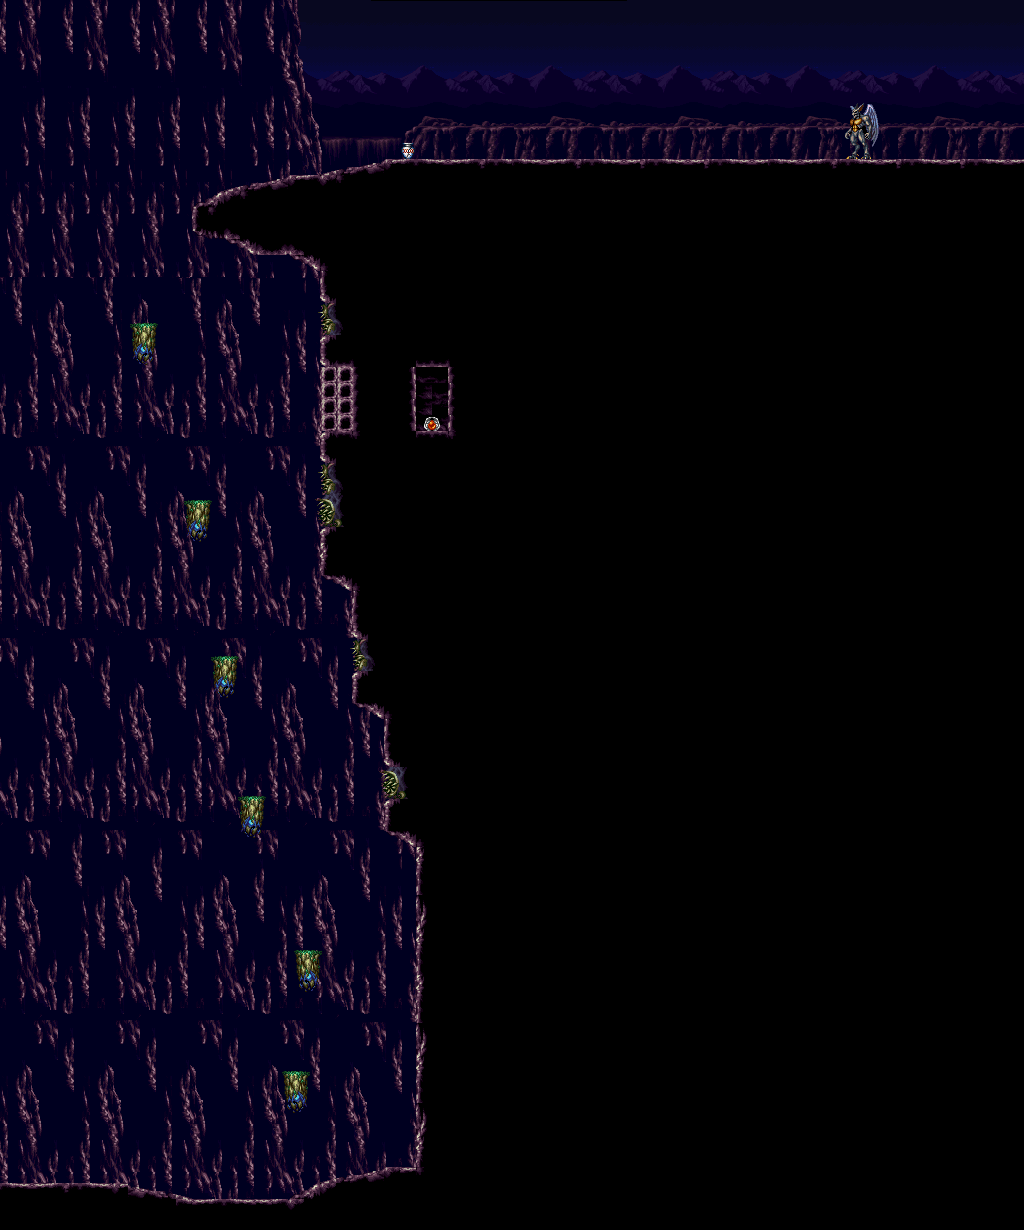
If you jump into the side of the cliff, you'll reach the top. Shoot down the pot to get a full health refill, then head right to face Arma, Phalanx's general. To advance through the dialogue boxes, press Y.

In your first battle with Arma, jump over Arma when he dives at you (when necessary) and avoid the fireballs that he spits. Arma is a pushover here, and when you beat him, you'll get the Crest of Earth. With this, you can turn into Ground Gargoyle, which allows you to tackle certain walls.

Thursday, December 15, 2022

PrinceWatercress plays Mega Man IV - Part 7 of 7


All's well that ends well for a fourth time. We take on the Robot Master Rush before foiling Dr. Wily's plans yet again.


Counter-clockwise from upper-left to upper-right is Toad Man, Bright Man, Pharaoh Man, Ring Man, Crystal Man, Charge Man, Stone Man and Napalm Man. Same strategies for each Robot Master still apply.

When you beat all eight Robot Masters, you'll be in another hallway where you'll be able to refill on weapons.

You'll take on Dr. Wily's giant robot. Stand underneath the flowing orb underneath the neck and use Power Stone at the top of your jump. Avoid the fists that smack the ground and the debris that falls from the top of the screen.

The orb will also shoot projectiles that track your current position at the time it is fired, so watch out for that.

You'll then take on the giant robot's head. Equip the Ballade Cracker and shoot them at the mouth when it opens up and tries to suck you towards it. Stay on the move to avoid the zaps that come out of the helmet, and use the Mega Buster to push it away when it backs up and moves towards you.

You'll then take on Wily himself. Equip the Pharaoh Shot (charge it up by holding B!) or the Ballade Cracker, then avoid the bombs and the pits they make. For best results, stay all the way to the left and slide right when Wily shows up. After two bombs, Wily will drop balls as he makes his way to the right. Thankfully, they don't hurt very much and you can hit Wily with either of the aforementioned weapons as he moves to the right. This is probably the easiest last Wily form in any game in the series.

After beating Wily, Wily escapes and Mega Man is trapped. Ballade shows up with a change and sacrifices himself so that Mega Man can get out and escape into the vacuum of space as Wily's spaceship explodes. You've won!

Wednesday, December 14, 2022

PrinceWatercress plays Mega Man IV - Part 6 of 7


In this entry, we go further into Wily's spaceship.


Wily Spaceship 1


Wily will escape to his spaceship, and Mega Man chases him down. You'll be able to make items with P-Chips before you leave.

Avoid the missiles at the start.

To take out the giant Mettaur turret, stand on the barrel of the gun and shoot the Met's face. You can also take it out from a distance when the Met's face is all the way down if you know what you're doing. Ballade Cracker also works against them; six hits will do it.

Use fully-charged shots to take care of the flying robots with the drill legs as well as the Sniper Joes in the spacecraft.

The boss here is a laser cannon at the end of the ship. When the dome-shaped eye is exposed, shoot at it with fully charged Mega Buster shots. Be sure to slide to avoid the arm that hits you from above.

The laser cannon will shoot Ballade Crackers, Ring Boomerangs and even Power Stone at you. Thankfully, they work just like your version of the weapon, even if the Ring Boomerang tracks you.

To use a Weapon Tank, select it from the menu, then select the weapon you want to refill and press A.

Wily Spaceship 2


Wait for the missiles to come down before clearing the pits at the beginning. Use the Ring Boomerang to get the Energy Tank and the Energy Tank Fragment.

The mini-boss here is a flying eye. When you hit it, it will create three more. The three it creates are fake and go down after one hit, but the real one will still float around amongst the other ones and takes lots of damage. The Pharaoh Shot is the best thing to use here; if you keep holding B, you don't have to worry about using any weapon energy whenever the real eye runs into the charged-up blast above your head.

The second time around, you'll face just two. They'll move across the room, which changes as the eyes move from one side of the room to the other. Hit the open eye with fully-charged shots.

You'll then enter the Boss Rush room. Counter-clockwise from upper-left to upper-right is Toad Man, Bright Man, Pharaoh Man, Ring Man, Crystal Man, Charge Man, Stone Man and Napalm Man. Same strategies for each Robot Master still apply.