Part nostalgia-bomb, part note-taking and part FAQ, what started in GameTrailers as a video game blog is now on Blogger. This blog is a look back at video games, both popular and obscure, from the video game industry's infancy all the way to the previous console generation.
The Errandbot will allow you to buy stuff without having to go to a town. This is very useful if you have plenty of money and you need to buy supplies badly. Unfortunately, you'll have to pay double the price for any items that you seriously need.
You'll also find a chest containing a Meat Bun. The Meat Bun will restore all of your health, and unlike other items, which you can carry up to nine of, you can only have one Meat Bun in your possession at all times.
To find the Errandbot, all you need to do is take the stairs going up to the east of the entrance and follow the path from there. When you meet him, you'll find out that he is the robot from Project 3F that was taken away to the tower.
The other path leads to Julia's father. If you take the Errandbot path first (which you'll want to do since Errandbot can prove useful), you'll have to go back to the beginning of the tower to take the other path.
You'll meet a new enemy: a green, winged goblin who holds a rock over its head. Watch out for the rocks it throws down, which create flame pillars when it hits the ground. This enemy can also dive downwards. Jump up and hit these guys with your sword, and be careful on the stairs - if you fall off them, you'll be dead.
Another new enemy you will meet is a blue-robed version of the enemies that shoot in eight directions, who also have a third eye that pops out when hit.
When you meet Julia's father, he will tell you that Project 3F is fishy, and tells you that King Romel of Satoon does not seem like he used to be. When told that Project 3F is a freight system, he finally snaps out of it and heads home. Before he leaves, he gives you the Magiport, yet another spell for the magic collection. This spell takes you to the last Convenience Store that you used.
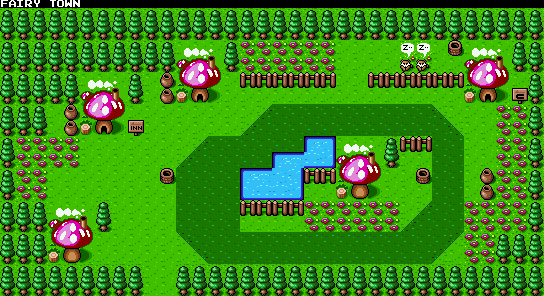
When you talk to Julia now, she will think you for bringing her father back from the tower. She then says she wants to send an Errandbot with her message of love to King Romel in Satoon, but the path to Satoon is full of invisible monsters. Jack and Ryu agree to escort him to town. Before you leave, Julia will tell you to go south over a desert and visit the town of Celestern before going over to Satoon. Here, you will find the Hyper Vision, which allows you to see the invisible monsters.
To go to Celestern, take the same path you took to go to Fairy Tower, but instead of going south at the large forest, go east instead. You'll see a bridge that takes you to desert. At the southern end is the town of Celestern.
On the sand, you'll meet some new enemies. You'll find enemies that look like men wearing white turbans who are really another palette swap of the robot enemies we've seen throughout the game that is the strongest you'll see yet.
Fighting in the desert can be tough, as the shifting sands carry you to the left as you stand on the ground. You'll have to keep jumping to the right to catch up with enemies and take them down, and you cannot even move up or down on it unless you are in mid-air. This can make battles against even enemies that you have already fought before more difficult.
You'll learn from the people here that the town of Celestern is dedicated to studying magic. You'll also learn about a master magician in the Tower of Belba, as well as the powerful punch known as Hypnoblow, which can be earned at the Medal Exchange.
Here, you can by the Rapid Shot, Iron Turban and Ingot Armor to upgrade your equipment. If you need a Meat Bun, you can find one here.
One of the houses is the home of Scheherazade from The Magic of Scheherazade, an NES game by Culture Brain. She will tell you that Airosche, the wizard at the Tower of Belba, has Hyper Vision, but you will have to undergo her training, which will not be easy.
You'll find out from one of the townspeople that the Tower of Belba is to the south. You'll also learn that one of the vases in the 4th floor there leads to something good.
There is a Medal Exchange mini-game to the right of the Convenience Store.
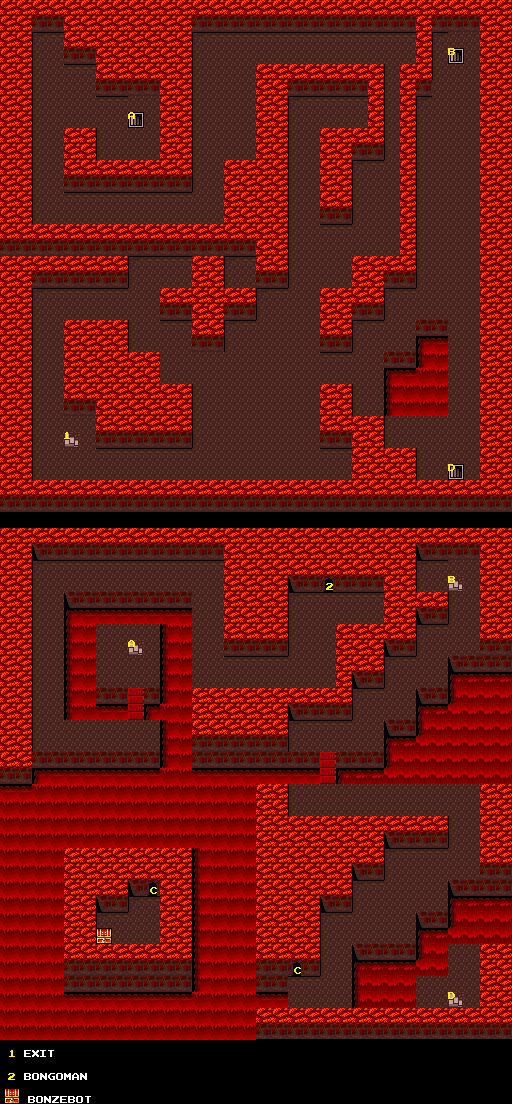
If you go all the way to the south when you go as far east as you can go on the first screen, you'll reach a dead end. Go north instead. From there, you can go south, blow up a wall with a Boo Bomb and open a chest that contains Bonzebot. Bonzebot can revive your character in two-player mode, which is pretty neat. Just remember it costs as much money as it usually would in a Convenience Store. If you're playing one-player mode, he's rather useless.
If you go north at the beginning, you'll find another path. This will lead you straight to Bongoman, your first boss battle. You'll have to fight him to free the samurai from his furious electric sound and stop their cursed idleness.
Unlike the other battles we've seen throughout the game, the boss battles are done in an RPG format, which means that the game is an RPG, a platformer and a beat-'em-up all at once.
"Fight" lets you attack the enemy, "Item" lets you use an item, "Magic" lets you cast magic at the cost of M icons (the number of which this game does not let you see, but still uses nonetheless), and "Run" lets you run away from the battle (or at least try to).
To the right of the command menu is the message board describing what is currently going on, and below that is your current stats. In case you are playing a one-player game, Ryu is computer-controlled.
Bongoman's Sonic Drum and Sting Boomerang attacks hit both characters, with the Stick Boomerang doing more damage.
If your characters have a shocked look on their face during an enemy's attack, they're taking damage. If they duck, then the enemy's attack missed.
Your regular punch is pretty weak, but you can use the Shogun Sword or your T-Star magic to do slightly more damage.
Bongoman has a special Thunder Rock Music attack that has a chance to petrify both of your characters and do a good amount of damage the longer a character is paralyzed. This is where the Cupsules come into play, as they can be used to cure status ailments.
If you need to heal both characters, use Vitalizer. This will recover a lot of HP for both characters.
When you beat Bongoman, you will get a red Auraball. Bongoman's magic will also have worn off, and Edo City will be back to normal.
From here, head back to Edo City. Once again, you'll have to take the long way to get out of Mt. Wasabi and head back to town.
When you talk to the townspeople, they will be more active again.
Head back to the palace and see King Toro. He will congratulate you for making the town more active again, and says Princess Tamago is in love with you. He will tell you that long ago, he saw an Auraball in a town known as Satoon. Princess Tamago will tell you that you will need a hoverboat to get there, and will give you one. You now have the "Arc-De-Travel." King Toro will ask you to talk to Emperor Chin for more info on Satoon. Be sure to use the inn and save your game before you leave town.
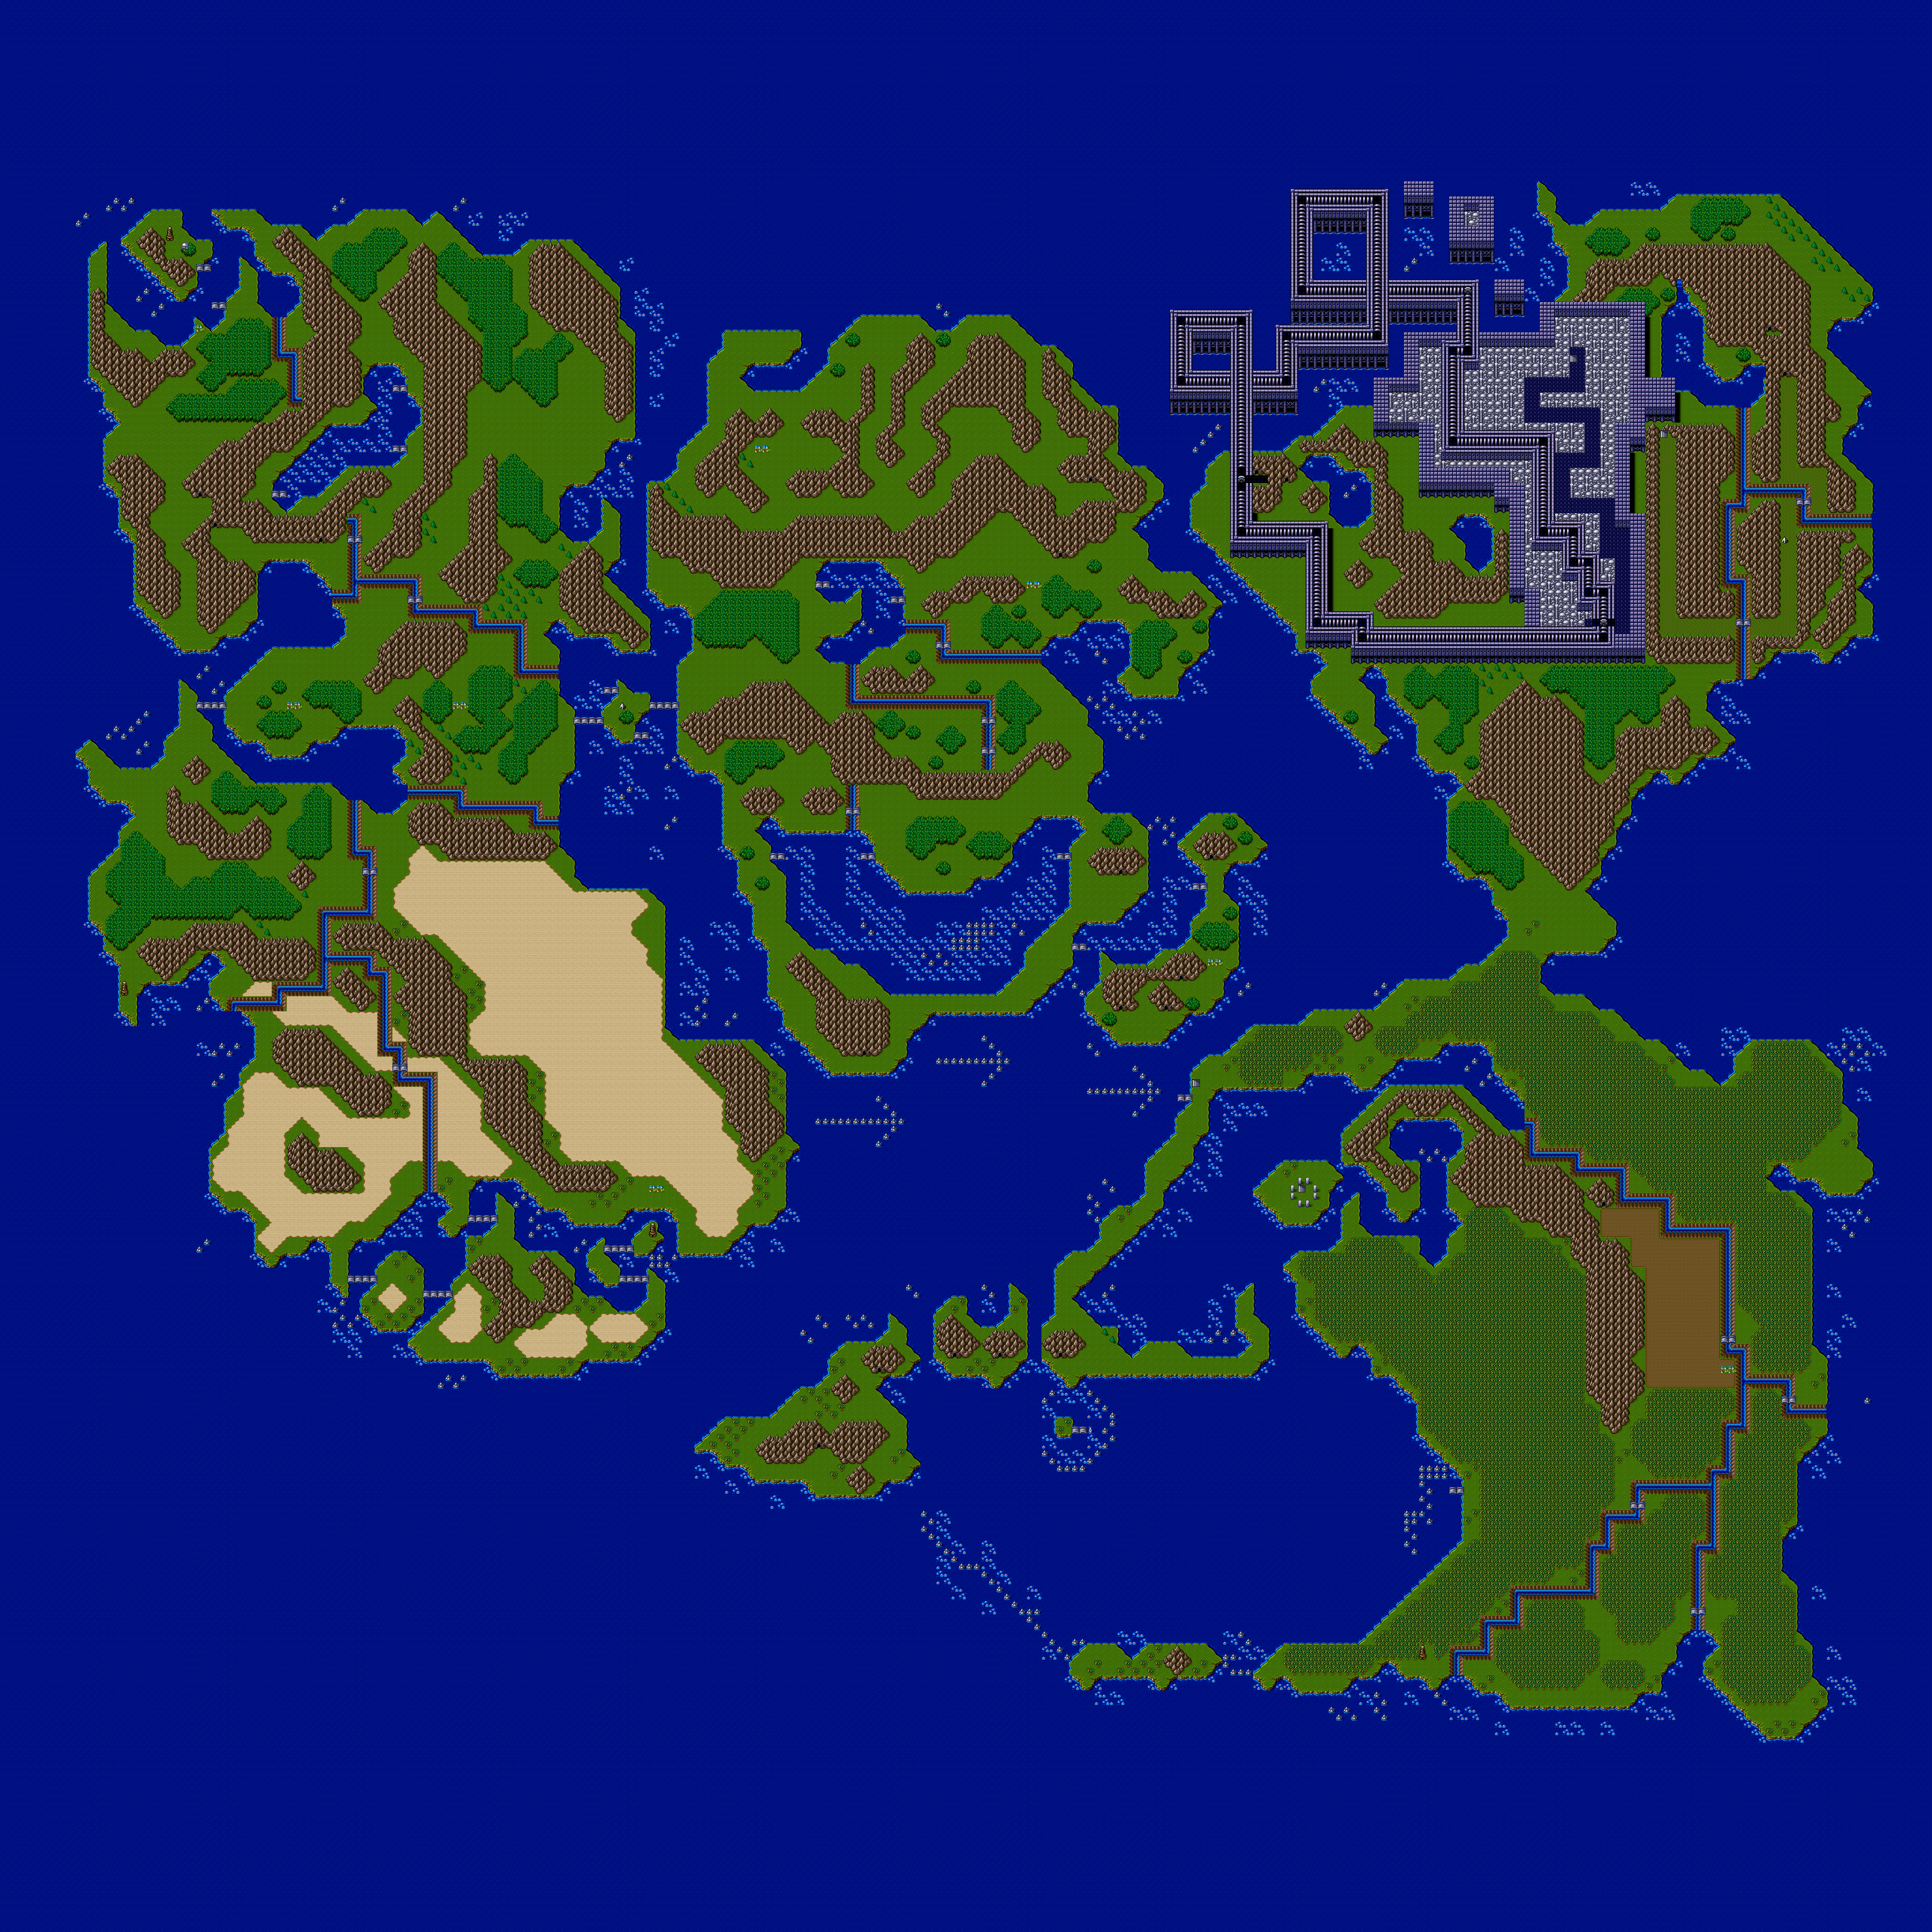
When you talk to Emperor Chin, he'll tell you that Satoon is to the west and that you'll see Fairy Land on the way there.
Once you leave, head to the west. Walk on the rocks in the water, and you'll instantly use the Arc-De-Travel. As long as you are on it, you will not have any random encounters with enemies. Once you make it to dry land on the other side, you'll be off the Arc-De-Travel and back on foot.
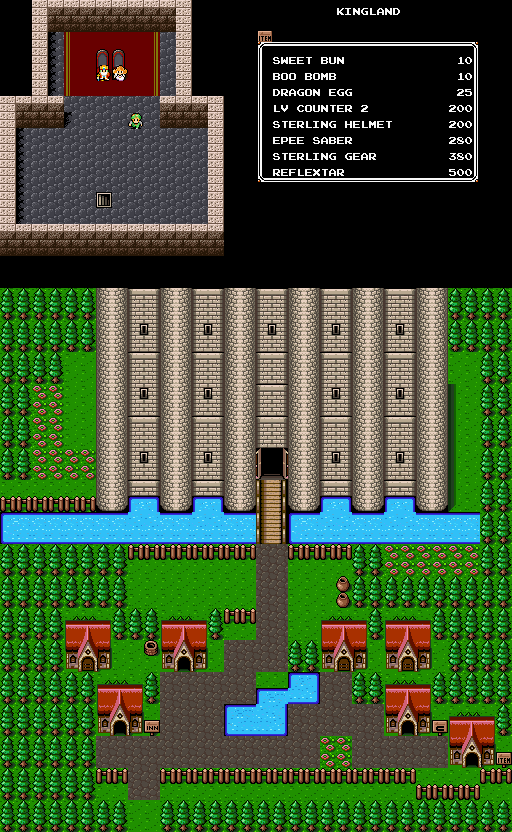
Once you're on dry land, you'll want to continue west. You'll eventually come across a tent consisting of an old couple and their daughter. You won't learn much there, though. Keep going west, and you'll come across a new town. This is the town of Kingland.
You'll learn from talking to the townspeople that horrible evil lives in Satoon, and that the town used to attack Kingland a long time ago. Thanks to King Romel, however, Satoon have never attacked them. You'll also hear of a Princess Julia, and learn that Fairy Town is west of Kingland and has a beautiful princess.
You'll also meet Dr. Justice. who is currently in the hotel.
At the shop, you'll be able to get LV Counter 2, the Sterling Helmet, the Epee Saber, the Sterling Gear and Reflextar. The LV Counter 2 lets you get info on more powerful enemies, while the Reflextar is a more powerful version of T-Star.
At the castle, you'll meet King Ashur. He'll tell you that King Romel has kept the monsters of Satoon from attacking the town since he started ruling it, and thinks highly of him, saying Romel is as good as he is. The queen does not say much, however.
.
West of Kingland has more powerful enemies. You'll meet gray and blue versions of the robot enemies who strike with nunchaku, as well as red smiling elves in armor who will shoot at you with bows and arrows. You'll also meet armored boars with shields who can spit fireballs at you. Use the Epee Saber on them to do maximum damage, and hit them before they can punch you.
There is only an inn and a Convenience Store here, but there is some info you can get here, such as the fact that Princess Julia is in love with King Romel, and that the town is working on Project-3F, which is a parcel delivery service.
One of the houses contains Princess Julia. He says that her stubborn father is against Project-3F, which was started with King Romel, and because of that, he shuts himself in the Fairy Tower. An errandbot that they developed for the project was taken away, misunderstood by her father. Not surprisingly, Jack and Ryu agree to head to the tower and talk with him.
The tower is southwest, after you go south from town. Also, you'll learn to meet Miss Finny if you make your way to Satoon.
Now that we have the Vitalizer spell, you'll want to make your way to the east. You can come here before getting the Vitalizer spell, but the ealier you have Vitalizer, the better. This leads to the Samurai's Tunnel.
You'll meet a new enemy here: a flaming face that will fly at you. It laughs at you before it comes at you, and you will want to get on a platform and hit it with a punch in mid-air. These enemies will give you quite a bit of experience for this point in the game. Also, unlike the other battles you've been in, this one takes place on a side-scrolling screen rather than one where you can move in eight directions.
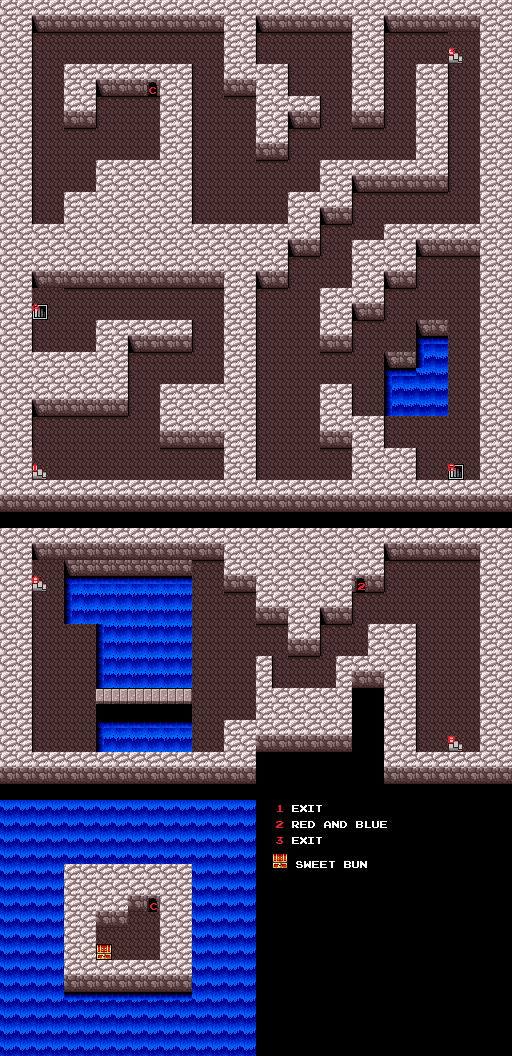
The path through here is pretty simple, though there is another mini-game here where you can play with the Red and Blue Gems. Once again, this is a game of concentration where you will be matching objects. Whatever you match, you will get, and if you match the skulls, you get nothing and lose one of your chances. This game costs 100 Sen to play.
The Cupsule will come in handy later. For now, if you get one in the concentration mini-game, hold on to it.
There is a path to a chest if you go past the exit. When you see the X in the wall, stand next to it and use a Boo Bomb on it. The chest just contains a Sweet Bun, though. If you have the maximum number of Sweet Buns you can carry, the chest will contain nothing.
The onis with the clubs will, of course, hit you with their clubs, and it does not take them long to do it. They give just as much experience and money as most of the other enemies you've met so far will give you.
When you reach the exit (which you'll have no choice but to do your first go-around in this cave), you'll meet a samurai who says he has all the information on the robbers that you'll need. From there, you can go back and take the path to the chest.
When you exit the cave, you will come out of a cave on an island to the west. This is Tamagi Island. Go south and you will reach Edo City.
When you talk to the people here, you will find out that the samurai here are rather idle, and that whoever kidnapped them cast a spell on them to make them lazy. You'll also learn that the cave west of here will take you to Mt. Wasabi.
One of the buildings across from the entrance to the city is Samurai Scorpio's dojo. He will tell you to pick two words that do not appear on the list of flashing words on the left side of the screen. Take your time, as there is no time limit. If you get it wrong, you'll have to re-enter and try again. If you get it right, Interestingly, the words are names of characters from other Culture Brain games. If you win, you'll just get a Dragon Egg.
You can buy Cupsules here, as well as the Shogun Sword and the Eastern Gear (which are stronger than what you have now).
You'll meet King Toro and Princess Tamago in the palace. They'll tell you that the robbers that you stopped made the samurais here lazy, and that they are hiding inside of Mt. Wasabi. They will tell you to come back when you stop them.
When you enter the cave west of Edo City, you'll enter a side-scrolling action scene. Here, you will have to bounce off log platforms to avoid the lava. Make sure you are as far to the right as possibel when you do this,
The skull platforms will sink when you stand on them. You'll also see Charon riding his boat on the lava before you leave the first section. You can use that boat as a platform.
For the second section, keep running by double-tapping the direction on the Control Pad you want to go to to avoid the falling spikes. From here, the Spider Shoes will let you move to the third sections. You can play Concentration here if you want to.
The multiplying flying enemies are back. Wait for them to disappear before crossing lava and pits in certain spots.
For the part with the broken platforms at the end, just keep holding Right on the Control Pad and you will make it to the exit.
If you beat up any enemies at any point from the beginning to the end of this area, you will get the experience and money you would usually get from them when you reach the end.
When you're back on the world map, you'll be on the other end of the mountain range that you could not walk to. Head to the east and enter Mt. Wasabi.
At this point, you should definitely have a sword equipped when you go to battle. The sword swing is slightly delayed, but it's much more powerful than your fists.
Also, the thieves that acted as a boss earlier are now regular enemies.
It's time to go through the four chambers and then tackle those thieves at Mt. Sampin!
All maps by zagato blackfist.
When you complete the Chambers of Earth and Water, you'll get another option for the magic list, T-Star. These are your throwing stars, which are your basic shurikens.
Rick will tell you to go next door for more training. Go to the building with the two doors to the right of where you met Rick to meet Gengar, another character from the Hiryu No Ken series. This time, you'll have to go through the Chambers of Fire and Wind, and if you get through them, you will get the Spider Shoes.
The Chamber of Fire has quite a few pits, and with that, some enemies that will rocket up from the bottom and split into two when they make it to the top of the screen. Be sure to go slow at the beginning, and make sure not to touch the spikes and you try to scale the walls near the end of the first part.
At the beginning of the Chamber of Wind, there is a series of blue blocks the path to the Soundmaster's Studio. Go to the menu, select Equip, then select Ninja Cyclone. At the cost of your M icons, you'll be able to break the blocks with the resulting spin kick.
Not surprisingly, there is wind in the Chamber of Wind that will push you around. If you hear what sounds like a muted explosion sound, that means the wind is moving. Be attentive to when the wind moves so you can know when to advance.
When you beat the Chambers of Fire and Wind, Gengar will prove himself a man of his word by giving you the Spider Shoes, which allows you to scale ceilings.
Now that we're done here, it's time to head back to Yokan, use the inn to restore your strength if you need to, and then head to Mt. Sampin.
On the way, you'll meet a new enemy: a white, bulldog-like enemy on a platform. Jump while holding Left or Right on the Control Pad and you will perform a somersault that will allow you to stomp them as they whiz by. Once you get the timing down, it won't be long until you're clearing screens that have this enemy like a pro.
There are two paths. One leads to a dead end, while the other is the way to the thieves. After taking the first staircase, just go all the way north and then go east; if you go east from the outset, you'll be travelling towards the dead end.
When you talk to the thief, you'll enter a battle. Go to the menu, go to Magic and equip T-Star. You'll use a few M icons, but you'll be able to throw quite a few shurikens at them for a couple of seconds. You'll eventually switch back to your fists, but even then they are easy. All they do are play on their guitars, and also surf towards you on them. They can shoot fireballs, though.
When you beat the thieves, you'll get the Auraball. This yellow ball will allow to use Mighty Ball and Ninja Cyclone during battle.
You're done here, so go back to Yokan.
Also, the big-eared enemies that look like they are carrying cymbals have a strange pattern. They spawn clones of themselves a few times, then only one shows up on-screen and claps the cymbals together. When it does, you will have to quickly get up to it or else it will try to hit you with an eight-way shot. Thankfully, you only have to destroy one.
Go back and see Emperor Chin. He will tell you the thieves' ringleader is hiding somewhere near Edo City, on an island called Tamari to the south. Prince Bonbon will give you the Dragon Blade, which is your first sword.
When you leave Yokan, go south, take the bridge to the west, then keep going south. At the pair of bridges, go around the mountains to the east and keep going west.Go south when you can't go west anymore, and keep to the west coast. You'll find a cave.
When you enter this cave, you'll meet Princess Leila and play the Janken House mini-game. She will play another card matching game, but this time it is a rock-paper-scissors (or Janken) game. The open hand is paper, the two fingers held up is scissors and the closed fist is rock. Rock blunts scissors, scissors cuts paper, paper covers rock. You don't have to pay anything to play this, but if you do well enough, you can win a spell. Once again, you can only miss three times. If you win three times, however, you win the Vitalizer spell, which lets you recover health at the cost of 10 M icons.
Ah, Culture Brain. You make some very strange games. They may have questionable-at-times English translations, but there is fun if you know where to find it.
All maps by zagato blackfist.
1-Player mode will let you only play as Jack. A second player can play as Ryu, but Ryu is only available on 2-player mode.
You can choose between easy, normal and hard difficulty if you choose a new game. You can also put in a password to start from where you last left off.
The story is pretty simple. Joyful people are living happily in Chinaland. One day, trouble arose in the peaceful country. A mysterious space ship fleet covered the sky of Chinaland. Suddenly, a 3D image appeared in the sky.
"Hello, people of Chinaland. Please don't be scared. We are on a universal peace mission. I am the leader, Rub-a-Doc. We are travelling the universe to promote peace. People in Chinaland, let's work together for universal peace."
A unversal peace conference was held between Rub-A-Doc and the Emperor Chin of Chinaland. Rub-A-Doc ecame very popular. He travelled all over Chinaland to promote peace. A Rub-A-Doc boom was on!
A few months later, the spaceship fleet and the Rub-A-Doc boom left Chinaland. A quietness returned.
We then hear from Jack and Ryu. Jack tells Ryu that some troubles have happened in the capital city of Yokan. Ryu finds it strange that there are troubles shortly after the Rub-A-Doc boom, and agrees that it looks like a job for the both of them (well, for Jack, because this is a 1-player Let's Play).
Pressing Start allows you to access the menu. There you can see what items, magic and equipment you have in your possession, your current stats, money and medals, the treasure that you have and a password that you can write down in case you turn the Super Nintendo off and you want to start back where you left off.
Money (known in-game as Sen) is used to buy goods and services, while medals are used as currency for mini-games you'll be playing later on.
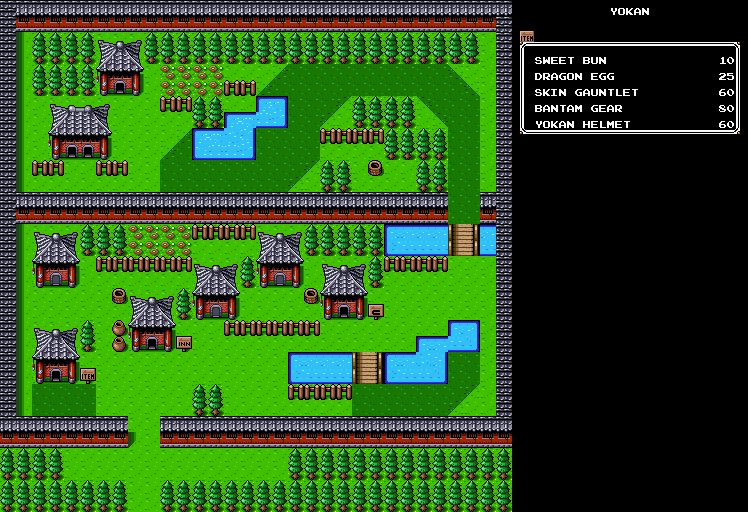
Most of the townspeople don't really say anything important, though the man by the bridge tells you that most of the men in the town were kidnapped by thieves who reside in Mt. Sampin. The two women on the northern half will tell you about Dragon Eggs and Convenience Stores.
At the item shop, you can buy Sweet Buns, Dragon Eggs, Skin Gauntlets, Bantam Gear and Yokan Helmets. The latter three are equipment that you can buy for your character so you can increase your stats (attack for the Skin Gauntlets, defense for the Bantam Gear and Yokan Helmet). Sweet Buns restore some of your HP, while Dragon Eggs let you restart a stage and save you from falling down a hole.
If you buy equipment and it is better than what you have equipped, the game will automatically equip it for you, and you'll also be able to sell your old equipment for ease the cost of upgrading to better stuff. If not, the game warns you and doesn't let you buy it.
The building with the sign with the "C" next to it is the Convenience Store. Whenever you enter, you'll be told by the shopkeeper how much experience you have until you reach the next level. You'll also set up that convenience store as a re-spawn point, so when you die you'll end up back at that convenience store and you won't be forced to restart the game from the very beginning. Be sure to enter a Convenience Store when you enter a new town.
At the Convenience Store, you'll be able to revive your ally in a two-player mode, change a game from a 1-player game to a 2-player game and vice versa, and get a password so you can come back to your game when you turn off the Super Nintendo (though you can do on the pause menu, it is thoughtful of Culture Brain to make this so).
The Inn allows you to restore all your health.
The building with the two doors is the palace. This is where you want to go when you enter Yokan at the beginning of the game. Here, you will talk with Emperor Chin, who will tell you about thieves from Mt. Sampin who came to the town, stole jewelry and kidnapped workers. Naturally, Jack and Ryu volunteer to get them back. Emperor Chin will then tell you to see a prophet at the back of the palace.
From there, go to the building behind the palace. You'll meet Notruedamas, who is obviously a reference to the supposed real-life prophet Nostradamus and is the palace fortune teller. He will tell you to go north to the cave in the mountain to Horizon Gate, and to look for Rick. He will also give you an Escape Leaf, a magic spell that will allow you to escape battle and action scenes. This is the first magic spell that you will learn in the game.
The Adventure Begins
Now that you've done all you can do in Yokan, it's time to leave. Leave through the exit at the southern half of town, then go east and then go north to the nearby cave.
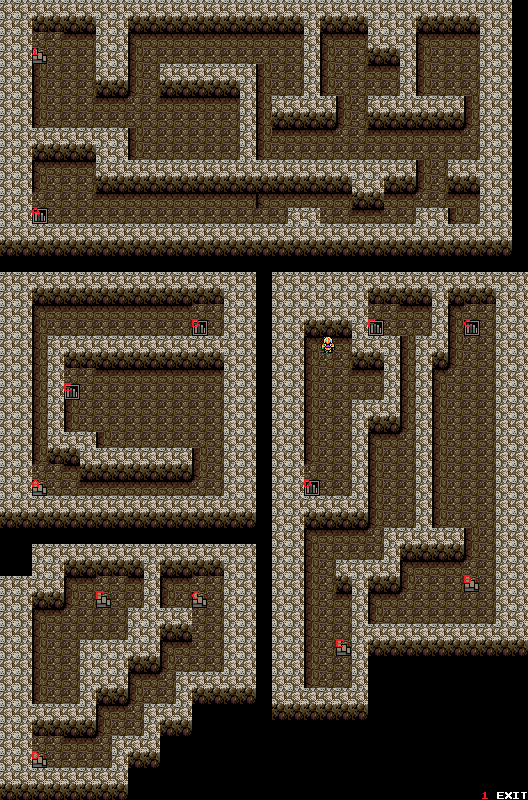
The Yokan Tunnel looks like a very simple tunnel despite its dead ends, but you will be running into your first monsters here.
The monsters you'll meet here include tigers that look like shamisens, grey-and-purple colored guys who look like robots who can do somersaults, kappas and bird enemies who wear gold helmets and can also somersault. The bird enemies can also do somersaults and have a little range to their attacks.
Pressing Y repeatedly lets you punch and perform a combo, while holding Y and moving allows you to run. B lets you jump. If an enemy is knocked down, you can press Y to pick them up and throw them.
Battles happen at random, and you can choose whether or not you want to take part in the battle. You can select "run," but you won't always be able to run away. At the very beginning of the game, you'll want to make sure you take part in and win every battle, as you will need the money and experience. As you'll soon learn, the encounter rate in this game can be strangely and insanely high, and it is not unusual to make it to Level 10 early on in the game. The battle scenes are like beat-'em-up games (think Final Fight or Streets of Rage, but simpler), and you can only attack to the left or right, much like your enemies.
Battles end when you defeat enough enemies. The number of enemies you have to defeat is pretty small early on, though it gets a little higher as you move on.
There are pits, but if you're paying attention, you should be able to avoid them. Be sure you do so, as dropping into pits will kill you.
The blocks marked with a "P" contain power-ups. Punch the "?" and you'll get what's inside. Power-ups you can collect include swords that you can use as weapons in battle for increased strength, "M" icons that give you energy for using special abilities, and skulls that will decrease the amount of "M" icons you have by one. Enemies will sometimes drop weapons for you to use in battle, too, such as nunchaku. The "$" icons give you more money when you win the battle.
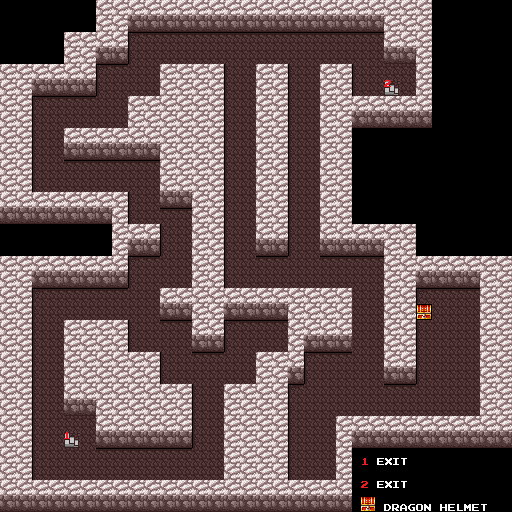
If you make your way to the other side of the tunnel and make your way south to the chest, you will be able to obtain a free Dragon Helmet, so you'll be able to save some money.
From the exit, head to the west. You'll eventually make it to Horizon Gate.
Talking to the people will let you know that Mr. Sampin is east of Yokan. You'll also learn about the Ninja Cyclone, an attack that knocks enemies down and breaks holes in wall at the cost of 3 M icons.
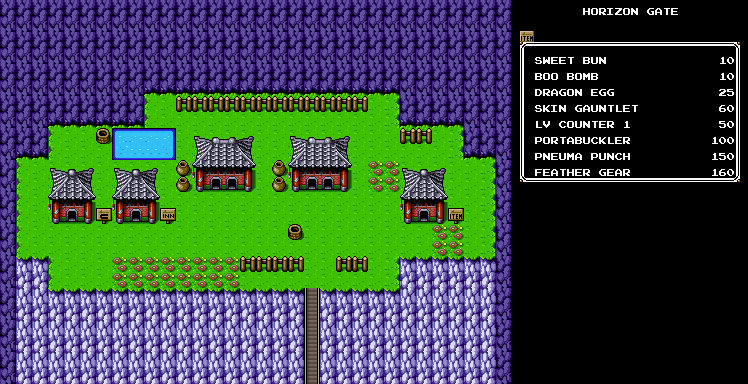
At the Item Shop, you can get new items. LV Counter 1 allows you to see what level the early enemies of the game are at and how many you have to beat to attack them. The Boo Bombs allow you to blow up strange-looking walls, and you can hold eight at any given time. The Pneuma Punch is better than the Skin Gauntlet, and the Feather Gear is better than the Bantam Gear. The Portabuckler is a shield.
There are two double-door buildings here. You can enter them in either order, but if you want clearer story progression, enter the left one first. This is where you will meet Rick, one of the characters from the Hiryu no Ken series. He will tell you to go through the Chamber of Earth and Chamber of Water, and if you clear both, you will get a reward.
You'll then go to the Chamber of Earth, which is your first action scene. You can still move left and right, but you won't be able to move up and down like you can in the battle scenes. Be sure to get as many power-ups as you can and defeat enemies when you are able.. You can jump slightly higher for some things if you are jumping straight up as opposed to jumping to the left or right. You can also jump a little higher while you are running. Just remember that you will be running a little bit further forward when you land.
To latch onto walls, move into them with a running jump. From there, you can use the Control Pad to climb up the wall.
When you go to the pause menu, you'll have a slightly simplified menu. Here you can use items, look at your magic and also equip your sword, Mighty Ball and Ninja Cyclone, should you have them.
The bomb is another Boo Bomb. Besides using them to blow up strange walls, you can also use them against enemies. The blast is pretty weak, however. Some of the P blocks also contain potstickers, when can help you recover 30% of your total health.
When you get through the Chamber of Earth, you will enter the Chamber of Water. Watch your jumps, as they look framey and feel floaty. Be very careful and bring plenty of Dragon Eggs before you start these two chambers, as it can be easy to land into a pit in the Chamber of Water.
The Chamber of Water has quite a few spikes. Avoid them as they will kill you instantly.
There is a log platform moving up and down at the end of the Chamber of Water. If you jump on it and take it upwards, you will go to the Soundmaster's studio. Here, you'll play a panel matching game where you match sets of musical notes if you have 10 Sen. You only have three tries, so make them count. For every successful pair you make, you will win a Medal.
You also get kicked out of the level regardless of whether you win or not. If you skipped the Soundmaster's Studio mini-game, you would have passed Rick's test.
After beating Visconti, Ardy returns the seven Rainbow Crystals to where he got them. The orange one is returned to Gilson, and the blue one is returned to the island where Ardy fought Beecroft. After getting back on dry land, the green one is placed back in the ancient pyramid. The light green one is brought back to the old woman, and the yellow one is placed back in the well. Ardy and Nina then return home. We never see the red one or the purple one.
After the credits, the game says "To be continued." Sadly, there was never a sequel.
This is it! It's the final few scenes in the game, and they're definitely the hardest.
Scene 14: Throne Room
Open the chest at the start of the level. This power-up turns Pec red. You're going to have to use him to fly through narrow, spike-laden hallways.
Some of the spikes move up and down, so be careful. To stay afloat, every chest that you can. If you get hit just before you reach a chest, use your invulnerability frames to get to the chest and get Pec back along with the power-up to stay alive.
If you need to, dismount from Pec with Y and then throw him again to get him inflated again.
You want to be very careful, especially in the first vertical segment. If you get hit in some sections, there's no way to recover and you'll be forced to sacrifice a life if you want to get Pec back.
After the first vertical segment is the first check point. At least you don't have to do this short but somewhat difficult scene all over again if you die.
Scene 15: The Tower
Yet another vertical level. This one will automatically scroll upwards, and some of the platforms will drop faster than others. Get on the platforms with the sparkles below it to start the level, then use your tail bounce to get from one platform to another on the way up. Keep an eye on the platforms, as some of them move down faster than others. Once you reach solid ground, you've reached the end of the scene.
Scene 16: Hall of Mirrors
Another auto-scroller, this time scrolling right. Some electrified tridents will be tossed at you from the right side of the screen. At the beginning of the scene, they will be easy to avoid, but as you get further into the stage, you will have to look at the mirrored floor on the lower half of the screen to see all of them, as some of the tridents will be invisible on the upper half.
The first mirrored floor is easy. The second one is more difficult, as some of the tridents will be invisible. There will also be some bouncing balls that you will have to tail bounce over, and some of them will be invisible, too.
There is a chest after the second mirrored floor
The third mirrored floor has what seems like a wall, but you can walk behind it. This makes it impossible to see the upper half of the screen, forcing you to rely on looking on the lower half to dodge everything. Once you're past that wall, however, the scene is over.
Scene 17: Grand Throne Room
You'll finally catch up with Count Visconti as everyone else waits to see what happens. Ardy will then meet up with Nina, but the barrier surrounding her is struck by lightning, killing her. Ardy is then struck by lightning by Count Visconti, who has the purple Rainbow Crystal.
Visconti will shoot down four lightning bolts. You can avoid those by simply standing next to the first column holding up the platform he is standing on, which you can easily do by standing as far right as you can go.
He will then shoot tridents from both sides of the screen before shooting the four lightning bolts down again. This time, go to the far left and wait there to avoid being zapped. After more tridents, go all the way to the right.
Don Jacoby will show up and take the purple Rainbow Crystal, but the wall crumbles and falls on him as he tries to take it from Visconti. Now the fight really begins.
Jump on the flying platform that Don Jacoby came in on and jump on it four times. On the fourth pump, it will launch forward. When that happens, jump on Visconti's head before he can zap you with lightning. When you see him create a grey ball, he has cast the spell. The grey ball will travel to the center of the screen and split into five smaller ones that travel in different directions.
After a while, he will throw a trident and also bring down lightning that destroys the machine. He will then throw purple lightning balls that bounce up and down after he throws them at you. Tail bounce off the balls and onto his head to hit him. After two hits, he will do the four lightning bolts again. Stand as far right as you can, then stand as far left as you can, and alternate between those two sides as he throws down the lightning. He'll eventually throw down the balls again, then go back to where he left off with the lightning bolts...so remember where the safe spot at the last salvo was!
When Visconti turns gray, you're nearly done. Tail bounce when he rushes at you, then try to hit him with a tail bounce when he leaps into the air. He doesn't leap very far, but he does leap high. If you don't hit him then, he will teleport somewhere else on the screen. Unfortunately for Visconti, his attacks are a lot easier to read than earlier in the fight. Once you've beaten Visconti, it's over. You've won!
It is not without great cost, though: Nina is still dead. Don Jacoby rises from the rubble and uses the Rainbow Crystals...all of them, including the ones you didn't see in the game, and uses them to summon a fairy who brings Nina back to life.
After getting aboard a pirate ship and getting a Rainbow Crystal from the captain, we've reach the stronghold of one of Visconti's henchmen...
Scene 11: Beecroft's Stronghold
Tail bounce your way to the right. Run and jump over the pits, and don't let the green guys throw bombs at you. Suddenly, you'll meet Nina...but she disappears.
There are security cameras throughout the stage. They don't hurt you, but they do alert enemies to your presence. The first security camera segment is easy enough if you're fast and nimble enough, but the second alerts a guy manning a spinning metal blade on a rope. Make a good, running jump over the blade, and run underneath the blocks below the third and fourth cameras. Ditto with the fifth. You'll want to be quick as you run to the right, as the spinning metal blade is on a push cart manned by two green guys, and if you're not fast enough, the blade will hit you from the left. At least the chest to the right contains Pec if you get hit.
After the chest, DROP DOWN. Do not jump to the right. Jump onto the block being carried by the first walking statue, and stay on it. The statue will slowly move to the right after running into the wall, and you can tail bounce off the block to get over the tall wall. If you try to rush to the other side and kill all the statues, you're going to have to grab the block, place it on the other side, and have a statue give you a boost...and hope you're close enough to the wall. You're better off just having the statue carry it to the right.
Once you're past that part, Nina will fade in and out again. You'll eventually meet the wolf guy from earlier: Beecroft.
Beecroff will sit at the top of a huge stone golem. Use the statue enemy to bounce to the top of the column on the left side of the screen, then grab the mirror shard there and use it to reflect the purple lasers from the golem's eye back at Beecroft. It should be noted that the blue Rainbow Crystal is being used as a weapon to create those beams. Make sure you avoid the statue enemy when you do. Just keep standing n the right place, and you'll get the blue Rainbow Crystal just before Beecroft and his weapon sinks below the earth and the ground shakes to reveal an underground passage below your feet.
Scene 12: Underground Passage
You'll drop down into an underground passage. Soon after you drop down, head to the left-hand wall. Don Jacoby will drop down and blow up the wall to the right with a bomb before heading back to earth. This is the only one you'll be able to break...for now. Jump over the pits of water and you'll eventually find one with a 1-Up over it. Grab the 1-Up and drop down.
The skeletons tied to the rocks will come to life if you get near them. Thankfully, you can stun them with the tail bounce to more easily avoid them. Keep going to the right, and use the logs popping out of the wall to make your way up, then continue to head right, jumping over the pits of water and avoiding the green guys with the snorkel masks. Drop down when you see the huge line of stars leading downward.
To tie right if your first continue point. Run past the skeleton, which won't come to life until after you're clear of it. Make your way up and to to the right. There will be a stack of brown boxes, which you can pull up. The only ones you have to worry about pulling are the first four, but you have to push and pull them to position them carefully so you can jump onto the top of the fourth one and tail bounce your way to the top and continue to the right.
After another skeleton, there is a place where you can drop down. If you have Pec, the nearby chest will turn Pec red. This will allow you to break the rock walls that you couldn't before. Be sure to pull the lever on the right-wall to released one of the blocks blocking the water here.
With your new-found powers, break your way to the left, then make your way back down. If you see any skeletons at this point, throw Pec at them when you're at a safe distance, as Pec will now be able to destroy them. There will be a pit to the right here, but you won't be able to do anything with it yet. Head back to the left.
Go back up to the level where you found the Pec power-up and head left. Break the blocks on your way there, and you'll be back on the part of the path just before the continue point. There is a path leading upwards. Take it. Make your way to the left and you'll find the second lever. Pull it to release one of the blocks blocking the water. If you need treasure, immediately to the right is a chest blocked by rocks.
If you ever lose Pec, you can go back to the chest where you got the power-up and Pec will come back. It won't be long until you'll be breaking rock walls again!
Go back down and keep going to the left. Remember where you got the 1-Up? Drop down there again and kill the skeletons. All the way to the left is the third and final lever to pull. This could have been pulled right away, but powering up Pec makes this a lot easier.
Now that you've pulled the three switches, go back to where the huge pit with the log was. The water will now fill that pit up, and you can use the log that was at the bottom to exit.
You'll now end up at Visconti's castle. Gilson's pirate ship, which now has Ardy's face on the sails, now joins you. They shoot down the front door so you can get in. All they can do now is wait...
Scene 13: Visconti's Castle
And here we are.
Run all the way to the right to head to the next area...which had a lot more going on than the front door did. You have lava pits, stone platforms and arrows being shot out of the walls! Take the stone platforms to the other side, and when you reach the right-hand wall, you're going to have to use the arrows as platforms one at a time to get to the top, which takes a good sense of timing and some practice to pull off. Use Pec to get rid of the green guy flying around, and when you see logs above, immediately tail bounce to them to get to the top, then make your way to the right. Do not drop down unless you want to take on this exercise in timing ever again.
We're now trapped in an ancient pyramid. Looks like we're going to have to find a way out.
Continue your way across the snake platform, avoiding more bombs and taking care of the green guy at the end. Take the flashing red bomb at the pile of bombs here, and use them to blow up the two walls that block your path. From there, drop down when you see the stars. You'll find a treasure chest here. To get out, climb on the rope above the mechanical snake so that the snake wakes up, and jump off of it before it grabs hold of the rope. Leap on its tail and you'll be able to go super high and land on the platform to the right.
From here, make your way right, and grab the block. Jump over the floor where the first ray of sunlight is so stalactites don't fall on you, then place it at the bottom of where the second ray of sunlight comes down. This will open the door to the right and allow you to enter the next stage.
Scene 8: Mouse Trap
If you clear a scene without Pec, you'll get him back at the beginning of the next one. This is helpful, especially in the later scenes.
At the start, attack the green guys on your way to the left. The mouse that climbs the ceiling is just there to distract you, and doesn't really do anything.
Once you drop down, you'll be in a slightly more expansive area. The first continue point is available if your drop far enough down.
You'll soon come across a gray block. Tail bounce off of it to the left, where there is another gray block. You'll have to pull it towards you off the edge of the floor, and then drop it down to the left. To do that, walk up to the block, hold Y and then hold Left to pull it left. From there, push the first gray block to the left and you'll be able to continue.
As you head further to the right, you'll see a set of spikes above you. As you run to the right, you'll hear a rumble. Push the gray block so you can jump over it, so the spikes will fail to hit you and bounce off the block instead. From there, run to the platforms above the spike pits and make your way up. You'll soon find the second continue point.
When you enter the room with the skeleton in it, you'll fight a genie that comes out of a magic lamp. When he descends towards you, tail bounce onto him, then tail bounce off the lamp. The genie will disappear, and you'll get a key that allows you to unlock the door to the right.
You'll find the green Rainbow Crystal again, but the mouse from the beginning of the stage will run around with it while comedic music plays. Thankfully, the mouse isn't super fast, and once you catch up with it, the Rainbow Crystal is yours again.
When you continue to the right, the ceiling will slowly close in on you! Before it can crush you however, the guy who looks like Indiana Jones - whose name is Don Jacoby, by the way - holds the ceiling back so you can escape. Unfortunately, the ceiling falls on him when you reach the other side.
After leaving the pyramid, Ardy thinks about Don Jacoby, then gets on a nearby raft.
Meanwhile, another henchman - this one a wolf - in that fortress far, far away takes orders from that guy behind the curtain, whose name is Count Visconti and seems to have his own plans for the treasure we are collecting. Visconty tells him about our victories against Grounder, Catry and the mouse in the pyramid, then gives him instructions.
Ardy soon encounters a pirate ship...
Scene 9: Gilson's Pirate Ship
You can use the tail bounce to get the stars while on the raft, but watch out for the shark moving back and forth in the water.
You'll eventually encounter a series of rowboats, and you'll have to use those as platforms to get to the pirate ship. Be ready to run and jump, and avoid the yellow sea chicks that the guy in the window is tossing out. The yellow sea chicks in the boats will slowly move back and forth, and also jump every once in a while.
You'll eventually have to jump up on some platforms on the side of the ship itself to get anywhere. Keep a look out for the first continue point as you do. Avoid the barrels that the guys in the windows toss out at this point, and pay attention to the bottom so that you don't have to make a bunch of blind leaps.
You'll eventually find two rowboats that will lead to a giant anchor connected to the ship. Get on the anchor, and you'll trigger a boss battle against the pirate captain Gilson.
Gilso will fly between both sides of the anchor. Tail bounce off his head, then land on the top of the anchor in the center of the screen. From here, you can easily tail bounce on his head again when he shows back up. He will keep flying in from the upper-left corner of the screen towards the right side of the anchor, making him predictably easy to avoid and also attack him multiple times. The anchor will be raised as you fight, but you'll eventually take Gilson down.
After beating Gilson, you'll be able to get on deck, and Gilson hands you the orange Rainbow Crystal.
The sun eventually starts to set, and back home, the wolf in the cape shows up at the elder's home. He attacked the elder, then breaks into the bedroom located below the house and kidnaps Nina.
Scene 10: Island of Ruins
As soon as you go to the right, you will see a giant, semi-circle shaped statue head that spits out giant balls. Avoid those, and avoid any skeletons that you see along the way. Watch out for any arrows that are spit out by the square statues from out of nowhere.
From here, you'll have to jump over the pits of water and avoid or attack the green guys (some of which dive out of the water to get you). Be sure not to fall into the water, as some of the water pits have spikes in them.
You'll soon find the first continue point. Go left and drop down to find a chest (which will contain Pec if you need him) and a 1-Up further to the left. Place the red square with the white circle on it on the left side of the see-saw when it is down (if you need to, walk on the see-saw to make sure it goes down), then leap onto the right side. The block will help you get back up to the continue point.
Make your way to the right, and watch out for the arrow that is shot out of the statue to the left when you make your way down to some more water pits. You'll have to do some more platforming to avoid the water pits here, and you'll even have to tail bounce off a green guy to ensure you clear some spikes. You'll eventually come across a long spike pit, where the only way to the other side is by tail bouncing off the gray balls that roll towards you to the left. You may lose Pec on the way to the other side, so take advantage of your invincibility frames if you can. You'll see a skull made out of collectible stars on the other side, then you'll encounter a skeleton. After jumping over the skeleton, you'll reach the end.
We've got one of the Rainbow Crystals, but we're gonna have to find more...
After you get the yellow gem, the girl - whose name is Nina - is praying for you to return when a guy in brown clothes and a fedora with a gun in his hands jumps into the well. Nina fears the worst.
Ardy eventually reaches the forest, and meets an old woman. She'll tell you about a female cat thief who stole another Rainbow Crystal much like the one you got, and asks you to go get it.
Scene 4: Lumberjack Forest
Your jumping skills, especially with the tail bounce, will be put to the test here near the beginning when you have to avoid the spikes.
Watch the trees, as some of the red fruits have eyes. If you get close enough to these fruits, they'll drop down and dive right at you, fangs at the ready. Thankfully, you can throw Pec at them and have him eat them.
The second treasure chest contains an upgrade in the form of what looks like an oxygen tank. If you pick it up, Pec turns red, and you can pump him up like a balloon and fly around on him. Be careful: when he starts deflating, your flight time is about to run out. Pick up more oxygen tanks to get more flight time.
After flying across the spike pit, you'll come across a continue point and a set of trampolines that will get you to the top. From here, you'll come across the green guys again. DO NOT attack them with Pec. Instead, leap off of them to the right, one by one, to clear the spike pit. Run down the slope and jump at the very edge to clear the spike pit, and you're outta here!
You'll then chase somebody to a treehouse.
Scene 5: Catry's Tree Fortress
It's that Indiana Jones-looking guy again! And one of those green guys is riding a flying vehicle that will let him ride to the top! When you meet up with the guy, you'll find you 'll have to make your way to the top the hard way.
Grab the vine to the left at the very beginning and climb your way up. You'll come across a couple of branch platforms, a ton of stars and a green guy. Use Pec to take down the green guy, and watch out for the branch platforms that spin, as they will slowly move you off. If you need to, use your tail bounces to get where you need to go. Just watch out when you do it on the spinning platforms, though. You'll still be moved to the side when you land during the tail bounce.
The dark brown vines can be walked on.
You'll eventually reach the flying platform that the guy dressed like Indiana Jones is standing on when it seems that you can't go any higher. From here, you can grab on to the hook at the bottom of the flying platform, Stay on the left side of this hook so you don't get hit by the projectiles firing out of the cannons. You'll reach another continue point, and if you use your tail bounce to the left of it, you'll find another extra life in a chest.
Press the yellow button to enter the next room. Here, you'll fight Catry, the thief that the old woman in the village told you about. There are four buttons: red, blue, yellow and green. Each colored button corresponds to a similarly-colored boxing glove that pops out of the wall. To beat Catry, all you need to do is jump on the button for the corresponding boxing glove she is near to hit, and make sure she doesn't do the same to you.
As you damage her, she eventually turns purple. After a few more hits, she gives up at first, then glides out of the tree fortress. Ardy automatically gives chase, and Catry gets eaten by a sand worm. Naturally, Ardy decides to join her in there.
Stage 6: Eaten!!
You'll eventually drop down into the belly of this beast. Do not let the droplets of acid touch, as you will take damage from them.
The bony creatures that follow you around can easily be rid of with some help from Pec.
The things that look like a stream of saliva are really ropes you can climb up and down on, and the things that look like sharp teeth are spikes.
Watch out when you are on the rope after the first continue point, as there are walls that can clamp down on you if you are not careful. Be sure to turn around to avoid these things as well as the spikes.
When you reach the bottom here, you'll find an unconscious Catry and the light green Rainbow Crystal. (Believe it or not, in the Japanese version of the game, Catry is a skeleton here and not simply knocked unconscious.) You'll still need to get out of here, so go right, climb the dropes, avoid the spikes and acid droplets and make your way to the top. When the music stops, you'll hear the sound of a sword slicing through the level. When you come out, you'll find out that the guy in all brown who is dressed like Indiana Jones has saved you from the sand worm, and that he has run into a table.
He then runs into a nearby pyramid, and Andy gives chase.
Scene 7: Ancient Pyramid
At the beginning, ride the square to the right, and duck to avoid being hit by the spikes. You'll need to pay attention to avoid being hit by spikes as you make your way down into the pyramid. There will be a green guy walking around and carrying a torch. DO NOT destroy this guy unless you absolutely have to, as doing so makes it harder to see in the level.
Be careful near the moving spiked walls. Don't go too fast, and be ready to jump over them to continue on. When you grab the rope, you'll find out that it is lit like a cannon fuse at the bottom and the fire will be rising towards the top. Leap off the rope and drop down, staying on the right hand side. You'll land on a platform that looks like a moving snake. Move to the right, avoid the bombs that move towards you and destroy the green guy who is planting them at the end. There is a chest with either treasure or Pec above him if you need it.
This game looks pretty attractive and seems easy at the beginning, but it gets harder later on. This game is still worth playing, however, even if it doesn't exactly set the world on fire.
The game begins with a brief intro credits scene before you go to the title screen. This really helps set the tone for the game and shows Ardy doing a few things. Nice.
Prologue
The game starts out simply enough. You are Ardy Lightfoot, and the blue guy following you around is Pec. Left and Right on the Control Pad allow you to move left and right, respectively. Holding Left or Right long enough allows you to run. Up allows Ardy to hold a mirror in front of him, which allows him to avoid damage for as long as he holds it, and Down lets you crouch. You can jump with B and throw Pec forward with Y or A to use him as a weapon, and if Pec bits anybody, they're going down. Pec also acts as an extra hit. Get hit once, and Pec dies. The only way you'll be able to defeat enemies then is to jump on their heads. Get hit without Pec, and you die.
The HUD in the upper-left corner is also simple enough. You have the number of extra lives followed by the amount of stars you've collected. 100 stars nets you an extra life.
Ardy can leap off the ground with his tail, similar to Scrooge McDuck's cane in the two DuckTales games, though executing it is a little different. Press B while in mid-air and you'll land on your tail. Hold down B to charge power when you're on the ground, then release the button to use it. As long as you're holding B when you land, you'll still be able to use your tail and bounce multiple times.
Push the crate near the tall wall to the wall, then charge up the tail jump and release the jump button to clear it. You'll go down a slope, where you will find a red bomb. Walk up to the bomb and pick it up with the Y button, then walk to the wall and press Y again to lay the bomb down. (You can also pick up items by throwing Pec at them.) The bomb will blow up the wall and you'll be able to continue.
After making your way to the right, you'll come across a gravel floor that will crumble under your weight, causing Ardy and Pec to slide down a slope. Head to the right and you'll find a tablet! This completes the prologue.
You'll then transition to another scene. A huge, shadowy figure behind a red curtain in a fortress somewhere in the world bosses around a mole with a spiky helmet on his head. The mole nods, then heads out to do...something.
You'll then go to a map screen. Ardy Lightfoot will come out of a hole in the ground and head to a barn. This is actually a cabin of some sort, and Ardy hands the tablet to the elder, who reads the tablet.
"Long ago, great power created a rainbow. Many bad things happened and the great power was lost. Then the power was divided into seven pieces. When these seven pieces meet again, any wish will come true. One returned to the earth. Another sunk to the bottom of a dark cold water. Another piece left forgotten in a deserted town. And another one disappeared into the outer sea...."
This is all that the elder is able to read, and this text scrolls by rather fast. Suddenly, the nearby village catches fire, and Ardy has to leap into action.
Scene 1: Mining Town Ablaze
The green guys that leap up and down can easily be dispatched by throwing Pec at them. Pec just eats them right up. Some of these green guys will throw bombs at you, but if you can figure out where the bombs will land (they're terrible at aiming) you can fight them off fairly easy with Pec. Some of them will also give the villagers a hard time, but if you get rid of them, the villagers will be able to escape.
The treasure chests can be opened by walking into them. They usually contain treasures such as stars, but it also helps to open them in case you've lost Pec, as you usually get him back this way.
The gray monkey statue with the quill pen and scroll is a continue point. Leap on his head, and he'll start writing, documenting your journey so far. After the continue point, there will be a green guy on a plane dropping bombs at you. If you keep moving in one direction, you'll run as opposed to walking.
The green guy on the airplane will eventually crash into the water tower. Unfortunately for him, he's as easy as the rest of the enemies you've come into contact with.
You'll then meet the mole with the spiky helmet. Turns out, his name is Grounder. He'll eventually head into the well along with two flunkies. The Elder and the girl that was with him in the red house at the beginning shows up, having followed you to the well. Ardy and Pec automatically jump in to go after Grounder.
Scene 2: Grounder's Mine
The conveyor belts will move you in any given direction, while the buckets on chains will pull you to higher heights whenever you jump into them. The "merry-go-rounds" go in a circle, and you'll have to wait to get from one bucket to another. Be sure not to take damage from the green guys in the helmets, as you can easily lose Pec to them and they can't be killed.
After the continue point, you'll come across a bucket. When you see an opening to the right, jump to it immediately or else you're going to lose a life. The chest to the right will contain Pec if you've lost him. From here, you'll have to deal with conveyor belts, wooden spikes and the green guys again...and this time these guys are flying. Throw Pec at them to make getting them out of your way easier. The chest in the upper-right corner of the spike and conveyor belt area contains an extra life, which is signified by a miniature Ardy Lightfoot.
On the set of baskets to the right, you'll have to throw Pec at the green guy in the bucket to the right in order to ride that bucket. You'll see another set of merry-go-rounds, and once again, the green guys will be riding in the buckets. Get rid of them with Pec, and watch out for the broken buckets as you won't be able to utilize them at all. You'll soon reach the exit.
Scene 3: Tunnel Chase
You're in an auto-scrolling area. You'll need to jump into the mine cart or else risk being left far behind and forced to lose a life - not an easy task if this is your first time playing the game - and stay on it. Watch out for the bombs being dropped by the green guy on the other mine cart, as well as their explosions. You'll eventually lose the guy after he gets knocked off the mine cart, but the ride ends pretty quickly as you run into a wall...and meet up with Grounder, who is also coming after you. You'll eventually have to fight this guy.
Avoid the blocks of dirt that drop from the ceiling whenever he stomps the floor. Thankfully, it's easy to see where to stand when you pay attention to the top of the screen. When he throws his spiked helmet, jump towards his his head and press B in mid-air to hit him with your tail on the way down. Avoid the helmet. When he changes color, he's close to death, and he will eventually go down. You'll get the yellow Rainbow Crystal for your trouble.
Once Ark goes to bed, Darkside Elle tells you she tried to kill you as a baby in Storkolm because the Elder's word is absolute, but she understood from watching Ark grow up that we are all individuals. She knows Crysta is disappearing, but if she and Ark are bound by fate, they will meet again after being reincarnated. She then says goodbye to Ark, if only for a little while.
Ark then goes into a deep sleep and dreams of becoming a bird, flying around and seeing the surface world's future. From there, we see the dream of Ark flying around as a bird, traveling alongside both a train and a plane while looking at the future of the world before landing in a forest...all while the credits roll.
After the credits, somebody knocks on a door somewhere in Storkolm. Lightside Elle answers the door, then goes outside. The game never reveals who was at the door, and the game ends.
After beating Dark Gaia, we then learn what happens to everything we know...
After you beat Dark Gaia, you'll hear the voice from the hero's grave in Antarctica. Lightside Ark's spirit. He tells you that Dark Gaia created you to rule the planet as his own, and that you were created from Lightside Ark when Dark Gaia was first sealed, as was the rest of the people in Crysta. He then tells you about Storkolm and how the world runs on a balance of light and dark. When Darkside Ark came to realize that, everything was made great again. Both Arks then return to their respective worlds.
You'll be back in Storkolm, but now the Crystal Blue will be flying there. Ark realizes this was his hometown, but with nobody to share it with, it's meaningless. He feels the pain Lightside Elle went through when everyone else in her town was killed. Yomi shows up, and Ark wonders what he fought for all this time, as he resurrected the above world but unintentionally did it for evil forces' gain. Yomi reminds Ark that he created heaven and earth, and that there is always a balance. Ark then finally asks Yomi what kind of creature he is, and Yomi explains that before animals evolved, they all looked like him. In other words, Yomi is the distant ancestor of every animal ever. Yomi then says that humans evolved to stand on two feet and use tools, but now rely more and more on machines, and thinks that humans may evolve into Yomi-like creatures. Yomi then tells Ark he is going back to sleep until the world has another legendary hero and is in need of them.
Ark then hears from Light Gaia, the soul of the above world. Now that Dark Gaia is destroyed, Crysta and the underworld will disappear, and the above world will return to normal. It is then revealed that the blood of both Light and Dark Gaias flows through Ark, and now that his duty is finished, his body will soon disappear as he was a creation of Dark Gaia. Light Gaia commands Ark to enjoy his last day in peace.
Ark then reappears in the Weavers' home. Strangely, Darkside Elle is still alive as if nothing had happened. Happy music plays in the town. From here, you can talk to everyone. Also, if you try to buy anything, the game won't let you. The Magishop will also be replaced by another merchant who tells you Magirocks don't exist. If you talk to the people in the Elder's house (now called Ark's, since the Elder doesn't exist anymore), they'll tell you the blue door just leads to a broom closet. If you talk to the fortune teller, she will tell you that a new world is starting. You'll learn that all traces of your journey have disappeared.
When you're done, go back to your room, where this whole game began and move into the bed. You can put the controller down. You're finally done. Enjoy the credits.
From here, leave Airsrock and head to South America. Remember where the hole we entered the world from was? Well, we're going to have to go back there. When you re-enter this area, you'll find a huge hole that wasn't there before as well as Columbus. If you talk to Columbus, he'll tell you he never forgot how you rescued him at Sylvain Castle, and that he has explored the world since and seen the world change so much that his navigation techniques seem primitive now. He is now convinced you are the legendary hero, and that it is prophesied that the hero will disappear underground.
When Columbus asks if you're going, say yes. He'll recommend you save at the nearby book and ink well first, and that once you go into the hole, you may never be able to return to the light world.
Once you enter the hole, it's just a short trip back to Crysta on the overworld map. If you talk to anybody in the town, they will turn into souls and attack you, saying if you had never found out, you would have been happy.
Once you trigger the red hue and the impending doom music, head to the Elder's house and see the Elder. He will thank you for resurrecting the world but tells you that you have learned more than you should know. He asks you to follow him so he can show you something.
Leave the Elder's house. The Elder will tell you to look at the sky. He will tell you that everyone in Crysta are replicas made from Crystal Blue, and float to the sky like Crystal Blue when used up. The Elder goes into a brief monologue involving duality before telling you that your duty is now finished. He then says it is now time to head towards the Gaia Stone.
You'll be teleported to a very strange place with very strange faces similar to those on the underworld tower doors. Keep running north and don't stop. You'll find out you are inside the sun in the underworld, and that the infinite corridor is the history of living things. You'll be told the planet was doomed with an unfortunate fate since the very start. The voice then states it will fight like you, with real form.
You'll be teleported to another room, where you'll meet Dark Gaia. This is the final boss.
Get to the far left at the start of the battle, and run around when you see the "Gaia's rage!" message. When he launches an orb of light, face Dark Gaia and keep using the rapid stab to reflect it back and attack him. Then, avoid the upper body when it travels towards you in the shape of a spiky ball, and go to the bottom of the screen and hit it with a dashing attack when it stops flashing.
You'll then be teleported to another screen when you beat this first form.
For Dark Gaia's second form, stay at the very bottom of the screen so Dark Gaia doesn't back away. Avoid the arrows, and when Dark Gaia approaches the north end of the platform, attack the mouth in the middle with your regular stab repeatedly. To avoid the laser, dash through it. Also, do not get hit by any of the crescents, especially the blue ones as they will freeze you.
There is a Sonic Boom attack that Dark Gaia can do, but it can easily be dodged by dashing to the far right or far left. You can jump over it, but going all the way to the side with the dash attack is better.
When the mouth in the middle unleashes a white light that covers the entire platform, block it. Otherwise, you will be absolutely annihilated.
Once you've done enough damage to Dark Gaia this time, you've done it! You've won!

