Part nostalgia-bomb, part note-taking and part FAQ, what started in GameTrailers as a video game blog is now on Blogger. This blog is a look back at video games, both popular and obscure, from the video game industry's infancy all the way to the previous console generation.
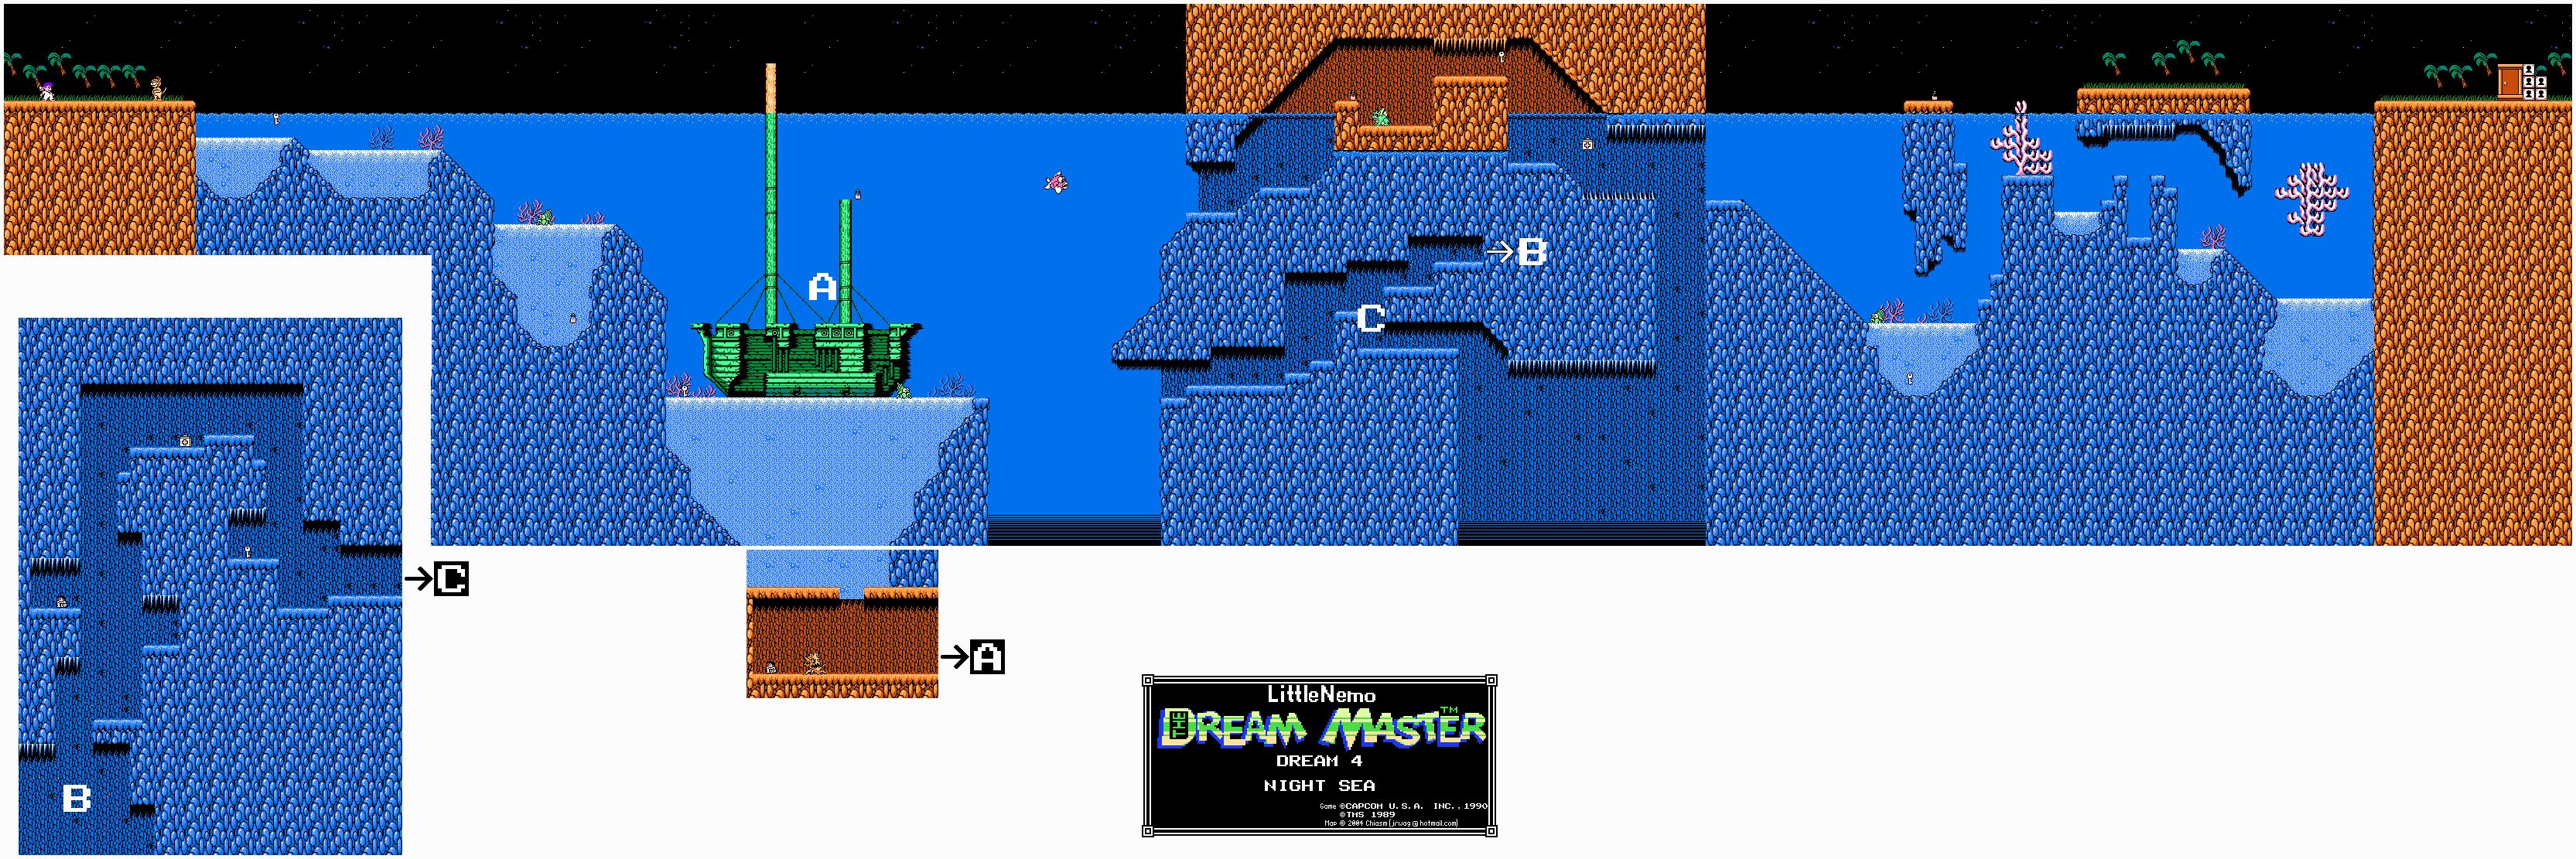
At the beginning of the stage, you'll learn that if you share your candy with the hermit crabs, they'll take you where you want to go...and, oh boy, do they ever. They can dig underwater like the moles and attack with their claws. If you're above ground, you can walk on ceilings.
Go under the ship and go down to find a 1-Up.
There are two routes you can take. If you take the lower path and go to the end of the upper fork, you'll enter a hidden bonus area where you can get another extra life and a first-aid kit.
You'll be told that you're in Nemo's house. First of all, you might as well tell me that cows go moo. Second of all...what happened to that staircase?
The flying turtles take two hits to kill, and they fly to the left while spitting turtle shells downward. If these shells touch the ground, they'll move towards you. Other new enemies include bats that fly at you and monkeys that throw dishes.
You'll have to use multiple animals to climb along the walls and fly around the house to find everything. You'll need the lizard to get one of the keys, and you'll need a bee to fly everywhere.
It will become a little more noticeable in this stage that the bee can't fly forever. You'll eventually float back down no matter how hard you're hitting the button, so land on things en route to your destination.
The mouse can climb on walls like the lizard, but you also have the slightly longer range that comes with the croquet mallet that comes with the mouse.
As stated before, the second lake in the world leads to another underground cave. You'll have to go down here to get one of the keys, but it's worth it anyway because a 1-Up is right next to it. Also, avoid the spikes. The spikes are instant death if you touch them.
The tree stump spits fire at you.
The tadpoles will try to swim into you.
The first aid kit will completely refill all of your life.
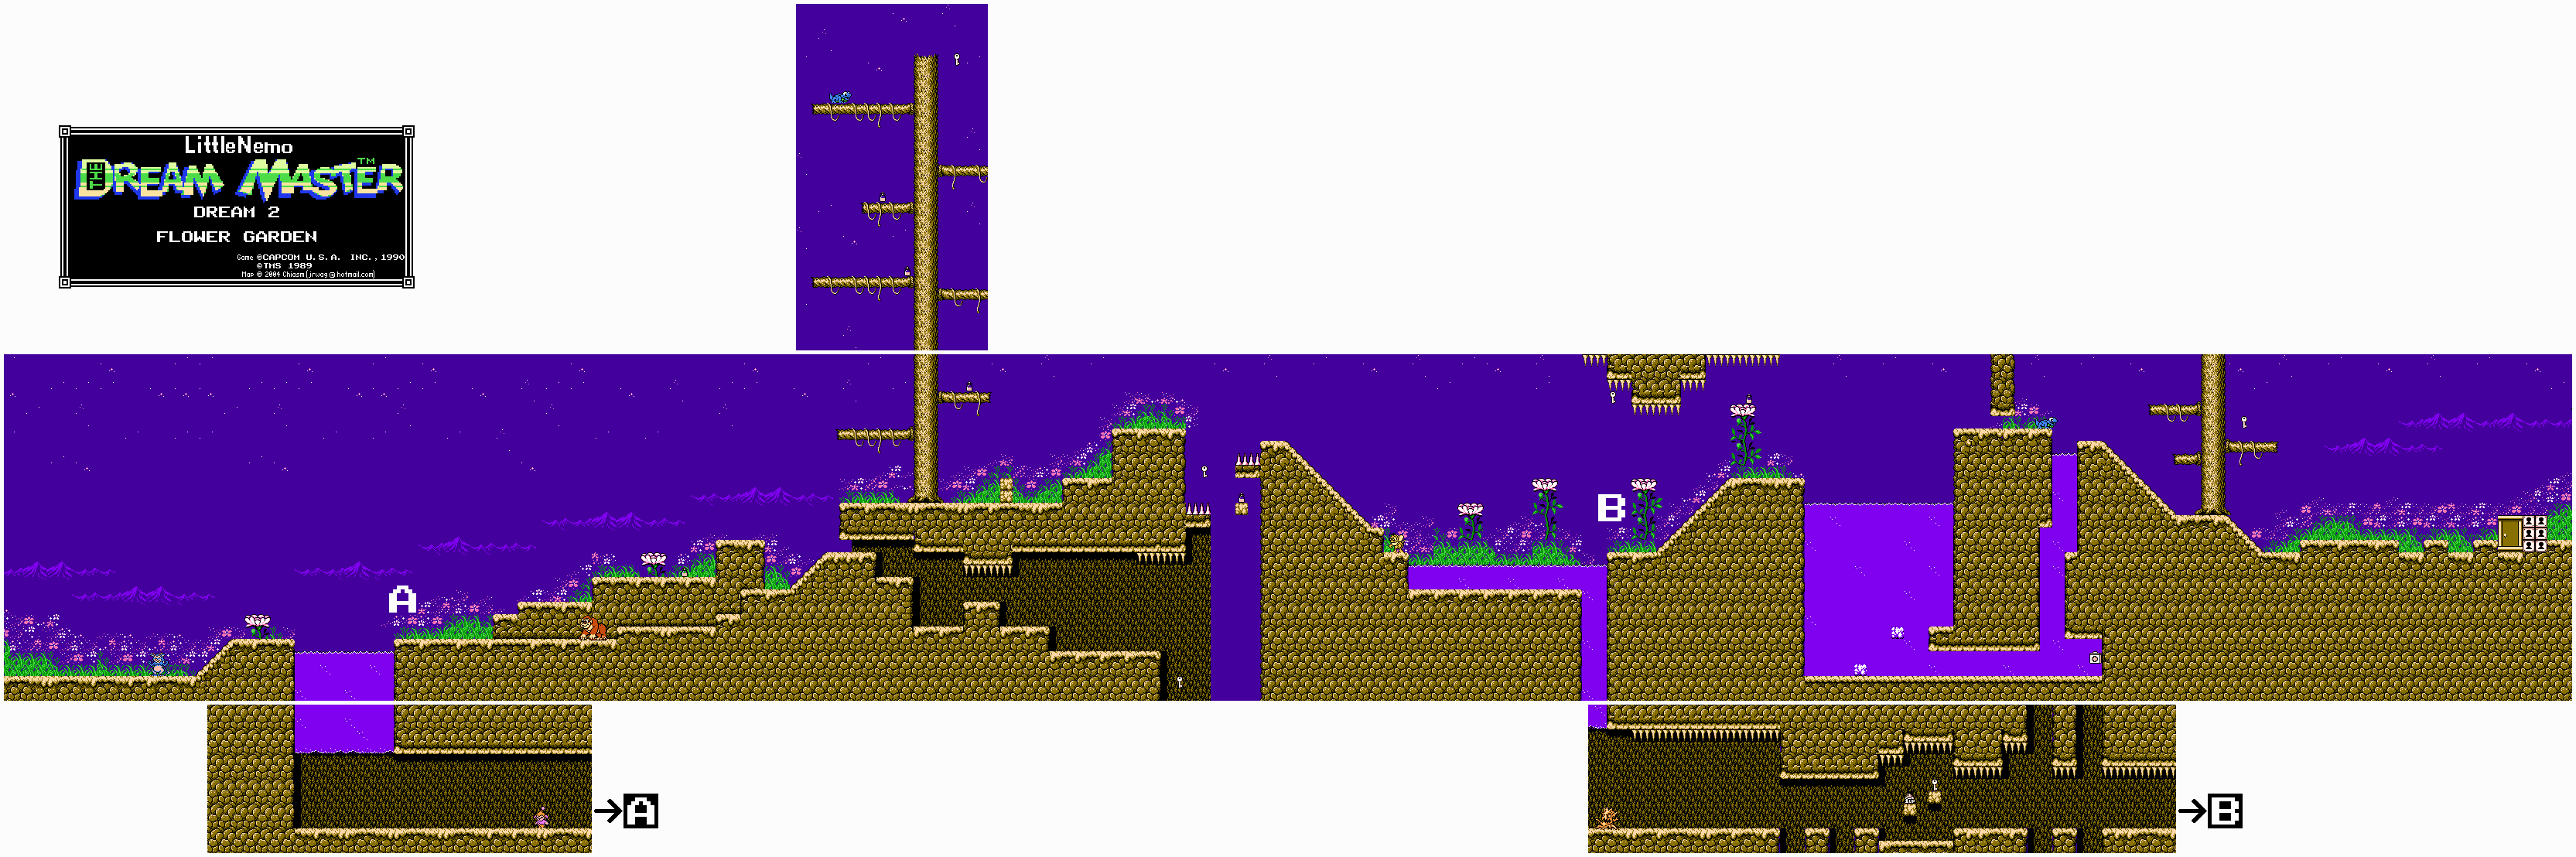
The beginning of the level is simple enough. Collect the keys, then get on the train. From here on out, you'll be dodging metal beams in your path as well as other enemies, such as toy planes, hot-air balloons that drop bombs, and evil flying squirrels.
The train will soon descend. The keys in the middle of the stage are optional, but it's worth having three in reserve in case the game gets too hard.
Be ready to duck when you see the ceiling spikes. Also, you'll want to go to the right to avoid all the spikes when the train ascends.
There are three more keys at the end. Even if you have six keys after collecting the ones in the middle of the stage, go ahead and take them. They could prove useful.
Who would have thought that Capcom could make a great game out of a turn-of-the-20th century newspaper comic?
New York, 1905. Little Nemo has been invited to Slumberland to become the Princess's playmate. He also gets a bag of candy as a present from the Princess herself. Of course, despite being taken to Slumberland, he still has to make his way to the Princess for reasons never really explained...at least, not in the game.
The game was actually (loosely) based on the 1989 film "Little Nemo: Adventures of Slumberland," which would not see a US release until 1992. As a result, the game and movie are considered to be seperate when the game is actually based on the animated movie.
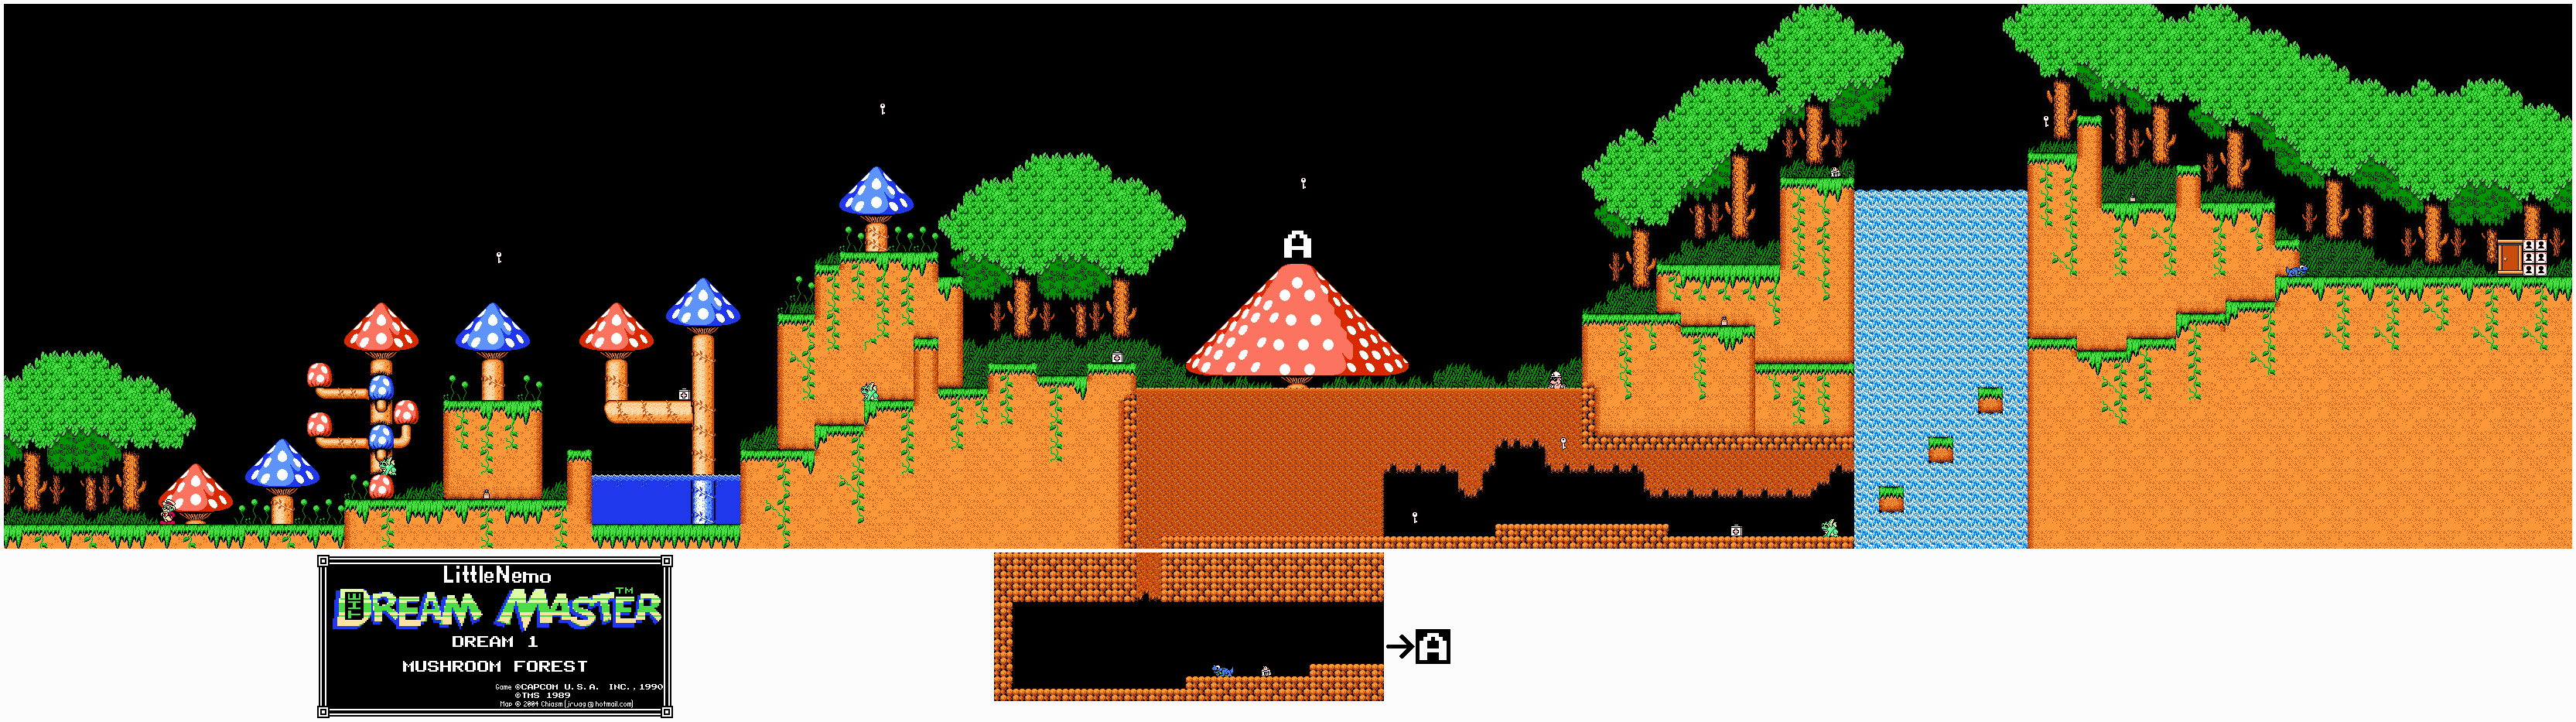
The clown at the beginning is Flip, who would wake Nemo up after the Slumberland adventure that made up the film (and the early comic strips). Instead of telling you to wake up (and make the existance of the game anti-climactic and rather pointless), he'll tell you that you can ride on some of the animals here if you feed them candy. You can ride them as long as you want, and you can press Select to get off. He also says that there are locked doors that require keys to get through them.
The green frog can be fed three pieces of candy and then worn like a suit when you jump on it while it's asleep. Prepare to see this happen a lot. This frog allows you to jump higher, at the expense of a slower walking speed. The animal friends you'll be able to get assistance from will have longer life bars than Nemo, so take advantage of that when you can.
The enemies here are pretty basic, for the most part. The snails just move towards you, while the sinister-looking bees just fly back and forth. You have to have an animal to defeat them, but you can stun them with the candy if you need to.
The little bottles with liquid inside will restore one unit of health when you collect them.
The mole can also be used as a suit with the whole candy trick. The mole can dig through dirt, which can let you grab hidden keys that you wouldn't be able to get with Nemo alone. If you go down, then go all the way to the left, you can find a pit you can dig through. Inside is a blue lizard you can ride on as well as a 1-Up.
You're supposed to dig all the way to the right, but if you have the blue lizard, you can climb the walls by jumping into them and continue to go right. You'll be able to find another extra life rather easily.
There are six keys in this level, and you will have to find them all before you can open all the locks and continue to the next dream.
As expected, one of his parents have to wake him up at the end of every dream. Usually, his parents scold or comfort him (or it's Flip doing all the work).
When you start the level, you'll meet one of the Boomps. He tells you that Oompi wants to meet you, and that he lives under the water.
Jump into the water at the start of the level and go all the way down. You'll enter an underground cave where you'll meet Oompi. Oompi tells you that you'll need the lizard's help to get through this area, and to look in the trees for it.
You can feed the gorilla three pieces of candy to take a ride on him. The gorilla can punch out any enemy in front of him, and you'll need him to get through the level and power through the worms, spiders and bees. You can also climb trees much like the lizard can walk up walls.
The worms are little flowers that you can barely see on the ground. When you get close to them, the worms will sprout up and move forwards.
The skulls on the dandelion seeds that fly down the screen are annoying. Even when you beat them up, they still come back with a vengeance from the top, flying back and forth a few times before they home in on you and go straight down.
The black birds will fly around and stop every couple of seconds to drop projectiles down at you.
The bee can help you fly into the air if you feed it candy, and can also attack with its stinger. Beware: if you enter the water with it, you'll lose the bee and go back to just being Nemo.
The second lake in the world leads to another underwater cave if you go all the way down.
Holy cow, Dedede gave me a hard time the second time around. But it got done!
Stage 4: Bubbly Clouds
The guys that fly around in circles are much faster.
The parasols that the Waddle Dees carry now have a mind of their own. Instead of floating into the sky never to return, they start flashing and start flying into you instead. Inhale the enemy that holds the parasol, then spit them at the parasol.
The Sir Kibbles no longer wear their armor, and they now look like Link...weird. They don't just look the part, though, as their boomerangs have more range and can move upwards on their way back, hitting you in the back of the head after you jump over them.
The room before Kracko's first form contains pelicans now.
To beat Kracko's first form, stay all the way to the left to avoid the cannon balls from his dashing attack, duck when he comes down, and jump over him when he does his dive attack. You can also stay to the left the whole time and keep facing left, turning around to attack. Spit any of the bombs he drops back at him, then get back all the way to the left side of the screen and repeat.
The Gordos in the wall full of Star Blocks move in a really weird pattern. They move left, then right, then go up a little bit before they do it again...and keep doing it.
Watch out for the stars in the portion where you can grab the curry and break the blocks with the fire breath. The starts will hurt you.
Stay all the way to the right at the screen before the boss door. The moon has a secret room in it. If you're agile enough, you can get two Maxim Tomatoes and a 1-up.
To beat Kracko's second form, basically do most of the same stuff you did against his first form. Just stay all the way to the left side of the room and fly over him when he dives towards you, then inhale a bomb when he drops them and send it his way.
Stage 5: Mt. Dedede
Well, here are the boss strategies (again):
Whispy Woods drops Gordos in addition to apples, and his air pellets are much faster this time around.
Lololo and Lalala move faster, but thankfully, that's all they do here.
The boss here is much faster than on the original quest. He goes into the rushing tackle attack almost immediately, which will do damage to you every single time until you get used to it.
To beat Kracko's second form, basically do most of the same stuff you did against his first form. Just stay all the way to the left side of the room and fly over him when he dives towards you, then inhale a bomb when he drops them and send it his way.
Dedede is much faster, and it can be a pain. Just stay on your toes against him. Staying on the ground will allow you more opportunities to attack. He also bounces twice whenever he jumps, so you have to wait until the stars from the second jump disappear before attacking him. He doesn't do this every time, though, so pay attention.
Also, funny how I mention doing a longplay of Chester Cheetah: Too Cool To Fool, and then forgot to do it completely. Whoops.
Well, since we have the code to access Extra Game Mode, we might as well do it, right?
Stage 1: Green Greens
Yep, another second quest.
The enemies are a lot faster in this mode, so you'll have to be ready when enemy forces come your way. Everything will kill you in less hits compared to the normal version of the game, so you have to know the enemies and be able to inhale them at a moment's notice if you need to. Cannons, meanwhile are now silver and look more modern...and they shoot four shots instead of three. The shots are faster, making the Shotzos in Extra Game mode much more relentless.
The chicks are replaced with chickens, and they have different attack patterns now. They can deal two units of damage, which can make them a real pain.
The Cappys are replaced with beans, and they hide in cakes. The first one you see in the stage shoot out cake icing, which makes it harder to get close enough to inhale it. Once you do, though, you can take the guy who was inside of it out.
The Bronto Burts are now black and have a weird facial expression. It's just...unintentionally racist. They can move really fast on a moment's notice. Like the chickens, they can deal two units of damage instead of the usual one. Gordos are even worse, as they can deal three units of damage now.
When you face the Poppy Bros. Sr., he throws bombs a lot more often now. You'll actually have to be on the move against this guy. He also has a dash move which is hard to avoid, due to the increased speed apparent on some of the enemies.
Whispy Woods drops Gordos in addition to apples, and his air pellets are much faster this time around.
Stage 2: Castle Lololo
The Broom Hatter at the beginning goes straight for your throat. When you enter the castle, the Waddle Dees and Waddle Doo jump around.
The ghosts are now cross-dressing...and they're really, really fast this time. Also, good luck getting the bomb. It'll start to explode as soon as it appears onscreen.
The masks have a different appearance, as well as the faces that come out of the ? blocks.
The hippo-like things that shoot bubbles upwards now shoot them towards you, and the Gordos in the underwater segment both move faster and jump around, which makes getting around difficult.
The Mummy balls are now Skulls, and...you guessed it...they're faster.
Lolo seems to have something against Kirby. Besides running around at light-speed, he shoots two things at you before retreating...and that second thing is usually a Gordo. It should be noted that the higher up he is, the slower he moves. To beat him this time, inhale a block, move away, then wait for him to attack again before you hit him. You'll also want to attack Lolo when he is coming in and out of the top two doors, as he backs out towards the door more slowly on those levels compared to the bottom two.
Lololo and Lalala move faster, but thankfully, that's all they do here. Your best bet is to swallow the block from behind, then hit either of them from behind, as you will risk taking damage from a frontal assault.
Stage 3: Float Islands
The squids are now octopi, and they deal two units of damage.
The clams that shoot the Waddle Doo beams are now crabs.
The Kabuus are angry now.
The cannon at the end of the ship is just relentless.
Kaboola is much faster than on the original quest. He goes into the rushing tackle attack almost immediately, which will do damage to you every single time until you get used to it.
Time to handle the second half of the game. It doesn't get THAT difficult, but the game remains fun throughout. Definitely one to recommend!
Stage 4: Bubbly Clouds
A little bit more difficult, but not too much.
The first two sections have you moving to the right. There are a good amount of flying enemies here, so be careful. The Sparkys (the smiling things that float) explode like bombs when you shoot air pellets at them. Inhaling them just makes them mad, and they instantly become one-eyed, fanged monstersthat chase after you until the blow up.
The third stage is a maze. The flying enemies here have set movement patterns that are easy to anticipate. When you reach a fork in the road, go left for power-ups and right for the mini-boss.
Another mini-boss, and this time it's Kracko...but in a weaker form and not the spiked thunder cloud we all know and love. Fly in the upper-left to avoid both him and his cannonball shots, then quit flying and spit the Waddle Dee he spits out back at him. After three hits comes the Warp Star.
Grab the oversized lemon (whatever it is) to the left of the waterfall...then fly right and break some blocks. There are two Pep Brews and a Maxim Tomato here, so there's no excuse not to have full health at this point.
The rest of this stage is easy - eat some curry and break all the blocks to access the door, then fly to the top to meet the boss.
Kracko is now in his powered-up form. He'll attack with two beams, swoop towards you in a U-pattern, and spit Waddle Doos out. Spit them at him like before, and jump out of the way when he swoops down.
Stage 5 - Mt. Dedede
The four doors are a boss rush.
Basically, you play short sections that look like the level they're from, touch the Kirby near the door to make the Gordo blocking it disappear, and then go in the door and fight the boss. That's it, really. Also, touching the Gordo blocking the door takes off three units of health.
Anyway, why do you fight Lolo and Lala? Aren't they the protagonists of their own series? Also, come on, HAL. Give us a 3D reboot of Adventures of Lolo. Please?
Why do the Kirbys that activate the doors dance? How do they dance like that? How and why does Kirby split into three? Why am I questioning all this?
When you beat all four bosses again, fly into the picture of King Dedede to fight...King Dedede.
Fly away from him when he rushes towards you without his hammer out. He'll slide into you or try to inhale you.
When he pulls his hammer out, move a few steps back, face him and inhale the star he makes when his hammer hits the ground.
When he crouches down, he's about to jump. Get close enough to inhale one of the two stars he makes and spit it at him.
After ten hits, you'll knock him out of his castle, causing the castle to have a sad face. Dream Land is hungry no more...at least until next time...
And now I take my turn on the first-ever Kirby game!
Stage 1: Green Greens
The controls are pretty simple. Press Up to fly (and B to spit the air out - works as a weapon, too), Left and Right to move around, Down ducks, while A are B are jump and suck respectively.
Once again, you can't copy abilities when you press Down after inhaling an enemy. Also, inhaling two enemies still gives you the normal star attack. (Both wouldn't debut until the next game, Kirby's Adventure.)
Once you have an enemy in your mouth, B spits them out as a star-shaped projectile. I don't know why I'm even mentioning this, as the controls are so easy you don't even need the instruction manual to figure them out, so let's just get back to the game.
The enemies here are nothing you haven't seen before (unless you've never played a Kirby game in your life - if you haven't, then your gaming expertise is bad and you should feel bad), so all you really need to do is just inhale them and spit them back out at other enemies.
The door with the word "in" above it leads you to two Pep Brews. Don't know why you'd need to refill four units of health this early in the game unless you've either run into or jumped on everything...but okay...
There's a Warp Star at the end of the first segment. It takes you a fight with Poppy Bros. Sr., which is a joke if you've played Kirby before. Just inhale the bombs he throws, and spit them back out at him. He [b]does[/b] have a leaping attack, but if your aim is perfect every time you won't see it. After three hits, it's smooth sailing from here.
The third section is the inside of a tree. The segments of the level blocked off by the Star Blocks lead nowhere, so just go straight up. If you need to refill your health for whatever reason, there's a Maxim Tomato near the top, which refills all your energy.
The boss here is Whispy Woods. He's ridiculously easy - just suck up the apples and spit them at him. Duck when he spits the air clouds. That's it.
When you beat him, grab the star and it's on to Stage 2.
Stage 2: Castle Lololo
It's the stage they didn't put in Kirby Super Star - sort of.
When you enter the castle, inhale the microphone and spit it back out to destroy the enemies. Go into the door on the right. If you go up, you'll find a door that leads to two ghost enemies and two Pep Brews.
Some of the other doors take you to dead ends with either enemies or power-ups. The game is so easy, however, that they aren't noteworthy.
When you see the bomb, inhale it and spit it out. As long as the resulting explosion remains on-screen, they'll kill off any enemies in your way.
The masks can be inhaled when they change expression. The faces in the ? blocks can also be inhaled. Go down and to the left in the third section.
Interesting note about the fourth section: he can't attack underwater, because the water gun attack wasn't introduced yet. D'oh! Just go from Point A to Point B here.
Grab the Candy and float all the way up. Simple.
The sixth section has the Mummy Balls, which can only be destroyed by an air pellet (made by pressing Up to fly and pressing B to stop flying). Since you're most likely still invincible, just run to the Warp Star.
You'll face Lolo here. Spit three of the boxes he shoves at you to beat him and move on.
You could go all the way right in the next section, but going to the top beforehand gives you a Maxim Tomato...and more points in the way of enemies to fight when you get up there.
After an easy section, you'll get a room full of doors. The one at the very top is the one you want, but another door leads to a 1-Up! (The rest just take you to another door in the room.) One last easy section, and you'll face Lolo and Lala.
Same thing as last time...just spit three boxes at each of them. Try not to get cornered, please.
Stage 3: Float Islands
Another easy level, though there are a few things to mention:
The clams that attack like the Waddle Doos can't be inhaled if their shells are shut.
The cannons have easy patters, but it's easy to damage from them if you're careless.
The falling coconuts on the palm trees (or are they dates or leaves? I can't tell) don't explode like bombs here, unlike in the later games.
The shells cannot be inhaled unless the occupants of them are poking their heads out and moving around.
The first two sections are easy. The first one just has you moving all the way to the right, and you can fly over all the enemies with ease. The second one has you making your way to the door at the bottom-right corner.
When you reach the ship at the beginning of the third section, you'll find a plate of curry. Taking it will have Kirby spitting out fireballs when you press B, and he'll be in motion and flashing as long as it's in effect. If you go through the door in the middle, you'' find a 1-Up. If you still have the curry power-up in effect when you jump in the water, it'll stop working.
The door at the end of the ship takes you to a Warp Star that takes you to a Whale's blowhole which takes you to the boss section. Fight off the Kaboos and you'll find what looks like an oversized lemon. Taking it makes you fly indefinitely and triggers a boss fight.
Just hold B and move around so your air pellets hit the blimp. Avoid the cannon shots, and move out of the way when it spins.
This area is pretty straightforward. You'll have a break a wall in mid-air near the end to enter the final chamber.
Dr. Max Cranium is all too happy to see you, and he takes you on with a giant, robotic Michael Jordan mecha. Shoot the head, which is a dome protecting Dr. Cranium's head. Avoid the balls he tosses at you and pick them up when they're on the ground to use them against him.
The basketball hoops at the side provide health and coins. Why they give you coins, I'll never know, but they do give you health. They also don't break after you use them once, so you can refill on health completely...if you don't get keep getting coins, that is.
When you beat Dr. Max Cranium, you've done it! You've won!
The freshly-waxed checkerboard floors will cause you to slip and slide as you walk on them.
Damaging steam will come out of the holes in the ground every couple of seconds, much like the flame jets in the factory.
The spinning candy cane floor is a conveyor belt.
The door near the captive is left, right, left.
When you talk to the captive here, you'll find out that as The Giant Brain Baby, he was forced to wear diapers and solve equations for the crowd...and that he never got over it.
The spinning platforms will spin MJ around. They'll take you either left or right, so pay attention to where you're jumping.
Boardwalk
To the left is the Haunted Maze. To get the Gold Keys for it, just take the platform underneath or use the baseball.
Haunted Maze
There's a ladder leading down at the left side of the maze, left of the start. Jump into the wall to the right midway down the ladder to find the door to the captive.
Be very careful around here. There is a shortcut or two that will send you back in the maze, but the maze itself isn't very long and it won't take you that much time to get back to where you were.
Boardwalk
To the left still is the final level. The key to it is underneath a platform that lowers as you continue to stand on it. Watch out for that eel!
In this episode, we head to Riverview, where the game throws us for a loop.
Riverview
The first thing you'll notice as soon as you start Riverview is that there is no map screen. Instead, all of these maps will be done back to back, so if you need lives and power-ups, you'd better go back to earlier stages and get them before you come here.
Boardwalk
Okay, I officially love this stage. The music is actually pretty eerie, and it really gives off that funhouse atmosphere. Heck, there's an advertisement for a giant brain baby whose head looks more like a tumor than a giant brain.
The first captive is immediately to the right of the silver keys. Just take the spring nearby and fly to the right. He'll be in one of the doors.
The door with the sparkles in it is the entrance to the next level. Take care not to enter a new level until you've found the captive.
The levels here are all in one central hub rather than a map screen, and you won't be able to tell what the levels look like unless you play them for yourself, play this game from memory, or actually draw it out on pen and paper.
Haunted House
The door at the beginning leads to the Haunted House. The ugly faces that act as backboards give power-ups.
There are quite a few secret passages in the walls that you can access by walking (or jumping) into them. Not surprisingly, one of them leads to the captive.
The skeletons sneak up on you if you face away from them, and they can only be destroyed with the quake balls. Hope you brought the maximum of nine before coming to Riverview.
Also, I officially take the comment about the giant brain baby's head looking like a tumor. If you talk to the captive, you'll find out the Giant Brain Baby is in fact Dr. Cranium as a baby. He grew up in the circus but wanted to play sports. You can just taste the bitterness.
The paintings are a reference to "The Scream" by Vincent Van Gogh. The eyes even follow you.
Be careful near the end, as you'll have to deal with platforms on rails much like in the Mario games.
Boardwalk
The big doors are the level entrances, while the smaller ones will contain powerups.
To the left of where you came out is the funhouse.
The gold key to unlock the funhouse door will be to the left of the door. Just take the platforms to get them.
We've fought the factory boss, and now it's time to head to Dr. Cranium's lair.
Factory
Level 5
To the left of the hook that leads to the quake ball at the beginning is a wall you can jump into and walk through. The bonus area and the Golden Heart is at the other side.
The boss here is some sort of green thing on metal legs. Throw basketballs at the head, and use the elevators to jump over the boss when necessary. Be sure to use your power-up balls to deal more damage to this thing, and duck or jump under the propeller blade it shoots at you.
Beating the boss gives you the green cardkey.
Tunnel
There really isn't much to this level. All you really need to have are the three cardkeys. The silver keys here will be needed to free the captive, which is also a no-brainer to find. You'll find out that Riverview is up ahead, and that the old amusement park is now Dr. Max Cranium's lair! Better go and find him!
We go further into the factory, and oh boy, does getting around get a little harder...
Factory
Level 3
You can take care of the enforcer just after the green key door by getting real close, ducking and then hitting him with the basketballs. Since he won't have time to block your shots at close range, you'll be able to bean him repeatedly until he dies.
The steel white platforms that look almost like clean slates will spin around, causing you to fall straight down after you stand on them long enough.
Unlike the claws in the first level, the claws here act as platforms you can grab onto with Up+B.
The grey wheels can be hit with basketballs to drain the slime below you, allowing access to more of the level. You'll want to be quick as you go through this level, as the slime will rise back up after a little while.
Be sure to look around in the upper-left corner of the level after you've drained the slime. You'll be able to find the hostage.
Level 4
There really isn't much new to this level, but this is probably where you'll start getting lost more easily for the first time.
In this episode, we finally enter the factory on Goose Island and gum up the works!
Factory
Level 1
The slimes will be the first new enemy you'll see, and you'll see them right away. Their movements seem a bit random, and they'll split apart like the spiders. Once again, you can use the fire balls if you need to, or the gold homing balls if they're being especially pesky. Don't try to outrun them unless you absolutely can, since the smaller slimes aren't forced to patrol a specific area like the smaller spiders are.
The slime at the bottom of the level hurts you if you jump into it.
You've probably figured it out earlier, but the rubber ball can split in two whenever necessary and cover more area while bouncing off walls.
Junk will shoot out of the chutes, and it will hit anything that it comes in contact with. You'll also have conveyor belts to go against the flow with as you try to run past crushers and claws. The black and yellow chevrons on the conveyor belts show which direction they run.
If you have to fight an enforcer from a ladder, you can hit them in the foot for an easy victory.
The fans will push MJ in the direction they're facing. You'll need one of them for a jump, interestingly and cleverly enough.
There is one jump near the end that involves jumping off the edge of a conveyor belt, and if you didn't have the instruction manual or played it blind, you would have no idea of how to do it. Here's the solution: you hold the L button and then jump. Turns out L acts as a run button, and since the L button can't be changed in the game options, you'd have no clue that it has a function. None of the captives tell you about this either, so it's like the game expects you to know about it from either the manual...which implies you have the manual (that, or reading GameFAQs).
Level 2
The slime has now been replace with lava and molten steel.
There's a fall-away floor just above the first lava pit.
You'll find out that you can hit wheel valves with a ball to drain slime pits in the next area. Also, you'll get the hint "Stay away from the high fastball and wait for YOUR pitch!" We'll find out what that means soon enough.
Watch out for the fire jets near the end. If you need to, you can destroy the nozzles with your basketballs.
We finish off the Laboratory and get the second cardkey.
Laboratory
Level 5
You'll need to go down the ladder to the right of the start and get past all of those electric barriers on the way down to find the captive, which is where some invincibility shoes nearby come in. You'll find out Dr. Cranium has a new creation. Hope you have some fire balls.
The boss here is a Frankenstein monster with orbs for a body. When the body turns into four orbs that surround the head when it flies away, stay on the move and watch the eyes. When they blink, they shoot balls of electricity that will try to home in on you but don't seem to do a very effective job.
When the boss raises his arms, run all the way to the left so you don't get shocked.
When you beat the boss, you'll get the yellow cardkey.
El Train 2 and 3
There are three El Train levels in the game, and they all go the same way: attack the paparazzi, get power-ups, avoid the steel when you're on top of the trains and make your way to the end.
The laboratory adventure continues as we cover the basics of the third and fourth levels!
Laboratory
Level 3
The snakes are here! Knock it down with a few basketballs and move past it as it bounces around on the floor. When it's hanging on the ceiling again, you'll have to stun it once more.
The bonus area has you jumping around on springs. There's a 1-Up to the far left there.
Remember the hint involving the triangles on the floor and ceiling in the checkerboard tubes. The force fields will damage you if you stand where they appear, so be careful.
Level 4
You'll need to use the freeze balls on the silver floating eyes to get to the captive shortly after you start this level. You'll find out that (thankfully) nobody's been mutated yet.
The door above the captive runs on a combination, and you have to trigger switches so they're pulled in a certain direction. For this one, it's right, left, left, right.
If it hasn't been made logical yet, you know now. The ball has to go opposite the direction the handle on the switch is pointed in order to trigger it. If the handle is pointing to the right, the ball will have to be thrown into it to the left.
We're about to enter a whole new world with brand new obstacles. Let's go.
Laboratory
Level 1
The massive basketball players are B-Ball enforcers of the highest order. The only way to hit them is with slams to the head.
Be careful with the platforms with the gears under them. If you're not dead center, you'll be taking a tumble as soon as the platform tilts.
You also have electricity crackling above pits, which further ensures instant death if you take a wrong step. You'll have it above platforms, ready to strike you if you stand on them. It'll also be crackling between platforms, forcing you to time your jumps. Sheesh, we're in the second world and already we're in an obstacle course. At least MJ is an athlete.
The first zombie you see has the set of silver keys.
The metal trapezoid backboards are the same as the wooden ones from the Holding Cells. They just give you power-ups.
The whistle robots will hit you with a piercing wail if you get too close. You'll want to keep your distance as you hit them.
The captive here will tell you about the force fields in the checkered tunnels, which are marked by the triangles on the ceilings and floors. You'll then learn about the invincible green basketball snakes, which you can only stun in order to get past. You'll also find out that Dr. Cranium's henchmen will try to steal your ball at this point.
You'll be using lifts throughout the laboratory to go up and down in a hurry.
At this point in the game, you'll want to throw balls at power-up balls. If they hit them, they'll instantly be exposed as Ball-Bots. The type that the fake balls are will indicate what power those Ball-Bots will have. When you finish them off, they'll drop the power-up you were wanting in the first place. Sweet.
The door to the left is a bonus area. You'll have to toggle the switches back and forth to get the correct combination to open the doors. Hurry, because you only have 15 seconds.
Level 2
Want to hit the switch at the beginning? Use the purple ball.
Those robots with the claws will try to steal your ball. You'll want to hit them from a distance.
You'll have to duck down and quickly throw multiple balls at referee bots on wheels.
The captive here will tell you that Dr. Cranium has a master plan: mutate the plays to create his own genetically engineered "Mean Team!" He'll also ask you to check the door to the left, and that the green key is above where he was imprisoned.
It's time to take on the first boss of the game...and then it's onward through the rest of Chicago!
Holding Cells
Level 5
To go up the slopes, just keep jumping. You'll slide down them automatically, but you still jump back to the top of them.
The captive here has the red key.
The bonus stage here has no time limit. Go ahead and take as much time as you need, because the Golden Heart will increase your max health by one unit. The Golden Heart will always be in the bonus levels at the end of every world.
The semi-circle-shaped backboards with the number 23 on them will freeze enemies in place. There will be a shot clock with 15 seconds that will show up in the upper-right corner when you use it, which indicated how long you have until the enemies are unfrozen again. Enemies can still harm you if you touch them while they're frozen, so be careful.
Use the freeze balls to turn the evil eyes in the lower-right corner of the level into platforms so you can get an extra life. You'll also get a refill on the freeze balls, too.
At the end of the level, you'll meet Dr. Maximum Cranium. We might as well call him Dr. Big Head (Mr. Big Head? Nah...), because he's got a big head. He tries to bribe you off, but we all know MJ ain't got time for that. After a threat to clone all the players from Dr. Cranium and a "Doc" Julius Irving reference from Michael, you'll face some...ball...thing.
The boss is a robot made entirely of basketballs. It will punch you if it gets close enough, and it can throw its arms forward like some sort of swirling projectile made out of basketballs. Just keep your distance and aim for its head. Use your power-up balls if necessary.
Don't use the gold balls (the homing basketballs), as they go straight for the chest instead of the head, making them practically useless for this fight. Also, be sure to use the "projectile punch" attack this monster has to get some more distance away from him, so you can throw some more balls at it.
When you beat this monstrosity, you'll get the Red Keycard, one of three keycards in the game. You'll be able to return to the map screen and pick one of the two El Train levels.
The El Train 1
You'll be in autoscrolling stage that involves - you guessed it - the Chicago Transity Authority train line, usually called "the L" or "The El." Be sure to look around and get those power-ups when you can, but be careful for both moving archways at the top and the paparazzi that stalk you around the train. Some of them even have cameras that make it hard to see for a second in addition to damaging you.
These cells will be the school of hard knocks. Rest assured, the game will get a little more interesting, both in difficulty and design.
Cells
Level 3
Can't get the extra life surrounded by walls? Use the boomerang ball. It can pick up items that you can't reach, and if the ball touches it, it's yours.
The bonus stage here will be the first sighting of the iron ball. It's a dark gray ball, and it's supposed to be a bowling ball. It rolls along the ground when shot, taking out the tiniest of enemies that the slam attack can take out. If you slam the bowling ball, it will cause an earthquake that damages all on-screen enemies.
When you enter the bonus stage here, be sure to check the end of the top and bottom paths. You'll find two extra lives.
When you free the captive, you'll find out Dr. Max Cranium's lab is underground near the Lincoln Park Zoo, and that his best mutants are there. You'll also find out the current of the water below is strong enough to carry you in one direction. The water also has robotic eels that will shock you.
Some floors are weak and will fall apart, sending you falling if you stand on them long enough.
If you see the eels, hit them with the slam attack.
Level 4
Some of the web sacs contain items instead of spiders if you break them.
Some of the bats carry bombs in their fangs and go straight for you, exploding as soon as they hit a wall, floor, ceiling...or you. You're best off avoiding them or ducking into an area they can't fly to.
Also, some of the eyes will stay near you and try to hit you with lasers at this point. You'll have to destroy them with basketballs, but they have the tendency to fly straight over or under you as you try to do that. Toss balls at them often until they're gone. They're slightly difficult, but you'll eventually take them out after a few seconds.
Talking to the captive here will bring up the Ball-Bot, Dr. Cranium's latest invention. It's a robot disguised as a ball. Oh, boy. You'll also find out the red key is in the upper-right corner of the level, but you won't be able to just walk up to it and get it. Expect to take out some enemies.
You'll also find out the factory on Goose Island also has some captives, and that Dr. Cranium's robots are made over there.
The robot that hangs on the rope in the upper-right corner of the room carries the red key. He goes down with a few hits, so take him out quickly.
You thought Shaq was the only one to get a video game?
Michael Jordan makes it to practice for an all-star charity game, but he's the only one there. He then gets a note on a basketball from one Dr. Max Cranium, telling him to go to the Egyptian Room in the Field Museum at midnight...alone.
When MJ makes it over there, he finds an underground prison hidden behind the walls of the Egyptian Room. Now it's time to free everyone and figure out what the heck is going on...
Be sure to use the info button for each level in a world, as you can get some useful information every once in a while (you'll get cardkeys for beating a level sometimes).
Holding Cells
Level 1
Well, the game looks interesting so far.
Michael Jordan attacks by shooting basketballs at his enemies. Speaking of enemies, you have bats, spiders, evil eyes that float around, and zombie basketball players with basketballs for heads. You'll want to take out as many enemies as you can, especially since some enemies will carry important items, including keys you'll need for the level.
The silver and gold basketball tokens are your "coins." Grab 100 of them for a one-up. Silver is worth one token, gold is worth five.
The set of silver keys will unlock all the doors with the silver locks. Obviously, you'll need a set of gold keys for the gold locks. Some may contain a captive basketball player that you'll get to ask questions from if you free them. You'll want to free the captives, as they also provide useful items. Other doors still may contain enemies, so step away from a door after you open it.
The Box of Snacks and Isotonic Drink both refill your health. Ironically, you can tell they're a box of Wheaties and a bottle of Gatorade, respectively. Heck, there are references to both brands you can find throughout the game.
Freeing the captive here gives you a green key after you've finished talking to him. You'll need it for the keyhole square with the green outline around it. The outline's color dictates which color key you'll need for it. When you go up to a keyhole, select the proper key with Select and press A to use it.
There are several basketballs you can pick up that give you special abilities. The flaming ball acts as a fireball that can attack low-lying enemies when slammed to the ground, and also does more damage. The gold ball acts as a heat-sinking missile. The purple ball can bounce off walls with a regular throws. The white ball is a boomerang, and is supposed to represent a baseball.
The red ball does heavy amounts of damage to all onscreen enemies without the aid of a triangle-shaped backboard, and can also damage bosses...so you'll want to save these up for when you really need them, especially when they are the only balls that don't have a limit to how many you can carry at any given time.
Slamming the ball into a wooden backboard can net you tokens and power-ups, and different backboards do different things. The triangle-shaped backboards hit all enemies currently onscreen, and the damage is equivalent to one hit from a basketball. Whoever developed this actually put some thought put into this game. You don't have to be at a backboard to use your slam. As a matter of fact, the slam is done with a separate button, and can be used to hit enemies that are low to the ground and can't be hit with your normal shot.
You can only use each and every backboard you see only once, so use them wisely.
To slam press X to do the Slam Jump, then press Y to slam the ball. The timing takes a while to get down, but it's worth it. Pressing Back and X at the same time does a overhead rear slam,
Some of the walls can be broken by shooting basketballs at them, so be sure to do that whenever you can. You won't know if the wall's weak until you actually hit it with your basketballs, so explore!
Throw basketballs at switches to trigger them.
The glass backboards are checkpoints. Shatter them with your slam to trigger them. You'll return to the last one you ultimately destroyed if you lose a life.
If you see a portal come out of a door, enter it. Get the ball through as many hoops as you can before the shot clock in the upper-right hand corner runs out. Different hoops have different power-ups. The number 23 (Michael Jordan's jersey number as a member of the Chicago Bulls) is an extra life.
The explosion-shaped destroy all enemies onscreen.
The green switches on the wall can be activated with the A button (much like the keys in the keyhole).
When you beat a level, you'll see your score, how many captives you've rescued and even get a password every once in a while.
Level 2
Hold Up before you jump to grab onto a zipline. This will take you to the other side without any other work needed.
The heart with "MJ" on it refills three units of health.
The tennis shoes will make you invincible for a short period of time.
The grey basketballs are ice basketballs. Hitting an enemy with one will turn it into a block of ice, which you can use as a platform until the enemy thaws out. You can also hit a frozen enemy with another freeze shot to shatter them.
The gold spiders are nasty. They'll spit poision at you and will also split into three smaller spiders when you destroy them.
The bonus stage here has the evil eyes instead of the backboards. Use the purple basketballs to hit the eyes and get power-ups out of them before the shot clock runs out.
When you beat the last four Robot Masters, you'll be able to drop down and fight Quint. Quint is Mega Man from the future, and reprogrammed by Wily to suit his evil purposes. Quint is not part of the Mega Man Killers, contrary to popular belief.
Slide under Quint as he tries to crush you with his pogo stick, and hit him in the head with the Proto Buster as he stands still. After you do enough damage, he teleports out of the room. You'll get Sakugarne, Quint's pogo stick.
Dr. Wily, meanwhile, flees to his alternate castle in outer space. Yep, he's got his own off-planet base.
Dr. Wily Stage 2
Well, know that I know the story, the melted clocks in the background as well the clocks on the floor make more sense.
Jump on the middle block on the first set of disappearing/reappearing blocks.
The rest of the starbase is relatively easy.
Dr. Wily will be in a plane with bird legs. (Looks that way to me.) Hit him with Air Shooter as you slide under him and run under his bombs as they bounce at you. You can also hit Wily in the head with the Proto Buster.
After doing enough damage, Wily will dump the bird legs and trade them in for a tank. Jump over the fireballs, but deal with the bouncing bombs the same way you did last time as you keep shooting Wily in the head.
Wily then trades the tank for a dinosaur suit. Shoot the skull. Stay low to the ground before jumping over the bullet that vertically tacks you, and move out of the way of the four bombs that he launches into the sky.
Mega Man then sends Wily back down to Earth as he escapes...with a missile. But you can beat that Dr. Wily will be back!
You can tell this is going to be a much shorter, easier game that we have on our hands.
Top Man (continued)
The cats are easy. Avoid the yarn ball they shoots out as you aim squarely for their heads. At least you're just dodging one this time as opposed to two or three.
The top shooting robots are easy if you take care of them and their tops at the same time. You can hit them anywhere, but go for the chest if you can so those tops won't become a nuisance.
The spinning top platforms move you back and forth, so be careful about where you are before you make that next leap.
Top Man can be beaten easily with the Proto Buster, if you wish. Stay near the center of the room to slide away from the tops he throws that home in on you, and jump over him when he spins to the other side of the room.
Beating Top Man gives you the Top Spin. Just like in the third NES game, this makes Mega Man spin around when used in the air and take out anything that comes directly for him. Also, it can be unwieldy.
Magnet Man
The bottom-left teleporter takes you to Metal Man's stage.
The flying magnets will attract you towards it and carry you back if you don't keep moving. Not that it's much of a hassle to deal with or anything. It's actually pretty interesting. Too bad the game doesn't really take advantage of it and allow for something that requires you to do it.
The large spring enemies that shoot homing missiles out of their heads are back. They're far easier this time, as only one homing missile can be on-screen at any time, and you can easily off-screen the missile.
The eyes with the two feet that move in a circular motion to propel it are back. They're easy. They'll also be back in the third Game Boy game.
The suction fans that drew you to them are now more like magnetic beams than fans, but they still do the same thing. Once again, due to the Game Boy games being easier than their NES counterparts due to the hardware du jour, they're not as menacing or as inconvenient here.
The part with the high wall and the disappearing/reappearing blocks is easier than you think. Just use Rush Coil to reach the last one and get out of there. You can use the Rush Jet for the rest of the areas that use them.
Much like in the second NES game, you can only carry four Energy Tanks at one time.
Magnet Man can be easily beaten with the Hard Knuckle, but you can also use Metal Blade or the Proto Buster if you want. Not only will Magnet Man jump around and shoot magnets at you from above, but he'll also drag you towards him with his magnetic powers. Thankfully, he's pretty easy, and you can hit him with the Metal Blade if you find it absolutely necessary.
Beating Magnet Man awards you the Magnet Missile, which works just like the magnets Magnet Man uses.
Needle Man
The bottom-right teleporter takes you to Needle Man's stage.
The porcupines will shoot needles before rolling around. Take them out before they go into the roll that makes them invulnerable.
The "periscope spikes" that are a fixture of Needle Man's world are back. Take care when moving or sliding, and plan your moves carefully so they don't extend into your head as you pass by.
The turrets here just shoot explosive balls that don't have an explosion radius, making these turrets (and their ammo) rather easy to deal with.
The dragonflies fly over you, then lower to where you are before flying into you from the back. Shoot them when they dive to your level.
The big crusher robot that guards the boss door can be cut to ribbons with Metal Blade.
Needle Man will attack you with the extendable, spiky top of his head...if he's not jumping straight up shooting needles or hopping from one side of the room to the other, that is! Hit him with Air Shooter when he's in the air to do the most damage, and keep your distance as you avoid the needles.
Avoid the tornadoes Air Man shoots at you as he blows you back by jumping over and sliding under them, and hit him with the Leaf Shield. The weakness weapons are really overpowered here.
Beating Air Man gives you Air Shooter, which shoots three tornadoes into the air. You also get Rush Jet, which lets you fly around as long as you have energy for it. The controls are the same as Mega Man 3: just use the Control Pad to go where you want to go after you jump onto Rush.
Clash Man
Nope, it's not Crash Man, it's Crash Man.
Once again, this is similar to the NES's counterpart stage. You have platforms running on tracks, you have those spinning cylinder robots that slowly fly towards you, you have the "can stack" robots that you have to shoot in the face and dodge the body segments that it hurls at you...yep, nothing's different around here.
Use Rush Jet to get the Energy Tank after the checkpoint.
The "Oil Can" robots that can aim forward at angles of their choosing are from Flash Man's stage on the second NES game. Since Flash Man was in the first Game Boy game and didn't have a stage, this is the only part of the game where they will appear.
When you climb one of the two ladders near the end that leads to three ladders, climb the right ladder for another Energy Tank.
To beat Clash Man, shoot the Air Shooter when he's almost right in front of you, then run under him so you'll dodge the Crash Bomb that he shoots to the floor. Rinse and repeat.
Beating Clash Man gives you the Clash Bomb, which lets you shoot bombs forward. The bombs can stick to walls and stay there for a few seconds before they explode. You'll also get Rush Coil, which allows you to use Rush as a springboard to a higher platform.
Dr. Wily's Castle
When you beat all four Robot Masters, you'll enter Dr. Wily's castle...only to fall right into a trap. You'll then choose between four teleporters.
Hard Man
The upper-left teleporter takes you to Hard Man's stage.
The Energy Tank at the beginning is dead easy to get.
The bees drop cocoons that split into five bees that fly straight for you when the cocoon hits the floor.
Watch for any part of the floor with vents in them, as they contain clap-trap like robots that spring out and chomp at Mega Man's legs. Keep going forward and just walk (or keep jumping forward if you need to) to get past them. Sliding will put you in a vulnerable position just long enough before you actually slide to let them make a meal of you.
Wait for the Joes with the ball on a chain to open their eye before shooting them, and dodge the ball and chain accordingly.
The monkeys from Wood Man's NES stage don't show up until the middle of Hard Man's stage. They'll drop down from the ceiling and follow you as soon as you walk under them, so be ready to strike. If you can hit them while they're still hanging on the ceiling, good for you.
The Mets on bulldozers are from Top Man's stage on the third NES game. Shoot the Mets to get rid of them and their implements of destruction.
Hard Man will shake the ground with his jumps (and freeze you no matter what). He also shoots his fists at you, which return like boomerangs. He's the easiest to beat with the Proto Buster out of the four Wily Fortress Masters.
Beating Hard Man gives you the Hard Knuckle.
Top Man
The upper-right teleporter takes you to Top Man's stage.
The frog robots that leap up and down (from Shadow Man's stage, which appears in the next Game Boy game) are easy to shoot down. Just takes one shot.
The disappearing/reappearing blocks are back, and now you have to deal with water physics at the same time. The second to last block is the worst, as it has the tendency to disappear before you have time to jump to the last one.
The robots that stand there and shoot to the sides can be taken care of after they stop shooting.
Yep, it's another Mega Man sandwich! Join our hero as he chases after Dr. Wily yet again and...wait. WHAT THE HELL IS THIS SHIT
Instead of Minakuchi Engineering developing the game, it's Japan System House. Guess what? The controls are halfway decent, but the music sounds like a cross between a runaway drum machine and a music box on crack, which was apparently bad enough to make this game the odd man out compared to the other four games in the Rockman World series. Not surprisingly, Minakuchi Engineering was brought back in for the rest of the Game Boy games.
The game's plot involves Dr. Wily hijacking an experimental time machine, traveling about 40 years in the future and causing havok. Meanwhile, Mega Man has to fight off Robot Masters he's fought before in the present as he tries to figure out what's going on. Or something. I dunno.
The first four Robot Masters you can choose from are Metal Man, Wood Man, Air Man and Crash Man (named Clash Man in-game).
Metal Man
The conveyor belts, the low-lying robots that uncoil like springs when they hit you, the spiked crushers that dropped like a rock when you get near them...they're all there.
Love how this stage just throws the spike-dodging out right away.
You can now slide by holding Down and pressing A, making the first game the only one that doesn't allow you to slide. At least Japan System House got that right.
The drills from Mega Man 2 on NES are back with a vengeance. They're not as numerous or as irritating this time around.
The robots on the gears will show up when you get close to their gears, and try to roll their way towards you. As always, the Mets show up again and shoot a three-way shot when you get too close. At least their shots are easy to avoid here.
If you have the Rush Coil when you reach the 1-Up, you can get it. Otherwise, don't even bother. You won't be able to reach it anyway.
Entering the doors to the boss rooms is kinda weird. You enter the doors, you and the screen move to the right, then the door closes, then you see the rest of the room. Strange.
To beat Metal Man, just stay on one side of the room and keep jumping and shooting as you avoid his Metal Blades.
Beating Metal Man will earn you both the Metal Blade and Rush Marine (the submarine ability that you could use in Mega Man 3). The Metal Blade is...well...the same Metal Blades that Metal Man throws. Just like in the third NES game, you can throw it in eight directions with the help of the Control Pad.
Wood Man
Once again, all the enemies you remember from the NES version of this stage are here. The carrot-tossing rabbits, the bats that slowly fly towards you from the ceiling, the fire-breathing dogs that you have to take out at a distance while jumping over the flames as they do a curve towards the ground before heading upward at you...they're all here. Yep, this stage sure is close to the real thing.
Up to a point.
You'll soon see water, turrets from the Air Man stage, and the spikes that draw in and out of the ceilings from Needle Man's stage that look like telescopes (to be fair, they always did, at least to me).
The last stretch of the level involves those running birds that you saw near the end in the NES version of the stage.
Wood Man is as easy as ever. Equip the Metal Blade, then jump over the Leaf Shield and stay out of the way of the three leaves that fall from the sky. This battle is much, much easier here than on NES, and the Metal Blade actually acts like it's cutting Wood Man to ribbons here. It's much easier not to die this time around.
Beating Wood Man awards you with the Leaf Shield, which works just like Wood Man uses it. Just make it appear, then send it flying forward into an enemy.
Air Man
Prepare to deal with the birds that drop the eggs right away. Unlike the NES version of Mega Man 2, these birds - and their eggs - move in slow motion, so they're much easier to deal with now.
As always, be careful with the platforms that appear out of thin air. There will be spikes that pop in and out at the sides, and there are always the robots that pop out of the sides of the platforms that slowly fly towards you.
Also making a return appearance: the worm generators (or "bacon generators," for some of you), the lightning-throwing robots on the platforms, and the fat guys with the fans in their stomach that blow you back as they beat their chests.


