Part nostalgia-bomb, part note-taking and part FAQ, what started in GameTrailers as a video game blog is now on Blogger. This blog is a look back at video games, both popular and obscure, from the video game industry's infancy all the way to the previous console generation.
Once again, we've got to liberate another planet. All in a day's work, I suppose.
Stage 5
Planet Rat
When you beat the Jet, you'll find out that the Toad Empire has taken over the Planet Rat. It's not too late, as Ro-Dent is still alive on the planet, so it's still possible to reverse the overthrow.
The green pipes in the floor shoot out flames. Wait for the flames to dissipate before passing.
The machine gun Toads have some good range, but you still fire at them from far away.
The domes with the yellow lids are multi-directional turrets. Use your stronger attacks from a distance to take them out.
The purple lizards with the flashing knives will try to get in close and try to slash at you. Once again, stronger attacks from a distance are the way to go. They can also block your laser blasts with their weapons, but keep hammering away and they'll eventually succumb.
Destroy the green dome that the Toad soldiers come out of to move on.
The flying Toads with the yellow guns are packing some real heat...they've got lasers. Take them out with stronger attacks.
When you get onto the giant Toad tank, use your stronger attack to get rid of the two turrets that are in your way, and stay on the move to avoid the turret fire. You'll eventually meet the boss, or rather...bosses...
We get on an asteroid and free a mouse with nature powers. Only in Bucky O'Hare, guys.
Stage 4
Asteroid Belt
Willy stops the Climate Converter, while Jenny gets a distress signal from the Asteroid Belt.
If it isn't apparent to you already, the voice acting in this game is really, really good. I'm surprised this game didn't show up on Super Nintendo or Sega Genesis/Mega Drive.
Anyway, you'll be jumping from one asteroid to the other as the screen autoscrolls to the right. Segments of some of these asteroids will break apart as you stand on them, and if you're on them as they slowly fall (or if you're teetering on the edge of an asteroid), quickly mash the jump button to get off of it with your jetpack!
The rock creatures near the captured prisoner take a good amount of abuse before the crumble and flash out of existence. Use your stronger attack on them, especially when they're close to each other. These guys will roll around and cover a good amount of ground in seconds, so stay on the move!
When you beat all the rock men, you'll rescue the mouse that was behind the energy barrier. He'll help you out by growing plants and trees on the asteroid belt, and this foliage will help you get from one asteroid to another without having to jump everywhere. Use your stronger attack against the robots that look like mines as well as the toad ship. The mouse will show back up and bring segments of an asteroid up for use as a bridge when you reach what seems like a dead end and an unjumpable pit.
When you reach the ship at the other end of this screen, you'll fight a Toad jet. Your main target is the center of the jet. Stand between the cockpit and the jet turbines at the side when it takes off and tries to hit you, and jump over the laser it fires when it returns.
The two laser cannons next to the one in the center will move apart from each other and get back to their original positions as they fire. You'll have to stay on the move here. Using Deadeye Duck's stronger attack if you can move to the side and avoid these two lasers altogether is ideal, as you can sneak in some extra damage. Thankfully, you can also destroy the laser cannons to put them out of commission.
To beat the giant toad sub-boss, shoot at it's mouth when it's open, and avoid the rocks it sucks up and spits out altogether. If you can't avoid the rocks, shoot at them until you give yourself enough room to maneuver. When the sub-boss gets closer to try to eat you and spit you out, back up and keep shooting.
AFC Blinky's stronger attack involves the little cannon on top of his backpack. When you use it, a plume of flame will shoot out from it, and anything that touches it gets burned to a crisp. It's got the shortest range, but it's still pretty useful as it emanates from the backpack cannon for several seconds, dealing multiple hits to any enemies that come in contact with Blinky.
You'll then fight Total Terror Toad as soon as you land, while Willy DuWitt deals with the Climate Converter. He'll jump around the battle area very quickly, and he'll also throw a handaxe at you. Stay on the move and watch his shadow, and you'll eventually beat this guy.
Deadeye Duck's stronger attack is a set of three sparks that move around him in a circular motion as they span outwards. They won't be able to attack everything, but it does a good job of taking out enemies that are around him.
The boss here is the Toad Borg. The Toad Borg will try to grab you with his extendable fists and throw you into the ground. If he grabs you, mash the buttons and wiggle the joystick to break free! He's also pretty slow, and if you use your regular and stronger attacks, you'll be able to bring him down really easily. Once again, keep on the opposite side of the screen and hit him with all you've got, and move out when he's close enough to grab you with those hands of his.
When you beat the Toad Borg, he'll be taken away for repairs and the people of Planet Warren will be freed. The celebration won't last long, however, as you'll soon notice the Climate Converter, and that the people were enslaved into building one. It's time to take this thing out!
Stage 3
Climate Converter
You'll be flying around in this stage. Thankfully, you can move around anywhere you want, but you won't really be able to take advantage of that freedom when Toad soldiers are flying around in a circle and shooting electric bolts that cover the length or width of the screen at you.
When you see the eight-way cannons come out of the partitions in the walls, light 'em up and destroy them as soon as possible.
You'll soon come across a maze of sparks that shoot out electric force fields between one another. Make your move between them when the moment is right.
The good news? There's fourteen regular entries. The better news? They're all REALLY short. Anyway, in this entry, we take on Al Negator and play liberation force for Bucky's people.
Stage 1
Planet Warren (continued)
Al Negator can shoot both on the ground and in the air. When he shoots in the air, the fireball will leave a trail that travels forward on the ground for a short distance. He will also try to jump kick you and whack you with his tail.
Use your stronger attacks against Al Negator, and keep your distance so you can easily avoid his gunshots. He'll have to get pretty close to you to use the rest of his attacks, so just stay on the side of the screen opposite from Al and you should do just fine.
Jenny's stronger attack is a crescent wave that quickly travels forward and does some major damage to anything it touches.
When you beat Al Negator, you'll find out from him that Bucky's people were taken to the planet Punk. It's been mentioned before this scene, but the voice of Deadeye Duck is also the voice of Rattrap from Transformers: Beast Wars and Beast Machines.
Stage 2
Planet Punk
You'll start off in an autoscrolling diagonal shaft where you'll be taking on more Toad soldiers as well as flame jets coming out of the pipes on the walls. Jump over the pipes, and shoot the cages with all you've got to free the people of Planet Warren!
Use your stronger attacks against the ships, especially the ones that fly out and try to run you over. When they stop flying and drop down with a mighty explosion, you know you've taken one down.
You'll then go further down the narrow corridor and onto a lift. Shoot down the missile pods on the wall, and jump over the flaming columns of metal that tumble down!
Konami may have made this little-known comic book into a well-known NES game, but did you know that there was also an arcade game for it as well? Yes, it exists, and Konami is also behind it!
This time around, you can not only play as Bucky O'Hare and Deadeye Duck, but also Jenny the Aldeberan Cat and AFC Blinky.
Anyway, Komplex and the evil Toad Empire are out to take over the galaxy with their feared Climate Changer! Bucky O'Hare, as always, is the galaxy's last hope!
Stage 1
Planet Warren
The voices are actually from the voice actors from the short-lived cartoon series, which explains why they're really good.
Unlike other beat-em-ups, you use your gun as your main attack, and you'll only use hand-to-hand combat when you're in close.
The doors that show up and disappear throughout the game are Willy Duwitt's high-tech closet door. These will give you gun power-ups which will increase the power of your shot or bombs that give you more chances to destroy everything onscreen when you need to.
Pressing Jump and Attack allows you to perform stronger attacks. These are actually different from the regular gunshot and are actually different depending on which character you're playing as. They also all act wildly differently, too, as they all deal multiple hits but cover different ranges and patterns. Bucky's stronger attack is a grenade that deals multiple hits but covers a very short range with its explosion.
When you press the jump button in mid-air, you'll be able to slow your descent down. This technically lets you hover. When you press Jump and Attack at the same time while you're in the air, you'll do a downward kick attack that throws you forward and into enemies for a big hit (it looks somewhat like the TMNT attack, except better).
The enemies here aren't that hard. As a matter of fact, they just stand there and shoot at you, and they're pretty bad at it, too. They'll take only one or two hits to kill. Some throw bombs, but the bombs don't explode until they stop moving.
When the ship lands in front of you, you'll take down all the enemy forces before facing the first boss of the game, Al Negator.
Shoot down the yellow machine on treads to keep it from crushing you as you pass under it.
You'll also see Cobra Commandos on guard towers too, so keep an eye on the top of the screen.
The boss here is the Weapons Manufacturer, Destro. He'll send enemies from out of the water, and the planes will be backing him up just like with the other bosses. Watch out for the green men that stick their heads out of the water, as they will shoot you before jumping towards the foreground in an attempt to leap at you. When the blast boat Destro is in shows up, pelt it with bombs and focus most of your attacks on it. Watch out for the missiles and the lasers that come out of the boat!
After a while, you'll heavily damage the boat, and Destro will come out to try to dispose of you himself. Watch out for the missiles and lasers just like last time, and dodge Destro's machine gun fire as you shoot at him.
When you beat Destro, the Cobra battleship will rise out of the water and fly into the sky! G.I. Joe will go after it!
Level 6: Battleship
The huge turrets that you'll start seeing at the beginning just shoot in one direction. They don't even track, so their attacks are easy to avoid. The ones with the blue tops that pop in and out of the ground, however, do.
You'll also be seeing a lot of tanks, planes and soldiers as you make your way to the front of the battleship. Once you make it to the gates, it's just a few doors until you meet the final boss: Cobra Commander!
The grey spheres that fly around him shoot electrical blasts at you. As you fire at Cobra Commando, shoot these things down as soon as possible. He'll send out more to protect him as he surrounds himself with a purple energy shield, but you can take those out while you wait for him to stop using it.
Cobra Commander has a flamethrower attack that he'll usually use after he deactivates the shield, so be careful and move to the side as soon as the shield dissipates so it won't hit you.
When you beat Cobra Commander, you'll find out it was just a robot double. The real one then shows up. He'll throw a lot of bombs, so pay attention and move out of the way when he throws a few handfuls of bombs at you in intricate patterns.
It's time to take down Cobra's weapons plant and bring an end to their ICBMs! Yo Joe!
Level 3: Cobra's Weapons Plant
During this level, you'll be on an elevator. You'll have a lot of flying enemies around here, and you'll get the occasional Cobra Commando and the guy with a laser cannon strapped to his back.
Be prepared to lose some lives and spend some quarters here, as it's harder to avoid some of the firepower around here.
The boss here is the Cobra Intelligence Officer...The Baroness! She'll jump in the plane and take off. She sends not only her flunkies at you, but also robots. The green ones just move around and try to run into you, but the red ones can shoot. Take as many enemies down as you can, and avoid all the bombs that get tossed. When the planes shows up, clip the wings. Using your bombs on the wings works well, as you'll get some substantial damage in.
For the second part of the battle, shoot down the plane while avoiding both the machines guns at the sides as well as the Baroness's gunfire. If you can get some shots on the Baroness, you can stop her from attacking for a little while.
Once you take down the plane, the first mission is complete!
Mission 2
Level 4: Jungle
Cobra Commander threatens to fire missiles at targets all over the world, but G.I. Joe finds the secret jungle base in the nick of time! Yo Joe!
Throughout this level, you'll be dealing with men in white that run around everywhere as well as men in red that shoot at you with flamethrowers! You'll also see a lot of planes and tanks, and the trees and shrubs make it harder to get to where you want to go.
If you find a first-aid kit, grab it. It will refill your health and also give you three points for your score.
The boss here is the Weapons and Tactics Specialist, Major Bludd. He'll come after you with a bevy of tanks and planes, and he also flies around on a jetpack. Avoid Major Bludd's attack, such as the multi-shot flamethrower, and stay out of the center when the rockets fire from the base in the background. The thing to shoot here is not Bludd, but the base in the background itself.
When you destroy the Base, you'll also destroy Major Bludd. Of course, it will be replaced with a rotating tower of death that tries to track your whereabouts with a laser. When it turns red, it's about to fire a huge fireballs at you. Keep on the move, and shoot at the tower while avoiding the fireballs as well as the missiles from the tower and the machine gun fire from the numerous planes that take off and fly at you from the background. Once you destroy the tower, it's over.
You'll then open up the entrance to a cavern base, and take an elevator as you get the chance to destroy a bunch of soldiers and planes on your way down to...
Level 5: Canyon Base
You'll have a whole bunch of soldiers and planes to shoot down here. You can also shoot down the rock columns if they get in your way.
All the enemies (and most of the destroyable scenery) aren't anything you've seen before. Since the waves of enemies are getting more varied and more versatile, you'll constantly be on the move as you take down everything that you possibly can.
I saw this as a kid, but I never played it. Boy, am I ever going to regret the decision of not playing it now...thank tjord for MAME.
Unlike the NES games, this one is a run-'n-gun. You'll be running forward, moving back and forth and aiming your cursor to shoot at anything that moves and anything that is in your way.
Anyway, Cobra has enough firepower to take over the world...and that's exactly what they're planning to do. G.I. Joe, as expected, isn't taking this very lightly and takes the fight to Cobra Commander once again!
This game was also developed and published by Konami, who could make even a fresh human turd into an awesome game at the time! Yo Joe!
Mission 1
Level 1: Chemical Plant
You only have a few hit points. Whatever you do, don't run into any destructible items that are in your way or let enemies run into you. It's embarrassing. It's also pretty obvious to take care not to get shot, too.
Destroy the piping with your guns in order to get rid of it all.
The vehicles take more damage than the soldiers, but they can be destroyed.
The "R" icons let you perform rapid fire. You lose this if you get hit or die. The bomb icons add one more bomb to your arsenal, which you can use to destroy enemies on a wider scale. To collect an icon, simply run over it or shoot it.
The Cobra Commandos just run around and try to shoot at you in large groups. Not surprisingly, they'll fail. The orange guys will throw bombs.
You want to destroy anything and everything that you possibly can to get the most points and get more lives. If it gets slightly bigger as you get closer to it and doesn't happen to be whatever building is in the background, shoot it up.
The boss here is the pair of Crimson Guard Commanders, Tomak and Kamot. They'll get on a chopper and also send a tank after you. Watch out for the flamethrower on both the tank and the chopper, and move out of the way when the tank tries to run you over. Keep your attacks on one vehicle at first, and you'll soon be able to divert all your attention on the other.
Level 2: Air Base
You'll be seeing a lot more choppers on this level, so keep an eye on the skies.
When you shoot the guys in the black suits, they'll set off a self-destruct sequence that cause them to blow up when you're near them.
Don't be afraid to use your bombs if you need to get by a whole slew of enemies and/or obstacles. You'll be getting plenty of bombs throughout the game.
You'll also have guys with laser cannons strapped to their back. They'll shoot at you, then take a few steps back and try to shoot at you again. They stand around a lot, making them easy targets.
The boss is the anti-tank specialist, Metal Head. Shoot down the flunkies and the planes that he sends at you...especially the guys flying around with copter blades strapped to their backs. When Metal Head shows up, focus your bombs on him and keep shooting at him and everyone else who happens to show up. When he starts flashing, he's nearly dead.
It's now on to the boss battle! You have three tries to get Jaws to come out of the water so you can ram into him with the front of your boat. If you miss three times, you'll have to fight Jaws underwater again before you can come back to this screen.
Press A to activate one of your three strobe lights when Jaws is directly in front of you and on the closest blue line. When you see the white of his belly show up, press B to ram him as soon as he starts spinning. This takes some practice, as Jaws has to be directly in front of you, and he can move to the side at the last minute as he moves back towards you.
Jaws will move up and down the screen, but that's all he does. He won't attack you at this point, so take your time.
When you get Jaws, it's over. Enjoy your two-screen ending.
We're gonna power up in no time! Screw the bigger boat, we're getting a submersible.
Five shells give you Power Level 3. Each Power Level you get will require even more shells to get.
After enough time in the game, you can see the submersible on the map between the two ports. If you can get it, you'll be able to get an extra hit in a nice ride that gives you less slippery maneuverability as well as slightly stronger weapons.
As you spend more time in-game, you'll see the smaller sharks more often. Shoot them down when you can, since they'll usually drop a shell upon death. Also, the jellyfish will stop moving straight up and will actually move slightly to the side. It's just enough to throw a kink into your movements and cause some near-death situations, so be careful where you swim!
When you get Jaws's power meter to blink after you bring it all the way down, it's on to the final battle
Believe it or not, at least LJN gave a decent effort on this one. It's really not that bad.
The aim of the game is simple. You'll be moving back and forth between docks, and having random encounters as you go. You'll need to fight off all the marine life with your harpoon gun and collect shells to trade them for radar to track Jaws' relative location to you (at first) and more power.
The enemies are pretty easy. You have manta rays swimming from one side of the screen to the other, while the jellyfish go up as they move around. As long as you don't let these enemies touch you, you should be fine. Just remember that if you do die, you'll lose half your shells and start over at the last dock you stopped at. If you have an odd number of shells when you die, the game rounds up. You'll also go down a power level and lose the transceiver. Thanks, game.
There are smaller sharks in this game, and while they take a bit of shooting at to get rid of, the points from both shooting at it and killing it can be appreciated.
If you're near land when you get a random encounter (or hit Jaws), you're not going to have a lot of room to maneuver. At least you can use your boat to launch some cannon balls at Jaws at the outset, but once the boat gets hit by Jaws, you're underwater. Being in shallow water isn't good, as it's easier to get hit by the jellyfish instantly when they appear out of the ground.
The crabs and starfish give you more points. You'll need points for extra lives.
If you see a shark fin on the overworld screen, it's Jaws. He's pretty big, and he also has the ability to vertically track you.
Despite what DeceasedCrab says, you can beat Jaws on Power Level 1, but you will have to pump Jaws full of harpoon gun ammo really quickly. If you don't kill him in time, his power meter will reset and you'll have to hunt him down again.
Sometimes, after the end of a random encounter screen, you'll get a bonus stage. It takes a bit of practice, but you can get the timing to destroy all of the jellyfish from a plane down to a science. The more you hit, the more bonus shells you'll get. Hit them all for bonus points! Hold the Control Pad the direction opposite you're flying to slow down, and hold it the direction you're flying to go faster.
When you get five shells, go to a port. You'll get a transceiver that lets you track Jaws. If you have three more shells, go to another port to get your first power upgrade. (You can't return to the same port multiple times to upgrade, as the game keeps track of the last one you went to to keep you from cheating.) With power upgrades, you can destroy smaller sharks (and Jaws) with less shots from the harpoon gun.
Time to go ahead and head out, but before we do that, we'll have to free the unicorn. Be careful going down the stairs, then leave the castle through the throne room and head into the stable to the left. Open the gate and the unicorn will trot out. Now you'll have to go down the mountain path on foot. This is a job for the mouse. Just remember that Rosella will walk in a straight line to where your cursor is, even if it means falling over the edge...so be smart about it.
Head back to the crypt and place Pandora's box back in the crypt at the lower-right corner of the room. From there, close the crypt door and lock it. You'll automatically get rid of the skeleton key, too.
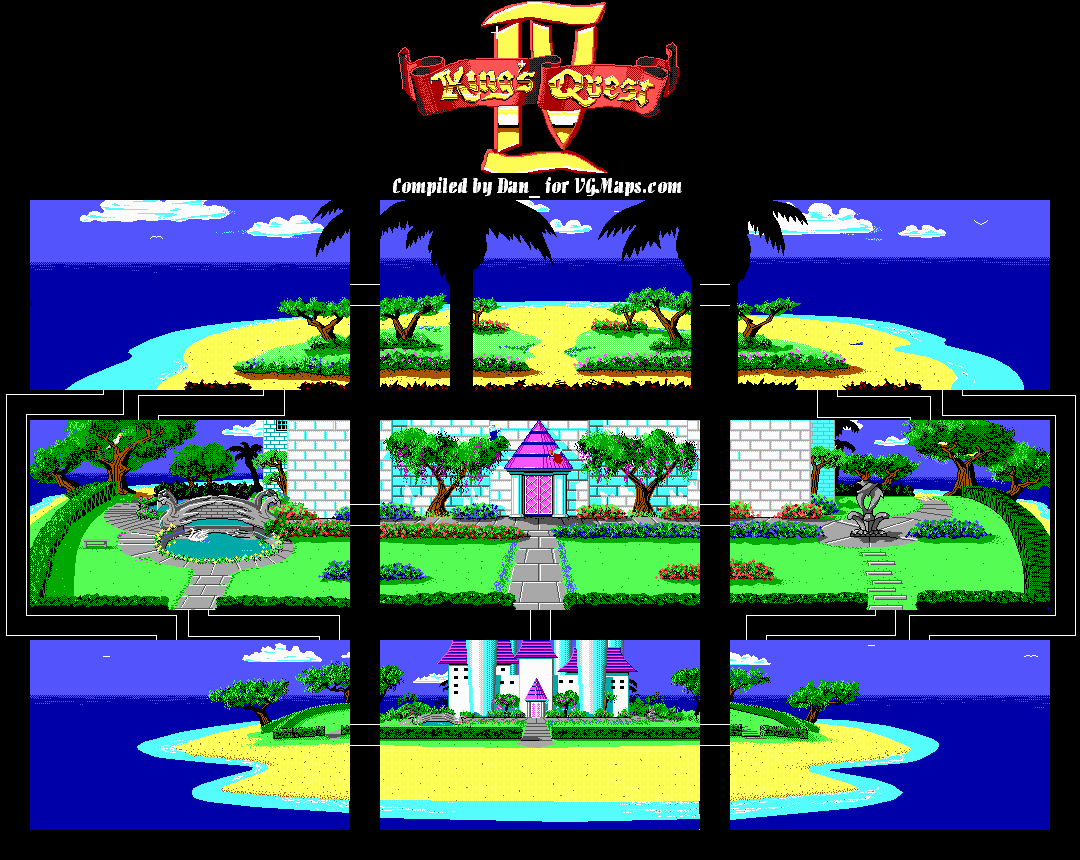
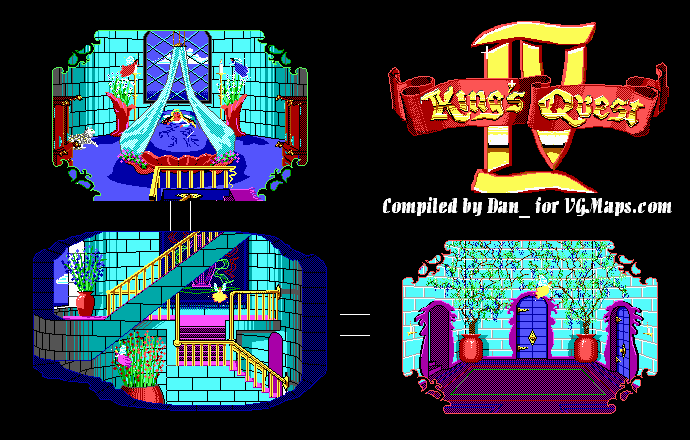
Now you can head back to the pier west of the fisherman's house and swim west until you reach Genesta's island. Enter Genesta's castle, go up the stairs to meet Genesta and give her the talisman. You'll bring her back to normal again, and she'll congratulate you on your victory! But you're still missing two points...
Don't worry, all will be revealed in time.
Genesta will go outside, and Rosella will be zapped outside with her. Genesta will also be glad that you found her hen. Rosella will give it to her and explain where she found it. Now you have all the points!
Genesta will be able to bring you back home to Daventry, but first the peasant robe will be replaced with the royal gown again. Then, she summons Edgar to the island with the wave of a wand...and transforms him into a human. Edgar wants to marry her, but Rosella politely declines and says that perhaps they meet again (and they will). Then, it's back to Daventry. Rosella gives the fruit to King Graham and saves his life.
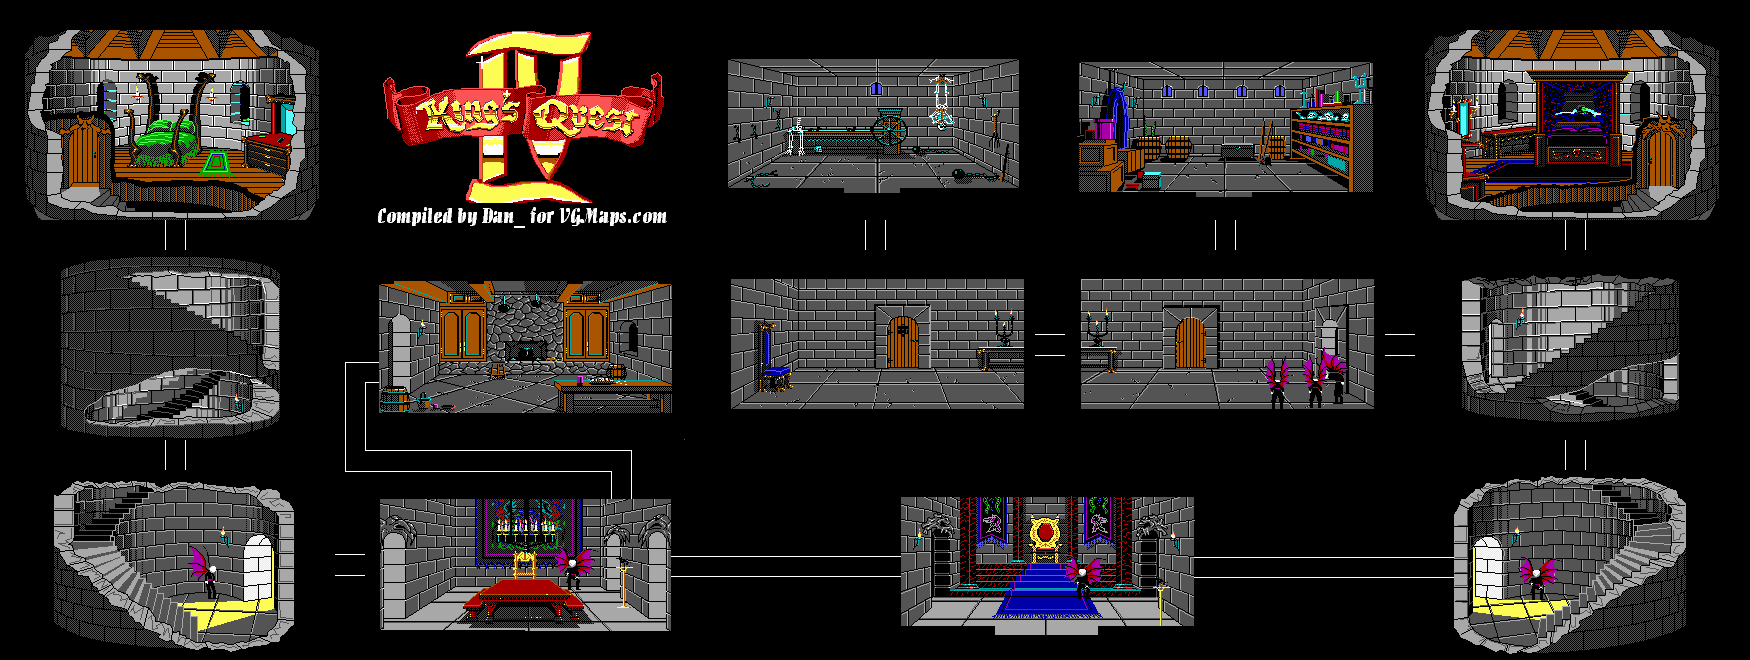
When you reach the dining room on the next screen, there are two doors. Enter the one on the upper-right corner. Don't worry, you won't wake the henchman as long as you're careful. Open the cabinet on the right and voila! There's your stuff! Take it all!
Now let's take the path next to the kitchen. This is the throne room. Go east without waking the guard here to find another tower similar to the one that led to the bedroom the goons locked you in. Don't wake the goon, and go up the stairs without dying. There is a door midway, but you're better off not entering it as the goon there will be wide awake and can chase you between screens.
Welcome to Lolotte's bedroom. Unlock the door with the gold key, then open the door and step inside. If you look at Lolotte, you'll notice she's wearing Genesta's talisman around her neck. If you go for the talisman, you'll wake Lolotte up and seal your fate. However...if you use the bow and arrow on her, she'll be killed by the power of love from the arrow, and you'll be able to get the talisman from her dead body. Edgar will show up and acknowledge Lolotte's death after night turns back into day. You're now free to move about the castle.
Go back to the hall between the stairs. The goons won't even do anything to you now. In fact, they now bow to you! Go ahead and open the door here. This is the storage room. Go in and take the hen and Pandora's Box, then leave. Going west here will take you to the prison where you were initally shoved into when you first met Lolotte. If you stand in the hallway near the door, type in "beam me". You'll get an easter egg that I'll mention in the epilogue.
Now that you're done, go ahead and stand up from the organ. Head out of the mansion. Be careful with those stairs!
Head back to the crypt. Unlock it with the skeleton key. Open the door, and you'll finally be able to go in. Grab the rope in order to climb your way down, and get Pandora's box. Don't worry about the mummy. Since you have the scarab, even the mummy won't do anything to you! Go ahead and leave.
Head back to Lolotte's castle. You finally get your "reward:" being married to Edgar first thing in the morning. You also get all of your inventory taken from you by one of Lolotte's goons as well.
Once you're in Edgar's bedroom, wait for him to show up and place a flower underneath the door. Walk over it and Rosella will automatically take it. If you look at it in the inventory, you'll notice there is a key attached to this rose. Take the key off of the rose and use it to unlock the door.
You'll now be dealing with another spiral staircase. Tap Down briefly, then Right so you hit the wall when you're on the upper segment. Press Left to get to the other side of the staircase. Now you can move normally.
When you reach the bottom, you'll see the floor...and one of Lolotte's goons! He's asleep, but if you get too close, he will wake up! You'll lose both the rose and the gold key as well as your one chance to escape, and you'll automatically get the alternate bad ending where Rosella is married to Edgar! Better luck next time!
When you give the locket back to the woman's ghost, she'll disappear. You'll then get another ghost - this time it's wailing downstairs! Wait for him to show up at the foyer...it's the Lord of the Manor! (He can also show up in other rooms, but the foyer seems to be the most common.) His tombstone will be on the west side of the house, and here is what his tombstone reads:
Lord Coningsby
1559 to 1626
Sleepeth here in peace:
an honorable man, a valiant soldier.
He served his country well.
Dig near this grave to find a Medal of Honor, and bring it back to Lord Coningsby's ghost. He'll disappear, then a young boy ghost shows up! Where are all these ghosts coming from?
The boy's ghost will run into the right-hand upstairs bedroom...and then climb up a ladder that wasn't even there before! Use the climb command, and you'll be in the attic, and the ghost will stay here this time. There's a chest there, but the boy is sitting on it. Use the climb command to climb back down, as you can die just from walking to the ladder and past it.
The boy's grave will be on the east side of the house. Here's what his tombstone says:
1546
Reader, here lies -- but forbear,
To read more without a tear,
One -- I cannot read the rest,
You may weep. I'll smite my breast,
Grief preventing, and this stone,
Too small to be written on.
Only this -- a little boy,
Willy -- in Abram's bosom's laid.
You'll find a toy horse near this grave when you dig at it. Give it back to the boy's ghost and he will disappear. This will be the last ghost puzzle you'll need to deal with thankfully. If you dig once more in the graveyard, you'll break the shovel. Thankfully, you won't need it anymore, and since you've dug in all the right spots, it won't be a problem!
Open the chest and look inside. You'll automatically take the sheet music in the chest. Go back to the organ in the tower and play the sheet music. Of course, this means you'll have to go up the spiral staircase and deal with the wonky controls on the second level once again. Use Up and Right on the arrow keys to get upstairs when the controls reverse.
When you play the sheet music (you have to actually type "play sheet music" for this), you'll open a secret drawer in the organ. Look inside to find a skeleton key. Take it.
"Fun fact I forgot to mention in the video: all of the epitaphs, except for the ones for the ghosts, are real epitaphs, and even the ghosts' were adapted from real epitaphs." Thank you, Sven.
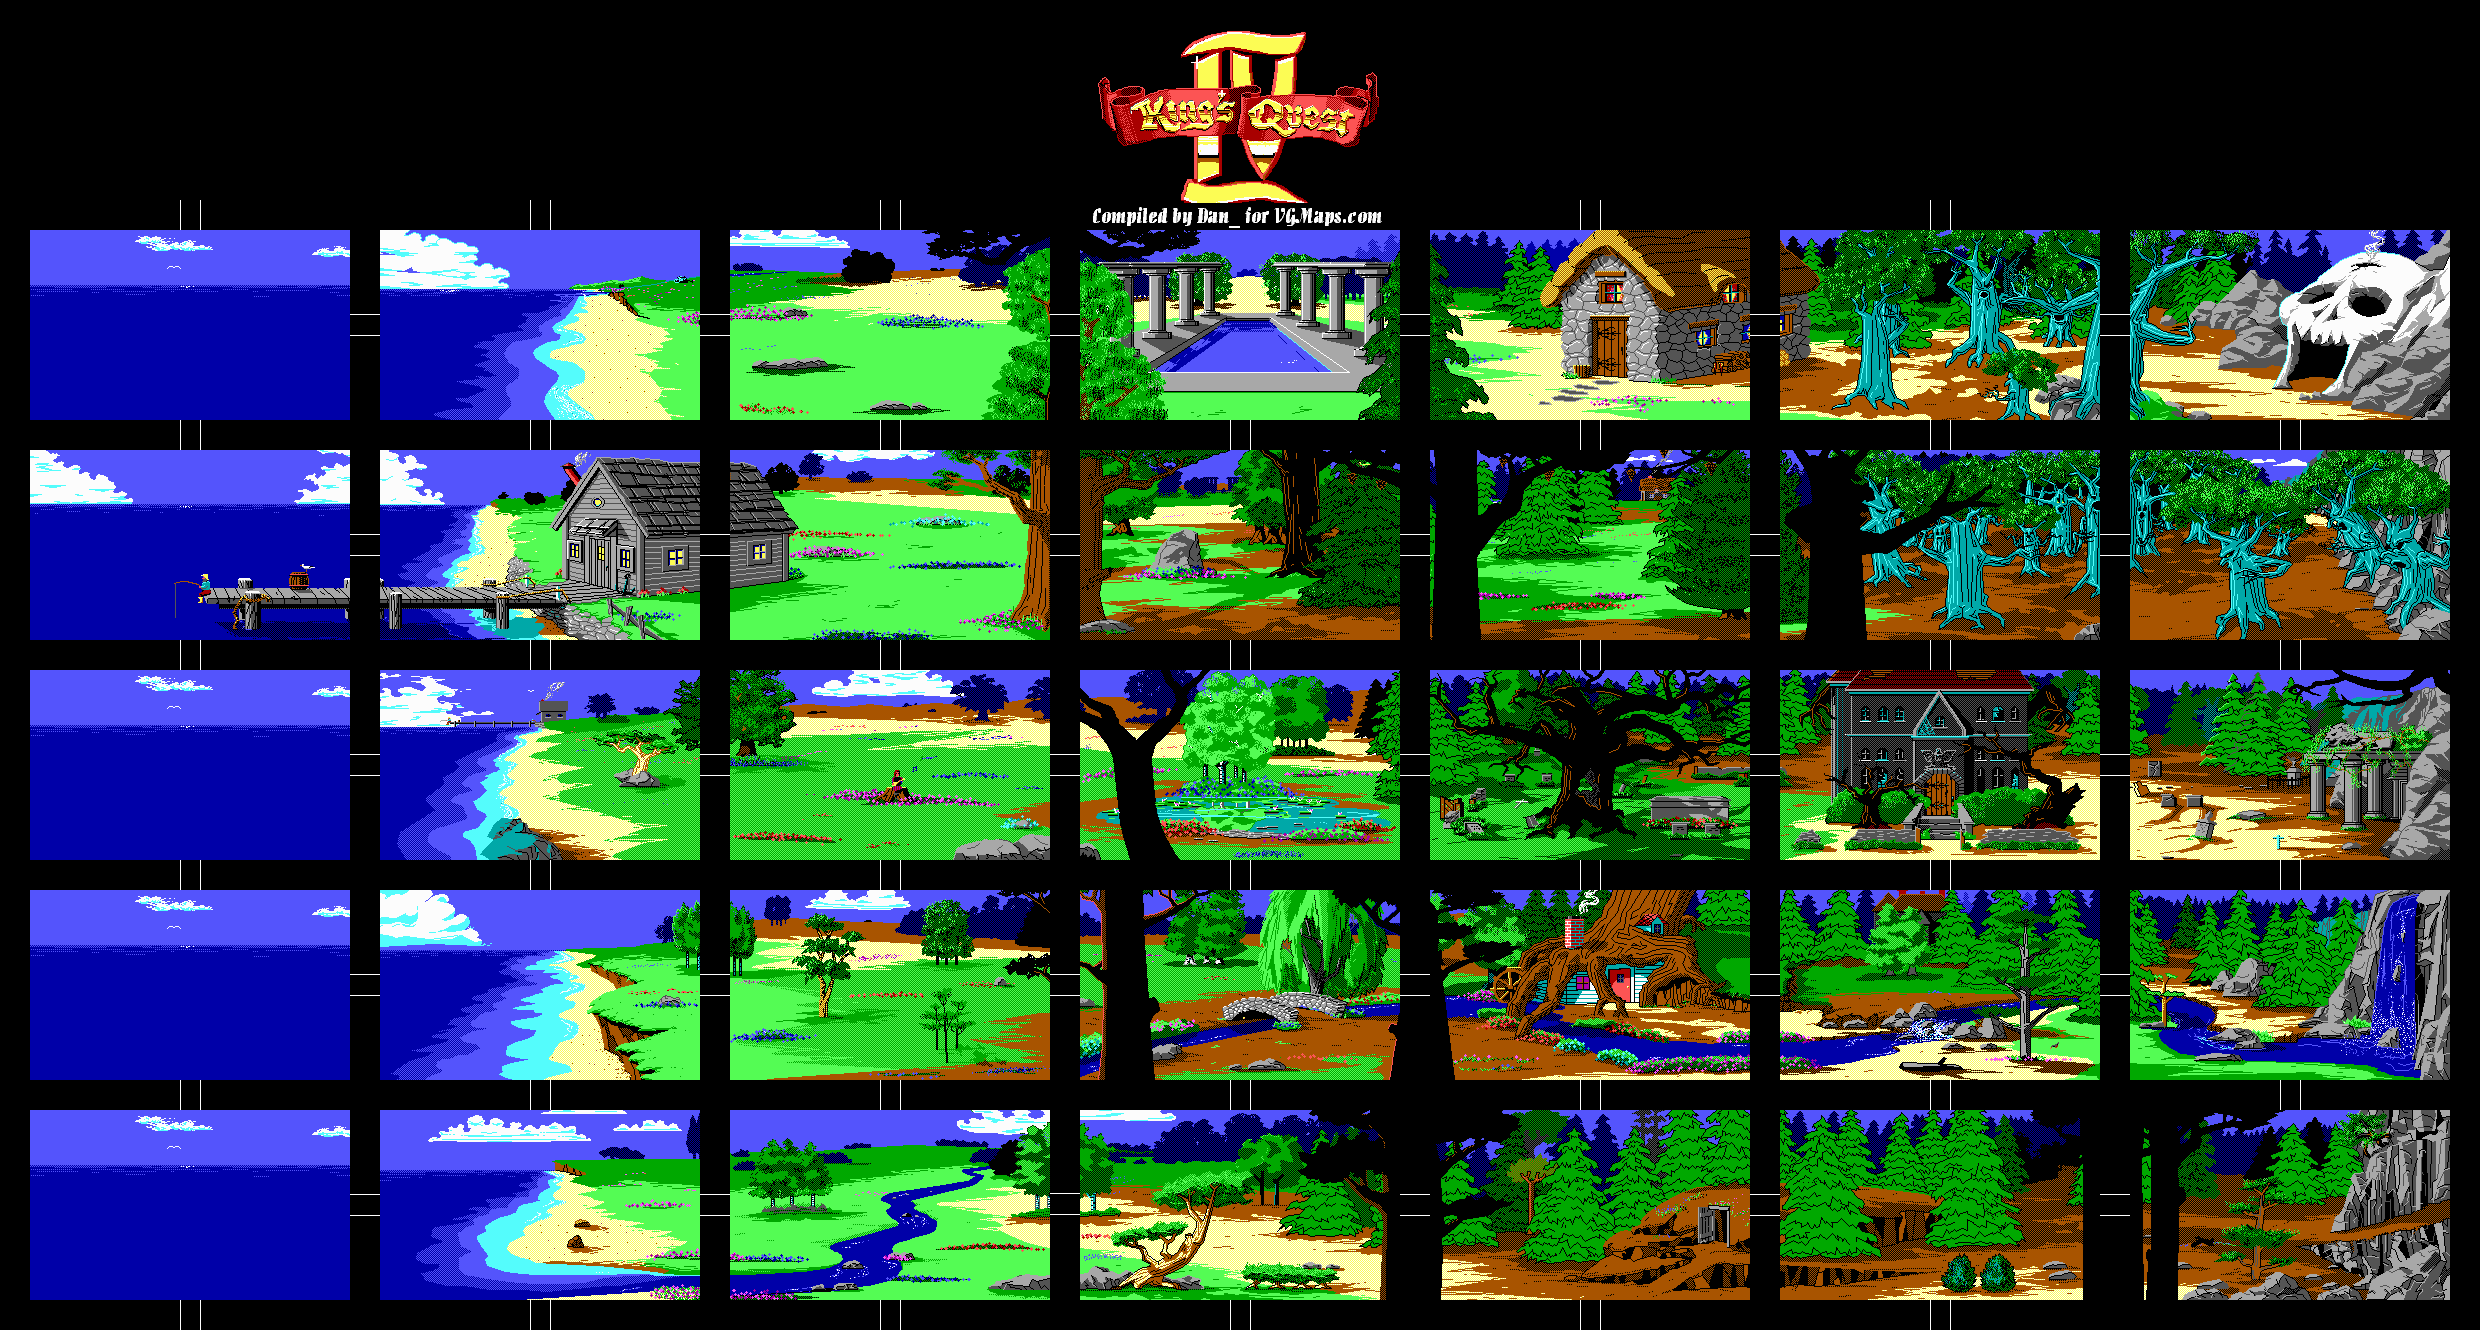
All maps by Dan_.
An interesting thing about night in Tamir: you can actually look around where people in this island live and see them doing other things. Some of them actually sleep, however.
Go to the haunted mansion. If you check the time, you'll see it's after 9 PM, as night falls at nine o'clock at night. Now that it's nighttime, you'll be noticing "activity" in the house. You'll hear a baby crying upstairs. Head back to the baby's room, and you'll see the crib rocking back and forth. There's a clue on one of the tombstones to the west of the mansion:
To the ever living memory of Hiram Bennet,
baby son of Edward and Sarah Bennet,
who by sudden-surprize fell asleep,
the 11th day of November, 1553
Aged 6 months.
Since you have a shovel, dig at the baby's grave, and you'll find a silver rattle. Keep in mind that you can only use the shovel a few times before it finally breaks, so be sure to save before you use it. Return to the baby's room and place the rattle in the crib. The baby's ghost will find peace, but then you'll hear the rattling of chains and loud moaning downstairs. Return to the foyer and you'll see the ghost of an old miser.
There's another grave for this guy, who happens to be a reference to Ichabod Crane of A Christmas Carol by Charles Dickens. This grave is also on the west side of the house.
1643
Here lies Newberry Will,
His life was finished 'cause he took ill,
But none will miss him, he should've been wiser,
'Tis his own fault, for bein' such a miser.
Dig near this grave to find a bag of gold coins. Since you have the scarab, these graveyard fetch quests are actually doable.
Go back into the house, go into another room, and you'll hear the miser's ghost again. Go back to the foyer and hand him the coins when he's close enough to you, and he'll disappear.
You'll then hear weeping from upstairs. Go to the right-hand room on the upstairs room and you'll eventually see a woman on a rocking chair. This is a reference to a tombstone which is on the east side of the cemetery:
Betty Cowden
1650 to 1669
Here lieth the body of Betty Cowden
Who would live longer but she coulden;
Sorrow and grief made her decay
When she lost her lover at sea one day.
Dig near this grave to find a locket, then take the locket back to the woman's ghost.
Go to any of the screens with the evil trees in them and use the axe. This will scare the trees and cause them to not bother you. From there, you'll be able to get past the trees and see what they've been guarding this entire time: a cave entrance that looks like a skull!
When you enter, one of the three witches will try to chase after you. If this witch catches you, you'll be placed in a boiling hot cauldron and killed. Instead, get between the two other witches and take the glass eye. They'll be blind and helpless. When you do this, the third witch will stop chasing you, and the witches will beg for you to give them back their glass eye. Leave the cave, then go back in. They'll plead again, then they'll throw an item towards you that wards off the undead. You'll find that this is an obsidian scarab if you look at it while it is on the floor. Take it.
After this, give the eye back to them from afar. They'll want you to come closer. Don't do it, or else they'll kill you. You'll have to give the eye back and then run to get maximum points.
Once you're done with the witches and all of the other day tasks (or if you wait long enough in game), night will fall. It is now night on Tamir. If you haven't gotten the magic fruit yet, you're out of luck - the game won't let you take it.
Now that you have the scarab, you can go to the crypt area and the zombies that come out of the ground near it won't even be able to affect you.
Let's head back to the house near the evil trees. If you see the ogre or the ogress, switch between screens until neither of them show up. When that happens, open the door. KNOCKING ON THE DOOR WILL CAUSE YOU TO DIE.
A bulldog may appear. When that happens, throw the bone to the dog and he'll stop chasing you. From here, you can do basically anything. Don't enter the open doorway to the right, though, as the ogress will see you and it will basically be instant death as she can chase after you between screens.
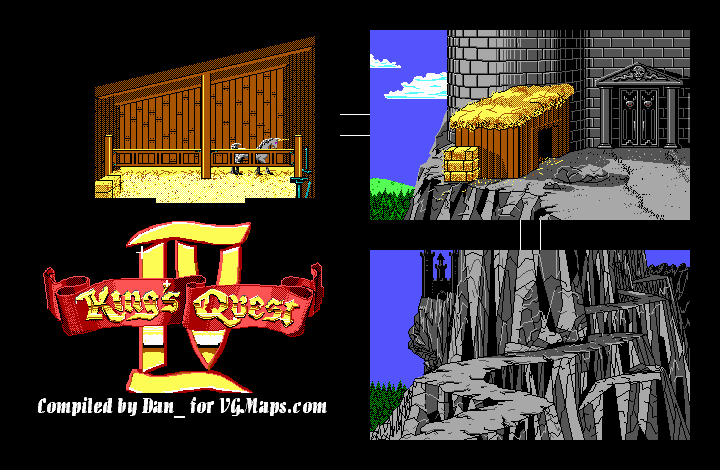
Go upstairs and grab the axe. Then go back downstairs and check out the closet. There's nothing in here, but the game mentions the keyhole of the door. You can look inside the keyhole to see if anything is happening. When you get the message that says that you can hear the ogre in the house, look through the keyhole. You'll be able to spy on him. He'll eat the deer, then he'll get the hen to lay an egg on command. (Kinda hilarious how the hen just nonchalantly turns around and lays a golden egg at the same time.) The ogre will then fall asleep.
Leave the closet and get the hen when it gets close to you, then open the front door to get out. The hen will wake the ogre, but if you leave the house and get away from it, you'll be free of the ogre. Mission accomplished.
Bring the hen back to Lolotte. She'll give you one more task: bring her Pandora's Box. (Lolotte wants the purest form of evil. Go figure.)
You can beat the game without getting the magic fruit, but it gives you the bad ending where King Graham dies. You can also eat the fruit and force a bad ending...and also lose ten points. Do yourself a favor: don't eat the fruit.
To leave the cave, just swim into the waterfall. You'll be swept back out automatically.
Now, you'll have to find the unicorn. Waiting for it to show up randomly won't help, so you'll have to remember the screen you last found it in as well as the direction it took off to when it ran away. When you find the unicorn, shoot at it with the bow and arrow. Then, get in front of the unicorn and place the golden bridle on the unicorn. Now you can ride it. Rosella will get on and automatically take it to the mountain path, and you'll taken to Lolotte by her goons.
She's almost convinced you're innocent, but she wants you to perform another tasks: bring her the goose that lays the golden eggs. The goose is held by the ogre and his wife.
Before you go anywhere, pick up the old board next to the entrance to the next room.
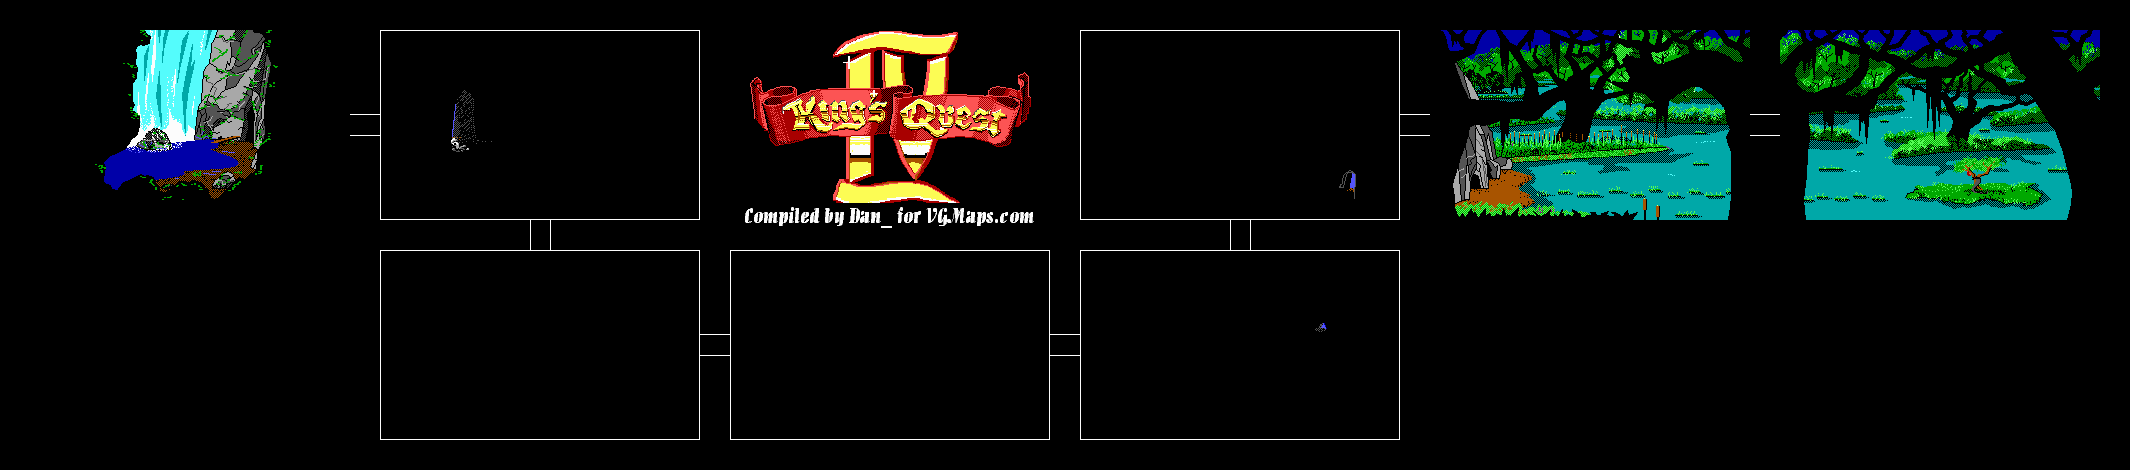
When you go to the next room, it will be dark. Go ahead and light the lantern. Don't worry, if you've looked at it in the inventory, you'll know that some flint comes with it. Get the bones next to the entrance while you're at it, too.
Getting through the cave will not be easy. Even with the lantern lit, you still won't be able to see anything unless you're near or behind a wall. Even worse, there's also a cave troll patrolling the caves that will show up at random, and he will kill you if he gets his hands on you. To avoid him altogether, save your game before you enter a new screen. The troll can also follow you between screens, making escape from him virtually impossible, so restore if he shows up. He shows up immediately, so if you see him, restore and try again.
First, go east from the entrance. Go east halfway through the screen, then go south. Go south to the next screen, and walk southeast until you're close to the east side of the screen. Go straight east from there. You'll notice a tiny blue shape, which is the opening on the other side. You'll want to be careful here, as you can fall into a chasm that you can't easily see and die. What you'll have to do here is place the board over the chasm, and you'll have to be close enough to the chasm in order to do it. This will take some slight moving around as well as approximating where the chasm is, but it can be done. Go straight east. Rosella will pick the board back up when you're on the other side. From there, stay close to the east side of the screen and go north towards the hole. From there, you can just walk up to the hole, which Rosella will automatically crawl through.
Unlight the lantern before you do anything else, since you will have to use the lantern again. Jump onto the tufts of grass, as walking into the swamp will suck you under and kill you.
On the other side is the tree with the magic fruit! Before you can get it, however, you'll have to deal with the giant black cobra that protects the tree. Put down the board first, since you can't jump the distance from the last tuft of grass to the small island without dying. Then, get on the island (carefully) and play the flute. You don't have much time to get the fruit, so grab it and get away from the cobra before it snaps out of the trance.
With that done, go back to that last tuft of grass and get the board again. Then, jump back to the cave. You'll have to head back to the other side of the cave, using the opposite of the directons that you go to the fruit from. Remember to use the board to get over the chasm and to save before every screen in case the troll shows up.
When you're back at the cave entrance, extinguish the lantern again.
Alright, let's go back east. We should see the whale on the next screen. Stay there and wait for a whirlpool to open up. When you do, go in and you'll be in the whale's mouth.
You'll see a bottle floating near the boat with the skeleton in it. When you moves towards it, you'll be wading in more shallow water. Go ahead and get the bottle. There will be a note inside if you look at the bottle form the inventory, so go ahead and open the bottle and then read the note...repeatedly. It's a plug for Police Quest, The Black Cauldron, Leisure Suit Larry, Space Quest and other King's Quest games. D'oh!
Now to get out of the whale. To do that, you'll have to get on the left side of the whale's tongue and work your way to the center. Saving often as you inch your way up and right works well here. When Rosella stops climbing and stands up, just walk to the center and then towards the uvula. Tickle the feather with the uvula and you're finally out!
You'll see an island to the north when you get out of the whale's mouth. Be sure to save here, as you may get eaten by a shark at random. (Yes, there is a shark near this island.) When you swim to it, you'll notice that you're somewhere completely different.
Whatever you do, do not approach the pelican. If you do, you'll scare it off and you'll have no way of getting off the island. Instead, throw the fish to the pelican before he flies away on his own. It will drop a whistle as it eats the fish, then it will take off. Take the whistle, then look at the ground behind the wreckage of the boat to the right of where the pelican was. You'll find a golden bridle, which Rosella will automatically take.
Now you can blow the whistle. When you do, a dolphin appears. Move towards the dolphin and ride on it. You'll be at the shore and north of the fisherman's house. There's just more meadow one screen east of here, so keep going east.
You'll show up at a pool one screen later. Cupid will drop his bow and arrow and go for a swim, but he'll take off without it when you get close. Take the bow and arrow. Don't go east, because you might run into the ogre. Instead, go north. The unicorn may show up here as well. We're not going to deal with the unicorn yet; instead, we're going to go west until we reach the mountain path entrance and then go north to the waterfall. Wear the crown that the frog prince gave you and you'll be able to swim through the waterfall and find a cave!
Now that we have the fishing pole, head west to the end of the dock and use the fishing pole. If you don't use the worm, you'll get a boot that you'll end up throwing out, so go ahead and use the worm. If you don't catch anything, keep trying. You'll eventually be able to get a fish.
If you swim west from the dock, you'll be able to reach an island. If you see a whale, go to another edge of the screen and off-screen the whale. You'll be meeting the whale again soon enough, and he'll come into play for something.
Anyway, two screens west of the dock is an island. You'll be able to go inside the ivory tower in the center and see Genesta. There is also a peacock that sometimes shows up south of the entrance, though the peacock is unimportant (like the rest of the birds on this island).
You can enter the castle, but you won't be able to do anything here...at least, not yet. Also, you can't die on the stairs because of the handrails. How convenient.
The north tip of the island has a peacock feather on the ground. Take it.
Unlike the other half of the cemetery, there is a crypt built into the mountainside on the other half. Unfortunately, you won't be able to enter it quite yet.
When you go north of this screen, you'll be in a bit of a spot if you're not careful here: the evil trees will grab you and end your journey. We're better off just avoiding them and heading west...
...and we see more of them. Just stay near the south edge of the screen and go west. You'll be fine.
You'll then be in a thick pine forest with a house to the north. We'll see the house later, don't worry.
Further west is more forest. You'll see a pool to the north, which we'll also see shortly.
The next screen west takes you behind a house. Go west and you'll be able to enter the house.
The screen southwest of the one behind the house also has the minstrel. Give him the Shakespeare book. He'll find out he's better as an actor than as a minstrel, and he hands you his lute before heading off.
Alright, back to behind the house. You'll randomly encounter Pan the satyr here. (Finally, a satyr appears in this one.) He'll be dancing around playing the flute, and if you play the lute, he'll stop in his tracks. Give him the lute, and he'll give you the flute. (Nice rhyme, there.)
Now that Pan's danced away with a new instrument, and you've got a nice trade-off, head west to the entrance to the house. If you walk on the dock to the west, you'll finally meet the fisherman. Stand there for a few moments and he'll pick up his fishing pole, stand up and enter the house. Follow him to the house and open the door to go in. Talking to his wife won't do much good, but if you talk to the fisherman, he'll be worried that the fish aren't biting. Hand him the diamonds, and he'll thank you by letting you have the fishing pole.
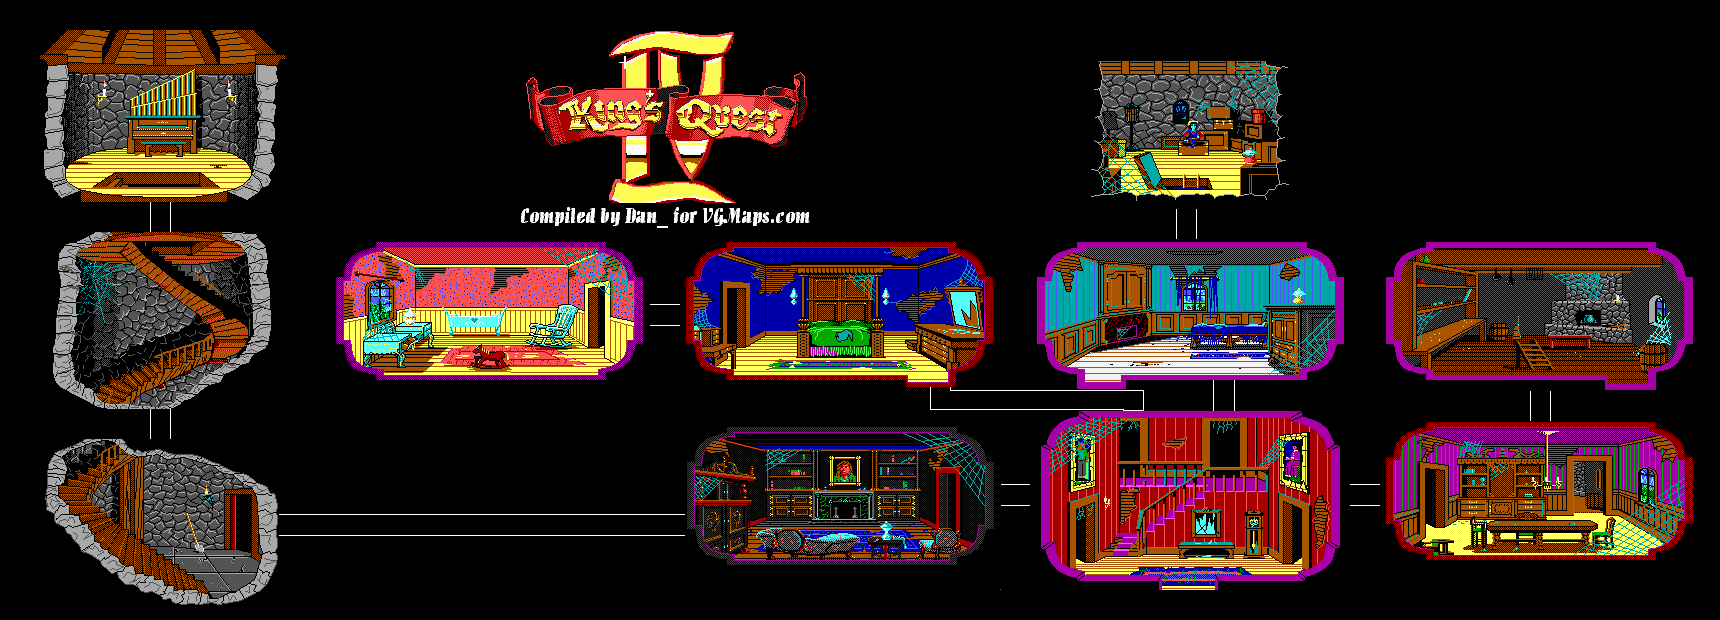
Apparently, the house here is really a mansion. Not surprisingly, everything here is smashed up and/or torn up.
The grandfather clock in the foyer is the only way of knowing what time it is in the game. There are some tasks that you can only do in the daytime that must be done. Not surprisingly, there are some things you can only do at night.
Going left from here takes you to the parlor. There is a book on the shelf that will catch your attention when you look at it. Take the book. Reading it gives you Shakespeare quotes, as expected.
If you look at the painting, you'll notice that the eyes are focused on the left wall of the parlor. Examine the left wall and you'll find a latch. Move it to open a secret door. Go in.
Take the shovel, and use the mouse to go up the spiral staircase. When you reach the top half of the second screen involving this staircase, use Right and Up instead of Left and Down, or else you're going to be going nowhere fast. (Yes, the controls reverse when the staircase twists. This basically makes the stairs here even worse than the last three games. It's like the game is saying "You're used to these games. Let's see what we can do about that." At the same time, the game is smiling with malicious glee.)
At the top of the spiral staircase is an organ. If you sit down at the organ and play it, Rosella will actually play it. (At least she's better than that guy with the lute.) Too bad there's nothing else here, so go ahead, stand up and get back on with the game. Remember to press Right and Down, and be careful when going down the stairs so you don't fall!
Head back to the foyer and take the left door on the second floor. You'll be in the master bedroom. The room to the left is the baby's room. There's nothing in either of these rooms, sadly.
The room to the right on the second floor is another bedroom. There's nothing here, either.
Go back downstairs and enter the room to the right. This is the dining room. The kitchen is across from it. There's nothing in these rooms, either. (Sheesh, what are we doing here?)
Leave the house and go east. You'll enter the other half of the cemetery.
You may notice that there's something gold underneath the bridge. Cross the bridge, go up to the other side, and look under it. You'll automatically take the small golden ball underneath the bridge.
Going west takes you to another beautiful meadow. You may also find the unicorn here.
Going west again takes you to the cliff at the seaside. Whatever you do, don't walk off the cliff, because you will die.
Go north now. Once again, it's more of the seaside, and you'll also see a house complete with a dock and some guy fishing. Nice. We'll get there later. For now, let's go east.
The next screen east is another meadow, as well as a tree stump in the center. Sometimes, a young minstrel playing a lute will show up sitting on the stump, though he shows up in other locations as well. Talk to him and he'll play a tune for you. Unfortunately, he's not very good. If you keep talking to him, he'll play bad renditions of other songs, some of which are previous [i]King's Quest[/i] songs.
East of this tree stump is a swamp. Here, you'll notice a frog wearing a small gold crown on its head. If you try to approach it, you'll scare it away, but it will come back if you get back and wait a little while. Throw the golden ball in the pond, and you'll "accidentally" drop it in the pond. You can pick up the frog and take its crown, but that doesn't give you the most points. Instead, pick up the frog and kiss it. Just like the fairy tale of the frog prince, the frog changes into a prince. He's surprised that you're a peasant girl and not a princess (hey, the disguise worked), but he gives you the crown anyway. Go ahead and get the ball back off the ground.
To the east of this is a cemetery. You can read the tombstones, all of which have epitaphs that are either snarky or hilarious. One of them reads:
I planted these shrubs upon your grave, dear wife,
That something on this spot may boast of life.
Shrubs must wither and all earth must rot;
Shrubs may revive, but you, dear wife, will not.
Keep this in mind, as this will come into play later.
One screen east is the haunted house. This is the last place we'll see, and it'll come into play later as well.
Let's go west, since we can't go east any further. You'll see a house in the distance, but there's nothing to do here. Go west again.
You'll now be at a house inside of a tree. Since you're north of the mines, this might just be the dwarves' house. When you go inside and look around, you'll notice that the house is a mess. Type in "clean house." (Once again, ignore the quotations.) Rosella will instantly clean the house. At least it's automatic this time around!
When Rosella is done cleaning, the dwarves will come in and get a bowl of soup and sit at the table. When they're all ready to eat (one of them gets double helpings of soup!), they invite you eat with them as thanks for tidying their house. Then you'll watch as Rosella and the dwarves eat (you can talk to them if you like), then they'll leave. If you want, you can "clean house" again, and although you won't get extra points for it, it'll make it easier to notice the blue pouch on the table. Take it. Check it out in the inventory and you'll find out it's full of diamonds.
Head out of the house, go south and enter the mine. This time around, the dwarves won't kick you out. Head to the right and give the pouch to the dwarf that is looking at the diamonds. He'll let you keep it, and also let gives you an extra lantern. (I'm guessing there were eight dwarves at one time, since they also had eight dishes on the table before you cleaned their house for them.) Head out of the mine.
Go back north to the dwarves' house, then go west. This takes you to a bridge.
At least we can walk across the stream. (Of course, the game calls it a river.)
You may notice the unicorn when you make your way east again. Just like last time, it will run away when you get close enough.
The next screen east is a mine shaft. Be sure to use the mouse if you plan on walking diagonally, as the manual keyboard controls are slightly off in this game. Don't even bother going in, as you'll be forced to leave as soon as you enter. All of the men in here are dwarves. (A Snow White reference, perhaps?)
The next screen east will feature a bird pecking at the ground. Walk towards the bird to scare it away, then get the worm it was going after. You finally have some points on the board as well as an item. That was easy. (It should be noted that is one of a few locations where the bird and the worm shows up, but this is the easiest one to get to.)
Go east again and you'll find a mountain path. If you go to the next screen, Lolotte's goons will pick you up and take you to Lolotte herself.
Lolotte can't tell if you're just some dumb peasant girl or if Genesta sent you here as a spy. She'll place you in a prison cell. There are balled chains, a torture rack, and even a cat-o'-nine-tails on the wall. After a couple of seconds (where you can look around), a henchman will let you out and take you to Lolotte.
Lolotte's son, Edgar, has taken a liking to you, and has given you a chance to prove your innocence. (Well, this is convenient. Also, how does a fairy have a human son?) She'll then tell you she wishes to own the unicorn that inhabits the meadowland. Bring her the unicorn, and she'll not only free you, but reward you as well. Her goons then take you back to the forest where you entered the mountain path from. (If you go back to the mountain path, the goons will just drop you back off.)
Going north of this screen takes us to a waterfall. You can swim just by walking into water. The waterfall will push you back if you swim towards it.
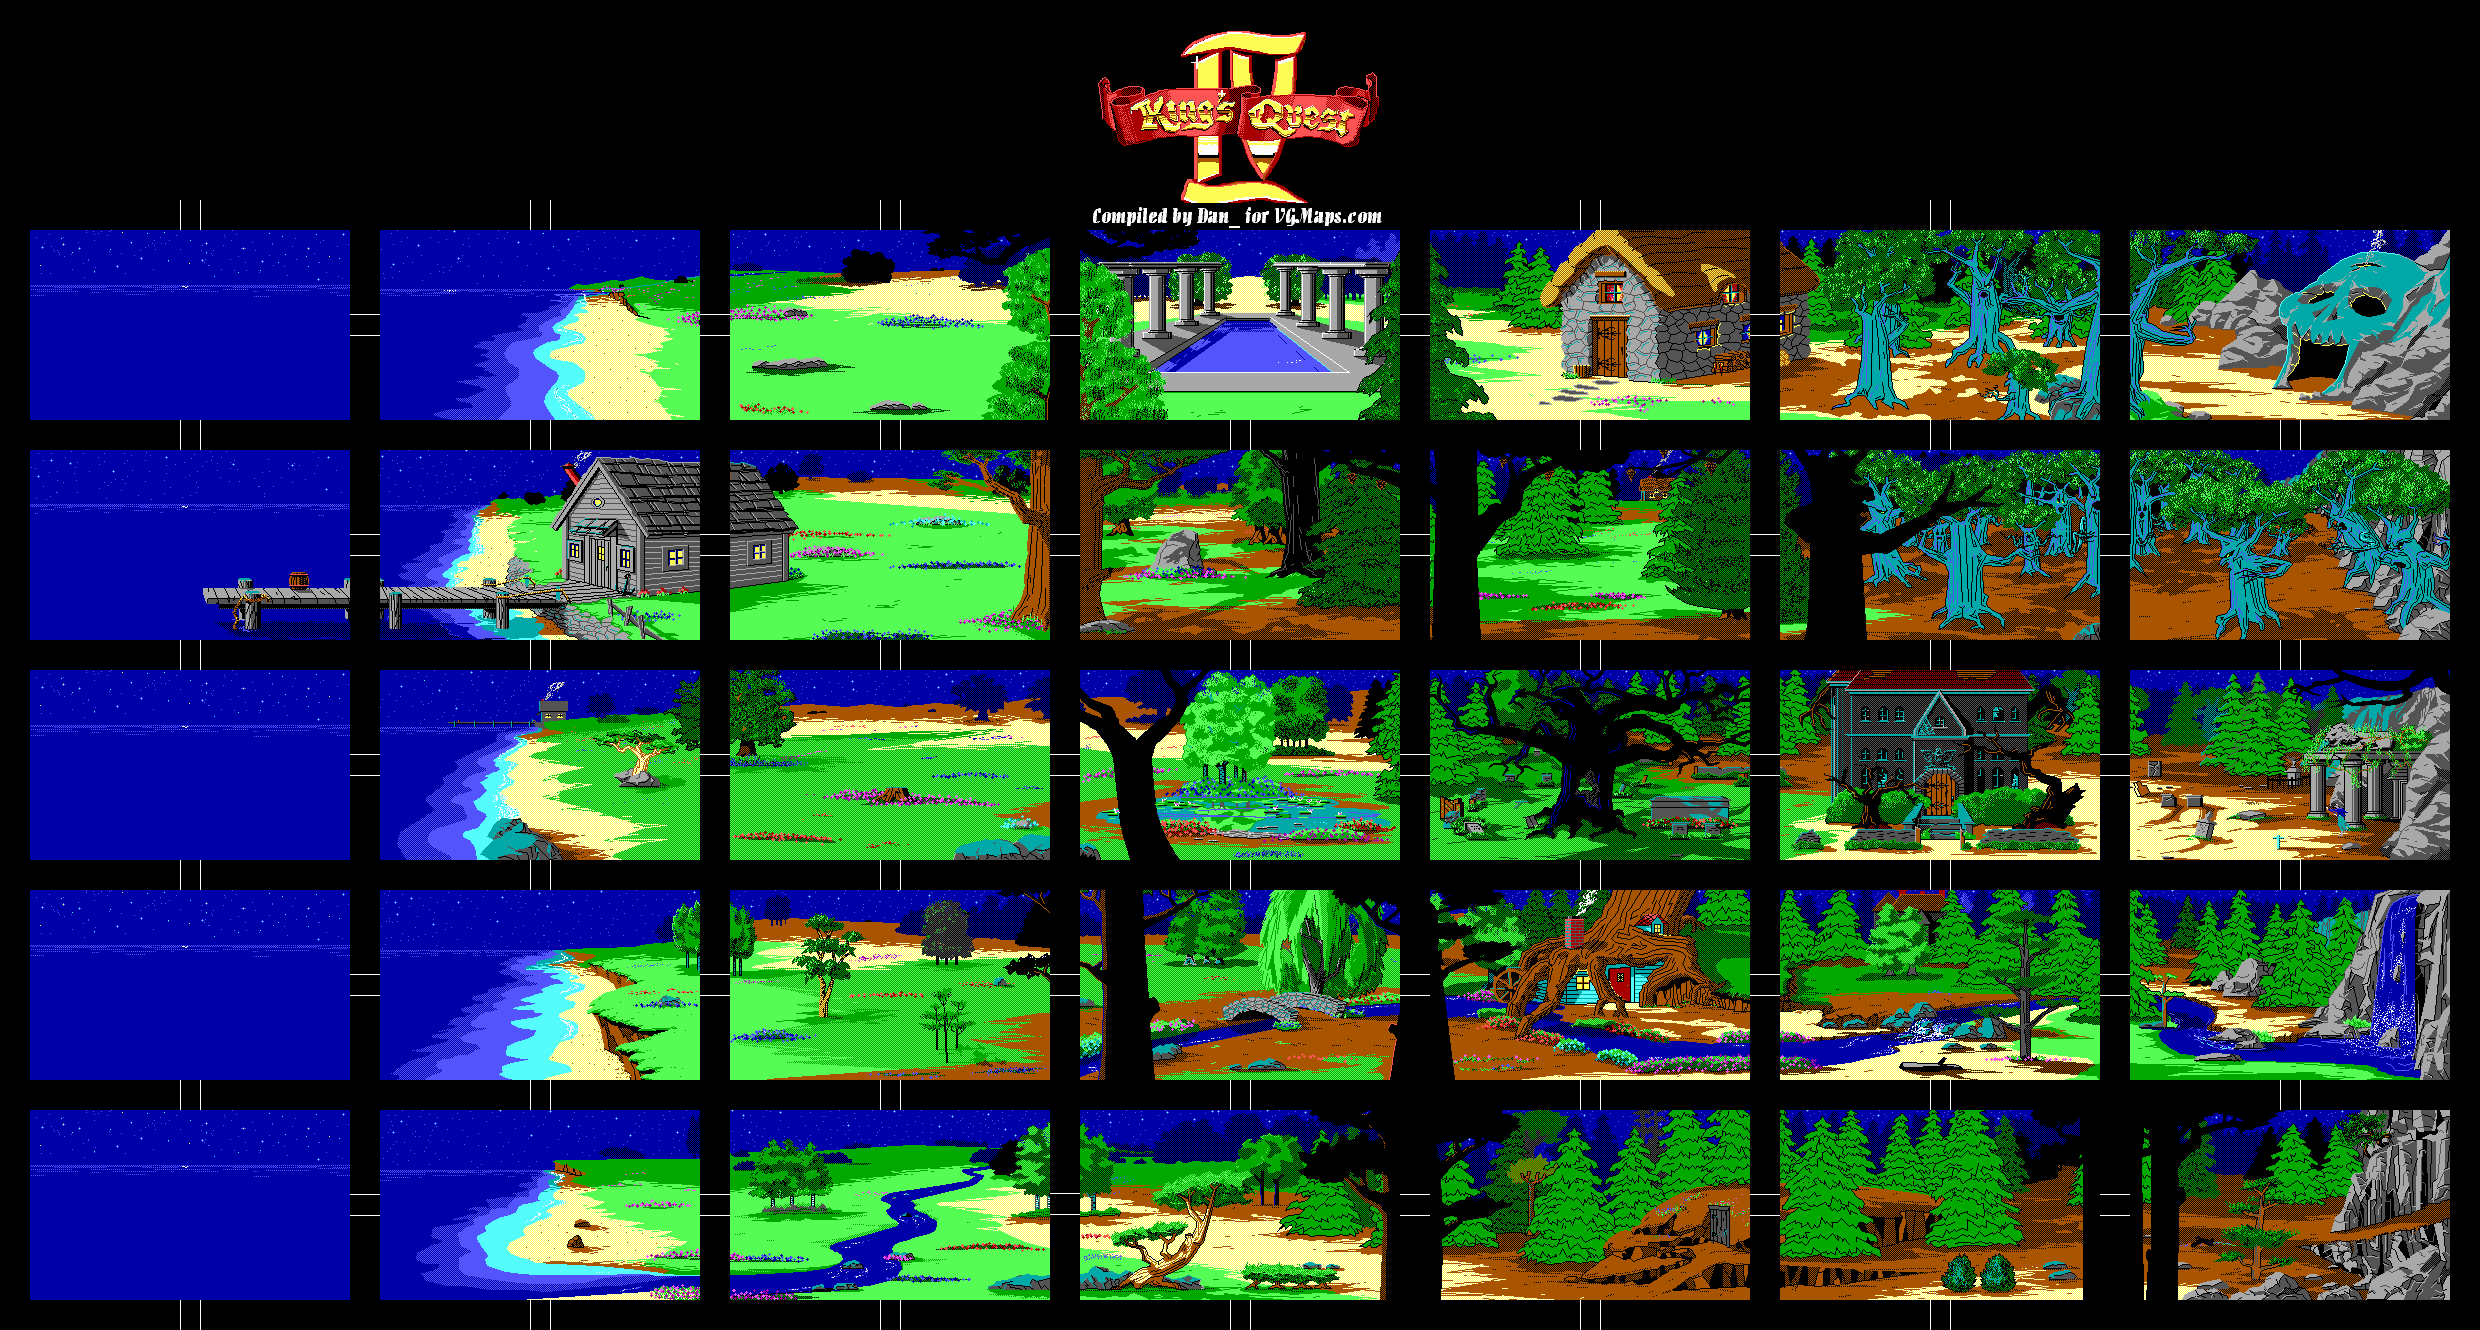
Oh, snap! More King's Quest action coming your way!
All maps by Dan_.
Need the manual to get past the copy protection? Here you go.
Anyway, there are a few things to mention here. First...the fourth game is easier compared to the third. Second, William Goldstein is the composer of this game, and he has also worked on the score to the TV series version of Fame (yes, it's based on the movie of the same name starring Irene Cara). Third, there's really no prologue to this as it's all the stuff from the last three games. At least you can read the prologue in the manual, which I've provided a link to.
Anyway, the game begins exactly where King's Quest III ends: King Graham tosses the adventurer's cap to pass the adventuring on to his children, Rosella and Alexander. When he tosses it, however, King Graham suffers a near-fatal heart attack.
A grief-stricken Princess Rosella runs from Graham's bedroom, and she sits on the throne wishing she could help her father. Suddenly, a fairy named Genesta from the island of Tamir appears in the magic mirror. She tells Rosella of a tree that bears a single fruit every 100 years. This fruit will instantly cure her father King Graham and give him good health and long life for many years...but there's trouble in Tamir, as the evil fairy Lolotte has taken the talisman that is the source of Genesta's power and plans to use it to spread evil throughout Tamir. Even worse, Rosella has a day to get both of these things before Genesta dies, and without the talisman, Rosella cannot return to Daventry. Genesta then disguises Rosella as a peasant girl so as not to attract attention.
The tree is located on a tiny island within a vast swamp on the other side of the mountains. Within these mountains, overlooking Tamir, is Lolotte's castle. You'll have to find both the fruit and the talisman in order to set Tamir straight and save King Graham!
Go east on the starting screen, since there's nothing you can do here.
You'll then come across a lovely stream as well as a unicorn. This unicorn will come into play a little later. When you take a few steps toward it, you'll scare it off.
You have quite a few new hazards here. The laser barriers will continuously go up and down, making it more difficult to get past them without being zapped. The Roadkill Rodneys take two hits to kill and will also jump over you in an attempt to lasso you from behind. You can take them out in midair with one hit. The homing missiles slowly move towards you in mid-air.
Donatello is best here, as he can also hit enemies behind him during the first frame of his attack animation.
In the section, you'll see spiked tank-like things that move towards you. You'll want to jump over and/or duck under these when necessary as they are invincible.
The final boss is Krang, interestingly. (This would also be the case in the sequel.) Amazingly, he's really easy. Jump over him, hit him, then jump into the air. Sometimes he'll kick at you after being hit (and turning around in the process), and sometimes he'll turn around and leap at you. Other than that, he doesn't much more of a strategy than the other bosses.
Once you've beaten Krang, you've won! Enjoy your ending!
Since Stage 3 was so short, you're getting a two-fer for this one.
Stage 3
This time around, you'll be walking along the tops of trucks. Most of the enemies will be Foot Can soldiers, and some of them will come out of boxes and throw the lids at you! You can knock the lids back at the enemies with your weapon, though.
The boss here is Baxter Stockman in his fly form. Avoid him and the three-way shots that he fires, and hit him as he flies to the other side. Nothing to it.
The Foot Clan are fleeing through the river now!
Stage 4
You'll not only be dealing with Foot Clan soldiers, but also turtle-eating fish!
At the beginning, you can jump on the logs to get through the beginning faster, but you'll eventually have to dive into the water. Watch out for the orb that moves around the logs near the end. They move straight towards you after dropping down, but they can be destroyed with one hit.
The fish aren't really that bad. They just move towards you like most of the enemies. Walking around is slightly slower in water, but your jump is the same. You'll eventually be jumping from one log to another again.
The second section is a cave. Take out the Foot Clan soldiers as well as the spiked balls that fly around. The Mousers will leap out of the ground, and some of them will do it from behind, so pay attention.
The boss here is Shredder, which is weird because he's usually the final boss in the scheme of things in a TMNT game. The trick to doing this is to jump over him and keep whacking him from behind, and don't let him face you if he's close to you as he will slash at you with that sword.
It's time to find some more bonus stages and fight Bebop as we chase after the Foot Clan!
Stage 2
Some parts of the floor are columns that move up and down, taking you to the top of the screen. I'm amazed that they don't crush you. Unfortunately, there are some columns on the ceiling that do...so get to the other side quickly.
You can attack the enemies through the walls by ducking before you attack. By holding Down, you'll be able to throw a ninja star.
There is a bonus stage just to the left of the second ceiling column. Just jump all the way up to the ceiling at the left side of the column, and you'll automatically access it. For this one, I play a target practice game. Move the target sight with the Control Pad and press A to shoot. An extra life awaits you if you hit all the targets.
There is another one that you can get after beating up the Foot Clan ninja with the Pizza pick-up. To the left of the nearby column, you can jump straight up for another bonus area.
The third bonus game is a game of "Poison." The rules are simple, take as many stars as you want, but leave one behind. If you're forced to take the last one, you lose. If Krang is forced to take the last one, you'll win and get your health refilled.
In the second section, you'll see a new enemy: fireballs that move up and down in an attempt to block your path. Luckily, you can kill them just all the other enemies you've seen so far.
You may see a box with a pizza on it flying around. Attack it, and you can grab the pizza it leaves behind.
The boss here is Bebop. He's a little more difficult to take on than Rocksteady. He'll try to ram into you and shoot you with his gun. Jump over him as he runs around, then hit him. Jump away when he punches at you. If he gets to the side of the screen, jump over the shots he fires, and be prepared to whack him when he starts moving again.
The Foot Clan will get away on cars, but that's apparently not a problem for the Turtles, as you'll find out next time.


