Part nostalgia-bomb, part note-taking and part FAQ, what started in GameTrailers as a video game blog is now on Blogger. This blog is a look back at video games, both popular and obscure, from the video game industry's infancy all the way to the previous console generation.
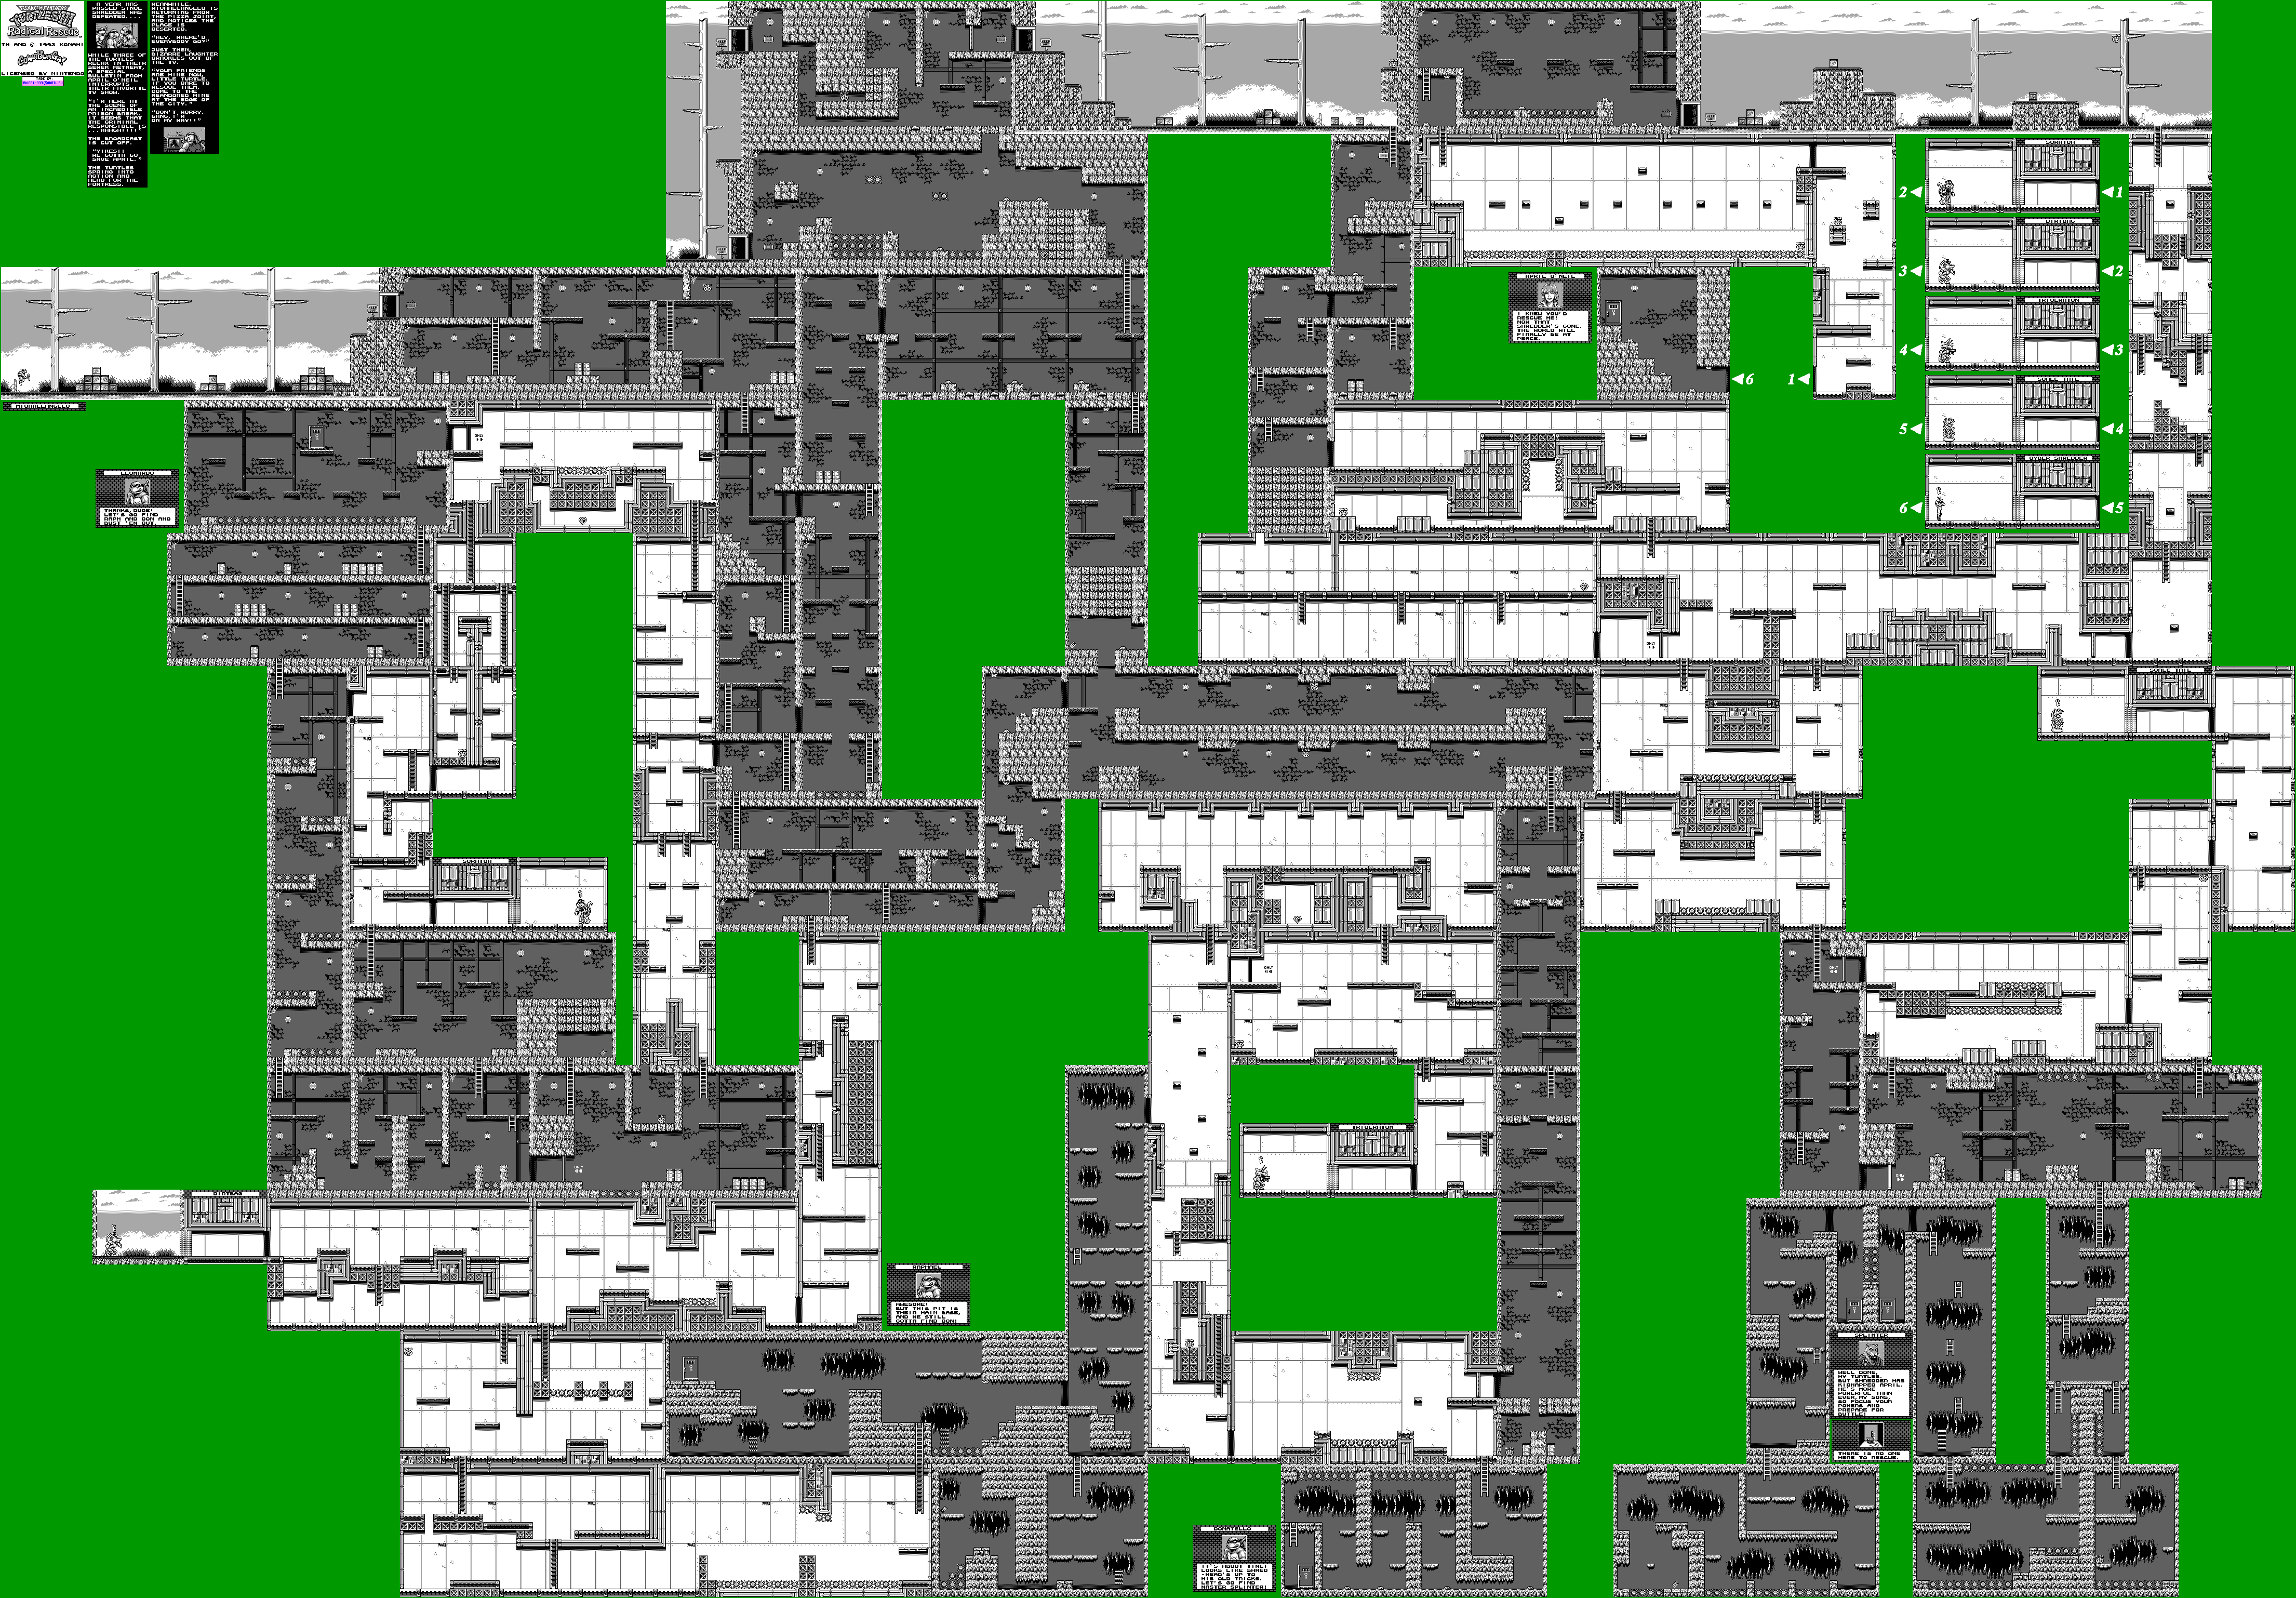
You've got Donatello, but there's still another card key to be found. You can leap up to the screen that it's on, but you'll have to go around to reach it, as you can't climb up to it with Donatello simply because the game won't let you.
Now that you've got the card key, it's time to head all the way to the top of the map, as you won't be able to explore the rest of the map in any other way.
When you're in the "right half" of the map, you'll notice the game has indeed changed. Some of the wall laser will shoot out homing shots. They linger for a few seconds, but they can still be dangerous.
The lower-right corner of the map leads to Splinter's cell. You'll want to go up from here and head to the right-most part of the map in order to reach Scale Tail.
Scale Tail has four attacks: his tail, a jump attack, a fireball that lands on the ground and creates a huge flame jet and the ability to suck you towards him. Avoid the tail and wait for the small pause when he ducks, as that is his tell for when he's about to jump. Go under him when he jumps, and attack him after he performs the tail whip, which causes the most damage.
Just keep moving away when Scale Tail tries to move you around with his mouth. If he leans forward when he does this, he'll blow you back. If he leans back, he'll suck you towards him. It's easy to figure out and avoid.
Once you beat Dirtbag and get the second key from him, head all the way down and head right. Use Michelangelo to fly over the spike pits, and use Leonardo to drill through the cracked blocks here so that Michelangelo can take bigger jumps. Be careful, as you can still hit the spike-infested ceilings. From there, you'll be able to climb up and enter the cave area. From there, go all the way left and you'll find Raphael.
From there, head right and head down to the narrow path leading to the ladder. This is where Raphael comes in. His special ability is to hide in his shell and spin around, allowing him access through narrow corridors that the other turtles cannot enter. Just duck down and hit B. You can also use this to travel across spike pits unharmed.
Go to the bottom and use Raphael to go through the narrow corridor to the left. Watch out for the flame columns that come out of the ceilings. You'll find another card key. You can then go up and enter the next area.
Watch out when you enter this part. The platforms will protract and retract from the wall at regular intervals. As long as the platforms are partially protracted, you can stand on them.
Make your way up when you enter this new area. You'll start meeting the cyborgs, which are pretty fast and take two hits to kill. Strangely, they only deal one unit of damage while the bats and other hazards deal two. You'll also see flame pillars come out of the walls, too.
Use Leonardo to break the cracked blocks around here to find another health extension. Go to the right, head down, and use Raphael to reach the nearby ladder. Use his shell-hiding ability to get past the lasers on your way down to the next boss room, where you'll meet...Triceraton.
Triceraton stomps his feet a couple of times before he dashes. He'll also jump around the room, and if you're close enough to him when he lands, he'll try to gore you. He'll also aim his gun, and wherever the aiming reticle stops, a bolt of lightning will come down to attempt to fry you as soon as he shoots into the air. Touching the lightning will stun you for a few seconds. Just keep a fair distance away, poke him and get away immediately, and keep up the distance game to get the third key.
From there, you'll have to take the one-way door and make your way down. Watch out for the Foot Clan soldiers on jetpacks, as they'll drop bombs. A ladder leading down will take you to another cave area. Go left and you'll rescue Donatello. Donatello can climb walls, much like Knuckles in Sonic and Knuckles.
Donatello will tell you that it's time to look for Master Splinter, who has also been kidnapped. Head right after getting back up from the cave area and use Donatello to climb up the wall. Go all the way up this corridor, then head left. The huge mine carts with the Foot Clan ninjas in them do a ton of damage, so be ready to jump over them.
At this point, you'll be back at the mine area at the beginning of the game. You've got some exploring to do...
At this point, you'll want to make your way to the lower-left quadrant of the map. You'll have to go all the way back up and head back to the initial mine area you entered before you found Leonardo. From there, you'll want to go down.
Once you're there, you'll be switching between Michelangelo and Leonardo to get through the area. Be careful, as the Foot Soldiers at this point will start dashing towards you when they see you.
The aliens are fairly quick and will leap at you when close enough. They take three hits to kill.
You'll take on Dirtbag. Watch out for both his miner's pick and his aerial stomp, which he'll perform when he leaps past the top of the screen. He also has a dashing punch which will let him quickly approach you while attacking at the same time. He'll usually perform it after performing an aerial stomp, but he can do it at random, too.
Keep your distance while fighting Dirtbag. You'll give him less reason to attack you with a random move and he'll be forced to use the stomp to get closer to you. You should be able to re-position yourself then.
If you ever die, the game is over and you'll be forced one of your two continues.
It's been a long time coming, but I finally cover the third TMNT game for the Game Boy...and this time, it's like Metroid!
It's been a year since Shredder was defeated. Three of the Turtles are watching TV when April O'Neil reports a prison break. She is suddenly captured on live TV and the three Turtles head out to save her.
Meanwhile, Michelangelo is returning back with some pizza when he finds out the place is deserted. A sinister voice from the TV tells him if he wants his friends back, then he should come to the abandoned mine at the edge of the city.
Once again, the play style is changed around. All of the turtles have their own special ability, and there's an open-world map. You can access the map at any time by pressing the Select Button, and if there's a dot in any of the room, there's something important there, such as a handy item or a boss battle. You'll also get a hint for that room if one is necessary. You'll also get a password to start where you left off on this screen as well.
You can press Start to switch between Turtles, but right now all you've got is Michelangelo. You'll find the others along the way.
You won't be able to reach every room or get every item right away, as certain areas will require a certain Turtle or item to enter it.
You start out as Michelangelo. Pressing A in mid-air will allow you to use the nunchaku as a helicopter and float down more gently.
Enemies do re-spawn after you scroll the area they show up on off the screen to a certain extent. When you enter the mine, you'll be dealing with Foot Clan ninjas (some of whom will lob bombs at a high angle) and bats that dive at you, but you'll be seeing more as time progresses.
You'll also want to watch out for the boulders that drop down from the ceiling after you get close enough to them.
Just like in the last two games, you can still heal yourself with pizzas. This time around, however, you have three item slots in the lower-right hand corner. If you find a pizza, you an take it with you and use it when you really need it, which works wonders if you're about to die. Sadly, you can only take one pizza with you at any time.
You'll want to start by working your way down and left. You'll eventually find a path leading into a new area with steel plate walls instead of the usual cave walls.
Watch out for the lasers as you drop down. Ladders are weird, since you can't jump up from them (you'll just drop down instead). Instead of using your weapon while on them, you'll throw ninja stars. Too bad you can't use them anywhere else in the game other than ladders.
You'll notice some breakable blocks which you won't be able to destroy until later.
Follow the path and you'll soon meet your first boss: Scratch the Cat. Duck under his ball and chain when he twirls it around, and duck under his claw swipe when he rears his arm back. When he does two hops, jump over him as he runs to the other side of the room. Attack him when you can. When you beat him, you'll regain all your health and you'll get a key.
Head back up a bit and go to the left. Keep going up from here and you'll be able to save Leonardo. You'll now be able to switch between him and Michaelangelo. You can exit this area by going right, but keep in mind that this passageway is one-way, and once the door closes behind you, you won't be able to enter from the other direction.
A slice of pizza will restore some of your health instantly. You'll be able to randomly get them off of enemies.
The robots with the antenna hanging off of them require that you duck in order to hit them.
When you rescue Leonardo and switch to him, you'll find out he shares the same life bar as Michelangelo. Nice going, Konami.
Leonardo will be able to break crushable blocks with his sword. Just hold Down and press A and you'll be able to spin your way down through them. To the right of where you rescued Leonardo is a health upgrade, which completely refills your health and adds two bars to your maximum health.
He can also jump higher Michelangelo, which allows you to reach some new areas.
Just below where you entered the area where you fought Scratch, there's a ladder leading down. Go down it and head right, and use Leonardo's block crushing ability to break the blocks and get the card key. If you take the long way to it, remember to use Michelangelo's helicopter ability to avoid the spikes.
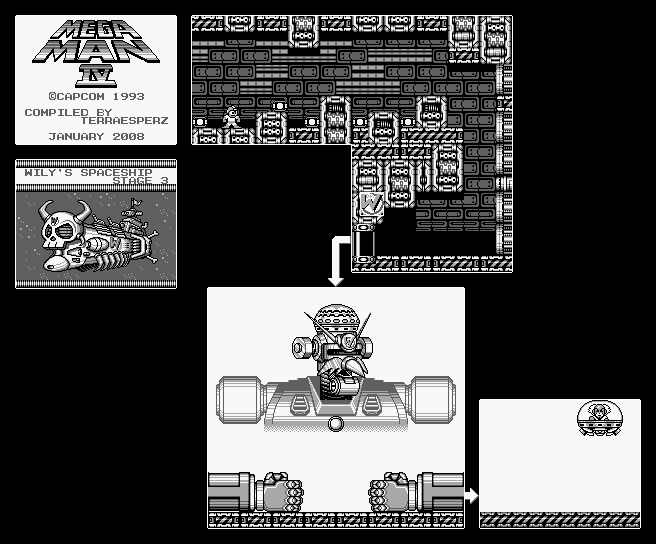
When you beat all eight Robot Masters, you'll be in another hallway where you'll be able to refill on weapons.
You'll take on Dr. Wily's giant robot. Stand underneath the flowing orb underneath the neck and use Power Stone at the top of your jump. Avoid the fists that smack the ground and the debris that falls from the top of the screen.
The orb will also shoot projectiles that track your current position at the time it is fired, so watch out for that.
You'll then take on the giant robot's head. Equip the Ballade Cracker and shoot them at the mouth when it opens up and tries to suck you towards it. Stay on the move to avoid the zaps that come out of the helmet, and use the Mega Buster to push it away when it backs up and moves towards you.
You'll then take on Wily himself. Equip the Pharaoh Shot (charge it up by holding B!) or the Ballade Cracker, then avoid the bombs and the pits they make. After two bombs, Wily will drop balls as he makes his way to the right. Thankfully, they don't hurt very much and you can hit Wily with either of the aforementioned weapons as he moves to the right. This is probably the easiest last Wily form in any game in the series.
After beating Wily, Wily escapes and Mega Man is trapped. Ballade shows up with a change and sacrifices himself so that Mega Man can get out and escape into the vacuum of space as Wily's spaceship explodes.. You've won!
The boss here is a laser cannon at the end of the ship. When the dome-shaped eye is exposed, shoot at it with fully charged Mega Buster shots. Be sure to slide to avoid the arm that hits you from above.
The laser cannon will shoot Ballade Crackers, Ring Boomerangs and even Power Stone at you. Thankfully, they work just like your version of the weapon, even if the Ring Boomerang tracks you.
Wait for the missiles to come down before clearing the pits at the beginning. Use the Ring Boomerang to get the Energy Tank and the Energy Tank Fragment.
The mini-boss here is a flying eye. When you hit it, it will create three more. The three it creates are fake and go down after one hit, but the real one will still float around among the other ones and takes lots of damage.
The second time around, you'll face just two. They'll move across the room, which changes as the eyes move from one side of the room to the other. Hit the open eye with fully-charged shots.
You'll then enter the Boss Rush room. Counter-clockwise from upper-left to upper-right is Toad Man, Bright Man, Pharaoh Man, Ring Man, Crystal Man, Charge Man, Stone Man and Napalm Man. Same strategies for each Robot Master still apply.
The robot mice can be destroyed with a charged shot.
After the third section on the top of the train, you can use Rush Coil to go left and get an Energy Tank.
The Y will be in plain sight just before the last rooftop segment. Jump to get it.
You can use Power Stone to beat Charge Man. There's just one problem: using Power Stone to hit him is more of a science than it should be, especially when he follows you around and shoots fireballs from the steampipe on the top of his head that drop down on you.
Instead, use the Mega Buster and hit him with fully charged shots. Whenever he dashes towards you, he's invulnerable to any attacks you throw at him until he stops.
Beating Charge Man gives you the Charge Kick. To use this attack, you'll have to slide. Your slide will have attack properties when this weapon is equipped. Of course, it's kinda weak.
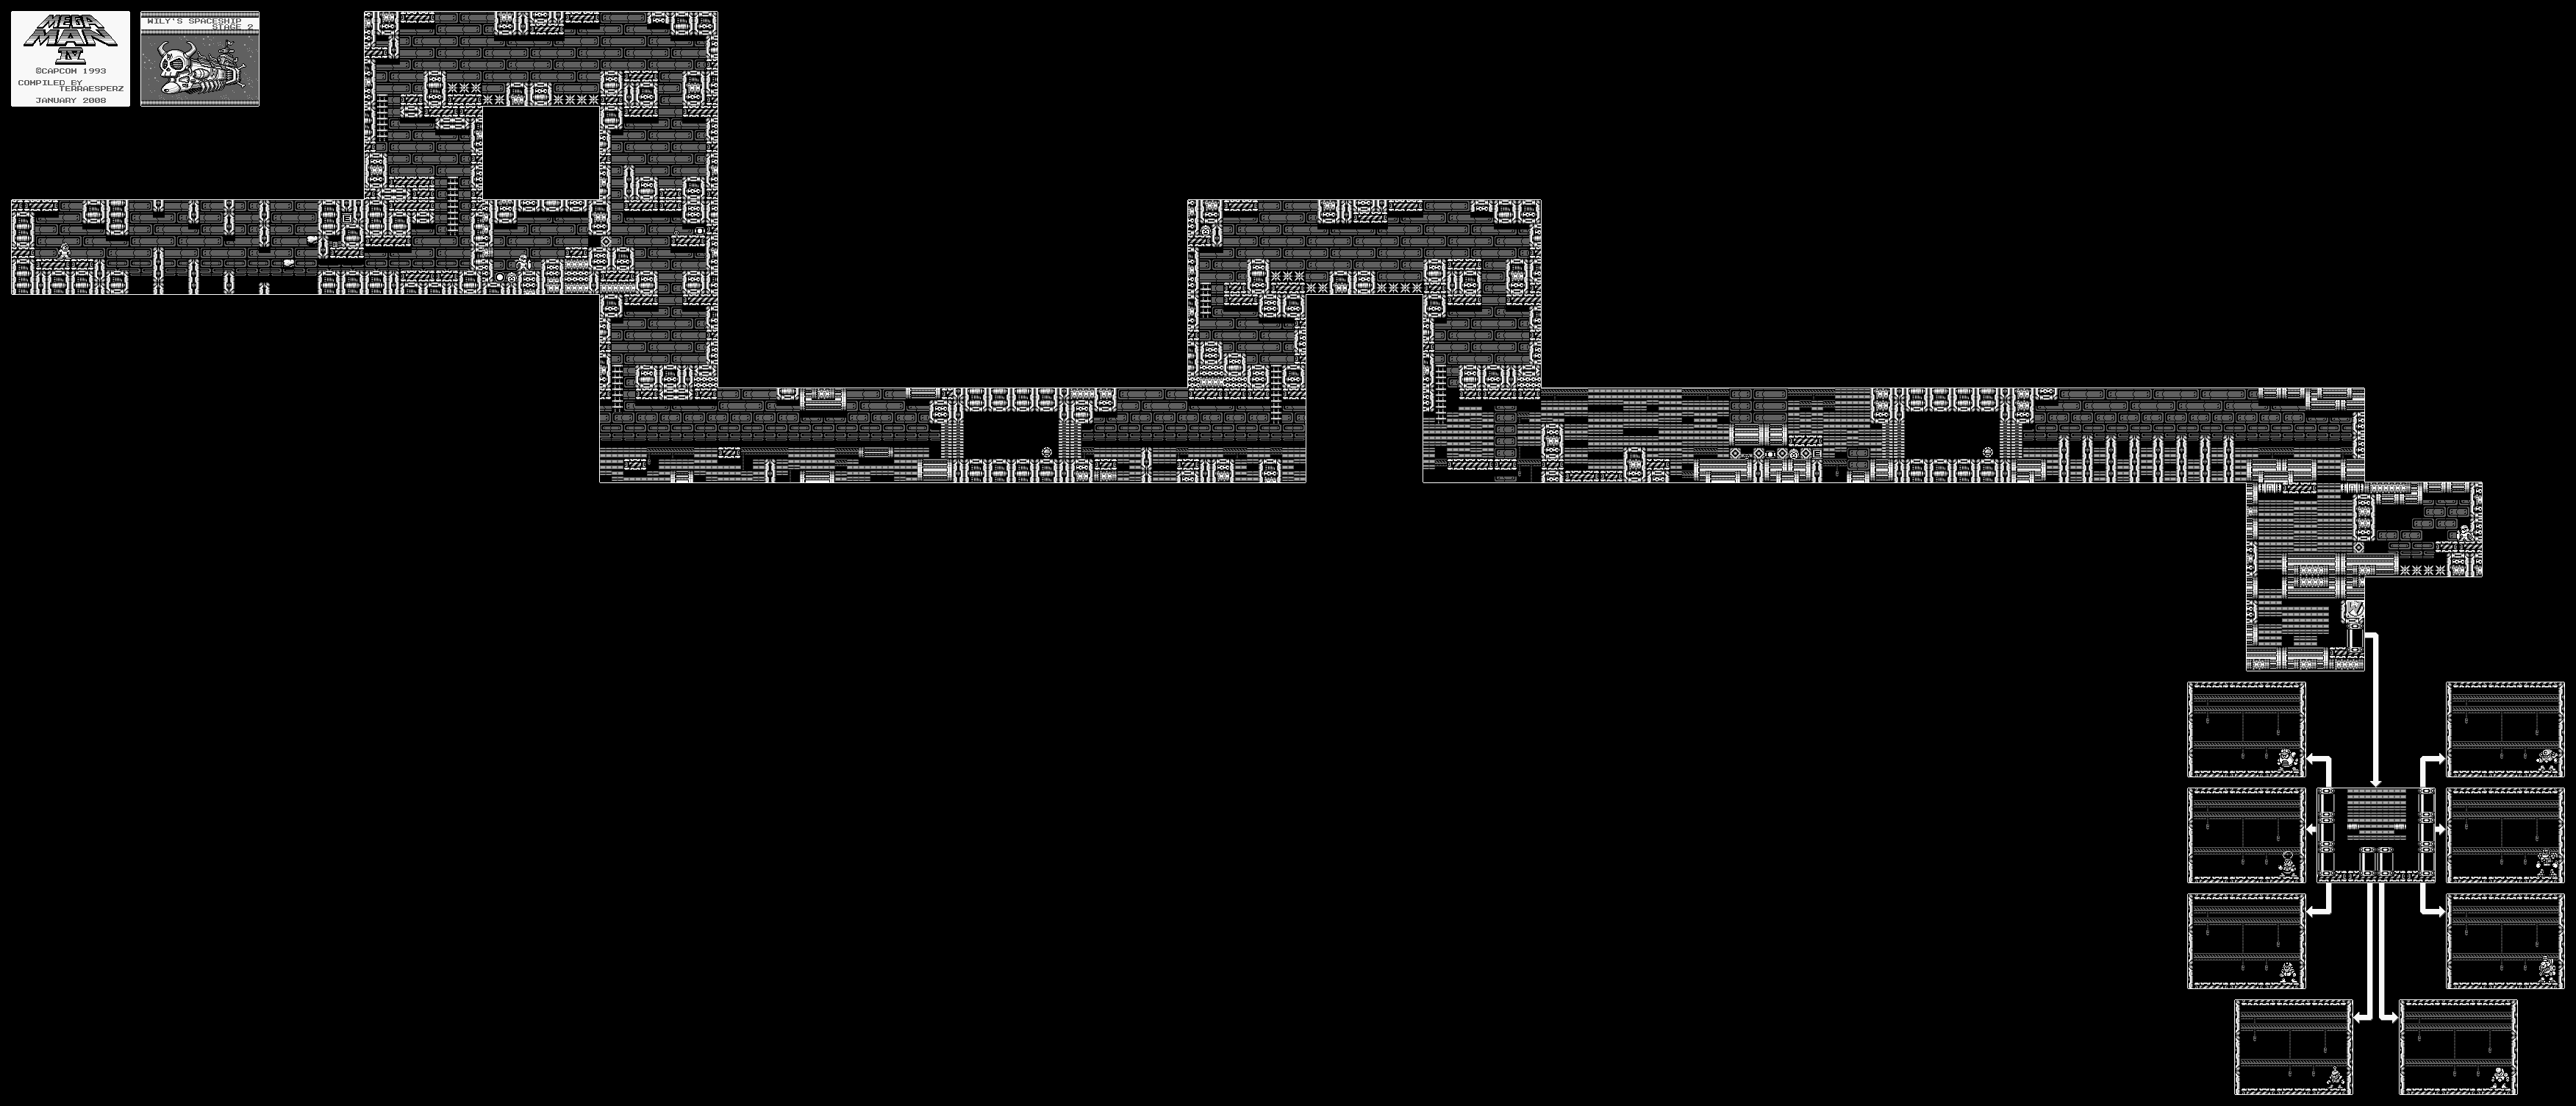
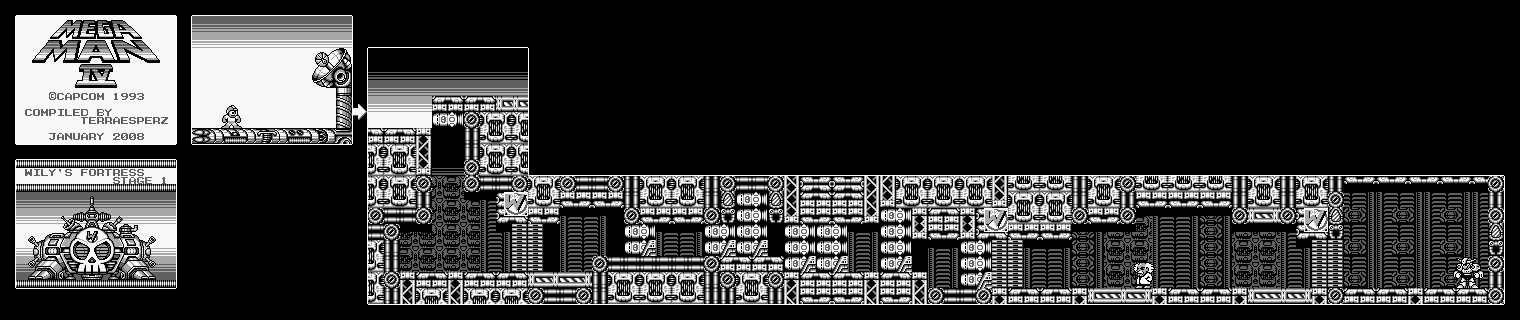
Wily Fortress 2
This stage isn't long. Since you have the four Wily medals, you should be able to go in. If not, go get them and come back here. Go get an S-Tank, which allows you to refill your weapon as well as all of your weapons.
You'll get some weapons pick-ups and an E-Tank prior to fighting Ballade. Shoot down the magnets so they don't hurt you.
Ballade powers up this time around. He moves around like he usually does, but he'll lay the bombs down in addition to shooting them. He's still easy to beat with the Mega Buster.
Beating Ballade will give you the Ballade Cracker. It's a bomb you can toss in four directions. Before you can celebrate, you'll have to avoid the destruction of the fortress that's right behind you. Use the Ballade Cracker to destroy all the missiles that are in your path.
The spike drills can be easily destroyed with charged shots. They can also be used as platforms as well as a way to break down seemingly impenetrable rock walls. Just be careful near them, as they can kill you in one hit.
The Mettaur turrets are pretty weak and can be destroyed by fully-charged Mega Buster shots.
Watch out with the missiles. When you shoot one down, it splits into four pieces of shrapnel that all travel diagonally.
The jumping robots shoot balls out of their heads that fall directly onto you like ammo out of a mortar cannon. Avoid the balls and their explosions (which have a short radius that comes off as an annoyance) and shoot the robot.
The grey missiles that pop out of the pits when you get close enough to them slowly make their way down after they show up. Looks like you'll have to be careful near pits in this game, too.
At one point, you'll have to outrun the exploding blocks. Each series will explode further
Napalm Man will jump around and fire grenades at you. You can do the most damage by firing the Crystal Eye at him, but using the rebounding shrapnel properties of this weapons works as well, since you can bean him from behind if you know and where to fire the missile from. When a Crystal Eye hits the wall, one piece of shrapnel will stay perfectly horizontal while the other two go up and down much like the diagonal bullets in a three-way shot, bouncing off walls and ceilings at 45-degree angles. If the diagonal shots don't hit Napalm Man, you can stand on the ground and wait for the third one to blast him in the back after he lands, which makes concentrating on dodging easier.
When you shoot the Mettaurs down here, they'll split into three smaller ones that bounce around before they explode into tiny fireballs.
The platforms with the two flaps will switch direction when you stand on them. Be ready to jump soon after they shake a little bit.
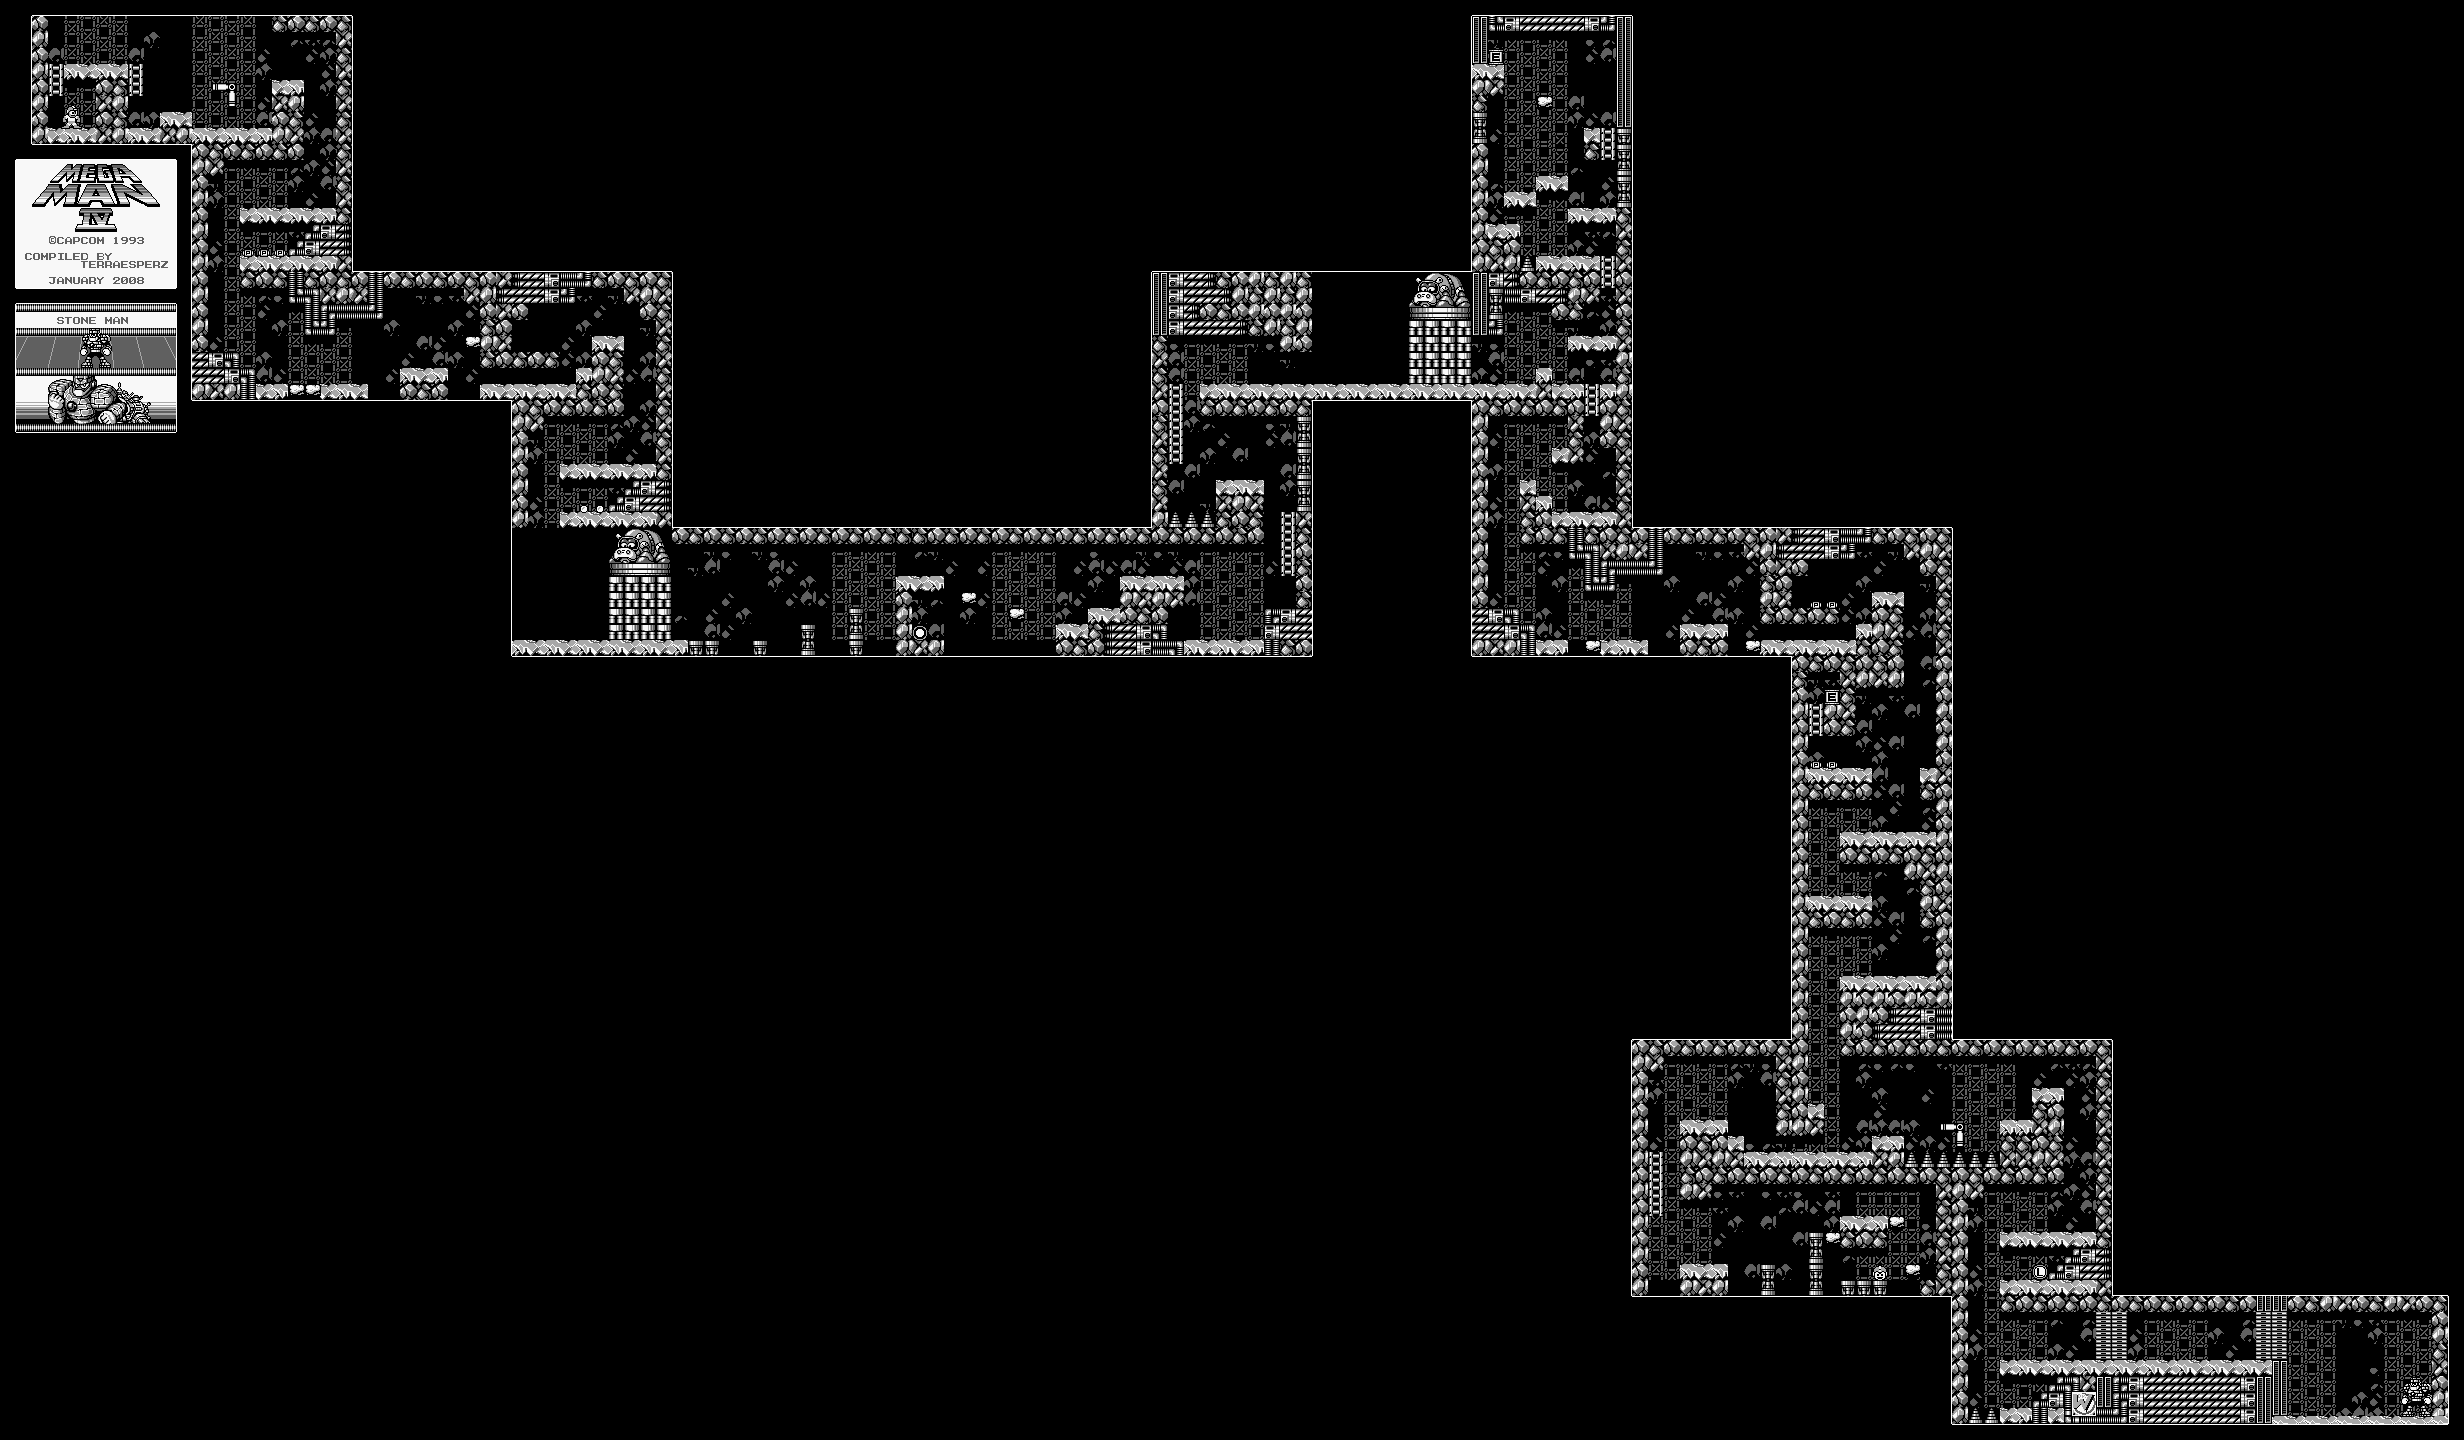
The hippos on platforms from Ring Man's NES stage are in Stone Man's GB stage. Shoot down the bricks holding up the platform, then hit the hippo with everything you've got while avoiding its missiles, which have homing capabilities. The platform will start coming back up, so alternate between shooting the column and the hippo every so often.
Wait for the shield turret robots to raise their shields up and shoot at you before damaging them.
The bats here are pretty easy to kill. Just wait for them to fly towards you, then hit him.
After the second hippo, you have a choice between going up and down. If you have Rush Jet, you'll be able to go up, and you'll be able to get an Energy Tank. There is one on the way down as well, but you'll need Rush Jet for both either way.
Near the end, you can slide through a narrow corridor leading to the left. If you can follow it all the way to the end, you can get an extra life.
The robots that shot the explosive balls out of their heads shoot rocks in this stage. At least the rocks don't explode.
The L medal is just before the door leading to Stone Man. It's pretty easy to spot and pick up if you can wrap yourself around to the platform.
The Napalm Bomb works best on Napalm Man. He'll jump around and shake the ground, and he also collapses into a pile of rubble every so often to make himself invulnerable to your attacks. Hit him while he's in the air with the Napalm Bomb to ensure that you damage him. His jumps don't go very far, and he doesn't do much, making him one of the easiest Robot Masters in the game to beat with the Mega Buster. He does have a shield of stones that encircles him, but he doesn't seem to do it all that often and it has a limited range.
Beating Stone Man gives you the Power Stone. It's a shield weapon, but the stones extend towards the edges of the screen in a spiral-like pattern.
Unlike the NES game, you're on the train the entire time.
The flying helmeted robots drop missiles out from their missile pods. They drop three before flying away.
The train Mettaurs are exclusive to this stage. When they see you, they let out a toot sound before opening their eyes and shooting at you with a three-way shot, then charging at you. When their eyes are open, they've vulnerable to any weapon you have at your disposal.
The chicken robot creates robot chicks out of the hole in its torso. Shoot down the head to get rid of it.
Destroy the missiles to get them out of your way. Just don't stand too close so you won't get hit by the explosions.
You'll meet Dr. Wily. When you chase after him, you'll be attacked by Ballade, the fourth and last of the Mega Man Killers. Slide under him when he jumps and jump over him when he runs at you. He'll toss bombs at you, but you can easily destroy them with the Mega Buster.
When you bring him down to one hit left, he escapes. It's time to take on the Robot Masters from the fifth game.
The next four stages take place in more of a Wily's Castle-like setting, now that you've managed to make your way in.
To get the Energy Tank fragment at the beginning, jump up and shoot the nearby platform with a fully-charged Mega Buster shot, then quickly use Rush Coil to jump onto it and grab the fragment. You'll be seeing this platform again, and you'll need it in order to get over a spike pit.
The Crystal Joes are only vulnerable when they shoot their crystals. Avoid their attack and hit them with charged shots.
The flying robots drop skull bombs when you're directly under them (or over them). Use the slide to avoid the bombs.
You'll see ball robots being propelled by cans on legs. Destroy the ball to get rid of this enemy completely; otherwise the ball will start bouncing around like crazy and careen into you.
The cones with the flashing lights fold down and move in for the kill when you get close enough. Thankfully, they go down in one hit and a charged shot will get rid of a whole line of them.
On the first drop down, go right on the third screen to get the W medal. The medals in this and the next three stages spell out "WILY," and you'll have to collect them before you can take on the rest of the castle or else you can't continue.
The street sweeping robot moves back and forth and shoots a three-way shot into the air. As long as you're not jumping around and have your Mega Buster fully charged, you should be fine.
Shortly after getting the W medal, you'll have a fork in the road. If you take the lower path, you'll have to deal with both the floor and the ceilings crushing you. Slide where necessary and don't stop for anything! At the pit, you'll have to wait for the floor to rise. From there, quickly make your way to the ladder.
The best time to jump over the pits with the crystals coming down from directly above is usually right after one comes down. Unlike the fifth game on NES, the crystals drop in a steady pattern and not randomly.
Near the end, you'll be having to do some waiting so the pillars can move around and make it easier to continue.
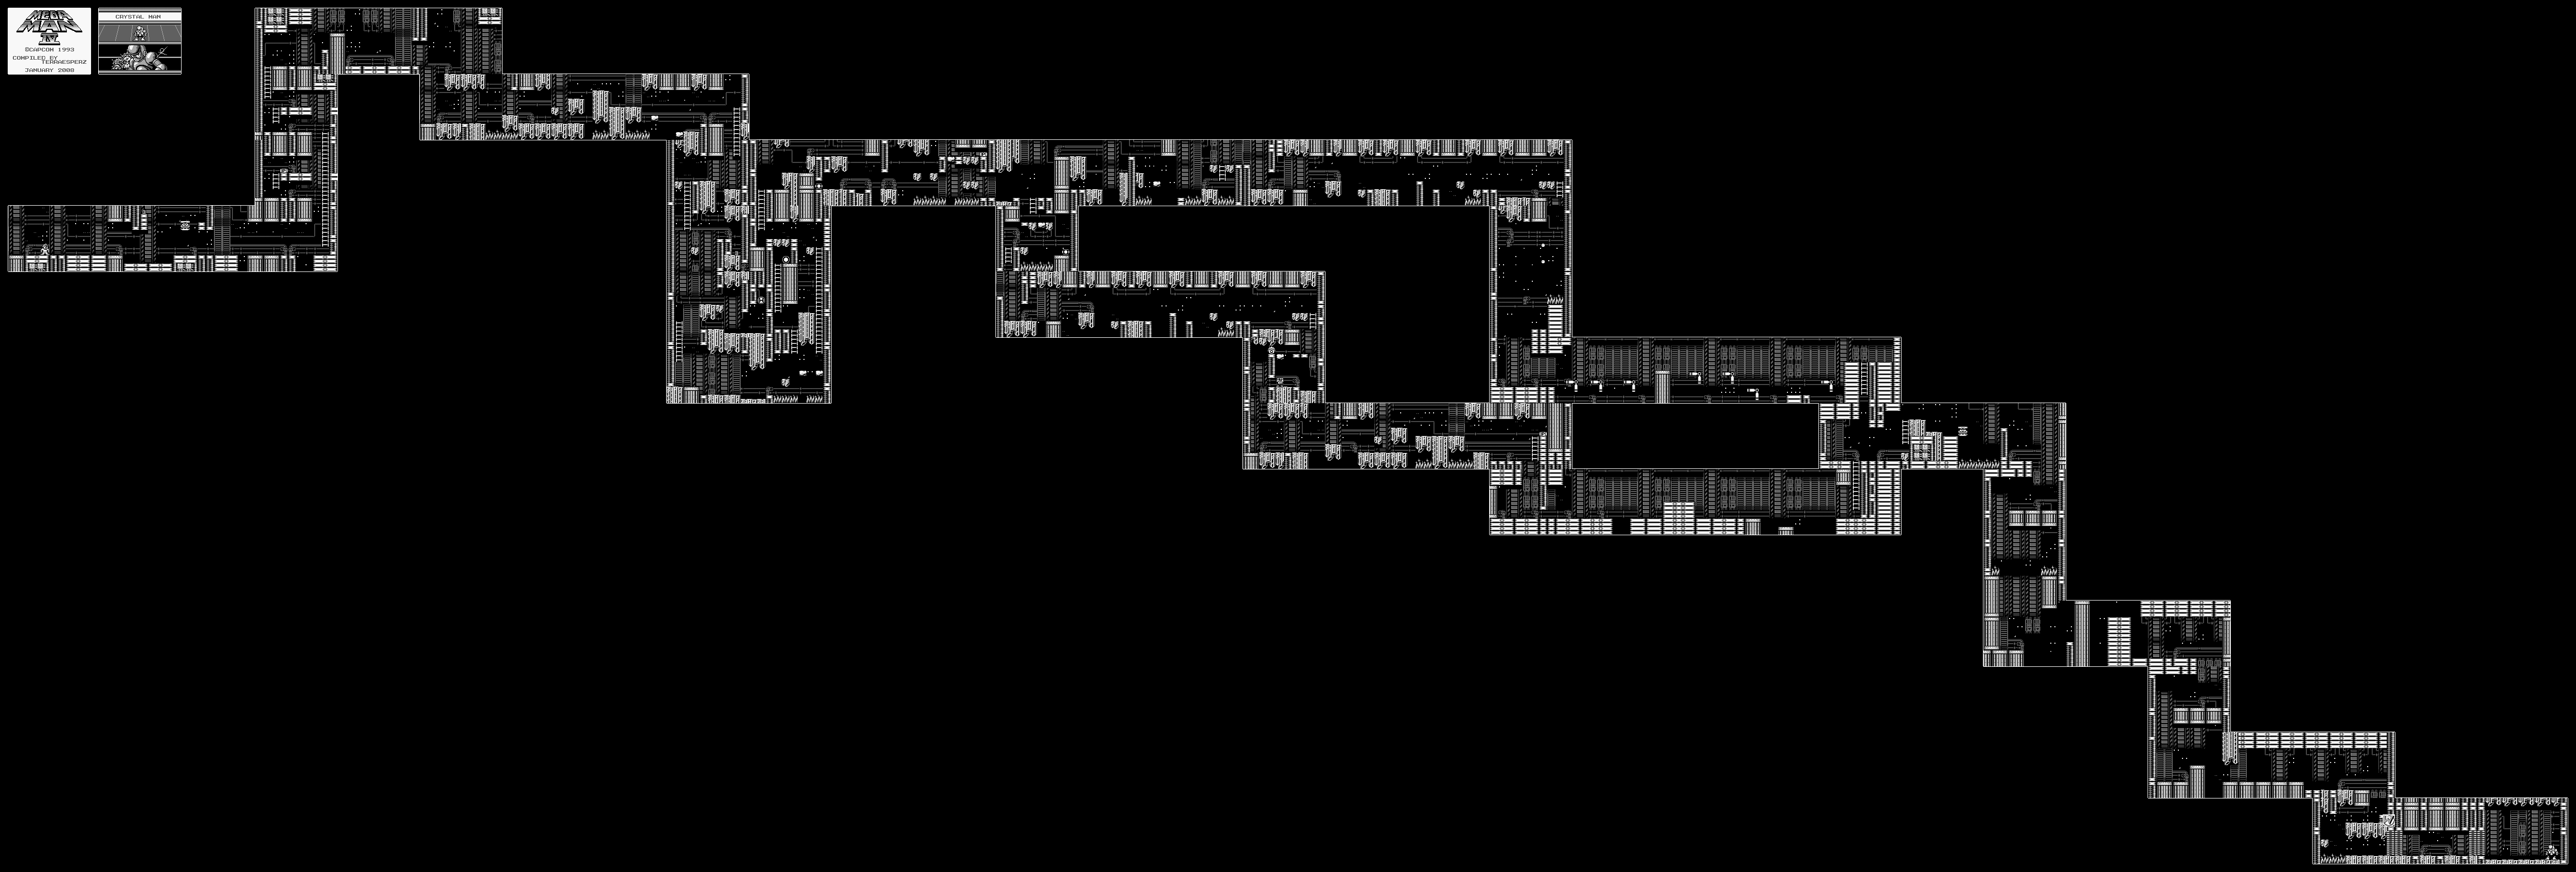
Crystal Man bounces around and shoot a crystal orb at you. When this orb hits the wall, it will split into four smaller orbs that bounce off the walls and ceilings for a little while before they disappear. Thankfully, they're not impossible to dodge. He also has a blaster that complements this weapon, but he only uses it if the crystals are still on the screen. Since you can't get the Gyro Attack in this game, use the Ring Boomerang on him instead.
Beating Crystal Man gives you the Crystal Eye, which works much the same way as Crystal Man's weapon does. The only difference is that this version splits into three orbs instead of four.
Wait for the rocks to explode before dropping down.
The tiger robots pounce around when they see you, and can be easily rid of with a charged shot.
At the ladder where the tiger is, go to the right and extinguish the flames with Rain Flush. Go up the ladder and you'll meet Proto Man, who will give you an Energy Tank to go alongside the one behind him.
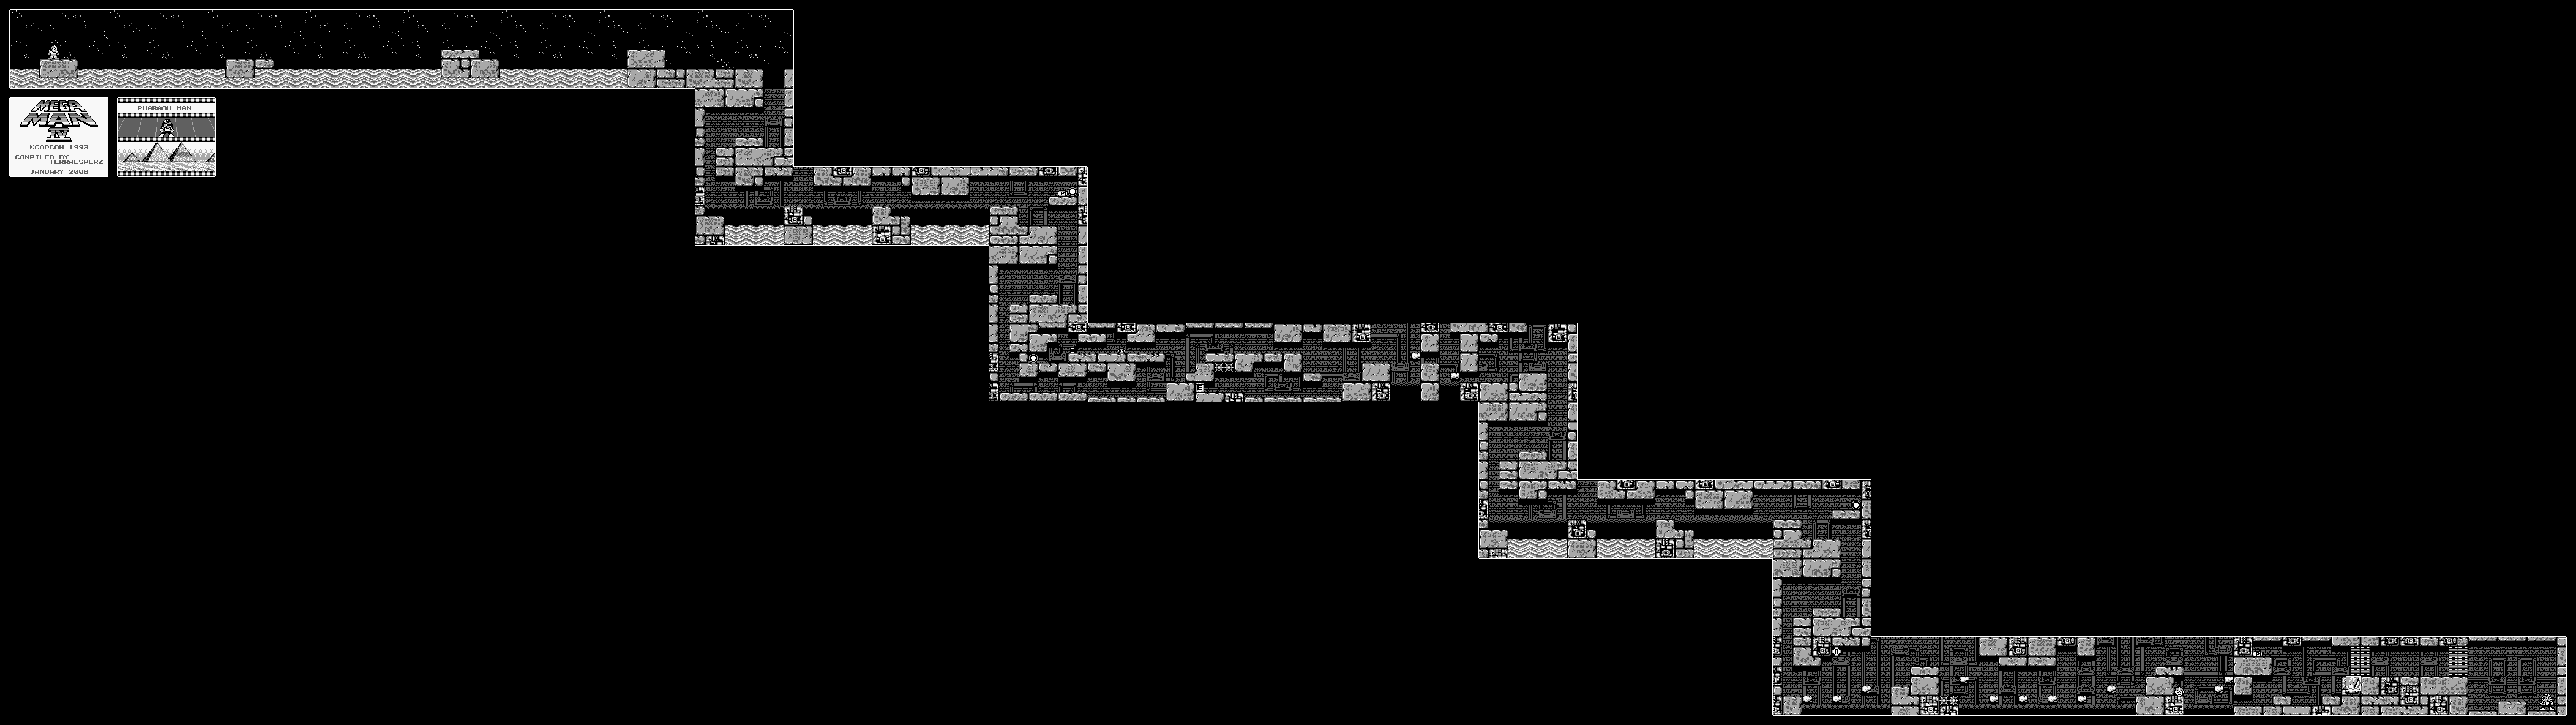
Ooh, boy. Pharaoh Man is one of the better Robot Master designs in the series, in my opinion, and the music for his stage shows how far the series has come to this point.
The flying bugs here at the beginning fly around and shoot bullets down at you, which can be pretty easy to avoid if you're paying attention. The scorpion robots move in at you, and dive in and out of the quicksand. The quicksand will definitely drag you down, but you should still be able to move around fairly quickly if you just keep jumping.
Once you get into the pyramid, you'll start dealing with mummy robots that pop in and out of their walls and launch their heads at you as part of their attack. They can easily be dealt with with a charged shot. The energy can near the beginning of the whole pyramid area is really easy to get with Rush Coil.
The platforms that take you over the spike pits also shoot bullets in two directions, so be careful when you get close so you don't get shot at.
Watch out with the rock platforms, as they lower the longer you stand on it. You'll need to use Rush Coil to get the A medal.
If you have the Flash Stopper, Pharaoh Man is easy, as he leaps around very quickly and throws the Pharaoh Shot at you constantly. He has a charged version that also goes left and right across the room, too. Just activate the Flash Stopper, then keep blasting him with the Mega Buster until he falls. Just keep pressing the B button and you'll keep activating the Flash Stopper when necessary, as it last for about five seconds.
Beating Pharaoh Man gives you the Pharaoh Shot. Remember, you can charge the Pharaoh Shot up by holding the B button, and as long as you have it held down you'll have a huge Pharaoh Shot above your head that can also damage anything that touches it, which proves to be rather interesting.
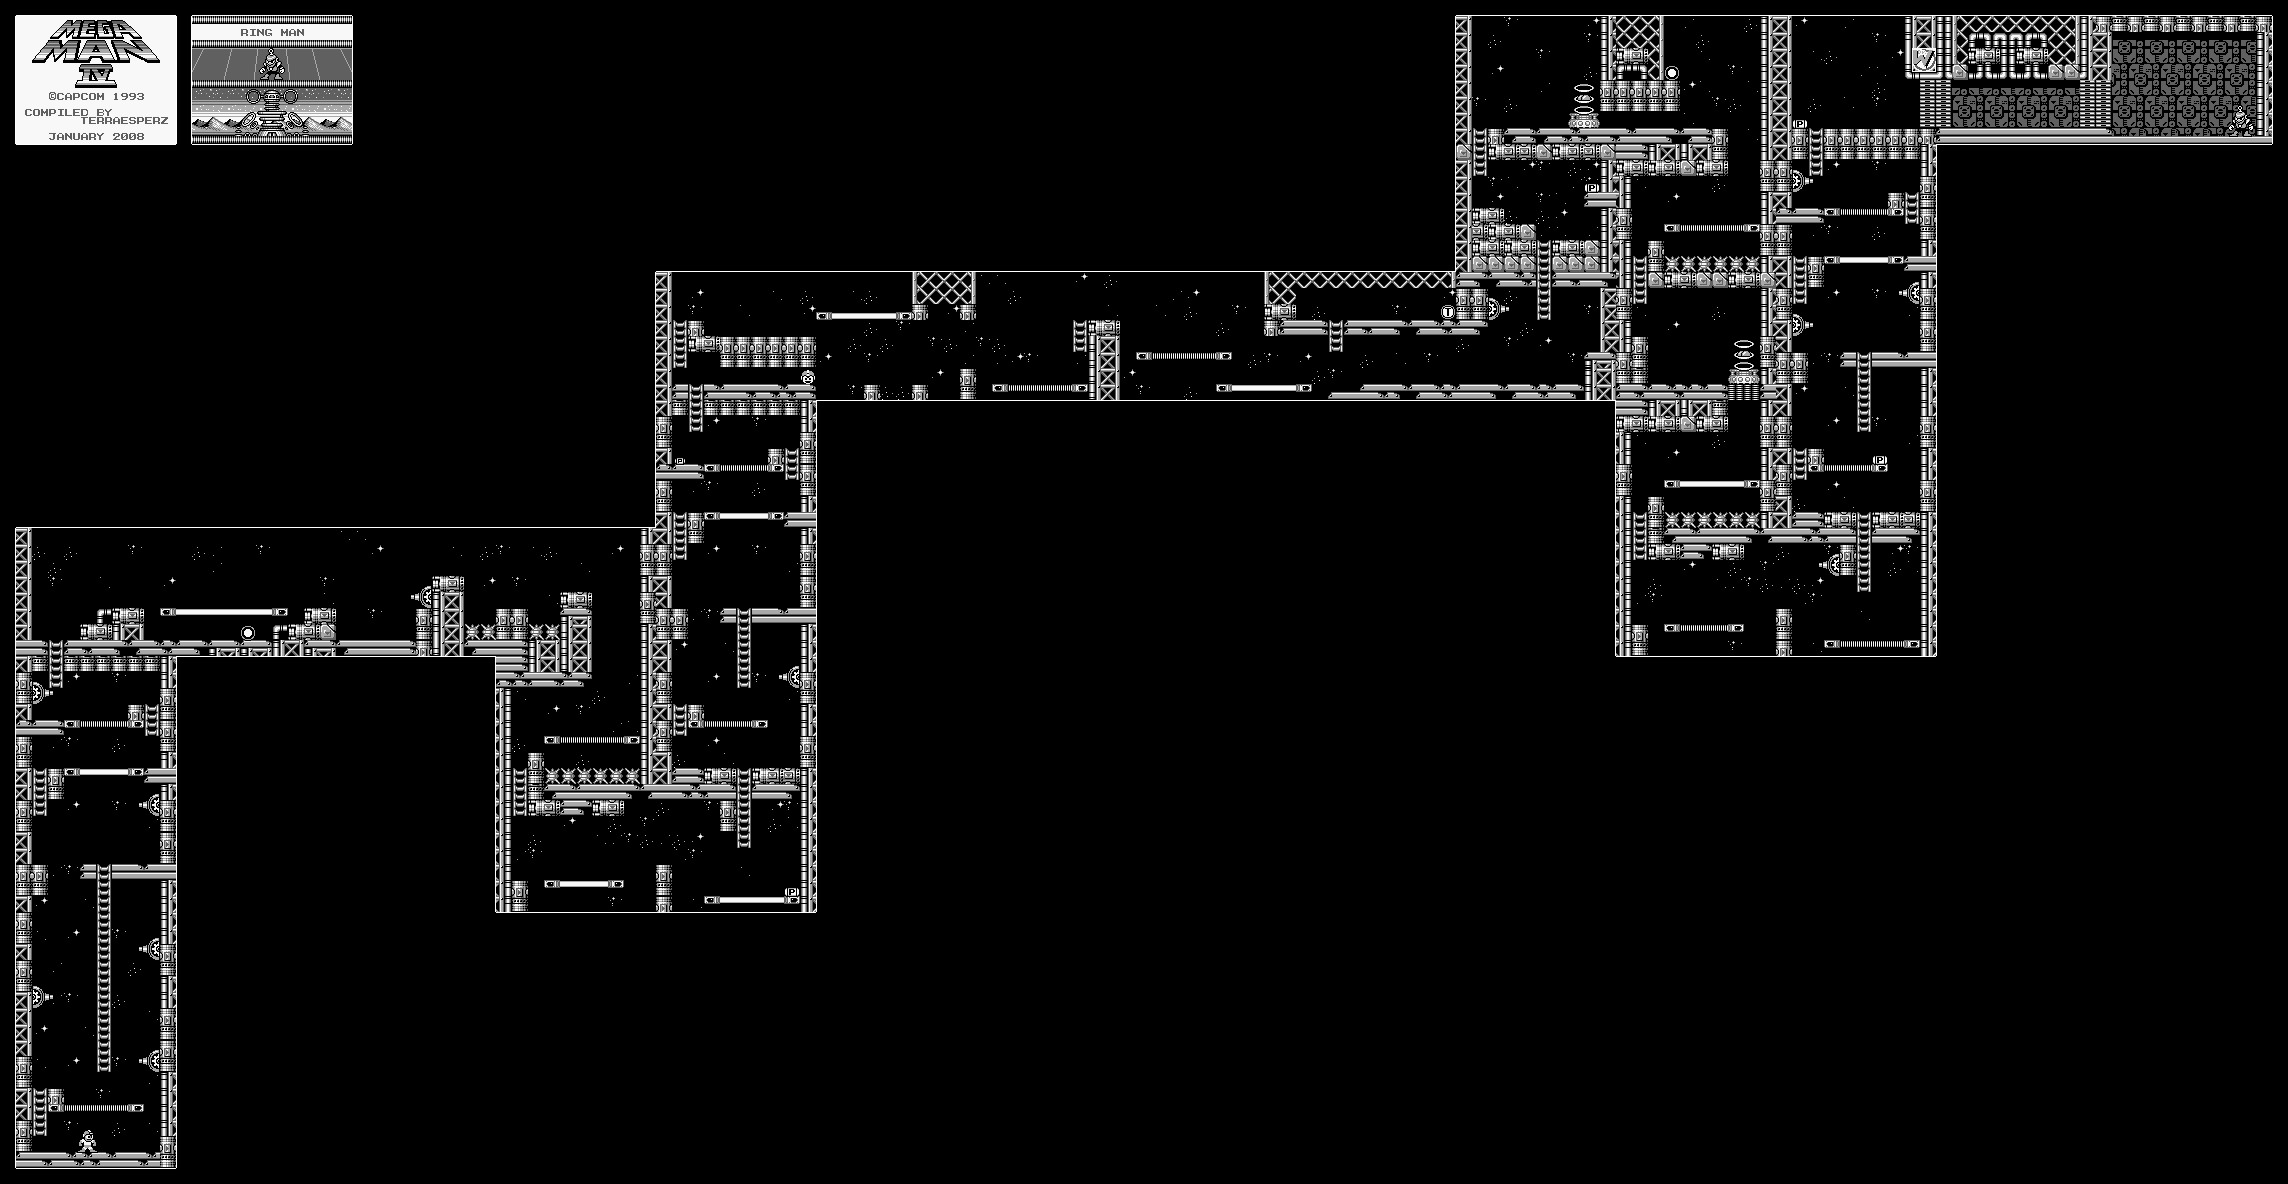
Not only will you have turrets sticking to the walls tracking your every move and shooting at you, you'll also have platforms that disappear from one end to the other once you step foot on them. The solid white platforms disappear from left to right, while the striped ones disappear from right to left.
The robot with the saw blade is the usual "moving from left-to-right and speeding up when you're on its level" enemy of the game. Either avoid it or hit it with the special weapon that will destroy it.
Thankfully, the T medal is extremely easy to get to.
The ring monster that blocks your path exposes its defenses when it shoots its six rings out in an asterisk-shaped pattern. Hit they eyes when they're exposed with charged Mega Buster shots.
Ring Man throws a Ring Boomerang, then waits for it to return to him before jumping up and throwing another one. When he hits the ground, he runs to the right and starts the attack pattern over, and he'll run to the left after the second time. He'll then alternate between running right and running left. This is yet another easy attack pattern, which adds to the haphazard "level is harder than the boss" pattern that the game seems to have.
You can destroy him with charged-up Pharaoh Shots, but you can just as easily beat him with the Mega Buster.
After beating the first four Robot Masters, you'll go after Dr. Wily...whose Wily Castle rises in the forest and fires missiles at Mega Man. After a few well placed shots, Mega Man takes on a satellite on the castle.
Avoid the ball and its attacks, especially the ring shot that rotates to the left side of the screen. When the ball opens its eye, hit it with Ring Boomerang.
Here it comes...it's the fourth Mega Man game for the Game Boy!
All maps by TerraEsperZ.
At the beginning of the game, Dr. Light will tell you about the P Chips. He's made a new machine that allows for the creation of items in exchange for P Chips. Think of this as a precursor to the Bolts in Mega Man 7 onward, because that's exactly what it is.
I suggest starting here, since he's the easiest boss in the game (and probably the entire Original/Classic saga, depending on what you want to call it) to beat with the regular arm cannon.
The rain in this area pushes you back, so you'd better be on the very edge of a platform when you jump to another one.
This is the first Game Boy entry to use the Mega Buster and not the Proto Buster, meaning that you can charge the arm buster now. Whenever you shoot off a fully-charged shot, however, you'll be pushed back slightly (unlike the fourth NES game, where this never happened). Be careful when you use it.
The floodgates start rushing in as soon as you reach the second screen. The water on the ground from the waterfalls will push you around according to where they're moving. If they're moving left, you're moving left. 'Nuff said.
The bird robots have three smaller clones behind them that home in on you when you're close enough. This is the best introduction to the charge shot in my opinion, as firing one at the big bird takes out the three behind it as well. Sheesh, this thing would have made the second and third games easy as anything.
The robots that come down on parasols can also be taken down rather easily with a charged shot. Same thing with the robot rats as well as the little bubble robots that can stick to both the floor and ceiling as they chase after you. Once again...best introduction to a new feature ever by having you finding out that using it makes the whole stage really easy except for the jumps.
The medallion with the B is for Beat. Beat finally makes his Game Boy debut here, and once you collect all four medals, you'll be able to send him after enemies.
The mouse robot moves back and forth, while the fish swim back and forth in the water, diving out of the water and right at you if you're close enough.
Shoot the snails in the eyes when they're open, and dodge the shots that it shoots at you like a catapult. Charged shots make this easier, as there's a chance that you won't even have to deal with its second attack - the snail's eyes coming right at your present location.
Toad Man is really, really easy. You could beat him with the Drill Bomb...but screw it. Keep hitting him with the Mega Buster as he jumps around, and he'll keep jumping around. You can still hit him out of his Rain Flush attack just before he executes it.
Beating Toad Man will give you Rain Flash and Rush Coil. Rain Flash damages everything on screen, while Rush Coil is just what you expect - Rush acting as a springboard to higher platforms.
When you beat a Robot Master, you can either go back to the stage select screen or to Dr. Light's Lab. At Dr. Light's Lab, you can buy items with the P chips you've found.
The short stout guys that walk around shoot out fireworks that light up the room, while the red robots with the light underneath them that fire a shot that splits into five projectiles that fan out. Destroying a flying robot will darken the room, since they're red light bulb robots. Destroying a green guy afterward lights up the area again.
The robots that hang on the ceiling and come down at you before spinning around like a top in your direction can be easily rid of with a charged shot.
The small squares with the "E" on them are Energy Tank fragments. Collect four of them to get an Energy Tank.
By flipping the switch, you'll turn off the lights and cause platforms to drop down. Take them across and hit the switch on the other side so you can see again.
The robot head platform lowers as you ride it. You'll have to jump on it repeatedly to bring it back up and to avoid being lowered down a bottomless pit.
The robot that shoots pellets at you can be taken out by both inching your way towards it (avoiding the pellets at the same time) as you fire at it. A fully charged shot also helps if you're an adept dodger.
The totem poles just spit projectiles at you from the second totem, while the robot crickets act as platforms that help you ride across the massive spike pits. Just stand on them and they'll start moving.
The platforms on the track are back. This time around, they just go back and forth. None of the platforms will fall off when they hit the other end of the track. One of them will have the E medal above it, so be ready to jump at the top ends of the path.
The only thing that Bright Man does (aside from the Flash Stopper, which freezes you in place) is jump around trying to land on you, while shooting bullets at you that goes in three directions at times. His attack pattern is a bit random. You could beat him with the Mega Buster (he's not that much trouble), but Rain Flush makes it that much easier since you can just launch it into the air and hit him regardless of where you are, which makes it easier to concentrate on dodging his attacks.
And now, the epic conclusion to DuckTales for NES!
The Moon
Oh, my. As the gravity allows for higher jumps on the moon's surface, you'll be taking on moon squids (I guess), robot moon ducks, aliens and more.
Be sure to explore as much of the UFO as you can. This allows you to find the UFO key, one of the hidden treasures, and some secret compartments.
One of the chests contains the UFO Key. You'll need this to walk past the locked door and get the remote control, which allows Gizmo to blow up the wall that blocks your path to the underground when you leave the UFO and go right. If you go up from where the remote control is, you'll find Mrs. Beakley again. That's really nice if you're needing the health. Thanks, game.
The can on the level just below the top leads to a hidden room with hidden treasures if you knock it right and pogo your way to the left off of it.
The top of the UFO leads you to a hidden treasure if you can make it all the way to the right. Inside the chest is a golden tile (or something) that gives you another cool million.
The boss here is a rat. He'll either run to one of the lower corners or jump to one of the higher corners. He has no set pattern, so start pogoing and do this the entire time. After five hits with the pogo attack, you'll get a piece of green cheese worth one million. At over $2.5 million, this is probably the biggest haul in the game.
When you beat all five lands, you'll have to return to Transylvania to get all your treasures back! A new challenger...comes!
The Finale
You remember how to get through Transylvania, right? Just go through that fake wall again and go through the mirror on the right, then head to the boss like normal.
Don't worry about collecting any treasure, there isn't any here.
The boss here is Dracula Duck. Bounce off the bats he sends at you with the pogo attack, then pogo him on the head. He's really easy, but that's not the end when you beat him! You'll have to race Flintheart Glomgold to the treasure box at the top of the room so he won't replace you as the richest duck in the world!
When you make it to the top before Glomgold, you did it! Enjoy the ending! Believe it or not, there's one for when you finish with less than $10 million and one for when you beat the game with more than $10 million, though I fail to mention this because, once again, I forgot.
It's time to tackle two more stages on the quest to get even richer!
African Mines
When you go to the African Mines, you'll find out that you'll need a key to go in. You'll be taken back to Transylvania. From there, enter the first mirror you see and open the chest to get the skeleton key for the mine. You'll then return to the world select screen, so go to the African Mines again.
The slugs are vanilla enemies, the bats try to dive into you as soon as you pass by, and the man-eating plants are basically invulnerable to your pogo attack. The bats can be taken care of with a golf swing to a nearby rock (assuming the rock connects), but you can wait for them to dive down, move out of the way so they miss and pogo them from there.
Look around for secret passageways and fake walls. You'll be able to find quite a few extra lives if you know where to look.
When you whack one of the rocks into that giant boulder, move out of the way!
Somewhere in the mine, you can find Mrs. Beakley, who will throw four ice creams your way so you can refill your health. The pit there might seem endless, but jump all the way to the right and use your pogo attack, and you'll bounce off four green guys who jump right out of the pit and act as a bridge. Once you make it past this pit, break the chest you find open and take the magic ring. You'll get an extra million.
The boss is the King of the Terra-Firmians. Wait for him to roll around the room and move out of his way, then pogo him on the head. When you beat him, you'll get a gemstone that's worth a million dollars. Congratulations, you just robbed approximately $2.2 million out of an abandoned mine shaft.
The Amazon
Despite the cheery music here, this level can be annoying, so don't be surprised if you choose this as your first level because it's the first choice and you get slightly frustrated.
Hit every tree trunk at ground level with the golf swing, as they all contain diamonds.
The snakes can extend their heads upwards when you get close, which can make hitting them with the pogo attack a pain.
When you go underground, pogo up to the top of the statue and pogo again to the left. You'll find a secret area with some treasure and ice cream. From there, go back to the right side of the room, pogo to the left and you'll find another secret area. Here, you can find some more treasure as well as an extra life.
The bees move around in a sine wave pattern. Thankfully, once you have the speed and the pattern down, they're not a big deal.
If you jump left from where Launchpad is (don't take that ride!) you'll find another secret area. When you cross the pit with Launchpad, leap off when Launchpad is at his highest point.
The treasure box near the spear-throwing guy takes you to a secret vine that lets you bypass the statue that wants you to pay $300,000 of the money you've collected to pass. Unfortunately, I forgot all about that shortcut, which means I end up being short $300,000. Regardless of which path you choose, you'll have to face the statue boss anyway. If you take the long path, be sure to jump into the air on one of the platforms to get a hidden invincibility medal.
This boss is really easy. Hit him when he's on the ground and watch out for that jump of his. Five hits scores you a million-dollar scepter.
To attack enemies, hold Down and B while in mid-air so you can land on them cane-first. Then, take the treasure they leave behind! You'll need to get money to get the best ending! You also have a golf swing that you can use to push blocks around as well as break some of them. Just move into a block, hold forward on the D-Pad and press B. That's all there is to it.
When you attack or move into certain spots, you'll find some hidden treasure chests. Hit them to break them open and find even more treasure!
Scrooge McDuck dolls give you extra lives. You won't find them a lot, but when you find one, go for it.
Collect ice cream and other foods to refill your life. You have three hits, so be careful!
As you move through the worlds, you'll meet other characters from the show. They give you hints as to what to do in the level. They don't say very much, mostly because they're relegated to three lines of screen space (usually).
This level can be very confusing unless you know where to go.
The rocks can be destroyed with the pogo attack, as can the enemies: skeleton ducks (which can only be hit when they're in motion) and the heads of suits of armor. Ghosts are hard to avoid and somewhat track your horizontal position.
At the beginning of the level, you'll meet Webby, who tells you that Huey has been kidnapped. There is an invincibility medal in a hidden chest in mid-air to the left of Webby.
Whenever you see a coffin, hit it with your gold swing. You may be able to find some treasure. Watch out, as you may find enemies, too! Be sure to use it on the suits of armor as well. Either the head will fall off or the head will change into a treasure box.
The rope you see after meeting Webby will take you to Huey when you go left. Take out the Beagle Boy and talk to Huey, and he'll tell you about the "illusion wall" in the house. Turns out there's a fake wall in this level. If you go to the left of Huey, you can find another invincibility medal that way.
The mummies are restricted by the ball and chain locked on them. Take them out of their misery by using the golf-swing on the ball to get them out of your way. You can also pogo onto their heads if you can.
Keep going right in the same area with Huey and the mummies and you'll find a fake wall. The chest inside has another star, which will bring your HP to the maximum of five hits. Don't even bother golf swinging the coffins here, as both of them have ghosts.
The rope just before the fake wall area takes you to a seemingly unattainable chest in mid-air. Hit the rock to the left of it with the golf swing and it'll rocket into the chest, giving you an extra life. The mirror to the right takes you to the first minecart segment. Duck to avoid any low-hanging ceilings. Jumping out is simple: just hold the direction you want to go and jump.
There's another fake wall below the mirror that takes you to another room with two mirrors. This is the "illusion wall" that Huey must have been talking about. The mirror to the left takes you back to the beginning, while the one to the right takes you to the boss.
The boss here is Magica De Spell. She turns herself into a bird, then drops down and tries to zap you with lightning bolts. When she stops before she drops down, be ready to jump and hit her with the pogo attack. Sometimes, she'll fly low enough for you to pogo her without having to wait.
When you beat her, you'll get a gold coin (which I kept thinking was something else that was gold-plated) and a cool million. You'll also get money for every second you have left on the clock.
The Himalayas
Don't pogo on the snow, or you'll get stuck. Thankfully, you can leap out by simply jumping. Also, if you go all the way to the right, you'll find a secret path leading underground.
Once you're underground, watch out for icicles that fall from the ceiling. As you move around, you'll find that using the pogo stick attack also helps you jump higher than usual. You'll definitely want to make use of that, since you're going to be using it the entire game.
Leap to the left after talking to Huey. You'll find an invincibility medal. This makes it easier to move further to the left, where you'll find Bubba the Caveman. The icicles will fall when you get close to them.
There's also another invincibility medal in one of the ice blocks en route to Huey as well.
When you find Bubba the Caveman encased in ice, move the steel can to the left wall so you can pogo into him. He'll open up a wall which contains a chest. Inside is a little starburst shaped item, which gives you an additional hit on your health meter.
There are a few secret areas here. One of them involves pogoing into the air and jumping through the gaps in the ceiling, while another involves pogoing left off of a Beagle Boy and pushing those steel cans away. The first one contains an extra life if you jump all the way to the left.
The hockey ducks knock blocks into you, with their hockey swing acting like your golf swing. After that, they're pretty easy to deal with. The spiders are just annoying and get in your path unless you jump low, and the bunnies are just vanilla enemies. Ditto for the Beagle Boys.
Move out of the way of the boulder as you climb the rope.
If you talk to Launchpad, you can go back to Duckberg and choose another level. If you select Yes and you have a 7 in the ten-thousandth place of the amount of money you've collected in the level, you'll get a bonus level before you return to the level select screen. Here, you'll be moving to the left as Gyro Gearloose flies in that direction and drops gems for you to pick up. You won't get a lot of money if you collect all the gems, but it's still something.
The boss here is the yeti. To beat him, hit him in the head with the pogo attack and avoid the snowballs that come down when he punches the wall before hitting him again. He's pretty easy. He'll go down after five hits, like all the other bosses.
When you beat a boss, you'll get a treasure chest. Open it up and you'll find a treasure unique to that level - in this case, it's a crown that's worth a million dollars.
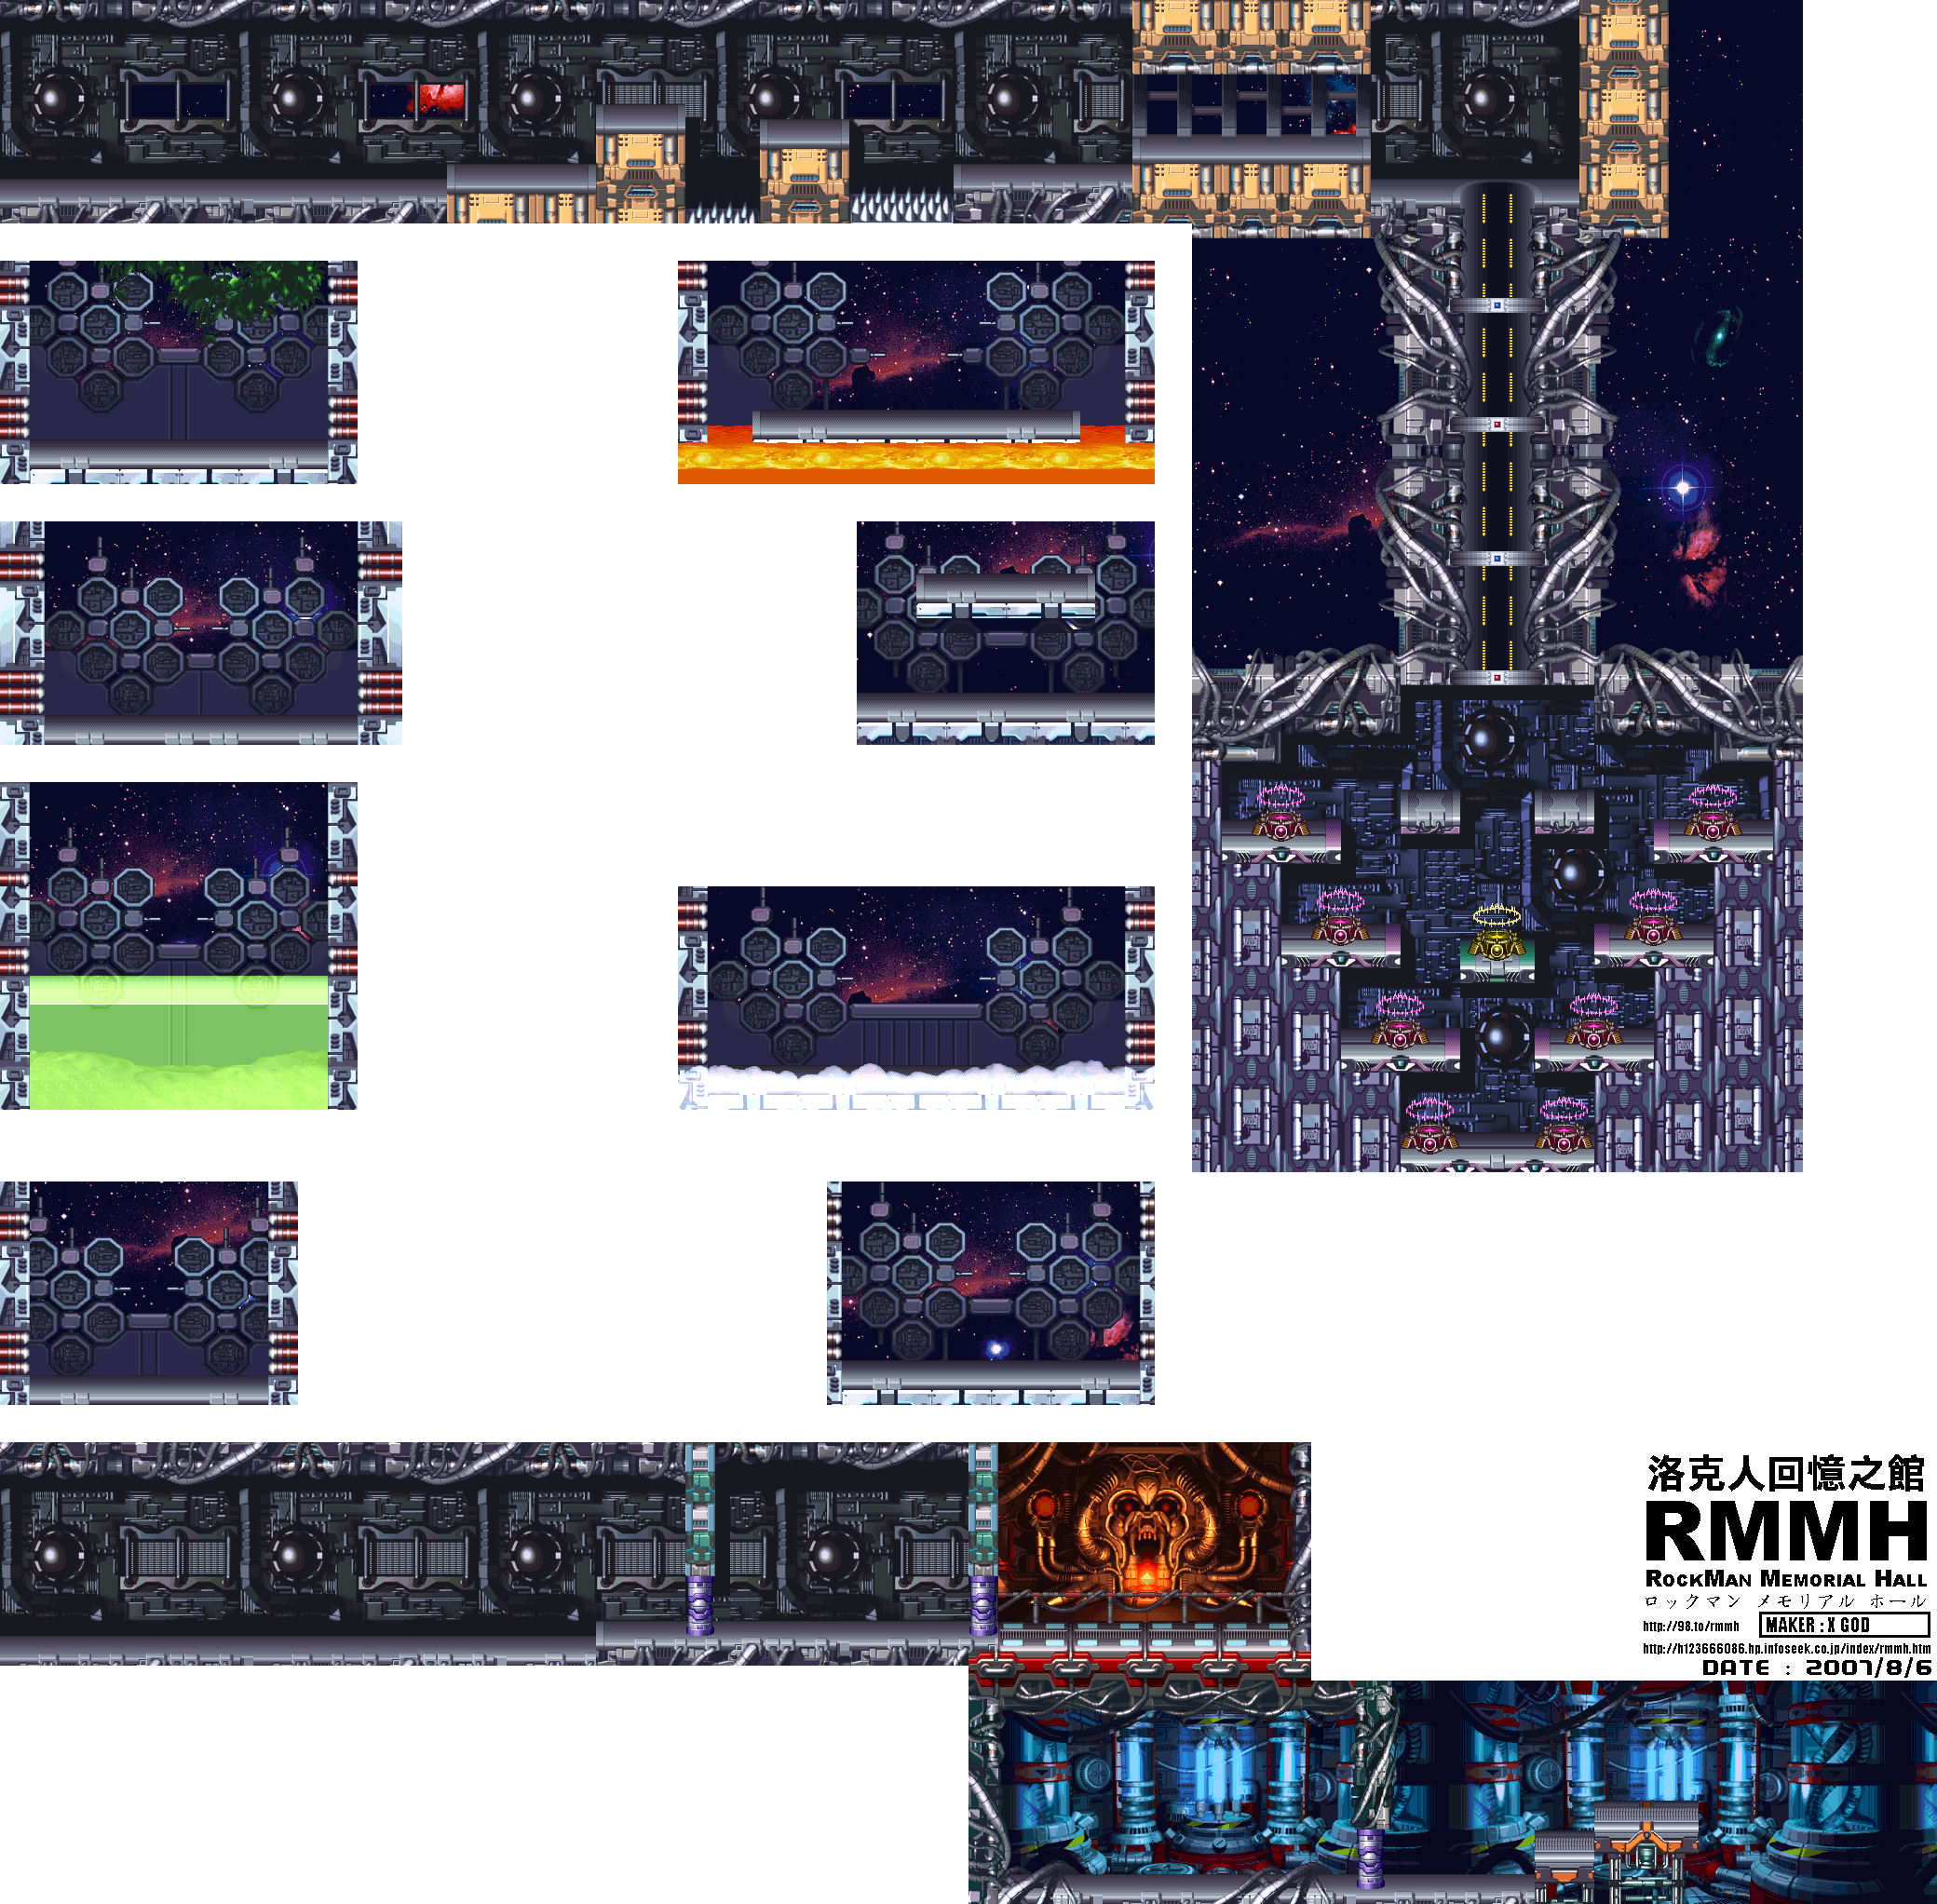
Here it is! The stunning conclusion to Mega Man X4 as Zero!
When you beat Sigma's third form, you'll be able to head through the foor on the right. Head to the right, and you'll meet General. He sacrifices himself to stop the weapon and fall with his now-destroyed comrades. Zero escapes and mourns for all that he has lost.
...and that's it! The game has ended, but both endings are far from rosy and everything regardless of who you play as, and there are more questions than answers...
We've finally met Sigma again. Now let's take him out and go home.
All maps by X GOD.
Once you beat all eight Mavericks, enter the gold teleporter in the center and keep going right. You'll meet the hooded figure responsible for all this mess.
It was Sigma all along...and he's still alive. Apparently Dr. Doppler's efforts from the last game were in vain. Sigma shows up, gloating how his plan of pitting Repliforce and the Maverick Hunters was a stunning success and that he's finally able to pit the weapon the Repliforce used against Earth.
When you play as Zero, you get a cutscene that reveals some interesting backstory.
Sigma tells you that he was once leader of the Maverick Hunters...but then he fought Zero. Zero was originally Maverick until he fought Sigma. During their fierce battle, Sigma lost his arm and was cornered, until a bright white "W" appeared on the blue jewel on his forehead, causing Zero to freak out and Sigma to finally beat him. Sigma walks away victorious, but commands his officers to take him to Dr. Cain to have him studied.
The first form is the hooded figure with the scythe. Use Ryuenjin against him. Use it while you're under him to destroy half of his health. He'll try to rush at you with the scythe if you give him time, but you can simply dash under it.
The second form is Sigma without the cloak. He'll throw the scythe in a circular motion in front of him. If the scythe hits a wall, energy will surge across the wall. He'll then jump to the end of the room opposite the scythe and shoot out eye lasers. Dash to the wall opposite Sigma and wall jump upwards.
Dash to the other side of the room to avoid the first throw. You want to jump before Sigma throws the scythe for the second throw so that it's guaranteed to hit the wall. Otherwise, the scythe will pierce the floor and the energy will surge across it, leaving you pinned to the wall.
Hit him with Raijingeki when he lands on the ground to do the most damage. Otherwise, use Ryuenjin and your somersault slash when he's in the air.
You think you're done yet? After beating the second form, you'll drop down into a room underneath where you just fought. Sigma has a third form this time around, and it's pretty complex compared to the other two. Be sure to pick up the energy capsule you land next to when the fight begins.
The three heads that show up are red, blue and yellow and have fire, ice and lightning attacks respectively. The red head will shoot series of four fireballs at you through the room, and you'll have to wall jump off the heads to dodge the first three sets and dash to avoid the fourth. The blue head will shoot an ice breath at you that will freeze you if you're too close. The yellow head will shoot lightning orbs at your current position. Stay on the move, and remember that the electricity will course through the floor upon contact with it.
The heads will fall if you do enough damage to them, believe it or not.
There are two forms of Sigma's body, and you'll have to destroy both of them in order to beat Sigma for a fourth time.
The first is the Sigma face that sometimes appears in the lower-left area of the room. When it opens its mouth to try to blow you into the spiked wall to the right, dash towards the head and attack the mouth with your sword. If he tries to suck you into its mouth, keep dashing away. Sometimes this form will cause boulders to fall down. You'll want to avoid the boulders, obviously. Your somersault slash will do quite a bit of damage here.
The other one is the giant body with Sigma's face on the top of its head that you saw when you dropped down to this room, and it appears on the right side of the room. It will try to shoot you with a gun. You can hit it with the somersault slash a few times before it shoots. Wall jump and wall slide off the heads to avoid the laser. If Sigma says "The end" in this form, immediately get to the left wall and wall jump on it until he stops firing his explosive laser attack at the floor, which will damage you regardless of where you are on the floor.
You'll meet Iris shortly after the beginning. She raises up a dark purple energy ball, which creates a Robot Ride armor suit around her.
Use the somersault slash on the Robot Ride suit. This will cause bombs to come out of the suit and eventually fly at you. You can destroy those with the somersault slash as well. A purple crystal will come out of the mech. Hit it with Ryuenjin.
When Iris charges up her laser cannon, get to the wall immediately, as the crystal will shoot a similar laser upwards. The crystal will follow you around until Iris fires her laser, so you want to stagger your retreat to the wall a little bit.
When you beat Iris, you'll get a cutscene where Iris dies, clinging firmly to the belief of a world where only Reploids exist.
After beating Double, you'll have a choice between one of two paths. The upper path has ton of spikes and superlasers from the Storm Owl stage, while the lower path has a lot of bottomless and tricky jumps to make. Pick your poison.
Regardless of which path you take, you'll reach the same destination every time: the Area 1 boss. This time around, you'll face General.
General will face blue energy shots at you, and will also fire his fists forward. You'll need to wall jump onto the fists and ride them to General, then slash him in the face with the somersault slash. This is much harder, since your attacks are all close-range only. Sometimes he'll switch to the other side of the room. If that happens, smack him in the back of the head with your sword after he stops moving.
General will be heavily damaged, but not out. The weapon shakes, and General tells you that someone else is controlling the Final Weapon. X now has to stop the weapon himself.
The left side of the teleporter room, from top to bottom is Web Spider, Cyber Peacock, Jet Stingray and Split Mushroom. The right side, from top to bottom, is Magma Dragoon, Storm Owl, Frost Walrus and Slash Beast. Same strategies apply.
In which we beat all the Mavericks and we find out Clement is robosexual.
All maps by X GOD.
After this last section, you'll take on Cyber Peacock. Like Split Mushroom, he pledges allegience to Sigma and not the Repliforce. Stay on the move and use Ryuenjin on him to stop all of his attacks, causing him to teleport in and out of the room, usually coming back in on top of your current locaiton.
If you don't Ryuenjin, be prepared to dodge the feathers that Cyber Peacock shoots at you as well as his dive attacks..
Beating Cyber Peacock gives you Rakuhouha. Using this attack clears out all enemies currently on the screen, and unlike X's Nova Strike, you can use this up to five times. You'll have to collect weapon pick-ups to refill it, though.
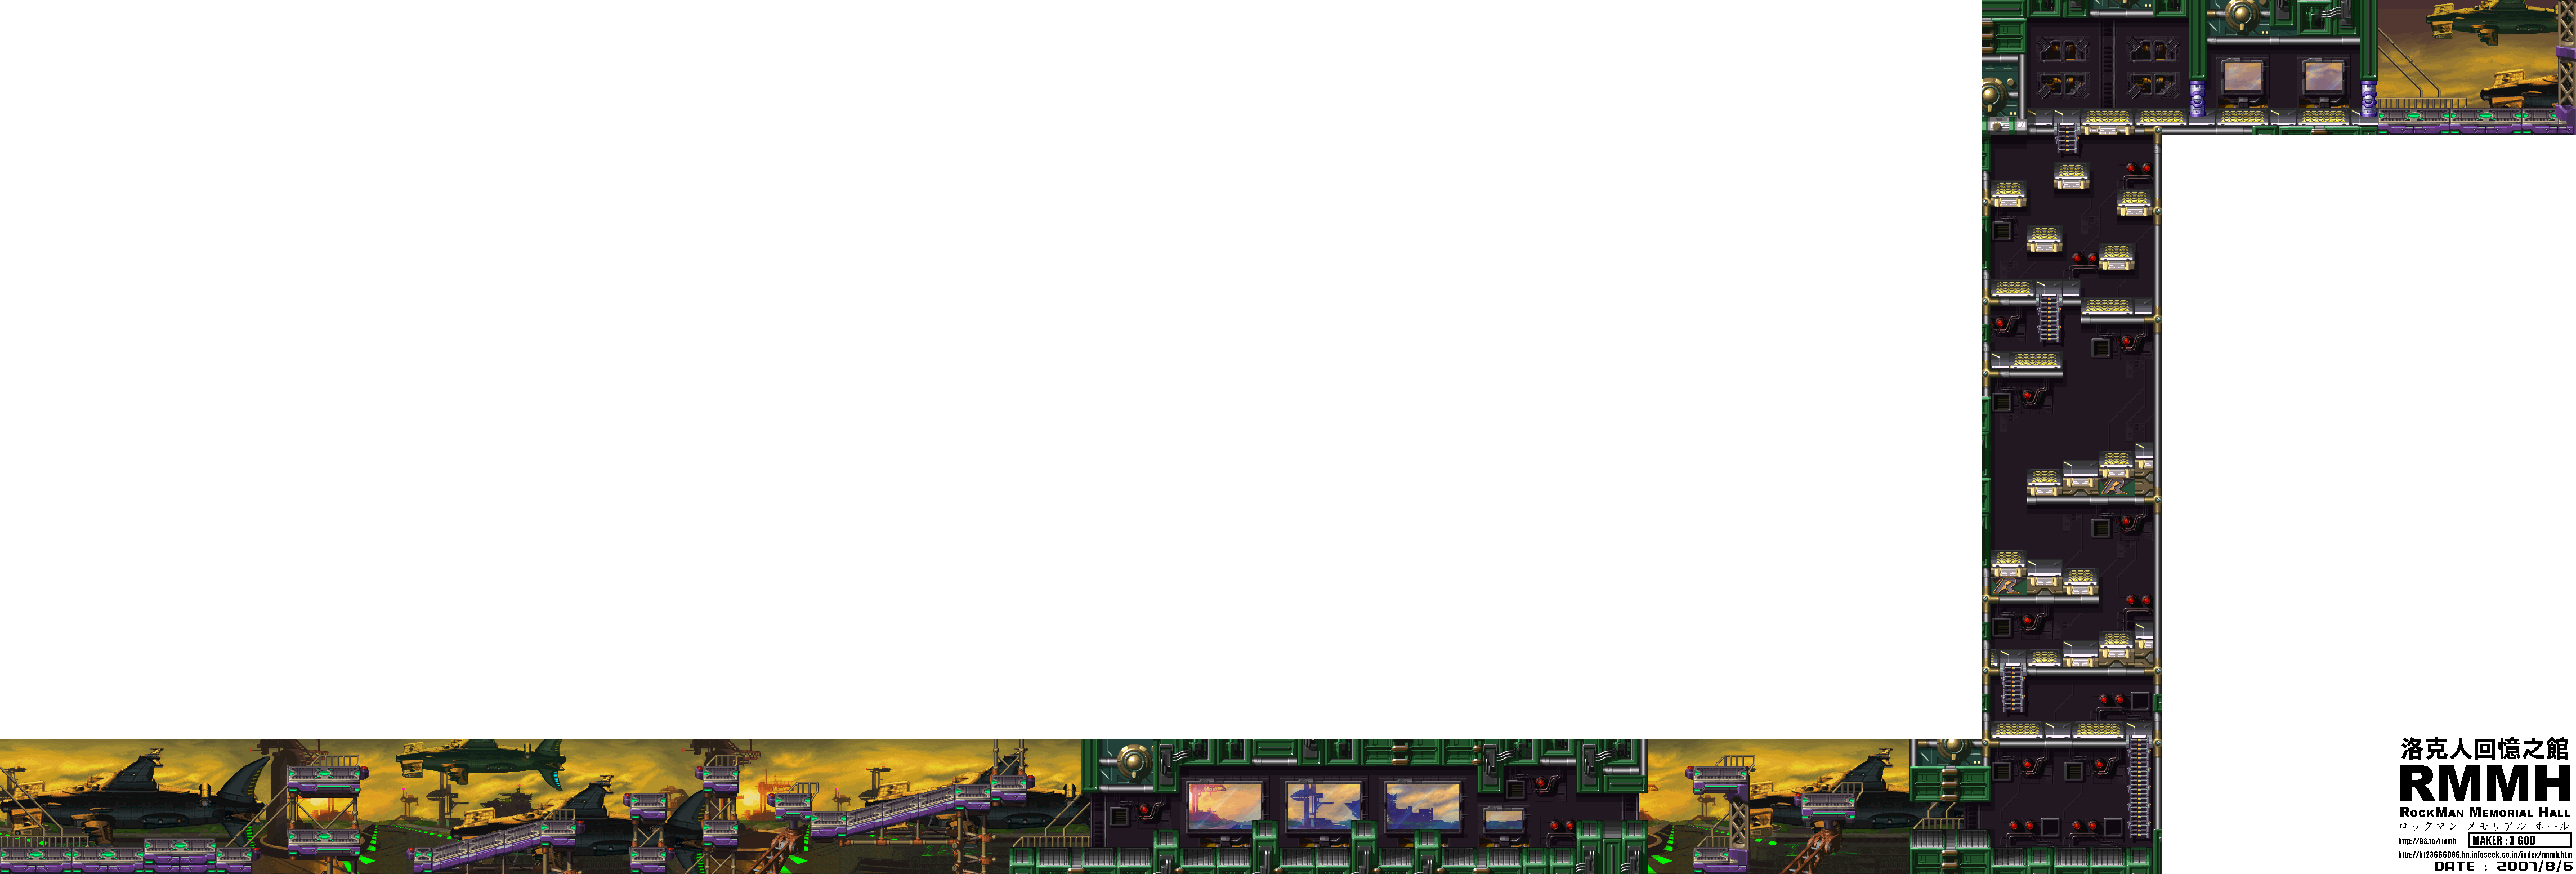
There will be blue and white ships that will fire missiles at you. You can use them as platforms, but there will be instances where you'll have to get rid of them to free up the path through the stage.
The blue Robot Ride armor has the ability to hover. Just jump and hold the button in mid-air to get some extra length into your jump. You'll also be able to fire at enemies with the attached laser cannon. Charge the gun for a three-way shot!
The small cannons on legs will follow you around and even jump around once they reach you.
Shortly after you reach the first big ship you can walk on, you'll see a superlaser positioned above two purple ships. Get on top of it and get the Heart Tank before the ships are demolished!
Use fully-charged X-Buster shots to destroy the green laser turrets.
When you see the spiked walls, use the Lightning Web to find the Arm upgrade. There are two capsules.
In the next room, you'll deal with a wall cannon. Use somersault slashes to destroy it, and take care of the smaller green cannons if you need to. You can only damage the wall cannon when the eye is open.
To beat Storm Owl, equip Rakuhouha. You'll be able to bring him down to half health. From there, just keep using your somersault slash attack on him.
His Double Cyclone projectiles will home in on your current position after he shoot off five of them.
Beating Storm Owl with Zero gives you Tenkuuha. This turns your Z-Saber from green to purple, allowing you to deflect certain enemy shots.
After beating all eight Mavericks, you'll find out the Repliforce is at the spaceport, and that they are planning to go to space!
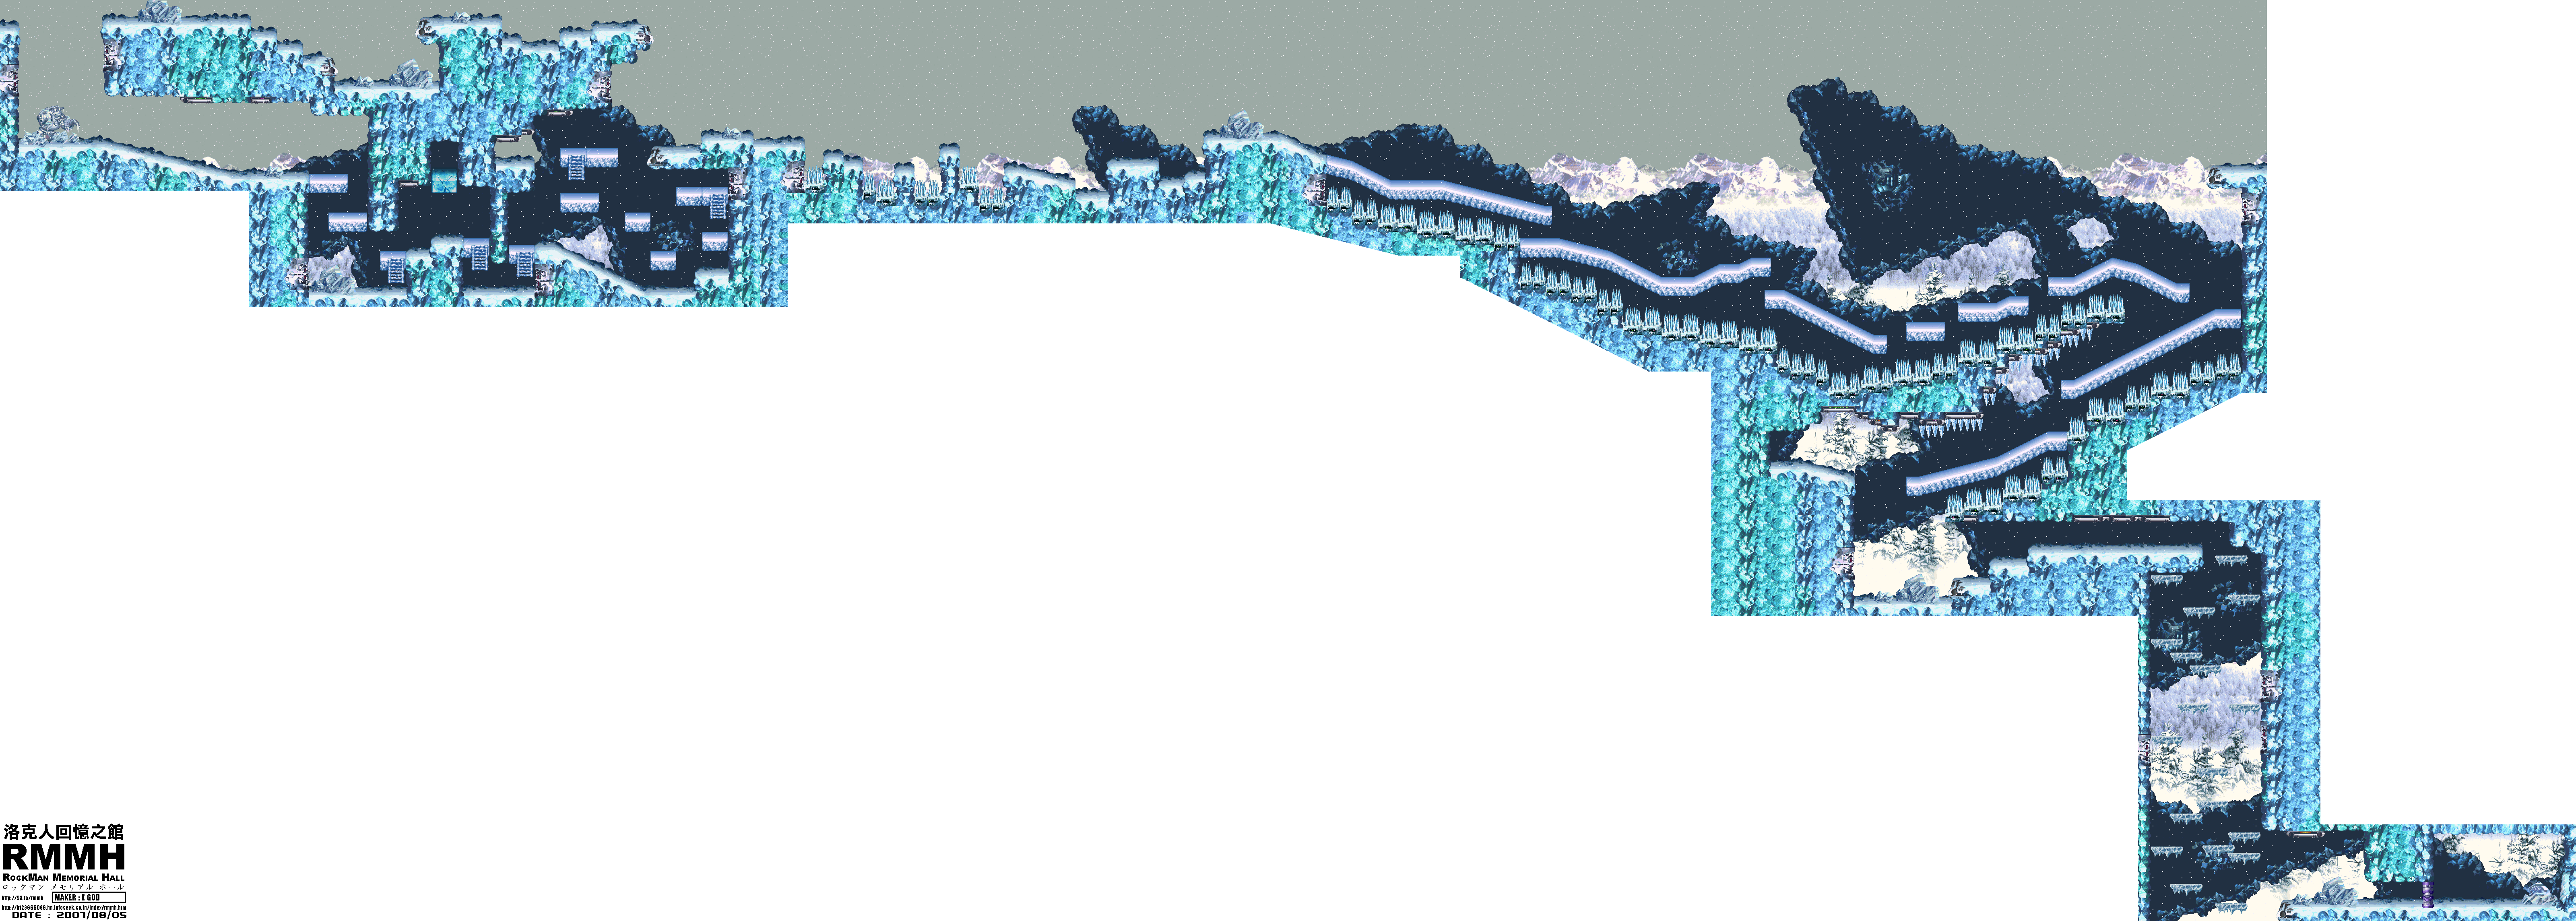
Remember the platform near the end of the snow platform slides you couldn't reach? Use your air dash followed by your double jump to get the EX-Tank. This allows you to start your game with five lives instead of three.
Also, you can go up at the start to find some energy to refill your Sub-Tanks with. You'll also find an extra life. Keep exiting and re-entering the level to get your fill of extra energy and lives!
The shield robots can only be damaged from behind.
Despite being a short level, you'll be dealing with a whole lot of spiked ball robots and Repliforce soldiers.
At the end, you'll face Colonel...this time for real. He's much faster, and he has a new attack where he sends electricity across the ground that zaps into the sky. Stand near one of the green panels on the floor and jump to avoid both attacks. He also sends a purple wave on the ground, but it's easy to avoid.
Double jump to avoid the energy waves that he fires from his sword.
Houretsuzan will do the most damage on Colonel out of all the special weapons. Use it from above so you don't have to risk life and limb to hit him.
When you beat Colonel, you'll find out the Repliforce is already in space. You'll have to track them down and stop them!
We're getting close to the Repliforce stages again...
All maps by X GOD.
Jungle (continued)
To beat Web Spider, avoid the webs that he throws. Use Ryuenjin to hit him from the ground and do the most damage. When he's down to half health, he'll make a huge web and climb around it, throwing webs at you. Avoid those and keep damaging him.
Beating Web Spider with Zero will give you Raijingeki. Press Triangle while on the ground for a powerful single strike of crackling lightning.
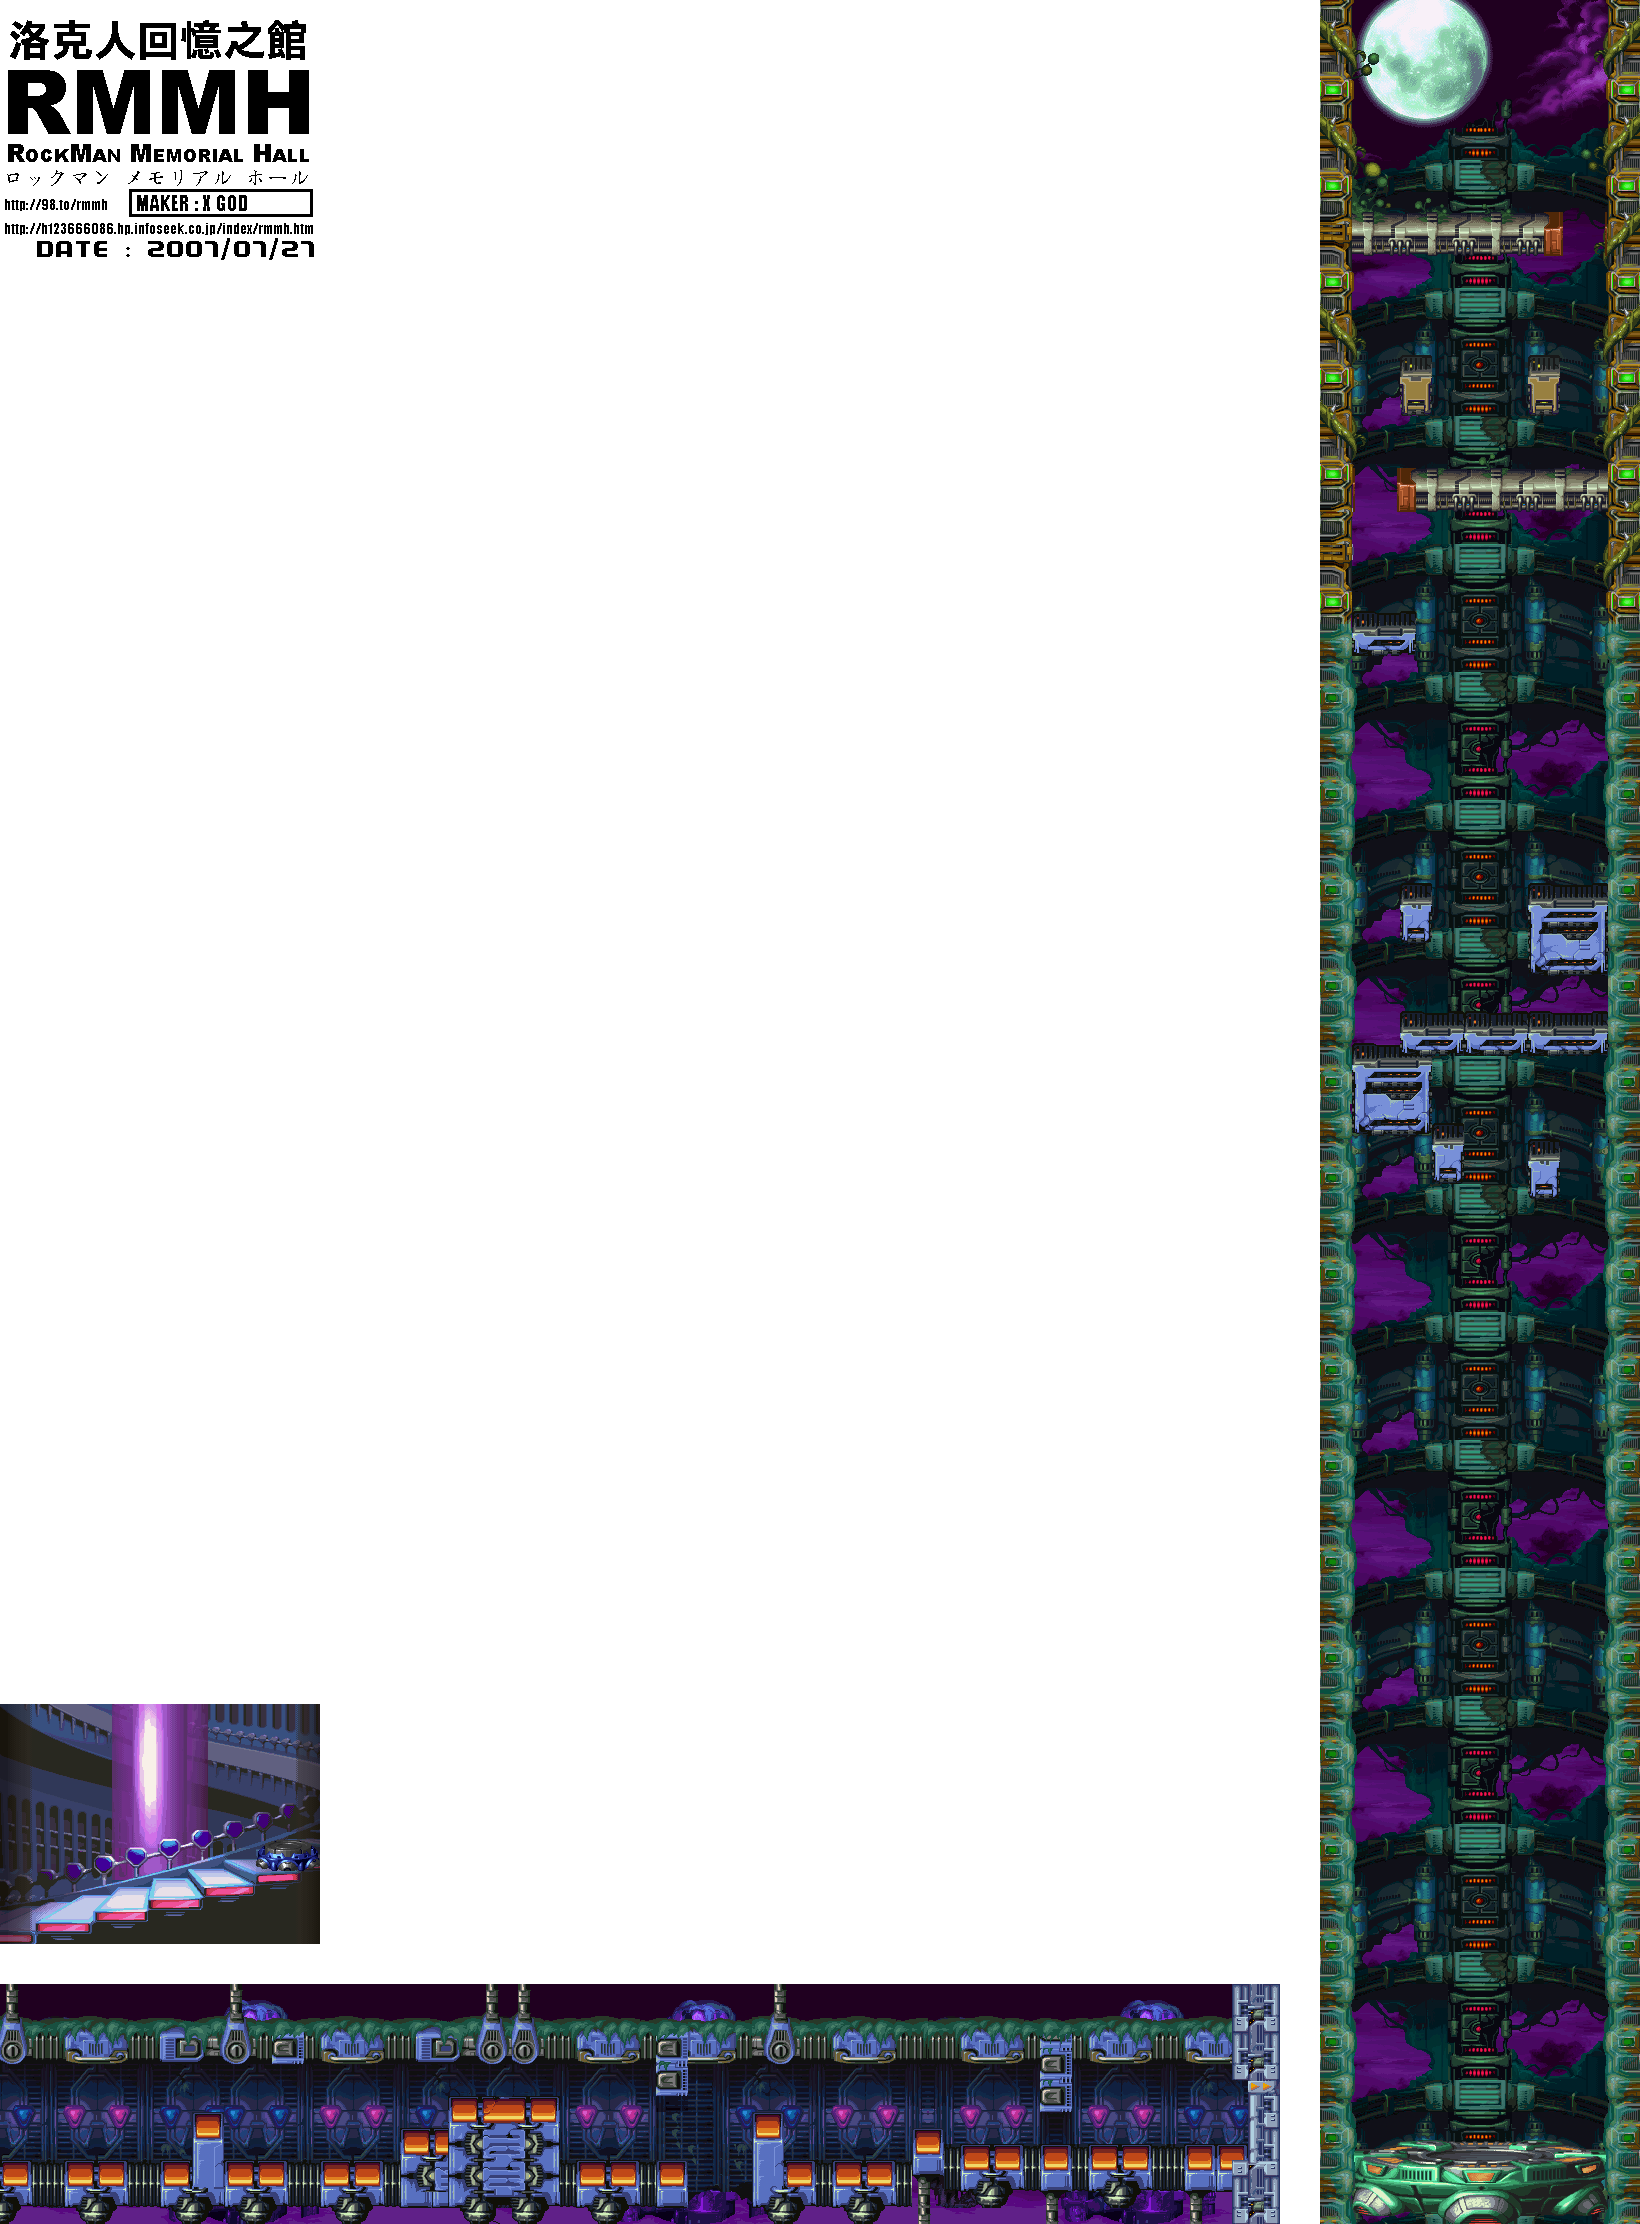
You start at an endless flight of stairs. You'll want to go up the stairs quickly to avoid the indestructible spiked shield robot that chases after you. Shoot down the flying robots when they raise their shields. You'll eventually come across a teleporter. Step onto it.
In the second section, you'll meet some flying enemies that look like small fish. These guys will fly towards you, hit you, then fly away. Be ready to slash them to bits!
The flower robots are just weak turrets, while the ladybug robots slowly fly back and forth. If they move off of a ledge, they'll gently fly straight down.
The black spiked robots will crash into each other in an attempt to crush you. At least they can't kill you, but nevertheless, make your move as they're separating.
Watch out for the thorns on the walls. They count as insta-kill spikes.
The mini-boss for the first area is a purple bug robot. Watch out when he stops for a brief second and activates its spikes. Every time he does this, he'll rise up and destroy the platform you're standing on, so move away, hit him with a fully-charged X-Buster shot and deal as much damage as you can before he drops back down. He'll stay up at your level for a few seconds, so before he drops back down for another platform to claim.
Once you've destroyed the mini-boss, the spikes below will disappear and you'll be able to head to Area 2.
You'll go up another stairway full of flying cannons and spiked bouncy balls...and of course, that stupid shield robot that follows you. Get on the teleporter.
The second section of the second area has the Heart Tank. The black spiked robots are back, and they're destroying the segments of the hallway you start in. One of them will succeed at the very beginning of the section. You'll want to get on the ceiling as that segment drops down, then wall jump up to the Heart Tank. You have only one shot to get this Heart Tank, and if you fail, you'll have to play through the entire level again to get back over there.
You'll then take an elevator. Shoot down the blue robot flowers that spit bombs at you, as well as anything else that gets in your way. There will also be blue platforms that will get in your way. They will be crushed whenever the elevator runs into them, so in case you're seemingly trapped, you'll still be able to re-position yourself if you're quick. Some of the flowers will pop out, but not bloom. They won't do anything except be in the path of the elevator, so just stay away from them.
When you meet Split Mushroom, you'll find out that he's under orders to destroy you. Unlike the other Mavericks, which have a Repliforce logo below their energy meter, he's got the Sigma logo. There's your wild guess.
When Split Mushroom latches onto the wall, slash at him and avoid the clones as they track you current location and jump right to it to attack you. He'll then create a clone, much like Gemini Man from Mega Man 3, and start running around the room while jumping over you in the same exact fashion as Gemini Man. The real one is more colorful and not as transparent as the fake one. Use Raijingeki on the real Split Mushroom to shock him and do the most damage. He'll leap to the other wall, but even then it's easy to keep track of him and turn him into fried mushroom for a few more hits. After three hits, the clone returns to Split Mushroom, and he'll return to the wall to make more clones and repeat his attack pattern.
Beating Split Mushroom with Zero gives you Kuuenbu. This allows you to double jump by pressing X after jumping. You'll also be able to perform Kuuenzan, a somersault sword attack that is much more powerful than your original aerial sword slice.
Unlike other stages, this whole stage is a race against time. You'll have to get from the start of one section to the end. The faster you are, the better your letter grade. The highest is S, and that's the one you want to gun for. If you're ever told to hurry up, you'll lose a letter grade for every time the game does so. If you score any lower than an A rank, you'll have to re-do the section.
This area is where the air dash you learn from Slash Beast as well as the double jump and somersault slash you learn from
The triangles will fly at you if you leave them on the screen long enough. You can destroy them with your new somersault sword slash that you got from Split Mushroom.
If you can get S rank on the first obstacle course, you'll get a Heart Tank. If you get S on the second, you'll get a Sub-Tank.
Getting S on the third as Zero will give you an extra life, since the Dr. Light capsules don't show up when you play as him. It's still better than nothing at all.
You'll want to avoid touching the yellow energy balls, since all they'll do is slow you down for about four seconds.
You've got one more section to go. Hit the buttons to turn the room upside down, causing the balls that are in your path to drop down and out of your way. They'll roll down slopes, too.


