This is the part where I stop talking and play through the entire game in one sitting. All treasure chests with things in them are revealed. You're welcome
Thursday, November 30, 2017
PrinceWatercress plays The Little Mermaid - Longplay
This is the part where I stop talking and play through the entire game in one sitting. All treasure chests with things in them are revealed. You're welcome
PrinceWatercress plays The Little Mermaid - Part 2 of 2
Told you this was an easy game.
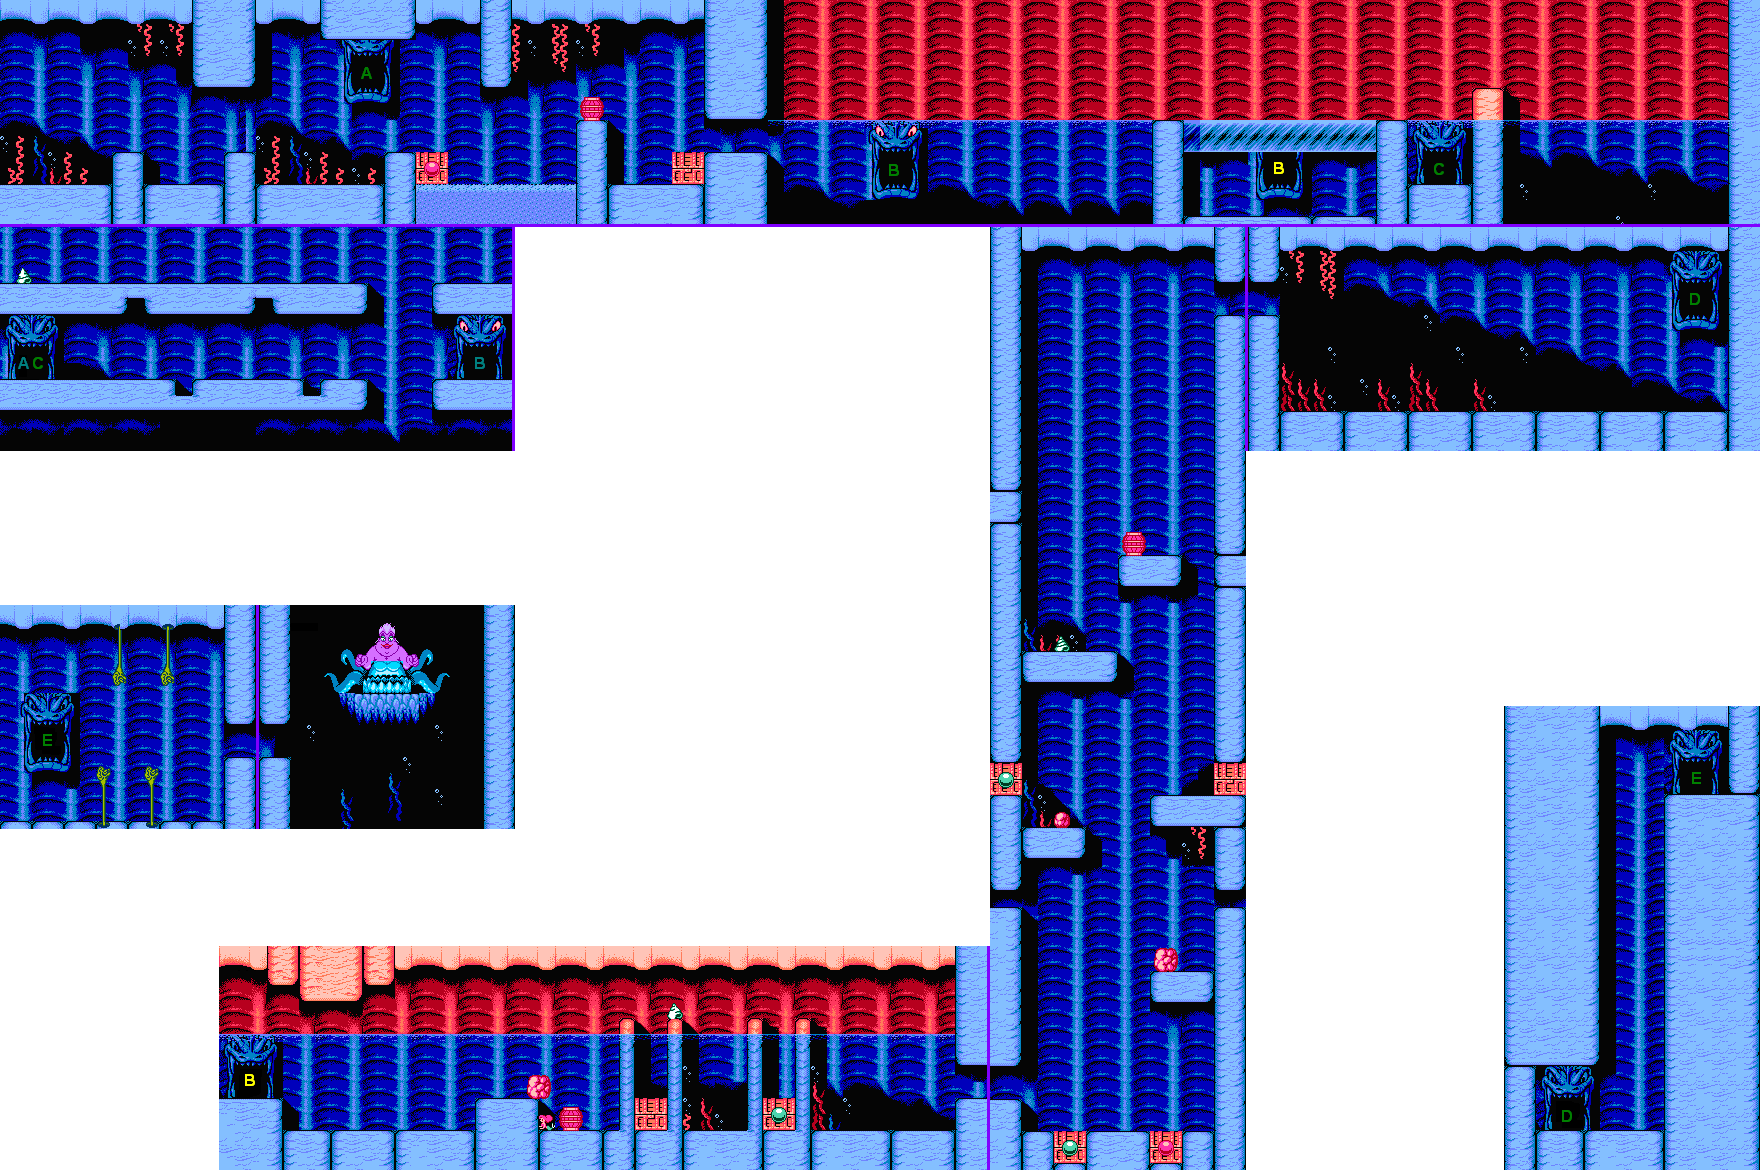
All maps by Will Mallia.
Stage 3: Sea of Ice
Well, at least the ice physics apply to the platforms only. You'll hop a little farther on dry land, but not by much.
At this point in the game, you'll come across treasure chests that contain nothing in them. Once you get used to where everything is, you'll know which to avoid. They usually show up in areas where there are two chests nearby, but only one conch shell. Thankfully, the location of the chests that contain power-ups is fixed and does not change every time you play.
The seahorses will usually move downwards when you move towards them if you time it right, so getting rid of them isn't a problem.
The boss here is a walrus. Use the conch shells he sends at you and throw them back at him. The frozen fish in the ice cubes cannot be used against him, so just wait for the conch shells to come down and hit the boss with them. Yet another easy boss.
Stage 4: Undersea Volcano
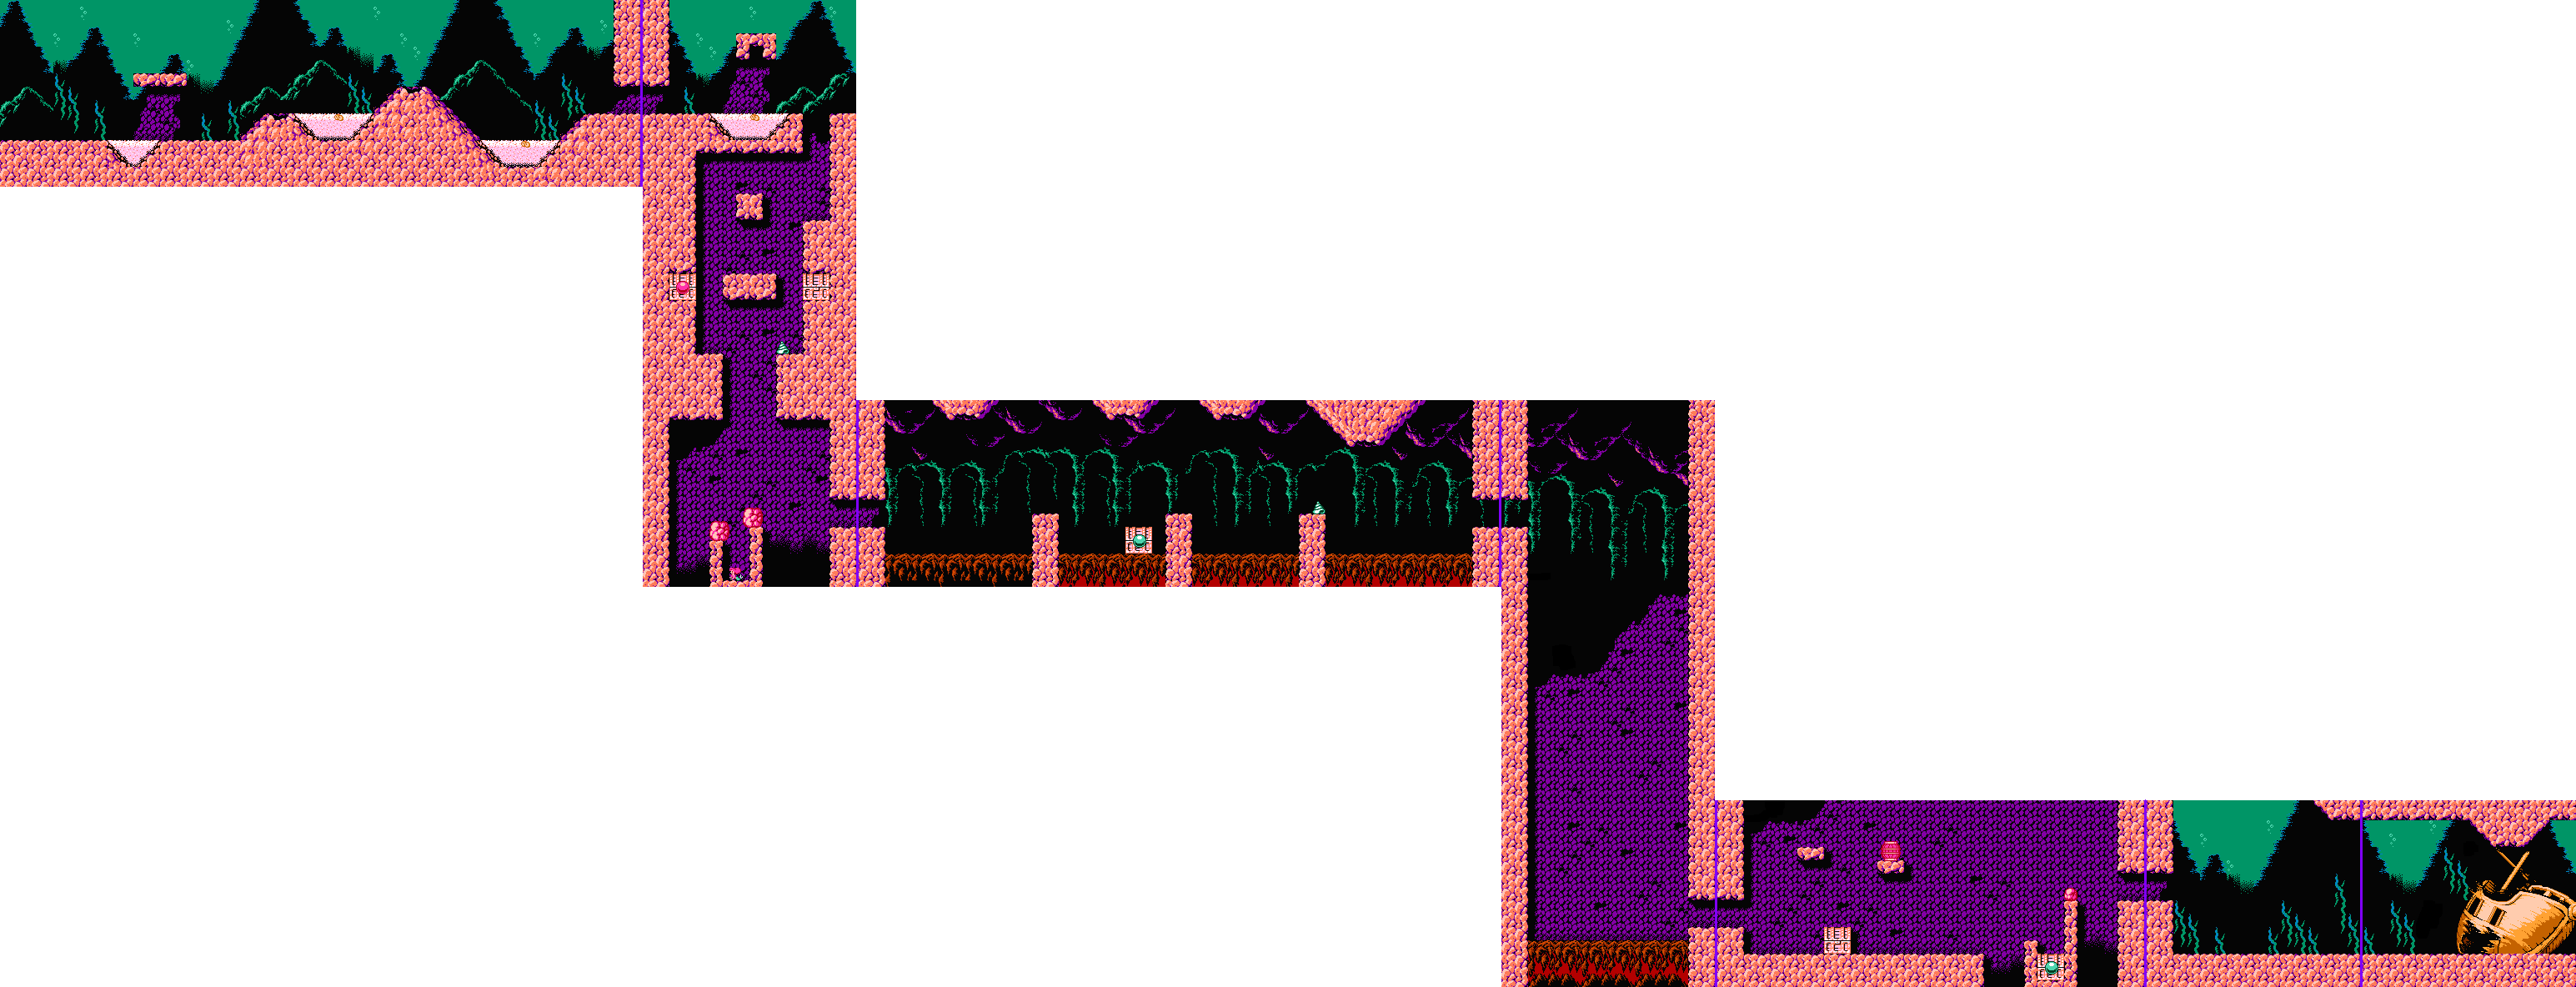
After Stage 3, Flounder will tell you there's serious stuff going on at the undersea volcano area. That serious stuff comes in the form of erupting undersea volcanoes. At least the fireballs from them are easy to dodge, as they come out very slowly.
You'll also see sandfish hiding in some sand pits in this stage. If you don't get close enough to them, you won't have to worry about sand popping out before they rise up to hit you.
The shrimp are the most annoying enemies in the game. They move quickly in your direction after they stand still for about a second.
The boss here is a fish with a music conductor's rod. He'll command the cannons on the sunken ship to shoot at you. Avoid the urchins and encase the fish that are shot out of the cannons with your bubbles, then send them back at him. It only takes a few hits to take this guy out of commission.
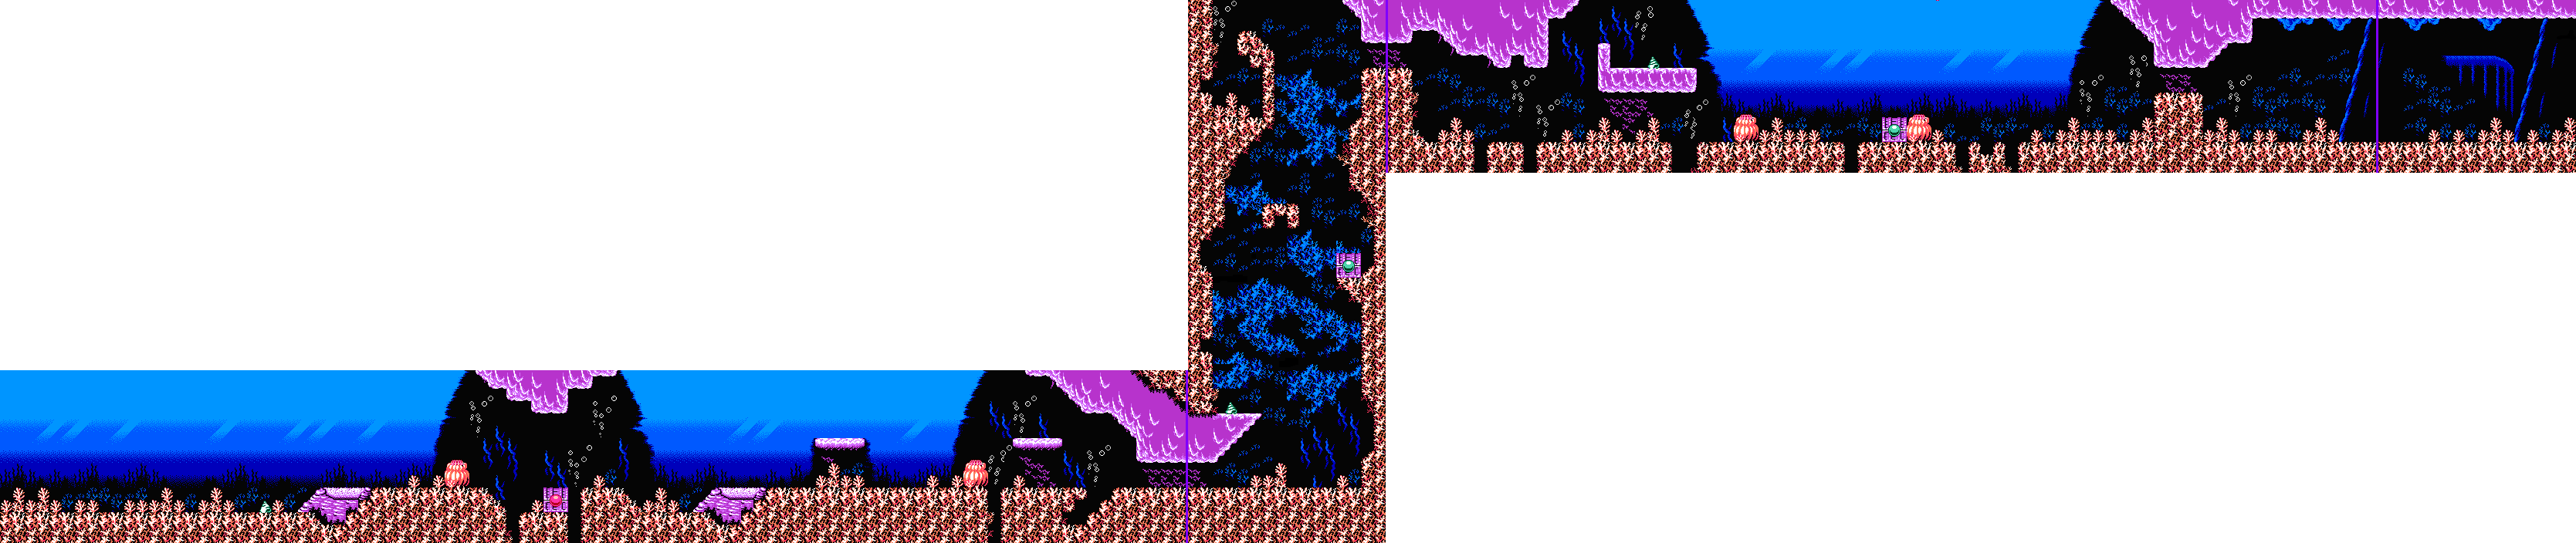
Stage 5: Ursula's Castle
Go right until you find a door with flashing eyes. Go in, then go back through the door. You'll be in an enclosed area. Go through the door again and you'll finally be on the right track. The rest of the maze is pretty straightforward.
Aside from the sleeping fish that shoot three miniature fish at you, there isn't much in terms of new enemies.
Ursula is dead simple. She shoots a bunch of spiked balls that turn into fish, starfish and sea urchins, but everything's really easy to avoid. Encase the fish in bubbles and shoot them at her head. That's it, honestly.
But just when you think you've got this won, you have to face a much larger Ursula with a trident.
Believe it or not, she's even easier. All she does is send fish (and nothing else) at you from both sides of the lower half of the screen and change the current of the water, making it a little bit more difficult to move around. Unfortunately, that's all she does, and you can just encase the fish in bubbles and send them flying towards her head.
When you beat Ursula a second time, you've done it! You've won!

Wednesday, November 29, 2017
PrinceWatercress plays The Little Mermaid - Part 1 of 2
Didn't think you'd see this as a Nintendo Entertainment System game, did you? Ah, but it was...and it's not that bad!
The game takes place during the second half of the movie, it seems. Ursula is back, and she's taken control of the fish and making them do her bidding. If she isn't stopped, she'll eventually take over the whole sea. Ariel becomes a mermaid and heads back into the sea to stop her.
Being meant for girls, this is probably the easiest of the Disney games...but it's actually really fun if you like Capcom's Disney-based material.
All maps by Will Mallia.
Stage 1: Sea of Coral
Well, you're underwater, so feel free to move in any direction you need to. Ariel can move pretty quickly if you need her to, and it's like a shoot-'em-up where you can move in any direction as well as turn around. It really makes the game easier to get into.
Though you have five hearts for your life bar, you'll always start with three. This happens whenever you start a new stage. You can find hearts in certain areas that will be able to add one heart to your current health.
The enemies are pretty easy to deal with for the most part. Most of them will just swim towards you, but a few of them, such as the octopi, will shoot projectiles. You can fire bubbles at enemies with your tail, trapping them inside a bubble and allowing you to grab them to either throw them into a ceiling or at other enemies or hold them in your hands and ram through them. You can also pick up conch shells that you may find to do the exact same thing, but they also let you break open the chests to get treasure and health, so you'll definitely need them. The treasure just adds points to your score.
The red and green pearls are the most useful. The green pearls give your bubbles increased range, while the red pearls give you increased power. You can only have range or power...not both. You can increase your range or power up to three times, and if you switch from range to power (or vice versa), you'll increase the new stat while the old stat goes back to normal. Thankfully, this isn't set in stone, because if you reach maximum speed or power, you'll be able to reach maximum on the other stat afterwards without powering down the stat that's been been brought up as far as it can go.
The Ariel doll, if you find one, will grant you an extra life.
The octopi will be the first of the bigger normal enemies in the game. Unlike the smaller enemies, the bigger enemies cannot be encased with the bubble attack. Instead, you'll have to encase a smaller enemy and let them loose on the bigger ones.
The boss here is a shark. He takes four hits to defeat. He sends fish after you, which you can then attack with bubbles and send into him. He'll move to the other side of the screen and send more fish at you, but he's a real pushover.
When you beat a stage, you'll get a stage clear bonus as well as bonus points for any treasures you collected.
Flounder will tell you that Urusla is headed towards the sunken ship.
Stage 2: Sunken Ship
Hit the barrels with your tail to send them moving. They can get rid of enemies and also open chests if they run into one.
You can leap out of the water and onto dry land, but if you do that, Ariel will just hop around in the direction you move her until she enters water again. To do that, hold up-left or up-right on the Control Pad and the B button, then hold A to leap through the surface of the water. Once you're on dry land, hold the direction you want to go and keep tapping the A button. If there's a conch shell in the way, Ariel will push it forward. When it drops into the water, you can use it to open a chest and take down enemies on the way. Much like the smaller enemies, you can send them upwards, which is useful for reaching treasures on dry land. Just send them up through the surface of the water towards the chest.
The sea urchins move across floors and are indestructible. At least they aren't very big.
There are certain gaps in floors and corners where you can drop conch shells and bubble-encased enemies to get power-ups. You can get hearts to refill and extend your health this way, so give it a go. To extend your health, collect hearts while at maximum health
The boss here is Ursula's pet eels, Flotsam and Jetsam. They'll always change places as crabs drop from the ceiling. Hit the crabs with the bubble attack when they stand up, then toss the crabs at them.
When you beat this stage, you'll find out Ursula has frozen the sea. Yes, even though the game takes place almost entirely underwater, we still have ice physics.
Tuesday, November 28, 2017
SCHLAUCHI plays Pong: The Next Level for Game Boy Color
Um...it's Pong. I don't really know what to put here other than that it's Pong.
Classic Pong
Nothing out of the ordinary here. Just white pixels and a black background. Helpful hint: have the ball hit the corners of your paddle to change the angle and make it much wider. The computer can only go so fast and will usually miss if you can get the angle right. This will be useful not only here, but in the other iterations of Pong in the game.
When you win, you'll be able to put your name in the thoughtful but sort of useless high score table.
Jungle Pong
This is where the power-ups come into play. Picking up the tornadoes allows your paddle to be tilted, allowing for some interesting angled shots.
You can also stretch the center of the paddle back from this variation forward in order to launch the ball back to the opponent with more power than usual.
The logs at the center will roll, but they don't really do anything.
Arctic Pong
The penguins will cause the ball to bounce off of them at the same angle it hit at them. The penguins can also spawn a second ball, causing twice the headache for you but also for your opponent if you can keep good track of them.
Soccer Pong
If you've ever seen or played Pong Doubles on the good old Atari 2600, you've got a good idea of what's going on here. Just remember that the ball can only bounce off the dark side of the paddles. If two good opponents link up and play this, there's a good chance the rounds will be really short or really long, as you can do some arcane bank shots here.
Tournament
The tournament mode has all four pong games in the order they appear on the menu. When you get 11 points on each variation for a total of 44 points, you've won.

WURM: Journey to the Center of the Earth - The OST
Here's all the music in one video with echo and reverb...
...and here's a playlist without.
Monday, November 27, 2017
FreezingInferno plays WURM: Journey to the Center of the Earth - Part 6 of 6
Weird how the game feels like it just ends all of a sudden.
Act 5: Dual Duel (continued)
For the platforming section, head right and grab the stone tablet. All the legends from the tablets start to make sense: Moby, her crew and all of the Dinamur are descendents of the Kingdom of Vahna, and the Nonmaltas are descendents of Lemuria...but what happened to Gaia? The King of Dinamur might know.
Head all the way to the right and jump up the hole in the ceiling. Head to the left and drop down the next pit you see. Open the door to the right to speak to the King. He tells you put the Dyna Crystals in the statue before Sogalz finds out. Go back up the pit you dropped down and head all the way to the right. Jump into the black space behind the statue to trigger a cutscene...but you'll come face to face with Sogalz in a first-person shoot-out.
You have four crystals to talk to. The order to talk to them in is green, red, yellow, blue. If you get the order wrong, the possibility percentage goes all the way down to zero and you'll have to start over. Get it right, and the possibility goes all the way up to 100%. Shoot him in the head once after that happens, and he's dead.
The statue then reveals Sowne, the Princess of Gaia. Well, a holographic projection, anyway. She tells you that long ago, the Lemuria civilization ruled the overworld, but soon sank into the underworld, which was inhabited by the peaceful Gaians. For a long time, the Lemurains tried to take their world by force, but the Vahn civilization from the moon took the overworld. Atlantis and Mu were established, but Atlantis sank into the underworld, and conquered the Lemurians. Gaia declined due to the steady attacks of both the Lemurians, and later, the Atlantans. A nuclear war became the last war, and just about everyone was destroyed. The holographic projection is their last testament to the horrors of war, and Sowne asks that everyone seek peace, and that war will not bring it.
And that's it. You just beat WURM! Congratulations!

FreezingInferno plays WURM: Journey to the Center of the Earth - Part 5 of 6
Here we are...the final battle...
Act 5: Dual Duel
You have a new weapon: Unit-Omega. This shoots a bi-directional sonic wave that takes out everything behind you and in front of you. Unlike Unit-Rho, this uses quite a lot of fuel everytime you use it, so use it sparingly. Use it on the starfish near the end, otherwise they'll continuously circle around you and make moving around difficult.
The next section is yet another vertical section that looks just like the first two. This one, however, changes in appearance soon after the start. Stay away from the flashing barriers. The brown and blue enemies will come at you fast, so be ready to shoot them down.
In the next section, you'll find the VZR-5...but you'll have to fight it off. Talk to Davis, Diane, Allan and Banda on the first talking phase. Banda will tell you to aim for the drill in the center. When the VZR-5 dives at you, shoot it a few times, then move out of the way. Also, avoid the missiles, but just remember that they arc.
If you go too far to the right and the VZR-5 doesn't show up, go to the left to get it to respawn.
For the rest of the talking phases, keep talking to Banda. You should be able to bring down the VZR-5 and save Locke and Mike, but Icamod escapes to the palace.
Sunday, November 26, 2017
FreezingInferno plays WURM: Journey to the Center of the Earth - Part 4 of 6
No! Not Ziggy!
Act 4: Ziggy
For this one, you'll be flying for the majority of the stage. You won't be able to transform into a plane, but you can shoot down basically everything in your path.
The next section is another side-scrolling area. Use Unit-Rho to shoot balls that fire at 45-degree angles.
When you reach the super-open area, keep on firing so you can take down the rocks that drop down from the top of the screen.
The next section is the boss. This time, it's the Bionic Monster. Be sure to talk to Sylvia to increase your possibility. Don't talk to Allan, or else it will go down. Yep, the possibility will go down if you talk to the wrong person sometimes...and so can your life. Avoid talking to Moby, period. When the fighting begins, shoot the shoulder when the blue part is exposed. Off-screen the missiles to avoid them.
On the second talking part, talk to both G-13 and Diane to get a huge boost in your probability percentage. If you have to talk a third time, keep talking to Allan.
The fourth part is the platforming section. You'll get the yellow crystal, then head into the control.
Keep heading right and you'll meet Icamod. Shoot him a bunch of times, then keep heading all the way to the right. You'll free Professor Fanda, and you'll find out Ziggy's brain has been placed into Bandal. Drop down the hole to the right of the stairs, then go all the way to the right and grab the stone tablet. Leap down the hole to the left and open the door next to you. Go to the right. Moby will find Ziggy, but it's too late. He's dead.
At least we can fly again, now that Aerial Mode is repaired.
CGR Undertow reviews WURM: Journey to the Center of the Earth
Another game, another CGR/CGR Undertow review. Enjoy.
Saturday, November 25, 2017
FreezingInferno plays WURM: Journey to the Center of the Earth - Part 3 of 6
Well, we know what the Nonmaltas are up to, but now what?
Act 3: Magma Falls
The snails bounce when you shoot at them, so just avoid shooting them altogether. The starfish and the pterodactyls just fly around, and the fish just leap at you when you get close enough. Stay in flying tank form the entire time.
You'll soon come across an underground volcano and another vertical section. It's just like the first one in the game, but you'll also deal with fireballs that fly out from the bottom of the screen and come down on you. Most of them will give you fuel pick-ups, which you're definitely going to need.
After the vertical flying section, Moby will find another life form at the bottom of the river. You'll face your third boss, Zalta. Talk to Diane to find out it's weak to water, then talk to G-13 to bring your probability up further to 60%. If you talk to Mike, he'll make a reference to The Miracle Worker by William Gibson, which in turn is taken from Helen Keller's real-life teachings from Anne Sullivan. Didn't think you'd see references to Helen Keller in a game, huh?
Dan will tell you that you won't be able to beat it until it transforms itself.
Shoot Zalta in the face, and move away when he ducks down. If you see him at a distance, fire once or twice at Zalta and then immediately retreat to avoid the tail whip attack.
The only way to increase your possibility percentage is to talk to Dan over and over again. That's it. Other than that, you're going to have to outlast Zalta as there are no other ways to increase your possibility during battle.
After defeating Zalta, you'll find a cave. Moby will walk outside and find the green crystal, then it's on to the side-scrolling section. Kick the bats when they drop down.
Keep going right, and you'll meet Ailvia. You'll find out Allan and Davis are being held by the Nonmaltas. You'll then go to the next section. Keep going right and drop down the first pit you see, then go left. WHen you can't go any further to the left, jump up the nearby hole and go left some more. Drop down at the far left and you'll find Dan. He'll tell you that the Nonmaltas have taken the VZR-5. Go further to the right to talk to Davis. He'll tell you Ziggy's been sent to the lab, and that Allan should be somewhere nearby.
Open the door and go to the right. You can now open the other door further to the right. There, you'll meet a palette swap of Zolda. Even though this is a different guy, he moves around in exactly the same way. When you beat him, you'll be able to talk to Allan and take the VZR-4. You won't be able to fly as aerial mode is disabled, but there is still work to be done...
FreezingInferno plays WURM: Journey to the Center of the Earth - Part 2 of 6
Oh, WURM?
Act 2: Dyna Crystal
Press Up+A at the beginning of the stage to access the A-form, which is the jet form of the VZR-5. This form will shoot lasers that do pretty good damage to the enemies. The Unit-Alpha attack is a rotating shield-bomb attack that hits stuff near your ship when you use it.
You'll still have to switch between the flying tank and the jet so you can burrow through some breakable walls, however.
Midway through the stage, you'll switch to a vertical shooter section after a cutscene. You'll still have to deal with losing fuel. Take care to take as little damage as possible.
Just like the last section, you'll have to switch between the flying tank and the jet so you can burrow through the wall with your drills. You'll want to burrow through the walls as fast as you can so you can deal with the enemies as they approach from the top of the screen. Avoid the fireballs when they show up, as they go straight for you when they show up.
After this section, you'll be at the area where VZR-3 disappeared. You'll face Anrok, a bio-monster. Talk to G-13 twice to bring your probability percentage to 65 percent, and then talk to the rest of your crew.
Anrok's weak point is his eyes. He will try to throw rocks at you, grab you with his hands, and stomp on you with his feet. You can shoot the rocks to increase your percentage by 15%, and you can move the hand out of the way by scrolling it off the screen as you move. The foot is harder to avoid, but it only does two units of damage.
Talk to G-13, then to Moby, then to Locke. You'll find out the weak spot is the navel, though you can still aim for the eye. The probability percent will be at 100% at this point...so let him have it!
Moby then checks out the ruins that the team has come across, and finds a red crystal.
Keep heading to the right at the start and jump over the first hole. You'll eventually come across a stone tablet with some hieroglyphs carved on it. These things will talk about some sort of cataclysmic events that happened in the fast, so keep picking them up.
Drop down into the nearest pit when you grab it. Go right and fall down the next hole you could in this new area. Go left and drop down the next hole, then go to the right and start climbing up the stairs. Jump up the hole and go left. Climb up the rocks and go through the hole at the top. Go right and jump down the next pit you come across. Go to the right in this area and climb the rocks. You'll find a prisoner here. She is the princess of the underworld kingdom of Dinamur. Zolda imprisoned her in his attempt to take over the entire planet both above and below ground. She'll tell you the four crystals - also known as the Dyna Crystals - have been stolen by monsters, and they protect the underworld.
There are two new enemies here: a flying enemy that flies at you and then retreats to the top of the screen before disappearing, and a panther that will lunge at you.
Head back to the stairs, go up them, but instead of going up the hole, go through the door to the right. You'll meet Zolda again, and your second showdown will be very much like the first. Shoot him a couple of times to get him to flee, then go through the door on the right. You'll meet the Princess again, and you'll have to head to Magma Falls as Zolda has retreated there. The Princess will go with you, as she needs your help to free the King.
Friday, November 24, 2017
FreezingInferno plays WURM: Journey to the Center of the Earth - Part 1 of 6
Well, here's a game for the NES that I don't hear about too often.
The game starts with the crew of the VZR-5 going underground in search of VZR-2. This, of course, assumes you let the game run for a while pressing Start, as this cutscene shows up if you don't press Start after some time.
Act 1: Nonmalta
The game begins in a horizontal shooting mode. You start on the ground, but you can go into the air with Up+A. In flight mode, you'll have a three-way shot instead of a two-way. The drill at the front of the tank will also be running at all times, allowing you to bore through specific walls.
If you're on the ground, you'll have to manually switch to the drill before you can use it.
The fuel gauge on the upper left steadily depletes as you make your way through the game, and can be refilled with fuel capsules. The shield protects you from harm if you take damage, but repairs itself as time passes. If either gauge is completely empty, you're dead.
When you make your way through part of the stage, an earthquake occurs. As this happens, a life form shows up on the radar. You'll come into contact with it. This is your first boss battle.
There are two things you can do: talk to the crew or use an item. There are four characters you can talk to. Moby is the crew chief and the main character, Dan is the engineer, Locke is the geothermal physicist, and Mike is the biologist.
Keep talking to your crew to increase the possibility percentage as well as regain health if you need to. Talking to your crew also lets you know what the boss's weakness is, and in this case it's the nucleus.
After some talking, the battle phase begins. Aim for the monster's eye. When it blows up, keep moving to the right or left and destroy all of the tentacles that you can to increase your possibility percentage. Each tentacle will give you 5%, so you'll want to shoot down all four tentacles before the boss returns.
After the battle phase, you'll return to the talking phase. Talk to your crew some more to increase your possibility percentage as well as to recoup any lost life. After some talking, the battle phase starts again.
When the possibility percentage reaches 100%, the boss will start flashing. When that happens, hit its weak point one more time to finish it off and continue with the game.
After beating the boss, you'll control Moby in a platforming section after a cutscene in which she leaves the ship and finds a blue crystal. Moby can jump, shoot her gun, and kick people in the face. There is an Arms gauge in addition to the life gauge showing how much ammo you have, and even though you can refill it with ammo pick-ups from enemies, they don't show up as often as you would want them to. That's a big thing, especially in the later levels.
Head all the way to the right, drop down and go left. You'll find one of the crew members of the VZR-2, who tells you the VZR-2 has been taken by the underworlders. He'll give you a key to open the gate. Moby also asks about Ziggy, another crew member and her boyfriend. Ziggy is nowhere to be found, and the crew member tells her to watch out for Zolda, the underworlders' leader.
To kill off the underworlders that charge at you, duck so that they jump over you without damaging you, then turn around and shoot at them.
Head all the way to the right and drop down the last hole, then go left to open the gate to the VZR-2. You'll run into Zolda, who thinks you are interfering with the Nonmalta Empire. Zolda jumps and moves around, and after you shoot him three times, he runs away. To the right is G-13. Talk to it, and you'll end the act.
Doug's First Movie...
...and his last.
Apparently it was called "The First Doug Movie Ever" until they just decided to call it Doug's 1st Movie. And it was supposed to be a home release only until they decided to take it to the big screen.
Thursday, November 23, 2017
KuuImpact plays Doug's Big Game - Part 6 of 6
I think it's safe to say that there's not much to this game and it will probably keep you busy for about 20 minutes.
The first mission shown here isn't in the FAQ, either. But the other one is.
Here, You'll find out that Mr. Bone is trying to shut down Sully's comic book shop. Head to Downtown Bluffington and head west to Sully's. Talk to Mr. Sully and he'll give you a petition. He needs four signatures. Head back out and use the payphone in the Downtown area. Skeeter will suggest your mom. Head to Doug's Block, ener the white house and talk to Doug'd mom. She signs and asks you to ask Judy to sign it.
Go upstairs and ask Judy to sign it. She declines, but she suggests your friends. Go to Mr. Swirly's, which is south of the Lucky Duck Lake area, and talk to Skunky. He signs. Go back to the park and enter the maze to the east. Go through it until you find Chalky. Chalky will sign it. Head to the mall and talk to Bebe. She makes you sign it for her, but it still counts.
Go back to Sully's, and he'll tell you to take them to Mr. Bone. Head to the Bebe Bluff School and talk to Mr. Bone in the second door. He'll tell you you're too late. This triggers Quailman vs. Robobone. Fly in circle to dodge the enemies, and shoot Robobone's glasses three times. After this, talk to Mr. Bone again. This ends the mission.
You also see a bad ending, where Patti's too busy to hang out with you. Maybe next time...

KuuImpact plays Doug's Big Game - Part 5 of 6
Notes: Get rid of this smell!
Head upstairs and go to Doug's room. There's a circle with a flashing red exclamation point. The homework is supposed to be there, but it's gone.
Head to Bebe Bluff School and use the payphone. Guy can't find your homework, and Doug will realize he left it in the car. Only thing is, Judy drove the car to the Sauerkrautski Festival.
Head to Downtown Bluffington and find Judy. She'll tell you to get her cape from the costume room. Go east to Moody School, enter the door in the upper-right and grab the cape off the table. Leave the Moody School and talk to Judy. She still won't give you the keys. This triggers the Quailman vs. Judy-Dra game. Fly around in circles so the bats won't get you, and shoot Judy-Dra in the face three times. You have six shots, so be careful. She still won't give you the keys, so Doug just decides to do his best at the study session without his homework.
Head back to Lucky Duck Park and talk to Skeeter. This ends the mission.
In another mission, Doug is told Patti is at Lucky Duck Lake. He heads over there to find Skeeter trying to use an attraction potion made by Al and Moo, also known as the Sleech brothers, on the Nematode. Doug tries some, but he accidentally uses too much and has to get the antidote from Al and Moo.
Head to Downtown Bluffington and head east to Moody School. You'll find a pink potion on a table to the south. Take it. then head to head to Lucky Duck Park and talk to Skeeter. Unfortunately, the potiton you picked up is a dud.
Head back to the Moody School and there's a blue potion. Doug thinks it's the wrong one. There will now be a red one. Take it. This triggers the Quailman Rescues Supersport mini-game. It's the same as in the other mission. When you clear it, you'll see the red one has a note saying "Do not touch. Call us if there's an emergency." Doug takes the potion, and it's off to find Al and Moo.
Al and Moo will be at the arcade. Talk to them, and you'll get the antidote and end the mission.
Wednesday, November 22, 2017
KuuImpact plays Doug's Big Game - Part 4 of 6
Time for another session of this game...
For this mission, Doug finds out Guy's been handing out stories for the school newspaper, and Patti may be with him.
Head to the Bebe Bluff school. Talk to Chalky, and you'll find out Guy's looking for Patty. Head to the far right door and talk to Guy. He wants you to cover the beetball tournament with Chalky. Talk to Chalky again, and you'll find out he threw a Beetball on the roof and knows nothing about the game. Talk to Guy again. You'll find out it's scheduled for next week, and he won't tell you what's going on at all.
This triggers the Quailman Rescue Supersport mini-game. Shoot the two spheres at the bottom of the machine eight times each and avoid the projectiles. When you win, talk to Guy again and he'll tell you she's at the mall. This completes the mission and you'll get a password.
Talk around and you'll get a new mission. Here, you'll find that Mr. Dink has a new toy, and that Patti went to see it. Head to Doug's Block and enter the red house, then talk to Mr. Dink. His new toy will explode, and the Quailman vs. the Salmon mini-game happens.
For this mini-game, avoid the fish that swim to the left until the game ends. Head to a payphone and Skeeter will tell you to head to the Moody School (east in Downtown Bluffington) and talk to Al and Moo. They'll tell you to go back to Mr. Dink's house at Doug's Block. Talk to Dink again. Al and Moo will tell you to go back to the Moody School and get the clamp, which is in the lower-right corner of the room. Go back to Mr. Dink's house one more time. This completes the mission after Mr. Dink says he doesn't know where Patti is.
After talking around, Doug finds out that Skeeter headed to Lucky Duck Park to set up a study session with Patti. Talk to him, and you'll find out that one, Patti isn't here, and two, Doug doesn't have his homework with him. To Doug's house!
Cornshaq beats Doug's Big Game in less than four minutes
There is a bit of a lag between input and what is actually shown on the screen. Forgot about that. Whoops.
But yeah, if you know exactly what you're doing, speed through the text get the right missions, you can beat the game in less than four minutes.
Tuesday, November 21, 2017
KuuImpact plays Doug's Big Game - Part 3 of 6
We've made it through a heck of a day...and we finally meet Patti!
Kuu skips to the third mission for some weird reason. As for that second, it's the one mission the FAQ that I'm looking at doesn't cover. That's just great. Here's how it goes:
When you go to Downtown Bluffington, you'll be told that there's a sale at Sequin World and that Bebe has went there with Patti. Head to the mall, and talk to Bebe. She'll ask you to deliver party invitations. Use the pay phone at the mall. Skeeter will tell you that Skunky is at Lucky Duck Park. Head there and talk to Skunky. Head back to the house at the park. You'll find Roger. who wants to act like an asshole instead of a normal human being and not take the invitation. This sets up the Quailman vs. Robo-Roger mini-game.
Avoid the fists (which don't home in on you this time) and hit Roger's face with three Quail Eyes. If you need to, press A and B together to switch to Quaildog so you have more ammo. Roger will take the invitation after that. Head down to Swirly's and talk to Bebe. She'll go ahead and have Jenkins deliver Patti's invitation, since you can't find Patti and Bebe considers you unreliable for whatever reason.
After completing three missions, talk around and you'll find out Patti's on Doug's Block. Go there, and talk to Patti to end the game. Depending on how quickly you did, she either hangs out with you or she doesn't.
KuuImpact plays Doug's Big Game - Part 2 of 6
I want to think the game is based on the TV series from ABC's 1 Saturday Morning...kinda like Mighty Morphin' Power Rangers: The Movie for Super Nintendo.
To go to the Four Leaf Clover mall, press Start to open the map, then choose the Four Leaf Clover Mall. Go all the way to the upper-right corner and enter the arcade. From there, you'll be able to find Fentruck. Talk to him, and he'll agree to help you draw Mr. Bone away from the detention room.
Pull up the map, and head to Bebe Bluff School. Head right and talk to Mr. Bone, who blocks the second door. Since you have talked to Fentruck, you'll be able to go into the detention room and confront Roger. This triggers the Quailman vs. Klotzilla mini-game. Here, all you'll have to do is destroy both sides of the building so that the building falls with your Quail Eye, all while avoiding the fireballs.
When you win, talk to Roger again and you'll get the drawing back. Mission accomplished.
When you complete one of the missions within the game, you'll get a screen with Pork Chop on. It will say one of three things: "Good job," "Not bad" or "Hurry up." This is dependent on how quickly you finish the mini-quests, and the faster you get through them, the better the ending you'll get.
You'll also get a password. Write it down.
Talk to somebody to get a new mission.
For Kuu's second mission, you'll find out Chalky was looking for you in your neighborhood. Go to Doug's Block on the map, and talk to Chalky. You'll found out he accidentally threw Patti's favorite Wacky Wizzer into a yard with a dog. Chalky's allergic to dogs, so you'll have to go get it.
Monday, November 20, 2017
KuuImpact plays Doug's Big Game - Part 1 of 6
How to Doug, Part 1.
Doug starts the game in a random location. He stalks to Pork Chop (the dog to your left). Patti Mayonnaise was supposed to meet Doug an hour ago. Doug starts looking for Patti, hoping he didn't go to the wrong park by mistake.
From there, you're pretty much on your own. Press A to talk to people, and B to talk to Pork Chop. Pressing Select shows your journal, and pressing Start shows the map.
You have to do a few things before you can meet Patty, and the things you have to do are random every time you play.
If you find a coin spinning on the ground, pick it up with the A button. From there, you can use it on the pay phone by pressing A at a pay phone. Explore new areas you enter to find more quarters, as they can be essential as the game goes on.
Back To The Future III...For Amiga
So here's an interesting one. Apparently, in the first stage, there were two sections where you are in vertical shooter mode and mow down Native Americans, soldiers and vigilantes in the first level. I want to guess they removed them from the Sega Genesis version due to memory issues, but at the same time, you're mowing down people's ancestors, which makes as much sense as the hunting scenes in Tintin in the Congo.
Sunday, November 19, 2017
Cornshaq plays Back to the Future III for Sega Genesis
You thought Karate Kid was hard? Here's the real four hardest levels to make up an entire game ever!
Level 1
At the beginning of the game, you'll play as Doc Brown, chasing after the You'll have to duck the birds, shoot at all the tomahawks, grab all the items you can, jump over the gaps and other obstacles lying on the ground, and shoot down the enemies behind you while ducking their bullets.
This level takes complete memorization to beat in one shot. Being knocked off the horse really sucks, because if you get knocked off the horse just once, it's enough to keep you from saving Clara Barton and continuing the game.
The hazards always show up in the same place every time, so it's a huge matter of memorizing everything for this level.
Level 2
Here, you shoot one of Colt's patent firearms for target practice. You'll want to shoot down everything you can, including the gunman targets, the big birds that fly up and the colored birds that show up at the bottom. You'll have to press another button to switch between shooting low and shooting high.
The ducks at the bottom give the lowest amount of points, but if you can get a chance to shoot them, do so. You'll be shooting a lot of bullets here, and while there's also memorization here, there's not as much to remember.
The anachronistic items show up at the bottom near the end. You'll want to shoot those down, too.
You have to reach a minimum score (as dictated in the upper-left corner), but as long as you can successfully shoot everything down, it shouldn't be much trouble.
Level 3
For this level, you'll be throwing pie plates at Beauford "Mad Dog" Tannen's henchmen. Use the Control Pad to walk around as well as to aim. You'll only be able to take a few hits to the metal serving tray, and once it's full of bullet holes, you're one hit away from death.
There are six henchmen in the portrait to the upper-left. As you finish one off by throwing enough pie plates at him, the others will pop in and out as well as shoot at you faster. Thankfully, each one always shows up in the same spot.
To reload pie plates, simply walk up to the stack of pie plates on the table.
You'll want to reload after you finish off all of the henchman, since you'll have to take on "Mad Dog" Tannen himself. You'll have to hit him six times before he punches a whole bunch of holes into the metal serving tray. Walking to the far left side and hitting him from there usually helps.
Level 4
For the last level, you'll have to go back...but there's trouble with the train: it can't reach 88 MPH!
You'll be going across the train, throwing pie plates at bad guys and increasing the boiler temperature along the way. To increase the boiler temperature, you'll have to pick up gray, striped discs in order to bring it up. To do that, walk up to the gray discs and crouch down on it. The color of the stripes will always match the next value on the boiler temperature gauge, and you must collect them in order or else you won't be able to complete the level and the game.
On top of that, there's a timer for this level that you'll also have to beat. You'll have to be quick to increase the boiler temperature all the way to the maximum.
When you increase the boiler temperature, smoke will blow from the left to the right, the color matching the current value on the temperature gauge, indicating you did just that. Watch out for the smoke, because it can knock you down as well as the enemies. At least you can crawl by holding the diagonal down directions on the Control Pad.
Enemies can also be taken out by the train steam, but they can also get knocked off by walking off an edge at the top of the train.
You'll fist-fight with enemies if you strike them in close.
Jump over the posts when you're at the top of the train to keep Marty from being knocked off the train for a few seconds. If he gets knocked off, it'll take a few seconds for him to get back on the train with the hoverboard from the second movie...and those seconds count.
When you reach the engine, walk across carefully so you don't get hit by the highly pressurized geysers of steam that come out of the train. The geysers pop out at random locations, so be careful.
When you reach the other side, you can finally bring the train to 88 MPH and return to the present day! You've won! Enjoy your one-screen ending!

Angry Video Game Nerd - Paperboy
You know I had to do it. It's the Angry Video Game Nerd video for Paperboy!
Saturday, November 18, 2017
AMF1534/LovelyCheesePizza plays Paperboy - Part 2 of 2
And now for the second half of the game, where the difficulty ramps up!
It should be obvious that the further you go, the harder the game gets. New enemies pop up, some enemies, such as the kids on the tricycles and the motorcyclists on the roads, will show up in greater numbers. Some enemies, such as the dust devil and the Grim Reaper don't show up until Wednesday.
There's not really much to talk about here, other than the pondering of why some guy is breakdancing on the sidewalk and it looks like he's trying to finagle around with his pants (either he's putting them on or taking them off, depending on who you ask), how the paperboy can throw a paper so hard that it stops a dog who wants to chase him stone cold, and who can possibly be controlling those remote controlled cars, as there is nobody visible with a controller running one of those things.
When you beat Sunday - the final day of the week - the game announces that you can retire in glory! You've done it! You've won!

AMF1534/LovelyCheesePizza plays Paperboy - Part 1 of 2
Here is a game reminiscent of not only a gaming era gone by as well as days gone by, but also an occupation gone by. Hard to find a paperboy these days...
The rules are simple. Take it away, Wikipedia:
The player controls a paperboy on a bicycle delivering newspapers along a suburban street which is displayed in a cabinet perspective (or oblique projection) view. The player attempts to deliver a week of daily newspapers to subscribing customers, attempts to vandalize non-subscribers' homes and must avoid hazards along the street. Subscribers are lost by missing a delivery or damaging a subscriber's house.
The game begins with a choice of difficulty levels: Easy Street, Middle Road and Hard Way. The object of the game is to perfectly deliver papers to subscribers for an entire week and avoid crashing (which counts as one of the player's lives) before the week ends. The game lasts for seven in-game days, Monday through Sunday.
Controlling the paperboy with the handlebar controls, the player attempts to deliver newspapers to subscribers. Each day begins by showing an overview of the street indicating subscribers and non-subscribers. Subscribers and non-subscribers' homes are also easy to discern in the level itself, with subscribers living in brightly colored houses, and non-subscribers living in dark houses.
So basically, deliver papers to the brightly colored houses, try not to run into anything, and don't break any windows unless you want to lose subscribers. You also can't miss any subscribers, either. If you lose all your lives or all your subscribers, the game is over. This is especially true of the second scenario, regardless of how many lives you have left if that happens.
Thankfully, the yellow, white and blue houses are the subscribers, and the red ones are not. If you can get the newspaper to land on either the doorstep at the front of the house or into the mailbox, you've done it. Landing it in the mailbox gives you more points. It's not that simple, as the angle of the newspaper differs depending on when and where you threw the paper as well as how fast your going, as moving forward makes the newspaper curve to the right.
You only have a few newspapers in your possession, and you will have to pick up a stack of papers to get more.
You cannot stop the bike; you can only move very slowly. This can make stuff pretty tough sometimes, especially if you're trying to get papers to all your subscribers. It also probably isn't much help that you're always near the lower-right corner of the screen at all times, which makes it harder to see some things coming if you are going fast.
You can break the windows of the red non-subscribers' houses for points.
Once you make it to the end of the neighborhood, you will make it to the training course. Throw papers at targets for points, and try not to run into anything. Thankfully, if you crash in the training course, you automatically move to the next stage. If you make it to the end, you'll stop in front of some bleachers, where a few people have been cheering you on the whole time. There is also a timer on the lower-right hand corner, so make sure to get to the goal before time is up.
If you can get newspapers to all the subscribers, you can gain subscribers as well as a reward. Keep getting perfect subscriptions to give yourself more leeway through future stages (though it can be just as easily said that you can easily do that by having only a few, it's up to you).
Now that all the bases are covered, it's time to mention a few of the enemies you'll meet. You'll see tires moving out from driveways onto the sidewalk, break dancers, dust devils, some guy with a jackhammer, remote control cars that move around on their own, the Grim Reaper, dogs, kids, motorcyclists and even grates that make it impossible to tranfer from the road back onto the sidewalk and make you crash if you ride into them. There's also a guy who comes out of a subscribing home who runs after you with what looks like a knife. And that's just a few of the enemies.
Why is the Grim Reaper here? Why is that guy coming out of his house in his robe chasing after you with an object that looks like a knife? Why do the grates make you crash? Are they covered in grease and leaves that make your wheels slip around? I have so many questions.
Friday, November 17, 2017
PrinceWatercress plays Fortified Zone - Part 4 of 4
Here's the final stage...and it's a doozy.
Stage 4: Fortress
There are robots that will take off three units of health if they touch you at the start. There will also be a fork in the road. You'll want to go right here, and make your way east in the dark area. From there, you'll be able to destroy the machine that is making that area dark.
Go back to the fork and take the left path (center leads to a dead end). Head north, and stand left of center across from the mini-boss so you can destroy the rockets it shoots at you along with it. Watch out for that three-way shot as well. You can also outrun the rockets by moving to the side if you're able to do it. Take the key when you're done. Head back south and take the right fork again. You can now unlock the door.
This leads to a room of conveyor belts and spikes. Destroy the enemies first, and switch to Mizuki so you can jump the spikes at the right side of the room and get out of here as quickly as possible.
Shoot down the robots in the next room, then head east and carefully destroy the turrets as you make your way to the other side of the conveyor belts. Switch to Mizuki again, as you'll need the agility to get past the moving spikes and the floor spikes. Kill the robots in the next room, then go down the stairs and carefully move across the narrow floor as your controls will be reversed. Shoot the control-reversing machine and head south.
Believe it or not, you can head east from the door, though it doesn't look very clear that part of the wall has recessed into the floor unless you look carefully. Go that way, and shoot the machine. This opens the door to another mecha mini-boss.
Once you get the key from that mini-boss, head all the way back to where you got here from and head south past the retracting floor spikes to open the door with the key. Destroy the enemy here to open the staircase leading up. Watch out for the flying mechs, which will shoot at you when lined up with you. From there, head north, and carefully maneuver your way to the controls-reversing machine and destroy it. It will leave another power-up that will increase your health, which you can pick up if you need it. If you have max health and you're definitely hurting for more, you can pick it up with whoever has eight units of health and use it to get all that lost health back.
From there, head out of the room,then head south. The mini-boss here can easily be destroyed when you're lined up with it. Head back north, then destroy the enemies and go back down the stairs. Destroy the robot and open the door to the south with the key. Shoot down the enemies, and watch out for the ever-changing directions on the conveyor belts.
From here, go west and take out all the flying mines..and boy, is there a lot of them. Once they're all destroyed, you'll be able to go up a flight of stairs. Take it, and destroy that robot mini-boss. It will leave a flamethrower. Take it. From there, head west and take out the turrets as you keep heading in that direction. You'll come across two more of those two rocket-launcher robots. Take the left path on the fork, then maneuver your way to the machine that is keeping the next room dark and destroy it. Head back to the fork and take the right path. This allows you to destroy a machine keeping another room dark.
From here, leave the fork and enter the fake wall to the north in the second turret room prior to the fork. Follow the path to the right and you'll be in yet another dark room. Destroy the machine, then head to the first turret room and enter the fake wall to the north there. There is a pit. Unlike other pits, you have to jump into this one in order to go forward.
You'll be in a part of the stage that you couldn't access until now. Take the middle path in the fork to the south, then destroy the machine making the room dark. Take the left path after this, and feel your way to the west, then north as soon as you're able. You won't be able to destroy the machine making the room dark...yet. From there, feel your way right, then south. Now you can destroy that machine. From here, head east, then north. Take the upper path and destroy the box to turn the lights on and get a key.
Head all the way back to where you started and open the door to the east. Destroy the robot and take the stairs up. Destroy the robots, now that you're back in (somewhat) familiar territory. Head north. You'll face another mini-boss. Stay at the bottom of the screen and shoot at it from left of center, otherwise the conveyor belt will make this battle so much harder. Head west and fight the jeep mini-boss. Yep, that mini-boss is back, and it's as easy as ever. We also have a boss rush on our hands.
Next up is that one-eye alien boss, followed by that robot mini-boss that shoots the rockets. After that, a boss. Take out the center cannon first, followed by the side cannons. Try not to get run over too much when taking out the center cannon, and shoot down or outrun any rockets that fly towards you when you're at the sides. After that, shoot at the eye of the robot when it starts blinking. This is where the flamethrower comes in...hope you still have it! Otherwise, you'll have to shoot like crazy.
But it's not over! You have to head all the way back to where you dropped down to when you jumped into the pit. After all this, you can finally head north. The door here will finally be open once you destroy the robot mini-boss one more time.
This is the final boss. Shoot down the cannons in the center, then take out the cannon behind it with the flamethrower. Destroy the cannons at the sides, then shoot at the flashing light. Just position yourself in front of it and just tank all the damage while shooting at it. This thing will be dead long before you are and you'll finally beat the game! Your mission is complete! My microphone finally decided not to work for about forty-five seconds! I switched to a USB headset for a while after this! It's over!

Thursday, November 16, 2017
PrinceWatercress plays Fortified Zone - Part 3 of 4
Not only do we have robots, but the terrains of the rooms themselves become a lot more sinister!
Stage 3: Cave
The human enemies are now replaced with robotic counterparts...and they take a little more damage to kill. You'll also lose two units of health with every hit, too, so you definitely want to be careful
The layout is a little more maze-like compared to the first two stages. No longer will there be a lot of wide-open rooms, instead, there will be more narrow corridors on more of the screens, which can make fighting enemies a little harder but not insurmountable.
If a room is dark, shoot down the machine that is visible to light the place up.
If you see light where there should be the shadow of a wall, walk into that lit-up area. You'll find stuff you couldn't otherwise reach, such as machines you can shoot at to unlock doors.
The conveyor belts make their debut in this stage. Be sure not to walk up or down on them unless you really have to, as they can push you back fairly quickly. Mizuki moves around on these better than Masato can, as her jump allows her to fight against being pushed back slightly better than her faster walking speed does. The bats just fly around while stopping to shoot four diagonal shots, and go down very easily.
The one-eyed alien is a mini-boss. It will shoot at you with a three-way shot, but it can be taken down very, very easily, especially since you'll probably be powered up at this point.
Watch out for moving walls! If you see one, shoot it!
The robot that looks like it has one eye moves quickly and shoots rockets. Line yourself up with it and take it out. Thankfully, it stops when it sees you, so use that time to get your shots in.
The little machine with what looks like a tiny rotor on it will reverse your controls. Shoot it down to return your movement to normal.
There is a three-way fork after the control-reversing machine. You want to take the left fork first, so you can destroy a machine and turn the lights back on reveal a pit that would have taken some of your health and make getting around impossible had you taken the easy road.
The crab mini-boss not only has a three-way shot, but also shots that will home in on your current position. Being at a distance against it can help.
Since I didn't say it in the video, looking back at this, I do have to say that I love the part with the controls-reversing machine with the narrow floors surrounded by the pits. Reminds me of The Legend of Zelda: A Link To The Past.
The blobs take a few shots to kill, but they can eat away at your health. The thing that looks like a tiny man with his arms raised up shoots two shots to the sides.
The tiny crab enemies just move back and forth horizontally.
If you see a fake-looking wall that looks like the moving one from earlier, shoot it. You'll open your way up to some secret power-ups, and also open up some stairs.
The boss is a dragon. Stay across from the head and move to the side to avoid the three-way shot, then get to the bottom when it gets towards you and shoot at the head as it retreats. Use the flamethrower as it moves back
Wednesday, November 15, 2017
PrinceWatercress plays Fortified Zone - Part 2 of 4
This one's a lot shorter than the previous stage, mostly because I know what I'm doing, don't have to explain as much and the maze is pretty linear.
Stage 2: Field
Watch out for the spikes. They move at a good pace, but they can be avoided.
The turrets are pretty easy to take out. Just keep the bullets away from your body.
Not long after you start the stage and start heading in a direction other than north, you'll see the Jeep miniboss again. Once again, just trap it in the upper-right corner and fire away with Masato, then grab the key. Head all the way to the start, being careful not to take a lot of damage (thankfully the turrets leave first aid kits). From there, use the key to unlock the door to the east. You'll come across another Jeep mini-boss that leaves another key. To the east, you'll find some more health increasing power-ups. Grab with the character of your choice, then head north.
The path here is very linear. It's even easier to find your way in Stage 2 than it is in Stage 1.
The men with the machine will fire at you only if they see you. Also, the mines that move down the screen act much like the missiles, but they are faster and can go horizontally, too. Keep an eye on everything happening on the screen.
The guy with the rocket launcher will give you flamethrower ammo. It will definitely help with the boss.
The boss is a giant tank. Stay all the way on the south side of the screen and shoot down the center cannon, then take the side cannons out with the flamethrower to beat the boss in record time.
PrinceWatercress plays Fortified Zone - Part 1 of 4
Believe it or not, this game and Operation Logic Bomb are part of the same series in Japan. As a matter of fact, they both share the same name!
Stage 1: Field
You start out as Masato, one of two playable characters in the game.
The controls are simple enough. You use the Control Pad to move around, and press A to fire your gun. You can have up to five regular bullets on the screen at any given time. If you find a special weapon, you can fire it with the B button.
The heads-up display is at the bottom and is pretty simple. The gauge on the left is your health, while the gauge on the right shows how much ammo you have left on your current special weapon.
The human enemies are a pushover. Right now, they stay in one spot and shoot bullets in one of four directions much like you do. They will start moving eventually, however.
When you see missiles firing down from the north side of the screen, shoot them down and avoid them when necessary. If you see any first aid kits, pick them up. You'll need them for later. If you're not at full health, they'll refill your health for you. If you are, you'll be able to take it with you and revive your character upon dying. You can carry up to nine at any given time.
Sometimes doors will block your path. Usually, you'll have to kill all the enemies in the really small room that you're in, but you may also have to find a key to unlock it.
The knife guys will come at you when they see you, and - if you let them - will advance faster when lined up with you.
For spike traps, wait for them to come up, then immediately move past them when they sink back down into the floor.
The boxes with the "X" on them contain useful stuff. You'll have to shoot them five times to reveal the contents inside...and the contents can be quite good.
The guys with what look like proton packs on their backs take two shots to kill and sometimes fire a three-way shot. Other times they'll just fire the usual straight shots.
If you press Select, you'll go to the map screen. This lets you change characters, use first aid kits, look at the map to see where you are.
You have two characters. As mentioned earlier, you start out as Masato, but if you select "Change" on the map screen with the B button, you'll switch to Mizuki, who can only shoot two bullets at a time, is a bit quicker than Masato, and jumps with the B button instead of firing special weapons. The jump allows you to jump over spike pits, and Masato cannot cross those in any way.
The icon with the "3" on it with the three cannons is the three-way shot. Watch your ammo in the lower-right corner, because those special weapons don't have infinite ammo.
The icon with "UP" on it increases your maximum health by one unit, and you'll find plenty throughout the game. The health increase goes to the person you pick it up with, so pick who you want it to go to before you pick it up.
The gun with the "S" on it increases the speed of your shots.
The mini-boss here is dead simple, as it stays in place and its bullets are super slow. All you have to do is face it and mash the shoot button to kill it off. When you destroy it, you'll get a key that you can pick. This will allow you to unlock a specific door in the stage in case killing all the enemies in the room doesn't open it.
Sometimes, enemies will pop up when you kill enemies in the room. In these cases, you'll have to kill the enemies to move on.
The Jeep mini-boss can be easily destroyed with the regular gun. If you can get it on the north wall and facing west, you can destroy it pretty easily without its three-way shots being able to do anything.
The grenade icons give you grenades for your special weapons. Believe it or not, this is the only special weapon Mizuki can use, but you have to have her pick it up in order for her to use them.
The gun with the "P" on it changes the appearance of your regular shots and also makes them stronger. You definitely want to pick this up, as everything will do down in fewer shots.
Don't forget to pick up the first-aid kits before you face the boss. When you finally face the boss, position yourself southwest of all the turrets and throw grenades at them. You'll destroy the boss without even getting shot at.
Tuesday, November 14, 2017
Kikoskia plays Postman Pat and the Greendale Rocket - Part 3 of 3
Well, that didn't take long.
Level 4-A (continued)
After using a bale of hay to reach a platform, you'll be able to climb up a pole with Jess, collect some letters and hit another button to activate a floating platform. From there, there's another red button to push a hay bale on, and you're done.
Level 4-B: Catch the butterflies!
Password: Mailbag, Pink Flower, Pink Flower, Present
You play as Jess this time around. It's an auto-scrolling stage in which you have to collect 80 butterflies...and you can't miss one, since there's exactly 80 of them in the stage. At least there's no timer here.
Level 4-C: Find Ted!
Password: Pat, Jess, Mailbag, Present
Time to find the mechanic. Strangely, the set-up of the obstacles here is the most linear of the racing levels.
The fourth mystery item is the wrench. Judging that we need to fix the train, this is a good mystery item.
Level 5-A: Find Mrs Goggins!
Password: Jess, Parcel, Jess, Pat
Yep, we have to find Mrs Goggins again.
You'll have to jump up to the roof again to reach a button and get an inner tube moving.
You'll meet Jess afterwards. Enter the narrow passageway to get some parcels and hit a button. Watch for the water, as the platforms are just big enough for Jess to stand on.
Watch out with the platforms in this level, as they can be a bit out of sync and you'll have to wait a little
Use the bin to reach the now-activated floating platform, and you'll be able to cross the now-activated bridge. After a drop-off, you'll meet Jess again. Enter the narrow passageway and jump over the button to find a secret passage, more collectibles and a second button.
To reach Jess on the roof, push the bin to the nearby red button to the right. You'll activate another platform and you'll be able to go down and enter another narrow passageway. Jump over the button again to find some more stuff. After hitting the button here, you can (carefully) jump to another button to get the inner tube below up and moving.
There's Mrs. Goggins...and the end of the level.
Level 5-B: Stamp the parcels and letters!
Password: Present, Parcel, Present, Parcel
Stamp the parcels and letters, but not the presents. If you stamp the presents, you won't be able to stamp anything for a few seconds.
It gets faster, especially before you run out of time. Thankfully, there is more than enough time and the parcels and letters are grouped together pretty closely at times.
Level 5-C: Find the Greendale Rocket!
Password: Pink Flower, Jess, Pat, Parcel
The water is now oil, but still has the same effect.
Go down on the fork in the road, otherwise you'll run into big oil patches that are tough to avoid.
This one is a pretty long one, but it can be done.
The last mystery item is a sack of mail.
The Greendale Rocket is repaired and moving around now! Yay! You won!

Subscribe to:
Posts (Atom)