Tuesday, February 28, 2023

HalfBlindGamer plays The Battle of Olympus - Part 5 of 8


We'll need to go through Phthia to get the second Fragment of Love, and it's not gonna be easy.
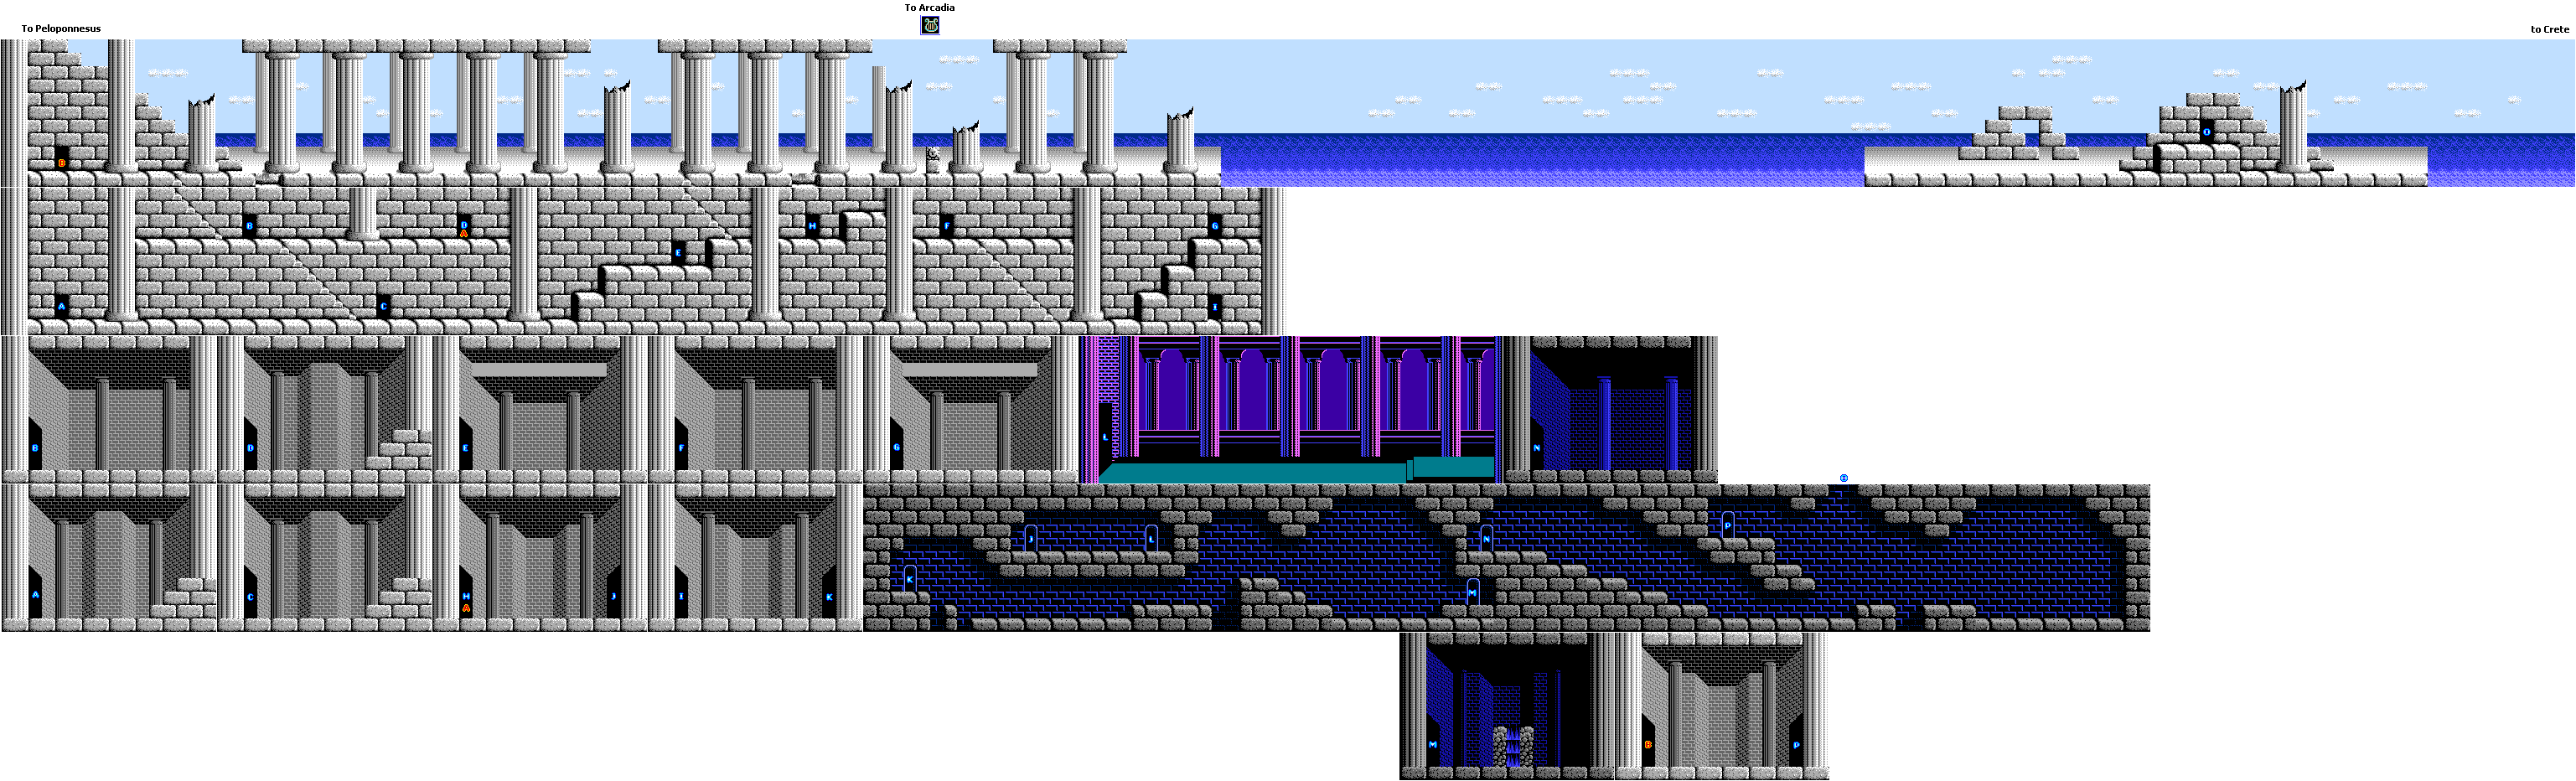

Argolis


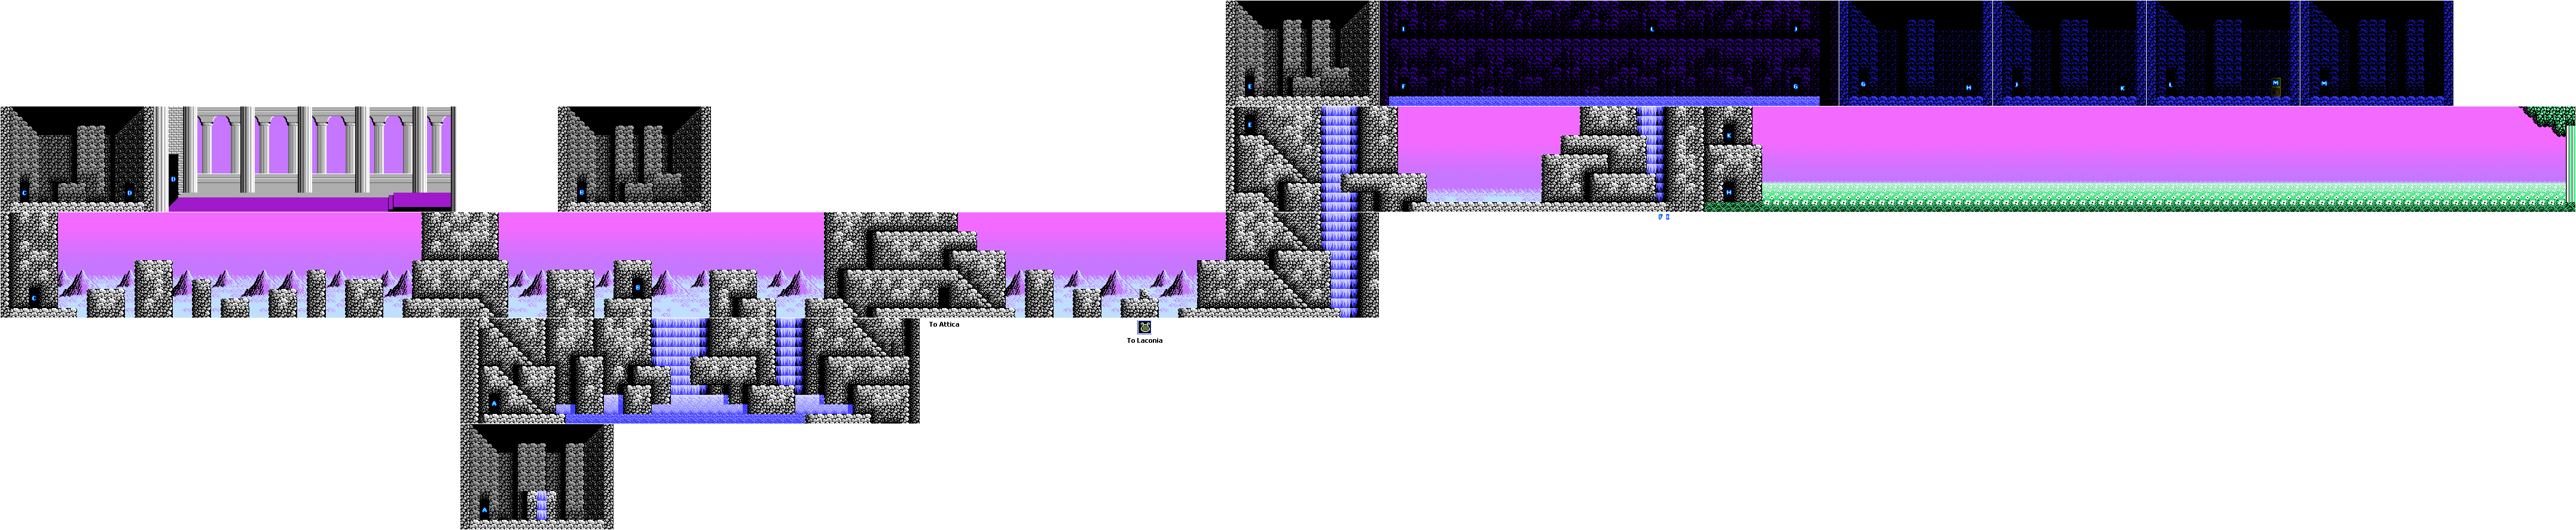
From here, leave the cave and call Pegasus with the harp and head to Attica.

Attica


The old man in the big house near the temple will tell you that the Nymph has gone to the Garden of the Hesperides, and to take the key that he gives you and go after her. Take the key.

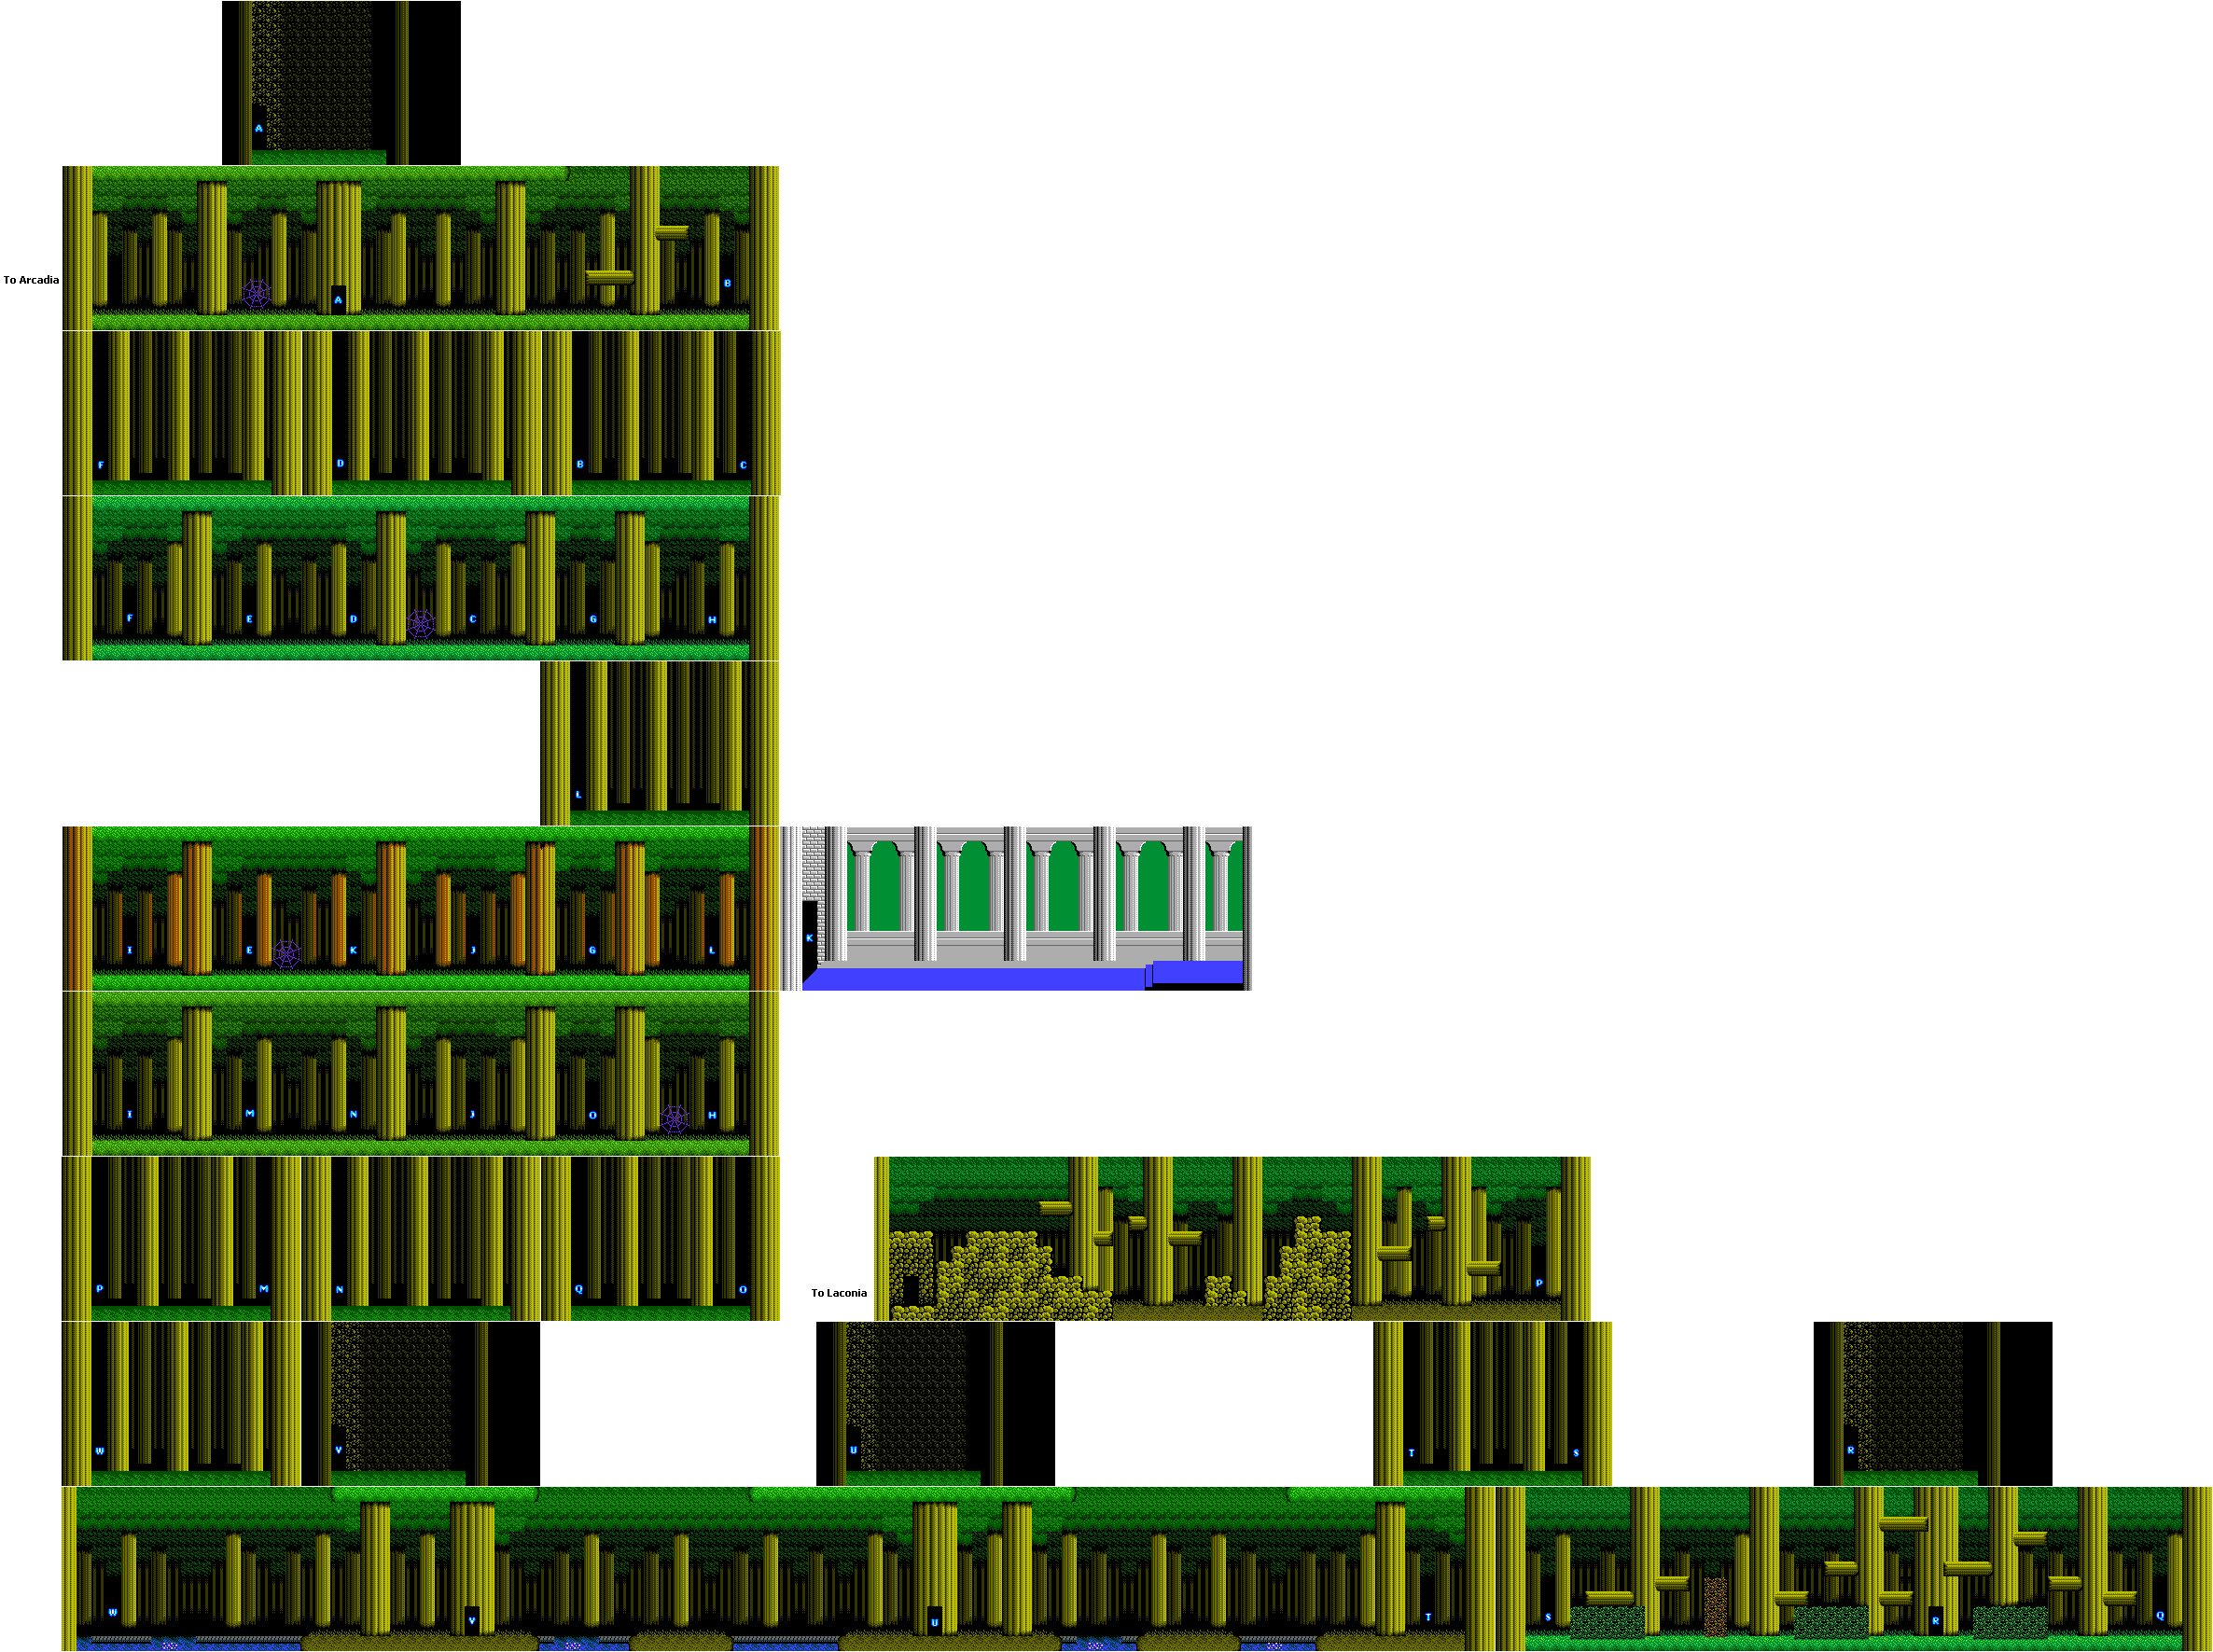
From here, head to the left and go through the cave, then head to the right and battle Gaea. Wake him up with the ocarina, then get ready to fight. Gaea will throw rocks around, but if you stay on a higher ledge and keep striking with the sword, you'll be able to beat him. After you beat Gaea, you'll be able to head to Phthia.
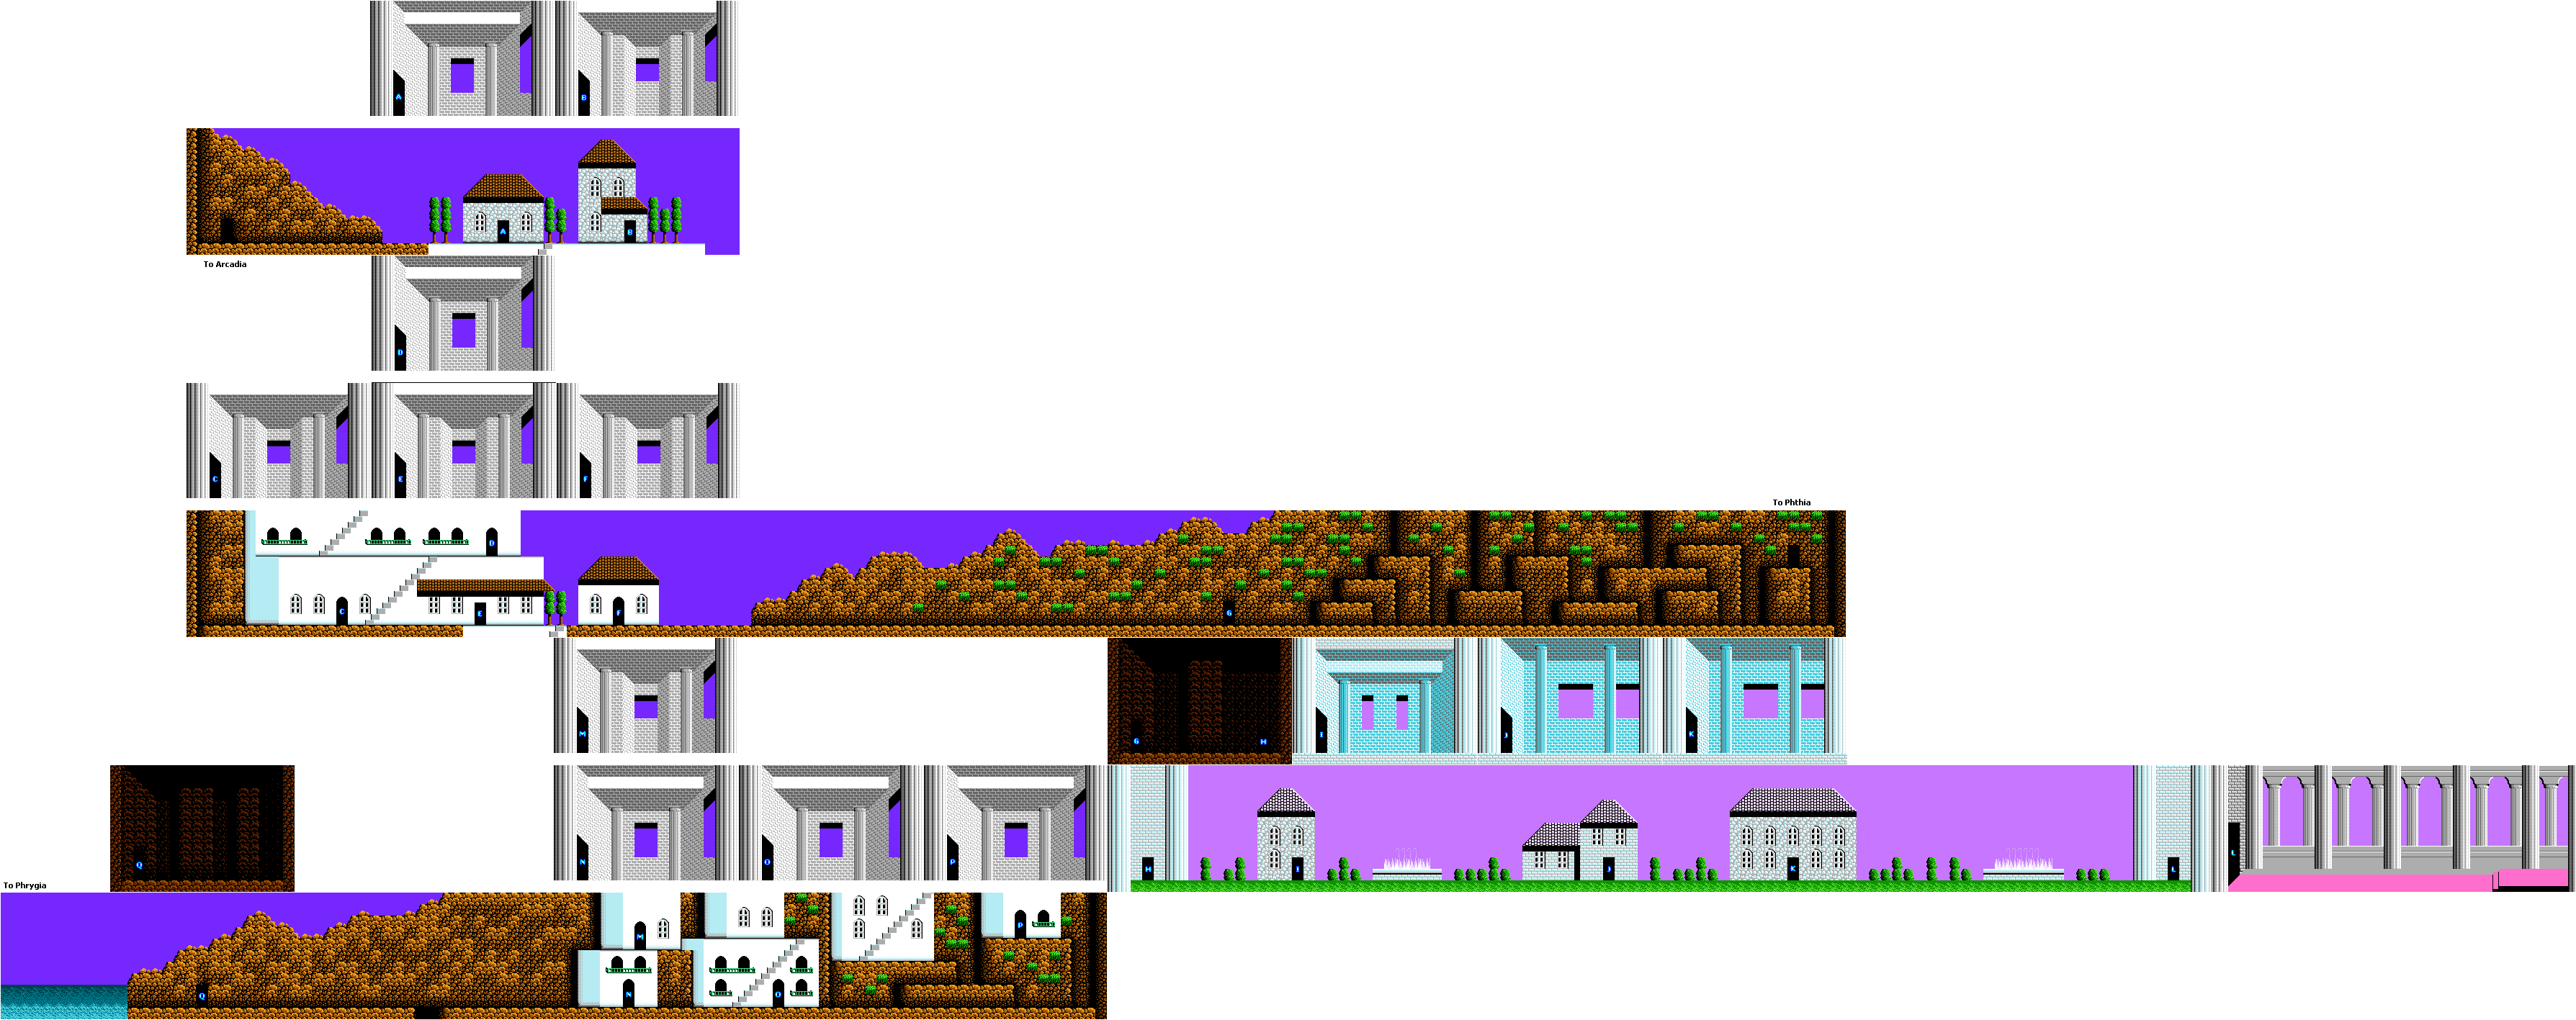
Phthia


The slugs quickly move back and forth. They will be too low to hit, but you can use the fire from the Staff of Fennel to burn it. Otherwise, avoid them.

Head left when you arrive, then go downwards. From here, left and enter the door on the lower-left corner to use the fountain if you need it. After that, head up the nearby stairs and head left. Be ready to avoid enemies as well as the pits, then head left and go through the cave to enter another temple.

You'll meet Hephaestos. If you have 70 olives - which you should have - you'll be able to buy his sword. Buy it; Hephaestos' sword - the Divine Sword - has the power of Argus and is the strongest weapon of the game. It can shoot lightning forwards, but it can also drain your health when you do this unless you have the Bracelet of Power. Hephaestos will also tell you that there is something useful in the Garden of the Hesperides on the other side of the waterfalls. Be sure to get a password from Hephaestos, too.

From the temple, head right until you find an opening. The old man inside will give you some ambrosia to increase your maximum health, and if you talk to him again, he will tell you to see the witch Circe before going to Phrygia. After that, go back and make your way down the stairs and back to where you started. From there, head to the right. The man in the opening up the stairs as you make your way up will tell you that if you are looking for the Golden Apple, it will be guarded a huge dragon known as Ladon.

Head to the right and take out the Centaur with the lightning from the Divine Sword. The Centaur will go down in two hits, and you don't have to deal with the arrows or the Centaur bouncing around all over the place. From here, go right, jump up the platforms and walk into the waterfall.

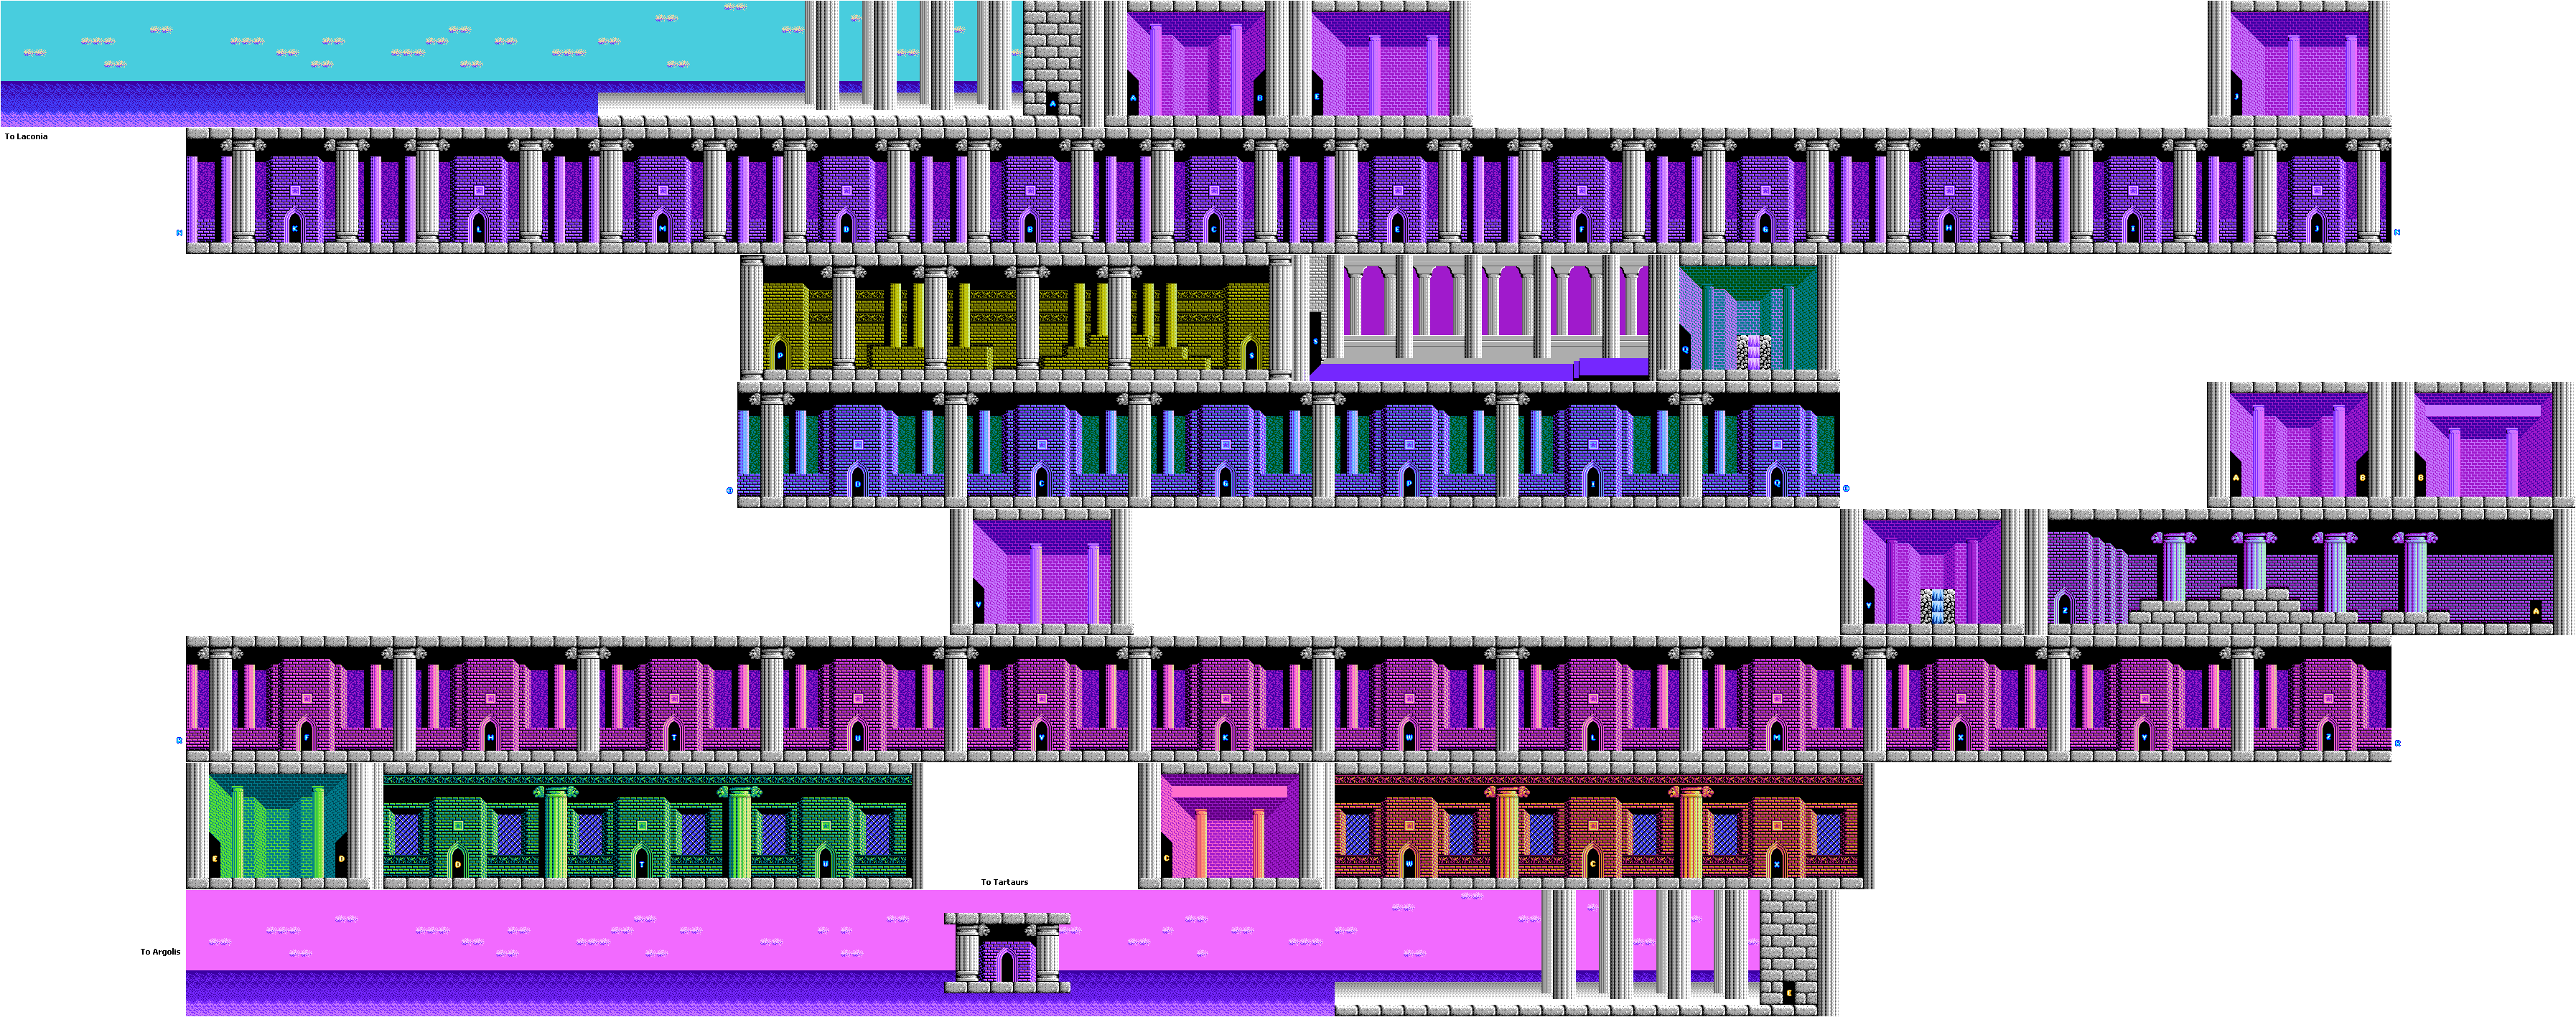
Use the Crystal Ball halfway through the upper path to reveal a door. Go through the door in the next room now that you have the key, and you'll find a Nymph who has fled here after being found by the Graeae at Laconia. The Nymph will tell you that Helene has been taken across the sea to Crete, and you'll get a letter from Erinna as well as the second Fragment of Love. Take the Fragment, and you'll hear from Erinna.

Erinna will tell you that she loves you so much and that she will never belong to Hades, as you will come to save her. She will then tell you that according to Hades' servants, the entrance to Tartarus lies along the sea between Crete and Argolis.

From here, leave this area, then head right across the upper part of the cave and go through the right opening. Keep going, and you'll soon find yourself in the Garden of the Hesperides. The butterflies will bob and weave through the air and spray poisonous powder, but you can hit them from a distance if you know what you're doing. The plants will shoot fireballs at you, but you can block the shots with the shield and hit them with the lightning from the Divine Sword.

At the end, you'll face Ladon. Fire lightning from the Divine Sword at the head, and keep away from Ladon as it flies around, as it can be devastating at close range. Beating Ladon will get you the Golden Apple, which doubles your defense. This is one item you'll really want.

From here, enter the lower opening to the Garden and go through it to get back to Phthia. Back at Phthia, get back to Attica.

Back to Attica


From here, head back towards the temple, refill your health at the fountain, and save the game; you do not want to go through any of that ever again.

HalfBlindGamer reviews The Battle of Olympus


It's been a fine game so far, but how does the game really stack up?

PrinceWatercress plays Blood Omen: Legacy of Kain - Part 26 of 41


In this entry, we explore more of the maze that is (was?) the town of Abernus.


We start out by entering the building with the torn-up front entrance in front of us in mist form.

1:03 - The time slowdown pick-up is a secret (see below). Make sure to kill the demons before. From here, enter the crack in the southeast corner with your mist form, then go south to enter the sewers.

2:08 - From here, you'll need to make your way to the stairs in the northeast corner of the map. Use your mist form and power your way past all the monsters. When you get upstairs, enter the crack in the east wall with Mist Form.

3:18 - Time to kill more demons. The Energy Bank hides a secret. If you're playing the PAL release of the game, you'll need to grab the nearby antidote first before you grab the Energy Bank in order for the secret to count (see below).

From here, get back to the sewers, and go all the way south until you find a doorway. Before you go in, however, go east and get the Heart of Darkness. This hides a secret (see below).

4:59 - From here, you'll need to get to the southeast corner and go up the stairs. Be sure to touch the area where the time slowdown pick-up is on the way; this activates a secret (see below). Watch out for the big red demon near the end, and once you're up the stairs, enter the crack in the east wall.

6:40 - Use Imploders on the big red demon. The time slowdown pick-up in the room to the north is another secret (see below). From here, go south to exit outside.

9:38 - From here, enter the house to the north for humans to feed on for health. The rest of the house leads to other pick-ups and an exit leading to the back of the cathedral. While this path looks like it could lead to something, it actually doesn't.

13:57 - The entrance to the Abernus cathedral, and Pentalich of Tarot in action. But the full moon is up...!

Secrets

78. - The time slowdown pick-up here is a secret.

79. - he Energy Bank hides a secret. If you're playing the PAL release of the game, you'll need to grab the nearby antidote first before you grab the Energy Bank in order for the secret to count.

80. - This Heart of Darkness is a secret.

81. - This time slowdown pick-up is a secret.

82. - The time slowdown pick-up in this room is yet another secret.

Monday, February 27, 2023

HalfBlindGamer plays The Battle of Olympus - Part 4 of 8


This time around, we head to Crete, we get the Bracelet of Power, and we get our first Fragment of Love.


On the way out of the temple, the woman inside will tell you that you will get a sword if you meet Hephaestos in Phthia. If you go through the same door you just came out of, you'll see a different room altogether where an old man will tell you that the Graeae are hiding underground somewhere.

The man in the opening to the left will tell you that in Phthia, there is a paradise called the Garden of the Hesperides, and that a golden apple with mysterious powers is rumored to be there.

Down and to the right is a man who has come from Athens after having seen the Nymph entering the house of Keleos.

To the right of that is a man who will tell you that a strange flask washed up on the shore. We've found it, interestingly.

Further to the right is some more doors. The door near the stairs leading up and to the left has a woman who will tell you that you must have fire in the cave beneath the sea. There are also two doors at the right. The top one has an old man who will tell you that if you cross the sea, you'll head to Crete, where there is a maze guarded by strong knights. The bottom door leads to a dark cave. Light the place up before you accidentally drop into a pit, then fight the Cyclops to the right. Unlike the first one, you'll have to stay close to him and hit him after he throws the rock. Once you defeat him, you'll get some ambrosia to increase your maximum health, and you can enter the nearby doorway to enter a fountain. Duck in front of it to refill your health and fill your flask.

Leave the area and head back to the left, then access the doors above. The first door has a man who will tell you that you will be mesmerized and ripped apart if you hear the call of the Siren unless you have a harp. You can go up from here and call for the dolphin to cross the sea to the right.

The flying fish you will fight here will jump out of the water and will usually attack in groups of more than one. Just keep moving and jump over them when they are in pairs, but shoot them with fire if you can. On the other side, you'll face the Siren. The Siren will fly up and down, but it will rarely swoop at you and will rely upon its call instead. Equip the Harp and use it to break the charm effect so you don't get pulled in, then kill it with fire. When you beat the Siren, a door will open. Ignore it for now and go to the right to head to Crete.

Crete


Watch out for the birds and the flying fish as you head to the right. To take out Talos, crouch and hit him in the knees when he comes at you. Talos will move back and forth try to run you down, but he will retreat if he has to. If you duck down and hit him on the charge, you'll knock him back. You can also jump over him if you're moving at full speed.

To the right of Talos is the entrance to a giant maze. The shadows will walk on the ceiling and will throw knives at you, and they can also carry a shield to block attacks. You're better off avoiding them, and if you can jump over them and run away, do it.

In the first door to the screen to the right, the old man inside will tell you to head towards Phrygia after you are done here to get an important item from Artemis.

There are also two Amazon warriors you will face here: the short ones and the tall ones. For the short ones, use the ceiling to avoid them and duck to dodge the projectiles they throw. For the tall ones, you can whack them when they approach you, but watch their movements. They can attack and even hop back, but they have little reach.

The ghosts will float up and down, and they will tend to orbit around you and home into you. Dodging and ignoring is your best bet, even if you can swat them away with some well-timed attacks.

In the next screen to the right, the last door to the right has a boy who will tell you that in Crete, both Master Ares and Circe are greedy, and you'll need olives to get their help.

Enter the second door in the room, then head right and into the next door for a fountain if you need it. From the fountain, enter the door you came in from. Head to the right and enter the door to enter the temple. You'll meet Ares, and you'll need to pay him 80 olives for a bracelet. (If you don't have the olives when you say "Yes," he steals an item instead.) Give him the olives for the Bracelet of Power, which doubles your attack power and nullifies the HP drain for the Power of Argus. Be sure to kneel down before him again for a password.

From here, head back to the left and go through the door, then go back to the fountain if you need to. Head to the right and enter the first door, then enter the next door and head left. You'll be able to get out. From here, head back to the left and get back to Laconia.

Back in Laconia

Enter the door that opened up when you beat the Siren. Light the cave up, then head to the right. You'll face the Graeae. These robed enemies will try to shoot magic at you and will teleport around. Use your shield to reflect the magic shots, then attack them when they are visible. Beating them will net you the Eye of Graeae, which reveals invisible doorways. This is one item that you are really going to need.

If you head all the way to the left and enter the doorway at the dead end, the old woman inside will tell you to take the salamander skins and meet the witch Circe on Crete. This is how you'll get the Salamander Shield. From here, head back to the right, then go up and left to get out of here.

You'll be back at the beginning of Laconia. From here, you can use the Harp to summon Pegasus at the Sun Stone (the block with the sun on it) and head back to Arcadia.

Arcadia


Head to the right and enter the tree, then go through the other end and head left to go to Argolis.

Argolis


Go through the left cave at the end and equip the Eye of Graeae at the beginning to find a hidden doorway. Go through it and head right, then head left on the other side. The opening at the top leads to a Nymph. Talk to her, and you will find out that she was captured by the Cyclops in Peloponnesus and forced back into this cave. You'll then get a Fragment of Love and a letter from Helene, and the Nymph will tell you to follow Hades' servant to Laconia.

Press down to get the Fragment of Love and progress the plot. You'll then hear from Helene, who will tell you that she was bitten by a poisonous snake and taken to Hades in Tartarus by some awful monsters. She has entrusted her love to you to the Nymphs - Aphrodite's servants - and asks you to accept it and use it wisely.

Leave the cave, then take the bottom passage. The woman inside will tell you that the Minotaur of Crete uses a barrier.

From here, head out of the cave. 

There is a pit next to the temple where you meet Hermes, and if you drop in, you can find Salamanders as well as a fountain.

HalfBlindGamer plays The Battle of Olympus - Part 3 of 8


In this entry, we head to Peloponnesus and Laconia.


From here, head to Peloponnesus. It will be all the way to the right from the temple.

Be careful when jumping while upside-down: if you jump too high, you can reverse gravity and land on the floor below. If you do this near a pit, it could end in disaster.

Peloponnesus


The bouncing purple enemy you see upon entering is the Hippogriff. Hit it with the fireball from the Staff of Fennel, then keep smacking it when it gets close. You can also avoid it by walking on the ceiling with the sandals. The Hippogriff is a big fast and can also jump every so often.

Use the fireball on the spider webs to get rid of them. If you get stuck on them, mash the buttons to get free.

The woman in the first doorway will tell you to be careful in the Forest of Thorns, and that you will be okay if you burn all of the withered thorns.

From here, go right and go through the next room. From here, head to the left. The man in the first opening to the left will tell you that Hydra has settled deep in the marshes of the Forest of Thorns. The opening all the way to the left has an old woman who will tell you that the Graeae of Laconia have a crystal ball with mystical powers, and that you can use its power to enter the caverns of Argolis. The opening between these two openings leads to the next section.

Destroy the nearby spider web and head right. The opening to the immediate right is a temple where you will meet Apollo. Apollo will give you his harp to play at the Monument of the Sun to summon Pegasus. With this, you can fast travel to specific areas at Sun Monoliths and also break the effects of the Siren's Song. Talk to him again to get a password.

From here, heading all the way to the right and entering the opening in the woods leads to a man who will tell you that Poseidon lives beneath Laconia. The opening to the left of that takes you back to the previous section, and you can go to the right to another opening to get to the other side of the spider web in the fourth part of this maze. Destroy the spider web, go left, and enter the door way to enter another room. Go left, and you'll be in the Forest of Thorns.

The woman in the tree to the left will tell you to never hit the pavement of the third pillar by the seashore. From here, avoid the green thorny hedges and use the fireball from the Staff of Fennel to burn the brown ones. Further to the left, there are bridges above water. Avoid the bubbles and the pits. The woman in the opening near the end will tell you that she saw the Nymph being taken to the caverns in Argolis.

Further to the left is more forest. The first opening has a woman who tells you to help the Spirit of the Forest as Hydra is bothering her. Further to the right is Hydra. Hydra will lunge from the water, and its jump length will vary. If you get too close, Hydra will stay hidden. Keep your distance, wait for a big lunge and strike. By attacking it once, you'll take off one of its head. Eight hits later, and the Hydra will lose all of its heads and die. If the Hydra moves past the water, head back towards the left end of the bridge to get the Hydra to show up again.

Once the Hydra is dead, keep leaping left over the pits to find the Spirit of the Forest. Now that Hydra has been driven out, peace will return to the forest. You'll then be rewarded with a sword as thanks. The sword is even more powerful than the Staff of Fennel, and you'll need it to fight the Cyclops later. Unlike the Staff of Fennel, however, you can't fire fireballs out of it.

From here, you can exit the forest. From where you entered the Forest of Thorns, two openings to the left leads to a man who will tell you that Cyclops has blocked the road to Laconia and that the only way to beat him is to touch his eye with a sword. The opening to the left of that has an old woman who will tell you that something is hanging from the tops of the trees. If you go left from here and smack the tree near the rock platform, you can get some ambrosia to increase your maximum health.

Further to the left, equip the sword to face the Cyclops. The Cyclops will maintain distance and throw rocks from his current position. Back him into a corner, bait him from over head, then get down and next to him to stab him in the head and poke him in the eye. After a few hits, he is done.

Further to the left is the entrance to Laconia.

Laconia


The birds will fly over you and drop rocks. Avoid the rocks, and hit them while upside-down if possible. There are plenty of scorpions and monkeys here. The monkeys will make big leaps back and forth. You can set them on fire with the Staff of Fennel, but you can also walk on the ceiling to avoid them.

Further to the right, hit the whole, intact pillar to the right of the stone with the sun on it. This is the third pillar by the seashore that was mentioned earlier, and if you hit it with your weapon, you'll get a Trojan Pitcher. This can be used to carry nectar, which you can drink at any time to restore your health.

If you hit the whole, intact pillar to the left of the sun stone, you'll go further down. The opening you land at will lead to a dark area, but if you shoot a fireball from the Staff of Fennel, you can light it up. Enter the doorway to the right and meet Poseidon in his temple. Poseidon will ask if you would like to use the ocarina for calling his dolphins. Say "Yes," and you'll be able to get the ocarina for 60 olives. The ocarina will allow you to cross the sea. Talk to Poseidon to get another password.

PrinceWatercress plays Blood Omen: Legacy of Kain - Part 25 of 41


Now that we're done with Dark Eden, it's time to head to Abernus. Guess what? It's just as bad over there as it was in Dark Eden, if not worse.


2:22 - Now that our business in Dark Eden is complete, we can go through this opening, which no longer has a door blocking it.

3:51 - This cave has a few pick-ups worth grabbing.

6:34 - There is this gate near this beacon. You'll only be able to go through the gate when the moon is full. The rune language here mentions a full moon and something about calling death from the sky. 

7:43 - There's Abernus. It's on fire.

8:13 - Be careful going through here. Thankfully, the Flame Sword will make quick work of the zombies here. You'll also have to equip the axes every 

11:15 - There is another beacon here. It won't be long until you get Kain's description of Abernus as well as the entrance to Abernus itself. Sadly, with all the carnage going on, this town is a maze.

12:24 - Enter the house to the right to save your game; you're gonna need it. The Chaos Armor makes the soldiers here a little easier to deal with. Also, enter whatever houses you can for pick-ups.

17:00 - This house is where you need to go. Going downstairs leads into a sewer maze. Use Repel to take out the enemies as you follow the path and get back upstairs to enter a new part of the town.

19:10 - At this point, we'll be facing more powerful demons. This guy in particular throws energy bolts that pack a punch.

24:19 - We'll be going here in the next video.

Sunday, February 26, 2023

HalfBlindGamer plays The Battle of Olympus - Part 2 of 8


In this entry, we head to Argolis and get some useful stuff that will prove useful later, including the Staff of Fennel.


Since the last video, Seb has kept fighting enemies in order to get 80 olives. You'll find out why later.

Remember the stairs leading downwards on the way to Athena? Go back to those and go down.

To the right of the stairs after you go down is a man who can make you a shield to protect you from fire. This is a reference to the Salamander Shield and we'll be getting that down the line.

At the top floor to the left of the stairs is a woman who will ask you to save her child from the vampire Lamia. If you can help her, she will give you a staff. (Amazingly, Lamia was never a vampire; she was a mistress of Zeus who had the children that she had with Zeus taken away from her - either through kidnapping or murder - which drove Lamia insane in the process to the point that she snatched up any children she could find and devoured them, making her physical appearance into an ugly, monstrous one.)

To the left is a pit to jump as well as a battle with Lamia. She will keep her distance and attack you from afar with her bow and arrow. The arrows have an arc which starts out a bit high and then lowers as they travel, so watch them. If you're too close when she shoots an arrow, the arrow will be too high for you to block. Thankfully, Athena's shield will protect you from the arrows. You'll need to jump in, strike and then jump back. If you see an arrow in her bow, be ready to block.

Once you beat Lamia, you can enter the cave that is behind her and find the child. Talk to the child, and the child will thank you. You can then go back to the woman who asked you to save her child to get the Staff of Fennel, and tells you that her father might know the man who knows how to use its mysterious power. The Staff of Fennel is a slightly more powerful weapon, and it has a mysterious power that needs to be unlocked: the ability to shoot fire and create light. This weapon will definitely come in handy, especially later on. Equip it now.

The woman living in the building below the woman who asked you to save her child will tell you that the sea will lead you to Phrygia, where you will find a fire-breathing dragon. The old woman directly to the right of this house will tell you to use the power of Poseidon to cross the sea.

Remember the old man who told you that his daughter's child was kidnapped by a monster? Talk to him, and he will tell you that Prometheus is the only person who knows how to use the powers of the staff.

From here's, it's back to Arcadia.

Arcadia


The old woman who told you about the Staff of Fennel will now tell you to go to Peloponnesus after you've gone to Attica and Argolis.

Going to the right of her takes you to a new area where you'll see the Spear Bears from Attica. From here, you'll be going left. The woman in the bottom floor of the first house you see will tell you about a strange flask that allows you to take nectar with you on your journey. The man on the top floor will tell you that ambrosia can supposedly be found beneath Argolis.

Further to the left is the entrance to Argolis.

Argolis


There is a man in the cave below where you entered from. He will tell you that he saw the Nymph being taken to a cavern. Further to the right is a child who will tell you that a shield made of salamander skin will protect you from fire.

There are two more caves to the right. The first one is a cave full of enemies, such as the snake. The snake will lunge at you if you're close enough. You'll need to move in quickly to smack it around, and you can jump over it if it lunges at you. The other one is the bat, which will dive at you if you get close enough. Move back if it dives on you, as it has three different speeds of attack and distance. The longer the dive is, the slower it is. Be sure to watch out for pits when fighting them, asp its are instant death.

The first cave you'll see in this area has an old man who will tell you that Prometheus was thrown into a cavern many years ago, and that he cannot escape the cavern because a lion is guarding the way.

The snakes to the sides of this "house" entrance is a good place to farm for olives and bay leaves if you need them.

At the next section is another "house" where the man inside tells you that there are many salamanders under the Temple of Hermes. Another "house" to the right has another man who will tell you that in the depths of the next cave, there is a nest of salamanders who will steal your life if you are not careful.

Further to the right is the aforementioned Lion of Nemea (also known as the Nemean lion, and is more known for being the first of Heracles'/Hercules' twelve labors). Get rid of the nearby bats first before starting this battle. When the lion charges at you, be ready to strike. It is a lot easier to get rid of the Lion of Nemea with the Staff of Fennel. When you beat the lion, you'll meet Prometheus. Talk to him, and you'll unlock the Staff of Fennel's hidden power: hold Up and press B to shoot fire out of the staff. This will allow you to attack ground-based enemies from a good distance.

From here, get out of this cave area and enter the other one. The first "house" inside this cave has an old man who tells you to use the ocarina to wake the earth.

If you duck and then hold Up and quickly press B, you can shoot fire from the Staff of Fennel while ducking.

Further to the right is another room where a man tells you that there are two seashores in Argolis, and that the one here leads to Crete.

At the start of the next section to the right is a woman who will tell you that you could fall into a nest of salamanders if you are not careful. All the way to the right is a woman who tells you that she saw a flask floating in the direction of Laconia. The door before that leads to a temple. The man there will tell you that Hermes is gone, having been summoned by Zeus. You'll need to find Zeus in Arcadia again to find Hermes.

If you drop down the pit just before the temple, you'll find the salamander nest. The salamanders are red versions of the snakes, and they will keep dropping down from the top of the screen for as long as you are here. Fight them like you have the snakes, and don't fight more than one at a time. Defeating salamanders will get you salamander skins, and if you can collect enough of them, you can get the Salamander Shield to protect yourself from fire with later on.

There is an old woman in the doorway in the center here who will let you have something nice for 50 olives. That "something nice" is a piece of ambrosia, which not only refills your health, but also adds four units to your maximum health. You'll only find ambrosia a few times in the game, and it will make getting through this game easier. Further to the right is the way back to where you entered Argolis - and this cave - from.

You're done here, so head back to Arcadia.

Arcadia


Head back to the temple. You'll find Hermes, who will give you some sandals that allow for a higher jump and the ability to walk on ceilings. Be sure to kneel down before him again for a password. 

HalfBlindGamer plays The Battle of Olympus - Part 1 of 8


Here's the introductory video. Here, Seb gives a brief history of the game, plugs his review for the game (which I'll make an intermission), talks about the format of the Let's Play (spoiler alert: there's gonna be a lot of cool stuff in here), and mentions the brief story of the game from the instruction manual.


...and now for the Let's Play, with a voice cast of many!


When you start the game, you'll be able to name the Hero and Heroine (default names are Orpheus and Helene, respectively). Since you have a six character limit and Orpheus doesn't fit, however, you can name them as you please.

Arcadia


You start the game in Arcadia.

At the top of the screen is your heads-up display. From left to right, you have a map of ancient Greece with a white dot marking your current position. To the right of that is your health, and if you run out of health, the game is over. To the right of that is your current amount of olives, which act as the currency for the game, followed by your currently equipped weapon and your currently equipped item.

The D-Pad lets you move left and right with Left and Right, duck with Down, and move up and down stairs with Up and Down. Pressing Up in front of an entrance to something lets you enter it. A jumps, and B attacks and talks to people. The game plays very similarly to Zelda II: The Adventures of Link. Pressing Start lets you enter the Inventory screen, where you can use the Control Pad and the A button to select and equip weapons and items items, and Select lets you use the currently equipped item. The first row contains all your weapons, the second row contains items that you can equip, and the third row contains items that do not need to be equipped and will always be in effect as a result.

Your first weapon is the club, which you start out with. It's the weakest weapon in the game, but it is better than nothing.

By entering houses around here, you can find clues. The old man in the bottom floor of the house you start out at tells you that you must first go to the Temple of Arcadia to meet Zeus. The woman at the top floor tells you a legend about a man who could control fire by using the Staff of Fennel.

There is another house shortly to the right. The man on the bottom floor will tell you to search for the Spirit of the Forest in Peloponnesus, as it holds the strongest sword. The man at the top floor tells you that inside the cave, there may be an invisible door.

The old man in the next house will tell you that he's heard that there is something hidden high up in the trees.

Going to the right of that house takes you to the next area. Here, you'll find worms that will drop down from the tops of the trees. When you approach them, they will try to get the drop on you, and if they land on the ground, they will crawl and hop around like they do on the ceiling. You'll want to hit them on their way down, and if you can't nail them that way, you'll want to duck down and hit them as they hop. Also, watch your distance.

The opening in the tree to the right leads to Argolis, but you'll be too weak to do anything there at the start of the game.

Sometimes enemies will drop bay leaves. Bay leaves will restore one hit point. Other times, they will drop olives, which act as the currency of the game. To pick them up, walk up to them and press Down. Strangely, items do not disappear after they are dropped, and you can use this to your advantage by getting rid of certain enemies in case you need to farm for bay leaves or olives.

The tree with the opening at the start of the next area to the right has an old woman who tells you that the oracle is speaking of a person, and that the first heart is the proof of his courage, the second heart is the power to undo the barrier, and the third heart is the start of a new ordeal. Near the end of the area, the woman in the last tree will tell you that the Staff of Fennel is in Attica. You'll be needing this staff.

Further to the right is another building. The door on the bottom floor takes you to Attica, but you don't want to go there yet. The man on the top floor tells you that in Peloponnesus, the power to jump and control fire will be necessary.

To the right of that house is yet another house. If you go inside and go to the right, you'll face Tauros, a bull. If you get close enough to him, he will rush at you. You can jump over the charge, but you can also hit him as he comes at you. He can re-spawn after he goes down, though, so watch out for him.

To the left of Tauros is the Temple of Arcadia. Go inside and go to the right, then kneel down with Down at the stairs to talk to Zeus. He will tell you that he has heard your story from Aphrodite and that you cannot use the power of Argus without the Sword of Hephaestos. Zeus will then call on the other gods to bless you with their powers. If you kneel near him again, you'll get a password. Be sure to write it down, as ridiculously complex as it is.

After fighting (or jumping over) Tauros and leaving the area, you can finally go to Attica.

Attica


The tiny purple creatures are spear-throwing bears. They will run up to you and stand there before throwing a spear and running away. Jump over the spear, since you don't have a working shield yet. If you can jump over the spear, duck down and hit them at this point, more power to you.

The first house has a woman who welcomes you to the city of Eleusis. She will tell you that Athens is a little further down the road.

The house to the right of that has a man who tells you of a large boulder that fell and blocked the pass to Phthia.

Between these houses is a flight of stairs. Go down it. To the right is a woman who tells you of Gaea, the monster created from a large boulder. Further down is another door with an old man who will tell you that his daughter's child was kidnapped by a monster before asking for your help, but you'll also have to deal with Satyrs. They will skip towards you, but you can easily hit them or jump over them. To the right of the old man's house is another door with a woman who tells you that because Gaea has fallen asleep, peace has come to Eleusis again. Further to the right still is another house, and the man there tells you that the shield of Athena is endowed with the power to repel your enemies' weapons.

Going right from that house takes you to another area with Spear Bears and Satyrs. The cave inside leads to Athens, and you'll want to go in there. You'll deal with a new enemy once you're there: scorpions. The scorpions stay low to the ground as they move back and forth on the ground, and they can speed up to run into you. Stay close and keep duck attacking to defeat them. If you need to, jump to avoid them.

The first house you'll see in Athens has an old man who will tell you that there is a god in Phthia that makes wonderful weapons.

Past the fountain is a woman who tells you that there is a crystal ball somewhere that allows you to see invisible things.

Further to the right is more houses. The first house belongs to a man named Keleos, who asks if you are searching for the Nymph before telling you that he can help you if you can prove who you are.

If you kneel down at the fountain to the right of this house, you can restore your health.

To the right of that fountain is another temple where you will meet Athena, the goddess of wisdom and war. She will give you a shield that will protect you from enemy attacks if you hold Down. Be sure to kneel down in front of her for another password.

PrinceWatercress plays Blood Omen: Legacy of Kain - Part 24 of 41


In this video, we explore Dark Eden and face some more members of the Circle of Nine.


1:15 - Use Repel as you go through this area; it will really help. There is a blood vial that you can get on the path. Once you're done here, you'll have the door to the east opened up.

4:26 - This feels like a mirror image of where we were earlier, albeit with different enemies.

6:22 - You can now go north once you go through the second teleporter. 

6:39 - I enter the left door first. When the enemies come at you, start swinging. Use the Mist Form to get the blood vial and rune triangle here.

7:26 - Hit the switch, then go through the door on the right. Watch out for the giant wall spikes as you go through here and get the blood vial

8:36 - After going through the now-opened center door, watch the spikes and spiked balls as you hit the switches. Use Repel to get to the last switch and exit to the north.

9:51 - The left door takes us to the Flesh Armor. This armor allows you to absorb the blood of the enemies that you fight, even if their blood is green or black. I just stick to the Chaos Armor. There is a rune triangle at the end of this path.

13:37 - The right door takes you to Spirit Death, which is like Control Mind but works on non-human enemies. Use your magic to get through the first part. There is another rune triangle at the end.

16:02 - Here, you will face Bane, DeJoule, Anarcrothe and Malek. Vorador shows up and fights Malek while everyone runs away and Kain gives chase.

17:46 - To beat Bane and DeJoule, you'll need to use Repel while you chase after Bane as he runs around and digs holes full of water into the ground and hit him with the Flame Sword. He'll eventually go down, and you'll be able to get his deer antler helmet as proof that you killed him. As for DeJoule, use Energy Bolt while Repel is active and shoot it at DeJoule. You'll soon be able to kill her and get her cloak. When you beat Bane and DeJoule, head east to the teleporter. You'll find out that Malek has been slain by Vorador and that Malek's helmet is intact. When you pick it and leave the room, you'll head to the Pillars of Nosgoth, where you can restore three more pillars. Now you must find Azimuth the Plains in Averness, but to do that, we must rise and we must fall, according to Ariel.

Saturday, February 25, 2023

PrinceWatercress plays Blood Omen: Legacy of Kain - Part 23 of 41


Our journey takes us to Dark Eden...and the area it is in is most inhospitable.


1:20 - The scarecrows. The flame sword works best on them. The crows can hurt you, but they have a limited range.

2:36 - There are two secrets where these pick-ups are (see below).

4:32 - The Hearts of Darkness human sacrifice in action.

6:33 - By going north of the village of Uschtenheim, we'll run into some new territory as well as some dangerous new enemies. Some of them are red humanoids who shoot spikes out of their bodies and cause a lot of pain, while the big slug enemies will poison your blood and force you to use an antidote. Use Implode to get rid of the slug enemies. Repel will work wonders here. We also get to look at the Signet Ring.

10:01 - A blood fountain! Your magic energy recovers even faster once you feed from here!

12:05 - A volcanic cave. Do not touch the lava while grabbing things; it will hurt you.  Use Control Mind on the enemy in the corner so you can trigger a switch. Hitting that switch triggers a secret (see below) and make it easier to get one more secret.

16:22 - We have made it to Dark Eden. There is a gate to the west, but it only opens during a full moon. Head north for now.

19:12 - The land has become twisted, but now there is lava. Also, there are a few human enemies around here in case you need to get some health. There are houses around here, but you cannot enter any of them.

24:06 - Using Control Mind to hit that switch makes it easier to get around and head further north.

26:36 - We are finally at Dark Eden. You won't be able to enter the nearby cave yet, so just enter Dark Eden and head west to save your game.

Secrets

75 and 76. - There are two secrets where these pick-ups are.

77. - A volcanic cave. Do not touch the lava while grabbing things; it will hurt you.  Use Control Mind on the enemy in the corner so you can trigger a switch. Hitting that switch triggers a secret and make it easier to get one more secret.

Friday, February 24, 2023

PrinceWatercress plays Blood Omen: Legacy of Kain - Part 22 of 41


In this entry, we head to Uschtenheim and find a few critical secrets.


0:39 - I go west first for a beacon, then I head east towards Uschtenheim. We also find Dark Eden in the distance, which we'll have to go to later.

3:07 - The Implode here hides a secret (see below). To the east is Uschtenheim.

7:52 - After exploring every other house here, I go to the one to the north of the sign. To open the door to the east, go back to Kain's Mausoluem with the Sanctuary spell, then head to the second mausoleum to the south. Go back to the puzzle that opened up the path to the exit and hit the right switch, then go back through Kain's Mausoleum with Sanctuary, then fly back to Uschtenheim and enter that house again. This time, the door to the east will be open. Approaching the teleporter activates a secret (see below), and the teleporter will take you to the spirit forge for the Heart of Darkness. As usual, approaching the path to the spirit forge triggers another secret.

If you leave through the main entrance, you'll find a gate to the east that only opens during the full moon. 

13:17 - You don't need to do this, but if you go to the pillars at this point, Ariel will tell you that the Circle have exiled themselves to the north and that Dark Eden is your next destination.

Secrets

72. - This Implode hides a secret.

73 and 74. - After exploring every other house here, I go to the one to the north of the sign. To open the door to the east, go back to Kain's Mausoluem with the Sancutary spell, then head to the second mausoleum to the south. Go back to the puzzle that opened up the path to the exit and hit the right switch, then go back through Kain's Mausoleum with Sanctuary, then fly back to Uschtenheim and enter that house again. This time, the door to the east will be open. Approaching the teleporter activates a secret, and the teleporter will take you to the spirit forge for the Heart of Darkness. As usual, approaching the path to the spirit forge triggers another secret.

Thursday, February 23, 2023

PrinceWatercress plays Blood Omen: Legacy of Kain - Part 21 of 41


In this entry, we finally meet Vorador, who wants us to embrace our vampirism and gives us his aid. This adventure is about to get a little more interesting.


0:43 - Have the Repel spell at the ready for the enemies in this room with the checkerboard floor. The purple demons spawn their own orange counterparts. Don't forget the blood vial and the magic refill!

1:46 - At the spikes, use your magic to destroy everyone, then head south. In the next room, use Control Mind on the woman on the balcony. Take her west and move into the panel on the wall. Press X to go back to playing as Kain, then continue south. Take out the demon and get the rune triangle, then continue west and take out the demons. Once again, Repel is useful here. Use the Mist Form to enter the northern door.

4:32 - Here, you'll get Blood Shower. With this spell, you can drink the blood of the two bandits and the two people chained to walls here to suck everyone's blood at once and open the door. 

5:54 - In the door to the north, you can some more blood from the people here. Feed off of everyone here with Blood Shower to open the door to the north.

7:51 - Be careful when you enter, as there will be enemies who will come at you. The panel on the north wall opens up a secret (see below): the doorway to the west. Going further leads to some Energy Bank and Heart of Darkness pick-ups as well as a magic refill. There is also a panel in the north wall that leads to another secret (see below). This opens a door to the east in the previous area. 

9:25 - Follow the spikes closely so you can pick up a ton of spells. The Mist form makes this easier.

10:46 - Here, we learn about the Serafan and the Vampire Purge from a nearby book. There is a switch to the east of the book that triggers a secret (see below), opening a door to the south. Use Control Mind on the human to the south, and take him south until you see a doorway to the west. Head there, then follow the path to the north. The glowing green light is a switch, this allows you to go further to the south. Follow the path and you'll end up in another area.

13:11 - To your immediate west at the start of this room is another secret panel hidden under some drapes. Walking up to it triggers secret #69 (nice; see below). From here, you're done with the guy you've possessed; you can go back to playing as Kain. Head to the north of where the book was to find more Flays and Hearts of Darkness.

15:05 - From here, head east, then take the doorway to the north. You'll find a save spire. Further to the north is Vorador, who tells Kain that he should embrace his vampirism before mentioning his past, where he talks about how he defeated Malek and took vengeance on the Circle of Nine for supporting the Serafan's vampire purge. The opening cutscene, which gets replayed here, now makes complete and total sense, as it is he who is put on the stake, but we also get more of the battle between Malek and Vorador. Vorador says that since his attack on the Circle of Nine, the vampires have not been bothered and only come out to feed, and warns Kain not to interfere with the affairs of man as Serafan are too tedious an affair to bother with. He then hands Kain a ring that allows Kain to summon him.

From here, pick up the ring at the north end of the table, then go through the grid-patterned panel on the north wall with the mist form. This is a secret (see below) that leads to some pick-ups. Watch out for the attractor, and use the mist form to walk on the water.

23:17 - As you go east from here, hit the panel on the northern wall of the exit room to find another secret (see below). To the north is another grid-patterned panel you pass through in mist form to find more pick-ups. From here, you can go south and follow the path to the exit. The teleporter will take you to another save spire and an exit to the south leading back outside.

Secrets

66 and 67. - The panel on the north wall opens up a door to the west leading to Energy Banks, Hearts of Darkness and a magic refill. There is also a panel on the north wall; you'll want to hit that for another secret. This opens a door to the east in the previous area.

68. - There is a switch to the east of this chronicle that opens a door to the south.

69. - In the northwest corner is a switch hidden by drapes. Walk into the northern wall in that corner to find the secret.

70. - This grid-pattern panel can be passed through with the mist form. On the other end is a chamber with a watery floor where you can grab some stuff.

71. - As you go east here, hit the panel on the northern wall in the exit room. You'll find another secret.

Wednesday, February 22, 2023

PrinceWatercress plays Blood Omen: Legacy of Kain - Part 20 of 41


Now that the item collection is out of the way, it's time to head to Vorador's Mansion.


3:48 - Here's a building I haven't entered yet.

4:03 - Once you're in here, you'll be able to find a new weapon...and it's a good one, too. Save your game here before you begin.

4:46 - Follow the path. Enter the south door. Fight off the enemies, then hit the red switches while leaving the green ones alone to reveal some stairs to the south. Once you reveal the stairs, hit the three switches below to open access to the Flame Sword, which sets enemies on fire instead of stunning them and is more powerful than the Iron Sword. As for the enemies that just stand there and lunge at you, you can fight them from a bit of a distance with the sword. Once you get the Flame Sword,, leave and go east.

8:16 - With the Flame Sword, you can kill zombies and tough human enemies.

8:45 - Once you hit this switch and immolate four more zombies, you're out of here.

10:31 - You could go east from where you got the Flame Sword and trek your way to Vorador's Mansion...

11:21 - ...or you could fly over there.

12:30 - Kane's brief description of Vorador's Mansion.

13:32 - Be ready for zombies as soon as you head north Go east and take out the next person, then use Control Mind on the person to the north and push the nearby switch. This opens up the path to the west. Switch back to Kain and head there. This triggers a secret (see below). Inside is some pick-ups, and if you walk through the wall to the east with mist form, you'll find a rune triangle. Grabbing the rune triangle triggers another secret (see below).

16:43 - By coming back to where we opened up the path to the path, we find out that everyone here is a vampire. Who knew?

17:16 - Use mist form to walk west through the spikes. There is a hidden switch behind the curtains next to the western-most pillar (which counts as a secret, see below). Go back east and enter the door to the north. This leads to another cool area with things to get.

19:36 - Look in the curtains to the west just north of here. You'll find another secret switch behind some curtains and another secret (see below). This opens a path back to the east that leads to a bunch of flays, a bunch of wolves and a full magic orb.

21:34 - After going through Vorador's "pantry" with the checkerboard floor, you can go east and end up here, where you can get the Chaos Armor. If anyone hurts you, that damage is reflected back on them, which makes fighting enemies easier, especially the teleporting enemy that is in the room.

The curtains north of where you found the Chaos Armor hide a switch (this counts as a secret; see below). Walk up to the curtains to reveal it, as always, then use Control Mind on the nearby enemy and take them through the door tot he north for some pick-ups and a blood vial. Just make sure you go clockwise around the room.

From here, you can press X and Control Mind that person again, then go into the nearby teleporter and hit the switch on the north wall to continue.

Secrets

61 and 62. - Be ready for zombies as soon as you head north Go east and take out the next person, then use Control Mind on the person to the north and push the nearby switch. This opens up the path to the west. Switch back to Kain and head there. This triggers a secret. Inside is some pick-ups, and if you walk through the wall to the east with mist form, you'll find a rune triangle. Grabbing the rune triangle triggers another secret.

63. - Use mist form to walk west through the spikes. There is a hidden switch behind the curtains next to the western-most pillar (which counts as a secret, see below). Go back east and enter the door to the north. This leads to another cool area with things to get.

64. - Look in the curtains to the west just north of here. You'll find another secret switch behind some curtains and another secret. This opens a path back to the east that leads to a bunch of flays, a bunch of wolves and a full magic orb.

65. - The curtains north of where you found the Chaos Armor hide a switch.

Tuesday, February 21, 2023

PrinceWatercress plays Blood Omen: Legacy of Kain - Part 19 of 41


It's time to wrap up the Lost City and get everything that's left before continuing the adventure.


0:26 - From here, leave and go to the building to the immediate east.

1:03 - Use Control Mind on the enemy to the west. Trigger the switch to the north and go further west to the teleporter and walk onto it. From here, do the same to the enemy on the east side. Hit the switch to the north, then continue east and onto the teleporter. You'll be in a different area. Go south to six Hearts of Darkness. Press X to play as Kain again. From here, you can enter the door to the north. This counts as two secrets (see below).

2:24 - Walk around this room in a circle, and watch the projectiles and the spikes as you do. You'll want to step on the buttons on the sides. This opens the door to the north. Before you touch the teleporter, touch the serpent statue on the north wall. This counts as three secrets (see below).

4:40 - Go south to the open archway. The tile in the center is a teleporter. From here, go all the way southeast for a human and some pick-ups, then go to the building north of here.

6:12 - There are some pick-ups here as well as a teleporter leading back to Nachtholm. Don't use that teleporter just yet. Instead, look around while avoid the traps for doorways. The first one is in the northwest corner. Each room not only has something different, but also an easy-to-find button that you can step on to open another room. This leads not only to eight different rooms with eight caches of different pick-ups, but also eight secrets (see below).

13:15 - I use Inspire Hate to get everything here a little more easily. From here, teleport back to the other archway...

15:12 - ...and enter this building.

15:35 - You don't need to go here, but if you do, you can use Implode on the enemies here to easily kill them, then go into the room to the north for pick-ups and humans to feed off.

Remember that teleporter from about ten minutes ago I told you not to touch? Go back to it and walk onto it to go back to the road leading to Nachtholm. You're done in the Lost City.

17:38 - From here, I head back to the area just before the Lost City. 

Secrets


48 and 49. - Use Control Mind on the enemy to the west. Trigger the switch to the north and go further west to the teleporter and walk onto it. From here, do the same to the enemy on the east side. Hit the switch to the north, then continue east and onto the teleporter. You'll be in a different area. Go south to six Hearts of Darkness. Press X to play as Kain again. From here, you can enter the door to the north. This counts as two secrets.

50, 51 and 52. - Walk around this room in a circle, and watch the projectiles and the spikes as you do. You'll want to step on the buttons on the sides. This opens the door to the north. Before you touch the teleporter, touch the serpent statue on the north wall. That counts as three secrets. 

53 - 60. - There are some pick-ups here as well as a teleporter leading back to Nachtholm. Don't use that teleporter just yet. Instead, look around while avoid the traps for doorways. The first one is in the northwest corner. Each room not only has something different, but also an easy-to-find button that you can step on to open another room. This leads not only to eight different rooms with eight caches of different pick-ups, but also eight secrets.

Monday, February 20, 2023

PrinceWatercress plays Blood Omen: Legacy of Kain - Part 18 of 41


We now take a shortcut to the Lost City of the Werewolves for a ton of secrets.


3:02 - We head straight west to head to...

3:23 - ...this teleporter. Going in leads to...

3:54 - ...the Lost City of the Werewolves. You'll only be able to enter this place under a full moon, and we're pretty close t one. From here, we wait.

8:17 - We're in. Watch out for werewolves as you make your way into a building to the immediate east.

9:23 - We need to open a door on the west side of this square-shaped hallway. The two buttons in the northwest and northeast corners of this icy rooms are secrets (see below).

10:39 - Be ready to beat up some enemies and open chests for items. There is a snake statue here; you'll want to walk into it to trigger a secret (see below).

12:31 - From here, leave the building, then go all the way south. From here, go east and enter the first building that you see. 

14:08 - Take the first east corner and walk into the serpent statue. From here, go west, then take out the Will 'o Wisps. Go to both ends of where the door is and hit both buttons that are ahead. They will open the door and they will count as secrets (see below).

15:46 - Hey, cool! A bunch of pick-ups. Just remember that the zombies here do get back up after you kill them with weapons.

17:37 - From here, enter the building to the immediate north.

18:36 - Hit the button near you when you enter for another secret. Use Control Mind on the soldier here and get him north past the moving spikes (watch them carefully) and the spiked ball to hit another button and trigger another secret.

20:15 - From here, you'll want to go south (assuming you didn't accidentally kill the guard and have to re-enter the room like I did and enter the now-open door to the east to find a teleporter. You'll have to enter it as the soldier, obviously.

20:44 - Follow the lit paths and step on the switches. There are seven of them in all, and they are all secrets. The teleporter at the end takes you to the top of the building for a few more pick-ups, and you can press X to switch back to Kain with everything you've collected here.

Secrets

33 and 34. - We need to open a door on the west side of this square-shaped hallway. The two buttons in the northwest and northeast corners of this icy rooms are secrets.

35. - Walking into this serpent statue triggers a secret.

36. - This serpent statue is a secret.

37 and 38. - The two switches on the sides here open the door here, and are secrets.

39. - Hit the button near you when you enter for another secret.

40. - Use Control Mind on the soldier here and get him north past the spikes (watch them carefully) and the spiked ball to hit another button and trigger another secret.

41 - 47. - Follow the lit paths and step on the switches. There are seven of them in all, and they are all secrets.

Sunday, February 19, 2023

PrinceWatercress plays Blood Omen: Legacy of Kain - Part 17 of 41


In this entry, I find a few secrets, and I don't even mention that some of the secrets are indeed secrets. This made things a pain in the butt making this blog entry (and future ones).


1:00 - Go north and get the Control Mind spell. The Control Mind spell lets you control enemies, allowing them to fight other enemies for you, toggle switches and even get things in areas that you can't get to. From here, take care of all the red skeletons but one to the west with Energy Bolt so you won't have to deal with them on the way to the Rune Triangle. When you have one skeleton left, throw Control Mind at it so you can make your way to the Rune Triangle.

Once you have control of the skeleton, enter the southwest hallway and watch out for the spiked balls and the floor spikes on the way to the switch itself. Toggle it to trigger a secret (see below), then you can get to the Rune Triangle. To release control of someone, either press X or get the person you're controlling killed. That's it.

As for the blood vial on the east end, kill all but one enemies, then Control Mind the sole survivor. Head west. You'll have to deal with a red skeleton, but you can easily circle around him if you know what you're doing. Get past the skeleton and hit the switch where the wall is glowing red to trigger a secret (see below), then go back and walk up the newly-spawned stairs so you can get the blood vial.

4:51 - After exiting through the doorway to the north, use Control Mind to hit the switch glowing red nearby. Follow the path, and when you see the hallway with the arrow traps in the walls, center yourself in the center of the hallway and throw Control Mind south so you hit an enemy. Grab the magic orb if you need it and hit the switch there.

There will be another enemy to your east. You'll need to hit him with Control Mind, then take him north past an axe trap in the wall to a Heart of Darkness. Believe it or not, this is a secret (see below).

6:28 - By going back to the first room and going up the northern stairs, you'll find another enemy near a switch. This will close the doorway to the north, but open the entrance. Toggle the switch again to return these doorways to the way that they originally were. We won't be messing with this switch.

6:47 - When you enter this room, stay where you are and throw Energy Bolt straight to the north. This triggers a secret. From here, take out all the enemies on the west end but one and throw Control Mind at the sole survivor.

There is a hallway to the north there. Take the enemy through it and watch out for the floor spikes and the arrow traps. Hit the switch there. This opens up a path to a teleporter. The teleporter is a back door to the spirit forge for Energy Bank, and making your way to it triggers a secret as per usual (see below).

If you take an enemy to the forge instead of Kain, you'll get 99 Energy Banks. This works with all the spirit forges.

If you go south as Kain, you'll end up back on the outside near the swamp. Thankfully, you can re-enter by going through the crack in mist form. Walking into the Energy Bank pick-up counts as a secret (see below).

11:03 - Now for the east end. Do the same as what you did on the east side, and watch out for the skeletons as you hit the switch. This will help open the teleporter to the north of the entrance to this room. Get in.

12:06 - You'll be at the spirit forge for Anti-Toxin. I should have used a human for this. Being here counts as a secret (see below). Once you go south from here, you'll be out.

Secrets

25. - This switch that helps you get to the rune triangle is a secret.

26. - This switch that helps you get to the blood vial is a secret.

27. - The Heart of Darkness that is here is a secret. You'll need to hit the knife-throwing enemy here with Control Mind to get it.

28. - When you enter this room, stay where you are and throw Energy Bolt straight to the north. This triggers a secret.

29, 30 and 31. - This path - and its switch - leads to a backdoor entrance to the spirit forge for Energy Bank. The switch is the first secret. Going forward towards the forge for an energy bank triggers the second.

There is another secret involved with this. Believe it or not, the outside entrance - the crack in the wall in the southeast part of the swamp where we are finding all these new things for our journey - is another secret. Run into the Energy Bank pick-up to trip a switch and get the secret. (thanks Lumpz the Clown)

32. - Hitting the button in front of the Anti-Toxin spirit forge entrance counts as a secret.

Saturday, February 18, 2023

PrinceWatercress plays Blood Omen: Legacy of Kain - Part 16 of 41


Our journey takes us into the swamps. Before heading to Vorador's Mansion, we do some exploration...and boy, is it going to pay off!


1:02 - We find Vorador's Mansion. We could teleport there or we could travel there by foot. Time to use the Mist form and travel to the dry land southwest. Watch out for the cannon and the poison spewing plants.

3:49 - The light green land in the swamps is safe, but the dark green land is poisonous swamp water that will eat away at your health until you use the Mist form. Also, the zombies here will pull themselves together when you kill them unless you use a specific weapon.

4:19 - Just south of where we entered is another blood fountain. This fountain will give you the second of three strength upgrades.

5:48 - Southeast of the blood fountain is a building where you can get the Blood Gout spell. Hit the switch to the north to continue on.

6:52 - Blood Gout allows you to throw your own blood on enemies to feed on them from a far distance. This will allow you to suck the blood of the people chained to the wall at the far ends here at the expense of some magic power, and this also opens the door to the south.

7:35 - More fun with Blood Gout. If you turn your blood green from hitting the blogs, use an Anti-Toxin. As for the path to the south, watch the spikes to see where to go when. Take out all the chained humans to open a door to the southeast.

10:44 - Use the Mist form to get past the spikes, and use your Flays to blow past all the enemies. There's a Blood Vial and a Rune Triangle in here as well; be sure to get them as you beat up the monsters and open the path to the teleporter.

14:27 - Northeast of the Blood Gout building, you can get the Control Mind spell. But we'll handle that in the next video...

Friday, February 17, 2023

PrinceWatercress plays Blood Omen: Legacy of Kain - Part 15 of 41


In this entry, we get the Mist form, which makes backtracking for some secrets easier...and a lot more fun.


1:38 - By repeatedly pressing the Square button, you can easily destroy the zombies here. Also, the shots that come out of these cannons have a purple glow.

2:41 - Another beacon.

3:07 - Uschtenheim is to the west. We'll need to head there eventually. For now, get in the nearby building...

3:49 - ...to get the mist spell, which turns you into mist and allows you to walk on water. You can access this spell with the Triangle button. You can pass through the wooden bars between the doors with no problem, and you can also go through physical weapons. Magical projectiles can still hurt you.

There are attractors that can drag you towards them, but if you keep moving away from them, you'll eventually break free

6:07 - You have only one shot to do this. Walk through the cracked wall to get a blood vial and a rune triangle.

6:47 - Use the Repel spell to take out the two demons here.

8:14 - Spikes cannot harm you in mist form. Turn the mist form off to get past the attractors.

8:48 - Take out the ghosts to hit the switch and exit. Once you're back at the beginning, you're locked out, which is bad if you missed the blood vial and the rune triangle.

Secrets

23. - There is a cave you can get to in the north end of Nachtholm with Mist. Pushing the rock out of the way so you can enter the teleporter gives you another secret and a bunch of things to pick-up.

24. - Go into mist form in this corner of Vasserburne and traveling southeast down the river will take you to another secret, where you can find another rune triangle.