I just now remembered that I saw these as a kid.
Friday, July 31, 2020
PrinceWatercress plays Gex: Enter The Gecko - Part 10 of 25
It's time to start going through some gates, and this time around, we tear through a level in one video.
The Media Dimension
We got quite a bit done last time, but before going through the red gate, we go through the green gate and find Gexzilla vs. Mecharez, which is another boss level we have yet to access. Behind that portal, however, are three new areas: Poltergex, Honey I Shrunk The Gecko and This Old Cave.
Now that this is settled, let's head back to the red gate area. One of the levels here is Fine Tooning. We'll be going there first.
Fine Tooning
Since this is another cartoon level, there will be plenty of familiar things here.
3:27 - I finally had it with the camera and I switched straight to Manual. Now I have total control. Also, the nearby switch that looks like the high striker at the funfair moves the block around when you tail whip it. Also, the shadows underneath the nearby tree are tokens. Jump for them.
4:15 - These dominoes don't hurt you, but they still push you back. Tail whip to get through them.
5:10 - When you go up this hill, boulders that look like white bowling balls will drop down. Be ready to avoid them as they drop from right to left.
5:37 - There is a pit that you can drop down into after this. You'll have to take out the scorpions to make getting around easier, and you'll have to move the blocks with the three high striker switches to get out. They will move back to their original position after a few seconds, so be quick about it.
6:20 - Now that we're using the platforms, we'll have to watch out for the blocks that expand and contract out of existence. As long as you keep running and jumping at the edge of the eternally spawning platforms, you'll be able to make it across. Be sure to hit the checkpoint.
7:01 - Be ready to long jump here so you can hit the high striker switch. This opens a path across the stream to the ship.
7:59 - Hit the high striker switches to access these tilting steel beam platforms. They will take you to an area high in the sky where you can get a shortcut back to the ship. Just hit the high striker switch and drop down the well. You'll come out through the other one that you saw earlier.
10:00 - The spinning blocks lead to these four blocks that move back and forth. At the top is a door, and this time, it's duck season to Tooned In's rabbit season. Once again, you're beating up hunters and taking tokens from them. Check trees and bushes, as always.
11:51 - You'll have to carefully cross this log that is rolling back and forth if you want to explore the rest of the area. I usually just tail bounce in the same direction as the log as it goes to the left.
13:47 - After going through a log tunnel, we finally get the first red remote ("Climb The Tree"). Be sure to press the Triangle button to zoom in and out if you need to.
19:13 - Remember the well from earlier? Time to use it. By coming out at the other end, the ship will no longer be encased in glass. By jumping onto the ship, you'll be whisked away to another area.
19:47 - Get on the platform above the deck of the ship, then leap onto the dock and hit the high striker switch. This opens up the castle.
19:59 - Go off to the left side and travel the perimeter of the castle. You'll find the hidden silver remote. The translucent wall takes you back into the castle.
20:32 - By using the fire power-up, you can light the fuse on the giant firecracker by holding Square and walking around. This causes fire to cover the ground you walk on, and if you walk in a circle, you can create a fire blast that can destroy enemies and give you even more collectibles. Use the Square button trick on the fuse, you can light the fuse, and the music will change to reflect this. Tail bounce onto the firecracker and you'll be sent to the other red remote.
The Spy Who Loved Himself is now unlocked.
Thursday, July 30, 2020
PrinceWatercress plays Gex: Enter The Gecko - Part 9 of 25
In this entry, we face our second boss, then tackle a level with a prehistoric theme.
In Drag Net
For this stage, you'll have to find 50 police badges in three minutes.
Collect the badges on the ground first, then use the ramps that go up and down to explore the balconies for more badges. You'll have to swing down ropes in order to switch sides and also reach platforms that you wouldn't normally be able to reach. Use your camera to look around and find all the ropes. When you get all the badges, get to the subway to get the gold remote.
After this, I unlock Lava Dabba Doo after grabbing four gold remotes. But first...Mooshoo Pork.
Mooshoo Pork
Run around the room so that Mooshoo chases you. Hit the switch before he reaches you, and if you time it right, you'll zap Mooshoo. If Mooshoo hits the switch, jump to avoid the electric shocks that travel across the room.
After two hits, the grates at the side will disappear, so you'll have to jump at every gap instead of just the one. After one more hit, Mooshoo is (well-)done. You'll get a gold remote and you'll unlock the red gates where more levels await.
The Media Dimension
7:28 - By climbing up this wall, we can jump onto a platform and access three hidden levels, one of which is Lava Dabba Doo. We will need more gold remotes for the other two.
Lava Dabba Doo
The tokens for the Prehistoric channel stages are drumsticks, cow skulls, and tiny dinosaurs
8:24 - Avoid the lava - and the flame jets - and take down spides as you work on getting some tokens.
8:54 - Time to jump on some platforms...and the camera here is super-close.
9:35 - At the top, you'll enter a door way that leads to some boulders. Alternate between both sides of the gap to avoid being squashed by the boulders...
10:14 - ...and you'll end up here. Beat up the dancing egg for tokens, then get on the gray sticky wall to continue on. Watch out for lava dragons as you get on the wall and lava droplets as you continue on.
11:18 - I don't know what he's mad about, so keep whacking him with your tail for tokens and move on.
11:59 - Tail whip the rib cage bones to get past them. There will be a small gray sticky wall afterwards to the left; long jump to it and you'll find the rest of the level.
12:43 - Time to climb another gray sticky wall. If you jump at the "Drop Zone" picture, you'll land someplace safe. Drop when you're on the top of the arch's ceiling.
13:38 - That way, you'll end up here. This time, you'll have to ride on rafts to get to the other side. Break the ribcage bones if they get in your way, and look our for gray sticky walls you can stick to and walk on.
15:05 - Well, that was talented.
15:51 - Now you'll have to leap off the rafts before they go down the waterfall.
18:07 - Look towards the lava and wait for a raft here. You'll have to run all the way to the edge and leap to get to the next one.
18:44 - You'll need to tailbounce on these Super Mario Bros. 2 rafts at the outer edge to get further up this waterfall. It takes me a while to figure this out...and get back to the waterfall.
21:26 - Finally. Now we can get the red remote here.
PrinceWatercress plays Gex: Enter The Gecko - Part 8 of 25
In this entry, we spend more time in the computer world in order to get those remotes and finish up www.dotcom.com.
2:14 - Here is the path to the portal leading to the next section for the other red remote. You'll need the green light to activate the data bus bridges, which won't stay lit - and navigable - forever.
2:40 - Here, you'll have to jump gaps and use the purple spark to see where the platforms are without getting hurt. If you fall into the pit, you go back to the beginning.
3:41 - Finally! A checkpoint! When you activate a data bus bridge, the camera automatically moves so you can tell where you're supposed to cross. Watch out for the mouse-like droid near the end of this section and be ready to tail whip it.
4:52 - What to do if you drop down in this section, and how to use the platform. Tail whip the magnet holding the spinning elevator as the platform is moving at the angle you want it to move, and you'll get the best results.
6:52 - The green platforms must be powered by the green light, so you'll have to absorb it to use it. You'll have to be quick to get to the green light halfway through, so you can go up here for the other red remote.
The rest of the video is me getting collectible tokens throughout both red remote routes to get the reward remote.
Wednesday, July 29, 2020
PrinceWatercress plays Gex: Enter The Gecko - Part 7 of 25
This level has given us some trouble, but not for long.
1:46 - We haven't been here before.
2:04 - On second thought, let's go this way.
2:49 - This time around on the sticky wall, we make it to a door. It should be mentioned that the spiky enemies will not knock you off if they hit you.
3:46 - After a long jump to another door, we have some narrow platforms leading to a fake wall with more tokens behind it as well as another door.
4:27 - This door leads to the central hub where all three remotes are located. This is the one for "Stick Across The Ceiling Maze," which is the third red remote. Combined with all the tokens we picked up, that's two remotes down and three to go.
Moo Shoo Pork's boss stage is unlocked, but we have more work to do here.
6:13 - Time to go through the red door.
6:33 - By jumping to where this red panel is and walking through it, we'll find the hidden silver remote.
6:53 - We've been here before, too. On the way to the left is another area we can land. This leads to another climbable wall.
7:38 - At the top is a whole new area to explore.
7:57 - At the nearby door is more platforming. By going down and exploring where the purple tiles are, we end up...
8:37 - ...here. Morgue cabinets move back and forth, and you'll have to make your way across them to get an extra life. Thankfully, we haven't gone far.
10:26 - By doing some platforming, we get another red remote ("Head Down The Ramp").
13:52 - Time to come back here again. Going up the ramp takes you to a bunch of axes to avoid and the last red remote ("Run The Axe Gauntlet").
The Media Dimension
For the remainder of the video, I check out www.dotcom.com.
www.dotcom.com
Tokens for the computer stages are 9V batteries, red LEDs, and atoms.
15:47 - You have jumping transistors that act as enemies. The green lights will activate bridges wherever there are green platforms at end of certain places, and you can also use the green trampoline pads while you are enveloped in green light. The green light does not last for long, and the music will change while you have it. Yellow walls are sticky and can be climbed on.
18:45 - This portal takes us to another area. The purple orbs trail across these bridges, and you can use them as a hint as to where to go. These orbs will damage you if they touch you, however.
20:19 - Once you reach the portal at the other end, you'll have to use the green light to use the trampolines. Droids will fly around. and you can tail whip them for tokens. If you look around in this area, you'll find the hidden silver remote. At the top is one of the two red remotes. Just be ready to beat up the robot you see at the top. We've got the tower taken care of; now it's time to cross the data bus bridges.
After this, In Drag Net - another bonus stage - will be unlocked.
PrinceWatercress plays Gex: Enter The Gecko - Part 6 of 25
After defeating the dragon in Mao Tse Tongue, we tackle the horror theme again with a maze of a bonus level followed by the toughest level in the game so far.
The beginning of this video is me defeating the dragon. Once you beat the dragon, a pair of doors open and you can easily get the other red remote inside.
The Media Dimension
We've unlocked another bonus area: Thursday The 12th.
Thursday The 12th
3:25 - Here, you'll have to find all the tokens in the given time. However, this one is a bit of a maze.
The proper path is the second door, the third door, the third door (watch out for the chandelier as you move back and forth to and from this door!), the third door, the third door on the upstairs part, the double doors on the right (watch out for the chandelier on the other side!), the third door, the first door (the third here takes you to an extra life), the fourth door (watch out with the chandelier on the way to this door as well as the one on the other side), the first door (the second game contains an extra life), and the first door (be sure to drop down for the last few tokens). (All doors are counted from left to right.)
7:00 - The successful run.
Next up is Frankensteinfeld, another horror film-themed stage that comes almost right after the first one.
Frankensteinfeld
11:29 - There are two doors at the beginning, and each one takes you to a certain red remote. You can also jump at the start for some free tokens.
12:14 - The "green door" takes you here. The trail here has a couple of enemies, and the flashing purple floor will damage you if you touch it.
12:37 - The wall with the window is a fake wall that acts as a secret passage. This leads to a couple of tokens.
13:36 - The phantasm at the top of this slope throws skulls downwards much like Donkey Kong throws barrels. It can be taken down with a tail whip.
13:51 - You have to long jump to reach this climbable wall. It leads to a 1-Up, and you'll have to press X to get to it once you're above it.
16:51 - Once you drop down to the 1-Up, there will be more to explore.
18:01 - By heading in the other direction after the Donkey Kong ghost, we get another Chucky doll.
18:28 - ...and we're soon back to where we were if went to the right.
19:12 - Another climbable wall. You'll have to go through this wall maze - and avoid the spiky star enemies that move back and forth - to get one of the red remotes.
20:17 - Well, that was a dumb drop.
Tuesday, July 28, 2020
CGR Undertow reviews Gex: Enter The Gecko (Nintendo 64 version)
It's the other console version, but it checks out.
PrinceWatercress plays Gex: Enter The Gecko - Part 5 of 25
We spend some more time in the Kung Fu level for this entry as we create a new word for "B.S." (I think) and take advantage of losing a life to get the reward remote.
3:35 - By tail bouncing to the right on the second - and holding Down and Right to get to the roof, you can find a wall you can break with a tail whip to find a hidden remote. Also, walk across the roof to find more walls with tokens behind them.
5:10 - On second thought, "bake sale" sounded better.
8:27 - When you die, you keep all your collectible tokens and enemies can re-spawn, allowing for the collection of more tokens. Also, power-ups such as health pick-ups and extra lives also re-spawn, so you can get those again, too.
14:06 - Got the reward remote. Love how the cutscene stops for me.
17:50 - Now it's finally time to go through this door. By climbing up the golden wall...
18:36 - ...it's time for some cannonball fun. We can move the cannon by waking into it and shoot cannonballs by tail whipping the cannon. Hit the gongs with the cannon to go...
19:04 - ...here. The path to the left leads to another golden wall.
20:05 - On the other side is this chamber. The scorpions can be a pain in the butt, but if you let them come to you, tail whip them, then tail bounce onto them, you'll take them out. Also, watch out for the flame-spewing Son Goku heads.
22:02 - With some yin-yang tile jumps, we can jump into the ropes to slide from one platform to another.
22:42 - After another rope...
23:21 - ...we have to fight a whole bunch of ninjas before triggering a platform leading to some golden walls. Go to the underside of the golden wall area to face the dragon.
24:58 - By staying near the cannon, the dragon should not be able to hit you. Just stand next to the side of the cannon and keep rotating. If you hear the dragon screech, you hit it. Keep hitting it so that it is eventually nothing, and you'll get the remote.
Monday, July 27, 2020
PrinceWatercress plays Gex: Enter The Gecko - Part 4 of 25
In this entry, we take on our first bonus area and our first boss, then go hunting for more remote as we revisit the Kung Fu flick theme from the last video.
The first seven-and-a-half minutes is just me getting the last red remote in Smellraiser. We've already seen that before.
Aztec 2-Step
8:10 - For this stage, you'll have to collect fifty gems in three minutes. Use the camera to look around and jump on raised tiles to open up other areas and find more gems. Once you collect all the gems, you'll have to get the gold remote, and the clock will still keep counting down during the cutscene and the trek to the remote.
The Media Dimension
You'll need three red remotes to enter Gilligex Isle, but once you do, you'll take on your first boss. Rez will taunt you before you enter the level.
Gilligex Isle
Tail whip the blue fireballs back at the tiki brothers after lining yourself up with them, and jump over the fire walls that they create. If they bounce off the statues, it doesn't count. After sending all three tiki brothers into the pot nearby, you'll get a gold remote and open up a gate leading to more of the Media Dimension.
The Media Dimension
As you move around, you'll find static-filled monitors for levels you don't have enough red remotes for. The next stage to get covered it Mao Tse Tongue.
Mao Tse Tongue
The token tiers for the kung-fu flick-themed levels are take-out noodles, yin-yang symbols
17:28 - We'll be breaking windows and fighting ninjas with swords up close on our way to one of the remotes. You'll have to be patient to ride on the spinning platforms. By hitting gongs, you'll open up paths. By jumping on the yin-yang titles, you can bounce higher than usual and reach platforms you sometimes normally couldn't.
18:58 - These statues will attack you when you get close, Tail whip them in the head to decapitate them, then hit them again to get rid of them
19:46 - By accidentally dropping down to the start, breaking this window and entering the doors...
20:05 - ...you'll end up here. The vases contain tokens, and the gold panels are climbable walls.
21:07 - Obviously, you don't want to run into these swinging guillotines. After walking across some different-looking titles that fall when we walk on them, we fight off a red ninja who tosses shurikens before sticking to this tile and being turned over to the other side.
21:37 - By hitting this gong, we get some platforms to rise up out of the floor.
21:48 - The floating Son Guku head here is much like the floating skull in Smellraiser. Wait for it to stop spitting fire, then make your move. Interestingly, tail bouncing into it destroys it.
22:13 - With the nearby yin-yang titles, you can leap up here and hit the gong to go through the next set of doors.
22:27 - It's time to fight some ninjas! Once you beat them up, you'll uncover some yin-yang tiles. Hit the two gongs to uncover another secret tile.
24:29 - After walking across the carpet and climbing on the wall with the help of the yin-yang tiles, you'll have to jump from one teetering platform to another to get to the red remote ("Traverse The Rocking Pillars") at the end.
PrinceWatercress plays Gex: Enter The Gecko - Part 3 of 25
Now that we're done with Out Of Toon, it's time to tackle another level theme and head to Smellraiser.
The Media Dimension
On the opposite end of where we entered Out Of Toon, we find the other stage we can enter at the beginning: Smellraiser.
Smellraiser
The token tiers for the horror stages are skulls, tombstones and hockey masks.
1:26 - By selecting the third red remote, "Ride The Haunted Elevator," you'll find out where the stage's hidden remote is.
2:28 - When you enter this room, you'll start seeing enemies such as the jumping jack-'o-lanterns that can be easily tail whipped.
2:39 - You'll also see one of the climbable walls in this level. Again, just move into it to climb up. When you climb to the top, you'll move up to the top and you'll be able to move around normally again. At the top here is a face that moves in and out of the wall and acts as an enemy.
3:03 - By jumping onto the table we saw when we first entered this room, we can approach the platforms high above the room. Besides the first of the five blood coolers that you can destroy with the tail whip (and also get tokens out of), there is a TV with the red background allows Gex to be set on fire. If you run with this power-up, you can leave a trail of fire that can hurt enemies. This effect does not last long.
\
4:27 - In this next room, you'll meet the zombies that lose multiple limbs to kill and drop tokens every time they are hit. Also, there will be suits of armor that drop their axes in an attempt to cut you in half. Avoid them.
5:16 - When you use the small chandeliers here as platforms, the chandeliers will drop after a second. Also, the second blood cooler is on the other side. You can also move the bookshelf by walking into it to find a hidden switch that will activate the elevator. Tail whip it to turn the elevator on.
5:50 - The next room is just nearby. Here, you'll always get this unskippable cutscene of Gex looking at a sign. Pay attention to the "Step into the light" sign, as it helps you deal with a specific enemy...
6:23 - ...and here it is. Stepping into the red light turns it green, and the ghost cannot harm you until you step out and it turns red,
7:03 - The third blood cooler will be in a corner of this large room.
7:35 - Wait for this skull to stop spitting fire before moving on. You can actually tail whip it for tokens, believe it or not.
7:58 - When you enter this room, rotate the camera so you can see the door. You'll find the fourth blood cooler. The rest of the room is a large, flooded bathroom.
8:43 - Avoid the axes, and you'll soon be able to reach the rest of the room
9:23 - This murderous doll (obviously a Chucky reference) takes multiple tail whips to destroy. Destroy the head afterwards for tokens.
9:45 - This table phases in and out of existence. Time your jumps to get to the other side.
9:56 - Ahead is the first remote. The elevator is to the left. Because we hit the switch behind the bookshelf, the elevator goes down immediately, and the pictures become a reference to the Haunted Mansion in Walt Disney World.
10:29 - When you go all the way down, there's the third red remote. Don't forget to drop down for the hidden remote!
12:06 - We just unlocked out first bonus area, Aztec 2-Step!
12:23 - Well, we know where the fifth blood cooler is: right next to the first red remote.
19:08 - To reach it, you'll have to jump on platforms to the top of the room. After breaking all five blood coolers, the red remote for them all will pop up where you found the third cooler.
Sunday, July 26, 2020
PrinceWatercress plays Gex: Enter The Gecko - Part 2 of 25
We explore more of Out of Toon in this video, and it's pretty darn wacky.
5:28 - After getting a couple of extra lives, we enter the rabbit hole again.
The bear traps do hurt, by the way. The main enemy here is the Elmer Fudd-like hunters. Tail bounce on them a couple of times to defeat them, and watch out for the bullets they shoot that home in on you. When you defeat both Elmer Fudd enemies here, you can get the red remote here.
11:30 - For some reason, the game just loves removing tokens in the nearby vicinity when you go up a tier. Also, tokens will sometimes be in new locations after you reach a certain tier.
19:14 - We make it to the second rabbit hole. This takes us to a desert area
20:00 - The TV with the checkerboard pattern is a checkpoint. Break it, and you won't have to go back to the very beginning of a level if you die.
20:48 - The wind will push you back if you get caught in it. Also the stream here has a strong current, so jump around if you're getting all the tokens here.
22:45 - If you leap into the slimy part of the wall, Gex will climb on it. You can move in eight directions on sticky surfaces with the Control Pad, and you can press the jump button to hop off. Unlike the first game, you can only stick to certain surfaces.
After this tunnel is the desert. The cacti will hurt you if you run into them, and the platforms near the train tracks do tilt, especially the big one near the end, so be careful getting the remote here.
25:45 - When we come back, we unlock Gilligex Isle, which is the first boss stage. There's more we want to do, however...
PrinceWatercress plays Gex: Enter The Gecko - Part 1 of 25
Gex is back...and this time, he's in 3-D and the action is wackier than last time.
Remember when I did the timestamps waaaaaaay back when I did the original Turok trilogy? Yeah, I'm resorting to those again.
0:40 - Here's the intro.
4:01 - Here's the (default) controls. Tail Whip is Square, Jump is X and Eat Bug is Circle. The Control Pad obviously lets you move around. I'll be sticking to these.
The Media Dimension
4:57 - As soon as we start the game, there are three types of camera. There is Semi-automatic, which allows the game to move the camera to the best angle at times; there is Automatic, which gives full camera control to the game; and there is Manual, which gives you total control of the camera. I eventually end up switching to Manual.
5:34 - By tail-whipping the diamonds with the question marks in them, you'll get gameplay hints. L1 and R1 allow you to rotate the camera.
5:48 - Well, that's obvious.
6:03 - In case you want to change cameras, you can pause the game and use Left and Right on the Control Pad to select between the three aforementioned choices. Like in Super Mario 64, you must be at a complete stop when you pause to do it.
6:27 - Holding the Triangle button allows you to go into first-person mode. While holding the button down, use the Control Pad to look around. Let go of Triangle to get out of first-person mode.
6:40 - Holding L2 or R2 and jumping while in motion allows you to perform a flying karate kick that doubles as a long jump. Remember this well and remember this now, because you're going to need it to get through the game.
7:06 - It's time to handle our first level, Out Of Toon. To enter a level, just jump onto the green button in front of a TV.
When we head over there, we'll get a choice of three red remotes. By selecting a remote, we get a short cutscene of where we have to go to get the remote. Pay attention to it so you don't forget. Even if you pick a remote, you are free to get the other two at any time if you wish.
The first one I pick is "Whack Five Purple Mushrooms," since it's the easiest of the three.
Out Of Toon
7:43 - The first purple mushroom is behind you at the start; don't miss it. Just tail bounce on it to get credit for it. To tail bounce, press and hold X while in mid-air to do a tail bounce. This will allow you to defeat enemies and also bounce to some platforms. Keep pressing X with the proper timing to keep tail bouncing.
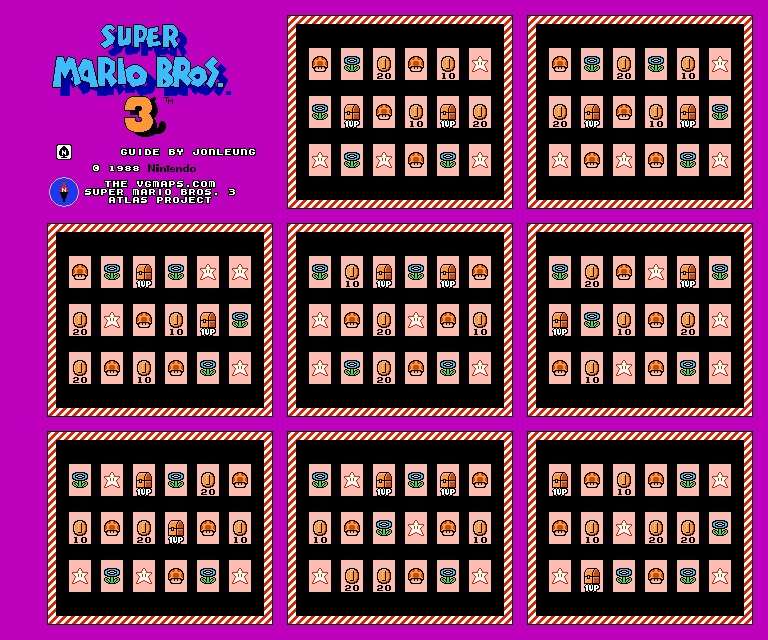
7:59 - The collectible tokens for each stage. There are three tiers of collectibles, and they are all different depending on which genre of entertainment your current stage happens to be in. When you collect 30 of the first tier, you'll get an extra life and go to the second tier; when you collect 40 of the second tier, you'll get an extra life and go to the third tier; when you collect 50 of the third tier, you'll get an extra life and a hidden (silver) remote. You'll need remotes to enter stages and clear the game. If you collect another multiple of 50 tokens of the third tier, you'll keep getting extra lives. The tiers for the cartoon stages are carrots, spinach cans and dynamite plungers.
8:18 - The second purple mushroom.
8:55 - Watch out here, the wall with the outline of the cartoon character on it will push you off the edge.
9:09 - Watch out in the areas with the checkerboard pattern on the ground; falling objects will hit you if you do not stay on the move.
You have four hit points, and if you lose all of them, you'll lose a life. Look for a monitor with a green background and a fly on it to recover lost hit points.
9:28 - Attack enemies for tokens. The bee just flies around.
9:33 - This yellow thing with eyes and a mouth gives you tokens if you tail bounce on it. Also, check the thin trees for tokens.
10:01 - The rainbows act as platforms, in case that isn't obvious. Also, the piranhas can hurt you if you touch them; thankfully, hitting them nets you tokens.
10:25 - The third purple mushroom. Also, the yellow flowers can be stunned temporarily. The red mushrooms give tokens when tail bounced.
10:57 - The fourth purple mushroom.
11:20 - Believe it or not, this snowy area is where you can find a hidden silver remote. After sliding around for tokens, you can use the wall that slides in and out to bounce to a platform where the silver remote is.
11:53 - This huge steel beam acts like a see-saw when you move across it. On the other side is the fifth and final purple mushroom. Tail whip the bouncing happy ball to defeat it and get its tokens.
It should be mentioned at this point that Gex can grab onto the edges of platforms with his tongue if he falls just short of reacing the edge of a platform.
12:18 - We finally destroyed all five purple mushrooms, so this television with the button that we saw on the way up is now operational. By jumping on the green button, we also get the remote and passage back to the Media Dimension.
12:56 - Here's one of the monitors I mentioned earlier. This one is a green background with a fly on it. If you whack the monitor with a tail whip or tail bounce, the fly will come out. You can eat it to replace one hit point, but you can also approach it to have it fly around and act as a shield if you want.
13:25 - This carrot patch is a good source of tokens, which is good, since we want the hidden red remote. Tokens can phase through the walls, though, so be careful.
13:54 - Hit the stop sign multiple times for tokens.
14:31 - By activating the purple mushrooms remote, this platform now goes up and down. This will allow us easier access to the "hunter and wabbit" section, where we can get another of the red remotes. Just jump ito the hole, and you'll appear in the section wearing a pink rabbit suit. Attack the mailbox for tokens.
15:15 - The purple TV with a fly on it. This gives you an extra life if you eat the fly.
15:44 - Time to grab that red remote we worked hard for earlier. When we do this, we'll get a results screen which tells us about everything we've collected so far before going back to the Media Dimension. From there, you can save your game, see your stats and also see your password if you're not saving on a memory card.
Saturday, July 25, 2020
[YTP] Rick Assley Gives Up On Everything (by @Silvanatorr20)
Look, there's not a lot for this game and I NEED AN EPILOGUE OKAY
PrinceWatercress plays Aerial Assault (Game Gear) - Part 4 of 4
After the third mission, the rest of the game is thankfully easier.
Last Battle
The orange planes will shoot lasers, the eye robots will just fly forward, the green ships will move in sine wave patterns while firing small rings at you, and the asteroids will move forward either straight or at an angle while giving you a ton of points for destroying them.
Thankfully, there is no such thing as floors, walls and ceilings in this fourth and final mission.
The boss here is some sort of face thing. Stay away from the face - and its ever-protruding nose. Avoid the eye waves and the nose lasers, and shoot down the red asteroids the boss creates as quickly as possible before it splits into three fireballs that travel downwards. If you can, shoot the nose down first to weaken the boss.
Every so often, the boss will become invisible, and you'll have to wait for the boss to re-appear before you can deal damage again. Keep firing in the meantime to shoot down those red asteroids as quickly as possible.
Once you've beaten the boss here, you've won!

Friday, July 24, 2020
PrinceWatercress plays Aerial Assault (Game Gear) - Part 3 of 4
Round 3 is the hardest round of all, as it introduces a new hazard: floors, walls and ceilings. This one took some effort to make happen.
Round 3-1
For this stage, there will be floors, walls and ceilings. Not surprisingly, there will be floor and ceiling turrets that move back and forth while shooting out green balls that bounce off surfaces three times before disappearing. These projectiles alone make these turret enemies the absolute worst in the game. It should also not be surprising that the entire third stage is the only stage in the game with walls, floors and ceilings whatsoever.
The orange mines can be destroyed easily, as can the tiles moving forward, the bouncing things that look like miniature staplers and the robots that walk forwards on the ground.
When you see the glowing red fence in the background, you're close to the end.
Round 3-2
The spaces here are even more confined, and this time around, you also have walls. If you have the five-way shot, keep on firing and make it so that you can take out a turret before it shows up on-screen and shoots a ball at you. If you have anything less than that for your gun, you're going to be doing a lot of dodging. Make sure you have a barrier to absorb some shots, too. There will be two opportunities to get one near the end.
When you see the square walls in the center of the corridor, take the low road to avoid beng shot at.
To beat the boss, stay above the ship and shoot down the turret first. Once that's down, stay above the ship and the lasers to take the boss down.
Thursday, July 23, 2020
PrinceWatercress plays Aerial Assault (Game Gear) - Part 2 of 4
Compared to the first round, the second round is much shorter.
Round 2
It's changing from evening to night in this stage. Be careful with the clouds at the bottom; pesky enemies can hide over there.
The small green ships usually show up in packs.
Later on in the stage, the sky grows dark and lightning strikes. Thankfully, it's just there for show, and the lightning will not hurt you.
The boss here is a big green plane. The final enemy you face before the boss carries a star, which gives you an extra life. (You can also get an extra life at 100,000 points and every subsequent 200,000 points.) If you have anything less than the three-way shot, be above the boss at the start and fire from there; other wise, hang back and stay below the boss before firing away.
PrinceWatercress plays Aerial Assault (Game Gear) - Part 1 of 4
It's time to get in your military aircraft and destroy aliens...or something.
This game is a horizontal shoot-'em-up...and a easy one at that.
Round 1-1
The Control Pad moves, and 1 and 2 let you shoot. You can only have two bullets at any given time. You gain points by shooting your way through the game and surviving. Everything kills you in one hit unless you have a shield.
If a light blue target reticle is focused on a. A green S increases your speed, while a blue sphere with a P in it. increases your power. You'll go from a straight shot to a homing shot with the first P power-up, and unless you're fairly close to something, the homing shot will circle around trying to hit something. The yellow icon with the red B gives you a barrier, which acts as a shield that absorbs a couple of hits before disappearing.
The next power-up is a green laser, and while you lose the homing ability, you can shoot stuff from further away again.
As for the speed power-ups, never grab more than one. Any more than that is a bit too fast.
The small ships with the blue drill fronts fly forward, while the slightly different looking small ships will try to track you vertically. The bigger ships take more punishment before going down.
Round 1-2
Here, you'll go from a city where the sun is going down to the ocean and some islands.
After the green lasers come the rockets, which travel fairly fast and can also line themselves up with an enemy provided there is minimal effort for it to do so. After that is the laser, which will take out multiple enemies should more than one be in their path. You'll get a three way shot after this, followed by a wider five-way shot. Once you get the
The "Gundam" robots fly at you in a sine wave pattern, and the ships and submarines will stay in the water and fire at you from below.
The boss is a flying battleship. Stay slightly above it, and keep hitting the top to destroy the missile launcher. If you need to, try to hit the turret in the middle as well. When it is near death, it will stay in place until you shoot it down and destroy it.
Wednesday, July 22, 2020
The Super Mario Bros. 3 Epilogue
First up is "Super Shitehole Bruthaz" by MrTennek. It's an acid trip of a video, to be sure.
Here is the intro and credits for The Adventures of Super Mario Bros. 3. There were 13 episodes from September to December of 1990.
Here are all the title card music variations from the show. World 1 has the most songs, while all the other worlds only have one or two.
Finally, here's the entire OST for the NES version of the game.
PrinceWatercress plays Super Mario Bros. 3 (NES) - Part 11 of 11
Earbuds or no earbuds, we're facing Bowser and beating this game.
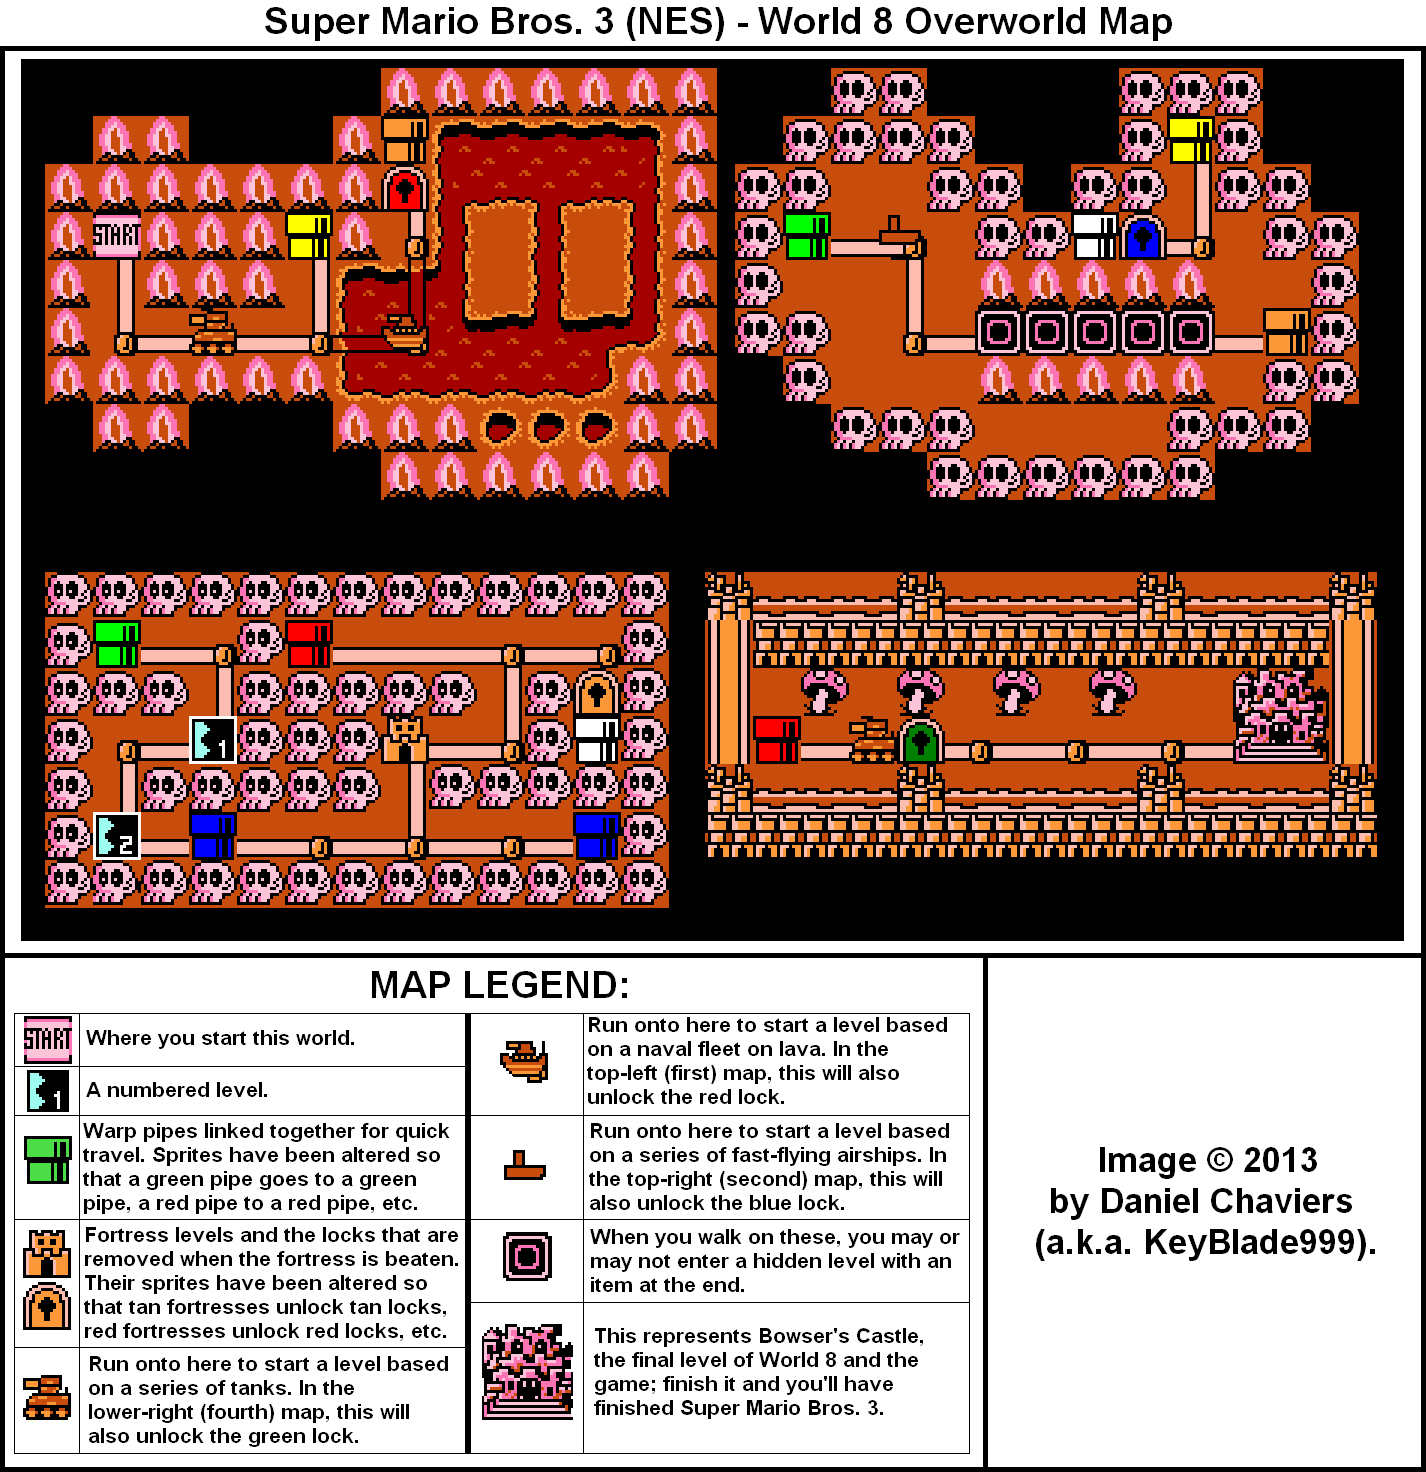
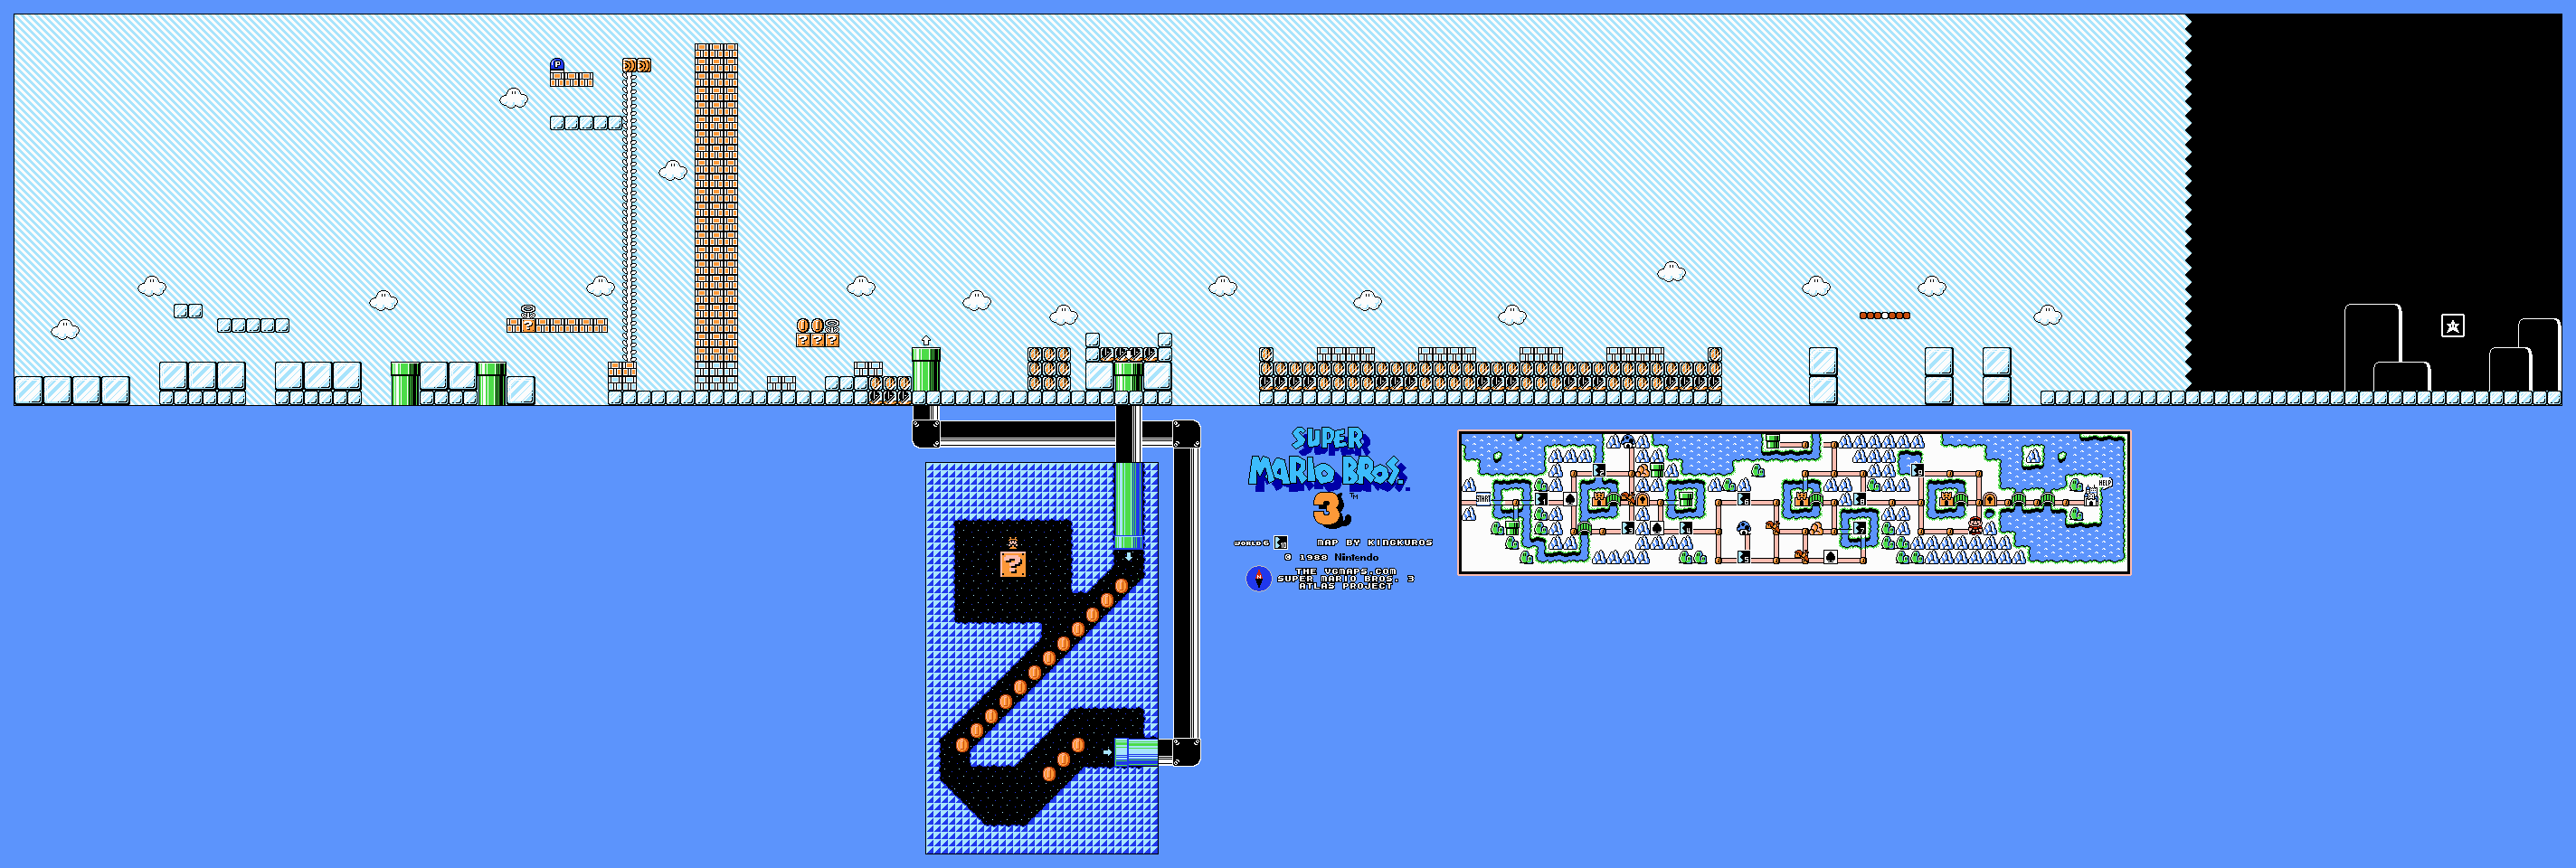
World 8
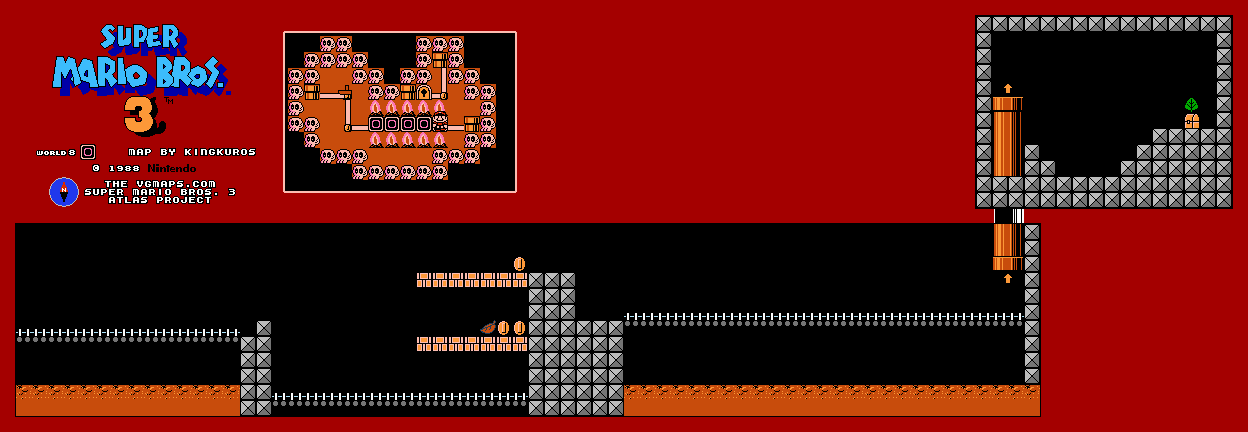
World 8 Tanks 1
This auto-scrolling stage has a lot of tanks and a lot of cannons and Bob-omb launchers. If you happen to be Raccoon/Tanooki Mario and you can stay in the air long enough by repeatedly pressing A at certain points, you can get 1-Ups just from jumping on enemies.
The little rotor thing at the top of one of the tanks doesn't hurt you.
Beating the Boomerang Brother here will net you a Starman.
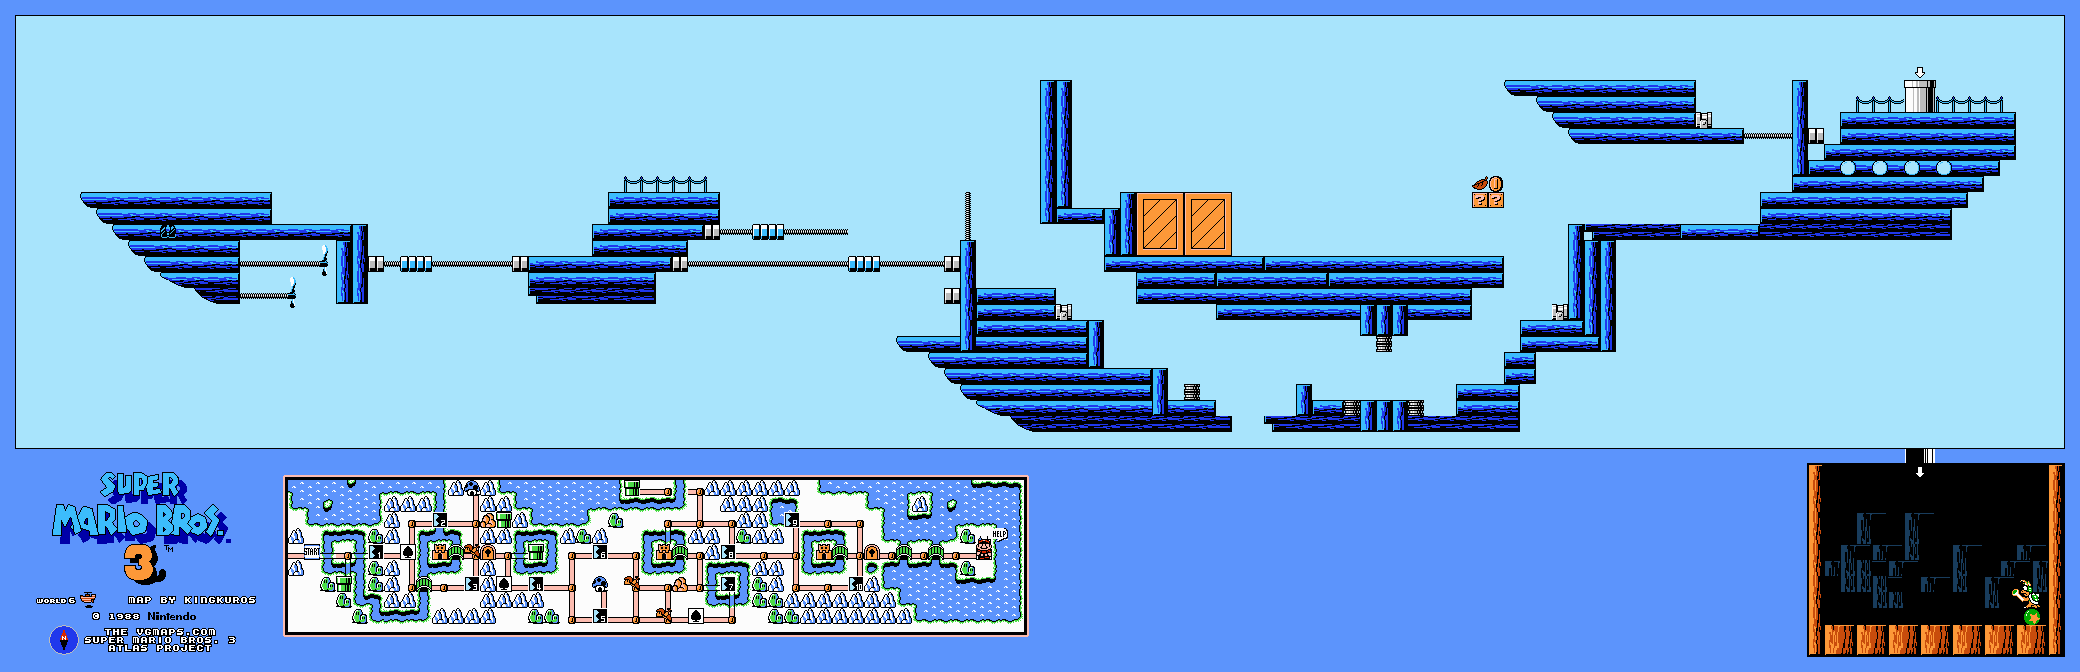
World 8 Ship
Another auto-scrolling stage. There are a couple of ships here, but as long as you know what you're doing, this isn't a hard level. Thankfully, the water at the bottom isn't instant death, and you're not eternally trapped in it if you fall in, either. Just wait for the ships to go down before leaping back onto dry land.
World 8 Hand Traps
If you randomly get caught in any of the "hand traps" - or enter them yourself - you'll have to reach the end of the super short stage that you get pulled into and get the item to get out. Thankfully, these stages are mercifully short, and you get something out of them.
World 8 Airships
This is one of the few levels (auto-scrolling or not) that I use a P-Wing for. You can leap from ship to ship, but you'll be dealing with flamethrowers all the while...so I just use one of the P-Wings that I have saved up from earlier in the game.
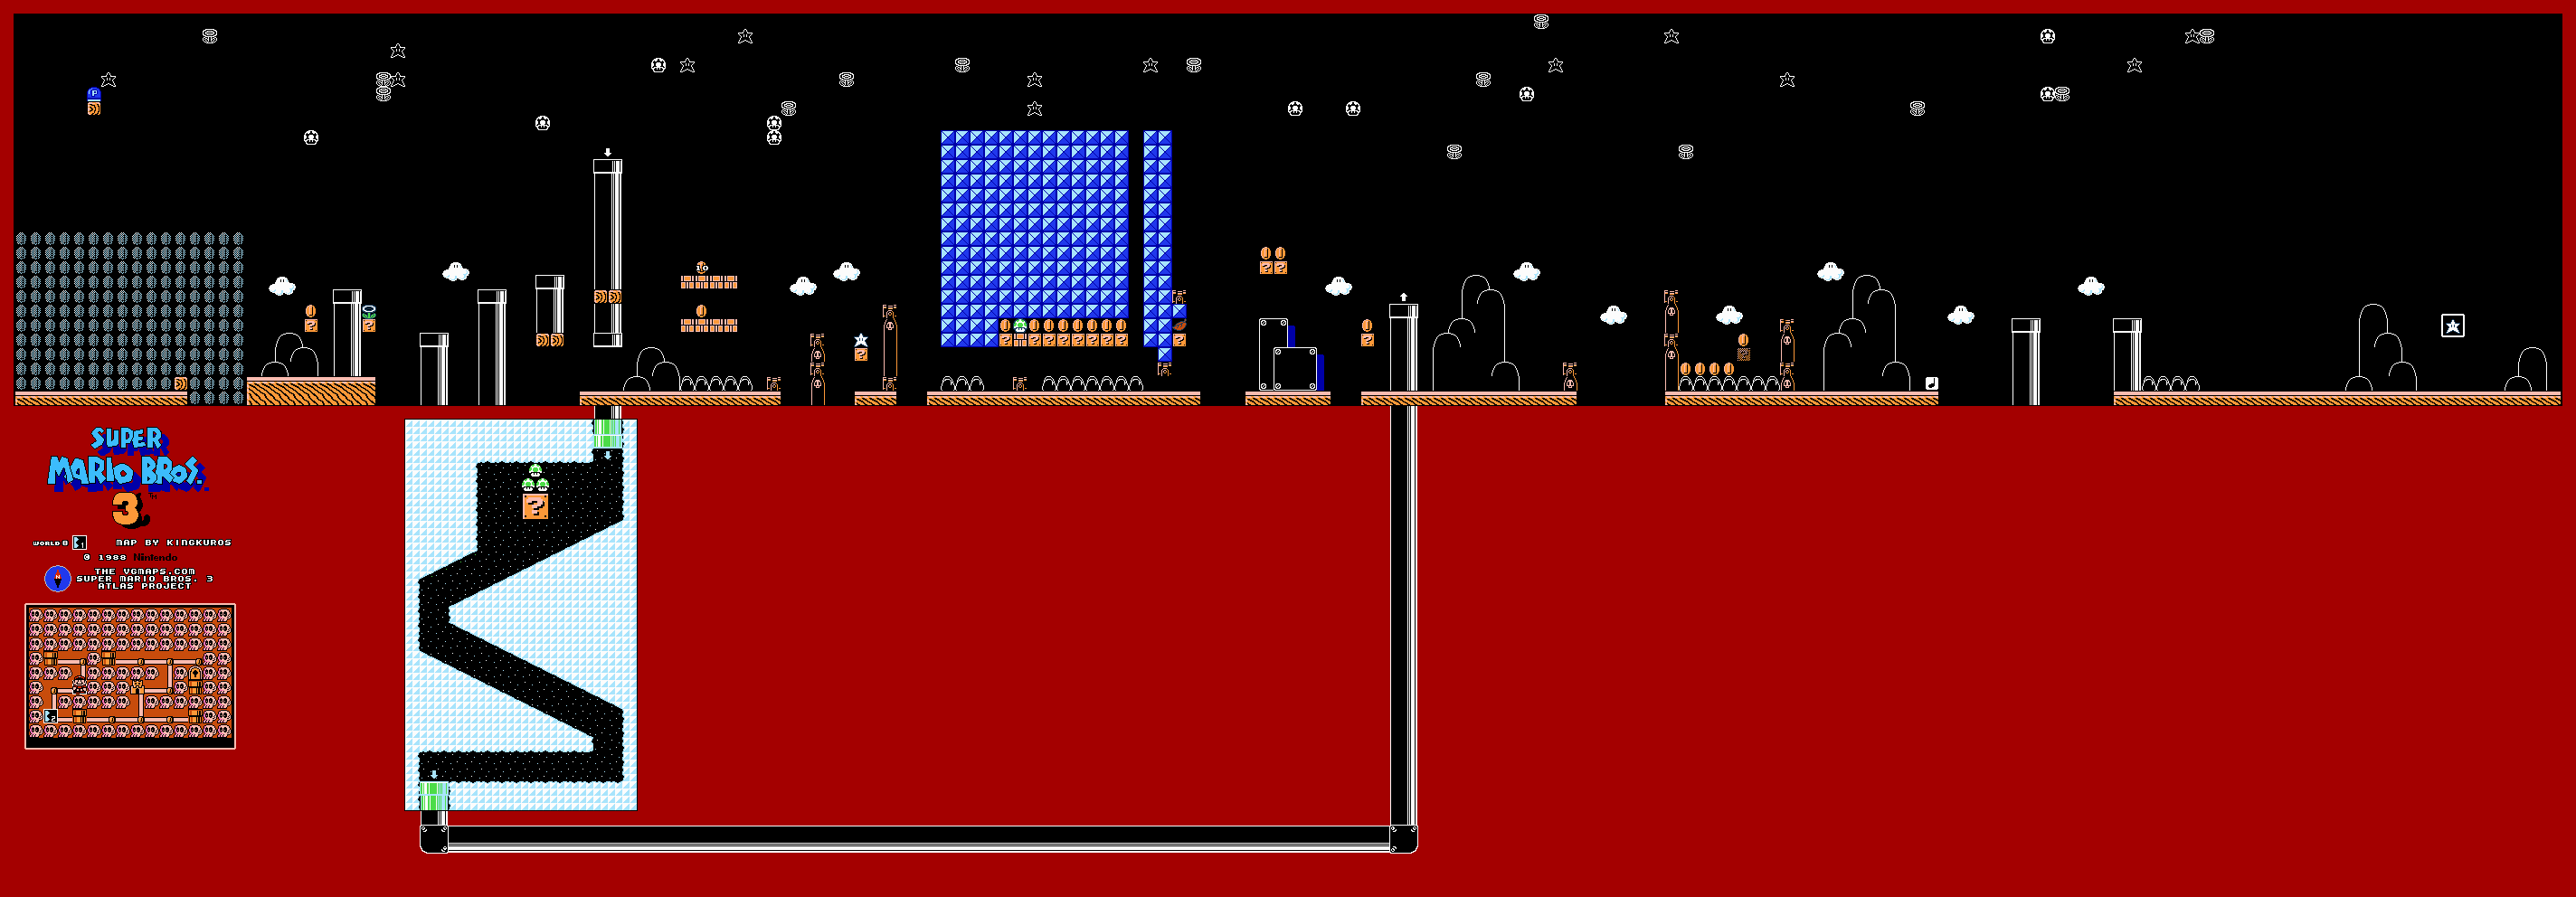
World 8-1
There's a P-Switch directly above the start of the stage that causes a bunch of coins to appear below? Had no idea!
If you can flip to the top of the fifth pipe after the start, you can get three 1-Ups and skip some of the level. Otherwise, you'll have to do some running ducks and bouncing off of some Bullet Bills to get to the end. You'll still have to do it if you take the shortcut, though; you just won't have to do as much.
If all else fails, use a P-Wing.
World 8-2
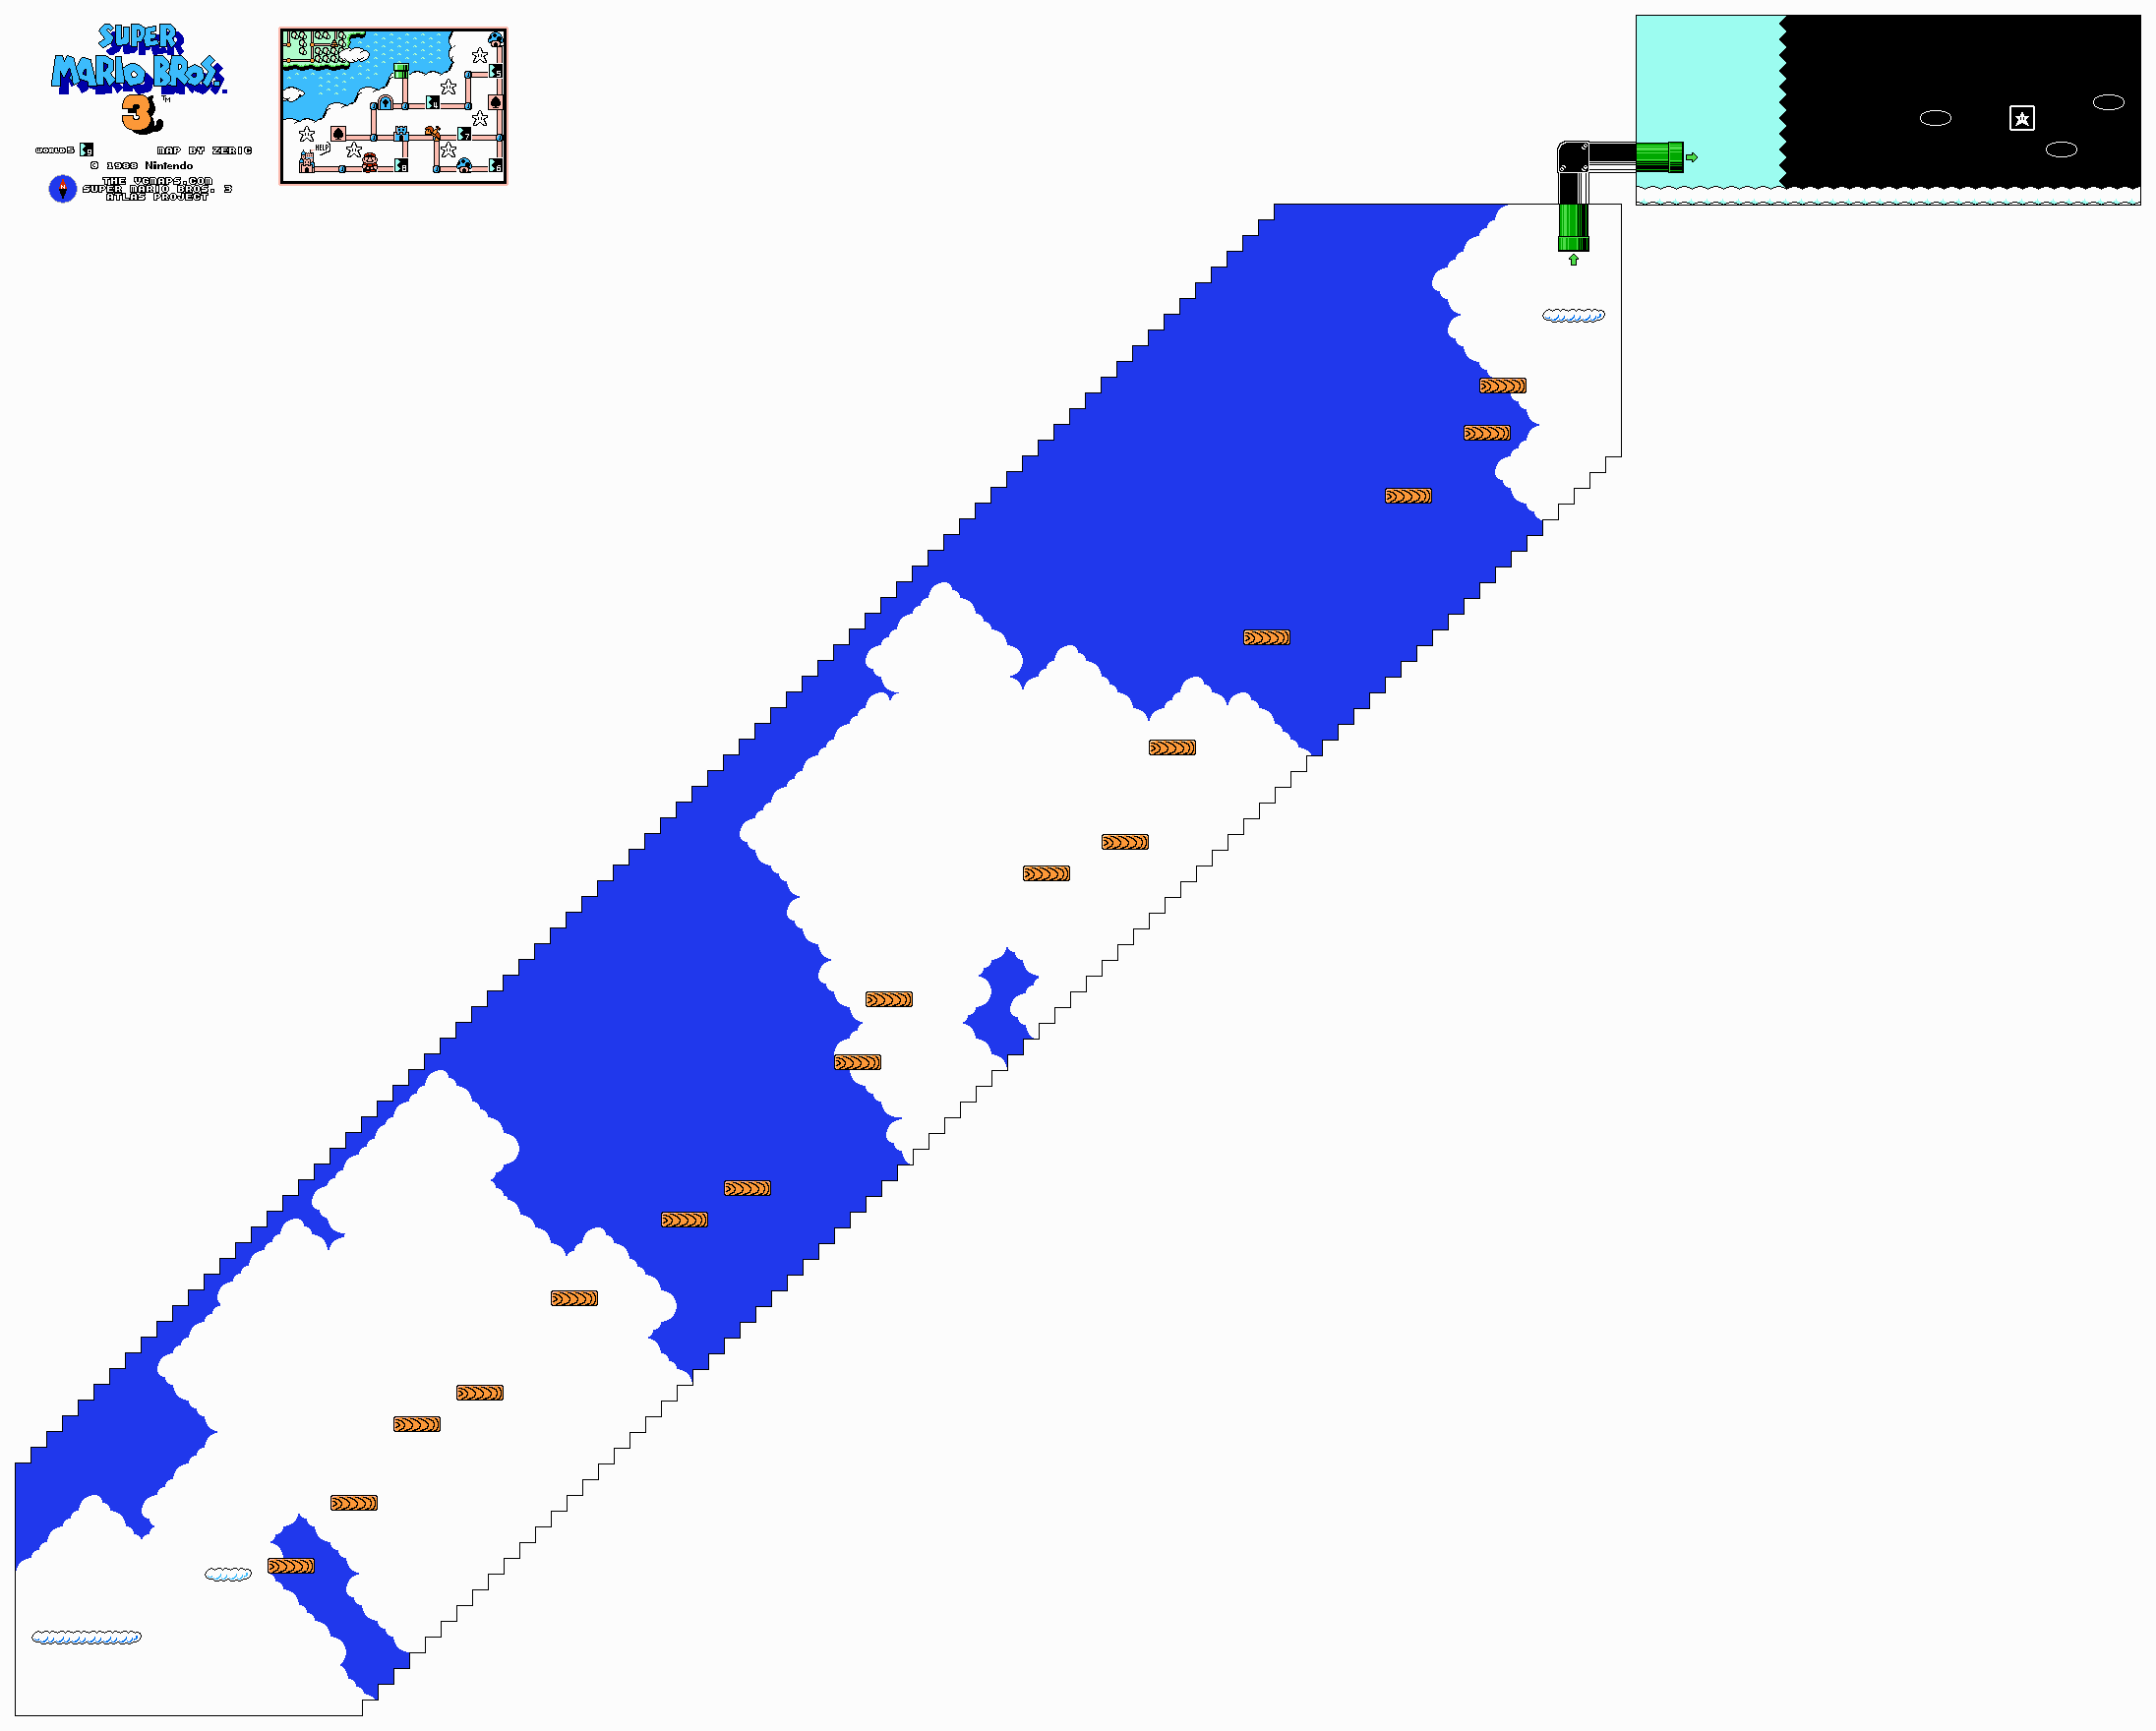
The first quicksand pit leads to two pipes leading to hidden stuff. Did not know that! If you take those, you'll skip the first set of note blocks over a bottomless pit.
You'll also meet the angry sun from the World 2 quicksand level here. I just use a P-Wing to avoid everything here altogether.
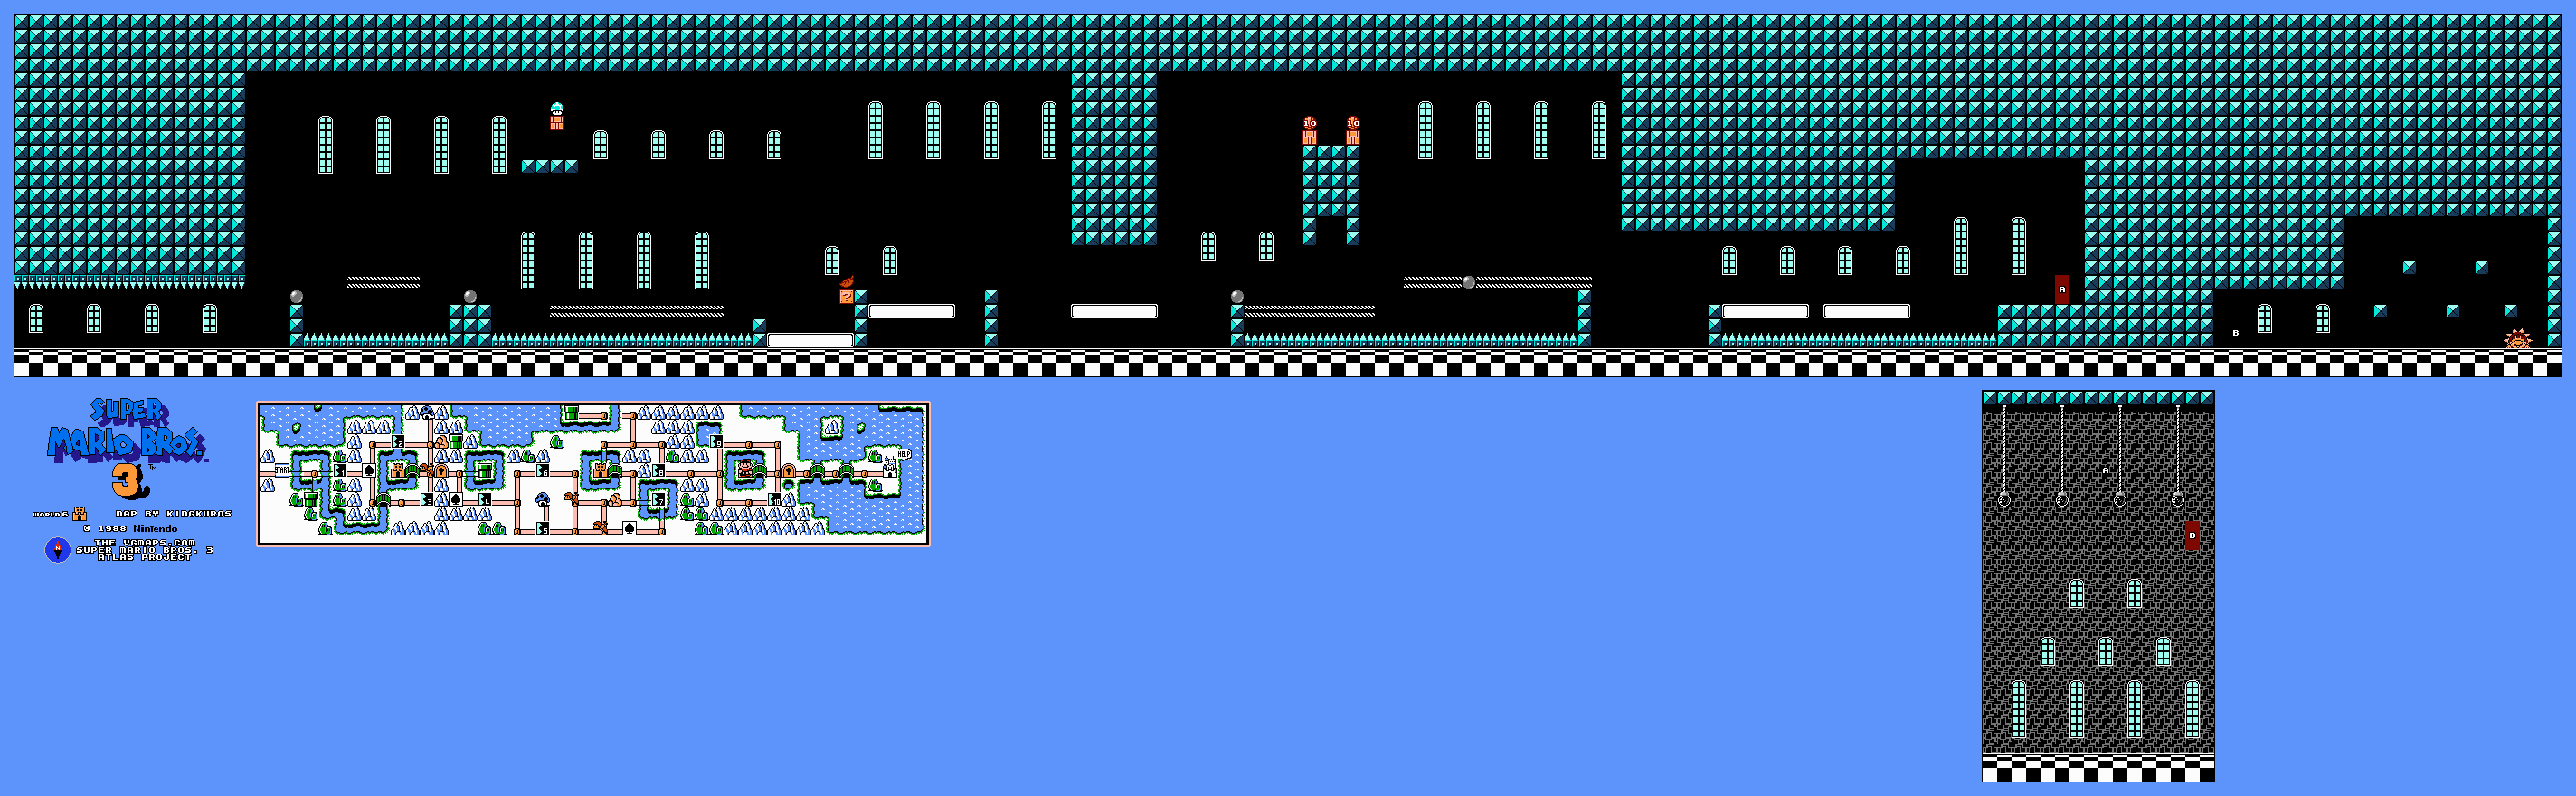
World 8 Fortress
The last fortress of the game is a complex maze. Here's the easiest path, which I don't take.Come in here as a big Mario. Go all the way to the right and enter the door at the end after breaking the blocks. Keep heading right and enter the first door you see after all of the conveyor belts. Hit the P-Switch, then run all the way to the right and stay at the upper path where all the conveyor belts are. Enter the door at the end, then stay on the upper path. When you reach the end, go down, then left, then reveal another P-Switch by hitting the bricks, hit the P-Switch, go back up and then go all the way to the right. There will be a door at the very end that was not there before.. Duck down on the conveyor belts to get over the spikes, then you'll face Boom Boom.
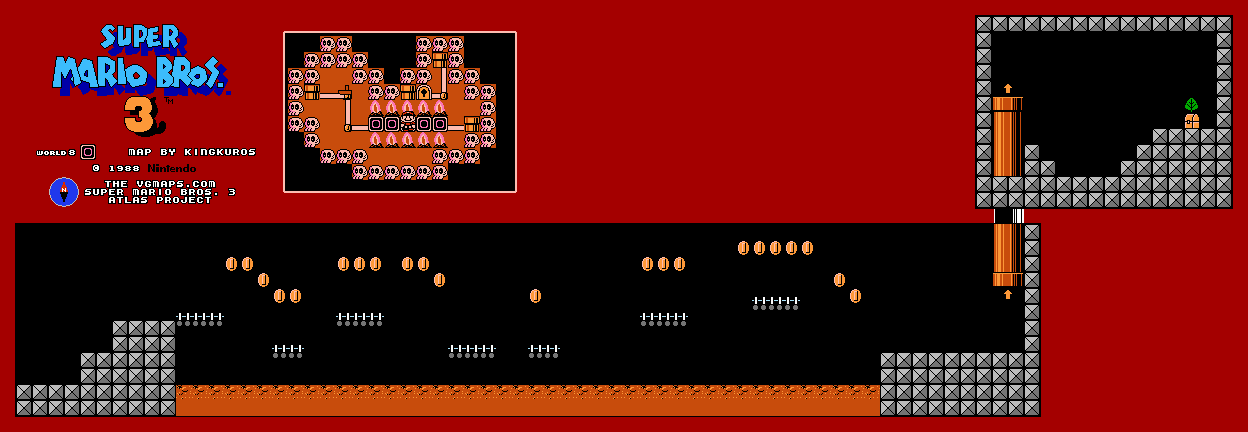
World 8 Tanks 2
This one doesn't have as many cannons, but there are plenty of wrench tossers.
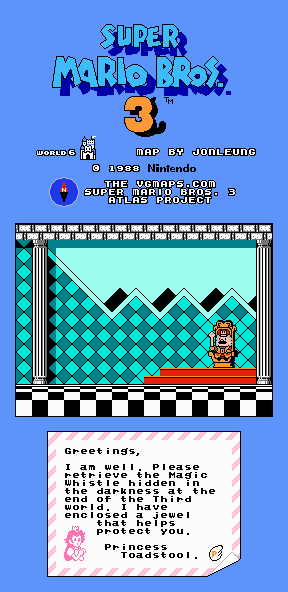
Bowser's Castle
There is a hidden door that takes you past the laser-firing statues, and from there, you can climb up the donut blocks to get to the door at the top. From there, you can jump across some donut blocks to Bowser.
Otherwise, run to avoid the lasers, take the elevator, drop down with the donut block and hold right, climb up the stairs while avoiding the Rotodiscs, then take the donut blocks to the door while avoiding fireballs.
If you take the second-lowest path after the donut blocks over the lava instead of the top path, you can drop down with the donut block there and head right for an alternate path to Bowser. You'll have traditional, more solid brick platforms (and a Super Leaf beforehand!) over lava on the way to Bowser.
To beat Bowser, you'll have to wait for him to stop jumping in place and shooting fireballs. When he leaps towards you, get out of the way so he breaks the brick floor below. You'll have to stand and move away from several spots before you can get him to break the bricks at the bottom and fall down the pit, sending Bowser to his doom. Be careful not to fall into any pits on the way to the door on the right, or you will have to do all of this over again. Enter the door, and you'll find Princess Toadstool! You just beat Super Mario Bros. 3!

Tuesday, July 21, 2020
PrinceWatercress plays Super Mario Bros. 3 (NES) - Part 10 of 11
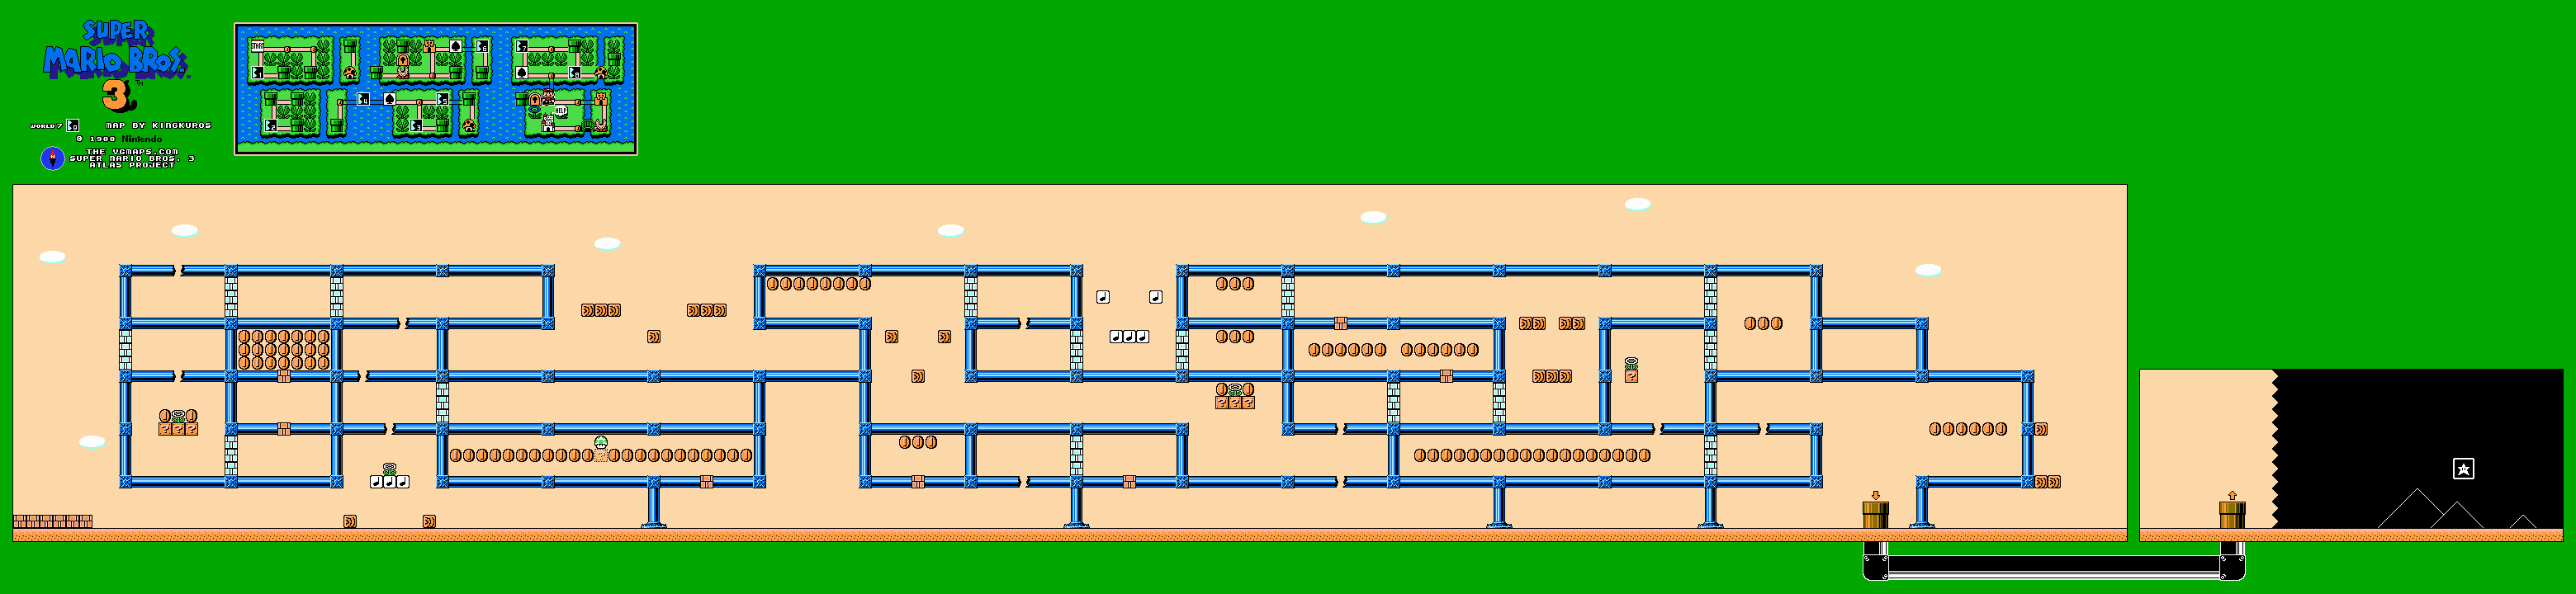
In this entry, we finish up World 7 before heading to World 8.
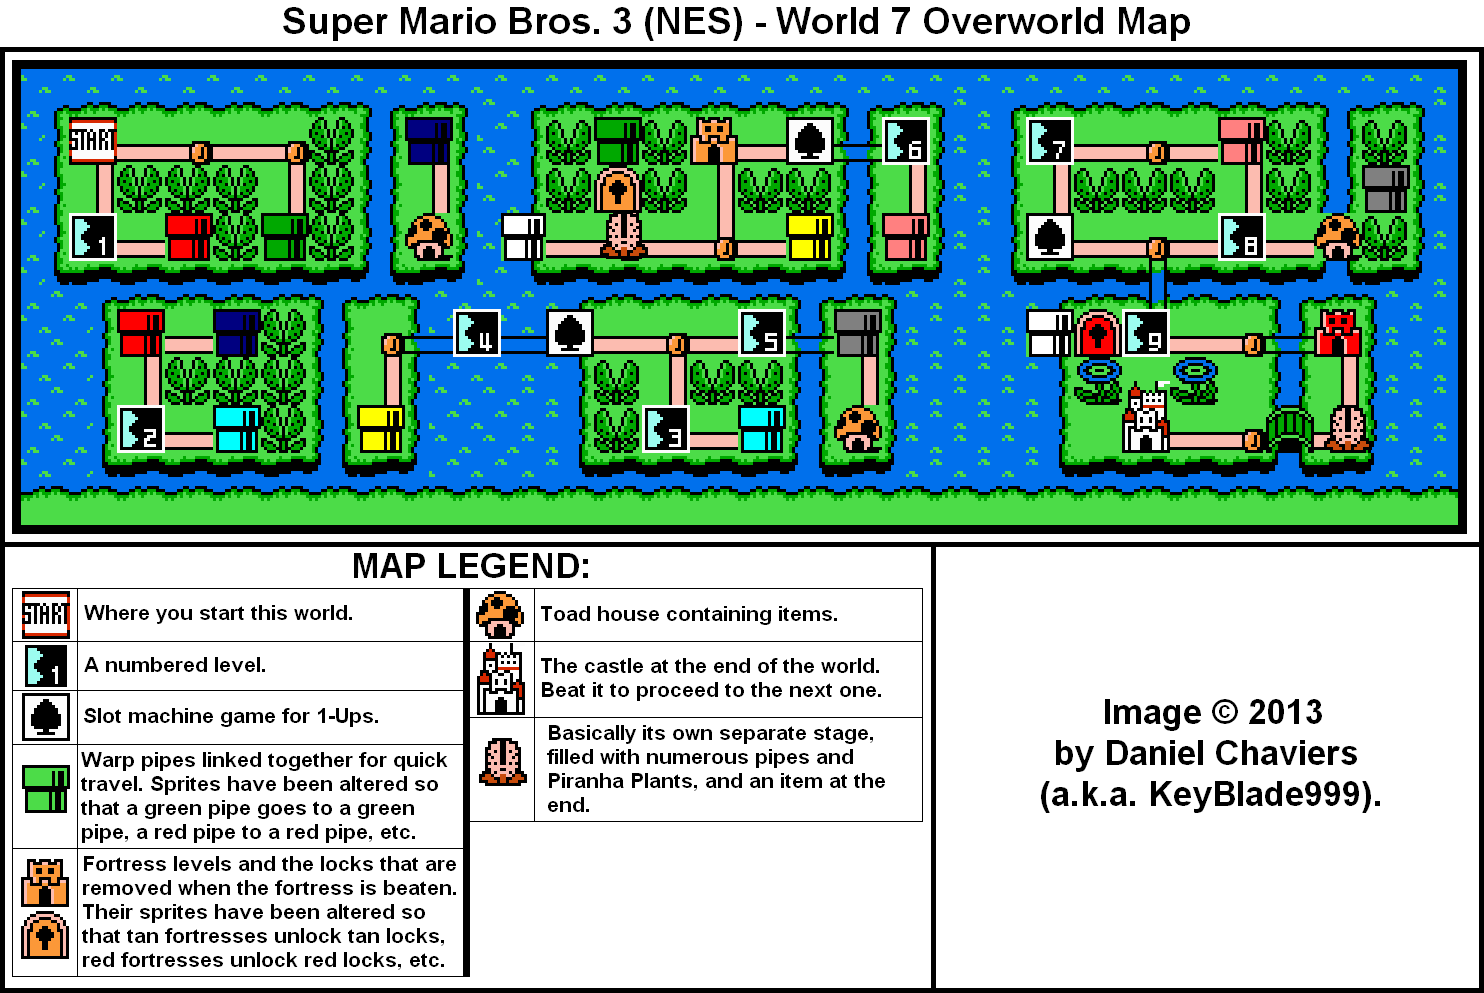
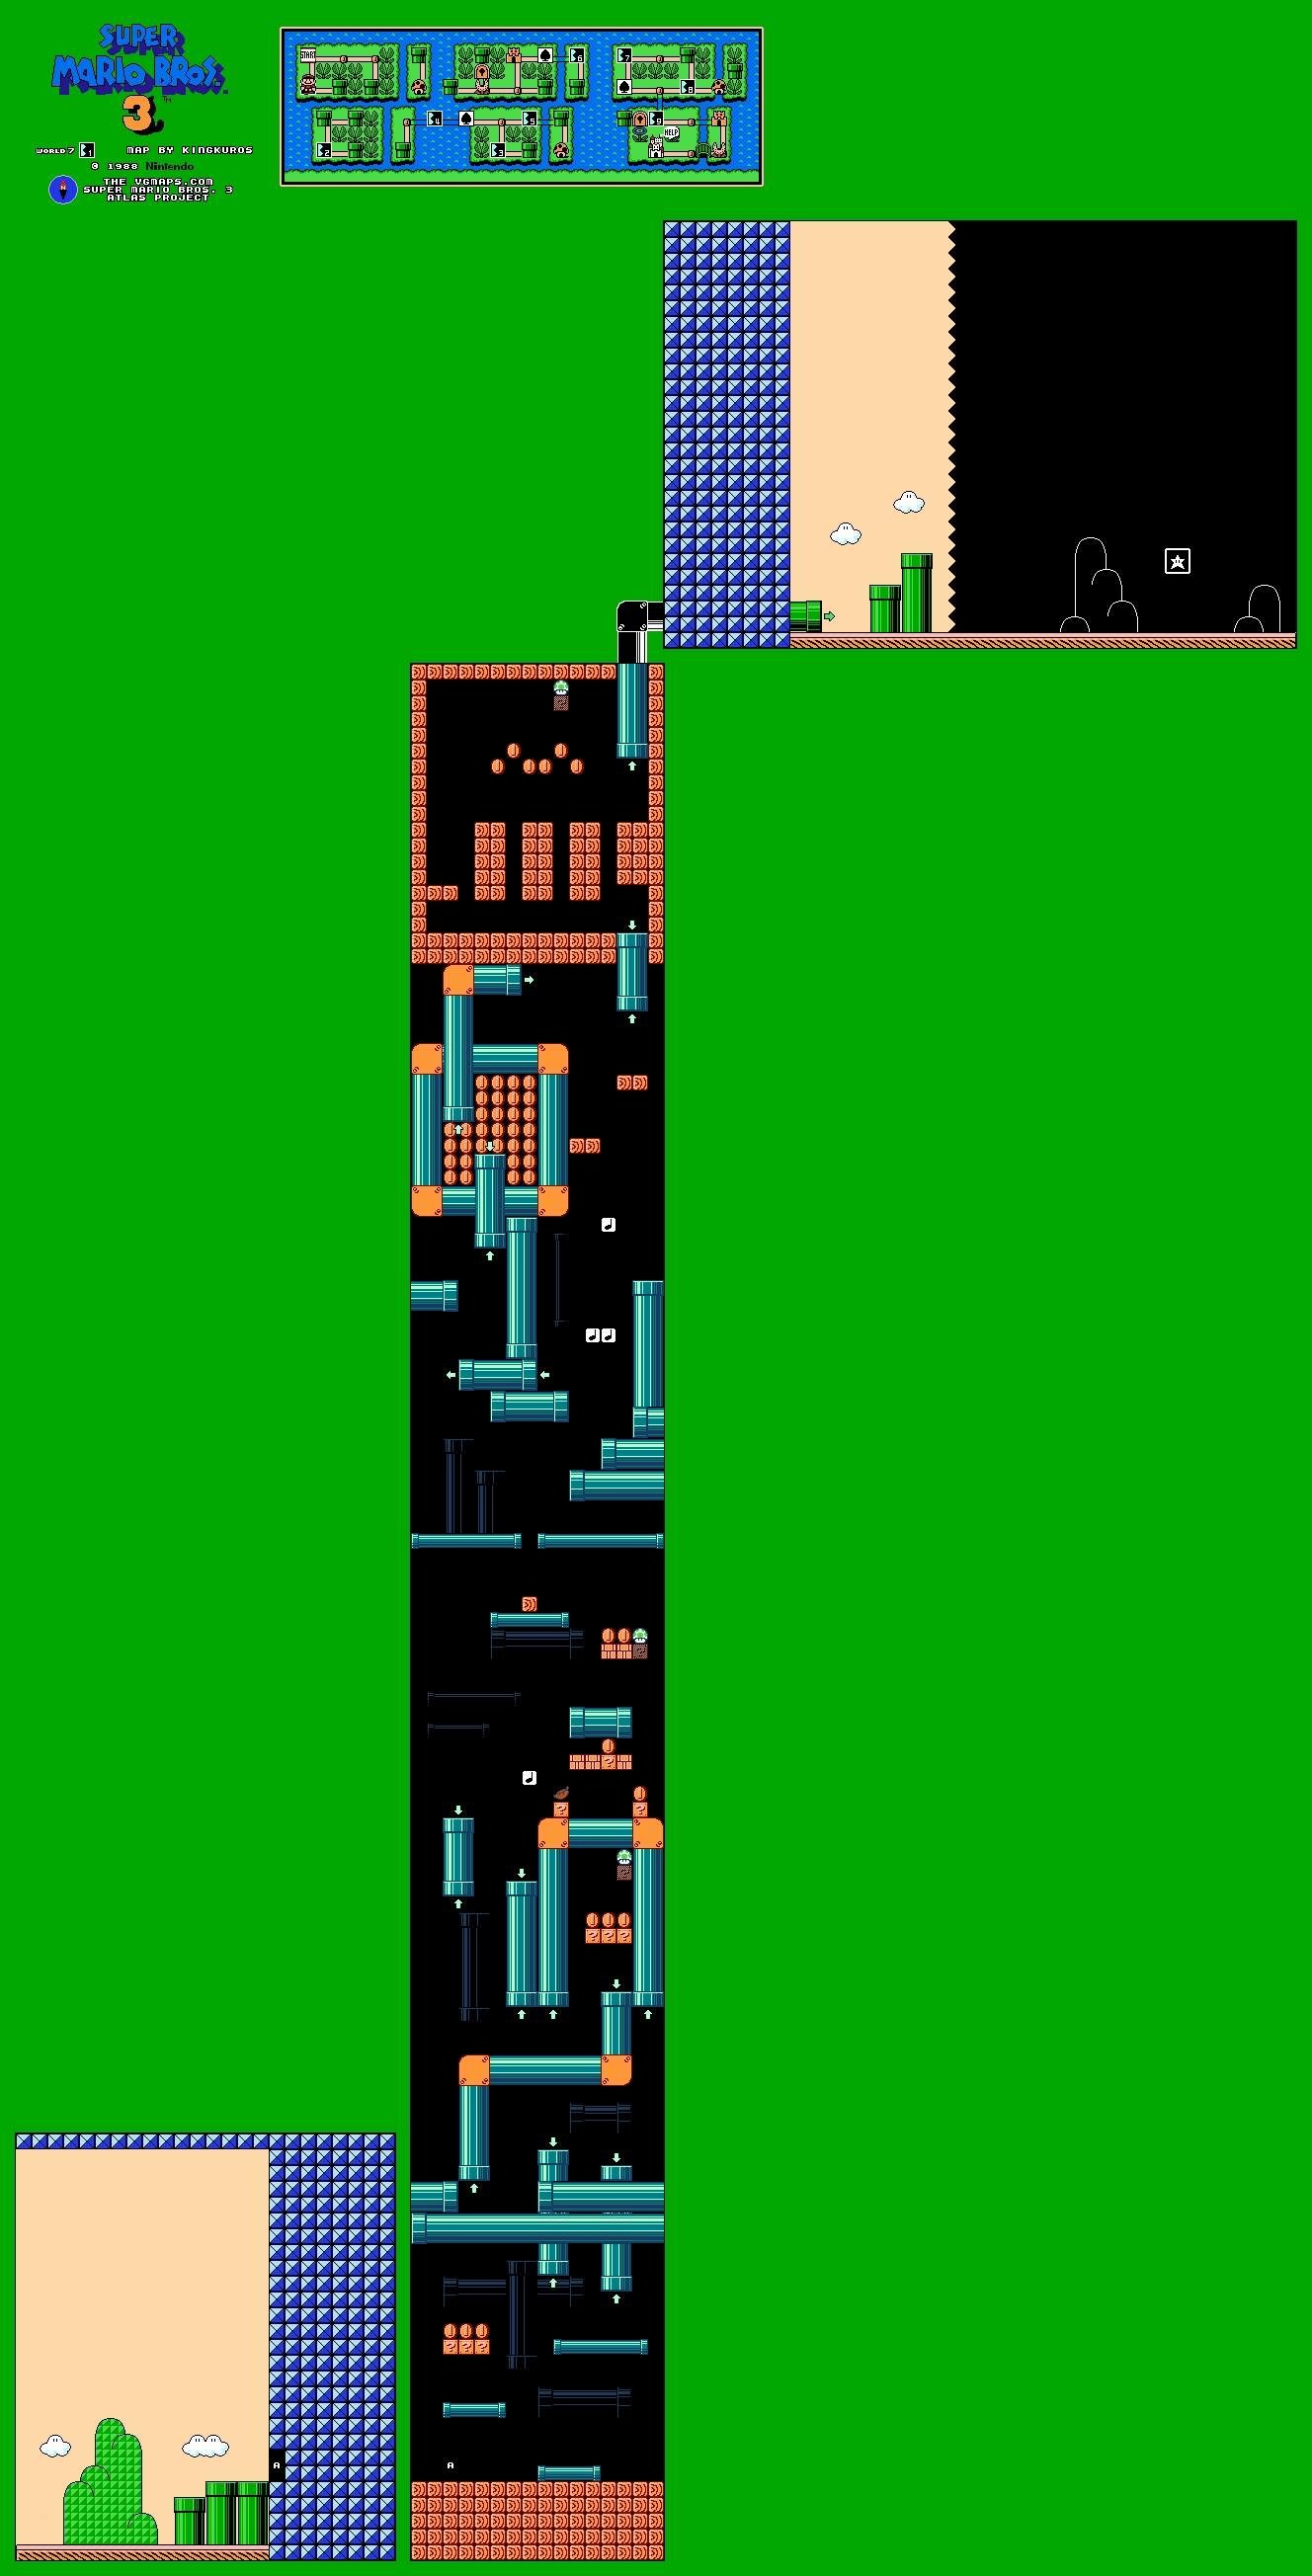
World 7
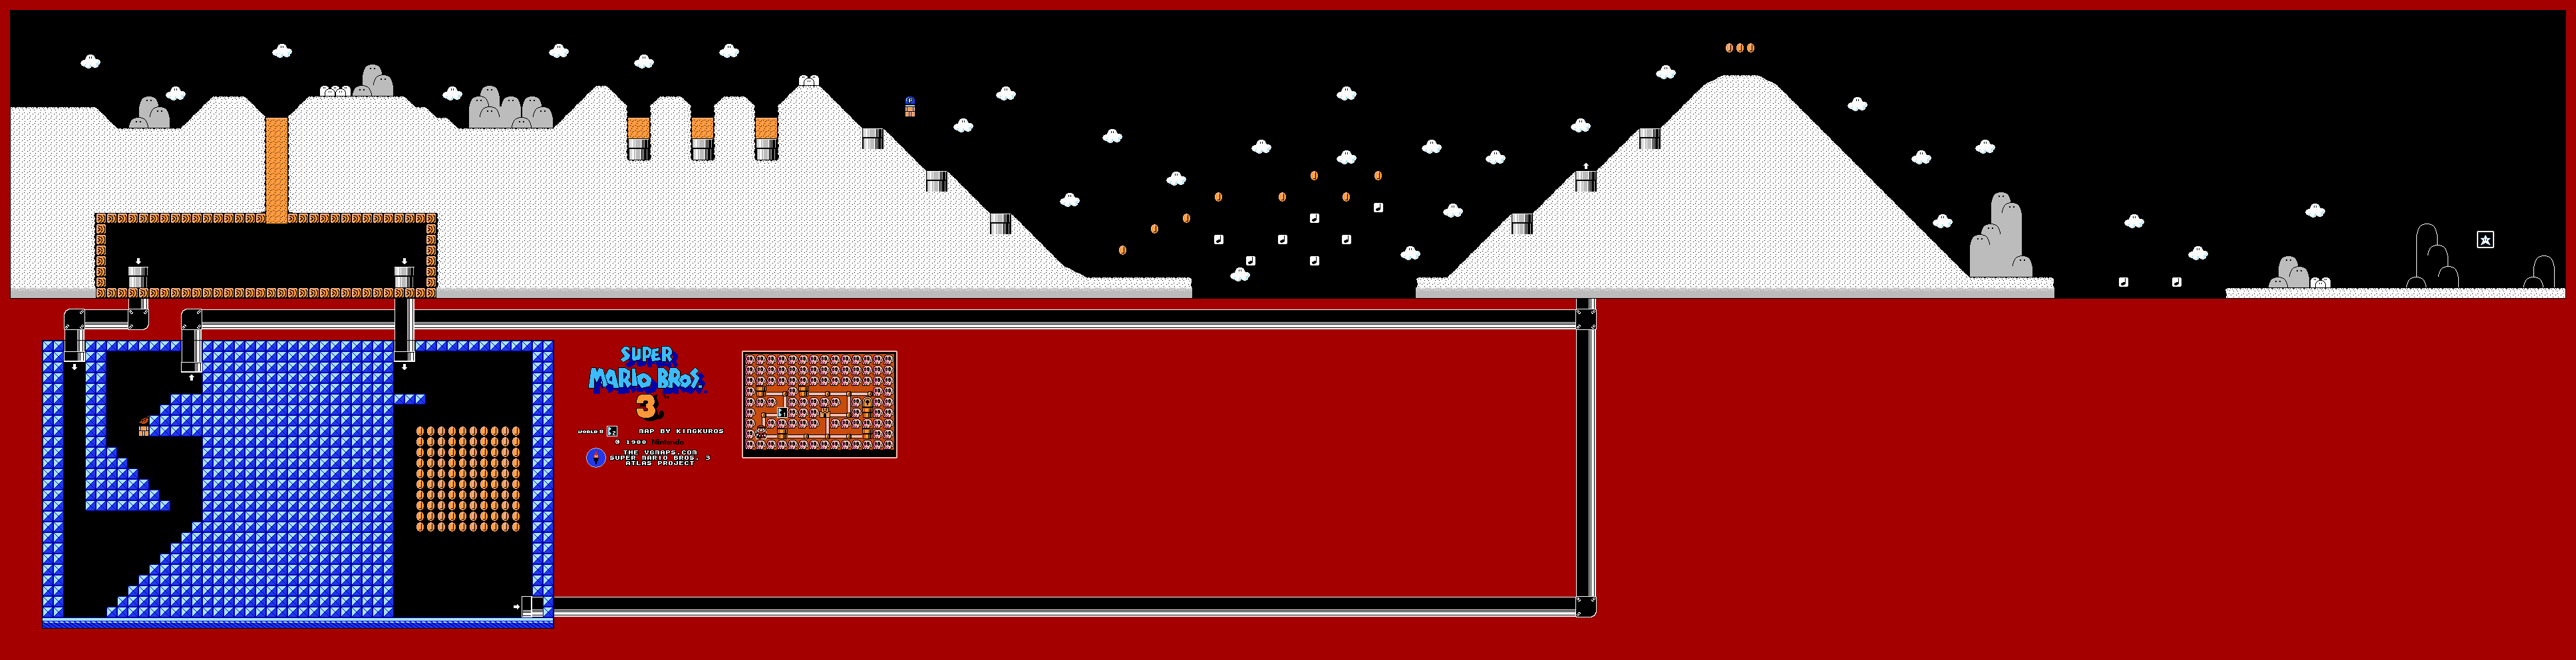
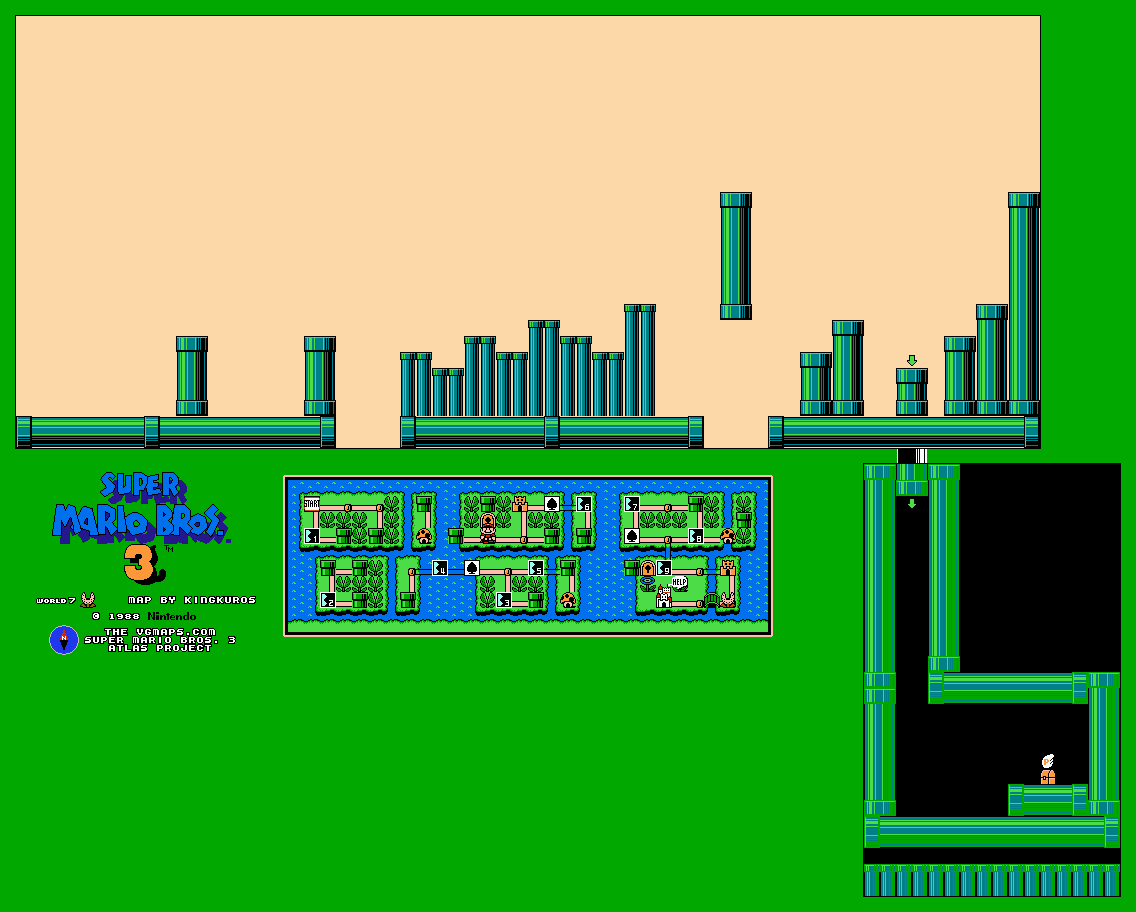
World 7-5
This stage is a bit of a pipe maze. You'll be hitting invisible blocks to make it easier to get to certain pipes and get out of the maze alive, but you'll also be dealing with other enemies too.
World 7 Plant 1
Believe it or not, this plant is its own level. You'll be dodging Nipper plants that alternately pop in and out of the pipes in pairs. If you can make it past all the small, thin pipes of doom, you can get a P-Wing.
World 7 Fortress 1
Break some blocks to the right of where you start until you find a P-Switch. Enter the door to the right at the start. You can also hit the P-Switch at the start for a bunch of coins and go down the door there. From there, you have to be Raccoon Mario and fly up and to the left into a pipe to reach Boom Boom.
If you can access the door to the left of the P-Switch after hitting it, you can get a Tanooki Suit. Other than that, there is no other way to get a powerup that will allow you to fly.
World 7-6
It's another vertical pipe maze with wrap-around sides, and this time, you'll be using platforms that you'll have to repeatedly hop on in order to change the direction in which they travel. Watch out for spikes!
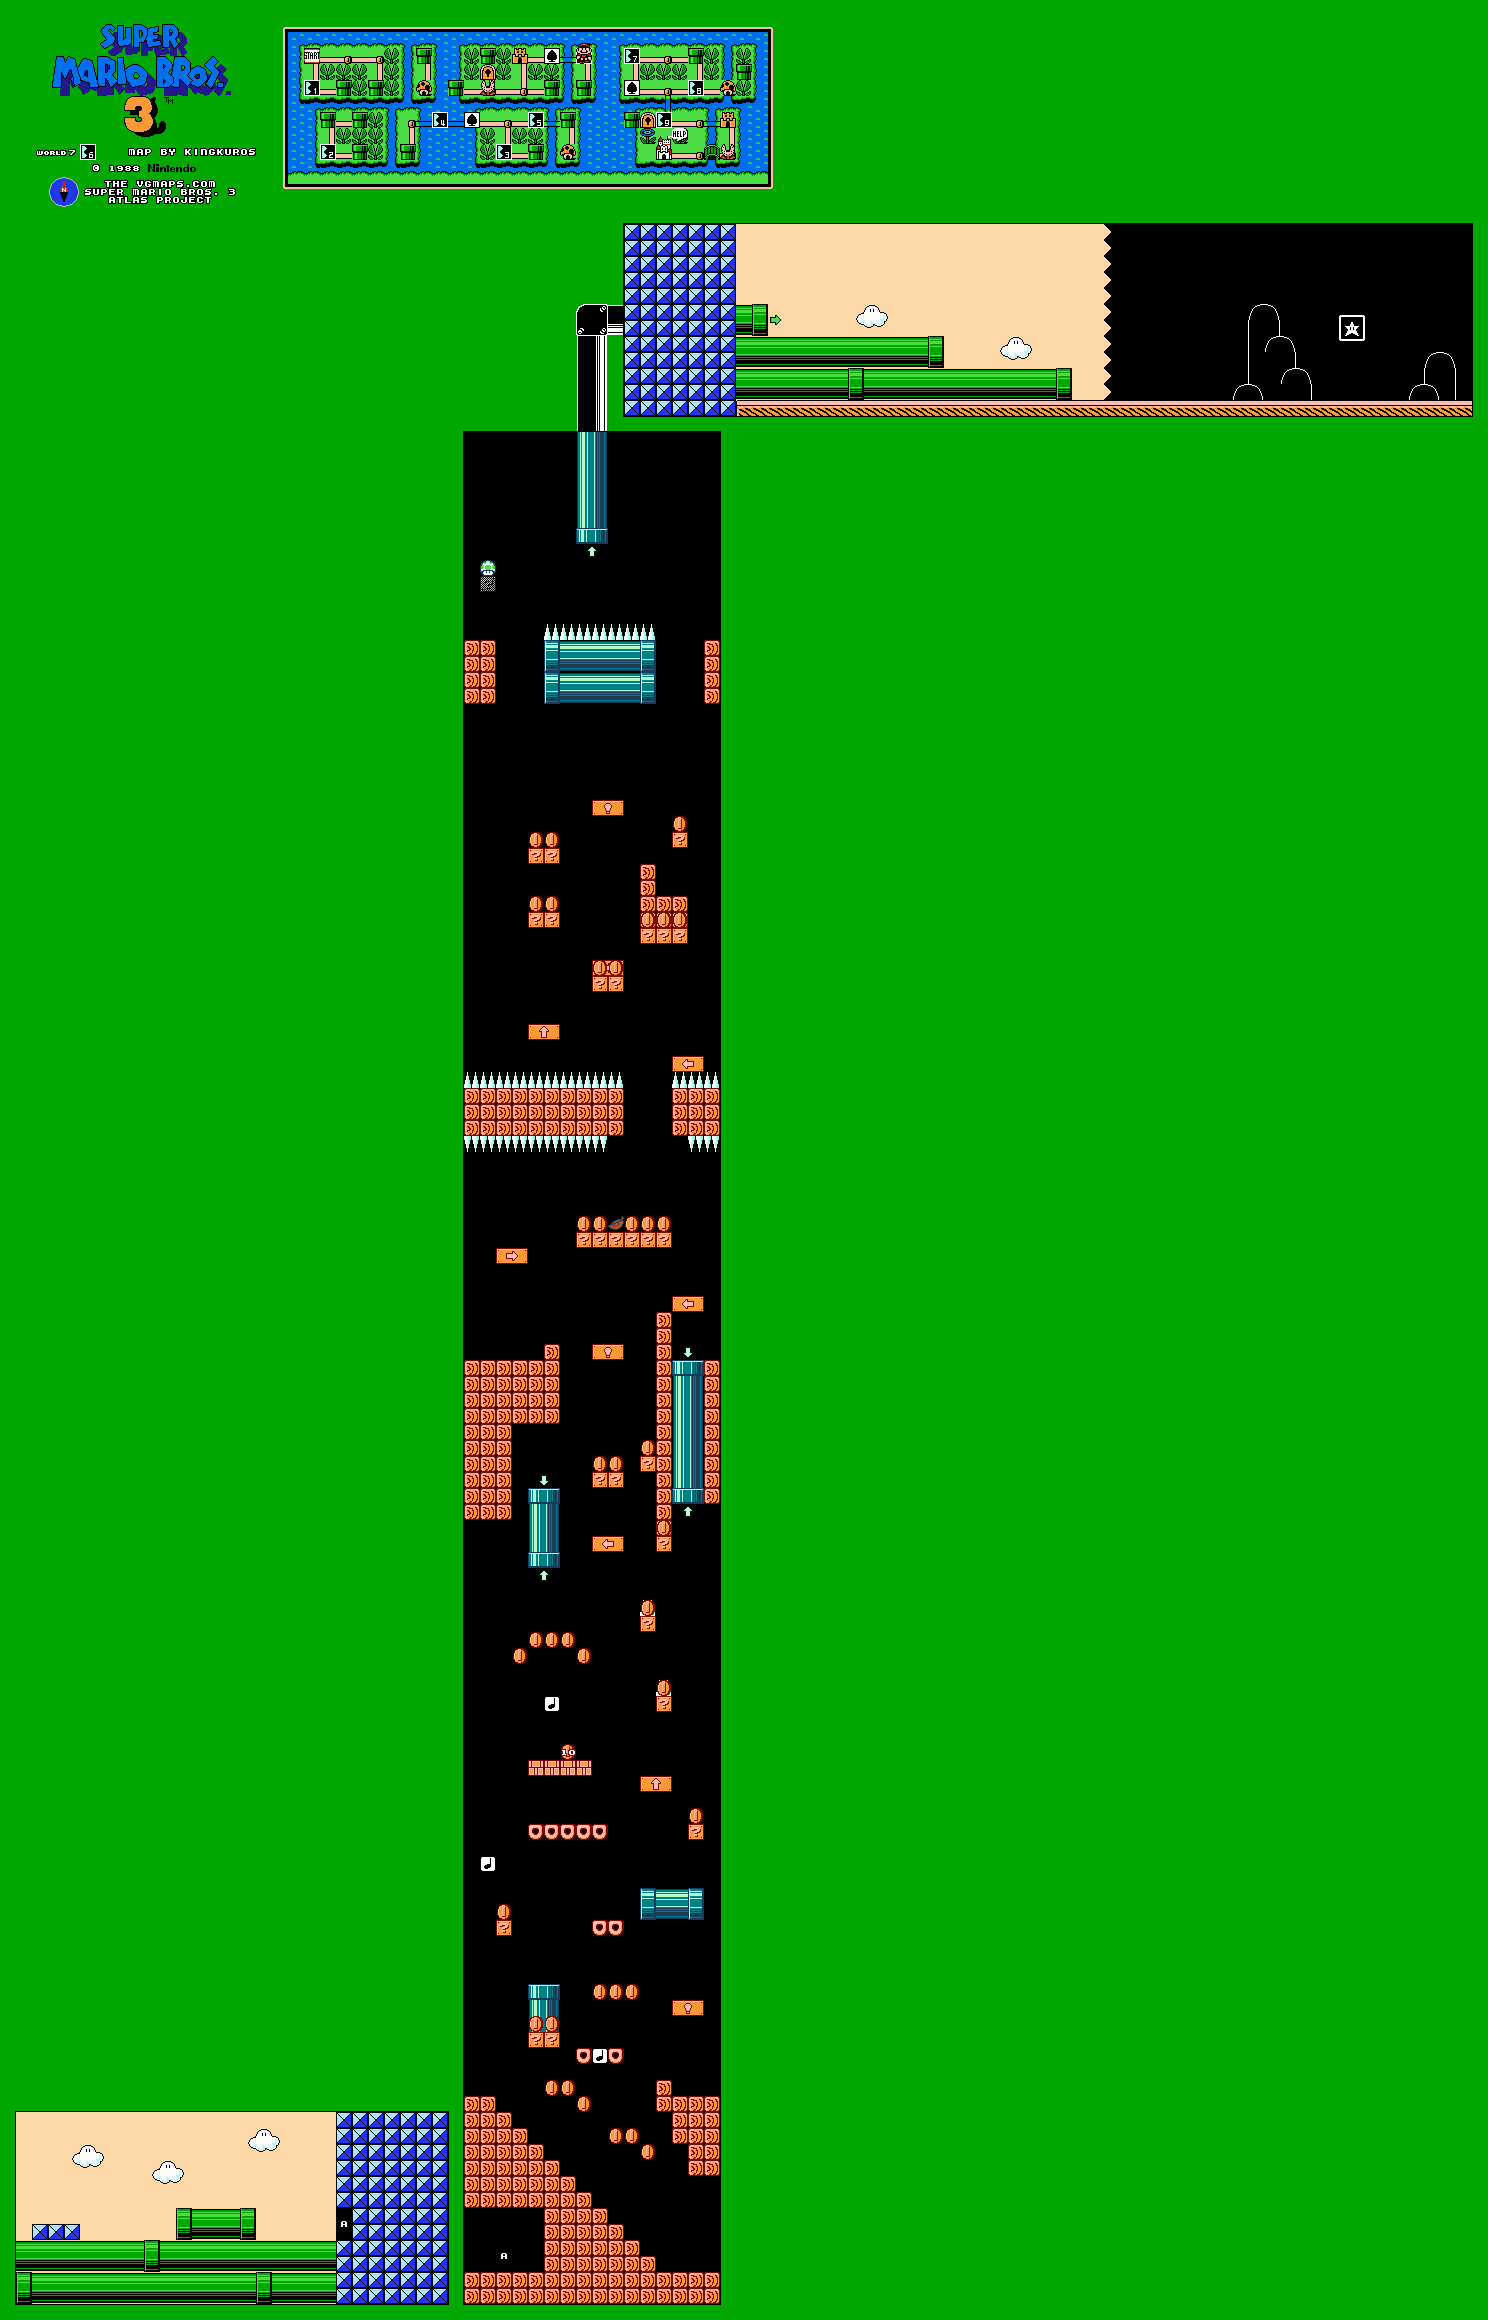
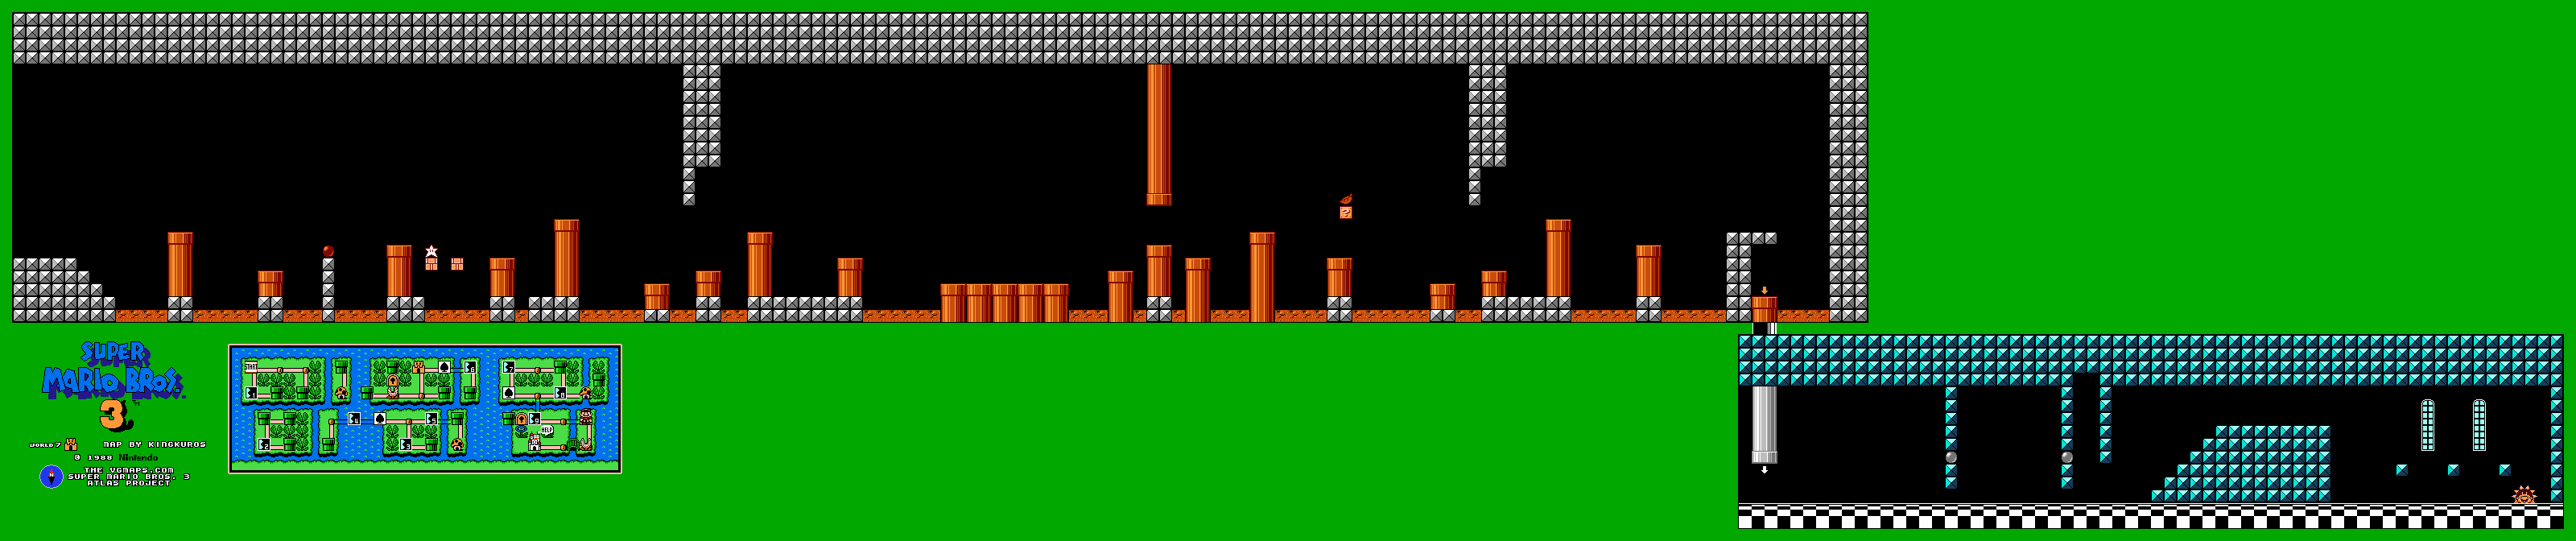
World 7-7
Oh, boy. This level.
For this one, you'll want to hit the brick with the Starman at the beginning, then let it travel a little bit to the right before grabbing it. When you reach another brick, keep doing this. Make sure the Starmen get some distance so you can maximize the distance over the plants, as there is no other way to get through this level.
You'll have to run all the way to a pipe and crouch down under it to get to the other side of it if you're anything but Small Mario, so keep that in mind.
If you can somehow get through this level, it's quite rewarding in its own right. Even better, this level is completely optional. You don't even have to play this level to beat it.
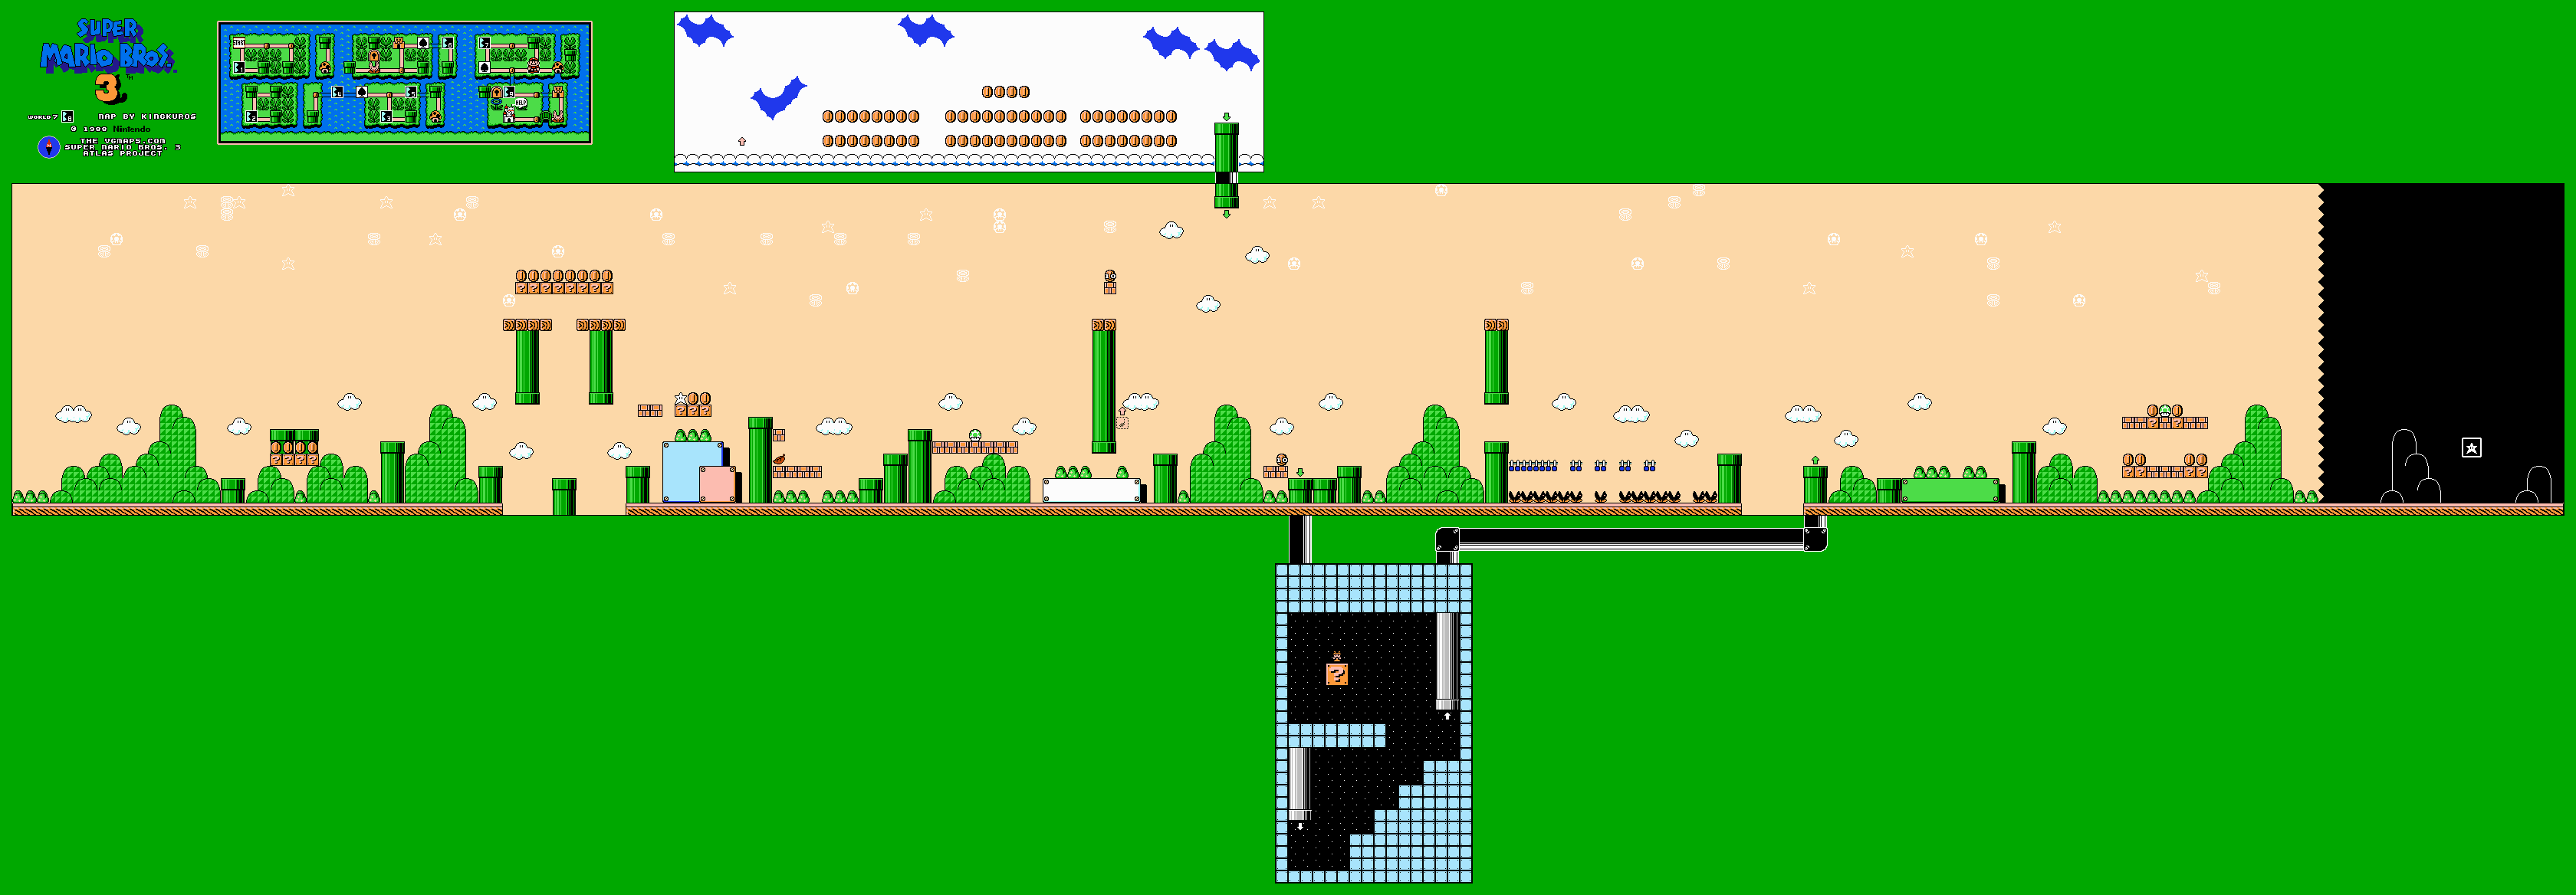
World 7-8
If you can somehow find the hidden note block here, you can enter another Coin Heaven.
One of the ground pipes leads to a hidden Hammer Bros. Suit.
This level has a lot of Piranha Plants, and one of the Nipper Plants at the end spits fireballs at you if you happen to have it on-screen.
World 7-9
This level is yet another maze, and this time it is of the desert world oil pipe variety. Thankfully, there are plenty of grabbable block walls that you can clear out, and there is no way to be eternally trapped.
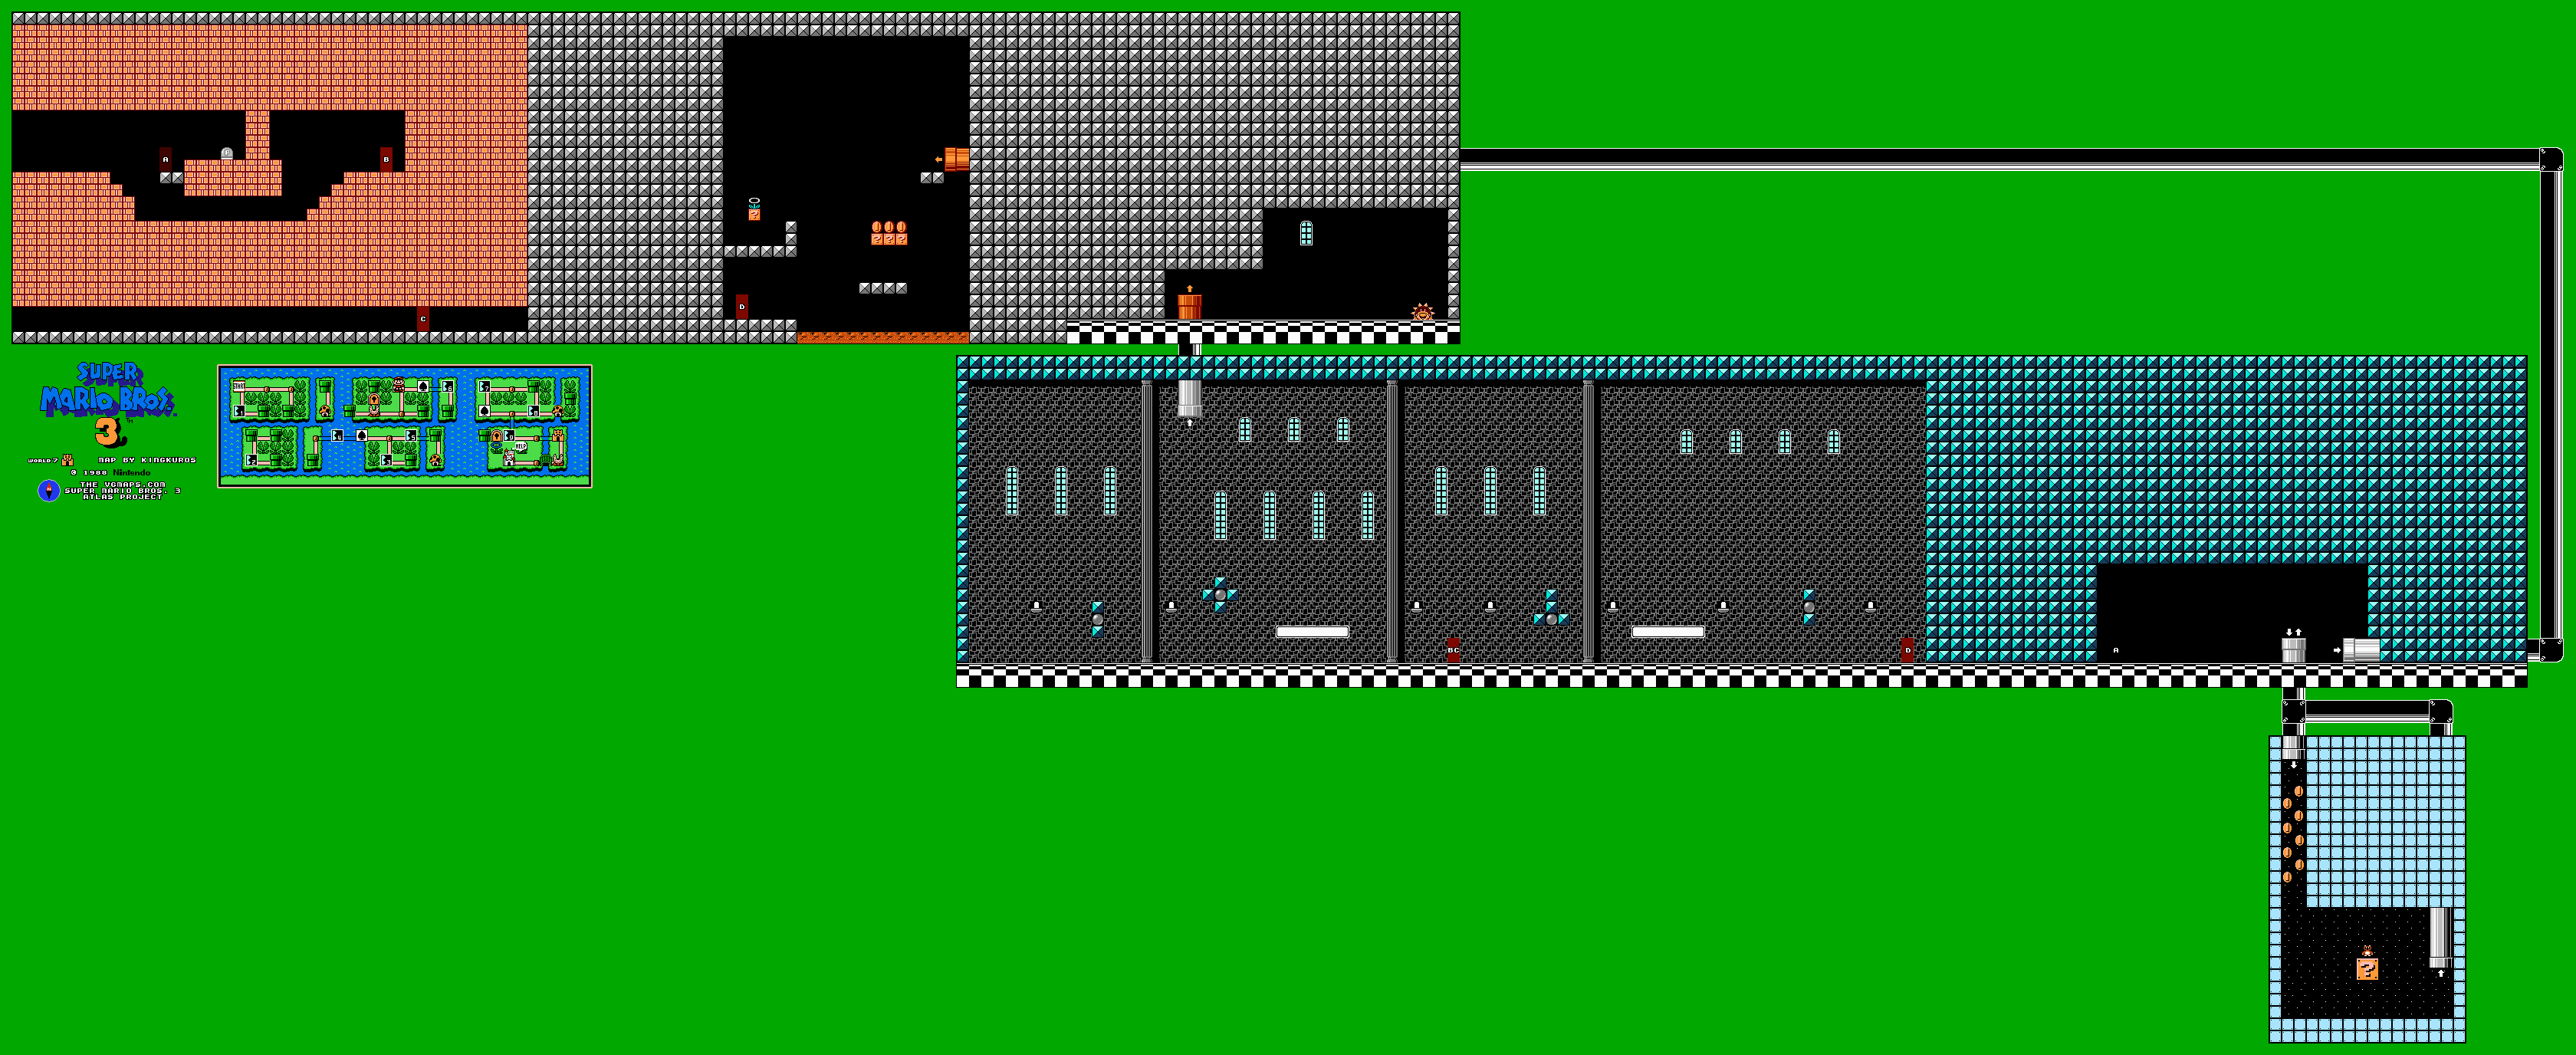
World 7 Fortress 2
There are a lot of pipes here in addition to other things, so watch out.
If you're big when you go down the pipe at the end, you'll have to do running ducks to slide under the Rotodisc walls to get to Boom Boom.
World 7 Plant 2
It's another plant area...and you'll have to clear this to get to the castle, too.
Thankfully, there are some note blocks you can use to get to the end...where you can find a Super Mushroom. Well, at least you'll have something to start yourself off with in case you die and have to retry a stage.
In case you fall off the note block path, just use the Para-Troopa as a saving grace.
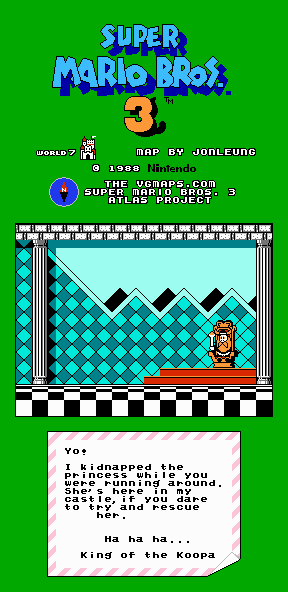
World 7 Castle
The King is a Piranha Plant in a tiny pipe. (In the Super NES version, he is a Yoshi.)
World 7 Airship
You'll have to do quite a bit of jumping and platforming in order to reach the white pipe at the end. Thankfully, there are very few enemies; this airship is mostly flamethrower.
There is a platform that you can hit from below to move forward, but if you're Small Mario or able to do a running duck, you won't necessarily need to utilize it.
The final Koopaling is Ludwig Von Koopa. He utilizes the same earthquake attack as Roy when you jump on his head, but he doesn't do much else.
The letter you get after clearing this will be from Bowser, daring you to come to his domain if you want the Princess back.
PrinceWatercress plays Super Mario Bros. 3 (NES) - Part 9 of 11
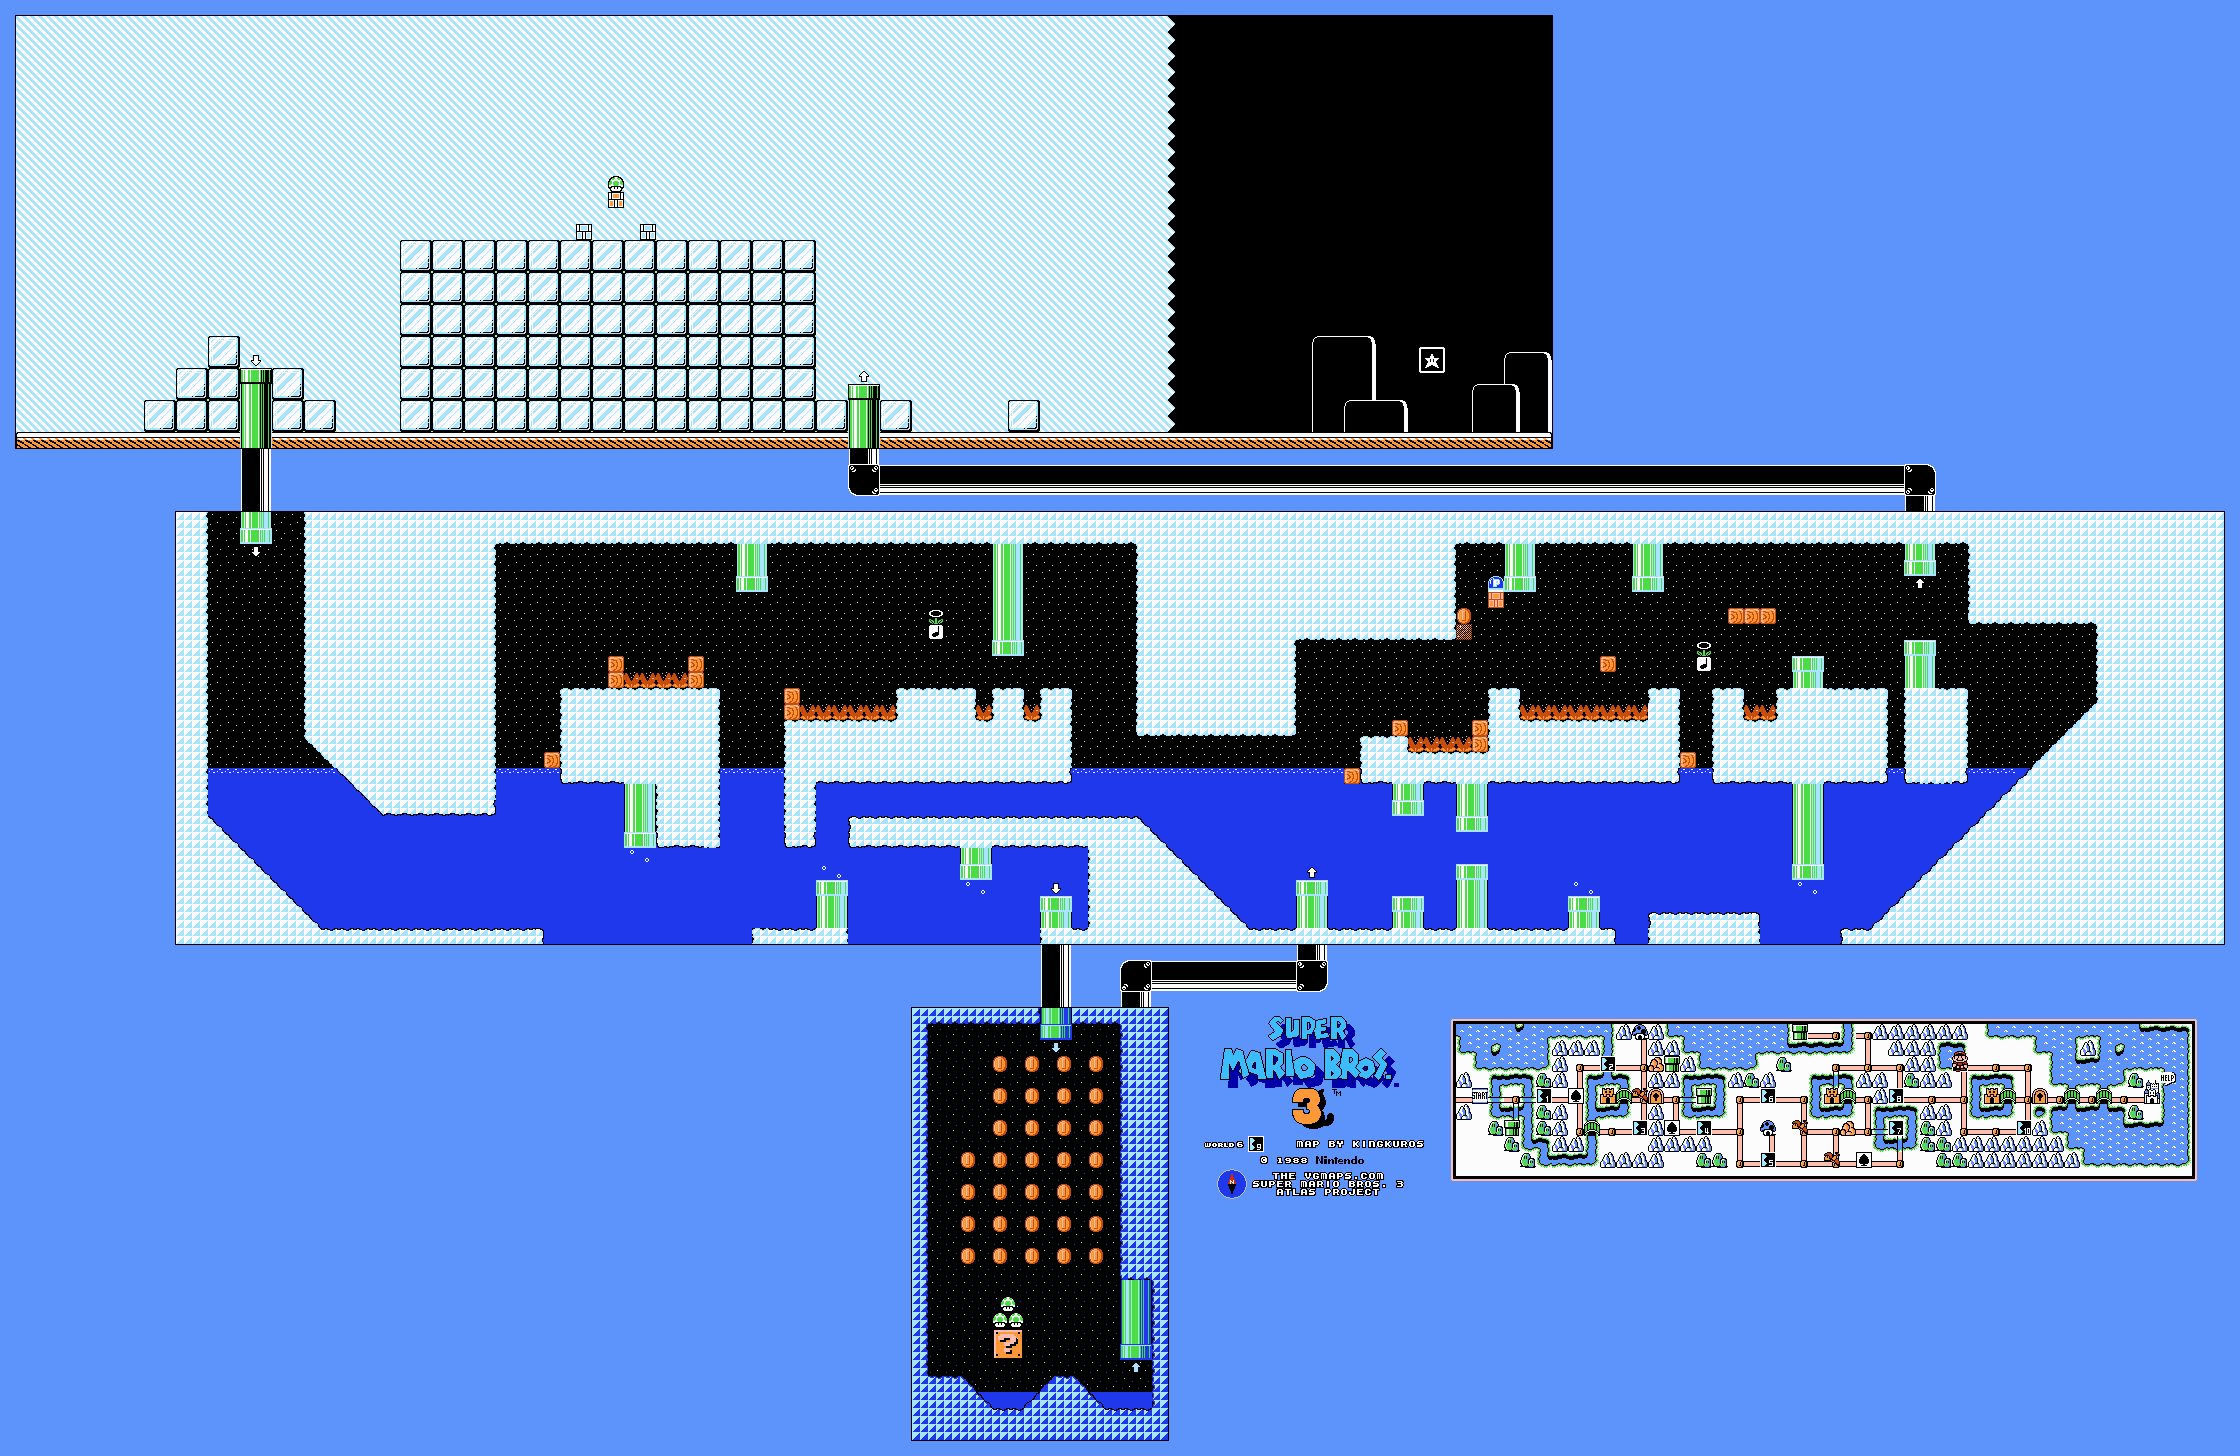
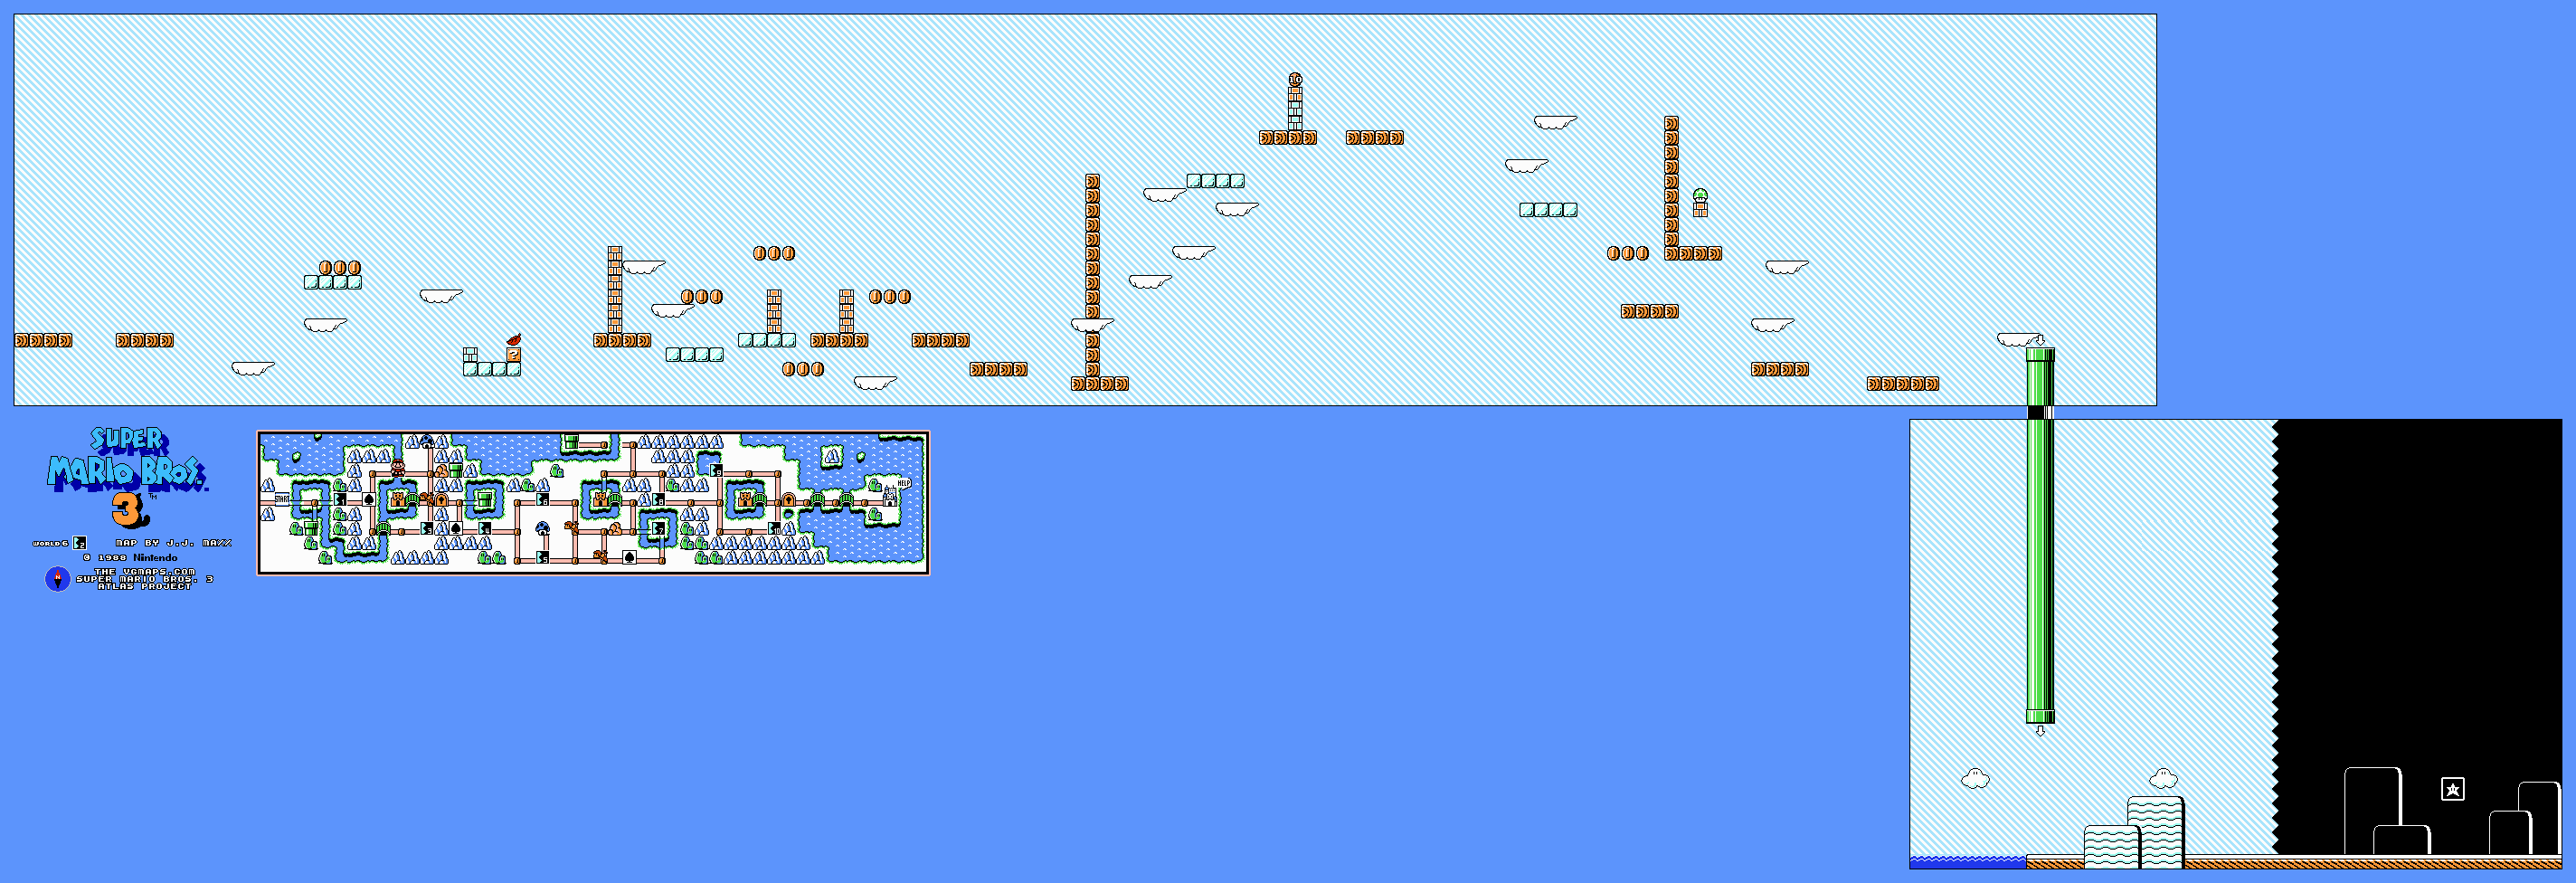
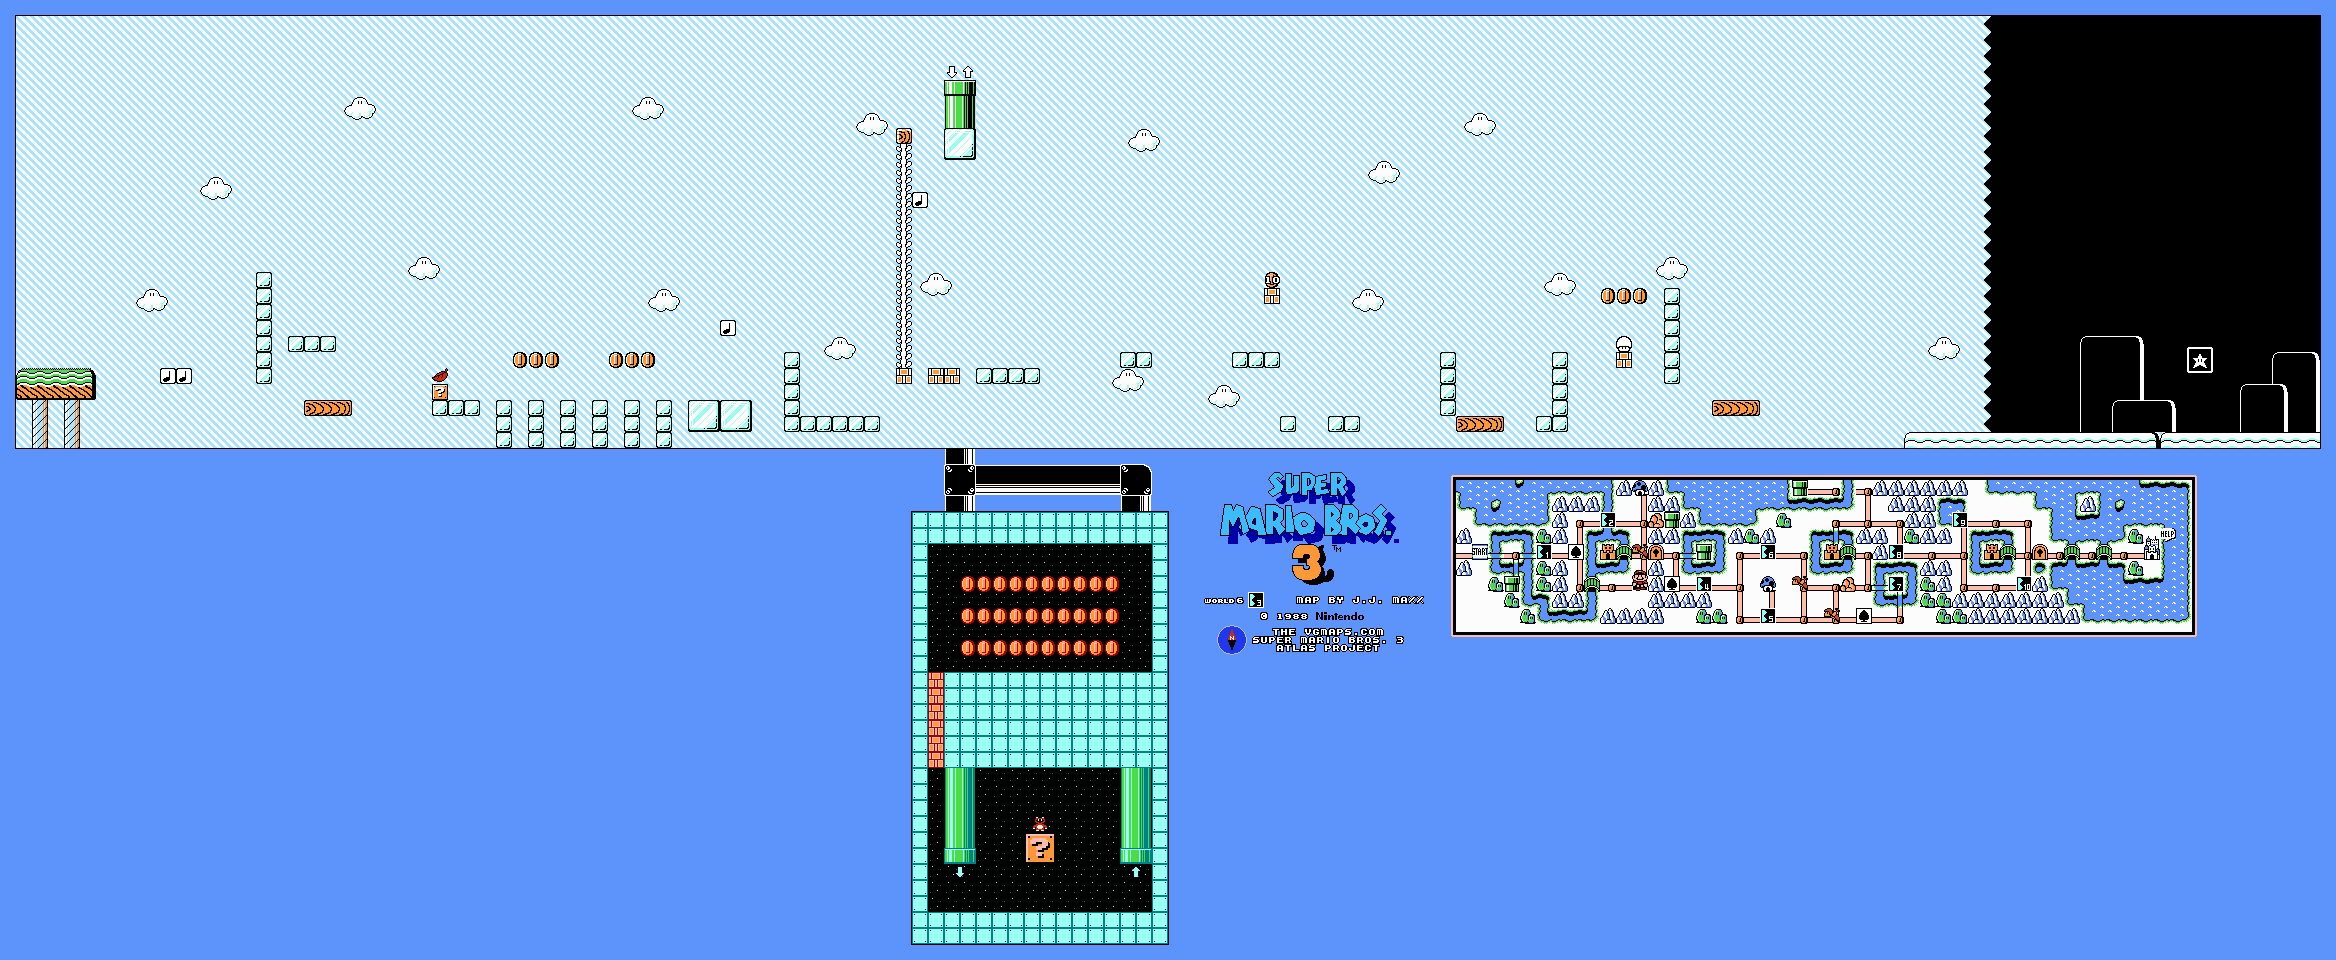
In this entry, we finish up World 6, then head to the maze of challenges that is World 7.
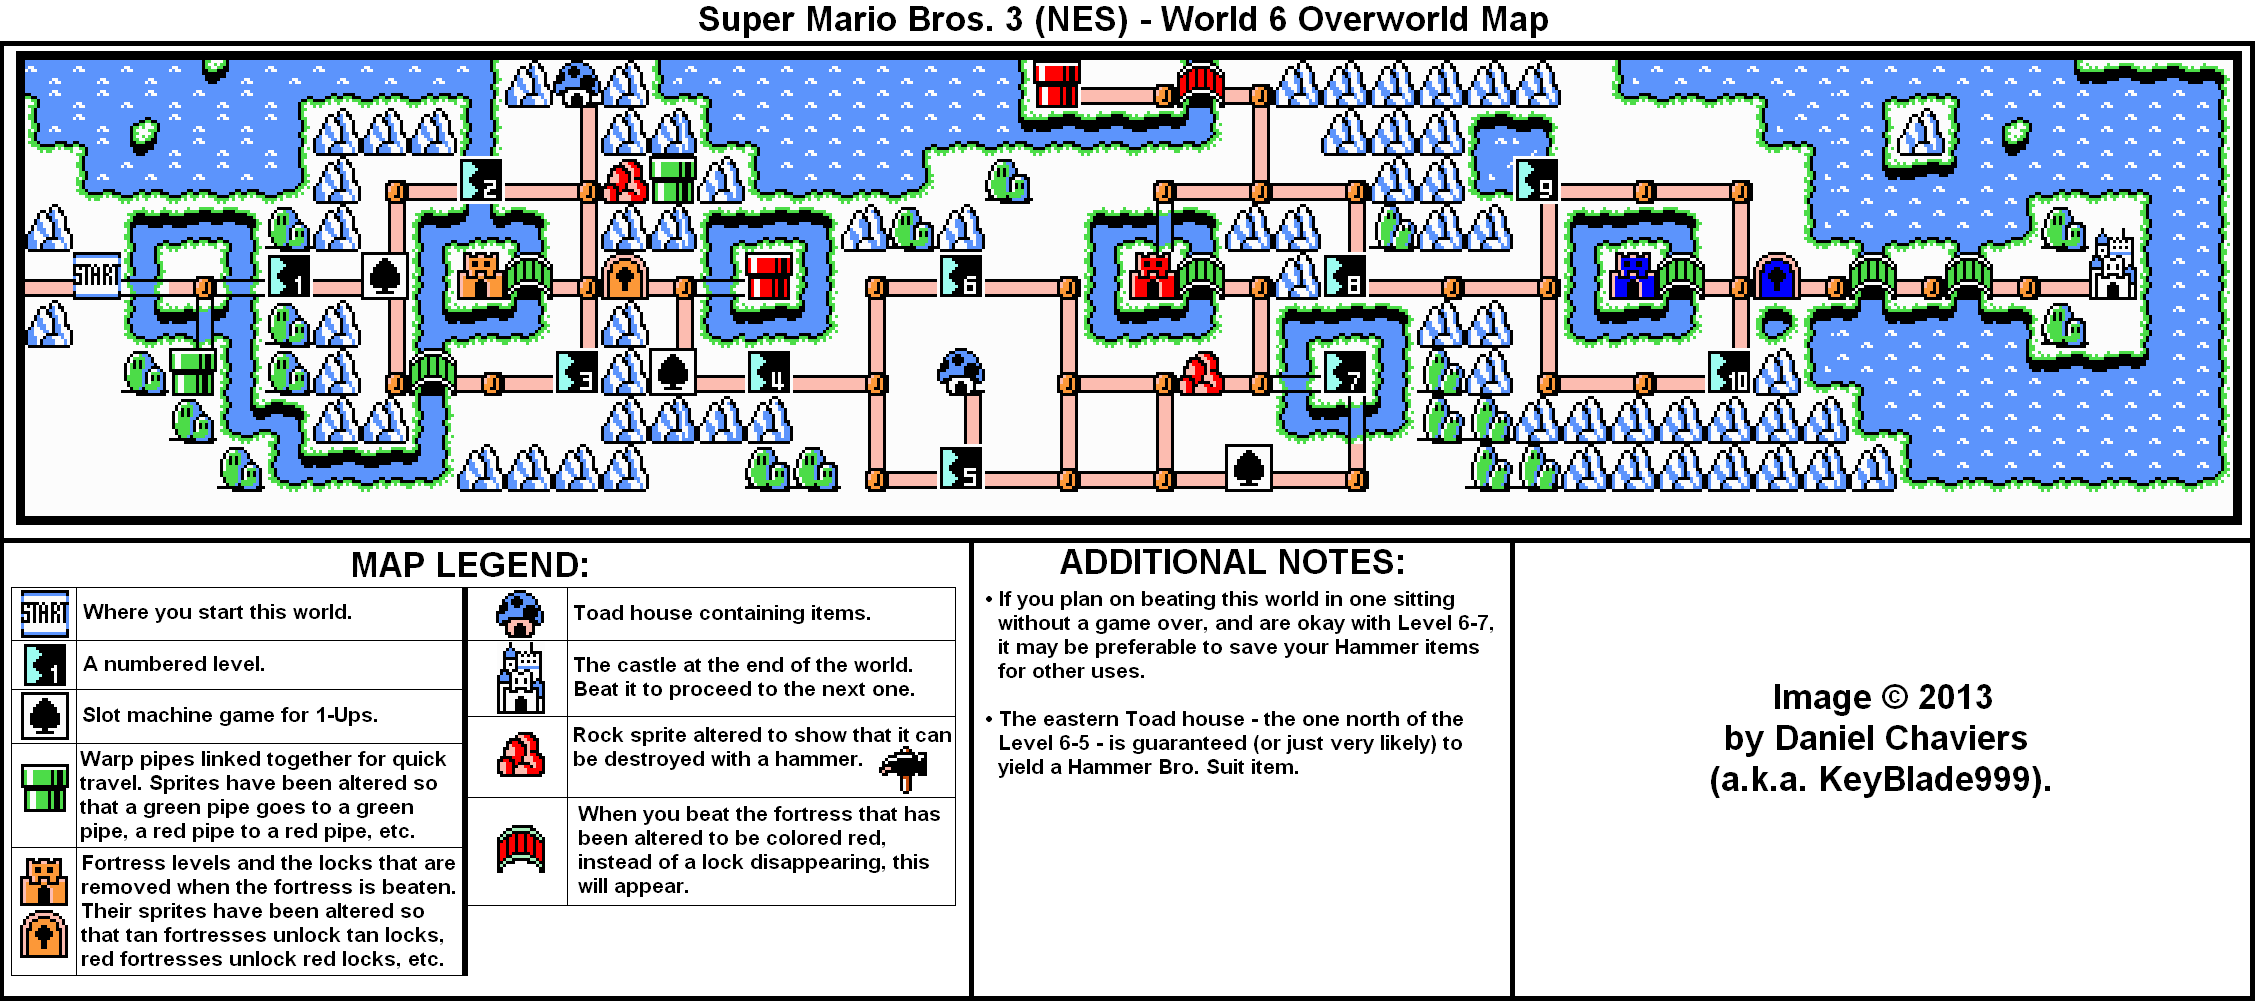
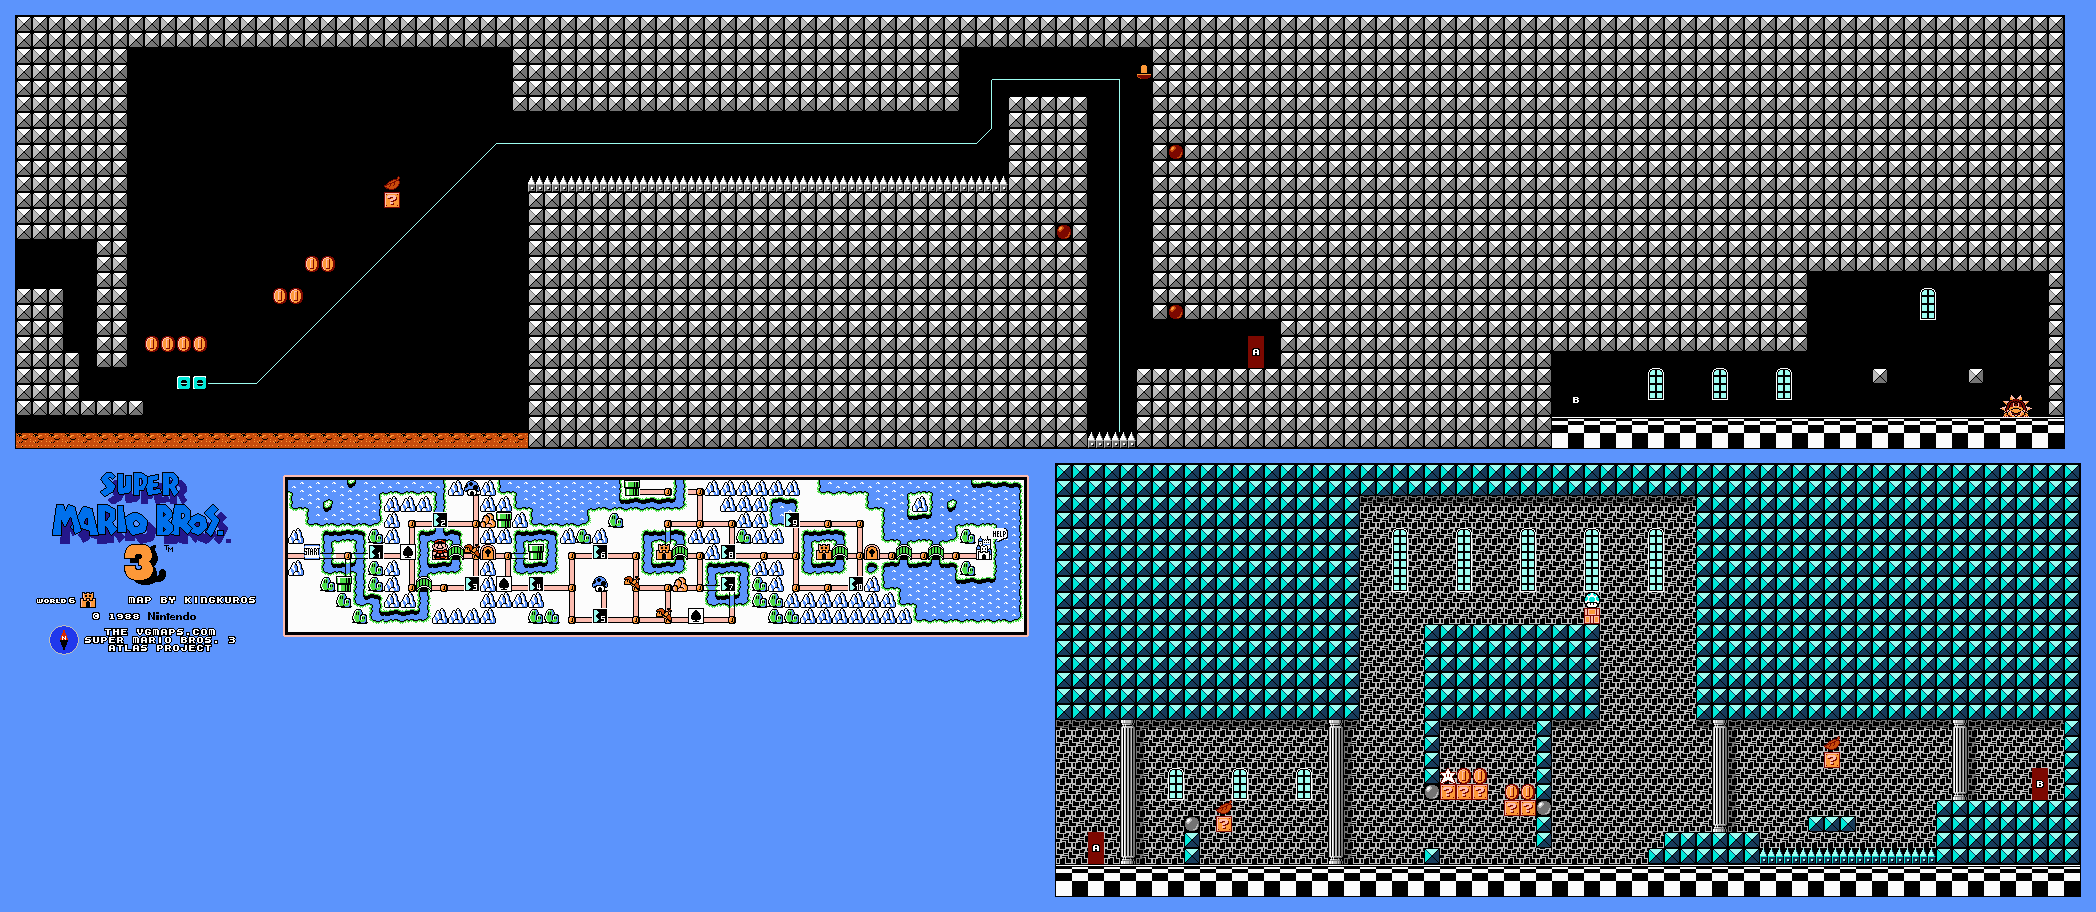
World 6
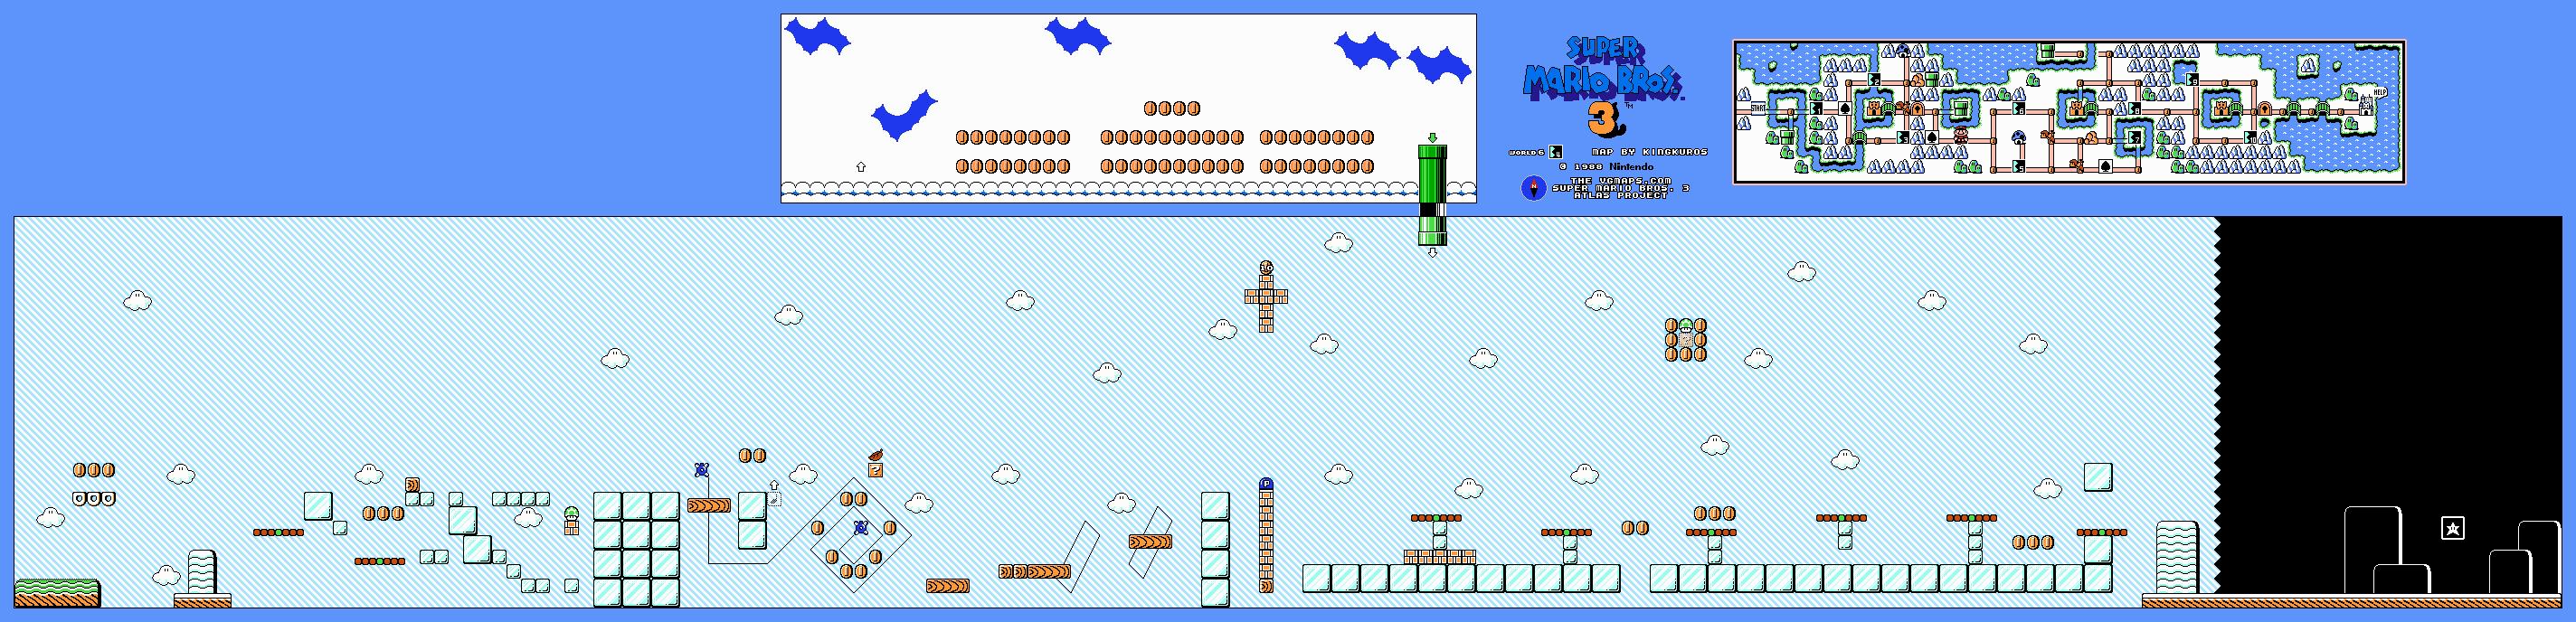
World 6-10
Here's a stage where the stuff frozen in ice comes up again, and this time, you have to deal with both frozen coins and frozen plant spikes. There is a P-Switch shortly after the start that you can locate if you find a hidden vine in a block that you can hit to turn a whole bunch of bricks into coins, but you don't need it to finish the level. However, if you unfreeze the Munchers blocking the pipe, then hit the P-Switch, you can go down the pipe for a Hammer Bros. Suit.
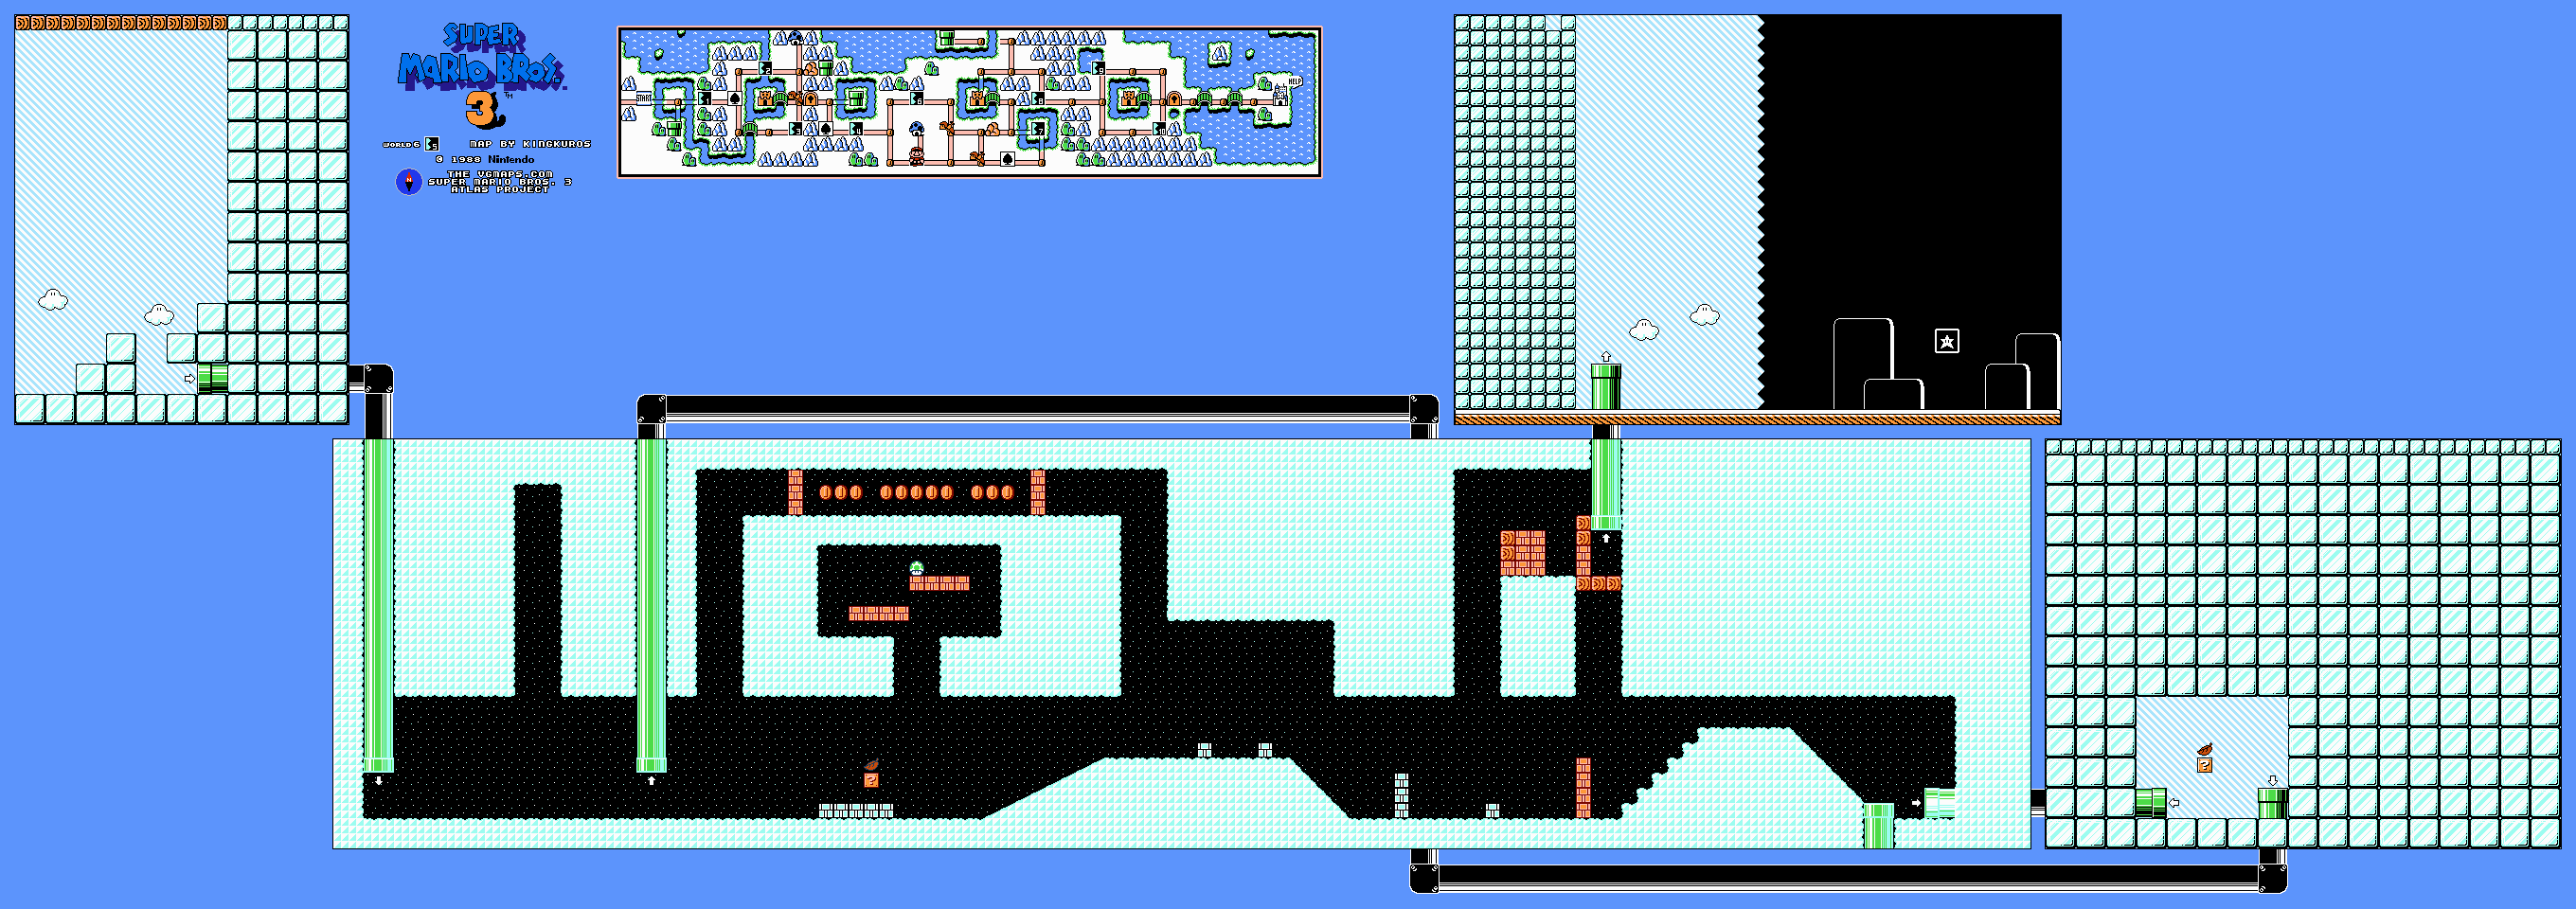
World 6 Fortress 3
A third fortress? Absurd! But it's real.
You'll be dealing with Boo Bars, disco waffles, spikes and conveyor belts as you make your way to the door on the other side. After that, you'll be in an elevator. Stay on the right-hand side and keep all three Boos on one side so you can look at them all and keep them from attacking. After that, it's Boom Boom time.
World 6 Castle
The king is a seal. Like how he's bouncing the crown on his nose.
World 6 Airship
The Koopaling here is Lemmy, who is balancing on top of his ball. Instead of shooting out wand projectiles, he spawns balls that bounce high and narrowly as you hit him. Try to use them to your advantage when you try to jump on Lemmy's head.
The king here looks like a nutcracker when you get his wand back. Meanwhile, The Princess' letter will tell you about the Warp Whistle in World 1-3 (and I'm assuming this is how you're supposed to find out about it). You'll also get a P-Wing.
World 7
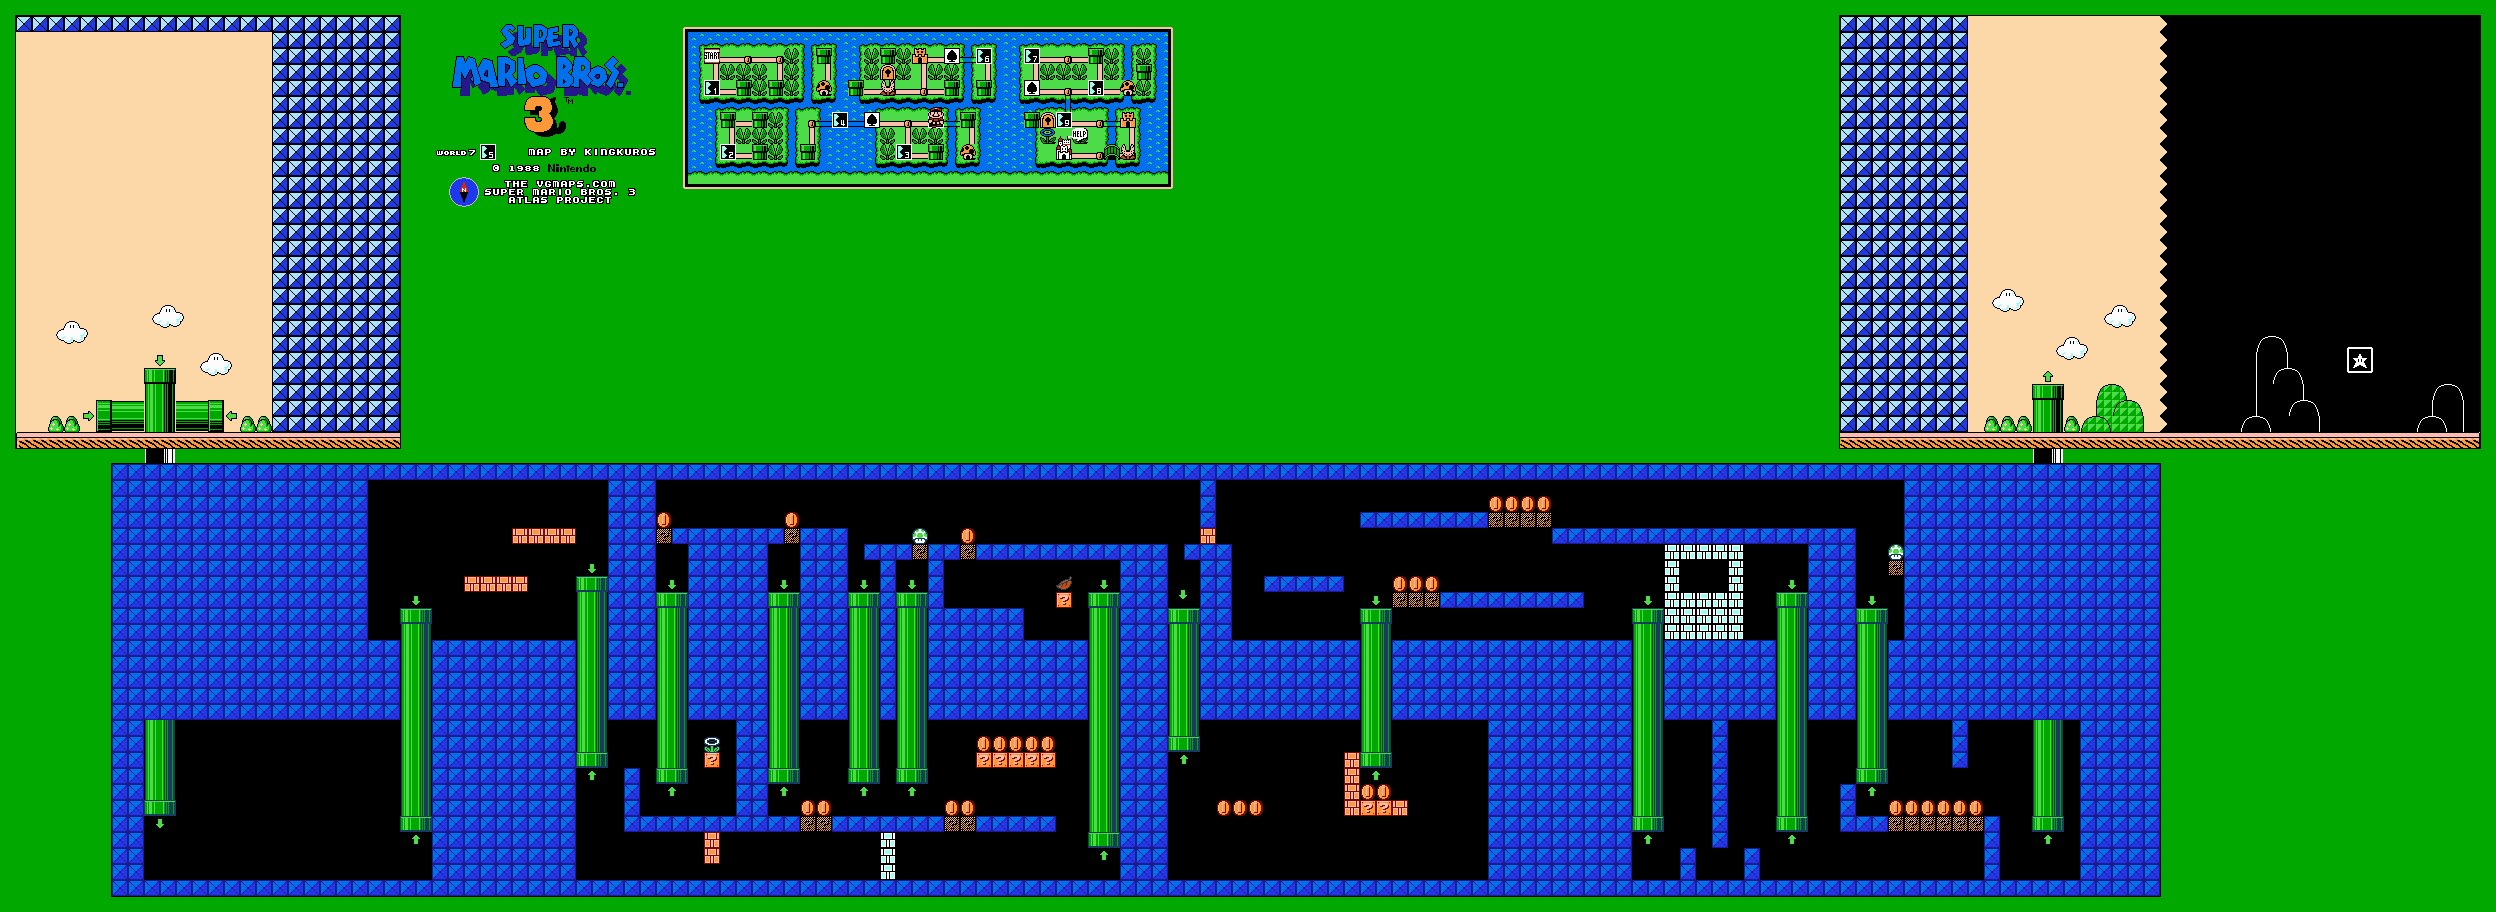
World 7-1
In this stage, you'll have to carefull leap your way up to get around in this twisted pipe maze. Remember that you can run through one side of the screen to end up on the other one.
At this point in the game, the stages are going to be the hardest you'll see in the game yet as well as some of the most daunting and confusing.
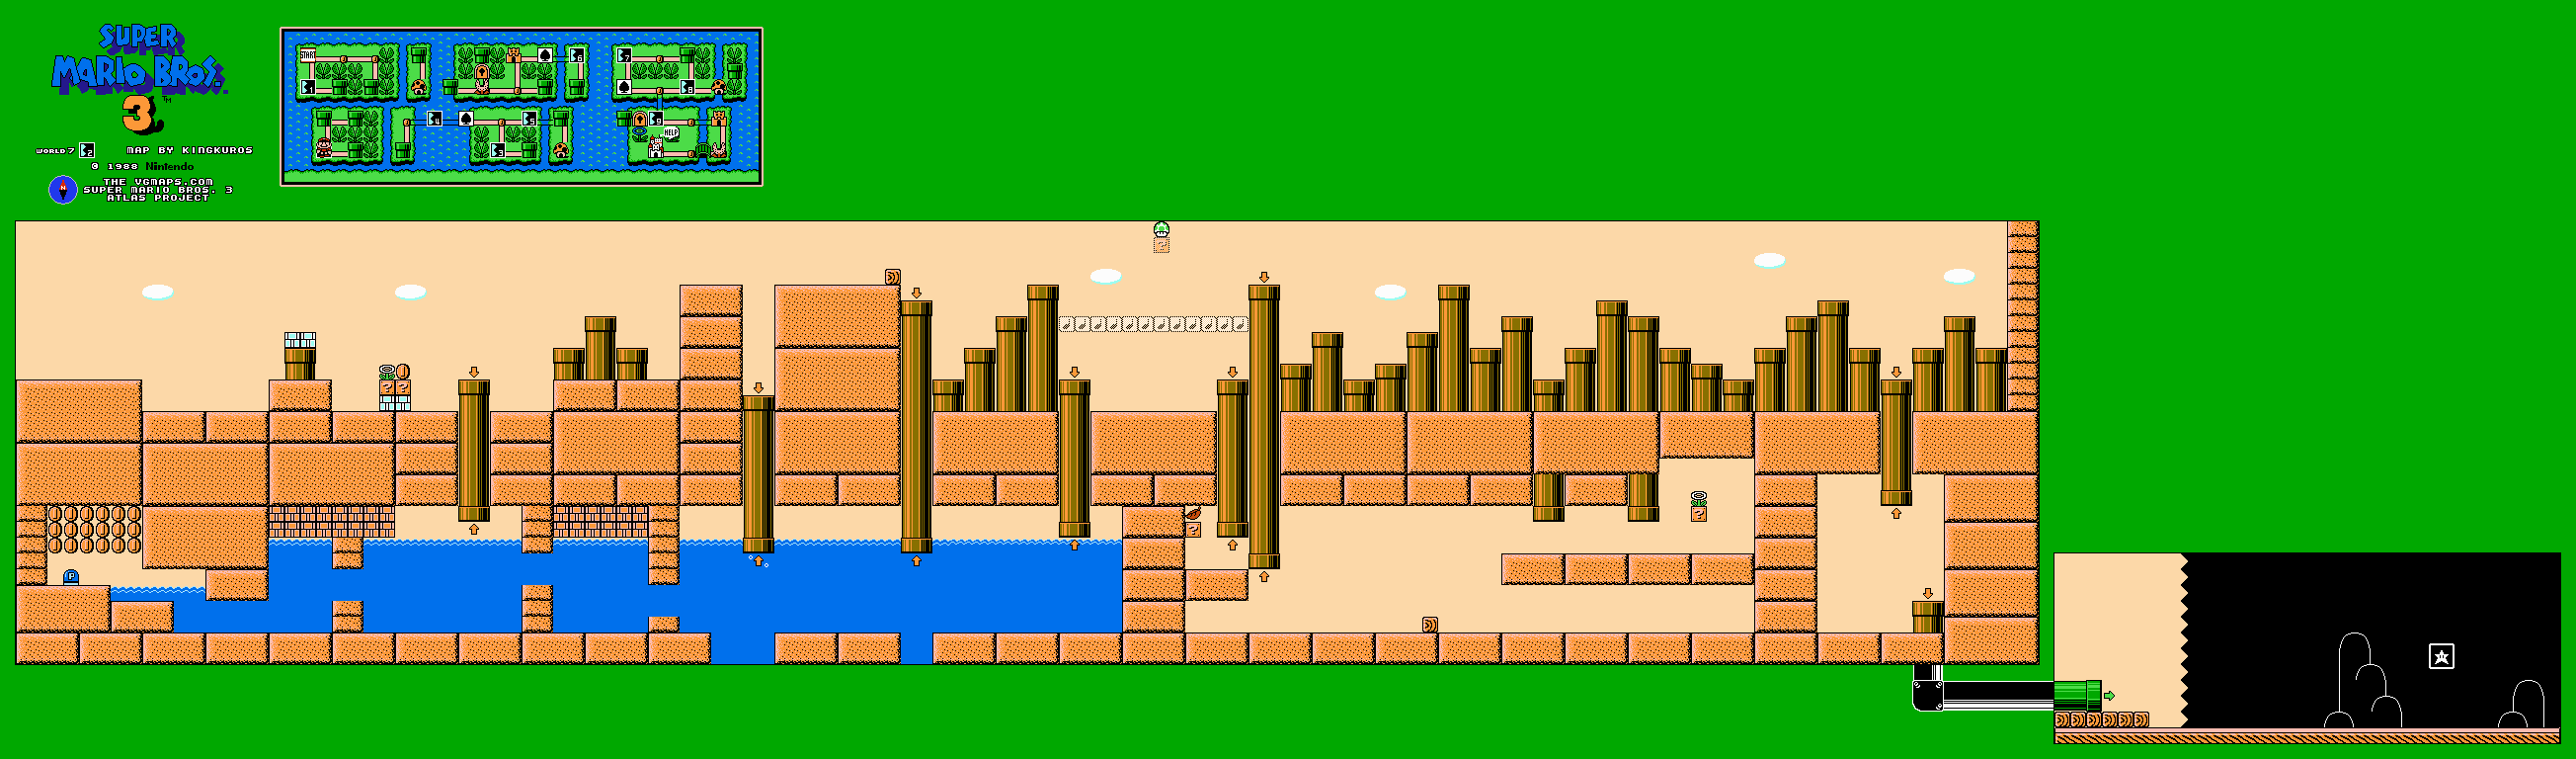
World 7-2
The twisting, confusing stages continue with this desert pyramid maze. You'll have to get all the note blocks to appear before making it to the exit.
If you can somehow get 46 coins in this stage, you can get the White Mushroom House to show up.
World 7-3
If you know what you're doing, you can get Starmen to spawn throughout the entire level, making it so that you can go through the entire stage invincible.
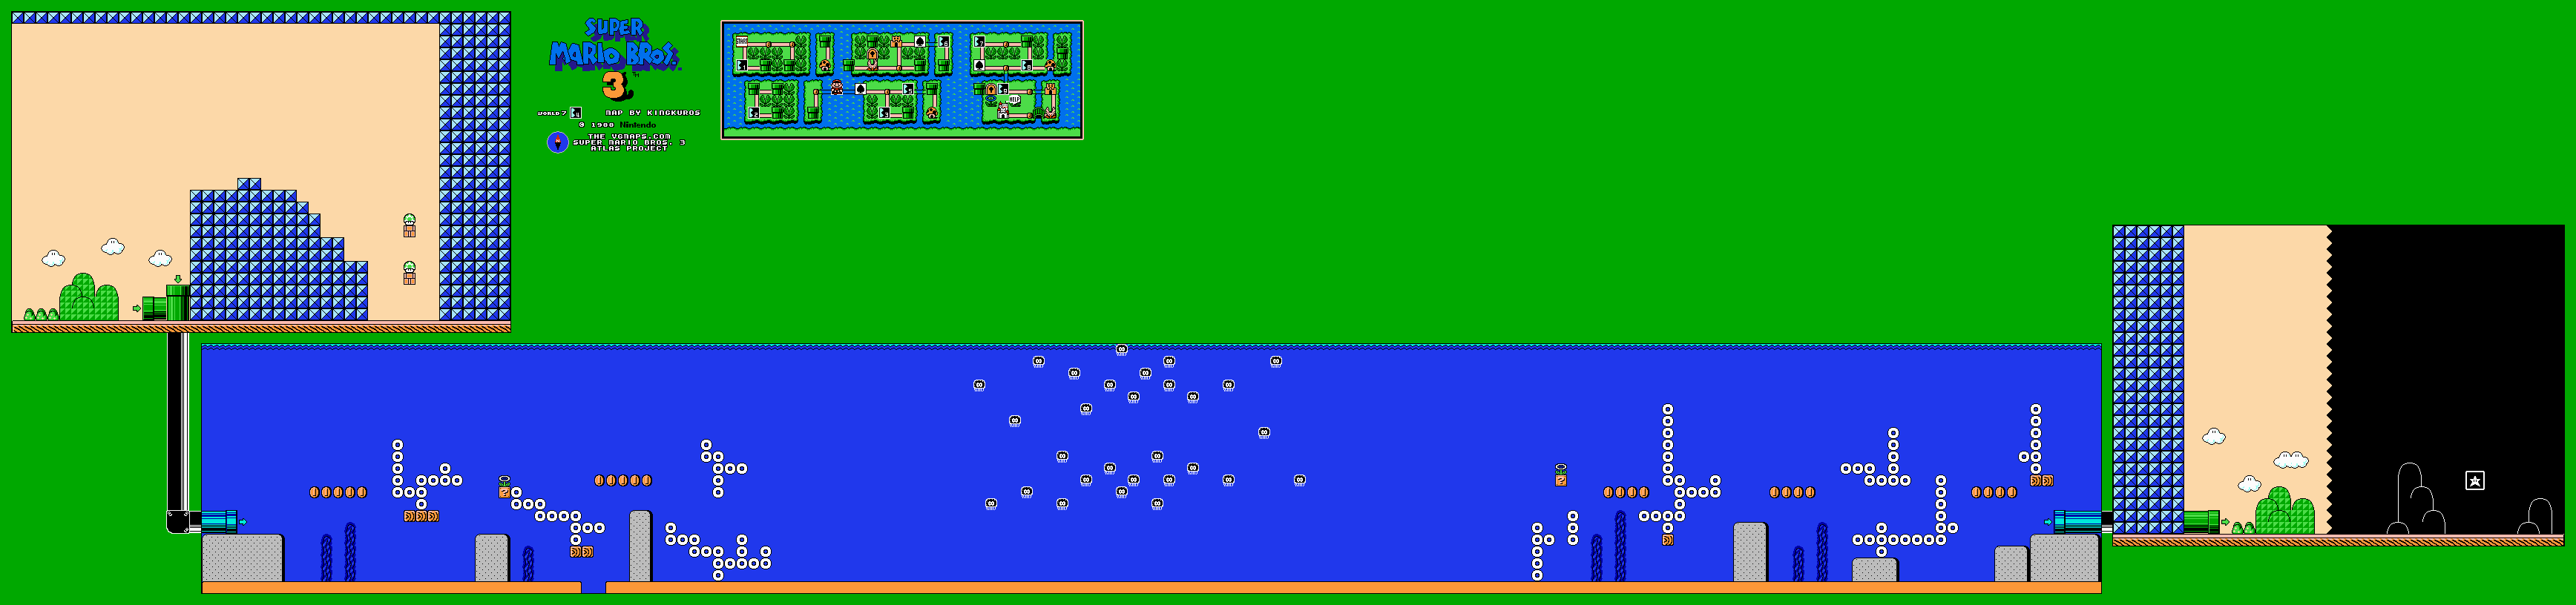
World 7-4
Here's an interesting level: an auto-scrolling underwater level. There will be spiky fish coming out from both sides of the screen as well as other enemies.
If you can fly over the wall at the beginning, you can find two 1-Ups.
Monday, July 20, 2020
PrinceWatercress plays Super Mario Bros. 3 (NES) - Part 8 of 11
As you can see, this one is going to take a while.
World 6
World 6 Fortress 1
You'll be riding on a platform avoiding Podaboos as well as falling into lava or spikes (face right so the candle flame doesn't come to life!), then avoiding some disco waffles before facing Boom Boom. If you can fly up in the second area, you can get a hidden 1-Up in a brick.
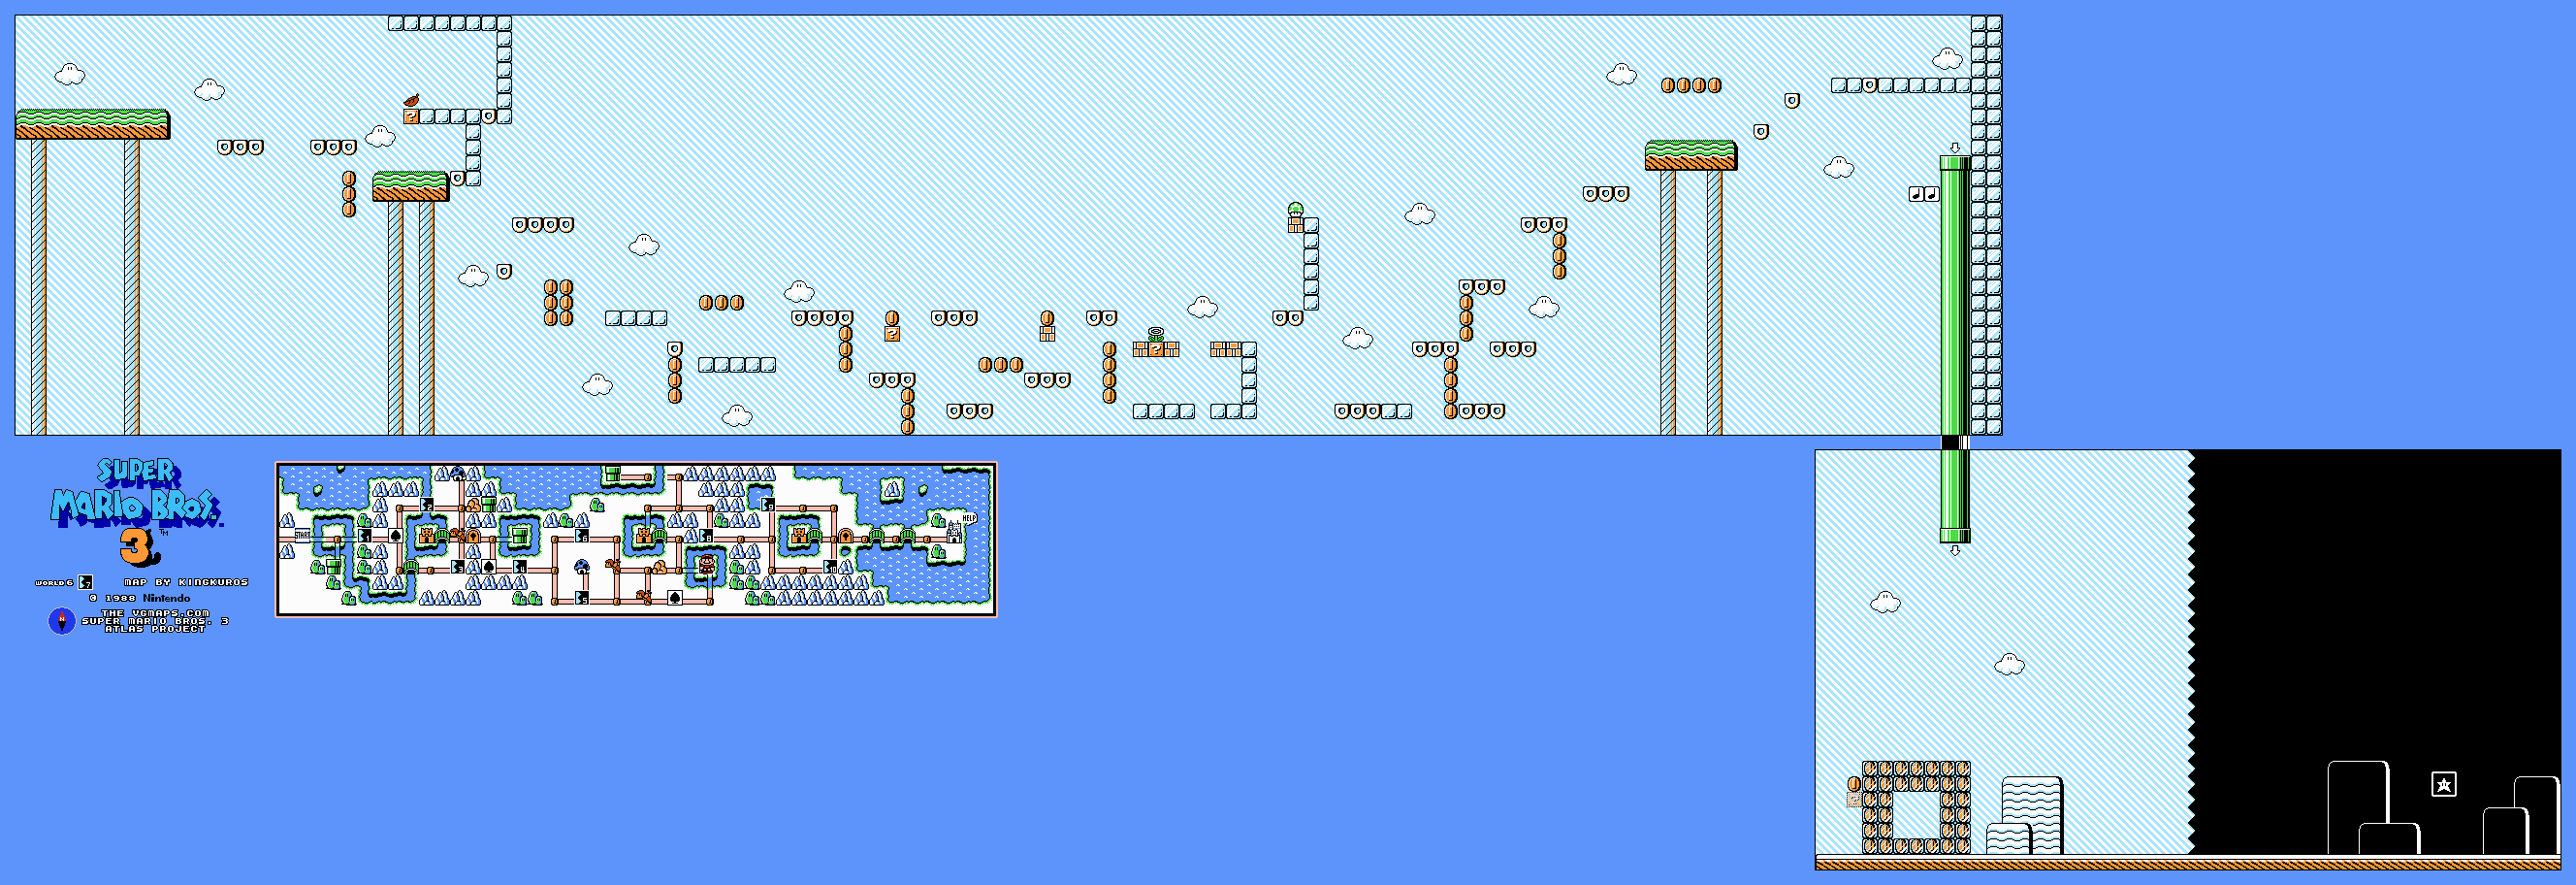
World 6-4
There is quite the series of obstacles in this stage. If you can fly high enough, you can get find a hidden 1-Up, and if you can somehow find the hidden note block at the beginning, you can skip half the level.
World 6-5
This is the hardest area in the game. You have to jump on a Koopa, be Raccoon Mario, and carry the Koopa all the way to the pipe above and send the Koopa shell into the bricks to open up a path to the goal. If you aren't Raccoon Mario, you can go into the pipe all the way to the right and get your Super Leaf there. There is no other way to clear the level, and there is no other level like this (which is both a relief and a disappointment, since this was pretty hard to clear but the potential for other puzzle-like levels like this one was there). If you accidentally kill the Koopa, go back to where you get the Super Leaf to reset the puzzle.
The Toad House north of here will always give you a Hammer Bros. Suit. To recap, the Hammer Bros. Suit has limited range, but the hammers you throw can do
World 6-6
It's back to shorter, more reasonable stages - and swimming - for this one. You can go up top at first for a Fire Flower, then hit the wooden blocks on the lower path up for a Starman. These will definitely be useful here.
World 6-7
This one is full of Donut Blocks...and auto-scrolling! Be ready to drop down when you need to, and to repeatedly jump when you don't. Also, ice physics and Fire Chomps are a thing here, too.
The White Mushroom House will pop up if you get 78 coins here. Good luck with that! Also, you'll need to be Fire Mario to get the coins stuck in ice at the end; thankfully, you can hit an invisible coin block if you get trapped on the far-left side of the goal area.
World 6 Fortress 2
This time, everything is ice, which means that ice physics abound. Keep that in mind while watching out for Thwomps.
World 6-8
Finally! Some relief from ice for once!
If you can fly up above where the P-Switch is, you'll be able to get a bunch of coins if you hit the P-Switch beforehand.
World 6-9
It's back to more swimming in this one...unless you fly over the wall at the start and send the throwable blocks out of your way to find a 1-Up and go over the wall.
If you choose to go down the pipe, you'll have to switch between the water and the land above the surface, the latter of which has plenty of Munchers. If you have the Frog Suit, you can find a hidden room where you can get three 1-Ups.
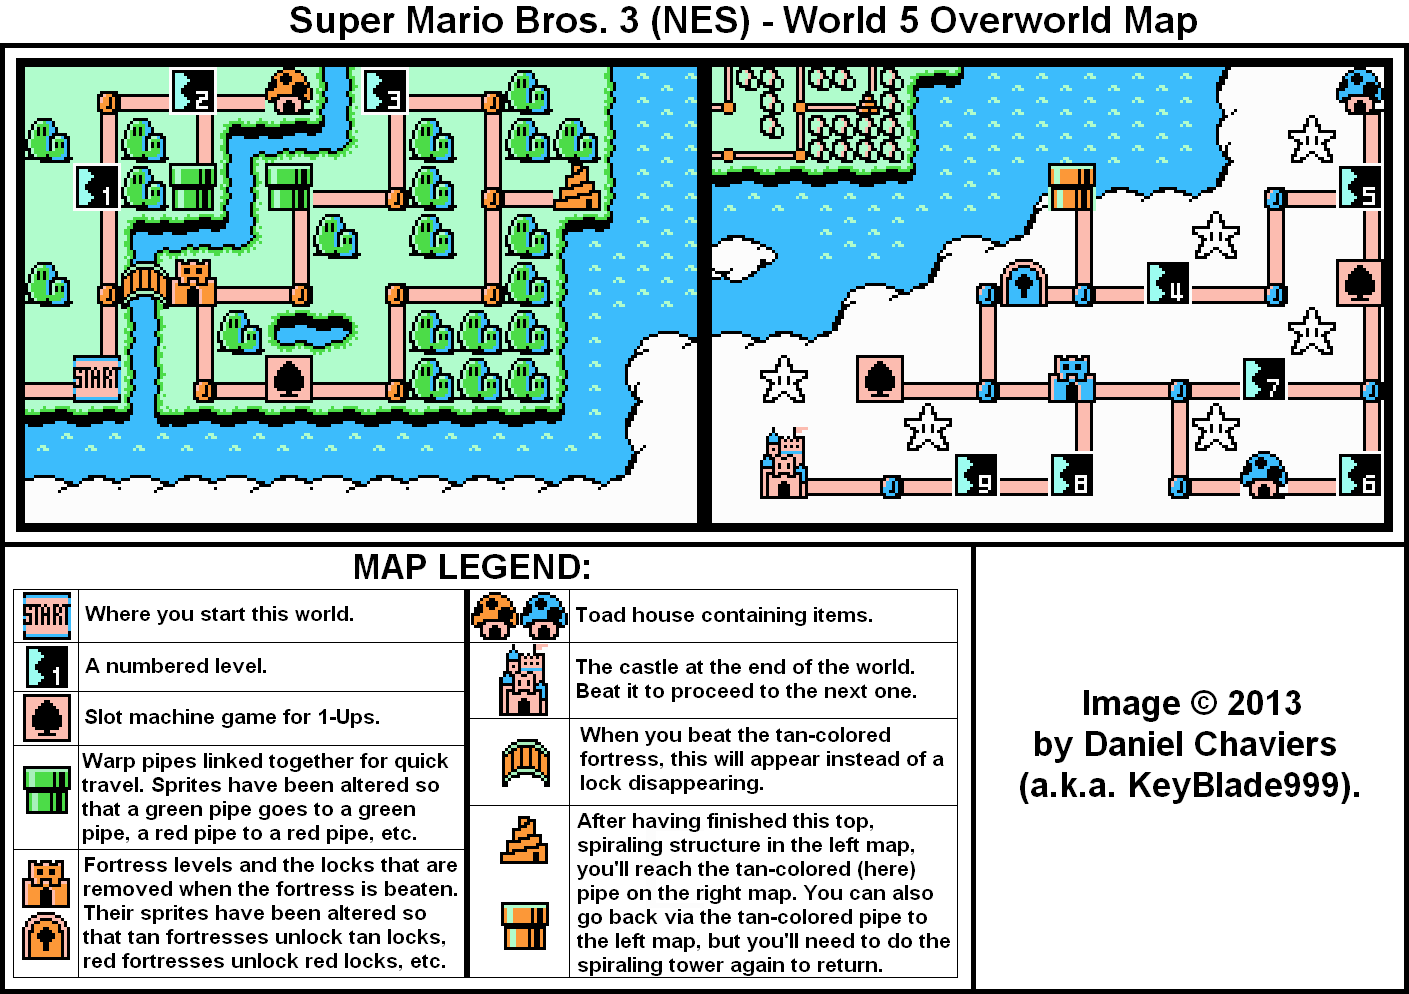
PrinceWatercress plays Super Mario Bros. 3 (NES) - Part 7 of 11
We save the day in World 5 before going to the icy plains of World 6.
World 5
World 5-6
This level is an auto-scrolling level.
This is the debut of the flying shell platforms, and when you land on one, it will sink briefly before slowly flying upwards. Watch out for the Fire Chomp near the end and the Lakitu at the goal.
World 5-7
There's quite a lot of power-ups you can get here.
If you can go down the first pipe you see, you'll enter a secret area where you can get a bunch of coins if you can fly to the P-Switch and hit it.
There is a Lakitu near the end and another Lakitu at the goal.
World 5 Fortress 2
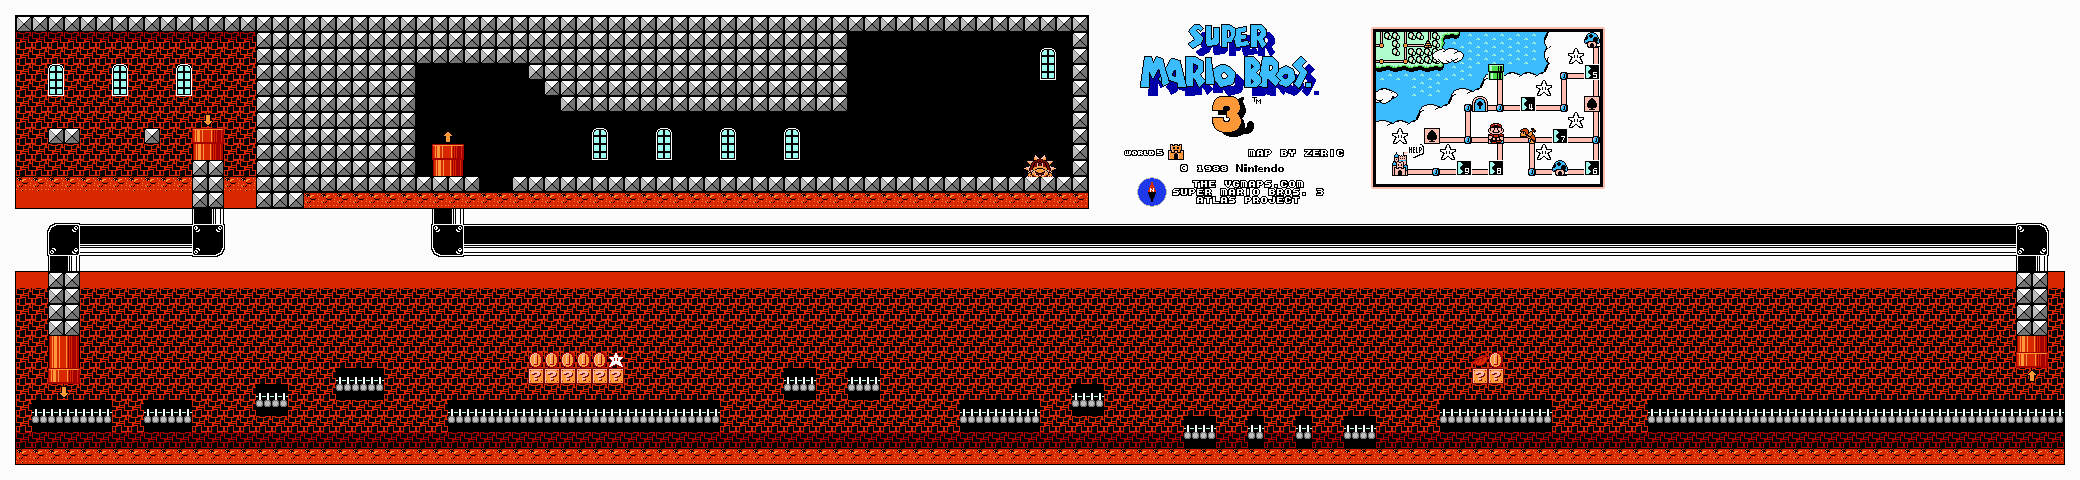
Be careful as you go through this fortress, as the floor and ceiling of this place are both lava and Podaboos can jump out from both of them.
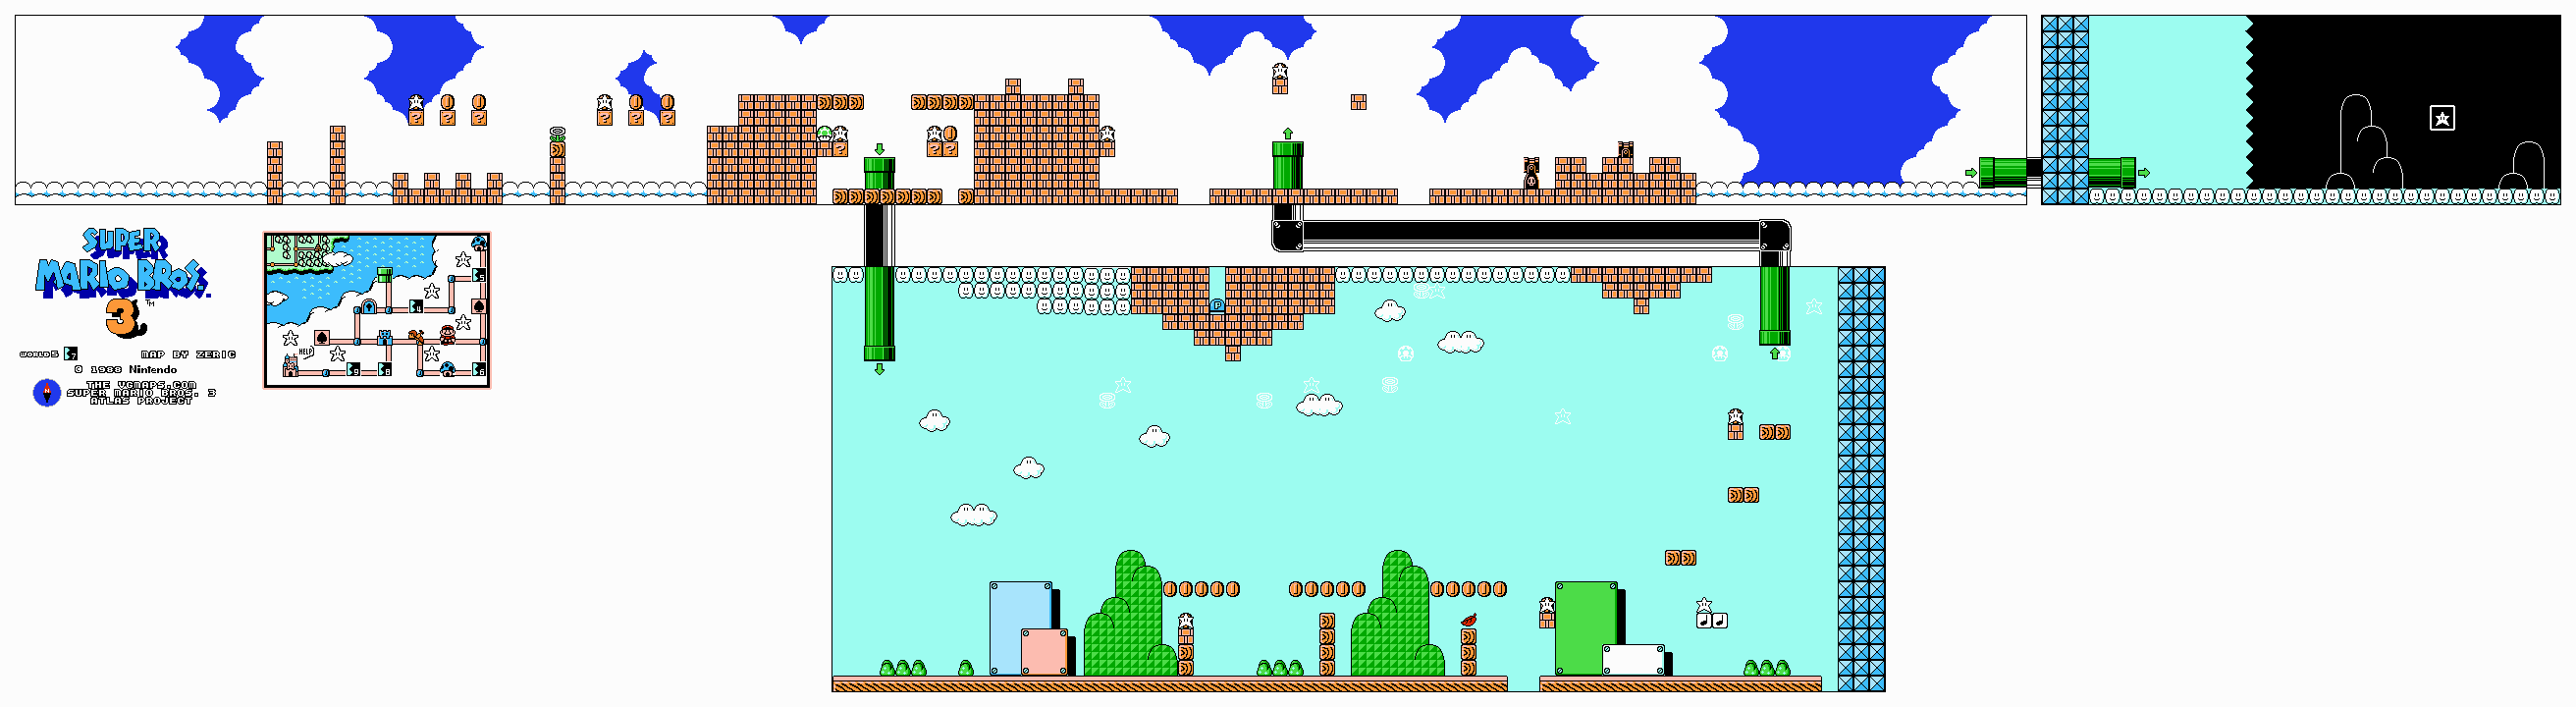
World 5-8
This one is a fast one and also one you can get through very quickly if you know what you're doing. You'll have a Lakitu chasing you down and throwing Spinys, but if you keep running and know when to jump, this level shouldn't be much of a problem.
World 5-9
This level automatically scrolls up and right. You'll have to watch where the platforms go as you make your way through this level, and you'll also have to watch out for the Fire Chomps. Instead of destroying the first one you see, have it follow you. When it runs out of fireballs to spit at you, it will eventually explode and have a chance of taking the only other Fire Chomp in the stage with it.
World 5 Castle
The king is a bird. I guess that makes sense.
World 5 Airship
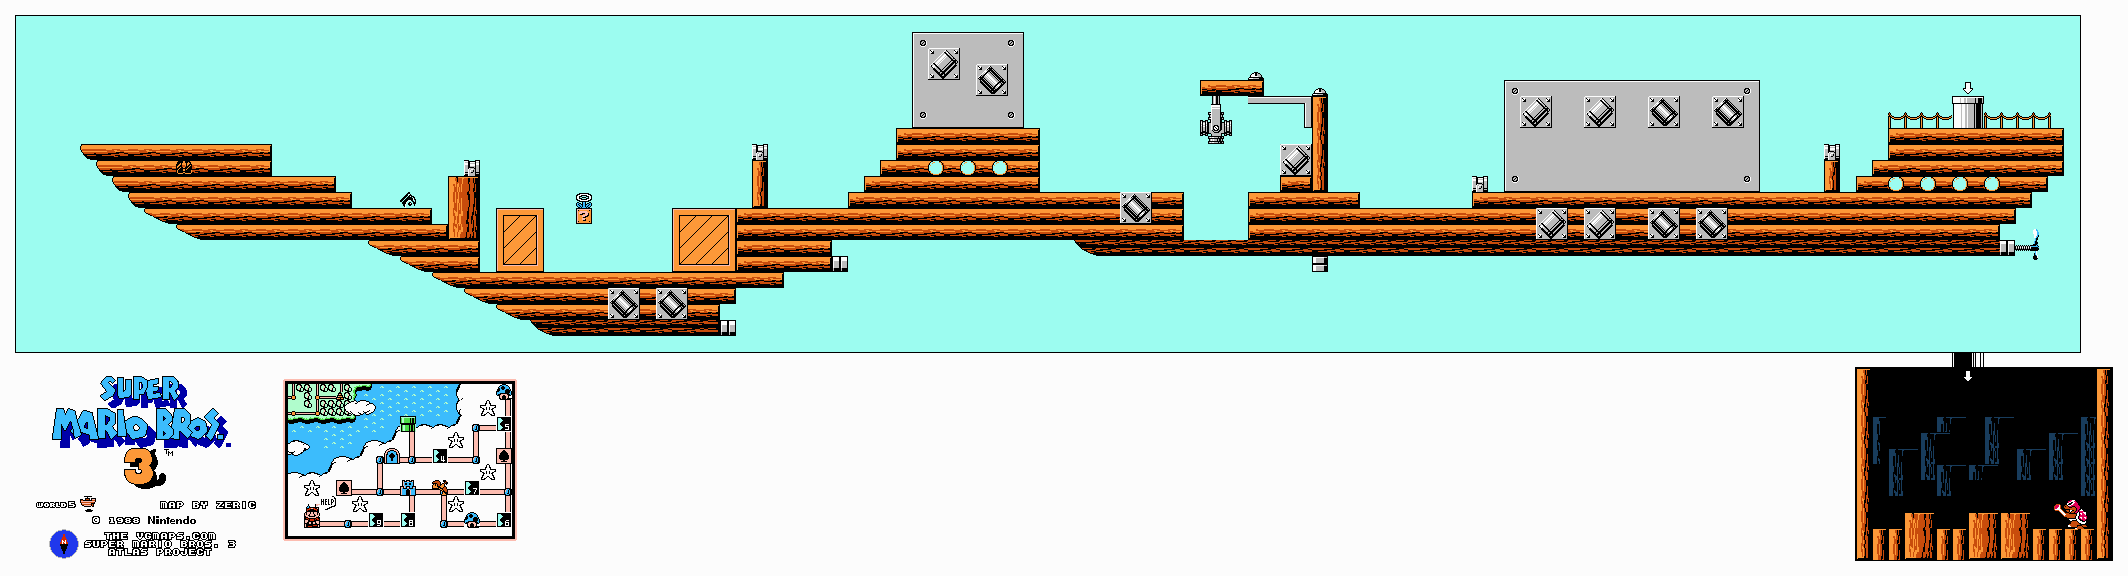
The Koopaling here is Roy Koopa. When he jumps, jump before he hits the ground once and bounces off so you do not get stunned from the earthquake he produces.
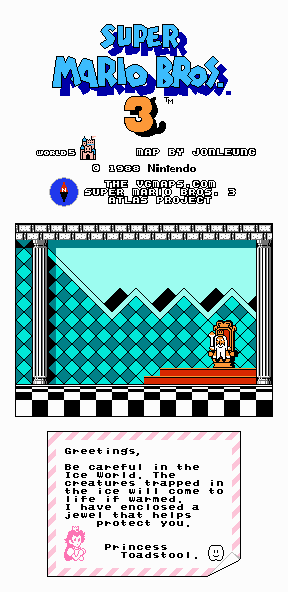
The Princess will tell you that enemies trapped in ice will come alive is freed with fireballs from Fire Mario, then you'll get a Jugem's Cloud.
World 6
World 6-1
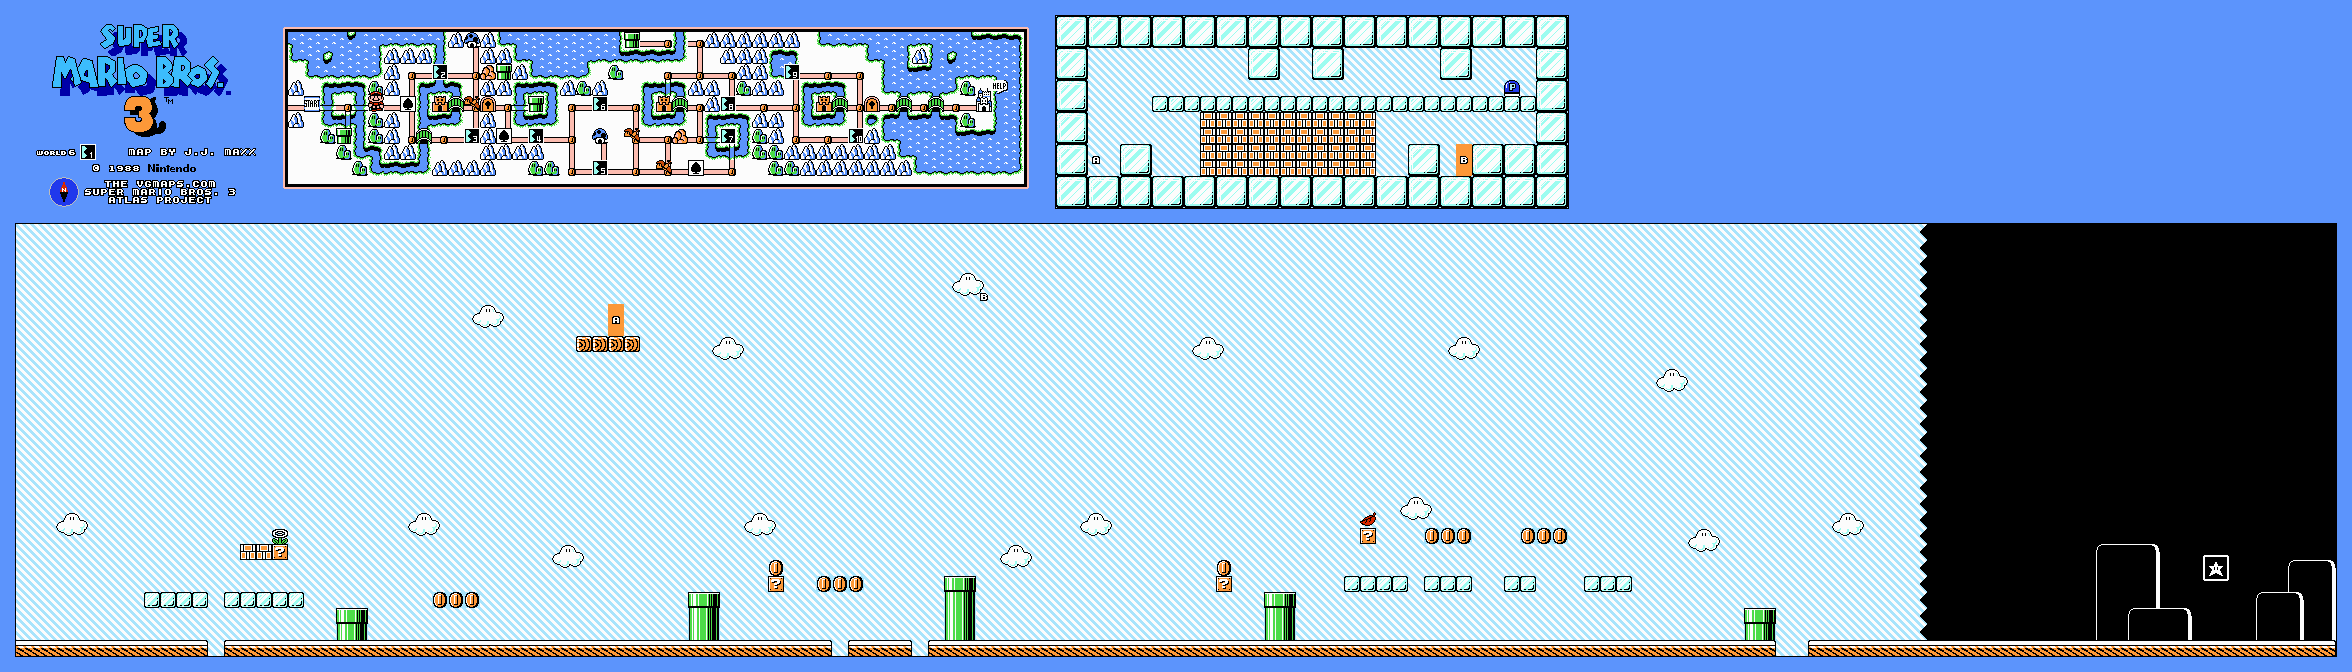
This is a pretty simple level. You'll see some Piranha Plants - some of them out of their pipes and walking on their own leaves - blowing spiked balls up into the air and making it harder to advance as a result.
It is possible to fly up to a door where, if you can get to the P-Switch, you can get a bunch of coins.
Oh, and ice physics. They're a thing. Watch where you going as well as how you're going, as it is easy to slide around but also move in place if you suddenly have to change direction.
World 6-2
Here's another auto-scrolling level. You'll have to use the clouds to get to where you want to go, but at least they don't fall down under your weight like the wooden ones from World 1-4.
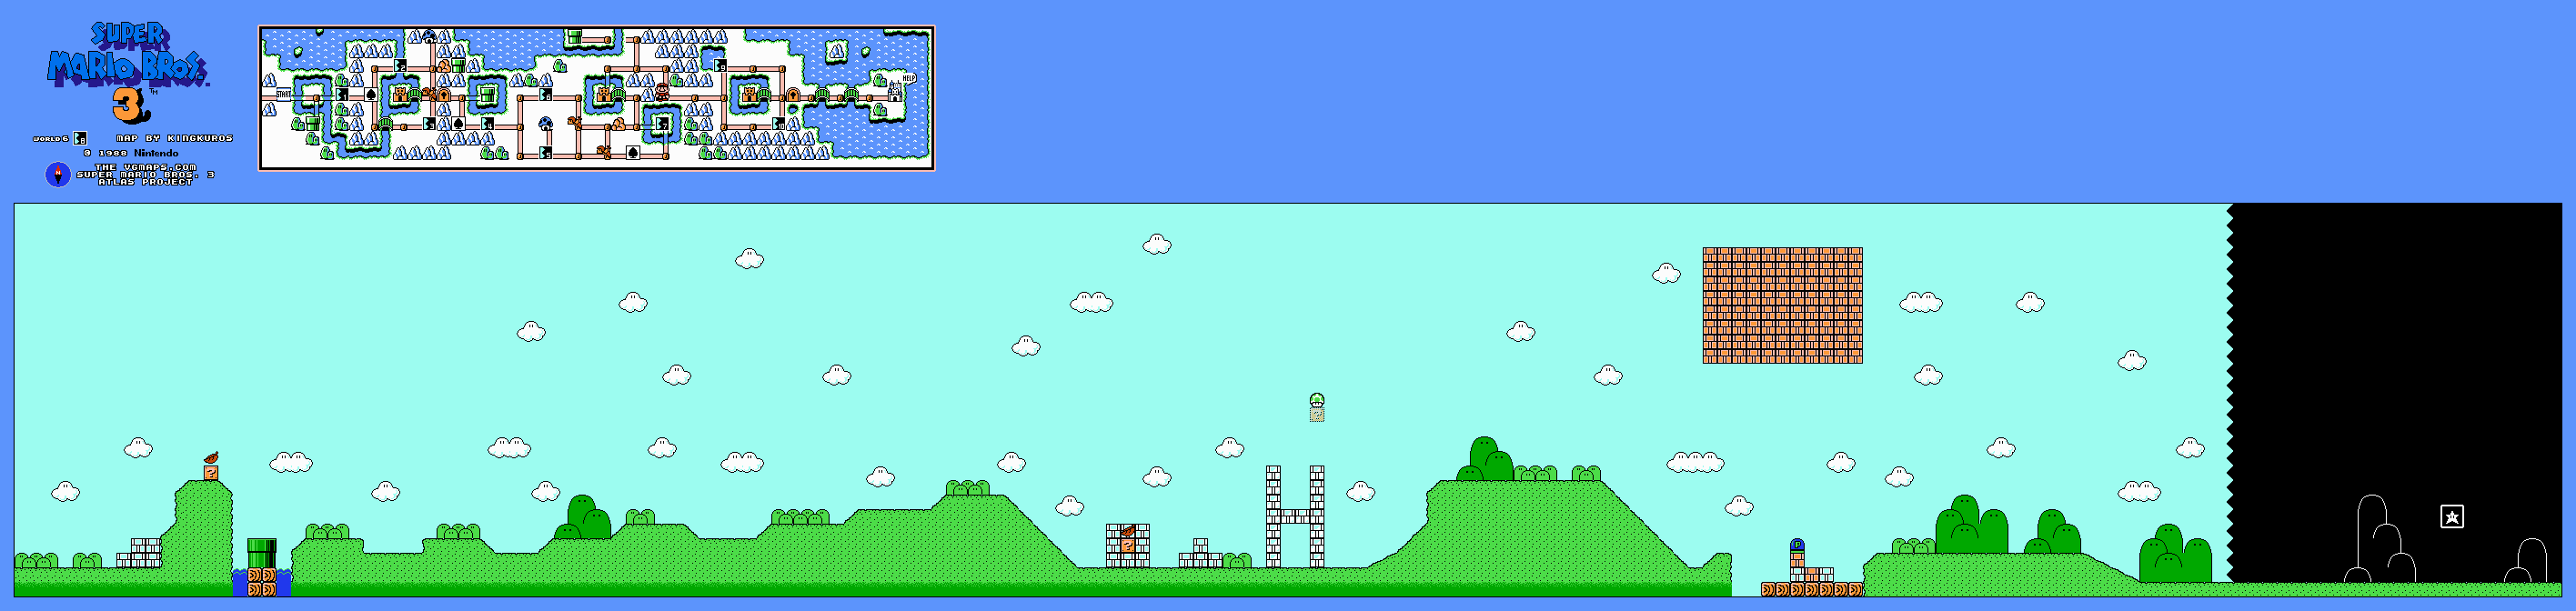
World 6-3
This one is a bit of an obstacle course. The loe block that I thought would give me a 1-Up actually contains a vine that leads to a pipe. Inside the pipe is a hidden room with a bunch of coins and a Tanooki Suit.
Subscribe to:
Posts (Atom)