Showing posts with label part 7. Show all posts

Thursday, January 22, 2026

PrinceWatercress plays Super Mario Odyssey - Part 7 of 92


In this video, we get the Cap Kingdom wrapped up, then head back to the Cascade Kingdom.

First | Previous | Next | End

There was someone near the Odyssey in the Cap Kingdom who tells you about a stranger at the top of Top Hat Tower. This is supposed to be how you learn about Captain Toad; I just never bothered to talk to him.

Uncle amiibo well help you get some Power Moons, Regional Coins and even costumes if you have any amiibo. Thankfully, you can unlock everything in the game without the use of one.

By opening the door of the Odyssey with your hat, you can go inside and look at all your souvenirs as well as change costumes. Any decals you have will be stuck to the outside of the Odyssey.

Despite what I was thinking here, we have all the Power Moons we can get in the Cap Kingdom...for now. We won't be able to fill up the rest of the Power Moon list for the kingdom until we beat Bowser.

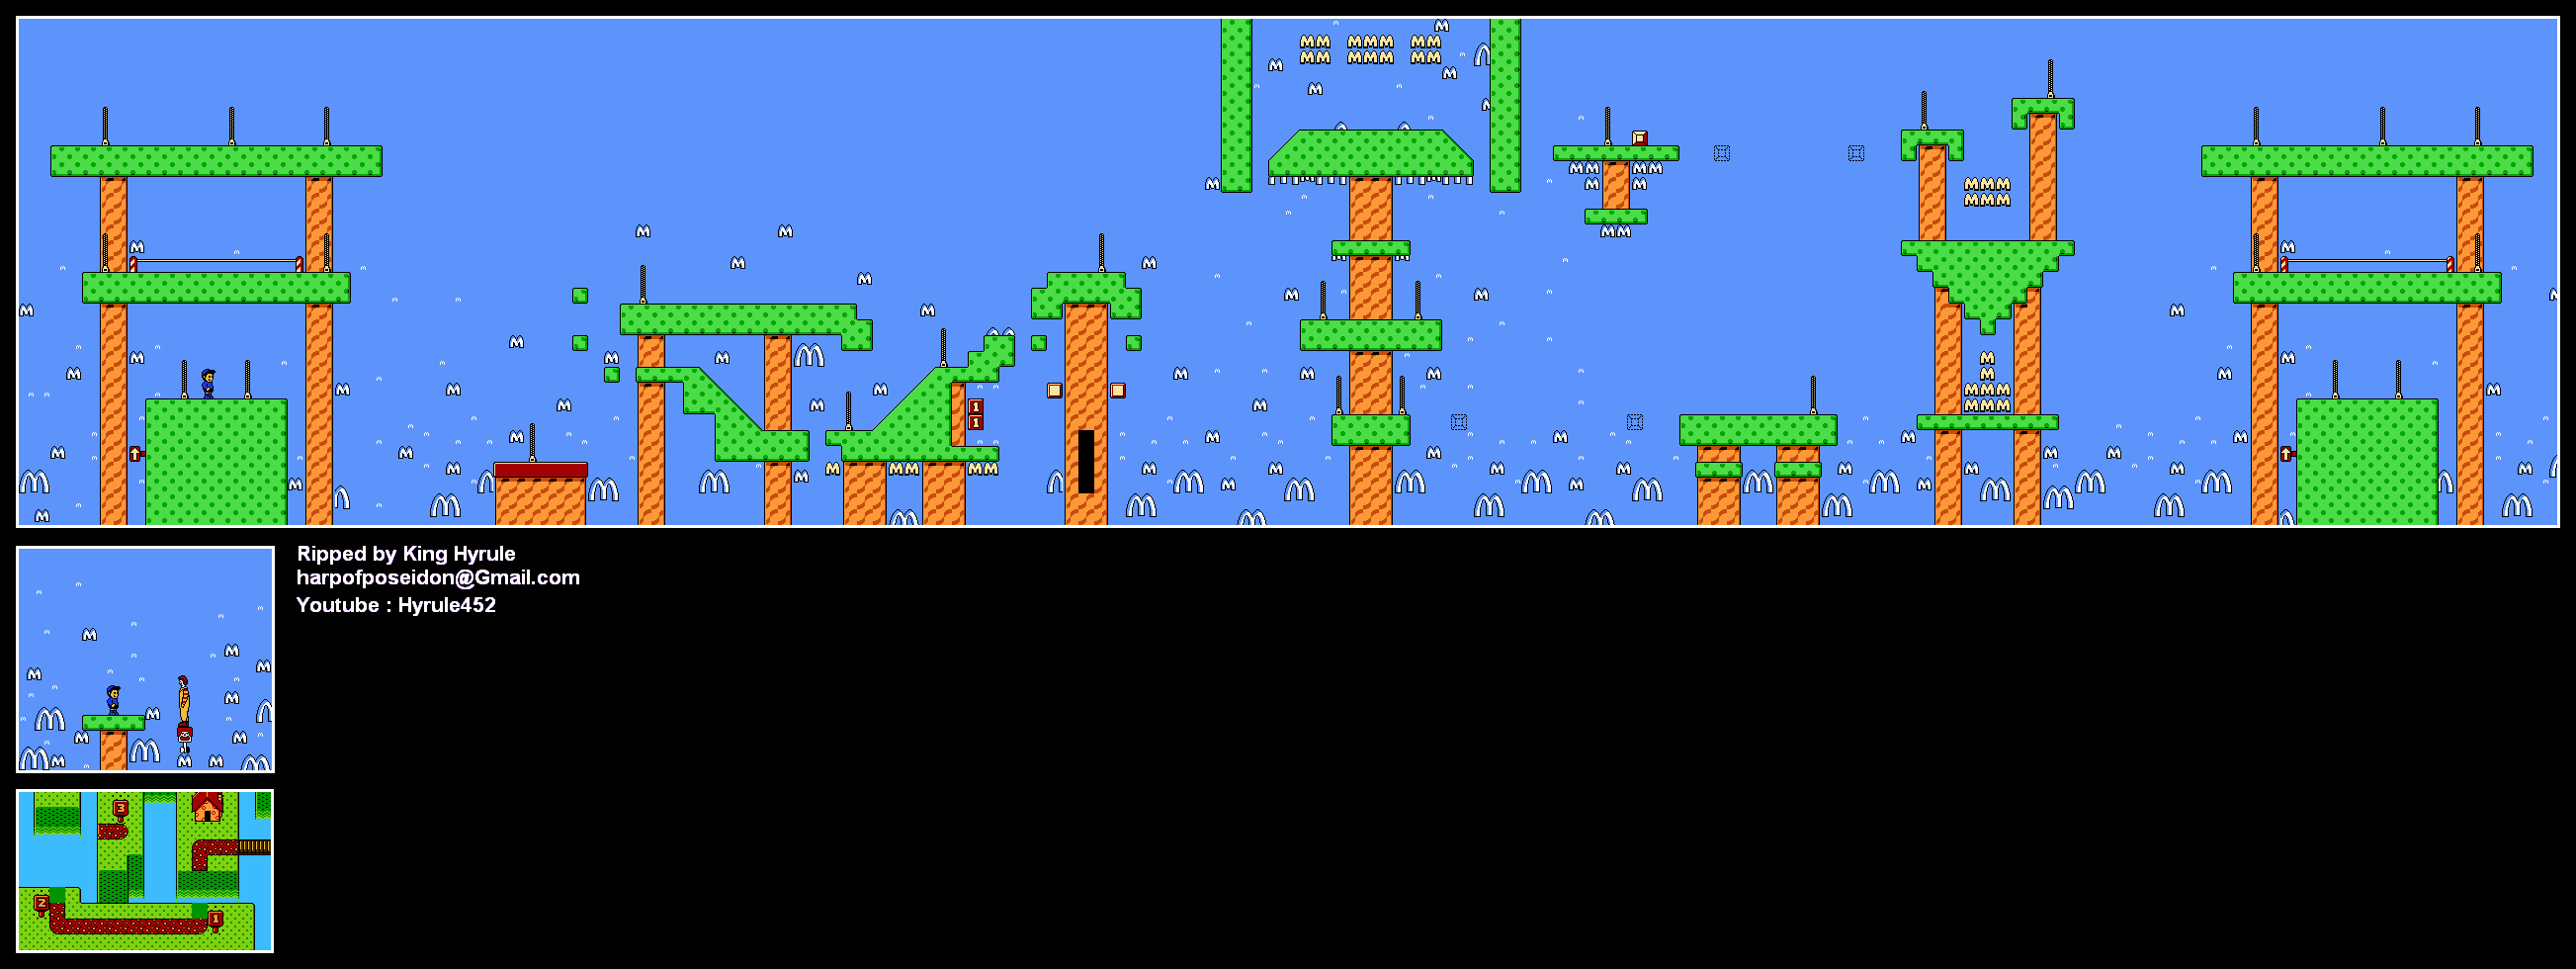
In the last area before you get Power Moon #16, staying as high as possible on the three sets of platforms will lead you to four Regional Coins.

Power Moons


Cap Kingdom


1. Frog-Jumping Above the Fog - Near where the Odyssey is, capture a frog, then jump onto the hat platforms in the bottomless pit area to the south. You'll need to hit some invisible blocks to get to it, but you'll find a Power Moon.

2. Frog-Jumping from the Top Deck - By jumping to the top of the double decker house in the village as a frog, you can then shake the controller to perform a high jump and get this Power Moon.

11. Secrets of the Frog Pond - Remember that really narrow platform you saw while getting the Moon Fragments in that one Hat Door room? If you high jump upwards as a frog, you'll find a hidden area with a Power Moon.

Cascade Kingdom


5. On Top of the Rubble - This one is within view of the Odyssey when you return to the Cascade Kingdom after completing all story objectives and coming back to the kingdom itself.

7. Above a High Cliff - Breaking this rock past the rock bridge with a Chomp will reveal a pipe. Entering it will take you to this Power Moon.

8. Across the Floating Isles - By going back to where you faced Madame Broode, you can find a series of floating platforms with three Regional Coins and a Power Moon.

9. Cascade Kingdom Timer Challenge 1 - The scarecrow next to the rock bridge will reveal a hidden challenge if you throw your hat at it. You'll need to hurry across the moving platforms before time runs out and the Power Moon disappears to get the Power Moon. If you take too much time, you'll get your hat back, and you'll have to try again. Keep in mind that you cannot use your hat while doing a scarecrow challenge.

14. Nice Shot with the Chain Chomp! - For this challenge, you'll need to knock Chomps into other Chomps and send those Chomps into the targets to open up each subsequent room. After doing this three times, you'll get a Power Moon.

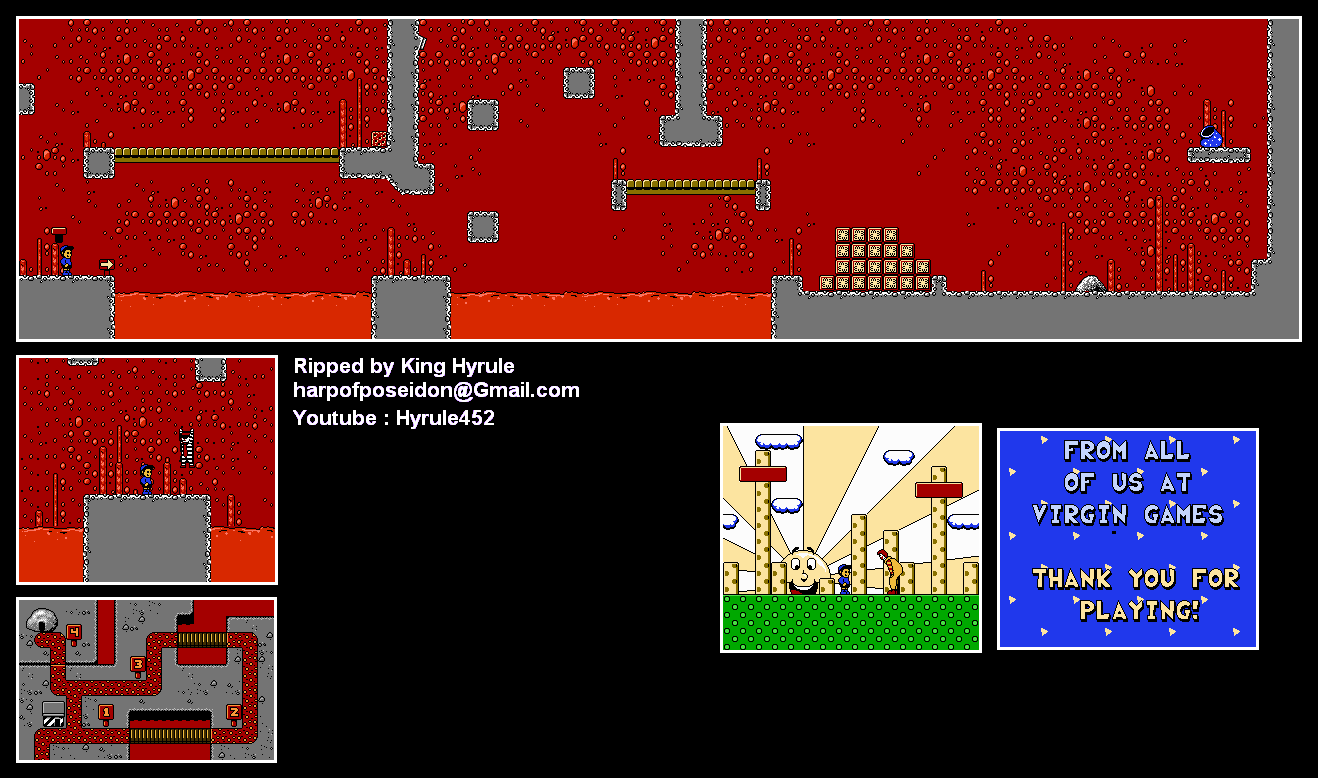
16. Past the Chasm Lifts - This Hat Door takes you to a simple obstacle course with an 8-bit area. Watch the platforms so you're not on them when they disappear and send you into the abyss below. At the end, you'll get a Power Moon.

17. Hidden Chasm Passage - While looking for Power Moon #16, there is a shortcut you can take to another 8-bit area. To the right behind the wall is a passage to a hidden Power Moon.

24. Shopping in Fossil Falls - Buy a Power Moon from the Cascade Kingdom Crazy Cap shop near the rock bridge.

Regional Coins

Cascade Kingdom


Wednesday, January 14, 2026

PrinceWatercress plays Metal Force - Part 7 of 7


In this video, we finally beat the game, then get hinted at a sequel that was never to be.


Mission 7: Planet X


The flying enemy at the beginning will drop projectiles where you are at and will keep following you until you destroy it.

Some of the enemies from Mission 4, such as the rock dropper and the walking mechs, return here. The walking mech near the end of the first section has a 1-Up if you destroy it on a platform.

The second section has a lot of the enemies with the blasters. You'll need to avoid getting shot while climbing up a ladder, then hug the left wall on the subsequent pit to take out all the enemies carefully and get yourself a continue. Be ready to jump to the left off the platform near the end when you see the edge of the floor near the top so you don't get hit by spikes. 

The UFO enemy has a five-way shot that we can finally see now that we have to get away from it in order to shoot down.

The pipes that shoot out the gas are back; avoid the gas/smoke/whatever it is that comes out of them.

You'll need to jump on the white parts of the wall at the end of the section with all the humanoid enemies to get to the ladder.

The boss is a flying purple ship that will shoot a five-way shot at you. Avoid the projectiles, jump and shoot, duck when it comes your way, then run to the side opposite the boss and repeat the process. If you know what you're doing, you can beat this boss easily.

When you beat the boss, you'll see the ending sequence. The hero escapes before the base self-destructs, and you'll have to return to base back on Earth in order to take care of things there. Unfortunately, the sequel never happened, as the publisher and developer of this game both stopped developing console games. Regardless, you just beat Metal Force!

Tuesday, January 6, 2026

PrinceWatercress plays Power Strike II (Master System) - Part 7 of 8


This game isn't getting any easier.


Stage 7


You'll have a lot of things to avoid at the beginning of the stage. The more turrets you can destroy, the better. Also, there will be plenty of enemies showing up from the bottom of the screen, especially those blue spiked balls.

The gray dolphin-shaped ships are really easy to take out if your weapons are powerful enough.

When you reach the castle, you'll see the drawbridge raise up and close.

When you start seeing bushes and trees after flying past the castle, turrets will start popping out of the bushes. If you have the Absorption weapon (Weapon 4), your shots will home in on them before they actually pop out.

You'll soon see a gray wall with twelve turrets. The turrets will not be vulnerable until they start firing; once they start shooting, let the super shot loose so you can take out a few and give yourself some breathing room.

After this, you'll start seeing turrets and ship spawners pop out of the ground in groups. Thankfully, Weapon 4 helped out with that.

When you start seeing even more of the castle, you'll also start seeing turrets in the walls. They shoot out the blue projectiles, but thankfully, those blue projectiles can be shot down. 

The boss is a big blue plane. The plane rains missiles down in addition to firing red projectiles out of the turrets. You can shoot the missiles down, and you'll do some damage by shooting down the wings. 

Once the wings are down, the boss will start shooting homing missiles at you. They can be shot down, but they are small and can be a bit hard to see. Once you do enough damage to the ship, it will start repeatedly diving at you from the top of the screen. Watch the top of the screen so you can move in and out and get shots in while you can. It will still shoot red projectiles, so you'll want to stay on the bottom of the screen to watch out for those.

Friday, November 28, 2025

PrinceWatercress plays Brave Fencer Musashi - Part 7 of 33


In this video, we explore some more to see what we can do and get to Chapter 1's level limit so we don't have to get any more experience until Chapter 2.


If you leap into a deep brown colored-wall, you can climb up it by alternating between the Square and Triangle buttons. Don't forget that when you latch onto a wall, you have to press Triangle first. You'll need to do this in order to use the Legendary Brace and reach the Administrator's Office, which we won't be doing...not yet, anyway.

There's a wall near the gondola, and if you climb up it at night, you can find another Minku and get another Longevity berry.

At Twinpeak Mountain, you can now take shortcuts with the Legendary Brace. Also, one of the pipes at the bottom on the way to the summit will now have steam blasting out of it now that there's trouble in Steamwood. The steam won't be there anymore once you fix the problems in Steamwood.

If you go past where you met Jon and built the raft, you'll see a rock followed by a few poles you can hang on and jump off of. You won't be able to knock the rock down...yet.

If you want, you can play the raft mini-game again and get more money while taking the shortcut all the way back down.

While the village is in crisis, you won't be able to enter the toy store or the restaurant, as they will stay close until the problems at Steamwood are resolved.

There are some walls you can climb on the forest path to Steamwood. The pipes will also be shooting out more steam than ever, so you'll want to be careful as you move around. One of them will be blocked by a cliff halfway up, and you won't be able to deal with that until later. Another one leads to more pipes, a path off to the side leading to a chest containing an AgedCoin, and the entrance to Steamwood itself. You'll need to talk to Administrator Fores just to open the door.

If you're at 75% Tired, Musashi will move more slowly and will walk instead of run. If you're at 90% Tired, Musashi will look like he is about to drop, and he will barely be able to swing Fusion. (His Lumina swing is strangely unaffected.)

We're at the level limit at the end of this video, so next time, we're heading to Steamwood.

Monday, October 27, 2025

PrinceWatercress plays Legacy of Kain: Soul Reaver - Part 7 of 28


Now that we're inside the citadel, it's time for some problem solving...and it takes a little longer than I would like.


0:28 - By switching back to the spectral realm, you can change all these pipes so that they curve differently, allowing you to explore more of the citadel. Be ready to do this to open the way when it seems like you're stuck...a lot.

2:31 - There's a switch here, but you can't get to it.

3:41 - Pulling this switch lowers a wooden platform. Stand on it to lock it in place. 

Nearby is another door where you'll need to phase through the gate and fight off some monsters before pushing some blocks. Your ability to push and flip blocks so that they fit into the wall to fit in with the rest of the drawings will be put to the test. When a block is in the right position, it will audibly click into place.

Also, enemies will drop in as you're moving blocks around, so be ready to fight.

When all the blocks are in place, you'll be able to raise up a block and get to the switch from earlier. That brings up another wooden platform of sorts, which you'll need to stand on. Doing so will cause some steam to rise nearby. If you go into the chasm where the steam is rising from and hold R1 to slow your descent, you'll be able to float higher.

Wednesday, October 8, 2025

PrinceWatercress plays The Blues Brothers (SNES) - Part 7 of 7


The game has saved the best for last! Thanks for watching!

First | Previous

Stage 31


Watch where the swinging platforms go as you lower yourself down. Grab the cake, jump on the platform and let it fall with you on it so you can land on the solid ground below, then run right and get the checkpoint. Wait for the swinging platforms to get close to you so you can jump on them one by one, and it should not be long before you get to the goal.

Stage 32


You'll need to shoot the breakable blocks to the left of where you start. Run to the right and avoid the electricity along the way, grab the records, go back to the start, and shoot left to break the walls below the goal to drop it down. From here, you'll need to get through the walls with as few shots as possible while continuing to collect records, all while jumping on trampolines, which is not the easiest task in the world. When you get to the trampolines, destroy the breakable walls under the goal to get the goal to drop.

Shoot your way to the next level down, then head left to the crates. Shoot down the breakable walls at the bottom of the crates section, then jump your way up and shoot down the breakable walls at the top. Head to the right and shoot down the walls so you can give yourself enough room while also avoiding the crushing ceilings. If these ceilings get to the end, you won't be able to continue, so you'll need to be fast and precise with your shots. 

From here, you'll want to make paths you can crawl through on the next sets of walls so that you also don't fall into or stand up and hit yourself on the electricity. Jump over the last bits of electricity, which are really short, and shoot down the lone bear trap. The goal will be just behind the last breakable wall.

If you missed a wall, you're going to have to start all over, as there are no checkpoints in this stage. If you die, you're starting all over, which makes this stage rather rough.

Stage 33


Hey, guess what! It's more of what you did in Stage 32! You're just going up instead of down!

Grab the records at the start and use the trampoline to break the walls to the left. You'll want to make it so that the trampolines stay in place and the goal is able to make its way up. You'll have to do this throughout the stage.

You'll then have to head right, break the walls, avoid the crushing ceilings and shoot the switches so that the electricity doesn't get in your way. You'll have to shoot switches while behind electricity more often than not in order to move forward, but you'll eventually find some small platforms that you'll have to jump from one to the next to make your way up and deal with more crushing ceilings and electricity. Keep the electricity horizontal on the way to the left, and when you get to the ladder, climb down to break the next goal wall to the left. Make your way up, shoot some more wall to the left to raise the goal up, then make the electricity vertical on the next level and shoot the next goal wall.

At the top, duck to destroy the next well, and use the nearby trampoline to destroy the wall above that. You'll need to avoid more crushing ceilings and shoot carefully at the walls to ensure that you don't set the electricity to the wrong direction as you go through the walls. In the area with all of the switches and bear traps, just jump your way through and climb upwards. Shoot your way through the left and mind the crushing ceilings, and grab the stacks of records for more ammo. Just destroy the two top layers of wall so you don't get shocked. At the next ladder, shoot down the wall to the left, then climb up the ladder and shoot the wall to the left there. You've made it to the goal!

Stage 34


Avoid the dodo birds as you jump upwards. You have only ten seconds at the start of the level, so you'll need to hurry. Bounce off the mushroom and land on the platform to the right, and grab the hourglass. You'll have more time to work with, which is good. Jump from swinging platform to swinging platform, grab the checkpoint, and keep jumping your way to the right. You'll deal with a few more spiked balls as well as an egg that shoots debris out in six directions, but if you can jump to that set of records, you'll be able to reach the goal and beat the game! Congratulations! You just beat [i]The Blues Brothers[/i] for Super Nintendo! A sequel is teased at the end, but it didn't happen! Who cares? You're done with this game!

Friday, September 26, 2025

PrinceWatercress plays Lucky Luke: Wanted! - Part 7 of 9


The stages are starting to get a little shorter, but they're also starting to get harder. Be ready to jump over attacks.


Rabbit Gulch Fort


The soldiers have been taken hostage by the Native Americans while the Dalton Brothers were raiding the place, and you'll need to restore order.

The enemies here will be Native Americans, and they will attack pretty quickly. You'll want to jump over their attacks as you head all the way to the left and grab the dynamite. You'll then need to go up, then swing over the pegs by holding Right and pressing B...assuming you can grab onto them, which can be a tad tough to do at times.

You'll need to head to the left when you get to the top. Blast open the door with the dynamite, then go into the hole at the bottom, then go to the left and grab the lockbox. You'll then need to stay on the top left as you head right, and you'll get a hand icon next to the dynamite telling you where to put the lockbox. Now you'll need another one. At least all the pick-ups will re-spawn, along with the enemies.

The second lockbox is on the other side of the level, and you'll need to head all the way to the right and do what you did earlier to get to the other lockbox. You'll then have to head back to where you placed the first lockbox and place the second box on top of the first. This will allow you to jump to the right and head to the boss battle.

To beat the boss, you'll need to jump over the tomahawks while shooting at the guy. You'll also want to jump over the guy when he charges at you towards the other side of the screen. Ducking the tomahawks does not work, as you will get hit. After enough hits, he will tell you that William and Joe Dalton - or at least one of them, anyway - was captured by the Apache. The other brother has escaped. You'll then free the soldiers who were taken captive.

There are no bonus cards in this level.

Thursday, September 4, 2025

PrinceWatercress plays Woody Woodpecker in Crazy Castle 5 - Part 7 of 18


In this entry, we blow through three stages in Wood World. At this point, things definitely start getting more difficult.


Wood Stage 2


The bees, which first showed up in the last stages, will stab at you if you get close enough to them.

The teddy bears are out in full force, so be ready to move wherever you are so you aren't hounded by them.

If you press Down on the top of the broken tree tops, you can go down them.

Wood Stage 3


The pink birds that fly around will chase you and try to hit you if you get close enough to them.

Also, these vine paths are becoming more and more confusing. Pay attention to where they go, and you'll be able to figure where you can go.

Wood Stage 4


The brown doors lead to the indoor routes that lead to other parts of the level. You're going to have to make some odd leaps off certain platforms in order to reach certain brown doors as well as reach the item that lets you move through the metal blocks. There's also going to be teddy bear enemies at just about every turn, so save any weapons that you find for when they are absolutely in your way.

Wednesday, July 23, 2025

PrinceWatercress plays Air-Sea Battle - Part 7 of 7


I did not know how to swap controller ports on Stella until later, so because of this, all of the one-player modes end up getting covered in this video. Enjoy!


Tuesday, July 15, 2025

PrinceWatercress plays Superman (NES) - Part 7 of 8


In this entry, we finally beat Lex Luthor, but now ghosts are running amok in Metropolis. It's not going to be long before we reach the end of the game!


From the Metro Police Station, you'll need to the CBD area. Thankfully, we can fly there from Teaboro. From there, head to the left of the building you land near and use Super Spin to go down the funny look tiles. 

Once you're underground, head all the way to the right and go down the ladder. From here, head right and go down another ladder. At this point, you'll have no choice but to head left and go down the ladder. Then, you'll need to head right and go up until you reach the end, where you'll find Lex Luthor. Hit him with the Heat Vision and stay away from him and his club while also taking out the gangster. When you beat Lex Luthor, he will be arrested, but a gang of monsters will soon be on the loose.

Interestingly, enemies do not move until you're completely off the ladder onto the ground. Weird.

When you beat Lex Luthor, monster gangs will be on the loose. Welcome to the last chapter, where your attack, defense and health will be as high as they can go.

Level 5


Back at the Daily Planet, Lois Lane will you that The B.G. Bros are waiting for you at Battery Park in Senneville. The B.G. Bros (B.G. being short for bubble gum) are actually the F.B.I. agents that you've been seeing throughout the second half of the game. 

When you leave the Daily Planet, turn to Superman and use your X-Ray screen on every screen you enter so you don't get your butt handed to you by ghosts. The ghosts will be every single place you go from this point on.

Take the subway near the Daily Planet, then head east towards Senneville. Move to the left past the Metropolis Bank area, and you'll find the park and The B.G. Bros. They will tell you that the monsters' boss may be hiding beneath Metropolis Park. You'll also find out that this is the last time you will see them, as their work here is done.

Once you reach the park, keep heading right until you find the blocks you can go through with Super Spin.

When you go down the dig point at Metropolis Park with Super Spin, use your X-Ray Vision to see the enemies before going down the first ladder you see. Keep using X-Ray Vision at every screen. Go left and go down the ladder, then head right and head down the first ladder you see. Go left, then go down the next ladder. Head right, then go up the next ladder you see. From here, head left (right is a dead end), jump over the water, then go up the ladder. Head right from the ladder and go up the next ladder you see, then head right again and go up the next ladder. When you beat up the purple ghost in this room, it will tell you that their boss is waiting for them at Freedom Island.

Go back down the ladder, then head left and go down the next ladder. Head all the way to the left and go up the ladder, then go right and go up the ladder. Finally, head left and jump up the opening to end up back in the park.

Of course, that's if you want to do things that way. I take the quick and dirty route, and that's taking damage on the ladder from an invisible ghost and continuing to end up back at the Daily Planet.

If you die while climbing a ladder and return to the Daily Planet, you'll be in the ladder climbing animation when you come back. If you punch, you'll be standing in mid-air. You can also press and hold Down to get back on the ground.

Friday, June 27, 2025

PrinceWatercress plays Young Merlin - Part 7 of 8


In this entry, we enter the third and last mine cart section...and it's anything but fun.


Time to head back to the dragon just so we can defeat it. The lightning bolt attacks and defeats all on-screen minor enemies, so you won't need the torch or the snowflake anymore. When you get back to the dragon, use the hourglass to stop time, use the lightning bolt to attack, then get on the other side of the dragon. Keep doing this until the dragon is defeated.


Defeating the dragon reveals an entrance to another chamber. Guess what? It's the third and final mine cart section. There are four doors, but only three are blocked by balls that bounce you back if you run into them. The only one that is not blocked at the start is in the lower-left corner, so here's what you need to do.

Get on the mine cart. Go all the way down and be ready to avoid broken pieces of track, because you'll be doing that again here. Take the turns across the south end of the area, then keep going north until you can't go north anymore. This will allow you to turn right. Go as far to the right as you can, and avoid the broken track as you make your way north. Go into the wall. You'll take a hidden passage, and in the middle of it, you'll get the final health extension.

From the hidden passage, turn right on the sixth intersection on the way north. Turn down, then follow the path and hit the spring. You'll need to loop back around, but you'll need to turn left just before you re-enter the hidden passage, which is the fifth intersection you see on the way down. This takes you straight to the first door. You'll need to place the lightning bolt in the door before you can open the door to go in.

Use the magic mirror in front of the mirror on the wall to go through the mirror. Make sure you equip the snowflake, as you're going to have to fight the big spider from Rainbow World again before you can rescue Sterm. Thankfully, the same strategies apply, with the only difference being that you're in a much bigger room. You may have to use the snowflake twice to re-freeze the cocoon, but at least you'll hit the big spider every time.

Eventually, the cocoon will be destroyed, and the big spider will spit webs to the side that spawn a bunch of spiders. Place the clone to the side with the mirror so he aims at that, and keep freezing him. You'll eventually save Sherm and shake hands with him before getting your health refilled.

Wednesday, June 4, 2025

PrinceWatercress plays Math Rescue - Part 7 of 19


In this entry, we start Episode Two, and the maze-like paths of the first level bring this off to a slow start.


On an outer arm of the Milky Way Galaxy, the planet Glixer II glints purpley in its orbit like a tiny galactic eggplant...

In the Grand Hall of Glixer, the Glixerian Commander sits in eggplanty gloom, attended by one of is captains.

"Captain Escargoto, the pet Gruzzles have become a tentacle-witling bore. How goes the plan to import new pets from Earth?"

"I will send Zorja and Grizz to report, Your Slimyness!"

"Have the Human creasures we chose to honor as our pets yet submitted to their good fortune?"

"No, revered Scum Master, they do not seem overjoyed at their good fortune."

"Have you succeeded in stealing the Humans' numbers and rendering their technology inaccessible to them?"

"We had some problems, Your Scumliness. But we will get right back and try again!"

Back on Planet Earth, you settle down to watch TV when you realize that you can't change the channels.

The number stealers are at it again!

Level 1: Follow the Gruzzles Into Space


From Episode 2 onwards, multiplication and division problems will start showing up. The division word problems will usually mention a large number of something, then list how many of that item are in a container (Glixerians in a UFO, marshmallows in a bag, etc.), which makes them easier to identify. As for the multiplication word problems, they'll usually list how many of an object exist, then list how many people or things interact with that items (i.e., there are 4 theaters, and 6 Gruzzles go to each one). Some of them also mention something being done a certain number of things being done a certain amount of times a day for a certain amount of weeks.

This level is very maze-like, and the Gruzzles are positioned in areas that make it a little harder to get around. Thankfully, all you have to do to find all the secret ares is to touch all the warps.

Tuesday, May 13, 2025

PrinceWatercress plays The Grinch (PS1) - Part 7 of 22


We've unlocked the third world in the game after only a handful of videos! We're really making some headway here!


It's time to head back to the Whoforest, now that there's no more to do in Downtown Whoville (for now).

Now that we have the Rocket Spring, we can take the beehives to the roofs of the rest of the cabins and throw the beehives down in them. Just make sure the "Drop It In!" prompt in on screen before you press Triangle.

Once you throw beehives in all ten cabins, you can then walk in through the front door of each and every one of them. There will be giftboxes to pancake and blueprints to collect, but watch out for the bees! The blueprints for the Slime Shooter gadget will all be in the cabins, so if you miss any, go check the cabins again.

One of the cabins has a locked chest. We'll be able to open it eventually.

You can use the Rocket Spring to get on top of the snow cannon. Smash the giftboxes, then press Triangle at the hole at the top to drop the glue in and gum up the works.

At this point, we've done enough to unlock the Whoville Dump, the third level of the game.

The Slime Shooter, when unlocked, will let you shoot slime at anyone or anything. Hold the Circle Button to charge it up, and when the charge gauge is full, release the button to let loose a glob of slime. In Downtown Whoville, you can use it to cover up the horns playing the music and get the giftboxes near them more safely (assuming you haven't gotten them already), and you can shoot slime at the police officers to get their giftboxes and get them out of your way.

To get the giftbox at the top of the Christmas tree in the center of Downtown Whoville, you'll need to aim at it with the Binoculars and shoot it with the Rotten Egg Launcher to knock it down for pancaking.


Tuesday, April 29, 2025

PrinceWatercress plays Dungeon Explorer (Witch Class) - Part 7 of 8


Ah, yes. The maze. I managed to find another room that leads to power-ups this time around.


If you talk to the king at Axis Castle, he will tell you to go north of the castle and enter Ratonix, and to watch out for Octopolus. You'll also get the magic charges, as usual.

Here, you'll have a dungeon with some of the darkest color schemes I've ever seen in a video game...and you'll also have a staircase maze. The skeletons drop White charges, while the mud creatures drop the Black charges.

Start by going west and going downstairs. From there, take the stairs that are further to the east. Go down the next flight of stairs, then go up the stairs to the north. Take the next set of stairs that you see, then take the stairs to the north. Take the stairs to the north, then grab the seed if you need to replenish your health and take the stairs to the north again. Take the stairs to your immediate east, then do it again. Go south to the next set of stairs, then go up another flight of stairs to the east. Go east down some stairs, then take the stairs going down to the south. Get the stuff to the north, then take the stairs to the south. Take the stairs to the west from here. Go down the lower set of stairs to the east (the higher set leads to an Intelligence crown, and while you will go back from this room, getting back isn't too hard), then go up the stairs to the immediate east afterwards. Take the next set of stairs that you see, do it again, then take the stairs to the east. Take the stairs to the south, then follow the path and take the stairs at the end. You'll face Octopolus.

To beat Octopolus, stay to one side and keep aiming at the eye in the center. You'll take out all the other eyes surrounding Octopolus' weak point before decimating the weak point itself before anything re-spawns, even though you don't need to do this and you can just destroy enough of them to get a clearer shot on the eye int he center. After the stat boost, you'll find out that you're on the way to Mistos and that you'll have to go underground and face Halatos. Follow the path to another dungeon.

Here, the ground is red and the enemy generators blend in with the floors rather easily, so watch for any part of the floor that is flashing. Despite the massive amounts of staircases here, it is easy to get to where you need to go. Just watch out for the massive amounts of blue eyeballs flying around, the flamethrowers and the orange demons that are very fast.

Near the end of this dungeon, you'll be dealing with enemy generators that spawn blue flames. If you see the blue flames, off-screen them immediately as you make your way to the south. You'll eventually face Halatos.

To beat Halatos, stay in one of the lower corners and fire diagonally to the north. You'll take out any flames that are shot at you while also slowly dealing damage to Halatos. Keep in mind that you can be poisoned during this battle. Once you beat Halatos, head all the way east and you'll find the ORA Stone! Grab it, then take the nearby stairs. You'll meet Judas, who tells you to head to Axis Castle. Just go east when you leave the house and you'll be there.

Of course, once you go to Axis Castle, you'll notice that the music in the castle is slower. When you talk to the king, you'll find out that he is Natas himself! The soldiers will tell you to go under the castle thru Roterroad to head to Balamous Tower, and to be careful of the plant pods.

Monday, April 7, 2025

PrinceWatercress plays Kid Icarus - Part 7 of 15


Needless to say, I am not a fan of the third labyrinth.


World 3-3


Being able to destroy the Octos with your shield and get a ton of Hearts is fun. At this point in the game, I do a little better at using the rotating shield as a weapon.

The door to the left of the exit is the last regular shop in the game before the ones in the final dungeon.

World 3-4


If you go down at the start, be careful! There are Eggplant Wizards in the room below that are waiting to turn you into an eggplant on your way down. If that happens, you'll have to go two screens down, one screen right, one screen up and two screens right to the nearest hospital.

The things that look like spinning shurikens are the enemies here that fly around in random patterns, and are known as Tros. They're worth shooting down for the points and the hearts. The guys with the beards (Uranos) just walk back and forth.

If you can quickly get to the top row of rooms in the dungeon, you can just keep going right to face the boss. The last room before the boss will be a store, so refill your health.

Near the end, there will be another room full of Eggplant Wizards, and you won't be able to avoid it. Believe it or not, the Eggplant Wizards have two kinds of throws - low and high - and you can tell the difference between them if you keep leaving and re-entering this room. You'll want the Eggplant Wizards on the left side of the room to throw high so you can immediately brute force your way to the right without stopping and shoot down Eggplant Wizards on the way to the door on the other side. I don't figure this out until my second loop through the game. Needless to say, I'm not a fan of this labyrinth, and I'm not a fan of the Eggplant Wizard placement here.

The boss here is Pandora. There will be two orbs moving in the room along with Pandora, and when Pandora turns black, he will be harder to see. Take your time, avoid the orbs and get a shot in when you're able.

When you beat the first three stages, Pit will equip himself with the three sacred treasures, then the game goes into horizontal shmup mode.

Tuesday, February 4, 2025

PrinceWatercress plays Wario Land II - Part 7 of 51


We get introduced to a new type of Wario as we explore more of the forest.


Chapter 2: S.S. Tea Cup

Story 2: Escape from the woods!


The penguins throw balls with handles at you. If the balls hit you, they turn you into Drunk Wario. Drunk Wario will move opposite the direction that you tell him to go, and he does not jump very well at all. Sometimes, he will stand in place before moving again. If you press B while drunk, you will belch out a cloud, but it doesn't seem to do anything. In order to become sober again, you'll have to fall into a pool of water. And before you ask, the balls were indeed beer steins in the original Japanese version before being censored in the Western releases.

In case you can't get to a cache of coins directly, tackle walls, jump into ceilings and ground pound floors. You'll eventually find a way to get to where you want to go...and a few other places, too!

Once again, you'll need to be Fire Wario to get your hands on a few extra coins.

The treasure room contains a sword of some kind.

Sunday, January 26, 2025

PrinceWatercress plays M.C. Kids - Part 7 of 7


PuZzLeWoRlD ended up being a little easier than I expected, but I like the level designs up to a point.


Now for PuZzLeWoRlD. There are no cards to pick up here or anywhere else in the game. If you complete all of PuZzLeWoRlD, then go back to Ronald in that world and talk to him, you'll get ten extra lives. It is possible to pick up all of the arches and get infinite lives (after being taken to 99, losing ten of them, and then talking to Ronald in PuZzLeWoRlD to get infinite).

PuZzLeWoRlD


Level 1: Phony Finishes


Grab the platform block, then throw it at its dotted line counterpart on the other side. When you grab the next one, drop down when you see the platform above with the goal all the way to the left. Make your way right, avoid the goals and get the platform block in the dotted line block. You'll need to ride it to the right, then get the platform block, use it to get further up, then ride the platform to the right when it's in place. You'll need to stay left and drop down, grab the plaform block, avoid the goals, and use the trampoline to place the platform. Do the superjump to get to the next platform. Jump over the goal and the blocks that send you all the way back to the beginning, and use the trampolines to get to the green platform at the end. Wait for the flying Ronald platform, and use it to get over the blocks that take you back to the beginning to get to the real goal. 

The real goal is the one with the arch moving back and forth in it. The others are fake. 

Level 2: Clowning Around


Grab the platform block and ride the Ronald platform. Wait for the next one, and be ready to maneuver yourself around the green platforms, then throw the platform block into the dotted line block moving around below the nearby zipper.

Enter the zipper, then wait at the left end of the platform you are on for another flying Ronald platform. Take it to the left, ride the next one, then wait for the third. Ride it and take the green platforms to the fourth. Wait for the platform block and jump to the top with it, make a running jump to the last trampoline, then keep holding Right to stay away from the blocks that will take you back to the beginning. Use the next Ronald platform to get around the green platform (and the arrow blocks), and use it to jump to the right, which leads to the final area. 

Here, you're meant to ride the Ronald platform all the way down, but if you're not on it perfectly, you're going to be sent all the way to the beginning of the level. Instead, you can run and jump to the right over the wall, drop straight down, then make your way to the goal.

Level 3: Zippety Do Da


At the start, enter the zipper on the left.

At the next platform, enter the lone zipper.

At the next platform, enter the lone zipper.

You'll be at the upper-left corner of the level. Enter the left zipper.

You'll be at the upper-right corner of the level. Make a running jump off the left edge, then drop down. At the platform shaped like an upside-down triangle, stand above the center dot. Run to the right and jump from the edge to reach the goal. That's all there is to it.

Hamburglar's Hideout


Level 4: Magic Cave


Use the trampoline, get to the end of the bridge and then grab the red block. From here, take a short hop to the left, throw the block with Down and B while in mid-air, then face right before you land so you can travel in that direction. From here, watch the fireballs as you jump from platform to platform to get to the boss. 

Press B at the hill of dirt to grab dirt clods to throw at everything. You'll have infinite dirt, so don't worry about running out of ammo. You'll need to avoid the tied-up towels and throw dirt clods at them as they approach to get rid of them. If they get too close, you'll need to make a running jump over them.

To beat the magic wand, stay directly underneath it as it moves back and forth to avoid getting zapped. From here, you'll want to make a running jump, then hold Up and B to throw the dirt clod upwards. If you're at the areas where the magic wand switches direction, you'll have a good chance of hitting the magic wand. 

You'll then face a rabbit in a hat that bounces around. Get under it as it is airborne, and jump straight up and throw the dirt clod to easily hit it. When it stops bouncing around and runs back and forth, you'll need to jump straight up and hit it with dirt clods until it is defeated. I got lucky and only had to do one more hit. After the bunny is truly defeated, run up to the Magic Bag and press B to pick it up and beat the game. Ronald will thank you for saving the Magic Bag, and you'll get the credits. You just beat M.C. Kids!

Friday, November 15, 2024

PrinceWatercress plays Great Greed - Part 7 of 28


Who's ready to NOT go to jail?


North of Herbal Village is the town of Tuna. When you enter the town for the first time, the women near the law making machine - yes, that's actually what it's called - tells you that you get to make the laws for today. You'll be taken to the law making machine, where you can change the three major laws for the day just by pressing the A button. The laws can keep you from exiting from certain directions, talking to the guards and entering certain buildings. Notice that you can't change the third law, which is "Talk To Guard." We're going to have to fix that. When you change the laws, a soldier hauls somebody off to jail, and you're forced to watch this every time you change the laws.

If you break a law, a guard runs up to you and demands a 200 gold fine. If you select yes, you'll play the fine; if you select no, then the guard threatens to take you to jail. If you select yes, you go to jail; if you select no, the guard leaves you alone. If you go to jail, you'll be let go when you press A on the cell bars, but you'll be booted out of town and your HP will be cut in half.

At the armory, buy the Scimitar. If you have the money, buy the Tin Helmet; otherwise, you'll have to wait until a little later to get a Tin Helmet for free.

In the house behind the magic shop, there will be a woman who wants to give something to her son in the jail, and notes that the law that keeps you from talking to the guard never change, and suspects that there may be a fault in the machinery. She will ask you to repair it. Say yes, and she will thank you before giving you 1500 gold.

In one of the other houses, the NPC's will tell you that the previous mayor has disappeared and that Sarg is now the town leader. 

The jail is in the northeast corner, but if you talk to the guard there, you'll get yelled at again, so don't. Instead, head back to the law making machine and talk to the girl blocking the door. For 500 gold, you can enter the building and fix the machine. Pay the 500 gold, then go in, walk up to the left switch and press A. You'll find out there is a lever. Raise it to fix everything. If you want, you can mess with the other levers so that you can keep laws that don't bother you alone. The center switch is for the second law, while the right switch is for the first. 

From there, you can change the laws by talking to the girl at the right side of the law making machine and paying 100 gold. This time, you'll be able to change the third law so talking to the guard does not get you in trouble. The guards outside don't tell you anything important, but the guards in the bigger house in the northwest corner will tell you that Sarg is out and that Sarg has set everything up the way that it is to keep peace in the town. A talk from the NPC's would clearly tell them they are not at peace.

Now that talking to the guards is no longer illegal, you can enter the jail in the northeast corner and talk to the guard to get access. Once you go down the stairs, you'll be able to talk to the woman from earlier, and her son will be able to tell you, should you face him and press A, that Dr. Bromide has been taken out of the town and to the Dragon Jail. Another person in another cell will tell you that those who have been taken to the Dragon Jail have ever returned, and yet another will tell you that the Dragon Jail is by the lake to the north, and that it is a scary place.

Fire Bug is weak against Freeze Magic and is strong against Fire Magic, and can cast Fire 1, which can do quite a bit of damage if it hits. It leaves 18 Experience and 66 Gold after defeat, and has a chance of dropping a Med 1-5 scroll.

Near the lake to the north is a boat house. The guy running the boat house tells you that there is a chance that you can get attacked by dragons and/or get lost if you get a boat. You'll also be told that without the Golden Pepper, the dragon will destroy you. If that is understood, then a boat is 500 gold. Do not get a boat yet; you will be wiped out if you do. If you select no, the guy at the counter will tell you that the Kim Chee tribe knows about the Golden Pepper. The Kim Chee tribe is to the west of the lake, but you won't be able to enter the village, as the guard will tell you that they only trust Dr. Bromide and his daughter before shoving you out. 

The Mel Mult is strong against Freeze magic and has a chance of running away. It has a chance of dropping a Med 2-5 scroll and gives 22 Experience and 68 Gold.

From here, you'll need to head back to Herbal Village and talk to Lolly Pop. When she finds out that her father as well as Spring Roll are both in Dragon Jail, she will join you. From here, you'll need to take her to the Kim Chee tribe. If you talk to her with the Party option in the status menu, she will tell you. On the way, Lolly Pop can randomly heal you during the battle, which is very nice.

Thursday, September 5, 2024

PrinceWatercress plays Chrono Trigger (Super NES) - Part 7 of 70


Now that's THAT's all over, it's time to take Marle home. What could go wrong?

Everything. Everything could go wrong.


With Lucca gone and it's just you and Marle that's left, it's time to take Marle home. Once you head through Guardia Forest and get back to the castle, the Chancellor will accuse of kidnapping Marle, brand you a terrorist and order the soldiers to seize you.

After this, you'll be in a courtroom where Crono is put on trial. When asked who started this whole mess, say you did it; saying Marle started it will be used against you. (I messed this part up, and I'll be correcting this when I go for the "all innocent" run again on New Game Plus.) When asked if you were tempted by Marle's wealth, say no both times. (Saying yes either time is used against you.)

If you brought the cat back to the little girl, the girl will thank you...if you talked to her. If you talk to the little girl, but you don't bring back the cat, the little girl testifies against you. If you bring the cat back to the little girl without talking to the little girl, the little girl never shows up.

If you ate the old man's lunch, the old man will testify against you.

If you tried to run away while Marle is buying candy before heading north to see Lucca's invention, someone will testify against you and call you a kidnapper.

If you picked up the pendant without talking to Marle first, this is used against you.

If you try to sell the pendant to Melchior, this is used against you.

If you lie at any point in the trial, this is used against you. Even if you did something you should not have, always tell the truth.

After the arguments of the trial, you'll get seven members of the jury who will find you guilty or not guilty depending on your actions at the Millennial Fair as well as during the trial. Here is the breakdown, courtesy of StrategyWiki:

Juror 1: Finds you guilty if you claim the fortune tempted you either time, or if you try to sell the pendant. Doing neither will lead to a "not guilty."

Juror 2: Finds you guilty if you talked to the little girl and didn't bring her cat back. This one can be tough to get the "not guilty" from.

  • If you never talk to the little girl and never return the cat, they will find you not guilty, as the little girl never shows up in the trial. (Do this for best results.)
  • If you rescue the cat before you talk to the little girl, the little girl will testify in your favor, and the juror will find you not guilty.
  • If you talk to the little girl but fail to return the cat, the little girl testifies against you and the juror will find you guilty.

Juror 3: If you moved away from the candy booth with Down on the D-Pad as Marle was picking out candy, this juror will find you guilty; otherwise, they will find you not guilty. 

Juror 4: If you admit that the fortune tempted you either time, or if you picked up the pendant before talking to Marle, this juror will find you guilty. Talking to Marle first after bumping into her rectifies this, as well as not being tempted by wealth.

Juror 5: If you admit that the fortune tempted you either time, this juror finds you guilty. Thankfully, admitting it didn't gives you a "not guilty."

Juror 6: Finds you guilty if you stole the old man's lunch...so don't steal the old man's lunch.

Juror 7: If you either lie at any point in the trial, say that Marle started everything, or clam you never stole something when you really did, this juror finds you guilty. If you state that you were not tempted by her wealth, but still try to sell Marle's pendant, this juror will somehow find you not guilty. Also, if you lie twice, this juror finds you guilty, but no other juror does.

For the best results, rescue the little girl's cat without talking to the little girl, don't eat the old man's lunch, don't press Down to drag Marle away from the candy booth, don't try to sell Marle's pendant, talk to Marle first before picking up the pendant when you bump into her, tell the truth by stating that you started the whole thing and admit to always stealing anything if you did, and mention that you were not tempted by Marle's fortune at all both times.

If you want all guilty, do the exact opposite, and talk to the little girl without returning her cat.

Even if you are found innocent, you are still found guilty of running off with the princess and you are still sent to prison anyway. As you're being processed, the Chancellor makes it clear that he wants you executed. You'll then be knocked out and put in a cell.

In the cell, you can save your game and also restore your HP and MP. If four or more jurors find you not guilty, there will be a pink sack on the bed, and if you press A next to it, you'll get an Ether. You'll get more Ethers if six or seven jurors find you not guilty as opposed to four or five.

Friday, August 16, 2024

PrinceWatercress plays Berzerk (Atari 2600) - Part 7 of 13


Looking for a challenge on the Atari 2600 version of Berzerk? This and the next two variations have it!

First | Previous | Next | End

In Game 7, Evil Otto is gone, but the robots will shoot at you. The worst part? There are no extra lives in Game 7. If you lose a life, you lose it for good. Games 7-9 are the "survival modes" of the game, with each successive game variation more difficult than the last. You'll need to play very, very well on this variation as well as Game 8 or Game 9 to get a high score.