Showing posts with label Young Merlin. Show all posts

Saturday, June 28, 2025

PrinceWatercress plays Young Merlin - Part 8 of 8


This game is finally over. Thankfully, things get easier after the second boss, but not by much. Either way, this game is beatable.


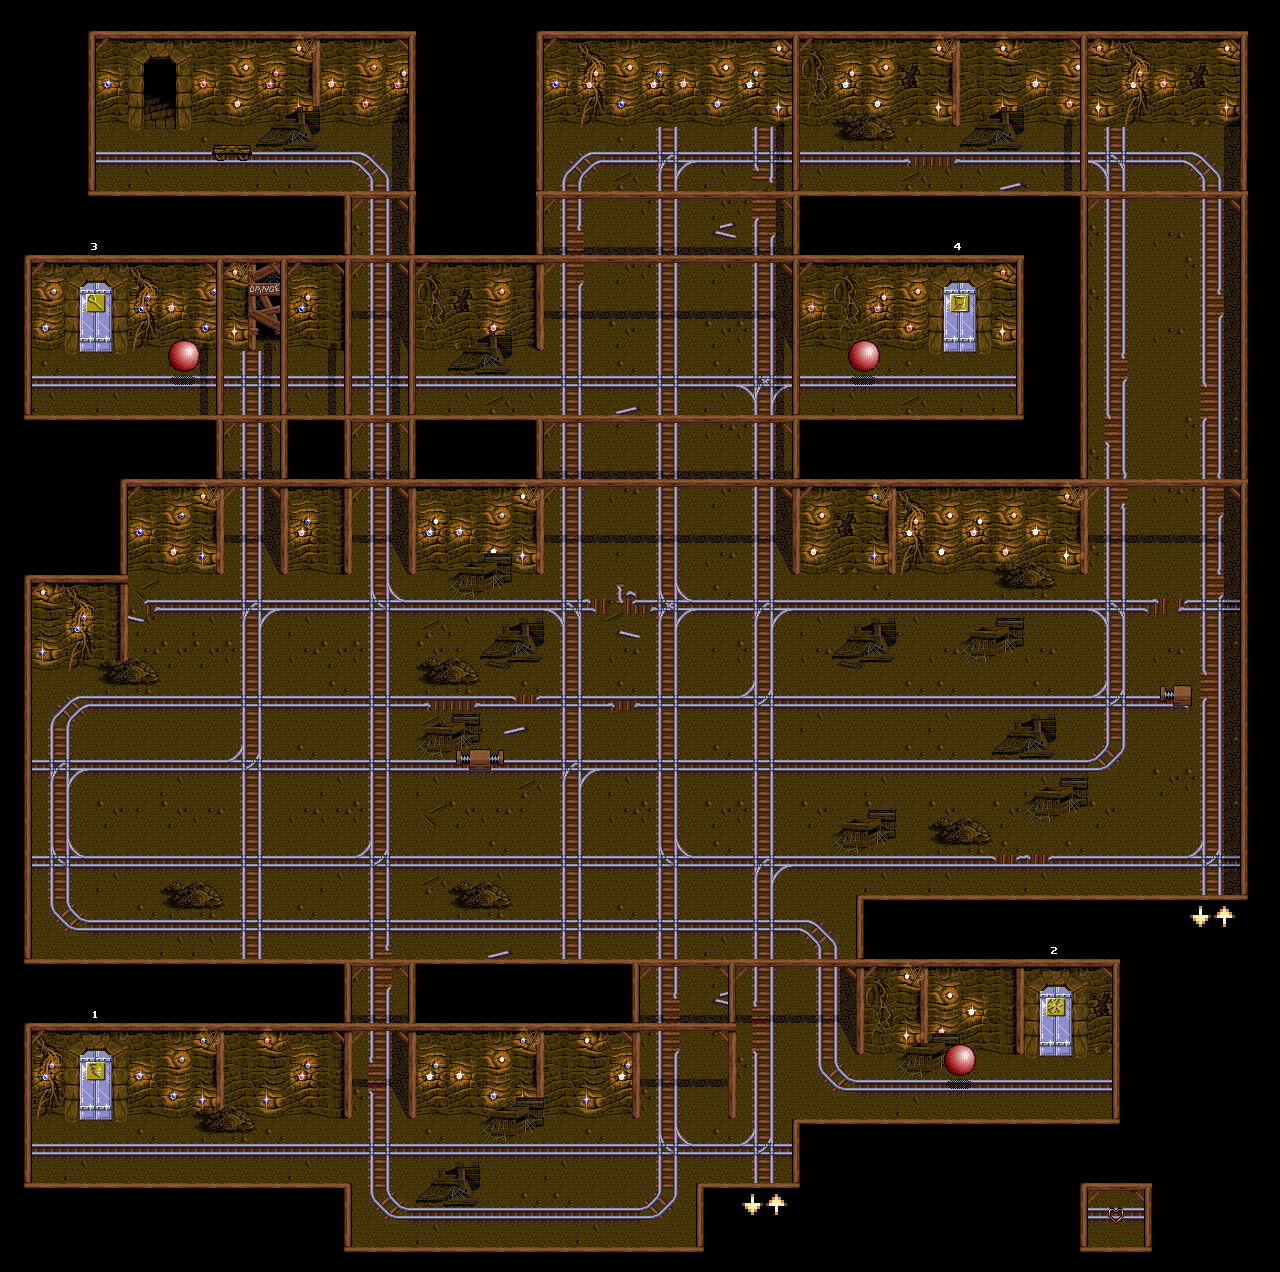
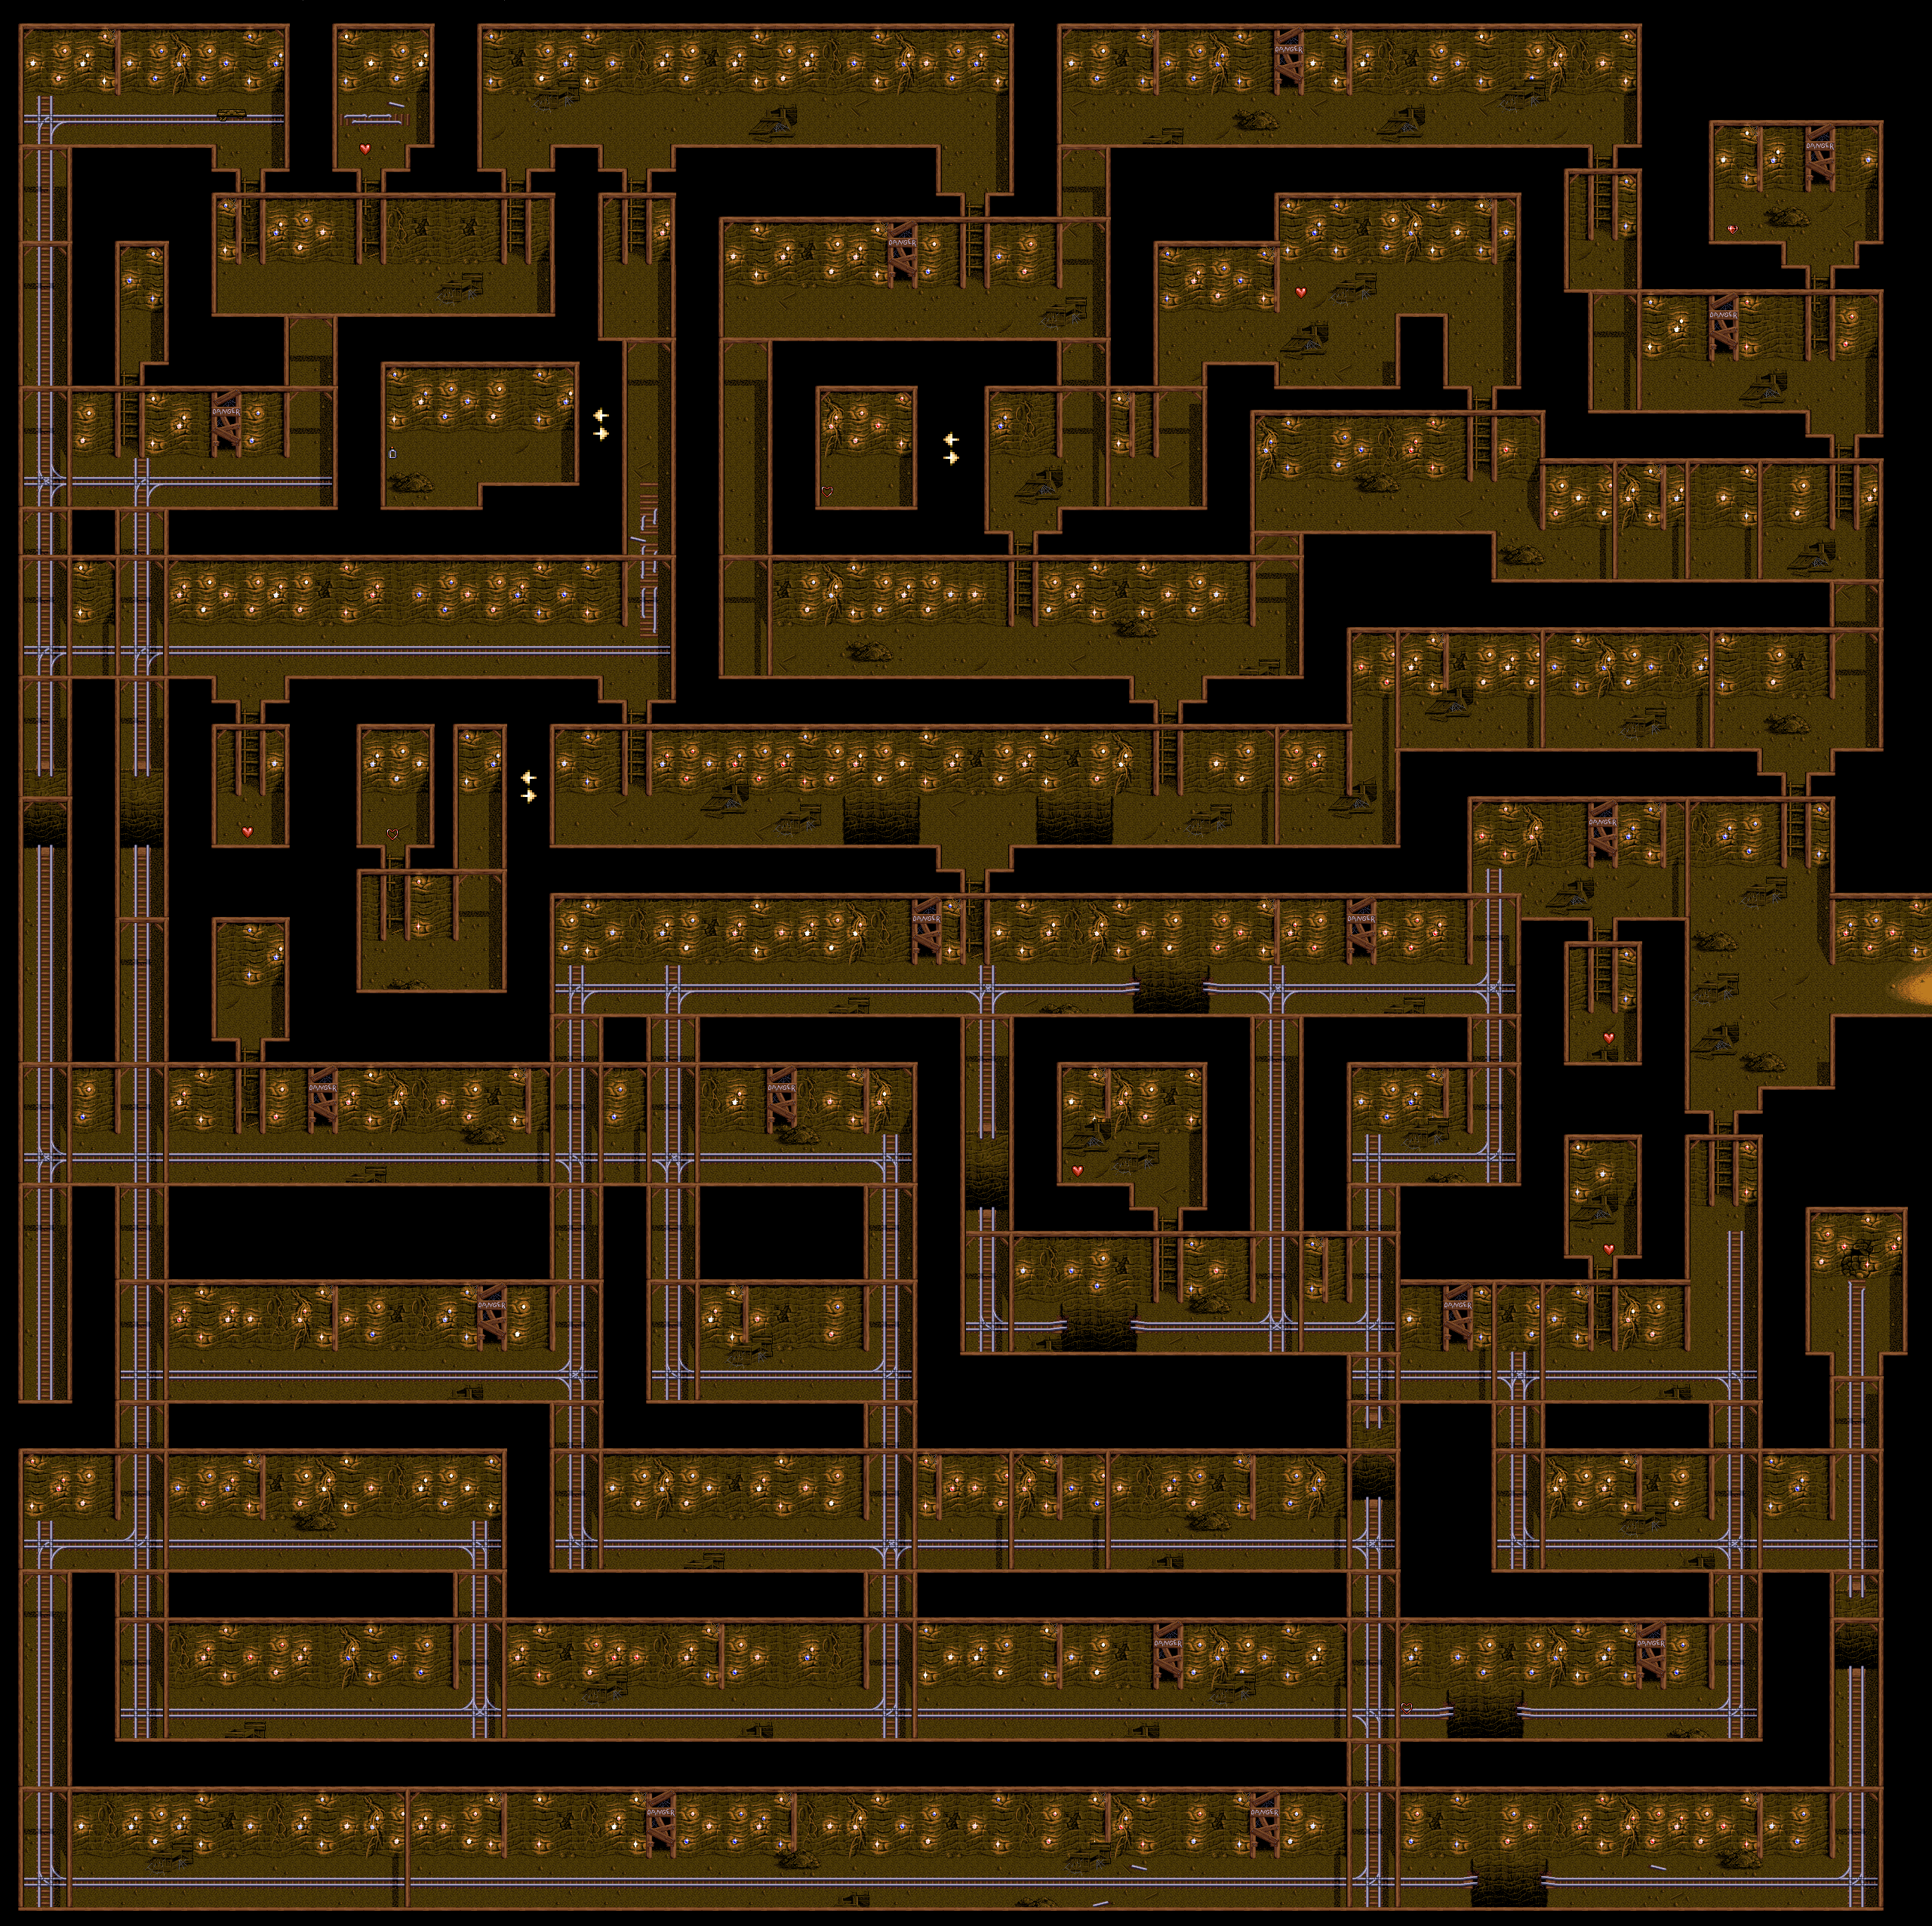
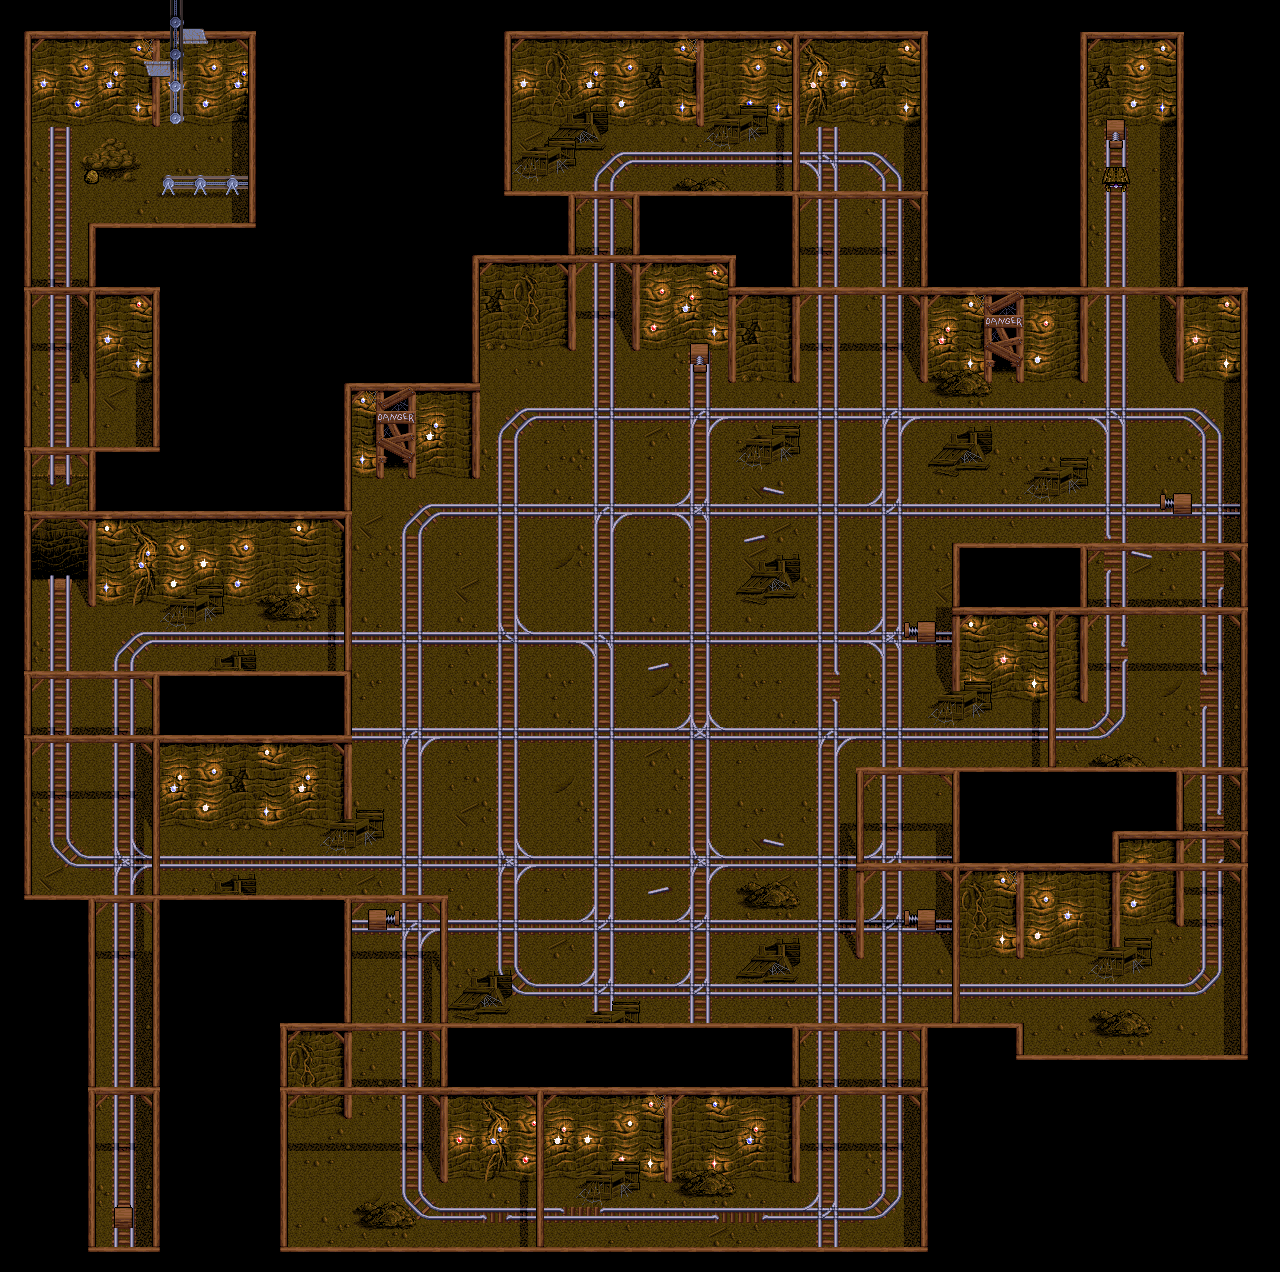
The next door you need to get to is in the lower-right corner. To get there, get back on the mine cart, then go right until you can't anymore and turn upwards. Once again, be ready to avoid breaks in the track. Turn right as soon as you are able, then hold up and take the path north and take the turn left. Hold Down to turn at the third intersection, then turn right as soon as you're able. Hold Down before the broken tracks to turn, then hold Left to left immediately afterwards. From here, you no longer have to turn at any more intersections; you just need to worry about avoiding the broken parts of the track with the D-Pad on the way to the door. I've labeled this path with red lines on the map.

At the door, use the snowflake in front of the door to open it. You'll still have the torch to burn all on-screen enemies, so keep that in mind. Equip the magic mirror and the star. Use the mirror to distract the smaller pigs, and use the powder and the star to defeat the giant pig like you did at the beginning of the game. You'll save the fairy, who somehow got kidnapped, and your health will be refilled.

From here, you'll need to head to the door in the upper-left corner. You'll need to take the turns that led you here, and after you're able to go up and right from the path leading to the second door, wait until you're going east and hold Up at the fifth intersection to turn. Hold Left to turn at the second intersection you see going north, and you'll head straight there. This path is outlined with the pink line on the map above. Congratulations. The worst is over. Put the bubble blower in the door. You're riding free and easy now and you're only going to have to worry about the boss battles from now one.

Remember the ooze monster from the Dwarven Palace. Well, guess what, you'll need to fight him again. Thankfully, fighting him is the same as ever: wait for him to split into multiple parts and freeze them with the powder before hitting them with the stars. This time around, however, since you have less room, you'll have to use the magic mirror to keep the boss from following you around and keep the slime pieces in one place so you can defeat them all more easily. The more you can destroy at once, the better. Just be aggressive with the powder, throw a few stars, and throw the powder again. Beating this boss again will free Casolari, who refills your health.

Now for the door in the upper-right. Just ride the mine cart all the way to the right, just as the green line signifies. That's it. Use the lantern on the door to open it. Head south, then take the left fork to the south and follow the path to find Melody...and the Shadow King!

To defeat the Shadow King, you'll need to equip the magic mirror and the torch. Use the magic mirror to the eyes and use torch to destroy the eyes more easily regardless of where they fly. Keep an eye on the torch so you can use it when the flame is lit again.

The Shadow King will then transform into some sort of winged minotaur-like beast. Use the balloon to get the bomb to explode on you yet fail to damage you. When the room gets dark, use the torch, then equip the mirror and use it in front of the Shadow King to get his shadow orbs to explode on your clone. He will then fly to the right. Head to the left and throw a star at the ball which contains Melody to free her. Melody will give you an amulet, which you'll need to equip. 

Equip the hourglass and use it to get away from the Shadow King when he dives as you head back to the right. From here, you'll need to move to him, then get back to the left when he dives at you and use the amulet. The amulet throws lightning bolts around at random angles, and sometimes the lightning will hit the Shadow King. The amulet has a cool down period, much like snowflake, torch and lightning bolt before it, and you'll need to wait for it to flash yellow again before you can use it again. The closer you are to the Shadow King before you use it, the better.

Once you hit the Shadow King enough times, you'll beat the game. Merlin will reunite with Melody and Sherm, then the fairy tries to warn Merlin about the two Meanies at the balcony above ready to drop a big brick on Merlin only to fail. When the brick hits, everything turns black. Merlin eventually wakes up back outside of his home, with the amulet falling out of his grasp as he heads towards his house, signifying that it was not a dream. A Meanie then shows up and takes the amulet, and Merlin chases after the Meanie as the game ends.

If you collect all the health extensions, you'll get special text after the ending telling you that you are in the running for a contest mentioned in the manual, which ended long ago. You just beat Young Merlin!

Friday, June 27, 2025

PrinceWatercress plays Young Merlin - Part 7 of 8


In this entry, we enter the third and last mine cart section...and it's anything but fun.


Time to head back to the dragon just so we can defeat it. The lightning bolt attacks and defeats all on-screen minor enemies, so you won't need the torch or the snowflake anymore. When you get back to the dragon, use the hourglass to stop time, use the lightning bolt to attack, then get on the other side of the dragon. Keep doing this until the dragon is defeated.


Defeating the dragon reveals an entrance to another chamber. Guess what? It's the third and final mine cart section. There are four doors, but only three are blocked by balls that bounce you back if you run into them. The only one that is not blocked at the start is in the lower-left corner, so here's what you need to do.

Get on the mine cart. Go all the way down and be ready to avoid broken pieces of track, because you'll be doing that again here. Take the turns across the south end of the area, then keep going north until you can't go north anymore. This will allow you to turn right. Go as far to the right as you can, and avoid the broken track as you make your way north. Go into the wall. You'll take a hidden passage, and in the middle of it, you'll get the final health extension.

From the hidden passage, turn right on the sixth intersection on the way north. Turn down, then follow the path and hit the spring. You'll need to loop back around, but you'll need to turn left just before you re-enter the hidden passage, which is the fifth intersection you see on the way down. This takes you straight to the first door. You'll need to place the lightning bolt in the door before you can open the door to go in.

Use the magic mirror in front of the mirror on the wall to go through the mirror. Make sure you equip the snowflake, as you're going to have to fight the big spider from Rainbow World again before you can rescue Sterm. Thankfully, the same strategies apply, with the only difference being that you're in a much bigger room. You may have to use the snowflake twice to re-freeze the cocoon, but at least you'll hit the big spider every time.

Eventually, the cocoon will be destroyed, and the big spider will spit webs to the side that spawn a bunch of spiders. Place the clone to the side with the mirror so he aims at that, and keep freezing him. You'll eventually save Sherm and shake hands with him before getting your health refilled.

Thursday, June 26, 2025

PrinceWatercress plays Young Merlin - Part 6 of 8


The rainbow gem opens up a whole new world...and a whole new set of headaches.


Since you've found out what the rainbow gem, it's time to use it for what it was meant for. Head to Pinedale and go back to the portal, then use the rainbow gem at the portal. You'll be able to enter a whole new world...which is also another maze.


The flowers are teleporters, and you'll have to find some open ones in order to use them. For now, enter the tunnel. Make your way to the lower-right corner first so that you can get a health extension. From here, you'll need to find an opening that leads elsewhere, and that is west of the health extension.

Destroy the mushrooms to get the wooden heart, then use the teleporters to open up the rest of the teleporters in the aboveground maze. There will be another one near the goblin, who can be destroyed with the torch, even though he will eventually come back.

You'll have to go through more of the tunnels to open up more of the area. As for the teleporters, they will take you to a random location, and you'll want to keep going through the same one over and over again to open everything up. Keep in mind that the flower teleporters close when you leave this maze and that you will have to open them back up when you return.

There is an area with moving mushrooms with a passage to the west hidden by the flowers. This leads to a health extension.

The small flowers will surround and attack you, so stay away from them.

Back in Pinedale, use the wooden heart at the stump with the heart-shaped imprint in it. The first one will create a mound that you will need to put the yellow tulip in, and that will give you a silver star that is more powerful than the one you started with. You'll also get a password. The second one will create a mound you'll need to place the rose from the maze in, and doing that will net you a comb.

Head back to Rainbow World and open the area up. You'll need to use the comb to get past the small flowers, as the good looks you get from using the comb in front of them will stun them. This will allow you to get the third wooden heart. Head back to that tree and use the third wooden heart, then plant the white flower from the fairy's pond to get a snowflake. The snowflake will hit all on-screen enemies with a blast of cold weather and stun them, in addition to destroying all minor enemies on-screen.

Eventually, you'll have to make your way back into the tunnels and use them to get to a giant spider. You'll want to equip the magic mirror and the snowflake. Freeze the cocoon with the snowflake, then switch to the star and hit the frozen cocoon. Use the magic mirror to get the tiny spiders out of your way, then keep doing the whole snowflake-star-snowflake-star thing, occasionally using the mirror to keep the small spiders out of your way. You'll keep freezing the cocoon, but you'll also freeze the big spider every time, too. If you do get a spider on you, use the torch to burn it, as the spiders can burn through your health. Eventually, you'll defeat the big spider, and you'll get a fourth wooden heart and access to more of the tunnels. Use the snowflake to get rid of the red ants so you can get out of here safely.

From here, enter the tunnels entrance east of the small flower enemies guarding the wooden heart. You'll see some buttons and a gate, but you won't be able to get past the gate...yet. Instead, make your way through the tunnels until you find an opening in a wall in the middle of a path. Enter that, then take out the red mushrooms and get the flower behind them.

From here, head back to Pinedale, use the fourth wooden heart on the stump, and plant the flower that you just found. This will get you an hourglass, which you'll need to use to get past the gate, as it stops time for a few seconds when you use it. Now you'll have to do a bunch of backtracking to get to the gate, stand on the button, use the hourglass to stop time briefly, and get the fifth wooden heart and the red flower near it. From here, go to the opening in the lower-left corner of the maze. Use the hourglass to get past the dragon and get another health extension. This is the last one in the area.

Head back to the stump in Pinedale and use the fifth and final heart and plant the last flower to get the lightning bolt - your most powerful attack - and a password. Despite what I say here, we are going to have to go back...

Wednesday, June 25, 2025

PrinceWatercress plays Young Merlin - Part 5 of 8


The Shadow King knows we're getting close now...


Welp, time to head all the way back to the guard in the Dwarven Palace, now that you have the mirror. That's right, there's even more annoying backtracking! Stand to the side and use the magic mirror. This will create a clone of yourself that you can move for a short period of time, and this clone can be moved straight past the guard to the other side.

You'll find an elf chained to the wall. Use the key to free him, and you'll get a password. You'll also see a hole. Walk into the hole and you'll land on...another mine cart skateboard. Joy.


And now for the solution! The red line is the starting path, the green line is after the first spring, the yellow line is after the second spring, and the pink line is after the last spring you need to hit. 


This time around, you'll need to move the mine cart to avoid broken pieces of track, which makes things even more of a nightmare. You'll not only have to worry about plotting a course, but also avoiding broken sections of track that will knock the mine cart/makeshift skateboard off the track if you don't lean away from them. I wouldn't be surprised if this is where a lot of players gave up.

Travel south, and once you turn left, be ready to turn right at the third intersection. Keep going forward, and bounce off the spring. Turn left at the fifth intersection, and keep going until you bounce off another spring.

From here, keep going forward. Turn left before you hit the spring on the right hand side (or else you're just going to keep bouncing back and forth until you do). The third intersection on the way north lets you turn left; turn there. Move past all the intersections, and be ready to turn left. Keep going until you hit another spring.

From there, you'll need to head back. That means turning right at the last turn you took, then holding Down to avoid the spring on the way back (hitting it will take you back to the . This time, you'll want to turn left at the second intersection you see as you head south. When you make the turn, move past all the other intersection and be ready to hold Down to make the turn. After a jump over a pit, you'll be at the other side. Merlin will land on the ball of ore near the ore pile and automatically grab it, so that will be in your inventory now.

Move into the path of the ore buckets to be taken back to the machine in the palace, and use the ball of ore on the processing machine to get the purple gem, which is the last one. When you leave, however, you'll have to face the Goblin King. Use the Magic Mirror to distract the three flying eyes that he sends at you so you can easily destroy them. After doing this three times, the Goblin King will put up his dukes. You actually have to run into him, get punched, and lose nearly all of your health from being knocked into the wall to get him to go away and continue on with the game.

From here, you'll need to backtrack all the way to the lake and throw the purple gem in. This nets you two items: a torch that can be used as a weapon as well as a rainbow gem. You'll also get another password to copy down just before everyone in Pinedale - Sherm, Melody and Casolari - gets kidnapped by the Shadow King by means of the Meanies. They will then use a rainbow gem much like the one you got at the portal to carry everyone into the Shadow King's realm. Looks like it's up to you to save the day.

Tuesday, June 24, 2025

PrinceWatercress plays Young Merlin - Part 4 of 8


We got a lotta pushin' to do.


As soon as you enter the stone archway, you'll be met with a new puzzle and a fire blocking your path. There are three bowls to put things in. Put rainbow water from the lake at the start in the left bowl, the clear water from the spring near where the pig enemies were in the center bowl, and the blue water from the fairy's lake in the right bowl. The only things hinting at these waters are a rainbow, a yellow flower near the stream near the pigs, and the white daffodil from near the fairy's lake, respectively. Putting the correct waters in the correct bowls will get rid of the fire. If you don't put all three waters in the correct order, you'll have to go all the way back, re-collect the waters, return here, and then put the waters in the right place. Talk about annoying! At least you can use the spring to get back to the blue gem area.

Once the fire is out, go left and use the balloon near the ledge above once you move the plaques out of the way. You'll elevate yourself up to an area that you usually couldn't reach to get a health extension. To get back down, just move down in a specific spot and Merlin will drop down.

On the way right, you can move around south of the lava. 

The four arrows logo on the floor can be used to reset puzzles. Just use the four arrows item like any other item, and you'll reset the nearby puzzle while reappearing on the nearest logo. Thankfully, completed puzzles don't get reset.

Pushing the next plaque onto the button lets you head north, where you'll have to get more plaques on more buttons. You'll need to push the three next to each other in position first, then move the other two. Keep in mind that the plaques can only be moved around on the checkerboard floor, but you can push them from outside said floor.

Head to the north. For the next puzzle, you'll need to get all four plaques on the left, then move them into place. That's all you need to do. The door opens up with the plaques disappearing. There will be a soldier past the door, and you won't be able to get past him...yet. But at least these puzzles are done.

For now, head back, then go left of the four arrows logo. Equip the powder and enter the next room to face Bloop. Wait for Bloop to split into four, then freeze the pieces of him with the powder and attack them with the stars. He may get back together once or twice, but the parts that get destroyed will stay destroyed.

After Bloop is defeated, head north to find some machinery. Head left to pick up the key. Keep the machinery in mind for later; you'll need to put something on it when you get that something.

For now, go back to the intersection east of where you started and go east. It's time for another puzzle. Push everything at the bottom to the top row - center, left and then right. Push the top right plaque north once, and the top center plaque to the west twice. This lets you push the top left plaque out and onto the bottom left button. From there, you can push the top center plaque to the bottom center button, then push the top right plaque onto the last switch.

This opens the door to the south, but you'll need to wrap around to that area from the other side. Move the plaques that are in the way to the south so you can head to the right, then move the middle plaque to the right. Wrap back around to the other side and push the plaque to the right south and the plaque to the left west. You'll be able to get the green gem and get out of here.

You now have all of the puzzles solved. They will stay solved, and while you'll still have to push a few non-puzzle plaques out of the way, getting around here is a lot easier now.

You can now head all the way back to the lake and throw in the green gem. When you do, you'll get the magic mirror. Meanwhile, there will be two dwarves where you found the blue gem...and now you're going to have to go through there AGAIN!

Monday, June 23, 2025

PrinceWatercress plays Young Merlin - Part 3 of 8


The underwater maze is truly annoying.


As soon as you walk into the water here, you'll enter an underwater maze.

You'll need to head from the southeast corner where you start to the northwest corner, where you'll need to use the balloon in the spotlight in order to surface. Along the way, there are caverns you can approach. Some of them have mermaids, and you'll need to let them kiss you in order to refill your oxygen, which will be in the lower-right corner of the screen. Others have piranhas that will swim after you as you try to get away from them. If you run out of oxygen, you'll be sent back to where you started the maze with reduced health.

There are other things to avoid, such as the jellyfish, hammerhead shark that will flatten you and do a lot of damage, and the dogfish chasing the catfish, which will stun you and cost you valuable time. There are even currents in certain areas that 

Aside from the northwest corner, there is also two places to go: west of the center of the maze, and west of the northeastern corner of the maze. Both of these areas lead to health extensions, and you'll want to get both of them.

When you get to the northwest corner and use the balloon in the spotlight to surface, then grab the blue gem. Head right of where you got the gem From here, if you haven't already, get the health extensions before leaving. It's easier to get the extension in the middle of the maze from the exit, while it's easier to get the extension in the northeast corner from the entrance.

From here, get out of the mine. Just keep in mind that this isn't the last time you'll need to go through this maze.


Head back to the gem lake and throw the blue gem in. You'll get an air bubble, which increases how much oxygen you have underwater, which makes the underwater maze easier. Also, a dwarf will show up near where the blue gem was. He will be guarding the weird icon that looks like four arrows converging into each other.

Believe it or not, there is a flower near the fairy's lake that you can pick up. You'll need it later.

Head back to the flooded cavern. At least you don't have to use the mine cart again. Use the air bubble to give yourself six air bubbles' worth of oxygen. If you still haven't gotten the health extensions here, go get them now.

The air bubble will make it easier to get the goldfish in the southwest corner. Since you have the goldfish, grabbing it will put it in the goldfish bowl. Head all the way back to Casolari in Pinedale and use the goldfish to get a spring.

Interestingly, the health extensions stay collected if you die in the maze; the goldfish, however, has to be re-collected if you perish before getting back to either the entrance or the exit.

Now you have to go all the way back to where you got the blue gem, take out the dwarf, and use the spring left of where you got the blue gem. This will take you to the opening on the other side as well as the four arrows icon. After you get the password, grab that icon, then be prepared to enter the opening...

Sunday, June 22, 2025

PrinceWatercress plays Young Merlin - Part 2 of 8


...and this is where some people understandably get frustrated and turn the game off. I made this part look a lot easier than it actually was.


With the bubble blower in hand, head back to where you fought the Meanies after getting the yellow gem. When you see the Meanies, use the bubble blower near the Meanies to get them to scatter. Behind them is the fairy's trapped shadow. Head back to the lake where the fairy was and use the cube to give the fairy her shadow back. The fairy will heal you, then you'll find out that you need to go to Pinedale, where the girl that you tried to rescue earlier, whose name is Melody, is safe and sound and back at home. You'll also get another password.


Head to Pinedale. The house just south of where you entered is the girl's home, but if you pick up the wrench at the front door, you'll find out that she lives with Sterm, her overprotective father, after Merlin somehow hides behind the tree. Sterm somehow sees Merlin and warns him just for waving back when Melody waves at him.

Past Sterm's house is a covered bridge, and north of the other end is a teleporter of some sort that we can't use yet. West of that is a tree stump with a heart-shaped slot. Northwest of here is Casolari, an old wizard who has locked himself out of his house. He's lost his key in the maze to the north, and you'll need to help him find it.

When you enter the maze, go as far to the right as you can, then head north. Take out the hedge monsters as you go by freezing and blasting them. When you see the bench, head south for the key. Don't leave just yet. Head back to the bench, then go west of the benches. You'll soon be able to get to an open area with a fountain where you can get some life-replenishing water as well as a red flower. Pick the flower up.

From here, get to the northeast corner of the maze. There will be a health extension; go through the wall left of this pick-up to get it. After picking it up, head west. There will be a secret wall leading into the area with the bottle; you'll need to walk through it to get the third and last bottle. From here, head all the way west, then head all the way south. From here, you can head all the way east, then south again to get out of the maze. Use the key on Casolari. He will re-enter his house and hand you a goldfish bowl, which we will need to put a goldfish in.


Head back to the entrance to the mine and use the wrench near the mine cart to remove the wheel. (If you move into the wheel beforehand, Merlin will mention needing a wrench.) Get the wheel, then head back into the mine. Get to the northwest corner to get to the mine cart, then use the wheel on it. Merlin will ride the mine cart like a skateboard...and this is where the frustration with the game kicks in. You'll need to turn towards the curves in the tracks before you take them, or else you're running into walls and starting all over. The fact that you cannot pause while doing this to make things easier really stinks. Thankfully, I've used the map from earlier and did some MS Paint Magic™ to work backwards and chart a route.


Hold Down on the D-Pad to turn immediately to the south, then take the jump and hold Right. Hold Down before the second intersection, then turn Right at the second junction. Hold Down near the end to turn, then hold Left after the first junction to turn left. Hold Up to turn as soon as you are able, then hold Right at the next junction. Hold Down to turn at the end of this part, then hold Right after that. Keep going to take the health extension here and take the jump, then hold Up after the jump to turn. You'll need to loop back around to where you got the health extension, then keep going back to the left where you turned to get to the health extension in the first place.

From there, hold Up at the third intersection on the way to the left to get back on track, then hold Left to turn again, then hold Down as soon as you're able to turn in that direction. Hold Right to turn when you reach the corner, then keep going to the right. Be ready to hold Up after the jump to turn one more time, and after the jump, you'll be at your destination: a flooded cavern. 

Since you cannot pause the game each turn to make things easier and you'll have to practice the crap out of this, this part can be pretty hard, and it can take several attempts to get this done. And before you ask, yes, you have to use the mine cart. You can't avoid it.

Saturday, June 21, 2025

PrinceWatercress plays Young Merlin - Part 1 of 8


This game can be hard if you don't know what to do. Thankfully, it's pretty easy to get started early on.


A host of evil creatures has besieged this once pristine land. From his underground palace, the Shadow King is directing his minions, the Meanies, to infiltrate, corrupt and destroy all things of beauty. The Shadow King is winning; all in the land will soon quiver beneath his vile gaze. Swept away by a raging river while trying to save a beautiful maiden, young Merlin finds himself in this enchanted land. As he explores, he discovers the Shadow King's hideous plot. Armed with an arsenal of magical objects, Merlin enlists the aid of the Lady of the Lake and vanquishes the Shadow King's evil minions. It takes all Merlin's cunning and skill to penetrate the Shadow King's defenses and crush him forever.


From here, you'll have control of Merlin. The D-Pad moves you around in eight directions. Walk into the purple gem to pick it up, then head towards the nearby lake and press Y to throw it in. You'll complete a part of a rainbow, and you'll be rewarded with a star. Walk into it and pick it up. When you press B with this golden star equipped, you'll throw it in front of you like an explosive weapon. This is your means of defeating enemies up head. You can see what you have equipped on the Y and B buttons in the lower-left corner of the screen.

From here, head east. Don't go near the plants; you won't be able to survive them yet. Instead, stay on the path north of those plants. You'll seen an evil tree. Go right up to it and start mashing B to destroy it. Two Minions will come out of the tree and flee. You'll also be able to grab a bottle and an orange gem. The bottle can be used to store water and drink it to restore health, while the orange gem needs to be thrown into the lake from earlier.

When you throw the orange gem into the lake, you'll complete more of the rainbow and get a bag of powder. Head towards the plants and throw the powder at them with Y to freeze them, then immediately walk past all the plants before they unfreeze. From here, you'll have to fight some pig enemies with the golden star. Sometimes they will drop hearts that will refill one of your hearts that act as your health in the upper-left corner of the screen, and sometimes they will drop shamrocks. If you collect twelve shamrocks, you will either get temporary invincibility or a full health refill. Don't expect to get that many shamrocks that often, because I sure didn't.

L and R let you switch between all the items that can be equipped to the Y button. You can also press Select and manually select the item you want, and select what is also equipped to B. Start takes you to the sound test and password screen, which will be explained later.

There are three types of water: the regular water, which is a four heart refill; the rainbow water from the lake where you throw the gems into, which only refills a slight amount of health; and blue water which gives temporary invincibility.

On the way to fight the pigs, you'll notice a stream. You can use the bottle on it to give yourself the regular water that refills four hearts. Near that stream is a yellow flower. Don't forget to pick it up; you'll need it later.

In the lower-right corner of the area where you fight the pigs, you'll find a red heart outline. This is a health extension, and it will extend your health by one heart. The pigs can charge at you, so be careful if you're fighting them to refill your health.

Further down the road, you'll fight a much bigger pig. To defeat him, throw the powder at him to freeze him, then attack him with the stars. If he starts flashing out of his frozen state, freeze him again. Repeat until the giant pig falls. You'll then be directed southwest towards a lake, where Minions show up and kidnap the nearby fairy's reflection in the lake with a cube. (It took me until after I made the Let's Play to figure out what was going on here.) The Lady of the Lake will then show up and give you a combination of buttons that you can input in the password screen you can access with the Start Button. Be sure to write it down and keep it where you can find it. Press Start to get back into the game.

If you die at any point, you'll be taken back to the start of the area you were in with reduced health. Lives are infinite.

The small brook near where you fight the pigs has the regular water, which acts as a full heal if you drink it.

West of where the giant pig was is the entrance to the mine. South of the entrance is another health extension. Southeast of the mine entrance is the entrance to Pinedale.

Southwest of the Pinedale entrance is a log bridge. If you move towards it, you'll have a humorous set of interactions with one of the Minions (who kicks you and takes a little bit of your health) before reaching the lake where the fairy is. If you bottle the water here and drink it, you'll get temporary invincibility. Talking to the fairy will tell Merlin about the Minions who stole their shadow, and you'll need to head southeast to get it back.

If you go east of the log bridge, you'll find a lantern. Be sure to grab it; you'll need it later.

On the way to the shadow, use the invincibility water to take out the evil tree, then grab the yellow gem and follow the Minions so you can fight them. You won't be able to get past them...yet.

Head back to the rainbow lake and throw the yellow gem in. You'll be rewarded with a balloon, which allows you to inflate yourself and fly upwards in certain spots.

From here, head to the mine. 


You'll need to get the lantern first before you go in here, or else you won't be able to see.

To fight the dwarves, freeze them with the powder, then attack them until they die. Watch out for their dynamite.

You can enter the little passages with the words "Danger" by pressing A in front of them, but they will take you someplace random every time. I just take the long way through the mine.

The first place to go is in the northeast corner. When you reach the broken ladder, use the balloon. You'll find the red gem.

From here, head to the northernmost part of the maze. Head west, then go south, as soon as you're able to again. The fake wall to the west will give you a health extension. Go back north and up the ladder, then go down the next ladder to the west and go through the wall to the west for a bottle. Finally, go south and down the ladder, then go through the west wall there for another health extension. From here, you'll want to backtrack to the mine entrance. 

Throwing the red gem into the lake at the start will net you a bubble blower. We'll put that to use in the next video.