Here it is: the soundtrack for Final Fight 3.
Wednesday, August 31, 2016
Jegudiel29ZX plays Final Fight 3 - Part 9 of 9
It's time for the final showdown!
Meet Black, the leader of the Skull Cross Gang. He's got the ability to shoot a projectile out of his hand like Guy can, and he's also got the strength and double spinning lariat of Haggar! He'll also hit you with that short whip in his hand if you're in front of him, so be careful when you go blow-to-blow with him!
If you knock him down, you definitely don't want to be around him when he gets up, as he'll do that spinning double lariat. You can't even hit Black out of it as he is completely invincible when he does that attack.
He has a lot of health, but it does go down. Your quarter-circle-forward+Y attacks and grab attacks will do a lot of damage here, so use them whenever possible.
When he's low on health, he'll hang out near the power generator on the right side of the stage. He won't stray far from it, but you won't be able to grab him either, leaving you to hit him with your standing combo. When you beat Black, you'll knock him into the generator and electrocute him. You did it!

Tuesday, August 30, 2016
Jegudiel29ZX plays Final Fight 3 - Part 8 of 9
We reach the final stretch of the game and take on the leader of the Skull Cross Gang!
Round 6 (continued)
When you're finally done here, you'll see a helicopter fly around in the background. Your character will run to the rooftops.
Yeah, I know there isn't much to this entry. Blame it on the video, where there was just more and more of the same over and over due to the use of continues.
Jegudiel29ZX plays Final Fight 3 - Part 7 of 9
After a rough start, we check out more of Round 6!
Round 6
I'm not quite sure what kind of place the second section is. I want to think it's a museum, but it's more like just another hallway.
There are two rooms that look the same, and both have a water cooler. The first one contains a 1-Up, while the second one contains a Barbecue to completely refill your health with.
When you leave this room, you'll be going right to another elevator. Unlike the other one, which was really a pane of glass (could have fooled me!), this is actually an elevator.
The elevator is full of Joes when you get inside, beginning the completely expected elevator fight. You may have fought one or two Joes at a time, but not four! When you destroy one, another comes out, and there's about eight or nine Joes in all. Grouping them together and hitting them all with the same attack really helps.
When you get off, you'll be fighting a lot of Mays. After the Fritzes show up, you'll have to put up with oil drums again! Whoever the leader is, he's ticked that you're here and sicced Donkey Kong on you. At least, that's what I think is happening. Regardless, you can break these oil drums and find some items to restore your health with (or get points). You'll then take on some Fat Jacks and Arbys.
Monday, August 29, 2016
Jegudiel29ZX plays Final Fight 3 - Part 6 of 9
We finally make it to the headquarters of the Skull Cross Gang...
Round 5 (continued)
The next section is some sort of metalworks factory. When you finally make it to the end after fighting a lot of bad guys, you'll take on the punk Stray. He's fast, he has a stomp and he can also block your attacks. He can also hit you a kick attack, a multi-jab attack and a dashing punch. Just stay on the move when you're fighting him, and keep an eye on what he's doing and you should be okay.
Believe it or not, there are doors around here you can open by throwing enemies into them. One of them leads to a slightly more lengthy computer room. You can also beat the round in this section and bypass the battle against Stray. To do that, destroy all of the grey machines with the tubes sticking out by throwing enemies into them. When you reach the end of it, you'll finish the stage and head on to Round 6.
Bonus Stage
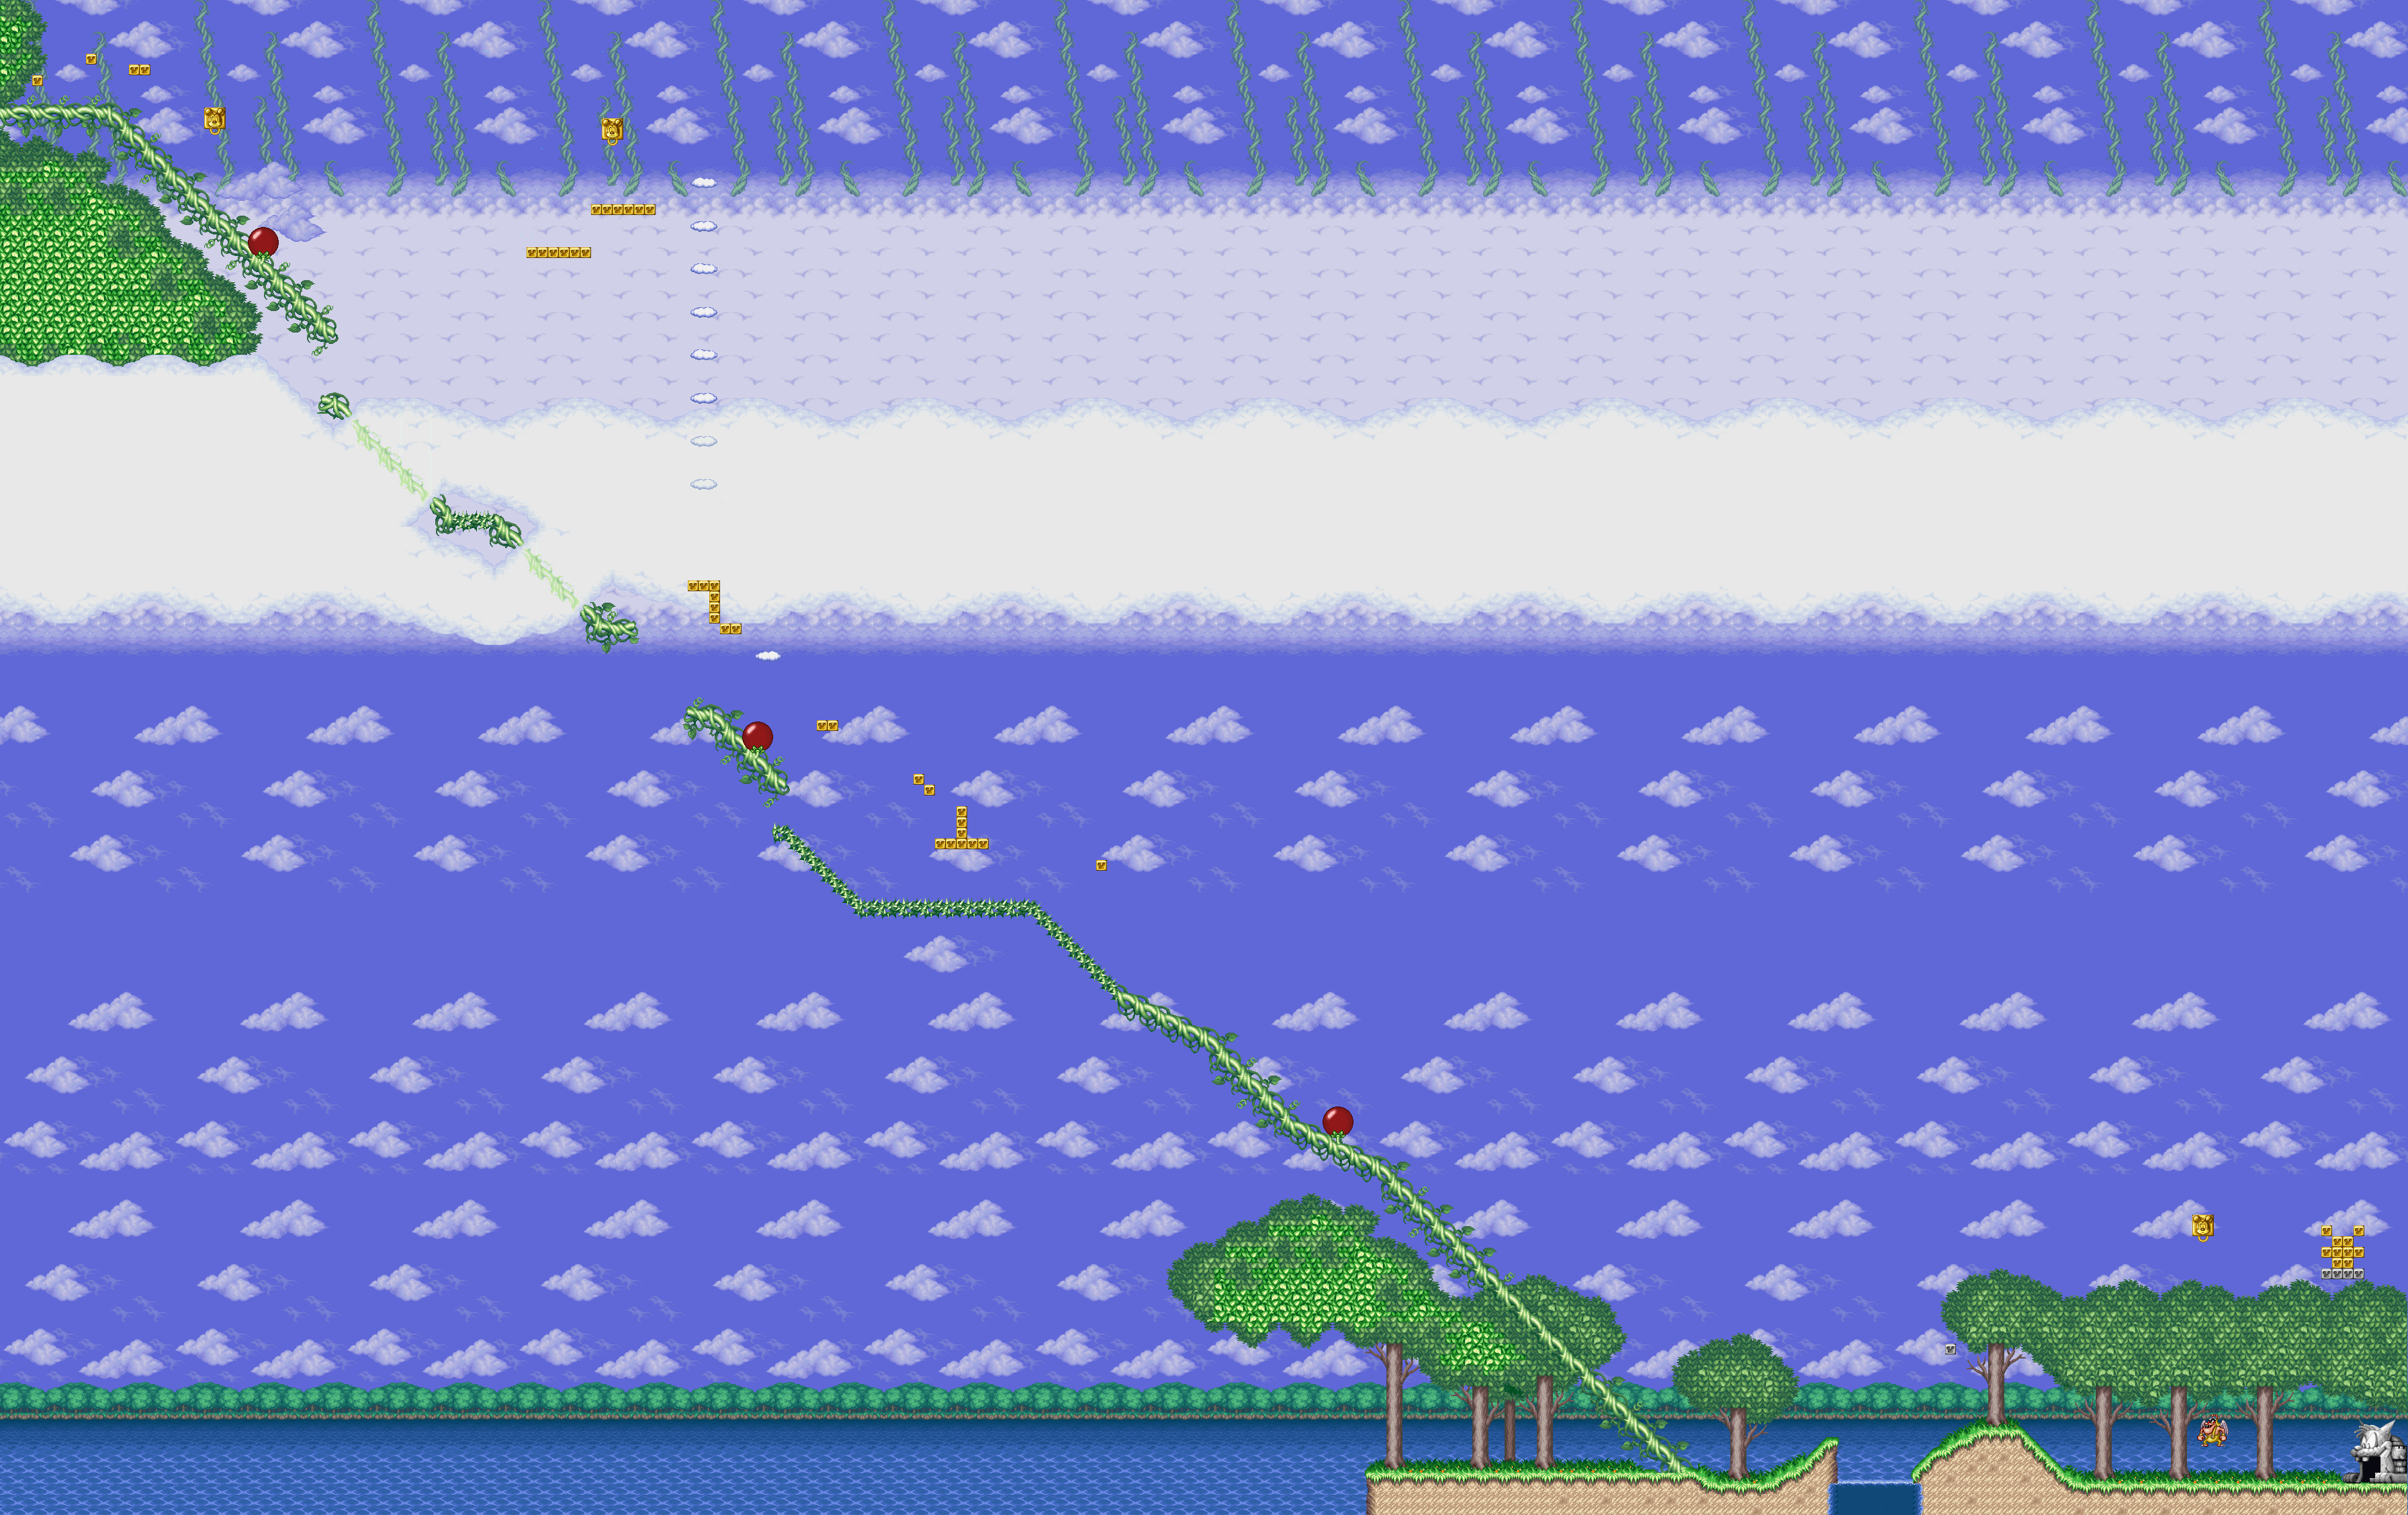
In this bonus stage, you'll have to run to the right while avoiding (or taking down) oil drums. Attack an oil drum only if you have no choice. (At least you'll get points for it.) If you can reach the computer at the end and destroy it, you win. You'll be awarded 500 points for every second left on the clock.
The trail of the Skull Cross gang leads our heroes back to Metro City and into one of the city's largest buildings. The final fight is about to begin!
Round 6
The first section is outside the building, and introduces you to the Skull Cross Gang HQ's welcome wagon. At the end, you'll reach the front door...
Classic Game Room reviews Final Fight for Super Nintendo
I'm surprised they haven't reviewed the third game yet. Well, here's the first game on Super Nintendo.
Sunday, August 28, 2016
Jegudiel29ZX plays Final Fight 3 - Part 5 of 9
Baseball players? Reminds me of The Warriors for some reason.
Round 5
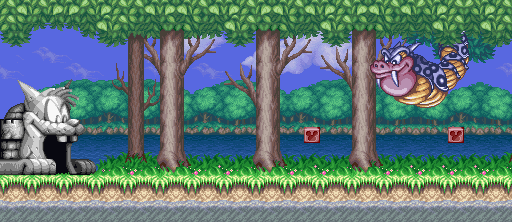
Hunter is a tall, skinny stereotype of a Japanese baseball player wearing a hockey mask. You'll see him when you begin this stage. He'll whack you with bat and also knock you off your feet with a baseball slide. At the end of the first section, you'll enter a building by busting down another wall.
Shortly after you enter, you can break part of the wall yourself and walk in. You can take out some more enemies here, but even if you don't want to, you can still walk back out of the room and continue as you normally would.
Jegudiel29ZX plays Final Fight 3 - Part 4 of 9
We finish off Round 4!
Round 4 (continued)
After you reach the rooftop, you'll break a wall and end up in a Chinese restaurant. You'll fight your way through a lot of Mays, fat guys, Andores and Joes before you reach the end. You've obviously noticed it throughout the game, but the fact that palette swaps don't have different names make me sad.
You'll meet Wang in the kitchen. He knows martial arts and carries some monk's beads in one of his hands. He has a somersault attack to bowl you over with, especially when he's getting up. You'll want to stay on the move and damage Wang however you can, even if it means throwing his henchmen at him. Wang also has a karate chop, a high jump and a straight punch that has some decent range.
Saturday, August 27, 2016
Jegudiel29ZX plays Final Fight 3 - Part 3 of 9
Even more new enemies? Sheesh...
Round 3 (continued)
The big guy we saw before the last video ended was Andore. Yep, we see much more of him here, and surprisingly, it's all we've ever seen of him. The jumping, piledriver and running attacks he's known for are still here, making him the most predictable enemy you can fight if you've played through the entire series.
The third section is the junkyard. You'll be taking down some more enemies as you approach another bus. Here, you'll encounter Rick for the first time. He's an edgier looking version of Dirk, and he has a dash attack. If you couldn't figure it out, it hurts, and he'll probably be your main reason why you hate the claw enemies in this game so much.
When you beat the enemies near the bus, you'll automatically back up and jump onto the top of the bus to fight Caine, a big man with a giant wrench in his hand that's probably as long as your arm. He's got some range, so throw bad guys into him whenever you can and try to outmanuever him so you can get close to him more quickly without getting hit. Also, use jump kicks on Caine, as they seem to do a good job. Whatever you do, don't stand near him when he gets up from an attack as you will get clocked.
Love the pause music, by the way. This series was as notorious for it as the first Battletoads game.
Round 4
Metro City has a Chinatown section? Who knew?
You'll first meet Joe here. Joe is a short guy with a wild mohawk that looks a lot like one of those cyberpunks. He'll use his agility to kip up off the ground, run and jump into you, and grab onto you and headbutt you.
Fritz throws Molotov cocktails onto the screen and runs away in typical Final Fight fashion.
In the second section, you'll be fighting on top of a building.
Jegudiel29ZX plays Final Fight 3 - Part 2 of 9
It's time to go through more of Metro City and meet some more of the new enemies!
Round 2
The first section is nothing special. There are a few more Dirks that last time, so be prepared to grab enemies and throw them into Dirk whenever you see him.
Apparently, weapons can be thrown in this game, much like Streets of Rage 2. The hammer can do multiple hits of damage as it spins.
You'll meet a new enemy type in the second section, and it's represented by two enemies: Fat Jack and Arby. They're like the huge, fat guys from the first game, as they can hit you with a running shoulder tackle.
Oh, yeah...Arby has a bandanna while Fat Jack has the mohawk, in case you're wondering how to tell them apart. Not that you'll need it, but...
The third section has multiple paths. You can either break the door near the fence to enter the restaurant, or you can beat the enemies to go to the park. Either way, you'll face Callman. Callman can grab you and beat you down if he gets in close, and he has a brief dash attack that lets him cover slightly more ground on his way too you, but not too much. He's on the slow side, but he'll tear you up quickly if you stand near him while he's getting up.
His henchmen is made up of another new enemy: May, a woman with knives in her hands and the ability to backflip to avoid attacks.
Round 3
If you destroy all the windows in the first section, you'll clear the stage automatically. I wonder how you were supposed to figure that out...?
If you're going to destroy all the windows there, don't worry about the last one. You won't be able to break it, but the game doesn't let you. Nevertheless, you'll still clear the round.
There is a sign showing the bus route at the end of this section. If you destroy it, you'll go to the ship in Round 4. Otherwise, you'll take the bridge.
If you don't destroy all the windows, you'll continue on with the second station of the round. The second section is a Metro City bus. As you fight the massive amounts of thugs on this bus, the sun slowly sets. It'll be early evening by the time you get off.
Friday, August 26, 2016
Jegudiel29ZX plays Final Fight 3 - Part 1 of 9
It's been quite a while, but I now have a guide for Final Fight 3...or rather...two guides for it.
The first one will be a single-player outing while the other one will be co-op. However, there are also two paths in the game, and each one will address one of the paths.
The Mad Gear gang is defeated, but since they no longer control the underworld, the street gangs have fought each other for control. In the end, the Skull Cross Gang are victorious and have now started terrorizing Metro City!
Haggar and Guy are back, and this time they're joined by two new characters: Metro City Special Crimes Unit Investigator Lucia, and a man named Dean who knows a few things about the Skull Cross Gang and fights with the power of electricity.
This playthrough is played on the Extreme difficulty, which is the hardest in the game.
Round 1
The gameplay is expanded here compared to the first two games. Besides having a dash attack as well as a Street Fighter II-esque quarter-circle-forward motion that lets your perform yet another attack, you can also pull a super special attack on an enemy after filling up a blue bar at the bottom of the screen. This attack can be used on one enemy after the bar is filled up and replaced with the word "Super," and involves grabbing an enemy and performing a slightly more complex set of commands (usually two or three directions on the Control Pad followed by the Y button).
You can also switch from being in front of a grabbed opponent to being behind one (which is based off the vaulting in Streets of Rage), and you can also hold one of the shoulder buttons down to walk backwards when necessary. You can also dash backwards and throw weapons, putting it on par with the Streets of Rage series.
Some characters are faster or slower than others. Guy is as amazingly fast as Haggar is amazingly powerful. Lucia and Dean seem to be the middle-of-the-road characters, but Dean is slightly stronger than Lucia.
The G's, Billys, Johnnys and Rays are your garden variety enemies. Just keep in mind that this is a Capcom game, and that these guys will have enough basic AI to cause some cheap hits and deaths here and there.
Dirk is another generic thug, but he's a big bigger and has claws on his hands. He can cut you multiple times in quick motions, and can move faster than the other foes, making him even worse at times.
As always, you'll find barrels as well as retrievable objects under them.
The first section takes place in town, while the second section takes place in a jail. Apparently, you'll find someone has broken out at the end of the second section, and you'll have to look around to see what's going on.
The third section takes place at some sort of gas station that's near the jail. Here, you'll take on the first boss: a corrupt cop named Dave. Yessir, we got ourselves a rehash of Edi E. He has a high stomp attack as well as some jump attacks, and he can also hit you with his billy club. Watch his shadow when he does the high jump so you'll know where he'll land. Be sure not to be right in front of Dave either, as you'll be open to his jump kick. If you have a Super and can walk diagonally into Dave and grab him, use it. It'll cut down on the time needed to take him down.
Yes, there are weapons here. You can pick up a pair or nunchaku as well as a hammer. Some characters have their own exclusive combo with certain weapons. For example, Guy can do multiple hits with the nunchaku, while Haggar can deal extra hits with the pipe.
You also get an extra life every 100,000 points and every subsequent 500,000 points. You have only a few continues here...five credits, to be exact. That's not bad.
As expected, the riot was just a ruse, and the Skull Cross gang has freed one of their own from prison. Dean finally explains himself: he's a street fighter, and when he refused to join the Skull Cross Gang, they murdered his family. Now he's in this for revenge.
Mickey Mania - The Genesis/Mega Drive OST
Here's the complete soundtrack to Mickey Mania for Sega Genesis/Mega Drive.
Thursday, August 25, 2016
Emperix plays Mickey Mania for Genesis/Mega Drive - Part 3 of 3
We have one more level to go...and this is where the difficulty spikes up.
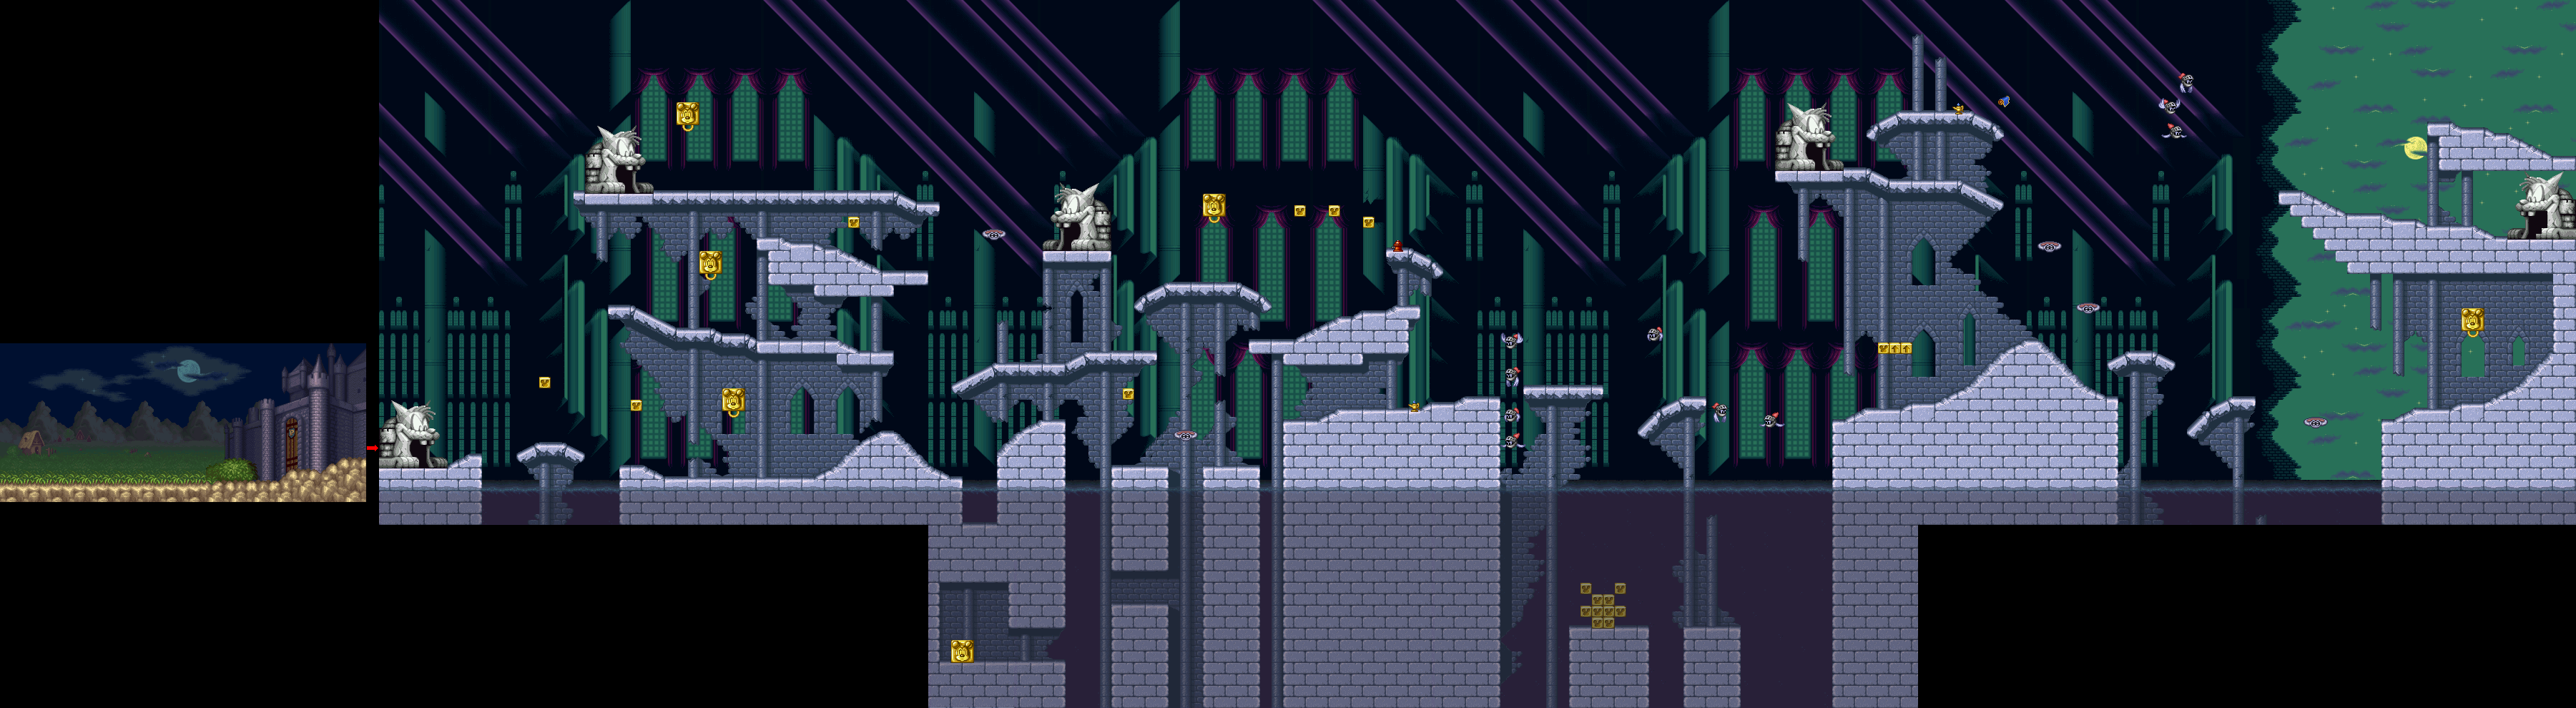
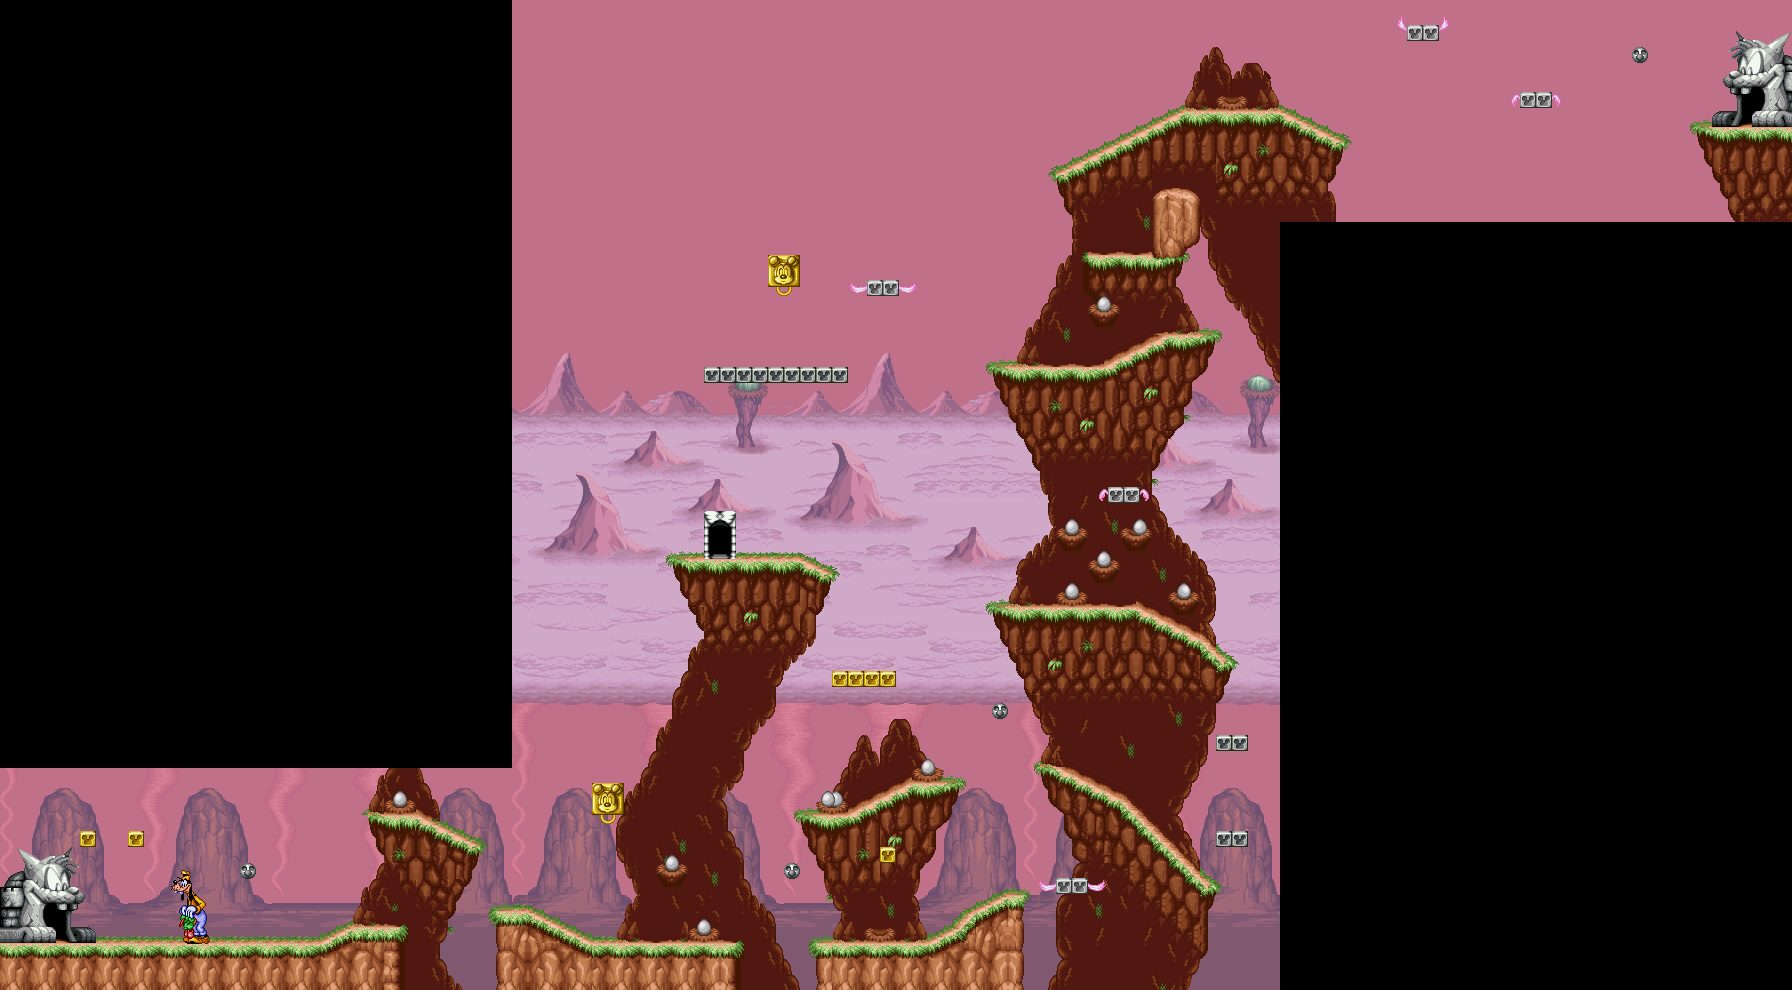
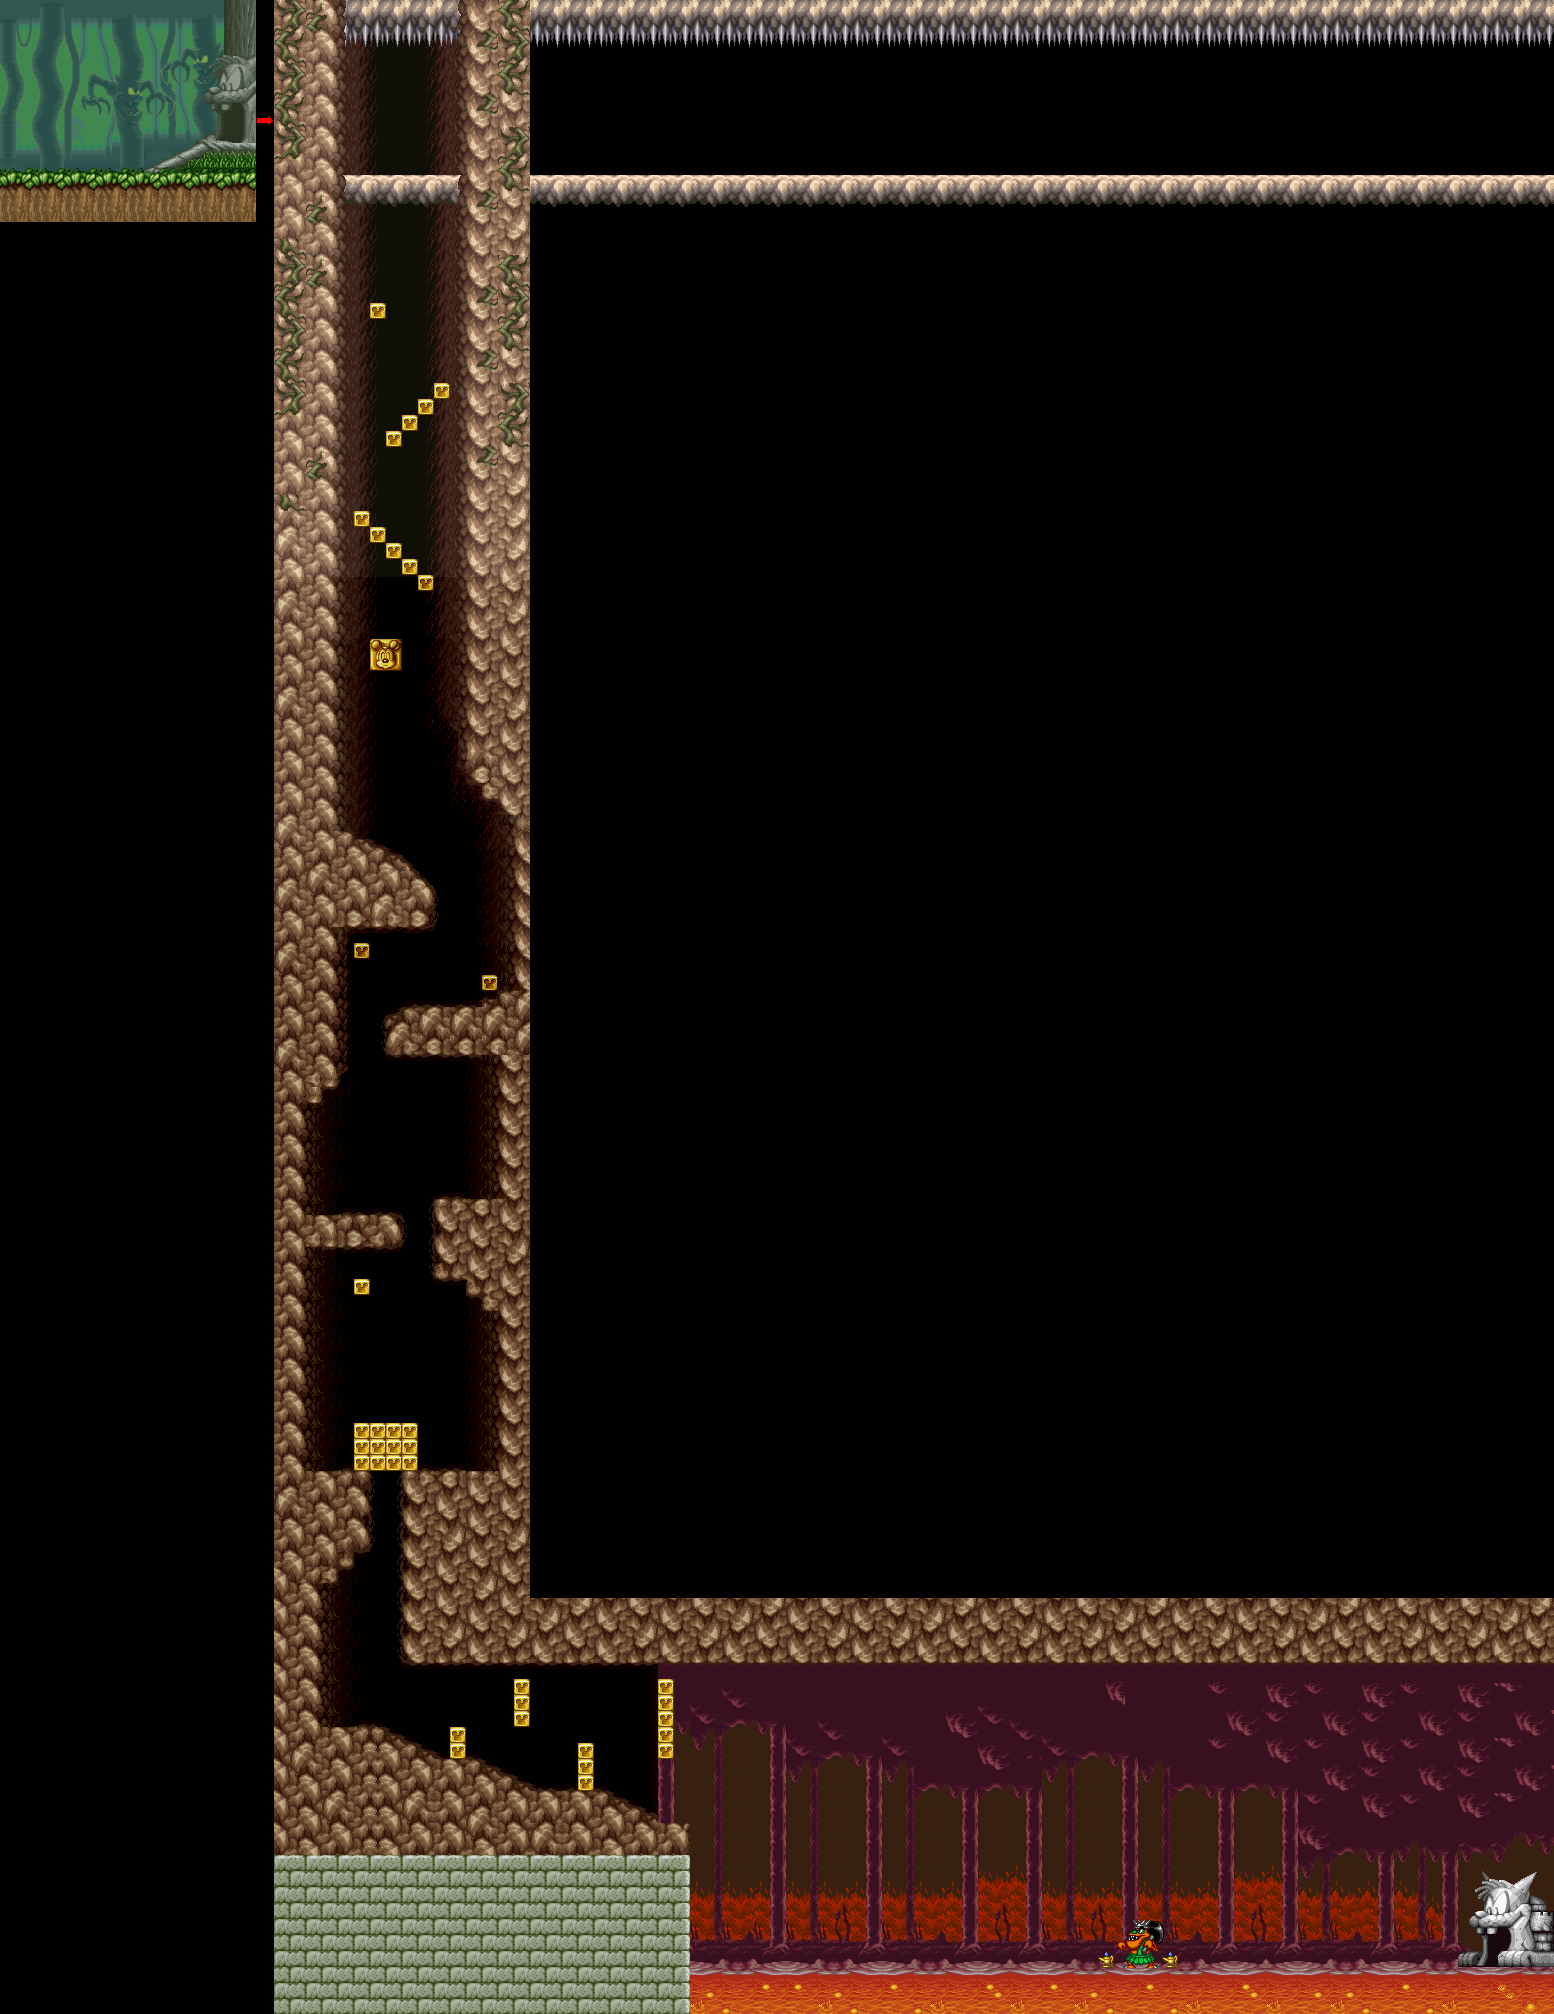
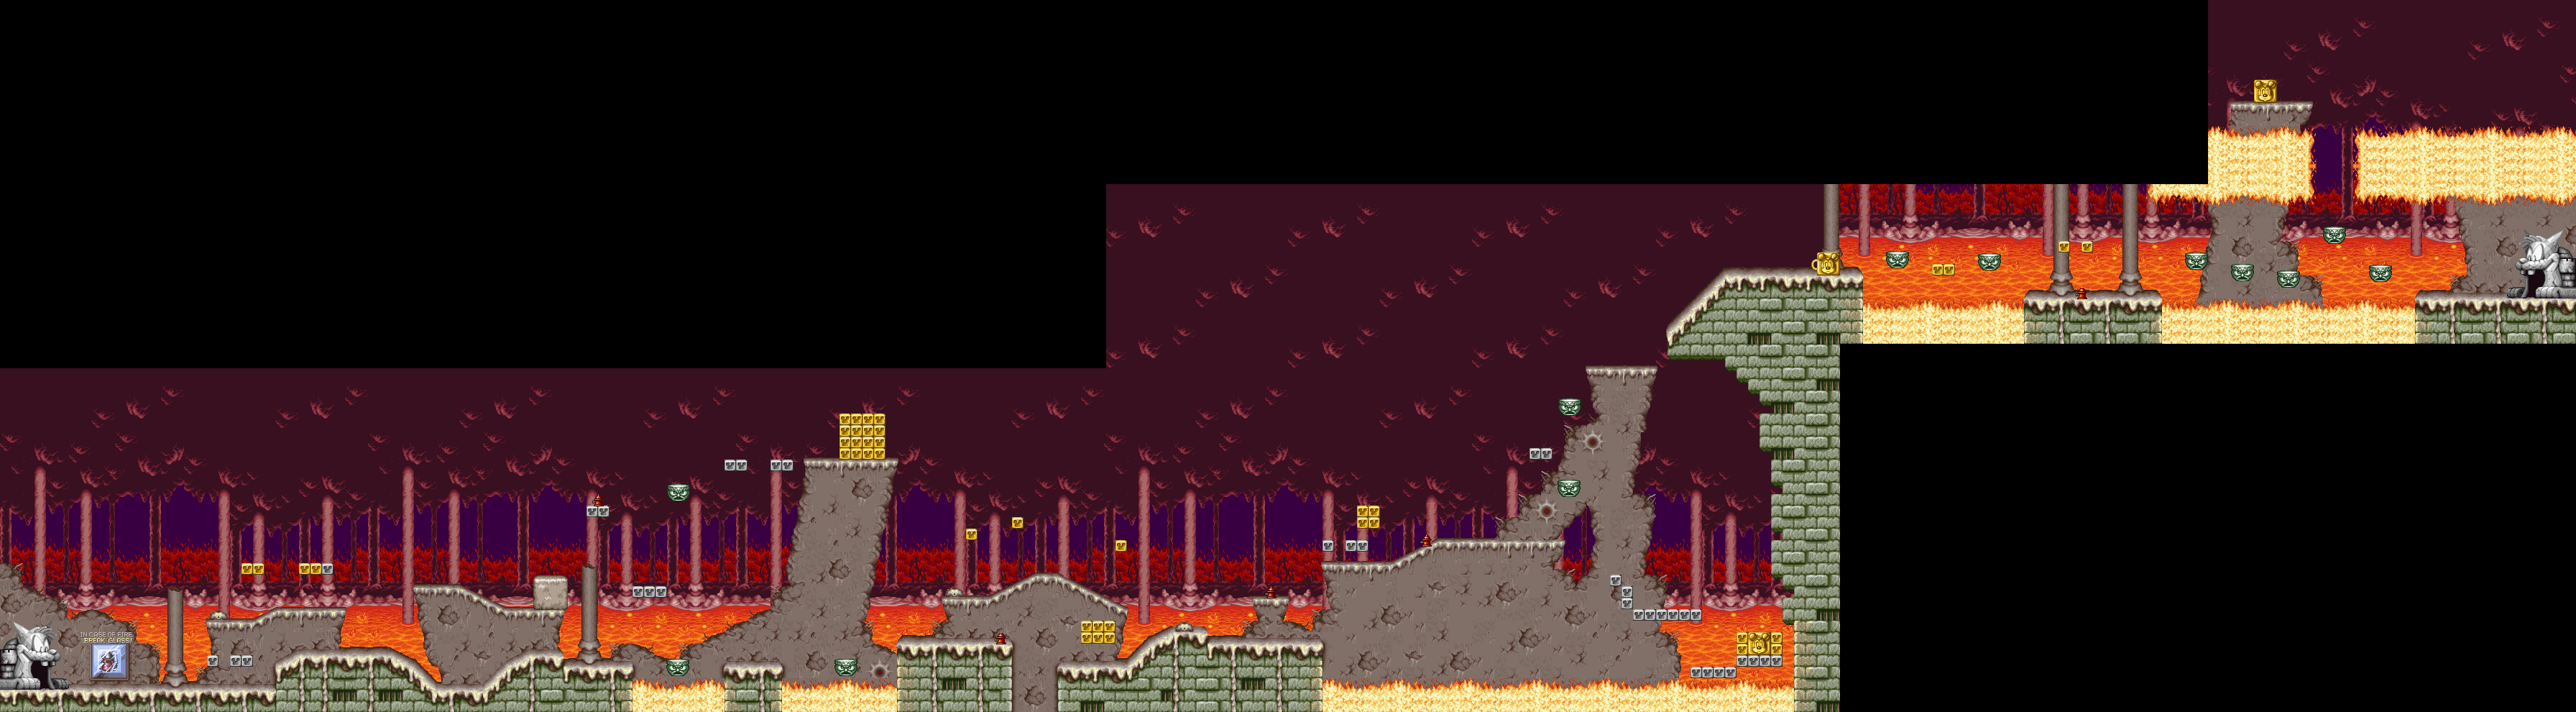
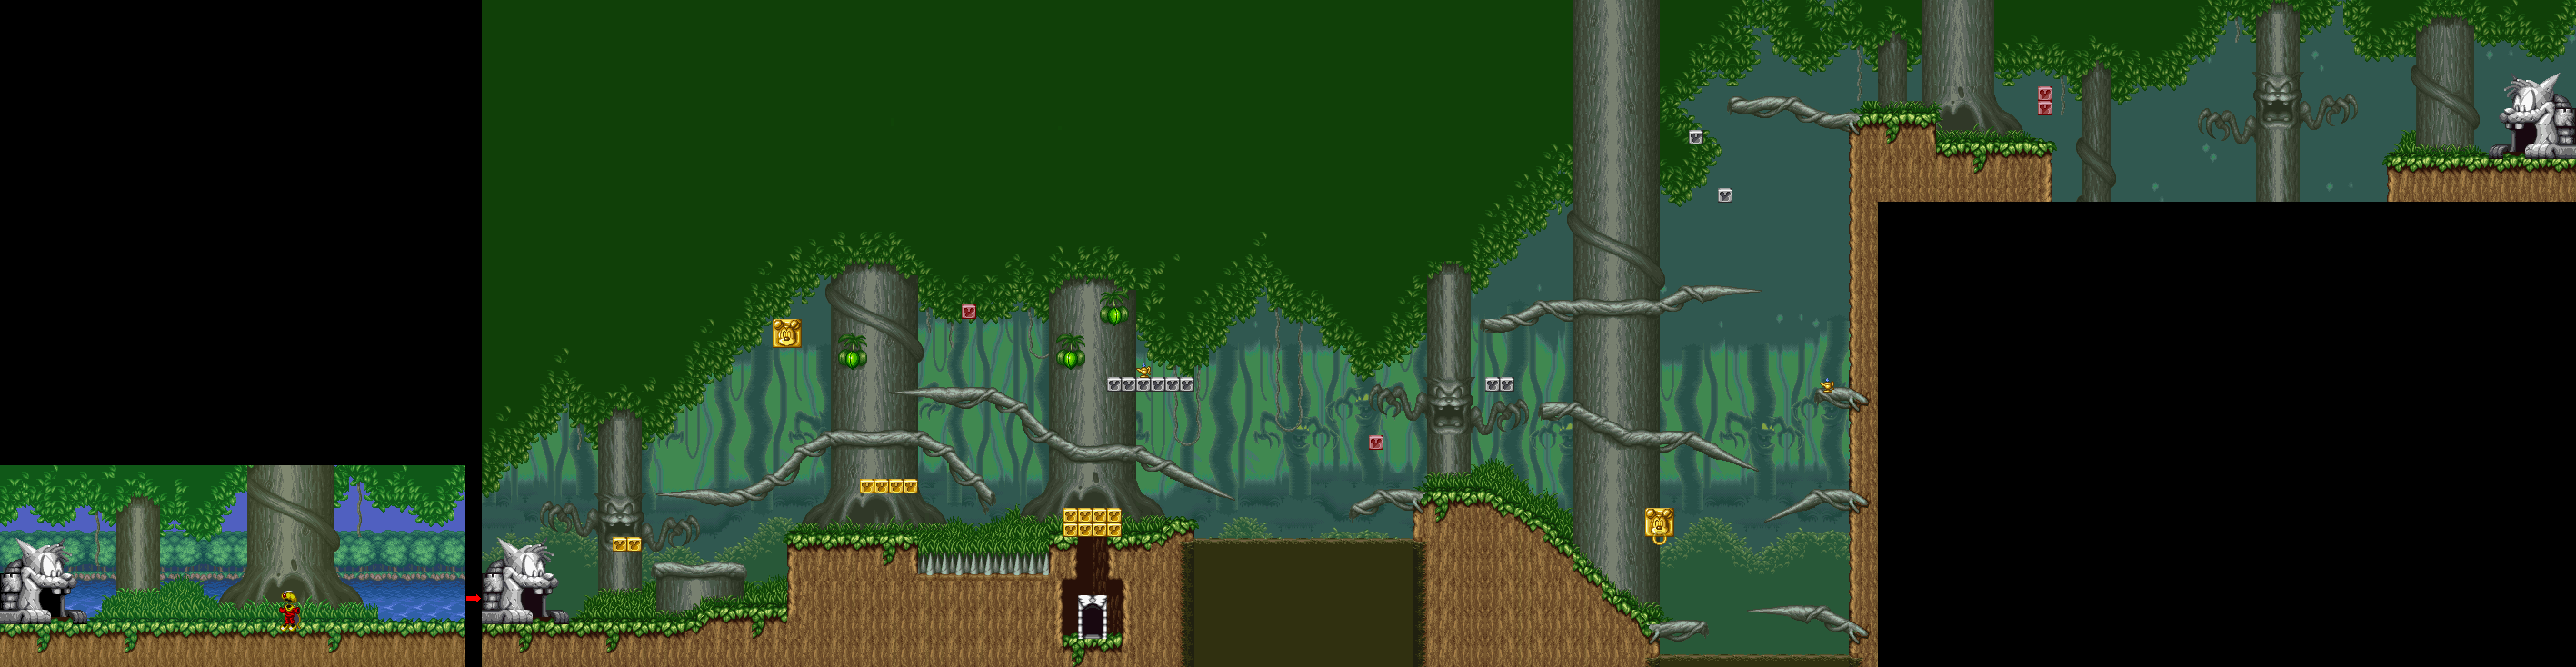
The Prince and the Pauper
1990
Section 1
If you go to the right, the stairs disappear.
Push the crate to the platform at the start of the stage. From there, leap up to the chandeliers. Walk back and forth on them to rock them, and make the jumps to the right easier.
Hit the switch to light up the library. The weasel knight will attack with either throwing daggers or crossbows, and the only way to defeat them is with marbles. It takes three marbles to take down one of the weasel soldiers, and you'll need to collect every marble you see if you want to survive.
In the library, you'll be using books either as trampolines or as magical teeter-totters that will get you around so you can continue the level.
You'll knock the pots down near the end. This effect was not in the Super Nintendo version.
When you reach Pauper Mickey, you'll find out Prince Mickey is still in the dungeon.
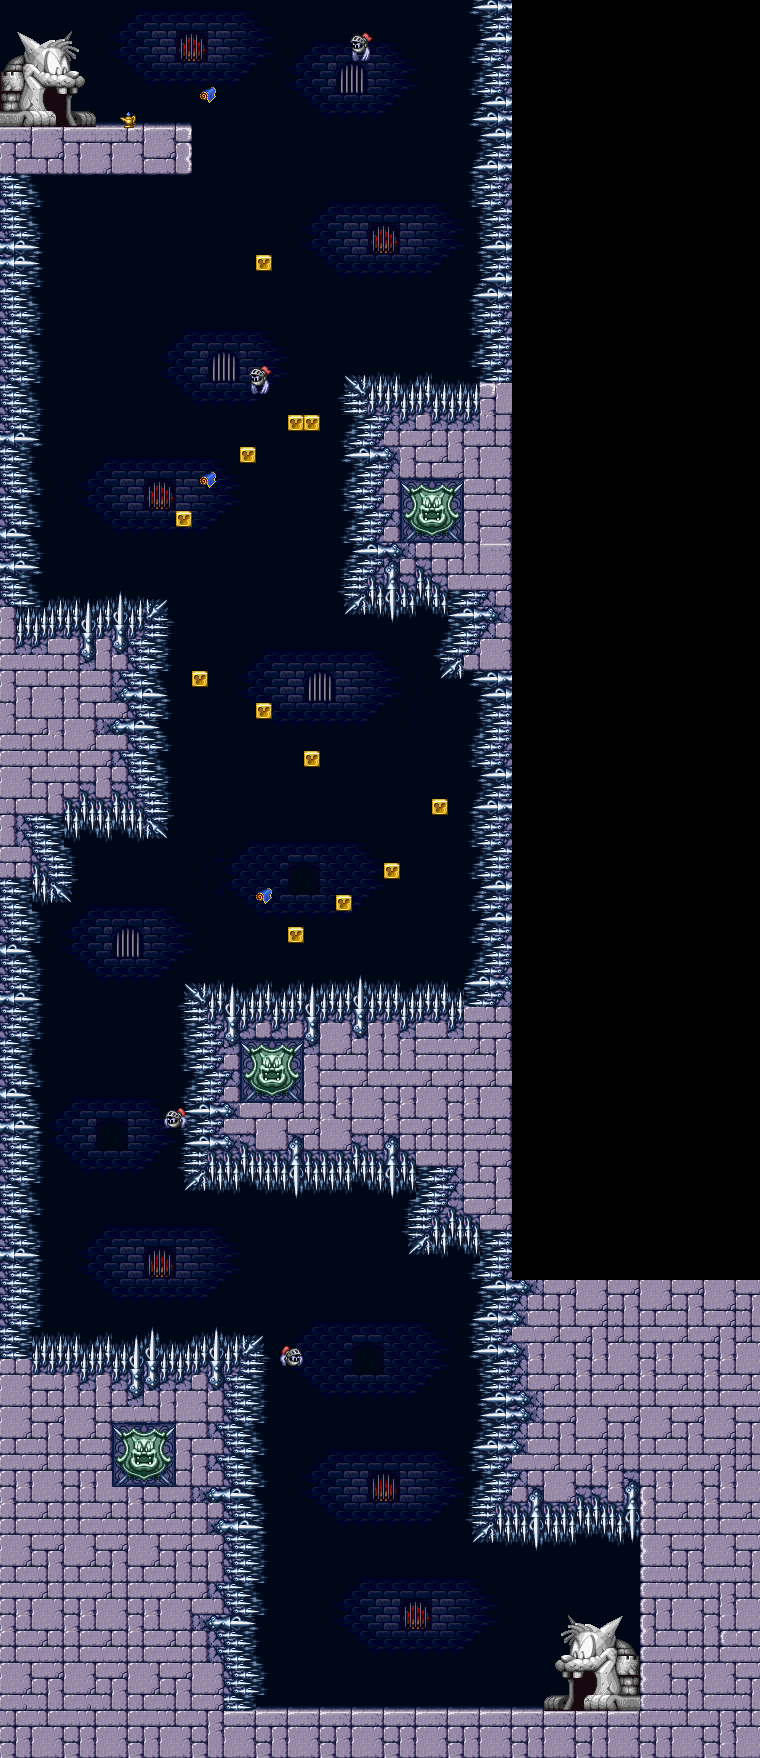
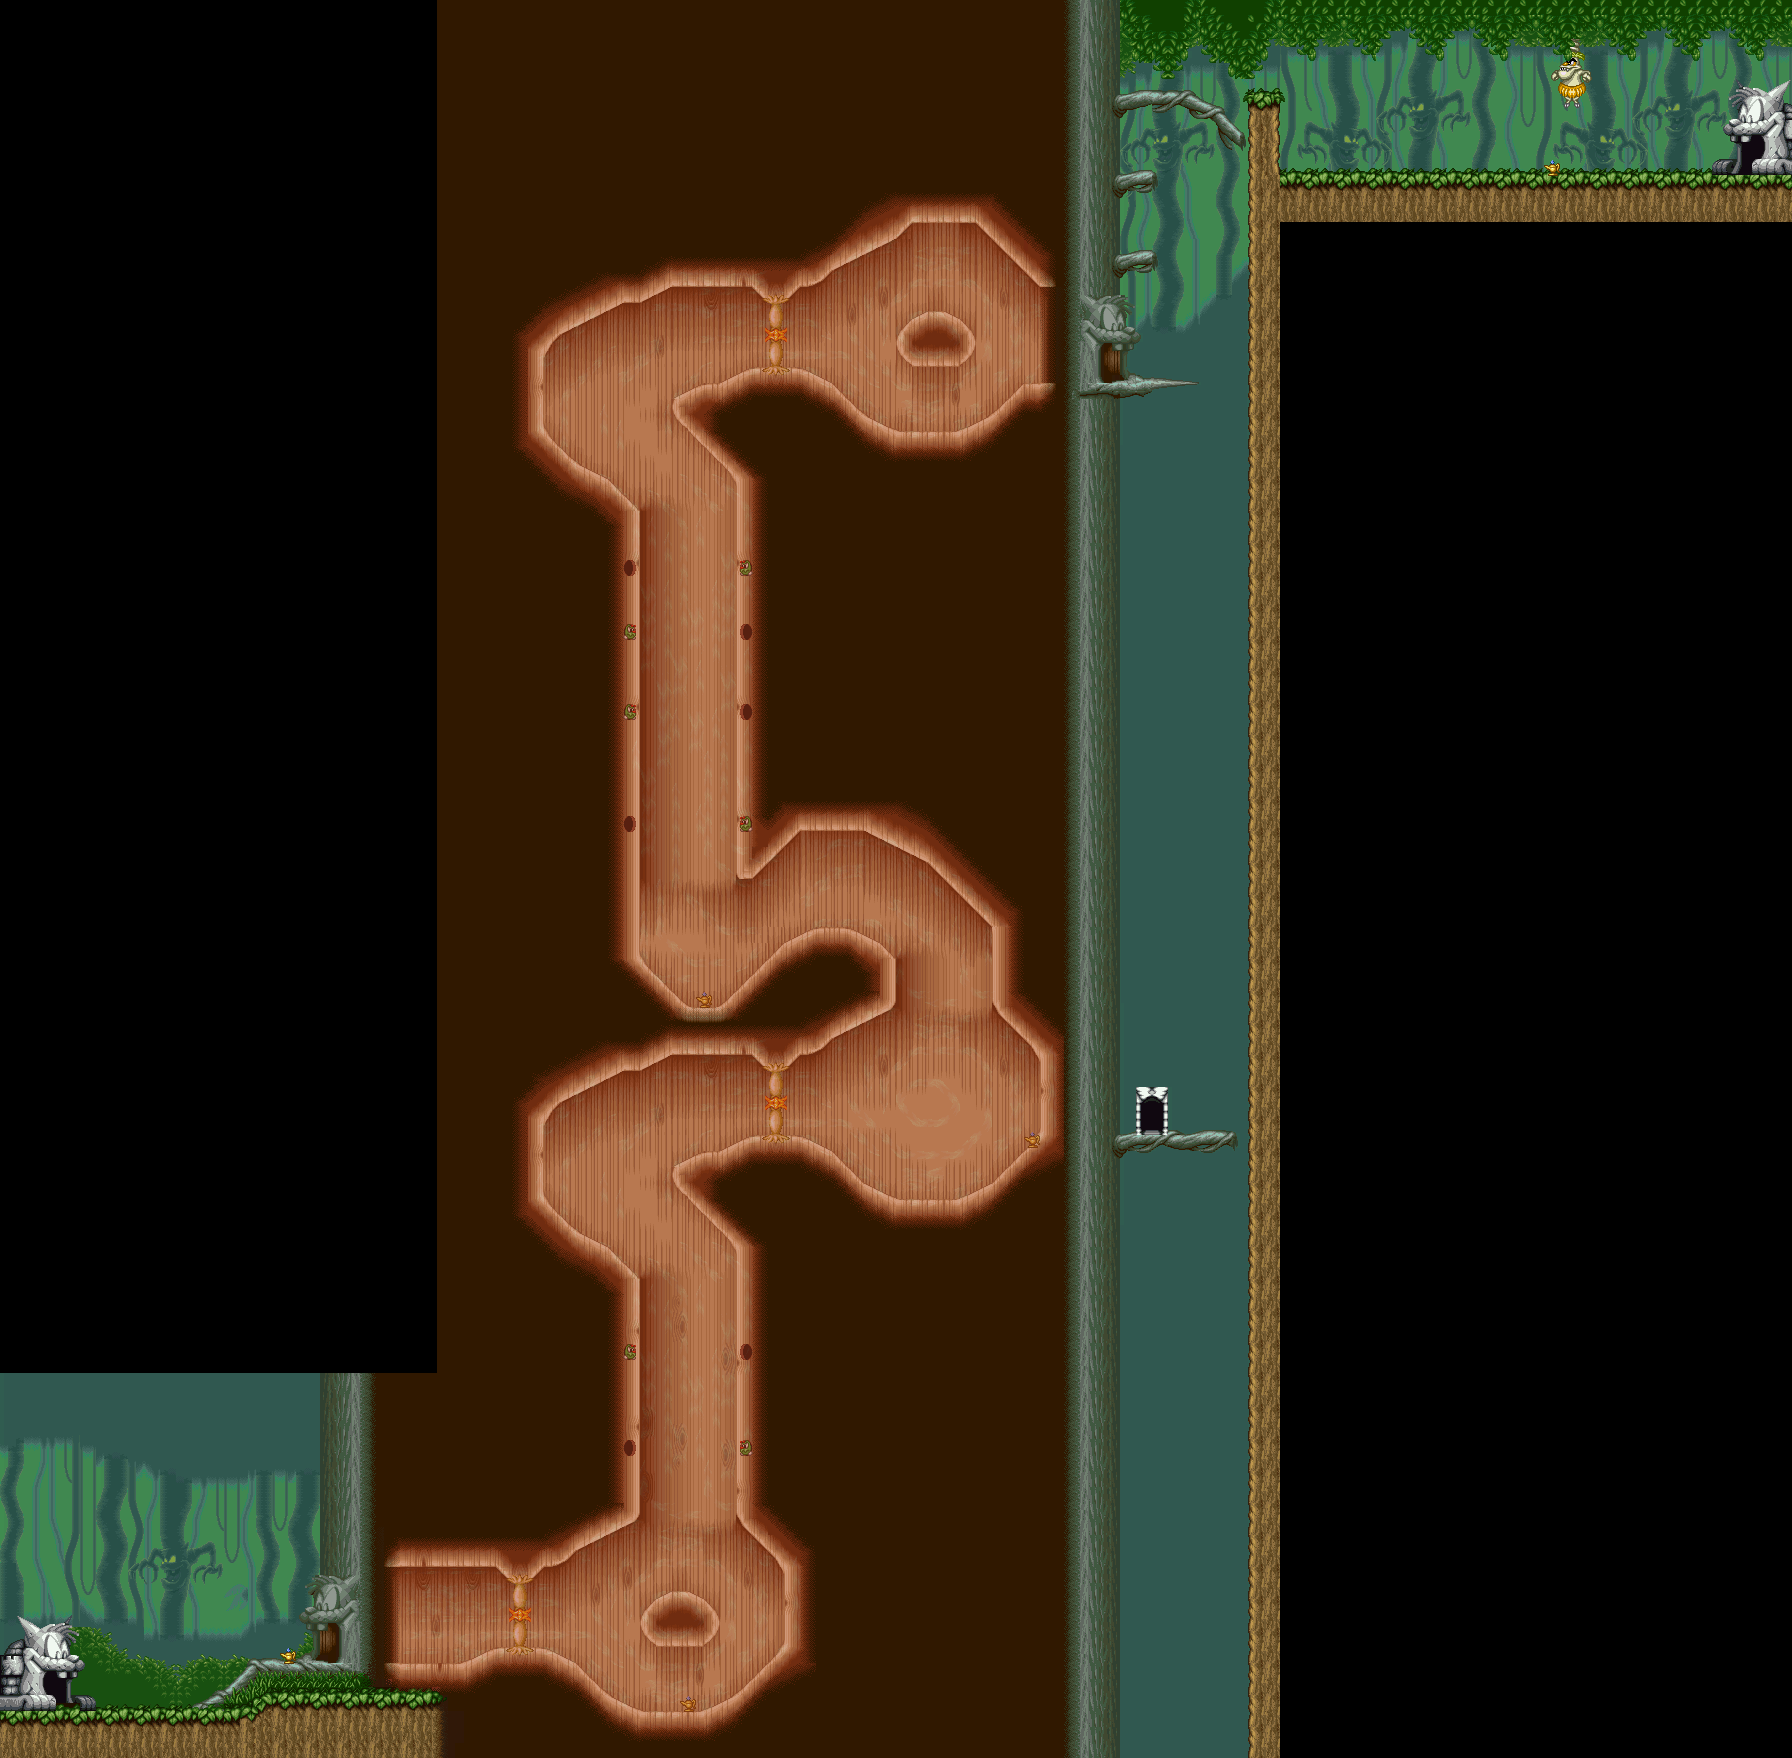
Section 2
Use the pitcher to jump up the platforms and hit the switch at the start. If you need to, move left into the wooden platform to push it to the left enough to make the jump to it and the jump after it. With this, you can continue to the right and enter the chute that lets you exit this section.
Also, coals will fly out of the fireplace to the right of the starting point.
Section 3
The music that was moved to the Moose Hunters stage is also used here on Genesis/Mega Drive.
Jump on the pump three times so you can inflate the inner tube. Stand on it so you can float to the top of the chamber. You have until it floods to get up there, or else you're going to lose a life.
From there, keep heading right. At this point, you're going to start finding out that the weasels can attack off-screen. The more you play these levels, the better you'll get at figuring out where the weasels are and also attack them from off-screen.
The platform on the chains moves around when you stand on it. Jump over the spikes and make your way to the other end as soon as you're able. The spikes will move on the second platform, and if you can jump to the right from high enough with the second platform, you'll get a hidden star.
You'll then be jumping off platforms over fire pits, complete with coals that jump out and have the potential to damage you. That will be just the worst of your problems, as you'll see weasels hanging out on the edge on the other side.
Go down the next shaft before the walls crush you!
At the spikes blocking your path, move to the right as soon as the first spikes sinks back into the floor. Love the animation on them.
When you reach the dungeon, push the rock onto the switch. From there, you'll have to leap on the platform on the rope and use the platforms to the right to avoid the spikes on the wall and jump back onto the rope platform when it stops moving. The platforms to the right will break after you stand on them for about a second, and if you mess up, you'll have to off-screen the platforms in order to start over. When you make it to the top, you'll meet Prince Mickey.
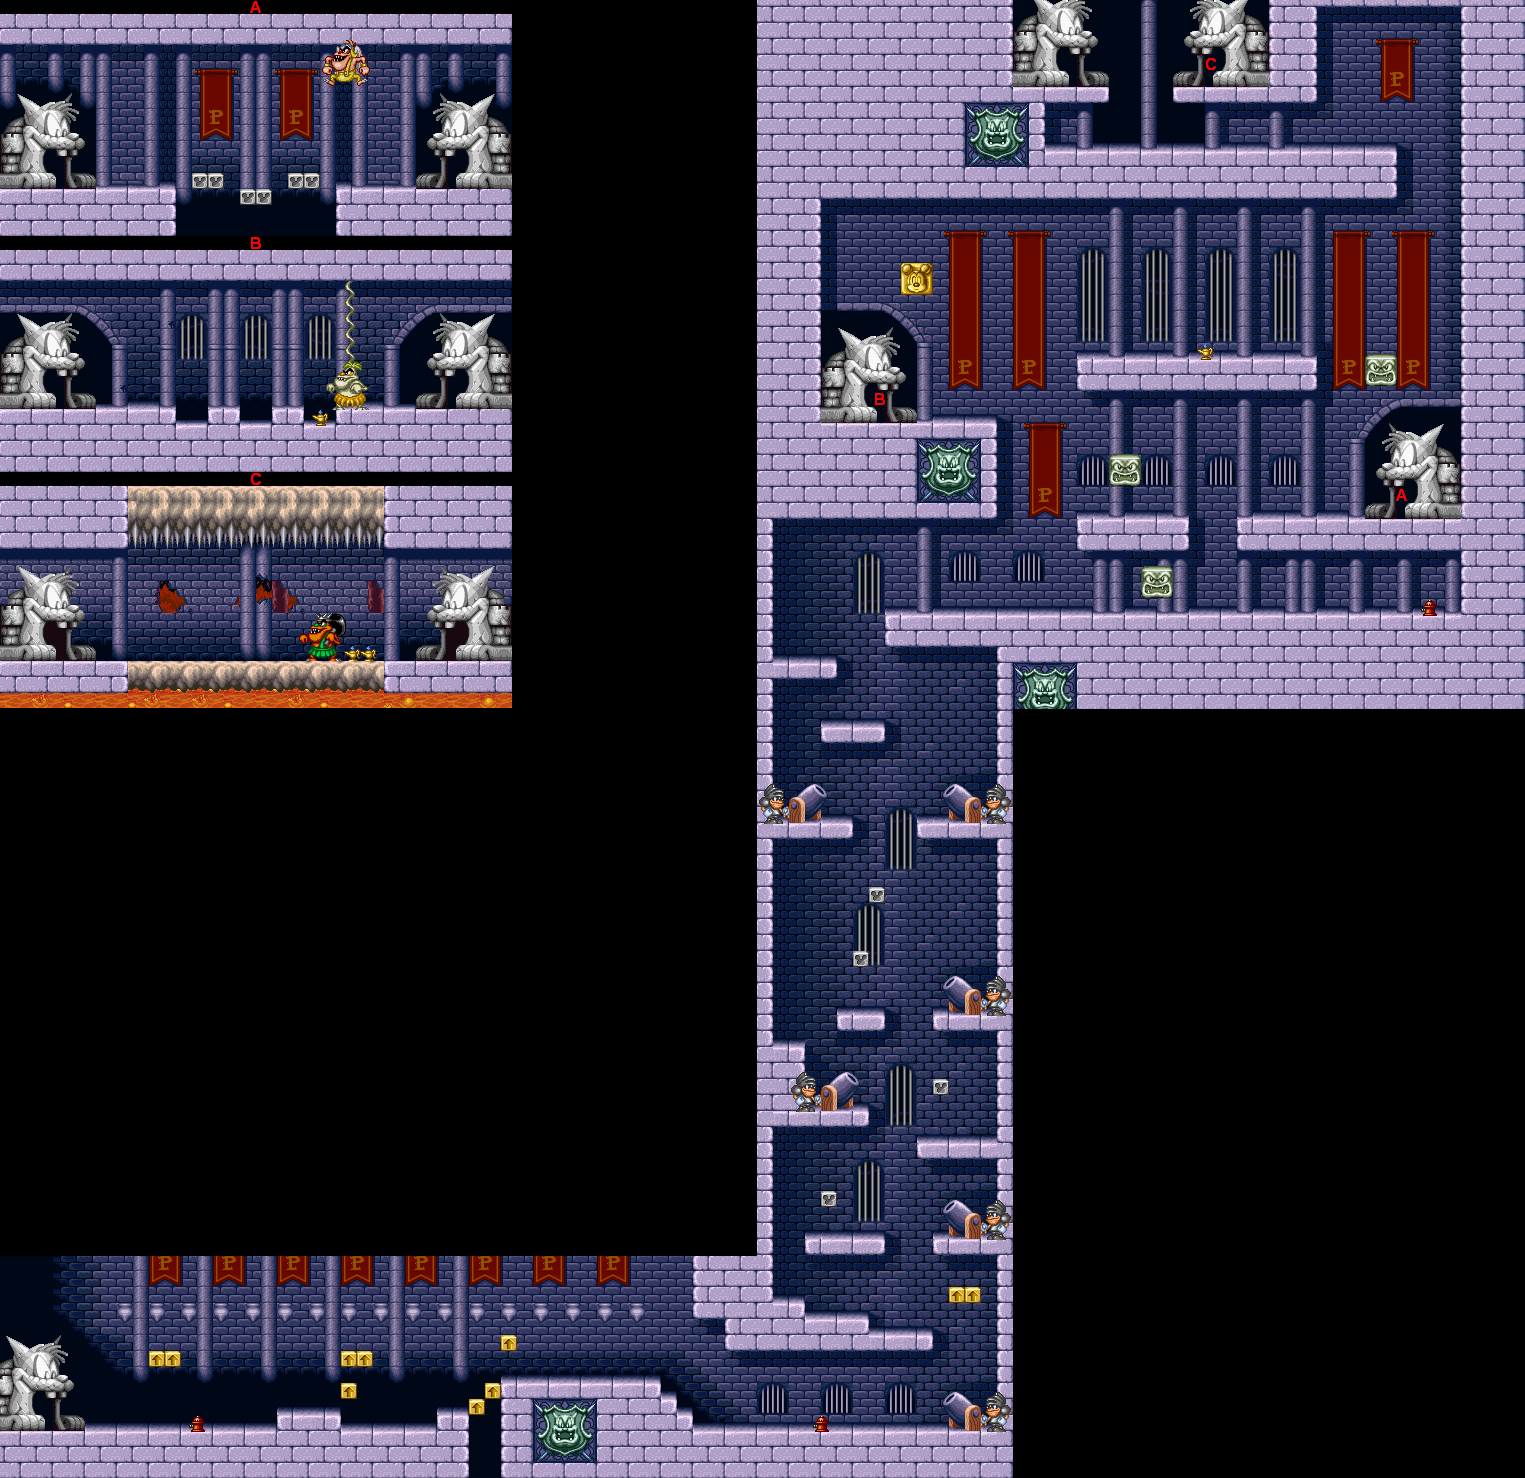
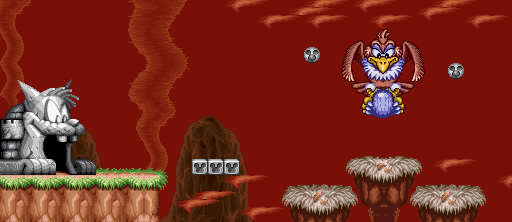
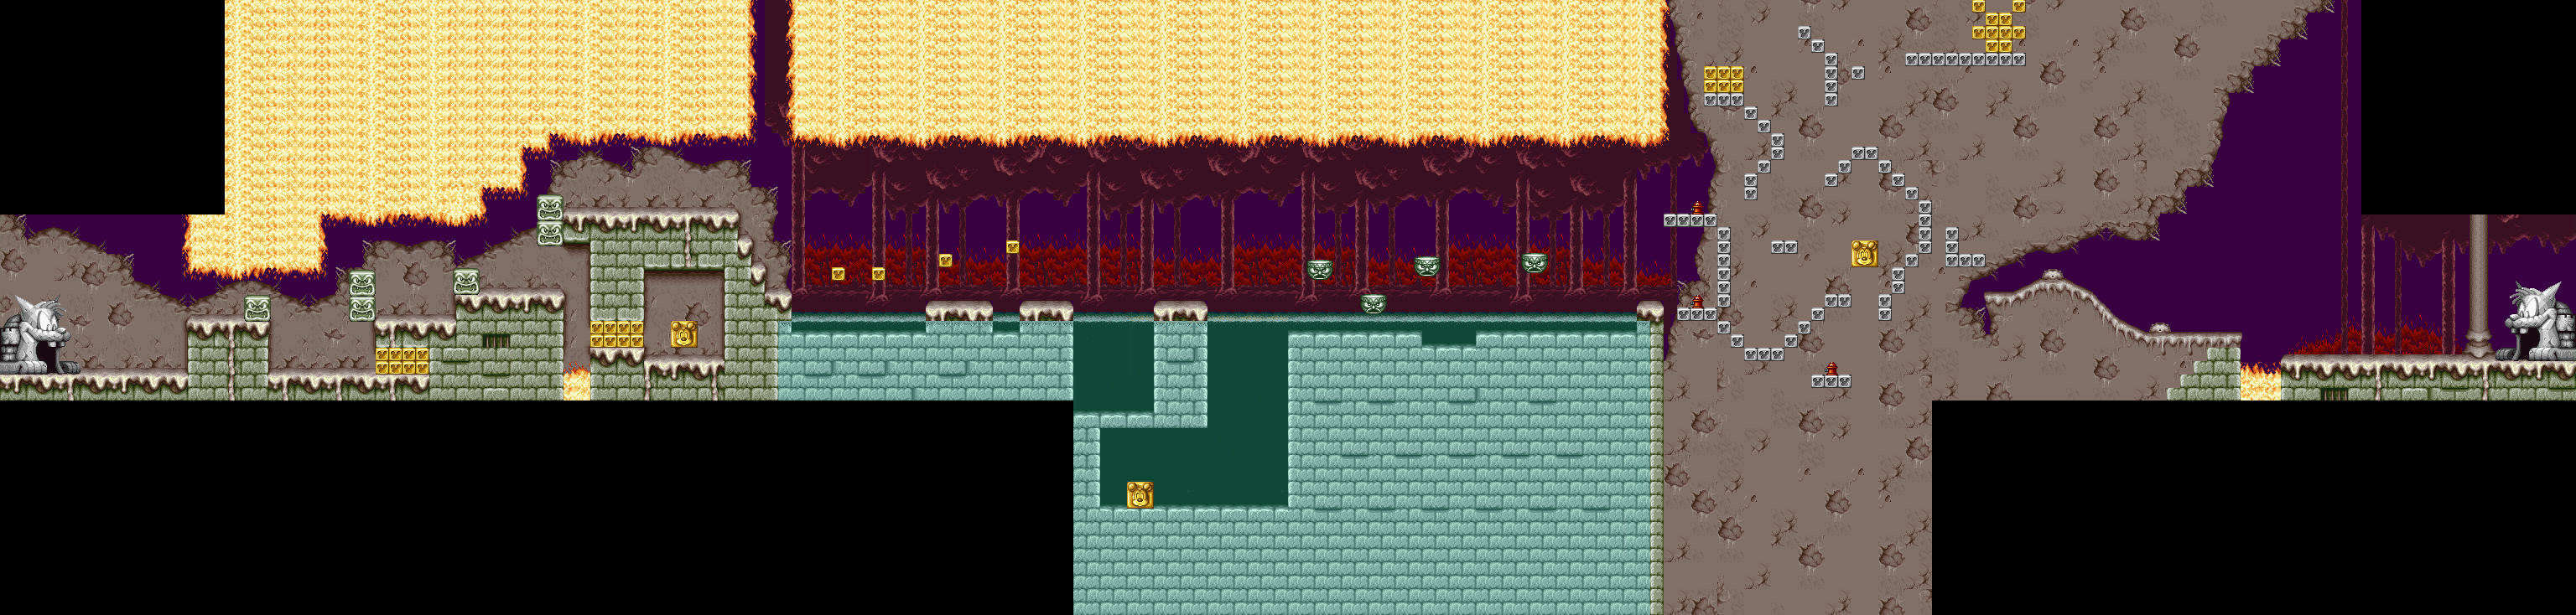
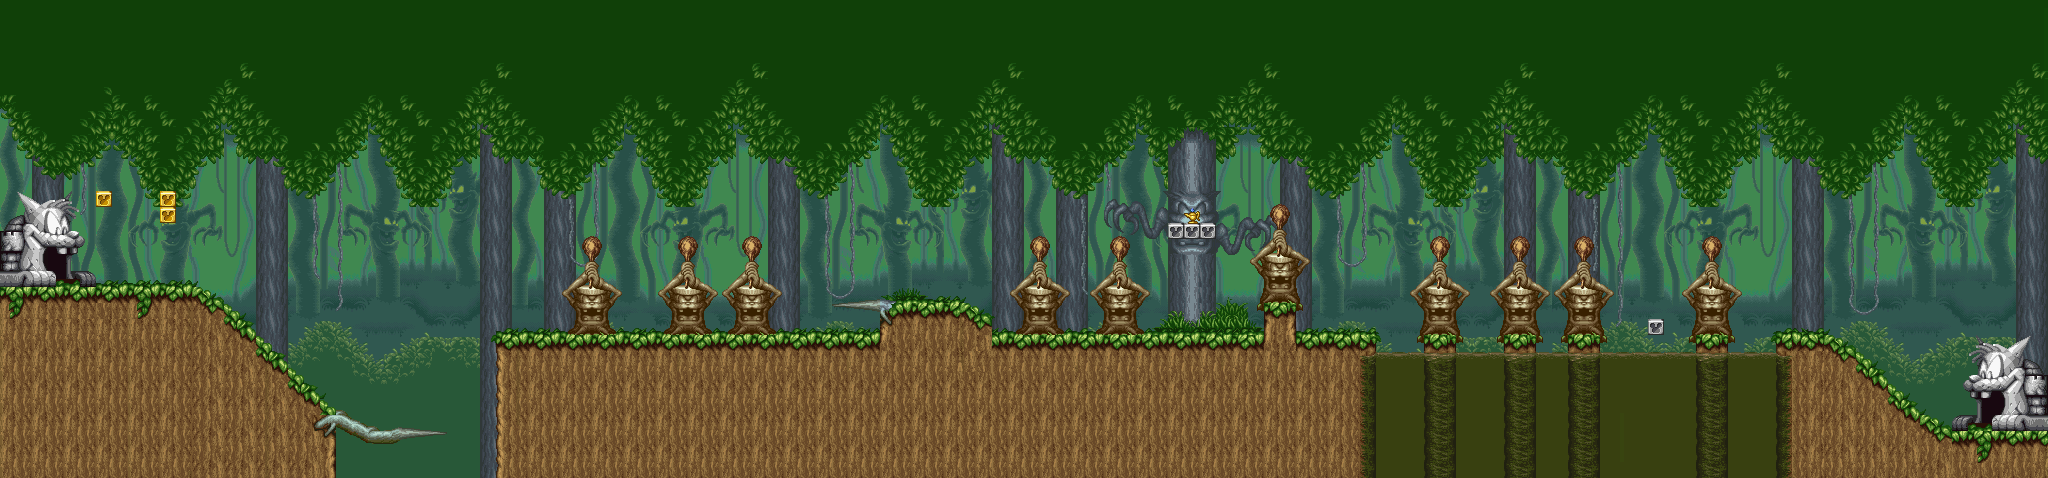
Section 4
You're now climbing Pete's Tower...which is anything but easy!
The music here was also used in the final battle with Pete. The music that was here in the Super Nintendo version was used for the Big Band Concert bonus level.
The platforms crumble a second or two after you stand on them. As you ascend the tower, a huge wall of fire will rise up the tower. If you mess up, you're heading back to the beginning.
You'll also be dealing with some tough jumps as well as spiked balls, but they're easy to avoid. (Yep, they're spiked balls now!) The jumps are the hard part.
Section 5
When you make it to the doorway at the end, you're still going to have to deal with the fire. You'll also be dealing with weasels as you leap up this vertical shaft of death. At least the weasels in this part only take one hit before they die.
The music in this part is in the Super Nintendo version, but amazingly, it's not even used there! That's a shame, because the Super Nintendo version does the song here justice.
When you make it to the top, you'll be able to refill your health and get some more marbles. The path to the right has weasels who now take three hits to kill again as well as some more marbles. You'll also be swinging off long chains and suffering the Ninja Gaiden-esque problem of...you guessed it...enemies hanging out on the edge of a platform.
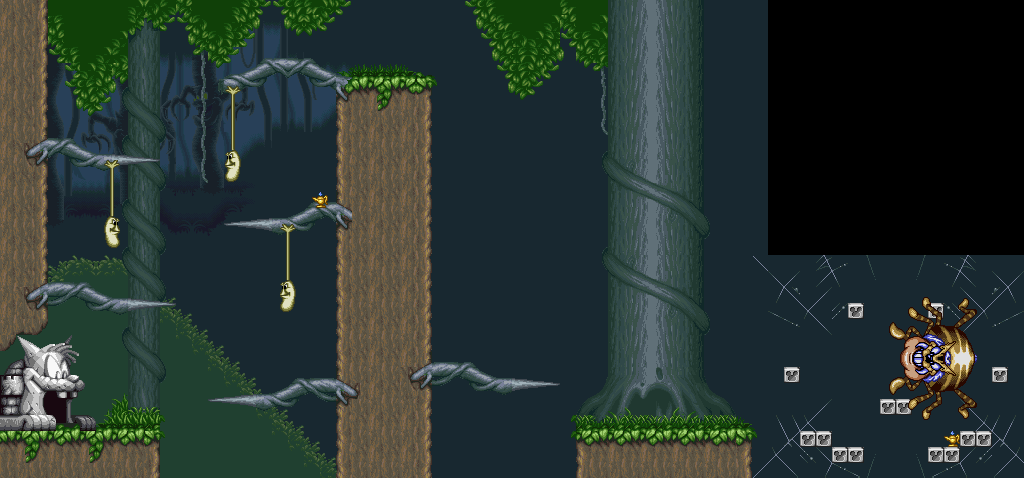
Section 6
Pete will throw a sword at you and then jump to the left. Duck under the sword and avoid Pete, as well as the shurikens that drop down whenever Pete shakes the room.
Whenever Pete shakes the ground, a wooden cart with spikes on the top will drop down. You'll want to position this so that when Pete lands on the ground, he also lands on this. Love how Pete has a digitized "ouch" speech sound for this version. After four instances of this, Pete will change his tactics.
There are five stars in this room, and you'll need to save them until you're badly in need of health. Keep that in mind, because the second phase is going to be harder!
There will now be a ball and chain suspended from the ceiling. There will also be two switches, with one on each end of the room. Pete employs the same tactics, but when he stomps the floor, two rows of shurikens fall instead of one. The first set falls slightly to the left, and the other slightly to the right. They are dodgeable, but you'll have to think on your thumbs as you do so. Sometimes these sets of shurikens will fall next to each other at the same time and have you staying in one spot, while other times they're staggered enough for you to just move out of the way with the first one, then the second one. The distance between the two shuriken sets will vary.
You will need to trigger these switches in order to deal damage to Pete. You have to jump onto the sword he throws, then jump into the switch to trigger it. The ball and chain will swing to the other end of the room. You will have to hit the switch on the side where the ball is in order for this monstrous weapon to move. Four more hits and plenty of patience later, you've done it! Enjoy the ending!
The "next animated cartoon" refers to the 1994 theatrical short "Runaway Brain," in case you're wondering.
Notable credits include outspoken game designer David Jaffe (who later directed the Twisted Metal series and the first two God of War games) and Michael Giacchino (who would work on Gargoyles by Disney Interactive before working on the soundtrack to Lost).
Alright, now for more differences:
During the first half of the battle with the spike cart, the boss music is the same as the Mad Doctor battle. When you make it to the second half with the ball and chain, it's the final boss music. Also, the ball on the ball and chain is gold instead of silver, and the shurikens in the second half of the battle don't vary in position like in the Super Nintendo version. Once you know how to dodge them here, you can dodge them every time.
Instead of fading out, Pete is knocked right off of the screen when you beat him here.
You get a "Well Done, Mickey!" screen with a smiling Mickey standing with his hands on his sides. The game will also ask if you've found the Mickeys from The Mad Doctor and The Band Concert even if you've already found them.
The enemy roll call has quite a few differences. All the enemies move across the screen faster, and there are also music changes and enemy additions.
The Mad Doctor uses its Section 2 music (instead of Section 1).
The Moose Hunters has an extra sprite for the moose that chases you in Section 2, and uses the Section 2 music. You also get to see the moose from Section 1 a little while longer.
The Lonesome Ghosts shows the motorboat ghost a little while longer.
Mickey and the Beanstalk uses its Section 3 music.
The Prince and the Pauper uses its Section 5 music and also shows off the death animations for the weasels.
Jon Burton's name under "Credit Text Typed and Checked By" is upside down. On Super Nintendo, it's right-side up.
When you get a game over, you hear the title screen music in the Super Nintendo version. This music is used in the Genesis/Mega Drive version and goes unused on Super Nintendo, where it is only available via the sound test (as do the other two unused songs).

Emperix plays Mickey Mania for Genesis/Mega Drive - Part 2 of 3
In this episode, we traverse through a haunted house and try to make it out in one piece!
The Lonesome Ghosts
1937
Section 1
This house not only has parallax scrolling, but the front of the house has some 3D elements or something. When you enter the house, the front side of the house will rotate clockwise, as if a cameraman was strafing to the right while keeping the camera still. The Genesis version also does this, which is pretty nice.
If you drop down one of the pits, you'll land on a boat with Pluto in a dark flooded area. The right-most pit you can drop down has enough stars to give a low health count a well-needed revitalization.
Section 2
You'll actually see Pluto in this section despite the fact that he's not even in the cartoon. Imagine that.
This part will be dark. Be careful as you walk around, as you can't see the sides of the screen and the ghosts will be popping up from out of nowhere to whack you with a floorboard or get in your way.
The stairways' steps will tilt and turn into slopes after you go up a certain distance, leaving you to slowly walk jump up them instead, and platforms will tilt as your distribute your weight to one side. There are some stars in this part of the section, as one of the platforms has some stairs and two ghosts in annoyingly-placed positions in it. You'll have to raise the left side of a platform while dealing with a ghost, and then deal with the stairs and two ghosts: one from the platform and one at the stairs. Expect to get hit at least once.
Near the end of the platform and stairs section, you can jump to the left off the highest platform to get an extra try.
You'll then be dealing with bats and pipe covers. You can bounce off the pipe covers to find even more stars to refill your health with.
After climbing some more pipe covers on walls that open and close, you'll have to walk to the left across a fallaway bridge. There are ghosts in this last part, and you'll probably get hit at least once.
If you fall right at the other side of the bridge, you'll be able to find eight stars!
Section 3
Pluto runs ahead of you before the water rises. The water also looks much different here.
In this section, you'll start out by jumping on barrels to make your way across the water. You'll also be following a ghost on a motorboat. Unlike the Super Nintendo version, the water sinks just before the game allows you to take the stairs.
You'll also be pushing a table to reach a staircase. As you do so, you'll be dealing with hat-throwing ghosts, and you'll have to position Mickey perfectly so he doesn't get hit by the ghosts' throwing arms. Not the hats...the arms.
This part of the final section has pictures on the wall that unfurl to show pictures. These pictures are a reference to the Haunted Castle in Walt Disney World, and are completely absent on Super Nintendo.
You'll then walk across a floor that drops and rises every so often. Use this to your advantage as you avoid the ghost. Also, be sure to move past the door at the end and get the star near Lonesome Ghosts Mickey before entering the door at the end.
Mickey and the Beanstalk
1947
Section 1
Head to the right, avoiding the butteflies along the way.
This part is trickier in this version , by the way. There are three butterflies, and they're all in your way. ome of these butterflies are either light orange or green, but they're all the same anyway. on Super Nintendo, they're well above you compared to this.
The pause (or "paws") animation is the same as Super Nintendo, by the way. The hand changes into dog paws.
Pluto shows up at the beginning but stops at the seed-spitting flowers.
The seeds that come out of the flowers are easier to avoid on their way down, as they seperate more after they stop dropping. Push the apple to get up to the platform. In this version, the seeds and the apple are green, and the seeds seem to move faster and cover a wider arc.
Push the flower pot to the water droplets to create a flower. Push the flower pot back to the left and leap to the closed-up mushroom to the left to climb up the leaves.
When you take the leaf platforms across the water, watch out for the mosquitoes. They fly back and forth pretty fast and you could get nailed from out of nowhere.
Other enemies here include butterflies (which can be destroyed by jumping attacks or marbles) and beetles (which can only be destroyed while they're flying).
Section 2
This stage now uses the Section 3 music? What?
You'll now be underground. Besides the beetles, you'll also be dealing with these golden, web-like pupae that fall to the floor and shoot out two baby spiders. Avoid the spiders as they come down, and be sure to back off as soon as the pupae come down
Some of the baby spiders will drop down themselves and float to the ground with parachutes I can safely assume are made out of spider webs.
Keep going right and you'll hit a floor switch. Jump on it and you'll remove the wooden bridge you passed along the way. Fall down and hit the switch to reveal a giant spider. Go to the right immediately, and ride on the ladybug to get out of there!
There are health and marbles down there, but there is no way you're going to outrun the spider (which is instant death) and you're better off staying on the ladybug anyway.
Section 3
The music here was used in the Moose Hunters stage on Super Nintendo. Also, Pluto shows up again.
The seeds sticking out of the ground create beanstalk platforms when you jump on them.
The Band Concert
1935
This level is not available on the Super Nintendo version at all. It's only available on Genesis/Mega Drive and Sega (Mega) CD, and after some research, I found out how to get to it via WWalker's guide on GameFAQs:
"In the third stage of Mickey and the Beanstalk, jump up the steps but DON'T KILL ANY BUTTERFLIES! When you reach the first beatle, wait until he's about to fly up, and then jump on him. You'll kill him and hopefully trip the switch above him. You only have one chance, so do it right. Once you've tripped the switch, go back down to the second ledge, and, using the tips for this stage, reach the ledge by bouncing off the two butterflies that take two hits to kill. The ledge is above the start, and is tough to reach. Grab the four stars and the 1-Up hat, and then touch the red question mark to be warped to the band concert."
Anyway, the aim of this stage is simple: leap onto the boxes that are flying around in a huge tornado and make it to the top. When you reach the box below Band Concert Mickey, you'll get a Continue for your efforts. If you fall past the bottom of the level, you don't get to start over, and you get absolutely no reward for your efforts.
Some of the boxes just move left and right, while others make figure eight patterns. The ones in the figure eight patterns are most easily jumped onto when you wait for them to reach the lowest position of their paths.
Keep going to the right and climb up the twisted column of wood. Turns out, this is a table leg that takes you to...
Section 4
...the kitchen table.
Since the music gets switched around, guess what? The music's different here, too. Remember the final section before you fought Pete in Prince and the Pauper on Super NES? Well, the music from that section plays here. If I didn't know any better, I'd say the game was made for either Genesis/Mega Drive or Super Nintendo first, then the other one got the music scrambled around. I keep thinking that this version was made first, since this had more stuff which got taken out of the SNES version, probably due to memory and system constraints.
This level looks a lot different this time around. The ground is raised up, as if you're actually looking at the action with your table near eye level. Therefore, more of what's going on onscreen is scrunched up, even though the level layout is the same. Case in point: you'll see two of the beetles being somewhat hidden behind one of the pots with the spoon in them.
A few of the butterflies here are a very light blue, and you'll also see some of them in groups of three.
The second pot with the spoon in it can be walked into from the right side to find a star.
If it's a bowl or cup, chances are you can probably stand on it.
The bowl of Jell-O mold can be used as a springboard.
You'll soon see beetles playing with orange slices...almost reminds me of Do-Re-Mi Fantasy.
Pluto shows up near the end running around in circles on a plate.
You'll then see Mickey and the Beanstalk Mickey. You're done with this level. In this version, the other Mickey actually shoots to the sky on the wine cork, whereas the Super Nintendo version never has this animation at the end.
Wednesday, August 24, 2016
Emperix plays Mickey Mania for Genesis/Mega Drive - Part 1 of 3
For the first time since Bubsy, I cover the differences between a Genesis game and its counterpart on the Super Nintendo!
In this game, there isn't really much of a story. Instead, you're taking Mickey Mouse through six levels in order to take on "the biggest, baddest Pete anyone has ever seen." Yeah, that's really not much of a story. It's more of an excuse to drag Mickey through six of his most well-known cartoons in video game form like some sort of retirement-age present. The game came out in 1994, a little more than 65 years after his debut, and was supposed to come out in 1993. Since it would have taken only months to complete the game, the game was delayed until the following year.
The game was released on Genesis/Mega Drive, Super Nintendo and Sega CD. It was also released on Sony PlayStation in Europe and Australia only, where it was renamed Mickey's Wild Adventure and remade from scratch with extra scenes not on the Nintendo and Sega versions. It was released worldwide on PlayStation Network in 2012.
This LP is played on Hard. Unlike the lesser difficulties, there are no checkpoints on Hard.
Steamboat Willie
November 18th, 1928
Unlike the Super Nintendo version...or the CD versions...the Genesis/Mega Drive version has no load times at all. Even the Sega/Mega CD version has quicker load times and happens to match the quality of the SNES version blow for blow yet has the Big Band Concert bouns game, which makes me wonder what the heck happened when they put the game on a Nintendo console.
There is also music when you see the name of the next stage. Despite being in the Super Nintendo version, it goes completely unused on that version.
Section 1
When you begin the stage, you'll get a 35mm film-style border on the sides of the screen, which fan out and reveal the rest of the screen after a few seconds.
You can stop the goat from spitting out music notes by jumping on the wine bottle, causing the cork to fly out and fly into his mouth. If you jump on the goat, the cork will fall out and he'll spit out notes again. This will be the first time you'll notice that there is more digitized speech in this version than in the SNES, which just uses it for taking damage, pushing walls and beating a stage (Mickey saying "I made it!").
The whistles above Steamboat Willie can damage you with their steam. If you walk towards Steamboat Willie, he'll run away for some strange reason. I usually do this to make sure I've found them, as there's usually another Mickey to find everywhere you go.
If you jump on the cat, you'll be able to go under Steamboat Willie and find some hidden stars that act as health pick-ups, even though you've probably taken one hit at most at this point. They'll be explained later, don't worry.
The birds that poke their heads out of the boxes can also damage you.
As it rains, there will be a crane that picks up the top crate in a stack full of them. Stand on this crate as the crane carries it and you'll be at the exit.
Section 2
You'll be using clotheslines as platforms, walking on windowsills and taking on the tobacco-spitting Pete at the beginning. You'll see Pete at the beginning, but it won't do much good to fight him at the moment. For now, use the spring near him to jump left to the windowsills of the house you just passed. Do as the sign near Pete says: ring the bells at the top of the house to open the bridge past the water. Unlike the first section, where a fish would nudge you back to the boat, you'll die if you hit the water in the second one.
As you walk among the windowsills, you'll be picking up marbles. These are Mickey's main weapon throughout the game other than jumping on enemies, and even though you could defeat the parrots that fly around with them, you could just as easily jump on them without taking unnecessary damage and save your marbles for something else.
You'll notice that you have a glove in the upper-left corner. This is your health, while the number next to it is your remaining lives, or "tries" as the game calls them. As you take damage, the number of hands on the glove count down, and if you get hit while it's a closed fist, you're dead. Enjoy your animation of Mickey hitting imaginary ground and pulling a flower out of his pocket with some hilarious "I'm dead" expression on his face. As hilarious as it is, it's less annoying this time around, as you no longer have load times to deal with and you only lose around 40 to 50 percent of your marbles you had when you die.
The number for the marbles actually has an animation. The two digits shift to the right when you either die or start a section of a level. It is also to the right of the picture of the bag of marbles, as it is for the health. The hand for the health is also bigger and is used in the other versions.
Want to recover your health? Pick up a star. It recovers one point of your health.
As you progress through this section, you'll notice that the world is going from black and white to color. At first, it's just the window dressings, but then in extends to the sky and water until you finally color everything else.
Once you've rung all the bells, go back and lure Pete all the way to the right where the crates are. Jump on Pete's until he dies, and jump over the chewing tobacco globs he spits at you. From there, jump on his stomach to get up onto the crates and continue on.
Be patient with the crates. They have a definite pattern, as one drops right after the other, but they drop pretty fast. At least you don't get knocked back from taking damage.
Love the animation on the crane that allows you to jump on the boxes to the end. It's fluid and was also done just as fluidly on the other systems.
The boxes lead to the boss, but jump left instead of right on the fourth box and keep going in that direction. You'll be able to grab a Mouseketeer hat, which looks like a pair of Mickey Mouse ears and gives you an extra try...and keep it, too. Remember that when you're jumping on these boxes, wait for them to stop shaking before jumping to the next one. In case you somehow screw up, they'll reappear just in time.
The boss here is some mechanical contraption with four gears. Throw the marbles at the gears to destroy them. While the bottom gears are no problem, you won't be able to reach the gears at the top with your jump. This is where the contraption comes in. There are two crates which will move across the top of the screen that drop bombs. Every once in a while, one of these crates will drop a spring. Jump on the spring and you'll be able to throw a marble at one of the two gears at the top. The spring is one-use only, so make sure your aim is true. You'll be dodging these bombs as you wait for the spring to appear again. When you destroy all four gears, you've beaten this short introductory level.
If you run out of marbles, there will be two that show up in the bottom corners as you move around the stage, allowing you to either keep your marble supply steady or get some in your possession in case you're desperate.
That's the normal way of defeating it. Apparently, I've never seen anybody try the method that Emperix uses here: leaping on the bottom gear and throwing marbles at the top gear as you bounce up. I guess the spring isn't necessary.
In the Genesis/MD version, you'll meet Steamboat Willie again. In the Super Nintendo version, you never see him beyond the first section, which was really disappointing.
Also, this version uses the boss music you'll later hear when fighting the Mad Doctor when you fight the screen at the end.
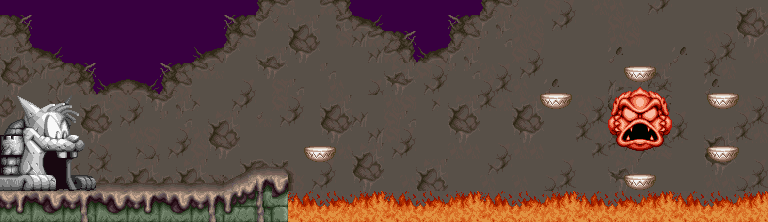
The Mad Doctor
1933
Section 1
The bats take two marbles to defeat. Also, the bridge portions fall as you cross it, so you'd better make your way to the front door.
As you make your way to the stairs, you'll see skeletons. There are some that will spin their heads off of their bodies (which will bounce around the room) and cause their bones to fly out in an arc, bouncing around before they disappear. You can hit the bodies with a marble, but it's not recommended as you can leave yourself open to attack. Others will walk around and take three hits to kill. Jumping on their heads repeatedly is easier, as you can easily jump down to a safe spot after the third head bop.
The meat cleavers that are stuck to the skull heads on the walls will fall when you get close enough, so don't go through this section too fast.
Section 2
This is the first part of the game where you swing around on ropes. To grab onto a rope, just jump into it. Use the Control Pad and the B button to get off.
The rope spiders take a marble to kill, but their bones will bounce around just like the skeletons'.
By getting higher on the ropes, you can collect the stars and the marbles that you normally wouldn't be able to obtain.
Unlike the Super Nintendo version, the fireplaces shoot out hot coals just like the fireplace in the cartoon. Yet this was done without a problem in Prince and the Pauper? Something's wrong.
Secret that wasn't mentioned last time around: stand on top of the pipe that leads to the next section, hold Up on the Control Pad and jump. This apparently lets you jump higher than usual. Do this to jump to the right and onto the top of the wall, where you can find some hidden extra lives.
Section 3
In this section, you'll be riding on gurneys while avoiding brown lava pits, spikes and buzzsaws. If you touch the ground or fall into a pit, you'll instantly lose a life. This one is quick as long as you're fast on the jumps.
Apparently, you can leap off the top of the buzzsaws here. I wouldn't know, since I never did this when playing through this level.
Also, the boss music plays here instead of the first section music.
Section 4
Hello...what's this?
After the gurney ride, you'll be going down a tower. At least you're not outrunning something, unlike near the end of the game.
If everything feels like it's ripped from the Pete's tower section near the end of the game where you're outrunning the fire, all the way to the way the platforms are positioned (to an extent), well...you're right. You'll still be dealing with the barrels, which will still come at you from the right side of the stage. Since you're going left and having to go down, this means that most of the time the barrels will roll out from behind. Also, the wooden platforms will still break a second or two after you touch them.
The boss music plays here, too.
Section 5
This section doesn't offer anything new, but be careful near the ropes, as you can still grab onto them while jumping on the skeletons.
The clock is a reference to the Mad Doctor short, which shows up 2 1/2 minutes in.
The music here is different. Instead of being the music from Section 2, it's the music from the final section.
Section 6
Here, you'll be on an elevator. As you ride to the top, you'll be dodging the bones of exploding skeletons as you take them down. Take them out with marbles from the opposite end of the elevator, so you can more easily dodge the bones. If you see a skeleton on the roof, stay in the middle. You won't even take damage.
When the elevator opens back up and lets you take the exit, get off and get back on. The elevator will take you up one more floor. Go to the right and keep going. When it gets dark and you can only see Mickey's eyes, you've reached the bottom. Go to the right and follow the stars to completely refill your health. You'll find a 1-Up at the end as well as Mad Doctor Mickey. You'll also go to the final section.
Section 7
To break the door, you'll have to push the beaker (just walk into it) and step on the pumps above to distribute chemicals into them. You'll need to put each of the three potions in there once, then push it to the Bunsen burner at the end and stand on the switch above until it blows up the door.
In this version, the colors for the potions are blue, green and brown as opposed to red, blue and green. Also, when you stand on the switch, the light goes off. Oh, When you blow the door, the bunsen burner survives! Finally!
In the Genesis version, the door to the boss battle closes when you're a certain distance away after entering. The door can close long before you trigger the boss battle! You won't trigger the battle until you come close enough to the Mad Doctor.
The Mad Doctor will walk around the room, throwing a explosive lab beaker forwards. To beat the Mad Doctor, throw a marble at him so it hits him. He will respond by throwing smaller explosives everywhere. Avoid them, and throw a marble at him again. If you need to, you can walk around the Doctor to avoid the beakers. You'll exit the stage after six or seven hits.
In this version, Mickey stops when he sees Pluto. Pluto is very happy to see you and actually greets Mickey. In the Super Nintendo version, Mickey just goes all the way to the right as if Pluto isn't there. Speaking of Pluto, he just sadly walks to the right and keeps on going with a glum look on his face. I'm now beginning to think that the translation of Jerry Boy with the storyline and the town exploration being removed was just the icing on the cake. This game is where Sony Imagesoft flips Nintendo the bird, as the SNES CD fell through and they picked up the pieces to develop the Sony PlayStation.
Moose Hunters
1937
I just did the fact checking. Emperix is right. Moose Hunters is copyright 1936 despite being released in in theaters in February 1937.
Section 1
Take it slow here. Sometimes, branches will fall from the tress. Other times, it's boulders. Regardless of what it is, you don't want to walk into it.
Now that you have Pluto and you're out of the Mad Doctor's lair, Pluto makes himself useful here. When Pluto makes a pointing gesture, The Moose will come at you from the direction Pluto is facing. It will always be from the left, and Mickey will also make an "uh-oh" just like when he dies, so you have no excuse for not jumping over the moose.
You also seem to have less time to see Pluto address the moose before the moose shows up and tries to tackle you with its antlers.
The branches on stilts is Moose Hunter Mickey. When you see him, you've reached the end.
The music used here is used in the last section of Mickey and the Beanstalk in the Super Nintendo version.
Section 2
Unfortunately, the moose doesn't like the fact that you've outsmarted him, and now he gives chase. This is a different kind of level that I had never seen before and has never really been done in the 2-D arena since (at least, not in any licensed games that I'm aware of). Here, you're running away from the moose...but Mickey is running towards the screen. Avoid the rocks on the ground and the streams, as they'll both slow you down...particularly the streams. Also, you want to collect as many of the apples as you can while you outrun the moose, or else Mickey will slow down and the moose will catch up. If you see too much of the moose, Mickey Mouse will die without any warning whatsoever.
Thankfully, this section isn't very long, and you'll cross the line at the end before you know it.
[TAS] SNES Magical Quest Starring Mickey Mouse by Dooty in 14:57.57
Here's something I didn't do last time: a tool-assisted speedrun!
Tuesday, August 23, 2016
newfiebangaa plays The Magical Quest starring Mickey Mouse - Part 5 of 5
Finally, we finish this bad boy off!
All maps by Will Mallia.
Stage 6
Pete's Castle
6-1
The blocks pointing upwards can be thrown to hit aerial enemies that are directly above you.
The flying helmets can't be defeated with a jump attack, though you can jump off of them to use them as a sort of stepping stone.
The floating circular platforms are trampolines. Wait for them to lower before jumping to get some added height. Don't stand on them for too long, or they'll rip.
To unfurl the magic carpets, attack it with the Magic Turban. From there, you can hop on and use Left and Right to move the carpet. It's a downward ride, as you'll see in the next part of the stage.
6-2
Unfurl the magic carpet with the Magic Turban, and use Left and Right on the Control Pad to guide the carpet to the end. Avoid the walls of spikes as well as the flying helmet enemies, and you should do fine.
6-3
In the beginning of the section, the torches will come to life and divebomb you. If you hit them with the Fire Suit's water pump, you'll be able to destroy them easily.
Jumping on the miniature Petes manning the cannons will cause the cannons to stop shooting.
You'll also have to face the three mini-bosses from the first three stages again if you take the wrong entrance. The same strategies apply, but you'll have to deal with pits for the first one, Proto Man-style gaps in the floor for the second one, and a lower spiked ceiling for the third one. If you're low on power-ups, however, you can go through these entrances on purpose to refill, but you'll still have to take on the mini-boss (which is never really hard).
There is a big block near one of the false exits that leads to a mini-boss. Inside is another Crystal Heart.
6-4
Emperor Pete is pretty nasty. When the yellow magic bolts come out of his hands, you won't be able to hit him in the face. He'll be doing this to conjure portions of the stone wall to come out and hit you, and there will be torches spawning from the ceiling to divebomb at you.
Switch to the Magic Turban and hit Pete's face with fully charged shots. Destroy the flying torches with it to refill your magic. Be sure to destroy the stone wall portions if they get in your way.
If you're using the Fire Suit, remember that you can stand on the stone wall portions to reach Pete's face, and the water pump will push them back as long as you're spraying them. If you hit the torches with it, you'll get the Fire Hydrants instead of the Magic Lamp.
After he takes enough damage, the yellow bolts will change to blue fire. It tracks where you are, so pay attention to the floor so you don't get burned.
When he turns red after some more damage, he'll alternate between the enemy summoning and the blue fire.
If you see a big yellow spark come out from between his hands during the yellow bolts, jump when it comes your way! It will move across the floor after coming down towards you.
After you do enough damage to Pete, you've beaten him! You've won!

newfiebangaa plays The Magical Quest Starring Mickey Mouse - Part 4 of 5
Well, I'm glad I covered the game again. In this entry, we get to combine the two levels before the finale in one compact video, which makes for some significant improvement over the last version of the guide (which is twice as long as this one).
All maps are by Will Mallia.
4-1 (continued)
When you start the level, Goofy will be there to give you the Climbing Suit. This suit comes with a rope that you can shoot in all directions to hang on stuff from if you use the Y button in conjuction with the Control Pad.
You can hang on the grey circles with the mouse face on them. You can then jump like you normally would to jump to the other side.
If you grab a block with the rope, Mickey will automatically start carrying it.
You can also use the Climbing Suit to get to the top of a platform. Just hold up and press Y, and then starting climbing with Up on the Control Pad. You'll be able to climb and hoist Mickey up to the platform above.
Sadly, the rope isn't a good help when fighting enemies. However, you [b]can[/b] pull the shields away from the miniature Pete enemies with it. Without the shield, you can jump on them until they're dead.
The egg enemies just run towards you. They can be stunned with a jump and used to take out other enemies.
Go left near the top to find a 1-Up. Drop down from the left edge from there to find the General Store.
4-2
The gusts of wind push you downward.
If you go down the second gust and hang onto the ceiling, you'll be able to find a lot hidden blocks. One of the big blocks will contain a Crystal Heart.
4-3
The boss here is an eagle.
When it divebombs towards you from the background, hold on to one of the grey spheres until it passes. Otherwise, you'll be blown clear off the screen and into the pit below.
The boss will then come down with an egg in its claws. Grab the egg with the rope, and then throw it into the eagle to damage it. It will then repeat its attack pattern. If the boss drops the egg, you'll have to dodge the two brown blobs that cover the floor and you'll have to wait for it to come back with another egg.
Stage 5
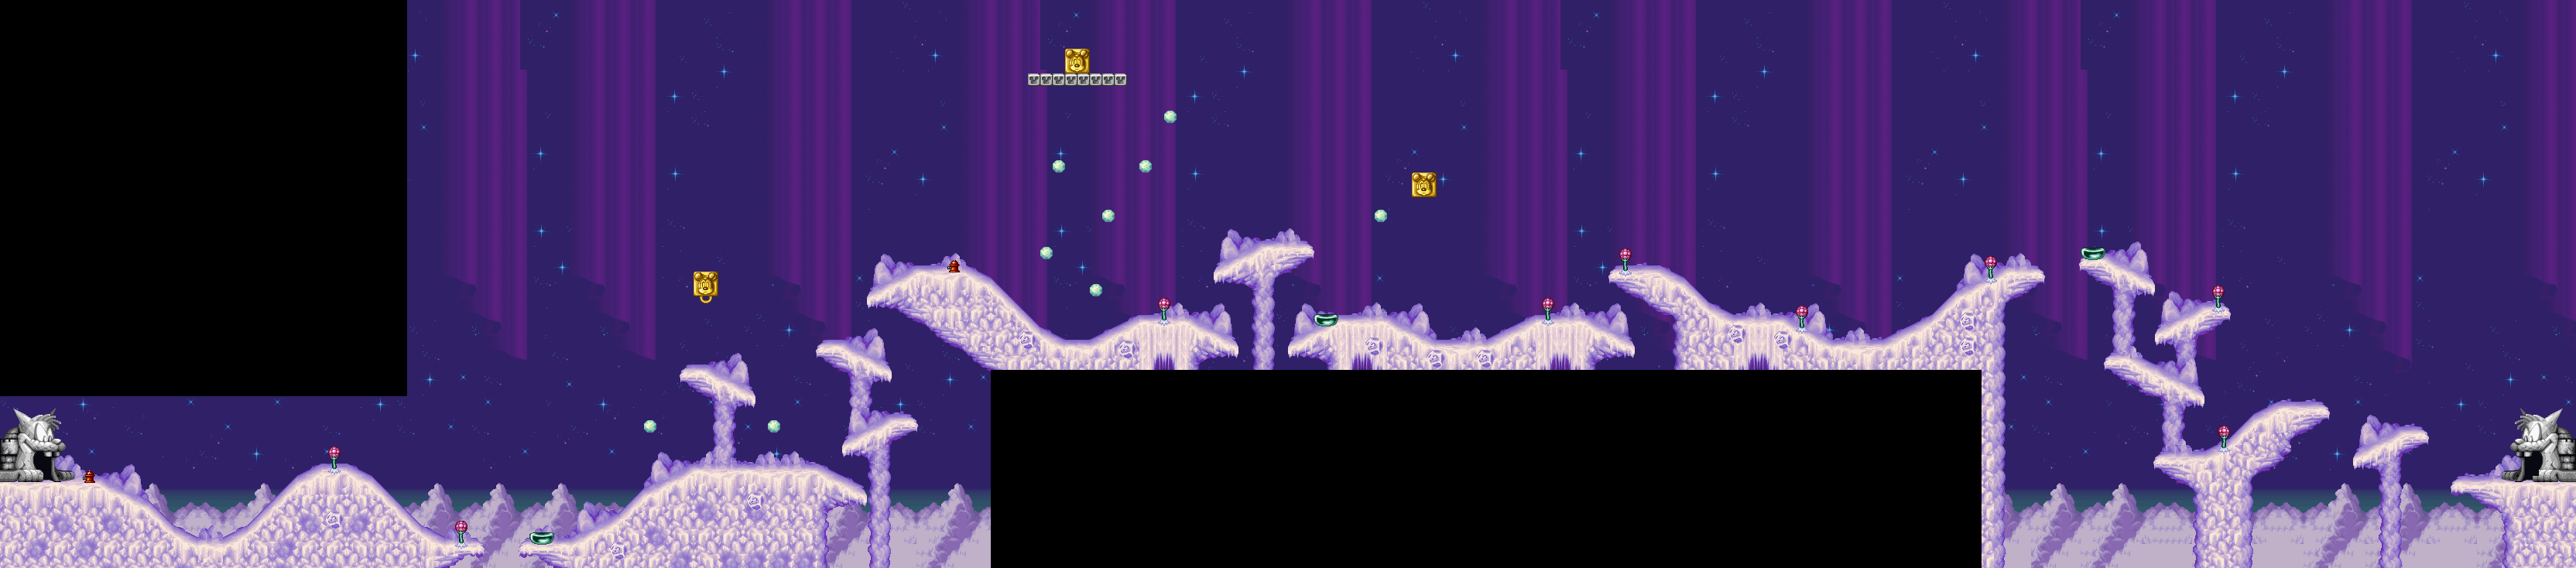
Snowy Valley
5-1
This stage (and its levels) is really short.
You'll definitely want to get the Fire Suit back out for these levels. When you spray the crystals in the air with water, you'll be able to create some temporary platforms. Cool!
The dandelions (dandy lions? I dunno) that come out of the ice crystals under the ground are just vanilla enemies.
The pink flower-like things push the ice platforms back and forth.
The ice platforms can be pushed by walking into them. If you jump onto them, you'll be able to ride them down the slopes like an icy surfboard.
Speaking of icy, be careful here. The ground in this stage is very, very slippery.
You can find an extra life by using the Fire Suit on the large group of ice crystals that you'll see shortly after the beginning of the level.
5-2
There aren't any enemies here. Also, you need not use the ice platforms to get through this level. All you need to remember is that the platforms go according to what direction you were holding the D-Pad when you landed on them (either left or right).
5-3
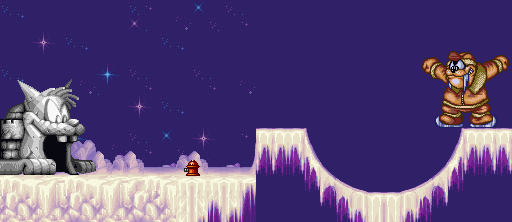
The boss here is a walrus Pete. He'll ice skate from one side of the screen to the other and breathe snowballs into you. Though you can use the Fire Suit to freeze his snowballs and damage him, the Magic Turban does even more damage when you charge it up.
If you're going to jump on his head (which also works here), be careful not to jump into his ice skates as he flips around or you're going to get hit.
Monday, August 22, 2016
CGR Undertow reviews The Magical Quest Starring Mickey Mouse for Super Nintendo
Here's CGR Undertow's review of The Magical Quest Starring Mickey Mouse. Yes, I know I've posted this before. We're watching it again, anyway, because CGR Undertow is horribly missed in these quarters.
newfiebangaa plays The Magical Quest Starring Mickey Mouse - Part 3 of 5
This is the farthest I ever got when my parents rented the game for me from Blockbuster. Why? Because I was seven, that's why.
Also, goddamn, the memories. Nobody uses Blockbuster anymore.
All maps by Will Mallia.
Stage 3
Fire Grotto
3-1
Go into the cave and prepare to take an elevator trip down. Shoot down the bats with the Magic Turban, and don't let the blocks or the ledges crush you.
That same guy is back, and this time he's got a hammer. When he hits the floor with his hammer, you'd better be out of the way of the part of the floor that shoots up into the spikes! You'll definitely want to charge your magic up here so you can spend less time against this guy.
He also shoots fireballs at you, but the fireballs are much easier to avoid.
3-2
When you start the stage, a block drops down to break the glass in front of you. You'll get the Fire Suit, and you'll be able to play as Fireman Mickey as a result.
Just like the Magic Turban, the Fire Suit has its own energy meter for its internal water pump. You can also cut the energy you use for it in half if you can find the General Store in this stage and pony up the coins.
The fire hose can break blocks and put out fires. It can also push the grey blocks and large stone blocks forward to help you reach previously unreachable areas.
The fire hydrants refill the Fire Suit's water pump.
The small flames that walk around can also walk on walls. The fire bats just fly around.
The fire pits hurt you, but at least they don't kill you on impact.
You'll see fire jets come out of the walls and the floors, and the wall-based fire jets can set platforms on fire. Extinguish them with the water pump before crossing.
3-3
You can push the blocks that move up and down forward with the Fire Suit.
If you use the Magic Turban underwater, you'll be able to breathe underwater if necessary and take care of that fish if necessary.
The ceiling of fire sets the platforms on fire, but thankfully it doesn't go all the way to the floor. The water in the floor extinguishes the fire on the platforms.
The Mickey Doll is a 1-up. I'm surprised I haven't seen one until now.
If you go underwater after the fish, you'll be able to find a big Mickey block. Use the Magic Turban to break the block and get another Crystal Heart.
The General Store door near the boss is pretty nice. When you leave, you'll be able to come back next to the entrance, so you can farm for coins for a while and get all the life you need. If you need the upgrades for the Magic Turban and/or the Fire Suit, you'll be able to make getting those easier here, too.
3-4
The boss here is a statue. To beat it, keep hitting it with the Fire Suit's water pump. The fireballs that come out of the statue's mouth will hit the platforms, and if you extinguish them, you'll get a fire hydrant to refill the pump for your efforts.
As you work on it, the flame in the statue's mouth will slowly die out. Don't take too long to defeat the boss, as it slowly regains its strength. When the flame is extinguished, you're done.
Stage 4
Pete's Peak
4-1
When you start the level, Goofy will be there to give you the Climbing Suit.
Sunday, August 21, 2016
newfiebangaa plays The Magical Quest Starring Mickey Mouse - Part 2 of 5
Now that we have the treetops out of the way, it's time to re-revisit the Dark Forest!
2-1 (continued)
Throwing an enemy into a giant Mickey block will also open up the contents.
The bug hiding underneath the leaf is basically the Dark Forest's version of the bug from the Treetops area, except he doesn't jump around. He's pretty easy.
There is a door underneath some block just after the start. Get rid of the blocks to enter the door, and pull on the big Mickey block to get a Crystal Heart.
Do not let the fish in the water bite you. If they do, they'll drag you under, resulting in instant death.
The plants that drop the spiky seeds are basically indestructible, but you can stand on them.
The bean enemies that hang off of the vines and bounce up and down can be knocked off the ceiling with a regular shot, and then taken care of like a normal enemy. A charged shot, however, will kill them in one hit.
While you're playing as Wizard Mickey, you can hold down Y to charge your shots up, much like in Mega Man. This lets you kill some enemies outright and deal more damage to others, and you can also get more distance out of your shot, going as far as the other side of the screen. Of course, charging your shot depletes more of your magic power when you finally let it go, so collect the Magic Lamps to refill your magic.
2-2
Remember what the Wizard said about the Magic Turban allowing you to breathe underwater? Equip it before you enter the tree, or else you'll slowly lose all your health.
Use your magic to open up the sea anenome doors. Shoot down any bugs that swim around and any worms that move from one hole to another.
When you exit the tree, drop down and fall to the left. You'll find the General Store. If you need to, you can now refill your magic power in the store. If you have 200 coins, you can get a crystal heart. If you have 300 coins, you can cut your magic consumption in half.
To beat the boss here, avoid him and the seeds that he throws up in the air. When he's on one side of the screen, he can shoot his grass skirt at you like a boomerang. Stay away from it (jump over it if you have to) and remember that it lowers when it boomerangs back to him, and charge up your shots so you can hit him and kill him more quickly in the long run.
2-3
There's not very much to this area. Move past the statues before they swing their clubs down. Make sure not to touch the clubs while the statues are rearing back between swings, too.
You can stand on the statues while the clubs are down, but you'd better make your move before they rear back their weapons again.
2-4
The boss here is a giant Pete spider. He'll try to run into you and he can also shoot webs at you. If you get hit by a web, mash the buttons to break free!
The spider's main weak point is his face. Use charged magic shots to hit him from the other side of the screen, and jump on his head when necessary. When the spider's face turns pink, it's about to go down.
newfiebangaa plays The Magical Quest Starring Mickey Mouse - Part 1 of 5
For the second part of the Mickey Mouse sandwich, we return to the first game in the Magical Quest trilogy!
Here's the gist of the game's plot: Mickey and Goofy are playing catch with Pluto while Donald's just standing there, and then Pluto goes missing all of a sudden. Mickey falls off a cliff while looking for him, and then the game begins.
Hey, at least there aren't any plotholes.
All maps by Will Mallia.
.png)
Stage 1
Treetops
1-1
Fighting enemies is a little weird, but once you get used to it, it's a snap. Jump on them, then pick them up with the Y button. Press the Y button to throw them forward with a nasty little spin.
The berries take you to high places when you tear them off the tree and grab hold of them. They explode after a few seconds, but you'll be much higher by the time that happens.
The sleeping birds give you a coin when dropped and let go.
You're not really going to be able to do much until you open the door. When you enter the house, you'll meet a wizard. He tells you that Pluto has been taken by Emperor Pete, and to find him, follow his statues. He'll then distribute magical boxes throughout the land, and these will be your main weapons. These can be grabbed the same way as downed enemies.
The yellow boxes can be grabbed. The grey ones cannot. The red boxes respawn when you grab them, giving you an infinite ammo supply. Sometimes, you'll find coins inside the boxes. Pick them up, as you'll need them to purchase supplies throughout the journey in stores that are interspersed throughout the levels. The hearts replenish your health.
There's a hidden door above the house. Break the blocks to find it, then enter it to find two of those sleeping birds. As for the big box with the Mickey head in the center, grab the chain beneath it, pull down, and let go. You'll get a ton of apples worth 500 points apiece for your efforts. If you find fruit in a box, pick it all up to get a ton of points. You can find a lot of nifty stuff that you'll really need in the big boxes, including coins...so keep an eye out!
The only way you can run is to walk down a slope. If you keep jumping every few seconds while you're running, you can maintain that speed, but if you don't do that while you're on flat ground, you'll go back to normal speed in a few seconds. (This hint is really useful if you're trying to do a speedrun, tool-assisted or not.)
You'll see the miniature Pete soldiers quite a bit throughout the game. You'll have to stun them with a block before you can take them out. Jumping on them does nothing.
The bees are really easy. All you have to do is jump on them to get rid of them.
The heart crystal adds a heart to your maximum health in addition to refilling all of your hearts. You can get a maximum of ten hearts, and having all that life can really make a difference.
1-2
Here, you'll be taking a ride on giant berries down a hill. To take a ride, just jump on. If you jump to the right and off the beaten path sometimes, you'll find something.
If you can make it to that grey block in the air, jump to the right into the trees. You'll land in the treetops, and you'll eventually find a ton of apples as well as another door. This takes you to the General Store. For now, you can refill your health, but as you progress through the game, you'll be able to buy other stuff.
You'll finally meet your first boss here: some guy with wings. You'll see him a couple of times throughout the game. Jump on his head to beat him. When you bop him on the head twice, he'll hang upside down on the trees like a bat and send some miniature clones at you. Jump on them and throw them at him to do some real damage! When you beat him, you'll be able to enter a cave and enter the next area.
1-3
Funny how Mickey just looks at you like "WTF" when you don't touch the controls as he sinks in the water.
Anyway, the wildlife here wants you dead. The frogs can be jumped on like stepping stones, the beaver waits for you to jump into the water so he can basically destroy you, and the starfish try to follow you. Wow, even the starfish want you dead.
If you see the chain to the side of the giant Mickey boxes, just grab it, pull it and let go as before. It'll still work.
1-4
This boss is pretty easy. Throw blocks at its head, or simply jump on its head. For the first couple of hits, a segment of the worm will pop off, and you can use it against the boss as well.
When his face turns red, get away from him and wait for his face to turn purple again so you can damage him. When he's short enough, he'll start jumping around. Keep hitting him in the head and he'll eventually go down.
Every time you beat a boss, you get more points and also get some more coins! The coins will come in handy for the second level, and you're going to find out why.
Stage 2
Dark Forest
2-1
When you start the level, you'll meet the Wizard again. He'll give you a magic turban and wizard's suit, and when you equip it, you'll be able to perform magic. You can switch between regular Mickey and the magic turban whenever you need to. This suit will let you zap enemies with magic bolts and also breathe underwater.
Subscribe to:
Posts (Atom)