Wednesday, June 30, 2021

PrinceWatercress plays Alex Kidd in Shinobi World - Part 1 of 4


Our girlfriend has been kidnapped by the Dark Ninja! Thankfully, the spirit of a good ninjas has given us his power so we can get after him! Hey, this game plays like Shinobi, but is kind of its own thing! That's cool!

Round 1

Left and Right let you move around, Down lets you duck, 1 lets you attack and 2 lets you jump. Down-Left and Down-Right let you do the duck walk.

The ninjas will move towards you, while the guys with the red top knots will throw boomerangs at you. Hit them from behind if you can, but you'll usually be jumping over their boomerangs to hit them.

The leaping green ninjas will leap towards you, and you'll have to time it right to whack them with the sword and get rid of them.

The chests usually contain hearts. Your health is in the upper-left corner, and you can have up to six hits. If you open a chest with a heart in it with maximum health, you'll find an Alex Kidd doll that gives you a 1-Up instead, so playing super well will give you a bunch of lives to get through the game with.

If you leap into a lamp post while holding Up, you can hold Up and Down to climb up and Down. If you hold Left or Right and hold Button 1, you can spin around until you turn into a fireball, then launch yourself in the direction you held when you release 1.

You'll need to wait for the guy jumping in place while throwing shurikens to make his way down before hitting him. You can also deflect the guy's shurikens with your sword.

Hold Up and Down in front of a ladder to climb up and down it.

The gunmen will fire straight ahead in the direction they are looking.

The P icon gives you a more powerful sword strike.

Press Up in front of a doorway to enter it. To destroy the gold shining blocks below, hold Down and press 1. 

To wall jump, jump towards a wall, keep holding the Control Pad towards the wall, then keep jumping as quickly as you can. This will get you to the Kunai, a throwable projectible that replaces the sword, and a heart.

To grab onto the horizontal poles, hold Up while jumping into it to hold up. Up and 2 lets you climb up, while Down and 2 let you drop down, even when you're on top of the pole. To rocket yourself up, hold Up, then hold 1 until you are in fireball form and release. You'll blast through all the blocks, and you can use Left or Right to move to the side in case you need to get somewhere.

To beat Kabuto, keep throwing Kunai at him. If he sends fireballs at you, try to get under them. He has his usual size for the first form, but he gets small enough that you have to duck to hit him in the second form. Having the Kunai here makes it extremely easy to wipe him out.

PrinceWatercress plays River Raid - The Longplay


It's River Raid, the game programmed by Carol Shaw for the Atari 2600 from Activision that has you flying a plane, trying not to crash and shooting down bridges, ships, planes while keeping your fuel constantly topped up so you don't crash into the river.

Left and Right on the joystick let you move left and right, Up lets you move faster when held, and the Fire button fires bullets one a time from your plane.

You'll need to shoot down whatever you can for points - helicopters, ships, planes and even bridges. You'll get an extra life every 10,000 points. You can also shoot down the fuel tankers you need to fly over to get the most points, but make sure that to keep the yellow needle on the fuel gauge at the bottom of the screen near the F. Also, don't try to actively go after any enemy on the screen; that can work against you. If you see a bridge, you will have to shoot it down; running into it will cost you a life.

You can lose a life from running into an enemy craft, running out of fuel, or running into a bridge or a wall. Pay attention to what you're doing, and get a feel as to when you should and should not accelerate with Up on the joystick. Once you figure out what you need to do, you'll be playing this game like a pro.

Obviously, this is a fun game with its share of challenge to just get further and further and get more and more points, as the game has no ending. This is definitely worth having in the collection and is definitely worth giving a shot, and it's nice to see that a lot of vertical shmups can trace their roots back to this one.

PrinceWatercress plays Ninja Gaiden Shadow - Part 1 of 5


I can't remember why I wrote "Too bad it's not the experience I hoped for." when I covered Kikoskia's Let's Play of the game several years ago. Sure, it's not exactly like the NES games, but having played it now, this one's not too bad.


Interestingly, the game takes place in 1985, and it actually takes place before the first Ninja Gaiden game. It should also be mentioned that this is made by the same developers as Shadow of the Ninja for NES, and the game was originally meant to be a port of that game, hence why part of the Shadow Warriors logo appears below that of Ninja Gaiden's.

Anyway, you're saving New York City from the evil forces of Emperor Garuda (Emperor Gulf in the European version), who is a servant of Jaquio. 

Stage 1


You just have six units of health as well as only one ninjitsu attack that you can store multiple uses of (the fire wheel power from the NES series). A lets you jump, B lets you attack, Left and Right let you move around, and Down lets you duck.

The flashing crystal balls contain the power-ups you'll be hunting for in this game. The ninpo orb gives you another ninjitsu attack, while the potions refill your health. A small bottle fills up two units, while the big one gives you full health. To use your ninjutsu, hold Up and press B. You'll shoot a bunch of flames forwards and upwards, and these flames will destroy any enemies they touch. You can carry up to five ninjutsu charges.

This game may be a bit slower than the NES games, and it may not have as many enemies, but it is still a playable game.

In this stage, you'll be dealing with missile-firing cannon (duck under the missiles), guys that seemingly try to alert people of your presence (for no reason), and bombs that shoot up a fire pillar when destroyed.

Unlike the other Ninja Gaiden games, you can't wall jump. Instead, the game gives you a grappling hook. Up and the A button throws it up. Why they couldn't put wall jumping into the game, I don't know. All I know is that the lack of it combined with other factors makes this game feel a lot like the odd man out.

The boss here is the cyborg Spider. Attack him as he crawls around before he jumps up to the ceiling and starts crawling on it. When you're under him, he'll either come straight down at you or come down to the floor at a slight angle. He's more likely to jump straight down if you just stand there. Move around so he won't hit you on the way down, then start slashing at him again until his attack pattern repeats once more. Also, don't use your ninjutsu. It will not damage Spider at all. He's an easy boss, but he can be a pain in the pants if you don't know what not to do. 

Tuesday, June 29, 2021

PrinceWatercress plays River Raid


We go from the SG-1000 to the Atari 2600 for another fun arcade-style vertical shooter.


It's River Raid, the game programmed by Carol Shaw for the Atari 2600 from Activision that has you flying a plane, trying not to crash and shooting down bridges, ships, planes while keeping your fuel constantly topped up so you don't crash into the river.

Left and Right on the joystick let you move left and right, Up lets you move faster when held, and the Fire button fires bullets one a time from your plane.

You'll need to shoot down whatever you can for points - helicopters, ships, planes and even bridges. You'll get an extra life every 10,000 points. You can also shoot down the fuel tankers you need to fly over to get the most points, but make sure that to keep the yellow needle on the fuel gauge at the bottom of the screen near the F. Also, don't try to actively go after any enemy on the screen; that can work against you. If you see a bridge, you will have to shoot it down; running into it will cost you a life.

You can lose a life from running into an enemy craft, running out of fuel, or running into a bridge or a wall. Pay attention to what you're doing, and get a feel as to when you should and should not accelerate with Up on the joystick. Once you figure out what you need to do, you'll be playing this game like a pro.

Obviously, this is a fun game with its share of challenge to just get further and further and get more and more points, as the game has no ending. This is definitely worth having in the collection and is definitely worth giving a shot, and it's nice to see that a lot of vertical shmups can trace their roots back to this one.

PrinceWatercress plays Star Jacker (SG-1000) - Longplay


Enjoy!


Here's an interesting game: it's a vertical shooter where, instead of going through all four of your lives (as opposed to three in the arcades) one by one, you have all four of them lined up like some sort of space convoy...and you move and shoot with all of them at once.

1 shoots, 2 drops bombs and the Control Pad move around. You want to make sure that you don't run any of your ships - not just your lead ships - into anything, and you want to make sure that none of your ships get shot down.

There are a multitude of enemies that you'll be shooting down and avoiding. Some simply come at you, others move in and out and shoot at you, and others split into shrapnel that can take you out when they are destroyed. There is even a There is also a big red spaceship that you need to shoot down. If you shoot it down, your convoy turns into one big ship and you go through the level at warp speed for a ton of points. 

Speaking of points, you'll get an extra ship every 10,000 points, and if you managed to hold on to all four ships as you keep hitting multiples of 10,000, the game will keep tabs on how many extra ships you've accumulated and you'll get a ship from your surplus at the end of the round. The more ships in your convoy at the end of the round, the more points you get, with a total of 8000 points if you get through a round with all four ships in tow (4000 for three, 2000 for two and 1000 for one).

This is a very fast-paced game, and while a session of this game might last for a few minutes, you'll be spending more time than that just to see all that there is in the game, see how good you can really get and you'll soon be spending quite a bit of time on this one if you're into vertical shooters and you like this game's play style. This is one SG-1000 game that has some serious staying power.

PrinceWatercress plays Fester's Quest AGAIN - Part 4 of 4


...and now, the final battle! Let's blow up the UFO and save everybody, including Gomez!


After the lass overworld boss, you'll be to the upper left of the building you were just in. The only way to go from here is north. You'll take an enemy-free path down the sewers to the island in the center of the overworld. Walk up to the tombstone in the center of this island and you'll instantly be whisked into the UFO.

The pink aliens with one eye will jump over your shots like no tomorrow, so use your gun or hit them with a Noose. The whip will not work.

The green spiked monsters are just like the slimes.

The brown monsters with the green orb on their heads (which look a lot like bird's nests with a green egg in them) shoot a three-way bubble shot at you. Hit them with a Level 4 whip, so you can take them out in two hits.

The floating eye with the three brown things rotating around them shoot three green projectiles in a triangular pattern in addition to the three-way bubble shot. A Noose is the best way to get past them.

If you need to, use a Noose to get out of tight spots. They don't work against bosses, so feel free to use one when necessary.

The green monsters that swing their arms around can be easily destroyed with a Level 4 whip.

The boss here is some sort of evil robotic thing. I can't even tell what it is. Use your Invisibility potions and destroy the turret in the center with the Level 4 whip, then stand a bit south of the center of the right side of the screen. If the brown balls it shoots at you don't touch you at all, you're standing in the right spot. From these, pound the boss itself with missiles (if the target isn't locking on to either part of the turret you destroyed, you're doing it right).

When you beat the boss, you did it! Gomez is safe, and so is the rest of the city! Enjoy your ending!

Items

All items except for Light Bulb, Keys and Money will replenish after you beat a boss.

Money: Equip and use them at Hot Dog Stands to refill a unit of health, at five Money units for each one.

Gun Upgrades: Blue ones power-up your gun, while pink ones downgrade.

Whip Upgrades: These work the same way as the Gun Upgrades, they just say "Whip" instead of "Gun."

Light Bulbs: These light your way through the sewers. Equip one and you'll have light until you go back aboveground.

Keys: Used to open doors aboveground. Enter the locked houses to get more power-ups.

TNT: Equip them, then lay one on the ground and wait for it to explode. Anything near it will be taken out.

Vice Grips: Some enemies will slow down Fester considerably with their attacks. When that happens, equip and use a Vice Grip. You'll be at regular speed in no time!

Potions: These will fully replenish your health when you use one.

Invisible Potions: Use these to temporarily turn Fester invincible. Not "invisible." Invincible.

Missiles: With the Missiles, you can lock onto any enemy you want and hit them from anywhere. This will send out a couple of missiles that will fly around and eventually hit the enemy. You can even lock on through walls and grab stuff you want with the Whip.

Nooses: Enemies hounding you? Use a noose and blow away all the enemies currently on the screen. These do not work on bosses.

Monday, June 28, 2021

PrinceWatercress plays Star Jacker (SG-1000)


It's time for some more arcade fun on the SG-1000. I had some fun with this one, believe it or not.


Here's an interesting game: it's a vertical shooter where, instead of going through all four of your lives (as opposed to three in the arcades) one by one, you have all four of them lined up like some sort of space convoy...and you move and shoot with all of them at once.

1 shoots, 2 drops bombs and the Control Pad move around. You want to make sure that you don't run any of your ships - not just your lead ships - into anything, and you want to make sure that none of your ships get shot down.

There are a multitude of enemies that you'll be shooting down and avoiding. Some simply come at you, others move in and out and shoot at you, and others split into shrapnel that can take you out when they are destroyed. There is even a There is also a big red spaceship that you need to shoot down. If you shoot it down, your convoy turns into one big ship and you go through the level at warp speed for a ton of points. 

Speaking of points, you'll get an extra ship every 10,000 points, and if you managed to hold on to all four ships as you keep hitting multiples of 10,000, the game will keep tabs on how many extra ships you've accumulated and you'll get a ship from your surplus at the end of the round. The more ships in your convoy at the end of the round, the more points you get, with a total of 8000 points if you get through a round with all four ships in tow (4000 for three, 2000 for two and 1000 for one).

This is a very fast-paced game, and while a session of this game might last for a few minutes, you'll be spending more time than that just to see all that there is in the game, see how good you can really get and you'll soon be spending quite a bit of time on this one if you're into vertical shooters and you like this game's play style. This is one SG-1000 game that has some serious staying power.

[YTP] Paula Deen's Butter Addiction (by @TheStaryFishy)


"Did I promise you some sweet nuts? Too bad!"

PrinceWatercress plays Fester's Quest AGAIN - Part 3 of 4


...and with this video, all the bosses are dead! Again!


When you go aboveground at the end of this sewer path, you'll find a hole in the dock. This leads to another sewer path.

Be careful with this next path, as the munch spheres will be coming out in full force. They'll even keep spawning if you stand in certain parts of the path.

If you haven't gotten your weapons fully powered up yet, now would be a good time to do so.


You'll come across another building when you get out. Here's another map from ReyVGM to light the way!

The boss here is some dinosaur-like creature with both a shield and a gun. You could use your missiles here, but you're going to be taking a lot of damage, so use your Invisibility potions and smack him around with the whip if you've got it fully powered-up. If you're forced to use the gun because the whip isn't powered up, be sure you're firing into his gun hand so you can do some damage, as he never lowers the shield and the gun will have no effect against it. If you run out of Invisibility potions, use your Missiles.

You'll get another Clue, but you'll find out there's still one more Clue to find...and another boss to kill off. Go ahead and enter the sewer entrance near the exit you just came out of and get over there already!

You'll get a huge yet straightforward path at the other side of the sewer path. The house you'll see here finally has Mama (Ah, so that's her name!), who will give you Nooses. These items are screen-clearing bombs, and they can come in handy if you're in a bit of a spot. Even funnier, you get a really nice picture of Lurch (he finally shows up) before everything gets destroyed. That picture actually looks really nice for any NES game. Just remember that you can't use the Nooses to destroy bosses.

You'll see the Addams Family Mansion on this path. You'll have to stand above the house (or behind it, depending on how you're viewing the top-down perspective) and walk into the bushes near the upper-left corner of the house. When you can't go west any further, go south. You're there.

Enter the house, and you'll get a monochrome brown-colored picture of the Addams Family (minus Thing and including Gomez, strangely, along with a moose whose antlers wave back and forth). Leave the screen, and you'll have your second and last health upgrade. Now you can take the path as normal and enter the sewers.

The sewer path here is more of a maze than the others, but it's not that hard. At least it's easier to identify on the sewer map I placed in these entries compared to the rest of the path, due to the dirt brown floor that you'll be seeing in it.


The next sewer path isn't any harder, and it'll send you to one more building. Here's the last map from ReyVGM on that matter.

The boss here is yet another dinosaur. Aside from another gun that does a three way shot, it also spits fireballs out of its mouth that go straight forward. He's really hard to dodge, so use your fully-powered up whip and keep using your Invisibility potions. He'll go down in no time.

When you check your Clues, you'll find out that Gomez is on a UFO! 

Items

All items except for Light Bulb, Keys and Money will replenish after you beat a boss.

Money: Equip and use them at Hot Dog Stands to refill a unit of health, at five Money units for each one.

Gun Upgrades: Blue ones power-up your gun, while pink ones downgrade.

Whip Upgrades: These work the same way as the Gun Upgrades, they just say "Whip" instead of "Gun."

Light Bulbs: These light your way through the sewers. Equip one and you'll have light until you go back aboveground.

Keys: Used to open doors aboveground. Enter the locked houses to get more power-ups.

TNT: Equip them, then lay one on the ground and wait for it to explode. Anything near it will be taken out.

Vice Grips: Some enemies will slow down Fester considerably with their attacks. When that happens, equip and use a Vice Grip. You'll be at regular speed in no time!

Potions: These will fully replenish your health when you use one.

Invisible Potions: Use these to temporarily turn Fester invincible. Not "invisible." Invincible.

Missiles: With the Missiles, you can lock onto any enemy you want and hit them from anywhere. This will send out a couple of missiles that will fly around and eventually hit the enemy. You can even lock on through walls and grab stuff you want with the Whip.

Nooses: Enemies hounding you? Use a noose and blow away all the enemies currently on the screen. These do not work on bosses.

Sunday, June 27, 2021

PrinceWatercress plays Flight of the Amazon Queen - Part 19 of 19


It's time to fly out to the Valley of the Mists and face Dr. Ironstein once and for all...


Get the heck out of Floda Inc., then go to Trader Bob's shop. Buy the alcohol. Since you have the dead Floda guard's ID, you can now get the alcohol. If you haven't combined the Commander Rocket coupon with the blueprint yet, do so now. Use the alcohol on the rocket pack, then leave the village. You'll then see Joe on the pinnacle in a static scene. Use the rocket pack and you'll crash land in the Valley of the Mists. After you talk to Faye Russell, head east.

You'll notice that a Brontosaurus is blocking your path. Go north, and you'll find out that the Brontosaurus is eating the trees nearby. If you go all the way north, you'll find some branches. Use the knife on the branches to get some, then go south and use the branches on the Brontosaurus' head. You'll feed it, then the Brontosaurus will get out of your way. Go all the way back south, and you can now go west.

You'll soon see some smaller dinosaurs munching on a dinosaur skeleton, then they will run away from a Deinonychus. Use the Tyranno Horn to scare it off, then go east. You'll encounter Dr. Ironstein, and Faye will mentions that he has a dino ray gun that can turn people into dinosaurs. Ironstein threatens to turn Princess Azura into a dinosaur, then commands Joe King to put the crystal skull in the nearby robot. The robot activates, and after it is revealed that the robot is the protector of the Valley of the Mists, Ironstein announces that it will turn everyone into dinosaurs and help him rule the world. Unfortunately for Ironstein, the robot mentions that the only person it takes orders from is whoever activated it...which is Joe King, not Dr. Ironstein. Ironstein tries to turn Joe King into a dinosaur, but the robot catches the beam, amplifies it and turns Dr. Ironstein into a giant dinosaur. The robot, knowing that Dr. Ironstein now has powers equal to his, grows in size and fights him.

Pick up the dino ray gun. If you use the ray gun on Dr. Ironstein, Faye will turn into a dinosaur and Joe will automatically change her back. Talk to Faye and ask her to turn her mirror around so that you can deflect the beam back on Dr. Ironstein, then use the dino ray gun on Dr. Ironstein again. This time, you'll turn Sparky into a triceratops, and Joe automatically changes him back. Give the death mask to Sparky, then use the dino ray gun on Dr. Ironstein again. The laser will bounce off Faye's mirror, then the death mask, then the robot and finally hit Dr. Ironstein, getting rid of him for good. Joe, Sparky, Faye, Anderson and Princess Azura get on the Zeppelin, the shield to the valley is restored, Joe gets a kiss from Azura, and the game ends.

PrinceWatercress plays Flight of the Amazon Queen - Part 18 of 19


In this episode, we finally get the Crystal Skull, but by the time we find out what we really did all that work for, it's too late...or is it? Thankfully, we get help from Faye Russell and a rather familiar face...


You'll need to use the two stone statues in conjunction with each other, and in order to do that, you'll need to get the tree sap one more time. Go back to the drop off point at the Prince's crypt, get the tree sap, put the tree sap on one stone statue piece, then combine that piece with the other. Return to the statue and use the statue you just repaired on it.

The statue asks as a key, and the floor of the altar moves to reveal a staircase. Go down the stairs and follow the path, and you'll come across a maze. Give the Cheez Bits on the dino rat, and follow the dino rat into the exact doorway it goes into to find your way out.

You'll end up at a strange room. If you look at the wall markings, Joe will automatically translate them with the Pgymy to English dictionary. Joe will find out that this is an escape hatch he is looking at, and that pressing the panels in the right order will activate it. Go up the steps and look at the left wall panel. Joe will notice it is loose and adjust it, triggering it. Trigger the other one, and you'll get the escape hatch set up.

Go through the door on the right in the foreground. Use the vacuum cleaner on the floor to reveal all the symbols. After a brief cutscene involving Sparky, the floor will be clean.

From here, you'll notice that some of the symbols on the wall do not match any that are on the floor. Move the bottom symbol on the second column (I go from left to right on numbering the columns, so the left-most column is the "first" one). The symbols will change. Touch the third symbol on the third column (I go from top to bottom numbering the symbols on the columns, so the top-most one is the "first one). You'll open a door to the right. Go through it. You'll meet the guardian again, and you'll have to prove your lineage. Give the crown to the guardian, and you will be able to take the crystal skull. Pick it up. 

Go back to the "throne room" and use the chair, which acts as the escape hatch. You'll be greeted by Henry at the jetty, and Henry will point a pistol at you and throw you into prison at Floda Inc. Dr. Ironstein mentions that the shield surrounding the Valley of the Mists is shut off, and he can now turn people into dinosaurs. Regardless of what options you pick in the dialogue options, Dr. Ironstein will go ahead with his plans.

When you regain control of Joe, move around and you'll notice a mug was behind where Joe was standing. Pick up the mug and use it on the prison bars. Faye Russell will show up with Anderson, and after Anderson's first name is revealed to be Hans, Faye finds a laser pistol in a nearby cupboard and disintegrates the cell door before telling Joe to find a way into the Valley of the Mists before it is too late before heading back to the hangar with Anderson.

PrinceWatercress plays Fester's Quest AGAIN - Part 2 of 4


For being based on Zelda, the game is really pushy about where it wants you to go.


I'm going to keep posting the items list at the end, because knowing which item does what in this game is very, very essential. Just refill whenever possible and make the best use of your gear.

Anyway, it's time to go to the sewers. The sewers are much easier as you progress, but they're going to get a little more difficult from here. The spheres with the munchy mouths that move around can go through the walls as they go straight at you. When you see them, shoot them immediately, as they can be quite a pain to deal with.

You'll now be near the upper-right corner of the overworld map. Go south until you hit the pavement, then turn north when you go towards the fork in the road. (If you need energy and have the money, so south to find a Hot Dog Stand. Be careful if you go south, as there are giant spider enemies that will require TNT to take down effectively.) Go north, and you'll see a path into some forest to the east. Take it and follow the path to the next set of stairs. As you go down there, those munchy spheres will show up and try to ruin your day again. Be glad you have a powerful weapon.

For this set of sewers, you'll meet a new enemy: the snails When you shoot them down, they'll turn into slimes. Once again, this can be a headache due to the power-up piles that the slimes can leave, and you definitely want to keep the gun power-up you have. When you come out, you'll be near a house. Go into this house, and Morticia will finally hand you the whip. Finally! Don't use it yet, though, as it's only at power level 1 and does next to no damage right now. Power it up to the maximum (level 4) before using it.

For the whip, Level 1 is normal, Level 2 is a chain whip, Level 3 is a morning star and level 4 is a flame whip. Nice. As you power it up, the range and strength increases. You can not only attack through walls with the whip, but also get items with it. The latter ability is a double-edged sword, as you can accidentally grab a downgrade while fighting enemies.

When you're back in the overworld, go straight down. You'll find another set of stairs.

Remember, if Fester touches a power-up anywhere below head level, he's got it. Keep that in mind while avoiding weapon downgrades.


When you're aboveground again, you'll come across another building. Here's the map from ReyVGM. I'd tell you where you wish to go, but there's not much to the building and I'm not Gwonam. Just go north, turn left, go straight, turn right, enter.

You'll meet another boss who looks like an anthropomorphic Triceratops in a Speedo with a whip in each hand. Use your Invisibility potions to get in front of this guy and wail away at him with your gun. If you run out, refill your health and push this guy to the top of the screen, moving back and forth as you do so and shoot at him. When he's at the top, just move left and right and avoid the whips. He always alternates between whips, and the raised arm will indicate which whip he'll attack with, which is a very good tell if you need to know what direction not to go in to keep from get smacked.

If you have a fully-powered Whip at this point (which is amazing considering you'll need a little bit of patience to do that), you can take this boss out even faster. Enjoy your clue, which still makes it somewhat ambiguous as to where Gomez might be.

You'll be at the upper-left corner of the building, and there's another extremely short path back to the sewers.

The whip is great against the slimes when it's at Level 4. Just like the TNT, the slimes won't multiply when hit with the whip. At least the chances of stepping back and causing the slimes to respawn are cut down to zero.

When you cross the stairs at the end, you'll be at the very upper-right corner of the overworld. The house has Thing again, and he'll have Missiles. (Where's Lurch? I haven't seen him yet. Same with the grandmother, whose name escapes me at the moment.) You can now hit any of those pesky enemies from anywhere on the screen! From here, take the wooden dock and keep going south. You'll take a path back to the sewers.

You can see signs for Sunsoft and the Sun Club along the way here. Sun Club was their Japan-only magazine, which (of course) showed off their releases amongst other things. There's another one that seems to say "UTB Team," but I have no idea what that is.


The boss here is a knight demon. If you have the whip fully powered-up, you can whack away at him without having to wait for the boss to expose himself. Otherwise, you'll have to wait and whack him with the Missiles. For best results, move all the way north to move the boss all the way north, then use the missiles. This ensures that more missiles hit the boss. If you have Invisibility potions and you're out of Missiles, use those to get some good damage on him with the gun. When he lowers his defenses, he also swings his swords and shoots out a three way shot.

If you have to use the Missiles, just move back and forth across the screen. Just remember that when the boss rears the sword back, he's about to strike.

Once you beat the boss, you'll be to the right of the building, right next to another sewer entrance. You'll also get a better idea of where Gomez is.

Items

All items except for Light Bulb, Keys and Money will replenish after you beat a boss.

Money: Equip and use them at Hot Dog Stands to refill a unit of health, at five Money units for each one.

Gun Upgrades: Blue ones power-up your gun, while pink ones downgrade.

Whip Upgrades: These work the same way as the Gun Upgrades, they just say "Whip" instead of "Gun."

Light Bulbs: These light your way through the sewers. Equip one and you'll have light until you go back aboveground.

Keys: Used to open doors aboveground. Enter the locked houses to get more power-ups.

TNT: Equip them, then lay one on the ground and wait for it to explode. Anything near it will be taken out.

Vice Grips: Some enemies will slow down Fester considerably with their attacks. When that happens, equip and use a Vice Grip. You'll be at regular speed in no time!

Potions: These will fully replenish your health when you use one.

Invisible Potions: Use these to temporarily turn Fester invincible. Not "invisible." Invincible.

Missiles: With the Missiles, you can lock onto any enemy you want and hit them from anywhere. This will send out a couple of missiles that will fly around and eventually hit the enemy. You can even lock on through walls and grab stuff you want with the Whip.

Saturday, June 26, 2021

PrinceWatercress plays Flight of the Amazon Queen - Part 17 of 19


Now he's gone and done it. Ian did something stupid and got himself killed, making it impossible to get out the easy way. However, this does allow us to do some more things in the temple. Unfortunately, we get stuck again.


Now that you've rescued Ian, we've been told not to follow him. Let's follow him anyway! Go back to the room with the lasers and use the death mask on one of the mirrored surfaces to destroy the laser trap. You can then go through the door behind it. You'll be on the lower path where the one dead body was. Go right, and you'll be on the other side of the room with the crypt. To get the green jewel, you'll need to create something that will allow you to get it.

Head back to the room where you dropped down from and go through the door on the right. Head back to the room where the Prince's crypt was and go down the hole. Pick up the tree sap again, and use it on the baseball bat. Go back to the green jewel and use the sticky bat on the jewel to grab it.

Go back to the statue with the eye holes and the two waterfalls. You'll hear Ian scream. Put the green jewel in the left eye hole and the blue one in the right. The waterfalls will disappear, and the statue will point to the right, telling you to go that way. If you go left, you'll see the trap that Ian accidentally triggered, killing him. If you go to Ian's lifeless body, you won't find the Crystal Skull at all. Instead, you'll find another stone statue much like the one you picked up earlier.

Go back to the double waterfall and take the right doorway. You'll be at the statue.

PrinceWatercress plays Flight of the Amazon Queen - Part 16 of 19


We finally helped Ian, but it doesn't exactly end well for us. However, we do get to open up more of the temple.


Enter the upper doorway where you played around with the pulley. Use the pickaxe on the stalactite in the room and grab the flint that drops to the floor. Use the flint on the lighter so you can use it. Then, use the pick-axe on the hole in the west side of the room to make it bigger. You'll end up in a new room, but you won't be able to do anything here yet.

Go back to the room with the giant snake. Use the mummy wrappings on the arm bone, then light the mummy wrappings with the lighter. You'll create a makeshift torch. Use the torch on the snake to get it to go away.

Go down the stairs and enter the doorway to the right. You'll end up in a previous room. Search the dead body for an ID card and a strange stone, which Joe will automatically take. Continuing west will take you to a large room with a statue, so go back and enter the room in the center. Go down the stairs and enter the doorway to the right. The stairs leading up leads back to the statue that you would have went to if you went west from the dead body, and you won't be able to go through the lasers blocking your path, so go west.

You'll trigger a cutscene where Dr. Ironstein meets with Anderson concerning the status of the zeppelin so he can fly into the valley and start his reign of terror. He also tells Anderson that Joe King will never bother him again, then leaves. Anderson starts to have second thoughts about his partnership with Dr. Ironstein...

You'll end up where you first met Ian. Go west and you'll see two waterfalls. There are eye indentations in the statue, and there is a big stick in a stone. Pick it up, and somehow, Joe will pull it out and put it in the inventory. Go back to the crypt from earlier and use the big stick on the crypt to open it. You'll lose the stick, but you'll open the crypt. Look inside, and you'll find a death mask, which Joe will automatically take. It is dirty, but you'll still have a little bit of the mummy wrappings left from when you made the torch. Use these wrappings on the mask to clean the dirt off of it.

Go back past where the snake was and return to the dead body. Go west, and then go east in the statue room. You'll be back at those stairs. To the right will be Ian. Pull the lever. Nothing will happen, but you will need to do this. Talk to Ian, and mention that you have a plan. Since you've hit the lever, you'll get the option of telling him to untie the rope tethering the cage. Ian will untie the rope at his feet. Hit the lever again, and Ian will be free. Unfortunately, Ian will draw a gun and tell Joe not to follow him. He will then walk away.

PrinceWatercress plays Fester's Quest AGAIN - Part 1 of 4


Gomez Addams and other townspeople have been kidnapped by aliens! This looks like a job for...Uncle Fester?

Yep, we're playing through this game again. Hopefully this will be a better overall set of videos than the first time around.


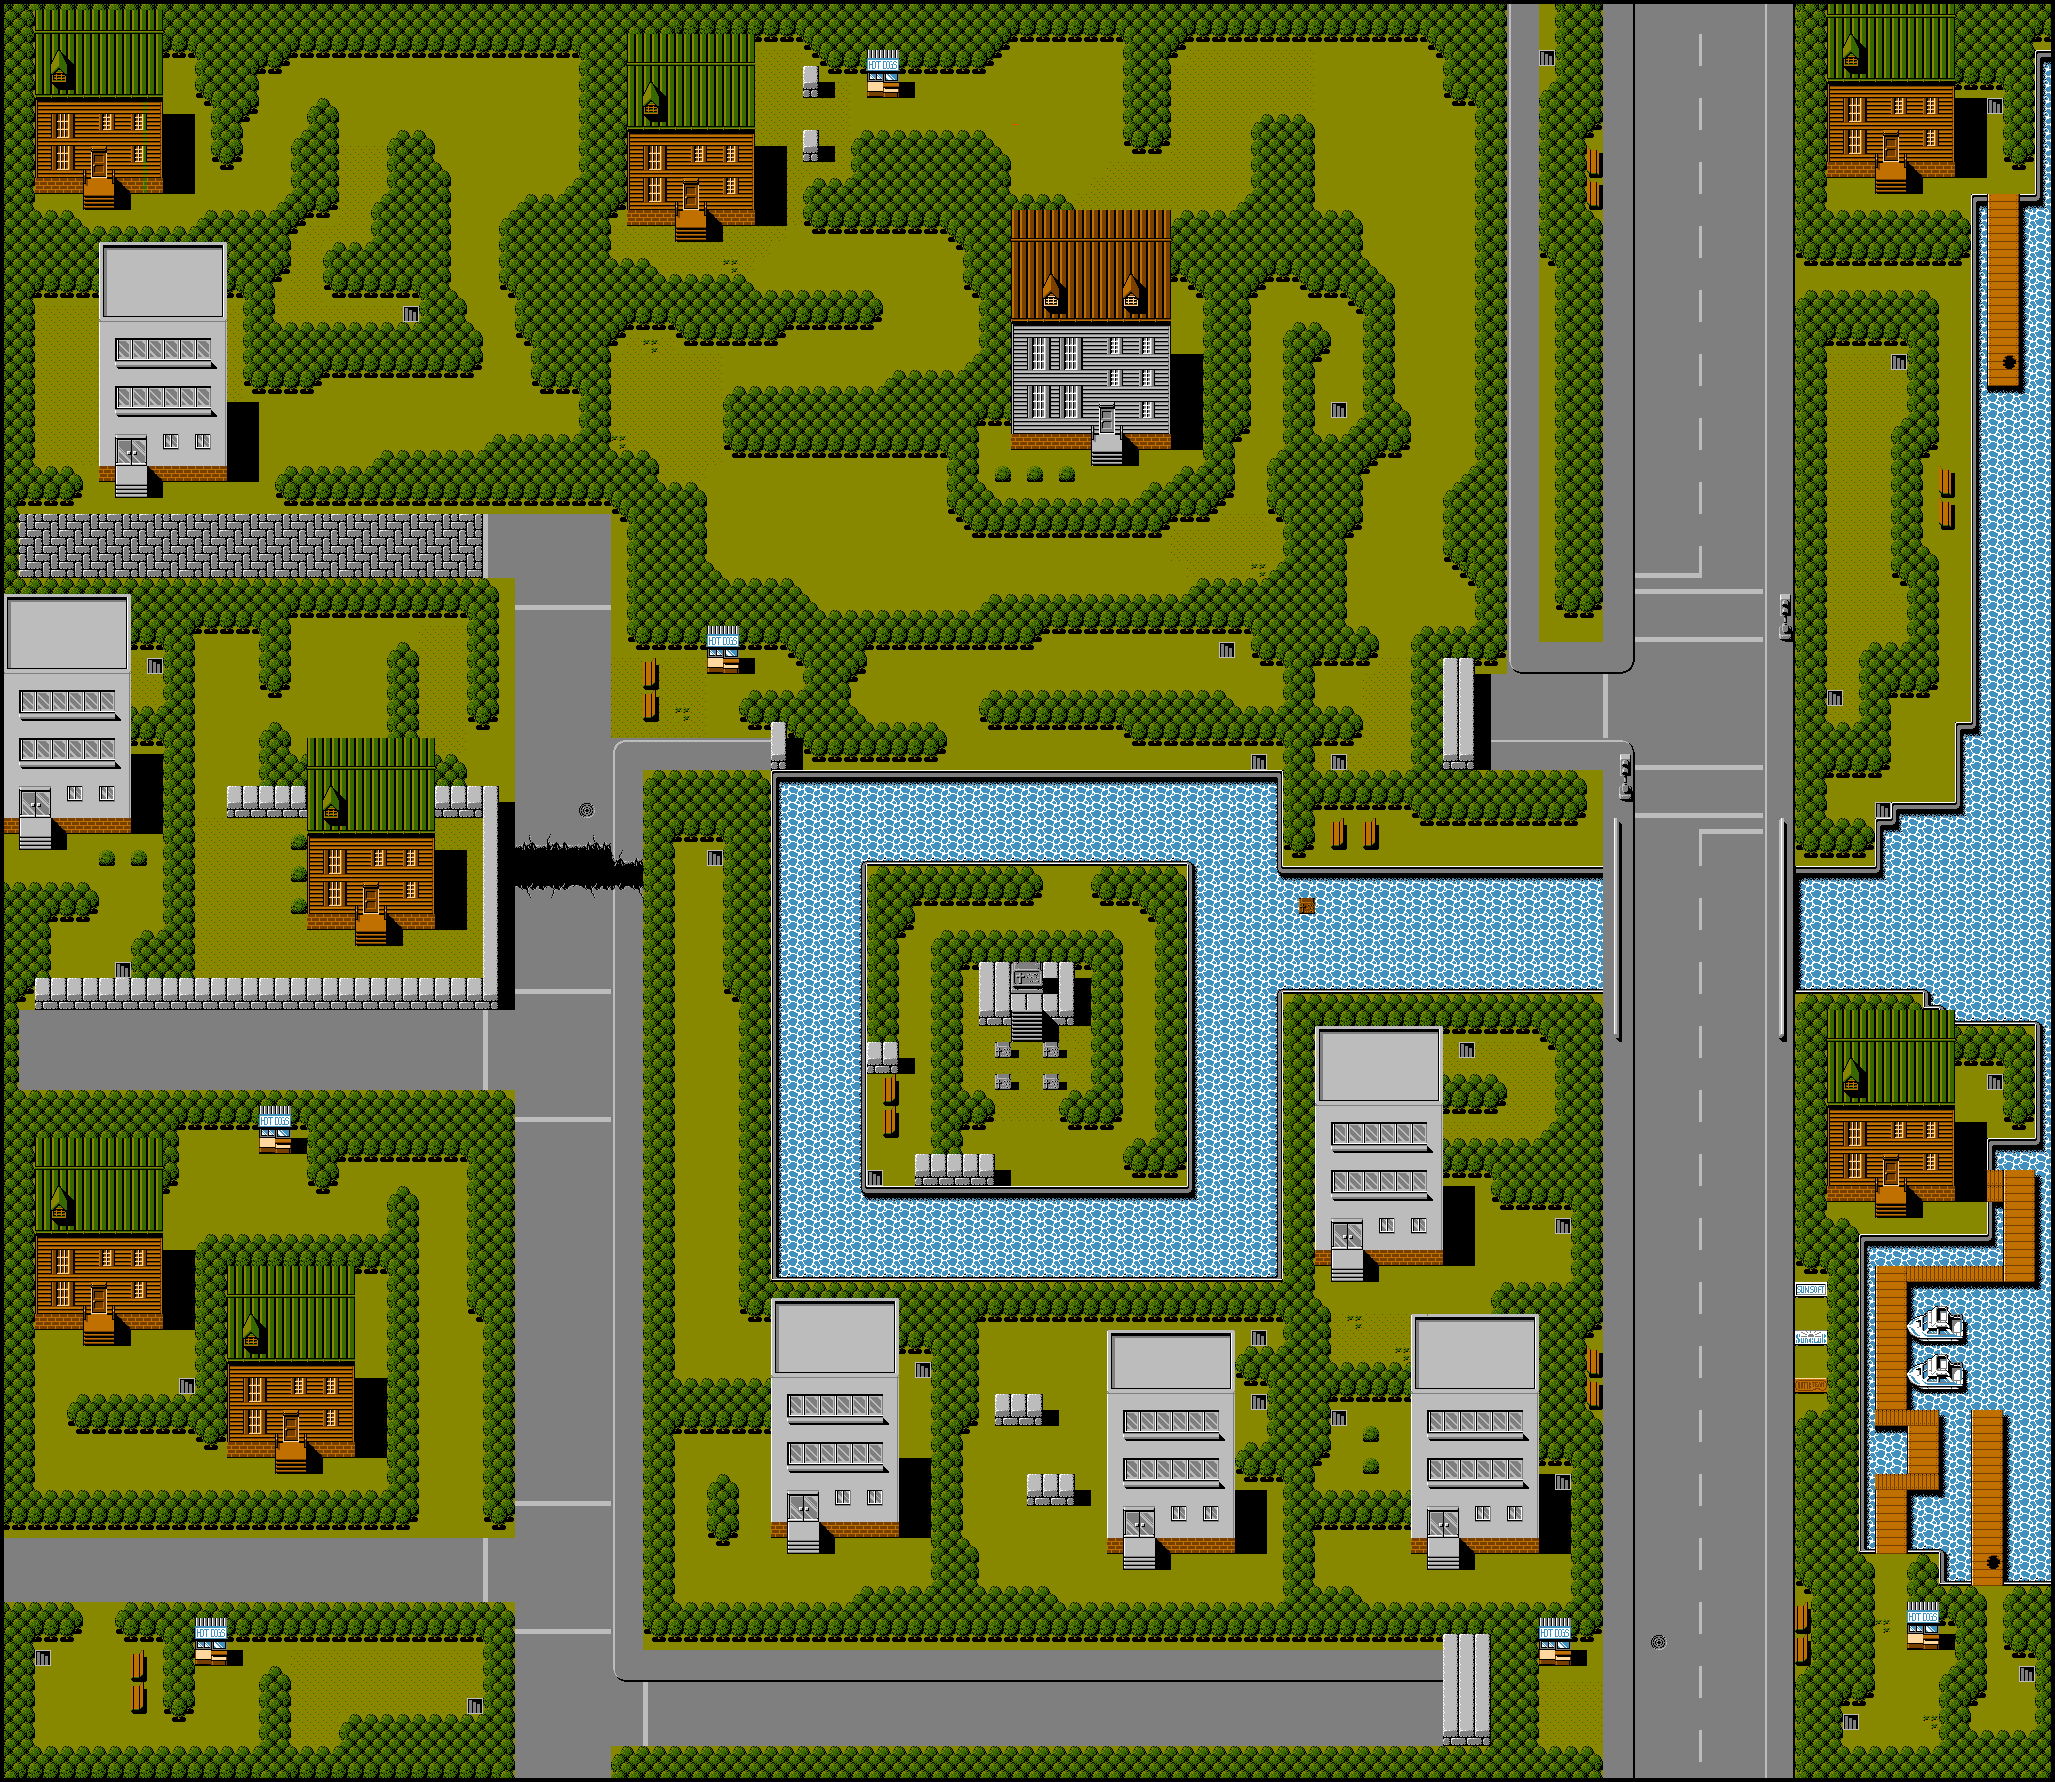
You start out in the center left part of the city. Get used to how this part looks, because you'll return her every single time you die and you'll have to inch your way back to where you were.

The gun has eight levels of power. For the first two, you have the standard yellow pellet. Upgrading it makes it go faster and further, but it's still not very powerful. Next, you'll get the orange crescents. These have two levels of power and distance, but they can get caught on the walls unless you're standing in the right area.

Ditto for the next two, which are black balls that circle around as they go forward. Unlike the crescents, they're even worse with running straight into walls. 

The final weapon is a bunch of pink triangles. They cover a wide area and they travel in a double-helix pattern that's more reliable than all the other weapons, so max out your gun power as soon as possible. You can power that weapon up just one more time before you're finally maxed out, and this will turn the double helix shot into an even better triple shot that doesn't arc around at all.

You can go to the inventory screen to see what level your gun is at any given time. Same for your whip later in the game, as you'll soon find out.

In this game, you have two hits before you die. You can find two extra hits to add to your maximum health, but that's as far as the game will allow you to upgrade it. Still, the health upgrades are a big help.

The frogs jump toward you, and sometimes they can be the death of you. They can also attack you with their tongues, which have a bit of range to them. If your weapon keeps hitting the walls, either use the whip (which you won't be able to do yet) or either reposition yourself or run away. Hugging the east wall in a narrow vertical corridor or the south wall in a narrow horizontal corridor usually helps. Also, try advancing slowly so enemies like the frogs that slowly but surely jump forward will go down. That's nice, especially when the respawn rate for monsters is so instantaneous and unnecessary that it's brutal at times.

The purple things on the ground that look like grapes can be destroyed easily. Just don't be stupid enough to walk into them. They're really good for filling up on money, light bulbs, keys and weapon upgrades.

The orange heads that float in place won't bother you until you shoot them. When you shot them, flies come out. You'll have to take out both the heads and the flies to move on.

For the houses north of where you begin, Pugsley (whose name is spelled wrong) gives you TNT, while Wednesday gives you Vice Grips. Don't even bother re-entering to get more, as you automatically get the maximum you can carry for each weapon when you get them from a house.

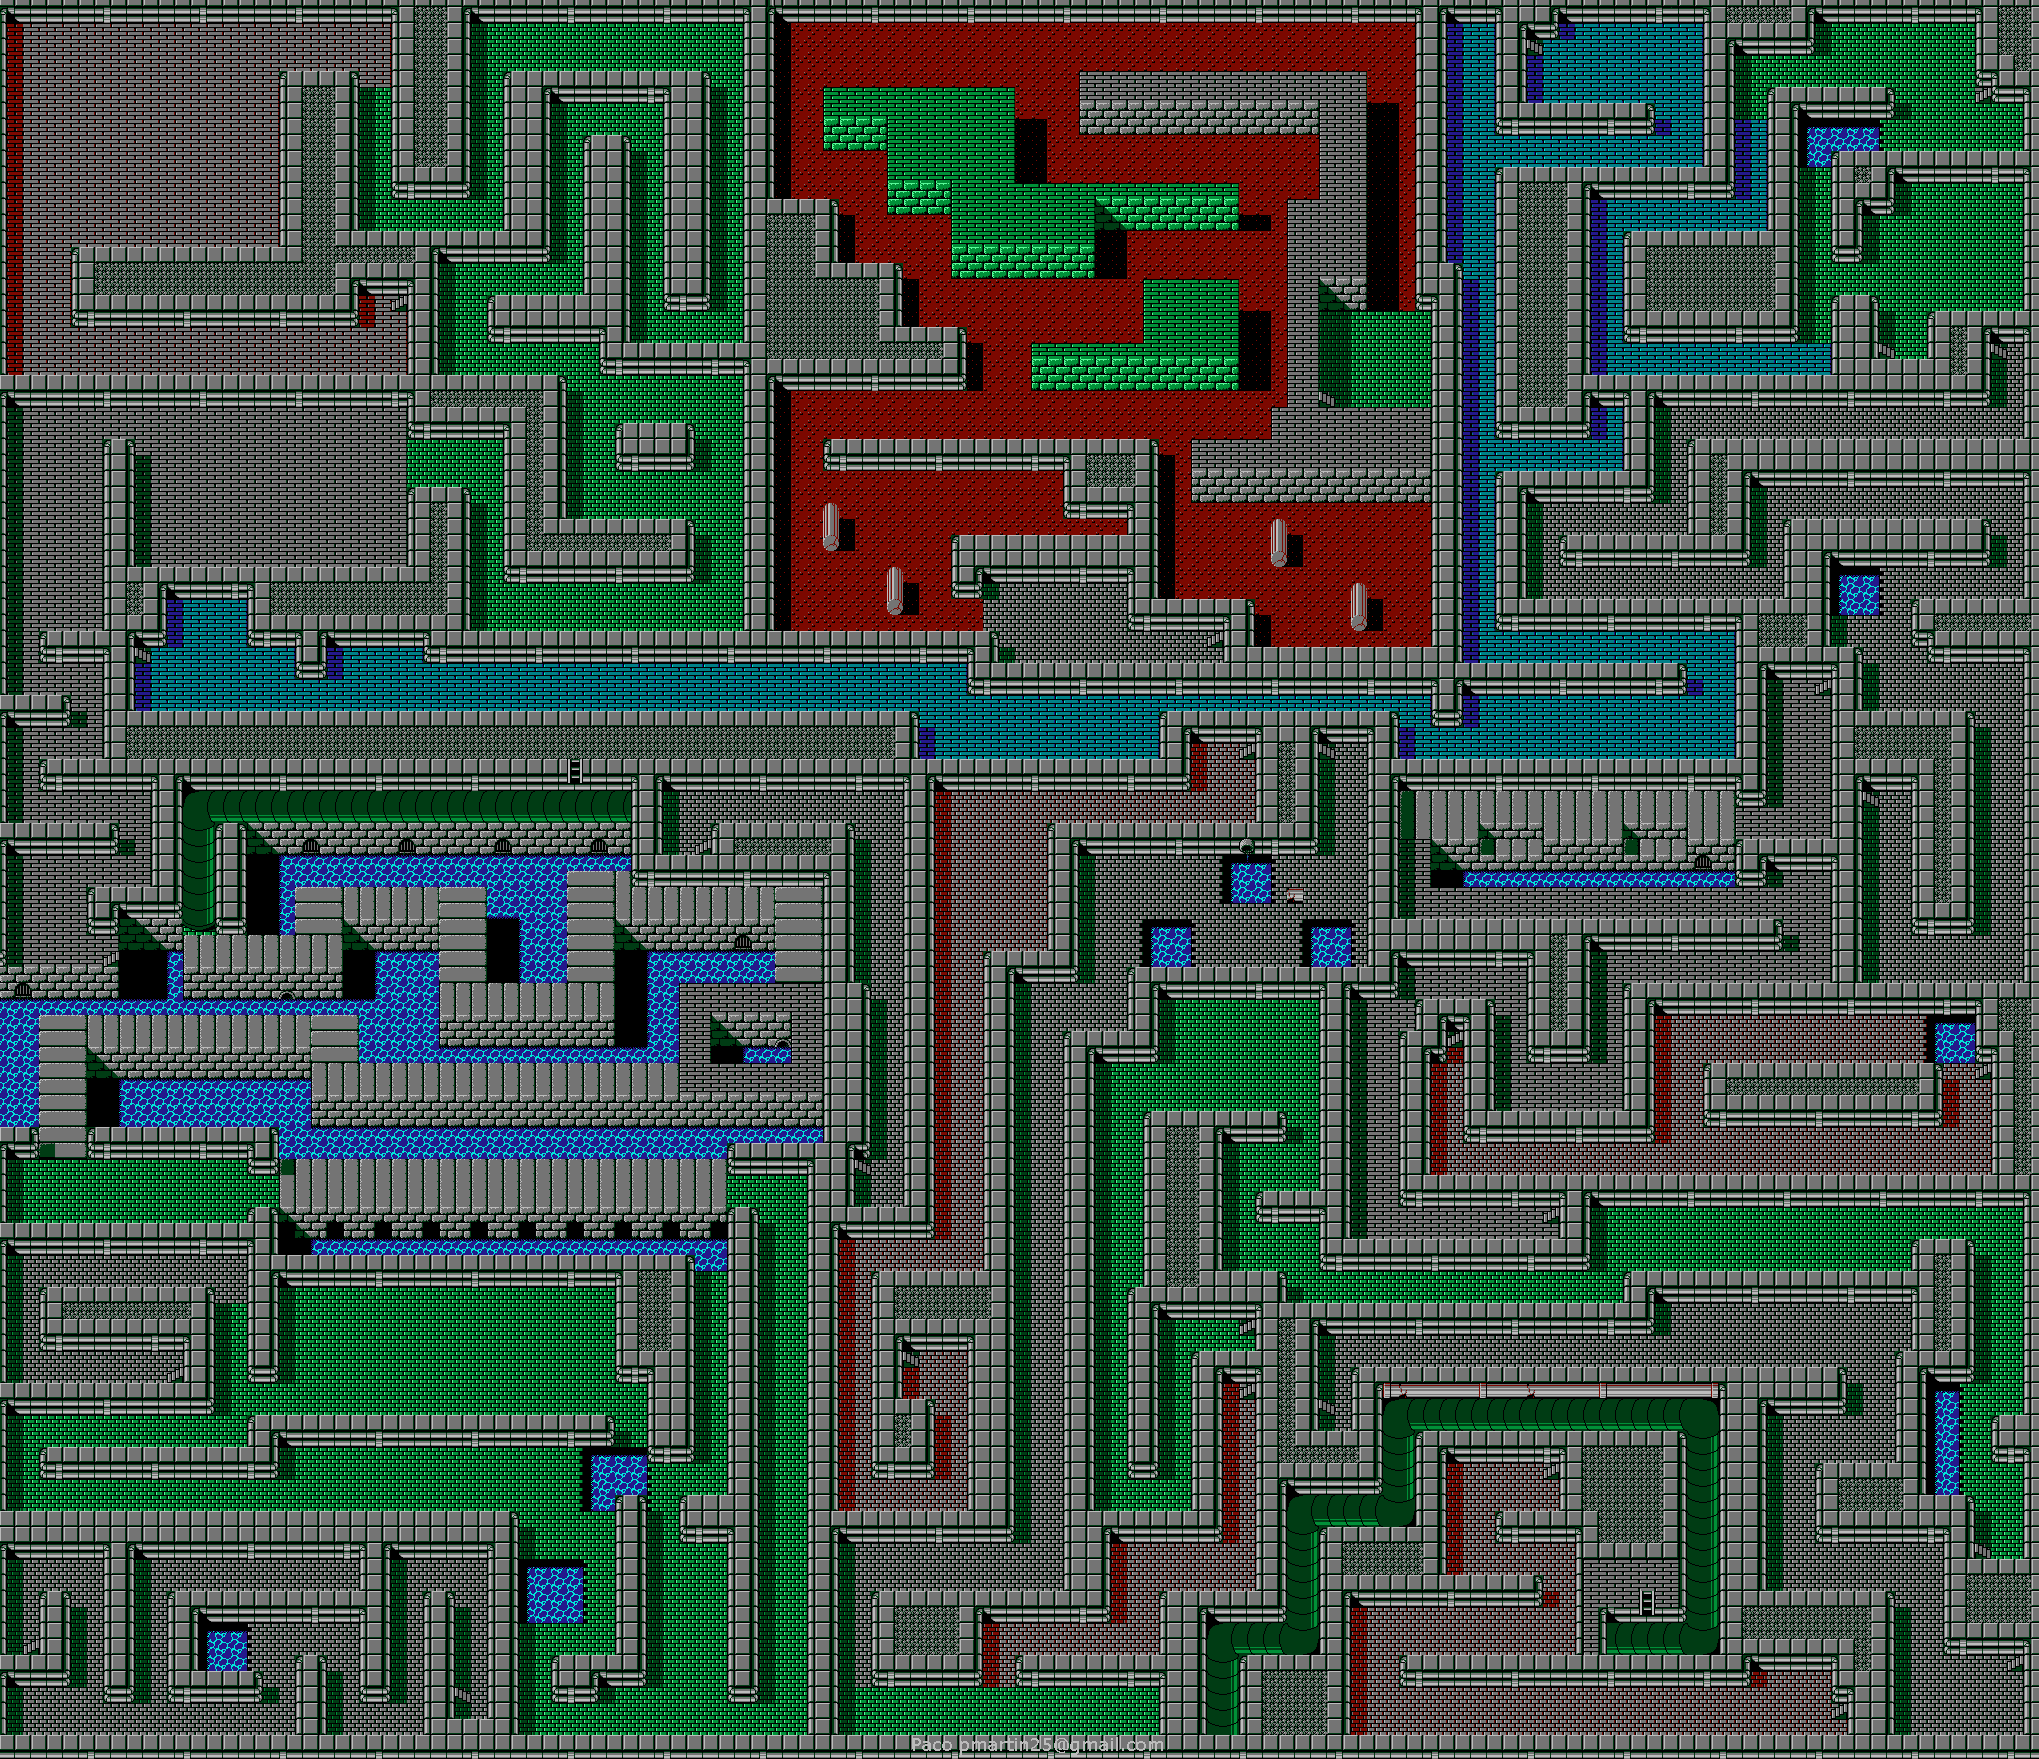
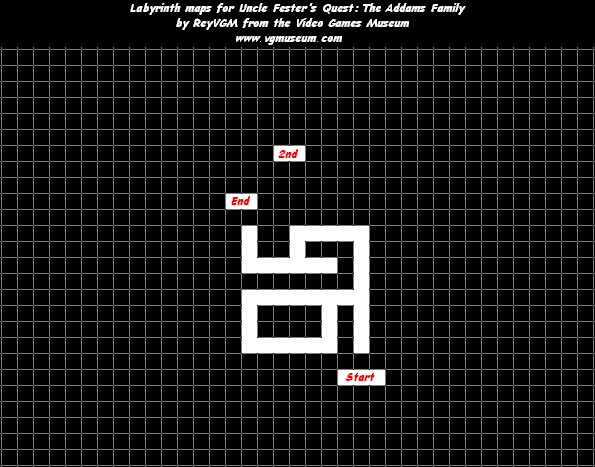
The staircases that lead down lead to the sewers, which you'll be entering a lot. We'll be entering from the staircase just east of the house where Pugsley gives you the TNT. Use a Light Bulb to illuminate the sewers, then equip TNT in case you need to get past a slime. The slimes multiply when you shoot them, but either shooting really, really fast or using a TNT will take care of that. (At least the slimes leave a lot of pick-ups you can use).

The heads here will now travel along the ground. You'll have to shoot them down this time, even though they leave larvae that crawl around on the ground and turn into flies after a few seconds. If anything is right in front of your gun, it's going to get hit.

The rats just hug the walls and go straight in one direction until they hit a wall, before they change direction again. They're pretty easy to take out.

Use the item button to go up the ladder, and you'll finally be aboveground again. You'll now be north of the un-crossable pit just north of the start. 

The pink frogs spit three fireballs, one straight and two diagonally. The green ones will lash their tongues forward. The blue frogs and the red frogs will just lap towards you.

Go to the house in this area so Thing can give you Potions. Get as many as you can, since these will fully replenish your health, unlike the Hot Dog Stands.

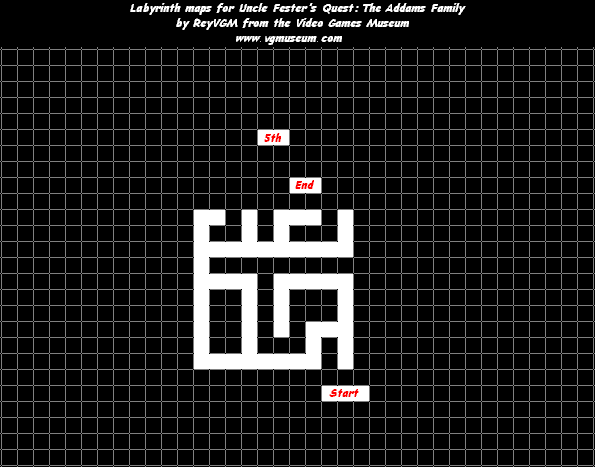
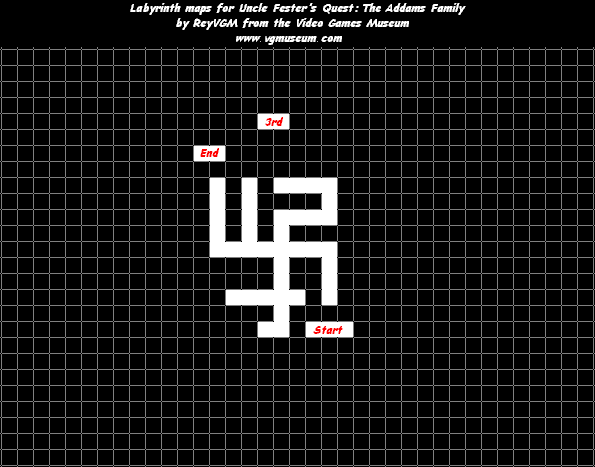
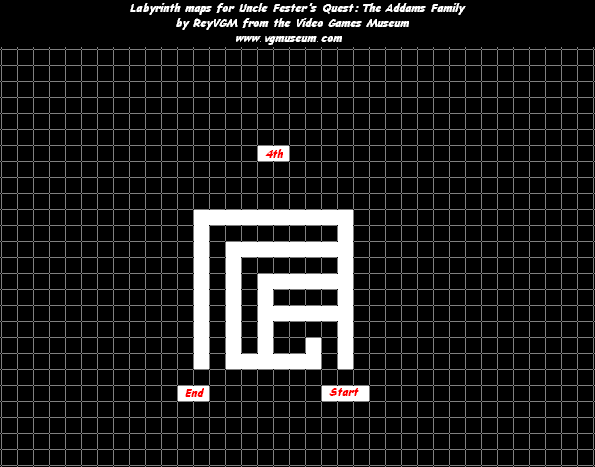
The tall grey building in this area is your first first-person-shooter style segment. Of course, you won't be shooting anything in these section because there's nothing in them to hurt you. That's good.


Anyway, there's not much to this building...except. Except if you go forward, turn left, go forward, then turn left again at the first junction you see, you'll reach a dead end. Go forward at this dead end and you'll get your first health upgrade. Yay! Now you can get out of there. Don't believe me? Use this map from ReyVGM. You're welcome.

The black monsters that look like a cross between a flea and a daddy longlegs will jump whenever you shoot at them. Just keep plugging away as they jump while moving back and forth and you'll eventually kill them.

The house north of the tall grey building in this area has Thing in it (how does he go between the two houses so fast?), and in this house he'll give you Invisible Potions. These will turn Fester invincible for a short time. Not invisible. Invincible.

You're finished here, so go back east and then turn south to hit the sewers up again. Follow the path, and enjoy the freedom of the most powerful gun power-up in the game. The frogs will go down in record time compared to the weaker gun shots.


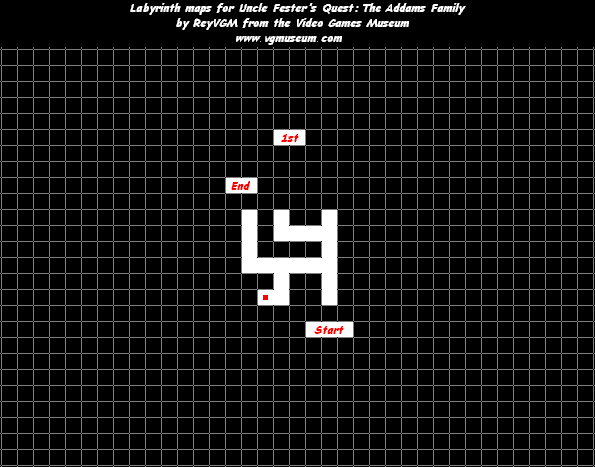
When you reach the staircase at the end, you'll be west of the house where Thing gives you the Potions. Enter the house and 
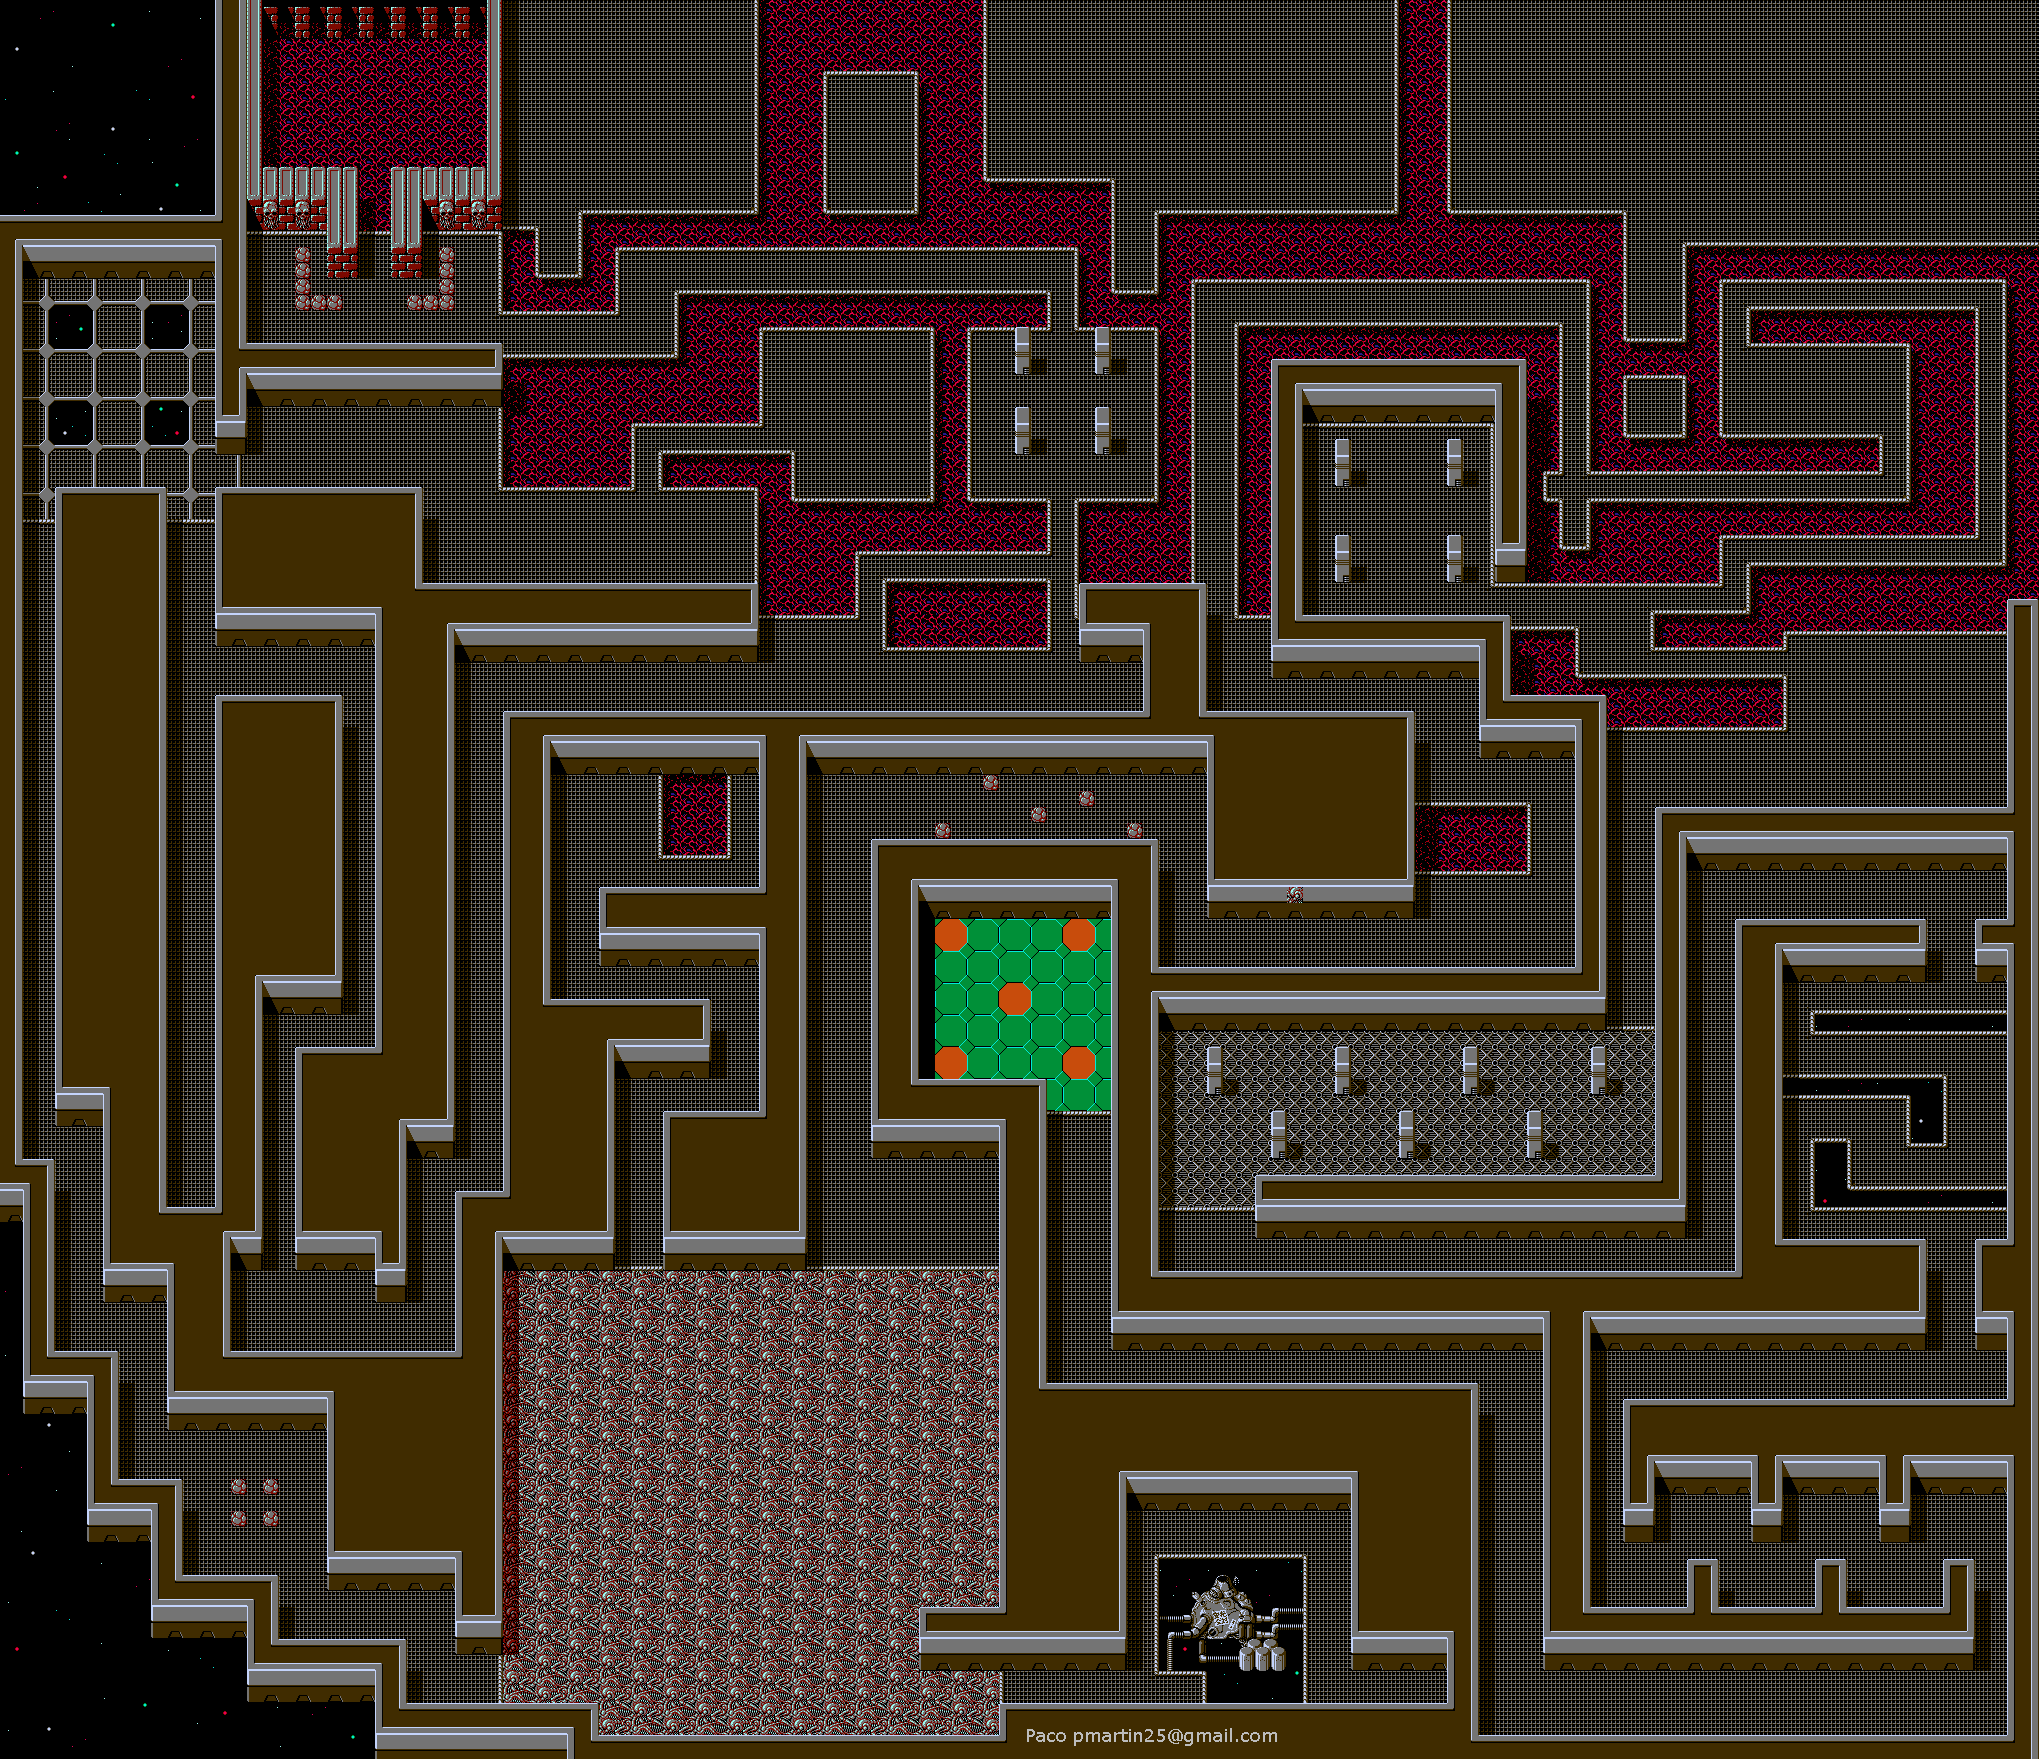
use this map by ReyVGM to get around. At the end, you'll fight a boss.

Whenever you enter a boss room, you'll get an invincibility flash. Consider this your few-seconds-long head start to align yourself properly and shoot at the boss without impunity. Anyway, this guy will attack with his extending arms, and they have some range. He always attacks left, right, right, both with his arms, then he moves around until he can immediately hit you with the left arm before repeating the sequence. Just bait him into attacking and stay on the move, and you'll do fine against him.

When you beat the boss, you'll be in an alcove next to the upper-right corner of the building. In it will be another sewer entrance. 

When you check your inventory, you'll notice there is a white rectangle on the left side of the Clue window on the upper-left. When you get all the clues, you'll find out where Gomez is.

Items

All items except for Light Bulb, Keys and Money will replenish after you beat a boss.

Money: Equip and use them at Hot Dog Stands to refill a unit of health, at five Money units for each one.

Gun Upgrades: Blue ones power-up your gun, while pink ones downgrade.

Whip Upgrades: These work the same way as the Gun Upgrades, they just say "Whip" instead of "Gun." You won't be able to make use of these until you get the whip later in the game.

Light Bulbs: These light your way through the sewers. Equip one and you'll have light until you go back aboveground.

Keys: Used to open doors aboveground. Enter the locked houses to get more power-ups.

TNT: Equip them, then lay one on the ground and wait for it to explode. Anything near it will be taken out.

Vice Grips: Some enemies will slow down Fester considerably with their attacks. When that happens, equip and use a Vice Grip. You'll be at regular speed in no time!

Potions: These will fully replenish your health when you use one.

Invisible Potions: Use these to temporarily turn Fester invincible. Not "invisible." Invincible.

Friday, June 25, 2021

PrinceWatercress plays Flight of the Amazon Queen - Part 15 of 19


In this entry, we do even more problem solving within the ruins of Sloth Island. This is gonna be a long one.


Talk to the leader of the zombie women, who is in green. You'll find out that they are Prince Almaxaquottl's personal concubines, and that they are waiting for the prince to rest before they go to the afterlife. By talking to then, you can find out that the temple - built by the guidance of the gods, who left a guardian behind - is a resting place for the prince, as death is looked upon as a form of rest until going on to the afterlife. You'll also find out that they have been waiting for about three hundred years after being blessed by a high priest, allowing them to stay in a physical form until the Prince wakes up and goes to the afterlife.

Tell them that they have been had as far as the wait goes, then ask where the Prince is. Ask them how they know the Prince is still in the sarcophagus. and when the leader says that they trust him, tell her to prove it. She will tell you to go away, so ask her if she is afraid he is not inside, and she will get angry and open the sarcophagus. You'll see a mummy, and one of the wrappings will roll out. Pick up the wrappings, and Joe will pull them out and take them with him. From there, ask the leader to open the sarcophagus again, then tell her that you pulled a pile of rags out of the sarcophagus. When the sarcophagus opens, the Prince will be gone and the women will be shocked and angry.

From here, open the sarcophagus. Joe King will take the crown. From there, use the knife on the vines popping out of the back of the sarcophagus, and you'll find a hole in the back. Close the sarcophagus, then move it. You'll find a hidden opening. Go in.

Joe will drop down a level. There will be some tree sap on the tree in the background, and you can use the knife on the tree sap to be able take some and put it in your inventory. Take the tree sap. To the left is a loose fountain head. If you use the tree sap on the fountain head, you'll be able to get the water on the floor out of your way and reveal a blue jewel. Take the blue jewel, then go further left through the door.

You'll see the Floda soldier from earlier. The man's name is Ian, and he will tell you that he has accidentally set off a trap and is caught in a cage. He will tell you that he also has the Crystal Skull, and that if you help him out of the cage, they can return with the skull. From here, you can ask Ian questions. To get over to where he is, you'll have to get past the giant snake first.

To the left is a statue pumping out steam. There is a mug, but you won't be able to take it, as it is fused to the statue. There is also a stone disc that looks loose, but if you try to pick it up, you'll burn your hand. If you use the hand puppet on the stone disc, you'll be able to get the stone disc.

From here, go back to the room you dropped down to and use the lever. You'll get whisked back up to the room where you met the guardian. Go through the center door and you'll end up on the upper level of the room to the right. Use the stone disc on the spindle, then place the vines on the stone disc. It will be loose at the bottom, however, so go back and enter the door on the right to use the loose vines on the pulley. As for how to get the pulley, you'll need to use the bat that has been in your inventory the whole time on the notch to turn it and move the stone slab out of the way. On the other side is a pick. Pick it up, then go back and use the bat on the notch to pull the stone slab back down.

PrinceWatercress plays Flight of the Amazon Queen - Part 14 of 19


I could have caught that bug a lot easier. Oh, well. Anyway, time to head to Sloth Island, which is going to be the hardest part of this whole game.


Give the beetle you caught with the net to Charon to give him some bait. Charon will finally catch a fish, then he will give you a ride to Sloth Island as soon as you give him the word. You can ask him if he knows stuff about Floda and Sloth Island, and you can find out that he has been ferrying people from Floda over to the island for the last month and that nobody has returned. You'll also find out that Sloth Island is the tip of a submerged mountain and that the temple is deep into the mountain.

Go ahead and go to Sloth Island. Once you make it there, Charon will leave you there. Go into the entrance. You'll be in a room with two doors, and the statue on the left will have a slot and three lights - red, yellow and green. If you go through the doors, you'll go in a circle around the temple and find a couple of mummies that looks like they are about to break apart. If you pick up the mummies, they will crumble, and some of them will leave bones that you can pick up. You'll also find the dino rat, which has somehow made its way to the temple. There are four that you can get: a leg bone, an arm bone, a rib and a skull. If you give the dino rat a Cheez Bit, it will eat the Cheez Bit and run away. Go back to the room where you came in from and place the four bones where they should be on a skeleton in the holes in the center of the room. Of course, when you try to place the arm bone where it should be, the game will not let you. Instead, put it in the socket of the statue, then use the arm bone. Use one of your coins on the slot in the statue, then use the arm again. The lights will flash and you'll hit the jackpot, then you'll open a door where the skeleton was. Joe will then take the arm bone back.

Go through the door. You'll drop further into the temple and you will encounter a spirit which asks "What walks at four legs at dawn, two legs at noon and three legs at dusk?" Obviously, the anser is man, but you don't have that answer as an option. Ask the spirit who it is, and you'll find out she is the temple guardian. You'll eventually have to answer the question, and once you do, you'll get another shot. This time, you can select "It's man in the three stages of life." From here, you can go through the last of the dialogue options and access more of the temple before the guardian teleports out. Three doors will open up here.

The left door will take you to a large white snake blocking a door. If you try to go through the door, the snake will hiss at you and block your path. You'll have to come back later.

Go back to where you dropped down, and this time, take the right door. Without knowing how to deal with the pulley, you can only go through the door and end up on a bridge, where you'll find another Floda soldier. Joe King will try to get his attention, but he will walk away. Go east on the bridge you are on and you will find a dead body of a Floda soldier and three zombies.

PrinceWatercress plays Ratchet and Clank - Part 38 of 38


In this entry, we play New Game Plus Mode for the last five Gold Weapons and get all of the unlockables.


Once you make it to Novalis again on New Game Plus mode, there will be a teleporter at the start that was not there before. If you use it, you'll enter a chamber where you can get all ten gold weapons.

The Gold Tesla Claw has more range and more power, and you can also attack more than one enemy.

The Gold Devastator has a more powerful shot that splits into multiple homing shots to hit multiple enemies.

The Gold Mine Glove has more range and more power, and moves towards enemies from further away than usual.

The Gold Morph-o-Ray morph things in less time and produces bigger chickens.

The Gold Decoy Glove creates a different decoy (Ratchet with red eyes and a devilish smile) that explodes when an enemy comes into contact with it.

When you have everything you'll get a "Making Of" Video and the commercials. Interestingly, the "Making Of" video has pre-final footage of the game, which makes it worth checking out. You'll also get the full sketchbook and epilogue, too.

And with that, there's everything to Ratchet and Clank!

Controls

As Ratchet: 

Control Pad/Left Analog Stick: move
Right analog stick: move camera

When hanging off platforms:
  • Control Pad/Left Analog Stick: move
  • Forward+X: vault up
  • Back+X: drop down

X: Jump and double jump
  • R1: stomp (must have Thruster-Pack)
Square: strike with wrench
Circle: pull out/shoot currently equipped gun/use gadget
Triangle:
  • quick select (hold and use in conjunction with Control Pad or left stick to switch guns; menu can be customized in Quick Select on the pause menu
  • double tap to switch between two most recently used Circle button weapons/gadgets

Select: Map
  • Left stick/D-Pad: move map
  • Right stick: Zoom in/out
  • X: view missions
  • Circle: play Infobot for planet
  • L1: previous map
  • R1: next map
  • Triangle: Exit
Start: Pause menu
  • Control Pad: select option
  • X: confirm option choice

L1: tap to quickly center camera; hold for first-person view (hold button and use left stick or D-Pad to look around; let go of L1 to move camera back behind Ratchet)
  • Square: wrench boomerang
  • Circle: fire gun
L3: see health and Bolt totals
R1/R2: crouch (hold down)
  • Square: wrench boomerang
  • Left+X or Right+X: side somersault
  • Down+X: backflip
  • X (while running): long jump (must have Heli-Pack/Thruster-Pack)
  • X: high jump (must have Heli-Pack/Thruster-Pack)
  • Double tap: hover (must have Thruster-Pack equipped)
    • L2: strafe left (while hovering)
    • R2: strafe right (while hovering)
    • X: exit hover mode (while hovering)

In water:
  • Square: dive and descend
  • X: surface and ascend
  • R1: turbojets (must have Hydro-Pack)

Trespasser:
D-Pad or Left Analog Stick:
  • Up and Down: switch rings
  • Left and Right: rotate rings
Triangle: leave Invinco-Lock screen

As Clank:

Control Pad/Left Analog Stick: move
Right analog stick: move camera

When hanging off platforms:
  • Control Pad/Left Analog Stick: move
  • Forward+X: vault up
  • Back+X: drop down

Square: punch
X: Jump (press and hold in the middle of a jump to glide with Heli-Pack)
Triangle: command menu (hold and use in conjunction with Control Pad or left analog stick to choose commands)

Thursday, June 24, 2021

PrinceWatercress plays Flight of the Amazon Queen - Part 13 of 19


In this episode, we take care of business in Floda Inc., but things soon go from bad to worse.


After giving Klunk the Chef's Surprise, call him a major league weenie again. This time, you'll knock Klunk out and you can enter the nearby door. Do it.

You'll be in Dr. Ironstein's office. Look at the notepad on the desk and use the pencil you found in the lobby on it, you'll find the combination for a safe. Joe will tear the page out and put it in the inventory.

If you want, you can go back to the room with the lone green file cabinet and the notes on the desk in the corner. There are four different notes you can read. Also, move the cabinet. You'll find the safe. Use the safe combination on the safe to open it up, then open the safe and look inside. You'll find a padlock key and plans for some sort of rocket pack.

Go back up and go back outside to where the entrance is. Use the squeaky toy on the guard dog to keep the dog occupied, then open the door. You'll be in a storage shed with a locked crate at the bottom. Use the padlock key on the padlock, then open the box. Look inside, and you'll find the rocket pack and put it in the inventory. It's out of gas at the moment, however.


Leave the storage shed and go to the pinnacle. You're done at Floda Inc. Head to the Amazon village and go to the throne room. Joe will automatically talk to Princess Azura, who will reward you with a Tyranno Horn, which makes the sound of a Tyrannosaurus Rex when blown into. Suddenly, Dr. Ironstein shows up, having followed Joe King out of the camp, and shows up with two guards. Dr. Ironstein mentions a crystal skull hidden deep with in an ancient temple on Sloth Island, and demands that Joe King get it for him or else he turn the entire village into dinosaur people. Dr. Ironstein promises to release the villagers if Joe gets the skull.

From here, you'll need to return to the pinnacle and head for the jetty. On the way there, use the net on the beetle at the waterfall to catch it.


This time, you'll see a man in a black cloak fishing. If you talk to him, you'll find out that his name is Charon. Yes, the ferryman of the dead. When it comes time to ask him if he is fishing, do it. Charon will tell you that he has had trouble catching fish. Ask him what bait he is using, and Charon will realize he is not using bait. Joe King will work out a deal where if he gives Charon bait, he can get a ride to Sloth Island. 

PrinceWatercress plays Flight of the Amazon Queen - Part 12 of 19


We finally find and free Princess Azura, but we're not done in Floda Inc. just yet.


Enter the fire exit. You'll be in the maze room where Dr. Ironstein and Anderson met. You can look at things here, but there is one thing in particular worth mentioning: the Super Weenie Serum. Looking at it will reveal it is the antidote for the Super Soldier Serum. Take it.

Go up the stairs and you'll meet Princess Azura. By talking to her, you'll find out that Floda guards ambushed her while she had none of her personal guard around. She will also tell Joe King about Dr. Ironstein's plan to turn Amazon women into dinosaur people and enslave the world. She'll also hint that the guard who took the key is a real bookworm (it's Henry). You'll also find out Wedgewood the parrot is an excellent mimic.

Take the key you found on the prison door to free Princess Azura. You'll then see a cutscene back at the crash site where Sparky worries about Joe, then you'll be in the lobby with the alarm set off. Use the mannequins, and Joe will turn off the lights and hide behind the mannequins. One of the guards will show up and use the buttons on the security panel. To use the panel, talk to Azura and ask her if she saw the guard enter the door code, and she will tell you what it is. Use the panel again, and Joe will automatically enter the code, allowing you to get out. Princess Azura will head back to the Amazon village while Joe stays behind.

Go back to the lobby and get the pencil, then go back to the underground corridors. If you haven't done so yet, use the can opener on the dog food, then use the Super Weenie Serum on the dog food. You'll have the Chef's Surprise. Give it to Klunk.

PrinceWatercress plays Ratchet and Clank - Part 37 of 38


It's time! We head to Veldin and take down Drek. Once we do, space will be free from this corporate planet destroyer and both Ratchet and Clank will be able to breathe more easily...until the next game...

Kyzil Plateau - Veldin

Hey, this looks just like Veldin the first time we were here! The only difference is that it's a little darker, and there are a lot more enemies.

The frogs return from the first time around, but you now have bounty hunters on jetpacks flying around called Elite Guards. If you can hit ten of them with the wrench by jumping up and hitting them with it, you can get a Skill Point. They shoot at you three times before waiting to shoot at you again, so keep that in mind if you want that Skill Point. If you die at any point, the game keep track of how many of these guys you've defeated with the wrench, making getting this Skill Point easier. If you've done everything thus far, this is the last Skill Point of the game.

Use the Visibomb and/or Devastator to take out the flying ships and the tanks.

7:18 - For the inner ring on this Invinco-Lock, you'll need the lasers on both 6 o'clock and 9 o'clock. These are the only ones that won't hit anything. For the middle ring, you'll need the lasers on 1 o'clock and 11 o'clock, with the blocker at 6 o'clock. For the outer ring, you'll need the lasers at 4 o'clock and 8 o'clock, leaving the blockers at 11 o'clock and 1 o'clock.

12:07 - Use the Taunter to get the enemy on the switch. When the force field is down, you'll be able to enter and pick up a Gold Bolt.

14:30 - When you see these Versa-Targets, look around. You'll find some platforms. Jump from one platform to another for a Gold Bolt.

16:04 - For the inner ring, you'll need the lasers at 1 o'clock and 11 o'clock, leaving the blocker at 8 o'clock. For the middle ring, you'll need the laser at 9 o'clock and the blocker at 1 o'clock. For the outer ring, You'll need the lasers at 10 o'clock and 12 o'clock.

20:06 - You can glide from the platform here to a rail that takes you to the final Gold Bolt in the game.

At point, you will see a giant group of flying ships and Elite Guards. Don't fight them yourself; instead, take the nearby tunnel to the side. Using the Hydrodisplacer, you can find a path to another size increasing pad that turns you into Giant Plank, allowing you to destroy virtually everything and everyone. This path leads to the final battle with Drek.

When you meet Drek, you'll find out that he has a giant robot of his own. Keep jumping to minimize the amount of damage you take, then hit him with a laser before punching him until he goes down.

After the battle, Clank will be shrunken back to regular size with a shrink ray from Drek's robot. From here, you'll need to use the Swingshot to get from one platform to another. There is a Gadgetron Vendor before you get moving, so if you need anything, now is the time to do it. When you get on a platform, be ready to jump off and use a Swingshot.

While you can fight Drek with a bunch of weapons, you're better off using the R.Y.N.O. to make everything a lot easier, as Drek will shoot a lot of missiles that produce fire rings and drop a lot of mines. When you wittle down enough of Drek's health, he will shoot the ground you are on with a big blue laser, breaking it apart. From here, you'll have to do it again. He will have much of the same attacks as last time, but you can also refill a little bit of your health here. Once again, whittle down his health with the R.Y.N.O., and you'll have to chase after him yet again.

When you chase after Drek following the second Ratchet phase of the battle, watch out with the last platform. It drops before you even have a chance to get on it, so use the Swingshot to get to him instead.

For the third Ratchet phase, Drek will press an ignition switch that will start a countdown leading to the destruction of Planet Veldin. You'll also find out that Drek is doing this simply for the cash, polluting world after world and getting paid for every square inch of the world that he creates, and that once the new world is made, he will pollute the planet until it is ruined, then start the whole process over again for more money.

When the battle begins, you will need to get to the red switch in the center of the platform as soon as possible, jump on it, jump up and press R1 to slam it down. From here, stay close to Drek (but not too close) and keep firing at him with the R.Y.N.O. Even if he is chasing you down and you happen to be close to him, you can still hit him with the R.Y.N.O.'s homing rockets even while you're running away. Every so often, Drek will start the countdown again. When that happens, get back to the switch and slam it with the butt stomp maneuver from earlier. Stay close to the switch, avoid Drek's missiles, and hit the switch whenever Drek goes back to start the countdown again.

When you beat Drek, he will be inadvertently launched onto a switch that turns the Planet Destroyer around to face his own new planet, and he will then be launched into his own planet. From here, you can hit the green switch the same way you did the red one to shoot the laser and destroy Drek's new planet. With this, Drek is dead, and so is his planet scheme. As the remnants of Drek's planet rain down, both Ratchet and Clank are hanging by a thread off the edge of the platform. Both of them drop down to safety, but the servos in Clank's arm are broken. Ratchet and Clank seemingly go their separate ways with their mission completed, but Ratchet tells Clank to come back so he can fix his arm. He does, and they walk back to Ratchet's workshop. The credits then roll.

After the credits, you'll get a post-credits scene of Captain Qwark selling the Gadgetron Personal Hygienator to disastrous results. From there, you'll see how many of the Gold Bolts, Gold Weapons and Skill Points that you got. If you've followed the directions of this blog series from beginning to end, you'll have all but five Gold Weapons. You'll also get a choice between starting on your last save or starting a new game with your current weapons and Bolts. We're going to start New Game Plus mode, but only to get the last five Gold Weapons.

When you start New Game Plus, you'll get the "Goodies" menu when you pause the game. You can see what Skill Points you've gotten, the credits, any cheats you have unlocked via button presses, all the cutscenes, and - if you've gotten enough Gold Bolts and Skill Points - concept art and the epilogue. There are also two more unlockables that you get if you get the Gold Weapons as well as everything in the game.

Controls

As Ratchet: 

Control Pad/Left Analog Stick: move
Right analog stick: move camera

When hanging off platforms:
  • Control Pad/Left Analog Stick: move
  • Forward+X: vault up
  • Back+X: drop down

X: Jump and double jump
  • R1: stomp (must have Thruster-Pack)
Square: strike with wrench
Circle: pull out/shoot currently equipped gun/use gadget
Triangle:
  • quick select (hold and use in conjunction with Control Pad or left stick to switch guns; menu can be customized in Quick Select on the pause menu
  • double tap to switch between two most recently used Circle button weapons/gadgets

Select: Map
  • Left stick/D-Pad: move map
  • Right stick: Zoom in/out
  • X: view missions
  • Circle: play Infobot for planet
  • L1: previous map
  • R1: next map
  • Triangle: Exit
Start: Pause menu
  • Control Pad: select option
  • X: confirm option choice

L1: tap to quickly center camera; hold for first-person view (hold button and use left stick or D-Pad to look around; let go of L1 to move camera back behind Ratchet)
  • Square: wrench boomerang
  • Circle: fire gun
L3: see health and Bolt totals
R1/R2: crouch (hold down)
  • Square: wrench boomerang
  • Left+X or Right+X: side somersault
  • Down+X: backflip
  • X (while running): long jump (must have Heli-Pack/Thruster-Pack)
  • X: high jump (must have Heli-Pack/Thruster-Pack)
  • Double tap: hover (must have Thruster-Pack equipped)
    • L2: strafe left (while hovering)
    • R2: strafe right (while hovering)
    • X: exit hover mode (while hovering)

In water:
  • Square: dive and descend
  • X: surface and ascend
  • R1: turbojets (must have Hydro-Pack)

Trespasser:
D-Pad or Left Analog Stick:
  • Up and Down: switch rings
  • Left and Right: rotate rings
Triangle: leave Invinco-Lock screen

As Clank:

Control Pad/Left Analog Stick: move
Right analog stick: move camera

When hanging off platforms:
  • Control Pad/Left Analog Stick: move
  • Forward+X: vault up
  • Back+X: drop down

Square: punch
X: Jump (press and hold in the middle of a jump to glide with Heli-Pack)
Triangle: command menu (hold and use in conjunction with Control Pad or left analog stick to choose commands)