Part nostalgia-bomb, part note-taking and part FAQ, what started in GameTrailers as a video game blog is now on Blogger. This blog is a look back at video games, both popular and obscure, from the video game industry's infancy all the way to the previous console generation.
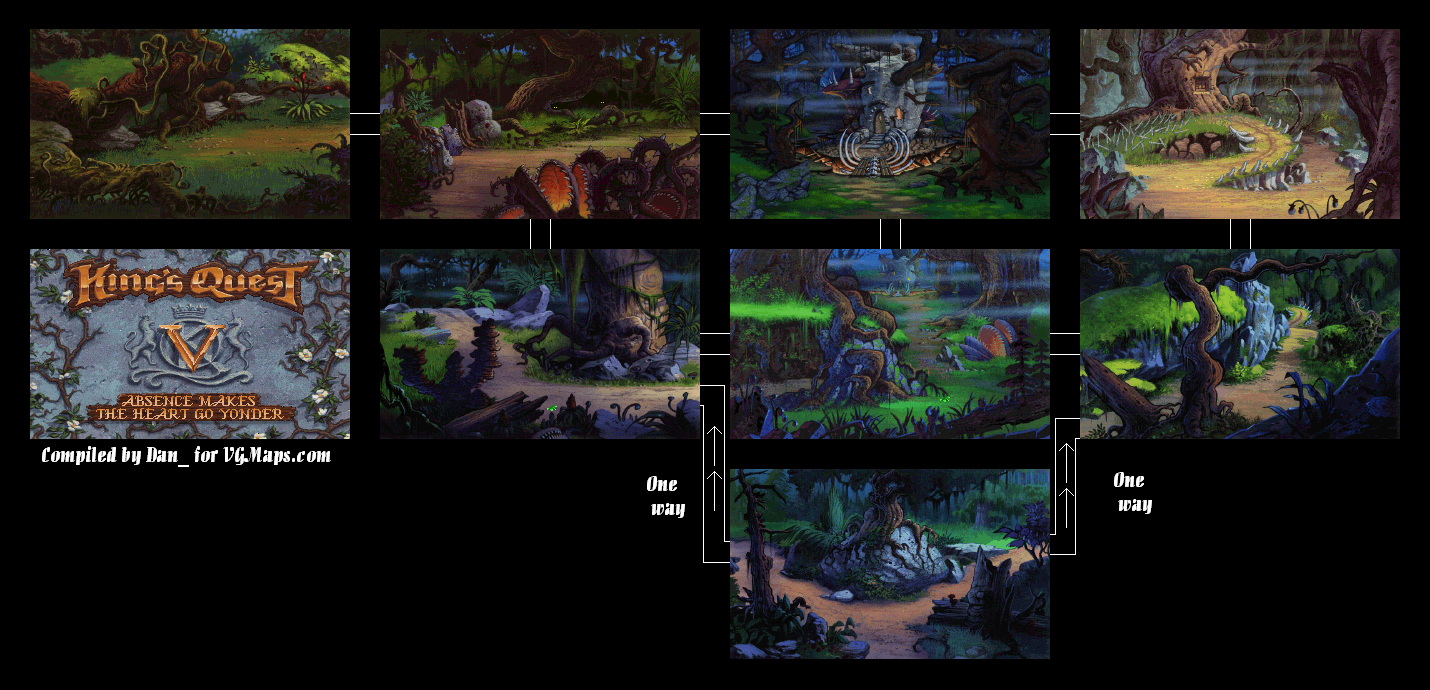
Here's an asinine thing to do here: put the emeralds on the ground. Yes. Use the emeralds on the forest path. Graham will throw an emerald to the ground and an elf will come by and pick it up before scurrying back into the shadows. Throw another one down, and the elf will come back and get it.
Now for the third emerald. Before you do this, though, use the honeycomb on the floor. Graham will squeeze all of the honey onto the ground, which will collect into a puddle at his feet. The beezwax that used to hold the honey will come in handy later.
Throw the last emerald onto the ground. Graham will drop it in the honey puddle, but the elf won't be able to get away as he is stuck in the honey! Graham is able to catch him, and the elf has no choice but to agree to help Graham escape from the forest. The rock that blocks the path is actually a forest creature, who moves out of the way.
Go to the left, and you'll see the way out: a tight tunnel that Graham has to crawl through. At the other side, you'll meet the elf again. He'll give you a pair of finely-made elf shoes. He then directs you to the way out: a tunnel to the right near the ladder we just climbed down from. Congratulations. You're out of the dark forest. You can go back through this tunnel if you have to go back for something, but if you did exactly as this guide has said, you won't have to return there ever again.
Head back to the weeping willow and give her the heart. She'll transform back into a human and she and her fiance will be able to walk off. She's also left her harp behind. Take it. Apparently King Graham can play the harp (even though the game doesn't let us hear a note of it), so the joke of the royal family being musically inclined from Dilandau's LP of the last game must hold true.
If you go west of where the weeping willow was, you'll find out that the fortune teller's wagon is gone. There is a tambourine on the ground in its place. Take it.
Head back to the gnome's house and give the spinning wheel to the gnome. He'll tell you that it can turn straw into gold - a reference to Rumpelstiltskin. He lets the boy give you his marionette before they go to the forest to gather wood for a new one.
To the south of the gnome's house is the inn. If you reached into the haystack before, you'd have found nothing. Try again this time. Since you've saved King Antony earlier, they join in the search. Your reward? A golden needle.
Head to the entrance to the Dark Forest...and go in.
Wow, is Cedric ever so useless.
The witch shows up on a random screen, but this time, we've got the amulet on. (You'd better have it on.) If the witch hits you with the magic spell that turns you into a frog, it will have no effect. She'll teleport away in surprise.
There will be a tree with a door in it, but you won't be able to open the door just yet. Don't fret. We'll find out how to open it soon enough. Oh, and you have to walk around the tree to the left to go left from that screen to the witch's house.
The witch's house is a far cry from what we saw from the first game. A gingerbread house, this is not. If the witch hasn't appeared yet, she will here. She'll hit you with the frog spell, but we've got the amulet equipped. So much for that.
If you talk to the witch, the voice acting gets somewhat better for some strange reason. Of course, Graham still has that smile on his face. Of course, you'll also find out that you'll have to leave in a different way than when you came in...so getting back to the fork in the road at the entrance to the forest is a moot point. The game won't even let you do this if that happens.
The witch will still stay put after you talk to her, blocking the path to her house. Thankfully, we have a way to get rid of her. Give the witch the brass bottle. Instead of the genie rubbing you out (pun somewhat intended), the genie will put the witch in the bottle, and both the bottle and the genie will disappear.
Enter the house. Use the hand on the small drawer just to the left of the entrance. You'll find a small leather pouch. Take it. Go to the inventory and use the hand icon on the pouch, you'll find out there are three sparkling emeralds inside.
Use the hand on the chest to the right of the entrance and Graham will find a small spinning wheel inside. Take it.
Use the hand on the incense burner hanging above the chest, as there is a tiny gold glint that appears from it. You'll get a key! You're done in here, so leave the house and go back to the tree with the door in it. Use the key on the door and you'll find the gold heart! Take it back to the weeping willow!
Well, we could, if we could get out of here. Go west of the witch's house. You'll see eyes spying on you. Hmmmm...
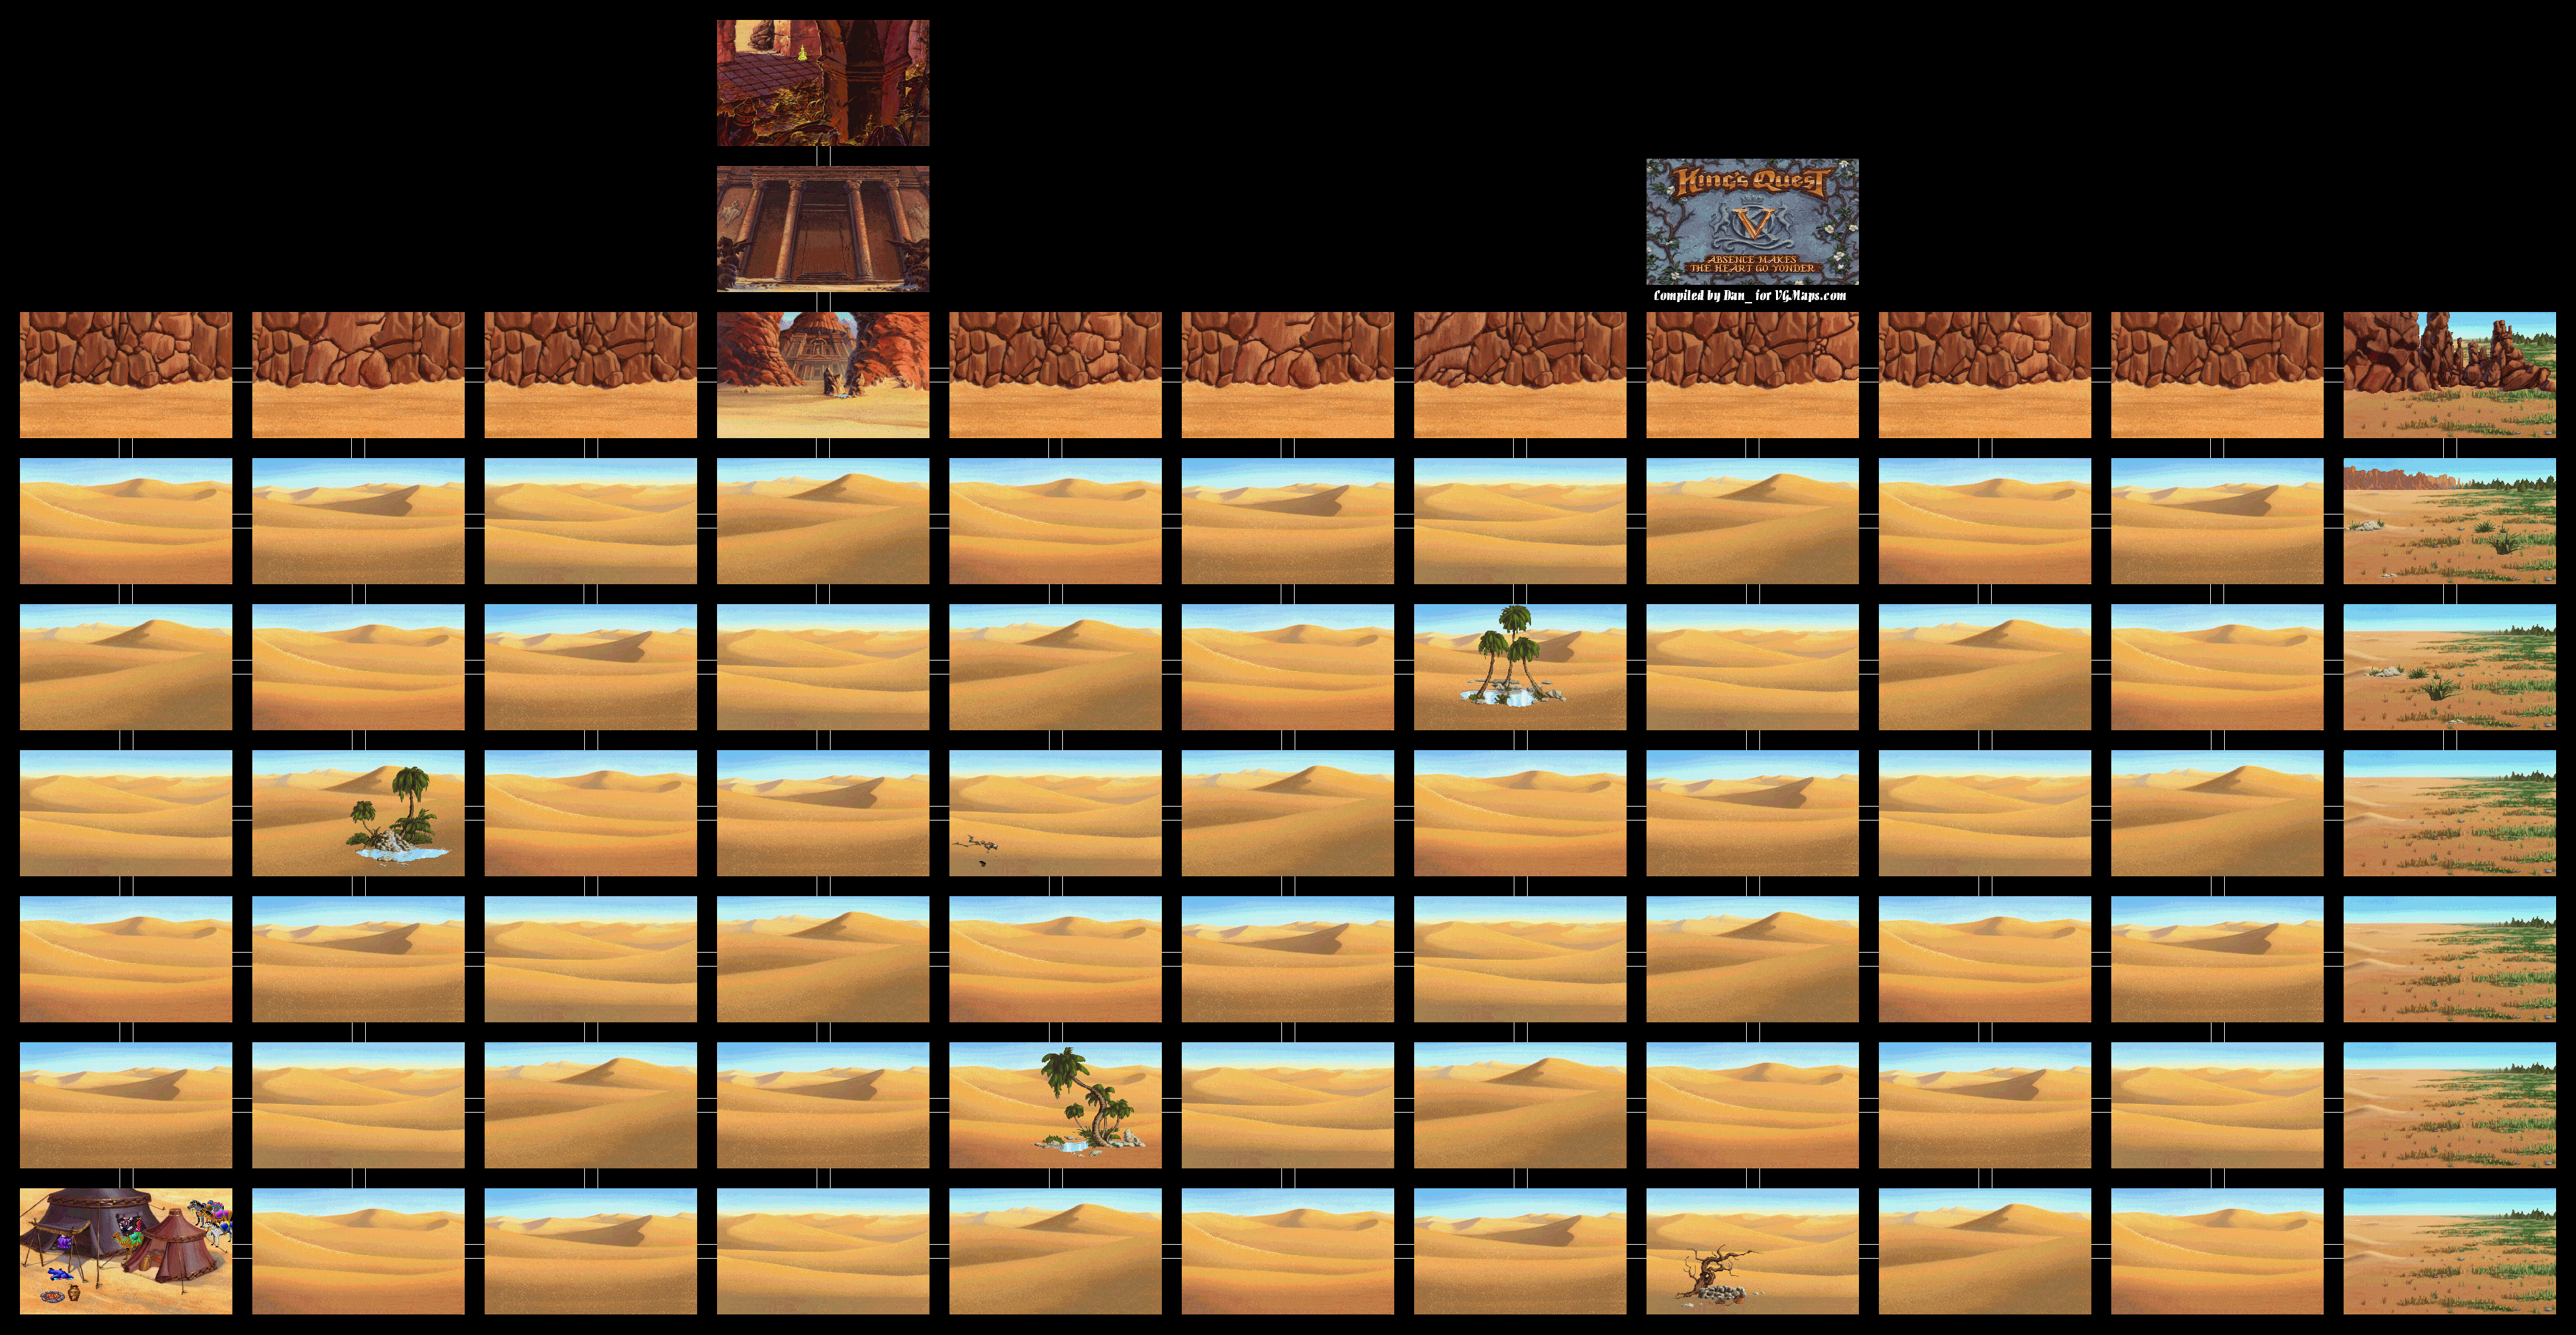
Go three screens north and two screens east. (You can switch these around, if you wish.) Drink from the small oasis, then go to the temple and use the staff on the door. The staff will break. So much for that. Go in.
Take the gold coin and the brass bottle to the right of the door, and quickly. If you don't get out fast enough, you'll be trapped in here and the game will end. DO NOT USE THE HAND ON THE BOTTLE. YOU WILL DIE.
Drink from the small oasis near the temple, then go all the way west until you're out of the desert. Thankfully, you'll never have to go back there for anything else.
Luckily, we're at the fortune teller. Give the gold coin to the man near the door, and you'll meet Madam Mushka. You'll gaze into the crystal ball. The castle is shrunken down and inside a bottle, and we see Mordack dangle a shrunken Alexander near a black cat. The black cat is Manannan from the third game, who is Mordack's brother! Mordack threatens to feed the entire royal family to the cat, starting with the queen if Alexander doesn't change him back. (Also, it's pretty clear now that Alexander changed Manannan into a cat on purpose.)
Madam Mushka gives you an amulet, which will protect you against all but the most powerful magic.
You'll be outside the fortune teller's wagon after this conversation. Take the amulet from your inventory and use it on King Graham in order for him to wear it. You'll need this later.
I know what you're thinking. What's with this skeleton? Well, there's a shoe near the skeleton. Take it.
Go one screen west and three screens north. You'll find a towering temple here. Drink from the pool of water. From there, you'll want to hide behind the rocks when you hear the hoofbeats so that the bandits don't kill you. Make sure Graham can't be seen. You'll see one of the bandits enter the temple by saying "Open sesame!" and knocking on the door with a staff, then going in, taking something and getting out. They'll both leave, and you'll be able to continue on your journey from there. You won't be able to enter the temple yet, so don't even bother.
Go two screens west and three screens south. Drink from the oasis. Go three screens south and one screen west. IF YOU GO NEAR THE LARGER TENT WHILE THE BANDITS ARE PARTYING, YOU WILL DIE. Instead, enter the smaller tent.
There is a man sleeping here, as well as the staff. IF YOU GET TOO CLOSE TO THE SLEEPING MAN, YOU WILL DIE. Take the staff, then get out of the tent. Use the hand on the large clay pot near the fire pit to drink the water out of it.
Head east, then go three screens north. Drink from the oasis.
With the forest being unexplorable for the time being, go west from the dark forest entrance. You'll meet a weeping willow with a harp. If you talk to Cedric, the weeping willow will change her facial expression, the music gets slightly louder, and the willow actually sings!
The lyrics aren't just for show, however: the weeping willow has lost her heart, and we have to find it for her. Of course, if you talk to her, you'd have found that out anyway. Turns out the witch wanted the prince for herself, and turned his fiancée into a weeping willow, turned her heart to gold and ran off with it when he refused the witch's advances.
To the west is a fortune teller. You won't be able to do much of anything yet here. You need a gold coin in order to get past the guy guarding the tent and see Madame Mushka.
This is almost all of Serenia...which means we'll have to explore the desert.
We'll start off from the northeast corner of the desert, as Dilandau decides to enter from there.
Go four screens west and two screens south. Drink from the oasis by clicking on it with the hand. (The speech from drinking the water is changed in the NES version, due to the "gods" reference.)
Go south one screen and west two screens. You'll find a skeleton.
Now that you've gotten rid of the bear, you'll notice a stick close to where the bear once was. Take it.
To the west of this screen is the desert. If you go south from here, you'll be killed by a scorpion. Yeah, that's a pretty bad beginner's trap.
Don't go to the desert. Instead, go north of where the bear was. You'll see a giant ant hill, and a dog is clawing at it. Use the stick on the dog to lure it away from the anthill. King Antony the Great of the ants will thank you, and offers his assistance to you if you need it.
To the east of this screen is the gnomes' house. The gnome's grandson is playing with a marionette. If you talk to the gnome, you'll find out that it'll take some work to get the marionette.
To the east of this screen is a prince sitting on the log. If you talk to him, you'll find out that his fiancee has gone missing, and that the wicked witch in this land might be involved.
Going east again takes you back to the intersection with the snake, so go north. This leads to the entrance to a dark forest. You won't be able to do anything, as the witch will instantly turn you into a frog and end your game.
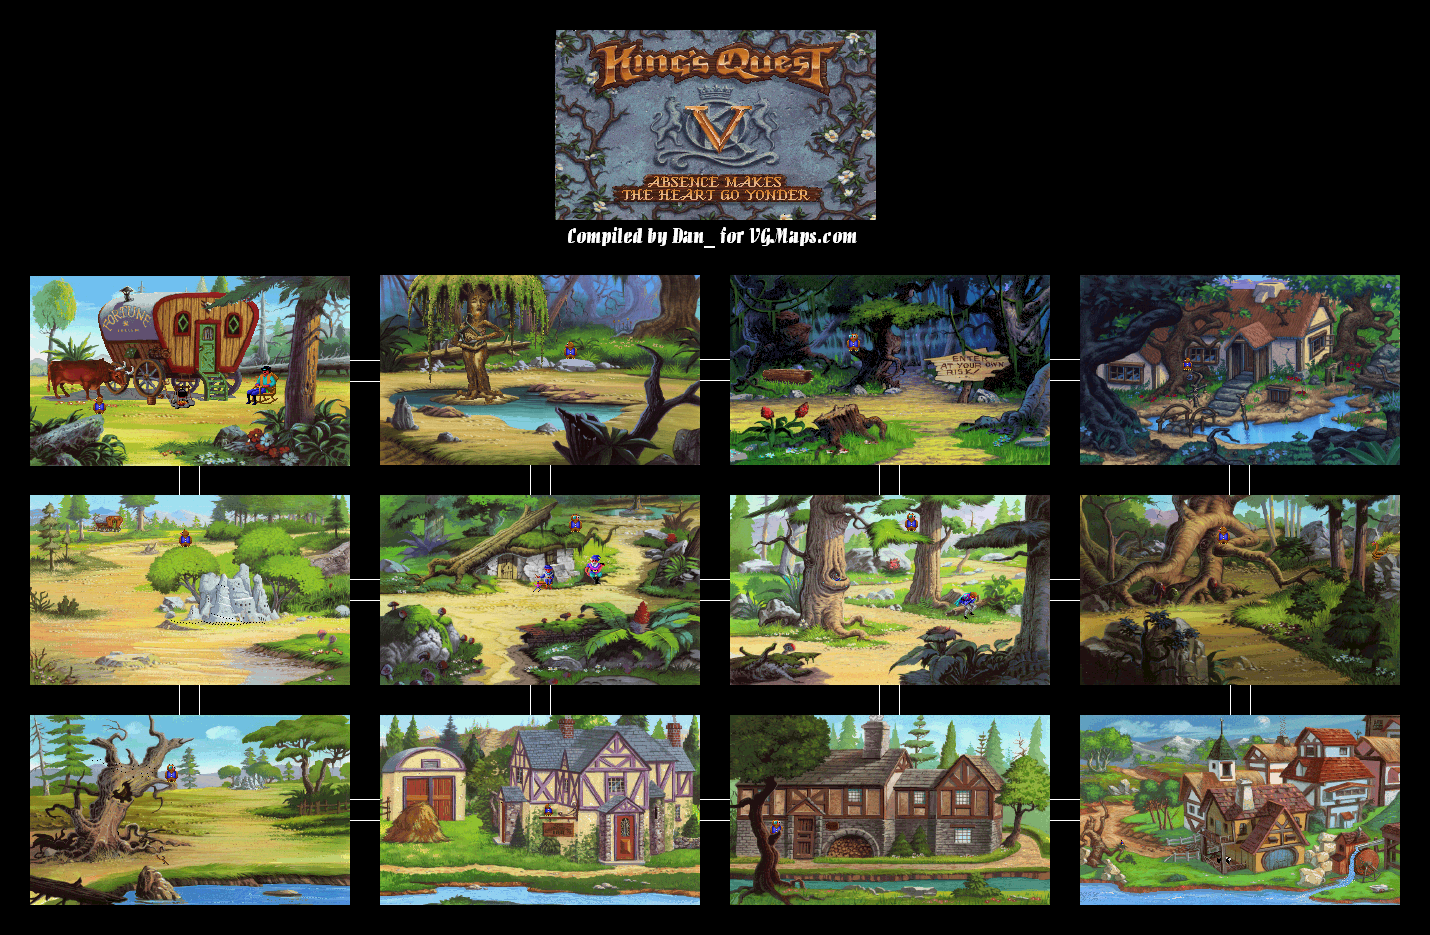
Leaving the town and going west from there will take you to a house outside of the castle. If you go inside, you'll find out it's a bakery. After some unintentionally bad voice acting (all the voice actors are Sierra staff), you'll find out that you can get a custard pie for only one silver coin. Go ahead and give the baker a silver coin for a pie. DO NOT EAT THE PIE. DOING SO WILL MAKE THE GAME UNWINNABLE.
To the west of the bakery is an inn. Talking to Cedric will have him inform you of the desert further west. IF YOU GO TO THE INN AND TALK TO THE INNKEEPER, THE INNKEEPER AND HIS GOONS WILL KILL YOU. There's nothing to do here at the moment.
To the west of the inn is a big bear near a tree. IF YOU INTERACT WITH THIS BEAR, YOU WILL DIE. Instead, use the fish on the bear. The bear will leave the tree alone, grab the fish in his mouth and leave. Queen Beetrice, one of the bees near the tree, will thank you for saving their hive from the bear. In return, she lets you reach into the tree and grab a honeycomb. Use a hand on the hole in the tree and do just that. You'll need it.
You can use the eye to read the signs above the doors. The door near the man fixing his wagon says "Tailor." Use the hand to open the door.
You can talk to the tailor if you want, but it doesn't lead to anything useful being done. Here, you'll see some guy trying to cater to the whiims of a pushy customer. If you use the hand on the cloak to the right, the tailor will try it out for you. It will fit Graham perfectly. You'll have to buy it to get it, but you'll need it, so keep this item in mind for later.
When you leave the tailor's shop, you'll notice the guy near the wagon is gone, and something shiny is in his place. Use the hand on it. It's a coin! Graham will take the coin. This will definitely come in handy later.
To the right of the tailor's shop is the toymaker's shop. You'll see the toymaker's son in the back, as well as his granddaughter playing with a doll to the left, wishing she could keep the doll. You'll see a sled to the right, but you won't be able to get it just yet.
The door at the other end of town is the cobbler's shop. Sadly, they have nothing to sell, and their business isn't doing so well as of late. If only we could help them...
Unlike the past four games, where commands are typed in, everything is now done in a point-and-click interface. You can choose a command, and then click on something to perform your chosen command on it, such as looking at an object or talking to a person. The inventory works the same away, with the item you've chosen working as the cursor.
If you go back to Crispin's house, he'll tell you there's nothing more he can do and that he has an emergency to attend to in another land.
To south is a fork in an intersection. To the east is a snake. DO NOT APPROACH THE SNAKE. YOU WILL DIE. If you use your hand on it, though, it will tell you to stay away. Nice touch, Sierra.
Talking to Cedric at this intersection will tell you the path the snake is blocking is the road to Mordack's castle. We'll have to find a way around the snake. Talking to Cedric again will reveal that the town is just further south.
The town is pretty nice, but the NES version's rendition is nothing compared to what it looks like here. To enter the town, just walk into it. Cedric will stay outside and wait for you to return. DO NOT WALK INTO THE RIVER TO THE SOUTH. YOU WILL DIE.
You won't be able to do much with the guy fixing his wagon near the town entrance.
The barrel near the entrance contains a fish. Reach into the barrel by clicking on it with the hand icon so the barrel's contents show up in the corner of the screen. From there, click on the fish.
I know, I know. I've covered this game a long time ago. But that was the NES version, which strangely was the only NES port and one of the few console ports in the series' history. I've come so far with these games now that to not cover the original PC version would be a baldfaced tragedy to what I've done with the blog after all this time. So here it is.
The game begins with an evil wizard appearing out of thin air near the Castle of Daventry. He raises his arms and lightning surrounded the castle. A dark cloud causes the screen to alternate between light and dark as the castle disappears...and the wizard with it!
Meanwhile, King Graham, fair ruler of the kingdom of Daventry and the patriarch of the royal family, is out for a walk when this happens (adventurer's cap and all) only to return to his home and find it missing. A talking owl named Cedric flies out of the tree and tells you that the evil wizard Mordack has cast a spell on the castle, causing it to disappear. With a sprinkle of fairy dust, he takes you to Serenia, where he and his master Crispinophur (Crispin for short) live.
You'll land with a dull thud in the shallow water, near Crispin's residence. You and Cedric will both go inside. Crispin will tell you more about Mordack, then he gives you a piece of magical white snake which lets you speak to the natural and animal world's inhabitants. He also gives you an old wand and asks Cedric to guide you before he sends you on your way.
Unlike the NES version that I covered a good while back, the wand is needed to get past the copyright protection. Thankfully, this is the CD version we're looking at, which did away with it. After all, nobody thought we'd have CD burners around the end of the decade or so.
Once you leave the house, Cedric recommends visiting the town first. After this, you finally have control of the game.
Oh, come on. Did you think I was gonna leave you hanging when it came to this? Anyway, here's the entirety of Duel Mode, where somebody gets through it with Gilius Thunderhead without taking any damage.
Time to finish what we started and save the kingdom from the true evil!
Stage 8: Death Bringer
This battle is pretty nasty. Death Bringer not only has the ability to shoot multiple shockwaves out in multiple directions, but he also has some of the spells that the main characters have such as the explosions and the purple dragon that breathes a massive flame (which isn't even seen here). The magic attacks that take the whole screen and stop the action are mercilessly cheap and are unblockable, so you'll have to keep Death Bringer down as much as possible to keep him from using these attacks.
Use your magic to do damage to both the skeletons and Death Bringer, and hit Death Bringer with your running downward stab as you take out the skeletons. His flunkies take a lot of damage, but they can be brought down. When you kill the skeletons, taking out Death Bringer is much simpler.
When you defeat Death Bringer, his own axe will be knocked into the air and will land blade-first into his chest (minus the blood). You've won!
You'll fight off some thieves to build up your magic, then you'll take on two regular enemies and one of those hammer-wielding barbarians. Once you finish those guys off, you'll take on Death Adder himself. This guy not only attacks you with an axe, but he can send magic shockwaves across the floor in an attempt to hit you from a distance. The skeleton flunkies that he has doesn't make things any easier.
Your best bet is to take out the skeletons first. From there, you can take out Death Adder. Jump over the shockwaves when he extends his hand forwards, and approach him diagonally to keep from being whacked by Death Adder's axe.
When you finally win, you'll rescue the King as well as the Princess. But...this isn't the arcade version. Turns out, there's more than just Death Adder. You'll have to go deeper into the castle to take out who he's been taking orders from...
As we head further down the Fiend's path, the enemies are going to get harder.
Stage 4: Fiend's Path 2
This is the first stage in which the skeletons show up as regular enemies and not as boss minions. Unlike other enemies, they can run up to you, leap forward and try to hit you with a downward stab.
Halfway through the stage, you'll see feathers flying through the air. If it's not apparent to you, you're now on the back of a giant bird.
The bosses here are all-black versions of the normal enemies. These guys are pretty smart and will try to surround you. Be sure to use your rear attack if you need to and keep these guys on one side.
Stage 5: Giant Eagle
Be sure to head to the bridge below (don't fall off) and knock the skeletons off the left edge.
The bosses are two of those fully armored evil knights that are similar to the one in Stage 3. These guys will be in red armor and take more damage to destroy. If you've hijacked the blue dragon halfway through this very short stage, you can attack them just before they can attack you.
Now that we have two players again, let's continue.
Stage 2: Turtle Village (continued)
The blue dragon is pretty awesome. If you can get the guy riding it off and steal it from him, you can breathe fire on the ground, roasting the feet of anyone in front of you. The pink one is even better, and even breaks the game, as you can get the dragon to spit real fireball projectiles. You can hit people from far away as cheaply as possible as long as you're still on the dragon.
The skeleton warrior is a new enemy here. These guys have a lot of HP and you're definitely going to see them a lot as you progress through the game.
When you camp out for the night, you'll meet the Green Thieves. These guys carry meat, and if you take the meat, you'll regain one bar on your health meter.
Stage 3: Fiend's Path 1
The big barbarians from the end of the first show up near the end as regular enemies.
At the end, you'll face a guy with a huge sword, a huge shield and full armor. These guys have some reach with their swords.
You'll get the chance to get even more magic and health refills when you camp out at the end of the stage. You have two thieves of each color, which works well even in two-player co-op.
Death Adder has taken the King and the Princess prisoner. Villagers have been mercilessly murdered. Now Ax Battler, Tyris Flare, and Gilius Thunderhead are the only ones who can take down Death Adder!
Ax Battler is the average character, Gilius Thunderhead is a dwarf warrior, and Tyris Flare is an Amazon with a penchant for magic.
Stage 1: Path To Village
The enemies here are relatively weak. They can dash towards you and strike if you're far enough away from them, but those attacks are easily dodgeable. As long as you stay on the move, and strike whenever you can, you should be good.
The magic works as your special attack. Keep picking up magic pots to increase your magic. The more levels on the magic meter you have, the more damage you're going to cause to all enemies. Of course, if you use your magic, you'll have to refill your magic all over again.
Thankfully, you can get magic pots from the blue thieves. They scurry about and stand still for only a few seconds, giving you just enough time to hit them. When their sacks are empty, they'll run away. Most blue thieves will usually carry just two pots.
If you can unseat the enemy off of the Cockatrices - affectionately known by fans as "Chicken Wings" - you can attack by having the creature swipes its tail around. If it looks familiar, that's because this creature appeared in Altered Beast, which was also developed by Sega and ended up being a launch title in the West.
Just like in Streets of Rage, you can move in any direction, you have a standing combo, you have a special attack, and you have a back attack (Attack + Jump).
Unlike Streets of Rage, however, you can dash with any of the characters. However, you can't grab your opponents to throw them. To do that, you'll have to hit them with your standing combo to the point that you stun them, then get in close, then hold forward and press the attack button to throw the enemy.
The giant barbarians have kick attacks, and they can also hit you with their hammer. If you have one of the Cockatrices, use its tail swipe attack, and don't stand too far away. Otherwise, try to keep them next to other, approach them diagonally and don't let them surround you.
At the end of every stage, you'll have a chance to take on some more thieves and build up your magic power. Hit those guys for all they're worth and take the magic pots that they drop. There will be just one, but as you progress, there will be even more thieves on the screen at once. When you take them all down, it's on to the next stage.
Stage 2: Turtle Village
There's a pit to the left right at the beginning. If you're used to the enemies here, you can even trick them into falling into the pit just by getting them to use their dash attack and sidestepping out of the way in time.
Speaking of which, the enemies get a little faster and a little more powerful.
Geld is a nightmare. Here I can only give a few advices but they will not help too much. He is vulnerable when he prepares to use his Giga Storm. When he starts to do it strike him !!!ONCE!!! then quickly grab him.
The second phase of the battle where he can shield himself with green fire is the hardest one. Do not even think to approach Geld unless you are sure that he will use Giga Storm and not shield. When you throw him - use only the lower throw as he can break free from the other one. And make sure that Geld is near left border of the field when third phase begins. After that it is easy: wait until he spits, grab, repeat. He'll go down after three times.
Once again, I can't guarantee that it will work - this whole battle I relied only on my luck and intuition.
Giga Storm, of course, is the attack where Geld glows green and that huge swath of fireballs surround him on the ground. Giga Shield is just the green glow minus the fireballs.
Finally, here it is: the soundtrack to Violent Storm.
We finally face the green guy! Also, the final boss!
Museum
You'll take on a bunch of Ryukens and R. Ryukens at the start. Do yourself a favor and make sure you always throw one of them into any of the others to do more damage to them at the same time, as several Ryukens in a group can be deadly.
You'll have a couple of seconds to destroy some barrels and take what's inside before you go into the museum.
The pictures on the wall are of all the bosses in the game, especially the last two, who you're going to meet here.
Penta and Scramble are also Konami releases, hence why they're arcade machines here. You can destroy these machines, but be careful as they explode when you do.
Destroy the cage door to get a ring worth several thousand bonus points.
You'll meet the green guy at the end, and you'll finally fight him, too. This is Red Fredy, and if you thought he was pretty freaky to begin with, well...you're right!
Aside from the jumping and sliding kicks, he's got a spinning claw slash, a hair swipe and a dashing punch! Fight this guy much like you would Sledge, and stay on the move!
The gold armor to the left has meat that will refill your entire health if you need it badly.
When you beat Red Fredy, you'll face a boy. This boy, as much of a Frankenstein's Monster-stitch together as he is, grows in size and becomes a ferocious beast in seconds. The fireball he throws at you before his transformation is but a glimpse of what he can really do. (Yep, this is the "person you'd least expect to be the final boss" trope that Final Fight kinda threw around with Belger.)
If you didn't notice, Red Fredy hangs on to a piece of the museum as he falls in the background. Nice to see Konami thought of that.
Anyway, Geldo (or Geld, as he's named here) has a lot of attacks. He has a standing combo much like yours (albeit slow), he can shoot out a fire wave that travels across the floor and he can also toss mini-Hadoukens at you, too. Probably his weirdest attack is...spitting a loogie. Laugh if you want, but that loogie stays on the ground for a few seconds and will damage you if you touch it. Talk about being tripped up.
If Geld glows green, get away immediately. Fireballs will travel across the ground at a good distance around him. It doesn't last long, but given that Geld can rip you apart in seconds and can be quite a coin-eater unless you get his AI down to a near-science, it'd be pretty wise. Sometimes he won't do the fireballs when he glows green, especially if you're close by, but it still hurts. So watch it.
When you finally beat Geld, Sheena is saved and the city is safe! You did it!
We move through the harbor to take on some ninja-turtle looking guy but also boats full of bad guys!
Level 6: Port Town
There will be enemies coming out of the ships that sail near you, so watch out.
The fish that come out of the water will refill your health.
The guy leaning on the bollard is also named DFC Nakagawa, just like the referee from the wrestling ring in Level 3. You can hit him a couple of times and knock him into the sea. Weird.
The second section is an oil rig. The boss here is Sledge, who happens to not only wear cooking woks as armor, but also uses them as weapons. Besides the ol' whack upside the head, he can zip to the other side of the screen like a ninja (he even teleports!) and also a few aerial attacks, such as a butt slam, a TMNT-style kick combined with zipping one location to another and a sidestep jump where he hits you in the head in mid-air. Unlike other bosses, Sledge can block your attacks, making your attacks do less damage. Keep the pressure on! Stay on the move, grab him and do some damage from there whenever you can, don't meet him head on, use your standing combo from an angle and you should be fine.
Final Fight vs Violent Storm Round 6: Harbor? Port Town? Pretty similar.
Also, it's pretty obvious that the Spike enemies are based on Abigail from the first Final Fight, which in turn is based on Animal from the Road Warriors/Legion of Doom. Interestingly, Abigail basically shared the same body as the Andore enemies from Final Fight, which were based off Andre the Giant, taking the art of ripping things off to a whole new level.
We head to the park...which is similar to the park in Final Fight. That's not surprising, considering what we've seen so far in this game.
Level 5: Park
Bull is a watered-down version of Dabul from Level 1 dressed in green. Not only does he have a shorter life bar, he can also be attacked while down without any fear of reprieve.
The second section takes place in some tropical gardens. If you attack the palm trees, you can get some fruits that are worth getting for both the health and the points.
In the third section, you'll break some statues and take on both a Lollypop and a B.Spike. At the end, the green guy will run away with Sheena and the statue that was next to him will come to life.
Mr. Julius is a narcissist. Whenever he flexes, you can punch him out and get up close to do some real damage. You don't want to be near him when he gets up, as he will do that little headstand spin-kick if you are. Aside from that, he has a bear hug similar to the Spike enemies, a TMNT-style drop kick where he hits you with both feet and a crouching kick.
Final Fight vs Violent Storm Round 5: Not only were we in a park, we were also inside a building midway through, too! Sure, it was a tropical greenhouse instead of a public bathroom, but still...
You have to admit, there isn't much in the way of original ideas, but this really feels like a early 1990s Saturday morning cartoon come alive.
If you can stay at the bottom at the start, move past the sleeping Jaxom, walk between the two steel drums and grab the one on the right, you can throw it on the Jaxom and destroy him before he can wake up.
You can grab the radio off of the fence by punching it.
Fighting multiple Ryukens is a lot easier when you throw one of them into another and keep them all on one side.
Lollypop Jr. is just like Lollypop, but with a smaller life bar.
Nice animation on the door when it slides open, by the way.
There are crusher plates in the second section, and they will stamp the parts of the floor that look like bright, translucent glass. The area they cover is well-marked and easy to avoid when you need to.
R. Spike is just a red version of Spike. This time, though, his pants are black and the accessories are red.
Be careful near those huge smelters of molten metal. When they tip over and pour, you'll want to stay away from the small pit that this lava-like substance will travel through for a few seconds. Again, these are clearly marked compared to other beat-em-ups, so you'll know where not to stand.
The boss here is Doyle, some guy wearing what looks like one of those Power Loaders from the Aliens series along with a mechanical chicken beak on his face. This guy's forklift-like appendages have some range, so you'll want to be careful when you get near this guy. He can not only swipe at you and extend the tip of his metallic arm parts to poke you right in the face, but he can also grab you, too.
If you're going to hit him while he's down, use your crouching attack or punch him from up close once and then sidestep away so he doesn't whack you in the process of getting up (which is a very solid attack of his, by the way).
Whenever you knock Doyle down, he also teleports around the room in a jetpack. Great, we're not only stealing from Final Fight, we're stealing from Streets of Rage II as well. He'll also do that swipe attack after he lands, so you don't want to be near him until then.
When you beat Doyle, his jetpack explodes and he's sent falling into the molten lava in the background.
Final Fight Round 4 vs Violent Storm Round 4: Wasn't Round 4 an industial area in the other game, too?
(1, 2, 3!) i’m gonna get you eventually, everybody wanna knock geldo down, i’ll go straight to sheena (sheena) and i’ll be there, yes i will, this world is very difficult, but i’ve got nothing to lose now, there’s no defeat, you’d sooner die, challenge the beginning of the end, till i rescue sheena, i’m never gonna stop (FLEE MY POWER), now i spend my time fighting all around, i’m a tough guy (DO IT, MAN), you think, you can beat us, we’ve got the look, oh so fine, just wait, i’ll get even with you (BRING IT ON!) (GET POWER) (CHECK IT OUT)
Level 3: Downtown
Believe it or not, you can destroy the stand at the beginning. Why? I don't know.
When you hear the heavy clang of steel, oil drums will be rolling towards you. Jump over them so you don't get hit.
You can take the pizza from the girl holding it at the end by walking up to it and pressing the Attack button to punch and grab it.
You'll meet B. Spike at the entrance to Sha La La. He's a Legion of Doom/Road Warriors clone with some wrestling moves, including a bear hug, a running shoulder tackle and various open-handed chops. Don't get too close to him and you should be all right.
You can use the flower pots at the entrance to get the jump on the bad guys at the bar.
There's another pizza on top of one of the tables. Get rid of one of the chairs, then jump onto the table and grab the pizza like you would any other item. Or you could just break the table. That works too.
You'll soon fight to Middle Eastern music with a belly dancer in the background. You'll meet Eliza, a blonde palette swap of Liza who can also do a crouch kick and a slide kick.
You'll enter the kitchen soon afterwards. B.Spike returns, along with Spike who wears dark green instead of blue. He uses the same tactics as B.Spike, but he has a longer health bar. You'll see another Spike when you get out of the kitchen, so watch out for that shoulder tackle.
You'll meet that green freak again, and this time you'll fall through a trap door and into an underground wrestling ring complete with a steel cage. (You also knock down the ref, whose name is DFC Nakagawa. A reference to one of the guys who made this game?) You'll then face Drigger, a burly wrestler who wears animal bones and a green loincloth.
Use whatever moves you have on him and attack him while he's down whenever you get a chance. As you wear down his health bar, he gets up more and more quickly, so you'll want to be careful as you keep knocking him down. His kick and diving headbutt has some range, so watch out for that, especially when he gets up as he'll mostly do the kick. His slap will knock you to the ground, and he can even grab you, throw you upwards and hit you with the top of his head like a human volleyball...or put you in a piledriver, one of the two.
When you beat Drigger, you'll bust out of the cage and leave the club.
Final Fight Round 3 vs Violent Storm Round 3: You fight through a restaurant complete with a bar and get sent into an underground wrestling ring. Just like in Round 3 of that other game.
Oh, and you fought the boss in another ring, too. At least fighting the boss here mimics that.
Oh, and an Abigail clone that appears earlier than in Final Fight. That, too.
You think the music is cheesy here? Wait until the next level!
Level 2: Train
Dr. Hogun is some rugged look individual who throws bombs at you and runs away. Just like the Holly Woods in Final Fight, he goes down with one hit.
Oh, and don't worry. It just gets more similar to that game from there. It's still fun, though, so don't run off on me now.
Gigadeath is a punk rocker in black leather who attacks you with a long chain. R. Ryuken is just a recolor of Ryuken, but he's not any less dangerous!
If people are too close to the background edge of the train when they get killed, they can be knocked off the train to their deaths.
If you grab one of the piglets near the mother pig, it turns into a football that you can throw at enemies. It actually damages them, if you can believe it. Of course, you'd think the developers would have known that footballs aren't made out of pig parts anymore.
You finally meet Sheena and her kidnapper again, who sics the train conductor on you. The boss here is Joe, an evil train conductor with a ticket puncher big enough to be carried in both hands and put you in a nasty vice grip. He has a roll attack and a jumping attack that both come out fairly quickly if you're too close to him when he's down. You'll want to be away from him at an angle to stop the jumping attack from occurring. He can also do a grab attack in the form of getting on top of you and punching you multiple times.
If you knock the ticket puncher out of his hands, he'll move out of reach to the lead car and ring a bell to call out a big fat guy named Lollypop. This huge pile of fat of a man is easy to take out, but he attacks with sumo strikes, diving slides and fire breaths. Add to the fact that you have to mash buttons to pick him up and throw him so you don't risk getting flattened by him and you got yourself a normal enemy that will prove harder than usual to defeat through very close combat.
Joe is really easy to take out with your standing combo if you can get close enough to him, so rely on those. Just keep getting him to back away and do your standing combo whenever you can and you should be able to reach him.
When you beat Joe, the lead car separates from the rest of the train. You've still got a long way to go.
Final Fight Round 1 vs Violent Storm Round 2: Well, we're on a train compared to a subway. Also, Joe calling out Lollypop is very eerily similar to Thrasher/Damnd siccing some flunkies on you.
Here's a playthrough of one of the last beat-em-ups Konami ever made...and one of their best.
In an post-apocalyptic future where World War III has ended, chaos rules the streets and the world. Wade, Boris and Kyle are vigliantes who protect the city they live in from anyone or anything that wants to cause trouble, including street gangs who prey on those trying to survive
One day, they meet their friend Sheena, who is heading home from a grocery store. Suddenly, a green-skinned, orange-mohawked freak on a motorcycle swoops in and kidnaps her. Now, these three men must save her from the Geldo gang.
Boris is the strongman of the group (and fights a lot like Haggar). Kyle is the speedster. Wade is the average guy. What are you waiting for? Pick the type of character you can work with and let's get hopping!
Level 1 - Train Station
You have a lot of interesting abilities to work with here. Among them, you have a special attack (press jump and attack together), a crouching attack that can attack downed enemies if you want to do so, the ability to attack downed opponents, a back attack that works by pressing Back and the attack button simultaneously, and the ability to pick up a downed opponent and grapple them (Up + Attack on a downed opponent).
Jaxon and Talcus are just your run-of-the-mill enemies, but Jaxon is slightly smarter and has a slightly higher life bar. They also have red palette swaps that you'll see every so often, and the red version of Talcus is known as R. Talcus.
Ryuken is a karate-based enemy with all sort of kick attacks. He can even leap at you and knee you in the face to do some damage. If you see him, take him out immediately, as he can strike as soon as he gets the opportunity.
The knife is your typical handheld stabbing weapon. If you can get your hands on it, you can do more damage than you usually can in one hit. You'll also see the pipe later on, too. Those will be the only weapons you'll see in the entire game. Lame. Although if you're playing as Boris, you can attacked low-lying crates and downed enemies with the pipe just by attacking with it like you normally would.
As you progress through the first section, you'll be seeing the guy on the motorcycle with Sheena again, and you'll also see a Ryuken backflipping around before jumping into the playfield.
Crossbones is a mohawked punk with a pipe in his hands. He's easy to beat, but the chances of knocking the pipe out of his hands is very rare.
The pots in the train station can be thrown at enemies. The benches, however, won't budge.
As you progress through the second section, you'll see some guy with a sack over his head running to the right.
Liza is the female enemy of the game, and she strikes at you with a knife. The only way to get her knife is to deflect it when see throws it, knocking it away and onto the ground. This way, you can pick it up.
You can destroy the bicycle for extra points.
When you reach the huge crack in the wall, the man with the sack on his head will bust through it and fight you. This is Dabel, the first boss of the game. He'll try to dash into you and attack you with his club. Standing combos and grab combos work well against him.
Don't attack him when he's down, or he'll knock you to the floor instantly. Also, watch out for that flying kick he does if you do retreat.
If you can hit Dabel with enough punch attacks, you can get the bag on his head to fall off, causing him to be unmasked. You can then pick the bag up for points.
Final Fight Round 1 vs Violent Storm Round 1: Well, your first destination is a train station. At least we reach it faster here.
Oh, and expect this section at the end to be in all the other entries, as well. This game follows Final Fight too eerily to be a coincidence.
Hooray for flying segments with bad controls! Yay! At least this is over. Again.
Stage-4
Hidden Caves
Later,gator.It's time to rock! If you're hip and brave enough,check out these hidden caves and stuff.Obstacles in the dark lurk out of sight, so get your paws on a major light.
No, now is the time to learn how to use the Space Bar.
The cave isn't supposed to be that lit up. Instead, you only have a limited amount of vision for this stage. Thankfully, enemies don't show up unless you're close to them, so you're going to know how it feels when it comes to playing this game for real.
The small bats don't hurt you, but they do latch on and can be kinda annoying. They'll latch off after you jump around a little while. If more than one latches on, you'll be slowed down severely. You do want to avoid the big bats, though, and bop them when necessary.
The pig men can be jumped on in order to stun them, while the guys on pogo sticks can be carefully jumped on in order to stop their rambunctious reign of terror. With the pig men, they'll wait until rocks drop down to them, so they can punch them at you. Be sure to avoid the rocks as well.
After a long drop and a lot of coins you can collect courtesy of the sunglasses, you'll be able to get onto a mine cart and ride down a mine shaft. The screen rotates as you duck under stalactites and collect coins and health replenishments.
After this part, you'll go up against Mean Eugene's train. Wait for the dog to throw three rocks and duck down to ensure you don't get hit as you stay close, then jump on the dog. After enough hits, the engine will show up in place of the dog. Grab it, and you'll get out of here.
Stage-5
Bird Houses
Whoa! You're quick, courageous and totally outrageous!
The only challenge left for me is to hit the bird houses and hawk the ignition key.
The enemies you'll see at the start - the grenadier bird, the vultures and the flying squirrel - are either indestructible or easy to avoid. Go ahead and avoid them.
You'll see a springboard at the end. Leap off of it and you'll take to the skies on a butterfly, which makes it officially known that this game has completely stopped making sense.
Aside from the enemies you've seen, you'll also see missiles, eagles with jetfighter helmets, hummingbirds, and that stupid dog in a man-made flying machine that looks like a bird. If you expected this to be a horizontal shmup and get better from here, you're sadly mistaken: you have to avoid everything. Bonus style points if you can time everything so that the grenadier birds hit an enemy with their bombs.
The music here sounds like it could have been made for a Konami game. The only thing is, if Konami actually composed it, it'd sound far better than this.
After a few more missile salvos, you'll finally face off against Mean Eugene in his helicopter. You'll have to time it so that the grenadier bird drops a bomb on you, only for you to fly away and have it land on Mean Eugene's helicopter instead. Avoid both Eugene and the missiles he shoots at you, and time the grenadier bird bomb drops right, and you should be fine. After you get the ignition key, you'll beat the game. I'd tell you that you did it, as always, but even then the ending leaves a lingering feeling of "Oh, Jesus Christ, why did I play this?" long after you get kicked back to the title screen.
Good show, amigo!
You are one righteous guide.
Like, my bike is ready to trip a ride on the wild side.
Four Corners Zoo can eat my dust.
Now it's Hip City or bust
Like this adventure has only one equal.
Look for me in Hip City, USA ... the sequel!
...and yet you still can't proofread whatever it is you try to tell me, game. That's too bad. But there really is a sequel, and we'll check it out in due time! Stay tuned!
Wow. Um. Oh, boy. I really messed up the volume mixing on this one. Whoops. Nothing I can do about it now.
Stage-3
Gator Alley
You're totally shrewd, dude.Now that you're on a roll, let's rally in Gator Alley. We've gotta get a grip on some hip handlebars.
You'll see that stupid dog wearing a duck hat swimming to the left shortly after the beginning. You're not fooling anybody, buddy.
The snails go down in one hit, but the green worms with the mohawks are indestructible. Sure, you can jump on them to slow them down, but just like the Dry Bones from the Mario games, it's not for long.
The ants with the balloons and crossbows will swoop down at you, but if you avoid them and jump on the balloon, you'll take them out and get the opportunity to recover two hits for your health bar.
The gators that point their nose upwards and chomp are platforms, but they are very, very touchy to land on. If you're not dead center on the nose, you will either take a hit from the gator's teeth or fall into the water near their eyes.
After the third gator, a hip-hop hippo will pop out of the water and serve as your ride across the water. You'll deal with two of those balloon ants, but the main enemy here is the guitar. If you grab it, you'll be dunked in the water sent back to the third gator, and there's nothing you can do about it. Wait until the guitar is directly over the hippo's head and is approaching his left hand, then jump over it. You'll be able to leap to the hippo's right hand and avoid the guitar altogether.
After some isolated planks on the piers you're walking on (which look a lot like prunes lined up on a slingshot), you'll see the sunglasses. This is the only way to get the skateboard for the bonus level, and this is how you get it: crawl underneath the sunglasses by going diagonal on the D-Pad, then go through the level as normal. Take out the two balloon ants, because this will make it much easier. Be careful with the logs, as they sink into the water and send you back to the left where the logs begin. Once you've taken the ants out, go back to the left and get the sunglasses. Time your jumps and get to the pier on the right in time and you'll be able to get the skateboard. You will have to jump off the right edge of the fourth and last log to get to the pier, as the game will not let you land on the very edge of that pier.
No sooner do you get past the log platforms does that stupid dog shoot bombs at you from a submarine. Move past him, keep going to the right, and you'll reach another pier after another set of logs. You'll see Eugene and the dog on a motorboat, followed by an empty boat that awaits you. Jump onto the boat. If you walk onto it, you'll end up going into the water for no reason.
Avoid the logs and pay close attention to the bottom of the screen. It's the only way to keep from being confused as all hell from the parallax scrolling here, which just makes everything a visual mess at this point. Collect as many coins as you can, too. When you see the handlebars, grab them. You'll be invincible when you get them, and you'll clear the stage...all without having to deal without Mean Eugene, his dog, and those bombs.
So, I found out that the health pick-ups are the long-since-discontinued Cheetos Paws and that the game draws heavily from the commercials of the time. At least Kaneko got that right!
...and here we are again. Love the music, but this can be a confusing level if you don't know what to do.
Stage 2: Monkey Pits
The music here is great. The level itself is not.
Like congrats.After that awesome showing,you best keep on going. Let's give Mean Eugene fits and ditch him in the monkey pits. Swing from vine to vine and grab the sunglasses this
Yeah, it doesn't even finish the sentence like it should. We also have lack of spacing between punctuation and the beginning of new sentences save for one case in the entire message. It's like whoever developed this didn't even try.
To swing on a rope, simply hold the B button and then use Left and Right on the Control Pad to swing back and forth, then let go when you're facing the direction you want to go. If you run into a tree during a vine swing, you'll crash into it like George of the Jungle. This is yet another example of something that has been done better by other games. If you let go of the B button, you let go of the rope. That's strike one right there. You have to rock the D-Pad left and right to swing. Going back to Mickey Mania: remember the chandeliers at the beginning of the final level? That was better than this. Three, once you've swung far enough like a pendulum on crack, letting go of the B button lets you catapult yourself into the air. This almost makes the first strike both forgivable and removable, but once again, this was done better in Donkey Kong Country. You could even better control your jump. Strike three. Oh, and the fact that Chester wears a Tarzan-like robe does not, repeat, does not make this any more enjoyable.
You'll have to find the sneakers again in order to dash. Whenever you beat a level, you lose whatever power-ups you had in your possession when you enter the next.
The coins will be clustered around in the shape of arrows to point out where you should go next. This should hopefully keep you from getting lost.
You can climb on the vines by jumping into them, then using Up and Down on the Control Pad to grab on. Use Up and Down again to climb the vine.
The hedgehogs roll around like a buzzsaw when they see you and can be jumped on. The wolves with silverware look like they can't be killed by any other means than the guitar, but you can actually jump on them to kill them. They do have a slight hop forward that they'll use if they see you, so watch out. The kangaroos with boxing gloves can shoot out small, sparkly purple stars that will instantly kill you. Even if you're hit, you have no invincibility until you hit the ground, so you can be hit multiple times in the air and get killed in two seconds even with a full health bar. The kangaroo can also punch the trees and cause bugs to fall from the top of the screen, which can damage you to the touch.
The little purple guys that hang on the sides of the trees hurt you if you touch them. This is honestly one of the most bull-crap moves I've seen a game pull in my life, since they don't do anything and look like they're part of the scenery.
You'll come across a monkey when you explore the ground level of this stage. You will need to find the monkey to get the motorcycle part for this stage, which in this case is the seat and frame. When you approach it with the monkey, the monkey will automatically climb up the tree and pull it down. Amazingly, even if you off-screen him, he doesn't seem to have much trouble keeping up.
Down-Left and Down-Right on the D-Pad lets Chester crawl when held.
You can jump into the vines to climb them, but you're better off jumping straight up and using the Control Pad along with it in order to climb up faster, as Chester's climbing ability is unbelievably slow. You'll still have to hold Up on the D-Pad near the top to keep from hitting your head on the bottom of the tree branches.
When you make it close to the end, the monkey will automatically climb up the tree and get the scooter part. Unless you have the monkey, you'll have to go all the way back to the bottom of the level and look for him. Once you have the scooter part, you can go to the right and get out of here. (The part here is the frame. Thanks for asking.)
The skateboard, if you can grab it, will allow you to enter the bonus stage.
Bonus Stage
For the bonus stage, you'll have to collect all 100 paw icons while avoiding the dogs on the steamrollers. Running into a steamroller will cause you to lose three paw icons. Jump carefully! If you pick them all up, you'll get a point bonus at the end, but not much else.
The story begins with an introduction form Chester Cheetah, who is being held against his will in Four Corners Zoo. In order to get out of the zoo, however, we have to rebuild Chester's motorbike. Watch out for the zookeeper Eugene!
Chester Cheetah, here !
I'm righteous kitty from the heart of Hip City.
But right now I'm being held against my will in Four Corners Zoo like, Squaresville
I just don't dig this bogus gig.
This guide covers the Super Nintendo version. The Sega Genesis version is the same, but has a different title screen and some things look different.
Yo,friend! It's time to split this den.With Mene Eugene on the scene,this adeventure is no lark in the park. But help me find the missing tire and we can go a level higher.
The controls here are pretty simple. Left and Right on the Control Pad let you move left and right, B lets you jump and R lets you dash if you have the running shoes. (The jump and dash commands can be reversed on the options menu.)
The first enemies you'll meet are the turtles and the springs. The turtles can only be jumped on if they expose their heads and zoom forwards, and even then you have to be careful when jumping on them, because if you're not exactly dead center on them, you'll take damage along wih the turtle. Holding the B button down after jumping on an enemy allows you to get some extra height.
The paw icons give you points at the end of the stage. If you manage to find every single one in a stage, you'll get a Perfect bonus when you clear it.
You'll eventually come across a steamroller manned by Eugene. There is a manhole nearby. Press Down on the Control Pad while you're standing on it to enter it, and you'll be able to enter a series of pipes and underground caves.
When you're in the pipes, hold the direction you want to go and keep holding B to get where you want to go faster. When you want to make your way back to the surface, press Up while underneath a pipeway that leads back to the surface.
The glowing orange paw refills one hit on your Life meter in the upper-right. Losing all your health is bad, because if you lose all your health, you'll die and you'll have to use one of your credits in order to continue. Use them all, and it's game over when you die one more time. It's a shame this cat has only one life instead of nine.
The guitar gives you invulnerability, but there's a catch...a terrible one. As Chester is playing the guitar, you won't be able to move at all, making this power-up one to stay away from at all costs.
The running shoes allow you to dash by holding the R button. You can see what items you have by looking underneath the score in the upper-left corner of the screen. You have to hold R for a second and a half for the dash to take effect, and Tiny Toon Adventures: Buster Busts Loose, which this is shamelessly borrowed from, still did it better.
The sunglasses allow you to see - and pick up - hidden paw icons power-ups for as long as the screen is dimmed. When the brightness is back to normal, these hidden pick-ups go away, so go get them!
The water not only houses fish that jump up and down, but also cause you to lose health, so don't jump into it.
You'll eventually come across Eugene's dog in a machine, and the dog will try to crush you with the legs. You won't be able to fight this thing, so go forward when the legs go up and stand between them and duck when they're down. Duck under the body so it doesn't squash you. This mini-boss will disappear when you make it to the other side of the screen. At least the game has the common decency to center you back on the screen after the mini-boss, unlike, say, Teenage Mutant Ninja Turtles for the NES.
The manhole with the down arrows leads to the tires. When you pick them up, the music changes and you'll be told "Go To EXIT!!" From here, you can go to the exit and enter the next stage. Thankfully, it's not far away and you don't have to deal with a boss at the end. After you beat a stage, you'll get some bonus points for clearing the stage as well as for how many paw icons you have. Sadly, collecting 100 does not give you an extra life.
Remember the "World X-3" mini-games you had to complete to get some of the Heart Stars? Well, you're doing them all again, all in a row. The same strategies apply.
The first game has some white blobby guy with a hat throwing circles behind a wall. Pay attention to what he's throwing, as each circle has a different face. Get all of them right and you'll get the Heart Star for this stage.
For the second one, you'll have to guess which pot out of the five the eel is in. You have to guess which one he was in last. If you can guess correctly three times, you'll get the Heart Star!
For mini-game #3, pay attention to the ten Gordos and count how many open their eyes. If you guess right, you'll get a point. Guess correctly three times and you'll get the Heart Star for this stage. If a Gordo has a grin, he doesn't count! Be careful on that, because this can trip you up at least once.
In mini-game #4, you'll meet some guy who's red, yellow and blue. You'll see a bunch of Gordos in multiple colors. They'll either be red, blue, yellow or black. This guy will then ask how many Gordos of a certain color there were, so you'd better be paying attention! It also gets much quicker on the third attempt, so you have to be ready to count as quickly as possible. You'll get the Heart Star after three consecutive correct guesses.
The finale is the mini-game featuring Chef Kawasaki from Kirby Super Star. Five Gordos will drop, and each one will make a sound. Kawasaki will whack the Gordo next to him with his pan, which will match the sound that one of the Gordos made. You'll have to choose which Gordo originally made that noise. After three correct guesses, you'll get the Heart Star at the end of the stage.
When you get perfects on all five mini-games in MG5, you'll get the Jumping mini-game.
Remember that mini-game at the end of each level where you had to leap to the power-up of your choice? Well, guess what? You're doing it here, except this time, you're doing it eight times in a row. Avoid the needle guys and land on the happy faces. It's easy at the beginning, but as you progress, it gets harder until there is only one space with a happy face under it. If you can land 10 successful jumps before hitting a needle guy, you'll get the scene select and 100% completion on this game!
In Boss Butch mode, it's just Kirby and the bosses, one after the other in an endurance run. No abilities, no animal friends, and no Gooey. Prepare to push out several attempts before you finally beat it.
Also, the screens you fight the bosses in have a different appearance, too.
World 1: It's autumn instead of spring.
World 2: Instead of inside a cave, it's out in the open in front of a blue sky.
World 3: It's now night, the background it lit up (and animated) and there are leaves blowing around.
World 4: The clouds are grey, and the colors aren't as bright as last time.
World 5: They sky is pinkish-red, and it looks like there are leaves blowing around.
World 6: The dark hues are replaced with yellow, green and orange.
World 1 Boss: Whispy
Whispy's back as the first boss in the game. *sigh* Old friends (or enemies) never die. Just inhale the fruits that Whispy spits out and send them back at him. At least he has more than just the apples this time around.
What's that? He MOVES when you bring him down to half health? Okay, now that's impressive.
He still spits the fruit out as he chases after you, it just goes farther before dropping to the ground. With that being said, it's not that much more difficult. He sure is getting tired of being the initial punching bag of the game, though.
World 2 Boss: Acro
Acro will leap toward you and and try to tackle the wall. Jump over his tackle attack and spit the rock that comes out of the wall back at Acro. After he takes enough damage, you'll fight him underwater. Use your air attack to send the objects Acro spits out back at him. If he hits a wall, rocks will drop from the top of the screen, and you can use those against Acro as well.
It takes a little longer than it should, as this sometimes sends the objects back at an angle, but it's still doable and a little safer than using an ability.
World 3 Boss: Pon & Con
Pon & Con is actually a combination boss. This is much like the fight with Nelly and Nruff in Kirby's Dream Land 2.
You're basically fighting a raccoon and a fox. Swallow the miniature raccoons and foxes and spit them at the bigger ones whenever they're onscreen. Watch out for the bombs that drop from the ceiling at the sides of the room. They don't move around, but they do explode after a few seconds.
World 4 Boss: Ado
Ado is a new addition to the Kirby series in this game, and she would also appear in Kirby 64 under a different name, though the question of whether this is the same character with a different name has never officially been answered.
Ado draws pictures of bosses from the last game in the Dream Land series, which come to life. The first one is the Snow Dragon. He comes with all of his signature attacks, including the ice breath. Just spit the ice blocks he sends at you back at him.
The next boss is the Ripple Field boss from the previous game. Duck under the spikes, run under him as he bounces to the other side and spit the starfish he sends at you back at him.
The third boss is Mr. Shine and Mr. Bright. One will fly around and throw stuff at you while the other stays near the ground and gets in your way. They switch positions every so often, so you'll get your chance to take out both of them before you know it.
Once you take out Mr. Shine and Mr. Bright, you finally take on Kracko...or at least a painting of him. He flies around trying to zap you with a lightning bolt and sends miniature clones of himself at you. Spit the mini-Krackos at him and avoid the lightning bolts. Once you bring him down to half health, he stops being a joke and will move from one side of the screen to the other as he zaps a bolt of lightning across the ground. Run away from him and hide in the corner so you don't get hit, and spit the mini-Kracko at him whenever he spits one out. This is harder than expected, as he dives towards the ground as he loops across the screen and spits out four of them, and they all either go up or down.
When you take out Kracko, Ado will finally run towards you in anger. Slide into him. It's over.
World 5 Boss: King Dedede
King Dedede attacks like he always does. He creates stars by whacking at you with a hammer and trying to squash you with a really high jump. But if you look at him, you'll see that there's something off about him.
This time around, you can fight him with an animal friend. However, this makes the inhale attack a little more dangerous. If you're on an animal friend when you're way too close when he breathes in a huge mouthful of air, you're going to be instantly dismounted as soon as you're sucked in. It's not any more powerful than what it already was in previous games, but the fact that it can dislodge you from any of the animal friends adds a miniature dimension of annoyance to the move now.
When you beat him, you're not done. This was the easy part. Remember when I said there was something off about him? Well, the glum, zombified expression on his face wasn't even part of it. When you beat him, he starts floating around and a black glow surrounds him.
Every so often, he'll float in place as a huge black eye forms around his gut. Turns out he's possessed by Dark Matter. Again. This eye will shoot balls of Dark Matter that can be spit at Dedede. If you have an ability, you can keep them from hitting you by using your ability on it until they disappear.
If you need to, you can stand at the bricks at the sides of the castle to get a bit of a height boost if you need to.
Level 6: Hyper Zone
Just like last time, you're going to be fighting Dark Matter by special means, this time with the Love-Love Stick. If you remember the Star Rod battle from Kirby's Adventure, you pretty much know how this will control. If not, here's how: press the attack button to fire projectiles, and use the Control Pad to fly around in eight directions. It's that simple.
The first form of Dark Matter flies around and has two attacks: a lightning strike that comes out of the eye as well as the ability to fire the yellow balls that surround it at you. The energy that comes out of the stick when you swing it can protect you from the balls. As for the lightning strikes, just center yourself and stand near the eye, as the lightning always fires at angles.
The second form of Dark Matter is a large white ball with a red eye, also known as Zero Two. Zero Two fires two types of projectiles: red eye lasers and black Dark Matter clones. The lasers can be destroyed with the Heart Wand if you're lucky enough, but you're going to have to dodge the Dark Matter clones and their ability to track your location to a degree. You'll want to shoot projectiles into Zero Two's eyes, and concentrate solely on dodging when the Dark Matter clones start popping out of him.
The third form is the eye that is left behind when you defeat Zero Two. This eye will do nothing but quickly chase after you. Stay on the move and keep swinging the Heart Wand as you do so. If the projectile doesn't hit this thing, the stick itself will.
The main thing that makes this battle difficult is that if you die, you'll have to start all the way back at the first form. Winning this battle is definitely still possible, and once you beat Dark Matter, you've beaten the game and saved Pop Star one last time!


