Part nostalgia-bomb, part note-taking and part FAQ, what started in GameTrailers as a video game blog is now on Blogger. This blog is a look back at video games, both popular and obscure, from the video game industry's infancy all the way to the previous console generation.
Now that we've gotten our initial story exposition and seen the gameplay screen, it's high time we started doing things around here...wherever this is.
In Version 2.0, you can speed Valanice up by pressing +.
If you click on any of the cacti that cause the cursor to glow, Valanice will prick herself, but thankfully she will not die.
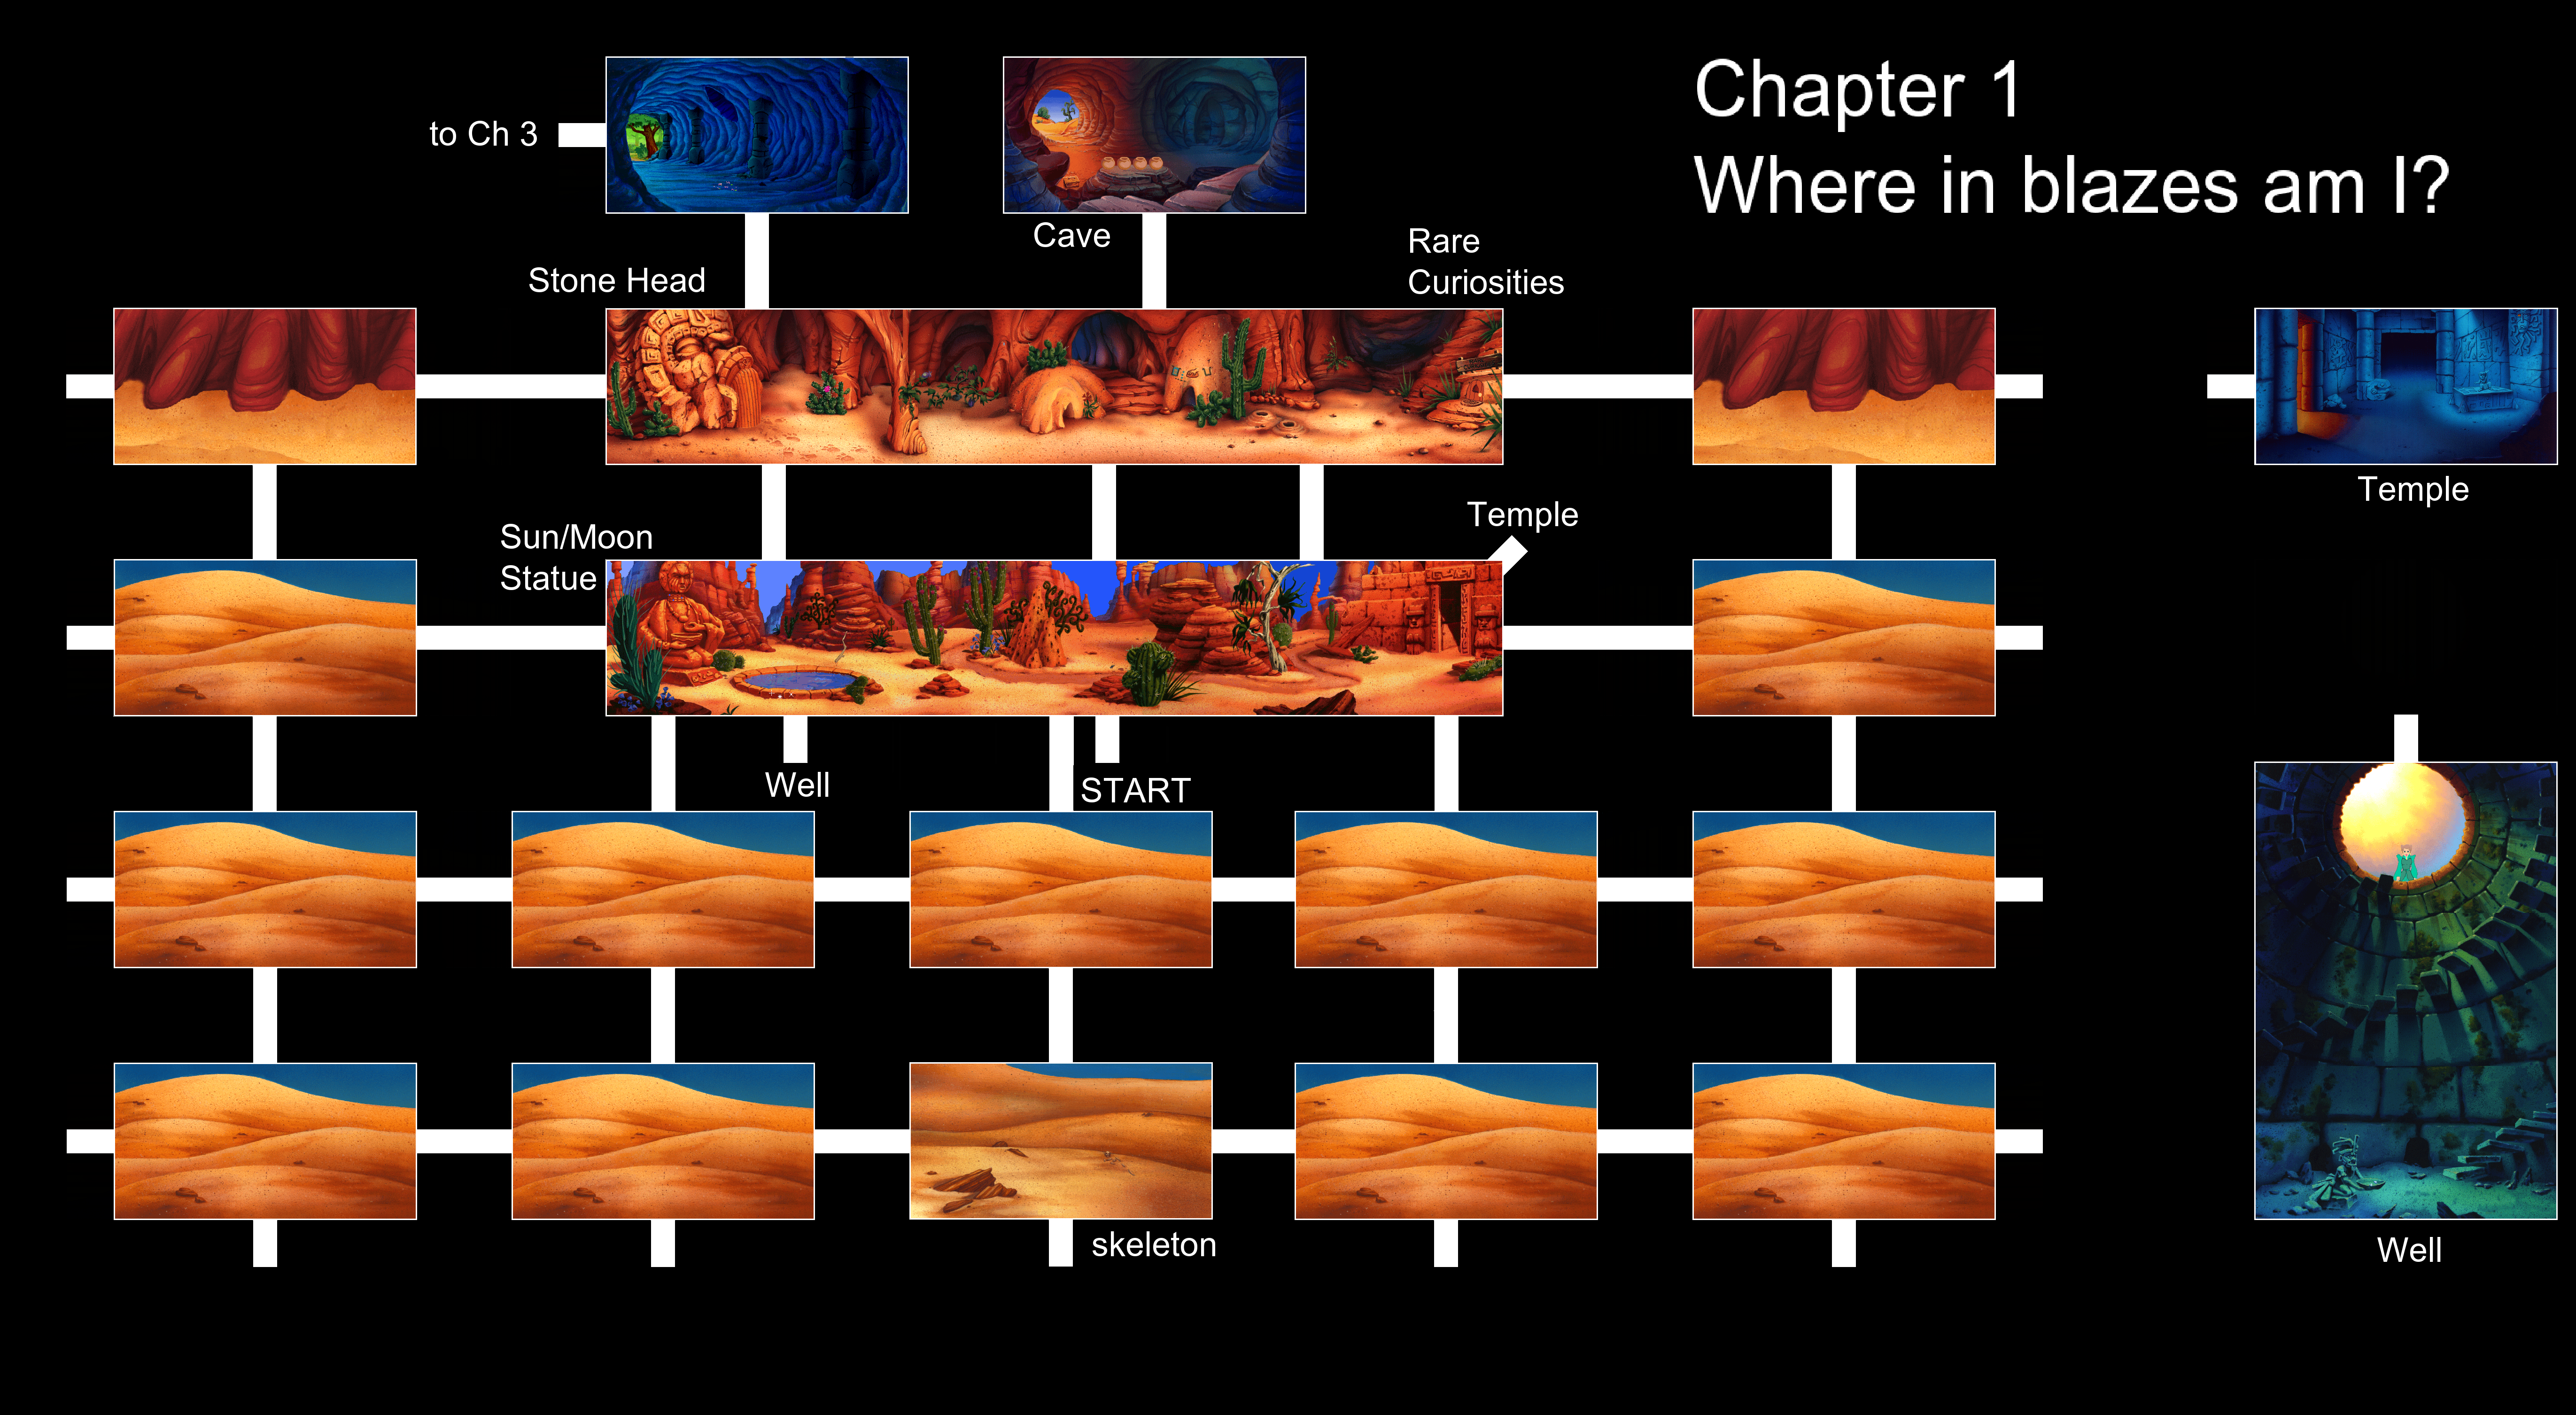
Going west of where you started leads to a tick a pool of water, some sparkles and a statue of a person carrying a bowl carved into the rock. If you click the pool, Valanice will look down into the pool and notice a statue carrying two objects in a bowl. If you click on it again, Valanice will notice that the pool is full of salt water.
The stick can be picked up and added to the inventory if you click on it, and the sparkles are actually salt crystals. You can pick those up, too, but you cannot eat them by using them on Valanice.
The statue has some pictures on the base, and you can read them if you click on them. Clicking on the base will cause Valanice to go "Hmmmm..." If you click on the base again, you'll actually look at them. From left to right, it looks like the base is telling you that the water is deadly, but if you cry tears into the bowl and add both salt water and corn, you can somehow drink the water in the bowl. That is a weird, peculiar and downright inaccurate way to make fresh water, but given that we're in the seventh game in the series, anything is possible at this point, I guess. The problem here is that we can't carry water right now and we don't know where to find corn.
If you click on the arm of the statue carrying the bowl, you can turn the bowl upside down in case you mess this up. If you click on the statue itself, Valanice will assume that the statue is expecting something.
You can also click on the blue beads of the necklace and move them around, but it doesn't look like they do anything for right now.
If you click on the statue's head, you can spin the head around and make what looks like sun rays come out of the head.
There's nothing else we can do here, so head east. There is a doorway as well as another path to the north, but you can head further to the east to another area. For some reason, this takes you to the vast desert. You'll also meet what looks like an undead man dressed like some sort of drifter, and if you can talk to him, he will tell Valanice that she is far away from life, love and hope, and that she is surrounded by dust and that dust is what she shall become. He will also tell you that he lost his life in the desert and must walk the desert forever, tormented by everlasting, burning thirst. He tells Valanice to leave while she still can by means of a portal through the mountains, and mentions that the giant stone head was closed by an evil enchantress, and while legend says it can be opened, he does not know how. He then tells Valanice to go before the thirst drives him into madness.
Head back to the west to get out of here. If you continue to walk through the desert in any other direction for enough screens, Valanice WILL EVENTUALLY KEEL OVER AND DIE. Thankfully, you can always retry instantly without the whole "restore game" thing from the first six games. IF YOU THOUGHT YOU COULD AVOID ALL CAPS IN BOLD AFTER ME NOT COVERING THIS SERIES AFTER SO LONG, YOU ARE MISTAKEN. The nearby opening is some sort of temple, but when Valanice enters, a giant black scorpion will show up. Get out of there; you can't do a thing in there yet.
Go north from the temple, and you will be near a small door in what looks like a tiny rock home. This is the Rare Curiosities shop, owned by one Ricardo Eduardo Rodriguez Roo Rat, proprietor. If you click on the door, Valanice will knock and be met by one of the two animals from the opening cutscene from this chapter. He will tell you that the jackalope - the other animal who was chasing after him - swiped his glasses, and he is unable to see because of that. Unless he can get his glasses back, he cannot help you. After he shuts the door, the jackalope comes out of a nearby hole - wearing the glasses - and kicks sand at Valanice before going back into the hole and blowing a raspberry at her.
If you click on the holes, the jackalope will blow a raspberry at you again and refuse to cooperate.
Going west from here, gives you can opening as well as some more pictures on a nearby wall. The pictures tell of a well of deadly water, followed by dripping water, a hand holding a semi-circular object, and an empty well. Would the well empty if one turns the bowl upside down under certain circumstances? Perhaps. If you remember the beads on the statue's necklace, you may notice that there were four specific places where each bead can go. If they were all in the third column, and the bowl was turned upside down, what would happen...?
It's been four-and-a-half years since I went through the sixth game, so it's time to delve into this one. I have memories of this one, but this one has not aged well.
The story takes place after the sixth game. Princess Rosella is enjoying the single life, but Queen Valanice reaaaally wants her to marry. Rosella isn't willing to settle down just yet, as she wants to go on an adventure, of course, and as Valanice talks about possible suitors (one of whom can conjugate Latin verbs), Rosella sees a flying seahorse come out of the water. Rosella takes her golden comb out of her hair and jumps into the water after seeing what looks like a castle, and Valanice quickly catches wind of this, grabs the comb, dives into the water and tries to grab on to Rosella. As she does, a beefy green arm comes out of the wall of the whirlpool and yanks Rosella in.
At least, I can tell that is what's going on by clicking on "Watch Intro" after starting the game and OH MY GOD IT LOOKS LIKE CD-i
Well, that's because the animation was outsourced to Animation Magic, which was based in America but had a fully-owned subsidiary in St. Petersburg, Russia, where all the animation was done. If their animation style looks familiar in any way whatsoever, that's because you've probably played (or seen), I.M. Meen, its sequel Chill Manor, footage from the cancelled Warcraft Adventures: Lord of the Clans, and the CD-i games Zelda: The Wand of Gamelon, Link: The Faces of Evil and Mutant Rampage: Bodyslam.
After naming your save file when starting a new game, you'll get to choose which chapter you play. We're playing on Chapter 1, because.
Chapter One: "Where in the blazes am I?"
Queen Valanice materializes in a desert. As she looks around, part of her petticoat gets caught on a cactus and comes off when Valanice tries to yank it off. After that, a mouse is running away from a bunny with small deer antlers.
If you click on the "fast forward" button that pops up on the HUD at the bottom of the screen, you can skip cutscenes. I know I had to press it to skip the very beginning of Chapter 1, because we had Version 1.0 and that cutscene tended to lock up on it, forcing a computer restart. (Thankfully, Version 2.0 fixes this.)
The HUD is pretty simple, and it replaces the action menu from the fifth and sixth games. The King's Quest logo on the left is just for show. The black rectangle with the comb is your inventory, and if you click on something, it will replace the wand cursor. You can use it on things in the environment, or even your current character. Just move it over something, and if the item turns white, click there and see what happens. You can also move an item to the eye, click on it, and click on the sides of the window that pops up to look at things in three dimensions. This will be very useful with some items in the game, as you can only interact with certain objects in this way. To bring an object back to the inventory, just move the cursor to the inventory and click there, and you'll put the item back.
The red jewel all the way to the right is your options menu, which you can use to save your game and even check your progress through the story. This progress bar is more or less your "score" for the game, since there are no points to collect like in the first six games. If there is a black bar with a golden orb with two arrow-like triangles on the side, it acts as a scroll bar. Click and hold the left mouse button on that orb, and you can scroll the screen. This bar and orb will only show up in more lengthy horizontal areas like the desert that you start in.
Instead of saving your game, you make a "bookmark," which you can only have one of at any given time. Be sure to make a new bookmark when you make significant progress so you don't lose that progress in case you need to save for whatever reason. Be careful when selecting "Exit" in the bookmark options; as it is the same as "keep old bookmark and quit the game." (The bookmarks only exist in Version 2.0; in Version 1.0, the game only saved when you quit.)
The cursor is shaped like a wand. To move somewhere, click on that area and Valanice will walk to it. If the jewel on the wand cursor is glowing, you can interact with that object. Beware, as this can lead to trouble. Sadly, this means that a lot of the interactivity from the earlier games is gone, and can make players feel like their hands are being held.
If the cursor changes into an arrow, that means you have found another area that you can go to.
Click on the piece of Valanice's petticoat to get Valanice to pull it off the cactus. That petticoat piece will appear in your inventory.
If you use the Golden Comb on Valanice, she will weep for Rosella having gone missing.
Not much longer now. We get the usual boss rush, then face the witch responsible for everything to conclude a rather interesting game.
Area 5-6
There will be crushers throughout the stage and power-ups falling from the sky in an endless vertical loop. Be careful as you make your way to the exit and grab as many keys as you can.
Area 5-7
There will be a cannon to the left of the start. Head the magic bubble and power up to the basketballs as you loop all the way back to the cannon, then let the apples have it.
Area 5-8
This level is a bit maze-like, but you can use the cannons to launch your way through the level to speed up the key-gathering process as well as get away from the raven...sometimes.
The bonus area entrance is hidden in the wall just below the exit.
Bonus area
There are two conveyor belts at the sides, but the center is ice floor, so be careful. As long as you don't have to move a whole lot, you'll be fine.
Area 5-9
There is another bonus hidden in the wall to the right of the exit.
If you're going for keys, see if you can head the magic bubble and create basketballs to take out as many melons as possible.
Area 5-10
This vertically looping stage is rather vast. There will be nests controlled by a switch and a few enemies carrying keys, but there is a lot of space, so be careful.
Boss 5
The boss here is Vito Mascutone. He will fly around in circles while tracking you, but if you are far enough away, he can't hit you while doing that. Your best bet is to stay in the corner, since you can avoid him from there sometimes and he will move away from you when he reaches the wall. Take the opportunity to head the magic bubble and hit him with volleyballs and basketballs (preferably volleyballs, since they can keep him stunned for a little while).
When he stops in mid-air, he will send his children after you. Be ready to jump over them, and at the same time, try not to get hit by him.
Area 6
This area is a boss rush mode. Here, you'll be facing all of the bosses in the order that you faced them. Same strategies apply. The only difference is that you won't get a 1-Up after every battle, as you'll just get five bonus coins every time.
From the video description:
NOTE: I accidentally edited out the Watermelon boss (6-3) for some reason. I think it was because I had to pause the recording at one point and take care of something and when I was removing that blank spot, I cut too far and too much. Oh well....not a whole lot to mention, just because it's literally the same fight as 3-11 with the constellation background. Sorry about that guys.
When you beat the first five bosses, you'll face Morticia, the evil witch who is responsible for all this. When she gets above you, avoid the sparkles that come out of her broom and hit her with baseballs. Be ready to stay out of the way when she drops down.
After enough damage, a small witch will move back and forth. Keep hitting her, and after some time, she will turn into Morty Crow. Stay under him when he stops and shoots feathers downwards, and keep hitting him with baseballs. When Morty Crow goes down, he goes back to being the small witch, which is Morticia's real form. After enough time passes, Morticia will become Morty Crow again.
Once you do enough damage to Morticia, you'll get 5000 points for every hit point/life you have left and you'll beat the game! Congratulations!
Welcome to the underwater world. Be ready to jump up and avoid monsters as soon as you start the stage.
Area 4-2
Once again, you're going to be dealing with statues spitting fireballs until you can get to the switch.
Area 4-3
There is a top hat at the beginning as well as a bunch of cannons. You'll be stuck in the right-hand corner fighting a bunch of melons. Thankfully, the top hat helps make quick work of them. Just don't get hit.
If you can fight off all the melons, you can get a bonus coin.
Area 4-4
Once again, birds will be chasing after you from the the center of the area. When you take out the orange at the switch, another will take its place, so be ready to take out the relief operator.
Area 4-5
This maze-like area has some crushers, and the switch is at the top-left corner. Use the magic bubbles to grab stuff, and be ready to move around the crushers as there are some strawberry enemies here.
Area 4-6
You can use the soccer balls to take out all the chestnuts at the beginning in one quick motion...and that's it. That's the level.
Area 4-7
There will be a strawberry at the switch. Take them out first, then make your way around the stage clockwise in case the canned melon takes control of the switch again.
Area 4-8
The bonus area is above the exit. To make your way up there, destroy the wall up and to the left with the attack balls.
Bonus area
In World 4, the floor is two conveyor belts.
Also, in case you can't tell, the lives and keys counters can't count past nine, but you can stockpile past those amounts, anyway.
Area 4-9
Take the baseball cap and go right for the area with the two eggs. Take out the strawberry at/near the switch, then get ready to take down the rest of the strawberries.
Area 4-10
Have a magic bubble ready for the melons that come out of the cannons at the start.
There is another bonus room hidden in the lower-right corner of the stage.
Boss 4
The boss here is Pippi Peach. Hit her with volleyballs and basketballs (especially volleyballs), and watch out for the baby peaches as well as Pippi herself when they both come down. You will have a better chance of hitting Pippi when she comes down.
Area 5-1
Welcome to the ancient city (I guess?).
Be ready to fight apples and lemons as you go up to get all the keys.
The platforms here move in rather distinct patterns. Be sure to stun the kiwis before attacking them.
Area 5-2
Stay on the platform, head the magic bubble until you get the basketball, and see if you can attack all the melons at once before making your way down. If not, be ready to use the cannons to take all the melon enemies out in this vertically looping stage.
Area 5-3
The floor with the parallelogram pattern on it is the ice floor for Area 5. The winged helmet will help you not slip on it.
The gray blocks can be destroy with attack balls. One set of gray blocks contains the Viking helmet.
Area 5-4
It's cloud platform central over here...and the apples will be your biggest threat in this vertically looping stage as you never can tell where they will drop down from. The magic bubble can be your friend.
The ice floor below the exit is the best spot to be, as this is where you will stand the best chance against all the enemies here.
Area 5-5
And now you're in a maze of conveyor belts and springs with strawberries tracking you down. This game isn't playing around. Some of the walls can be broken with attack balls.
Funny I should find this, given that Sears was saved at the 11th hour the other day. Makes me sad, as there used to be Kmarts up and down the United States; now you'll be hard-pressed to find one within 30 miles.
It's time for some more Spanky's Quest, and the game looks pretty appetizing, to say the least.
Area 2-9
You can get a straw hat as well as a 1-Up and a few coins at the very beginning of the stage, and you can get a top hat on the way back down.
After making your way back down, the bonus area will be to the left.
If you take too much time going through the level, you will hear a siren followed by some frantic music. This indicates that Morty the Crow has shown up, and Morty will chase you all over the level until you get out.
Area 2-10
There is another cannon in this level. The top hat will help you get rid of enemies easily early on.
The winged helmet lets you move faster and also keeps Spanky from slipping on the ice. Be careful when moving around so you don't stumble into other enemies.
Boss 2
Sluggo the Pineapple will bounce around. Be ready to move when he runs up to you and catches up, as that is when he will start bouncing around again. You'll probably be hitting him with a lot of baseballs, but if you can get the occasional soccer balls or volleyball, be ready to time your attacks so it hits him on the charge.
Area 3-1
Time to hit the neon beach!
Take out the oranges at the bottom first, then make your way up and use baseballs to take down the kiwis and get their keys if you need them.
Area 3-2
The bonus area is down and to the left of where you start.
Down...and to the left....down...and to the left...down...and to the left. (I know it should be "back," but still.)
The nest with the broken egg with the beak popping out sends out birds. These birds will quickly follow your around, and is yet another trap controlled by a switch. Take out the enemy at the switch, and the birds will stop coming out of the egg.
Bonus Stage
There are now two columns, one to the left of center and one to the right. At least there aren't any conveyor belts.
Area 3-3
There are a lot of melon enemies here. There is also a viking helmet at the very bottom if you need it.
Area 3-4
Welcome to another vertically looping stage. Take out the lemons with basketballs to get all the keys that you can, then hang out near the exit door to take care of any melon enemies that might have keys.
Area 3-5
There are strawberries in this vertically looping stage. You can use the cannons if you want, but you can just keep falling to get to wherever you need to go.
Area 3-6
Apples, conveyor belts and melon cans, oh my! Watch out for attacks from above by the apples, and prepare to have your platforming skills tested with the tiny platforms as you make your way up and take care of that orange on the way to the exit.
Area 3-7
Use basketballs at the start to take care of the oranges, then make your way down to fight off the melons.
Area 3-8
In yet another vertically looping area, you can use the platform on the right side of the screen, then drop down and have a baseball fall down while you do to take care of any enemies that are out of your way. It's quite fun.
Area 3-9
Take out the orange at the switch at the beginning so the crushers aren't a problem.
Hidden in the blocks below the start is a door to the bonus area.
Area 3-10
Be ready to take out an apple at the beginning. Watch out for the fireballs coming out of the stone faces at the sides.
The baseball makes it so that the magic bubble always follows you, homing in on where you are so you don't have to move underneath it to head it.
Boss 3
The boss here is Fatso the Watermelon. He will move back and forth and drop down to spit seeds at you. Since he takes a bit of time between seed spits, you can hit him with the volleyballs and basketballs really easily. Just make sure his seed projectiles don't hit you.
It's time to attack sentient fruit with sportsball! Why? I have no idea.
The game begins with a monkey named Spanky traveling through the forest when bricks suddenly start falling down from the sky. Before he knows it, he is trapped in a tower. Suddenly, a witch shows up and sics sentient fruit and vegetable minions on him. Now it's up to Spanky to get out of there.
Area 1-1
You have a bunch of melon enemies, but that's it. These guys move around fairly fast, so be careful. Some enemies will carry keys above their heads throughout the game, and this is true here. By defeating enemies, you can take these keys. You will need the keys to open the door to the next area.
To defeat enemies, press B to create a magic ball, and press it again to create an attack ball. You can stun enemies with the magic ball (and keep them in place with repeated hits from it), but you must turn it into an attack ball to defeat them.By moving under it and bouncing it off your head (which will be referred to as "heading"), you can make the magic ball bigger (as well as different colors), and more powerful when you turn it into an attack ball.
The smallest (blue) ball is the baseball, which only takes out one enemy. The green ball is a set of soccer balls that can defeat multiple enemies. The yellow ball is the volleyballs, which stay in one spot and defeats multiple enemies as they spin around before disappearing and ends up being useful in boss battles as a result. The largest (red) ball becomes five basketballs which will spread out as they drop down to cover a wide range and take out a lot of enemies.
The heads-up display is pretty simple. The number next to the tower shows which world you are in. The scroll next to the door indicates which stage you are currently in. Below all that, you have your score (which awards you an extra life every 100,000 points), the number of lives you have and the number of keys you have. Whenever you get hit, you lose a life, which acts more like a hit point than an actual life. If you lose all your lives, the game is over and you have to restart the world from the very first stage to get back to where you were.
The number of locks on the door indicates how many keys you need to open it. The one here has two; in other stages, the door may have as many as four or five. When the key icon at the top of the screen is flashing, you have enough keys to go up to the exit door, press Up and enter the next stage. Once you use the keys, however, you'll have to replace them with new ones in the next stage.
Area 1-2
The oranges move back and forth. If they are on platforms, they will look down before deciding not to jump off the platform and instead walk to the other side, and will continue to do this.
If you go to the far right and send attack balls through the blocks near the wall, you will find a gold door. Entering it takes you to a bonus area.
Bonus Stage
In the bonus stage, you will be bouncing a huge ball off Spanky's head for a ton of points. If you bounce it enough times, you will get a few coins for some extra points and a 1-Up as well as the door to the next stage. Just make sure the ball does not phase through the wall, or else you will lose it. Regardless of how you do, you'll be able to head to the next stage anyway (and if you collected all the keys before this, you'll have a key surplus).
The more coins you pick up without losing a life, the more points you will get from each coin you pick up.
Area 1-3
If you need a key (or want to keep the key surplus going), go all the way to the right. Be sure to take care of all the oranges, too. Thankfully, the door here only needs one key.
From here on out, you can either choose to use your surplus keys to breeze through a few levels or go through the stages and stockpile more. Stockpiling can help, especially in later stages.
Area 1-4
More oranges and keys here. The purple pads with the star on them will bounce you up to the exit platform.
Area 1-5
The lemons fly around, and when they come to a stop, they look around before going in another direction. Take them out as you see them on your way up, since you can't hit them while they are off the screen.
Area 1-6
Throughout the game, there are hats you can pick up which will let Spanky do cool things. If you get hit by enemy, you will lose the hat. Enemies can also take the hat and wear it, but you can take the hat from them as well.
The top hat, when picked up, allows you to increase the magic ball to its biggest size after bouncing it off your head once.
Don't forget the 1-Up at the bottom of the stage.
Area 1-7
The apples bounce around as they move left and right.
As you defeat enemies, there may be cans that have a fruit on them. When these cans shake, the enemy pictured on them will spawn out of the can, which will disappear.
Area 1-8
The kiwis will charge at you if they see you.
Area 1-9
The chestnuts jump around when in their bushes. You can hit them whether they are in their bushes or not, but a baseball from above will bounce off in bush form.
There is a bonus room door hidden in the lower-right corner of the room.
Area 1-10
The strawberries are pretty fast and are willing to go anywhere. They can fly up and down if need be, and they also will stand around once in a while and either brush their leaves when allowed.
Boss 1
Mac the Apple is the first boss. He will slowly fly around and dive at you if he reaches the ceiling every now and then. Keep heading the ball and hitting him with soccer balls, volleyballs and basketballs. Volleyballs work well if you can get him in the corner.
When you beat Mac, you'll be able to get a 1-Up as well as a few coins.
Area 2-1
You'll go from an area full of ivy-covered walls to a city with newspaper clippings making up the white background for both the clouds and the vehicles going by. This is also the first place where you will see more than one kind of enemy at the same time; in this case it is the melons and the oranges.
The conveyor belts will move you in the direction they are moving in, which can be figured out at a glance.
The viking hat is hidden in one of the sets of blocks and can be freed by attacking it with attack balls; this hat will allow you to take three extra hits (and kill the enemy that touches you!) before it disappears.
Also, Area 2 has some really good music.
Area 2-2
Be sure to hit the springs with attack balls if you can; you might find a hidden 1-Up and some coins as you fight off the oranges on the platforms.
Area 2-3
The black and purple things that look like fish on chains are really crushers. Wait for them to drop down and then come back up to move on. If you can get to the enemy controlling the switch and attack them, you can stop the crushers.
If you make the magic bubble big enough, you can use it to collect an item out of your reach and get it closer to you when you turn the magic bubble into an attack ball.
Area 2-4
There will be multiple types of enemies here. Be careful on your way up.
The bonus area is hidden in the set of blocks in the lower-right corner.
Bonus Area
In Area 2, the bonus areas have conveyor belts on the floor.
Area 2-5
The straw hat allows you to slow down while falling by holding Down on the Control Pad.
The cannon shoots you forward when you jump into it, and will allow you to attack all enemies in your path. The enemies can use it, too, so be careful!
Area 2-6
The statue heads will spit fireballs forward, and the fireballs can travel a good distance. Once again, if you can beat up the enemy at the switch controlling it, you can stop the fireballs.
Area 2-7
To reach the key at the bottom of the stage, you must make it to the top, as the stage vertically loops. This won't be the last time this happens in the game.
Area 2-8
Be ready to launch some attack balls and leap to higher platforms to clear out a few enemies before moving around here. The shiny blue platforms are icy platforms, and they make Spanky slip around.
Controls
Control Pad: Left and Right allow for movement, Up opens doors with keys
Hat tip to StrategyWiki for getting some stuff figured out.
If you can keep the submarine icon near the cross to the best of your ability (and with that, under the USS Coontz), you'll get maximum points when you reach the upper-right corner of the screen.
Afterwards, the Captain will come back, still a bit weak from the concussion, and congratulate you before asking you to come to periscope depth and speed. After that, they can have a look around.
Get the depth gauge to 70, then move the engine lever so that only one light is on above it. When the captain says you did a good job and to see what is out there, stand up. The captain will say that there is more on our hands than anticipated and that a gunboat is out there keeping a close watch on the harbor entrance. Head to the periscope and take a look.
Use the left and right buttons to look around. The heading of the periscope will be in the lower right corner. At 282 degrees, you will see the oil rig mentioned in one of the messages that you must destroy through means other than your weapons. At 40 degrees, you will see the harbor being blocked by a ship. Press down to exit, then go up to the sonar man and ping the oil rig. You will learn that the rig is 2850 yards away. Ping the harbor, and you will learn it is 1640 yards away. Be sure to get the distances to get points.
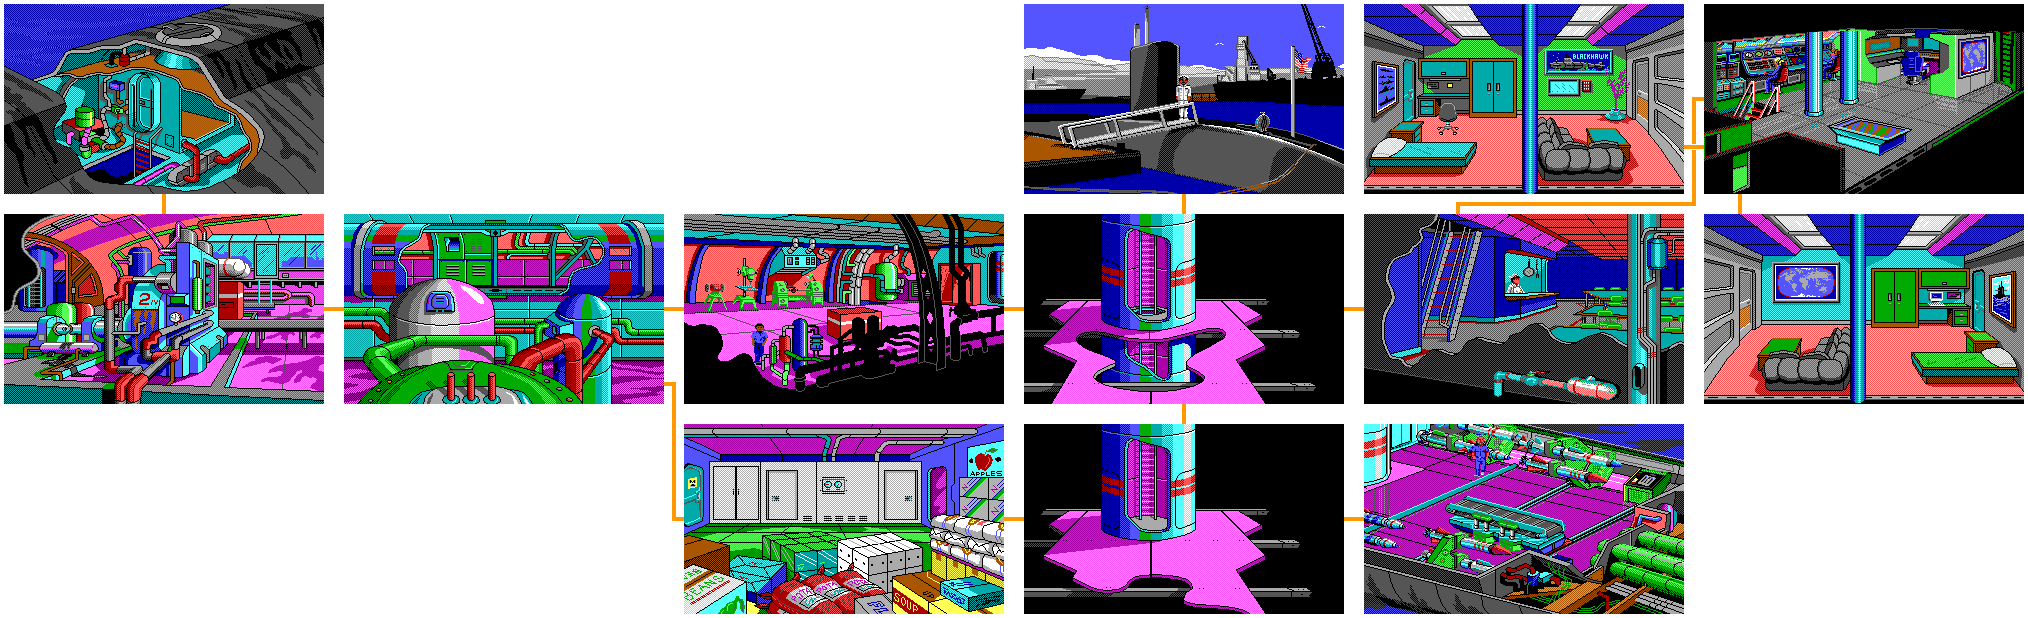
Go down the stairs and head west to the elevator. At the machinery room, talk to the man there (whose name is Johnson) and ask for the key. You will get the key to the hatch. (If you ask for it any earlier than this, he won't give it to you; you have to get through all the navigation stuff first to get it.)
Go back to the ladderwell and climb down. Go to the torpedo room and head to the cabinet in the northwest corner of the screen. The cabinet will open and you will see plastic explosives for underwater demolition and two boxes of flares. Get the explosives and the flares (get the flares twice), then head west to the storage room and enter the cabinet near the door to the west. Johnson will show up and take the scuba gear to the escape hatch for you, then leave.
If you want, you can go through the door to the west with the radiation symbol on it and expose yourself to the radiation of the nuclear-powered engine of the USS Black Hawk. Save before you go through this door, as you will not be able to avoid dying after doing this. You will not die in the room, but if you go back to the storage room, you will.
From here, head back to the ladderwell and climb up. Go west to the machinery room and keep going west to the escape hatch. Press the button at the hatch, then get the diver. Check the diver. You will see that is runs fine except for a slight vibration. If you examine it, you will notice it is coming from the shaft. Examine the shaft, and you will learn that a nut and washer used to secure the prop are missing.
Measure the shaft. You will learn it is 1/2" in diameter. Drop the diver to place it back in the compartment, then head to the machinery room. Go to the cabinet and get a 1/2" washer and a 1/2" nut, then close the cabinet. Head back to the hatch and open the drawer of the nearby cabinet. Put the hammer back in the drawer, then get the 1'2" wrench and close the drawer. Get the diver again, then install the washer and the nut to the diver. Since you have the 1/2", the washer and the nut will be installed. Make sure to tighten the nut down. Check the diver again, and you will notice it runs smoothly. Go back to the drawer and put the wrench away, then close the drawer again.
Get the diver one more time, then enter the coordinates. For waypoint #1, enter "2850" for the distance and "282" for the heading. For waypoint #2, enter "1640" for the distance and "40" for the heading. You can now climb the ladder leading to the escape hatch.
At the hatch, open the door, go in and wear the suit. As you do this, you will press the button that fills the hatch up with water. If you press the button without wearing the suit, YOU WILL DIE. You will then leave the submarine through the hatch and enter the open sea. With the distances and headings entered, you'll be able to go to where you need to go instantly.
As you swim, watch your heading, the amount of yards to your target and the amount as well as your air. Swim to the west until your heading is 321 degrees with 525 yards to go, then go north until you reach your destination. When you see the oil rig to your left, go west and place the explosives on the rig. Westland will place the explosions and start the timer. Go east immediately. Keep going east. At 71 degrees with 1650 yards to go, the explosives will go off and destroy the rig if you kept going east immediately after planting them.
At 11 degrees with 600 yards to go, go north. Keep going north, and you will make it to the ocean floor. If you won the magnetic device in the card game, you can just go north and this part will be over. However, if you don't, you will have to do this the hard way. Thankfully, the hard way gives you more points. Here's how you do it.
Go west two screens until and enter the cave in the background. If you haven't won the bottle from the card game, you will find a bottle in a rocky hole two screens in in that direction. Just approach it and get the bottle. After that, enter the cave in the background. When you go in, light the flare. The first one will be a dud, but the next one won't be. Notice that a trace of the flare will be moving north when the flare goes out. Go north, then light a flare again. Once again, the first flare is a dud, but the second one won't be. (Good thing you got both boxes of flares, huh?) The game will hint that you need to go west next. Go there.
It should be noted that using the flares gives you points.
From there, the flares will tell you to go north, then east, then east again. However, if you go north again after going north the first time and then go east, you'll end up at the same place early: a wall of rocks. Pass through the gab in the southeast corner of the wall. From there, go south and then east. If you have yet to light all your flares, do so now before you run out of air and before you go east. The maximum number of points you can get from the flares is eight.
There. You've made it past the magnetic field and got even more points. Go north.
Go east on this screen. A net will show up, Put the bottle in the net. The net will rise up into the water. Wait a little while, and the net will come back. Go east two screens and hide the diver, then go back to the screen with the net and go north. (You can hide the diver before putting the bottle in the net if you need to.)
When you surface, walk up to the fisherman to the west. Type "say Iceman," and Westland will mention the code name of Iceman in Arabic. The fisherman acknowledges by shaking his head and handing you a fish. Look at the fish, and you will notice a line sticking out of the mouth. Remove the line, and you will notice something attached to the line just above the hook. This is the weight. Look at it, and you will learn it is actually a small capsule. Open the capsule, and you will find a small map. Look at the map. You will learn the directions to your disguise.
From here, go towards the background and west behind the wall. Enter the door to the west and go behind the open window. Look around and you will find a wooden crate in the corner. Open the crate and you will find clothing. Get the clothes, and Westland will automatically swap the diving suit for the clothes as well as drop the fish and the map so you aren't given away.
Head to the east from here, then go north. At the fork, go west and you will find the oasis. Talk "say iceman" to the woman there, and she will respond in English. It's Stacy from Tahiti! She will wish you luck on the remainder of the mission, From here, get the map from Stacy. She will give you a map, a key to her apartment and a phony ID. Stacy will tell you to find your way to the apartment so she can meet you there later. She then tells you she will make contact with the USS Saratoga and let them know that everything is on schedule, and that there are things in the apartment for you in the kitchen.
Look at the map and you will get directions to Stacy's apartment. Be sure to give the map back to Stacy to get another point that is easy to miss and to keep your cover from being blown.
From the oasis, head east two screens, then head north, then head west. The doors on the northeast corner of the screen is the apartment. Approach them to enter.
In the apartment, go up to the small canister on the counter and grab one of them. Open it, and you will find coffee. Search the canister, and you will find nothing. From there, drop the canister and grab the medium canister. Open it up and search it, and you will find flour and nothing else. Drop the medium-sized canister and grab the large one, which will be bottom-heavy. Open the canister to find sugar. Search inside to find a false bottom on the canister. Empty the canister to pour out the sugar, then open the bottom to find foam rubber underneath. Take it, and you will find a weapon. Take the weapon. If you look at it, you will learn that it is a gun that shoots tranquilizer darts.
Go up to the refrigerator and take the tape sitting on top, then open the icebox. Look inside and you will find food. Drink the remaining, milk, eat the entire block of cheese and get the butter dish. Open the dish and you will find a plastic bag that appears to contain a folded piece of paper. Remove the folded piece of paper, which will return the butter dish to the icebox. Close the icebox, then read the paper. You will learn that a catering business by the name of "Bagdad's Fast Foods" makes a twice-daily delivery to the compound, and that both deliveries are at the same time each day. Stacy's log file also reveals that one of the two guards will search the caterer prior to entry, and that the guard then always accompanies the caterer inside.
Go up to the north wall and take the green business card off the wall. Look through the window. You will see the caterer do his delivery. Look at the card, and you will see it is a card for Bagdad's Fast Food Catering Service. Another phone number will be written on it in blue. Use the nearby phone and call the number that is written in blue. You'll get a man named Basal. Talk to the man, and Westland will explain that a new caterer will be making the delivery to the compound. You now have a way in.
Use the phone again, then call the number that was in red. You will call the catering service. Talk to the man on the other end, and Westland will place an order with a phony name and the apartment number (which is 84). When the caterer hangs up, wait at the door. You will hear footsteps outside the apartment door followed by a knock. Open the door, and Westland will let the caterer inside. He will lay the order down on the kitchen counter, he will ask for money. Use the gun on the caterer, then take his uniform. When he undresses, use the tape to bind the hands and feet and tape his mouth shut. West will don the caterer's uniform as a disguise.
Wait there, and Stacy will show up, asking you if you found the weapon and the notes. When she arrives, say yes. Stacy will tell you that they must work quickly, as the Ambassador is going to be moved. Stacy then leaves to contract her superior and arrange for a helicopter before advising you to take the caterer's van and begin the rescue. She also tells you to conceal the weapon.
Leave the apartment and get in the van. You will take the van to the compound. Hide your weapon in the food, then get the food and open the door to step out of the van. Walk up to the guard, and Westland will identify himself with the fake name. With the gun in the food, the search from the other guard will produce nothing. You will be lead to the Ambassador.
Put the food on the table, then open the lid and get the gun. Shoot the gun, then quickly shoot again. You must enter both "shoot" commands twice quickly enough, or else you'll have to start this over. Go up to the Ambassador and free him, then look at the guards. You'll notice that one of them is wearing a ring with a KGB symbol, revealing that the Russians are in on this. Tell the Ambassador to change clothes by typing "change clothes," then type "leave."
On the way out, the guard will point his gun at you, but Stacy will shoot him in the head, killing him. The three of you will get in the van.
From here, you will have to drive the van to the helicopter in this last scene. Use the Left and Right arrow keys to turn, and Up and Down to go faster and slower respectively. You will need to speed up to get over the hills and slow down on the turns to avoid crashing into the wall, and you do not want to make a wrong turn unless you want to tip the van over and cause it to roll over the edge, killing the three of you. Whatever you do, do not let the enemy's vehicle catch up with you.
You can skip this segment by pressing F8, but you will miss out on points if you do this. You must complete this section the hard way to get a full-points run.
When you make it to the top, you will get in the helicopter and head to the USS Saratoga.
From here, you get the ending sequence. Westland attends a mandatory debriefing with the Captain and his staff where you learn that the terrorist group guilty of the abduction of Ambassador Loyd was infiltrated by the KGB, who instigated the abduction knowing the incident would strain relations between the United States and Tunisia, causing Tunisia to sever relations with the United States and halt the oil trade, giving Russia most of the oil, if not all. This would have had definite negative impact on the U.S. economy.
Thanks to Westland's efforts, the tables have been turned on the KGB, and the KGB's devious methods of operation will be exposed to the world. The Captain then congratulates you, and announces that a special award ceremony awaits you on the flight deck.
On the flight deck, the Rear Admiral awards Westland with his Submarine Warfare Insignia (aka "the Gold Dolphins") and the Naval Distinguished Service Medal. After a salute, Westland is promoted to Captain. Westland kisses Stacy, and the game ends.
And with that, you should have 300 points! Enjoy the credits!
This one's even longer...and at this point, the adventure is nearly over. However, this is probably going to be the most difficult stretch of the game.
Hat tip to StrategyWiki for getting some stuff figured out.
From the galley, go est under the stairs to go back to the ladderwell. Go west again to enter the machine room. Going west again will take you over the nuclear reactor. Going west still will take you to the engine room. If look around in the engine room, you will find a ladder leading to an escape hatch toward the stern.
In the engine room, go up to the red box near the ending, open the drawer and get the hammer, Close the drawer, then go back down the ladderwell and go east to enter the torpedo room. Talk to the man there (who is the same guy you gambled with) and he will tell you that his equipment sounds a bit strange and that there could be a problem. If you go up to the console on the east and start a test, you will see a torpedo placed on a conveyor to be placed in a tube. As this goes on, you will notice that the conveyor will not feed the weapon towards an open torpedo tube.
Examine the conveyor belt that the torpedo was placed on. You will find a sheared cylinder and remove it. If you measure the cylinder, you will find out that the diameter of the sheared cylinder is 1", and the cotter pin hole is 1/4". Unfortunately, you cannot tell how long the cylinder was because it has been sheared off. Measure the belt, and Westland will determine the replacement cylinder must be 6" long and 1" in diameter.
Go back to the machine room. Open the cabinet near the door and get a cotter pin. Measure the pin to make sure it fits in a 1/4" hole. You will find out it is two inches long and that it will fit a quarter inch hole. From there, get a cylinder, and when asked what size, pick 6". Close the cabinet, then go west to the lathe and put the cylinder in the lathe. Set the lathe to a 1" diameter, then turn the lathe on. You will cut the cylinder to a 1" diameter and take the cylinder back. Go west to the drill and drill the cylinder, then type "select bit" and select the 1/4" bit. Then, turn the drill on. When the drill is turned off, go to the grinder to the west to grind the edges off the cylinder. Measure the cylinder again, and you will find out it is 6" long and has been milled to a diameter of 1" with a 1/4" hold drilled near one end and the rough edges ground smooth.
Head back to the ladderwell and climb down the ladder. Go back to the torpedo room and install the cylinder into the conveyor. Install the pin (make sure you have the hammer; if you don't, go back to the engine room and get it), then start the test at the console again. This time, the conveyor will successfully feed the torpedo into the tube.
From there, head back up to the galley and climb the stairs back up to the bridge. The Captain will be back, and he will ask you to take the helm so he can direct you to the next radio contact. Here's what to do:
"Maintain current heading." You don't need to do anything here.
"All ahead full." Move the engine lever so that all four lights above it are lit up.
"Set depth to 300 feet." Move the dive lever so that the depth gauge reads 300.
"Acknowledge when depth obtained." When you get the depth of the submarine to 300, type "depth obtained."
"Aye aye, Commander! Maintain course and depth." You don't need to do anything here.
"Reduce speed to 2/3." Move the engine lever so that only three lights are on above it.
"Make your depth 100 ft." Move the dive lever so that the depth gauge reads 100.
"Ahead slow." Move the engine lever so that only one light is on above it.
"Surface." Move the dive lever so that the depth gauge reaches 35.
From there, the Captain will tap you on the shoulder and tell you that your shift replacement is here, You and the Captain will then go topside while radio makes contact.
Stand up, then Westland will follow the Captain up the ladder to the east. You and the Captain will scan the horizon. Talk to him, and he tells you that there are a couple of ships on the horizon, with one bearing down on the USS Black Hawk and another appearing to head port to starboard. Westland looks through the binoculars, then the Captain sizes up the situation and notices that the two ships are Russian war ships, with one of them heading right for the USS Black Hawk. It is now time to get back to the controls, but as you do, the Captain gets a little too excited and falls on the way down the ladder, hitting his head on the floor and suffering a concussion. As the Captain gets medical position, it is up to you to get the USS Black Hawk out of danger.
Westland will go back to the controls. You'll find out that a Russian destroyer is 18,800 yards away and closing. You'll then learn how the tactical display works.
The top (white) bar extending from the right represents the approaching enemy vessel. Other bars extending from the right represent the approaching enemy weapons.
Lower (black) bars extending from the left represent your weapons approaching the enemy.
Activate Silent Running Mode (press Shift+F4, or click on the triangle shaped button above the throttle speed indicator lights), then press the Fire Control Panel Activate Button (you can either click on it with the mouse, or use Shift+F2). After that, dive down to 600-700 feet and maintain a slow speed.
Let the enemy attack first. ALWAYS. OTHERWISE, YOU WILL GAME OVER.
When you see the schematic of the missile, select a decoy (either use Shift+F5 or press the first button on the Fire Control Panel), lock (with Shift+F6 or the second button on the Fire Control Panel), and fire (Shift+F8, or the fourth button on the Fire Control Panel). Hopefully, the decoy will attract a torpedo.
The harpoon has the three sets of "wings" on the side and has that small dark tip. The torpedoes are long and have the green tips on the sides on them, and have a narrow tip. The decoy is shorter than the other two missiles. You only have a few of each weapon, so be careful.
When you see the top white bar extending from the right appear, be ready to fire the missiles. Select the missiles, then save your game first before you fire. If the lower black bar on the screen goes all the way to the right, that means you missed. Restore your game if that happens.
If any bars below the top one near the red ship symbolizing the Russian destroyer go all the way to the left, that means their torpedo missed you.
Once you're close enough, select the harpoons (stingers) and fire. You only have four harpoons, so make those count and remember to save your game, too.
You can only take three hits before the USS Black Hawk sinks. Once you've taken three hits, the Black Hawk is dead in the water and the game is over.
Once you've destroyed the destroyer and taken care of all of the enemy missiles, the sonar will be silent and the coast will be clear. You'll then get coded messages again.
Stand up, then talk to the radioman. You'll get a coded message from Washington and a coded message from the CIA. Here are the examples Chris gets (yours, once again, may be different):
Washington messages: FF-F-C, FH-E-D (11-1-6) (15-2-4)
CIA messages: E-A-J, BE-D-G, (2-0-9) (10-4-3); (5-3-2) (15-7-6) with Navy offset
Go back to the computer in Westland's cabin and dig out the technical manual again, and start doing the whole "page-line-word" thing again.
Numbers higher than 10 are handled interestingly with the coded message. If you have two letters and the first one is a F (which is a 1), that number acts as a "tens place." If a two-letter combination starts with anything other than F, then you have to add the two numbers together. Therefore, "BE" will be 10, and not 82. (If it was 82, you'd be getting nowhere fast, believe me.) By going up, you go to 13, which doesn't have a red box with code words. Therefore, it goes up two pages to 15. In case that happens, you'll know why. (At least, that's how I think it works.)
Remember that you have to go up three with the numbers on the CIA messages, as per the offsets mentioned on the microfilm.
Using the examples Chris has, the primary word key is "redwood" and the secondary wood key is "steer" for the Washington message. The Washington message reads as follows:
Contacting fisherman...
After exiting water,
contact agent for further
instructions
It looks like this goes with the other Washington message.
For the CIA message, the primary word key is "destroy" and the secondary word key is "directly." The CIA message reads as follows:
After polar crossing is
achieved...
Do not surface for remainder
of mission
Once we're past the North Pole, we cannot surface the submarine for any reason or else we may compromise the mission.
From here, go back to the controls of the submarine. Be sure to slow the game speed down and save if you need to before getting back in the control seat. Sonar will report many icebergs. Turn on the closed circuit monitor (either press Shift+F1, or press the green button above the Fire Control Panel Activate Button). Then, make sure the the engine lever down so that only one light is and the speed indicator reads five (5) knots.
When the music starts, use the wheel to drive away from icebergs and make sure they do not hit you dead center on the screen. It may look like some may hit you, but if they are not fully visible when they are super close and they are not dead center on the screen, you won't have much to worry about. If you can make it past all the icebergs without getting hit once, you'll get full points. You can take up to three hits before sinking, and if you take hits, you can survive, but you won't be able to get the full amount of points. Hope you saved before you did this whole sequence!
When you make it through the ice pack, there will be a break in the ice. You will also pick up and active sonar on the 150 degree arc, 100 miles south of true north.
Contact the station, and the radio will report the contact. Turn off the closed circuit TV monitor. The radio will be standing by with a coded message.
Stand up and talk to the radioman again. You'll get a coded message in alpha from Naval High Command in Washington, D.C. You'll also get a coded message from the CIA. Once again, they may be random, but here's what we get in this video:
Washington message: J-G-F FH-I-C (9-3-1) (15-7-6)
CIA message: E-A-J E-E-F (2-0-9) (2-2-1); (5-3-2) (5-5-4) with Navy offset
Go back to Westland's cabin and go to the computer.
Going by the examples once again, the primary word key is "latitude" and the secondary word key is "directly" for the Washington message. The Washington message reads as follows:
Rendezvous with USS Coontz...
36 degrees latitude 12
degrees longitude.
Listen for erratic sonar.
At that time, signal
presence with one active
ping.
Pass through straits
under Coontz
So when we make it to our destination, we will have to get to where we need to go with another ship. We just have to know how to tell them who we are. Interesting.
For the CIA message, the primary word key is "destroy" and the secondary word key is "coontz." The CIA message reads as follows:
Diversion tactic necessary
Locate nearest off-shore
drilling rig and destroy
Do not use Blackhawk
weaponry
This will definitely come into play later, as will all the coded messages.
From here, go back to the controls of the submarine. This time, there is an inversion layer at 1,000 feet. Move the dive lever so that the depth gauge reads 1200, then activate silent running. Later, you will be pinged by a Russian submarine, triggering another battle.
This time around, if you get hit once, the game is over. If you see any torpedo lines extending from the right, fire a decoy to get rid of it. (The inversion layer is supposed to divert the enemy torpedoes, but all of them will hit nevertheless.) Use your torpedoes to destroy the sub, as your harpoons will be useless (assuming you still have any). Save your game before firing any torpedoes (which you should do when you see the thin white line at the top extending from the right), and restore your game if they miss. When two torpedoes hit the enemy submarine, all you have to do is deal with any enemy torpedoes and you should be good.
And as always, let the enemy attack first.
After you beat the submarine, you'll be off the coast of Portugal. You will get single pings coming at irregular intervals. Press the Sonar On/Off button (which is to the left of silent running button and indicator lights), then press it again immediately. The pings will stop. You will have contacted the USS Coontz and properly identified yourself. The mission will continue as planned. The aerial view will be shown on the monitor, with the USS Coontz displayed as a cross.
Bring the submarine (which is you) to the cross. If you can get directly under the Coontz, you will give the maximum score of five points out of five.
From here, keep the submarine icon right where the cross is with the Left and Right arrow keys. Be sure your speed is matching the Coontz, and that you aren't going too fast or two slow.
The Coontz will move straight up for a while, moves over to the right for a while, then goes straight to the right. When it turns right, set your heading to 45 degrees and adjust as necessary.
Hat tip to StrategyWiki for getting some stuff figured out.
After getting your half of the combination right, the briefcase will be opened. Inside is an envelope. Open the envelope, and you will learn that inside are a chart and a set of orders. By reading the chart, you will learn that your destination will be over the Mediterranean. By reading the orders, you will be asked to commit the words on the orders to memory before destroying them, as the expediency of the mission is of utmost importance to the survival of the Ambassador.
You will be asked to use extreme caution navigating the Bering Sea, as the USSR is threatening a blockade of the Straits due to claimed violations of United States military operating inside her territorial waters. Washington has denied these accusations and has issued a counter-communique warning the Soviets that appropriate action would be taken if any blockade is encountered.
The orders are as follows: "Arrive Mediterranean at 12 degrees longitude and 36 degrees latitude no later than 0700 January 29th. Rendezvous with female CIA agent at nearby oasis at 1000 hours January 29th. Come to periscope depth at 0930 hours this date for further coded messages.
Your destination is the Mediterranean Sea and the east coast of Tunisia. The route you must follow will include the following areas: Bering Sea, Bering Straits, Arctic Ocean, Greenland Sea, Denmark Strait between Greenland and Iceland. Proceed south through the North Atlantic, east through the Straits of Gibraltar into the Mediterranean.
From time to time you will receive additional orders by radio. Good luck and Godspeed!"
From here, the Captain will tell you that he will handle the destruction of the orders before telling you to make sure you figure out the coordinates of the proposed route and enter them into the computerized charts table. You will have to do this before you can continue.
Before you go, type "get combination." The safe combination is "23448803" and the briefcase opens with "762134." After that, exit out of the Captain's cabin or else you will get fired and the game is over. (Yes, this can happen. Thanks to StrategyWiki for making this known.)
The computerized charts table will be the table on the center of the bridge, and when you type "look map," you can plot out your route. To get started, type "plot course." From here, you can use the directional keys until the latitude and longitude you have calculated are displayed. If you need to change a waypoint you have already entered, type "change point." When entering the last waypoint, press the Enter key twice.
When entering your way points, you must be able to deviate no more than nautical miles from an optional course. The ones used here are pretty close to an optimal course and will be accepted by the on-board computer:
30 N, 170 W
72 N, 170 W
86 N, 86 W
83 N, 2 W
65 N, 23 W
36 N, 12 W
If you are off by a little bit from the 36 N, 12 W coordinates, you'll eventually have 36 N, 12 W as your final waypoint anyway. You may be off by 50 nautical miles, but you will still get full points.
After that, you'll be directed to the next radio contact. Time to take control of the submarine and
"Maintain current heading, Commander." Don't do anything here.
"All ahead 2/3." Move the ending lever up so that three lights are on above it.
"Set depth for 300 feet." Move the dive lever down so that the depth gauge (the top numerical in the column of five on the far right) reaches 300.
"Acknowledge when depth is obtained." When you reach 300 or get very close to it, type "depth confirmed."
"Aye aye Commander! Maintain course and depth." Don't do anything here.
"Sonar contact. Twin screws bearing 330 degrees off port bow. Range 17000' and closing. Stand by for signature identification. Sonar computerized signature scan. Friendly. Type... French "Frigate." Class... "FL 3000." " You don't need to do anything here.
"Come to periscope depth." Move the dive lever so that the depth gauge reads 70.
"Reduce speed to 1/3." Move the engine lever down so that two lights are on above it.
"All ahead slow." Move the engine lever down a little bit more so that one light is on above it.
"Commander... Radio is standing by with coded messages." Type "stand." Talk to the radioman (the one with the brown hair). You will get a coded message from Washington. They will be different every time you play. You'll also get a second coded message from CIA command headquarters. Be sure to write them down if you need to.
Washington message: I-I-I J-C-D (7-7-7) (9-6-4)
CIA message: E-E-F C-A-B (2-2-1) (6-0-8); (5-5-4) (9-3-1) with Navy offset
From here, you will need the manual. Enter the captain's room, which is the darkened doorway to the west. Go to the safe, and type "enter code." The code is "22348803." You'll open the safe, and Westland will get the briefcase. Enter "762134" when asked for the briefcase combination. Insert your ID card into the slot, and you will convert it into a microfilm viewer that magnifies microfilm so it is readable.
Insert the microfilm. You will get some CIA decoding offsets to Washington codes by branch:
A = -2
N = 3
AF = -1
M = 5
A is Army, N is Navy, AF is Air Force and M is Marines. Obviously, we want to use the Navy offset.
Close the briefcase. You'll get your ID card, and Westland will place the briefcase back into the safe. Leave the Captain's cabin, then enter your cabin, which is directly across from it. Use the computer. Because you met with Stacy and got her earring, got your correct ID from the Pentagon and asked the Captain for his combination when you had the chance, you'll be able to decode the messages.
The Washington message is "I-I-I J-C-D." Using the code book, we find out that the two messages are 777 and 964, respectively. The first number is the page, the second number is the line and the third number is the word. Pull out the technical manual, go to Page 7 and look at the red box with all the random words in. Go to the seventh line, and input the seventh word in that line for the primary word key, which is "ship." For "964," go to page 9, go to the sixth line and insert the fourth word for the secondary word key, which is "russian."
You'll get the following message:
Contacting fisherman...
Locate fisherman's net
Signal you presence by
placing a bottle in net
When way is clear...
Fisherman will remove bottle
Recieve next communique at
next waypoint
"Receive" is spelled wrong, obviously.
When asked if you want to decode another message, press Y.
Now for the CIA one. E-E-F and C-A-B are 221 and 608. However, there is an offset of 3, since we are currently in the Navy, and we need to take all the numbers in each coded message and add three to them. All the numbers go from 0 to 9, and if you go past 9, you roll over to 0 and continue from there. Wit that, 221 will be 554, and 608 will be 931. The primary word key will be page 5, line 5, 4th word. In this case, it is "coontz." The secondary word key is page 9, line 3, 1st word. In this case, it is "latitude." You will get the following message:
Russian war ships on patrol
Use extreme caution in Bering
sea
Use alternate entry to
harbor
It looks like the Russians will be on patrol in the Bering sea, and you will have to be careful by taking another route.
Leave your cabin. From here, go down the stairwell near the sonarman (the guy with the blonde hair). You'll enter the galley. Get the bottle on the table. As you try to get it, a man will enter the galley and ask if you are interested in wagering a $10 bill for his bottle of rum. Type "yes," and you'll play a dice game with the man. Hope you have the technical manual and it's set to page 30, because you're going to need the dice game instructions.
Before we begin, it should be mentioned that you can only save three times during a dice game session; otherwise you will be accused of cheating and you'll game over. Also, you can play with either the directional keys or the mouse.
Both of you will roll, and if you have the better hand, you will be the Boss. The Boss will be able to call the game based on the strength of his hand.
From here, highlight the die/dice you want to get rid off, then select "R" to Roll. After this, you can select "C" to tell the opponent to "come on up" and try to beat your hand, or you can select "N" to start the round over. If you start the round, both players start over clean.
There are some special rules. If you become Boss with two pairs, you cannot roll for a full house and you must roll three dice. Also, if both players have two pairs, it is a push, or a draw. If one player has one pair and the other has two pairs at the start, and they both match on the high pair, it is also a push.
If your opponent cannot beat your hand, you win a round. If you can win two rounds, you'll get the bottle.
The hands you can win with, from best to worse, are as follows: Five of a kind, four of a kind, full house (three of one number and two of another), three of a kind, two pair, and one pair. (Straights are not counted in this game and are considered "high card.")
If your opponent is the Boss, you will not be able to see your opponent's second roll, should he do it, so you will not know the strength of his hand.
Once you win the bottle, you can play again two more times, one for the man's money and again for the KGB's magnetic device he has that neutralizes magnetic fields. Keep on playing, save when you absolutely need to, and don't give up. This might take a while.

