Yep, these videos again. Big brownie points for getting the last two deaths, one of which involves waiting 5 minutes and the other for 40. Play 'em off, MrWhitman!
Tuesday, May 31, 2022
PrinceWatercress plays Sumo Fighter - Part 14 of 15
The only good thing about this stage is that I only have to play it one more time.
Super - Stage 4
Stage 4-1
The angry white birds start showing up in numbers here. Be careful not to get knocked into the pits on the way to the end. One of the pits even has a guy dropping straight down from the sky as you jump over it. Not fun.
Stage 4-2
Remember that thing I said about leaving the pots near the pits alone so you can make better jumps? You'll be doing it here, especially when you'll have the parasol yokai showing up on the other sides of these jumps. Be sure to scroll the screen as far to the right as you can as you do this.
Stage 4-3
This is where it gets hard.
When you reach a pit with blocks on the left side of it, leave the blocks alone. You'll need them to make longer running jumps. Just like with Stage 4-2, scroll the screen as far to the right as you can so you can spawn the hawks from Stage 1-1 whenever possible. The hawks don't really show up until near the end of the stage, but they can definitely send you plummeting into a pit if you don't see them coming.
To beat the boss, get up to him and hit him. Avoid the rocks that he throws when he jumps into the air and buries himself in the ground. Wait for the dust to kick up under your feet. This will be where he will pop out. Move slightly to the side and hit him so you can do damage when he comes up, then stand still to avoid the first rock and jump up to avoid the second, and land where the boss is burying himself. It will take some practice to get the timing down, but if you can get it down, it makes beating this boss much easier. You'll have to keep doing this until he dies.
Near the end of the boss battle when you have the boss down to about one or two units left, you'll stun the boss instead. Keep palm striking him and he will be done.
Monday, May 30, 2022
Dilandau3000 plays Space Quest II: Vohaul's Revenge - Part 13 of 13
We've beaten Sludge Vohaul and aborted the clone launch, but the asteroid base is about to crash and we need to get off. We make it out in time, but this leads to a sequel tease.
You'll be in one of the hallways. Head west and keep going. You'll come across a ED-209-esque droid. You'll need to push the button on the doors before it comes at you, so type PUSH BUTTON on the blue walls with the orange lines and press Enter at the escape pods. From there, press Enter at one of the white buttons where the droid is (the right-most one will do) and run to the east before the droid catches up to you. Keep going to the east until you go through a flashing tunnel. You'll be back where you landed, and the droid will be gone. Thankfully, the escape pod will be open, and you can go back in there without having to press the button. Just make sure you have ENTER POD pre-typed when you return to that screen so the droid doesn't get you. When you enter the pod, the droid will leave you alone.
Interestingly, there is a 40-minute time limit once you reach this part. If you take more than 40 minutes to get out of here, YOU WILL DIE.
Once you are seated in the escape pod, LOOK PANEL. There will be a clearly marked launch button. PUSH LAUNCH BUTTON. You'll get out of Vohaul's asteroid base, but suddenly, you'll get an oxygen warning, and you'll have about five minutes of oxygen left. If you wait five minutes, YOU WILL DIE. If you WEAR OXYGEN MASK, you'll also find out that the tank is empty.
Look around, and you'll find a sleep chamber . Go up to the right end of the pod and OPEN CHAMBER. ENTER CHAMBER. The sleep chamber will seal automatically to preserve oxygen, and you'll drift aimlessly in space until someone finds you...which blows the door wide open for the third game.
You've just beaten Space Quest II with all 250 points!

Dilandau3000 plays Space Quest II: Vohaul's Revenge - Part 12 of 13
Just because we're small doesn't mean we can't do something.
To get out of the glass jar, USE CUTTER. You'll cut an opening in the jar, which will fall to the counter. By looking around, you can find some vents to the back.
If you head west, Sludge Vohaul will see you and smack you with his fist, squashing you. YOU WILL DIE. Instead, move to the vent near the west entrance. CLIMB IN VENT. You'll enter the vent. By looking around, you'll find out that you are in Sludge Vohaul's life support system. You'll also see a sign. READ SIGN. You'll find out that there is a button for emergency shut-off. Go behind the pump and PRESS BUTTON to turn off the life support system. Go back to the vent and CLIMB OUT, then Sludge Vohaul will tell you that you have sealed your fate as he struggles to take his last few deaths. He then flips a switch on the far end of the console before dropping dead.
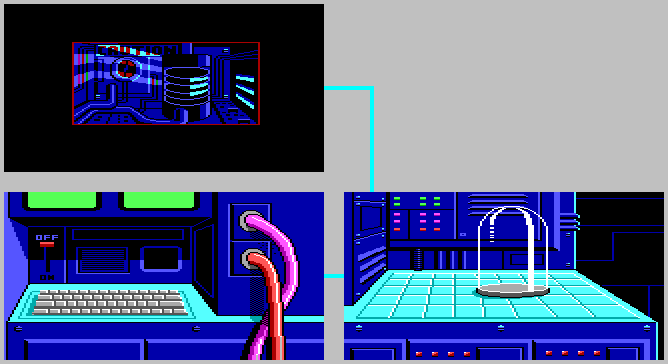
Head west. Go up to the on/off switch and PULL SWITCH. The nearby text screen says "Reduce or enlarge?" Obviously, you want to enlarge so you can return to your normal size. Walk onto the keyboard and TYPE ENLARGE. The text screen will say "Sequence has begun." Head back east and go back into the glass jar, and you'll return to normal size.
When you get back off the console, you'll find out that the clones are gone. One of the screens on the console is blinking. If you look at Sludge Vohaul, youll find out he is indeed dead. If you SEARCH VOHAUL, you'll find out that the letters "SHSR" are written in pen on the back of his left hand. (The letters are all one down from what they should be, which is the word "TITS.")
LOOK MONITOR. You'll find out that there is a launch countdown for the clones that is quickly going down. To abort the launch, type SHSR and press Enter or Return. This will abort the launch. Unfortunately, the monitor is also telling you that the asteroid base's orbit is decaying and that the temperature is at critical levels, that means you only have a limited time to get out. (Believe it or not, you can also type "TITS" as the password and you'll still get the abort.)
Take the stairs to the east. You'll be in a tubular passageway. Near where you came in is a box. LOOK BOX. You'll find out it is actually an oxygen mask receptacle. OPEN BOX to get the oxygen mask and close the box. Put on the oxygen mask. From here, follow the path. When you're almost past the second screen, a part of the glass tube will fracture from stress caused by the asteroid entering Labion's atmosphere (which you can see by looking around on this screen) and the air will be sucked out of the tube. If you do not have the mask on when the fracture forms, YOU WILL DIE.
Once you get through the second screen, you'll take off the mask as you enter another area of the asteroid.
PrinceWatercress plays Sumo Fighter - Part 13 of 15
Just like on Hard, this part is the same as always. Of course, I have to play the next stage one more time...
Super - Stage 3
Stage 3-1
Now that our fists are at maximum strength, we can break any blocks in the game that we want.
Stage 3-2
The fireballs move from the right end of the screen to the left. You can duck down and palm strike them to get rid of them, but they'll fly over your head about half the time, especially if you duck whenever you see them.
Also, we finally enter the bonus area!
Stage 3-3
The floating head makes an appearance before the bonus area. It also shows up soon after you go up from returning from the bonus area.
The boss here is the same as ever.
Sunday, May 29, 2022
Dilandau3000 plays Space Quest II: Vohaul's Revenge - Part 11 of 13
In this entry, we finally meet Sludge Vohaul...
If you wait long enough, somebody will fart and you'll get some text.
Before you leave the stall - and the bathroom - GET TOILET PAPER.
Keep going west from the restrooms. You'll reach the elevator. Type ONE to go to Level 1.
From here, head back to your shuttle and head south. This time, you'll have a way to get out of that acid trap. When you trip it, go to the left and PUT PLUNGER ON WALL when you're about to run out of floor. You'll use the plunger to stick to the barrier and hang above the acid trap. If you do this too soon, Roger will let go too soon and YOU WILL DIE. When the floor returns, LET GO. You'll be back on the floor.
From here, you can go back, or you can explore further. LOOK CEILING in the trap area. You'll find some fixtures that look like sprinklers. Remember that for later. For now, if you go all the way to either side, you'll be chased by a robot. You can only be chased by one robot at a time. If the robot runs into you, you will be shocked to death. YOU WILL DIE.
Before you go anywhere, stay in the trap area. PUT PAPER IN BASKET, PUT BASKET DOWN, then LIGHT PAPER. This turns on the sprinklers. This will not only extinguish the fire, but it will also kill the robots on both sides by short-circuiting them. From here, you are free to go to either side. Go east.
To the east is Vohaul's secret chamber, where Sludge Vohaul is seated before a large console while surrounded by tubes containing evil insurance salesmen clones. Sludge Vohaul will laugh at you, and tells Roger to watch the downfall of his civilization.
Sludge Vohaul is obviously connected to life support, but if you approach him, you'll be zapped by a laser into micro-particles, shrunken down and molecularly reconstructed into a glass jar. Amazingly, Sludge Vohaul decides to keep you as a conversation piece instead of killing you outright.
Dilandau3000 plays Space Quest II: Vohaul's Revenge - Part 10 of 13
Now that we're in Sludge Vohaul's asteroid base, we have a lot of exploring to do...
While you're inside the janitor's closet, LOOK. You'll find a plunger. GET PLUNGER. From here, continue west, and you'll find another elevator. If you see the floor cleaning droid again, run. When you get into the elevator, Type FIVE.
You'll be at Level 5. Start heading east. Two screens in, you'll find another door on the background wall. If you look around, you'll find out that there are some kind of cages around here and that these holding cells are not well kept. If you enter the door here and LOOK, you'll find a small wastebasket and a pair of crusty work overalls. GET BASKET. You'll soon get a message making fun of how you can carry so many things. If you GET OVERALLS, Roger will find out that they are dirty and do not fit, and tosses them back onto the floor only for something else to drop. LOOK FLOOR. You'll find a lighter. GET LIGHTER.
The cage east of the door contains a creature. If you're too close to the cage as you're passing by, the creature will crush you and YOU WILL DIE. Stay at the bottom of the path next time.
On the next screen to the east, a cage will open. Keep going east. Otherwise, the xenomorph that comes out will stun you, but not kill you. However, the kiss actually kills you at the end of the game. Yes, a facehugger comes out of your chest. YOU WILL DIE AT THE END OF THE GAME. Instead, keep heading east, get in the elevator, type FOUR and press Enter before the alien gets you.
Back at Level 4, head west. Once again, watch out for the floor cleaner and run in the other direction to get it to disappear if it shows up. Two screens east, there is a door. PUSH BUTTON to get in the door. LOOK. You'll find a glass cutter. GET CUTTER. From here, continue west. You'll find bathrooms. The men's is to the left; the women's is to the right, and each have their own button. Regardless of which one you enter, you'll find out it is a unisex bathroom.
If you USE LIGHTER in the bathroom, you will blow up the bathroom and YOU WILL DIE. So don't do it.
Instead, go to the third stall. OPEN DOOR, then CLOSE DOOR. SIT DOWN. Roger Wilco will use the toilet. If you stay inside the stall and type LOOK, you'll get a description for the inside of the bathroom stall. You can also READ WALLS to read messages at random, as well.
PrinceWatercress plays Sumo Fighter - Part 12 of 15
...and the copying and pasting (with a few small additions) continues! Seriously, I can't see a difference between Hard and Super, especially with max stats involved.
Super - Stage 2
Stage 2-1
Amazingly, there isn't much difference between Easy and Hard here...or in this case, Hard and Super.
With that said, the geisha yokai are called rokurokube, and the parasol yokai with the one sandaled foot is called kasa-obake.
Stage 2-2
The white birds that dip up and down as they move forward show up and become a nuisance here. If you can hit them, they'll drop a rice bowl worth one experience point. Only hit them if you know that you can hit them; otherwise, leave them be and don't even go after them.
Also, the ninjas now toss throwing stars at your current position.
Stage 2-3
There isn't much different here going from Easy to Hard (or Super) here, either. Also, thanks to our enhanced stats, we can just plow through the boss by just attacking while inside of him.
Saturday, May 28, 2022
Dilandau3000 plays Space Quest II: Vohaul's Revenge - Part 9 of 13
We're free...almost! We need to find out how this shuttle works and then get to Sludge Vohaul so we can stop him once and for all.
With the power to the shuttle on, LOOK DIAL. You'll find out that the Attitude dial is set to HAC - Horizontal Attitude Control). You'll want it see to VAC - Vertical Attitude Control. To do that, TURN DIAL. You'll see the dial to VAC. PUSH THRUSTER BUTTON. This will ignite the ascent thrusters. PULL THROTTLE. Finally, you're able to take off. You'll look at the monitor, which tells you what forward and back does in Vertical Control. Press a key, then just sit there and you'll leave the planet.
If you type "WHO", the game will tell you the name that you gave the game at the very beginning.
You'll soon be told that adequate attitude has been achieved. After looking at the monitor again, press a key to find out you're in space. TURN DIAL. This will turn HAC on. The monitor will show you the controls for Horizontal Control. PUSH THROTTLE. Sludge Vohaul will show up on the display screens and tell you that he has taken control and that you will be visiting him again. You'll have no choice but to wait it out until you see Vohaul's Asteroid. Once you see it, you're in Sludge Vohaul's fortress whether you want to be in there or not.
You'll land in the vehicle bay. If you head to the south and go to the sides, you'll be trapped, and the floor below you will give way from the right. There is sulphuric acid below, and you'll have nothing to help you. YOU'RE DEAD.
Head to the west instead, and watch your step or else you will fall to your death. Enter the elevator, then LOOK ELEVATOR. You'll notice the digital read-out reading "LEVEL 1" as well as a rectangular panel. LOOK PANEL. You'll find a vertical row of four button as well as some small engraving at the bottom of the panel. If you READ ENGRAVING, you'll get a completely useless message stating that this lift was made by Bobco Lift Division, a subsidiary of Bobco, Inc., the makers of Nad's Hamster Tape.
LOOK BUTTONS. The buttons have words next to them. In order, they read "One," "Three," "Four," and "Five." Just type the number, and you'll go there. There is no button two.
Go to Level 3. You'll notice that a security camera is watching you from the ceiling. Head west. If you see a floor cleaning droid, go back to the elevator and hide there, then wait for the floor cleaning droid to pass by before moving on. It will be gone by the time you go to the next screen, so keep going west.
You'll eventually find a door on the side wall. Go up to the door and PUSH BUTTON. You'll find out that this is a janitorial closet. In case the floor cleaning droid shows up again, hide here so it doesn't kill you.
Dilandau3000 plays Space Quest II: Vohaul's Revenge - Part 8 of 13
Now that we know that we can die in this cave, let's not do that.
Now that we know that the left fork leads to death, let's try the right fork. This time, you'll find a whirlpool. Roger Wilco will have no choice but to be sucked in.
On the other side of the whirlpool, you'll be back in the open again. Interestingly, there is a face where the waterfall is.
Wade to the east to reach a clearing. The only way out is through a path to the north, but you don't want to do that. Instead, BLOW WHISTLE. This will blow the whistle you got through the mail, and it allows you to call a Labion Terror Beast which tears through the rock wall like Taz the Tasmanian Devil. If you do nothing, he will attack you. YOU WILL DIE. THROW PUZZLE. This throws the Cubix Rube puzzle at the Labion Terror Beast, who reaches down, grabs it and examines the Cubix Rube, leaving him completely distracted. Just walk behind him and into the entrance he made, then GRAB ROCK. You'll get a rock you'll need later. From there, go north.
To the north is the landing pad. There will be a guard, and you'll need to sneak past him. He will look over the edge often, so you'll have to be quick and careful. You can throw the rock as a distraction, or you can sneak
However, the solution that gives you the most points is the most violent: SLING ROCK AT GUARD. This allows Roger Wilco to sling the rock at the guard with the athletic supporter and hit him in the head, knocking him over the edge and onto the ground. From here, you're free to move around. Don't even bother searching the guard; you'll find nothing.
Go up to the door on the right side of the landing pad and INSERT CARD. You'll take an elevator to the top of the launch pad, and from here, you can take the shuttle. Be careful not to fall off the launch pad, as YOU WILL DIE. Get to the right behind the shuttle and OPEN DOOR to open the hatch. From here, LOOK, then LOOK PANEL to look at the instrument panel. PUSH POWER to turn on the shuttle.
PrinceWatercress plays Sumo Fighter - Part 11 of 15
Now it's time to play on Super...and it feels like Hard. Okay, then...
I can't find any discernible differences between Hard and Super. It also doesn't help that I have all my stats maxed out when I start the Super difficulty. As a result, all the strategies here are the same as in Hard Mode.
Super - Stage 1
Stage 1-1
It should be noted that the locations of the bonus areas are the same as they always were, so if you knew where they were then, you'll know where they are from here on out.
By starting with the password we got at the end of Stage 5-3 on Hard, we're able to start the game on Hard with all of our stats from Easy.
Hawks will show up from the upper-left corner and divebomb at you. If you defeat them, they will drop skulls. In the harder difficulties, they will lower your stats, so avoid the skulls at all costs.
Stage 1-2
The flying demon heads will leave skulls when defeated, and they also shoot fireballs at your current position as they loop around in a small circle. Sometimes it's better to leave them alone.
Stage 1-3
Since we have much better stats compared to Easy and Hard, we can tear the boss here apart.
The little white bird that dips up and down as it flies forward shows up here. They will show up in greater numbers later on, and they can be tough to defeat.
Friday, May 27, 2022
Space Quest II - The Trailer
Believe it or not, a trailer was published for this game back in late 1987.
Dilandau3000 plays Space Quest II: Vohaul's Revenge - Part 7 of 13
In this entry, we explore a cave. This is the most interesting part of Labion, mostly because it's a breath of fresh air compared to aboveground.
Once you land on the ledge to the left, go left and enter the cave. By going west, you'll soon become a pair of light blue floating eyeballs, but you don't want to venture too far doing that. HOLD GEM. You'll be able to light up the cave, but you'll also hear a small shriek and the sound of many footsteps moving away from you.
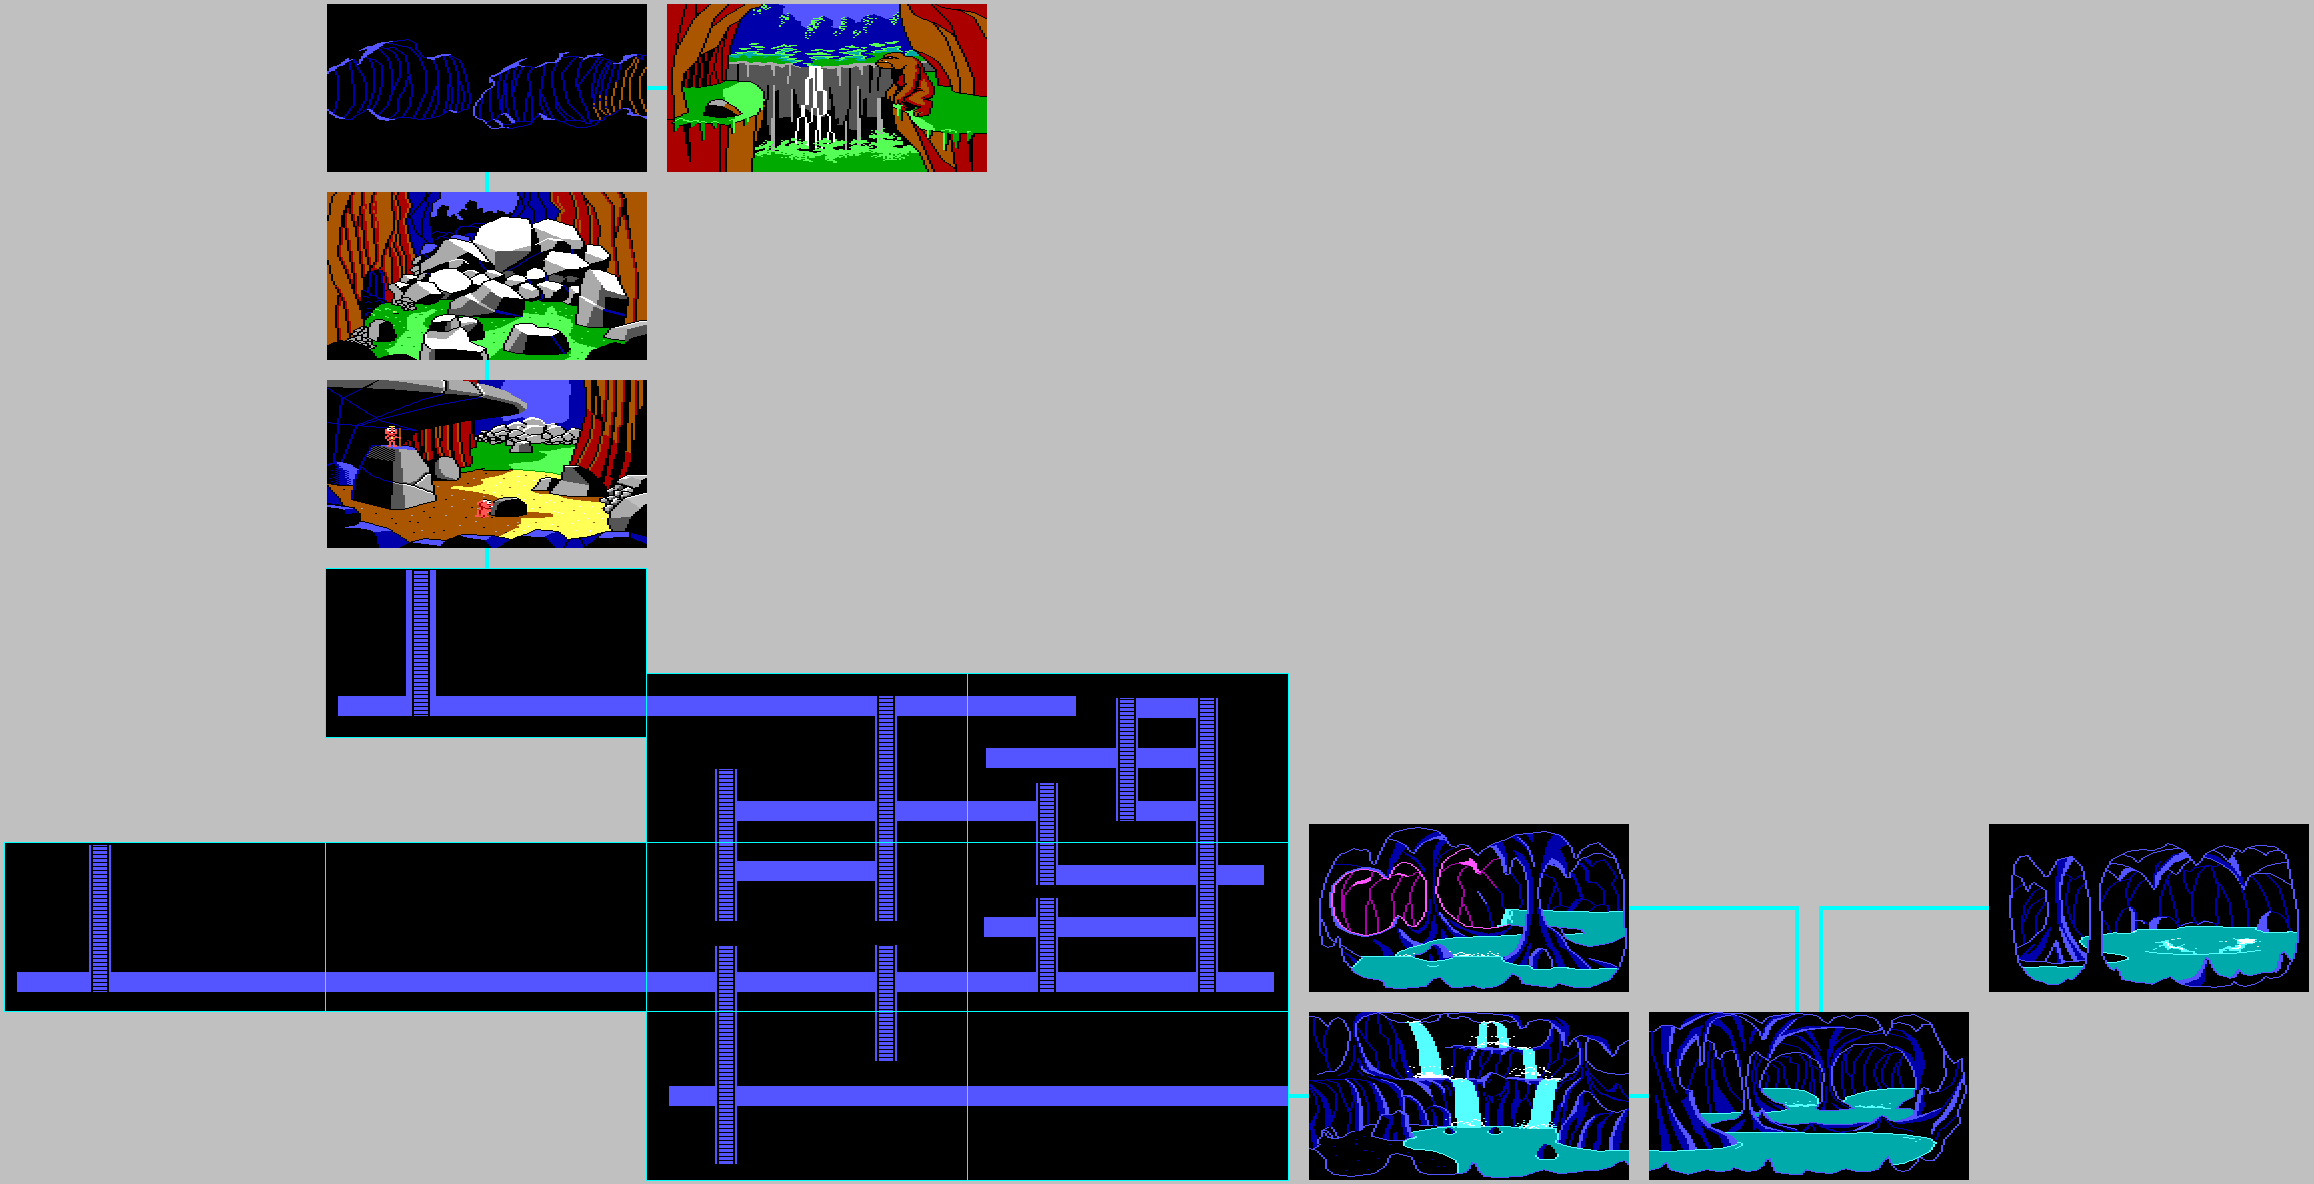
Once you go all the way west, the ground below your feet will disappear and you will fall. You'll end up outside where a bunch of rocks are, and you'll meet some of the little pink creatures that you've met earlier on this planet. Thanks to the translator, you will know that they will tell you to follow them before leaving. Before you go anywhere, GET GEM to get your glowing gem back, then go south. You'll meet their leader, who thanks you for saving their friend from the hunters by letting you stay here as long as you need to and to just say the word if you need to leave to be directed to the only way out for someone of your size. Once you leave, however, they will have to seal the exit behind them for their own protection.
You can look and talk to the pink creatures with LOOK PEOPLE, but it doesn't do much and they just giggle. If you type SAY THE WORD, the pink creatures will move out of the way to reveal a ladder in the ground. Once you go through here, you can't go back, so make sure you have the gem before you leave.
Go down the ladder. It will be dark again. If you wait long enough, you'll hear an inhuman guttural moan echo through the caves. This is the cave squid, and it will get a hold of you if you go the wrong way. HOLD GEM IN MOUTH. You'll be able to light the area up. (If you just type "HOLD GEM," you won't be able to do anything.) Climb down the ladder, and make sure you save your game. Once you climb down, go right, then climb down the first ladder you see. At the bottom, go right, then climb down the next ladder. Go right again, then climb down the next ladder. At the bottom, go left. Skip the first two ladders you see, and go down the third one. When you're able to go right, do so. Keep going in that direction, and you'll be out.
You'll then end up in a cave with luminous water and waterfalls, and Roger Wilco will put the glowing gem back in his pocket. Wade east through the water and you'll soon come across a swiftly moving river. follow the path. If you take the left fork, you'll die as soon as you drop down the waterfall.
PrinceWatercress plays Sumo Fighter - Part 10 of 15
After the big difficulty boost in Stage 4, Stage 5 goes back to being manageable. Next up is the Super difficulty...
Hard - Stage 5
Stage 5-1
The floating head shows up just before you reach the bonus area. Also, there will be more enemies dropping down from the sky as you climb up the stage
Stage 5-2
There will be a couple of flying fireballs and demon heads through the area, especially where the bonus area is.
Stage 5-3
This stage has no changes between difficulties, so I'm just going to cut and paste here.
This area is pretty straightforward. If you need any power-ups, take the lower path in the fork in the road.
There are two bosses to end this journey. The first is a shogun. If you strike him, he will jump kick at you. To beat him, you'll need to jump over him, get all the way to the other side, then stomp as much as possible as he advances. When he gets close enough, you'll need to jump over him and repeat. When he is beaten, he will leave a full health pick-up.
As for the second boss, wait on the right side (but not too far to the right) and keep pressing B to palm strike. As the boss approaches, keep attacking. When you stun him, keep attacking and you'll bring him down very easily.
You'll get a password (which you should write down and remember for later), then you'll get a message congratulating you before telling you to play on Super. Yes, that password will be useful for Super.
Thursday, May 26, 2022
Dilandau3000 plays Space Quest II: Vohaul's Revenge - Part 6 of 13
In this entry, we overpower our captor, but the danger is far from over.
To get out of the cage, you'll need to get the key of of him and also get the upper hand on him. CALL HUNTER. This will cause the hunter to move closer. From there, THROW SPORE before he opens the cage. You will throw the spore at the nearby hunter to paralyze him. SEARCH HUNTER. You'll find a key. If you just throw the spore without getting him near, he will be too far away to get the key from him, and he will immediately kill you when he gets back up.
From here, GET KEY, then UNLOCK CAGE and OPEN DOOR. Go to the rope to the west of the cage and GET ROPE, then get behind the bushes to the north and head north to get out of here.
You'll see the landing pad from earlier as well as a shuttle taking off from it. If you head too far north or stay here too long, Vohaul's troops will shoot you down and kill you, so don't do that. Instead, head east and go back to the chasm where you had to knock the dead log down and use the rope to go down the chasm.
Do not tie the rope to the tree stump; it will break. Instead, CLIMB LOG, then TIE ROPE TO LOG. You'll tie the rope to the log and give yourself a path straight down. CLIMB DOWN. You'll find a cave to the west and a hungry creature to the east. If you press F6, you will release your grip on the rope, and if you do it now, YOU WILL DIE. Instead, go further down the rope and SWING. Let go of the rope with F6 when you have enough momentum to reach the ledge but before the creature grabs you. Wait for the creature to grab you twice, then let go you when you head to the left. You'll land near the cave.
On the third grab attempt, the creature will grab you. Make sure that doesn't happen.
Dilandau3000 plays Space Quest II: Vohaul's Revenge - Part 5 of 13
Well, it was only a matter of time before all that exploration got us into trouble.
If you try to go through the swamp to the east, you'll get the attention of some sort of creature as you go east, and you'll soon get eaten once you're on the second screen. YOU WILL DIE.
Instead, RUB BERRIES ON BODY. The game will tell you that you now smell like a walking ammonia inhalant. If you go through the swamp now, the creature will try to eat you only to retch and gag. You can now continue east, but you'll have to swim once you reach the deeper end of the swamp. HOLD BREATH to go underwater, then use the arrow keys to get through the very simple path. When you see the light on the west end, go up towards it to enter a grotto where you can find a glowing gem on top of a boulder. Go up tot he gem. GET GEM. If you're not fast enough on the way, you will suffocate and die. From here, go back into the water, HOLD BREATH, and swim back. Go all the way up to get back to the surface, then head east again.
On the third screen, you'll soon be able to get on dry land. Head east, and you'll soon come across a fissure. If you walk into the fissure, YOU WILL DIE. So you'll need to find a way to cross it.
If you go up to the tree near the fissure and LOOK TREE, you'll find out it is dead and that there is no foliage and that the bark must have fallen off years ago. CLIMB TREE. You'll find out that the tree if free of the slick secretions some of the other trees generate, and you'll crack the tree, turning it into a makeshift bridge. Move to the east to get off the log, then go east.
From here, make your way to the east. You'll fall for a hidden snare trap, then Roger Wilco will pass out and have a dream where he is Larry Laffer in the first Leisure Suit Larry game. When he comes to, he will find himself in a cage, and that his captor is sitting near a fire.
By looking around, you'll find out you are in a clearing surrounded by large, smooth rock formations on three sides, that there is a fire and that a rope sits on a nearby boulder. Meanwhile, you're obviously in a cage as potential dinner.
PrinceWatercress plays Sumo Fighter - Part 9 of 15
The lyric I forgot to mention was "It was not a night to be with birds" from "Christmas Time in Motor City" by Was (Not Was).
Hard - Stage 4
Stage 4-1
The angry white birds start showing up in numbers here. Be careful not to get knocked into the pits on the way to the end. One of the pits even has a guy dropping straight down from the sky as you jump over it. Not fun.
Stage 4-2
Remember that thing I said about leaving the pots near the pits alone so you can make better jumps? You'll be doing it here, especially when you'll have the parasol yokai showing up on the other sides of these jumps. Be sure to scroll the screen as far to the right as you can as you do this.
Stage 4-3
This is where it gets hard.
When you reach a pit with blocks on the left side of it, leave the blocks alone. You'll need them to make longer running jumps. Just like with Stage 4-2, scroll the screen as far to the right as you can so you can spawn the hawks from Stage 1-1 whenever possible. The hawks don't really show up until near the end of the stage, but they can definitely send you plummeting into a pit if you don't see them coming.
To beat the boss, get up to him and hit him. Avoid the rocks that he throws when he jumps into the air and buries himself in the ground. Wait for the dust to kick up under your feet. This will be where he will pop out. Move slightly to the side and hit him so you can do damage when he comes up, then stand still to avoid the first rock and jump up to avoid the second, and land where the boss is burying himself. It will take some practice to get the timing down, but if you can get it down, it makes beating this boss much easier. You'll have to keep doing this until he dies.
Near the end of the boss battle when you have the boss down to about one or two units left, you'll stun the boss instead. Keep palm striking him and he will be done.
Wednesday, May 25, 2022
Dilandau3000 plays Space Quest II: Vohaul's Revenge - Part 4 of 13
In this entry, our adventures through Labion continue.
If you check your inventory, you'll find that you have an order form, which you've had since the beginning of the game. READ FORM. You'll find out it's an order form removed from a magazine for a free Labion Terror Beast Mating Whistle that is ready to be mailed.
Go up to the mailbox and MAIL FORM. An object will drop into the tray at the base of the mailbox. If you LOOK TRAY, you'll find the whistle. GET WHISTLE.
If you want, you can walk south off the cliff where the mailbox is as a shortcut.
The blue growths on the ground look like spores or pods. If you get close enough to them and LOOK SPORES, you'll find they are loosely attached to the ground. If you walk into them, it will release a fine powder into the air that will completely paralyze you. It will eventually wear off and you will be able to move again. Get close enough to the spores without releasing the powder and GET SPORES. You'll be needing these later.
Go north from here. You'll find a small creature picking berries from a bush, but a weird-looking brain bush stands between you and the creature. LOOK MONSTER. You'll see that it appears to be some kind of overdeveloped root with a pulsating growth near the middle connected to several meters of root-like appendages. If you walk into the roots, the monster will immediately consume and kill you.
You'll have to go through the maze by walking through it without walking onto the roots and saving often. When you make it to the archway in the upper-left corner of the maze, you can just walk past it automatically. Roger Wilco will automatically duck underneath the arch.
Go ahead and look at the berries if you want, then GET BERRIES when you are near them. You can try to eat them, but the pungent scent will make Roger change his mind.
Now you'll have to make your way back. Once again, travel the maze without touching the roots, and save often!
Go south to leave, then head east, then east again behind the bushes to the north. There will be a swamp and a creature rubbing something on his body.
Dilandau3000 plays Space Quest II: Vohaul's Revenge - Part 3 of 13
Just when all is lost...dumb luck is achieved. Too bad dumb luck won't help you survive if you do the wrong things, and there are plenty of ways to annihilate yourself here.
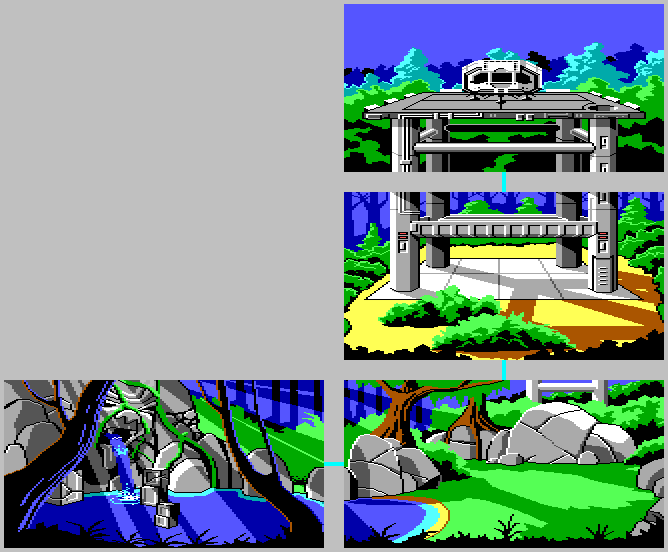
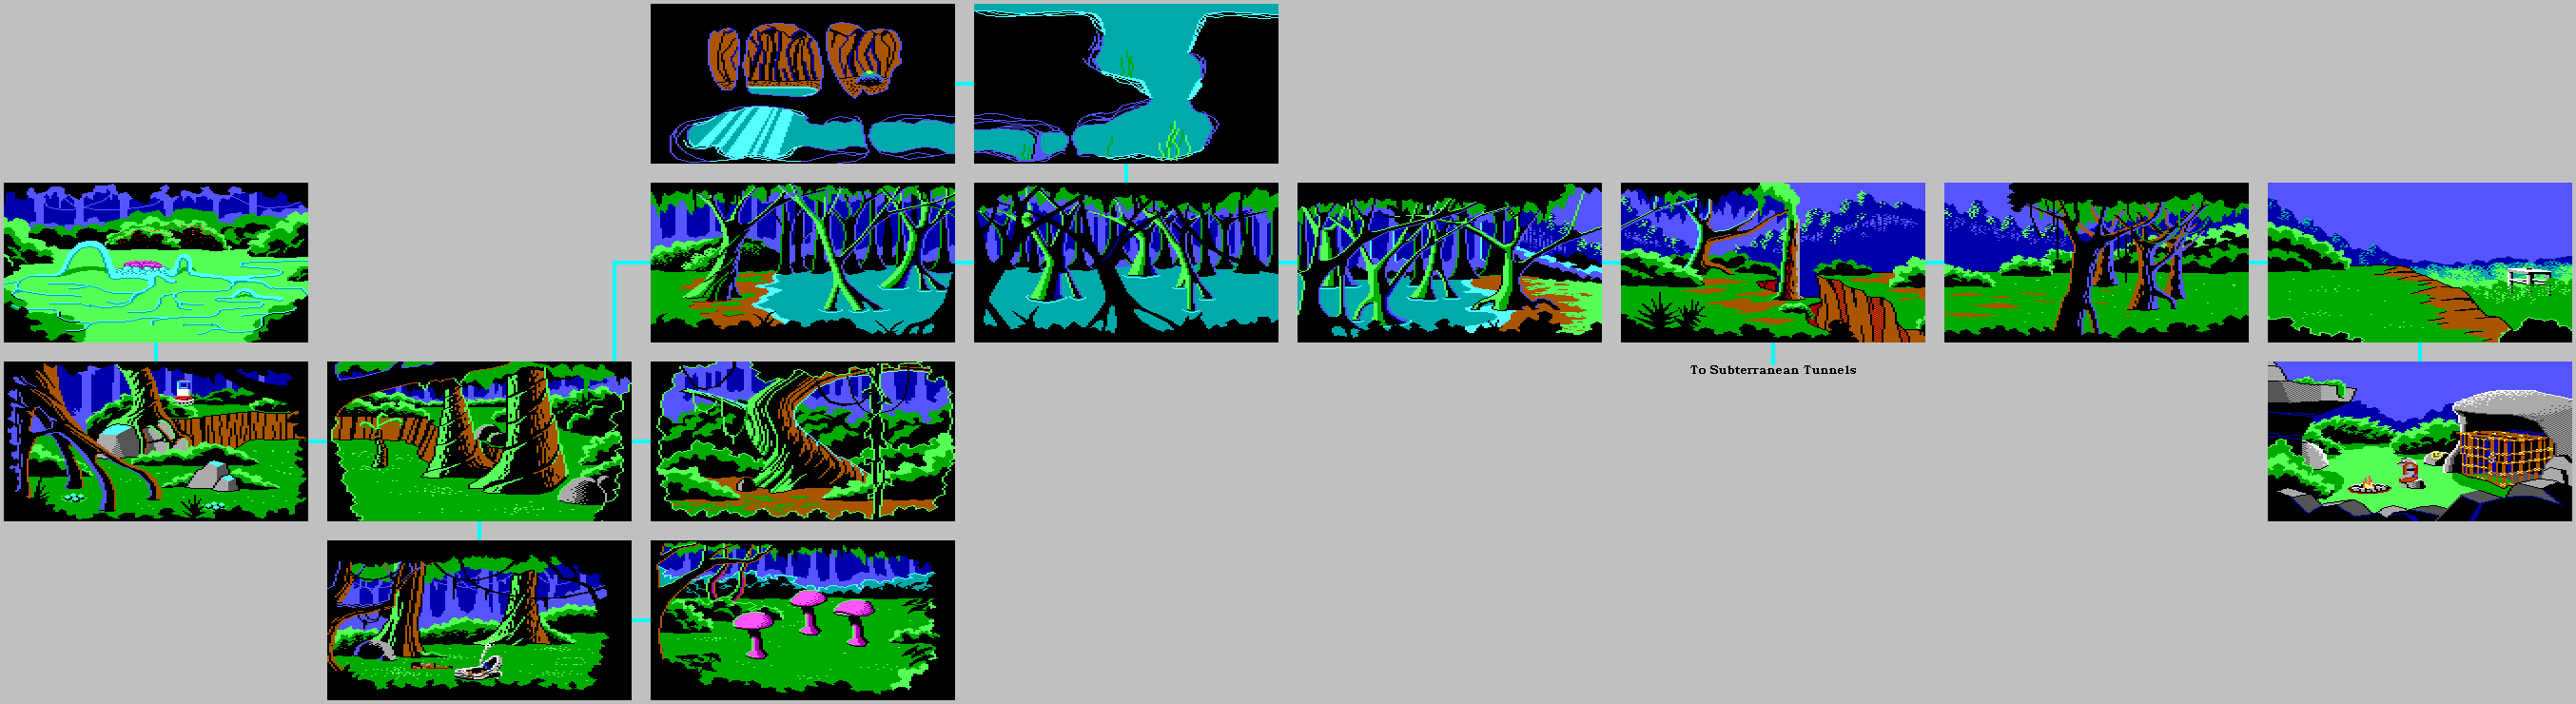
Labion Forest
Thanks to dumb luck, you're still a free man, albeit elsewhere.
If you type in LISTEN, you'll find out that the high pitched beep that you are hearing is from the wrecked hovercraft. If you LOOK IN HOVERCRAFT, you'll find out that there is a button next to a flashing light emitting the beep. PRESS BUTTON. The light will go dark and the beep will stop sounding. Good thing you did that, because that was a homing beacon and you would have been recaptured if you waited too long on the screen you crash landed in without turning it off.
Go up to the guard on the ground and SEARCH GUARD. You'll find a magnetic keycard. GET CARD.
There is a conspicuous set of pixels made to look like a square. If you go near it and type TRAP, the game will make a joke. If you walk onto the square, however, YOU WILL DIE.
You won't be able to head west, so go east to see some giant purple mushrooms. If you walk up to the mushrooms, you'll be eaten. YOU WILL DIE.
Go back west, then go behind the shrubs and head north. You will hear a "twang" followed by a high pitched shriek to the east. If you go up to the big tree to the north and CLIMB TREE, you will stick to the tree and a bunch of insects will eat you. YOU WILL DIE.
Instead, head east. You'll find the critter from earlier hanging upside down in a snare trap. Go up to the critter. UNTIE CREATURE. The critter will run off, but not without giving you a long glance. Sadly, you cannot take the rope for the snare trap. The creature will have headed east, but you cannot follow it in that direction.
While you are in the jungle, you may get a prompt telling you that you can hear a hovercraft not unlike the one you wrecked in. If you spend too much time on the screen afterwards without finding a spot where you cannot easily be spotted, the hovercraft will show up, you will be shot at, and YOU WILL DIE. If you can somehow hide behind a big tree or something, the hovercraft will pass by and you will go unharmed.
Go back to the big tree and head north, then head to the north end of the screen and head west. You will find a mailbox out of nowhere.
PrinceWatercress plays Sumo Fighter - Part 8 of 15
Other than a few new enemies popping up, Stage 3 is the calm before the storm. You'll know what I mean by that next time.
Hard - Stage 3
Stage 3-1
Now that our fists are at maximum strength, we can break any blocks in the game that we want.
Stage 3-2
The fireballs move from the right end of the screen to the left. You can duck down and palm strike them to get rid of them, but they'll fly over your head about half the time, especially if you duck whenever you see them.
Also, we finally enter the bonus area!
Stage 3-3
The floating head makes an appearance before the bonus area. It also shows up soon after you go up from returning from the bonus area.
The boss here is the same as ever.
Tuesday, May 24, 2022
Dilandau3000 plays Space Quest II: Vohaul's Revenge - Part 2 of 13
Somebody is not happy that we saved the world in the first game, and in this entry, we meet that somebody.
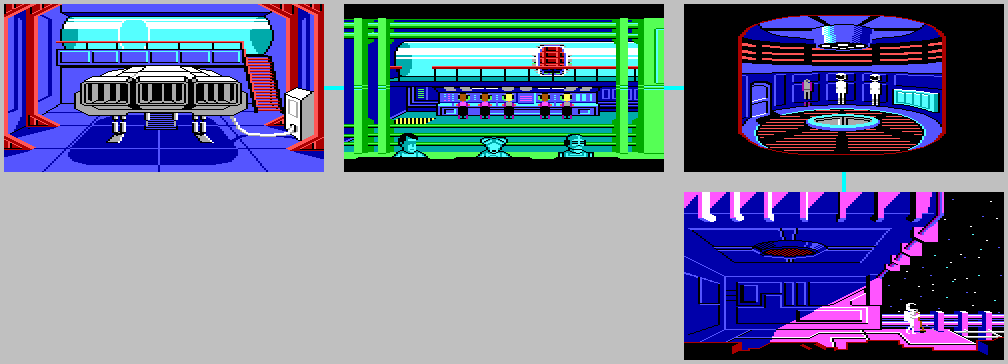
In the airlock chamber, go up to the uniform on the left and SWITCH CLOTHES. From here, you can look at the lockers, but there is nothing interesting about them. If you OPEN LOCKER, then look at it, you'll open a locker and find your cubix rube puzzle and an athletic supporter. GET RUBE. GET SUPPORTER. CLOSE LOCKER.
If you look at your inventory, you'll find that you have two items: an order form and a dialect translator. Keep these in mind for later.
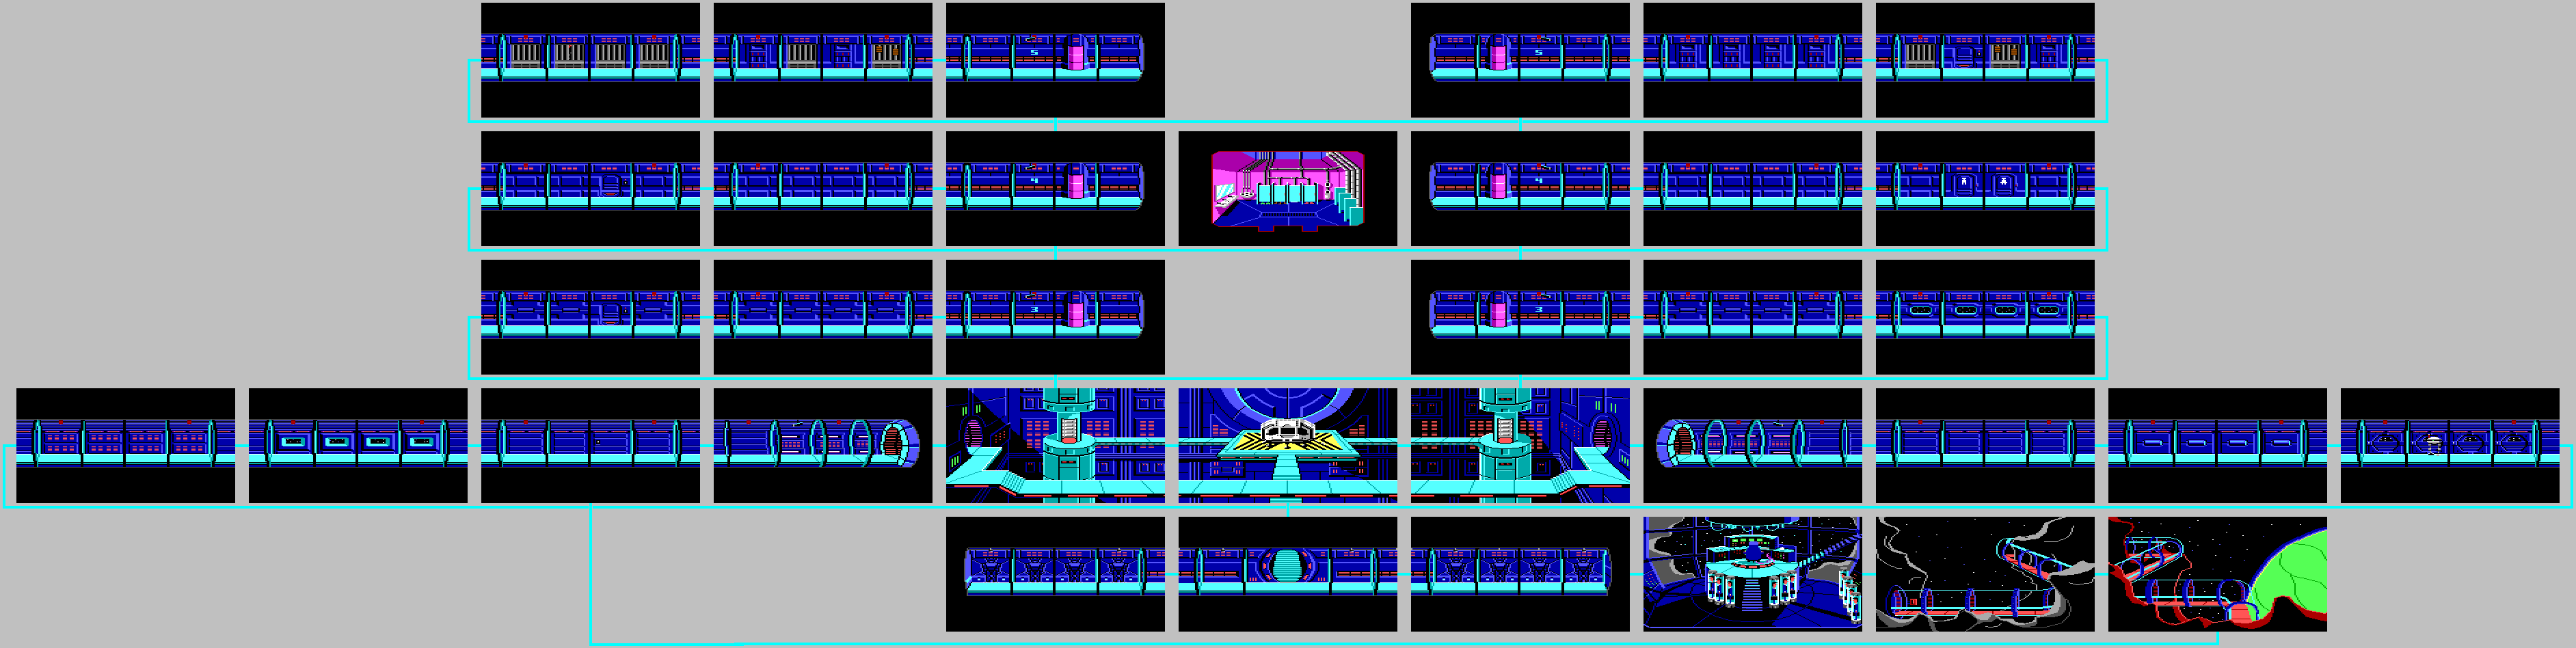
Walk up to the door to the west and it will open. Keep going west and you'll enter the transportation control room, where your boss tells you to go straight to the shuttle bay while making it clear that he is about to fire you. He also sends a command to the transportation officer to make sure you go over there...and nowhere else.
You can talk to the people here, but they will tell you to get moving and that you also owe them twenty buckazoids.
To get moving, walk onto the part of the floor with the yellow and black stripes. This is a platform that will take you to the pneumatic transport tube. Walk into the hole with the red wall inside, and you'll be be taken to the shuttle bay.
Once you reach the shuttle bay, you can look at the shuttle, and if you walk down the stairs, you can look at the refueler. To enter the shuttle, walk up the stairs that are underneath it. Roger will go inside only to get beaten up by two guys inside to the point of unconsciousness.
Time will pass, and when Roger comes to, he finds out that he is being held hostage by the two goons from before. Roger will soon make out a rather large man connected to a life support machine. This is Sludge Vohaul, the genius behind the Star Generator back when it was still in its concept stages. (The Vohaul from the data cartridge in the last game was Slash Vohaul, meaning that Sludge is a different person.) He wanted it to be his war weapon, but scientists decided it was better used saving lives rather than destroying them, which he considers a waste of technology. He knows that Roger ruined his Sarien operation to make Xenon pay for that they did to him, and wants to make sure that Roger is not around to foil his next plan. That plan: infest Xenon with thousands of genetically engineered door-to-door life insurance salesmen. He originally planned to kill Roger, but he had a change of heart, and would rather watch him suffer in his forced labor mines in Labion.
From there, an injection renders Roger unconscious, and he is loaded onto a shuttle out of Vohaul's massive asteroid fortress. You'll then land on Labion and be ushered to a hovercraft taking you to the mines. On the way there, however, the platform falls due to a lack of fuel, and the two soldiers (who look like something out of Planet of the Apes) argue before the platform crashes to the ground. You survive, but the guards do not.
Dilandau3000 plays Space Quest II: Vohaul's Revenge - Part 1 of 13
After the events of the first game, Roger Wilco is once again an absolute loser.
That's about to change.
In the events of the last game, Roger Wilco became a hero after he foiled the Sariens' plot to rule the galaxy with the Star Generator and returned the Star Generator technology into safe hands. Unfortunately, time never stands still, and Roger Wilco is back to being a janitor on Xenon Orbital Station 4 after the excitement and glory of his heroism, which has since died down.
Xenon Orbital Station 4
A shuttle lands on Orbital Station 4. From here, you get to type in your name, up to eighteen characters. Roger Wilco's name was not exactly Roger Wilco's name yet (that wouldn't be until the third game), so you have the liberty of naming him something else here. If you leave it blank, you'll be named "Roger Wilco," anyway. However, if you do leave it blank, there is a glitch in the game that makes your name blank when you save and restore.
The game starts with Roger Wilco sweeping outside of the station while wearing a spacesuit to remove construction debris and space dust. Roger soon gets a message on his wrist watch, and when he takes, the broom flies away into the vacuum of space. (That was the third one this week!) From here, you have control.
Just like in the original EGA version of the game, you'll need to use the arrow keys to move and you'll have to type in your commands with the keyboard. LOOK WATCH. You'll look at your watch. If you LOOK LIGHT, you'll find out that you have a call waiting. If you look at an individual button, the game tells you to press a button or press F10 to leave the watch screen.
You can type in H, C or T on this screen to press a button. Pressing H gives you your horoscope, which tells you to keep up the good work as you get the big promotion you think you deserve and not to take any wooden buckazoids. The T button tells you the current time and temperature. Since you're in outer space right now, it's cold. -47 degrees Celsius, however, is equivalent to -52.6 degrees Fahrenheit, or 226.15 degrees Kelvin. In reality, space is -270.45 Celsius, which is -454.81 degrees Fahrenheit, or 2.7 degrees Kelvin.
The C button lets you take the call. You'll get a call from your boss, telling you to head to the shuttle that just landed as one of the passengers got space sick on the way down before chewing you out for not being done an hour ago. The call then ends. You can then leave the screen with F10.
First of all, do not go to the right. YOU WILL DIE. THE BOLD UPPERCASE TEXT LIVES. Instead, walk into the background wall. You'll be able to move to the red panel on the "ceiling," which takes you to the airlock chamber. You'll then be decontaminated.
PrinceWatercress plays Sumo Fighter - Part 7 of 15
The difficulty spike hasn't happened...yet. It's going to happen eventually, though.
First | Previous | Next | End
First | Previous | Next | End
Hard - Stage 2
Stage 2-1
Amazingly, there isn't much difference between Easy and Hard here.
With that said, the geisha yokai are called rokurokube, and the parasol yokai with the one sandaled foot is called kasa-obake.
Stage 2-2
The white birds that dip up and down as they move forward show up and become a nuisance here. If you can hit them, they'll drop a rice bowl worth one experience point. Only hit them if you know that you can hit them; otherwise, leave them be and don't even go after them.
Also, the ninjas now toss throwing stars at your current position.
Stage 2-3
There isn't much different here going from Easy to Hard here, either. Also, thanks to our enhanced stats, we can just plow through the boss by just attacking while inside of him.
Monday, May 23, 2022
PrinceWatercress plays Sumo Fighter - Part 6 of 15
Hard mode brings some dangerous new enemies - and rules - into the mix.
Hard - Stage 1
Stage 1-1
It should be noted that the locations of the bonus areas are the same as they were on Easy, so if you knew where they were then, you'll know where they are from here on out.
By starting with the password we got at the end of Stage 5-3 on Easy, we're able to start the game on Hard with all of our stats from Easy.
Hawks will show up from the upper-left corner and divebomb at you. If you defeat them, they will drop skulls. In the harder difficulties, they will lower your stats, so avoid the skulls at all costs.
Stage 1-2
The flying demon heads will leave skulls when defeated, and they also shoot fireballs at your current position as they loop around in a small circle. Sometimes it's better to leave them alone.
Stage 1-3
Since we have much better stats compared to Easy, we can tear the boss here apart.
The little white bird that dips up and down as it flies forward shows up here. They will show up in greater numbers later on, and they can be tough to defeat.
Sunday, May 22, 2022
PrinceWatercress plays Sumo Fighter - Part 5 of 15
From here, it's a brisk road to the final battle so we can save Kayo! But can we beat the game on Hard mode?
Easy - Stage 5
Stage 5-1
In this stage, the guys with hammers from the very beginning that slowly move forward will drop down from the sky.
Midway through your climb, the bonus area will be to the far right. Getting to it is crucial, as it'll let you skip a good amount of the level (as always).
Stage 5-2
A few of the new enemies - especially the big geishas and their skull icons - will come back. Be careful on the rocks, as the feudal lords can land on them if they try to jump back at you.
The bonus area is above a stack of breakable blocks, so make sure you stand on them and jump up to find the bonus area.
Stage 5-3
This area is pretty straightforward. If you need any power-ups, take the lower path in the fork in the road.
There are two bosses to end this journey. The first is a shogun. If you strike him, he will jump kick at you. To beat him, you'll need to jump over him, get all the way to the other side, then stomp as much as possible as he advances. When he gets close enough, you'll need to jump over him and repeat. When he is beaten, he will leave a full health pick-up.
As for the second boss, wait on the right side (but not too far to the right) and keep pressing B to palm strike. As the boss approaches, keep attacking. When you stun him, keep attacking and you'll bring him down very easily.
You'll get a password (which you should write down and remember for later), then you'll get a message congratulating you before telling you to play on Hard.
Saturday, May 21, 2022
PrinceWatercress plays Sumo Fighter - Part 4 of 15
Stage 4 has the hardest boss out of the entire game...and some of the most challenge that the game has to offer, too.
Easy - Stage 4
Stage 4-1
The platforms in this area are perhaps the hardest obstacle in this stage. You'll want to be careful when jumping from one to the next, as the jumping guys will either knock you off a platform into a bottomless pit or out of the air and into a pit. If they land inside the platform, they will attack again. It's best just to let the jumping guys pass by and fall into a pit. Also, some enemies will drop straight out of the sky, so be caution when progressing here.
You'll need to be at full strength to get to the bonus area.
Stage 4-2
This place is full of parasol yokai. Let them come to you, and if they get close, palm strike and throw them. If you see a destructible plant pot near a pit, scroll the screen to the right as much as you comfortably can to reveal enemies when necessary, then making a running jump off the pot to ensure that you clear the pit that is in front of you. This will definitely come in handy in the later difficulty levels.
The bonus area is next to a pot.
The thumb wrestling mini-game plays differently compared to the other mini-games. You have a cursor, but so does the computer, who has one underneath the bar.
If the computer stops its cursor before you do, your thumb will be pinned down. You will have to keep stopping your cursor at the middle between the two hands to free yourself.
If you stop your cursor first, you'll pin the opponent down instead.
As a result, you must stop your cursor in the dark rectangles near the center as quickly as possible, so you can pin down the computer. If whoever is pinned down cannot free themselves by getting their cursor to the center within three seconds, they lose.
For some reason, I could never figure this out. Still can't!
Stage 4-3
Be ready to make some running jumps over the pits. If you need to, use the rocks to give yourself some extra height and length from the get-go. One of the last jumps has ninjas approaching on the other side, so be ready for them when you land.
The bonus area is up and to the right of the first set of mid-air platforms.
To beat the boss, get up to him and hit him. Avoid the rocks that he throws when he jumps into the air and buries himself in the ground. Wait for the dust to kick up under your feet. This will be where he will pop out. Move slightly to the side and hit him so you can do damage when he comes up, then stand still to avoid the first rock and jump up to avoid the second, and land where the boss is burying himself. It will take some practice to get the timing down, but if you can get it down, it makes beating this boss much easier. You'll have to keep doing this until he dies.
Near the end of the boss battle when you have the boss down to about one or two units left, you'll stun the boss instead. Keep palm striking him and he will be done.
Friday, May 20, 2022
PrinceWatercress plays Sumo Fighter - Part 3 of 15
Time for some more moving to the right and palm striking anything that moves. Stage 3-2 has some interesting enemies, by the way.
Easy - Stage 3
Stage 3-1
Watch out for the guys with the ponytails; they will jump kick at you. As long as you let them come to you and attack as they approach, they're no problem.
The bonus area is above the first set of rocks. Jump up to find and get it.
Stage 3-2
The old men just move towards you. The geisha with the oversized heads do, too, and they all drop skulls if you defeat them. Never pick the skulls up; you'll get a lot of points, but you'll lose all your experience.
The kids in the raccoon suits throw fireballs at you. Be ready to dodge, then attack. Stomping works best.
Some blocks cannot be broken unless you're at full strength. I'm assuming the game wants you to be at full strength with the punch at this point. The bonus area will be surrounded by blocks that you can't break until your punch stat is as maximum.
Stage 3-3
In this stage, you'll be jumping your way up a temple. There are some tables and vases that you can break. The bonus area is in mid-air; just dash to it and you'll reach it.
The last table and vase has the full-health power-up.
To beat the boss, get on the platform in the center. Get to the right of the boss, stomp, then jump over the boss when he slide kicks. Repeat until he's dead.
Thursday, May 19, 2022
PrinceWatercress plays Sumo Fighter - Part 2 of 15
We start Stage 2 by going down the mountain we went up in Stage 1, then take on a guy with a wolf.
Easy - Stage 2
Stage 2-1
You'll be making your way down in this stage. Be sure to defeat the tiny sumo and destroy all the rocks that you can.
To get rid of the geisha yokai, use your stomp. That will get rid of them in one hit and hopefully keep them from hitting you with fireballs. The parasol yokai go down like most of the enemies you've seen and usually drop a rice bowl.
As you progress, the cursor on the bar in the mini-games moves faster and faster. The rewards, however, get greater and greater, and if you can beat all three rounds of a bonus game, you can get a lot of experience. Speaking of which, the arch leading to the bonus area will be to the right as you drop.
There is an extra life to get near the end.
Stage 2-2
The feudal lords will become super deformed when you get near them. They're very easy to defeat with your palm strikes, though.
The bonus area is above one of the mid-air platforms. Jump to find it.
Stage 2-3
The ninjas drop five experience when defeated, making them a pleasure to beat up. The tall guys with the jars will throw the jars at you; thankfully, you can jump over the jars.
The bottomless pits appear again here. In case a tall guy with a jar blocks your way between a thin platform and safer ground, keep to the left and jump over the jar when it is near ground level.
The bonus area is after the first tall guy with the jar. It will be above a mid-air platform.
You may have to make a running jump to get to some of the mid-air platforms.
The boss here moves back and forth and summons wolves. You can jump over the wolves. As for the boss, get behind him and smack him around with the palm strike, and keep moving towards him if you are behind him. It also helps to have seven hit points worth of health going into this battle.
Wednesday, May 18, 2022
PrinceWatercress plays Sumo Fighter - Part 1 of 15
Here's an odd little game where the main protagonist is a sumo wrestler. It may not be the best platformer for the Game Boy, but it's still enjoyable in its own way.
You are a sumo wrestler Bontaro Heiseiyama aka Bon-Chan, and you have to sav your love Kayo, who has been kidnapped by ninjas.
Easy - Stage 1
Stage 1-1
Left and Right let you move, and double-tapping either direction lets you dash. Down lets you duck. B lets you attack with a palm strike, especially if you press it repeatedly, and pressing it while running performs a headbutt. A lets you jump, and holding Down while pressing A lets you perform a stomp move that stuns some enemies and kill others.
At the bottom of the screen is your current health, your current experience, your current lives and your current score.
The pause screen shows the current strength of your strikes, your stomps, and your health meter.
As you go through the stage, you'll beat up enemies with rods that run towards you as well as tiny sumo. As you attack enemies repeatedly with the palm strike, you'll eventually throw them into the stratosphere to get rid of them for good. You'll need to beat up all the enemies and pick up what they leave behind. Rice bowls give you one point of experience, while the thing that looks like either a butterfly or a black four leaf clover gives you five. You'll need ten experience points to get to the next level. When you reach ten, the number on the right for your experience will flash. Pause the game and select one of the three things you want to strengthen: your strikes, your stomp or you health meter. You'll then have to get more experience to level up again. I recommend starting with strikes and health first, and saving the stomp for last.
Spikes do one hit point worth of damage. Don't walk on them.
Strike rocks in order to find things and pick them up. The drums gives us fist projectiles that you can throw out by holding Up and pressing B, and you have a limited amount of projectiles. That number is directly underneath your health, if you have them.
The kebab pick-ups replenish one point of health.
The gift box gives you a lot of points and also makes you temporarily invincible.
The arch above one of the platforms in the middle of the level leads to a bonus stage, and you'll need to select one of three cards to see what you'll get. There are three games: an arm wrestling game, a sumo wrestling game, and a thumb wrestling game. There is also an "Oh no!" card that gives you nothing. Besides giving you a game that you can play for more experience, you can also use the bonus stage to refill your health and skip part of the stage, even if you don't get a game.
To beat the sumo wrestling game, keep pressing the A button when the black cursor reaches the center of the bar at the bottom of the screen. With timing and practice, you'll be able to press the A button and stop the cursor as close to the center of the bar as possible and win the game and a lot of experience. You'll have three rounds of this to do, and you'll need all of them to win all the experience points, which will definitely be a help at this point.
The salt basket completely refills your health.
The stone at the end is the end of the level. When you beat a level, you'll get a password. Be sure to write it down, as it also saves your stats. Also, break the rocks at the end for more experience.
Stage 1-2
There are bottomless pits here, so be careful.
When you see the man with the hat, keep your distance and wait for him to throw his hat, then get up to him and attack him. They can knock you into pits much like any enemy, so know when to back off and know when to strike.
The guys with the sheathed swords will jump at you if you get close enough to them. They also wal
The bonus area is at the end of the second spike pit with the platforms. Just jump up to find it and get to it.
The mawashi gives you a super stomp that works for only one stomp. If you have the fist projectiles, it will replace them.
Break the rocks at the end to find some experience as well as a sumo fighter doll. The sumo fighter doll gives you an extra life.
Stage 1-3
Stage 1-3 scrolls vertically. Be very careful when making your way up the level, as the level does not scroll back down and falling beyond the bottom of the screen will cost you a life.
Watch out for the Ronin that run at you.
The arch is on the right side of the screen about halfway through the level.
The arm wrestling game plays just like the sumo wrestling game: stop the cursor as close to the center of the bar as possible and win the game and a lot of experience.
The boss is a martial artist. You can either get caught inside of him and position yourself so you can stay super-close to him and keep hitting him, or you can do the safer option: wait at the side of the screen opposite the boss and move under the boss as soon as he does the jump kick - which will be unable to hit you at the extreme ends of the screen - and then hit him. (Thanks One Credit Classics) Once you take him out, it's on to Stage 2.
Tuesday, May 17, 2022
PrinceWatercress plays Dungeon Explorer (Elf Class) - Part 8 of 8
We've returned the Ora Stone...only to find out we gave it to the Devil. Now we've got to beat the Devil and get it back!
At Axis Castle, enter the doorway to the west of the one leading to the throne room. Go south, then go down the stairs. From here, you'll be in a very alien-looking dungeon. Be ready to tear through enemies and the enemy generators that spawn them, including brown bugs that just charge at you in non-diagonal directions.
You'll then face Judas. Use your White magic, stay on the movie, run around the room in a circle, and keep as much distance as possible while attacking Judas and avoiding the multiple boomerangs he throws. After the stat boost, you'll be in Ciria Village, where the villagers will be cheering you on while telling you to head east to Balamous Tower. East of Balamous Tower is a path leading to Melba Village, so if you need to heal up at the tavern, you can do that.
You'll have some very narrow areas to move and shoot through in the tower, so getting the reflect mirror that will let your attacks bounce off walls is a must. Also, be ready to blaze a path to a staircase and then get right to it, as you will be overwhelmed if you try to fight all the enemies at this point.
You'll then face Natas himself. Move from one lower corner of the room to the other while aiming diagonally north, and stay away from the hands. You'll take out the hands and even a few projectiles coming out then be able to aim at the ORA Stone, and while the hands will re-spawn, taking out both hands will make things easier. Be ready to heal, especially if you get poisoned. Once you beat Natas, you'll be able to take the ORA Stone and beat the game! You've just beaten Dungeon Explorer!

Monday, May 16, 2022
PrinceWatercress plays Dungeon Explorer (Elf Class) - Part 7 of 8
In this entry, we finally find the ORA Stone! But not all is as it seems...
If you talk to the king at Axis Castle, he will tell you to go north of the castle and enter Ratonix, and to watch out for Octopolus. You'll also get the magic charges, as usual.
Here, you'll have a dungeon with some of the darkest color schemes I've ever seen in a video game...and you'll also have a staircase maze. The skeletons drop White charges, while the mud creatures drop the Black charges.
Start by going west and going downstairs. From there, take the stairs that are further to the east. Go down the next flight of stairs, then go up the stairs to the north. Take the next set of stairs that you see, then take the stairs to the north. Take the stairs to the north, then grab the seed if you need to replenish your health and take the stairs to the north again. Take the stairs to your immediate east, then do it again. Go south to the next set of stairs, then go up another flight of stairs to the east. Go east down some stairs, then take the stairs going down to the south. Get the stuff to the north, then take the stairs to the south. Take the stairs to the west from here. Go down the lower set of stairs to the east, then go up the stairs to the immediate east afterwards. Take the next set of stairs that you see, do it again, then take the stairs to the east. Take the stairs to the south, then follow the path and take the stairs at the end. You'll face Octopolus.
To beat Octopolus, use your White charges to heal, stay to one side and keep aiming at the eye in the center. You'll take out all the other eyes surrounding Octopolus' weak point before decimating the weak point itself before anything re-spawns. After the stat boost, you'll find out that you're on the way to Mistos and that you'll have to go underground and face Halatos. Follow the path to another dungeon.
Here, the ground is red and the enemy generators blend in with the floors rather easily, so watch for any part of the floor that is flashing. Despite the massive amounts of staircases here, it is easy to get to where you need to go. Just watch out for the massive amounts of blue eyeballs flying around, the flamethrowers and the orange demons that are very fast.
Near the end of this dungeon, you'll be dealing with enemy generators that spawn blue flames. If you see the blue flames, off-screen them immediately as you make your way to the south. You'll eventually face Halatos.
To beat Halatos, stay in one of the lower corners and fire diagonally to the north. You'll take out any flames that are shot at you while also slowly dealing damage to Halatos. Be ready to heal, as you can be poisoned during this battle. Once you beat Halatos, head all the way east and you'll find the ORA Stone! Grab it, then take the nearby stairs. You'll meet Judas, who tells you to head to Axis Castle. Just go east when you leave the house and you'll be there.
Of course, once you go to Axis Castle, you'll notice that the music in the castle is slower. When you talk to the king, you'll find out that he is Natas himself! The soldiers will tell you to go under the castle thru Roterroad to head to Balamous Tower, and to be careful of the plant pods.
Sunday, May 15, 2022
PrinceWatercress plays Dungeon Explorer (Elf Class) - Part 6 of 8
In this entry, we'll be facing the Splatter Slime and the Gargon.
Once you go back to where you got back into Axis Castle from, go east. You'll eventually come across a wall of fire that cannot be passed through; turn back and go north as soon as you are able. Go east, then go north. You'll eventually find stairs leading up; take them. After another room, you'll be in Cursoka Village.
Watch out for the dwarves, spiders and worms and take them out on sight before they get you. Head to the northwest corner and enter the house you find there, then go down the stairs for another dungeon area. The skeletons with the purple shoulder pads are fast, and the fly enemies will bounce off the walls.
You'll eventually encounter the Splatter Slime. Keep your white magic ready, move around the room in a circle to avoid the Splatter Slime and the slime enemies that it spawns (in three new colors!) and hit the Splatter Slime when you get enough distance. The Splatter Slime will go down in no time, and once you increase one of your stats, you'll be able to go back to Axis Castle by going west, but if you go south, you'll head towards Raraport and face yellow pill bugs, gray soldiers, orange soldiers and red dwarves, the last of whom will overwhelm you if your strength isn't high enough and you're not using White magic.
To beat the Gargon, stay around the southeast or northeast corner and keep firing at the Gargon. You'll be hitting fireballs while trying to attack the Gargon, but at the same time, you'll be able to clear a path. If you need to, lea up with your White magic. The Gargon may move back and forth every so often, so be ready to change your aim if you need to. If you have the reflect ability for your attack, this is even easier. It may take a while, but the Gargon will go down long before you do.
You'll then go through yet another dungeon. Push the rock, go up the stairs, and you'll be east of Axis Castle.
Saturday, May 14, 2022
PrinceWatercress plays Dungeon Explorer (Elf Class) - Part 5 of 8
It's time to head further away from the village and further into this strange land in our quest for the ORA Stone.
From here, head back to the fork in the road with the house that was near Cherry Tower. From here, take the path on the right to the north. From here, take out the enemy generators, the purple spiders and the dwarves who throw aces and the barbarians as you head east. You will eventually find a path to the north; don't take it yet. Instead, continue east. The man in the house you find here will tell you that the nearby stairway will take you to Karma Castle; from here, you can head to Stonefield.
The purple pillbugs are even faster than the silver ones. The green guys in the armor are also fairly fast.
The oval shaped balls that bounce off the walls come out of generators that cannot be destroyed.
You'll eventually face Cyclopus here. The boss here will chase after you and will only fire diagonally. Get a good distance away, hit him a few times, wait for him to teleport, then keep away from him and repeat the process. Be ready to heal, just in case.
You'll end up back outside, and you'll be able to head to the nearby Karma Castle. Go into the castle. You'll meet Judas, who tells you to go underground through Rallymaze.
The glowing white balls that shoot out damaging white orbs of light cannot be destroyed, and neither can the white orbs. At this point, you should have enough agility to run through rooms very quickly; it may just save you in case you lose a lot of health.
You'll soon face the Reaper of Death. He will split into four and have himself and his clones go after you; use a White magic charge if you need to heal, keep your distance and take them out one at a time. They'll all fall before you know it, and you'll soon be back at Axis Castle. From here, you can go to other areas and also go to the castle proper. The side door areas are now open, so you can skip a good amount of the game in case you have a password that takes you this far.
The side entrances of the castle lead to the multiplayer arena, where you and a bunch of friends can fight each other. Also, talk to the King. The King will tell you to go to Cursoka Village east of Karma Castle - and beware of the Splatter Slime - if you talk to him at this point. Yes, you still get the magic charges.
Subscribe to:
Posts (Atom)