Part nostalgia-bomb, part note-taking and part FAQ, what started in GameTrailers as a video game blog is now on Blogger. This blog is a look back at video games, both popular and obscure, from the video game industry's infancy all the way to the previous console generation.
We've got three playable characters, so let's try out The Tin Man and ease on down the road, shall we?
Scarlet Marsh
The Scarecrow can walk on the swamp water's surface and not slow down; everyone else will sink into it and be slowed down a lot.
The bigger mushrooms will shoot you into the air if you jump on them. Use this to find power-ups.
The Tin Man uses the axe as the melee weapon, but can also use throwable items. There's just one weakness with the Tin Man: he cannot jump if you press the B button.
Climb up the last tree at the exit. There is a red Ticket at the upper-left corner, but if you're not paying a lot of attention, you will miss it. It is there, though.
Rouge River, West Fork
There are a lot of fish here that will jump out to bite at you, as well as crab enemies that slowly move back and forth.
The doors marked "secret" can be entered to take you to other parts of the level. If you see one on your way up, enter it.
When you're able to see the sky, you'll be able to not only reach the end, but also play a mini-game entitled "Toto vs. Lobsters." Here, you have to move Toto to the "end" gem to get a red Ticket. You can jump over the lobsters if you need to.
Here's the problem with this mini-game: the lobsters move only when they feel like it. Wait for them to move forward, and if there is an empty space on the other side, move into them to kill them off. There are two you can kill off at the outset, but you'll have to wait on the rest. All you can do is just be patient. The Ticket will be at your left. Grab it, then keep going up to exit this level.
The first obstacle you'll deal with are the fires that bellow in and out of the chimneys. Watch your leaps carefully as you make your way to the buildings.
There is a Ticket just to the left of the top of the first building. Maneuver yourself to the right after you jump for it and get it.
The townspeople will leap up on the bridge once they notice you. Also, the bluebirds are now redbirds.
The brick bridges will fall apart as you cross, so be careful.
Look to the top of the buildings for red bricks. Be sure to use the winged slippers to get past the second set of chimneys.
If you can somehow make it to the top of the level at the exit, you'll be able to get an extra life for both Dorothy and The Scarecrow.
Carnelian Forest
It's another forest level! You have red bees that will divebomb when you get close enough. At least they stop to telegraph beforehand.
Get to the treetops at the very start of the level. This lets you get through much of the level without incident, as well as find red bricks as well as another red Ticket.
You'll eventually fight another boss: a jumping train on wheels. Use your throwing gems as well as your weapon to hit the front of this thing, and don't let it jump on you. It will eventually fall apart after enough hits, and you'll un-rust The Tin Man, making him your third playable character. You'll also get another password that you'll definitely want to write down, too.
We are now in the Red Country...and it's going to get a little bit harder from here on out. Keep your eyes peeled for much-needed collectibles.
Rouge River, North Folk
There are two means of standing on and traveling tot he other side: the static platforms as well as all the logs that show up at random and always move with the current, which is obviously going opposite the direction you have to go.
The chattering teeth jump up and down, chomping all the way. How they have tongues is another matter entirely.
The Tickets and bricks here will be red, because you are now in the Red Country. They will be
The Red Ticket is in plain sight, you'll just need to get on one of the lower logs to reach it.
Oh, and make sure you jump at the end, or else you're going all the way back to the beginning.
Poppy Fields
You can get the winged slippers for Dorothy here as opposed to Shy Village, if you prefer. Just jump to the left and then jump straight up to grab them. More than likely, you will be needed
Aside from the poppy platforms and the returning bees, you want to stay away from the pollen that comes out of some of the flowers. Also, if the stem is not sticking out of the flower platform, it will drop down after you jump onto it.
The "Follow The Path" mini-game is easy to get lost in or fail if you don't know what to do.
Go right two, down two. right two, up three. right two, then down until you reach the left arrow. Go left two, then down two, right, down, right two, up three, right, and up until the end. The Ticket will be right in front of you at the end.
The bale of hay is health for The Scarecrow.
There is another Ticket in plain sight if you keep jumping from poppy to poppy. That's one thing you want to do, because if you drop down, you'll have to use the leaves to get back up, and it can be hard to figure out which ones you can land on and which ones you cannot.
Well, we don't have super-annoying mini-games anymore, but we still have some super-annoying platforming to do.
Xantham Farms
Now you have stalk leaf jumping...and a bottomless pit. The biggest thing to remember is that you have to land DEAD CENTER on the leaves if you want to land on them. Otherwise, you're going straight through.
You'll also have to watch out for the birds that fly out from both sides of the screen as well as the bees that will dive down at you.
The platforms that move back and forth very quickly are tricky, so bringing the winged slippers is well-advised. If you land on them, they stay in place for a while before falling straight down. Don't let them take you with them.
At least there is no Tickets or mini-games here.
Lemon Trees
Enemies here include grump cats, falling gold apples and trees that throw fruits at you.
To the right of the start is another bone leading to a mini-game called "Toto vs. Mice." You have to move Toto to the "end" emerald to collect a Ticket. You will not be able to jump over the mice, and you must move by pressing diagonal directions on the D-Pad or else you will fall and have to do this all over again. Thankfully, if you know what you're doing and have a little luck, you can beat this in seconds. The Ticket will be right above you when you return to the stage. You now have the sixth and last Yellow Ticket.
Your best bet for going through the rest of the stage is to stay as high as possible. This will allow you to blow through the stage.
Citron City
It should be noted that every time you enter a new stage, your health is completely refilled.
You can enter the houses, kick the crap out of the villagers, and take the single brick that they have.
These city stages (there are four in all, one for each country) will test your jumping skills as well as your ability to find what you can and cannot jump on. You'll also have to watch out for bluebirds as well as walking patio tables.
One of the doors contains an extra life for The Scarecrow. You'll want to get that. There is also another one for The Scarecrow located at the top of the stage.
You will want to complete this stage with 75 yellow bricks. If you don't have that much, go back to earlier areas, especially Shy Village (which is the best area to recommend).
It should be obvious that you should not touch any open flames as they will damage you.
The exit is at the top-left of the stage where the arrow is. If you leave from the sides at the very bottom of the level, you will leave, but the level will not be counted as complete and you will have to go through it until you find the actual exit.
Yellow/Red Border
The more yellow bricks that you have when you come here, the less jumping you will have to do. In case you don't have enough, you can always leave from the left side, go back to an earlier stage, collect more bricks, and come back.
When you cross to the Red Country, you will get a password. Write it down.
Time for two more levels of the Yellow Country and...OH GOD WHY DOES THIS MINI-GAME EXIST
Maize Meadow
Not only does this level play host to pumpkins on springs, corn stalks on unicycle that toss corn grenades, mice that violate the laws of perspective by hitting you even though the fence they walk on is part of the background, crows that dive down at you, but it also has the worst mini-game in the entire game.
That mini-game is the Lemon Drop Elimination mini-game. You jump on the Trouble-style dice popper to roll the dice, and you have to push off the lemon drops that have the same numbers as the dice, or the sum of both numbers together. The numbers are between 1 and 12. Let's say you roll an 11. You can knock off 5 and 6, or you can knock off 11. The choice is yours, but choose very, very wisely.
This mini-game isn't so bad until you figure out that this mini-game HEAVILY RELIES ON RNG (random number generation). GREAT JOB, DEVELOPERS. Not going to lie, I actually used ZSNES' recording feature and abuse of rewinds to get this thing done, because FUCK DOING THIS LEGIT, THAT'S WHY. Good luck getting double 1's for 2 and double 6's for 12, BECAUSE YOU'RE MORE LIKELY TO WIN THE LOTTERY THAN BEATING THIS CRAP!
The ticket for this is mercifully where you pop back up in the level. Good riddance.
Also, try not to lose all your health. If you do, you lose all of your throwing items. Another smashing job from the developers. The star let you shoot in a straight line, but good luck finding stars because you won't see them often.
The boss is a giant crow in a vest which jumps forward and sometimes kicks at you. Let it move to the left a little bit, then keep kicking the crap out of it. You'll be able to free The Scarecrow and unlock him as a playable character, and you'll also see him at the end of every stage from now on. You'll also get a password for making it this far. Write it down.
Saffron Fields
To switch characters, press Select. You'll be able to select between Dorothy and The Scarecrow. The Scarecrow is signified by the pink graduation cap that signifies his wish for a brain. Pressing A with The Scarecrow allows you to attack with the pitchfork. X does nothing. It should be noted that The Scarecrow is the slowest of the four characters, so you don't want him to be surrounded by enemies.
All the characters have their own health bars. If you're nearly out of health with one character, you can switch to another.
This time around, you'll be jumping up hugh cornstalks to find some enemies. This is where the winged slippers will come into play.
Inside the mill, you'll be able to find a yellow Ticket and an extra life for Dorothy at the top. Use the winged slippers to get both. You can kick the big buzzsaws, but they take a lot of abuse before they are destroyed.
Some of the spiked plants in the backgroudn will spring to live and spring into the air. Be ready to kick them.
There is a small storage shed one of the leaves of the giant stalks. You'll find a few yellow bricks here.
The barn is just after the storage shed. There is a 1-up, it is really hard to get a hold of. When you enter, you're damaged by a mouse, and when you come out, you get hit by a corn stalk on a unicycle.
Strangely, this is the first Let's Play I did that got a really good amount of views while it was still fresh. Not surprisingly, I hit the 50-sub mark when I was doing it.
The story begins with Dorothy sleeping in front of the barn with only socks on her feet and looking dead while Toto strangely looks like a cat while having more going on like something that is about to picked up by a character in an animation cel from an old hand-drawn cartoon. As she sleeps, a tornado touches down near the barn while Dorothy complains about everyone. The cows go into the barn as it gets ripped apart, and then we see dead-looking Dorothy spin around in the background that made up the title screen because MODE 7, THAT'S WHY.
Dorothy then wakes up in Oz with shoes and a picnic basket. She's now wearing blue shoes for all of less than a minute before they are replaced with the ruby slippers the movie is known for. At least she doesn't show up with the red shoes right away. She is then told by Glinda, the Good Witch of the South (North in the movie) to take them to The Wizard of Oz in Emerald City, and to not take them off until then. She also gives her a wand, but good luck utilizing it when ammo for it is limited and has to be farmed.
Glinda - or a bubble of Glinda - is bumped aside by a bubble with the Wicked Witch of the West's face on it and kidnaps Toto. You'll have to give her the ruby slippers personally to get Toto back, but we all know that's not happening.
You start out in the Yellow Country and have to follow the brick road through four countries in total: Yellow, Red, Blue and Purple (which is taken from the books rather than the movie) before taking on The Wicked Witch of the West, getting Toto back, and finding a way back home.
Shy Village
The heads-up display is pretty straightforward when you know what is what. From left to right, you have your ammunition (which you'll never know how much of it that you have until the icon disappears), the current item that you can use with the A button, a gauge that shows how many tickets from each world that you have, the current members of your party and how many lives your current character has, and the amount of bricks that you have.
Pay attention to which icon signifies which character. If you find it on your travels, pick it up to earn an extra life for the appropriate character.
Below is the name of the current stage (which shows up for the first couple of seconds in a new stage), and then displays your health.
Controls are simple. Left and Right let you move, Down lets you crouch, B lets you jump, Y lets you attack with all the characters, A lets you use an item, and X allows for another attack that is of the non-projectile variety.
For Dorothy, Y uses the wand while A uses the item. X does a kick.
Enemies here are lemon drops frown and drop down when you come close, frogs that take two kicks to kill, bluebirds and moving chairs,
You can walk to the left to leave the area, but you won't get credit for clearing it. You will have to make it to the designated exit in order to move on.
Pressing Up at the doors in the trees will allow you to enter them. Use the branches on the trees to get up to the doors.
The bricks are used at the end of every country to build a bridge to the next one. The ones here will be yellow, as you are currently in the Yellow Country. There are four countries in the game: Yellow, Red, Blue and Purple. The game apparently has some things that come more from the books than the movie. Bricks and Tickers will
The bone allows you to play a mini-game. Here, you'll have to remove all the blocks by moving Toto around with the D-Pad and also find a hidden message at the same time. The correct path reveals the hidden message "You are not in Kansas anymore." When you complete this mini-game, you will get a Ticket...but you'll have to find it to get it. Thankfully, the game goes easy on you here and lets you pick it up as soon as you return to the main stage.
The Tickets will allow you to enter the Emerald City...but you will need all twenty-four in order to enter and get the best ending.
The orb with the purple core refills four units of health for the character you are currently playing as.
One of the tree houses leads to a maze. For the doors you want to enter, it is right, left and then left. This takes you to a room with one door. Enter the door, then go all the way to the left to find a health pick-up and another Ticket.
The ruby slippers with the wings can be utilized by holding A while playing as Dorothy. Press and hold A to do a floating jump for a few seconds. You can use this to make getting around a little easier as well as get to items and areas you normally would not be able to access. Shy Village is always the easiest place to find winged slippers, so if you need some, go here.
The arrow signifies that you have reached the exit.
When you beat a stage, you'll be at the overworld screen. You can go back to areas you've previously cleared, which is nice in case you need to get power-ups or more bricks.
Gamboge Gorge
New enemies include cactus cats you can kick to destroy, and vultures that will randomly dive at you. Use your projectiles to take care of the vultures, and remember
Be careful around the actual cacti. If you jump into them, you can take damage from doing it.
The first pit leads to some bricks as well as some throwing blocks, Get on the spring to get back above ground.
You'll soon be jumping on top of rocks while avoiding clouds that will blow you around if you are in the air. Be sure to jump when you get on the wooden bridge, as it will fall down when you land on it.
After the bridge, go down the second pit to find an extra life for Dorothy. The first one contains spikes that will tear you to shreds and you will not find out until it is too late. The third leads to yet another yellow Ticket.
While I haven't been what you would call "a fan since Day One" of this channel, I did get on this one while it was still more or less on the ground floor (so technically "Day One-ish," thanks, Usos). One Credit Classics, straight out of the UK, has been clearing some great classic games - some of them harder than others - on one credit, without continuing, as advertised. This one is definitely no exception. I've been following the channel since its guest spot on GamesYouLoved in October of last year with the special Halloween clear of Castlevania for the NES, and I've since made the time to watch all the back videos and keep up with what has been going on since. I've pretty much spread the gospel that is One Credit Classics by sharing pretty much every video ever, and I've even thrown down the money for the T-shirt that was proposed before Christmas, so it would be very, very remiss for me not to put 1CC on the retrogaming notes blog. With that, I'll leave you with the Kung Fu soundtrack. Until next time...
Here's that NES beat-'em-up classic Kung Fu, also known as Kung Fu Master and Spartan X.
You are Thomas, and you must save your girlfriend Sylvia from the evil Mr. X! Travel up five floors, defeat the enemies, avoid the dangers, and beat Mr. X at his own game!
Game B is harder than Game A as enemies are faster and more numerous. 2-Player Mode is, of course, alternating.
You do have a life bar, so you won't die in one hit unlike other games from the time this game came out.
Use Left and Right to move. Press Up to jump and Down to crouch. A lets you punch and B lets you kick.
Floor 1
The enemies here are pretty easy. Punch or kick them when they get near you.
If you see the knife throwing guy, you'll want to take him out immediately. Duck under the high knives and jump over the low ones, and immediately attack him twice to defeat him, unless you want to be stabbed at point-blank range.
The boss is some guy with a stick. Get close so he attacks, then move back when he rears the stick back. When he attacks, smack him immediately, then move away when he rears back again. Repeat until he's dead.
Floor 2
The pots can easily be broken with a punch or kick while still in midair.
The green ones send out a snake that comes after you if they break. You can jump over them, or you can crouch and kick them to get rid of them.
The greenish-yellow disk-like objects can also be destroyed, but if you can't get them in time, they release a dragon that spits fire and disappears. If you're near one, duck down to avoid the flame and attack it immediately. The yellow ones that shake in mid-air are the worst. If you don't take them out right away, they'll split into a downward three-way shot that does a lot of damage if the shards hit.
Midway through, you'll meet the normal enemies.
To beat the boss, duck over the first boomerang, jump over the second, then immediately pummel him repeatedly. Dodge the boomerangs when they return.
Beating this stage will give you a cutscene, then it's on to Floor 3.
Floor 3
The green midgets show up here. Their flip attacks do a good amount of damage, but most of the time they'll stay low to the ground and vulnerable to a crouching punch or kick. If they show up in packs, at least one of them will do the attack. You can stand up to hit them with a jump kick or punch, assuming you can do so in time.
The boss is a heavy-set guy in a wifebeater. Get in front of him and duck under his punches, then attack him as he punches. If he kicks at you, you can jump over the kick or back away from him.
Floor 4
The hornets take one hit to kill. Punch or kick them when they're at attack level. If you need to, crouch down.
Halfway through the stage, the hornets will stop showing up. You'll eventually meet a hunchback who can throw fireballs. Get in front of him, duck to avoid his fireballs and attack. When he teleports, watch for where the cloud is so you can get in front of him when he reappears. Keep crouch attacking until he's dead. If you use a standing attack, he'll just keep teleporting, so remember to duck for the whole battle.
Floor 5
After the cutscene repeats, it's the last floor. Try to take as little damage as possible.
To beat Mr. X. Get in close and crouch kick from a distance. Hit him a few times, then back off from his attack. Repeat until he's dead. He slowly regains health, too, so keep that in mind.
When you beat Mr. X, you'll save Sylvia. From here, you'll go back to Floor 1 and play the game all over again.
Remember the movie "The Untouchables?" Well, there was an NES game based on it.
Scene 1 - On The Street
There are a few streets you'll have to clear of gangsters...but watch the timer. You only have about thirty seconds before time runs out.
You have up to two shots, and you'll have only two shots before you have to hide behind the building and reload.
The first street has three enemies, the second street has five, and the third street has eight.
This takes quite a bit of practice, but once you've got this one down, you'll be able to beat this stage without too much difficulty.
When you complete this scene, you...go back to the title screen? Believe it or not, this is going to happen every time you finish a scene. Press Start, and you'll start Scene 2. You'll have to do this every time you clear a scene, and it's very annoying.
Scene 2 - The Warehouse
You're now in a side-scrolling scene where you shoot enemies. There are two kinds of enemies: the guys with the yellow hats, which try to take you out, and the guys with the grey hats that drop evidence (the grey pieces of paper). You'll have to collect pieces of evidence to complete the screen to get 100% of the evidence.
Sometimes the yellow hat enemies will drop enemies when you kill them. That's nice, considering that you have a limited amount of ammo, and as long as you don't miss, you'll be able to get enough ammo to complete the level.
Even though there are two floors, stay on the first one. You'll encounter all the enemies you need to shoot down and complete the scene with here.
Scene 3 - The Border Raid
You'll have to shoot the bottles to find evidence, but there are a ton of enemies trying to kill you. Keep rolling around, and take out any bottles whenever you see them.
You have four characters to choose from instead of just Elliot Ness, so if you get killed off you'll still have three characters in reserve. Switch characters when your health gets low to restore that character's health and get a new health bar.
You'll have to shoot about 25 bottles in order to get 100% evidence, and you only have 4 minutes to complete the scene. At least you have unlimited ammo, so hold the fire button so you can tell where you're shooting. Just keep rolling every so often so you can delay being near death.
Scene 4 - The Alleys
This is just like the first scene, except you can switch between characters and you can earn bonus time for subsequent streets by going through each street as quickly as possible. You'll want to have a lot of seconds on the clock, so you can add the remainder of how much time you had left to the next street, allowing you to take your time.
The first three streets are the same as Scene 1, but there are eight streets. Street 4 has 10 enemies, Street 5 has 15 enemies, Street 6 has 20 enemies, Street 7 has 24 enemies and Street 8 is the boss.
Street 8 is easy when you know where the boss is going to stand. Shoot him twice whenever he gets close, and you should have him. Just watch your health.
Scene 5 - The Railway Station
Here, you'll be guiding and defending a baby carriage. This carriage will continue moving, and you'll want to keep it away from both walls and enemy bullets. At least the baby has a health meter, but it can still be difficult.
Just keep walking into the carriage in order to guide it, Walk behind the carriage so it doesn't tip over the stairs, and keep it away from walls so the baby doesn't fly out. Either scenario will cause you to start the scene all over again.
You'll definitely be going through this level a lot in order to memorize the level and figure out how to guide the baby carriage so it doesn't run into anything, as you'll be going through some tight avenues with enemies shooting you down at every turn...but it can be done.
Scene 6 - Free the Hostage
You'll have to hit the hat of the guy in brown...but you have only one shot. If you miss, you'll have to start this scene over. There is a practice round that you can access by pressing A instead of B. Keep playing it until you're ready.
You'll want to get a clear shot of the guy in the yellow, and you'll want to take it as soon as you can. When you do, you'll be able to save the guy in gray, who is a vital witness. Again, you only have one shot. Make it count. Move the gun up and down and you should be able to get it in.
Scene 7 - The Rooftop
You have limited ammo, but it's like the alley levels. Shoot Al Capone when you have a clean shot. You have only six bullets, and you can't waste a shot.
When you shoot Capone, you'll push him back. After six shots, you'll push him over the balcony of the building. You've won!
Drop the sandwich into the mouse cage near you. The mouse will go for the sandwich, and the cage door will slam shut, trapping the mouse.
The next part is a tad precise. Make an effigy from the clay. Stick the pins into it, and the witch will run to the cage only to fall to the floor. Open the cage door. You're free! Now take the small cage with the mouse with it as well as the golden candle near the cooking pot, then head out of the witch's hut and the village and head west.
You'll see an elephant. Drop the cage in front of the elephant, then shoot the elephant with the darts and open the cage. Since you shot the dart first, the elephant will stop at the river on the next screen to the west and block it, damming the river completely. Head down to the west. You'll be able to cross the river at last. Keep going and you'll be at the path where you found the scroll. Head back to the waterfall and approach it to find another path. Go west to find the secret garden. You're at the pool of life! Fill the flask with the magical water. You've got it! Now head back to the main path! The elephant will wake up, causing the waterfall to run again.
Head back to the river. Swing across the vines if you need to (do it, you get points) and search the plants on the right side by walking into the upper left corner of the bushes to the north. You'll find an old, worn out book. Take it.
Head back to the cave with the evil spirit. Get in front of the ghost and read the book. Apparently, it's a spell book. Now that you have the bell and the candle along with the book, you'll be able to get rid of the evil spirit.
When you go inside, you'll meet the old man from the first two games who tried to keep us from progressing with his dumb little pop quizzes. Only thing is, you're asking the questions and he's the one answering them. If he answers correctly, you'll be able to pass.
You'll hold something in your hands, and he has three guesses to get it right. On the first and second guesses, he gets it wrong. Say "no" on both questions. On the third guess, he mentions the flask of the water from the pool of life. Say "yes." He'll let you pass.
Since you have the crystal ball, he'll take it off your hands.
You'll reappear at the area before the bridge that collapsed. Head to Penelope and give the flask. Congratulations, you just won a short and easy game. (And yes, you head back home despite the game telling you that you ran out of gas. Go figure.)
It was only a matter of time before the third game was covered...
Hugo and Penelope head back from their vacation in the last game, However, a magnetic storm causes Hugo to lose all sense of direction and forces him to land in a South American jungle.
When you land, Penelope explores the jungle, but not before telling Hugo to change his clothes as they clash with the scenery. Unfortunately, Penelope gets bitten by a spider, but cries for help before she falls unconscious.
A native girl will rush to Penelope before Hugo (now in safari gear) can and tells him that a dreaded tree spider has bitten Penelope. There is only one antidote, and you only have 48 hours to cure Penelope.
The antidote is from a place known as "the pool of life," located in a secret garden behind the waterfall. From here, it's up to you.
Don't head over there just yet. Head back to the plain and look inside. There are some clay, some pins, a water flask, a sandwich and some bouillon cubes. Take them all. Then type "go back."
Head down the path behind the native girl. You'll eventually come across a bridge. You won't be able to cross it as it won't support your weight. Tie the vines to the bridge. You can now cross to the other side...but when you do that, the bridge collapses. You'll have to find another way to head back to the plane.
Continue on and take the scroll. If you read it, you'll find that there is a crystal ball near the mighty boulder, and that the scroll is signed by an old man who wants it back. This will come in handy later on.
Take the lower path to the east. Pick up the golden bell that is in the path. Keep going and you'll find the waterfall. Go past the waterfall and you'll find a cave guarded by an evil spirit. You won't be able to enter it just yet.
Past the cave is a path with a huge boulder. Remember what the scroll said and type "look behind boulder" to find the crystal ball, as promised. Take the crystal ball.
Keep going, and you'll find a native village. One of the villagers will approach you and tell you that you're basically safe here as long as you don't enter the witch doctor's hut to the right. They're also roast hyena...again...and the villager wishes there was a way to make it more interesting. Give the villagers the bouillon cubes, and they'll be grateful enough to give you a blowpipe and some sleeping potion darts.
Head to the witch doctors hut and enter. You'll be locked in a cage...
The final level takes us to a haunted house, and it's the most challenging yet.
Level 5: Haunted House
Password: Roger, Webbly, Kelly, Bobby's Dad
Derek shows up. He tells Bobby that Mom wants him to make sure he cleans out his closet. Of course, Derek knows how to tease Bobby, and tells him it's a haunted closet.
Bobby throws pumpkins in this level, and this time you're forced back into the usual short-ranged arc that Bobby's throwing weapon usually has.
Here, X lets you swing back and forth on the statue heads on the wall that act as hooks, as well as the wooden stumps that stick out form the side of the wooden columns. You'll have to jump to the other side a la Super Castlevania IV. If you're not used to the swing animation by now, you're in for a tough time. Since this is a new thing, you'll have to get used to this as well. You'll have to do this rather quickly, because you'll be swinging over bottomless pits before you know it. It takes a little bit of time, but once you're able to get the swing of swinging, you can beat this stage.
A lot of enemies, such as the blue ghouls, the zombies and the skeletons move back and forth, but the skeletons move faster than the others. You'll also want to take down the candle monsters that come out of the candle holders.
The purple monsters with the umbrellas will send bats at you when their umbrellas open up. They take one hits to defeat, but they take a while to die.
The little green guys that roll across the floor will drop from the sky with no warning, but you can block them with the A button.
The branches that stick out of the wooden columns that alternate between low and high can be terrible if your timing isn't spot on. Once you get past the stumps above the bottomless pits, though, the worst is over. The second section is perhaps the hardest part of the entire game, and one where you should bring plenty of lives to.
In the shooting section, Bobby is a witch on a broom that spits the pumpkins forward.
The final enemy is some weird purple creature with fly wings. Avoid the little green guys he throws downward, stay away from the bats that come at you, and keep to the very left side of the screen as always. Keep throwing pumpkins at him no matter what, and make sure Bobby is at least at the same height as the monster's eyes so that you can minimize damage.
When you beat the third and final boss, you get a pretty basic ending, but an ending nevertheless. Good job!
As Bobby gets his room cleaned, we head to Atlantis and the Wild West!
Level 3: Fish Tank
Password: Kelly, Webbly, Roger, Bobby's Mom
Guess Bobby's Mom isn't the only other character in this game after all. Kelly tells Bobby that Mom wants the room cleaned. Bobby soon sees the fish tank in his room.
In the first section, you'll be tossing bubbles at enemies, but that's not the only weapon you have this time around. Pressing X in this level does something different, and in this case, Bobby will throw Webbly like a Boomerang. Webbly will travel to the end of the screen before returning. If you jump over Webbly as he returns, you can hit stuff behind you with him as well.
Aside from the piranhas and manta rays that move forward as well as the turtles that swim in wave patterns as they drop eggs that track you at ground level, you'll want to avoid the purple coral sticking out of the floor. If you touch them, they'll pull you inside their holes for a few second and you'll take a hit.
Be careful with the bubbles that come out of the ground, as they will take you higher when you stand on them. This can lead to those purple corals that can pull at you if you're not careful.
Those brown, prong-like things in the ground and ceilings in the second section are spikes. The bigger ones hold orbs, which you can stand on safely.
The Atlantean guards can only be stunned temporarily with Webbly, but it gives you enough time to walk past him. As for the black mermen that throw lighting bolts, hit them with Webbly to make them stop.
The heads of the fish skeletons in the walls near the end of the second section act as platforms you can stand on.
The third section has you piloting a submarine in typical shooter section fashion, and you should know how this works by now. If you're playing with a password, you'll be able to get plenty of hearts to increase your maximum health here.
Be sure to take out the orange fish in the third section, as they do count as enemies.
The end boss here is a big, orange crab-like creature. Stay all the way to the far left and avoid the fish it sends at you, as you can't destroy them.
Level 4: Wild West
Password: Derek, Kelly, Bobby, Bobby's Mom
Ha! Now Bobby's dad wants him to clean up the bookshelf. This leads to Bobby reading a cowboy book.
The X Button returns to its Level 2 function, which is letting you hang on bars. Again, use the Control Pad to move left and right while you're hanging on the bars.
You throw horseshoes this time around. For something that we're used to seeing being thrown at an arc, these are thrown straight and forward for the entire level! You don't have to wait until the third section!
That's good, because some of the enemies are low to the ground, such as the walking cow skulls and the snakes that hid in the holes in front of the doors.
If you see a vulture in the sky, hold A to shield yourself from their attack and let them come to you. Not only will you not take damage, you'll get rid of them at the same time without having to do very much.
The cactus dogs just move back and forth.
The thin cowboy that shoots the cork at you (miserably) takes two hits to bring down.
The Webbly icon near the end of the first section allows you to bounce over the cacti in your path at the end whenever you use Webbly.
To get rid of the fat cowboys in the second section, block them with A to send the back, then throw a horse shoe at them.
You can stand on the barstools and the bar itself to get over some of the bottomless pits.
For the shooting section, you'll be pedaling a dirigible that can of course, shoot horse shoes. No boss here!
You probably remember Bobby's World, the children's show with a kid named Bobby who had a rather huge imagination, from the early days of the Fox Television Network. But did you know there was a video game back in the 16-bit era? Read on!
Yep, Bobby's World. The 1990s cartoon created by Howie Mandell about a four-year-old with an interesting world view and a big imagination to match that ran through most of the decade and became of the most enduring things to come out of the old Fox Kids weekday afternoon and Saturday morning blocks.
Believe it or not, there was a game. At least, there was supposed to be a game. The game is dated 1994, but the game was strangely never released during the planned time frame of early 1995.
In this game, Bobby's mom tells him to clean his room. As he does so, he keeps finding toys and having dreams about putting them away.
Level 1: Spaceship
Every level contains two side-scrolling sections, then a shooting section which is followed by a boss.
The game teaches you to use Bobby's favorite stuffed spider Webbly as a shield right away. To do that, press A. This will save you from anything that will hit you, but it has to hit Webbly directly. If it still touches Bobby's head, you're taking a hit.
Bobby can attack with flashing orbs with the Y button. They don't have much distance, but they're better than nothing. You can run to move faster, but that involves holding the Y button, so you have to make a priority out of whether to run, walk and fight here. Thankfully, this isn't so bad since the game is meant for kids, but the whole "attack and run command assigned to the same button" thing from the NES era shouldn't be applying to a Super Nintendo game, either way.
You can also jump on enemies to stun them. This allows you to get a hit in, especially on faster enemies.
Collecting 100 lollipops gives you an extra life. The cookies restore one unit of health, while the milk and sandwich refill them all. If you take damage without any hearts, you lose a life.
Watch out for the shooting stars that drop from the sky with basically no warning.
Enemies to defeat include meteorite pieces that walk around when you get close enough, purple aliens that hide in craters in the background and try to smack you, and aliens in UFOs that try to zap you with their tractor beam.
In the second section, you'll be taking on green lizards with ray guns. Use Webbly to shield yourself from getting zapped. You can use your blocking enemy to send them (and any other walking enemy) in the opposite direction.
In the third section, you'll be in a spaceship that lets you move in all directions and shoot straight ahead. You'll be flying around trying to avoid literal meteor showers as well as literal black holes. Wait for a pause in the meteor showers before moving past them.
The heart replenishes one hit will add one heart to your maximum health. At least you don't lose those when you die. You can have up to a maximum of six hearts.
The boss is some sort of space amoeba, and he's pathetically easy to defeat. Just stay all the way to the left and avoid being touched by this thing.
You get a password after beating every level. The kid with the blond rat-tail haircut is Derek, the girl with the huge hair is Kelly and the dog is Roger. In case you don't know who the characters here are, there you go.
Level 2: Under the Bed
Password: Bobby, Derek, Kelly, Roger
Bobby's mom wants him to check under the bed as part of the room-cleaning. This will obviously be an adventure in itself, and the music here makes it feel worth doing.
You'll learn before the level happens that if you use X, you can use Webbly to hand on a bar. This will come in handy throughout the game. While hanging on, you can move left and right across the bar with the Control Pad.
You now throw pillows instead of green energy balls, but they work the same way. Expect your unlimited ammo to change form throughout the game.
There's not a lot of enemy variety in this game, it seems: aside from the purple bugs that crawl low to the ground, there are still the small bedbugs enemies that drop from the sky with no warning unless you know they're coming (much like the shooting stars in the first level), and the crater monsters that try to smack you are yellow and now come out of soda cans. There are a few news ones, though: evil sock creatures on clouds that spit fireballs downwards, tiny sub sandwich enemies that walk back and forth, sock snakes that bounce up and down as they trudge forwards, and purple bedbugs that fly forward and divebomb you when you're close enough.
The purple bugs are the worst, since they're low to the ground and you'll have to be far enough and/or high enough above them to hit them effectively sometimes...unless you're right in front of them. That works too.
The Bobby head is an extra life. It's self-explanatory. I couldn't tell what it was because the hair on the Bobby Head icon meshed with the background. Speakng of the background, what is going on here? How much stuff does Bobby have under there? According to his imagination, there's a zillion things down there and they're all bigger than he is. No wonder this feels like a chore to him.
In the second section, you'll find out there's a whole village under there. Use Webbly to get on those bards and shimmy over the bottomless pits.
In the third section, you'll be riding a bedbug and shooting at stuff, avoiding the spring walls as you go. This is more of a basic obstacle course than the first level's shooting part. At least you don't have to deal with literal meteor showers anymore.
Unlike the first level, there's no boss here. The picture of the purple creature with the antennae is Webbly, while the woman with red hair is Bobby's mom.
It's time to put an end to Dr. Fessenden's plans once and for all!
Episode 7: The Vault
It's just as Mustapha Cairo thought. Dr. Fessenden is behind all this.
The background is a palette swap of the "Top of the Building" part of Eastcoast 2513, but it's evening now.
The pterodactyl goes down in one hit, so get rid of it as soon as possible.
The second section takes place in an elevator that takes you underground about 40 floors. Every so often, it stops ad you'll have to face a whole bunch of enemies for it to continue going down. Don't even bother relaxing on this elevator, as enemies will constantly drop until you reach the end.
Library
Once you break the gate in the beginning of the third section, you'll be in the library.
Not only will you be fighting two Lash T's at the same time, you'll also be fighting two Bludges at the same time. Yep, they're back again.
The second gate leads to the computer room.
Computer Room
After beating up a bunch of fat enemies, you'll meet two Slisaurs. It's basically two copies of Slice with dinosaur DNA spliced in. They have the same attack patterns, but there's two of them, which makes this boss battle twice as dangerous. Stay on your toes and use your standing combos whenever possible...and get your quarters ready!
Episode 8: The Under World
There's a lot of underground experimentation going on here. Tubes will break, leading to fights against Bludges, dinosaurs and even Tyrog-2, which is just Tyrog with only one form.
Underground
Be sure to destroy the flamethrowers on the walls so they don't make moving around difficult. That's the only new hazard you'll have to worry about.
Cave
When you start going downhill, just run to the right and keep right on running. Stay away from the barrels and just let them roll into the enemies.
Getting out of here is pretty tough, especially when you have to take on two Walthers and two Lash T's at the same time...but it can be done.
At the end, you'll meet Dr. Fessenden. He fights just like Morgue from Episode 5, so if you're used to fighting him, you'll know what to do here. But that's not even his final form, as a two-headed dinosaur sprouts out of the majority of his body, with Fessenden's shell in the center.
This guy is pretty slow, but he's pretty powerful. He can slash at you, shoot fireballs down at the ground at you, and even send groups of Blades to throw knives at you. Just stay on the move and use your full standing combo on him to do the most damage.
When you beat Fessenden, the main characters escape as the lab explodes. Jack has to save Hannah when he trips and falls. Mess and Mustapha make it out okay, but they head back alone, fearing Jack and Hannah died in the blast. In the end, Jack and Hannah are still alive, and they show up driving the Cadillac. Relieved, the four heroes head home. You did it!
The poachers are getting more daring, but now there are some human-dinosaur hybrid experiments being done. This can't be good.
After beating Slice, you'll get a radio transmission from a nearby village. The village is under attack by rampaging dinosaurs!
Episode 5: Village of Flame
Do yourself a favor: after beating up the three guys at the beginning and coming in contact with the dinosaurs, just run to the right. They can and will turn orange and attack you.
Watch out for the falling rocks once you reach the mountain area.
New enemy here: Bludge. This green guy that looks like Blanka with a tail will try to grab you with his long tongue and drag you towards him. You'll be stunned for a while if his tongue gets you.
Village
You'll fight off a few more enemies here.
The water buckets contain items, believe it or not.
At the end, you'll meet the old man who sent the distress signal. He'll tell you the village was razed to the ground as the villagers didn't want to participate in someone's evil plans. Before he can reveal who that person is, he is shot to death by Morgan, who then goes after you.
Morgan doesn't seem all that hard, but he can quickly leap to the center of the screen and shoot at you with his Uzi. He'll also kick rocks at you, too. Like always, his henchmen make everything harder than it should be.
When you beat Morgan, he'll transform into a dinosaur and go after you. Morgan becomes Morgue, and he becomes much harder to deal with. Use the Uzi he drops against him, and hit him with your standing combo from an angle. His slap attack has some range, and his tackle attack is pretty quick, too.
After beating Morgan a second time, you'll find out it's Dr. Fennessen who's creating these nasty human-dinosaur hybrids.
Episode 6: Jungle and Mine
You'll be able to break into the mine by punching the wall you run into at the beginning.
Coal Mane
Yes, that's actually how the game spells it.
You'll be fighting a lot of enemies here, including a Lash T. and a Walther. You'll have to take them all out to continue.
Jungle
As you take down all the enemies, watch out for the huge feet of the dinosaur near the water. Their stomp can do a good bit of damage, but they can also hurt enemies, too.
The boss is Tyrog, a Gneiss transformed into a dinosaur-like being thanks to a weird symbiote that takes him over. Hit hit from an angle with your standing combo, and watch out for both its slap attack and the weird slashing attack that it makes with its stomach.
When you beat Tyrog, it soon gets a second wave by latching onto a Wrench T, turning orange and learning a new attack in the process: the ability to spit fireballs at you. Fighting this thing like you did last time.
Beating it again causes it to latch on to a Walther, turn gray and take you on yet again. This guy will spit acid around him in a circle pattern, so you'll want to run away from him when he looks up to the sky.
After beating the Butcher, you'll find out the enemy plans to take Jack's garage.
Episode 3: Hellroad
Desert of Death
Driver is just a palette swap of Ferris with a bigger health bar.
Shortly after the beginning, you'll be able to drive the Cadillac. Take it, because it makes the level much shorter and you can take down all the enemies with ease. Be careful, as the Cadillac can only take so much damage before it is destroyed.
You'll take on Hogg for the boss battle, He'll try to run you over and throw grenades at you, and if you don't have the car anymore, he'll send in his henchmen as well. Keep hitting him with jump kicks and throw guys into him whenever possible, and watch the shadows on those grenades to see where they'll land.
Episode 4: Jack's Garage
Just a few enemies to take care of here. Nothing more.
In The Garage
Walther is a yellow palette swap of Vice T, and he'll show up again in other color coordinations. (It's sort of a reference to the Walther PPK, which makes sense, since he has a gun.)Thug is another version of Punk.
You can defeat the bikers in just one attack.
You can break the gate blocking your path down by attacking it.
Be prepared to use your special in case you're surrounded by enemies, as it will get them all off of you for a few seconds.
In the second section, you'll quickly be surrounded by Hammer T's and Wrench T's. Use your special to keep them all from ramming into you.
At the end, you'll meet Slice, the enemy commander from the beginning of the episode that took control of the garage. If you've played Final Fight, you'll notice he's similar to Rolento but fights with boomerangs instead of a staff...and he loves those grenades.
Slice is pretty fast, and it's hard to get a hit on him edgewise as long as he's moving. If you can get your hands on him and throw him or smack him with your standing combo, that's great. You'll more than likely be relying on that over anything else. Be sure to try to throw enemies into him, too. Just watch out for his slash attack as well as multi-boomerang throw which makes jumping around pretty tough.
There was a short-lived Saturday morning cartoon of the same game, and while the series didn't last for more than a handful of episodes, there was also a beat-'em-up developed by Capcom. And it's pretty awesome. Turns out, it was based on a comic book
Earth has been ravaged by pollution caused by advances in science and technology, causing the human race to hide in underground villages for 600 years. When they come out of hiding, they find out Earth has changed considerably. Cities are now ruins, and creatures that were previously known to be extinct have returned to reclaim the Earth....especially dinosaurs.
Technology is now limited, and those who have mechanical skills have power and influence.
Humans and dinosaurs have lived peacefully together for the last one hundred years or so...but dinosaur poachers always threaten to ruin the balance.
Jack Tenrec is the main protagonist of the series. He has average stats and doesn't really have any strengths or weaknesses.
Hannah Dundee is a diplomat from a neighboring country. She isn't very strong, but she is very skilled with items. Give her a weapon and she'll blow all the bad guys away.
Mustapha Cairo is Jack's friend, ready to help Jack at a moment's notice. He's got some awesome flying kicks and may not be the strongest, but he's also the fastest.
Mess O'Bradovich...who is he, anyway? We know he's the slowest guy, and he's not the best with items, but he's definitely the strongest. His throw attacks are particularly nasty and are worth checking out. All I know about him is that he makes a brief appearance in the comics and gets killed, and he never shows up in the cartoon. Kudos to Capcom for reaching deep to get him in the game.
Episode 1: Eastcoast 2515
Top of the Building
This section is rather short, but it's a harbinger of how good the music in this game is going to be. Seriously, check the game soundtrack out when you get the chance.
You have all the usual beat-'em-up attacks here, such as a running attack, a standing combo, a jumping attack, the ability to grab people and either throw them or beat them up, and a special attack that uses part of your health.
Ferris and Gneiss are your typical fodder enemies. Whack them before they whack you.
In The Building
You can find all sorts of items here. Usually they'll be points pick-ups (like money and inedible objects), weapons (like pistols, shotguns and Uzis) and health restoring items (like salads, steaks, and barbecues). If it's a prop you can destroy, do it. You might be able to find something useful.
The guns are really awesome and can blow through enemies, but watch your ammo at the bottom of the screen below where your health bar is. Collect ammo to reload. If you run out of ammo, you can still throw the gun at the enemy to do one last bit of damage.
You'll meet some new enemies here, such as Blade who attacks you with knives. Wrench T. (Wrench Terhune), Hammer T. (Hammer Terhune) and Blk Elmer (Black Elmer) are the fat enemies who will try to ram you to do damage. Wrench wears orange, Hammer wears green and Elmer wears purple and blue. The fat guys tend to drop food items to recover your health with.
Punk is a smaller generic enemy. He's pretty fast, and he'll even somersault around the room if given the chance.
47th Street
When you reach the end of this area, you'll face Vice T. (Vice Terhune). Rather strange that the guy we met is a blue-themed recolor. and this guy's blonde and wearing purple.
He's also got a Rock Hopper for a helper. Defeating the dinosaur causes it to calm down, turn them from orange to green and walk away rather than die, and this will definitely make the battle easier. That's a good thing, because you don't want the Rock Hopper to gnaw on you and toss you around.
Vice T. will leap around and try to put you in a deadly multi-punch combo. He'll also shoot you with his gun and hit you with jump kicks. Vice T. is also pretty fast. He also shoots his gun into the air to summon some henchmen, and you'll have to deal with them as you're trying to take down Vice T. Do whatever you can to get rid of these guys, but also try to deal damage to Vice T. at the same time.
When you beat Vice T., he'll tell you The Butcher is in the northern woods...and he's nuts.
Episode 2: The Swamp Forest
Mack is a triceratops. When they're orange, they'll try to tackle you. Just stay out of their way.
Poacher J and Skinner are the poacher enemies, and they'll try to use the guns. Whatever you do, don't let them attack the green dinosaurs, or they'll become enraged, turn orange and attack you.
Sometimes you'll see a few Blades pop out from the sides and try to throw knives at you. Watch out for the knives!
Mud Swamp
Gutter is another poacher enemy.
Lash T. will attack you with a spiked mace attached to a rope. He'll also try to kick you, too. Hit him from a distance, using either your skills or a weapon.
The second section will reveal that this "Butcher" guy has slaughtered some dinosaurs. That's not cool. After a brief fight with a few more enemies, you'll take on The Butcher himself.
Butcher will try to attack you with his huge butcher knives and also try to squash you. If you can knock him down, you can cause him to lose of his knives. The knives doesn't do as much damage as the standing combo, but it does make it easier to keep his henchmen at bay, so pick your poison.
If you use a continue, you'll re-appear on the screen with a bazooka and a couple of rockets to get back at enemy forces.
Razor is basically like Blade, but wears different colors and has a shorter brown haircut.
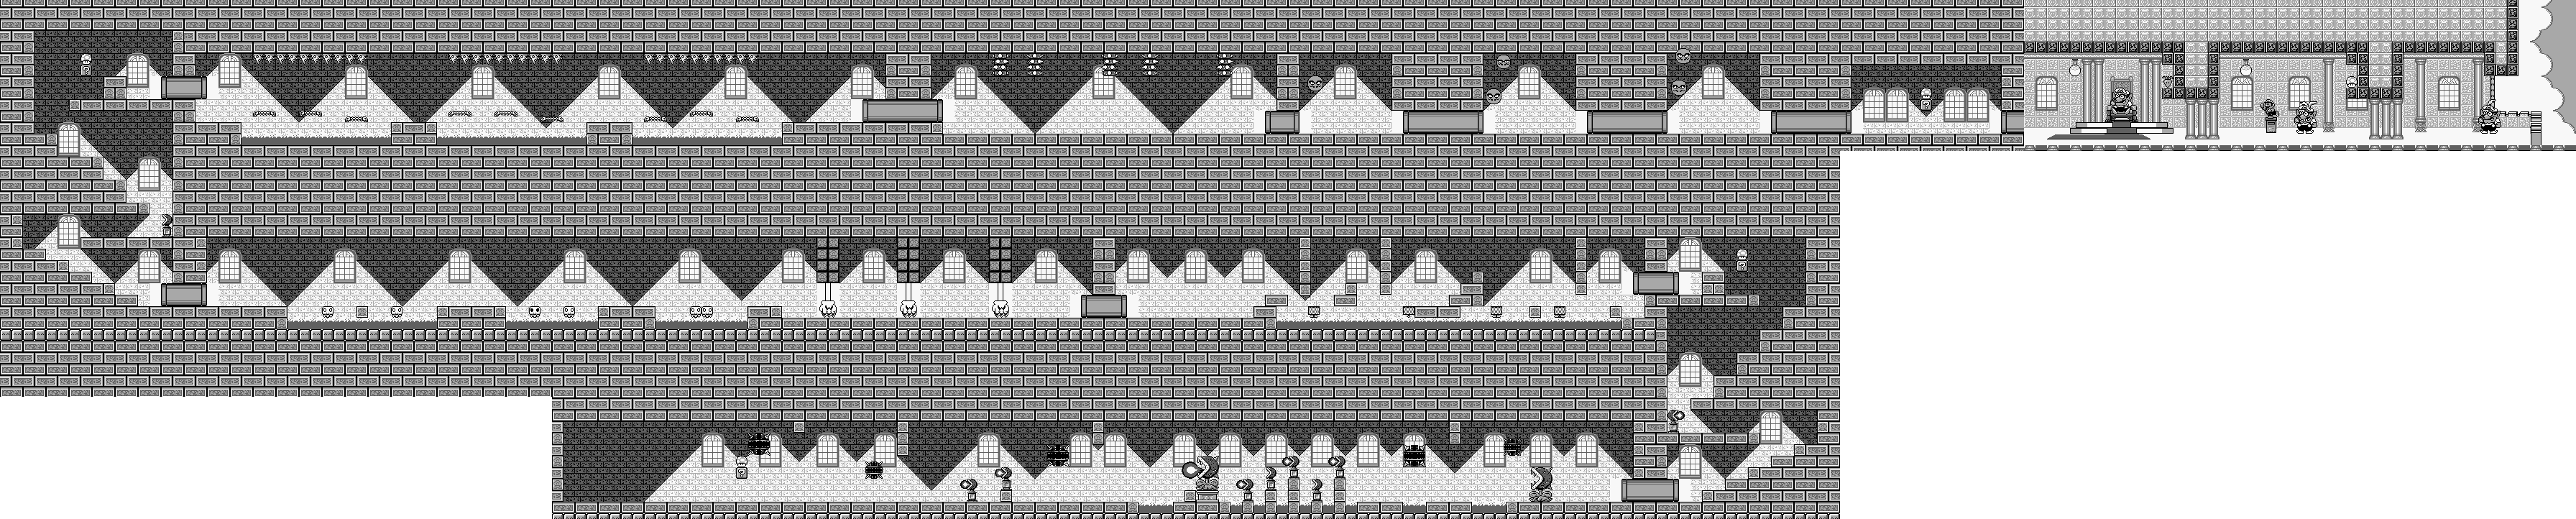
Alright, the final stretch. Head north of the starting point and the cave and you'll reach the castle. Since you've opened the door, you can go in.
You'll be riding a lot of platforms over lava and avoiding both fireballs and swinging spiked balls of both large and small sizes, but it'll all be worth it in the end.
The white gaps in the walls are where the moving fists are. If you step on a certain part of the floor (hint: it's always the center tile) and it turns black for a second, you've triggered a fist. Jump towards that area and you won't have to deal with it.
The skull platforms fall apart when you land on them, so you'd better know what you're doing ahead of time.
Some of the bone platforms fall when you land on them, while others rise right into the spikes while you stand on them.
The cylinders with the spikes drop down and come back up like Thwomps, but they come up slower than normal. At least you have plenty of time to run under them.
The circle with the Wario head is really easy. All it does is bounce on the walls. Just stomp on its head twice. After fighting it and going through the pipe, you'll fight two of them at the same time, which is slightly harder...unless you spin jump on them. Spin jumps take them out in one hit! You'll do this one more time before you can finally reach the final confrontation.
Wario is not only bigger than you are, he has three forms.
For the first one, stay in the air when he pounds the ground, and avoid the flask that drops whenever he shakes the screen. Jump on his head three times.
For the second form, he'll be Bunny Wario. Wait for him to stop flying around and drop like a stone before jumping on his head. If he's in the center, stand on the head of the Mario statue and you'll have a height advantage...and a free hit!
For the third form, he'll be Fire Wario. He'll be running around, stopping only to throw a fireball. Three more hits, and you've done it!
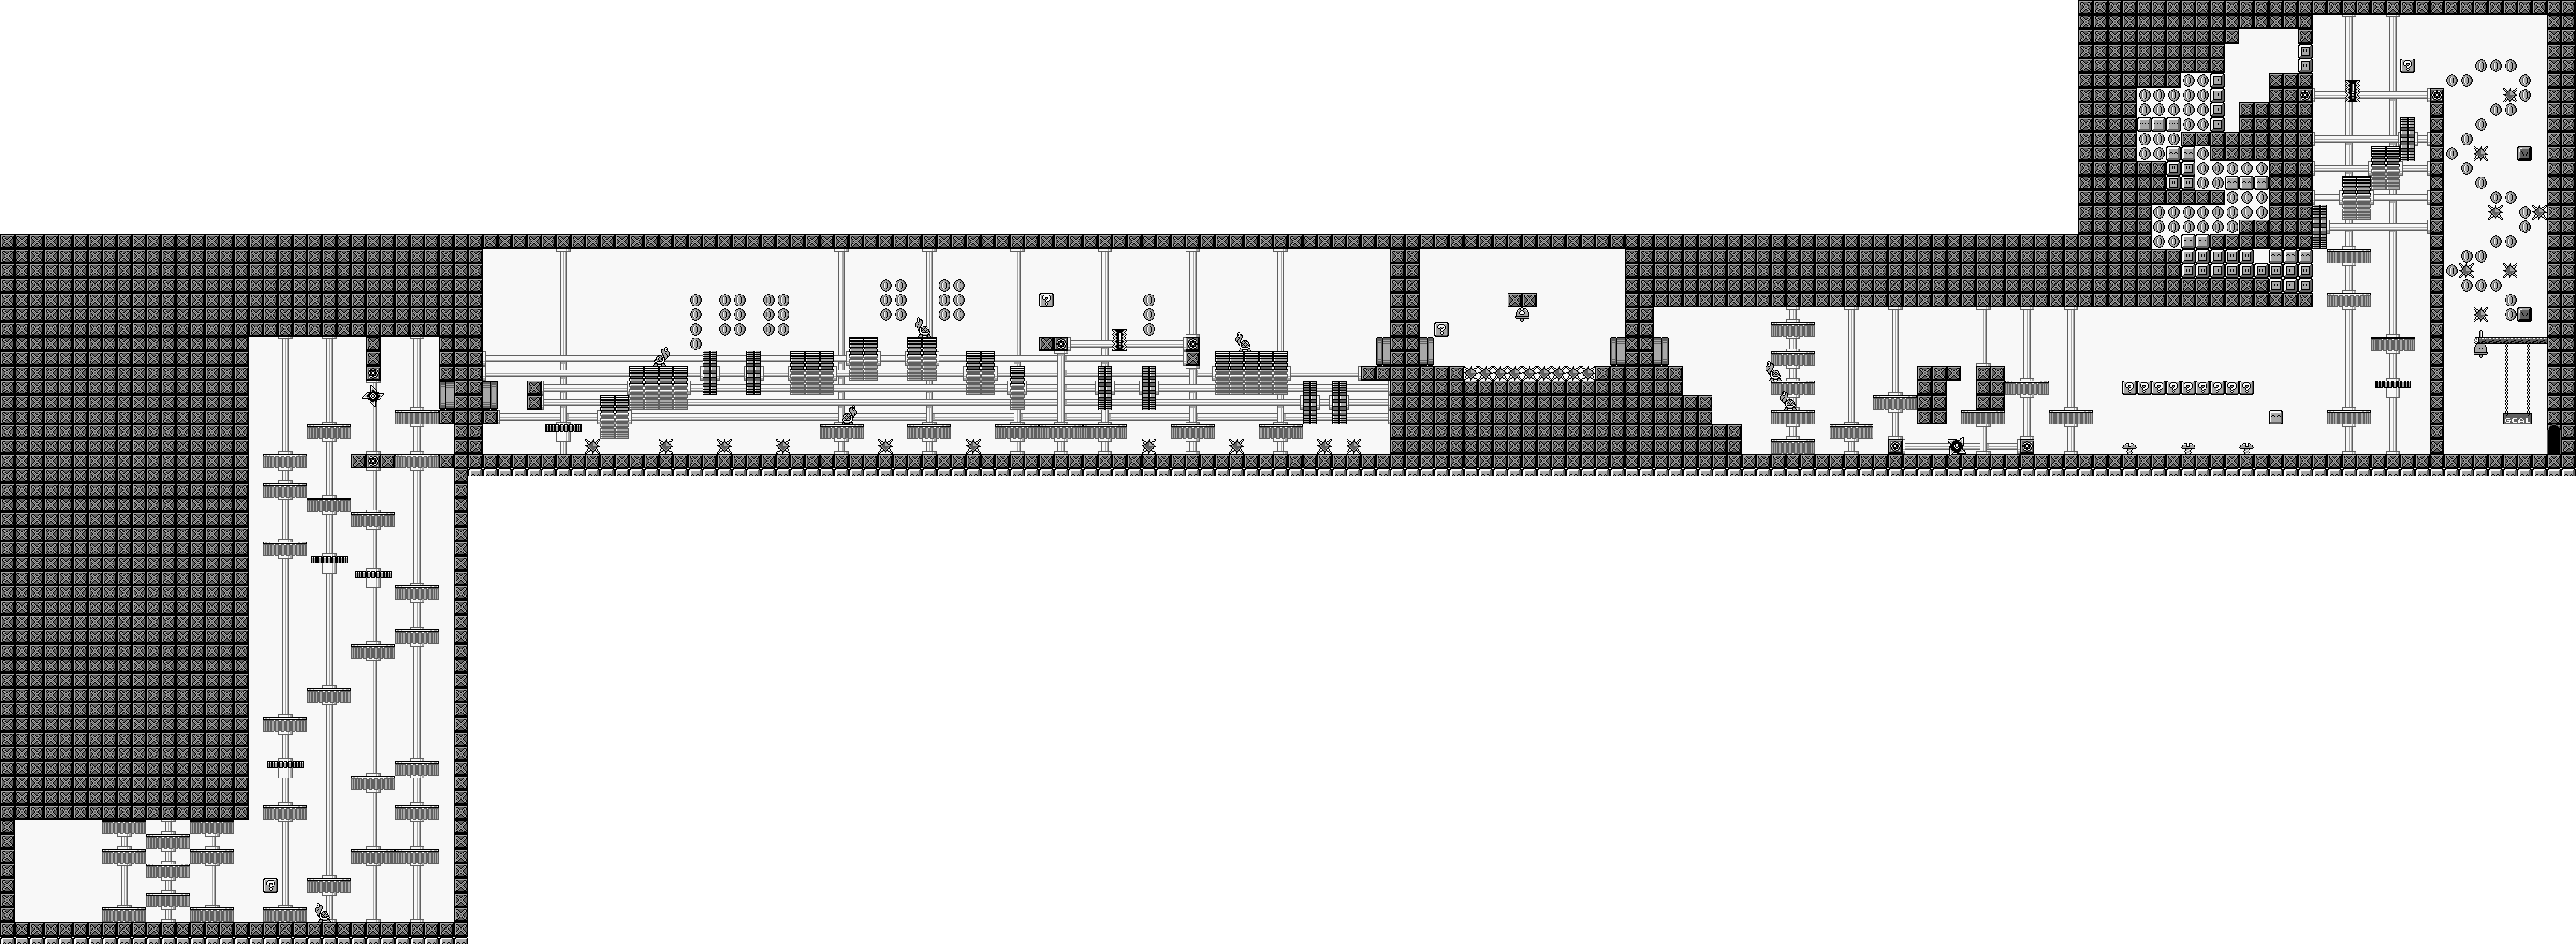
The first level shows off some new obstacles and hazards, such as moving gear platforms, nails that come out of the ground and bounce up and down, buzzsaws that move up and down poles and block your path. Amazingly, Koopa shells can get rid of them.
You can get a 1-up at the end of the fire block segment.
We're in the giant Mario's stomach, but it's full of balls. *ba doom tsh*
When you go into the first pipe you can enter, the two sets of four balls in the background hint at blocks. The left one has a Carrot to get Bunny Mario while the right one has a Starman. You'll have to be quick to get back down there and take down all the Goombas to farm lives.
The bears on the beach balls can be taken out so you can steal their rides. Don't worry, you won't be moved around if you stand still on the balls.
Why do the toy soldiers look like mushrooms plopped on top of soldier bodies? And why do we have jack-in-the-boxes coming out of ? blocks?
Love the giant mushrooms in the walls.
Anyway, along with actual Bullet Bills, we also have black gears that you can take a ride on to get past the spikes and also ride along the chains with.
If you jump into the crane hooks, they'll carry you across the pits as long as you don't move. You can get the coins at the bottom with these. You'll need to remember this if you want to hit the bonus bell.
I didn't even know about that pipe underneath those platform that leads to a bunch of Bullet Bill cannons and a 1-Up. Thanks, vgmaps.
There's an awful lot of Legos and circular saw blades around here.
One of the blocks says "N&B," by the way. It wasn't until much later that I found out what it means: it was Nintendo's answer to Lego in the late 1960s, which brought out the idea of circular pieces. Lego sued them for basically making their own version of Legos, but Lego lost the lawsuit. Nevertheless, N&B blocks didn't fit properly like Nintendo hoped, and N&B blocks were discontinued by the early 1970s.
To beat the three bosses, anticipate their jumping patterns and jump on them at the appropriate time. It takes three hits to beat each one, and they get progressively faster as you damage them. The first one just rolls around, the second one jumps low and the third one jumps high.
And with that, we have all six coins! Time to head to Wario's Castle at last!
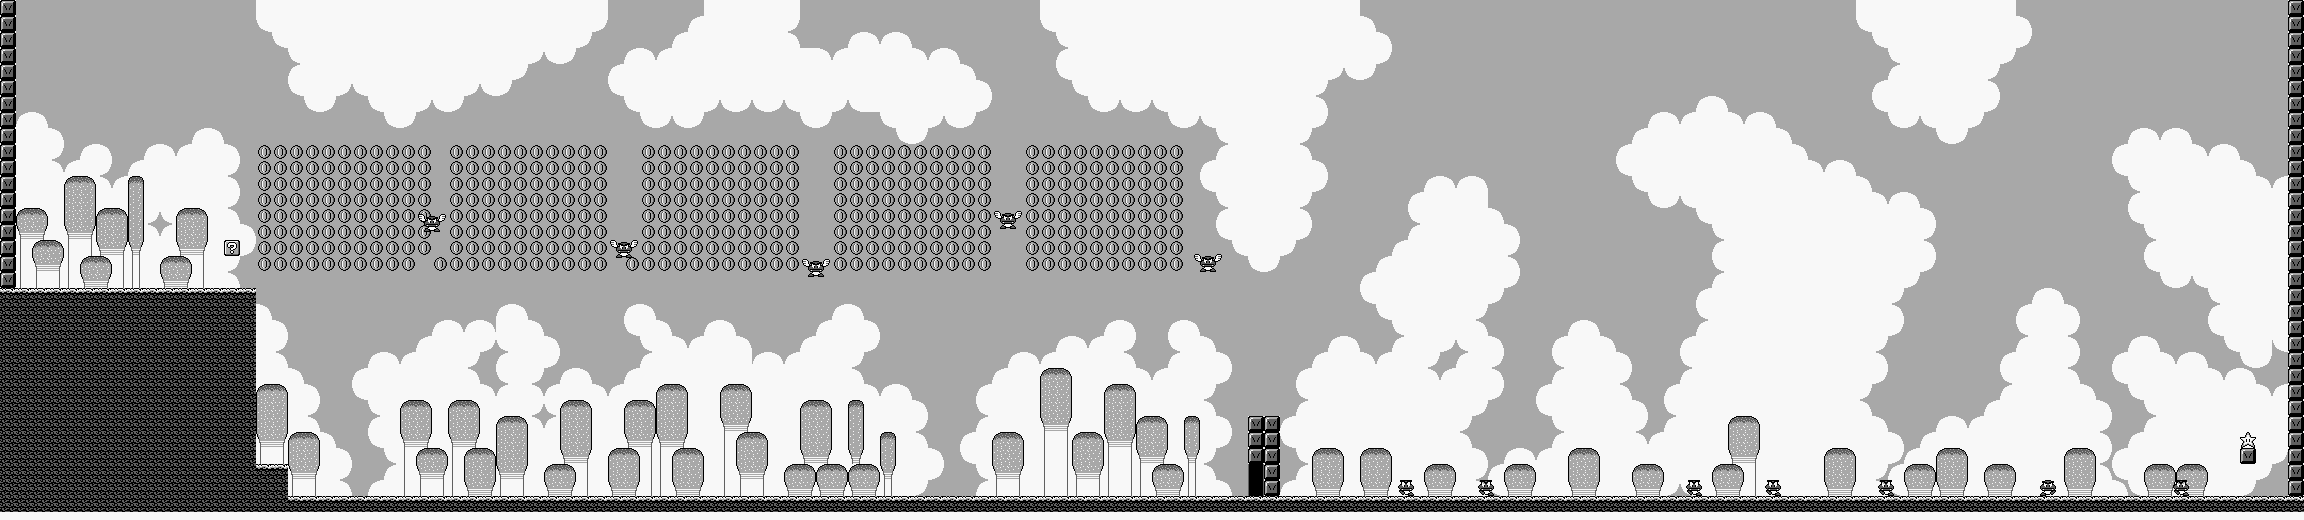
If you're Bunny Mario, you can press A repeatedly to get as many coins as possible and also fly past the exit door. If you do that and make it all the way to the right without taking out any of the Goombas, you'll find a Starman that you can use to take them all down and farm a few lives with.
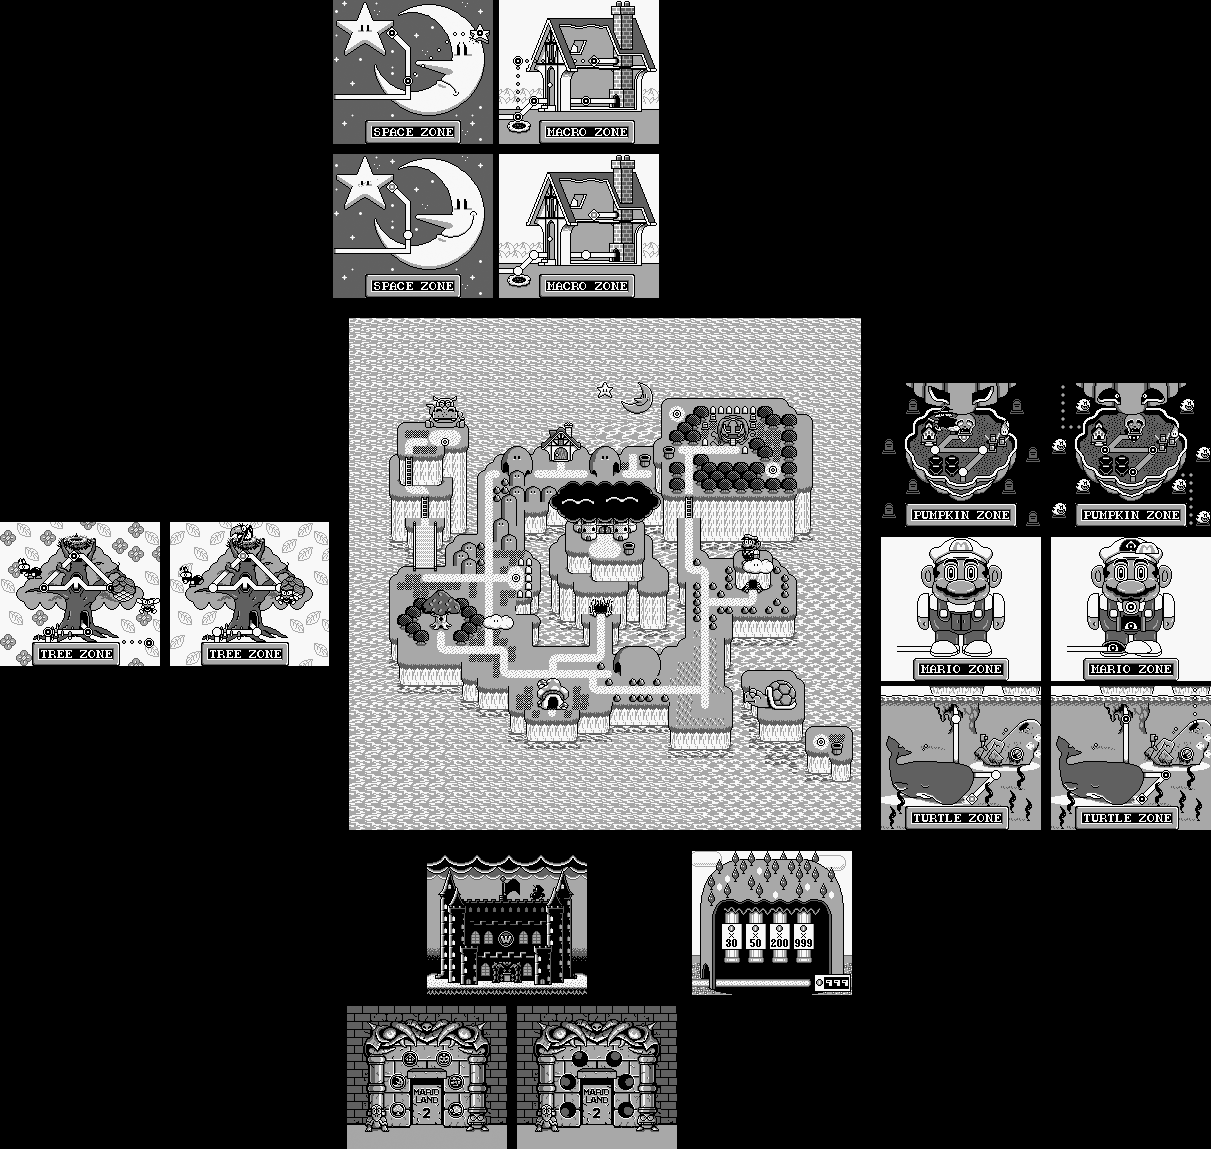
When you beat this level, the pumpkin in the Pumpkin Zone world map will have eyes.


