Thursday, March 31, 2022

PrinceWatercress plays Bugs Bunny: Lost In Time - Part 22 of 23


Today's entry is the Daffy Duck show as we play the last two levels we have yet to go to before the final one.


0:50 - Roll into this hole in the wall, get the torch out of the chest, light it up at the huge flame and light the four torches on the wall for a clock.

4:21 - This barrel goes into an area in the water you normally cannot access. Jump for the clock!

"Train Your Brain!" in Dimension X is now unlocked.

6:13 - Drop down near the drawbridge for "Downhill Duck." For this, you just need to make it to the end while grabbing all the locks and avoiding fences, rocks, trees and snowballs. Especially the snowballs. Left and Right let you steer. That's it. The clock is at the end.

8:54 - "Wabbit or Duck Season" is a competitive mini-game. Kick all the signs so they show Daffy Duck's face, and keep it that way when time runs out so Daffy gets shot and not you. Don't kick any Daffy signs or they'll go back to being Bugs Bunny signs. When the time runs out, whoever has more signs showing their face gets shot. It needs to be Daffy, obviously. Once you win, get the clock and get out of here.

Wednesday, March 30, 2022

PrinceWatercress plays Bugs Bunny: Lost In Time - Part 21 of 23


In this entry, we play the final level of The Pirate Years and go for a wild ride on a mine cart.


Remember that one rope with the electric current coming down in The Carrot Factory? If you climb up it after the electricity passes down, you'll find a golden carrot at the top.

3:34 - Be ready to break ten crates.

As for the clams, you'll need to jump on them to get the pearls and place three of them on the pedestal in the nearby cave to open up a path to another part of the level.

4:28 - The first crate. If you get caught on the wall during the wrap-around jump, keep jumping towards the crate and you should be able to reach it.

6:17 - Kick the tree to send this guy flying, then light the TNT barrels with the torch. You'll be able to use a pirate as a platform across the water.

7:53 - Get this guy winded, then kick him from behind multiple times to get the wheel back and open the gate.

11:10 - Grab the TNT barrels, place them in front of the boulder blocking the mine entrance, then light them up to blow the boulder up and open up the mine entrance.

12:31 - Jump up to the targets to take alternate paths as well as avoid things that lay on the mine's path and grab all the crates. Watch the arrow above Bugs' head to see where you're going to go. You'll need to take all the paths if you want to get all of the crates, clocks and golden carrots.

Left and Right lets you avoid things to the sides as well as parts of the sides of the tracks that are torn up, and also lets you get some things just to the side as well.

If you reach a clock, you've reached the end of the certain area and you're about to enter another one.

Down lets you duck under low overheads, such as the boards held by the pirates.

12:48 - The second crate.

13:04 - The third crate.

13:58 - The fourth crate.

14:40 - The fifth crate.

15:51 - A clock and the sixth crate.

16:22 - The seventh crate.

16:41 - The eighth crate.

16:52 - The ninth crate.

18:42 - The tenth crate is in this area, where you'll be using Left and Right to ram Pirate Sam into the TNT barrels on the side. Also, be ready to grab the golden carrots to the side. If anything is flashing red or has a lit fuse, be ready to avoid it. When you see Sam, ram into him with Left and Right. Once you beat Sam, hit the target above your head to finish the level.

Tuesday, March 29, 2022

PrinceWatercress plays Bugs Bunny: Lost In Time - Part 20 of 23


In this episode, we enter the Carrot Factory to finish our business in The 1930s. We're coming pretty close to the end of the game now.


0:51 - You'll need to dive twice to get into The Carrot Factory.

1:36 - Get ready to destroy five crates. Oh, and watch out for the shockwaves traveling around the platforms as you hit switches to get around. The jets of steam push you back.

3:40 - The steam and heat from the vertical pipes hurt, but they can also push some platforms upwards to get you to new areas.

4:24 - Roll under the crushers when they are up.

4:37 - To get rid of Muggsy, have him chase you, and jump on the doors in the floor to open them when he is right behind you so he will fall in. Jump on the green button so you can lift up the electric fence and go after Rocky. 

5:14 - Jump on the valves to lift up the platforms.

7:00 - The mouse will take the key and go into the funnel. Before you go, look around to find the first crate. Be careful near the funnel; the metal floor is slippery.

7:43 - In the warehouse areas, look around for one clock and two golden carrots. As fort he mouse with the key, you're going to have to roll into it. The red arrow tells you where the mouse is. Also, the carts with the crates don't hurt you. Strange shadows are where oversized carrot juice cans will drop down much like the anvils. Also, the gates will open and dunk you into the water below.

10:04 - The second crate.

10:37 - There are a lot of things that can hurt you, and the crushers will instantly turn you into a can of carrot juice and kill you. Thankfully, the patterns on everything in the conveyor belts is usually of the "moves back and forth" variety.

11:10 - The third crate.

12:25 - The fourth crate.

13:28 - Another warehouse sections. Kick all the crates to ensure you find the clock and two golden carrots here before grabbing the key.

16:20 - After the flamethrowers, make the turn to the final crate.

17:08 - To beat Rocky, press the buttons to crush Rocky with the weight that is across the room whenever Rocky is below it. After this, Muggsy will shoot at you with a gun. Go up to his side, grab the mallet and hit him. You'll have to do this three times. After hitting Rocky three times, you're done. Rocky will drop two golden carrots and a clock, while Muggsy will drop just two golden carrots.

"Mine or Mine?" is now open.

Monday, March 28, 2022

PrinceWatercress plays Bugs Bunny: Lost In Time - Part 19 of 23


This level is much like "Run, Wabbit, Run," but there A LOT of changes.


1:31 - Time to break seven crates!

2:31 - The first crate.

4:46 - Use this fan to get a clock.

6:00 - Yep, you're using this whole to get to the second crate.

8:04 - The third crate.

10:10 - This guy has a golden carrot.

11:44 - The fourth crate.

12:10 - Get into the rabbit hole to break the fifth crate from underneath.

12:40 - The final two crates are here.

14:36 - You'll need to push these columns together to make a staircase.

After this, we unlock The Carrot Factory in The 1930s.

Sunday, March 27, 2022

PrinceWatercress plays Bugs Bunny: Lost In Time - Part 18 of 23


Now that we've got all of the magic spells, it's time to clear out two levels for good.


2:39 - When you get an anvil to land on Witch Hazel, kick her in the behind for a golden carrot. This one's easy to miss.

3:00 - The first crate.

3:19 - The second crate.

4:08 - The third crate.

4:54 - The fourth crate.

6:16 - The fifth crate.

6:41 - The sixth crate.

7:28 - The seventh crate.

8:34 - The eighth crate. Also, this is the fan spell in action. Jump up above the fan, then turn Bugs to where you want him to face and press X. Once he looks up, hold forward on the D-Pad to get him to jump forward. Also, pick up the flag, you're gonna need it to complete "What's Cookin', Doc?" once and for all.

9:43 - Taking the flag over here lowers the drawbridge here for a clock.

10:58 - The ninth crate.

11:34 - The tenth crate. We're finally done with "What's Cookin', Doc?".

13:29 - Back in "Follow The Red Pirate Road," I get the three compass points lit up...

18:18 - ...then do what I should have done: take this torch, light the nearby "S" stone up, and get the clock in the compass points room...

19:16 - ...after using the Key Spell on this door for virtually everything else that's left.

Saturday, March 26, 2022

PrinceWatercress plays Bugs Bunny: Lost In Time - Part 17 of 23


Now that we're almost done with the backtracking, we head to a brand new stage to get the last of the magical abilities. From here, we should be able to get everything in the game.


2:03 - Get ready to kick ten crates!

2:29 - The first crate is above a snowman. Kick the snowman and jump on the top hat to get to it. By kicking the bottom of the snowmen, you'll find golden carrots. Kicking the One of them will contain Robin Duck, and you'll have to throw a snowball from the snowball piles three times to get two golden carrots. Also, the top of a tower has yet another gold carrots.

5:34 - Going down takes you to the second crate as well as another one of Merlin of Munroe's houses. Talking to Merlin nets you the fan spell.

6:58 - Take your time on the ice platforms and use Circle in mid-air to land on them softly, or else they'll break apart.

8:26 - The third crate. Use the snowballs to hit the target and lower the bridge.

9:30 - Jump on the dragons just when they are about  for two golden carrots and a clock from each one.

10:58 - When you go into the cavern here, stay close to the wall to avoid the snowballs. If you can find the five stars, you can find out how to open the exit and the clock with the star stones you'll find throughout the stage. You'll also get the "Open Sesame" key spell, completing all the magic spell collecting you need to be doing.

12:24 - The fourth crate is behind one of the pillars, as is a golden carrot. You can also push a pillar to find a hole. This leads to a slide with the fifth crate and another golden carrot. A star stone is at the bottom.

13:24 - To get through Robin Duck's lair, use Circle to sneak across the bridge, then kick the log and kick Robin Duck from behind. You'll get a golden carrot, the sixth crate, and a star stone. Watch out for the icicles. Thankfully, you can tell where they are by the shadows on the ground.

15:20 - The seventh crate.

15:44 - The Slide Hare is a timed race. Get close to some of the icicle shadows to get rid of them, then hit the red button. You'll need to be both quick and careful to get to the star stone. Keep jumping to maintain control and get the star stone. Afterwards, you can kick the eighth crate. There will be another slide afterwards; jump for the golden carrot at the end.

19:15 - Zee Cavern has a shape puzzle. By jumping on the floor panels and matching two shapes, you'll open up a platform. Once you get two of the same shape, don't get the third or else you'll have to get two of that shape again to bring the platform connected to it back up. At the other side is a golden carrot, the ninth crate and a star stone.

21:04 - Raquette Hare! Make your way into the opening in the ice wall for the tenth and last crate (and a clock) and the snow shoes. Take out the knights here for golden carrots and get the last star stone before the snow shoes wear off. 

22:44 - The snowballs come back, but only on the way up. From here, you can get the last clock and get out of here. From here "Magic Hare Blower" is unlocked in the prehistoric era.

Friday, March 25, 2022

PrinceWatercress plays Bugs Bunny: Lost In Time - Part 16 of 23


We head back to "The Greatest Escape" one last time before taking part in the greatest race off earth.


2:43 - As soon as you use the music spell on the piano, back away. You can finally cross the wooden see-saw platforms to the last golden carrot and the last clock.

5:23 - To get to the finish, it's the first door, the second door, and the fourth door.

Marvin clearly cheats by going before the starting gun.

For the first set of doors, the middle one takes you to a golden carrot. The first door lets you advance.

To get past the Martians, just use the rabbit hole in front of them to burrow under them. You can also go south and drop down for a golden carrot, then enter the door to pop up behind them like you would with the rabbit hole. 

For the second set of doors, you'll need to enter the second door. Watch out for falling boulders.

For the third set of doors, the first door takes you to a golden carrot. Watch out for the Martians! The fourth door lets you advance.

If you drop down near the end, you can get a golden carrot. Use the red button to get back to the path leading to the finish line. 

If you get to the X before Marvin, press R1 to plant your flag. You'll get sent back to the hub for Dimension X afterwards. Also, next to the X is a series of platforms you can drop down to which you can't reach otherwise, and each one has a golden carrot.

Thursday, March 24, 2022

PrinceWatercress plays Bugs Bunny: Lost In Time - Part 15 of 23


In this entry, we race against time, learn a musical spell, then put that spell to good use. We'll be using that spell next time, too!


1:43 - As soon as you start this race, you'll not only be racing against the clock, you'll also be kicking ten crates and collecting all the clocks you can so you don't get a pot dropped on your head.

Watch out for Witch Hazel's magical blast so you can't get zapped or squashed by a rock. Also, watch out for falling rocks and ledges that tumble when you stand on them.

2:31 - The first crate.

2:44 - The second and third crates.

3:21 - The fourth crate. Watch out for falling trees and be ready to jump from platform to platform across the water.

4:11 - The fifth crate is near the end of this section.

4:51 - Ride the log for golden carrots before kicking the sixth crate. 

5:25 - The seventh crate.

5:33 - The final section. Jump on the pigs and haystacks to get a boost and get some clocks. The eighth crate is inside the first windmill you have to walk through.

6:02 - The ninth crate.

7:09 - The exit, and the tenth crate.

Talk to Merlin to learn the musical spell. Now you can use the spell in places you've been before to get to other things!

8:54 - This golden carrot is very easy to miss.

10:48 - We can now take a ride from a buzzard with our new ability in "What's Cooking, Doc?". There is a crate here, and the two doorways to the side have clocks. Watch out on the wooden platforms so you can get the golden carrot.

12:26 - There is a crate near the stairs here.

From here, wake the guy up, then kick him in the behind a get a golden carrot from him and get over the gate.

If you see a tree shaking, kick it to drop Daffy out of it as well as an apple. Put three apples on the shell near the small fountain to raise the platforms leading to a clock and also stop the bigger fountain so you can go underground by diving where the huge spout of water used to be. Beware: Daffy will take apples from the shell if you let him, raising the shell up.

When you're underground, you can get the golden carrot behind the wooden portcullis. Also, look around for a chest with a clock in it and kick it.

"The Conquest for Planet X" in Dimension X is now unlocked.

Wednesday, March 23, 2022

PrinceWatercress plays Bugs Bunny: Lost In Time - Part 14 of 23


This entry was so short and simple, I didn't need timestamps.


In La Corrida in The 1930s, you'll be facing Toro the Bull. Get to one of the red targets with the white circle on it, then wait for Toro to charge at you. Jump out of the way before he hits the target and loses health. Each hit nets you a golden carrot, and five hits gets you the clock.

Back in Dimension X, we head to The Vort "X" Room. This is a boss battle with Marvin The Martian, Grab the green tables that Marvin throws before they turn into Martians, then throw them at Marvin. The tablets will turn into Martians and grab onto Marvin's saucer. You'll need to get five Martians on Marvin's saucer to defeat him. You'll want to be reasonably fast, or else Marvin will get the Martians off his saucer one at a time and slowly regain health. If the tablets become Martians before you can grab them, kick at the Martians to get them away.

"Witch" Way to Albuquerque will unlock in the medieval era.

Tuesday, March 22, 2022

PrinceWatercress plays Bugs Bunny: Lost In Time - Part 13 of 23


We head back to a previous level to kick some crates before driving a multitude of vehicles in a new one.


1:19 - We're back in "The Greatest Escape," and this time we can get the clock from all the crates.

2:07 - The first crate.

3:16 - The superjump panel lets us get to a new crate. Here's the second one that we can break, as well as a golden carrot.

5:39 - The third crate.

7:09 - The fourth crate.

8:14 - The fifth and final crate.

10:04 - The cutscene for "Objects In The Mirror Are Closer Than They Appear!".

10:32 - Here, you'll be in a series of vehicles in multiple sections. Don't run into walls or other vehicles else you're starting the segment over. Things such as the bullets from Rocky's car and the water from the fire hydrants just take away health.

11:47 - With the motorbike, you'll be jumping off tramps and getting golden carrots from out of mid-air. You'll soon be chased by Rocky and Muggsy again; don't forget to get the clock at the end of this section.

12:30 - You'll be riding with Rocky and Muggsy, but not for long. When you catch back up, watch out for the bombs, and make sure you jump through the opening in the train cars and avoid other vehicles coming at you. Unlike other sections, the X button has you ringing the bell instead of jumping.

13:48 - Avoid the water puddles and the fences; they'll slow you down and hurt you. If Rocky and Muggsy catch up to you, you're starting the whole section over. If you leap on a pig, you'll get a bit of a bounce. When you make it to the end, you'll get the final clock and unlock the Vort "X" Room in Dimension X.

15:43 - I accidentally unlock a stage. I'll play that next time.

Monday, March 21, 2022

PrinceWatercress plays Bugs Bunny: Lost In Time - Part 12 of 23


In this entry, we wrap up The Planet X Files and face Marvin the Martian.


1:04 - You'll need to run in one direction to get to where you want to go on this electric carousel of pain.

1:54 - With this console, the D-Pad moves the robot and Square shoots. Press Circle at the "Robots Only" sign to use the elevator. Once you go up, keep shooting to take out all the turrets as well as the other robots. You'll lose one of your arms on the first hit and fall apart on the second should a turret or another robot hit you, but you can always get another robot. By destroying all of the turrets, you can continue to the boss battle.

Climb up the poles to get the two clocks before using the superjump panels to get the last of everything.

6:06 - Avoid the lasers. The green ones are high and must be ducked or rolled under; the red ones must be jumped over. Eventually, the P-38 Space Modulator will break down, and the platforms leading to it will become solid. Get behind Marvin the Martian to kick him, then you'll automatically go to another platform.

The electric shocks go to one of the two pillars on the platform and shock the half of the platform that pillar is on.

The five shockwaves in a V pattern can be avoided if you're far enough away from them at first, but they'll eventually go to your current position on the fourth platform.

Once you beat Marvin, you'll be able to get the last four clocks of the level, then you can exit. You'll unlock "Objects In The Mirror Are Closer Than They Appear!" in The 1930s.

Sunday, March 20, 2022

PrinceWatercress plays Bugs Bunny: Lost In Time - Part 11 of 23


This entry gives us our first taste of Dimension X...and quite a few collectibles.


1:24 - The Planet X Files is your first meeting with Marvin the Martian.

2:20 - This is where you end up if you get caught by any of the robots in this stage.

3:10 - After a few golden carrots and a few electric barriers to jump over, we kick a switch that activates this platform.

3:58 - The robot here will shoot at you and grab at you. You want to trick it into shooting the Martians that block your path so you can get to these platforms that pop out out of thin air. If a Martian gets frozen, kick them. If you get frozen, mash the buttons to break free. If they catch you, they send you to the garbage chute area near the start of the level. After this, watch where the platforms spawn and quickly get to them, as they will disappear from under you if you take too long. Be ready to rotate the camera, too.

8:40 - You can roll under a laser or jump over it, depending on the circumstances.

10:00 - Be ready to avoid a robot and turn a few Martians into popsicles when you open the door here. Also, getting thrown into the garbage chute is absolutely painful because you land right on a checkpoint at the other side.

15:04 - Be careful getting past the electricity. For best results, roll or jump.

17:01 - The button makes the platform solid, but it's on a timer. You'll need to hurry up to get on the other side. You'll also need to hit another button to get back. Watch out for the thin conveyor belts!

17:55 - Keep running towards the fan to run around it and kick the switch to deactivate the barriers.

Saturday, March 19, 2022

[YTP] Once upon the 80s (by noisepuppet)


I CAN'T WAIT TO GET A TWISTED DICK INSIDE MY FRUITY PEBBLES

PrinceWatercress plays Bugs Bunny: Lost In Time - Part 10 of 23


In this entry, we spend some time in The Pirate Years to open up a road to Mars and also get some extra collectibles.


0:56 - For the first part of the battle, you'll need to catch the cannonballs with your cannon by moving the cannon with Left and Right. Once you grab a cannonball, a random part of the ship will flash. Line the cannon up with that part - or get close to it - and press Square to fire at that part.

1:19 - Here, you'll need to use the bellows to blow the TNT barrels with sails back to Sam so they hit his ship blow up on him. The controls here are the same as the cannon battle. You may have a hard time just because of the random movements between the three positions on the ship that Sam will make.

After you do enough damage down below, you'll head back topside. Send more cannonballs back at the flashing parts of the ship, then you'll need to send the barrels with the sails back at Sam again. After that, it's back to the deck where you'll need to get the last shots in.

The barrels with the sails will give you health if they hit Yosemite Sam, assuming you need it. Also, you'll need to play well and not die in order to get the two golden carrots here. After you beat Sam, you'll get the clock and leave. The Planet X File in the Mars area is opened.

4:33 - At the beginning of "Follow The Red Pirate Road," the opening cutscene shows you how to get into the cave. Jump onto the stumps in the same order that Sam did to get in.

5:32 - Move the crates to the west and north in the compass room and roll into the holes you find for new rooms. The room to the west has a bunch of scorpions that you'll need to avoid while you get the torch, light it and then light the torch in the center. And yes, the scorpions constantly re-spawn as you do this. The wheel in this room will open up a platform in the east room.

7:52 - The north room has a guy you'll need to kick in the behind after he chases you. You'll need to use him as a trampoline while he's laid out so you can get to the torch in the center of the room and light it. Don't forget the wheel for the platform in the east room.

9:54 - Get rid of the scorpions before placing the steering wheel and kicking it for an opening to more of the level. Also, you can light the torch here. (I can light the torch for the "south" area, but I didn't know how to do it just yet. I figure that out later.)

12:07 - Once you drop down the rabbit hole in the "south" area, this guy will be the biggest pain in the butt to deal with. You'll need to kick the treasure chest while he's in it in order to get the golden carrot.

From here, you'll be in a bit of a maze where you'll be dealing with scorpions, pirates, fall-away floors and steering wheels you'll need to place and kick. There's also another pirate in a chest, and you'll need to kick the chest while the pirate is in it for a clock. Also, if any pirates are standing on crates, you'll need to kick the crates to knock the pirate down for a steering wheel.

16:06 - This steering wheel controls which part of the opening to the cave is opened. If the eyes look left, it's the left area; it they look right, it's the right one. The one to the right has a clock and the exit. Just be careful on the platforms that are flying around in a circle to get to both.

Friday, March 18, 2022

newfiebangaa plays Land of Illusion Starring Mickey Mouse - Part 7 of 7


Now...the thrilling conclusion!


At the bottom is the final boss: the Phantom (who is actually The Horned King from The Black Cauldron).

Butt bounce off the Phantom's head before he raises his arms. When he raises his arms, get right next to him and duck to avoid the fireballs. When he spins around the room, jump over him. If you butt bounce off him when he does this, you won't damage him, but you'll avoid taking damage yourself.

When the Phantom flies to the ceiling and starts spinning around there. When the Phantom stops and raises his arms, watch the ceiling and avoid the falling blocks. One block will stick around on the ground; grab it and throw it at the Phantom the next time he stops spinning. Repeat until you damage him twice.

He will then turn into a projectile that bounces around. Run right under him to avoid getting hit. When he is back in a more humanoid form, butt bounce off his head, then immediately get away to avoid being hit by the lightning bolts.

After three more hits, the Phantom will defeated and he will drop a crystal. Grab the crystal, and you'll beat the game.

Mickey will get a kiss from Princess Minnie. The cast of characters and credits roll, then you'll see how many power stars you got as well as your final score. Mickey wakes up on the couch with a book in his hands and lipstick prints on his cheek. You've just beaten Land of Illusion!

newfiebangaa plays Land of Illusion Starring Mickey Mouse - Part 6 of 7


In this entry, we head to the Sand Castle to save King Donald, then head to the Phantom's Castle for the final battle.


Sand Castle Stage


Keep jumping to save yourself from sinking into the quicksand. Watch out for hermit crabs that chase after you on the slopes, which push you around somewhat like a conveyor belt. When you reach the part where the sand collects and pours down like an hourglass, stay there to drop down and continue on.

Butt bouncing the crab only sinks it into the sand briefly, but you can use that to help yourself get away.


You'll be swimming again. Hit the sign to trigger the checkpoint, and avoid the fish and spikes and remember to surface at the pockets of air as you hit the switches to open up more of the maze.

Near the end, the water will rise and fall upwards. When you reach the wall at the end, climb all the way up with the Rope and jump across the sand blocks to get a Power Star.

Place the barrel on the geyser to get to the door at the end and face the boss.

The boss is a giant crab. Throw the barrel at the crab, and when it spins its arms, stay far away and near the surface to jump over the tornado it creates. You'll then need to grab the barrel and throw it at the crab as it moves around afterward. Thankfully, the crab goes down after only three hits, which is the saving grace of this battle in case you can't move fast enough to get a hit in on the boss.

When you beat the crab boss, you'll rescue King Donald. He'll tell you that this fortress was used to guard the harbor until it was turned to sand, then give you a ship from the harbor to reach the island.

Island Stage

By moving into the boat, you'll head to the island.


You'll need to throw the bean to get a beanstalk. If you throw it to the ground and it sinks downwards, you've found the magic spot. From here, a beanstalk will grow on the world map.


From here, you'll need to climb up the beanstalk. If you have the cloud shoes, you'll be able to walk on the clouds. Bounce off snakes, birds and spiders to get to other places when necessary. You may have to use the tornadoes to get to other places, too.

The key and the door is at the top. If you go left at the top and drop down, you'll find a Power Star.

Phantom's Castle Stage


The door you pick chooses which area you get next.


The left door has you climbing on a wall on the left side of the screen with the Rope to avoid the spikes below and in the air. You will also have to throw blocks out of your way, too. Use the Shrink potion to get to the exit.

The middle door has you riding a moving platform over a yellow liquid. Be ready to avoid projectiles from the dragon heads as well as spikes that line a few of the walls, and be ready to throw some blocks out of your way near the end.

The right door has you riding on platforms while avoiding flames and spikes. You'll have to switch between the two platforms in order to get to the end. Believe it or not, this is the door you want to take, as the final Power Star of the game is at the end of this section. (Pretty cheeky, game.)


Regardless of which room you go through, you'll end up here. Pulling the switch at the beginning gets the wall out of your way, but watch out for the ball and chain that drops down in an attempt to squash you when you get close. Grab the key and take it to the keyhole wall, then grab the key near the door, hit the checkpoint, pull the button above, then leave the room to turn the yellow water into better blue water and enter an upside-down version of this room below.

From here, go left, jump into the switch on the ceiling and go through the door, then get the key and take it back to the upside-down area. Take the key to the keyhole to the right, then go left and hit the switch upwards if you haven't alreadyt, trigger the checkpoint after passing by the ball and chains and enter the door.


Here, get the door to follow you around, then butt stomp it and enter the door when it lands on the ground. Go up and pull the switch up, then go into the translucent door to go back to the previous room and butt bounce on the door immediately once you get close to it to make it alive again.


Here, you'll need to swim past the spikes - with some of them moving around - on the way to the bottom. If you can make it to the chest at the end, you'll be able to heal yourself. Hit the checkpoint near the door before going in.

PrinceWatercress plays Bugs Bunny: Lost In Time - Part 9 of 23


Now that we've cleared up a path to the exit, let's look through more of the level for things to collect.


3:28 - Stomp on the stake to release the barrels. You can then jump on the barrels and walk with them to get to the golden carrots near the start. Watch out for the piranhas.

6:05 - There is a golden carrot behind the waterfall. You'll need a barrel to reach it.

6:57 - To get the golden carrots from Daffy Duck dressed as Robin Hood, you'll need to kick him in the behind. Daffy only covers a specific range, and if he sees you, he will chase after you and knock golden carrots out of your possession if he catches up to you. Thankfully, you can attack them to get them back if he does that. You'll also get a golden carrot from Daffy from kicking him, too.

8:22 - Another clock, and the sixth crate.

9:06 - Kick the trees in the Daffy Duck area to get three more golden carrots.

10:30 - The seventh crate, plus Merlin of Monroe's house. Keep jumping at the waterfall's edge to make it easier not to fall down on the way there. Merlin of Monroe will give you the superjump ability at the superjump pads if you can find his magic cookbook. Open one of the chests for a clock, and the bed has a golden carrot above it.

12:07 - You'll need to get an anvil to fall on Witch Hazel to get the magic cookbook. You'll then get the superjump spell from Merlin.

After getting enough things, we unlock "When Sam Met Bunny" in The Pirate Years.

18:28 - Using the superjump. You'll need to use the D-Pad to get Bugs to the steering wheel and kick it after pressing R1 at the panel. This opens up "Follow The Red Pirate Road" at last.

Thursday, March 17, 2022

newfiebangaa plays Land of Illusion Starring Mickey Mouse - Part 5 of 7


In this entry, we find the Cloud Shoes, meet the Good Princess, and find out how to get the Cloud Shoes after having found them.


Craggy Cliff Stage


For the first section, you'll need to climb to the top. If you use the Shrink Potion and bounce off the vulture at the start, you can find a Power Star.

You must have the Rope in order to climb up.

The vultures just fly around in circles. That's it.


In this area, you'll be dealing with floors that ascend and descend as the lights go in and out. Use the Shrink Potion before going any further and watch for spikes when the lights came back on. If you need to break a crate, turn big again.


You'll be climbing just a little bit more in the third and last section of this stage. Bounce off the vulture while small to grab the key and exit.

Desert Stage


The vultures will show up from out of nowhere and divebomb you here; be ready to butt stomp them. Also, butt stomp the mounds with the one eye that move back and forth across the sand. 

You can butt stomp the cactus enemies on the pyramid. 

Going all the way to the right takes you to an exit, but instead of doing that, you'll need to throw the blocks that are situated around the pyramid. Inside one of them is a door you can enter while small, and if you enter it and pull the block to the right to open a path to the door, you'll find a way into the pyramid.


Spikes will rush at you from the left when you enter. Be ready to climb up the wall and get going, and watch out for the spikes. Once you're away from the spikes, hurry right and grab the blocks to ensure passage to the right. When you reach the end, the spikes will disappear.


The rotating stone spheres can be stood on. Also, the brown platforms with the red triangles will move in the direction you are facing, allowing you to avoid the projectiles that drop down from the stone lion heads on the ceiling.

When you reach the key door, butt stomp the arrow block to get the key. Unlock the key door, but don't leave just yet. Instead, go back up to get another key, then drop it at the left side of the door. Jump onto the key, jump to the wall to the left, then head left through a fake wall to find a Power Star. Use the Rope to get out.

The boss here is an egg. You'll need to trick it into hitting the wall a few times by standing near the wall and jumping over it when it comes your way. After a few collisions with the wall, a snake will pop out; butt bounce on the snake.

Soon, the snake will leave the egg and bury itself in the sand. When the mound of sand comes your way with one eye sticking out, butt bounce the mound, then butt bounce the snake before it gets back into the sand. After three hits, you'll get the Cloud Walking Shoes, which allow you to walk on clouds. You'll also be able to exit.

Good Princess' Castle Stage

By going up from the Desert Stage, you can reach the Good Princess' Castle.


After a warning by the Good Princess to watch out for enemies, grab the key to get it out of your way. Take the spring to the right to continue on, and bounce off the enemies while small to keep on going. The path you take will dictate which path you will take next.


You'll have to deal with pits of purple water and spinning stone spheres on the top path, and a bunch of stone lion heads that spit projectiles. on the bottom path. Pick your poison.

If you take the top path, however, you'll get a Power Star at the end. Just use the Rope to get it.


Stack the Mickey Blocks to reach the platforms above you while keeping the moving spikes from hitting you. On the first level, take one with you to the second level. From here, you'll have to use the Rope to get to the door at the top.

You'll then be back in the first area. Shrink down and stand in the gaps between the spikes to avoid getting hit, and watch out for the big moving spikes that move up and down along the way. You'll need to jump to get over the columns with the spikes in between. The door will be at the end.

You'll then meet the Good Princess, who is indeed Minnie. She will tell you that if you plant the beans beneath the Phantom's Cloud Castle, a beanstalk will grow into the clouds. You'll find out that clouds have moved out to sea, so you'll have to plant the seeds on an island in the ocean so that the beanstalk will grow in the right place. She will then tell you that there is a stone pyramid in the desert, and you will find the Magic Cloud Shoes to help you walk on the clouds without falling through. Thankfully, we've already gotten those. The Good Princess promises to reward us with a kiss if we find the entrance.

THE OWENS DOES NOT LIKE TEXAS


I CAN'T EVEN REMEMBER THE LAST TIME I'VE DONE ONE OF THESE

PrinceWatercress plays Bugs Bunny: Lost In Time - Part 8 of 23


This video sees us enter the medieval period for the first time. We'll need to go through as much of "What's Cookin', Doc?" as much as possible, as there is something there that we will need for other parts of the game.


2:29 - Our first trip to the medieval period has us meeting Witch Hazel.

4:49 - The first of ten crates. Jump on the knights, then kick them to defeat them.

5:45 - Kick the chests here for carrots, then tire this guy out and kick him in the behind near the cage. You'll get a golden carrot and a way over the cage. The second crate is here, and you'll find the key for the lock in the dungeon to unlock the cells, which you can enter for a clock and a golden carrot. Hit the switch to open a door guarding a golden carrot.

8:35 - You'll need to tire the guard out to enter the castle.

9:00 - Press R1 at the stairways leading to the doors to see where they go.

10:00 - Pick up the balls and place them on the tiles to open up a gate to a golden carrot.

11:19 - Climb up the stairs and avoid the fire for the third crate. Drop down the center for a golden carrot and a bunch of regular carrots, and land on the button and climb up again to get a clock before the cage drops.

14:07 - The Ramparts is this game doing its best Crash Bandicoot impression. You can't defeat the broomsticks. Hit the drawbridge button to get rid of Witch Hazel.

As you move along, avoid the dragons' fire and the cannonballs that move around. You'll also learn about the fan ability halfway through.

16:15 - Here, you'll be in an area full of lava. The fourth and fifth crates are in two corners of the room with clocks, and there is a third clock in another corner. The lava obviously hurts you and knocks you into the air Super Mario 64-style if you land in it. Yes, the fireballs that jump in and out will hurt you.

19:57 - You'll have to face two guards at once here, but they are both defeated the same way. Beat them both to get a clock and open up the exit.

Wednesday, March 16, 2022

newfiebangaa plays Land of Illusion Starring Mickey Mouse - Part 4 of 7


At this point, we start heading back to previous areas to find the Power Stars for a full clear.


Flower Field Stage

There is a Power Star here. To get it, you'll need to get past the second pit of piranha plants, make your way up, use the shrinking potion and bounce left off the butterfly until you see it.

Palace Ruins Stage


Bats will swoop at you at the start. They can be butt bounced on.

If you see any bouncing rocks, butt bounce them to stop them. The debris will destroy any destructible blocks. 

Watch out for the fireballs from the stone dragon heads.

The static brown boulders explode when you get near them, and the debris can destroy destructible blocks. You can butt bounce them near the blocks to speed up the process if need be.

You'll need to use the barrel with the blue M on it to get further up the first area.


You'll need to make your way down an quickly. While the white stars that create barriers of other white stars are fast, they don't outright kill you, but they can block your path and leave you no choice but to lose a life. Once you reach the checkpoint in the middle of the area, you'll have to deal with a rolling boulder.

When you reach the bottom, the boulder turns into a boss. Keep away from it. When the boulder hits a wall, it will drop a bouncing rock. Butt bounce on the bouncing rock and throw it at the boulder as it smiles. You can only have one bouncy, throwable rock on screen at the time. After four hits, you'll get the rope. The rope allows you to climb walls by simply moving towards them and pressing Up on the D-Pad. You'll then get a key to exit the level.

Forest Stage


Head back to the tree and enter the second door you see on the way up. Press Up at the wall, then jump mid-way up the wall to get to the Power Star.

Castle Ruins Stage


Head all the way to the left at the start and use the lanterns to get there. At the checkpoint, climb the wall to the left with the Rope to get the Power Star.

Tiny Cavern Stage

Climb up the left wall where the three climbable root vines are. You'll climb into a hidden area. One of the two chests instead contains an extra life. From here, use the Shrink Potion and head left. Jump straight up at the purple opening and hold Right on the D-Pad to get the Power Star. Thankfully, you can climb back up with the Rope if you miss it.

Palace Ruins Stage


At the second bouncing boulder, you'll need to climb up the ladder. Use the Rope to find the Power Star above.

newfiebangaa plays Land of Illusion Starring Mickey Mouse - Part 3 of 7


Now that we have the shrinking potion, we can get around in the tiny cavern. This will allow us to head to new frontiers in the game.


Tiny Cavern Stage


You'll need to use the shrinking potion to get around in here.

The pill bug enemies will roll towards you when you get close enough. Just approach, and jump straight up and butt bounce when they move.

The stag beetles will rise out of the ground and chomp away before going back into the ground; wait for them to descend before walking past them. 

Watch out for moving floors; they can crush you into the ceiling if you're not careful.


There is a background layer and a foreground layer to this stage; to switch between them, you'll have to find an opening with a purple background and enter it. Also, just walk past the spider on the way to the key, and don't jump near it.

Flower Field Stage


The worms just move back and forth; the bees will dive down at you. Wait for the bees to stop and move straight up before trying to butt bounce on them.

The yellow piranha plants will eat you if you land on them.

The drop of water that moves down across the leaves will hurt you if you touch it.

The white puffy dandelion produces seeds you can stand on and ride to get past the second set of piranha plants.

The butterflies just fly forwards.

The brambles are spikes; don't land in them.

Toy Workshop Stage


The cannons shoot mortar shots upwards; wait until after they fire to butt bounce them.

The orange blocks can be grabbed and thrown at enemies, but they can also be butt bounced on.

Just like in World of Illusion, put barrels on switches by picking them up and placing them with Button 1.

The water shooting out of the water pistols act like conveyor belts; watch how the fish move before butt bouncing on them.

If you see a door, either transparent or solid, press Up to enter it. At the piano keys, jump over the musical notes. Enter the door after the piano keys, go right to get a Power Star and open a shortcut back to the piano keys.

The decks of cards drop cards down; you can easily avoid the cards.

The ? block has a boxing glove inside. Avoid the boxing glove and use it when it punches downward to get to a new area.

To go up on the yo-yo, jump onto the yo-yo, then run to the right to get it moving upwards. Take care not to accidentally run your way into the ceiling spikes.

Throw an orange ball into the big orange ball in the ceiling to get the key.

From here, keep yourself lined up with the doors as you make your way down to get to the last part of this level, and use the shrinking potion to get to the second key. Use the key to get to the button, stand on the button, and stop it so the crane on the ceiling grabs the key and takes it to you. From there, use the key on the keyhole to enter another boss battle.

The boss here is a set of cards. Butt bounce on the cards when they are on the ground as they jump, then be ready to jump over the last card as it spins back and forth across the room. When the card stops, butt bounce on it, then be ready to dodge again. After three butt bounces, you'll save Goofy, who will tell you about the nearby cliff that you'll need the rope in the Palace Ruins to climb on. Goofy will then destroy the boulders blocking the ruins with a toy cannon.

PrinceWatercress plays Bugs Bunny: Lost In Time - Part 7 of 23


The Greatest Escape, unlike other levels in the game, will not be completed in one trip. You'll be coming back here multiple times just to get everything.


2:25 - Looks like you're looking for crates again. You'll need five this time. Kick things everywhere for golden carrots and clocks. The circular shadows on the floor are spiders that will drop down. Don't even fight them; they're hard to hit when they're on the ground.

3:23 - The first crate.

3:47 - The fallaway floors have a lighter shade of blue. You can tiptoe across them to walk past without breaking them, as I find out later.

4:07 - Jump straight up to avoid the barrels Muggsy throws, or else you're getting hit. As you go further up, you'll chase Muggsy all the way up until you reach the exit.

5:13 - The second crate. Push the table to get to the crate.

6:30 - Jump on this lamp for a clock.

6:53 - Remember this couch for later.

7:40 - At least you can get this golden carrot. You'll need the super jump panels for the final crate.

10:13 - Another ability you'll have to unlock: the music ability.

10:41 - The third crate. If you drop down the pit here, you'll end up back on the first floor.

14:12 - The fourth crate. You'll need to stack the bricks to get to it.

16:19 - You can push the bookcase here to get the stuff on the other side. Kick the flower pot on the way for another golden carrot!

18:26 - To beat Muggsy, get some distance between yourself and Muggsy after taking the bomb he throws at you and waiting until it flashes red. When that happens, you'll need to toss the bomb back to Muggsy. Muggsy will look at the bomb, not knowing what to do at first, before throwing the bomb back. When you damage Muggsy, you'll also get a golden carrot for your effort. After three bombs, Muggsy goes down and you'll be able to get a clock. You'll also unlock "What's Cookin', Doc?" in the Medievil area.

Tuesday, March 15, 2022

newfiebangaa plays Land of Illusion Starring Mickey Mouse - Part 2 of 7


In this entry, we explore a castle and beat up a ghost.


Lake Stage


Now that the water is at a higher level, if you return to the lake, you can get to the exit instantly.

Castle Ruins Stage


The place will be dark, but if you grab the lantern, you will light the room up. If you put it down, it will be dark again.

The ghosts just move back and forth. If you bounce on them, they will come back after a few seconds. The jack-o-lanterns will fly towards you, but you can jump on them easily.

There is a power star the checkpoint, but you won't be able to get it yet.

The Mickey blocks are re-usable. You can use them to make a bridge across the spike pit, and you can also use them to get to the treasure chest at the end of the first section. Make sure not to accidentally bounce on them and break them.


The second section is an auto-scroller. The buttons will make the screen go in the opposite direction. Once you get the key at the end, you'll be able to use them to get back to the wall with the keyhole at the far left. Make sure you stand on a button to scroll enough of the screen back to the right so you can reveal the next button and get to it in time. As for those blocks stacked on each other that you couldn't get rid of, you'll need to put the key on the button, stand on the key, grab and throw the top block to get rid of it, then grab and throw the bottom one. From there, you can grab the key and get to the door with the keyhole.

The boss is a ghost. When the ghost dives at you, bounce on its head. The ghost will produce flames with every hit you deal, and you'll have to watch out for the flames as you bounce on the ghost. After three hits, you'll get the shrinking potion. While crouching, you can now press Button 1 to shrink in size. Doing that a second time will allow you to return to normal size.

newfiebangaa plays Land of Illusion Starring Mickey Mouse - Part 1 of 7


I've played two of the titles in the Illusion series (three if you count the Master System and the Genesis/Mega Drive versions of Castle as different games, which they are), but when I found out there was a little more to it than just "go to all these places, do these things and beat the main antagonist," I just had to look further into it. And here we are.


One evening, Mickey fell asleep while reading a book of fairy tales. When he woke up, he was no longer in his home, but in a strange and gloomy village.

"Gosh, it sure seems creepy around here."

"An evil phantom has stolen the magic crystal that protected everyone in the village. With the crystal gone, the good magic in this valley has disappeared. In its place, bad magic has changed everything. Now, rather than being a place of happiness, the valley is full of gloom. Can you help us?"

"Uh, did you say...phantom?"

"Yes, an evil phantom who lives in a castle in the clouds. A good princess in the north mountains can tell you the best way to get there."

"Swell! I'll do my best."


Once you press Start on the title screen, you'll be on the world map.  The first place you can go to is the Forest Stage.
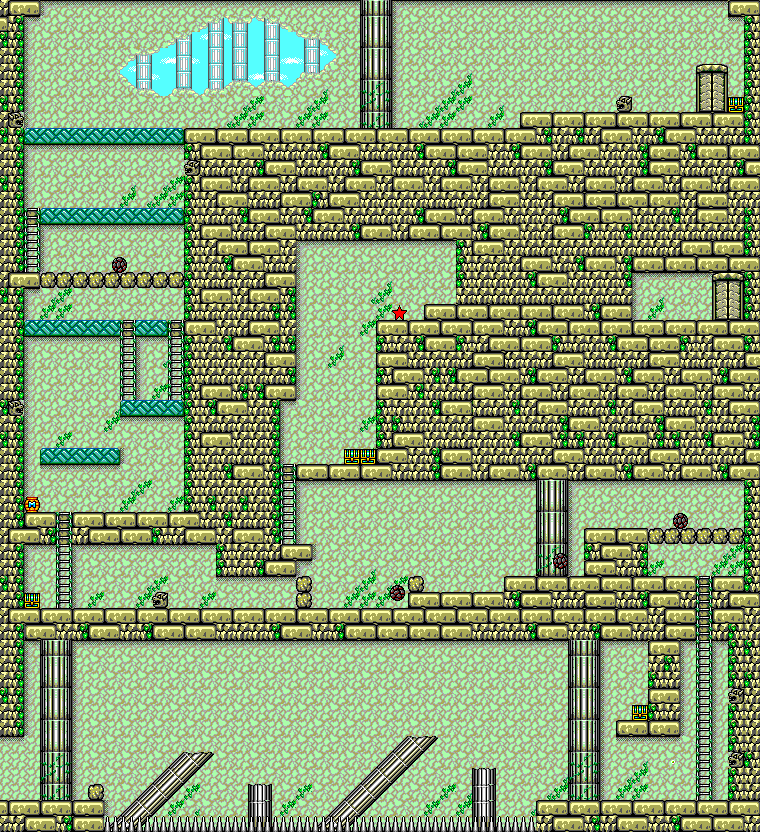
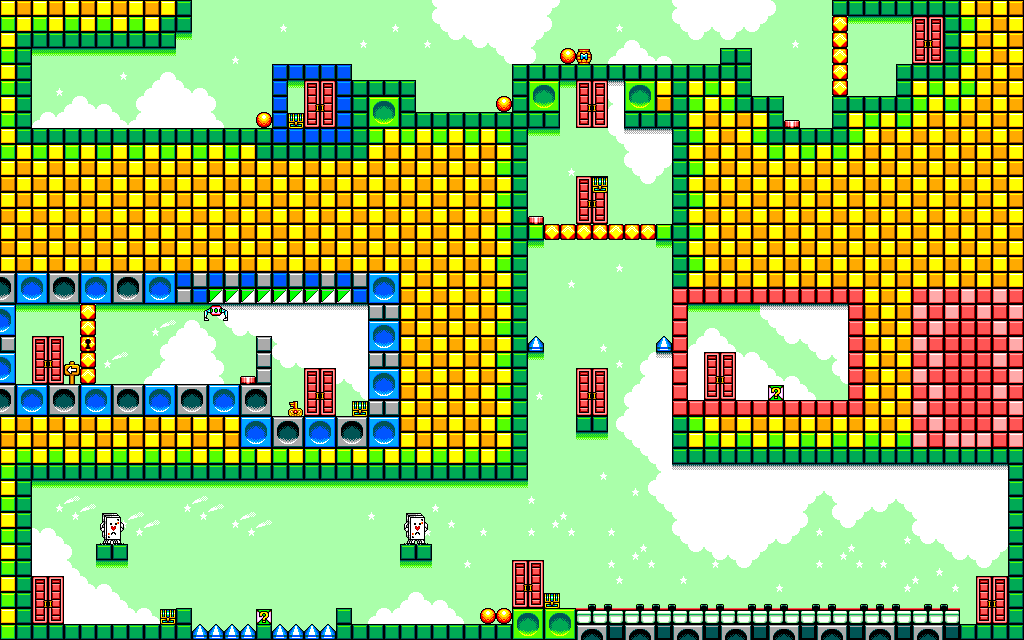
Forest Stage


Much like in Castle of Illusion for Sega Master System, you have to press the jump button twice to butt bounce on enemies and defeat them. You also use the other button to pick up blocks and throw them at enemies, which also defeats them.

Enemies here include snakes, spiders that crawl across the webs and a bird that you'll only see if you keep going right instead of up at the start.

At the bottom is your heads-up display. Power indicates how many stars you have left, tries indicate how many lives you have left, score is your current amount of points earned, and time shows how much time you have left. If the time goes all the way down to zero, you'll lose a life.

If you go up from the start, you'll take the high road. You'll have no choice but to get there anyway. The spinning leaves are platforms that slowly move downwards before landing in the webs, and you can use them to jump to the other end.

Climb on the vines by jumping into them and holding Up or Down on the D-Pad. This will help you get past the whirlwinds which will blow you around.

Slices of cake will refill one unit of health, while whole cakes will refill three. To open chests, butt bounce on them.

Get into the whirlwind to get past the spikes, then use the D-Pad to grab the vine so you can stop being blown around.

To enter the opening in the background, walk up to it and press Up.


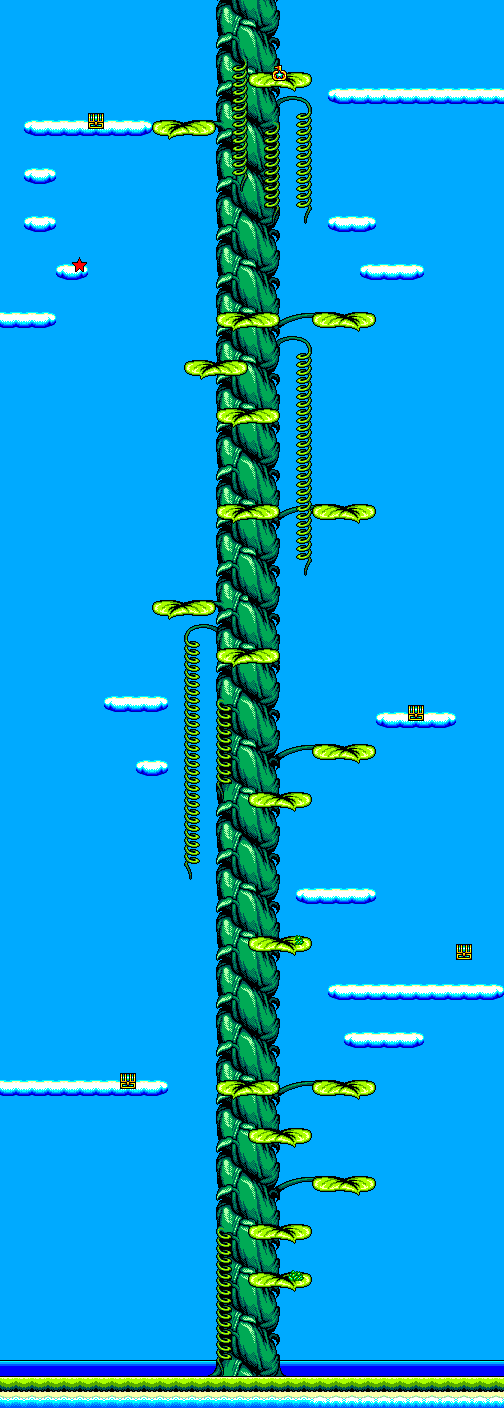
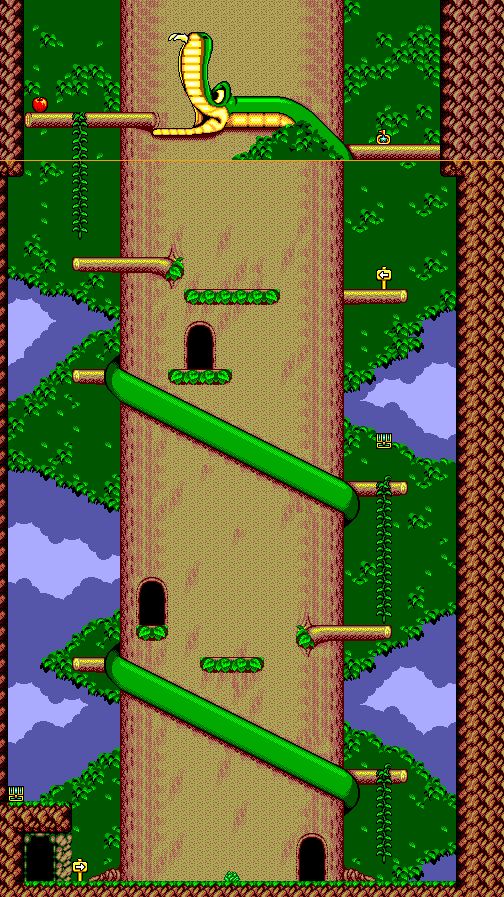
The second area has you going up a tree.

Sometimes, the arrow on a sign will change color. If that happens, you just touched a check point. You'll return there instead of the start of the level if you lose a try.

Coins give you points. Big points give more than small ones.

You can pick up the barrels to move them around and use them as platforms.

Oranges will drop down, so watch the skies. Thankfully, they always drop down from the same place every time.

The spiders here move up and down. Wait for them to come down before you butt bounce on them.

At the top of the tree is a snake. Grab the apple and throw it into the snake's mouth to continue to the key. Pick up the key, and you'll open up the exit to the level. It's now on to the Lake Stage.
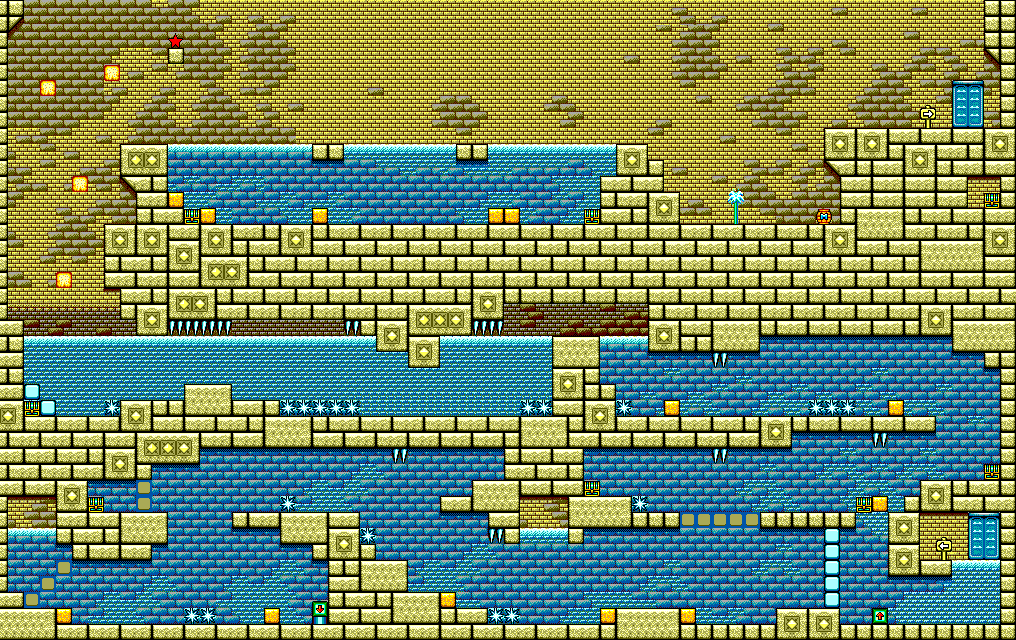
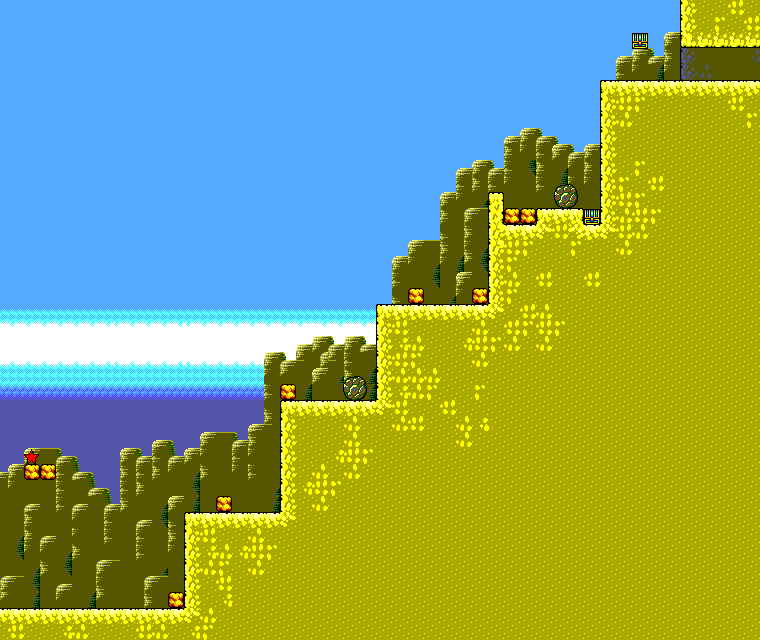
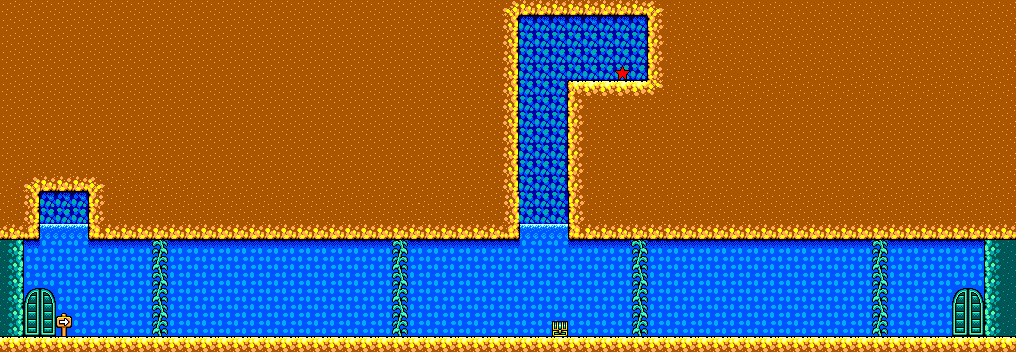
Lake Stage


Unlike other games in the Illusion series, you have an air meter. If you run out of air, you'll lose a life. Use the D-Pad and the jump button to swim. If you need air, swim all the way to the surface and either jump out of the water or hold Up at the surface to get all your air back.

The water here rises and lowers, which can make you wait at times to get past certain hazards. Just stay near the surface and don't go anywhere until you have room, and you'll be all right.

Watch out for any and all enemies and hazards, such as the spikes, the green balls that float on the surface of the water and the fish that swim forward, 


Every once in a while, you'll be pushed back by the current. Use Up and Down to grab onto the vines if that happens. Once the current stops moving, you can continue forward. You'll want to be quick but cautious so you don't spend so much time in the water that you end up drowning and losing a life.

At the waterfall, watch for the fish that jump out from underneath, and butt bounce them if you want. At the pool of water, you'll need to watch out for the green ball that swims around in a circle and throw a block at it to get the key. Once you get the key, go up to find the exit.

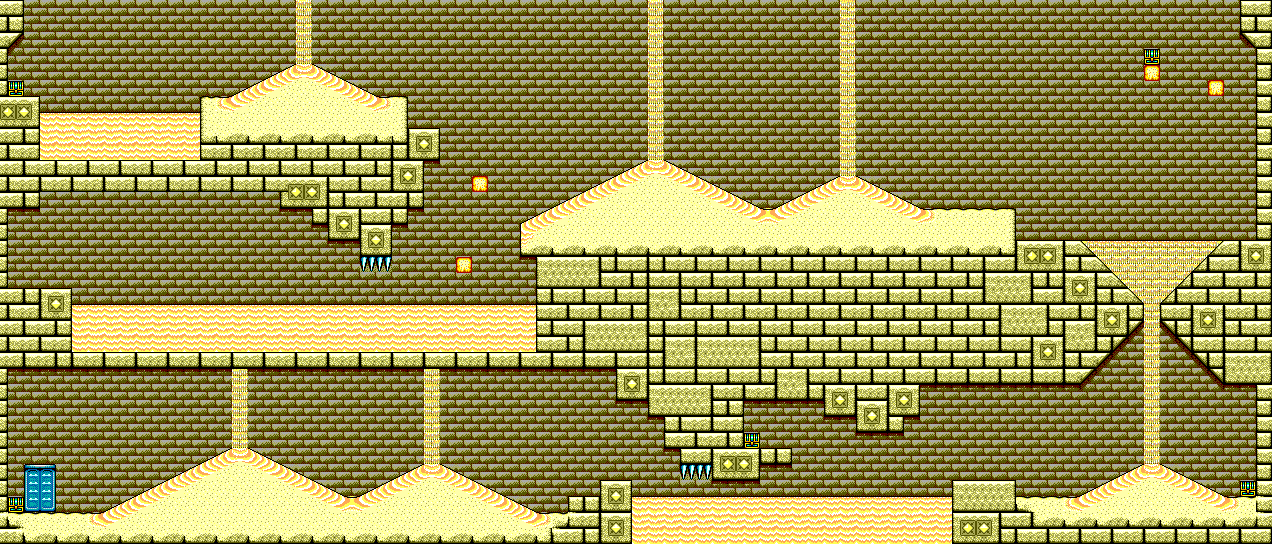
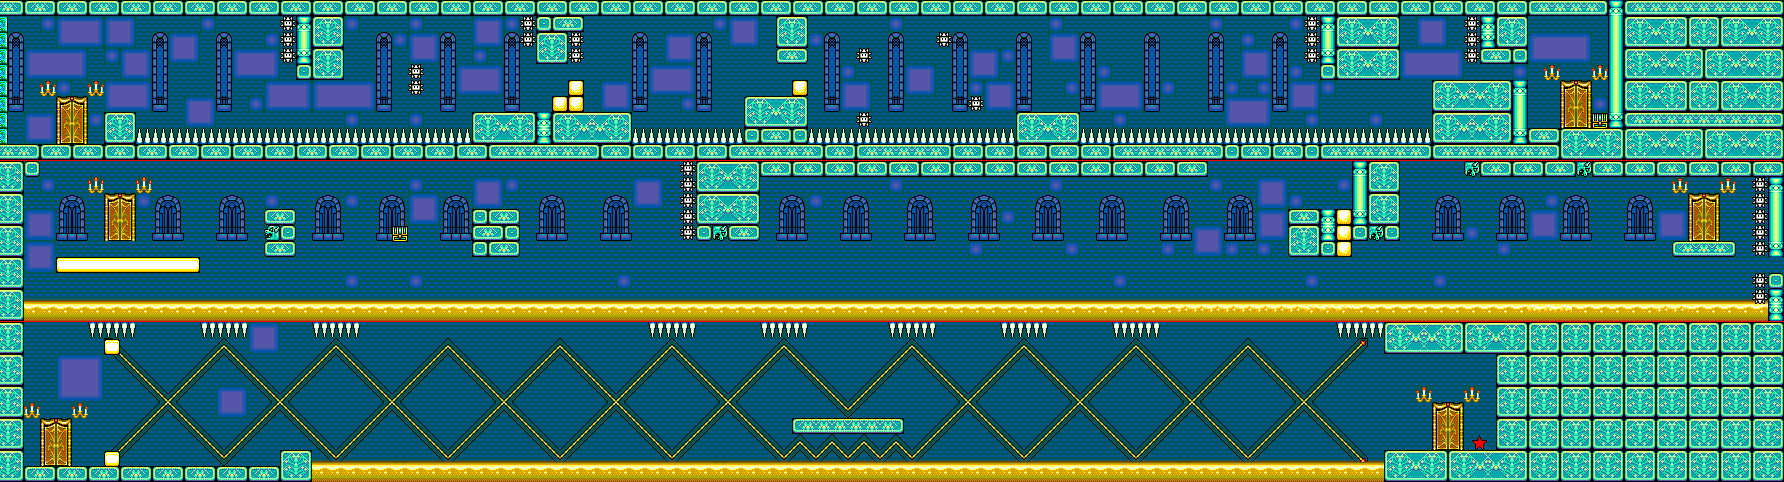
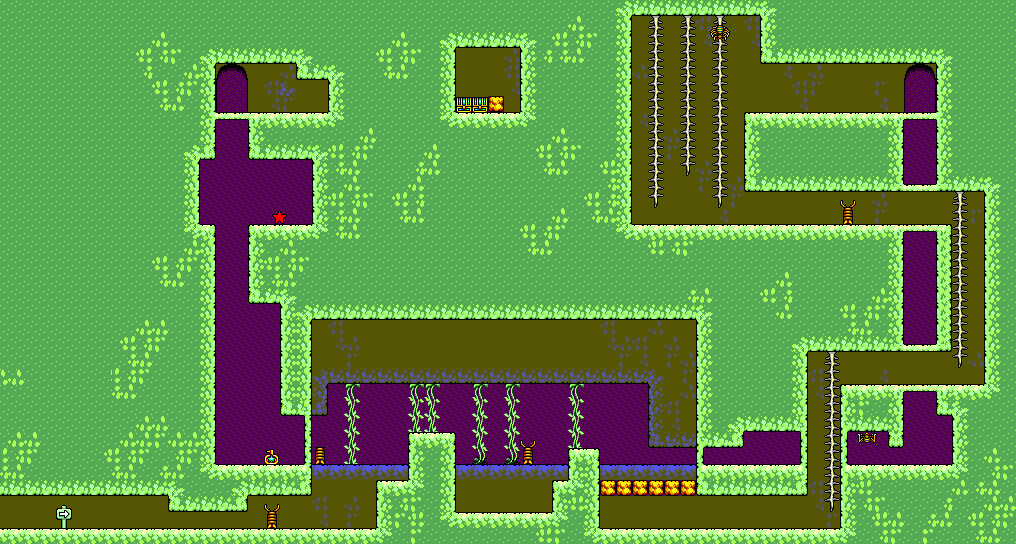
Blacksmith's Castle Stage


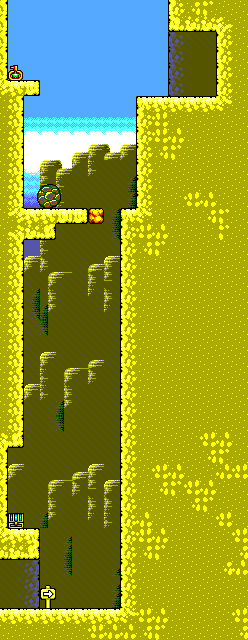
When you start, be ready to run! The flame at the left will grow legs and follow your around, leaving a trail of fire in its wake. Thankfully, its two weaknesses are dead ends with no way out and water. Just keep going.


Dragons will come out of the lava and spit fireballs here, but if you're able to get through here pretty quickly, you won't have to deal with them very much.

Watch for platforms that move up and down above the lava.

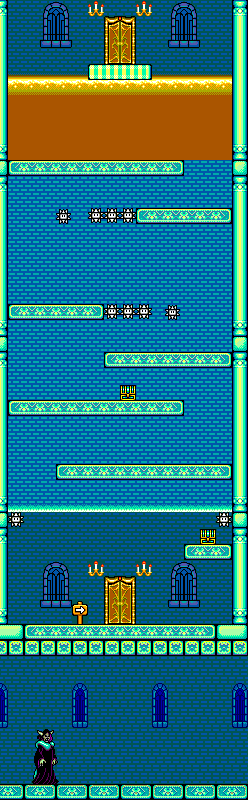
Yes, the matches have limbs. If you go to the right with the help of the jumping board at the ladder, you'll get a big coin.

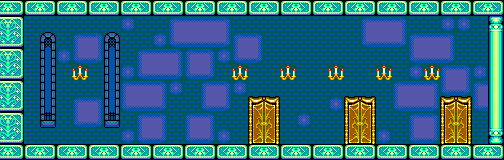
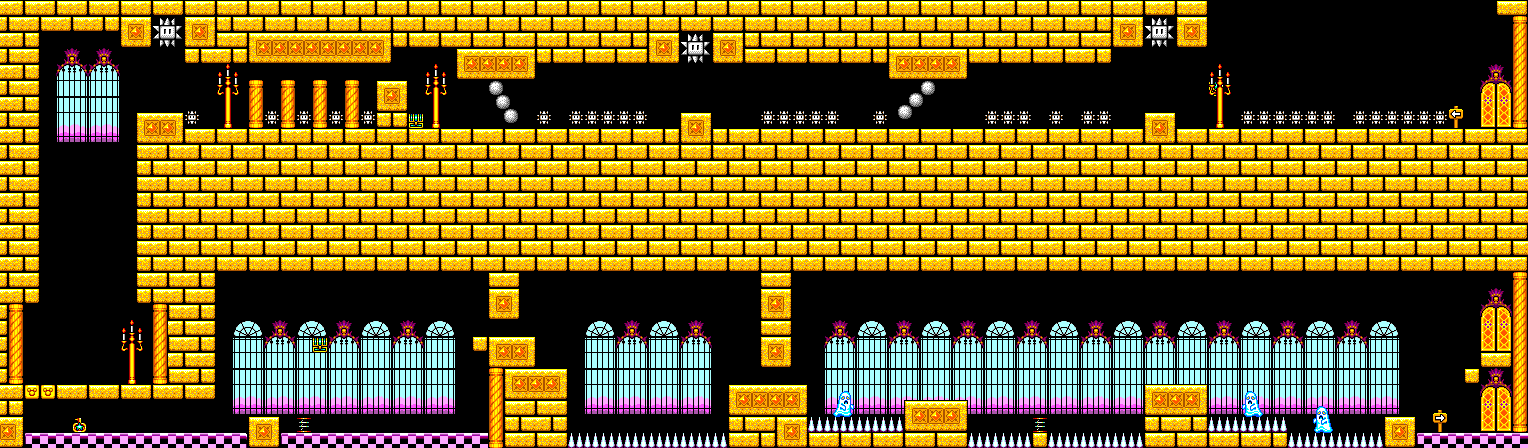
At the top of the ladder, use the jumping board to get to the flashing star to the right. This is a Power Star, and there are fourteen of them in the game. By picking one up, you'll get an extra hit point for your power. You can have up to five, but there are fourteen of them in all and getting them all will get you a 100% clear.

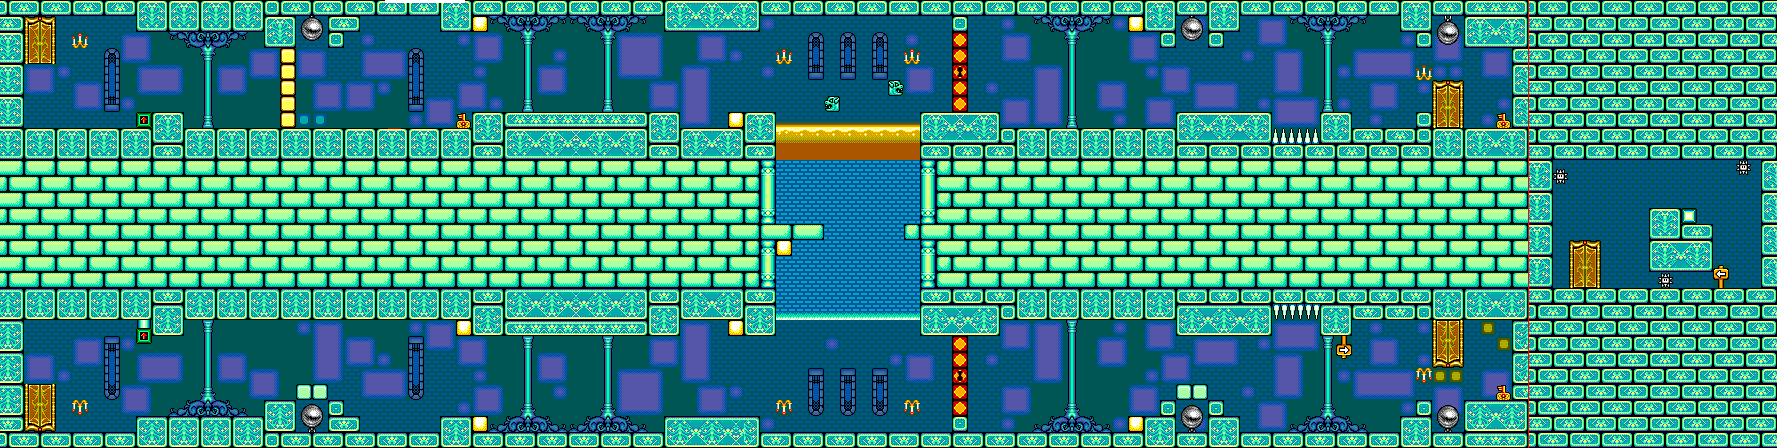
From here, head to the left. There will be fireballs that leap in and out of the water, and some of them will cause a little bit of fire to be in your path from hitting the underside of a platform.

At the exit door, you'll face a big red dragon. Throw blocks at it, and watch out for the fireballs that bounce around at 45 degree angles. After three hits, the big red dragon goes down, and you'll rescue a villager. He will tell you that the bad magic had him trapped in his own castle, and that you'll have to travel through a tiny cavern up ahead. However, you'll need to shrink in size to get in, and there is a shrinking potion in the castle ruins. Also, the fire in his castle has weakened, leading the water in the lake to rise and open a path to the castle ruins. He also hands you a flute that allows you to go back to previous areas.

PrinceWatercress plays Bugs Bunny: Lost In Time - Part 6 of 23


I can't believe it took me twenty minutes to find two golden carrots. Anyway, enjoy the first level of The 1930s, where Rocky and Muggsy become your primary annoyance. I like these guys.


0:55 - Kick the box of bones, then throw a bone to distract the dog. Jump on the green button to see what the button sequence is, which is different every time. Copy the sequence, then do it again. You'll open the next door and get all the golden carrots opened up.

3:17 - Lure Muggsy towards the anvil shadows to damage him, or tire him out and kick him from behind. Three hits does him in. Rocky will throw bombs after the battle, but you can use them to break the barred windows for golden carrots and Clocks. Stack the small green crates to get to the key. Go to the keyhole, then kick the door. The guys in the pots will shot at you, but you can kick the pots to get rid of them. Use the plants for cover, and watch out for the falling bookcases. Kick the switch to activate the elevator, then go in to enter the next section

7:04 - Watch out for the guys that come out of the door. To get rid of them, throw the dynamite at the doors with the enemies in them to defeat the enemies and get their golden carrots.

10:52 - Once you're done with the gangsters, you can blow up the safe room for a Clock. Also, you can push a bookcase to open up some doors as well as a hidden room. Throw the dynamite at the guy near the safe to get rid of them and get another key. You can now exit this area.

13:15 - There's a pressure plate here. Kick the safe for a gold bar and put it on the plate to keep the door open. You can attack the sleeping guards for their keys, but you can sneak up to them and take their keys out from under them. Otherwise, you'll have to kick them from behind three times for the key.

15:35 - Move the safes in this room, then go back to the previous room, grab the mallet and break the glass to get the next key.

17:49 - Besides the open window, you can kick this portrait for another route outside. Kick Muggsy in the behind when he is tired out to get rid of him. You can also use the anvil shadows to get anvils to drop on him. After another hit, you open up the elevator to the boss battle.

20:18 - To beat Muggsy, get Muggsy tired out like before, then kick him from behind. From here, get to the center where Rocky is and kick him from behind, too. Get away afterwards; Rocky will spray bullets around when you hit. Four hits later, you'll get rid of Rocky and Muggsy and you'll get the sixth and last Clock for the level and open up "The Greatest Escape."

23:28 - There are carrots in the pots here. You'll find two of them in this particular part. Also, if you select "Exit Level" in the pause menu, anything you collected stays collected.