Showing posts with label part 13. Show all posts

Friday, July 10, 2026

PrinceWatercress plays Space Station Silicon Valley - Part 13 of 32


Kid me never beat this level. Let's change that!


Penguin Playpen


Not only has a stinky seagull laughed at the ship's crash landing and needs to be knocked down a peg or two, but the penguins have built a statue on top of the exit that needs to be destroyed if you want to get out of here.

You'll start as the penguin. The seagull will fly away, and if you're quick, you can get a shot on it with your snowballs. You'll meet the seagull again eventually.

From here, get in the water and defeat the three fish in the water nearby. If you destroy all three of them, you'll get the king penguin trophy.

To get the Power Cells in this watery area, you'll need to take control of one of the fish, use the Control Stick - which changes your altitude in the water with Up and Down - to get to the surface, then leap out with B. You can only leap out at the surface of the water, and in order to move and steer left and right with the Control Stick, you'll need to continuously hold the A button for a speed boost. Believe it or not, Skill A and Skill B are the opposite of what they're supposed to be.

Do not land on dry land as the cod. You will lose health at an alarming rate, and getting back in the water will not replenish it.

The land mass where the fish are has a Power Cell and a walrus. Take control of the walrus and push the ice block in the water into the gab near the fence at the beginning, then take control of the penguin again, jump the fence, jump on the ice block, and then jump to the other side. Remember that as the walrus, you can move on the surface of the water with just the Control Stick without having to use the speed boost.

Once you're on the other side as the penguin, you'll see two other penguins who say "I love you!" before walking off onto the slope. At the bottom is a polar bear tank that can drop bombs and shoot at you. Do not fight it as the penguin; you will get destroyed. Instead, get to the lift on the other side and take it upwards. Near the trees is a husky on skis that can shoot homing missiles at you. Go down the nearby slope and get back on the lift; this will lure the ski husky down to where the polar bear tank is and cause both of them to fight each other. Take the lift again to avoid them both, then watch the carnage from above.

The husky may get some shots on the two penguins below, but it will eventually tangle with the polar bear tank and get destroyed, as the polar bear tank can take a bit more damage than the ski husky. Take control of the ski husky once it goes down, then destroy the polar bear tank from a distance.

Before taking control of the polar bear tank, keep playing as the ski husky and go back to the top of the lift. As you explore, keep in mind that you can walk forward with the ski husky by holding forward on the Control Stick. There is an ice bridge that you'll need to cross, and if you cross it, you will have to tangle with the seagull. Shoot at it when it gets low enough to attack you when you get close enough, and try not to fall off the ice bridge if you're using that as a means of staying away from the seagull. That will do it for the seagull and one of your

Once you get the seagull, take control of it and fly around in the area where you found it. If you defeated all three fish earlier, you'll get the gold penguin king trophy at one of the edges. As the seagull, you can keep pressing A to fly around the level, collect the remaining Power Cells, and see where you need to go.

The gap near the ramp on the way to the seagull leads to the penguin statue. You'll need to go down here as the husky, take out the nearby penguin, place the penguin on one of the switches, place two more penguins on two more switches, then place the seagull on a fourth switch to melt the statue and open up the exit teleporter.

Cool Cod


Type: Cool Cod
Environment: Ice
Skill A: Jump
Skill B: Speed Boost
Water Resistance: Excellent
Mass: Tiny
Armour: Light
Strength: Weak
Traction: Very Poor
Fall Distance: Medium
Production: Very Short
Engine: Jet
Intelligence: Medium

Ski Husky


Type: Ski Husky
Environment: Ice
Skill A: Speed Boots
Skill B: Missiles
Water Resistance: Poor
Mass: Medium
Armour: Light
Strength: Medium
Traction: Very Poor
Fall Distance: Medium
Production: Medium
Engine: Electric
Intelligence: Medium

Polar Tank


Type: Polar Tank
Environment: Ice
Skill A: Hot Shots
Skill B: Mines
Water Resistance: Excellent
Mass: Huge
Armour: Medium
Strength: Strong
Traction: Very Good
Fall Distance: Medium
Production: Very Long
Engine: Fusion
Intelligence: Very Low

Seagull


Type: Seagull
Environment: Ice
Skill A: Flight
Skill B: Claw Attack
Water Resistance: Excellent
Mass: Medium
Armour: Light
Strength: Little Lift
Traction: Average
Fall Distance: High
Production: Medium
Engine: Kerosene
Intelligence: Low

Power Cells


Sunday, June 7, 2026

PrinceWatercress plays Donkey Kong Land III: Dixie Kong's Double Trouble - Part 13 of 13


It's time for Time Attack Mode! Fun fact: I recorded all of the footage for this video in the span of one hour, all in one night. That's how long it took me to clear all twelve courses. Thank you, Master Thief Sprints from the first Sly Cooper game.


In Time Attack Mode, you'll be playing through twelve levels and getting from the start of the level to the end as quickly as possible. All of these levels will be based on levels that you have played before, and if you complete all twelve of them, you'll get a trophy from the game congratulating you for beating the game fully at 103%.

Stilt (0:48)


For this one, you'll definitely want to play as Dixie the entire time. You'll want to take the high road and use the helicopter spin across the sky for as much as you possibly can, as it will allow you to skip a lot of the terrain and also a lot of the enemies. If you can do all that while going as fast as possible, you'll have no problem with this one.

Mill (1:30)


This one will give you a little more trouble compared to Stilt. You'll want to jump up to the next level from the moving platforms as soon as possible, and you'll also want to roll into or run under all those Rekoils. At the moving platforms before the porcupine enemies, you'll want to go left at the top so you don't run into a dead end. When you see the arrow made of bananas pointing left, you'll want to follow it. If there's an area leading downwards with moving platforms, drop straight down and avoid the platforms. You'll go downwards faster that way.

Snow (0:53)


You'll want to take the high road again and roll through all the Skiddas while running across the roof of every log cabin that you find as the first snow level in the game comes back with a time attack vengeance. Just like in the Stilts level, you'll also want to use Dixie's helicopter spin to fly through as much of the stage as possible, as it will allow you to skip past much of the terrain. Also, be ready to do your spin/roll attack through the last Skiddas before the goal, as it just might give you the late-race boost you might need.

River (0:55)


Be ready to use Dixie's helicopter spin through much of the level. You'll want to stick to the high road (again), and you'll also want to be ready to jump over the set of three Knick-Knacks (those flying bugs) shortly after the start, as that will give you a huge boost. Be ready to avoid the Knick-Knack before the N (the Kong Letter) so you can drop into the water, get back onto dry land and get back on the move as quickly as possible.

Coral (1:20)


The first underwater level is back...in time attack form! Get Enguarde as soon as you start the stage, as you'll be able to move faster as Enguarde. After you're back in Kong form, you'll want to swim into the wall when you see the Barbos enemies. You'll swim into an invisible barrel cannon, and once you get in, you'll want to hold Right on the D-Pad so that you can get to the goal as soon as you're launched out of it. You'll need to use this shortcut if you want to beat the stage in less than 1:20.

Tree (1:22)


This one can be a bit tough if you don't know what to do. You'll need to roll through the rat enemies, and you'll also need to drop down the areas where you go straight down. There is a barrel cannon that will launch you upward just a little bit, and I usually find myself using it to save a few seconds. If there are platforms in the way, you'll need to use your roll attack in order to move towards and fall off the edges, which will keep your roll going indefinitely as long as you're moving off ledges. As for the parts where you need to climb up and avoid the Minkeys, use the barrel shields, but be ready to quickly climb up the ropes at the first opportunity. 

Cliff (1:20)


Cliff is probably the hardest of the time attack stages to beat. I go up at the start, and I drop downwards at the parts where I need to go down. You don't need the steel keg shortly after the start, but it might help with one of the big blue Kremlings. Drop down from all the ropes as soon as you can, then use the barrel cannons and head left while avoiding the Klasps. Once you drop down, you'll need to avoid all the Buzzes as you head to the right, then you'll need to drop down all of the ropes while heading to the left. Once you're past the last Klasp, just keep heading to the left, drop down as you go, and jump over that big blue Kremling to get to the goal.

Machine (1:40)


Be ready to jump over the Bazuka and his barrel shots shortly after the start, and keep in mind that the Karbines - the owls that shoot out the fireballs - will shoot out a fireball the moment they are on-screen, but if you keep running without hesitation, those fireballs will not hurt you. On the parts where you have to go up while dealing with a Karbine, you'll need to time your ascent so that you can avoid getting hit by fireballs. I recommend jumping into the barrel cannon past the first lava pit that leads the O; you can skip a little bit of the terrain that way and you can drop down and get back on the move without having to use the barrel cannons that will take you back to the meat of the stage. There's another Bazuka that shoots barrels near you before the N, but once you get past him, the worst that the stage can throw at you will be over. With that said, being as fast as you can before the N is essential to beating the stage in less than 1:40.

Falls (2:00)


The final waterfall level is the time attack stage for Falls. For this level, I recommend not using Ellie at the beginning, as you can save time not transforming into her. Also, taking the barrel cannon shortcut shortly after the beginning can definitely shave a few seconds off if you can get to it seamlessly. For the Tracer Barrel sections with the Buzzes, you'll need to time your movements and your launches so you can easily get over the Buzzes while getting to the other side quickly as easily, and with enough practice, you'll get used to the up and down movements from the Tracker Barrel launches. There are very few areas where you can use Dixie's helicopter spin, if any, and none of them are in the areas with the Tracker Barrels. When you see the arrows made of bananas that point at where to go, follow them. Once you reach the top, head to the right.

Cave (1:45)


Aside from all of the enemies you'll need to get past, there are also the Ghost Barrels that you'll have to luck out with. As long as you're fast, they're not much of a problem. Also, when you get Squitter, be ready to shoot out webs constantly, and make sure that you forego the Barrel Cannons so that you can get down faster. Also, watch out for the Kuchucka at the end, especially if you have just one Kong, as that Kuchucka can be an absolute run killer.

Jungle (0:58)


You'll want to use Dixie's Helicopter spin whenever you can in this stage. When the game hands you a Barrel Cannon to jump in, be sure to take it. Once you get on the conveyor belt ropes, it's just a matter of taking the high road and sticking to it with Dixie. When you see the Barrel Cannon pointing down and right at the conveyor belt ropes, take it; the first one lets you continue on while the second leads you to the end.

Tube (0:46)


When it comes to the jumps over the Buzzes, the bananas will be your guide. The trick is to jump just before you touch the bananas, because if you jump the moment you touch them, you'll be too close and you'll be taking a hit. Once you get on the second sled, you won't have the bananas to guide you, so you'd better have the jumps down if you want to beat the time of 46 seconds here. When you reach the Barrel Cannons, aim to the left so you can finish the level.


Wednesday, January 28, 2026

PrinceWatercress plays Super Mario Odyssey - Part 13 of 92


In this entry, we face another member of the Broodals. Interestingly, we're not done yet...


Flower Thieves of Sky Garden


The Fire Brother can throw fireballs, and if you light campfires with your fireball powers, you can get coins as well as Hearts.

From where you got your first storyline Power Moon, jump on the P Switch to activate a plant bridge. Stay on the plant bridge as it moves across by moving forward with it. After the first P Switch, you'll see a tower off to the side where you can get four more Regional Coins as well as a Power Moon in a nut before taking a detour back to the path you need to take.

Inside the Sky Garden Tower, you'll need to hit P Switches in order to open a way to the top. The P Switches stay pressed, and the plant bridges will keep spawning and re-spawning on a regular basis. You'll find an Uproot or two going up the tower; use them to get on the platforms that move in and out of the walls as well as to get to other areas where you can find things such as Regional Coins and Power Moons.

At the very top of the tower, you'll have another boss battle. Before you go, hit the Sky Garden Tower checkpoint, then leap off the side before approaching the Broodals and walk slowly and carefully across the metal girder to find four Regional Coins. Use the checkpoint you just activated to return and face Spewart. Keep your distance to avoid the poison that Spewart spews out, then throw your hat towards him to get the poison out of your way and hit Spewart. This will knock the hat off his head. Jump on Spewart's head to start the second phase. If you need health, break the rocks that are around here to uncover Hearts.

For the second phase of the battle, you'll need to avoid Spewart as he hides in his hat and spins around. If you need to, throw your hat at the trails of poison Spewart leaves behind to give yourself room to move. When Spewart reappears in the center of the field to spit more poison around and around, hit him with your hat again, then jump on his head.

The third phase is the same as the second phase. Once you hit him one more time, Power Moon #2 will be yours. 

Path to the Secret Flower Field


While the Soirée Bouquet cannot be saved, there is still hope for the Secret Flower Field, which the Broodals are still trying to look for. When you see where you're supposed to go next, a strange, UFO-like enemy will land where the Secret Flower Field is.

The road to the Secret Flower Field will be a little longer, as some of the checkpoints that you unlocked earlier will no longer be available to you until you complete this storyline mission.

You'll start seeing white flowers with orange on the insides of them. If you grab them with your hat, you'll start running quickly. Grab more flowers to maintain this speed, but make sure you watch where you're going and don't run into any walls.

The tank enemies are called Shermans, and if you possess them, you can break dark brown walls with your cannon to open up new areas. The left stick moves, the right stick aims, and Y fires from the cannon.

The silver robot will provide a seed that you can throw into the nearby dirt mound for a vine you can climb; this will take you to another checkpoint that you can unlock for the Forest Charging Station.

Power Moons


2. Flower Thieves of the Sky Garden - Defeat Spewart. The strategy to defeat him is above.

9. Thanks for the Charge! - The right-most charging station in the Forest Charging Station area has a bright light in the ground. Ground pound it for a Power Moon.

11. Tucked Away Inside the Tunnel - There is a waterfall near the Odyssey that you can follow upwards to a stream, which takes you to another gate you can open by throwing your hat at a switch as well as a Fire Brother. By using the Fire Brother to make a wrap-around jump towards the platform above, then leaping out of him to perform a mid-air dive jump onto the platform, you'll find another nut that you can break for a Power Moon.

14. Climb the Cliff to Get the Nut - From Power Moon #11 (see above), open up the nearby gate with the switch, then possess an Uproot and make your way up to where the nearby Regional Coins are. Get those coins, then keep going up. You'll find another Fire Brother as well as another nut. Break this nut to get another Power Moon.

17. Cracked Nut on a Crumbling Tower - As you move forward with the plant bridges, you'll see a tower off to the side. Move across the fallaway blocks, then take the lift to another nut and another Power Moon. 

19. Fire in the Cave - Tucked away in the Iron Road: Entrance area is a hallway leading to a gate and a scarecrow. Throw your cap at the scarecrow to open the gate, then jump on the Fire Brother when it stops to throw fireballs to defeat him. 

21. Love in the Forest Ruins - Near the Forest Charging Station, you'll need to make a stack of Goombas to get the female Goomba's attention. This will net you a Power Moon.

24. Nut Planted in the Tower - Near the end of the Sky Garden Tower, there is a nook in the tower that contains another nut, which you can easily break for a Power Moon with an Uproot.

25. Stretching Your Legs - At the top of the Sky Garden Tower, you'll see a shadow. This is another Power Moon; use an Uproot to get it.

41. Wandering in the Fog - The Mini Rocket in the Forest Charging Station leads to a very foggy area. Possess a Para-Goomba to find some of the five Moon Fragments - some of which will be in the underside of this area. so you can get the Power Moon here.

Regional Coins


Thursday, December 4, 2025

PrinceWatercress plays Brave Fencer Musashi - Part 13 of 33


Now that Tim is safe, it's time to find out where the Vambees are coming from. It does not take long for us to get our answer.


The OldGloves are really A-Glove (army gloves). They're useless, so you'll have to sell them. Also, if you talk to Connor the appraiser, he will tell you that he detests Mannick, the restaurant owner, because he bought the restaurant upon hearing rumors that there is a treasure in the basement.

Head to the cafe near the mountain path leading to the gondola in the evening when the restaurant opens at 18:00. You'll find Bakery's Towst banging on the door. He has a headache and is pretty aggressive due to eating too many pork chops. (In the Japanese version, it's alcohol.) He'll tell you to go talk to Wanda and Macho at the inn. (Wanda is the waitress at the restaurant.) He'll run away before the ghouls start showing up.

Head to the inn and make yourself at home, then select "Chat." Talk to Wanda and Macho. They'll tell you monsters came out from behind the counter.

Head back to the restaurant at midnight. You'll see Vambees come out of the door. Enter the door as soon as it happen. Check out the opening behind the counter. You'll enter a dungeon-like area, with a trail of soda bottles (they're liquor in Japan). Go down the stairs and you'll meet Mannick. He will say he wanted to get rid of the ghouls, so he went down into this dungeon.

You'll follow Mannick to a door with four eyes. You'll have to light up all four eyes in order to open the door, and you'll have to go exploring to do that.

The door to the left of Mannick contains a dungeon. You may remember it from the Hard difficulty scenario from the demo disc. Balls of slime will drop from the ceiling, and large pink plants shoot bowling balls that quickly become bigger than you. You'll have to step out of the way, wait, or enter openings in the floor to avoid the bowling balls. If you Assimilate one of them, you'll get Bowl. Use it to blow down cracked openings in walls at 10 BP a shot. Press Circle to bring up an angle gauge, and use the gauge to control the straightness of your shot by pressing Circle when the cursor is at the angle you want to throw. You cannot move whenever you Bowl. 

You'll start seeing narrow paths here, too. Take it slow so you don't fall. 

The flaming Vambees are invincible. Use your block ability right in front of the flaming arrow shooters to get past the flaming arrows.

The cracks behind the huge flower before that wall you have to climb up hide a treasure box with a Shield. Take it for the money, because it definitely isn't a Shield.

The right wall in the room with the giant bowling ball flower that seems like a dead end contains another cracked segment if you look carefully. Use Bowl to break it.

You'll be doing some bowling at the bridge. If you can get all ten Vambees that stand around for you like bowling pins, you'll get extra experience to boost some of your stats up.

The platform with the eye that the Vambees stood on will take you up, allowing you to continue the area. Don't take it yet. Instead, jump to the platform leading to the doorway ahead. Break the Bincho Field to rescue Mercenary Potrowst. If you break the cracked wall to the right, you'll find a chest containing the OddHat.

Now you can take the platform. If you head to the right, a flamethrower will block your path. Going left will just take you earlier into the level. You'll have to trick it into facing one direction by having it hit you, then run around it and hit it with Lumina Rotation to get rid of it.

Next, you'll be avoiding crushing walls. Get to the other side and enter the opening in the first room, then jump on top of all the walls in the second. Break the cracked segment on the wall to the left with Bowl.

You'll do some more bowling. Once again, you can break the cracked wall ahead to find another Bincho Field and rescue Mercenary Stue. Just use Lumina Rotation or Bowl on those Vambees first.

The next elevator takes you to a blue crystal. Smash it with Lumina and you'll trigger a teleporter behind you. When you head back to the eye door, you'll find out one of the eyes is lit up.

Sunday, November 2, 2025

PrinceWatercress plays Legacy of Kain: Soul Reaver - Part 13 of 28


In this entry, our adventure takes us into Rahab's domain.


When you're done looking around in the crypt, phase out into the spiritual realm. The floor will lower, and you'll be able to continue on. There will be a portal where you can phase back into the material realm, and when you do, you'll face one of Kain's henchmen. You'll need to run around with the Soul Reaver and slash about at him, and when he's stunned, pick him up and throw him in the water. You'll be able to compress and manipulate space and shoot an orb of kinetic energy at things to hit them. From here, find the block with the circles on it, then face it and press Triangle to shoot at it. You'll push it out of the way.

4:50 - From here, you'll have to go through where the block was and go through the water. From here, you'll be going in and out of water and going between the two realms before doing some platforming in the material realm. There's a door on the other side, and you'll want to go through it.

7:20 - One of the paths leads to a window depicting an armored warrior riding a hawk (or something). The other path leads to a gate you'll need to phase through. Take out the two wraiths, then get ready for some puzzle solving. 

9:13 - Once you're in the material realm, get rid of the two goat-men. From here, you'll want to face the statue in the cage and push it towards the solid wall so you can high jump to another path. Go down the path and go back to the material realm, and continue down the path. There will soon be a fork in the road, and you'll want to take the path with the gate you can phase through. 

12:08 - You'll be in a more open area drenched in water, and at the surface is a boat. You won't be able to surface yet, so go across the bottom and follow the path. You'll soon be able to head back to the material realm.

13:37 - From here, glide to the ship, then phase back into the spiritual realm while on the boat. The boat will change shape to allow you onto a ledge, and you'll soon find another portal leading to the material realm. Look around for the teleporter room door, then go through it and activate the teleporter. You'll want to activate it so you don't have to go through this again.

15:23 - Go through the wooden door across from the teleporter room, then open the door that blocks your path with your energy projectile. You'll soon be introduced to the watery world of Rahab courtesy of the Elder God. Not surprisingly, Rahab and his brethren have become immune to water's effects on vampires and have now become vampiric sea serpents that can swim.

16:29 - Be ready to glide from platform to platform without touching the water. The sea serpents don't take a lot of damage if you run circles around them while slashing the Soul Reaver about, but they can spit projectiles at you and keep you from using the Soul Reaver, and it can be a bit maddening.

Wednesday, September 10, 2025

PrinceWatercress plays Woody Woodpecker in Crazy Castle 5 - Part 13 of 18


Last entry wasn't so hot. This time around, we do a lot better.


Fire Stage 2 (continued)


Your best bet to get through this stage is to go through the upper-left corner of the level thoroughly first. As for the guns, you'll want to use them on only the cat enemies, as they will be the most annoying to deal with. 

As it turns out, the blue hedgehog-like enemies have orange counterparts that use the ladders. 

Fire Stage 3


The doors that look like open mouths lead in and out of indoor sections, giving us an indoor maze in a stage with a much more forgiving level design that the previous one.

Fire Stage 4


There are lava plumes that slowly move up and down. Those things will fry you if they hit you, so try not to get close to them. Also, the fake floors that cause you to drop down when you move onto them come back.

Also, the orange hedgehog enemies can go up and down the stairways, much like the cat enemies. Thanks, game, I needed another reason to not like those enemies.

I finally figured out the slot machines! Turns out you need to press A on what appears two positions before the item you want. 

Tuesday, June 10, 2025

PrinceWatercress plays Math Rescue - Part 13 of 19


I didn't look at the story for this episode, so I put it at the beginning here. Anyway, here's Episode 3.


Your butterfly friend, Benny, warned you that the Gruzzles would return, and sure enough...

The very next day, California Highway Patrol officers are thrown into a panic when, once again, the numbers vanish off the speed limit signs across the state.

Level 1: Candy Land


The level design here is pretty linear, with some warps thrown in. Given that this place has three whole sets of numbers to collect before you can get the key for the next level, that's a good way to start the episode. Be sure to look for a ladder at the bottom of the level, you'll find a "3" there.

Level 2: Rocky Road Way


Be careful here, as it can be pretty easy to grab the wrong number on accident. Also, your platforming skills will really be put to the test, and you'll want to be pinpoint with the marshmallow platforms to ensure you don't overshoot them. Also, to find all the numbers, you'll need to find all the warps.

Monday, May 19, 2025

PrinceWatercress plays The Grinch (PS1) - Part 13 of 22


In this entry, we finally enter the power plant section of the dump area.


Back at the dump, you'll need to head back to the metal doors. If you haven't already, slime the things that look like security camera to the sides of the doors with the Slime Shooter, do it now. After that, the floor near the door will no longer be electrified, and you can climb up the doors with the Octopus Climbing Device to enter a new area.

You'll be spending a bit of time in this area just to short-circuit the power plant, so be ready to look around and destroy any giftboxes that you see.

The guys with the shock sticks will electrocute you if you get close enough, but you can defeat them with your bad breath. Use the Nitro Eggs lying around to destroy the robots.

Pancake the grates to get to the giftboxes below. Also, watch out for the steam coming from the wall pipes; it will hurt you.

Keep hitting the wind activated switch with the bad breath attack to get some platforms moving and get up to the top of the towers. Hit the green buttons at the top of the tower to deactivate the power lines so you can get across without getting shocked. Watch out for guards, as they will see you, so be ready to hit them with bad breathe.

You'll find a red button behind the protection field. Switch to Max to step on and activate it, then hit the rest of the nearby switches that turn red with Max (it does not matter which order, as long as they turn green). You'll soon be able to turn off the protection field and get The Grinch closer to the power plant.

You'll soon have to Rocket Spring up to some more towers and hit some more green buttons with the Rotten Egg Launchers. As for the rat guards on the lines, you'll need to destroy them with the Rotten Egg Launcher. At the other side, you'll have to hit more switches with Max. 

You'll soon be able to head downwards and find three turbines. You'll need to activate the wind activated switches with the bad breath attack to get the turbines powered up so you can use the turbine blades as platforms. Use your shadow to ensure that your jumps are good, and watch out for the sudden camera change on the other side.

At the power plant entrance, drop down for some giftboxes, then get back up and use the power line to drop down into the middle area, destroy the giftboxes there, then hit the green button on the tower with the Rotten Egg Launcher. The switch will open the door to the power plant, but it's a trick, as you're not going to be able to get there in time due to the timer not having enough time for you to get there anyway. Head to the door, anyway. From the door, find the green button on the tower, then use the Binoculars and the Rotten Egg Launcher to hit it. You'll then be able to enter the power plant.


Sunday, April 13, 2025

PrinceWatercress plays Kid Icarus - Part 13 of 15


We're getting a lot closer to our goal of the best ending. Now to get there and keep it that way...


I chose not to spend as much time in World 3-1 as I did the first time around due to the nature of the level itself, due to the combination of how the enemies show up as well as the level design itself. If you want to get points and Hearts, you'll want to get them in the first two worlds.

At this point, I'm more careful on how I spend my Hearts, as we're getting close to the end of the end of the game again. 

World 3-1


There is a hot spring at the very beginning of the level.

The knights with the wings (Collins) will have EelEyes circling around them. Be sure to take them all out to get them out of your way and get stronger.

The brown enemies that pop out of the ground (Holers) will shoot projectiles at you, but you can take them down for hearts and strengths.

The red things with the yellow tendrils sticking out of the top will damage you if you touch them.

The little light blue guys with the wings (Pluton Flys) will fly at you when you are lined up with them. They will also steal your weapons if they hit you.

The dark blue flying enemies (Keepahs) will dive down at you, but you can shoot them down from below if they happen to be above you and you happen to be close enough.

World 3-2


The platforms at the beginning will stop and turn around when they hit a wall. Keep that in mind while fighting the Grim Reaper enemies.

Shortly after the start, there will be another training room. Shortly after that, you'll find another shop.

The blue Metroid looking things are called Komaytos. They fly around like the other flying enemies that always show up in fours. 

The orange octopi that leap around and keep moving their mouths (Octos) will keep leaping at you. They can show up with other enemies, and that can cause the game to slow down considerably.

You'll get one more chance to buy things in the middle of the level.

There is a hot spring to recover your health with near the end, and it is the last one in the game.

Monday, February 10, 2025

PrinceWatercress plays Wario Land II - Part 13 of 51


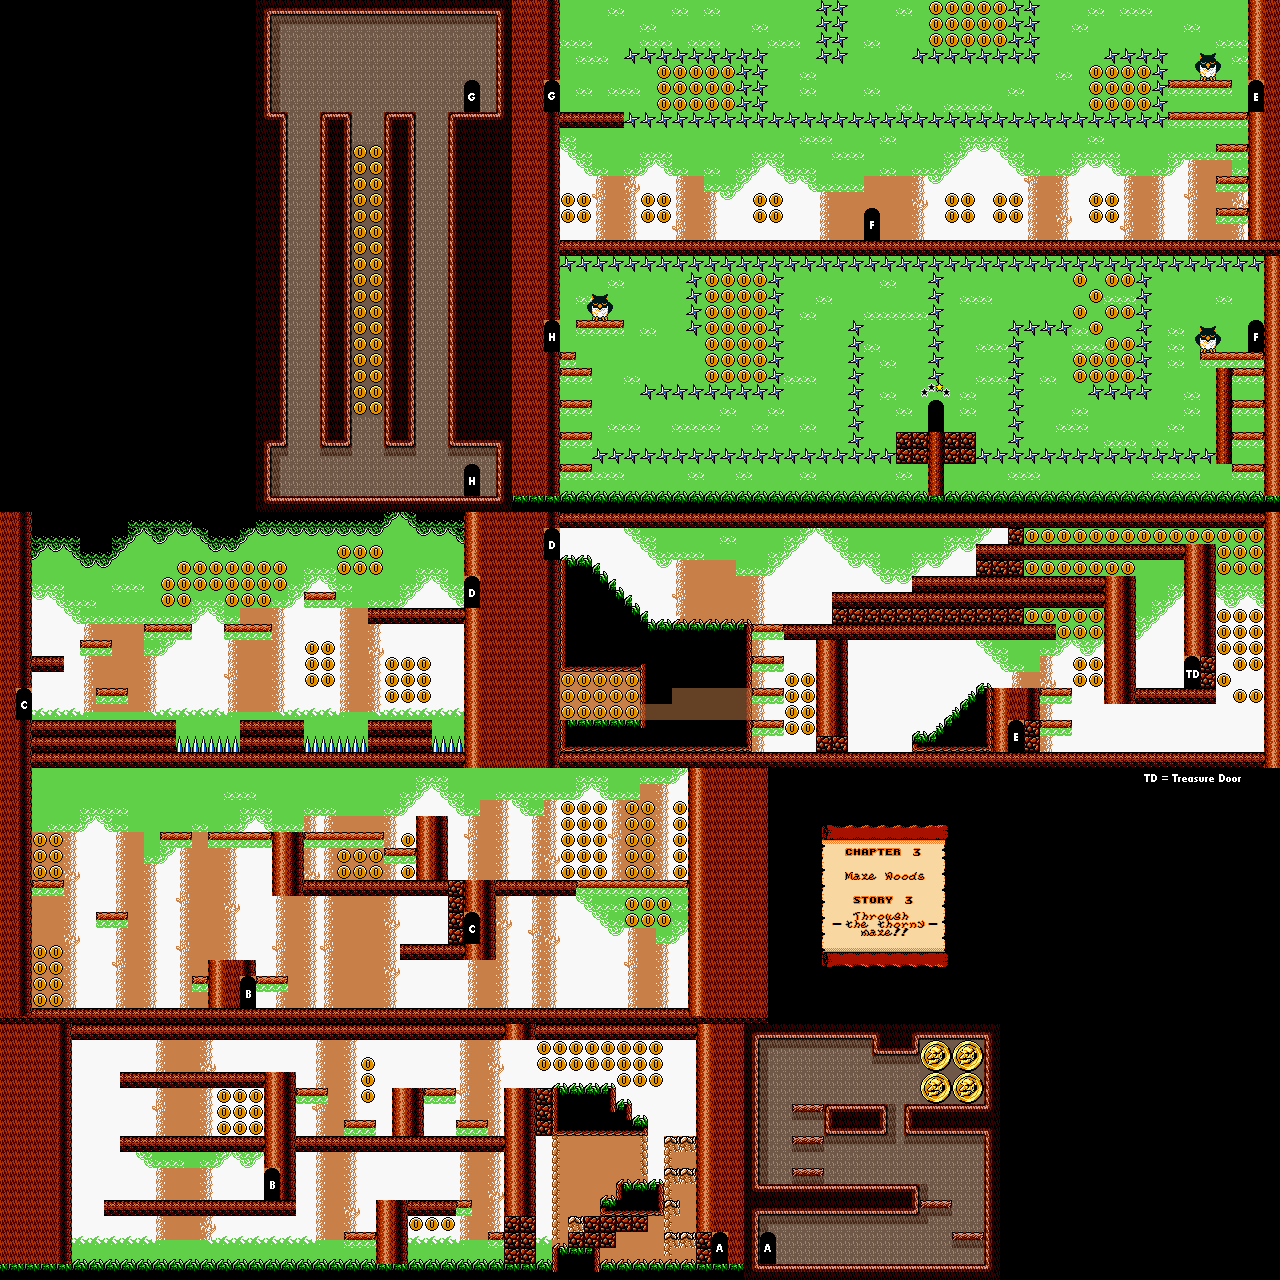
The thorny maze seems rather treacherous, but if you're used to controlling the owl, it's not that bad.


Chapter 3: Maze Woods

Story 3: Through the thorny maze!!


You'll be dealing with flying spiked skulls at the start, so tread carefully as you break blocks and collect coins. The door above the start leads further ahead, and the door all the way to the right leads to more coins. The enemies near the big coin will try to shock you if you're close enough to them and you happen to be in front of them, so sneak up on them and then tackle them to get rid of them.

After some seagull platforming and some flying spiked skulls, you'll have to roll down some slopes and jump up to some areas to break through some blocks to get some coins as well as open the treasure room. The lower room in the slope path area leads to a maze full of spinning stars that will hurt you - hence the "thorny maze" - which you'll have to fly through with an owl. After dropping down the middle path past the door on the other side, you'll be in another owl room. Going to the right of the exit will lead to the bottom of the first owl room, which makes for a nice shortcut to the treasure room, where you'll earn a golden apple, so if you want to get more coins before getting the treasure, you'll be free to do so.

Thursday, November 21, 2024

PrinceWatercress plays Great Greed - Part 13 of 28


In this entry, the mystery woman's identity is revealed, and we find out that we must join a beauty contest in order to get the weapons that the resistance really needs.


From Macaroni Burg, you'll want to head south and enter the forest. Head west until you can head north, then head north until you can head east. From there, head south, and you'll find the resistance base.

You'll find the village, but only the strong woman who is accompanying you - who happens to be Princess Citrus - is the only person who believes you are who you say you are, as the rest of the resistance is not convinced. You'll then get in a battle with Citrus, or "Citurus," as the game wants to call her for this one point in the game. Just keep hitting her with your sword, and she will eventually go down. You'll get 900 Experience out of the battle.

After the battle, everyone will be satisfied, then Citrus leaves to attend a strategy conference. From here, you'll be able to explore the resistance base. By talking to the people around here, you'll find out about Mr. Shrimp, the resistance's strategist. You'll need to go into all of the tents and talk to everyone before you can head into the tent at the far north and talk to Citrus so you can leave. Citrus will introduce Sam to Mr. Shrimp, then she will tell you to head into Pasta Village in the south to acquire some weapons powerful enough for the resistance to take on Bio-Haz before re-joining. From here, you can leave the resistance base, and you can then leave the forest.

Lavaflow is a new enemy and can only be found in the forest leading to the base. It can cast Poison and Bolt 2, and will leave 61 Experience and 240 Gold when defeated. It also has a chance of dropping Regain 2.

From the forest, head south, then follow the path. You'll meet a new enemy in Hot Dawg, which is weak against Freeze and can cast Push. It gives 80 Experience and 255 Gold upon defeat, and also has a chance of dropping Regain 3, which is nice if you can get one.

At Pasta Village, you'll find out that there is a beauty contest going on. At the inn, you can go upstairs and enter the first room you see, then talk to the guy near the wall to get a glimpse at the contestants in the other room only to get pushed aside almost immediately. Interestingly, you can go into the other room and talk to the ladies inside, and if you look at where the peephole is and press A, you can scare the guy on the other end.

At the armory, you'll find out that the weapons for the resistance base were sold to pay for the prizes for the beauty contest, one of which is a powerful sword. As for what you can buy, get the Bronze Armor and the Iron Shield. You can also buy an Iron Helmet, but you won't need to if you managed to get a Chrome Helmet earlier.

The building near the east wall that looks different from all the rest is where the beauty contest takes place. The prize will be in a nearby chest, and one of the people inside will tell you to meet with the contest coordinator in order to join the beauty contest. You won't be able to do anything else here for the moment.

At the magic shop, you can get Tactics, which temporarily reduces the rate of random encounters - instead of outright eliminating them - at the cost of 6 MP. If you want it, pass on it here, as you'll find it for free in the next area we're heading to. Freeze 3 is a must, as is Heal 3. Freeze 3 does more damage than Freeze 2 at the same cost of 7 MP, while Heal 3 heals 180 HP at the cost of 8 MP.

At the house in the northwest, you'll meet Mr. Fifi, the beauty contest coordinator. Talk to him, and you'll get the chance to enter the beauty contest. Say "Yes," and Mr. Fifi will tell you to go to the Forest of Fruit to the east and bring back three kinds of fruit: an apple for grace, a peach for beauty, and a walnut for wisdom. (How is a walnut a fruit?) There are three trees in the forest that each carry one of these types fruits. With the three fruits, Mr. Fifi will make a beautiful costume for Citrus. 

Wednesday, September 11, 2024

PrinceWatercress plays Chrono Trigger (Super NES) - Part 13 of 70


Well, I had the best of intentions here, even if they didn't exactly work out. Still, what I do here now is going to help out later.


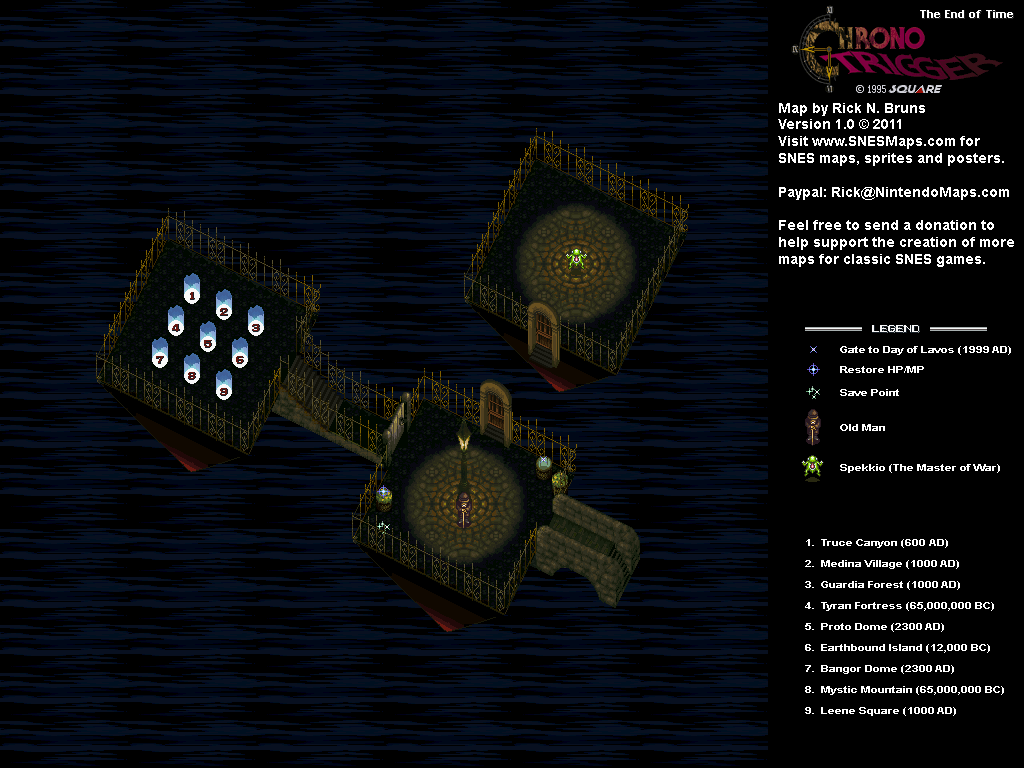
The End of Time


If you bring Robo to Spekkio, Spekkio will tell you that Robo cannot learn any magic, due to being a man-made creation from after the age of magic, although his Laser Spin does do Shadow damage. Keep that in mind.

We're supposed to head to Medina Village in 1000 A.D. and make our way home at this point. Before I do that, though, I have the bright idea of heading to the prehistoric era and getting some things ahead of time. It doesn't work out as well as I would like, but I do get a few things and level up a little bit nevertheless.

From here, we'll be going through the pillar of light in the bottom center position. 


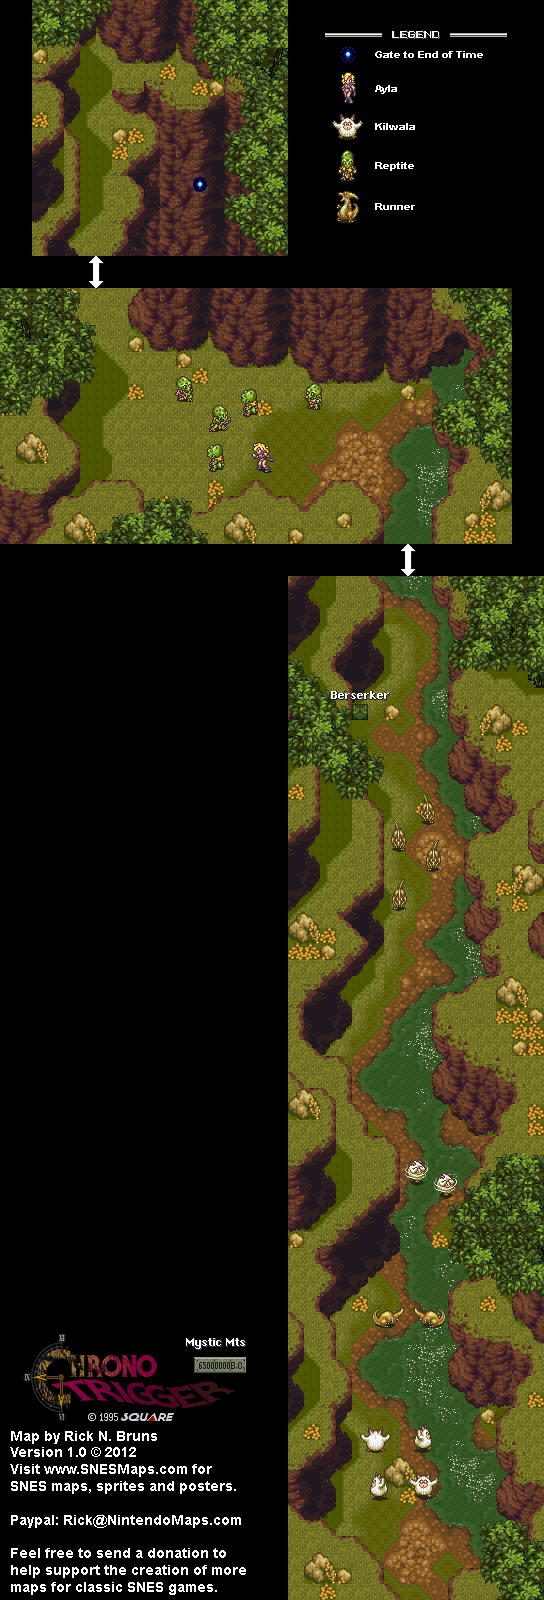
When you arrive in prehistoric times, you'll fall down a gap for a little while before you land near the stream below. As you make your way south, you'll be facing Runners and Kilwalas. Lightning will do a lot of damage to the Runners and can lower their defense, while the Kilwalas will attack your party members one a ta time by running at them. If you need to take out multiple enemies at once, Fire Whirl and Laser Spin help. You may have more luck having Marle in your party rather than Robo, as Aura Whirl will help with healing the whole party.

As you fight enemies in 65,000,000 B.C., you'll be collecting four new times: Petals, Fangs, Feathers and Horns. You'll need to use these in the trading hut.


Once you make it down the Mystic Mountains, you'll be able to explore the overworld. There are some huts, including the Chief's huts, but only one of them will be of use to you, as one of the villagers in them will allow you to drink "sweet water" that replenishes your HP and MP. One of the villagers in another hut will tell you that thunder stuns all dinosaurs, which is how you're supposed to find out that hitting dinosaurs with lightning spells will work wonders for you by lowering their defense. 

In the Meeting Site, you can meet more people, and you'll also see Kino for the first time. Kino looks obviously different from everyone else, and he will not want anything to do with you.

One of the huts is the trading hut, but to my surprise, you won't be able to trade your Fangs, Horns, Feathers and Petals for anything this early in the game and you won't be able to do it until the storyline demands you head here.

There are two places we can head to: the Hunting Range and the Dactyl Nest. I head to the Dactyl Nest first because I'm absolutely nuts.

Dactyl Nest


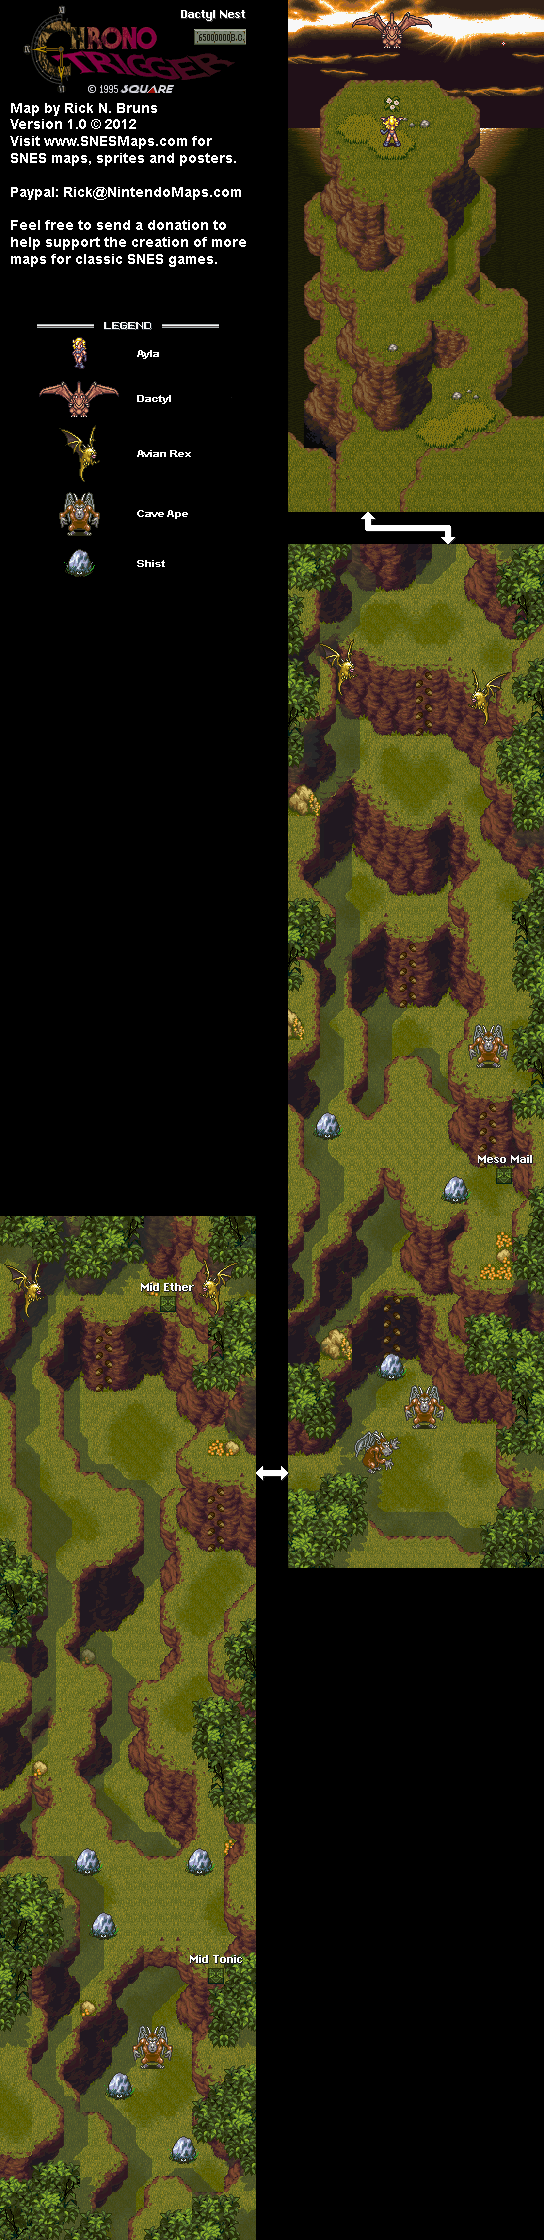
When you head here, you'll have to face a Cave Ape and a Shist immediately. Take out the Cave Ape first, as he is quite powerful and can attack you one of two ways: throwing a Shist at you (or you at another person or a wall) or swinging his arms at you. Both hurt at this point in the game. Crono's sword will do the most damage at this point. The Shist will not do anything unless you attack it, at which point it will turn into a Pahoehoe and spit rocks at one party member for a little bit of damage.

The Avian Rexes attack in pairs. Lightning will do a lot of damage to them, but don't be afraid to use other magic or a multi-target attack like Cyclone or Fire Whirl on them as well. 

If you ever need to heal, use a Mid Tonic or Aura Whirl. If Marle learns Cure at this point, use that, too. This is especially true if the Cave Ape gives you a hard time. 

There are two screens to explore here before you reach the final screen all the way up, which has absolutely nothing. I avoid that final screen because it makes it easier to get the heck out of here. You'll know you're near the top when you open the chest that contains the Meso Mail, which is the most powerful armor for men that you can get at this point in the game (if you're bold enough). If you get it, stick it on Crono.

After getting the heck out of the Dactyl Nest area (which I obviously should not have been in at this point in the game), I head to the Hunting Range.

Hunting Range


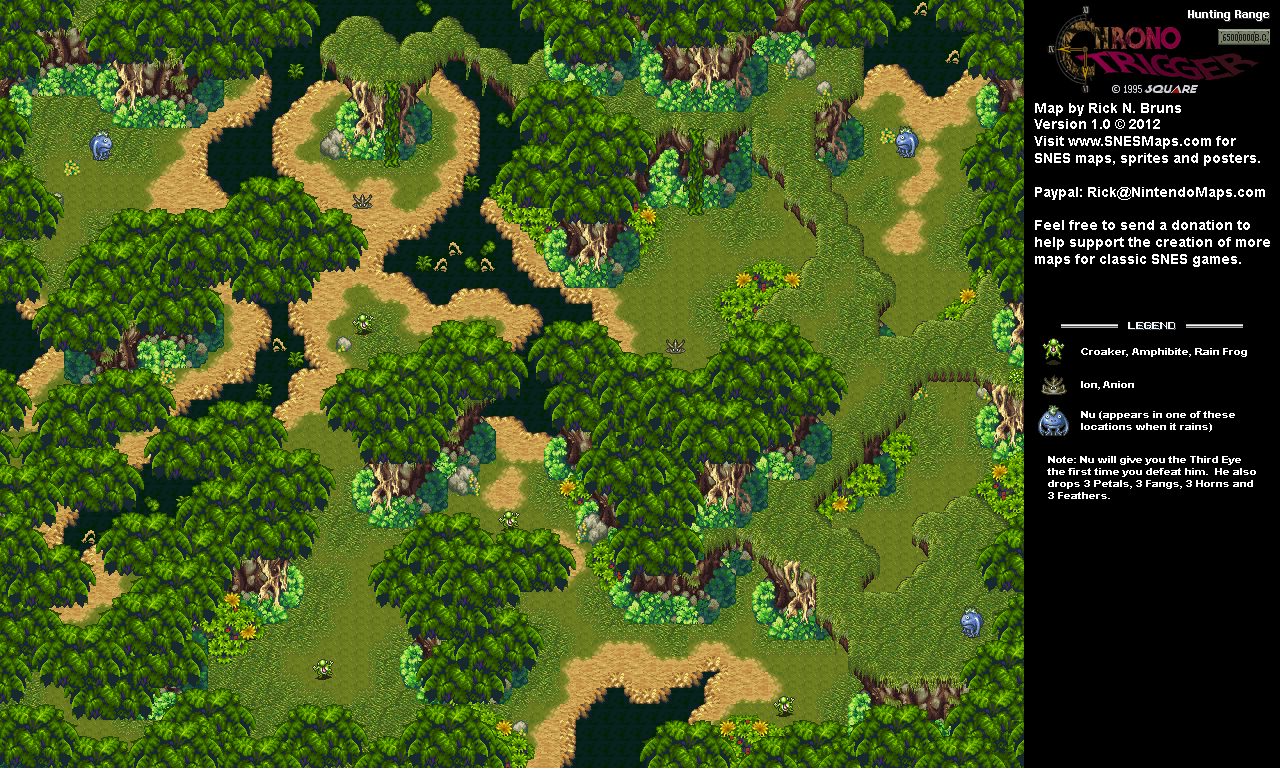
When you enter this area, you'll be able to move around and fight some enemies for more Petals, Fangs, Feathers and Horns. The Croakers, Amphibites and Rain Frogs can hit you with rain spells and with their cheeks for an up-close attack, but you can easily wipe them out with Cyclone. The Ions and Anions - much like the frog enemies - always show up together - and they will hit you with a close-up physical attack if they get close enough. Once again, use Cyclone.

Every once in a while, it will rain, and when that happens, Nu will show up. Nu will show up in one of three locations: the northwest corner of the map, the northeast corner of the map and the southeast corner of the map. I stick to the east side because I've always had more luck finding him on the east side of the hunting range in the many years that I've played this game. If you talk to him before the rain stops, you can fight him. Nu has one attack, and it's a headbutt. It is programmed to take your HP all the way down to zero, and if you don't heal, it will take a few more hits before the weakened party member loses that one last hit point and goes down. Nu has exactly 1,234 hit points, and if you can hit him hard, you can take him down pretty quickly...so use Double Techs if you can and Aura Whirl if you absolutely have to! When you beat him, you'll get three more of all four of the trading items, and if you've beaten him for the very first time, you'll get the Third Eye, which doubles the Evade of whoever equips it.

There's nothing else to do in 65,000,000 B.C., so I head back to the End of Time.

Thursday, August 22, 2024

PrinceWatercress plays Berzerk (Atari 2600) - Part 13 of 13


Just when you thought this was done, I get to show off a ROM hack of the game that allows for digitized speech. Better late than never, and what's there is pretty awesome.


In 2002, Mike Mika hacked digital voice samples similar to those in the arcade version into the Atari 2600 port of the game. It includes the phrases "Intruder Alert! Intruder Alert!", "Chicken, fight like a robot," and "The humanoid must not escape" as you move from one room to another. The game also has darker blue walls and a green player character to more closely resemble the arcade version.

There were also physical copies of the game sold at the 2002 Classic Gaming Expo, which quickly sold out, giving this ROM hack physical form.

You can find the ROM hack here.

Wednesday, June 5, 2024

PrinceWatercress plays Ratchet and Clank: Going Commando - Part 13 of 54


Well, we need some crystals to get a new ship. Let's go get some crystals.

First | Previous | Next | End

In order to get some crystals, you'll have to head out into the desert near where the exit to the level is. When you do, make sure you are armed and your ammo is full, as you'll be facing a lot of enemies as you explore the forest. If you need to get experience for any of your guns, this is a good place to do it early in the game. Just keep in mind that when the enemies are defeated, they stay defeated. This makes it easier to explore the desert, and if you explore all of the desert, you'll get a Skill Point for it. 

To get the crystals, just attack them with your guns or you wrench. When you completely break them, you'll get the crystal inside. There are 100 crystals in all in the desert, and while you only need ten to get a new ship, getting the other 90 will net you a lot of money.

If you see a pile of stones anywhere in the desert, a giant one-eyed flying creature with a laser attack will pop up. You'll want to destroy this enemy with your guns, as this will get you another crystal. Just watch that pink laser and be ready to jump over it like a jump rope when it comes your way.

There are some ammo boxes in the desert, but you're better off using the Megacorp vendor near the exit to ensure your ammo is fully refilled. You can also get some health back here, though nanotech is limited in the desert.

Controls:

As Ratchet:

Control Pad/Left Analog Stick: move
Right analog stick: move camera

X:
  • Jump and double jump (hold button after double jump to use Heli-Pack or Thruster Pack)
  • Wall jump (near certain walls)
Square: strike with wrench
Circle: pull out/shoot currently equipped gun
Triangle: 
  • quick select (hold and use in conjunction with Control Pad or left stick to switch guns; menu can be customized in Quick Select on the pause menu
  • double tap to switch between two most recently equipped weapons/items
  • interrupt on-screen messages

Select: open map
Start: Pause menu
  • Control Pad: select option
  • X: confirm option choice

L1:
  • center camera behind Ratchet (tap button to center)
  • first-person view (hold button and use left stick or D-Pad to look around; let go of L1 to move camera back behind Ratchet)
  • Square: wrench boomerang
  • Circle: fire gun
  • R1/R2: zoom in and out (Pulse Rifle only)
L2/R2: strafe (hold while moving)
L3: see health and Bolt totals
R1/R2: crouch (hold down)
  • Square: wrench boomerang
  • X: high jump
    • long jump (hold crouch button and jump while running to perform)
R3: open map

In water:
  • Square: dive and descend
  • X: surface and ascend
  • R1: accelerate with Hydro-Pack

As Clank:

Control Pad/Left Analog Stick: move
Right analog stick: move camera

When hanging off platforms:
  • Control Pad/Left Analog Stick: move
  • Forward+X: vault up
  • Back+X: drop down

Square: punch
X: Jump (press and hold in the middle of a jump to glide with Heli-Pack)
Triangle: command menu (hold and use in conjunction with Control Pad or left analog stick to choose commands)

Wednesday, May 15, 2024

DeceasedCrab plays Earthbound - Part 13 of 53


Looks like we're stuck...that's where telepathy and a third playable character comes in!


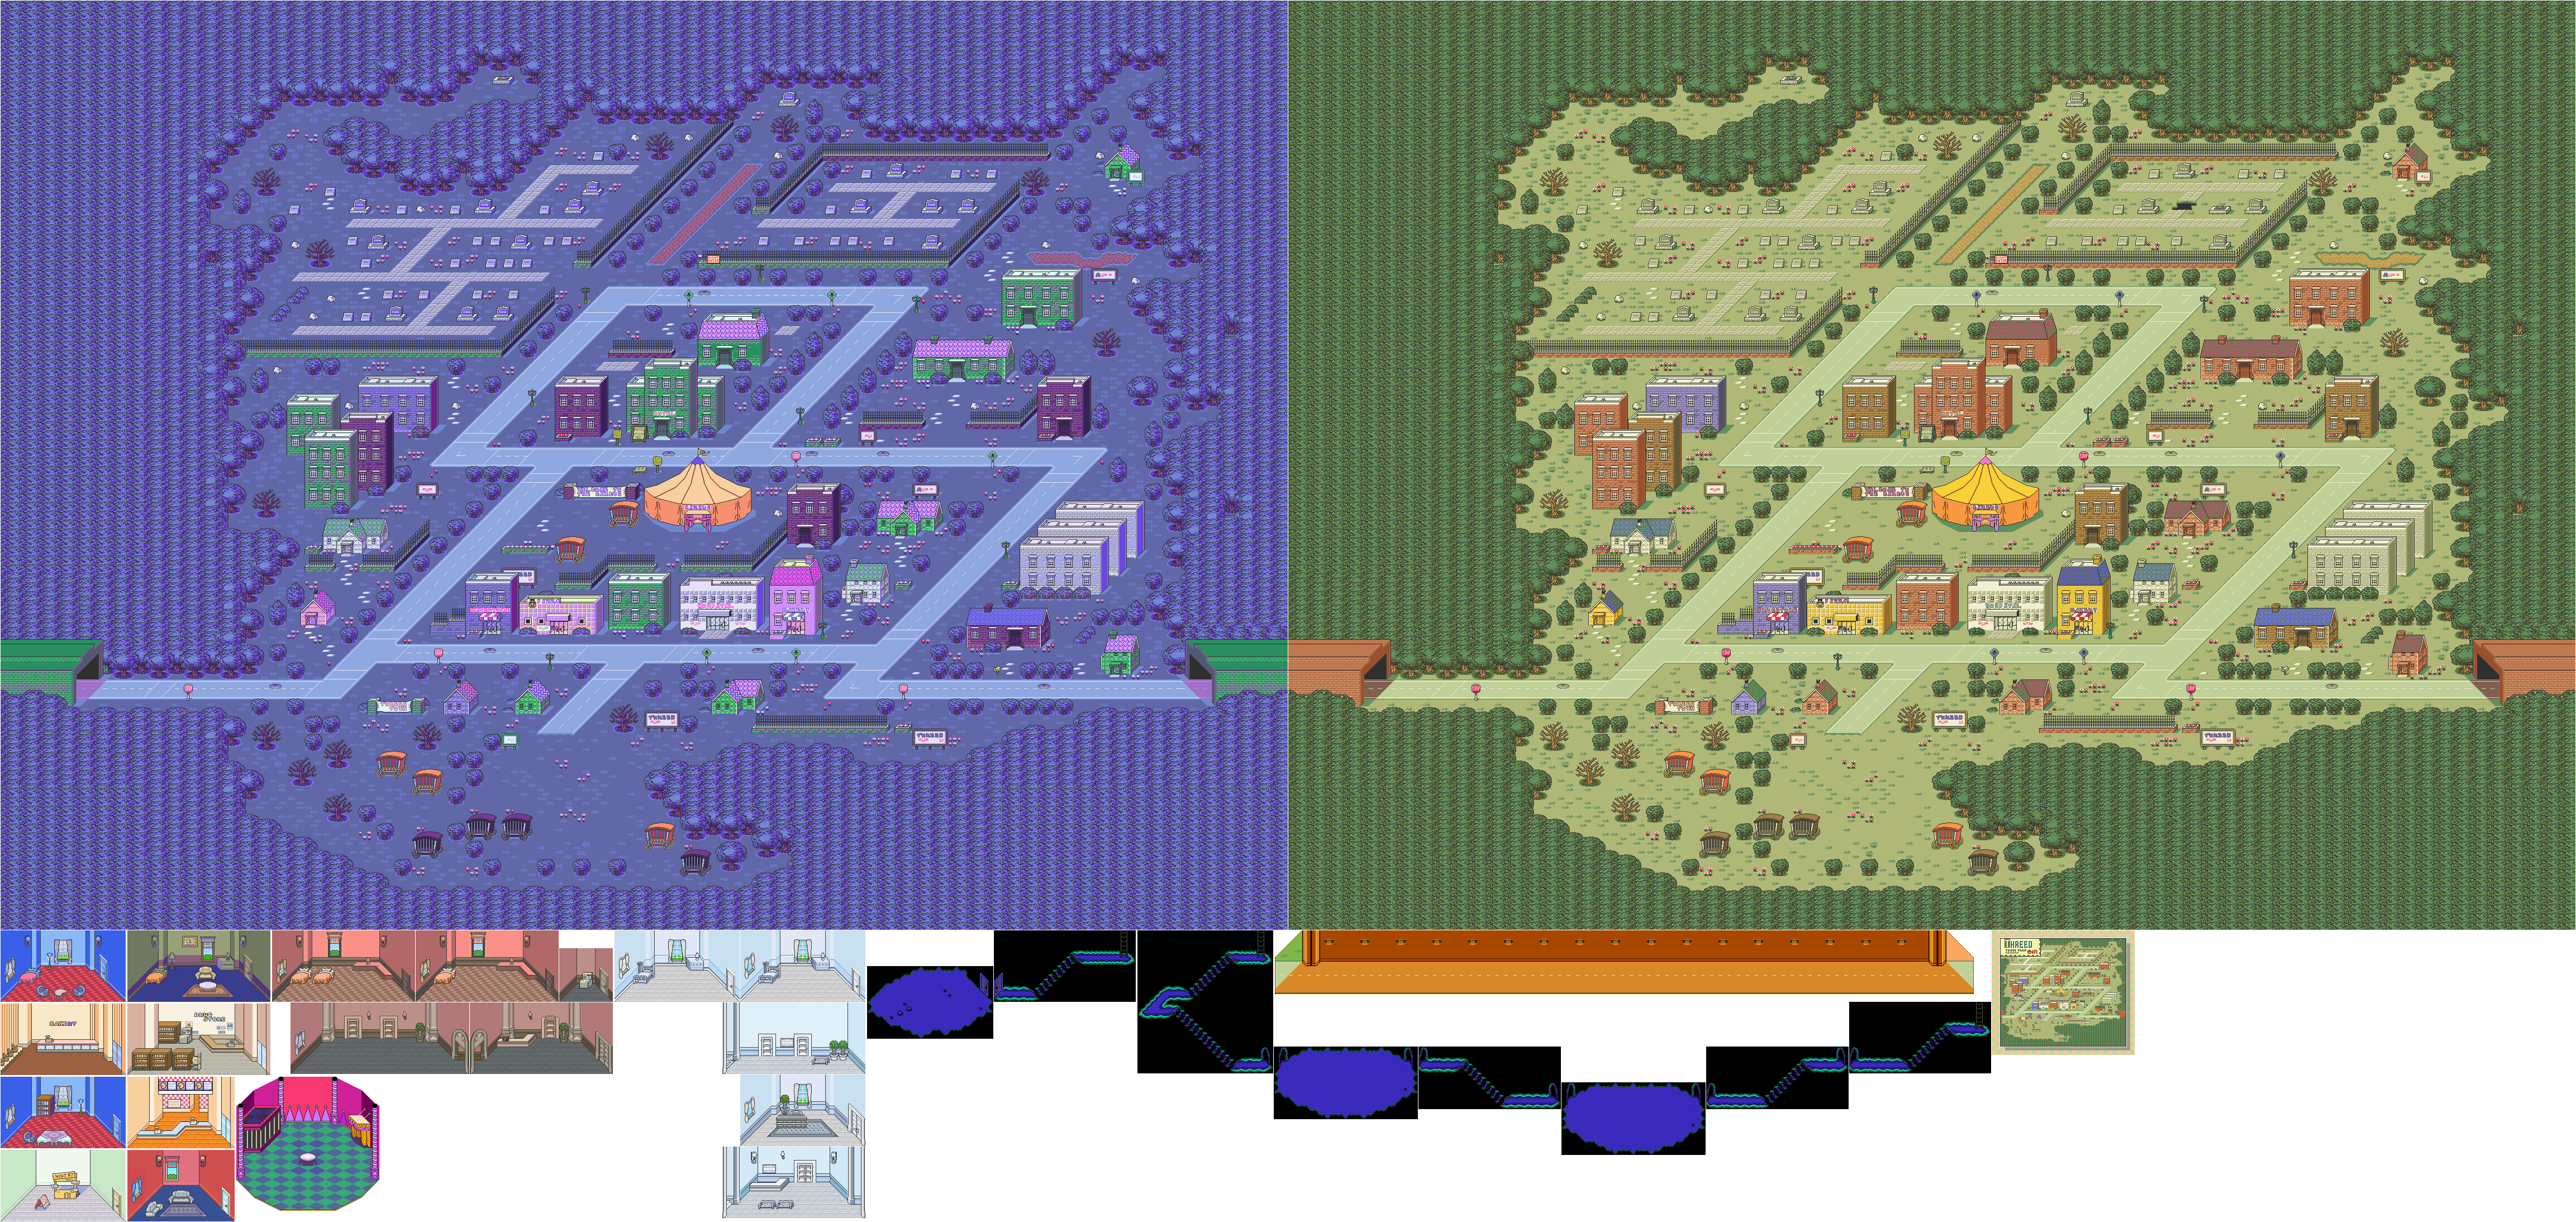
At this point, head to the hotel. You'll meet a mysterious woman with sunglasses and long, blonde hair. The guy at the counter will be missing. If you follow the woman further into the hotel and into the next room, you'll be surrounded by ghosts and zombies. Before you know it, you'll be locked in a strange, underground room. If you try to open the door, you'll find out it is locked. From here, Paula will use her psychic powers to call for Jeff, the third playable character of the game, in Winters (which seems like a combination of England and Canada).

At Snow Wood Boarding House, Jeff will be woken up by Paula's psychic message. As you attempt to leave the room, Jeff's roommate Tony will wake up and tell you that there are some things in the locker room that you will need before you leave. He will then follow you.

Jeff will have a big bottle rocket, a boiled egg, a ruler, a protractor and a broken spray can in his inventory. Ditch the ruler and the protractor, as you are not going to need them. He also has $2. You'll need them.

When you leave the room, talk to everyone on the right. They will all be talking about Tessie, a Loch Ness-like monster in the southern lake, as well as the nearby Stonehenge. The door to the left of where you came out from has seven gifts for Tony's birthday party. Open them all for Cookies. They won't heal for much, but they're better than nothing. The guy on the left will tell you to say hi to Maxwell in the lab downstairs before you leave, as he always looks out for the younger students. 

Head down the stairs to the left and enter the first door. You'll find Maxwell, who will tell you about Mr. Andonuts before handing you the slightly bent key to the locker room. He will also save your game if you call him on a phone anywhere in Winters at this point.

The next room is the locker room. If you use the locker room key on any of the lockers, you will find out that the key does not work due to it being slightly bent. Go back to Maxwell and talk to him again to get the Bad Key Machine, which will open any door. You'll also find out that you are able to repair small tools and make them useful as Jeff. To do this, you'll have to rest at a hotel or other hotel-like place with Jeff in the party. As you do this with anything broken, there will be a random chance that Jeff will fix it overnight.

Head back to the locker room and open the lockers with the Bad Key Machine. You'll find a Holmes Hat, a broken air gun and a Pop Gun. You'll need these before you can leave. Equip the Holmes Hat and the Pop Gun, because you'll need them when you head out. 

To the right is the exit. With everything in hand, Tony will help you leap the gate and head off into the unknown. There's no turning back.


Near the boarding school is the drug store. Go inside and talk to the woman near the counter. Pay her $1 to get a pack of bubble gum and the monkey near the entrance. Talk to the monkey to give him a piece of gum and have him follow you around. From here, use the phone at the counter, then leave the drug store and head south.

As you head off, you'll face Runaway Dogs. The dogs will be pretty weak, and you can fight them without any problems. If you're lucky, you can find some bread rolls, which will heal more than the cookies. Keep in mind that Jeff usually fights with guns and other distance weapons, and as a result, he will have less accuracy than the other party members and will not be able to land critical hits. Also unlike other party members, Jeff does not have any PP, and therefore cannot cast spells.

Also, the monkey will sometimes stand still and sometimes look around as you move, and if any enemies run into the monkey, it will be the same as the enemies running into you. At least the monkey can do damage at times during battle, even if the monkey does only 1 HP of damage.

As you head towards the southern lake, you will find tents. The first one acts as a healing point if you talk to the guy on the left.

The Gruff Goats are more powerful than the Runaway Dogs, so make sure you fight the dogs for levels and bread rolls before you take them on. 

You'll soon see more tents, where men with binoculars are moving around looking for Nessie. At this point, you'll have reached the southern lake. The tent at the far left will be a place you can heal up and rest. Do that to advance the plot. As you rest, you'll get another message from Bird telling you where to find them in Threed.

The broken spray can that Jeff starts out with with is a Defense Spray, which can increase one party member's defense during battle. It can only be used once.

It will be daybreak when you leave the tent. You may have noticed a brown spot near the lake. You'll want to head there. As you do, you will run into the photographer at the nearby tent, where you can also use a phone to save the game.

When you stand on the brown spot, the monkey will ask for some gum. You will give the monkey some gum, and he will fly towards teh lake where he will land on Tessie's head. From here, you'll be able to take a ride on Tessie to the other side. Tessie will then swim away. Once again, there is no turning back.

There will soon be a pencil-shaped iron statue blocking your path. You won't be able to get rid of that statue until later, so just go into the nearby cave. When you do, you'll enter Brick Road the Dungeon Man's dungeon. Here, you will fight Rowdy Mouses, Mad Ducks and Worthless Protoplasms that masquerade as fake gift boxes. Thankfully, there is a bread roll in a gift box just west of the entrance.

Friday, May 3, 2024

PrinceWatercress plays Drill Dozer - Part 13 of 28


Before we beat the game, let's get some extra stuff done, shall we?


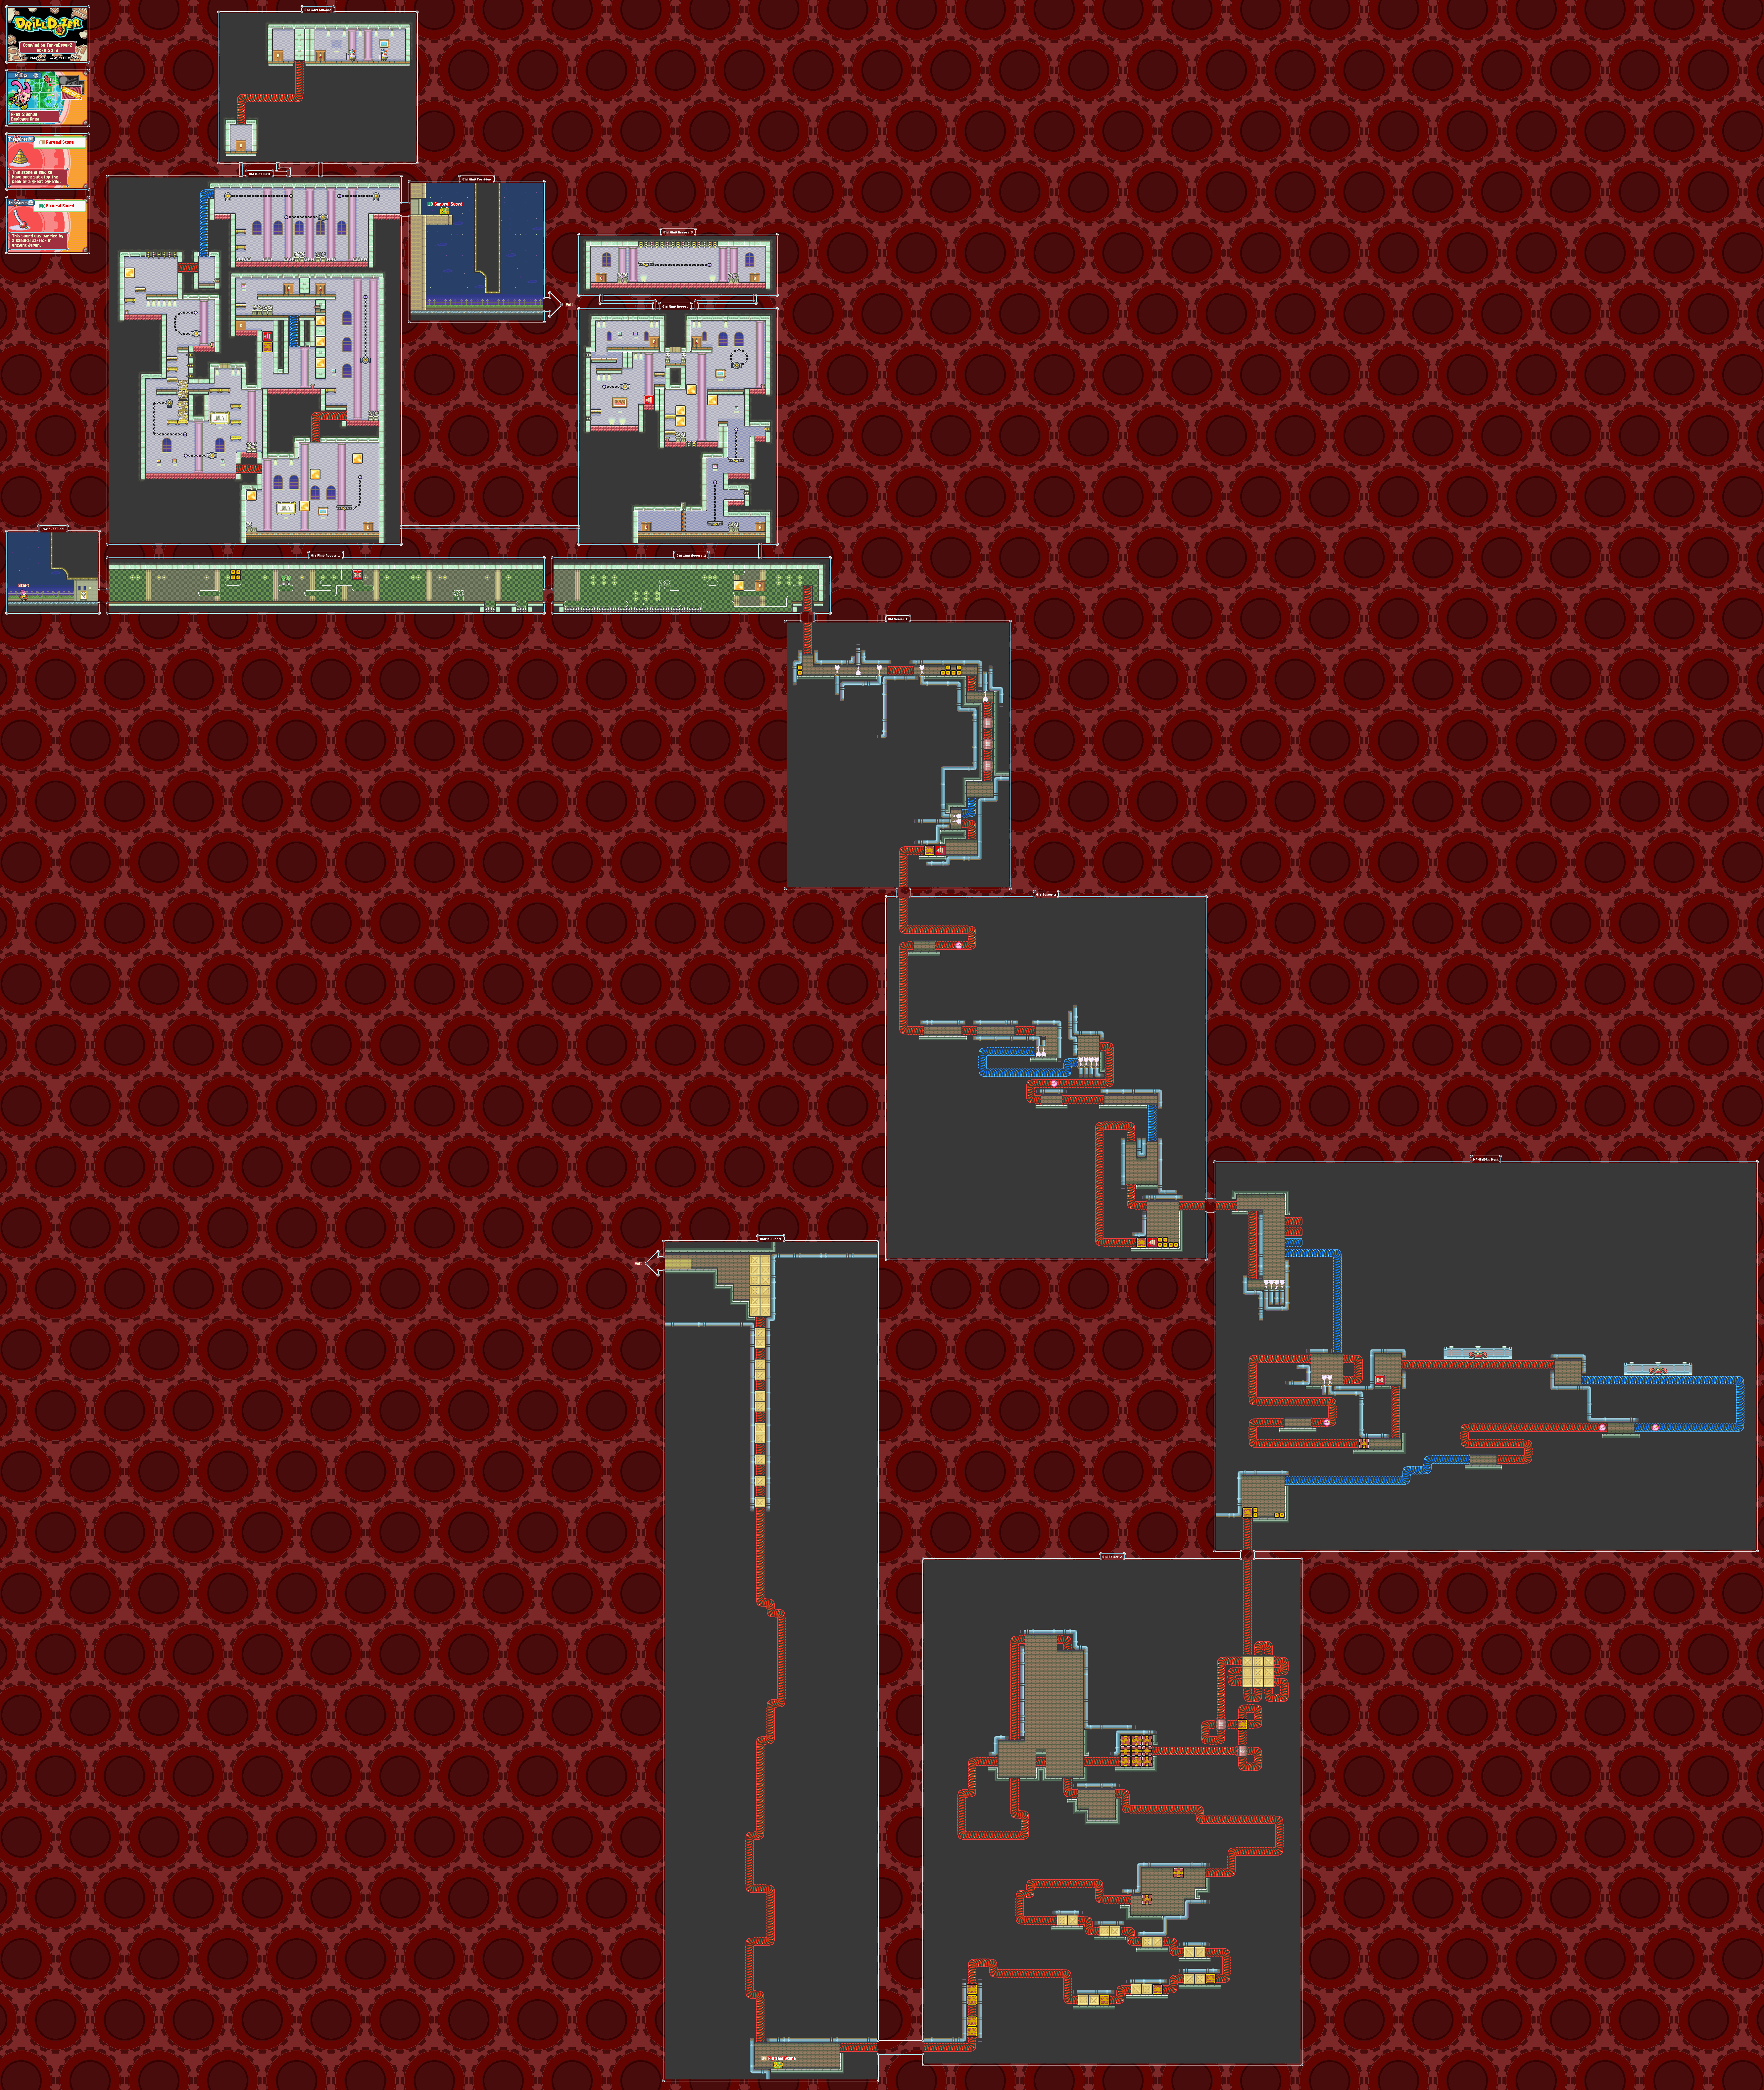
Area 2 Bonus: Employee Area


When you go in, the green floors will blend in with the green walls, but if you pay attention to the floor, you'll be able to tell where you can go. In an even funnier twist, some things that can be destroyed will blend in with these floors.

There is a door we can slide to, but we don't enter that one yet. Instead, we go further to the right down a drill duct and take another path. This path is, thankfully, the easier path. Throughout this path, you'll be dealing with steam blasts as well as the pink Pac-Man enemies that will chase you down the ducts.

Once you hit third gear, you'll be having some fun with going in and out of the the smaller ducts to get back on the main path and revving the drill up ahead of time to ensure you can get through a series of ducts. You'll also have to face the crab boss again - twice! - but you fight the crab boss the same way. The eye that flashes indicates which claw it will attack with, and you'll need to attack that claw to damage the boss (or avoid that claw if you're not in position to). If it's the left eye, it will be the left claw; if it's the right eye, it will be the right claw. When the crab lowers its eyes into the duct after you successfully avoid its attack, you'll want to attack the eyes with the drill. 

After a really fun part where you go through the drill ducts at top speed, you'll get the Pyramid Stone in a chest. You can then rocket through a few more ducts and get out of here.

But what about that set of doors that led to someplace completely different? We're going there next time!

Sunday, March 10, 2024

PrinceWatercress plays Ka-Blooey - Part 13 of 25


The levels are starting to become a little bit bigger as we start off the second half of the game.


Level 66

Hit the switch, then wait in the lower right corner for the enemy. Go left, up, up, left, left, then detonate the small bomb and go left. Go right, then hit the switches and go up to the mine in the north end of the level. Detonate the small bomb, then go left. Go right, then detonate the rest of the bombs you see in the upper left corner.

Level 67

Go left, up, right. Detonate. Go down, then left. Detonate. Go left, detonate, then go right, up, right and down. Detonate. Go left, then down. Detonate. Go right, detonate, go right again, then detonate the bomb and go up. Then, go up, then left, and detonate. Go left and detonate the final bomb, then go left again.

Level 68

Place one large bomb near each temple. Detonate the large bombs first, then the small ones. When in doubt, detonate the northern-most large bombs first. Watch for the enemies throughout. (Thankfully, you can stand on the temples if you need to avoid enemies.)

Level 69

Detonate the small bomb in the lower left corner. Detonate the small bomb near the red guy at the start. Take the red guy to the small mine in the lower left corner. Take the long path at the top to the right. Hit the switch near the mine. Take the red guy to the large mine at the start. Detonate the nearby small bomb when the nearby swell bomb is medium. Go back left, detonate the small bomb and go up. Go back to the start and enter the bottom teleporter. Take the small bomb on the slot tiles to the medium. Take the blue guy to the lone medium bomb. Detonate the small bomb down and to the left, then detonate the small bomb on the slot tiles near the medium bomb. Hit the switch. Detonate the small aerial bomb. Detonate the medium bomb and step into the teleporter. (The tiles spell out the word "MULE.")

Level 70

Go down and hit the switch, then enter the nearby teleporter. Go down twice, detonate the medium bomb and go down again to enter the teleporter. Place small and medium aerial bombs at the ends of the slot tiles, with the small aerial all the way to the right and the medium aerial next to it, and place the large aerial bomb in the lower right tile of the "square." Detonate the small aerial. Detonate the bomb in the lower right corner. Hit the nearby switch surrounded by bombs. Detonate the trail of bombs near the upper right corner and step left onto the cracked tile. Detonate the lone small bomb at left. Go to the swell bomb, then go up and right. Detonate the bomb, then go left and down. Detonate the small bomb when the swell bomb is medium. Detonate the small bombs near the mines. Go to the upper left corner, then detonate the small bomb near the mine and go up. Go down, then hit the switch near the swell bomb. Detonate the small bomb that appears when the nearby swell bomb is at medium.

Sunday, December 24, 2023

KuuImpact plays Superman (NES) - Part 13 of 17


This is not meant to be a complete set of notes, nor does it show everything off. This did, however, get me in the right direction concerning this game. When I play through this myself (which I will eventually do), I'll show off a lot more.

In this episode, the last of those blue fire enemies finally get beaten. Thankfully, the progress picks up next time.


The third blue fire enemy will be outside the Civic Center in Teaboro. You don't even need to go inside the building; the blue fire enemy will be there. Beat it up like you did the others.

Saturday, November 4, 2023

PrinceWatercress plays Word Rescue - Part 13 of 14


Just a few more levels to go...


Level 11 - The Country Castle


Be careful on the way down; you might find some Gruzzles on the way.

There are a lot of places that you can go in this level. There are a lot of branches and clouds to land on and jump off, but there are also a few pools of water at the bottom that you do not want to land in.

Level 12 - Cliff Houses


Comb the bottom of the levels first for Gruzzles, and watch the sky at the houses. Thankfully, you don't have a lot of hazards here.

Level 13 - In The Tree Tops


Once again, you have a lot of clouds and branches that act as platforms. There are roofs of houses at the bottom, but you can still fall off in the gaps at the bottom. The exit is at the upper-left corner of the level.

Level 14 - The Underground Pueblo


Coming in here with a full bucket of slime is recommended, as there will be plenty of Gruzzles not just above ground, but also in the underground maze below. You'll need to go underground for the letters for the secret word, and you'll need to stay above ground to match the words and pictures.

Sunday, October 22, 2023

PrinceWatercress plays Beard Blade - Part 13 of 13


...and now...the final battle.


Fortress Tower


When you get here, the Smuglin with the sheep has been defeated and the sheep kidnapped. When you launch yourself up the tower, you'll see Forbeau pulling the last orb out of the sheep. He will take the rest of the orbs from you, then mentions that the orbs contain his memories, powers and real name that the Smuglins took from him. By reuniting the orbs, he can return to his true form: Wrazaar, the most powerful wizard to ever exist. He then reveals that to fully restore his power, he must take the power of the beard blade that he gave Branson out of him by taking his soul, as it is essentially bound to him.

You will have to jump on one of his fists when he is not attacking, then jump to his face and attack it.

Wrazaar has three attacks. If you see Wrazaar making a "scissors cutting" motion with one of his hands and the magical scissors coming down, move back and forth to avoid them. When he summons the portal that shoots out fireballs in the center, get behind the sheep on the right side of the screen and duck. If he moves up and makes both of his hands flat, get between them and keep moving to avoid being zapped. You'll get an opportunity to hit Wrazaar between attacks.

Once you beat Wrazaar, Wrazaar will be no more. Mora will take you back home on her boat, and the game ends. You've just beaten Beard Blade!