Part nostalgia-bomb, part note-taking and part FAQ, what started in GameTrailers as a video game blog is now on Blogger. This blog is a look back at video games, both popular and obscure, from the video game industry's infancy all the way to the previous console generation.
Use the Key 2 on the hatch in the floor. You'll end up in a cavern.
Enter the archway to the left. You'll be in a frozen room, where the mist creates a human figure that looks like an old Chinese man. He tells you that he dueled with his disciple, Dracan, in this place long ago. He confined him in the ice, but Dracan overpowered him and locked him in this dimension forever. He can only project his image into this frozen cavern. He wants you to send the sleeping Dracan in the ice and away into the Dark World.
This must be the Master.
Use the Star on the ice wall in front of you. This causes the ice to melt and send a whole bunch of water - including a human figure - into the next cave. The Master reappears and tell you to quickly eject him into the Dark World.
In the next cave, Use Dracan's body on the hole in the floor across from you. This will send him into the Dark World. Well, that was simple. Go into the cave past the hole and you'll find a staircase leading to a door in the cavern wall. Use Key 2 to open the door. You'll be back in the mansion, and you'll hear your sister from above! We've finally found her!
Go back to the second floor hallway. Go to the upper-left room and go into the bathroom. You'll be directly below your sister now! But the bathroom door has shut behind you!
Turn on the bathtub, and try to Open the light fixture on the ceiling. As you do this, the tub overflows and the room begins to flood! Keep trying to Open the light fixture. Your head will eventually reach the ceiling. When that happens, you'll have opened the light fixture if you kept using the Open command on it.
You'll find your sister, but she won't respond. If you Examine her, you'll see her eyes are glazed and she has a sickly smile. Hit your Sister, and a demon will come out. Your sister will come to and break the window, jumping out. Use the Goblet on the demon, and the demon will be destroyed.
Jump out of the window and you'll join your sister. You've won!
Use the Cage on the bird. The snake will eat the cat. If you Examine the snake, the game says the cat is full. Nice typo, game.
Go south and you'll eventually meet up with the bouncing creature. Open the Cage in front of it and it follow the bird. You'll be able to get the jewel behind it. It's the Blothney Gem! Use Telemaze to get out.
Head out to the backyard and go to the laboratory...sorry, Magisterium. Use the Jewel (Blothney Gem) in the hole above the door, then go in.
To get rid of the ghost in the first room, give it the Fruit. The room to the right is an astronomy room. There's nothing that is of use to you for the moment. The room to the left is locked, but the room across from you is a laboratory. There is a wall safe to the upper-left here, as well as a hatch in the floor.
Open the wall safe to go to the combination screen. The combination is 794780. Inside is...a cookie jar. There's something inside it, but you'll have to break it to open with the axe. You'll take Candles and a Cookie.
Head back to the game room and use the Cookie on the plate in the floor. He'll take the cookie and leave the key. Take the Key 2.
In this entry, we enter a stone maze, and learn about someone named Dracan...
Go back to the servant's bedroom and Use the floor lamp. You'll move a picture hanging on the wall and reveal a book, but a spirit covered in chains will pop up from out of nowhere. This must be the servant, as this is his room. He thinks Dracan sent you here, and says you cannot have "his precious" as he has hidden it..."his precious" meaning the book, since he blocks you from getting it.
If you give the ghost something he doesn't want, he covers you in acid and kills you. Instead, Use the Spider on him. The stunned spider will freak the spirit out and cause him to go away. How you're supposed to figure this out, I don't know.
You'll finally be able to Take the Diary 3 that the spirit was blocking. Open it and you'll find the following passage:
"The Master would not, or could not, so I have stolen Dracan's star. He is an evil soul. Unlike the Master, he uses his power for amusement and profit. He is not concerned with spiritual enlightenment. There is no compassion with is power. I grow weak. I am dying. I have hidden the star in Master's special box. It never opens, it has no locks. Dracan's star never discerns. In fire it freezes. In ice it burns.
Head back to the game room and head to the backyard. There are three buildings here: a laboratory, a greenhouse and a church. You'll also see something move in the trees behind the church.
Go to the greenhouse and Open the door. There isn't much here aside from a pot of dirt that needs watering and some dead plants. Take the Watercan and Use it on the jar sitting in the lower-left corner. You'll be able to water the plant twice, but after that water won't come out of the Watercan. Go back to the greenhouse entrance, Use the spigot and use the Watercan on the water. Go back and water the plant a third time, and a fruit will sprout. Take the Fruit.
Head back to the backyard and approach the church. You'll come in contact with two menacing dogs. Use the Thundere spell to drive them away. You can now Open the church doors.
Take the Goblet, and the altar will move to the side to reveal a secret passage. Take the Candles too. As for the secret passage, you won't be able to enter it. The game will warn you several times when you try to enter, but after the fourth time, you're going to die.
Instead, use the O Sesame spell to open the door to the left. The stone bust will speak and the door will open. This leads to a stone maze, but you'll be blocked by an apparition that rips you apart immediately...unless you light the Candles with the Matches before going through the door. This causes the apparition to go away. You can now enter the maze.
The scroll mentioned when you enter is Scroll 3, which mentions the Blothney Gem.
Head north. If you examine the slab, you'll find that the Blothney Gem "is in a deep place."
Another slab to the northwest reads "The Pendant can protect you from the undead." To the northwest still is yet another stone slab that states "The bouncing creature loves things that fly."
There are dead ends in this maze that contain packs of Zombies. If you use the Pendant on them, you'll end up making the game unwinnable.
You'll find a tombstone nearby. Examining it reveals nothing, and you won't be able to Use the Bouquet on it, which is described as "looking good on a tombstone." From this tombstone, keep heading east. You'll run into a Zombie. Use the Pendant on it to kill it. Head east one more time, then head south until you see a different tombstone. Use the Bouquet on it. This reveals a secret passage to the west. Go west once, and you'll see three cages sealed within the far wall of the maze. If you Use Key 1 on the keyhole below them, you'll free a bird, a cat and a snake. If you Examine them, you'll find out that they're all ready to eat each other.
Go back downstairs and open one of the doors. The Scarlett O'Hara ghost will show up. Open the No Ghost and Use it on her, and she'll melt away.
You can now open the doors here. The lower-left door to find a parlor. There isn't much except for another door to the north. This is the veranda, and you'll see a black spider walk across you. Use the Spray on the railing, then leave and come back. The Spider Cider spray will stop the spider and you can Take it. Yes, you'll need a spider for something.
The upper-left door leads to a dining room. Take the Bouquet off the table, then Open the north door. The room here is really cold. Take the Blotter off of the desk, then Open the Desk and Take the Card. On the Card are periodic elements and their numbers: Copper, 29; Silver, 47; Gold, 79; Mercury, 80; Lead, 82; Uranium, 92. The door at the upper left is right.
Go back through the left door to enter the dining room again and Open the upper-left door. It's a kitchen. Take the two knives hanging below the pots, as well as the Fry Pan in the upper left.
Going west from the kitchen takes you to what appears to be a servant's bedroom. Take the Brush off the bed and the Cologne, then head back out and head east from the kitchen. Take the Matches off the second-highest shelf along with the Salt Jar.
To the south of the dining room is the game room. There are scratches on the dresser, but it's locked. Open the north door and go in to find the trophy room. Don't bother taking the guns; they're locked onto the wall. Take the cage in the lower-left corner.
The door to the north takes you to the backyard, where you can see three buildings. You can drop any items you don't need in this screen.
Go back the game room, and you'll see a cute dancing demon with a key in its hand.
Go south from the game room to return to the hallway.
The upper-right room leads back to the foyer. Cut the Couch with the Knife 2 to find a Key 1. Take it. Go back upstairs, enther the master bedroom on the lower-left and Use the Key 1 on the closet. Open the two scrolls to read them. The Scroll 2 reads "Gold, silver and mercury. Together they form a key." The Scroll 3 reads "The heart of the garden maze contains the blothney gem. It is guarded by 'he who moves as the moon.'" Take the two scrolls.
Open the Box inside. There is heat being generated inside the box. Take the Box as well as Bottle 2, then head out. Go back to the game room and Use the Key 1 on the cabinet. This unlocks the cabinet and reveals a Gyp.Doll. If you Examine the Gyp.Doll, you'll notice it's so detailed it seems alive. Take the Gyp.Doll, then Use the DollDoll spell on it. It will tell you to find her pious brother so you can find your sister. A word from him can open doors in high places." You'll learn the O.Sesame spell.
Head back to the foyer and Use the Matches on the fireplace to light a fire. Then, Use the Box in the fire. You'll get a heavy, bras star with the words "Fire and Ice" emblazoned on it.
Here's the intro, like he does for every Let's Play.
Here's the game!
You start the game in your car, which you've apparently crashed into a tree. Your sister was in the car with you, but she isn't here. It looks like she's gone for help. You can smell gas, so the gas tank is punctured. Get out of the car, otherwise the car catches fire and you'll die. To do that, select the Open command and press A on either the door in the window in the upper-left corner or press A on the circle on the left side of the map, which is located in the lower-left corner. From there, select Move and press that same area. Yep, it's a point-and-click style adventure game, where you choose commands and press A on things and places to interact with them.
When you leave your car, you'll come across a mansion. Your car will burst into flames behind you. The doors to the mansion will not budge if you try to Open them. Instead, Open the mailbox, then Open the Envelope. Inside is a Pendant and a Letter saying...
"Dear Master,
Please forgive me. My health prevents me from aiding you in your battle against the evil Dracan. You teach your students well; they become too powerful for their own good. Enclosed is an amulet that should look familiar. Wear this charm and think of me. The undead will surely fear it. Still the evil, my friend; set it free for the sake of the family. Fare thee well."
When you take the Pendant, the door to the mansion will finally open. When you enter, the door slams shut behind you. There's no going back now.
When you Examine the couch in the foyer, you'll notice that something has been stitched into it.
Open the door to the right and enter. Looks like a library. There is a gray book on the shelf. Open it and Examine it, and you'll find out that it's about magic. If used properly, good can happen. If not, bad happens. You'll also learn a few spells: Cloudisi, Stillini, Thundede and Telemaze. The book then disappears. Examining the spells will give you a hint of what they do. You'll be able to know when to use them later on.
Head back to the foyer, and Open and enter the door to the north. You'll be in a hallway. The upper-right door is already open. This leads back to the foyer.
A strange woman that looks like Scarlett O'Hara will randomly appear in this hallway if you go anywhere other than up the stairs. If you try to leave, she kills you. Way to be a jerk, game.
Go up the stairs. You'll come across five doors. The upper-left door leads to what seems to be an ordinary bedroom. This game will make you feel very weak. Take the Diary 1 on the table and the candle.
Diary 1 says: "My star is gone but not lost. Master's servant will pay for his betrayal. The vehicle of my power has not yet served its purpose. When it sets me free, I will have a chance to realize my unlimited potential. The forces of the technological society will be unprepared for the likes of me. I will not be denied. My victory is inevitable."
Opening the table will reveal Scroll 1, which reads (when Opened) "Doll, doll...wilt thou lead the lost." This teaches you the Dolldoll spell.
Open the door to the upper left. This leads to a cold, dark bathroom with no toilet. If you Examine the light fixture on the ceiling, you'll find out it's been made to be gripped.
If you Open the hamper and Examine the Towel 2, you'll find out it smells bad and that it's blood-stained. You won't be needing this.
Go back to the hallway and open the upper-right door. This leads to a guest bedroom. Open the bureau across from you to find a Ruby. If you Examine it, you'll notice that a strange power seems to run through it. If you Take it, you'll die three or four screens later from the power of the Ruby, so this item isn't worth grabbing. What a useless room.
The right center door in the hallway leads to a spiral staircase. Take the Axe in the corner, then go up the stairs. (You can Use the light switch to the right to turn it on, but there isn't a visual difference.) You'll see a jail cell with the bars reaching up to the ceiling. There's nothing to do here, and if you open the door and go in, you'll be trapped in here and you'll die of starvation...so just go back down.
The lower-right door leads to the master bedroom. Take the Candle 2 and Bottle 1 on the table, then open the Diary 2 that is left. It reads: "I have lost control of Dracan. My star student now fancies himself a master. Though his power is strong, his spirit is weak. He is easily corrupted by the dark spirits of greed and power. My servant, more aware than I, sealed his star in my hingeless box. They're locked away, beyond his stare. I've hidden the key, a chair knows where. Go ahead and take Diary 2.
If you try to Open either of the doors in the master bedroom, you'll find out the double doors across from you are locked, but the door to the left is not. You'll enter another bathroom where a voodoo doll and a ceremonial mask hang above the bathtub. Take the Bottle 3 and Bottle 4 between the sink and the mirror, then head back to the hallway.
There's one more door to try, which is to the lower left. Open it up and you'll find it's a small closet. Take the two bottles on the second-highest shelf (the Spray and the No Ghost). The spray kills spiders, which you'll find out if you Examine it. No Ghost is pretty straightforward; it gets rid of ghosts.
The white box on the top shelf contains a Hat if you Open it.
We've done everything we need to do, so let's head to the police station and end this thing.
When you get out of the sewers, you'll see a big brute of a mugger. He'll show up sometimes in the back alley. Hit him, and you'll be beaten to the punch and knocked out cold. You'll also lose all your coins and you'll find this out when you come to.
Head back to the bar, then go to the far right square on the map to go to the police station. Go to the door. You'll be in the hands of the police, but you'll have the evidence necessary to clear your name and none of the stuff that will implicate you.
You'll also find out that Martha Vickers was behind this all along. You've won!
It's time to get rid of the evidence planted to frame you for all this and clear your name!
Get in the cab and head back to Sherman. Enter the bat, go up the stairs and enter the room with the dead guy. Remember that yellow thing that was next to the entrance? Well, that's a safe. Either Note3 or Note4 will have the correct combination. Use the two Notes on the safe until it opens, then open the Folder inside. Note1 is inside, and it's an I.O.U. to Joey Siegel for Ace Harding worth $1,000. For some reason, you can't remember writing anything like this. Take the Note1 anyway. Looks like you're being framed for the kidnapping.
Open the Box and take the Key4. Go back to the fire escape and go down. Head back to the bar and Move to the trunk. Use Key4 on the trunk. It's Mrs. Sternwood...and she's unconscious. Take the gag off of her mouth and use Medic.1 with the Capsules. She'll tell you to take her home. Home is 626 Auburn Road. She then falls back into unconsciousness.
Move away from the trunk, then go back to the cab. Head to Auburn Road. Open the mailbox and examine Letter1. It's a ransom note demanding $20,000 in 24 hours, and stand at the corner of Peoria and Elm at midnight. Take Letter1.
Move up to the font door of the knocker. Use the knocker to enter. You'll be allowed in by the butler, who has orders not to let anyone in unannounced. Hit the butler in the face, then go up the stairs. There are two doors that you can Open.
The one to the left has a woman sleeping inside. Judging by the cheap perfume smell, this is Martha Vickers. If you Examine her, you'll notice that you've probably seen her before. Open the drawers of the nighttable. The only useful item is the Memo. If you Examine it, you'll find indentations where the memo has been written on before, but you can't make them out.
With that, open the door to the upper-right. This is the master bedroom. Mr. Sternwood is obviously sleeping here. There is a briefcase on the table, but if you Open it, you'll find out there's nothing inside. Take the briefcase anyway.
Open the night table here as well. Inside is Tissue, a CandyBox and Envel.3. Open Envel.3 and examine the Letter2 that is inside. The letter tells Sternwood to keep his hands off of Martha Vickers, or his wife will find out. Since Vickers belongs to her, he can pay her $20,000 grand if he wants her that bad.
Head back to the cab and go to Peoria. Go back to the bar and open the manhole near Siegel's car. Climb down, then enter the sewage hole in the wall. Go south. Use the Pencil on the Memo so you can read the indentations on the Memo. Turns out he had a plan.
At 2:15 AM, make sure everyone's gone. At 2:30, have Mrs. Sternwood in the women's bathroom to have her bound and unconscious. At 2:45, wait for Ace Harding at the front door. At 3:00, put Ace in the stall, inject him with 10CC of diethanol trimene and take his gun and stuff. (Well, we got out gun at the beginning of the game, so...) At 3:15, wait for Siegel. At 3:30, get Siegel behind his desk and kill him with Ace's gun, then grab Siegel's car keys. At 3:45, plant Siegel's things on Ace and put Ace's gun back with his fingerprints on it. At 4:00, put Mrs. Sternwood in the trunk of Siegel's car and plant evidence in the glove box. Put the car key in Ace's coat and the other key in the safe. At 4:30, lock up and take the ransom case with you. At 5:00, plant a new Siegel letter in Ace's file.
So Siegel didn't do it...and you're being framed.
Now that you're at the bottom of the sewer, you'll be discarding evidence. Leave all the items that the game will want you to leave. If the game lets you Leave it, you won't need it and it'll probably be used as evidence against you. If you can't Leave it, you'll need it later on.
The items you'll need to Leave are Gun1 (the murder weapon), the Handkerchief, the Lighter, the Sunglasses, the Map (written by Sternwood), the Snapshot (Mrs. Sternwood's picture), File5 (the planted kidnapping note) and Note1 (the faked IOU).
You'll need to keep the Diary, the Letter1 and the Memo.
Stuff is starting to slowly come together. Now we know what we have to do.
Go back down to the cab and head to S. Kedzie. You'll find out the door to the woman's house is locked. Use Gun1 on the door to break the lock and open the door. The inside of the bungalow smells of cheap perfume.
Examine the white piece of paper on the table. It's a slip of paper with three numbers on it: 33-24-36. Take it. There's also a brown piece of paper next to it with three more numbers: 25-03-45. Take it as well. Here's the thing, though: one of these combinations is real. The other is fake.
Open up the table drawer to find Key5 and the Diary. If you Open up the Diary, you'll find a bookmark. If you Examine the bookmark, you'll find the initials J.S. Joe Siegel, perhaps?
If you Examine the Diary, you'll find out there was a case of jealously from Siegel towards this woman. She's more interested in John Sternwood, a married man, and wants him to divorce his wife. This smells of an affair. Take the Diary.
Get back in the cab and go to Sherman. Go through the door across from the cab and head into the hallway to the right. You'll be in front of Dr. Brody's office. Use Key5 on the door and go in.
You'll be in the doctor's office. Take all of the medication bottles, then use Med.6 on the Capsules that are in your inventory. Use them on Self. You'll slowly regain your memories. On the third dose, you'll realize you're Ace Harding, Private Eye!
Use Gun1 on the file cabinet to open the top drawer. File1 is a patient's chart for Ace Harding. File2 in particular is a receipt saying that Martha Vickers, Joey Sigele's secretary, wants an order delivered to Joe's Bar. File3 is pretty useless. File4 shows what the medicines on the shelf do, which we probably should have read before taking all that medicine. Medrezine is a nerve antidote, diethanol trimene causes memory loss, sodium bicarbonate eases pain of overeating, chemopapain induces gleeful euphoria, sodium pentothal is a truth serum (and also used in death penalty injections) and bisodiumits are diethanol trimene's antidote, which requires more than one dose to take effect.
Go back to the entrance and take the stairs to the left. It's your office! But there's someone's shadow coming through the glass. Use Gun1 on the shadow, The shadow disappears. Unlock the door with Key5. When you enter the office, you'll find the guy laying there dead behind the desk. If you Examine him, though, you won't find anything unusual.
Open the desk to find an AmmoCase. Open it and take the bullets. Open the file cabinet to find three more Files. File5 is a letter that says you'll have to perform a simple kidnap job in order to get off the hook for whatever it is you're implicated in. Turns out it's the kidnap of Mrs. Sternwood. File6 finally puts a name on the woman whose you knocked out earlier: Sugar Shack. She hates Siegel for something he did to her. File7 says she's doing five years for blackmailing an alderman. Take the Files.
You're done here, so head back outside to the cab.
Oh, hey, there are other people in this game. Too bad one of them has a gun aimed at you right off the bat.
At this point, you should have at least 40 coins. Head through the yellow opening in the north wall and head back to the area dimly-lit secret passage, Head back to the bar and unlock the front door with Key3 and leave the bar.
Don't go into the car. It's a trap. Go to the far right square on the map. You'll speak with a woman who just got out of prison. She wants to pay a friend to her old friend Siegel, but she only saw his car and has put a surprise under his hood (hence why you shouldn't have gotten in the car). She also has a surprise for you, too. Use the Hit command on the woman's face to knock her out, then Examine the purse. Inside is Cosmetic, a $20-Bill and a Gun2. Apparently she was planning to kill us. Take the Gun2 and the $20-Bill. You won't really need the Cosmetic.
Go back to the car and unlock it with Key2. Get in the car, but don't start it or it will explode. Open the dashboard compartment and Take everything inside. The Map contains the address to Joe's Bar - 1060 Peoria St. You'll also getting a message saying to go to Joe's Bar if you're being followed...as you don't want the cops to find Mrs. Sternwood in the trunk.
Note2 is a car registration made out to Joey Siegel of 1212 West End St. I think we'll be paying him a visit later. The Snapshot is a photo of a 400-pound woman you feel you should recognize.
When you get out of the car, a mugger will point a pistol at you. Use the Hit command on his ugly mug. You'll get rid of him, but he'll run down the street saying he'll be back. (You'll definitely meet him several times if you're unlucky enough, and you'll have to give him your money if you see him a fifth time. If you have a $20-Bill, he'll take that instead of your coins. Also, you can examine the slot machines if you do run out of coins.)
Now that you're out of the car, move to the far left square on the map. You'll be at a newspaper stand. (If you get a newspaper here, you'll find out the game takes place around 1941.) Head left and you'll run into a bum. If you have 50 cents, he has some info. Give him two coins and he'll tell you Joey's hit man has been looking for you...and he's waiting in your office! Do not punch the bum.
Go to the left and you'll see Pete's All Nite Gun Palace. At the counter is a standard military-issue German Luger. Since you have the $20-Bill, just take the gun. The $20-Bill will automatically be used.
When you leave and head left from the gun shop, you'll be at Peoria Street. You'll also meet the mugger again. Hit him in the face a second time to get rid of him. From there, get in the blue cab that's waiting for you. Speak to the driver. Go to Westend when the cab driver asks where you want to go. Be sure you have three coins to give to him, or else you'll be arrested and lose the game.
You'll be at the Stanford Arms. Use the Card on the key slot next to the private elevator, then Use the Card again to go up. Leave the elevator and you'll be at Joe Siegel's apartment. Examine the photograph on top of the fireplace and you'll find an address to 520 S. Kedzie. Take the Photo.
darkchiron makes an introduction for his LP of Deja Vu.
Now for the game!
You wake up in a bathroom stall. You have a huge headache, your right hand is covered with dried blood which most likely isn't yours, you have a tiny puncture on your left arm and you have complete amnesia.
This is going to make for an interesting game.
The gameplay is very similar to Shadowgate, and also similar to Uninvited, which I still have yet to cover. The action will be in the upper-left, the inventory will be in the upper-right and the commands, map and text that summarizes all the action will be at the bottom.
Take the coat. From there, take the .38 caliber pistol off the hook that you'll find behind the coat.
Believe it or not, you can Use the .38 caliber pistol (known hereafter as "Gun1") on Self and prematurely end the game, making for one of the fastest Game Over attempts in video game history.
Okay, okay, enough funny business. Open the Coat. Take everything inside. When you get to the Wallet, Open the Wallet and take everything in there as well. Open the door in front of you. It's time to get going. Use the Move command and the screen at the upper-left corner to get to where you need to go.
When you head forward, Examine the mirror. You'll look at yourself and realize you don't even know who you are. You can now leave the bathroom.
When you enter the dingy hallway, you'll see a trail of water when you open the door back to the bathroom where you came from. Go back in. Turns out there's a door to the left of the sink. Open it up. You'll find a toilet, and if you Examine it you'll find out it's cracked and leaky to the point that water ends up in the hallway. If you Open the toilet, you'll find out nothing is inside.
Go back to the dingy hallway. Open the door on the right and go in. You'll be in Joe's Bar. Take the Seltzer that is on the counter, then Use it on Self. You'll drink the Seltzer, which you'll need to do so you don't die this early in the game. Be sure to use the Gum on Self as well.
Go up the stairs and examine the pictures of the boxers oon the wall. One of them will be a picture of you with the name "Ace Harding" under it, but it still doesn't ring a bell. Open the door in front of you and go in.
You'll be in an office that smells of cheap perfume. Open the desk, then open Envel.1. Inside the envelope is a Bill. Examine it. It's made out from Doctor Brody to Joe's Bar, 934 Sherman St., Chicago, Illinois. Apparently it's for capsules, Sodium Pentothal, Medrezine and Diethanol Trimene. It is made out for a total of $132. That second item on the tab is pretty suspect, since it can be used for anesthesia as well as lethal injections for death penalty executions.
You'll record the Sherman St. address after you finish reading the Bill. From there, Take the Bill.
The door will be left. Thankfully, you have Key1. Use Key1 on the door to open it. When you go in, you'll find a dead man slumped over with his hand on a phone receiver, which is cut. There's something in his pocket. Open the desk and Take the Key3 and Pencil.
Open the pocket, To do this, select the Open command and use the hand cursor on on the dead guy's suit. Take the Key2 from him, then Open the window behind the dead guy. Before you leave, Examine him. He seems familiar, but you can't quite put your finger on it.
From here, move to the window and go up. Open the window, then go in. There is some sort of chair with straps on it here. Take the middle of the three bottles below the window, which is Medic.2. Use the Open command on the wastebasket between the chair and the elevator door and Take the Capsules.
Use the Hit command on the button next to the elevator. The elevator will open. Get in, and press the second button out of the four to go back to the second floor. Go back down the staircase and open the door behind it. You'll be in the wine cellar. Use the Open command on the winetap on the barrel to the right to open the spigot. Examine the wine rack and you'll notice there's no dust on the rack. Use the Hit command on the wine rack to open a secret passage! Go in!
There are two doors, one to the left and one to the right. There is also a ladder in the floor leading downward. Open the door to the left first. Inside is a casino. Use a coin on the slot machines. Get some coins while you're here.
Just like the first game, this one ends pretty quickly.
Level 4: The Chase, 1:30 A.M.
Marv will be chasing after you as soon as you start this level. Go to the right and climb down the rope. You'll have to wait for the bats to move by before you continue to go down. Harry will be climbing down that rope as well, but you can move faster than he can.
When you make it all the way down, continue to the right. You'll be avoiding falling safes, falling flower pots as well as garbage can lids...some of which fly towards you in sine wave patterns. Other lids will just move straight up and down.
At this point, you'll want to use the slide to avoid the bats so you'll be under them when they drop down. Use the slide to defeat the rats as well.
You'll be running continuously to the right until you reach a Christmas tree. Go into the Christmas tree to enter the final segment of the game: the Christmas tree in Central Park. Go up to the top, using the ends of the tree branches as trampolines. Grab the blue star at the top, and Pigeon Lady will show up. Press the Y button, and Kevin will say "Help!" When that happens, Pigeon Lady will throw bird seed downwards. You'll want to hit the Sticky Bandits with this stuff. When you hit Harry or Marv with the birdseed three times, they'll be down for the count. When you beat both of them, you've won!
I find it strange that this game omits a lot of the story from the movie. It's like you're expected to watch the movie first.
Level 2: Central Park, 5:00 P.M.
Use the slide attack to get rid of the mice, and the BB gun to get rid of the bats. As for the muggers, you'll have to move past them after they strike with their billy clubs.
After this, you'll be leaping to the top of a wall. The platforms aren't very big in comparison to how big Kevin is, so precision jumping is a must here. Be sure to search for secrets, as you can find a whole pizza and get an extra life.
You'll be able to find a pigeon icon to get the spin jump, and you'll find the blue bottle at the end. Use it to sprint your way to the end like Sonic the Hedgehog.
The punk in blue tries to catch you with a net. Why? I don't know.
You'll soon come across an open manhole, where you'll fight the Pigeon Lady. Stay on the move and avoid the sticks that the pigeons try to drop on you, and both the pigeons and the Pigeon Lady will run to the right. Keep jumping to give yourself momentum, as you will be sliding around quite a bit on the floor in the sewers. You'll have to keep doing this two more times until you eventually befriend her. She'll direct you to the ladder to the right.
Go to the left, jump into the open window and you'll enter Kevin's uncle's house.
Level 3: The Uncle's House, 12:30 A.M.
It's now you against Harry and Marv.
Sometimes you'll have to jump from one floor joist to another. Other times, you'll have to jump into the pits in-between the exposed joists to reach areas you couldn't find otherwise.
Avoid the falling debris and rocks, and use the BB gun on Harry and Marv when you see them. Don't let the Sticky Bandits touch you, otherwise they'll choke you out and kill you in one hit.
The opening to the living room leads to power-ups. Go to the right (get the pizza at the other side of the joists if you need it) and leap down the first pit to land on a ledge. Leap to the left and get a key. This will be one of the keys that you'll need to collect to find other keys, and you'll be going in a completely different order every time you play. There are seven keys: X, Z, Square, Striped, Triangles, Diamond and Dot. Unlike the keys, the positions of the doors do not change.
In the key rooms, you'll have to contend with Harry or Marv (or both). If you can vanquish these guys in the room, you'll get another of the seven keys.
Z and Striped are on the first floor. X and Square are on the second. Diamond, Triangles and Dot are on the third. Use the stairways to go up or down floors.
When you enter the X door, jump and shoot at the candle with the BB gun. This will move the candle to the left. You'll eventually light the dangling wire on fire, and cause a 10-ton weight to land on Harry. If you run out of BB gun ammo, another BB gun will pop up.
When you enter the Z door, jump over the wire and let Marv trip over the string.
When you enter the Square door, jump onto the top of the chair, then the filing cabinet. Shoot the bowling ball so it falls on Harry.
When you enter the Striped door, keep stomping on either Harry or Marv. One of them will give up the key when you force them all the way down the hole. You can do the same to the other guy if you want. That's it.
When you enter the Dot door, jump on the washing machine. Jump up and shoot the blue box to cause gasoline to spill out, then shoot the candle to burn Harry to a crisp.
When you enter the Triangles door, stun Harry or Marv with the BB gun. Jump on their head, then jump up and grab the key for the next door. You'll want to wait until one of these guys is almost completely visible.
The Diamond door leads to the roof. When you open it, you've completed the level.
Kevin's alone again...but he has a whole city to himself this time! Unfortunately for him, so do Harry and Marv! They're out of jail and out and about in New York City, unbeknownst to Kevin!
RIP John Heard, who played Kevin's dad in the first two Home Alone movies.
A year after Home Alone, the McAllister family takes another vacation. Kevin makes it this time, but instead of heading to Miami, Kevin makes it to New York. It's...complicated.
The game begins in the middle of the movie, with Mr. Hector, the Plaza Hotel concierge, calling all the hotels saying that Kevin is using his dad's credit cards (just like in the movie). Meanwhile, Harry and Marv are out of jail and out to steal again. They're out for revenge.now that they know Kevin is in New York.
Level 1: Plaza Hotel, 12:30 PM
Leap onto the flower pot to the right and jump over Mr. Hector, who can insta-kill you. Jump into the light fixture above the trash can. You'll find a pigeon, which allows Kevin to spin jump and attack enemies as he does so. You'll be able to spin jump until you take damage. Like the last game, you'll be leaping into light fixtures to find stuff. Unlike the last game, however, you don't have to hold Up on the Control Pad...but you will be finding stuff out of what seems like thin air at times.
The first picture of the vase above a sofa contains a BB gun. Use it to stun human enemies.
Your main attack for defeating enemies is a slide. In order to perform it, press Down as you're running. Kevin will slide on his knees, and if he runs into enemies during this animation, it hurts them. This works for inanimate objects such as suitcases, travel bags and mops in buckets, but for human enemies you're going to need a more viable alternative such as the spin jump or a gun.
The one enemy you don't want to slide into is the vacuum cleaner. If you slide into it, the vacuum cleaner will suck you in and instantly kill you.
The first set of doors after the hotel entrance at the beginning is the gift shop. Kill the shopkeeper with the spin jump. then get the bazooka from the top shelf.
If you can get any coins, those will give you points.
You'll be seeing necklaces that you have to pick up throughout the level. These can be thrown forward and used as weapons, but the throwing range for them is absolutely horrible.
You'll have to avoid the woman with the umbrella (unless you have the spin jump), as well as the guy at the registration booth that throws bombs.
You'll be finding pizza slices throughout the game, and they seem to be in greater numbers here compared to the last game. Once again, collecting eight pizza slices will give you an extra life, and you can find a whole pizza to get an extra life instantly. You also have five hits before you die instead of three.
You'll make it to the elevator. Hit the elevator button with Up, and contend with sentient suitcases and other travel bags as you wait for the elevator. If the elevator button flashes, press it again to get the elevator to continue to come down. When the elevator comes down, you'll take a trip to the 11th floor. If there's a door sign on the doorknob, you can't open that. There's a pizza slice in Room 1122, and there's a room service guy that you can kill with the spin jump, but that's about it.
Go up a floor and enter Room 1221. Avoid the maid's pillow throwing attacks and get the bazooka, then get out.
Go up again and enter Room 1422. You'll find a gun in the upper-left corner above the bed. In 1424, you can find another bazooka.
Go up again. Use the BB gun on the old man in the grey coat (whom you've probably seen in the news store) to stun him temporarily, then get the two pizza slices from Room 1522 if you need to. (Watch out for the maid!)
Go up yet again. Enter 1621 and take out the maid with the spin jump to get the blue bottle. This blue bottle will make Kevin faster and invincible for a short time. Go all the way to the end and take the service elevator all the way down.
Go left, shoot the man in the grey coat with the BB gun, then immediately blast him with the bazooka until he falls. Spin jump the room service guy if you can, then use your slide to avoid the steam clouds as you pass by the dish-washing machine. Watch out for the dish washing lady that throws plates at you! From there, be careful for the pots and pans above you as some will fall down from above and try to hit you when you get close enough. You'll then meet the chefs cutting some meat. Slide under them after the piece of meat they chop falls down through the bottom of the screen.
You'll then meet the head chef himself. Avoid the meat cleaver he throws at you and slide into him until he dies. This only takes a few hits, but it's a tad easy to be hit at the beginning.
When you escape out of the hotel, you'll be caught by Harry and Marv. Unfortunately, Harry gets punched out by the woman to the right after Kevin slaps her ass and tells her Harry did it (which is shown in the movie and not in the game, for obvious reasons).
Over already? Well, that's not surprising. Also, this short blog entry is dedicated to John Heard, who played the role of Kevin McAllister's dad in the first two Home Alone movies - just one role in a host of many. Godspeed.
Level 4 (continued)
When you reach the basement, you'll have to avoid rats. Keep an eye on the ceiling, as you'll have to avoid rats that are dropping down from the ceiling joists between the pipes and the wall.
The boss here is a giant rat. Once again, leap into the brick and hit the rat with it. This is going to be a little harder, as the rat moves around erratically. There is one weakness to its movements, however: it never touches the left edge of the screen, and if you stay there, the rat will never touch you.
Once you beat the rat and lock up all the pets, you've beaten the game! Congratulations!
When you reach the basement, you'll have to avoid spiders. The spiders that are in the air are controlled by your jumps. The more you jump, the more they'll go up and down, making them easier to avoid if they're packed somewhat close to other spiders that are on the ground.
You'll then fight the first boss of the game: a giant spider that's just a Mode 7-enlarged version of the ones we've just dodged. Jump into the brick in the center of the room to get it to fall. If it hits the spider, it will take damage. The more damage the spider takes, the faster it goes. Thankfully, the spider congregates mostly in the middle of the room.
Level 3
Now you have to pick up electronics to clear the level. There are 35 items to pick up, but you can carry up to ten items at once this time around. How you're able to do that with a backpack when you're picking up TVs and alarm clock radios, I have no idea.
In about two spots in the level, you can find an entire pizza. If you pick it up, you'll get an extra life. One of them is in a bedroom drawer, the other is in the bathroom toilet. What.
In one room, there are five light switches on the wall. You can turn them on with the water gun, and if you turn them all one, you'll get three free valuables.
When you enter the basement, you'll have to deal with ghosts. Most of them will keep going up and reappear under the floor when the reach the top of the screen. Walk under those. Near the end, there will be ghosts low to the ground that will hop up and down. You'll want to jump over the hopping ghosts.
The boss here is a leaping ghosts. Fighting this boss is just like fighting the spider, except the ghost just bounces around in even more predictable patterns and its speed never changes.
Level 4
Now you're rescuing pets and small animals. Some of them will be in the air, so you'd better be ready to pick up animals in mid-air. You'll be rescuing frogs, dogs, cats, birds and even tiny lizards that climb on the background walls. Just like last time, you can carry up to ten animals.
The drawer to the far left at the start contains the BB gun. This thing is even more powerful than the slingshot. It's the most powerful gun in the game, but the big drawback is that the gun is slow to fire.
Remember Home Alone? The movie with Macaulay Culkin plays Kevin McCallister and accidentally gets left at home while the rest of his family goes on Christmas vacation? Not surprisingly, it got a few video game adaptations. This is one of them.
Level 1
The game begins with Harry and Marv outside of the McAllister home getting ready to steal everything. You then play as Kevin, who has to go around the house, collect all the valuables and deposit them where the thieves can't find them.
There is a slingshot in the drawers to your left near you when you start the game. Go get it, and pick up the emerald ring at the top of the drawer as well. Be sure to look around the room and move around near desks, drawers, or anything that has drawers you can open to look for hidden power-ups and points. There's a piece of pizza at the desk to the far left, and if you collect eight pieces of pizza, you'll get an extra life.
When you leave the bedroom, go to the far left end of the hall. Touch the banana peel on the ledge on the wall to bring it down, then open the drawer of the cupboard to the right. This will cause the henchman standing around to go for the ring that pops out only to slip on the banana peel, which lets you get rid of him.
Go right. Hit the bowling ball so that when the next henchman is under the trophy, it'll hit him in the head and kill him.
You'll come across an opening in the wall. This is the air vent, and if you walk up to it with any treasure, Kevin will drop it down there. You can only hold six items in your backpack (which is in the upper-right corner, if you want to know how many items you have). If your backpack is full, the number of items you have will flash and you'll have to dump everything into the air vent leading to the basement.
Be sure to go through doors when you see them, and explore everything to ensure you have all the items. Clothes hamper, toilets, sinks...if you can hide items in there in real life, you can more than likely find stuff in them in the game. But don't forget to hold Up on the Control Pad and leap into other things, such as pictures, mirrors and other wall decorations. Items will be hidden in those as well. If you can't reach a treasure that's on top of a huge vanity closet, open the drawer and jump onto it to get to the top,
Be sure to use your water gun to stun enemies. It has unlimited ammo, and it's better than nothing. Sometimes enemies will cough up treasure when you stun them from squirting them enough times.
When you go downstairs and enter the first white door, you'll meet Marv. Get what you can, but don't let this guy touch you.
Don't step on the toys that are scattered on the floor. You will take damage.
When you secure all the valuables, you'll be able to open the golden door. However, you'll have to find the key for it first. It's pretty simple to notice, as it's a gold key that's on the ground. Once you find it, look for a door that's a different color than the others near a staircase. You'll be able to open it and enter the basement. Avoid the bats and mice by jumping over them, and keep going left until you reach the valuables. Kevin will lock them up and it's on to the next level.
Level 2
The thieves are after toys now. Great.
Get everything in the bedroom, then leave the room and go left. You'll meet Harry. Keep going right until you find a paint can above a toy soldier. Leap up to the toy soldier's gun and leap into the paint can when Harry is right under it to get rid of him.
You can now carry eight things at a time, which will come in handy here.
There are tacks all over the floor. You definitely do not want to move into them, as you'll take damage. Love how tacks act as spikes in the rec room where the pinball machines act as platforms between tack pits.
In case it isn't very obvious, you have to pick up the toy helicopters and toy robots that are moving around. They aren't enemies, and they won't damage you if you run into them.
Harry will be standing on a toy soldier's gun a little further down the hall. If you knock the toy on the soldier to the left down, Harry will try to go after it. Quickly get the toy, then lure Harry further to the right. Drop the paint can on him when he's under it.
Cookies will refill one unit of health if you pick them up.
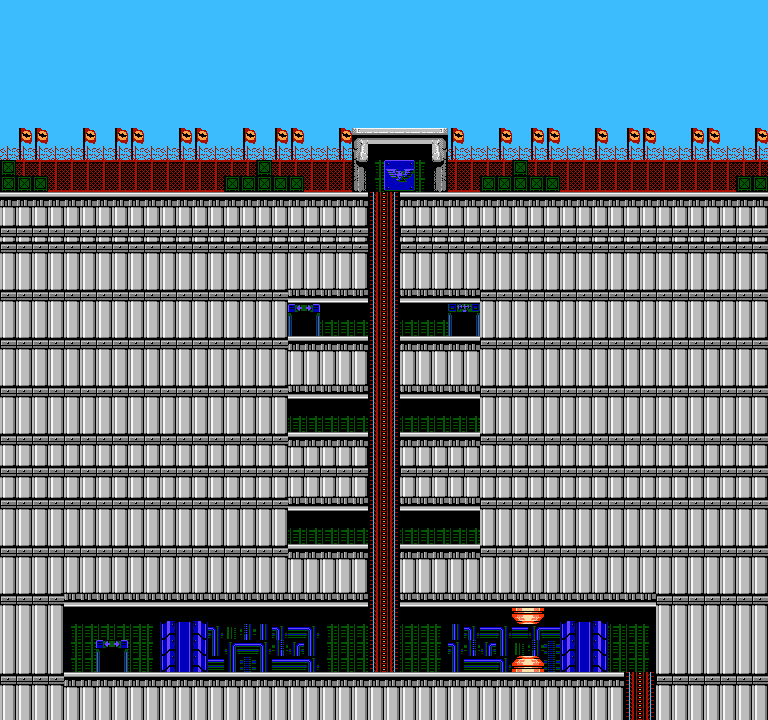
Take the elevator, and use the computer in the right door of the first floor if you need to. The door to left has an electric floor. Avoid the sparks and enter the first door you see. Destroy the power supply in the first door, then continue making your way down.
Enter the door at the end, then go all the way to the right. Swing over the narrow gap and use the elevator. You'll find a computer. Communicate with Joe, then go up a floor and enter the door on the right. Swing over the barrel that is hanging off the ceiling to send it flying out of your way, then keep going down until you reach a door. Go in and you'll find the real reactor room. Destroy the guy that's in there, then go back through the door and go further down. Enter the door at the bottom and destroy the power supply there.
Go back to the elevator and go down to the bottom floor. Go left and take the elevator to the bottom. Swing over the spikes. Enter the door.
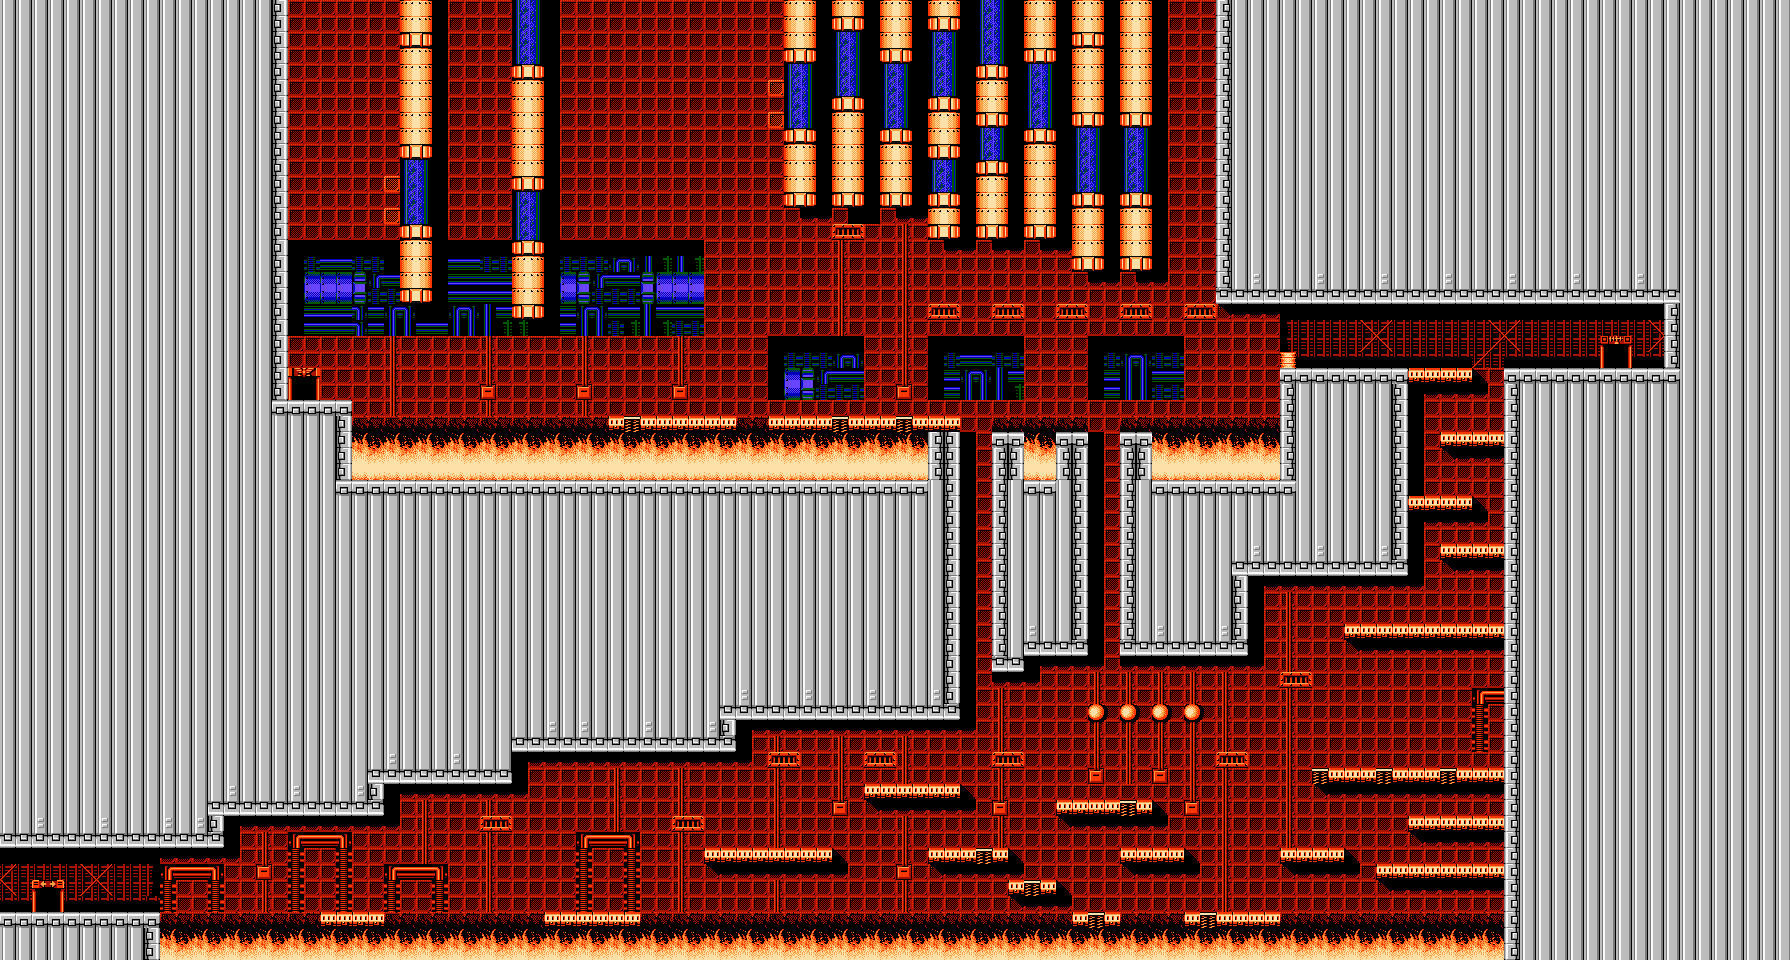
When you meet Generalissimo Killt, he'll try to stop Master-D from reviving only to be killed by the power of the machine. Master-D will show up. It's pretty obvious he's Adolf Hitler. You'll then face the Albatross.
To defeat the albatross, you'll have to use the bionic arm to climb your way to the ceiling at the top of the ship, then hang off of it and destroy the pulsating yellow core while it's on the screen. You'll obviously want to avoid the flame jets that come out of the exhaust pipes you can use to get to the top, but it shouldn't be too bad, especially if you're at full health.
Continue to the right after the battle. The guy you meet will give you the Hyper Bazooka. You'll want to swing off the ceiling and shoot at the helicopter window as you drop down. If you can time it right, you'll destroy the plane as well as Master-D, who dies from spontaneous combustion pretty well.
You then have 60 seconds to get out of the base. Use the bionic arm to climb your way up. You'll meet the robot. You can avoid him, but if you can't, hang off the ceiling and shoot him in the head until he falls. You should still be able to get out in time.
When you make it out, you'll rescue Super Joe and blow up the enemy base! You did it!
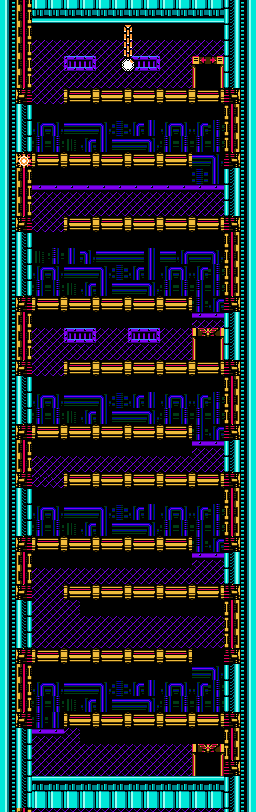
Make your way up until you see a door. Go left through the door. Take out the robot that's in your path with the rocket launcher and enter the door to the left. Take the elevator to the top floor and enter the door there, then carefully make your way to the door at the bottom. Take out the robot with the rocket launcher and enter the door to the right.
Go right until you can work your way down. Be sure to use the communications room that's halfway there. After you drop all the way down, go left and enter the first door you see. Take the middle door in the next elevator room. Get rid of the soldier with the bionic claw on his back, then keep going until you reach the first elevator room again. The second door from the top is now open.
To get rid of the soldier with the bionic claw on his back, hang on the ceiling to coax him into hanging on the ceiling with you, then shoot the rocket launcher and immediately drop back down. He'll be blown away immediately.
The reactor room is full of soldiers. Stay away from the guys with the shields, as you can't damage them. Just focus on the reactor.
Beating Area 8 will give you 10 health pellets and the Iron Boots, which let you kick enemies and damage them when you swing into them while hanging on a ceiling with the bionic arm.
There's a 1-Up just before you drop down at the start. Go get it!
Watch out for mine carts, spikes and the fire pit just before you reach the exit. Thankfully, the high road is the best road.
When you reach the reactor room, you'll find out Super Joe has been transferred to another location. The reactor is still easy to destroy as ever, though.
Beating Area 9 will give you 10 health pellets and the 3-Way Shot. It's like the Wide Cannon, but the bullets have more range.
There's an enemy soldier behind the first door. If you talk to him twice, you'll find out there are underground routes between Areas 14 and 17 and between Areas 15 and 18, allowing you easy transportation between some of the neutral zones. If you use them, however, you'll have to deal with enemies before you can cross to the other side.
In the passages, watch out for the blue guys with the hooks that they spin around, and pick up the Helmet before you go through the exit. It protects you from three attacks.
The guy in the second door is one of your agents. You'll find out Joe is in P.O.W. Camp in Area 7.
Your swinging skills will be put to the ultimate test near the end.
Shoot down the wall at the start with the rocket launcher, then avoid the guys in the tanks as you make your way up.
You'll face another cyborg boss in the reactor room. Fight him like you did the other one, then take down the reactor. When you finish this stage, you'll rescue Super Joe. He'll tell you that Generalissimo Killt is trying to resurrect Master-D, the man with key knowledge of the Albatross project, so he can finish the giant laser cannon that the plans mentioned. Area 12 is where the battle will end, but a man named Destroyer-3 has a gun that you'll need for this in Area 18.
Near the second door, you'll meet Destroyer-3. Say "Yes" when he asks if you're in need of a machine gun. He'll also tell you that "S" is in town located between the mountains. This is the Delta Communicator, and if you've looked around everywhere, you'll have gotten it by now.
With that, go into the second door and get the machine gun.
You can stand on top of the searchlights, but you will slide off quickly. Promptly make your next move.
A new enemy here is the blue guy with the rotor on his back. These guys will fly around and shoot at you.
If you find a green box floating downwards underneath a parachute, shoot it to open the contents. The POW icon will give you a temporary shield that travels around your character and protects you from enemy fire temporarily.
When you reach the reactor at the top, you'll face a giant laser cannon. Avoid the laser cannon's firepower as you make your way to the reactor, then shoot this thing down from behind. It won't be able to turn around, making it easy pickings before you focus on the main reactor.
Beating Area 5 will give you ten energy pellets and the Rocket Launcher.
You'll find another communicator (the green communicator) to collect in the first door. Don't even bother with the second one, as the guy you can talk to inside has no useful information.
You'll want to equip the Rocket Launcher from this point on, as it is very powerful.
The blobs of water that come out of the sewer grates in the background will push you around.
You'll be facing more soldiers in the reactor room. At least the rocket launcher is much more powerful.
Beating Area 2 will give you ten energy pellets and the Pendant. How its appearance got past the censors is beyond me, but it protects you from one hit.
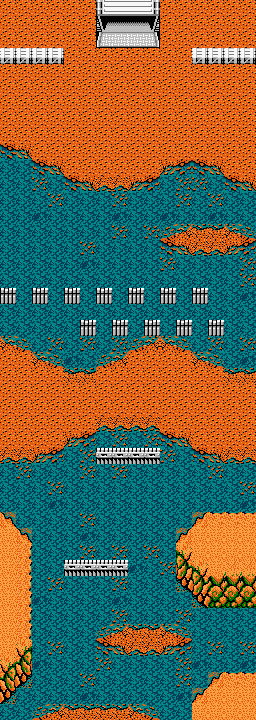
This area is truly something else. You'll have man-sized butterflies flying about, man-sized spiders crawling along the mountain walls and man-eating plants in the ground. If you see the ground move, get away so you don't get eaten.
Use the bionic arm to make your way out of the grey quicksand at the beginning of the area.
When you enter the mountain base, you'll be seeing enemy soldiers pop out of the doors that frequently open and close.
You'll face another giant laser cannon in the reactor room.
Beating Area 3 will give you ten energy pellets and the Rapid Fire Device, which allows you to keep firing with the Normal Gun by holding the B Button.
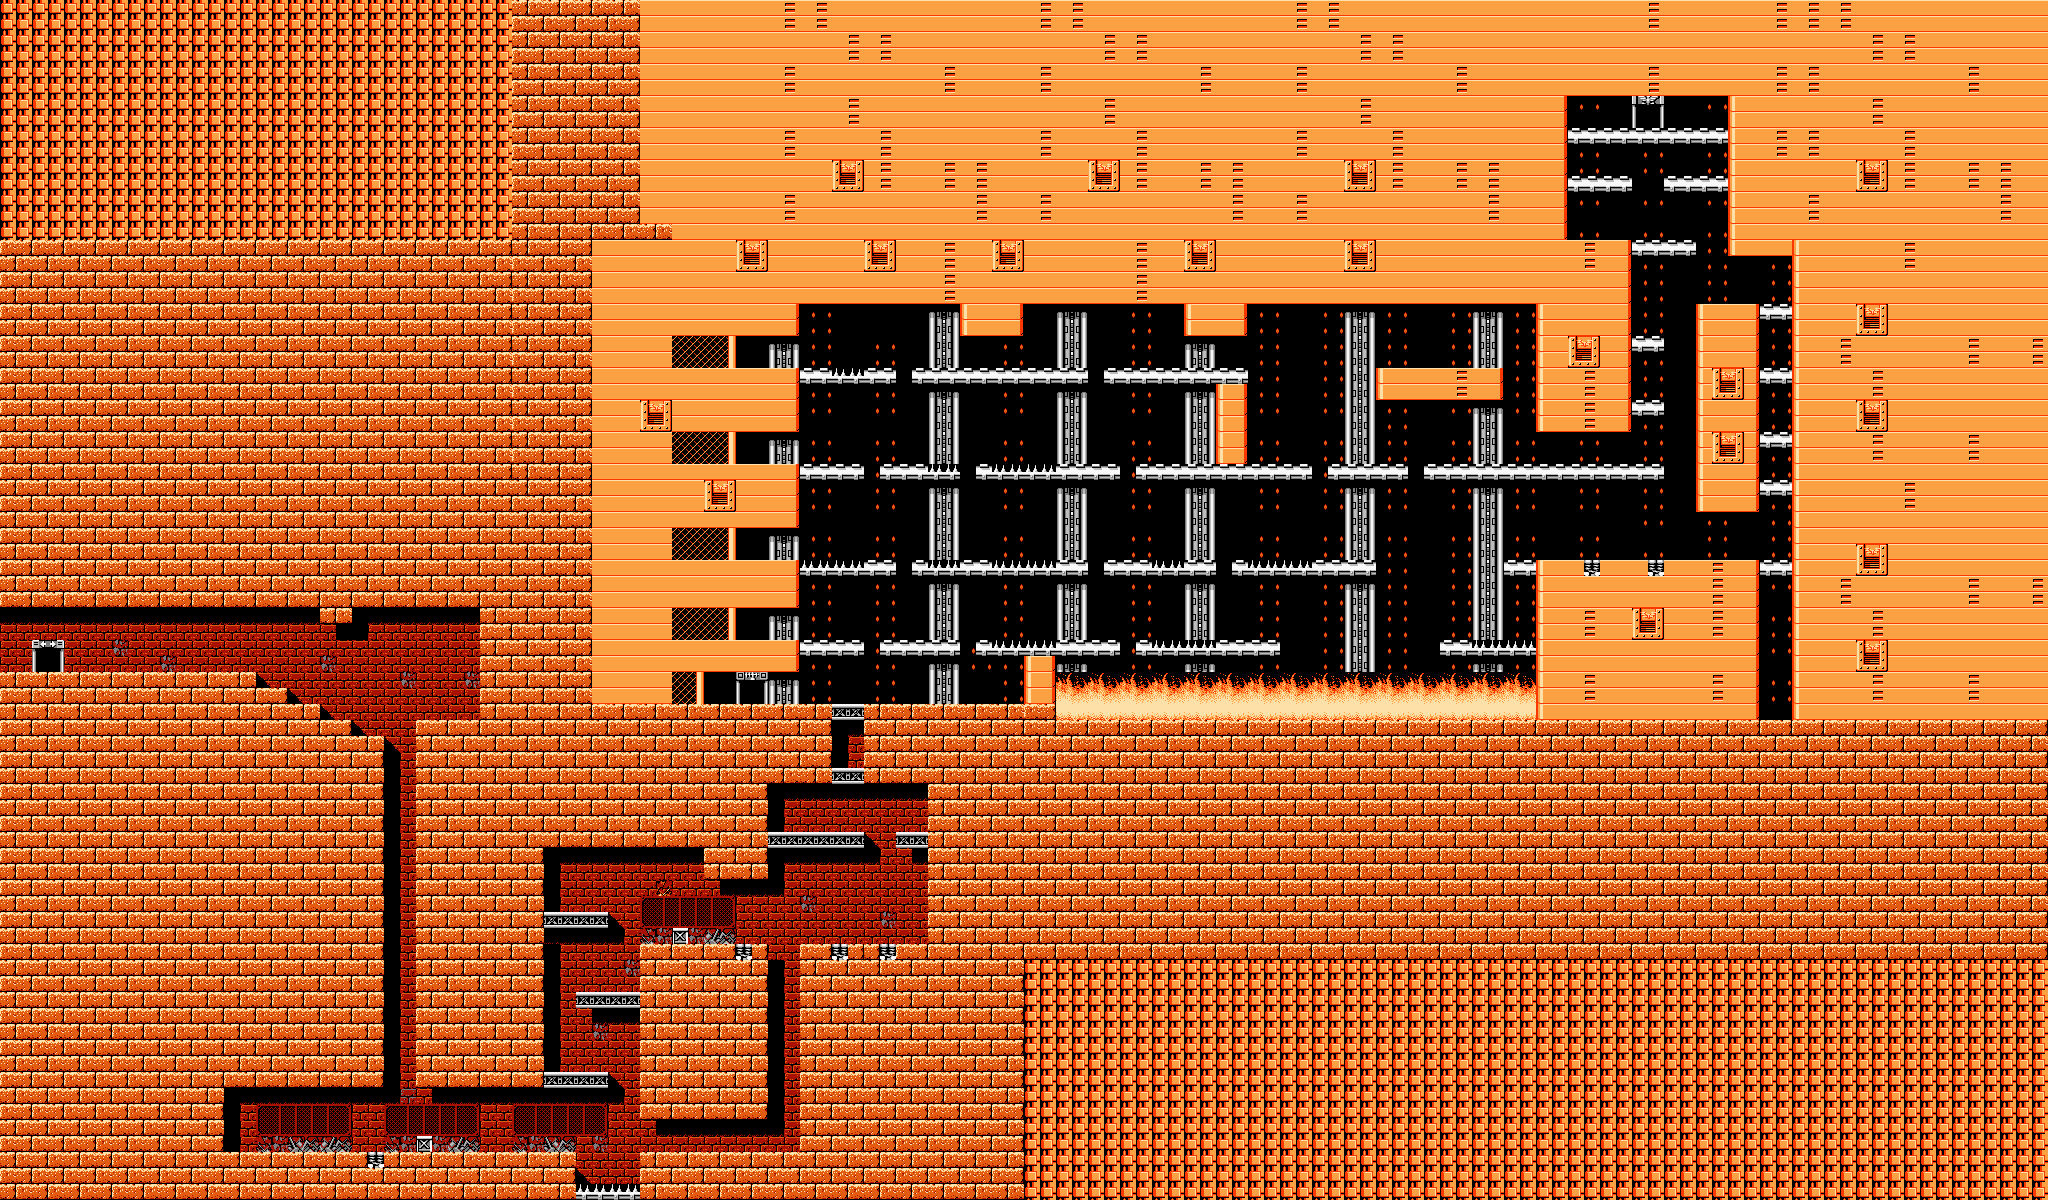
You'll want to be careful here. One wrong movement could be your last, leaving you to plunge into the water below.
You'll be avoiding mines that jump in and out of the water at the start of the area. Time your swings carefully. You'll also be seeing robots that go back and forth as well as spiked circles that will drop from the top of the final building.
When you reach the reactor room, you'll come face to face with a cyborg. Hang on the ceiling and shoot him when he approaches, then drop straight down when he backs away. If you have the rocket launcher, it'll only take four shots to get rid of him. The reactor should be a piece of cake.
Beating Area 6 will give you 10 energy pellets and the Permit, which allows you to enter certain neutral zones.
Area 14
Equip the Permit so you can enter this area.
The first door contains the blue communicator. The second door contains 10 energy pellets.
You've probably heard the story before but here it is: in the 1980s, the military found the Badds' top secret "Albatross" plans. They were seen by Generalissimo Killt, who decided to execute them. The military responds by bringing in Super Joe, but they have lost contact and have no word on his condition or whereabouts.
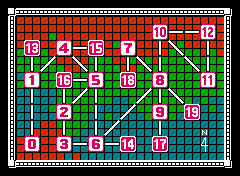
When you start the game, you'll talk with one of the soldiers, then you'll be on the map screen. You can move to wherever you want and descend on any area to beat the boss and get an item out of the ordeal. If you run into any of the enemy trucks while flying around on the map screen, you'll have to make your way past it on foot before you can go back to the map screen.
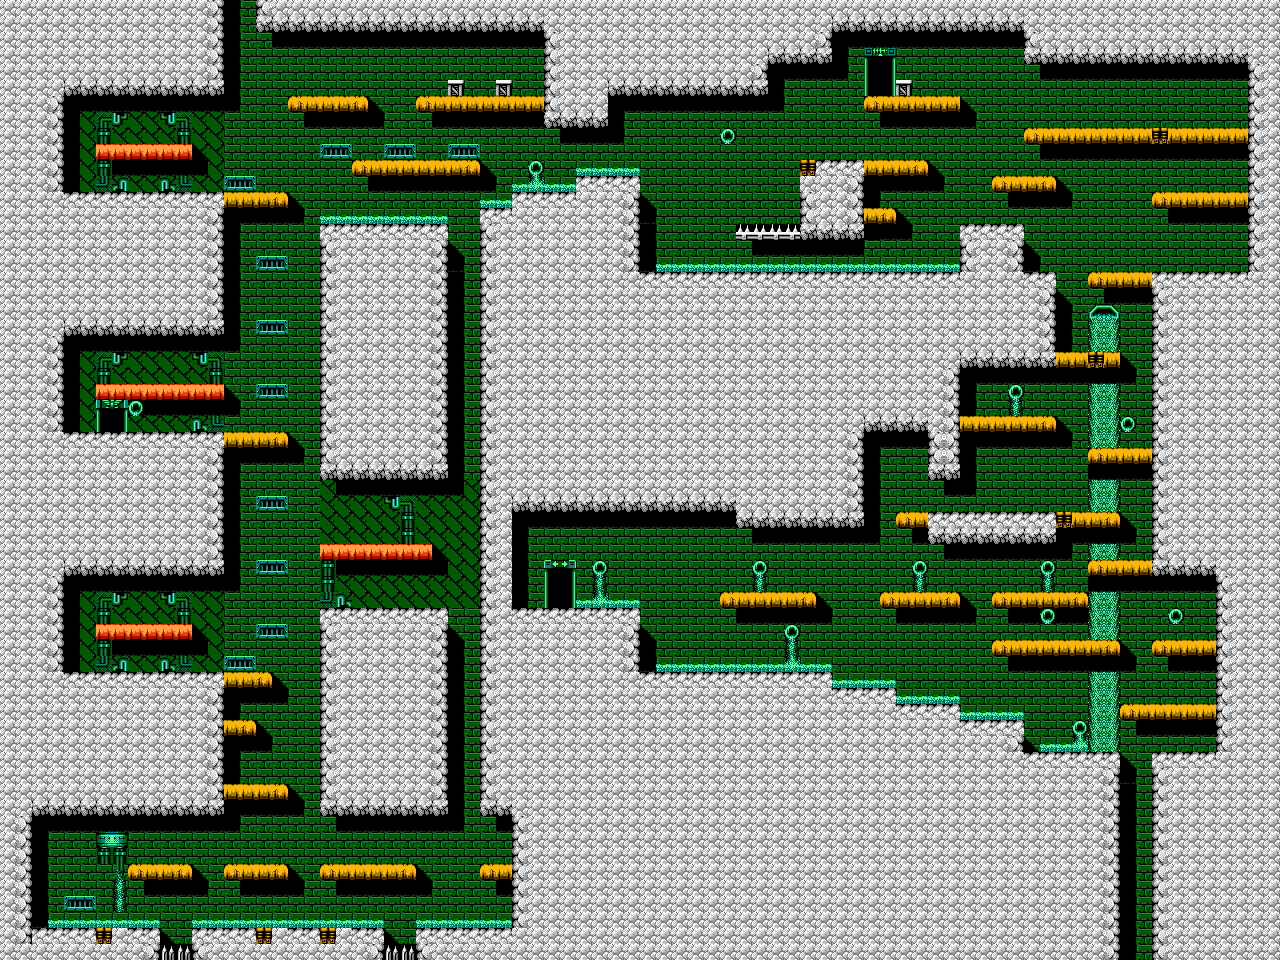
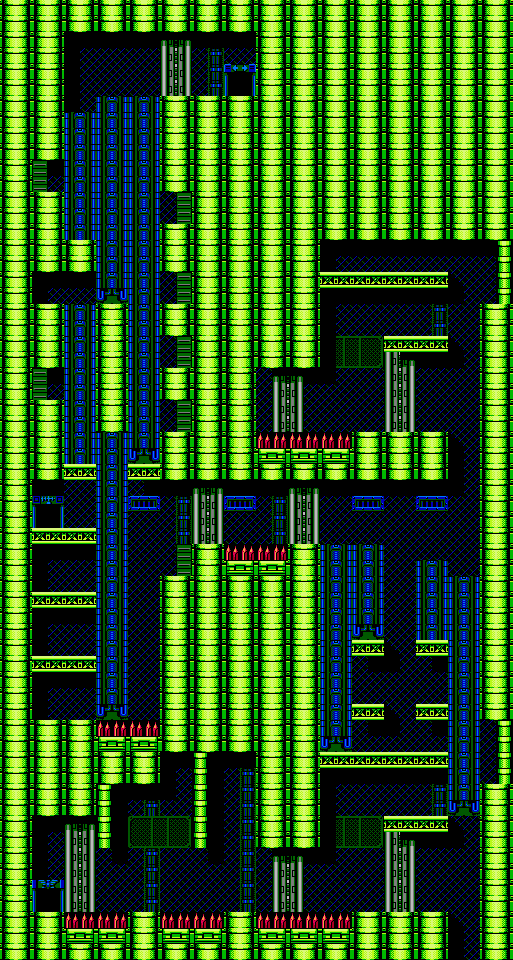
All maps are from The Bionic Commando Database, except for the neutral zone map by Thundard and the world map by Optimega.
Unlike other games of the time, you can't jump. Instead, you have to hang off of ceilings and other things with your bionic arm and swing to places you couldn't normally reach. You can aim it upwards and climb up the ceiling to another area, but swinging diagonally works a little differently. Press the D-Pad in the direction you're facing when you're hooked on something to swing from side to side, then press the opposite direction or Down to latch off and go in the direction you're swing. Pressing A lets you ascend to the highest point. The more space between you and the ceiling when you connect to it diagonally with the bionic arm, the bigger your swings will be.
Sometimes you'll find computers that you can use to communicate with your fellow troops. You can also wire-tap and find out what traps the enemy has ready to spring on you. Be careful with wire-tapping, as you can set off an alarm and send enemy units to come and attack you.
The items that look like bullets with green tips will give you extra health. If you collect ten of these pellets, you'll earn one extra hit point.
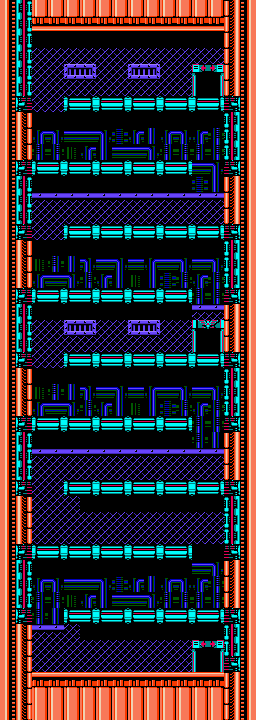
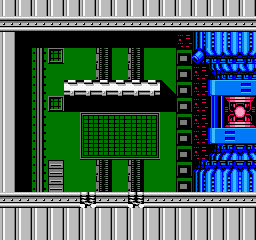
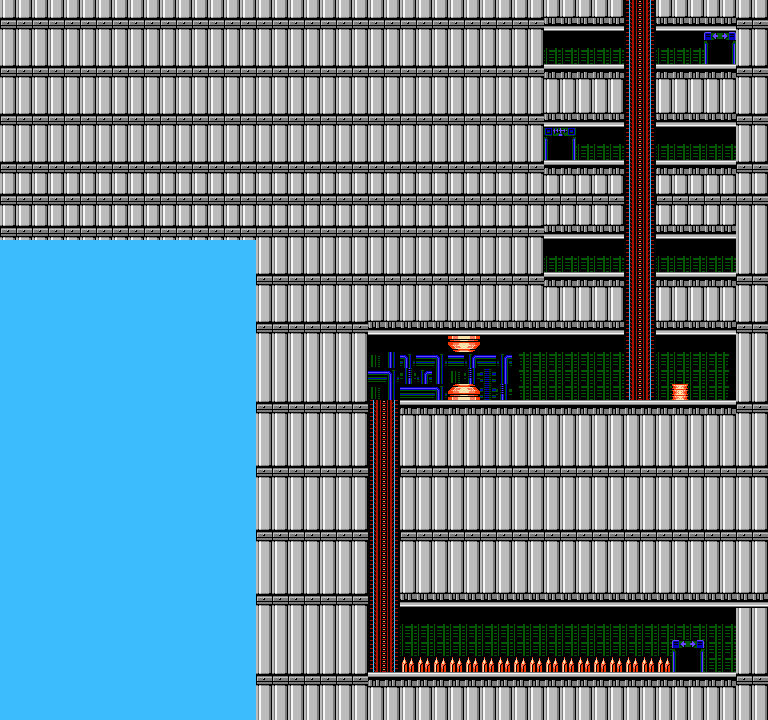
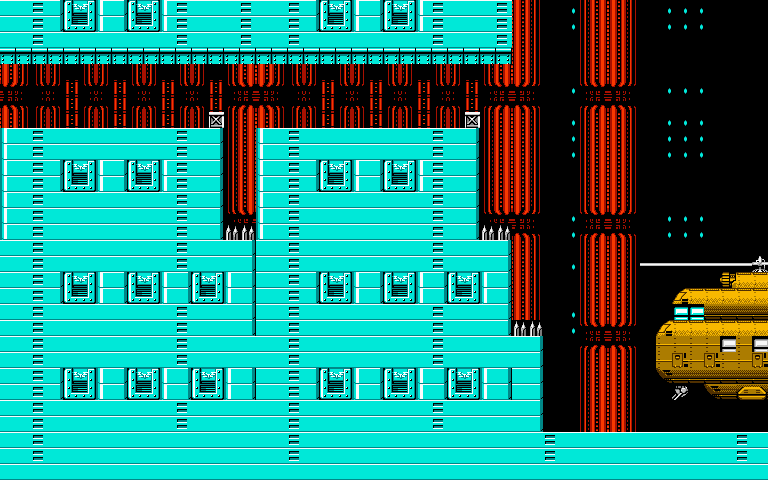
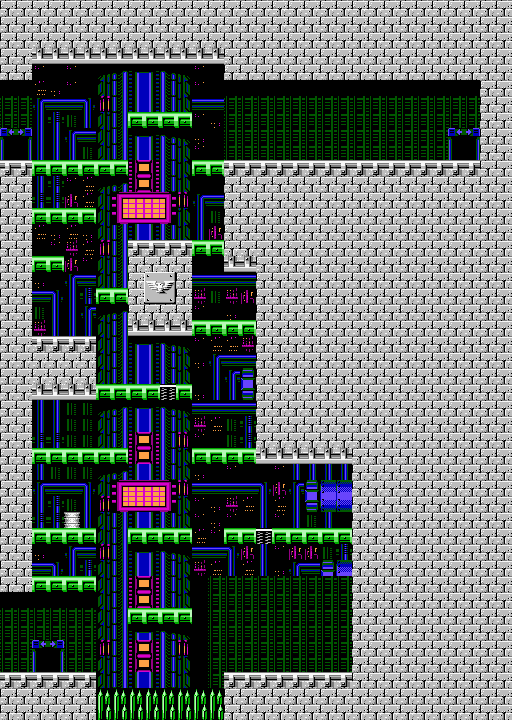
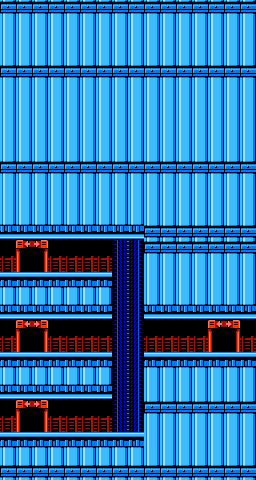
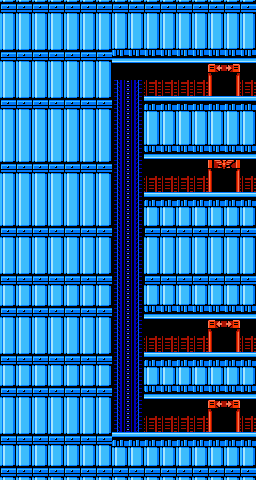
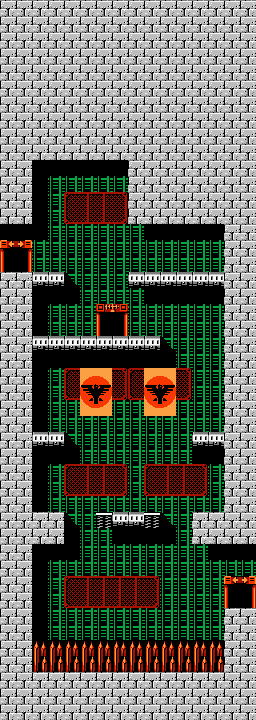
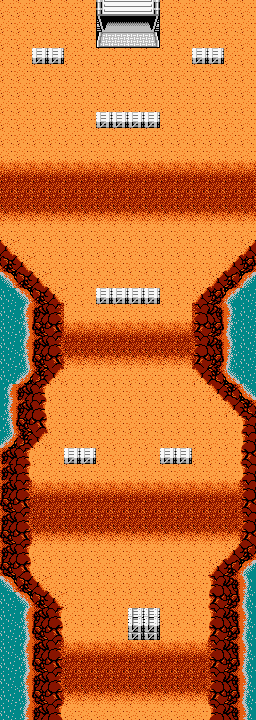
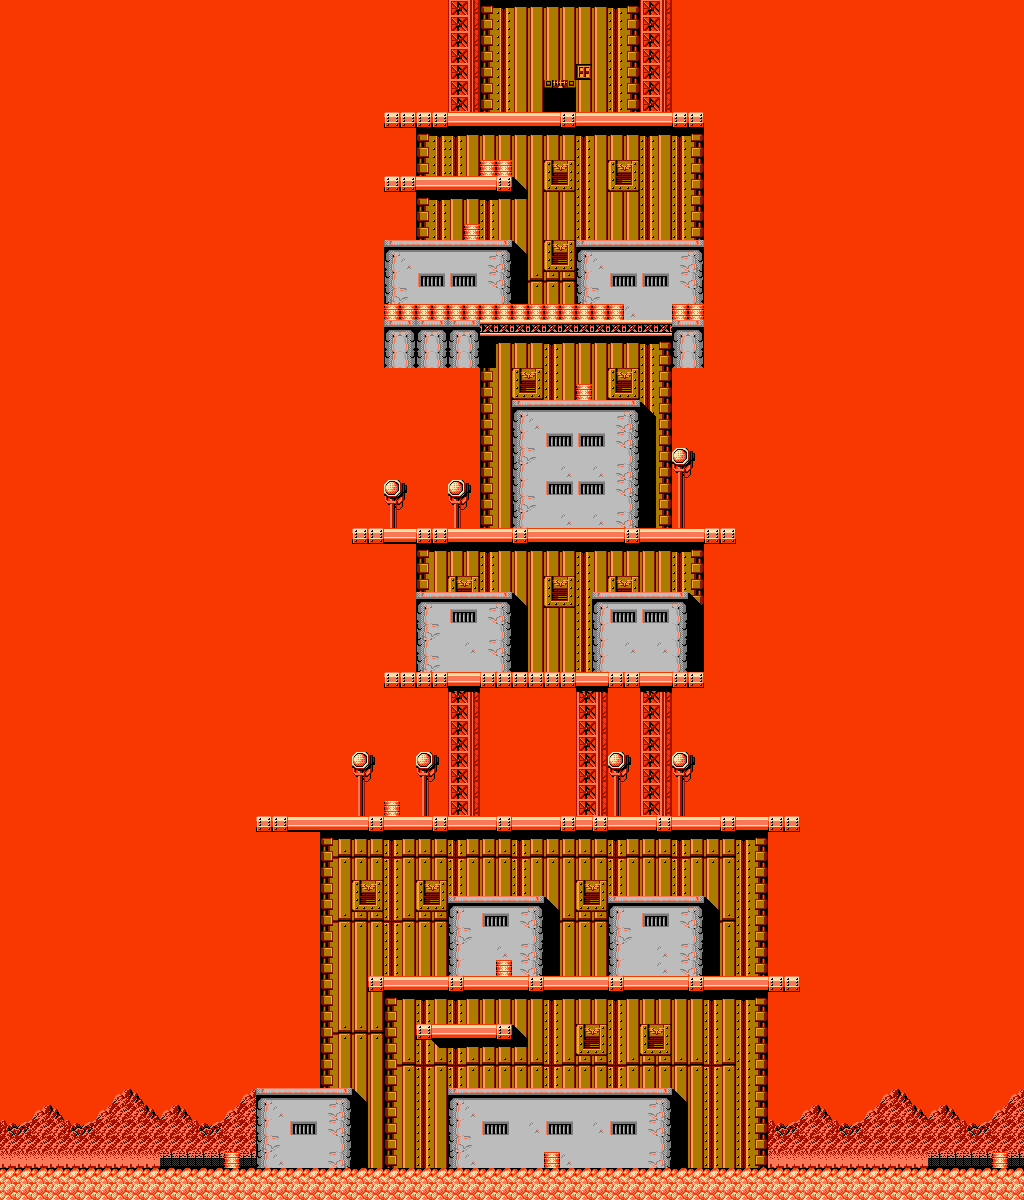
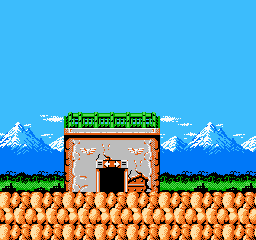
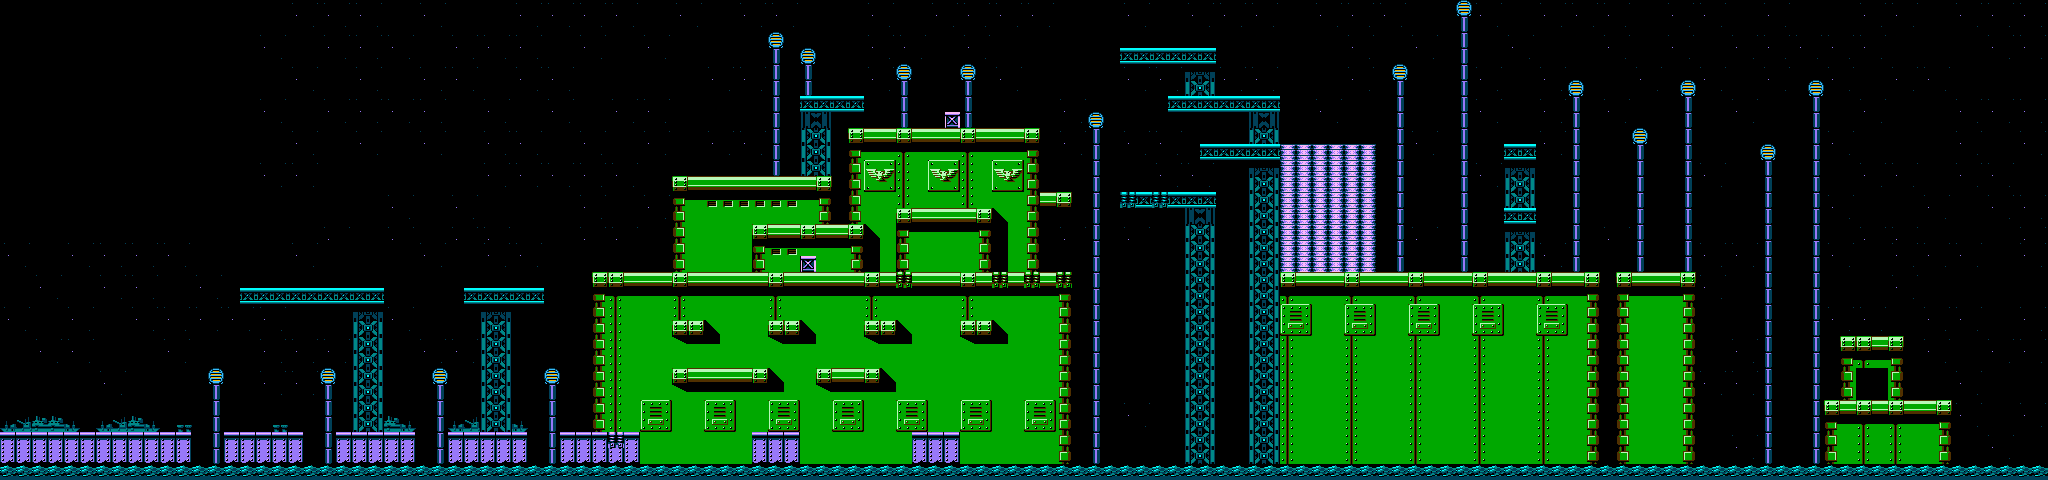
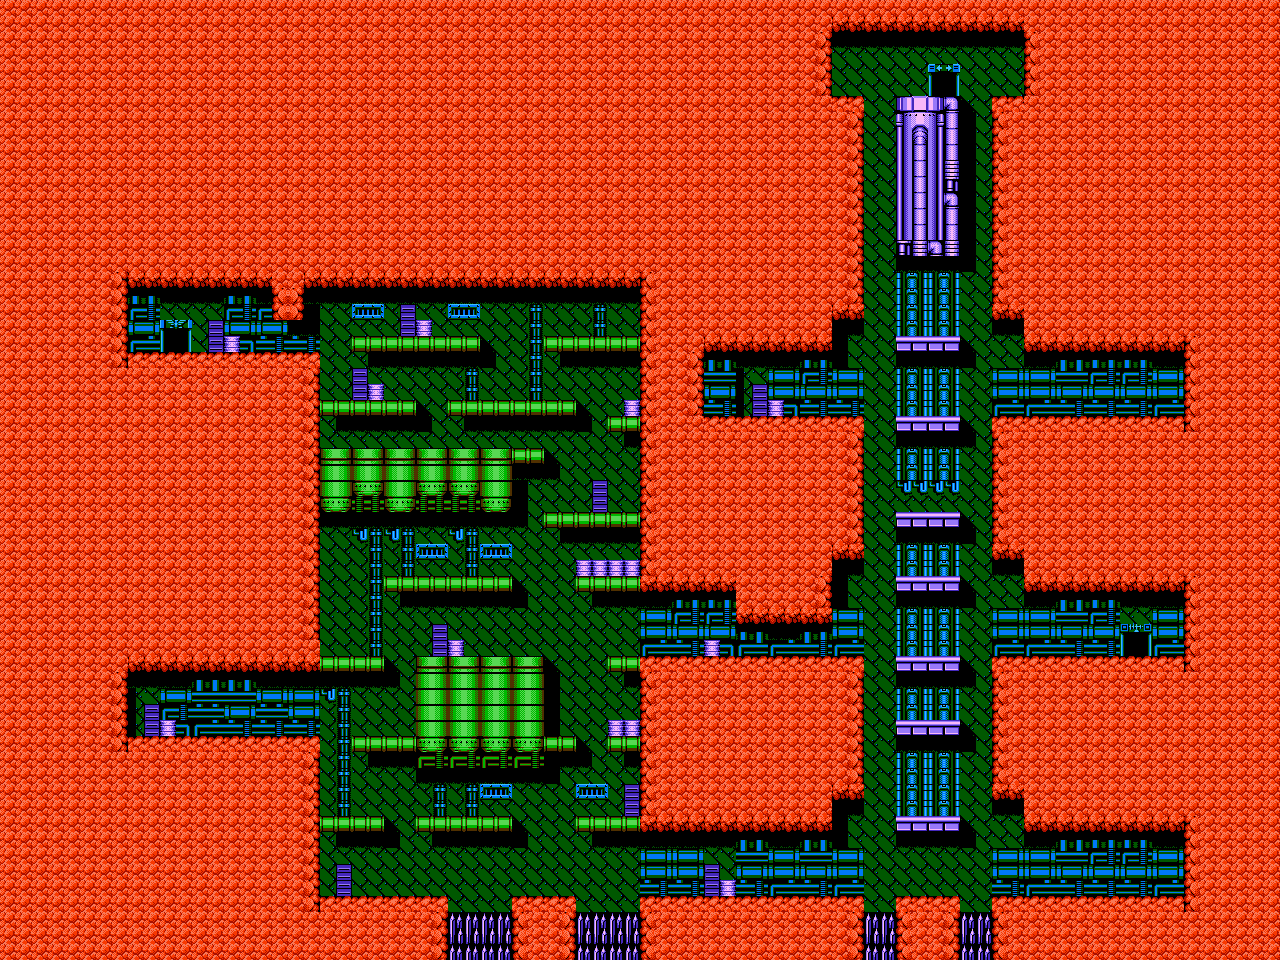
When you enter the door on the right island, you'll enter a fortress. As you deal with troops that parachute to your level and force fields that you'll have to shoot down, you'll find a computer at the right side of the area as well as the main reactor room to the right.
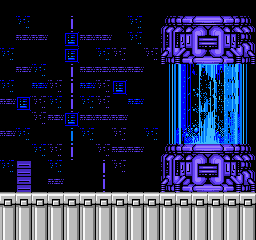
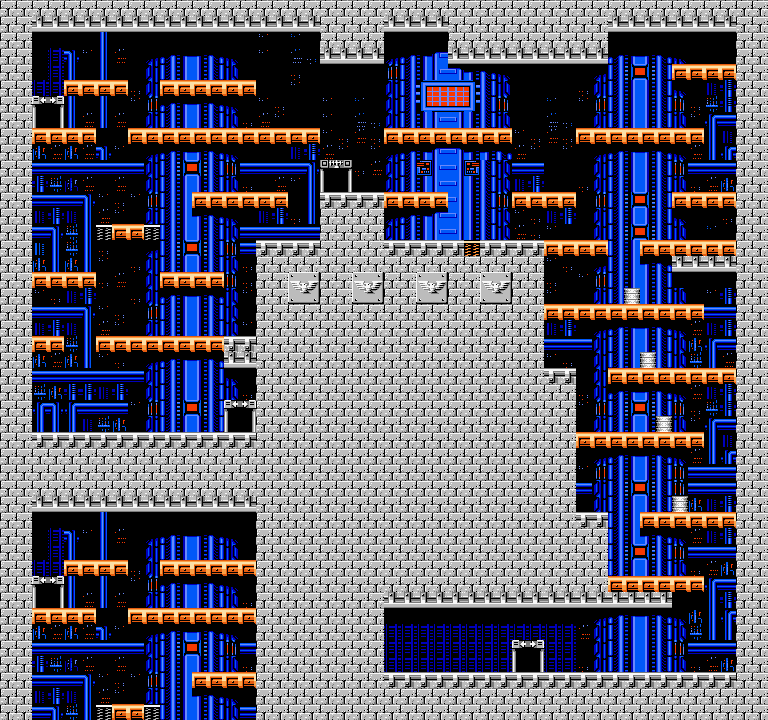
There are three kinds of doors, as signified by the archway above the door. If there are left and right arrows on the archway, the door will take you to other sections of the area. The archway that has what looks like a radio antenna is a communications room, where you can communicate with your agents and, if you're daring enough, wire-tap the enemy at the risk of being spotted and surrounded by enemies. The archway with what looks like a falcon on it leads to the reactor room, where you'll have to destroy the reactor to complete the area.
The reactor room battle here is pretty easy. Take out any enemy soldiers that are in your way as you shoot at the reactor core. The soldiers do more running than shooting, so you should be okay here.
For beating Area 1, you'll get 10 energy pellets and the Energy Recovery Pills. Equip them and press Start to refill your health.
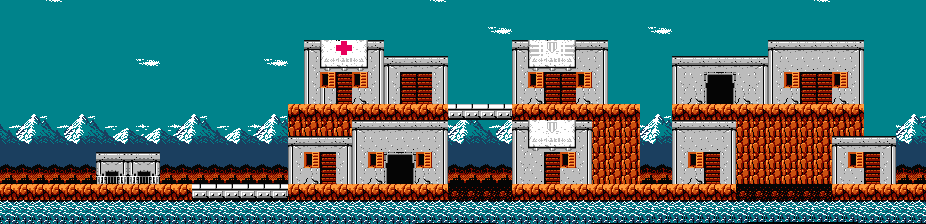
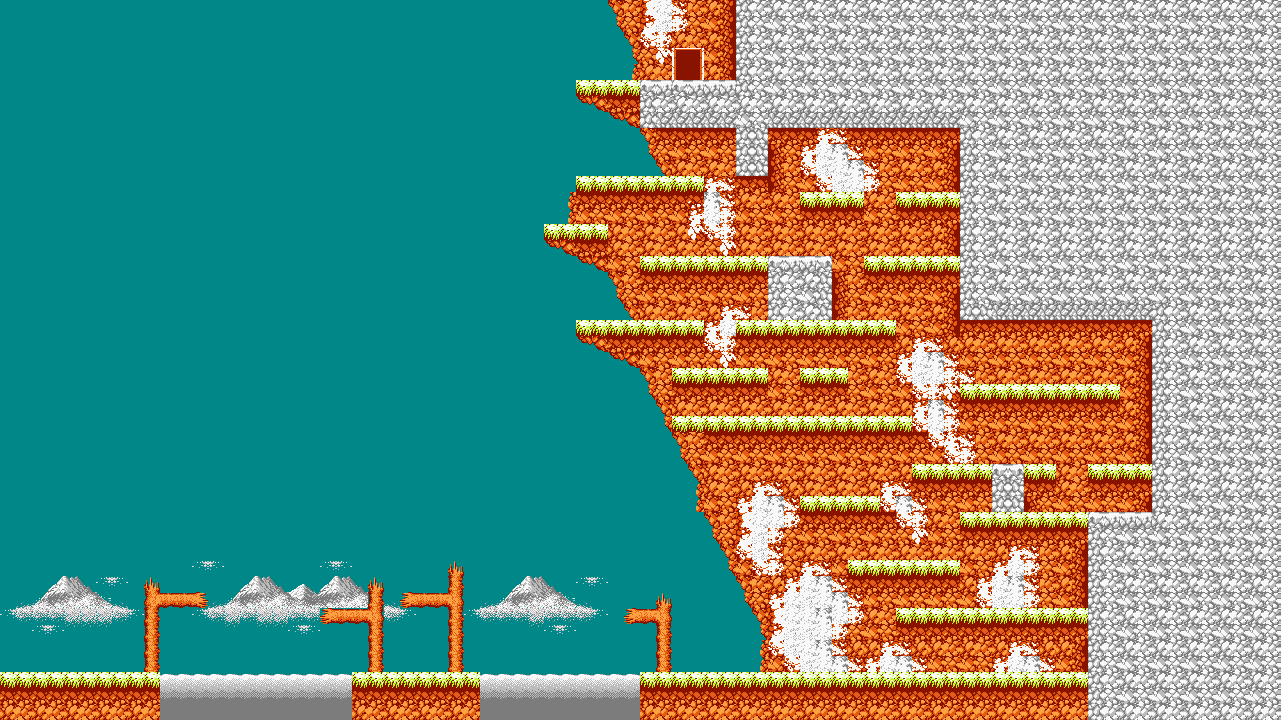
Unlike the white areas, the red areas are neutral zones. You can talk to both friends and enemies, but if you shoot at anyone, peacekeepers dressed in white will show up and shoot at you.
The first open door contains an energy pellet, and the second contains a flare. You'll need it for the next section.
Area 4
Since you have the flare, equip it before you go here. When you enter the dark cave, press Start and the flare will light the way.
You'll find the computer mid-way through, and you'll reach the reactor upon swinging over the huge pit after you climb further up.
The soldier in the reactor room will stay on the ground level. You do not want to be precisely above him as he will try to hit you with the grappling hook on his back. Use your own hook to swing over him and shoot down the main reactor before he catches up to you. As long as you're not on the ground, you won't have to deal with his running bayonet attack.
For beating Area 4, you'll get 10 energy pellets and the Wide Cannon. The Wide Cannon provides a three-way shot when equipped.


