Sunday, November 30, 2014

Goron50 plays Wario Land: Super Mario Land 3 - Part 8 of 17

We make some much needed headway through the game, getting two levels and almost wrapping up Sherbet Land!

Sherbet Land

(continued)


Course No. 17


You won't be able to destroy the cloud that flies around and shoots lightning bolts at you, so head to the right and stay out of that thing's way. Once you make it to the first door, the cloud will stop following you.

If you go into this door and make it to the door at the top of the ladder, you'll be able to find the key for this level. Head back to where you entered this area from and head further down to the right, and enter the third door. Get on the carriers and ride it up to the door. The bell is all yours, finally giving you Treasure E.

The seal with the harpoon gun at the end is pretty easy to avoid.

Course No. 16


Apparently, I forgot that the secret room here that I mentioned in the last entry also took you to a door that leads you to the secret exit. Also, while you're in the ceiling, you can keep jumping up and down for even more coins, which explains why there's a lot of coins in this level. Go figure.

Course No. 18


There's a keyhole at the very beginning of the level, but how are you going to open it?
Well, it's pretty simple. Take the platforms over the first spike pit, enter the door, and hit the ! Switch. Instead of going through the door below it, though, go back through the door that you entered this room from. You'll find that a ladder has appeared next to it. Climb up the ladder and go right to find another door. The middle block in the set of three blocks in the next room contains the key.


To get it takes a little bit of work, but not too much. Keep going right, enter the door, and go down until you reach the next one. There, you'll find the ! Switch. Hit it and leave the room, and you'll be able to head back up to the key and get it. Take it back to the keyhole, and you'll get Treasure F, the magic lamp.

Goron50 plays Wario Land: Super Mario Land 3 - Part 7 of 17

Oh, man. After that suspension bridge level of doom, we get another treasure as well as an optional boss battle! Good times!

Sherbet Land

(continued)


Course No. 15


The hedgehogs can only be attacked from the front. I wouldn't want to get near them from behind unless you want to get damaged by their spikes.

You've probably already seen the penguin guy before at the beginning of the game, but here he is as an enemy. He throws a spiked ball at you if he sees you, but it only has a limited range.

The carriers change direction whenever you jump on them. It's right, up, left, down, then back to right where the pattern repeats itself, in case you want to know what direction you get as you jump on it.

Course No. 16


The key is in the first block of the level. Take it to the right to the second set of half-broken bricks. Leave the key nearby and break through them to open up a door. Get the key again and take it through the door. Make your way across the set of platforms (be careful not to slip up on the ice) and take the key to the keyhole. Throw it in and you'll get Treasure D: a shield.

The lone coin at the beginning of the second section hints at a hidden block. Try to get it from underneath, and you'll uncover this block. From there, you can stand on the block to get the coin and jump into the ceiling. Go right, and you'll eventually drop into a hidden room where you can get even more coins.

The exit that's up in the air at the beginning of the third section is the secret exit.

Course No. 19


The first two sections are pretty simple, but the third section has more evil logs! And it's not the suspension bridge kind, either. Instead, you'll have to deal with logs sharpened on one side that move back and forth and block your path.

Forgot how to take care of the snowmen: avoid the snowballs they spit out and take them out like you would a regular enemy. That's it, really.

You could exit this level normally through the door, but to beat the penguin, all you have to do is jump onits head. It will drop down into the water and come back with a spiked helmet on its head. Tackle it from behind to knock the helmet off, then jump on its head like normal. Everytime you jump on its head, it will move around faster than last time. When you jump on its head three times, you'll get four giant hearts that give you three 1-Ups each, giving you 12 extra lives. You'll get this instead of coins, though the hidden room with all the coins give you more than enough reason to come back here and farm for the necessities when necessary.

Unlike the other bosses, you can fight the penguin over and over again! You can farm lives pretty quickly with this stage!

Course No. 16


Remember that set of blocks and coins that make up a staircase? Well, you'll have to be Jet Wario here. Hit the ! Switch at the end of the stage as normal, but keep going left to this area. The coins will be replaced with blocks of ice (the same ones that blocked the normal exit.) Go up this staircase and follow the path, then go all the way to the right and hit the ! Switch. You'll be able to access the secret exit to Course No. 17.

Saturday, November 29, 2014

Goron50 plays Wario Land: Super Mario Land 3 - Part 6 of 17

We finally have two worlds to choose from instead of just one! Sherbet Island is the way to go, though, if you want to do all the courses in order.

Mt. Teapot

(continued)


Course No. 08


Remember that arrow of coins near the end that pointed upwards? Well, if you fly into it with Jet Wario from as high as you can, you'll be able to bounce off the wall and onto the top of the platform above, where you'll find another exit. Going there will take you to Sherbet Land, which you wouldn't be able to access unless you found this exit.

Course No. 12


If you throw an enemy onto the top of one of the owls, you'll be able to get three 10 Coins from it.

You'll have to be Bull Wario to get some of the coins in the second sections. Just jump so your head touches the bottom of the conveyor belts and hold Up on the Control Pad as you collect the coins. Be careful, as you don't want to accidentally let go of Up and fall straight into the abyss.

The third and last section has duck pirates that throw boomerangs. Thankfully, the boomerangs don't have much range, yet they seem that way here since you're jumping from platform to platform.

The big ! block at the end closes the lid on the top of Mt. Teapot. This will change Course No. 10 into Course No. 13. This is the boss level.

Course No. 13


This is like Course No. 10, but the geography of it has changed somewhat. The water isn't as high, and there is now ground where there wasn't ground before.

Remember that trail of coins that took us to that pool of water? Well, you'll have to go there again to finish the level. This time around, there will be a door. Avoid the Thwomps and get as many coins as you can while making your way to the door on the other side.

When you enter that door, you'll mee the second boss of the game: a Brahma Bull. This guy is really easy: all you have to do is jump into him from underneath, pick him up and throw him into the lava. You only have to do this one time, and once you do it, he's done. From there, pick up all the coins, and you're done with Mt. Teapot!

Sherbet Land

Course No. 14


After beating Mt. Teapot's boss, you'll be able to enter Stove Canyon. But since we've unlocked Sherbet Land, let's go there first.


Remember that segments of the bridge can still fall off when you stand on them.

Goron50 plays Wario Land: Super Mario Land 3 - Part 5 of 17

In this entry, we find two more treasures.

Mt. Teapot

(continued)


Course No. 10


There really isn't much to this level, to be honest.

Course No. 11


After dodging a zillion Spear Goons, you'll be able to get Treasure C, which is a crown. Hit the block at the bottom to get Jet Wario, then use the boost to make your way to the top. The key will be on the left and the keyhole door will be on the right.

The Starman lets you gain 10 hearts everytime you walk into an enemy. You won't see it that often in the game, but when you do see it, grab it. You'll be able to farm hearts until the music stops.


Watch out on the bridges at the end, as parts of it can break away when you stand on them.

Friday, November 28, 2014

Goron50 plays Wario Land: Super Mario Land 3 - Part 4 of 17

We get our second treasure and split a video before it's even over.

Mt. Teapot

(continued)


Course No. 09


Near the end of the level, there is a lone brick that's halfway broken. Break the brick, then get the key to the right. Go back to where the brick was and press Up. This is a hidden door. You'll find the keyhole door there.

The huge blocks carry either a huge coin or a huge heart. The huge coin is worth 100 coins. I'll mention the huge heart later.


Tackle the treasure box to get Treasure B: a harp.

Goron50 plays Wario Land: Super Mario Land 3 - Part 3 of 17

We get our first treasure and explore more of Rice Beach before exploring Mt. Teapot!

Rice Beach

(continued)


Course No. 03


Now that you've completed Rice Beach, it's underwater. Head back to Course No. 03. The quicksand is replaced with water, and the music is different. You'll find some blocks that weren't there before, and one of them has a key. Grab the key and take it back to the huge skull door with the giant keyhole. Tackle the treasure chest inside to get your first treasure: an ancient chalice. It will go into slot A.

You'll also be able to go past the normal exit, now that the room it's in is flooded. This takes you to the alternate exit, which takes you to Course No. 06.

Course No. 06


You'll be able to turn into Bull Wario at the end of the first room. Do it.

Use the Ground Pound to uncover the crabs, and tackle them to take the coins they carry.

This level is dead simple. Hey, at least you can farm on coins and hearts here.

Mt. Teapot

Course No. 07


Finally! Our first (real) swimming level!

The little balls with the craters on them are bombs. Throw them into an enemy, and when they flash, they're about to explode. The explosion can hurt you, but it can also hurt other enemies if they touch it.

Unless you're Dragon Wario, you won't be able to directly attack enemies underwater.

The hat that looks somewhat like a bunny turns you into Jet Wario. With Jet Wario, you can fly in a straight line for a few seconds, making your tackle super-long. You can also tackle in the air as well as underwater. Wario also runs a lot faster, too.

Also, the seahorses are really annoying on the first playthrough.

Course No. 08


You may have noticed it at the end of Course No. 07, but the water at the beginning of Course No. 08 pushes you back.

The pelicans spit bombs at you, while the sea urchins with the spike on their heads move up and down, trying to stab you.


The second to last section has that same moving water at the beginning, but the water moves different directions in different places. Pay attention so that you're not thrown right into a moving sea urchin, and use Jet Wario to make getting around a little easier.

Thursday, November 27, 2014

Goron50 plays Wario Land: Super Mario Land 3 - Part 2 of 17

We finish off Rice Beach and go through some more misadventures!

Rice Beach

(continued)


Course No. 03


Unlike the first two courses, the icon for Course No. 03 is a circle inside a circle. That means there's an alternate exit. You won't be able to reach it yet.

The spiked crabs can only be tackled when they're hiding in their shells. Of course, being Dragon Wario or throwing another enemy into them also gets rid of them.

If you already have the current helmet power-up you're using, collecting it again gives you ten hearts.

You'll have to mash the A button to get through the quicksand.

Course No. 04


Run away from the Thwomp! It's full of spikes and it'll kill you!

When you make it to the lava, wait for the Thwomp to show up, then take a ride on its head. Watch out for the bats!

Course No. 05


The pirate rats have to be stunned before you can tackle them into oblivion.

The Pencoons shoot the spiked ball out of their stomachs and kick them at you. If you can either hit them from behind or hit them while stunned, you can take them out of the picture.

The ! block acts as a switch. Jump into it from underneath like you would the regular blocks.


To beat the boss, avoid him as he spins around and either hold Up to hit him in the underside on his way back up (as Bull Wario) or jump on him on his way back down into the sand. After three hits, he's history! Collect as many coins as you can!

Goron50 plays Wario Land: Super Mario Land 3 - Part 1 of 17

Finally, after a zillion guides for the first game and a blind run for the second game, we have...another person who doesn't know what he's doing for the third game. lolsequels

Unlike the other Super Mario Land games, you play as Wario, the "villain" from the second game. Unlike the other Wario Land games, you have lives and an extra hit, and you can die here. Apparently, innovation hadn't really caught up with Game Boy games yet.

Nevertheless, this was one of the first games for Game Boy that I both played and beat, and I still pop this sucker in every once in a while!

Rice Beach


Once we see Wario trade his normal hat for a safari hat and go through the pipe for an empty save file, we start the game. There's only one place we can go on the World Map, and that's Rice Beach.

Course No. 01


Unlike the other Mario games, you have to tackle enemies to get rid of them. The normal guys can be taken care of really easily. They can't even kill you! The guys with the spears, however, have to be taken care of from behind or while they're stunned in some way.

You can use your tackle to break blocks and get coins, which you can also get from tackling enemies.

The blocks with the eyes are obviously SML3's version of the ? Blocks. Some contain coins, but others may contain hearts. These hearts are used to increase the amount of extra lives you can get, and when you get 100, you'll be able to get an extra life.

You can also crawl by either holding Down with Left or Right, or by walking into something that's too low to walk through.

Whatever you do, don't become Small Wario. You'll have to get garlic to turn back into Big Wario, and you're prone to a one-hit kill.

The Bull Hat changes Big Wario into Bull Wario (or Small Wario into Big Wario). Bull Wario has a longer-ranged tackle, increased strength (bricks take one hit to break) and you can even pound the ground by holding Down on the D-Pad on your way back down after a jump, stunning all ground-based enemies onscreen. You also hold Up to get Wario to stick head-first on the ceiling, which makes for some interesting (and sometimes more accurate) jumps.

Don't forget, you can also hold Up before a jump to jump higher. This makes for longer and higher jumps.

One of the ladders leads down to a long pit with a floor full of Nipper Plants. You won't be able to access this part of the course until a little later in the game.

When you reach the end, you'll be able to learn how to open the exit: by throwing a giant coin into it. You'll learn how to do it in the second course (or rather, the guide will show you).

If you're Small Wario when you finish a level, you'll turn back into Big Wario.

When you complete a stage, you'll get a choice of two bonus games. The first one lets you double your money, and the second one lets you go for more lives. We'll skip these for now.

At the end of every stage, the amount of coins you have at the end of a course will be counted and carried over to your total riches. You'll also see fifteen slots to your right, one with a letter of the alphabet. Those will come into play a little later into the game...

Course No. 02


The little guys that walk on the ceiling drop down on you when you're underneath them. Luckily, if you're Bull Wario, you can knock them off the ceiling and down onto the floor, where they're both vulnerable and helpless.

The platforms that continually lighten and darken can only be stood on when they are at least partially darkened. You'll see these kinds of platforms now and then throughout the game.

The spiky guys that hop around can only be destroyed by throwing an enemy into them (or with Dragon Wario).

The skulls with the coin slot above it are continue points. Hold Up and press B to produce a 10 Coin (the coin with the "plus" symbol on it), then throw it into the slot with B (it's a no-brainer to do). This is also how you open the exit doors. You have to have 10 coins to produce a 10 Coin.

The dragon face turns Wario into Dragon Wario. The tackle is replaced with a flame that comes out of the dragon helmet, and it can be used to destroy both enemies and blocks in one hit.


The bonus game with the coin has two buckets. One has a bag of money inside, the other a 10 pound weight. Pull the string on the bucket and one of those two things will fall on your head. Obviously, you want the bag of money, as that doubles your end-of-course earnings. The weight cuts your earnings in half. You get three tries.

Wednesday, November 26, 2014

Gibbcore

Still awesome after all this time.

PrinceWatercress plays Felix The Cat - Part 9 of 9

The final battle with the Professor begins!

Level 9-1


Wait...if the professor is in outer space...how was he calling us down on Earth all this time?!?

The biggest pain you'll deal with are the rocks. Other than that, this is a fairly short level.

Sometimes there will be small octopi jumping out of the watery pits, sometimes there won't. Stay near one for a second or two to see if one comes out before jumping.

Level 9-2


This is basically more of the same, and just as short.

Level 9-3


This isn't really a maze, guys. The whole "run all the way to the right" mentality is still here like it's been every level. Getting to the boss is the tricky part...watch out for those moving Professor heads lining the walls.

The boss room has three bags. If you need magic and/or "hit points," hit up the three magic bag warps for Felix Heads, milk bottles and magic hearts.

The professor is just as easy as everyone else. Stand between two bags and stay close to the professor, mashing the attack button as you move around. He'll keep orbiting over you in a semi-circle and will never waver from this pattern. If you duck into one of the bags, the Professor's hit points won't refill, so don't worry about that.


When you beat him, Felix will finally meet Kitty and they'll return to Earth. Enjoy your no credits.


Tuesday, November 25, 2014

PrinceWatercress plays Felix The Cat - Part 8 of 9

CATS IN SPACE

Level 8-1


There's only one level in this world, and it's a bit of a doozy. If you lose all your magic or get hit here, you'll fall straight to your doom and there's nothing you can do about it. Collect as many Felix Heads as you possibly can.

The spaceship has only one level of magic, so every time you get a magic heart in this level, you'll get a one-up. At least your magic is refilled every time you pick one up, so every magic heart and milk bottle you can get your hands on is essential to making it to the end.

The aliens are pretty evil. They come at you and shoot at you, stop at the left side of the screen, and move all the way back to the right in some sort of hyperbole-like pattern.

PrinceWatercress plays Felix The Cat - Part 7 of 9

...and the ice physics continue...

Level 7-1


We're still in the North Pole? What is this? Is the Professor's lair supposed to be in this area? I don't get it.

Even though the snowballs that are as big as you seem indestructible, you can still destroy them with your attack.

Level 7-2


Guess what? The bats from World 2 are back.

There's a bunch of blocks in the level that spell out the word "Felix." If you go up to the top of them, you'll find out the tops of the letters are made out of Felix heads. There's also a platform before that which takes you to the magic bag warp.

Another two-level world. Guess what? The boss here is a rematch with Poindexter. He attacks the same way, but this time he shoot snowballs instead of balls. They still fire at a very high arc (about an 85 degree angle), and the tactics are woefully the same: stay in close and just keep attacking him. This game's bosses are way too easy.

The Professor taunts you one last time. It's the final battle!

Monday, November 24, 2014

PrinceWatercress plays Felix The Cat - Part 6 of 9

At this point, we got not one world, but two worlds' worth of ice physics!

Level 6-1


And now, we have our obligatory ice level...as well as another surface swimming level!

The fish in the water now shoot at you like the cannons do...except they shoot at a 45 degree angle and move at the same time. Unless you have the Dolphin Magic, these guys can be a pain in the ass. Thankfully, there's a weakness in that attack: they can only shoot at you when they're at the very surface of the water.

Level 6-2


Felix, you're swimming in sub-zero temperature water. What's wrong with you?

Unlike the other worlds, this one has only two levels. Guess what? We're fighting Master Cylinder again. This time, he's still easy and he fires nothing but bubbles. He still moves around the same way. Fail.


Also, the Professor decides to taunt you for no reason. Again.

Michael Rosen as a Nyan Cat

I couldn't think of anything else. I'm so sorry.

Sunday, November 23, 2014

PrinceWatercress plays Felix The Cat - Part 5 of 9

I hate this round. Seriously, I hate this round.

Level 5-1


A simple hike in the mountains, this is not.

The only real hint of use here is that if you enter the magic bag warp near the beginning, you'll skip a little bit of the level.

Level 5-2


The green hedgehogs that run around in this level throw rocks at you similar to how the cannons in the earlier levels attacked. Yeah, they're like cannons except they move, which can be pretty annoying.

Level 5-3


We're back on ground level, and this time there's a forest we can traverse through.

The boss here is Evil Felix. Evil Felix has a gun and wears a cowboy hat. He just moves in one direction and occasionally shoots at you, moving at twice his normal speed when he does. Whenever you hit him, he gets knocked back.


If you wait at the very left side of the room and keep shooting at him, you won't have to deal with much.

PrinceWatercress plays Felix The Cat - Part 4 of 9

In this episode, we see two new types of gameplay that we'll see only once or twice through the entire game. Also, the difficulty goes down just a tad.

Level 4-1


This is far from a tropical vacation, Felix.

The birds take a few steps before stopping to jump. This can be annoying at times, since there's the chance of them jumping right into you when you're trying to avoid them.

Level 4-2


Our first surface swimming level. If you collect a magic heart, your robot will change into a dolphin, and you'll able to throw energy balls.

It should also be noted that if you make it a certain distance through the level before you die, you won't have to repeat very much.

Level 4-3


Welcome to the swimming levels. Here, you start out with a snorkel and a punch glove. If you upgrade your magic, you can get a bubble-spitting turtle before you can finally upgrade to a submarine!

The boss here is Gulpo. He's just like Master Cylinder, except he has two attacks instead of one. The first is the bubbles. Thankfully, they're easy to avoid. The other is the word "BLOB!" traveling towards you twice as fast as the bubbles. He always shoots two bubbles before shooting a BLOB!. The more you hit him, the faster his attacks come. Thankfully, you can fight him the exact same you did Master Cylinder and get away with it.

For 100,000 points and every subsequent 200,000 points, you'll earn a 1-Up.

When you complete World 4, you'll be taunted by the Professor. Again.

Saturday, November 22, 2014

PrinceWatercress plays Felix The Cat - Part 3 of 9

In this episode, we have to deal with tons and tons of platforming. Also, here's where the first death of the Let's Play is.

Level 3-1


The Tank is best for this level, since you can attack some of those egg creatures (or whatever it is those white things are supposed to be) from a higher distance.

Overall, the game is still pretty easy.

Level 3-2


Watch out with those snails. They'll jump up and down whenever they keep landing in those bottomless pits. Also, you may remember the cannons from Level 2-1. They're back with a vengeance, and they're a little harder to avoid since you're not in a floating level.

You may be better off with the Motorbike instead of the Tank, since you'll be able to attack straight in front of you, at least.

3:39 - That death hurt just looking at it.

Level 3-3


We're flying again!

We finally get to see the Airplane in action. For once, attacking in a straight line is a bona-fide privilege, and the energy ball attack you get with it is really good.

There are a lot of walls here. You're better off staying at the lower half of the level, if only to avoid the cannons. At least you'll find a magic bag portal in that half.


The boss here is Master Cylinder. Move around so that whenever he fires his laser, he'll automatically miss. Just stay in close and keep moving up and down and you'll take him out with no problems.

PrinceWatercress plays Felix The Cat - Part 2 of 9

In this episode, we see the first of a few flying gameplay stages before exploring a pyramid.

Level 2-1


Welcome to the first floating stage of the game. Here, whenever you're in the air, Felix will be airborne in some fashion.

Notice you don't have your magic here. The game resets your magic when you enter different types of stages.

There are three levels of magic in the floating stages. The first is an umbrella and a punch glove, the second is a hot air balloon with frisbees, and the third is an airplane with an energy ball.

This one's not too hard. Just fly all the way to the right and try not to hit anything.

The smiling blocks can't hurt you, in case you're wondering. They act as platforms, and you'll see them more often in the later levels.

Level 2-2


We're back to manning a tank. Awesome. We're also inside a pyramid.

The bats fly around in a circular pattern that's easy to avoid. Other than that, the enemies still shouldn't give you too much trouble.

Be careful in the part with all those springs. You don't want to go flying high somewhere and accidentally run into an enemy.

Level 2-3


Even though there is some at the beginning of the level in Level 2-1, it should be noted that the lava where the skulls pop out of (similarly to Podaboos, I might add) should not be jumped into.

At the end of the stage, you'll fight Rock Bottom. He's pretty easy to fight as well. Just hit him and avoid the bullets he shoots out of his gun. That's it, really.

After the second boss, you'll get another call from the Professor where he taunts you. Well...

Friday, November 21, 2014

PrinceWatercress plays Felix The Cat - Part 1 of 9

Well, it's high time I covered my own playthrough of the game.

Anyway, you're playing as Felix, and you're saving his girlfriend Kitty from The Professor. Commentary that gets slightly better than past LPs up until this point as well as the locations of all the Professor heads that carry 1-ups will both be front and center here, so pay attention to the vids if you want to know where all the lives are at.

Level 1-1


The controls are pretty simple. Pressing B lets you use a punch glove, but you'll be able to get stronger attacks.

The Felix Heads give you an extra life every time you collect 100, but in the meantime you'll get other power-ups from them as well.

When you reach a total that ends in 0, you'll get a magic heart. This gives you a magical power that lasts for a limited time, as signified by the ten hearts on the upper-left corner of the screen. If you keep collecting magic hearts while you have magic, you'll be able to power your attack ability up. It goes from Normal Felix to Magician Felix to a motorbike to a tank. If you have the tank when you collect a magic heart, you'll get an extra life, so make it a big priority to not get hit!

You also get extra lives for getting 100,000 and reaching every subsequent 200,000 points on the scoreboard.

When you reach a total that ends in 5, three milk bottles will appear. They'll give you 500 points each, but if you have a magic attack on hand, you'll refill two hearts on the timer for each one you collect, making the Felix heads you'll find throughout the game essential.

The ! blocks fall apart when you stand on them. They're not very dangerous in this level, but they're pretty deadly in the later ones, so watch out.

If you find a giant magic bag, jump into it. You'll find yourself in a room that usually contains Felix Heads and other power-ups. You won't be able to leave the room until you collect all the heads...which is a good thing.

Anyway, this is a pretty simple level. Feel free to get a grasp on the basics here.

Also, you'll see white, cloud-like heads that look like Kitty and the Professor throughout the game. Sometimes, if you attack one of these a couple of times, you'll find a 1-Up, so do take some time to attack some of them a bunch of times and see what happens! ultimachocobo86 will find some that have 1-ups throughout the game, so pay attention!

Level 1-2


More stuff to mention here.

If you get hit while you have magic, you'll go down one magic level. If you have no magic, you'll die.

Remember me saying that the ! blocks would prove deadly? Well, here, they do. They block off a bottomless pit. Thankfully, they're pretty easy to jump over.

Also, the magic bag that's in this level has a ton of Felix Heads, so take the spring below it up and jump in.

Level 1-3


This isn't much harder than the other two.

There are two bags in this level. The first one is midway through and contains some Felix Heads. The second one is at the end of the level. Go down this one and you'll take on Poindexter.

He's really not that hard, especially if you have the tank. Stay close to him and his balls shouldn't hit you at all. The more powerful your magic, the less hits it takes to destroy him.

Screen Warp Glitch And Other Stuff

Here's what you can do with the screen warp glitch in the original Game Boy release, which was removed in subsequent versions of the game.

Also included: some other nifty tricks, such as the flying rooster-boomerang trick.

Thursday, November 20, 2014

HCBailly plays Link's Awakening DX - Part 32 of 32

The epic conclusion!

Overworld maps by Osrevad. Dungeon maps by Revned.


Go into the egg. Go north and enter the pit, and go the same directions that you got from the book in the library. When you reach the end, you'll find a pit. Jump inside and you'll meet the final Nightmare.

The first form is a black blob. Hit it a couple of times with the Magic Powder.

The second form is similar to Agahnim from A Link to the Past. Hit the fireballs he sends at you back at him with the Whirlwind Slash. He does have a fireball that just splits up when you hit it, but he doesn't really use it that often.

The third form is Moldorm. Hit the tail with the Whirlwind Slash. He fights just like he does in A Link to the Past.

The fourth form is Ganon. Hit him with the Whirlwind Slash until he falls, and watch out for both the fire bats and the staff that he throws around. At least you don't have to worry about parts of the floor falling out like in A Link to the Past.

He'll then change into a ball and come at you. Hit him with either a Whirlwind Slash or the Magic Rod.

You'll then meet it's final form: a face with one eye and two spinning orbs. Equip the Roc's Feather and the Bow and Arrow. Jump over the arms, and hit the eye with the Bow and Arrow when it opens. After about 16 or 17 hits, he's done. You can also kill him in one hit with the Boomerang.

Once you've beaten him, go up the stairs to the north and you'll meet the Wind Fish and get off this island! You've won!


HCBailly plays Link's Awakening DX - Part 31 of 32

Whaddya know? We make even more sense out of it and complete the dungeon!

Overworld maps by Osrevad. Dungeon maps by Revned.


Turtle Rock
(continued)


The Magic Rod can also be used to melt the ice blocks that block your path to the Nightmare's Key.

To beat the Nightmare here, zap it to death with the Magic Rod while avoiding the fireballs that come out whenever it jumps around in the lava. It has a second form, but it's still pretty easy (much like the bosses in the rest of the game).

When you beat the Nightmare here, you'll get the Thunder Drum. It's time to go to the egg.

Koholint


Head back to the Mabe Village library. Read the book on the very lower-left. Since you have the Magnifying Glass, you'll find out where to go when you enter the egg. They're different each time you make a new game.


Head back to the egg. You'll meet the Owl one last time, and you'll finally be able to play The Ballad of the Wind Fish. The other eight instruments will join in, helping you...open a door into the egg. What.

Wednesday, November 19, 2014

HCBailly plays Link's Awakening DX - Part 30 of 32

In this entry, we make progress in Turtle Rock and make a lot of sense out of it at the same time.

Overworld maps by Osrevad. Dungeon maps by Revned.

Turtle Rock
(continued)


To the east of the first room after the entrance, you'll have to poke the walls with the sword to find the secret room with the switch in it. When you find the part of the wall that makes a metallic clang noise with the sword, that's your cue to blast that part with a bomb to find it. This room is crucial, as you won't be able to complete this dungeon without reaching it.

One of the stairs that leads up takes you to a dead end. If you're low on supplies, go over here. It's pretty helpful.

The mini-boss with the boxing gloves can be taken care of very easily with the Whirlwind Slash. If you've hit the switch I mentioned earlier, congratulations! You'll be able to get the Magic Rod, which works like the Fire Rod in A Link to the Past.

The stairway in the wall that goes up in the upper-left corner of the dungeon takes you to the final Heart Piece in the game. It's very easy to get, thankfully. If you go east from here, you'll find a teleporter. Keep going east, and you'll be able to reach the upper platform in the room where the worms that have to be killed with Bombs to the mouth are. This way, you'll be able to open the chest that pops up after you kill them.


Remember those torches near the beginning that we couldn't light earlier because we couldn't reach them? Well, with the Magic Rod, we can!

HCBailly plays Link's Awakening DX - Part 29 of 32

Now that the seventh instrument has been collected, it's time to go for the eighth and last.

Overworld maps by Osrevad. Dungeon maps by Revned.


When you beat Eagle's Tower, the Flying Rooster returns to the Hen House.

The final photo for the Album is the lone platform with the bush (that has a monster on it) that's east of the hen house. Cross the bridge to get there, and when you make it there, the Photographer will automatically show up.

Go west of the Hen House, and you'll find Marin stranded on a lone area of the broken bridge. Just hookshot to the other side and you'll rescue her. Tarin shows up and then he and Marin walk to the left. (Apparently, I was mistaken. This is the last time you see him.) The Owl shows up and tells you that she sang The Ballad of the Wind Fish in front of the egg. No wonder she was up here in the mountains! He also tells you that the final dungeon is in the west.

Go west again, and you'll find a staircase leading underground underneath the bush. There is a part of the wall in the south end of the screen that you can bomb. Blow it up, then follow the path to find a Heart Piece.

When you make it to the other side, you'll find a lone rock. Pull it out with the Power Bracelet to find yet another underground well. Use the Magic Powder on it to get the ability to carry more arrows!

One screen west, drop down to the south. Bomb the opening in the wall and follow the path to...come across a flamethrower! Since you have the Level 2 shield, you can equip it and use it to get past it. Once you're at the other side, you'll finally be able to make it to the Turtle Rock dungeon. Play the third song to open it up. You'll wake up the turtle head, and it will crane its neck out to try to attack you. Swing at it with your sword as quickly as possible, and it will very easily die. Now you'll finally be able to go in.

Turtle Rock


The flying demons should be killed as quickly as possible, otherwise he'll start moving around the room, spitting fireballs and become even more of a pain in the ass. You'll have to kill the two bats he splits into, and you'll have to do that to get some of the puzzles completed.

The little machines can be controlled with the Control Pad as soon as you walk into them. Use them to get rid of lava and pits.


You won't be able to get to those two lamps quite yet...not unless you have the item for this dungeon.

Tuesday, November 18, 2014

HCBailly plays Link's Awakening DX - Part 28 of 32

We finish off the seventh dungeon!

Overworld map by Osrevad. Dungeon maps by Revned.

Eagle's Tower
(continued)


The miniboss is a skeleton guy with a flute who calls bats out to run you down. If you kill all six in one go, you'll beat the guy.

To get the Nightmare's Key in the room to the north, push the blocks so they both touch each other.

You'll meet the one-eyed bomb throwing cyclops again, but he's a real pushover this time. If you fall into the pit to the left of the key, you'll be able to get another Secret Seashell if you're still looking for them.

When you destroy all four pillars, you'll cause the tower to lower, reconfiguring the center four rooms in 3F.

When you make it to the tower, you'll meet the skeleton kid again. He'll call out a giant eagle and take a ride on him, and the eagle strikes. Hit the eagle with either the Sword or the sword beams (if you have the Level 2 Sword), and use the Shield to guard against both the wind and the feathers it shoots at you. If you fall off the tower, you'll have to get back up here and start this battle all over again.


You'll be rewarded with the Organ of Evening Calm when you go back into the dungeon. You're next and final stop is...somewhere. The music of the Ocarina leads somewhere, but...where?

HCBailly plays Link's Awakening DX - Part 27 of 32

In this episode, we start exploring the Eagle's Tower, which is probably one of the more interesting dungeons in the game.

Overworld maps by Osrevad. Dungeon maps by Revned.


On the other side of the cave you flew through with the Flying Rooster is the Hen House. Unless you've don't have the Flying Rooster, this guy is basically useless.

Southeast of the henhouse, there's another cabve. Place a bomb near the wall on the lone tile of dirt to find a secret passage that leads to five chests on one screen. They all contain 20 Rupees, so don't expect a Heart Piece here or anything.

If you open one chest, you'll open all five when you leave the screen and come back to it. The reason for this is that every screen with a chest usually has one. If you open the chest, the game will know it. Since the programming for the rooms with chests assumes that there's only one chest there, opening one will open them all when you leave the screen and come back to it. Interestingly, you can easily open all five by leaving through the south without opening any of the chests and going back in.

The chest south of that exit contains another Secret Seashell if you haven't gotten the Level 2 Sword already. The caves will eventually lead you to the Eagle's Tower. Place the Bird Key in the keyhole in the rock and you'll open the door to it.

Eagle's Tower


A lot of enemies and obstacles that you see here are definitely from the last six dungeons.

This is also the only one with individual floors, albeit really small floors.

The mummies don't get knocked back when you hit them with the Sword, so stay on the move as you kill them (or use your Sword Beam if you have the Level 2 Sword).

The orb is used to destroy the pillars in this dungeon. Grab it with the Power Bracelet, take it to a pillar and throw it at the pillar to destroy it. If it falls into a pit for any reason, the orb will reappear where you first found it.

Throwing the two horses so they land right-side up gives you the Map. The three guys with the pips will give you the Compass.


The room on 2F with all the switch blocks that block your way to the chest contains the Mirror Shield. You'll have to either use the Boomerang or hit the switches and move around so that you can get it. This is basically the Level 2 Shield, and it can block energy beams.

Monday, November 17, 2014

HCBailly plays Link's Awakening DX - Part 26 of 32

HERE AWAKENS THE FLYING ROOSTER

Overworld maps by Osrevad. Dungeon maps by Revned.


Face Shrine
(continued)


You know those statues from A Link to the Past with the eye that rotated around it, looked forward and shot a laser at you when you were in its direct line of sight? Well, there's a one-eyed creature just like it near the end of this dungeon, and it attacks the exact same way.

The room with the Nightmare Key door has two unlit torches. If you light them up with the Magic Powder, the two monsters inside the room will turn into Fairies.

The boss here is the floor. Really, it's the floor. When its face shows up, blow it up with a Bomb. Be sure to equip the Shield on the other button, so you can protect yourself from the floor tiles and pots that come out of the ground. When he's out of ammunition, he'll start making tile-sized holes in the floor that you don't want to fall into. Luckily, this guy is a real cakewalk, and he falls after a few Bomb explosions.

You'll be rewarded with the Coral Triangle, and your next destination for another Instrument is the mountain.

Koholint


Go talk to Ulrira. You'll find out about the Flying Rooster. Head back to Mabe Village and go to the statue of the Flying Rooster. Equip your new Power Bracelet and push the statue up. You'll find a hidden staircase that leads underground to where the Flying Rooster is buried. Play the Frog Song of Soul (the third song on the Ocarina) and you'll wake its carcass up. It will start following you around, so head to the mountains.

Before you do, though, head to that long gap that blocks that staircase near the castle entrance. You'll be able to get 20 hard-to-reach Rupees (or a Secret Seashell, though we've gotten the Level 2 Sword already).


Once you're in the mountains, you'll be using the rooster to get past some normally uncrossable pit areas. This is how you get the Bird Key.

HCBailly plays Link's Awakening DX - Part 25 of 32

In this entry, we figure out even more of the Face Shrine and find the Nightmare's Key after some lengthy exploring. Win.

Overworld maps by Osrevad. Dungeon maps by Revned.

Face Shrine
(continued)


You can stun the Wizzrobes with the Boomerang, believe it or not. Too bad the sword will still fail to work on them.

The horse heads have to be tossed so that they land right-side up. Sadly, there isn't a trick to it. You just have to keep trying.

One of the staircases leads above ground, to an isolated platform in the raft mini-game maze. You'll be able to find another 20 Rupees here (if you haven't found the minimum of Secret Seashells).

The tiles that flew off the floor and rocketed right at you from A Link to the Past are much easier this time around. Just block them all with your shield.

One of the chests has the secret medicine, if you haven't gotten it from Crazy Tracy's.

The mini-boss in the right "eye" is some sort of slug that tosses a metal ball at you. Throw the metal ball back at him with the Power Bracelet until he's destroyed.

The room to the north loops to the bottom of the map if you keep going north from there, so use the Power Bracelt to pick up the left statue and find a hidden passage. Go through the side-scrolling section here and you'll find a path to another side-scrolling section. Use the Pegasus Boots to get past the mini-Thwomps, and when you make it to the end and go back up, you'll take on the Pols Voice. Yep, they're back again. You can use the Ballad of the Wind Fish to take them all out at once.


South of the Pols Voice room is that pair of worms again. Just plant the Bombs in their mouths to blow them up. Go left from here, and you'll find a chest that you seemingly can't open. Throw a pot at it with the Power Bracelet to get the Nightmare's Key.

Sunday, November 16, 2014

The Canadian commercial for The Legend Of Zelda: Link's Awakening

Believe it or not, there's one in Canada for the French market. Funny how they failed to mute the sound from the in-game footage. But holy crap, this guy takes the game very, very seriously...

I've recently found out that the actor in the commercial is Robert Brouillette, Nintendo's spokesperson for the Quebec market in Canada in the early-to-mid 1990s. You can find out a little more here.

HCBailly plays Link's Awakening DX - Part 24 of 32

We finally enter the Face Shrine and do some massive damage.

Overworld maps by Osrevad. Dungeon maps by Revned.


When you enter the North shrine, you'll come across a giant Armos Knight. Shoot it down with the arrows as quickly as possible to keep it at bay. At this point, it shouldn't be much of a pain if it does that stomp attack to stun you for a few seconds, since it won't be able to reach you. You'll break its shield first before breaking its helmet, exposing its face. By that point, you'll be able to destroy it in just a few more hits. You'll get the Face Key for defeating him, and you'll need it to enter the next dungeon.

Go further north, light the lamps, and read the picture on the wall. You'll find out that Koholint Island is nothing more than an illusion.

Now that this bombshell is out of the way, head back out and you'll meet the Owl again. Once you're done talking to him, head back to that island with the two Armos Knight statues. Destroy the one on the left to find an underground passageway, and go through it to reach the Face Shrine.

Face Shrine


The first thing of importance that you'll see is the Wizzrobes. Their hats pop up, then you'll see them entirely, shooting beams of magic at you. You need Bombs to kill them. There is an interesting thing you can do, though. Put the bow and arrow on one button and the Bombs on the other. You'll drop the bomb and shoot the arrow at the same time, and the Bomb will move with the arrow, creating an exploding bomb. Not sure if this is intentional or an actual glitch, but this is the only game where you can do this, and it's really wonderful. An exploding arrow will take care of a group of Wizzrobes when they're close together.

You can also use the Boomerang or the Magic Powder to stun a Wizzrobe, then manually lay a bomb right next to it. But who has time for that?

The spark creatures that move along the walls can be destroyed with the Boomerang. I did not know this until now.

The Shy Guy acts kinda weird. It moves in the opposite direction that you do. Take advantage of this by turning your back so it turns its back on you, then hit it with the Whirlwind Slash.

Believe it or not, the "eyes" on the map are actually rooms. To reach the left "eye" place a bomb between the two torches on the wall on the screen west of it. Defeat the enemies inside, get through the side-scrolling section without being hit by those large blinking spheres, take out the worm and those Wizzrobes, then go north and get the Level 2 Power Bracelet. This lets you pick up the large elephant statues in this dungeon, along with other things. You can also find a Fairy in this room if you need it.


Go north, and you'll be back in the Shy Guy room. Pick up the elephant statue and throw it at the door to the east to get the 100 Rupees. You can open the door to the south the same way you got in here.

Saturday, November 15, 2014

HCBailly plays Link's Awakening DX - Part 23 of 32

Now that we have the Hook Shot, we can do some more stuff! Don't you just love exploring in this game? I sure do!

Overworld maps by Osrevad. Dungeon maps by Revned.


The green guys that shock you when you hit them with your sword can be stunned with the Hook Shot. From there, you can hit them with the sword without taking any damage.

You'll be able to reach the mermaid statue, thanks to the Hook Shot. Place the Mermaid Scale in the statue to access a secret passage underneath the statue. You'll finally get the Magnifying Lens! Now you'll be able to see the invisible enemies that hounded you in the first room of this cave...and more!

If you go underneath the bridge where you traded the fishing hook, you'll see the Photographer again. Talk to the fisherman and he'll catch him with the fishing rod, unlocking another picture for the Album.

When you get the magnifying glass, go to the seemingly empty house on the far right. Go into the water and you'll meet a Zorah who doesn't want to kill you. You'll get a picture with him for the Album in the GBC version. He'll also tell you that you can find someone like him with the Magnifying Lens in Toronbo Shores.

Believe it or not, there is a cave opening in Toronbo Shores near the shore that you can blow up with a Bomb. Do just that, then go on in. You'll see a friendly Moblin. Equip the Shovel in your B button slot, then trade it for the Boomerang. Finally, you have a Boomerang. You can beat the game without it, but the Boomerang is still pretty cool to have, and it actually kills enemies instead of just stunning them this time around, so why not?

The Hook Shot will also allow you to access the River Rafting game. Go inside, pay the guy 100 Rupees, then equip the Roc's Feather and get on the raft. Jump for items (the raft stops when you jump), and be sure to reach the islands to get more Rupees. The owl head says that you will have to look far for a secret. You'll find out what he's talking about soon enough.

Once you make it to the bottom, you can enter the nearby cave if you want to give it another go. For now, let's explore a little more.

When you reach the island with the two Armos Knights, you'll meet the Owl again. He'll tell you about the two shrines - one to the north and one to the south. You won't be able to enter the one to the north quite yet, so go to the one to the south first. You'll have to brave the Armos Knights maze again, so equip your shield and use it to bump the ones that come alive when you touch them regularly out of the way. This leads to the shrine that basically tells you about...a major game spoiler.


9:49 - Okay, I have to admit, this is hilarious.

HCBailly plays Link's Awakening DX - Part 22 of 32

We finish off the fifth dungeon and learn the third and final song for the Ocarina...

Overworld maps by Osrevad. Dungeon maps by Revned.


Catfish's Maw
(continued)


The statues in the side-scrolling section that leads to the Nightmare can be grappled onto with the Hookshot.

To beat the boss, avoid the tail and grab onto the boss's head whenever it peeks out of one of the four holes. By doing this, you'll be able to get the boss out of its hiding spot, and smack the part of its neck with a heart on it with your sword. You have a few seconds to damage it a little bit before it zooms back into the hole. Whenever you get it with the hookshot, the tail reverses direction.

After enough hits, you'll beat the boss and get the Wind Marimba.

Your next mission: the Shrine.

Koholint


Your next stop is not really the shrine, but the Signpost Maze. It's a few screens south of where you end up when you use Manbo's Mamba in the overworld. Use the Roc's Feather and the Pegasus Boots to clear the long gap before it, then read the sign on the other side. When a sign in the Signpost Maze tells you to go a certain direction, you go that direction from where the sign is. If you read the wrong side, you'll have to head all the way back to the first sign, read it, and start again.

Once you read all the signs in the way the maze intends you to, a staircase will appear in the center. Enter it to see a frog named Mamu, who looks a lot like Wart from Doki Doki Panic/Super Mario Bros. 2. Give him 300 Rupees, and he'll teach you the third song for the Ocarina, The Frog Song of Soul.

If you go back to where the Walrus was and play The Ballad of the Wind Fish on the Ocarina, you'll get him to pop his head out of the water. He'll be disappointed that you're not Marin, though.


The upper-right screen of the Animal Village has a cave you can access by blowing a hole in the wall with a Bomb. To get there, go north from the screen where the Walrus was. From there, enter and equip the Hook Shot. Blow up the wall to the north of the entrance with a Bomb (you'll have to throw one over there), then follow the path and throw a Bomb into the cracked block. Head back down to the entrance screen and head left. Follow the path, and you'll get another Piece of Heart.

Friday, November 14, 2014

HCBailly plays Link's Awakening DX - Part 21 of 32

In this episode, we make a lot of progress, taking out the Master Stalfos and getting a rather nifty treasure for our efforts!

Overworld maps by Osrevad. Dungeon maps by Revned.

Catfish's Maw
(continued)


There is an intersection with five blocks and a switch on the floor. You'll be pushing that block and walking back and forth from that screen. West of that screen is a path to where the torchlight beams cross. You won't be able to do anything there yet, however.

Anyway, hit that switch. You'll meet Master Stalfos again, and you fight him the same way you did last time. There are four rooms with the skull pattern on the floor, and the number of corners with blocks in them dictates the order in which you have to enter them to fight Master Stalfos. Anyway, after a bit more damage he'll run away again, but this time around he isn't very far. Even then, he runs away, so you'll have to backtrack towards the entrance and make a beeline for that staircase to the side-scrolling section with the weighted platforms to make it to the empty room there. This is the fourth and last room that you'll find the guy in, and once you finish him off here, you've finished him off for good. He leaves the Hookshot, another favorite item from A Link to the Past, and you'll need it to get some of the chests as well as what we're about to do.

Also, it should be noted that if you use the Hookshot on the masked lizards, you'll be able to remove their masks and leave them wide open to attack.

Head back to where the torchlight beams cross. Dive into the center of the deep water and you'll be in another side-scrolling section. Yet another Mario enemy here: Bloopers. Make it to the other end, grab the hook on the bridge at the other side with the Hookshot, then make your way to the chest to get the Nightmare's Key.


The mini-boss on the way to the Nightmare are two Gohmas. Get up close and hit them with the Hookshot when their eyes are open, and don't mind the fireballs. If they stop and shake without opening their eye, they will charge you.

HCBailly plays Link's Awakening DX - Part 20 of 32

We do some more trading before we head off to the fifth dungeon!

Overworld maps by Osrevad. Dungeon maps by Revned.


Head back to the Seashell Mansion. Now that you have twenty Secret Seashells, you'll be able to get something really, really nice. You don't need it to beat the game, but it's definitely useful and makes the game easier.

In case you haven't found 20 yet, here's the list again. I'll wait for you.

Secret Seashells


1. The empty lot full of bushes and grass in Mabe Village contains a Secret Seashell in one of the bushes.

2. The chest blocked by a rock in the Mysterious Forest contains another Shell.

3. Go back to the doghouse near Madame Meow Meow's house where you got the Ribbon, and use the Shovel. You'll find a Secret Seashell in one spot.

4. The crack in the wall in the Tail Cave requires a bomb to open up. Going inside takes you to a chest with a Secret Seashell.

5. The screen south of the lone grave contains a Secret Seashell underneath the bush.

6. When you collect five Shells, don't collect any more until you enter the Seashell Mansion. You'll get a sixth one. This one is pretty easy to screw up at getting if you're overly eager to explore Koholint Island.

7. Go one screen east of the Seashell Mansion and cut the bushes. You'll find another one.

8. In the pig-man maze just southwest of the Seashell Mansion, lift the rock with the Power Bracelet to get another Secret Seashell.

9. Go into the cave in the pig maze. Go one screen west and use a bomb on the small nook on the west end of the room to find a staircase. Go up and get out of the cave from there, then go north. Use the shovel on the ground where the owl head is to find another Secret Seashell.

10. On the other side of the screen with the mermaid statue is a lone bush. Cut it with the sword to get another Shell.

11. Come back to the Seashell Mansion with exactly ten shells. You'll get another Secret Seashell. Just like the sixth, being too eager to explore the island will cause you to miss out.

12. It's located in the chest in the dungeon that leads to the Slime Key maze.

13. On the path to the Key Cavern, there is a space in between four patches of grass. Use the shovel on it to get another Secret Seashell.

14. Go to the phone booth near the Key Cavern and run into the tree next to it with the Pegasus Boots. You'll cause a Secret Seashell to pop out of the tree.

15. One of the Armos Knights in the Armos Knights maze hides an underground passage to a Secret Seashell.

16. The owl head near Animal Village is the site of another Secret Seashell. Use your Shovel to find it.

17. Run into the tree west of the Tail Cave to knock a Secret Seashell out of it.

18. After you leave the quicksand cave in the Yarna Desert, go south and use the Power Bracelet on the rocks. You'll be able to get a Secret Seahell.

19. When you get the flippers, swim up to the island with the lone bush near the pig-man maze. Destroy the bush to get another Secret Seashell.

20. The bush on the island just southwest of the mermaid contains another Secret Seashell.

/Secret Seashells

Anyway, bringing 20 Secret Seashells to the Seashell Mansion will give you the Level 2 Sword. It works just like the Master Sword in A Link to the Past: when you're at full health, you'll be able to fire beams from it. It's also more powerful, too.

Anyway, go back to the bridge near the Mermaid and the Catfish's Maw, and go under it. You'll find a fisherman fishing underneath it. Give him the fishing hook, and he'll catch the Mermaid's necklace for you. Bring it back to the mermaid to get a mermaid's scale. If you go offscreen, return to where she was and get back on land, she'll show up again. When you talk to her, she'll mention that an artist who wanted her to pose for him wanted a scale as well, and she also mentions something about "the legend of the Magnifying Glass." Hmmmm...

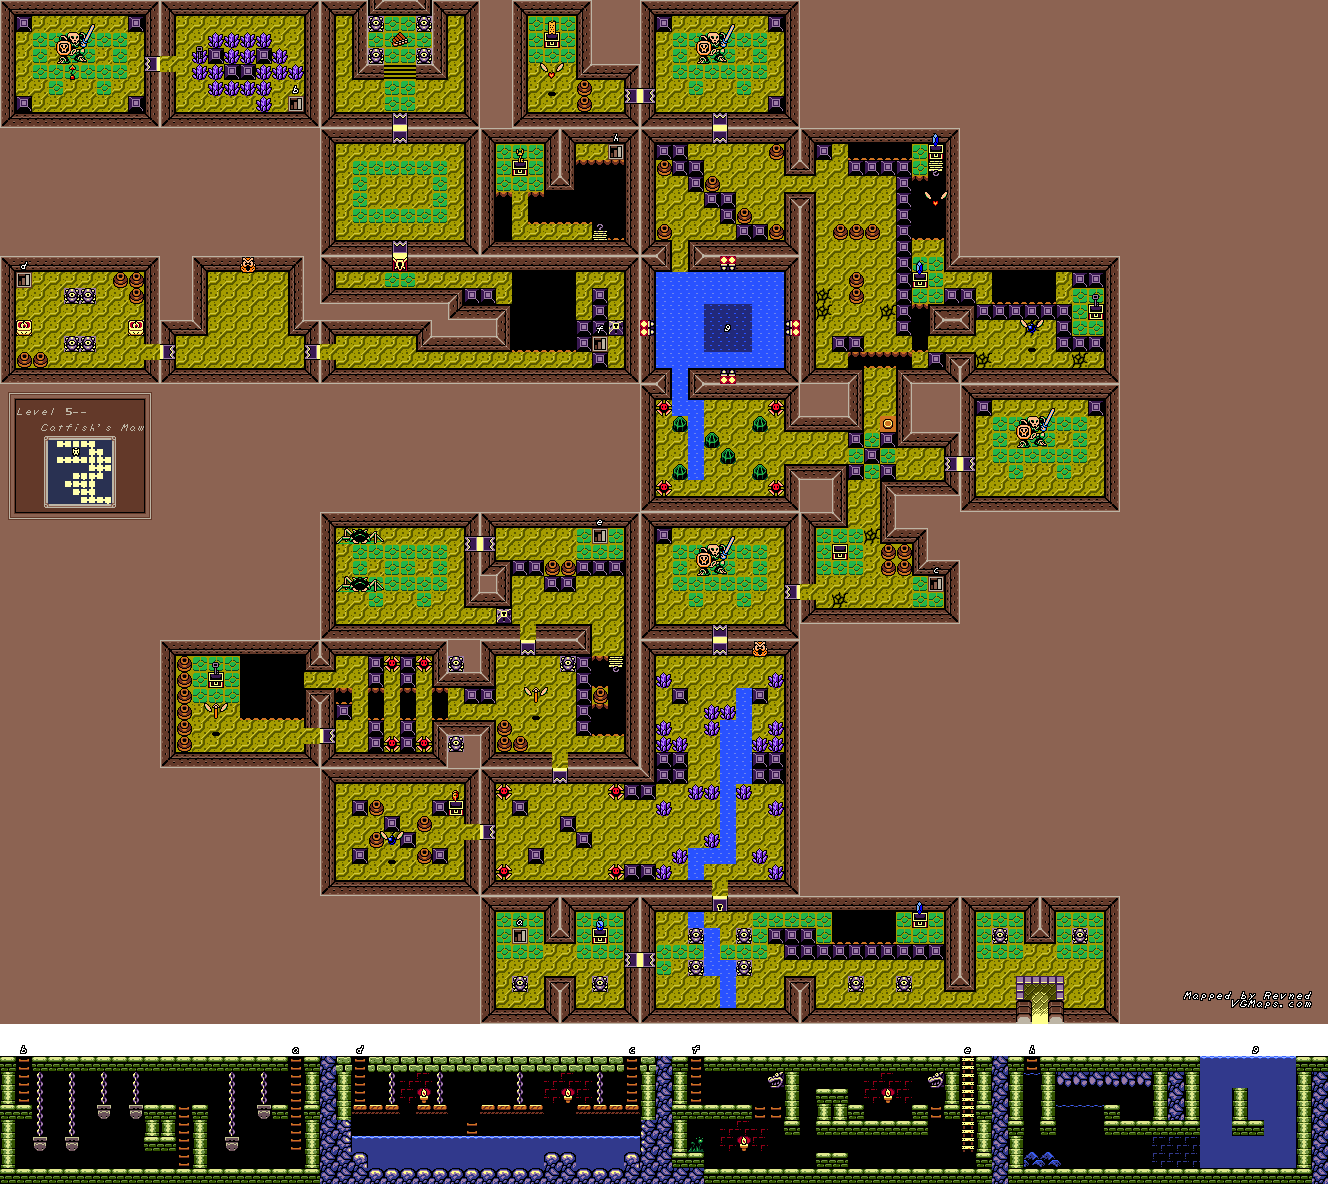
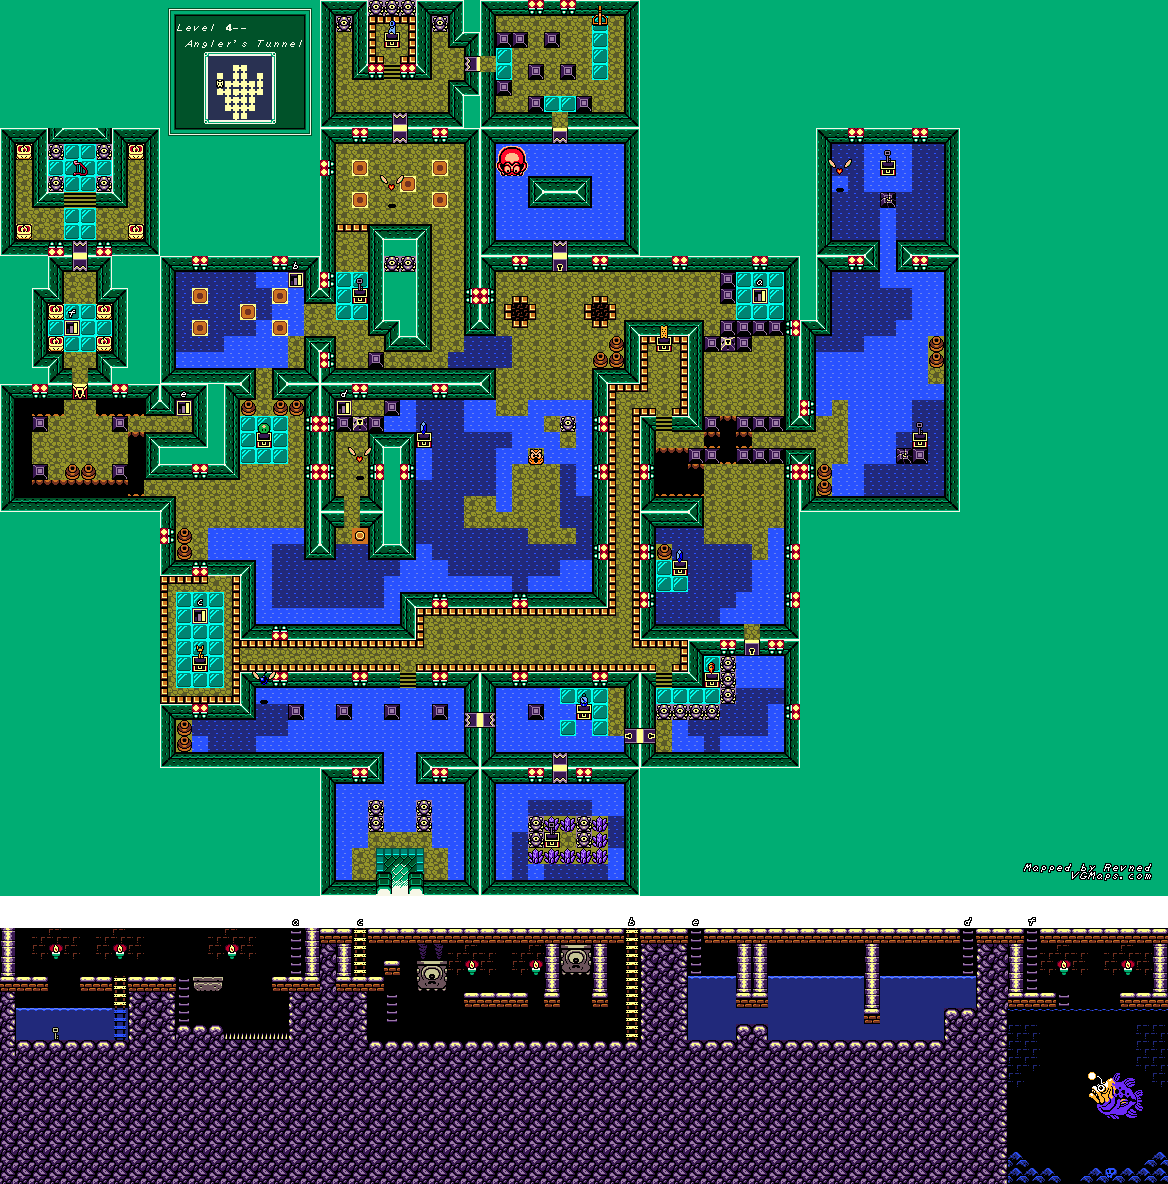
Anyway, head south of the screen where the Mermaid was to find the Catfish's Maw. Go into the little alcove in the west wall near the Maw and dive. You'll enter a side-scrolling section where you'll find a secret tunnel in the rocks under the dungeon, where you'll be able to get to the other side and enter the Catfish's Maw.

Catfish's Maw


The little lizards with the masks can only be hit from behind. You'll find an item that deals with them better than this soon enough.

The weight platforms move like the balances on a scale when you stand on them. Jump at the right time to get to the other side.

When you come out of that side-scrolling section, destroy all the crystals on the floor move the blocks so they form a square. You'll get a small key for your efforts.

The Owl Statue will tell you that if you can't destroy a skeleton with your sword, use a bomb instead. Hmmmm...

The mini-boss here is Master Stalfos. Yep, he's a skeleton. Hit him with a bomb and keep whacking him with your sword. If you have the Level 2 Sword, you can just get back to full health, nail him with a sword beam and keep beating on him from there. He'll run away, and when you enter the next room to open the chest, you'll find out he took what was in it. You'll have to hunt him down and find him to get it.


The next Owl Statue will tell you to dive where the torchlight beams cross. Hmmmm...

Thursday, November 13, 2014

HCBailly plays Link's Awakening DX - Part 19 of 32

We take the ghost back to where it came from and do some more trading!

Overworld maps by Osrevad. Dungeon maps by Revned.


Let's head over to those bushes separated by that large space of pits nearby. Use the sword and the Roc's Feather to destroy one of the bushes, then use the Roc's Feather and the Pegasus Boots to get to the other side. From there, slash the bushes to clear a path to the stairs leading underground and go in.

Following the path will take you to another underground well similar to what you saw in the Mysterious Forest. Once again, use your Magic Powder on it and the demon that appears will increase the amount of Bombs you can carry! Sweet!

When you take the ghost to the House by the Bay, he'll look around his house and he'll be happy that his house hasn't been messed with. He'll then ask you to take him to the cemetery. Take him to the lone grave near the cemetery. He'll tell you to head back to his house to look for a jar before he disappears. If you head back there, you'll find a Secret Shell, but you only need 20...and we have 20.

You'll then meet the Owl...again. He'll tell you to head to the bay and enter the Catfish's Maw, which is your next dungeon.

If you walk off-screen and head back to the grave in the GBC version, you'll get another picture for the Album. When he snaps the picture, you'll find out that the ghost was posing along with you. XD


Now that that's out of the way, let's head back to the Animal Village and hand the hibiscus flower over to the goat. She'll hand you a letter to take to Mr. Write near the border of the Mysterious Forest. Take it back over to him to find out that she sent him a picture of Princess Peach. Why? I don't know. Anyway, you'll receive a broom. With this broom in hand, head back to Mabe Village and hand the broom to the broom lady. She'll give you a fishing hook.

HCBailly plays Link's Awakening DX - Part 18 of 32

Now that we're done with the Angler's Tunnel, let's look at some more stuff!

Overworld maps by Osrevad. Dungeon maps by Revned.


Angler's Tunnel
(continued)


It should be noted that you cannot use the Roc's Feather for the tile puzzle. You [b]have[/b] to use the Flippers. Thanks, game.

Anyway, finishing that other tile puzzle takes you into a side-scrolling area where you have to avoid those giant crushers. You'll have to stand on the second one with the help of the Roc's Feather in order to make it to the other side. This will lead you to the Nightmare's Key.

Apparently, the only fish in this area are in a staircase that was blocked by that switch we couldn't step on until after we got the Flippers. They're Bloopers, all right, and you can simply take them out with a sword swipe or two.

When you enter the Nightmare's Key door, you'll find...a set of stairs. Go down and jump into the water. From there, go down and you'll meet up with a giant Angler Fish. All you have to do is to be just above (or below) its angler and smack it with the sword. He sends other fish after you, but he's so much of a real pushover that the fish won't even pose a threat to you. Once you beat him, grab the Heart Container as it sinks to the ground and head back up. Since you've beaten the boss, the door here will open when you come back upstairs. You'll be rewarded with the Surf Harp. Next stop: the bay.

Koholint


Now that you have the Flippers, swim to the left of the entrance to the Angler's Tunnel. You'll meet Manbo the Fish, and talking to him will teach you Manbo's Mambo. You can now play it on your ocarina (song #2). Playing it warps you to Manbo's Pond, near Crazy Tracy's house.

There's a cave full of deep water just east of the Angler's Tunnel. If you dive underwater around the center and move around, you'll find a Piece of Heart.

When you head back to Camelot Castle (where you found the Golden Leaves), a ghost will follow you around. It wants you to take it back home. Take it back to the house by the bay. While you're in the water, go to the lower-left corner of the moat and dive underwater in the center neart the south wall of the moat. You'll find another Piece of Heart. (I never knew about this one while playing the game, and I don't even know how the game expects you to find it without the aide of a guide.)

While you're doing this, you'll be followed by a ghost. Apparently, you'll have to find some way to shake this guy off, since you can't enter any dungeons with him following you.

The island with the bush near the pig-man maze has another Secret Seashell. Be sure to hit the bush from the north, or else the Secret Seashell will fall into the water.

If you talk to the mermaid (who you can swim to now), she'll tell you that she lost her necklace while swimming, and if you return it, she will give you a scale from her tail.

Secret Seashells


19. When you get the flippers, swim up to the island with the lone bush near the pig-man maze. Destroy the bush to get another Secret Seashell.


20. The bush on the island just southwest of the mermaid contains another Secret Seashell.

Wednesday, November 12, 2014

HCBailly plays Link's Awakening DX - Part 17 of 32

We finally begin tackling the Angler's Tunnel and wonder why the hell somebody would cancel The Pirates of Dark Water before it could run its natural course.

Overworld maps by Osrevad. Dungeon maps by Revned.

Angler's Tunnel


The cracked blocks can be taken care of the same way as you would a crack in a wall: just use a bomb on it to break it. You'll have to do this to get one of the keys.

The Peahats (the little helicopter-like things that look like flowers) can only be struck when they land on the ground for a brief time.

The owl head tells you that the glint of the tile will be your guide. Hmmmm...

You'll see five tiles with a circle in the center. Don't bother with these for now, you'll see what they do later.

The octopus mini-boss is easy to beat. Just hit him with a Whirlwind Slash when he comes your way.

Use the Power Bracelet on the pull switch in the wall to open up the blocks that are in your way.

When you get the Flippers, you'll be able to move around in the dark water without drowning and being returned to where you entered the screen from. This will not only give you access to previously unreachable areas, but it will also open up the World Map quite a bit. You can also use the B button to dive underwater for a few seconds, which lets you swim underneath bridges and whatnot.

South of the room with the Flippers, you'll see those same tiles again, except they're glistening. It's the center one, followed by the upper-right, the lower-right, the lower-left and the upper-left when you step on the ones that glisten. Remember this for the other set of these tiles that you've seen.


The key that fell into the pit can be accessed when you enter the steps that go down. You'll have to have the flippers to actually swim in the water that the key lands in, though.

The American commercial for The Legend Of Zelda: Link's Awakening

I barely remember seeing this two or three times as a kid.


Tuesday, November 11, 2014

HCBailly plays Link's Awakening DX - Part 16 of 32

We explore the desert before looking for the Angler's Tunnel...

Overworld maps by Osrevad. Dungeon maps by Revned.


If you throw a pot while you have Marin with you, she'll scream at you. If you play the Ocarina near her, she'll comment on how bad your ocarina playing is...

Looking in chests and hurting chickens will also give you some strange dialogue...

If you use the shovel near Marin, she'll tell you to dig to the center of the earth.

Also, if you talk to the people in Animal Village with Marin in tow, they'll acknowledge her existence with a good amount of excitement.

Anyway, go up to the walrus and have her sing to it. She'll return back to the Animal Village and you'll be able to continue into the Yarna Desert.

If you use the Magic Powder on one of the skeletons in the desert, they'll tell you to use a bomb where the quicksand swallows you. Hmmmm...

The cacti hurt you if you touch them.

The quicksand area looks a lot better in the GBC version. Beat the sand worm that jumps in and out of the sand with Whirlwind Slashes, and you'll be able to get the Angler Key. Go into the center of this "room" to enter the cave that skeleton was talking to you about. One of the walls can be opened with a bomb. Do just that, and you'll be able to get a Heart Piece!

Go east and leave this room, then head south. Keep going until you reach the rocks on the ground. Lift them up with the Power Bracelet and you'll get a Secret Seashell.

As you head out of the desert, you'll meet the Owl. He'll tell you to head to the key hole at the mountain waterfall. If you've found the teleporters, getting here is easy. The waterfall will disappear and reveal the dungeon when you place the Angler Key in the keyhole.

Let's explore the mountains. We can finally start exploring the mountains near the mountain waterfall. The Power Bracelet will help you make your way to Papahl, and if you got the pineapple from the Animal Village chef, you'll be able to give it to him and get a hibiscus flower. Hand it over to the goat lady at the Animal Village.

To reach the Angler's Tunnel, you'll have to drop down to it from the mountains.

Secret Seashells


18. After you leave the quicksand cave in the Yarna Desert, go south and use the Power Bracelet on the rocks. You'll be able to get a Secret Seashell.

HCBailly plays Link's Awakening DX - Part 15 of 32

In this episode, we get to take Marin to Animal Village.

Overworld maps by Osrevad. Dungeon maps by Revned.


Using the teleporter near the Animal Village makes taking Marin down there less of a drag.

When you return to the statue of the Flying Rooster, Marin will be gone and one of the quadruplets will be there instead. Talk to him, and you'll find out that she's at Toronbo Shores near the ocean.

If you go to Marin and Tarin's house, you'll find a note saying that Marin is at the beach. I didn't even know this until watching this Let's Play. XD

Now that you have the Pegasus Boots, using them to run into the palm trees with the monkeys on top will knock the monkeys off, forcing them to retreat.

The screen south of the western exit out of Toronbo Shores will be Marin. Before we do that, though, let's explore the land west of Toronbo Shores. There's a house by the bay, but you won't be able to do anything with that place...yet...

Anyway, let's talk to Marin. After a nifty conversation on a even niftier scene where you and her stare into the sea, Marin will talk about wanting to be a seagull and flying as far away from the island as she could, as well as whether there's anything beyond the sea at all. When she asks if you're paying attention to her, say yes. After this, you'll be holding her like a trophy (does Link look up her dress?) before she joins you to...wherever it is that you go.

For added fun, fight enemies with her, explore with her, go through a dungeon with her, and even go to the cliff edge directly south of the entrance to Toronbo Shores (this one is GBC-exclusive, since all it does is give you a picture for the Album). If you jump into the well with Marin, she'll ask if you're okay (and you'll also get a picture for the Album if you're playing the GBC edition - which reminds me, how does the photographer know we're going to do this?).

Another weird thing you can do is have her play the Trendy Game when she asks to. Just go over there and when she asks to play the Trendy Game, say yes. She'll grab the guy running the game with the hook and then drop him off at the conveyor belt where the prizes land, then he'll kick the both of you out for being a pro.

In the GBC version, you can walk up to the Flying Rooster statue and get another picture for the Album! You'll get to see Tarin one last time here (unlike the original monochrome version, where you wouldn't see him again after getting the honeycomb until you beat the game).

I wouldn't recommend it if you're going for a perfect game, but Marin does react if you steal something from the store with her in tow.

Secret Seashells


17. Run into the tree west of the Tail Cave to knock a Secret Seashell out of it.

Monday, November 10, 2014

HCBailly plays Link's Awakening DX - Part 14 of 32

In this episode, we check out the Animal Village only for our path to the Yarna Desert to be blocked...

Overworld maps by Osrevad. Dungeon maps by Revned.


There's a fairy cave north of the Tektite maze.

To the south of it is a bunch of Armos Knight. Some will come alive if you touch them, but if you bump into them with your shield out, you'll be able to tell which ones will without awakening them. At the end of the path here is a temple. Go inside and read the inscription. You'll find out that the island of Koholint is (supposedly) a figment of Link's imagination. You will also find a Secret Seashell underneath one of them, too, so look around.

The owl head near the Animal Village is host to another Secret Seashell.

Just like in A Link To The Past, there are creatures that hide in the bushes and rocks and try to run into you. They're just as easy (or difficult) to deal with, but they're a bit faster here.

When you enter the Animal Village, you'll find out that the path to the Yarna Desert is blocked by a sleeping walrus. You'll have to find a rather unique way to get him out of your way.

As you check out the village, you'll find a goat writing a letter. She wants some hibiscus flowers. She might just be a good pen pal for Mr. Write, since her house has the same music as his...

One of the houses is the home of a bear. He's a chef, and if you give him the honeycomb, he'll give you a pineapple to keep the trading game going. If you talk to him again, you'll find out that Marin could be able to wake that walrus up.

Secret Seashells


15. One of the Armos Knights in the Armos Knights maze hides an underground passage to a Secret Seashell.


16. The owl head near Animal Village is the site of another Secret Seashell. Use your Shovel to find it.