Showing posts with label part 31. Show all posts

Tuesday, July 28, 2026

PrinceWatercress plays Space Station Silicon Valley - Part 31 of 32


In this entry, we finally save the Earth and beat the game.


Big Celebration Parade


This is the final level of the game, and you can only access it if you've collected all four pieces of Evo's shell suit. If you have all of the Power Cells in the game collected, the shell suit will be gold instead of silver.

The level begins with the space station approaching Earth and pointing a laser at it. You'll be playing as EVO. Keep holding Up on the Control Stick to move forward. As you do this, the space station shoots the laser at Earth and shrinks it. Go further and you'll eventually see a brain controlling the space station. You'll be able to attack it with your laser with the B button and destroy it, but then you'll realize the brain was controlling the space station, which is now going to crash into Earth.

From here, you'll be outside. Press and hold A to use your jetpack to get to the city, then use your laser attack with B to destroy all the enemies that are moving around. This time around, even the most docile of animals such as the sheep and the racing mice will attack you. There will be bombers helping you by dropping bombs, but you'll want to watch out for them and not get hit by them, as they can damage you just like they can damage the enemies.

There is energy littered throughout the stage. You'll want to save it for when you are in dire need of health.

The hardest enemies to destroy are the dog planes and the flying foxes. The dog planes will constantly follow you and dog you around (pun somewhat intended), while the flying foxes are pretty fast. You'll need to trap them near the walls if you want to take them out.

Make sure you don't destroy any cars that are driving around, as this will cost you five seconds. You'll only have 22 minutes to defeat all 50 enemies, and the game will constantly tell you many enemies you have left to destroy and how much time you have constantly as you defeat enemies and as time passes, respectively.

Once you defeat all of the enemies, you've beaten the game. You'll get the credits, but we have one more thing to check out...

Sunday, February 15, 2026

PrinceWatercress plays Super Mario Odyssey - Part 31 of 92


In this entry, we begin our adventures in the Snow Kingdom, and we've got a lot of exploration to do.


Metro Kingdom is as complete as can be at this point, so let's head to the Snow Kingdom.

The Cake Thief's Parting Gift


Don't forget to check behind the Odyssey when you get here for two Regional Coins.

There are some wooden posts you can remove with your hat near the Odyssey; these will produce some wind columns you can ride upwards for a shortcut back to the Odyssey.

The next place to go will be lit up with the rainbow-colored column right in front of you. If you throw your hat at the snow, you'll uncover a hole you can drop down. This will lead you to the village of Shiveria Town. When you approach people, you'll find out that not only has the Frost-Frosted Cake has been taken by Bowser and the Broodals, but the people here have been blocked from getting on the race course by the Broodals. You'll need to get some Power Moons to open up the path to the race course and restore order.

There is some hint art hidden behind the boxes near where you enter Shiveria Town. It will show Poochie in the Lost Kingdom. Remember this for later.

There will be four doorways near the entrance to the race course, and you'll need to go through all these areas to unblock the entrance.

In Wind-Chill Cavern, you'll meet the Ty-foo. The Ty-foos (which share a name with a British brand of tea, it appears), will blow strong gusts of wind that can blow away anything in their path. If you can take control of one with Cappy, you may be able to slowly float over the lava and reach areas that you normally could not. As for the Spinies, you cannot defeat them, but you can knock them away with your hat and also send them falling into the lava that way.

You'll see two Ty-foos pushing a wooden platform back and forth on an ice track. Stand on the top of platform and let the Ty-foos do the work. After that, take control of the Ty-foo on the other side and blow on the wooden wall to blow a wall forward and continue on. From there, stay away from the Ty-foo's gust and take control of it to blow away all the Spinies and reveal your first Power Moon. You can then take the pipe to return to Shiveria Town. Before you do that, though, you can float around the level with the final Ty-foo and get some stuff you normally couldn't.

If anyone is standing in front of an archway near the race course entrance, that means that you've found the Power Moon for that area.

In Snowy Mountain, you'll be constantly throwing your hat in order to clear out all of the snow. You'll also need to remove some wooden posts with your hat to reveal some wind columns to go further up the mountain with. 

At the end of Snowy Mountain, you'll fight Rando again. The same strategies as last time apply, but this time, the floor will be a thick sheet of ice. Also, Rando will throw two hats at once instead of one whenever he attacks.

In Hollow Crevasse, watch for the shadowy faces in the floors as you collect the five Moon Fragments to get the Power Moon here. If you're on top of them, they will raise up before trying to chomp on you. You can use the fact that they chase after you and try to eat you to your advantage by luring them to where you need to go in order to reach other areas. Just remember to jump straight up to avoid getting bitten.

If you haven't figured it out already outside where the Odyssey, the water in this kingdom is cold! If you spend too much time in it, you'll lose health, even on the surface of the water.

In Icicle Cavern, be careful near big, circle-shaped shadows. These are icicles that can fall on you if you're not careful. When you see Goombas here, you'll want to make a stack, as you'll need to do this to get through the area; the Goomba's non-slip shoes really make a difference on that narrow ice bridge. The Goomba-shaped switch will open up the path to a Power Moon that can be easy to miss if you step on it with four Goombas, and there is an area at the top where you can get the icicles to drop onto some cracks and bring down one big icicle to use as a bridge to the fourth and final Power Moon that you need to fully open the race course barrier.

Power Moons


1. The Icicle Barrier - At the top of Icicle Cavern, walk across the icicle shadows above the cracks to bring down an even bigger icicle to use as a bridge to the final Power Moon (see above).

2. The Ice Wall Barrier - Collect the five Moon Fragments and reach the end in Hollow Crevasse (see above).

3. The Gusty Barrier - Get this Power Moon by defeating all of the Spinies at the end of Wind-Chill Cavern (see above).

4. The Snowy Mountain Barrier - Beat Rando at the top of Snowy Mountain (see above).

7. Behind Snowy Mountain - There is a hidden passage in a wall covered by snow near the end of Snowy Mountain. If you go through it, you'll find this Power Moon.

9. Atop a Blustery Arch - Remember the wooden wall that you had to use a Ty-foo's breath to reveal an opening in? After taking control of the final Ty-foo in Wind-Chill Cavern, you can blow the wall back. As it turns out, the wall has a stairway on the other side, and it leads to the top of the wall, which is really an archway. At the top of the archway is an X; ground pound the X to reveal this Power Moon.

12. Treasure in the Ice Wall - Near the end of Hollow Crevasse, there is a path in the wall that Mario can grab onto and shimmy across. On the other side is a treasure chest containing a Power Moon.

18. Ice-Dodging Goomba Stick - In the middle of Icicle Cavern, there is a Goomba-shaped witch with a "4" on it. Jump on it with a stack of four Goombas to open up a panel in the wall and reveal a Power Moon.

21. Shopping in Shiveria - Purchase the Power Moon from the Crazy Cap Shop in Shiveria Town.

Regional Coins


Monday, December 22, 2025

PrinceWatercress plays Brave Fencer Musashi - Part 31 of 33


...and now it's time for the Soda Fountain maze.


You'll be in what looks like an empty room. After heading to the right, the screen will flash. The Fire Scroll symbol will be on the other side of the door. Go through it.

From here, you'll see multiple doors. The Calendar will tell you what the order you're supposed to go through this.

Go right. Skip the first door, then enter the second. Equip the Earth Scroll, then use it to hit the switch and create a bridge across the water. At the wall, hit the column that has the top that looks like the switch that triggered the switch. After lowering that column four times, the wall to the right opens up. Enter the door there.

Go right, use the Sky Scroll to float over the spikes, skip the first door, then float over the spikes until they disappear. Enter the door in front of you.

Swing up the poles to get to the next door.

Light the torches to the right with the Fire Scroll, then hop onto the top of the crusher and head left. Enter the door in front of you.

Use the Water Scroll to extinguish the torches to your left. Use the Water Scroll to land on top of the water below, then go right and enter the next door.

Go left, then enter the next door. Equip the Wind Scroll, activate it, and jump the pit while you're spinning to get to the final door.

Get to the platform below you, then use the Sky Scroll to go right and float over both the spikes and the water. Head to the left and you'll face Ed of Leader's Force. Ed tells you [b]he's[/b] the leader before you fight.

Walk around in a counter-clockwise pattern to avoid the fire blast that Ed shoots out, double jumping over it when you need to. You can also walk left and right, and double-jump over the blast when it comes towards you. When he gets tired, whack him!

Ed will then teleport. The orange balls will split into giant fireballs that go in eight directions. The purple ones let him teleport. If you can hit him before he can teleport again, it will make this battle a bit faster.

After beating Ed, take the elevator. You'll be able to save your game at this point.

Friday, February 28, 2025

PrinceWatercress plays Wario Land II - Part 31 of 51


In our second side-story, Captain Syrup's goons enter the cellar instead of escaping out of the castle and through the forest. This should prove interesting.


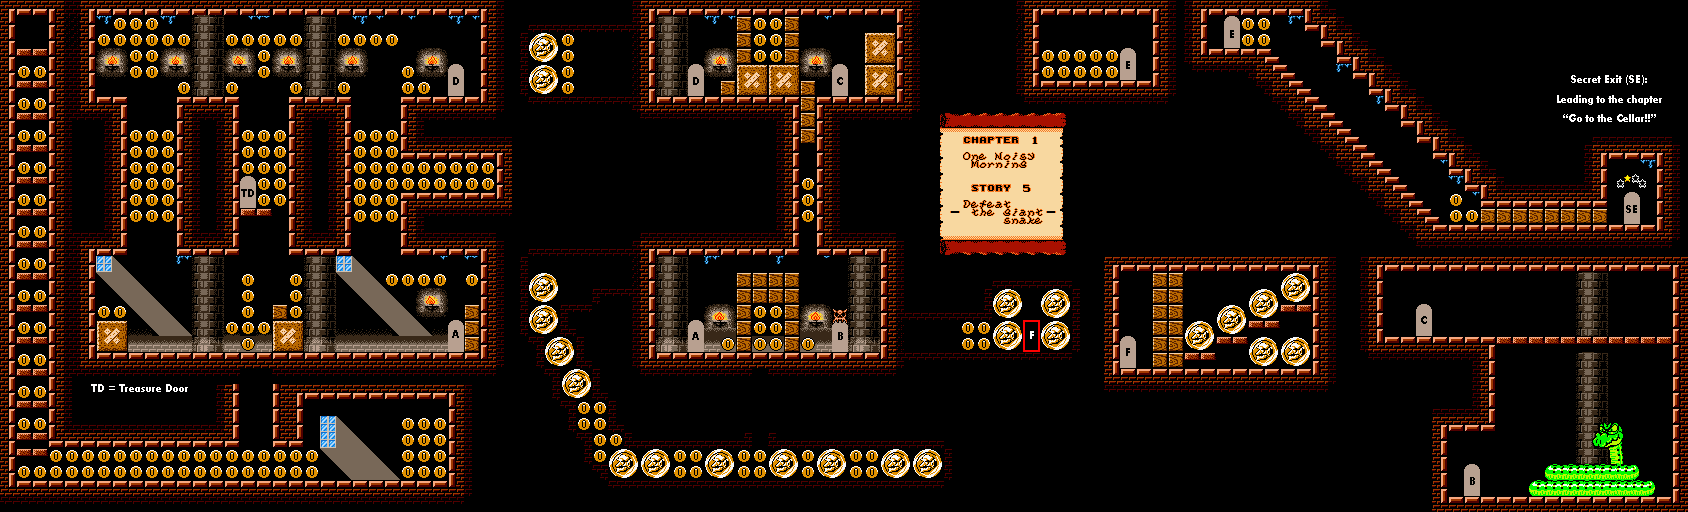
Chapter 1: One Noisy Morning

Story 5: Defeat the giant snake


This time around, you'll want to take the secret exit that can be found by breaking through walls to find hidden areas. This will take you to a brand new side-story where Captain Syrup's goon enter the cellar instead of the forest.

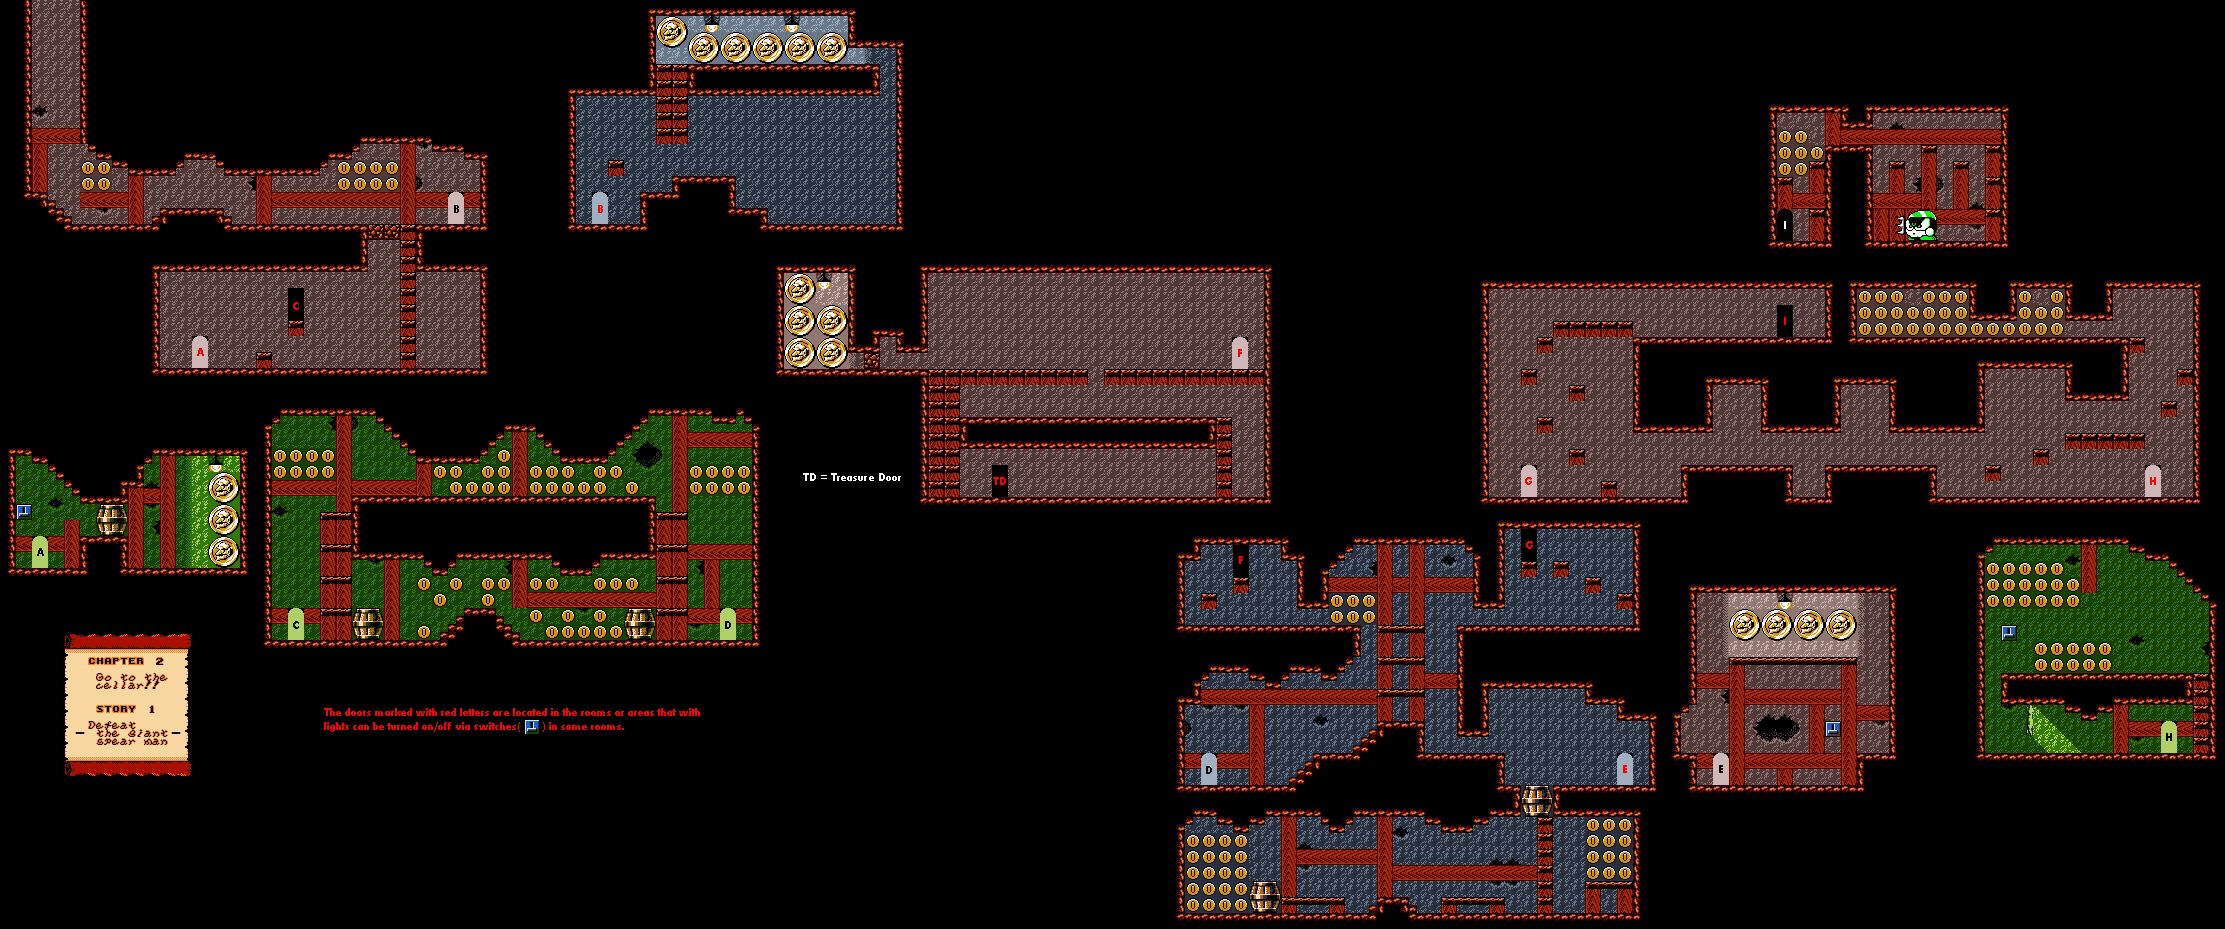
Chapter 2: Go To The Cellar

Story 1: Defeat the giant spear man


Be prepared to ground pound a lot to keep enemies, especially the pelicans, away from you.

The dark areas are lit up with switches that you can turn on by hitting them from underneath. You'll need to do this in order to get through the level. The one near the ghosts has some coins has some coins above it. Hitting that one to turn some lights off, and you'll have to feel your way through the previously lit areas to figure out where the door leading to a previously dark area was. This time around, the formerly dark area will be lit up, and you'll be able to find the treasure room, where you can win a magic torch.

The barrels can be smashed by tackling them or ground pounding them.

The giant spear man is above where the monsters get aggressive when you attack one of their own. He is defeated the same way you beat him the first two times, which is ground pounding him to death. Don't forget to get that inverted color coin afterwards.

Sunday, September 29, 2024

PrinceWatercress plays Chrono Trigger (Super NES) - Part 31 of 70


In this entry, we make our way up the Mountain of Woe in our task to rescue Melchior.

First | Previous | Next | End


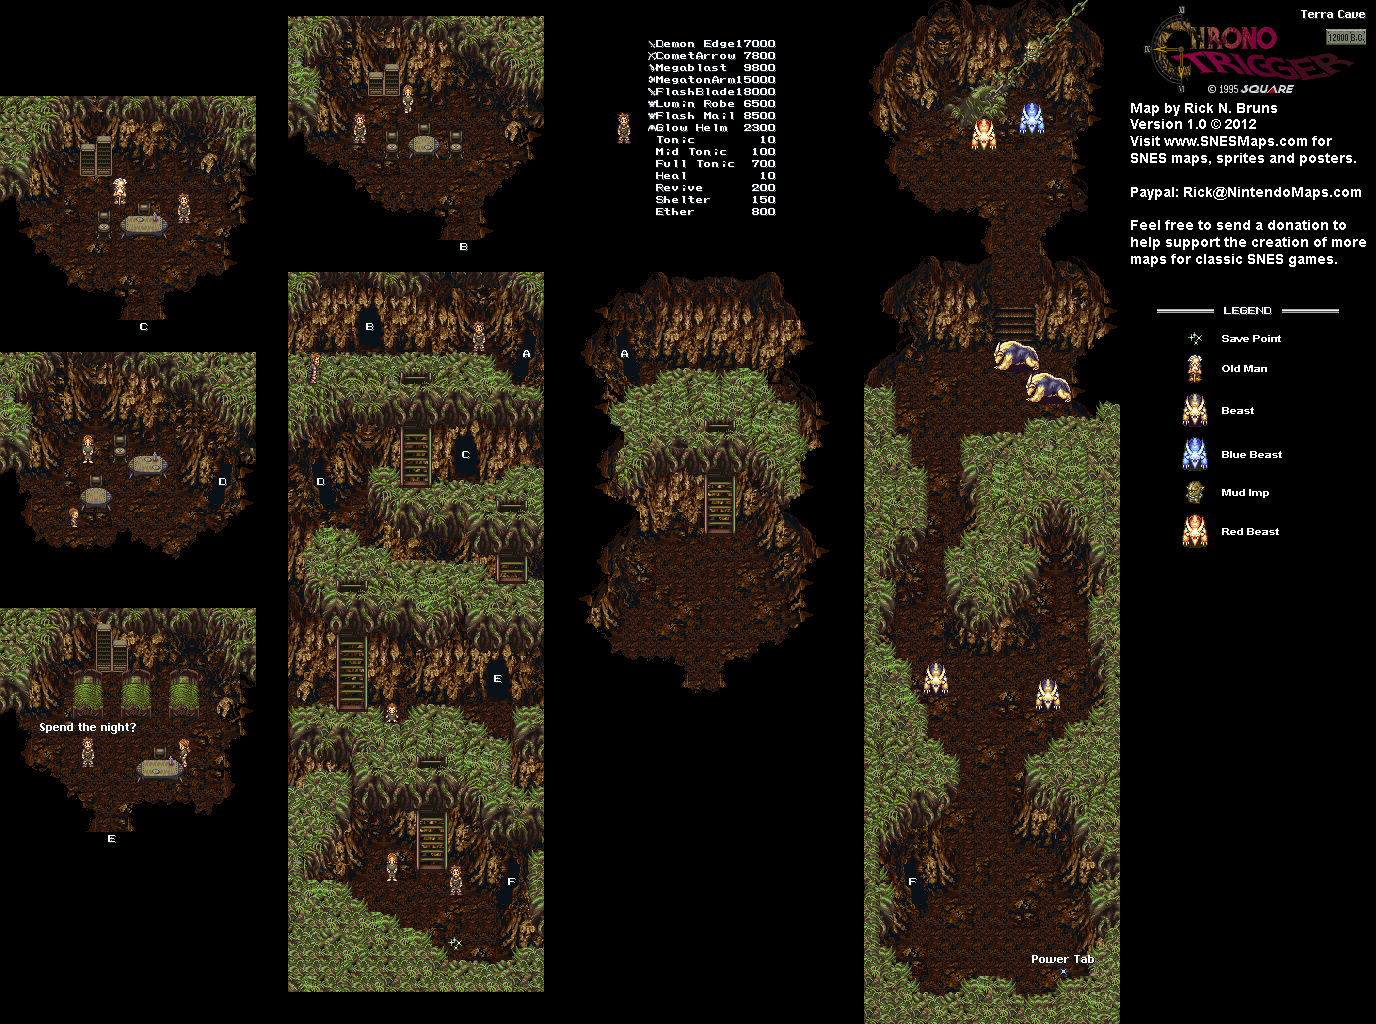
When you go past the staircase, you'll face the Mud Imp, Red Beast and Blue Beast. They will block the way to Mt. Woe, and you'll need to get past them to climb up the mountain.

The Red and Blue Beasts can both stomp the ground to damage everyone in the party and slowly drain their health, and they can also hit one party member with X Strike. The Mud Imp can ride on one of the beasts for more damage, and can also heal the whole enemy party.

If you Charm the Mud Imp, you'll get a Speed Tab. If you Charm the Blue Beast, you'll get the Mermaid Cap, which is as good as the R'Bow Helm, but cuts Water magic attack damage in half instead of Lightning.

Defeat the Beasts first. Hit the Red Beast with Water magic and the Blue Beast with Fire magic, or you'll end up healing them. Falcon Hit helps with both of them as well. After that, the Mud Imp's defense will drop, and you can easily beat them down.

The Mud Imp will eventually run away if you don't kill him in time. After you beat the Mud Imp and the Beasts, the Beasts' Lair will be empty, and you can head to Mt. Woe.


The gold rock enemy is called a Rubble. It will cast Lock All on all of your party members and keeps them from using techs or items, but it does not attack at all. It never appears with any other monsters, and if you can kill it in time, you can get 100 tech points for everyone in your party.

The Bantam Imps give you an Aeon Blade for Crono when Charmed. They can sometimes drop Stone Imps when defeated. The weapons Charmed from the monsters here are better than the ones you can get in the Terra Cave, so get them here and equip them so you don't have to buy them later on. 

The Lode Helm is useless thanks to the helmets you could get from the Beasts earlier, assuming you got enough for all your party members. The Lode Armor, however, isn't, and you'll want to use it for whoever needs the defense boost the most.

The Gargoyles attack you with a ball and can also take one party member's HP down to 1 in one attack. If you Charm one, you can get the Big Hand for Robo.

The Man Eaters can inflict Chaos on one party member with the Blizzard attack. Charming one will net you the Pearl Edge for Frog. Once you get that Pearl Edge, focus on taking them out early, because they can be troublesome. Falcon Hit can do the trick.

The chains here not only hold parts of the land together, but they can be used to get from one island to another.

Sunday, June 23, 2024

PrinceWatercress plays Ratchet and Clank: Going Commando - Part 31 of 54


Time to bust out of prison...

First | Previous | Next | End

1:22 - The Hammer Bot. We'll need this guy to smash the containers with the electrical charges in order to spring Ratchet out.

2:19 - Have the Hammer Bot use the hammer on the see-saw to get in the vent.

3:01 - We have some Microbots to fight some enemies with in order to get the Hammer Bot back with us and open up the next section.

4:15 - Get to the elevator and get the Microbots to sic on the larger robots, as the larger enemies will definitely hit you.

5:41 - Hitting the switch to cause a power failure throughout part of the ship, which will free Ratchet and switch control over to him. From here, get to the weapons vendor and refill on weapons, then get rid of everyone who shoots at you.

7:27 - Playing with gravity, causing the enemies to fall sideways into the lava and die.

8:55 - You'll need to jump across these platforms to continue and switch back to Clank.

11:13 - Build another bridge and hover jump off the edge to reach the next area. It won't be long until you're Ratchet again.

13:28 - A new wrench, and more platforms.

14:04 - The Synthenoids are really useful against all the enemies here.

14:26 - Good thing we had a Synthenoid army with us here.

16:20 - More platforming.  We have two wall jumps before Ratchet and Clank reunite, but we're not done yet.

18:03 - Gliding down near your ship leads to the area's lone Platinum Bolt.

18:41 - This Levitator section leads to the plumber from the first game, who finds a Qwark action figure. For 20,000 bolts, you can buy it off of him and bring it to that guy on Todana.

22:17 - Another Infiltrator area. The solution is left, up-left, left, down-right, down-left, down, down-right, down, down, down-right and then up.

22:27 - We have some more Levitator segments here. Watch the white lasers while passing through. 

23:58 - We intercept a message from Angela Cross, who warns us that that Thugs-4-Less has returned from a Megacorp distribution center before getting caught. We now have coordinates for Planet Gorn as well as access to our ship again as soon as we hit the nearby switch.

Controls:


As Ratchet:

Control Pad/Left Analog Stick: move
Right analog stick: move camera

X:
  • Jump and double jump (hold button after double jump to use Heli-Pack or Thruster Pack)
  • Wall jump (near certain walls)
Square: strike with wrench
Circle: pull out/shoot currently equipped gun
Triangle: 
  • quick select (hold and use in conjunction with Control Pad or left stick to switch guns; menu can be customized in Quick Select on the pause menu
  • double tap to switch between two most recently equipped weapons/items
  • interrupt on-screen messages

Select: open map
Start: Pause menu
  • Control Pad: select option
  • X: confirm option choice

L1:
  • center camera behind Ratchet (tap button to center)
  • first-person view (hold button and use left stick or D-Pad to look around; let go of L1 to move camera back behind Ratchet)
  • Square: wrench boomerang
  • Circle: fire gun
  • R1/R2: zoom in and out (Pulse Rifle only)
L2/R2: strafe (hold while moving)
L3: see health and Bolt totals
R1/R2: crouch (hold down)
  • Square: wrench boomerang
  • X: high jump
    • long jump (hold crouch button and jump while running to perform)
R3: open map

In water:
  • Square: dive and descend
  • X: surface and ascend
  • R1: accelerate with Hydro-Pack

As Clank:

Control Pad/Left Analog Stick: move
Right analog stick: move camera

When hanging off platforms:
  • Control Pad/Left Analog Stick: move
  • Forward+X: vault up
  • Back+X: drop down

Square: punch
X: Jump (press and hold in the middle of a jump to glide with Heli-Pack)
Triangle: command menu (hold and use in conjunction with Control Pad or left analog stick to choose commands)

Saturday, May 25, 2024

DeceasedCrab plays Earthbound - Part 31 of 53


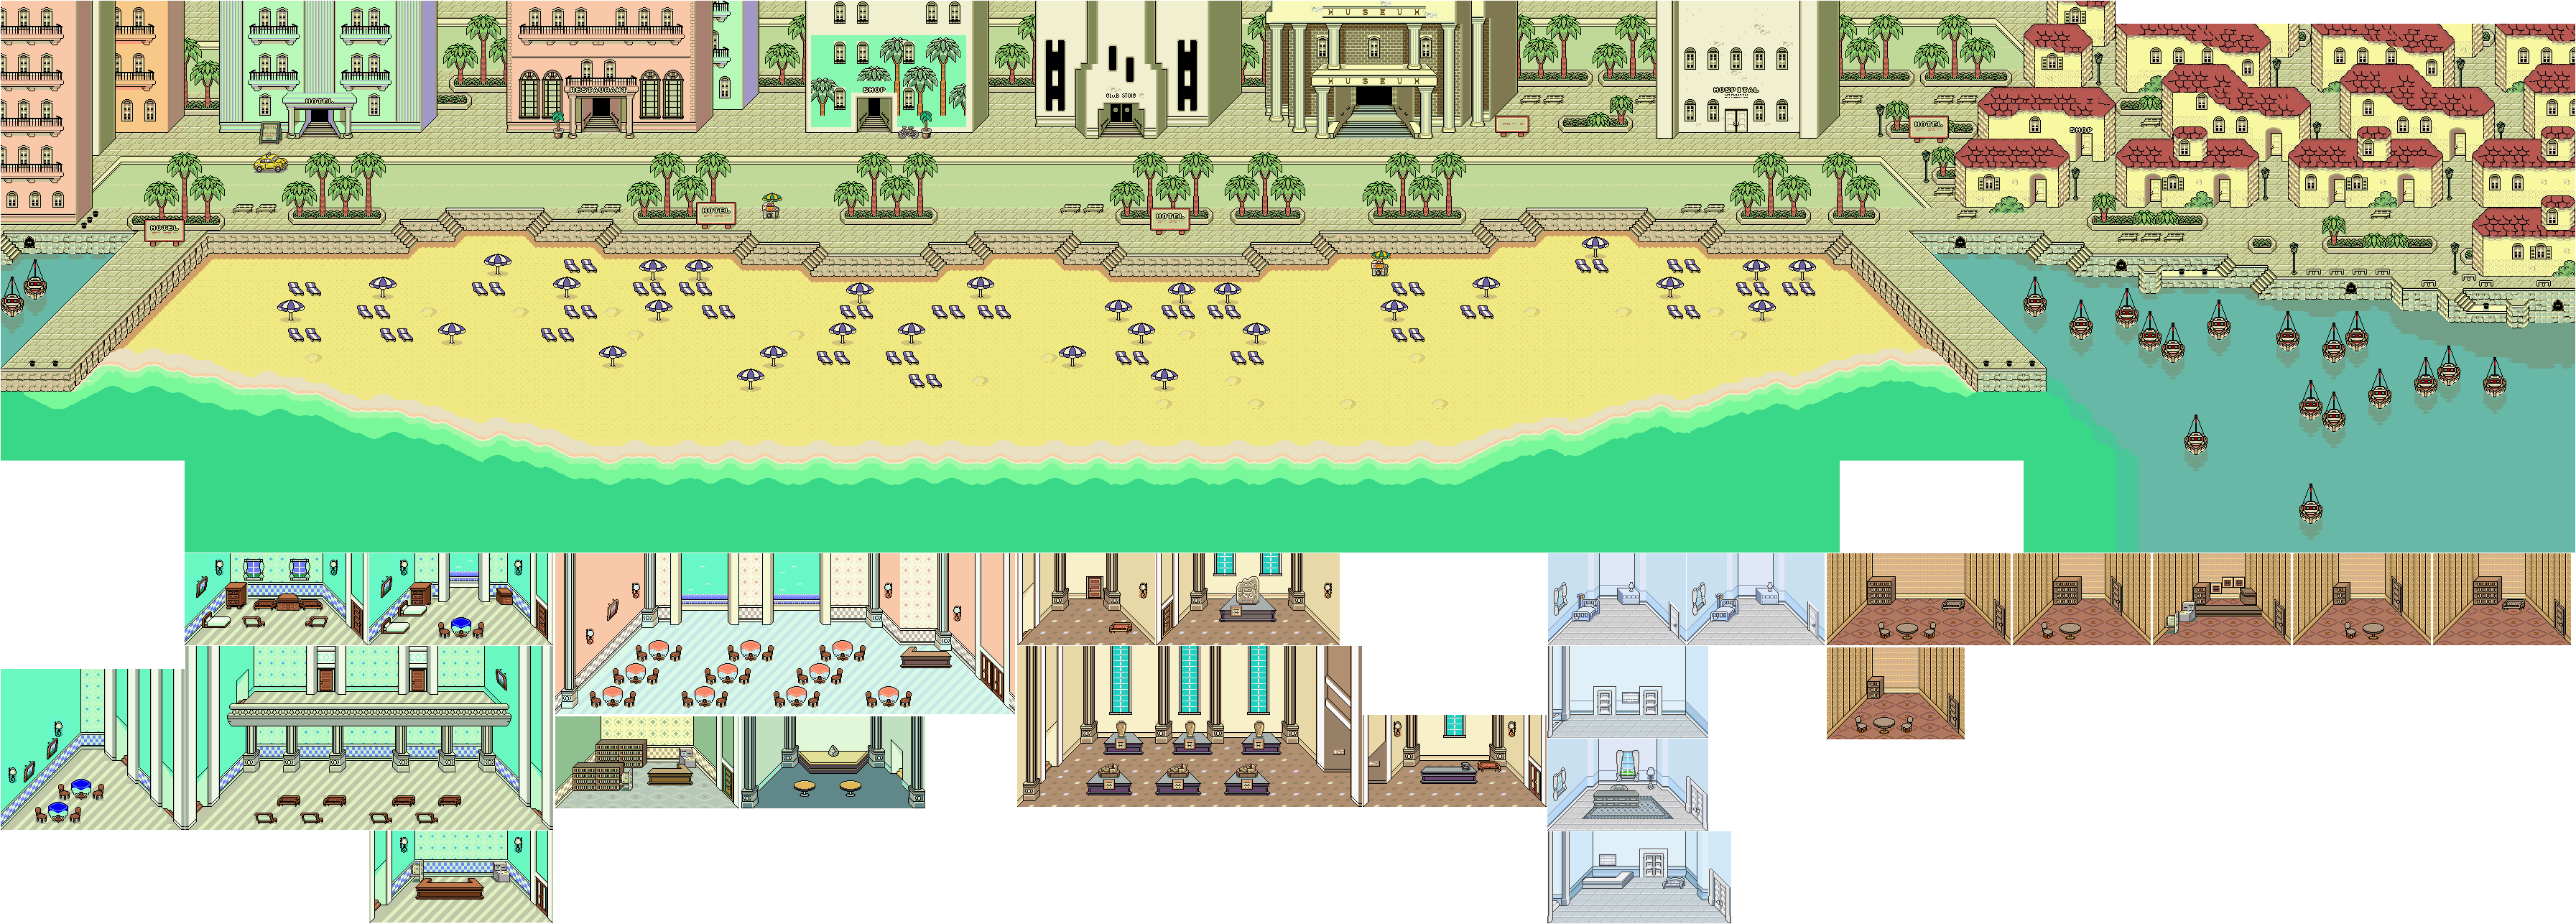
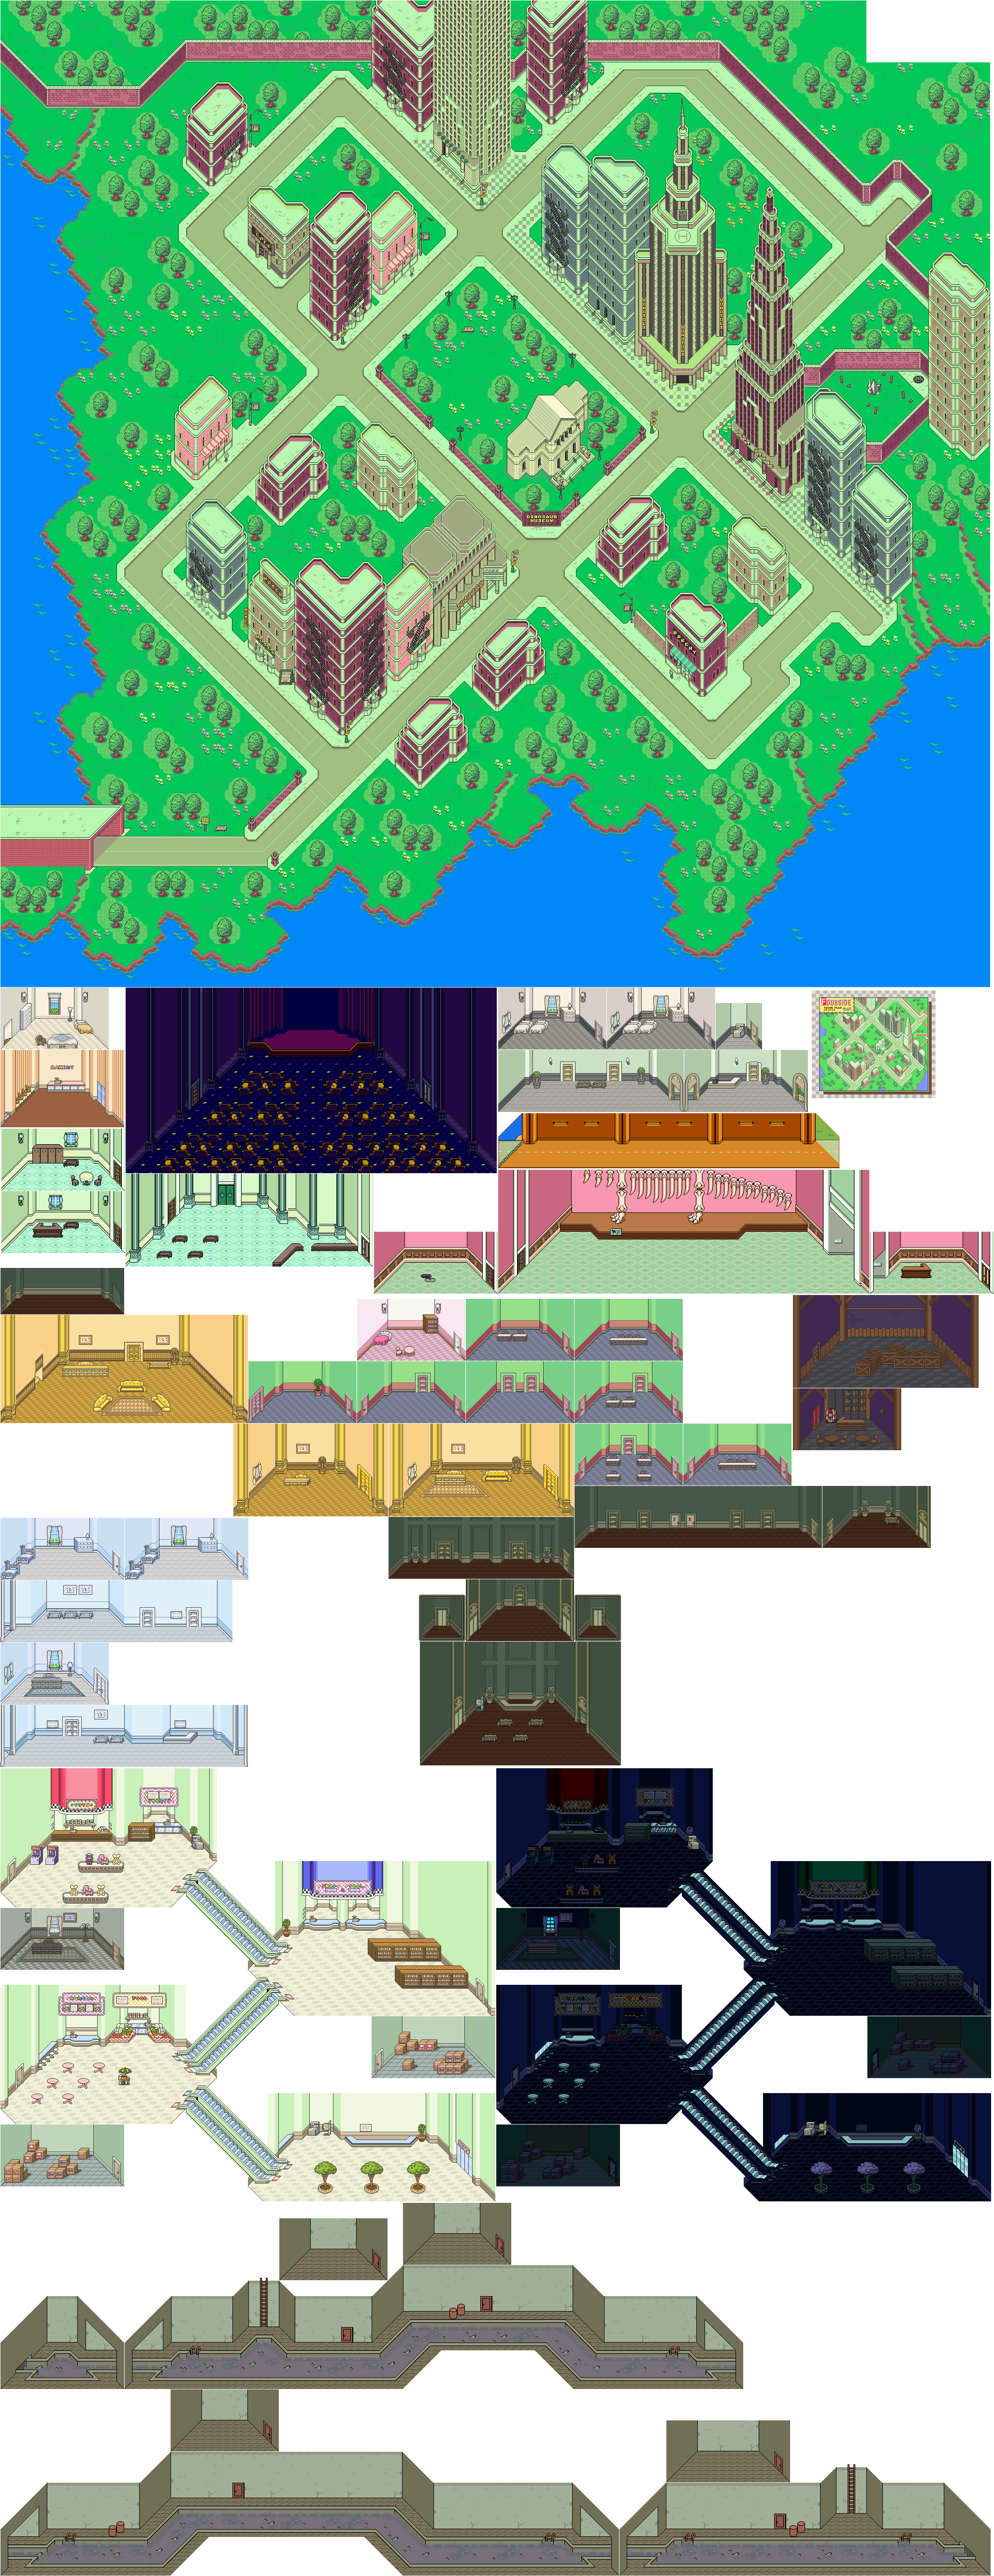
In this entry, we head back to Fourside to claim another "Your Sanctuary" location.


If you talk to the Magic Cake woman again, you'll find out she can't make Magic Cake any more, and that she is now selling Magic Tarts, which taste even better. You can get one for $480, and it heals 20 PP. Pudding heals 40 PP, while Truffles (which you'll see later on) heal 80 PP.

Head back to the museum and give Poo's Tiny Ruby to the security guard blocking the door. You'll be able to check out a Scarabian hieroglphs, but you'll also fight two Shattered Men, who are in the room in the form of moving sarcophagi. Ice spells work well on a Shattered Man. The Mummy Wrap can be used to damage and stun an enemy for one time only.

Poo can learn Magnet Alpha at Level 21 and Brainshock Alpha at Level 24. Brainshock Alpha can confuse a single enemy. Poo will be levelling up pretty quickly when you first get him.

When you read the sign near the heiroglyphs, you'll learn about how the ancient Scarabian civilization fought against Giygas and lost. You'll also get a clue as to how to get into the Sphynx, which watches over everything. Poo will then tell you to head for Scaraba. When you leave, the man inside will give you a copy of the hieroglyphs, so you can refer back to the notes as to get back into the Sphynx at any time.

When you head downstairs, the lobby desk will be empty and the phone will be ringing. Take the call. You'll get a call from Mr. Spoon of the Fourside Museum of Natural History asking for Mr. Fork of the Scaraba Cultural Museum, telling you that he has found something fantastic.

As mentioned before, Teleport Beta makes you move around in a circle before teleporting. You can still move yourself with the D-Pad, but take care not to run into anything.


Back at Fourside, head to the Dinosaur Museum and talk to the man blocking the door again. He will want you to get Venus' signature at the Topolla Theater. Head to the Topolla Theater and see Venus' show. At one point, you'll see the guy blocking the door from earlier - who happens to be Mr. Spoon - get close to the stage at first before getting on it and being carried off by security.

Head backstage and talk to Venus. This time, she will give you one, albeit on a banana peel. You'll get the Signed Banana as well as a kiss from Venus. Head back to the Museum and give the Signed Banana to Mr. Spoon. He will tell you that in the next room, there is a manhole, and inside the manhole, he found a very large rat. You'll need to go in there to find a "Your Sanctuary" location.

The Broken Gadget will become the Double Beam when fixed. It is more powerful than the Hyper Beam.

When in the sewer, keep heading east. There are rooms where you can find treasures, but you'll also find monsters in them, too, so be careful. If your path is blocked, you'll have to swim through the water before you can get back on land.

The Stinky Ghost is another ghost enemy that can decrease a party member's offense with its odor as well as possess you with a Mini Ghost. The Deadly Mouse is a more powerful mouse enemy with a high amount of Guts.

Paula will learn Fire Theta at Level 37.

Tuesday, October 31, 2023

Jerry Martin plays Strong Bad's Cool Game For Attractive People - Part 31 of 53


With every other band in the battle floundering, Strong Bad wins his own contest and fixes his Fun Machine. We only have a few things left to do now...


Once you click on the lobster, Strong Bad will take it and warn the viewers not to put a lobster down the back of their pants before putting it down the back of his pants. Use the lobster on the speaker cable, and Strong Bad will try to cut the cable with the lobster's claws only for it to not work. The King of Town will then notice the lobster before swatting at the lobster with his guitar, cutting the cable and causing a speaker above the stage to fall down. People will cheer at The King of Town swings at the lobster.

Grab the lobster bucket, then go to the left and click on the ladder to climb up to the rafters. From here, go all the way to the right and click on the lever on the pulley. This is supposed to reveal something, but thanks to the fog and the bats, this misfires. From here, use the lobster bucket on the fog machine to pour the butter inside. This will bleach the bats with butter, and The King of Town will eat one them in a weird Ozzy Osbourne reference gone mad. This causes DOI to win the Battle of the Bands. As for what was behind the curtains when you pulled the lever on the pulley? A cardboard drawing of Strong Bad with "DOI" above it. Everyone then leaves while carrying off The King of Town, and Strong Bad stands on the stage alone.

From here, the game shifts to Strong Bad's house. Strong Bad returns to his room with the Fun Machine, but when he turns it on, it is still broken. Strong Sad shows up and finds out that there is just a crusty wad of jalapeno cheese spray suck in the Limozeen cartridge. Strong Bad then eats the dried cheese spray, then plays the game with Strong Sad watching from behind as the credits roll. The game then reveals what the next episode is about: the gang filming a new Dangeresque movie!

After that, you're in Extended Play, which will allow you to do some extra things.

Head back to Strong Badia and talk to Strong Sad. Strong Sad will mention that he has come up with a band called "Security," and you'll get a musical moment.

Go to Club Technochocolate and use "Doin' The Wigglie" on the turntable. You'll get the back cover for the Limozeen Hot Babelien Odyssey game manual. Do it again, and you'll get another musical moment where Strong Bad dances around. Finally, use "Slide To The Right Y'all Bridesmaids" on the turntable to get another musical moment.

Finally, go back to Strong Bad's house and play the Fun Machine. There's only one thing left to do.

OUTFITS:
- Sloshy Shirt: Use mic in downstairs laundry room.
- Leopard Print Pants: Examine couch in downstairs TV room.
- Head Band: Use mic near brick wall to the right of Bubs.
- Hollywood Boulevard Boots: Use the Black Metal Detector near the picket fence.

STRONG BAD ABUSE:
- Examine the microwave in the kitchen.
- Examine the Lappy Plug in Strong Bad's computer room.
- Use the fake sword on Marzipan.
- Use the bleach on the pond at the Two-o-Duo stage.
- Talk to Strong Sad at the Pomstar stage.

LIMOZEEN SHOT GLASSES:
- Larry Shot Glass: Examine Luxa-Lounger.
- Perry Shot Glass: Use mic near Strong Bad's mailbox.
- Gary Shot Glass: Use the Black Metal Detector next to Marzipan's Zen Garden.
- Mary Shot Glass: Examine the dead fish at the Two-O-Duo stage after using the bleach on the lake.

LIMOZEEN MANUAL PAGES:
- Cover: Use the Ordinary Light Switch in Strong Bad's computer room.
- Dedication Page: Use the Black Metal Detector in front of the Two-o-Duo Stage.
- Lyrics Sheet: Use the Mic in front of the Cool Tapes stage.
NEW! Back Cover: Use "Doin' The Wigglie" on the turntable at Club Technochocolate. (Extended Play)

RARE BAND POSTERS:
- Two-o-Duo: Use the Black Metal Detector on the right side of Bubs' Concession Stand.
- Cool Tapes: Check the first locker on the left in the Locker Room.
- Pom Pom: Use the microphone at Club Technochocolate.
- DOI: Use the Black Metal Detector in front of the DOI stage.

EXPRESSION OF AFFECTION:
- Talk to Strong Sad about bats twice.
- Talk to Bubs about the Fun Machine.
- Talk to Coach Z about Marzipan twice (before he leaves Locker Room).
- Use Cool Tapes Photo on Marzipan and make out to Strong Bad.
- Use Cool Tapes Photo on Marzipan and make out to Coach Z.
- Talk to Coach Z about Poetry at Marzipan's House.
- Talk to Limozeen about Two-o-Duo at the Two-o-Duo stage.
- Talk to Coach Z at Pomstar (after breaking up Two-O-Duo and before sabotaging Pomstar).
- Talk to the Whale at the Pomstar stage twice.
- Give both of the photos (whale and pond) to Marzipan and take the coloring book, then turn hints up to high and walk around the Two-O-Duo Stage (before coloring the coloring book and before playing the Teen Girl Squad ).

MUSICAL MOMENTS:
- Offer The Cheat an entry form.
- Offer The Cheat an entry form twice.
- Offer Strong Mad an entry form.
- Talk to Coach Z about the Boom Box at Marzipan's House.
NEW! Talk to Strong Sad at Strong Badia. (Extended Play)
NEW! Use "Doin' The Wigglie" on the turntable at Club Technochocolate twice. (Extended Play)
NEW! Use "Slide To The Right Y'all Bridesmaids" on the turntable at Club Technochocolate. (Extended Play)

Monday, April 24, 2023

PrinceWatercress plays Sly Cooper: Thieves In Time - Part 31 of 48


Only two treasures this time around, because I hit a huge snag. I had the right idea with the Steer Horns, but in the next video, I execute it a little bit differently.


The treasures in this game work much like they do in Sly 2: they will be in certain locations in the episodes, and you'll have to go out of your way to find them, interact with them to grab them, and bring them back to the hideout without getting hurt by the enemies. Sadly, there is no way to get them show up on the Select screen map. Unlike that game, where some items were on timers and others were not, all of the treasures are on timers and you'll have a certain amount of time to get a treasure back to the hideout. The amount of time that you get depends on the treasure.

Each episode - not counting the Paris prologue and epilogue - has 12 treasures in all, leading to a total of 60. There are also a few Trophies for going for all the treasures along the way.

I also create some rules of my own for the treasure collection videos as well.

1. There are no practice runs. Everything that is done is done on the fly.

2. You will need all of the costumes before even attempting to get all of these.

3. There is a total of twenty (20) minutes to collect treasures per video. Whether any more time is needed to get one more treasure is a matter of discretion.

4. The timer only starts after exiting the hideout and gameplay begins.

5. In case a return to the hideout is needed to get away from enemies or to switch episodes, the timer is suspended. The timer is only restarted once the hideout is exited again and gameplay begins again.

6. After the twenty (20) minutes are up, we get to read the treasure descriptions and rotate the treasures.

GamesRadar made for some pretty good notes on how to find everything; you can find them here.

7. Tacky Tombstone


This one is north of the Branding Iron and requires the Archer Costume to get to. Believe it or not, you'll have to look down to find the rope arrow bucket.

8. Diamond Cactus


Remember where you had to shoot down those scorpions with Murray? It's near the wooden ramps. Be ready to ride the rails to get this thing to the hideout in a minute.

Achievements:


Clockwerk Collector: Collect over twenty treasures.

Controls:

Left analog stick: move
Right analog stick: move camera
X: Jump and double jump (hold X on second jump for hover jets as Bentley)
Square: attack
Circle: 
  • interact (usually with anything that has sparkles) (Sly)
  • steal from enemies (from behind) (Sly, Bentley, any of Sly's ancestors)
Triangle:
  • knock enemies upwards (from behind; press Square to slam enemies down for stealth slam) (Sly, any of Sly's ancestors)
    • press Circle after knocking enemy upward to perform Silent Obliteration (Sly; replaces Stealth Slam; must buy on ThiefNet)
    • press Square for Stealth Slam (any of Sly's ancestors)
  • spin attack (hold to charge) (Sly)
  • throw bombs (Bentley)
  • Thunder Flop (in mid-air) (Murray)
  • spin attack (hold to perform) (Murray)
    • control with left stick (must buy on ThiefNet)
  • Raging Inferno Flop (in air; Murray; must be bought on ThiefNet)

L1: 
  • bomb aim (Bentley)
  • smoke bomb/flash bomb (Sly; must buy on ThiefNet)
  • aim/strafe mode (Carmelita; must hold button down)
    • left analog stick: move
    • R1: shoot (can only shoot in strafe mode)
L2:
  • hold for costume select menu (Sly)
    • hold down to stay in menu; use D-Pad or left stick to make selection
  • hold for weapon select menu (Bentley)
    • hold down to stay in menu; use D-Pad or left stick to make selection
  • hold for fist select menu (Murray)
    • hold down to stay in menu; use D-Pad or left stick to make selection
  • hold for shot select menu (Carmelita)
    • hold down to stay in menu; use D-Pad or left stick to make selection

L3: activate compass
R1: run (hold while moving to perform)
  • Paraglide (Sly; in air; must buy on ThiefNet)
    • Square: Paraglide Dive Attack (during Paraglide; must buy on ThiefNet)
  • Adrenaline Burst (Bentley; double tap to activate; must buy on ThiefNet)
  • Clothesline (Murray; double tap and steer with left stick; must buy on ThiefNet)
  • Cane Push (Sly; double tap; must buy on ThiefNet)
R2:
  • Trigger Bomb (Bentley; must have bomb on field to detonate manually; must buy on ThiefNet)
  • Super Jump (Carmelita; hold and press X to perform; must buy on ThiefNet)
R3: Binocucom
  • Right analog stick: move
  • Left analog stick: zoom in and out
  • R1: take picture (when applicable) (Sly, Bentley)

Start: pause menu
Select: map
  • Left analog stick: zoom in and out, switch between map and status
  • Right analog stick: move map
  • Circle: back

Sunday, March 5, 2023

PrinceWatercress plays Blood Omen: Legacy of Kain - Part 31 of 41


Now that we know that we need to go to Willendorf, we're heading there. On the way there, we do things.


Now that you're done at the Pillars, head back to the beacon you activated after beating Azimuth, go through the portcullis again and go east.

3:17 - Willendorf...and scarecrows. Yes, the scarecrows are back.

4:06 - You're supposed to wait until you get the third strength upgrade to push this rock, but if you try to push it, then jiggle the D-Pad, you can get through. The Hearts of Darkness hide a secret (see below). 

4:45 - South and east of the secret is a bridge. 

5:36 - Using Control Mind on this guy and moving his to the right triggers a floor switch that opens a door to the north. This also triggers a secret (see below). The room to the north contains a ton of pick-ups.

By the way, you can try to push the big rocks and then jiggle the D-Pad in order to make your way back.

9:04 - East of the rocks has one more meeting with Mortanius, who tells us that he can help us no longer. Further to the east is a beacon and a shortcut to Willendorf, and northeast of that is a cave.

11:24 - Use Repel to make your past the projectiles and save your game, then use Control Mind the guy on the right. Hit the switch to the north, go east, throw knives at the guy to the south, then get past the spiked balls to refill your magic. Control Mind the guy on the left, hit the switch to the north, go west, kill the enemy, hit the panel on the north wall, then get past the spiked balls to get two Pentalich of Tarot pick-ups.

13:31 - Use Mist to get past the spiked balls. Use the Flame Sword on the zombies.

14:26 - Use Control Mind on the guy to the north to get Spirit Wrack, which is much like Control Mind but can be used on ghosts. Be sure to hit the switch to the north, too. Use Spirit Wrack on one of the undead enemies that will kill your human host to get a rune triangle and a magic orb.

From here, press X to return to Kain, then get rid of the other zombies with Pentalich of Tarot after moving south slightly. From here, use Spirit Wrack on the skeleton to the north and hit the nearby switch. This will open up a bridge. From here, keep using Spirit Wrack to hit switches and continue to make your way to the north.

18:58 - Use Pentalich of Tarot to get rid of the enemies and get the blood vial before going east and leaving.

21:23 - South of the beacon and the cave is a sign where you can learn about Willendorf. 

22:50 - You're supposed to go past the last boulder with the third strength upgrade to get the Pentalich of Tarot cards and the secret (see below), but trying to push and then jiggling the D-Pad lets you go in and out.

23:48 - NOW we have our third strength upgrade.

Secrets

85. - The Hearts of Darkness hide a secret.

86. - Using Control Mind on this guy and moving him to the right triggers a floor switch that opens a door to the north. This also triggers a secret (see below).

87. - The Pentalich of Tarots hide a secret. You're supposed to come here with the third strength upgrade, but trying to push and then jiggling the D-Pad lets you go in and out.

Tuesday, December 21, 2021

HCBailly and JB play Secret of Mana - Part 31 of 41


In this entry, we finally take the test of courage.


The Test of Courage


When you return to Jehk, you'll finally meet Sage Joch. Talk to Joch, and you'll find out that you must undergo a test where you must conquer the ones within to learn courage. From here, you can head north.

The Nitro Pumpkins will cast Wall on themselves, and they can cast Burst and Sleep Flower for some good damage. They're also hard to hit with your weapons unless you can land critical hits. Good thing we have Moon Energy. If you can luck out, you can cast Change Form on them to turn them into weaker enemies before they can cast Wall.

The Shape Shifter can spawn other enemies, such as Captain Ducks that can cast Exploder on your party, Eggplant Men that can cast Lucid Barriers, and even Metal Crawlers that can Poison and Engulf you.

At the end, you'll face three clones of yourselves known as the Shadows. The Randi clone (Shadow X1) wields the sword, the Purim clone (Shadow X2) wields the gloves and the Popoie clone (Shadow X3) wields the boomerang. They fight much like you, even down to the high-level strike combos, but they do not have a lot of hit points and a high level physical weapon strike can take them down in one hit if your stats are good.

When you beat the three Shadows, head south and you'll go back to Jehk. You'll find out that Jehk was really Sage Jock all along and that the other guy was just an illusion. He will tell you that he waited for you to find your inner strength before helping you, then tells you that the Emperor seeks to raise the hidden land. He also tells you that atop the coral, you'll find the Tree Palace, and below that, the Mana Fortress. You'll then get your HP and MP restored, and you don't have to come back to the Lofty Mountains again.

There is one place left to go: the purple island with the palace in the center. This is northwest of here. Land at the palace.

Monday, November 29, 2021

PrinceWatercress plays Sly 3: Honor Among Thieves - Part 31 of 42


In this entry, we leave international waters and outsmart Captain LeFwee at his own game as we rescue Penelope.


Operation: Reverse Double-Cross

Once you find the X to get out of international waters and back to Blood Bath Bay, the fight is on.

You'll first fight the Death's Head. Here, I get lucky, and the Death's Head's cannons face me only once or twice, allowing for an easy defeat. From here, Sly gets on board the Death's Head automatically, where LeFwee seizes him for a plank walking.

At this point, insult LeFwee's creativity, make fun of his pirate talk, then mock his ability to keep Penelope prisoner. This will trick LeFwee into revealing that Penelope is locked up in his keep until she agrees to love him. After this, Sly will leap off the plank into Murray's waiting jolly boat. Row as fast you can to shore, which is up ahead. 

Once on dry land, you'll need to use the same shortcut to Skull Keep that you took with Bentley and Penelope and go into the door where the treasure is. Sly will find Penelope only to learn he has fallen for an explosive trap. Meanwhile, the Cooper Gang takes their ship to harbor, but LeFwee blows the masts off. At this point, Guru and Crusher show up.

You'll need to move the left and right tentacles up and down with the left and right analog sticks, respectively, and use L1 and R1 to attack with the left and right tentacles, respectively. Watch the corners of the ship carefully and be ready to hit every guard that shows up as Bentley tries to break the four locks on the door leading below deck.

Once all four locks are broken, LeFwee catches up to Bentley and Penelope, and Sly seemingly comes back from the dead (honestly, did you think that explosive trap killed him?) and knocks LeFwee down from above with the Paraglider. As Bentley lies on the deck, Penelope produces a rapier and keeps LeFwee away from Bentley. This leads to a duel on the mast.

Use the left analog stick or D-Pad to jump and duck with Up and Down. Left and Right allow you to move across the mast. Up jumps over the low swipes, while Down ducks over the high pokes. When LeFwee is leaning away from the screen between sword swipes, press Triangle for a right swing. When LeFwee is learning towards the screen between sword swipes, press Square for a left swing. If you use the wrong swipe, it will be blocked. If you get hit, you'll be knocked back, and if you're knocked off the mast, you're doing this whole boss battle over again.

When you knock LeFwee off one level of the mast, it's down to the next level. The first level has you learning to jump and strike with Triangle, the second level has you learning to duck and strike with Square, and the third level puts it all together. 

After the third level battle, you'll complete the job, Bentley finally finds true love, Captain LeFwee will be shark food, and Dimitri will be part of the team. From there...it's on to Kaine Island, where this all began...

Controls:

D-Pad/left analog stick: Move
X: jump/double jump
Square: attack
Circle: use to interact with sparkles, steal from enemies (from behind; with Sly), grab objects and stunned enemies (with Murray; press Circle afterwards to grab enemy out of air and press again to shake them, or press Square to throw them)
Triangle:
  • charge up cane, knock enemies into the air (from behind; with Sly, use Square afterwards to slam enemy down/use Silent Obliteration)
  • drop bombs (Bentley)
  • uppercut (Murray; press Circle afterwards to grab enemy out of air and press again while holding enemy to shake them, or press Square afterwards to knock enemy out while in mid-air)

Select: access Gadget Grid
  • D-Pad/Left analog stick: select gadget/ability
  • L1, L2, and R2 buttons: assign gadget to button pressed; gadget can then be used with that button

Start: Pause/unpause
  • D-Pad/left analog stick: choose options
  • X: confirm choice
  • Triangle: back out of choice

L3: bring up waypoint

R3: use Binocucom
  • Left analog stick/D-Pad: look around
  • Right analog stick: move in and out
  • R1: take picture

R1: run (hold down)
  • use Paraglide (as Sly; hold down to use, must purchase first)

Right analog stick: move camera

As Carmelita:

  • Left analog stick/D-Pad: move
  • Right analog stick/D-Pad: move camera/aim
  • Triangle: toggle between strafe mode and free movement
  • Square: kick
  • Circle: mega jump
  • X: jump and double jump
  • R1: shoot

As The Guru:

  • L1 (hold): transform
  • Circle (in mid-air, behind an enemy): mind control
    • Left analog stick/D-Pad: steer enemy
    • X: jump off enemy and launch enemy forward
    • Square: attack

Grapple cam controls:

  • D-Pad/Left Analog Stick: aim camera
  • X: shoot/grapple with hook
  • Circle: distract enemies
  • Square: self-destruct (hold down)
  • R1: Fire turret

Hacking mini-game controls:

  • Left analog stick: move
  • Right analog stick: aim and fire gun

As The Panda King:

  • Square: flame chop
  • L1: hold to load fireworks, release to attack with stored fireworks
    • Right analog stick: sweep over multiple targets

Saturday, October 30, 2021

HCBailly plays Final Fantasy II AGAIN - Part 31 of 65


It's time for more new enemies in the Cave of Deist!


The WildHorn is a Rank 5 enemy. For best results, Curse them to decrease their attack and defense, even though they are not terribly tough. 

The Changers are Rank 3 can cast the Swap spell, swapping your HP and MP with theirs. (You cannot exceed your max HP and MP if that happens, however.) They are considered Werebeast-type enemies, for some reason, and are weak to Mind elemental spells.

The Gaia Drum deals non-elemental damage to all enemies.

The Death Idol casts Level 10 Fear on all enemies, making them more likely to run away.

Saturday, July 24, 2021

PrinceWatercress plays Bio Menace - Part 31 of 37


The game gets a little easier here, but it's going to pick back up once you reach the next stage.

Armory

The first door in the stage has the keycard. As a matter of fact, this is the first level in Episode Three to have one and the only level to have multiple keycards. Fortunately for you, there are enough keys and keycards to go around if you want to get everything.

You'll be going up and down throughout this level, and of course, the spitting cobras and the fire demons from way back in Episode One make a return appearance here. Save the grenades for the cobra enemies in case you get blocked by one trying to jump over an electric barrier you just deactivated, and shoot down everything else.

You'll be doing quite a bit of exploration in this level, but once you get through this level with everything, you'll have some more points and (hopefully) more lives.

Friday, June 18, 2021

PrinceWatercress plays Ratchet and Clank - Part 31 of 38


In this entry, we head to Quartu. While we can do some damage to Drek's plans here, we still need to go elsewhere to get the Hologuise so we can enter the factory.


When you leave Oltanis after completing it, the game will play another cutscene. Here, Drek is in desperate need of a planet to destroy.

Blackwater City - Rilgar

You'll need the O2 Mask and the Morpho-Ray for this. Equip the O2 Mask and the Morpho-Ray, then shoot the Morpho-Ray at a tank until you fill up the orange gauge at the right side of the screen. If you can do that, you can turn the tank into a chicken and get a Skill Point for it.

Robot Plant - Quartu

By climbing up the ladder near the Gadgetron Vendor, you can enter an underwater area. Swim through the three rings quickly to open the door, then avoid the lasers to get to the switch on the other side. By stepping on the switch, you'll de-electrify the water for one minute. Make your way to the other end with the Hydro-Foil and swim through to the other side to get the Bolt Grabber, which lets you grab Bolts from further away.

If you approach the factor, you'll be told that you'll need the Hologuise to enter. Unfortunately, you'll have to head to another planet to get the Hologuise.

The robots on the bridge will try to shock you, but you can tag them from a distance with the Blaster. When you destroy them, they don't come back. You'll also have the little chomper robots coming at you here, too.

Near the end, there is a door that you won't be able to open until you find a specific item on another planet.

At the end of the path, you'll find a floor pad that will turn Clank giant! The nearby scientist is trying to destroy the pad to keep Drek from using it to turn other robots giant, and you can use it to make Clank giant-sized and take out the enemy forces to buy the scientist time. You can use this to go to the arena shaped area at the other side of the bridge. The left analog stick and/or D-Pad will allow you to move, Square lets you punch, Circle lets you fire missiles, X lets you jump, and Triangle lets you fire a super laser that destroys anything in its path. You'll have a health meter in the upper-left corner of the screen that you don't want emptied out by the enemies, and the light at the left side will glow red when the super laser is recharging and green when the super laser is ready.

As for the enemies in this area, you'll have robots that shoot missiles at you and planets that come out from a distance and also shoot missiles at you. Watch your health, take out the enemies as efficiently as possible, and if you need to, mow through multiple enemies at one time with the super laser.

Once you beat all the enemies in the "arena," you'll get an Infobot. This will take you to Kalebo III, where you can find the Gadgetron HQ as well as the Hologuise.

Controls

As Ratchet: 

Control Pad/Left Analog Stick: move
Right analog stick: move camera

When hanging off platforms:
  • Control Pad/Left Analog Stick: move
  • Forward+X: vault up
  • Back+X: drop down

X: Jump and double jump
  • R1: stomp (must have Thruster-Pack)
Square: strike with wrench
Circle: pull out/shoot currently equipped gun/use gadget
Triangle:
  • quick select (hold and use in conjunction with Control Pad or left stick to switch guns; menu can be customized in Quick Select on the pause menu
  • double tap to switch between two most recently used Circle button weapons/gadgets

Select: Map
  • Left stick/D-Pad: move map
  • Right stick: Zoom in/out
  • X: view missions
  • Circle: play Infobot for planet
  • L1: previous map
  • R1: next map
  • Triangle: Exit
Start: Pause menu
  • Control Pad: select option
  • X: confirm option choice

L1: tap to quickly center camera; hold for first-person view (hold button and use left stick or D-Pad to look around; let go of L1 to move camera back behind Ratchet)
  • Square: wrench boomerang
  • Circle: fire gun
L3: see health and Bolt totals
R1/R2: crouch (hold down)
  • Square: wrench boomerang
  • Left+X or Right+X: side somersault
  • Down+X: backflip
  • X (while running): long jump (must have Heli-Pack/Thruster-Pack)
  • X: high jump (must have Heli-Pack/Thruster-Pack)
  • Double tap: hover (must have Thruster-Pack equipped)
    • L2: strafe left (while hovering)
    • R2: strafe right (while hovering)
    • X: exit hover mode (while hovering)

In water:
  • Square: dive and descend
  • X: surface and ascend
  • R1: turbojets (must have Hydro-Pack)

Trespasser:
D-Pad or Left Analog Stick:
  • Up and Down: switch rings
  • Left and Right: rotate rings
Triangle: leave Invinco-Lock screen

As Clank:

Control Pad/Left Analog Stick: move
Right analog stick: move camera

When hanging off platforms:
  • Control Pad/Left Analog Stick: move
  • Forward+X: vault up
  • Back+X: drop down

Square: punch
X: Jump (press and hold in the middle of a jump to glide with Heli-Pack)
Triangle: command menu (hold and use in conjunction with Control Pad or left analog stick to choose commands)

Tuesday, March 30, 2021

PrinceWatercress plays Gex 3: Deep Cover Gecko - Part 31 of 32


We've collected everything. It's take to take on Rez.


8:31 - What A Crock! is replayed. Triangle, X, X, Circle, Square, Triangle will give you full health at the vault.

11:52 - You'll have to jump from satellite to satellite...and it's a long way down. These satellites have see-saw properties when you put your weight on them, and if you fall, you're starting all the way back from square one.

Interestingly, you can use R2 to glide, but I had no idea that you could do this until after I finished the game. (thanks newfiebangaa)

13:01 - Here, you'll have to carefully make your way into the three domes, avoid the flashing barriers and tail whip the switches. At one point you'll have to go up and down elevators while avoiding flamethrowers and falling just to pull this off. Once you open the door, you'll meet Rez...

Wednesday, February 3, 2021

PrinceWatercress plays Sly 2: Band of Thieves - Part 31 of 49


Operation: High Road commences in this entry! We get the Clockwerk Eyes, fight The Contessa and ultimately get out of Prague while giving The Contessa her just desserts.

Operation: High Road


Pick Murray and get to the main gates of the castle. Murray will turn off the searchlights, and Bentley will sic Neyla's forces on the castle before paragliding to the blimp with Sly. As Sly, you'll need to beat up the enemies before making it to the re-education tower. With the Shadow Guard gone, you'll be hacking The Contessa's hardware. Once you successfully break down the barriers and hack in, you'll free Carmelita, who chases after The Contessa and Bentley will blow up the machinery. Bentley will get one of the Clockwerk Eyes, but Neyla will get the other.

As Sly, you'll chase after Neyla. Neyla will not only leave a yellow trail, she will also drop a web that flashes yellow when ever she makes a high jump. Thankfully, the webs will also have a yellow glow, but if you're not paying attention, it'll take you a while to notice the webs.

You'll eventually catch up to Neyla - who is stuck in a web - and the other Clockwerk Eye, but you'll soon have to face The Contessa. As Sly meets with The Contessa, you'll be Bentley again, and this time, you'll have to pay another turret segment where you will have to shoot down 20 planes. If a plane is shooting at you, be ready to shoot it down. As always, watch the temperature on the turret.

You'll then go back to Sly and The Contessa. When she runs at you, get behind her and smack her. Watch out for any spiders she spawns, and take them out if you need health. If you knock her off the edge, she'll jump back up to the building. Once you beat The Contessa, she will be down, but not out, and she will knock Sly down and take the Clockwerk Eye that the gang has.

Meanwhile, Carmelita has the eye and has taken Bentley along with a tank. You'll then play as Murray in the tank again, and you'll need to follow Carmelita and shoot her tank down. Once you do that, you'll face The Contessa as Sly once again.

The second battle is the same as the first. If The Contessa's head gets super huge, stay away from the green light that she shoots out or else you'll be hypnotized and vulnerable, and the only way out is to get hit. (It's worth it to see the expression on Sly's face as he is hypnotized at least once, though.) Once you beat The Contessa s econd time, you'll get the Clockwerk Eyes, and Sly will help Carmelita - who is still on the outs with Interpol - get out of town before the gang lays low before the events of Episode 6. 

Controls

D-Pad/Left Analog Stick: move
Right Analog Stick: move camera
X: jump and double jump
Square: Horizontal Attack
  • horizontal attack (as Sly)
  • slam enemies launched into the air from behind (as Sly)
  • hook punches (as Murray)
  • Thunderflop (as Murray; in mid-air only)
  • crossbow swipe (as Bentley)
Triangle: Vertical Attack
  • vertical attack (as Sly; used to knock enemies into the air)
  • downward dive (as Sly; in mid-air only)
  • uppercut (as Murray)
  • drop bomb (as Bentley)
Circle: Action button (near blue/green/purple sparkles and character icons)
  • pickpocket (as Sly)
  • stomp (as Murray; use Square to throw object/enemy)
R1: hold to run

Select: Gadget Grid
  • Control Pad: highlight gadget
  • X button: confirm gadget
  • L1, L2, R2: assign gadget to button pressed

L1, L2, R2: use gadgets assigned to button pressed

Start: pause menu
  • Control Pad: select menu choice
  • X button: confirm choice
  • Start: un-pause game

L3 (press the left analog stick): locate beacons for mission objectives

R3 (press the right analog stick): Enter and exit Binocucom for first-person view
  • Left analog stick: look around
  • Right analog stick: zoom in and out (with up and down on right stick)
R1: 
    • take pictures with spy camera (as Sly; when applicable)
    • shoot sleep dart (as Bentley)

Hacking mini-game controls:
  • Left analog stick: move
  • Right analog stick: aim and fire gun

Sunday, July 5, 2020

PrinceWatercress plays Terranigma - Part 31 of 50


In this entry, we spend some time in Nirlake, then go back to Freedom to make some inventions happen.

Freedom


That's everything we can do here for now. You can exit through the south or through the west at the town square.


Head north to Nirlake. It will be near a cave. As a matter of fact, you won't be able to go much anywhere else at this point.

Nirlake


Nirlake is a small farming town. By talking around, you'll learn that the people here are very superstitious. One of the guys will tell you about a status ailment known as Deadly Poison, which can only be cured by using a Serum. Unlike ordinary Poison, Deadly Poison can and will kill you if left untreated.

The woman in the house in the lower-right corner of town will tell you that this place is plain and quiet compared to Freedom. In the room to the right, you'll see a guy working on...something.

Don't forget to take a picture here.

The old man at the house to the farthest right will tell you that Anita went into a house up ahead, but then disappeared. There's nothing inside that house that's of much use.

If you go to the right of that house, you'll meet Keinz, who will tell you that the town is so placid that it is difficult to motivate progress. You'll have to really do something to get this town to expand. That won't be until later, though.

Go into the house where Keinz is standing. Go up to the gray rectangle on the floor and press A to pick it up. You'll get the Tin Sheet. From there, ready the nearby diary. You'll find out that whoever is here is trying to build something important. Is this the human equivalent of flight?

There is also a big bookshelf near the journal. Push it to the right and you'll find Anita. After you tell her you're a friend of Perel. He'll tell you that she's waiting on Will, and doesn't know where he is.

The building in the center of town is the inn. The room to the right is the inn. The sailor here will tell you he's looking for the mystic Anchor in the Great Lakes, and that whoever finds it won't get washed away in the rapids.

The sailor near the inn will tell you that he saw something spewing smoke as it fell towards the lake.

The girl in the house behind the upper-right corner of the inn will tell you that women who die at sea become mermaids, and that her mom died at sea too.

Behind the inn, there is a woman who will tell you that the Lake God is supposed to live at the Five Lakes up ahead. She'll tell you that her dead husband used to claim he saw a big animal there.

The other house behind the inn is where you'll find Amanda, who is with another man. If you talk to her, she'll tell you she's through with Bell, saying that she is sick of a man who would play with odd machines than with her and that she has found someone else. The new boyfriend will just growl at you if you talk to him.

The shed in the lower-left corner of the town contains a Life Potion inside a chest. Just toss away all of the pots that in your path.

The upper-left most house is Mack's house. Talk to him, and he'll tell you his dilemma: he's a master chef, and he is studying a cheap and handy beef item that can be eaten while farming, but he's not quite sure how to go through with it. When he asks how he should prepare the beef, choose "Grind it." Leave, come back, talk to him, and he'll ask you what to do next. Pick "Wrap w/lettuce." Leave again, come back again, and talk to him again. He'll tell you the lettuce will get soggy. Choose "Put it in a bun." Leave, come back and talk to him one more time, and he'll tell you that it's delicious and that it has spread around town.


If you head to the cavern to the north of the town, you'll meet up with Servas. He is waiting for his fiancee Nana, who is coming from Liotto from the south. Unfortunately, he's blocking the path. You won't be able to go in there until later.

In the upper-left area near the river, there is a part of the forest where there aren't as much trees. This is Gumin. Go up to the trees with the faces and an orange creature will pop up, asking who is wrecking the forest. Attack it, then attack the four pieces it splits into. From there, get directly in front of the trees with the faces and press A to get Logs. Keep going in and out of the area and keep doing this to get the maximum of nine Logs. You'll need these Logs for later.

Freedom


Head back to Bell's house and talk to Bell. Tell the truth. He'll head to the pub to get drunk. Go to the pub and talk to Bell, then leave and talk to him again. He'll apologize and tell you that he was working on a machine that will let you talk to someone far away, and didn't think someone will make it. He says he will make it now, and that if someone can be saved with it, it'll make him happy. He'll then tell you to come to his house.

Head back to Bell's house. You'll be able to get Magirock #56 if you told him the truth about Amanda. Be sure to talk to Bell one more time. After that, leave the region, come back and Freedom should be expanded.

Sunday, September 29, 2019

PrinceWatercress plays Secret of Evermore - Part 31 of 35


We hunt for some of the parts necessary for the spaceship...and encounter some new things along the way.

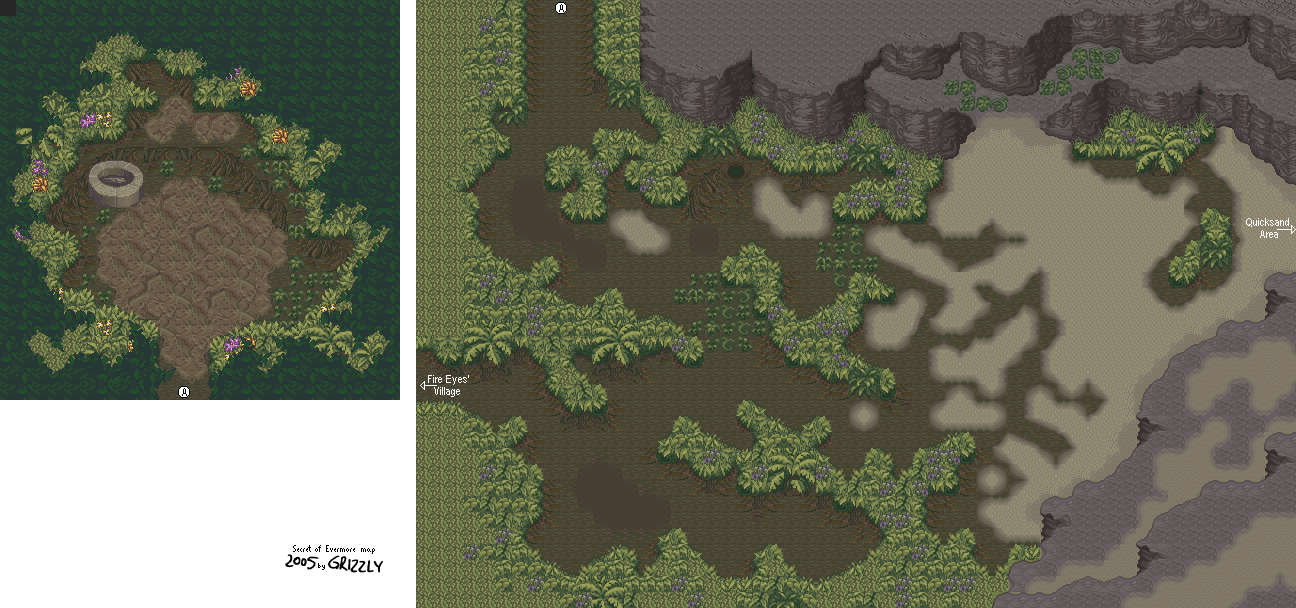
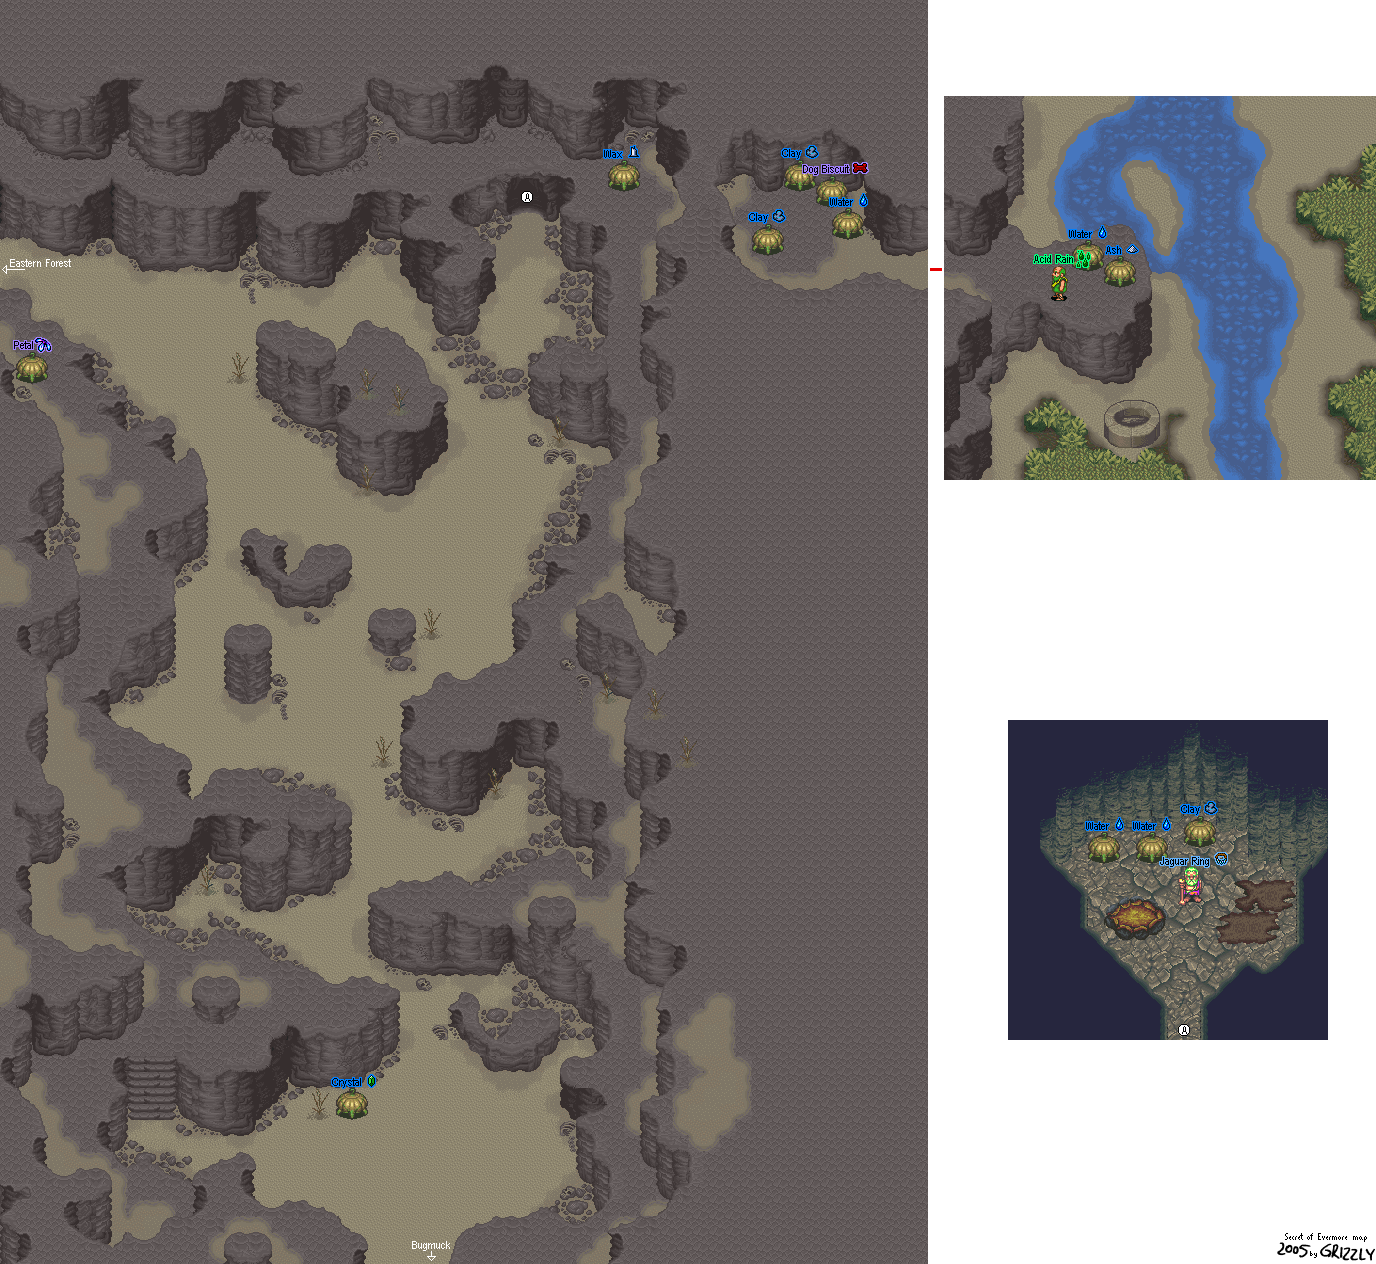
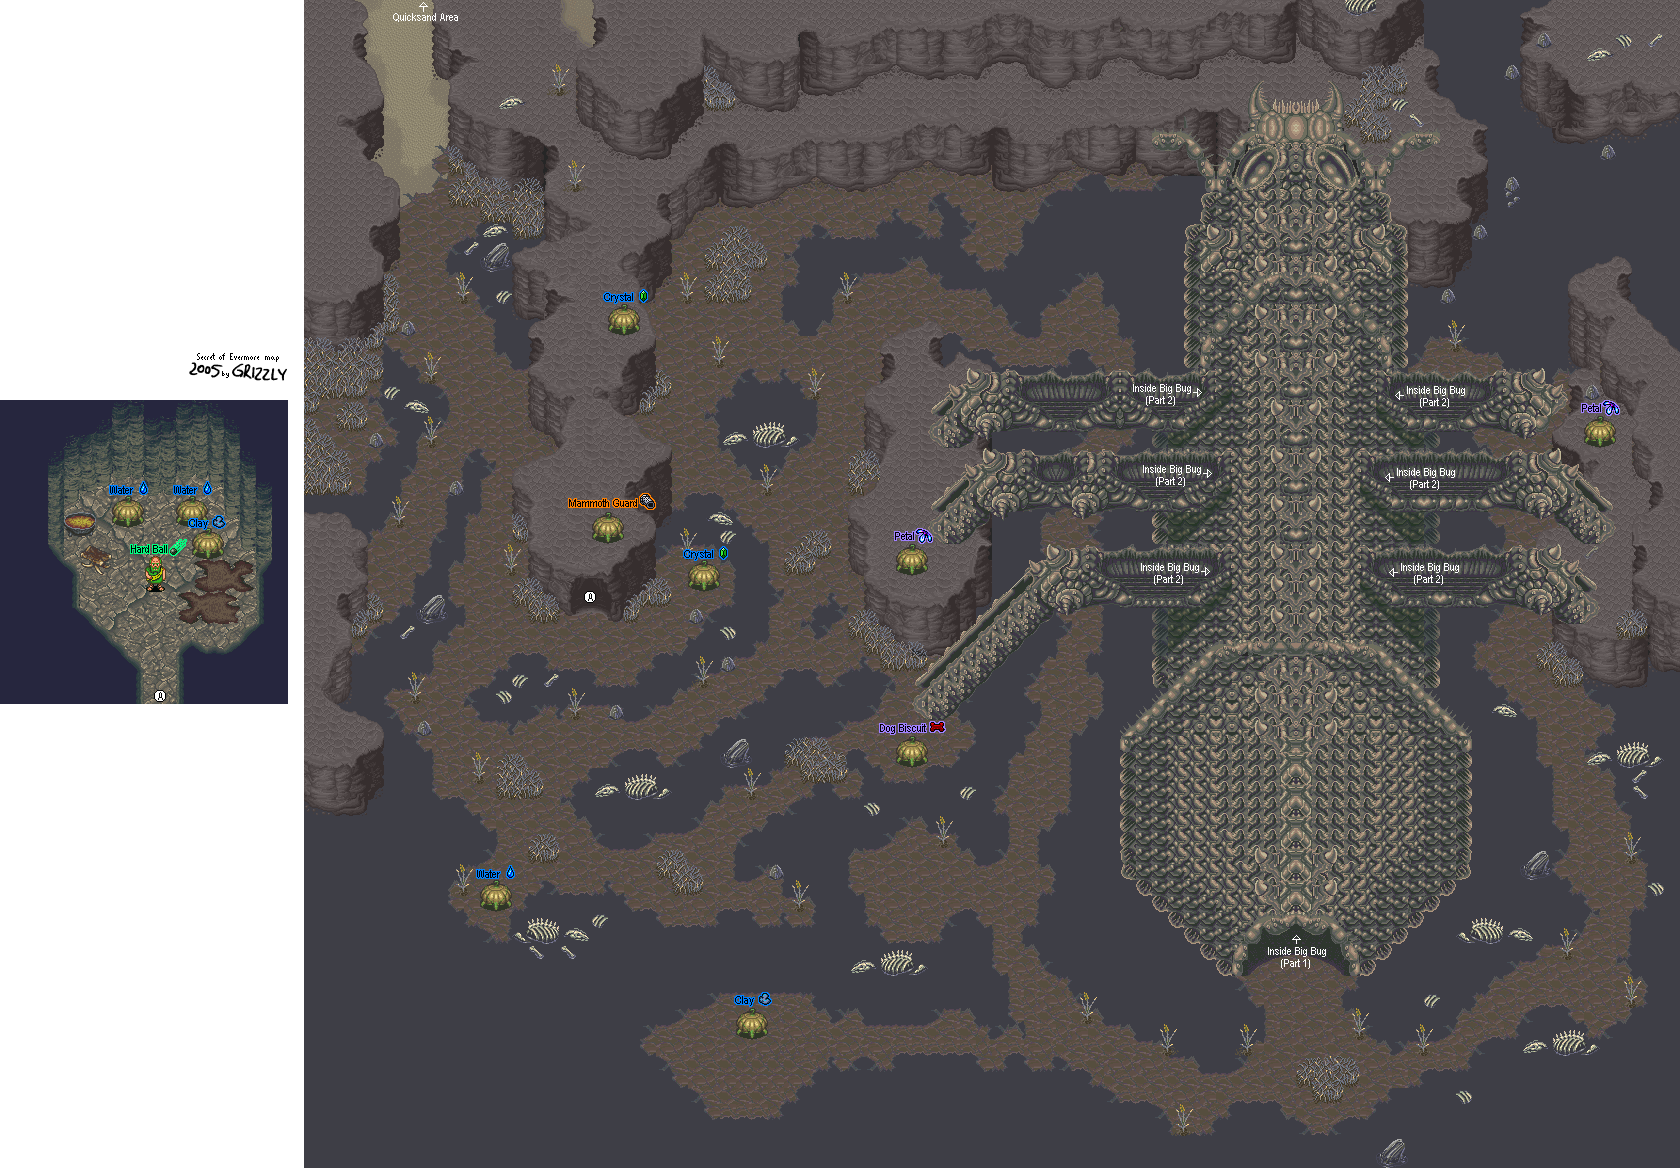
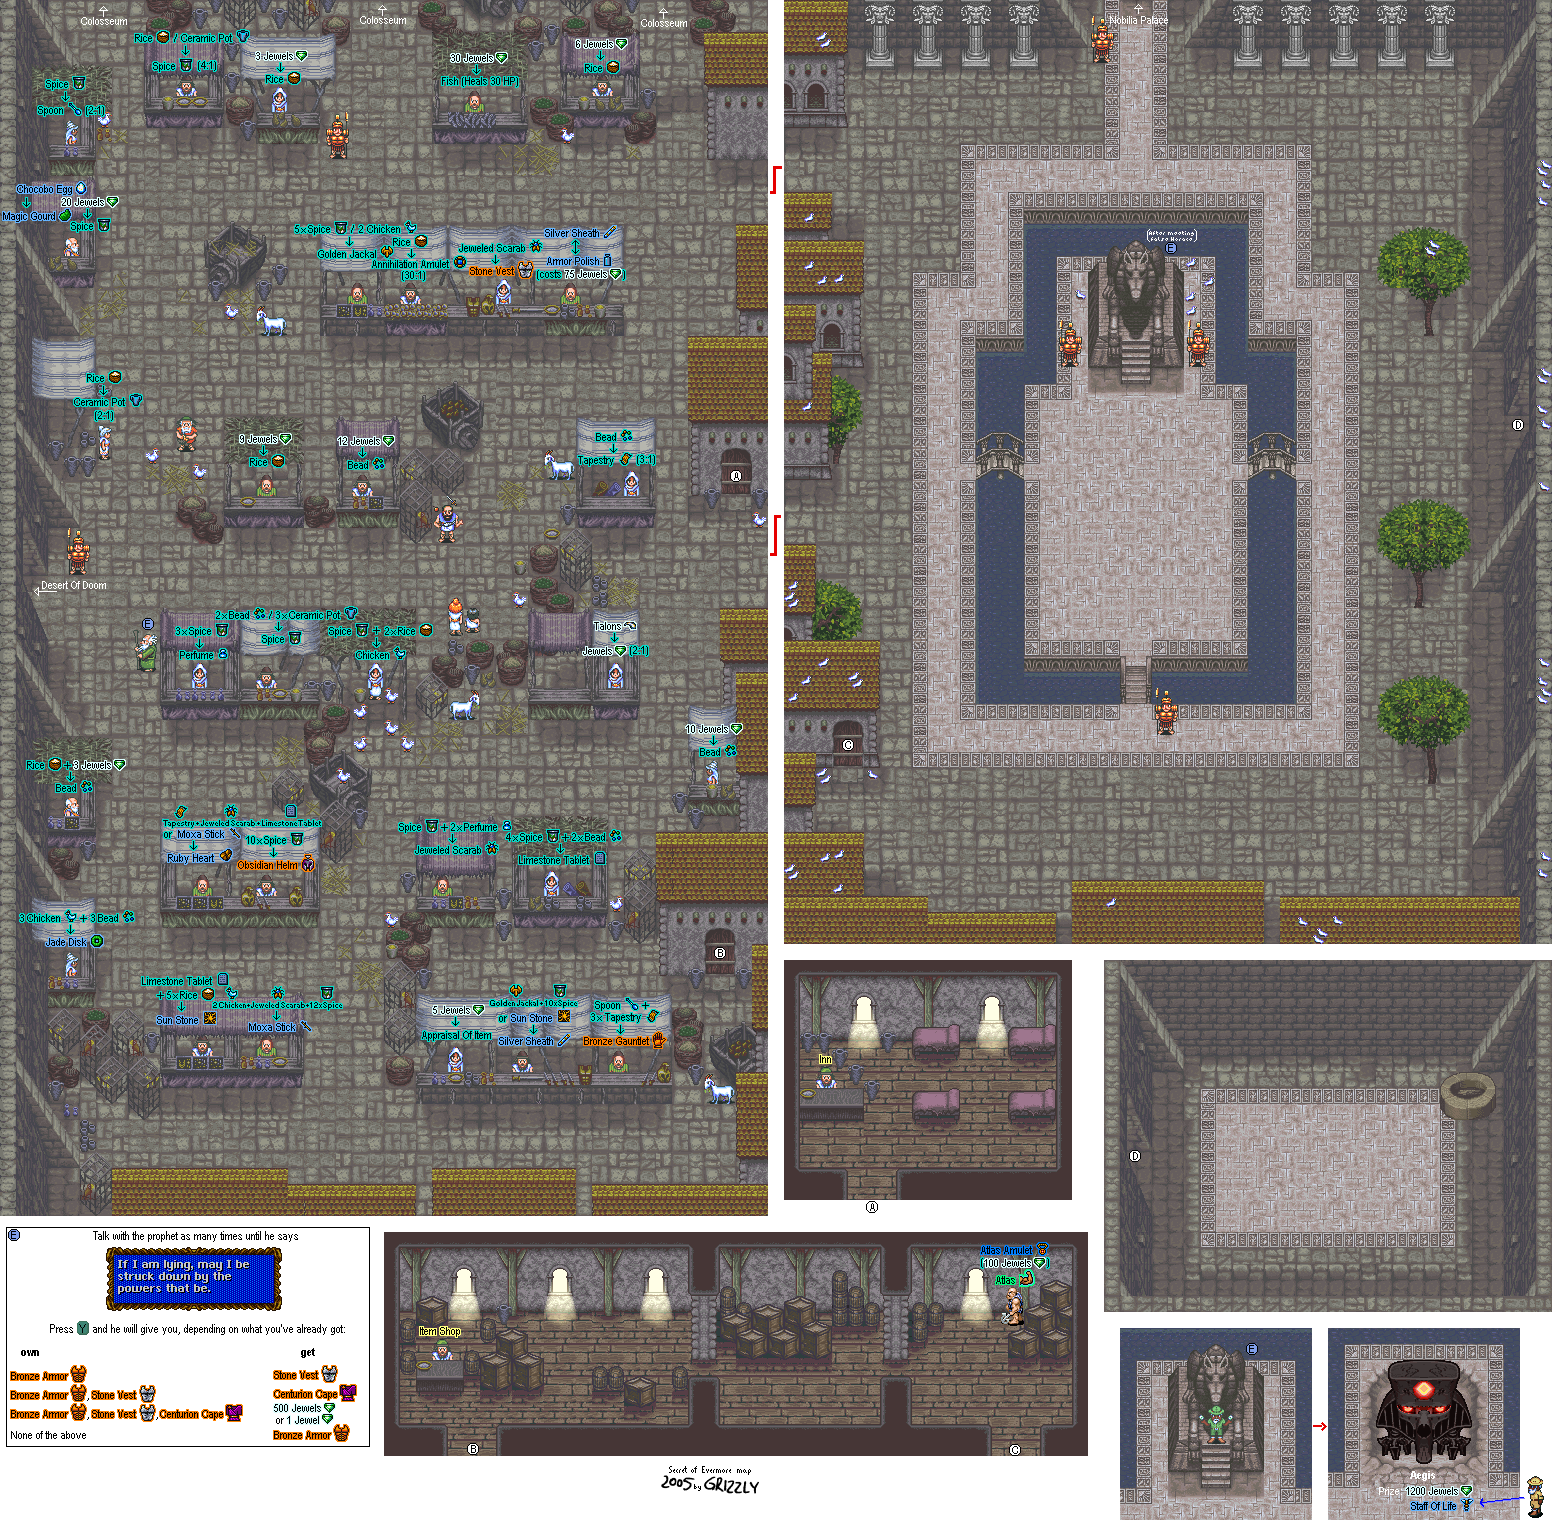
All maps by Grizzly.


Next stop, Bugmuck.

Village Exit to Bugmuck


Why walk when you can fly? There's a fire pit near there as well.

Bugmuck


Go through it like you did Thraxx. Yes, you'll have to deal with the collapsing maze again. The only thing is, you're much stronger than you were at the beginning of the game...and you have sharp instruments. Remember to look for free alchemy ingredients, including Oil and Wax, in the Bugmuck. Free is good.

Boss: Coleoptera


When you return to where you killed Thraxx, you'll find a blue recolor in his place. This is Coleoptera, and he's much stronger...but so are you.

You fight Coleoptera the same way you fight Thraxx. This time around, you'll have some more devastating spells to deal with, as Coleoptera will usually cast Storm, Flash and Heat Wave. He can also zap you with an electric attack straight from his eyes. (At least he doesn't drop Maggots this time.) Since you have some strong spells on you as well as a spear in your hand this time around, you'll be able to hit the heart without going through all that trouble like you did with Thraxx. 

Word to the wise: keep The Boy's health above 100. The Dog's, too, if necessary...pulling a Level 3 Dog Attack on that still helps if you can situate yourself just right. Using Double Drain on both arms and the heart acts as an instant heal for The Boy while dealing damage to Coleoptera at the same time.

Like last time, killing the arms gives you extra experience if you need it.

When you kill this thing off, you'll get 4000 Talons. Now hack the cocoon that's inside where Coleoptera used to be and you'll get the Wheel. Next stop, the Great Pyramid. Thankfully, you can fly to Nobilia and not have to deal with the Desert of Doom.

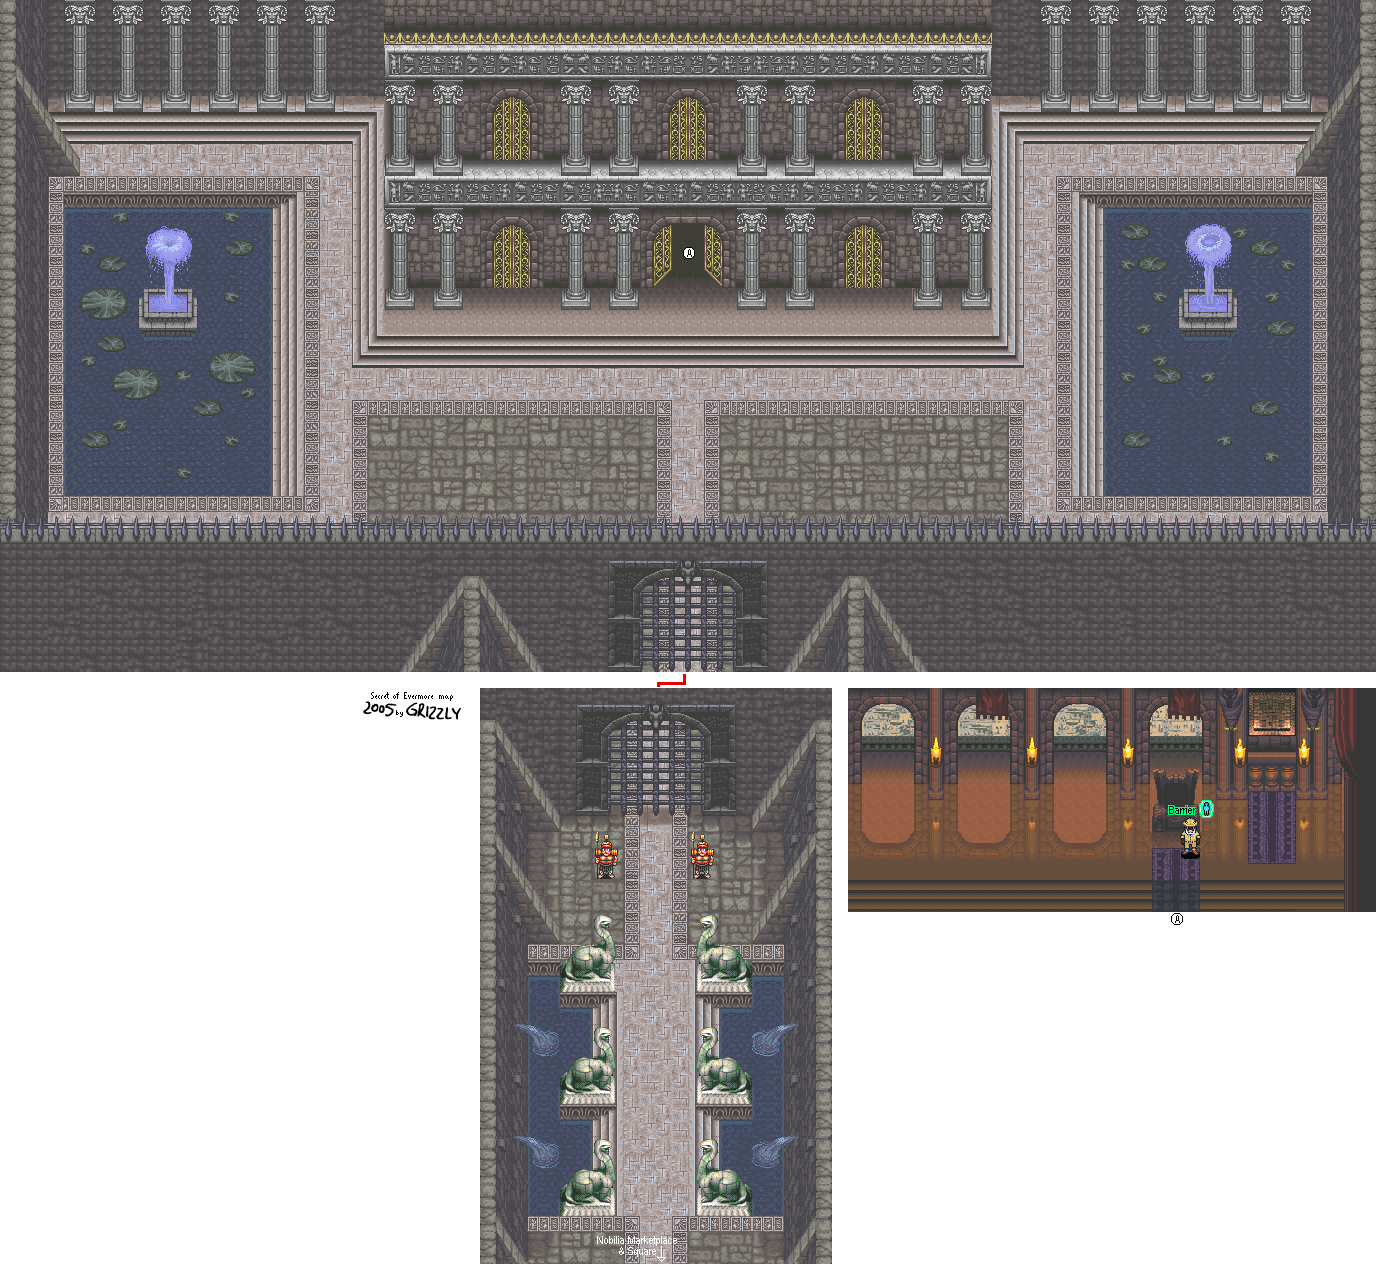
Nobilia


Remember the palace we couldn't go to before? Go there now. The gate will now be open now that Horace has regained control of Nobilia.

There is a glitch where if you stand to the right of the top right statue and press B really fast, you'll be able to get infinite Call Beads. In order to trigger it, you have to press B on the middle statue on the left to talk to it.

It is possible to walk on a certain point on the pool to the left. Near the big lily pad in the center of the pool is 2500 gold coins for Gothica. In the European foreign language versions, you fall into the water and rapidly lose your health while in it as you make your way to the gold coins, and you don't come back out until you go back to where you entered the water from.

Nobilia Palace


There is a secret path in the left pool that you can walk on, and if you make it to the lower-left corner of the fountain and press B, you'll get 2500 Gold Coins (as opposed to Jewels).

Enter the palace and you'll meet Horace again. You'll learn Tiny's acting strange and has joined the Oglins. (You'll also find out that Tiny went over to the cave inside the dried-up riverbed if you talk to people inside the pirate ship in Crustacia.) Horace will give you a new spell: Barrier. It's a better version of Defend...if you level it up.

Barrier
1 Limestone, 2 Bone

Hey, it's a better use for the Bones than Revive.

It should also be mentioned that if you forget to get the formula and beat Tiny, you won't be able to get it.

Fly back to the fire pit near Crustacea. Go back to Crustacea and make your way back to the Pyramid. Go into the dried-up river bank and go east this time. We're back in the area with the Oglins and the Sons of Anhur, and the riverbed has dried up.

Saturday, May 11, 2019

HCBailly plays Final Fantasy IV (Super Famicom) - Part 31 of 70


Can we make it to the top of the Tower of Zot and rescue Rosa?

Tower of Zot


As soon as you get on the airship, Kain's airship will show up. Cecil and company will get on the airship with the Crystal of Earth, and they will end up in a tower. Kain will tell Cecil that Golbez wants to thank him personally when Cecil asks where Rosa is. Golbez announces that he is on the top floor of the tower with Rosa, and will exchange her for the Crystal of Earth in thanks for sparing him from having to invade a town...if Cecil can get there quickly enough.

Pranskters are weak to Fire, but you will want Tellah to Mute them first so that they can't counter-attack with Confuse in case you don't kill them in one shot. The Centaurs have plenty of hit points, but they don't really do anything special.

The Flame Mail is for Cecil, and it increases his magic defense in addition to his regular defense.

The Bavarois are also weak to Fire, as are the Blizlizards. However, the Bavarois has great physical defense. In case of multiple Bavarois, cast Fire 2 on all of them.

The Marionette are weak to Fire, but the Marion is not. If you leave Marion alone, it will summon more Marionettes, so you will want to kill the Marion quickly. You can cast Mini on the Marion, however.

One of the chests contains a Flame Dog. Make sure you equip Yang with an Ice Claw so he can do a huge amount of damage, and use Ice 2. You'll get the Flame Sword for Cecil for defeating it, and it is even better than the Dancing Dagger when used as an item.

The Ice Beast is obviously weak to fire, while the Sorceress and Lady Guard are both weak to Mini. You can also cast Piggy on the Sorceress as well, so use the Apparition Rod on her.