The original movie had movie-to-game translations on the Atari 2600 and 5200. Here's the 2600 version.
Sunday, July 31, 2016
Mike and Bootsy play Gremlins for Atari 2600
The original movie had movie-to-game translations on the Atari 2600 and 5200. Here's the 2600 version.
PrinceWatercress plays Gremlins 2: The New Batch for NES - Part 5 of 5
Just one...and done. The sole normal stage is challenging compared to the boss. But once you're through it, you've won this one.
Stage 5-1
With the fire arrow, you shoot only one arrow. When it hits something when powered-up, it explodes. The explosion can also destroy anything in the vicinity.
The first part of this level is jumping from conveyor belt to conveyor belt. After this, you'll see a few long conveyor belts. Time your jumps carefully; if you fall, you'll be sent back to the beginning of the conveyor belt you were on. If you have a balloon, though (which lets you fly around for a second after falling into a pit), you can skip through this. There's a hand after that last one, so be ready to fire.
After this, there is lava. Again. Some sort of checkerboard from Hades, if you ask me. Following this, there will be a platform moving horizontally around a bottomless pit, with four electric barriers throughout its path. Jump onto it so that you land on it when it's between two of the barriers, then immediately jump over the rest of the pit.
Continue on, and you'll see Master Wing's shop. This is the final shop in the game, so pick your last item wisely.
The last obstacle course in the game is more conveyor belt platforms, followed by another field of lava and then one more moving platform which thankfully is the easiest one in this level. The end of the area takes you to a computer. Congratulations! You've made it to the final boss!
Stage 5-2
Oh, dear god, it's the spider-like Centaur that Mohawk changed into. This boss battle may bring back (not so) fond memories of Fester's Quest due to the black background.
Hit the body with the fire arrows. The shots he throws are easy to avoid, but his charge attack is quite fast. If he waits longer than usual, position yourself so that you'll be between two of the legs (preferably not directly in front of his body). This helps to minimize unnecessary damage.
When he catches on fire, you've won! Enjoy the credits!
The End
Billy releases the electric Gremlin by taking the phone off hold and holding it so that the electric Gremlin finally comes out on top of all the other Gremlins. The other Gremlins are already wet (which happened in the movie), so this leads to electrocuting them all and turning them into slime.
Billy is now able to move on happily with Kate (now his fianceé) and Gizmo.

Saturday, July 30, 2016
PrinceWatercress plays Gremlins 2: The New Batch for NES - Part 4 of 5
asdf
Stage 4-1
Hope you have the power-up here...you'll five arrows instead of one and cover a slightly wider area than you could with the paper clip!
The first new enemy you'll see is a Gremlin that spins around and throws hats at you. Luckily, the power-up makes him easier to defeat. Just remember that you can only hit him when he's not spinning.
You'll soon see a spinning ball and chain, an electric barrier and two conveyor belt platforms in the same area. Wonderful obstacle course, there. Take the left belt unless you want to get your path blocked by a table and/or hit by that ball and chain.
You'll have a choice to go either up or right after this. Go up to find Master Wing's shop.
Go down after defeating the next spinning Gremlin, and you'll see an electric barrier, conveyor belts and what looks like a row of rotating blades.
You'll see a series of conveyor belts with the paths blocked with electric barriers in-between pits. You'll see the hand popping out of the ground again (twice), and then you'll reach the end.
Stage 4-2
Now we're in the genetics lab!
You'll be maneuvering your jumps to land on the conveyor belts at the start of this level, then you'll be dealing with lava floors yet again.
After that, you'll have to deal with another moving platform going under the rotating blades, which is nothing new by now.
You'll have a choice to go up to more fire floors, or to the right. The right takes you to Master Wing's shop. Buy an item, head back to where you were and go up. The path will be full of more ball and chains as well as more fire floors, but you're not that far from the end now.
Stage 4-3
This is pretty easy.
It's another Gremlin, and this time he has a gun. Fortunately for you, he can only fire straight down. Watch out for the spikes on the floor. If you can get to the top of the screen and shoot him in the back, great.
After you hit him enough times, he'll fly off again and you'll get the fire arrows! You're close to the end now!
Gremlins 2 (Game Boy) review by Mike Matei
Here's a short review for the Game Boy game...which is a different beast compared to the NES version.
Friday, July 29, 2016
PrinceWatercress plays Gremlins 2: The New Batch for NES - Part 3 of 5
...and this is where the conveyor belt jumping starts ramping up.
Stage 3-1
The paper clip is pretty interesting if it's powered-up...it'll shoot in three directions instead of one if it is! It also has a much longer range than the match regardless of whether you've powered it up or not...perfect for fighting something on the other side of a long pit.
Yes, that is a hand popping out of the ground. Thankfully, it stays in one place as it pops in and out. It shoots projectiles, so be careful when you're getting close enough to hit it.
You'll also start seeing maces spinning around in a complete circle from a post on the ground throughout the third level. Thankfully, the radius they cover isn't very wide, but they can be annoying if you're not careful.
After that bottomless pit with a tricky moving platform-to-moving platform jump, keep going up and you'll find Master Wing's shop yet again.
Go left, and you'll see a bottomless pit with bits of floor with weird spiked things on them. Attack them from a distance whenever possible, they will run into you like the motion sensor bombs from Level 2.
Past the camera after that obstacle course of spikes and pits is a change in the floor tiles. Looks like the set of a cooking show...how anyone's supposed to reach it by normal means is beyond me. The first enemy you'll see in this area will appear before you jump the pit...it's a mutated plant Gremlin that throws exploding pineapples at you. The quicker you can beat it, the better.
After this, you'll enter another area with a different look. This time, it's the set of a horror movie. Why everything from the cameras to the lights to the coffin to the fake graves is moving like there's either an earthquake in the area or everything is having muscle spasms is totally beyond me.
You'll face two large bats (the bat Gremlin?) that'll shoot tornadoes at you if you don't kill them immediately.
Keep going up, jump over the pits one more time, and you've reached the end!
Stage 3-2
Conveyor belts, spikes and electric barriers? How horribly built could this building be?
The pits get a little crazy this time around, as you have to cross conveyor belts that move you to the side and into the pit below if you stand around for even a second. You'll have to hop your away across these kinds of platforms, being careful to maneuver your jumps to stay centered at all times.
After this, the floors are now surrounded by lava. It's finally official...Clamp has flipped his lid and Master Wing is rolling around in his grave.
After a couple of these platforms, more lava and bottomless pits, you'll find a moving platform and an electric barrier blocking your path to the other side. You'll have to time it so that you jump over the barrier and land back on the moving platform.
After this, it's a bunch of spikes and more lava floors, then you'll find Master Wing's shop again. The Gremlins that walk around a couple steps before stopping and walking again aren't that hard.
After more lava and conveyor belts from Hell, you'll see a giant desk with a built-in paper shredder...and one of the bottomless pits you just traveled over is on the other side of it. Who built this building?
As you leap over the lava on the conveyor belts floors again, notice how well-animated those TV screens are. Amazing how Sunsoft got everything to the little things down quite well, even if the level design is challenging enough to keep you on your toes as you try to question it (or keep yourself from doing so altogether).
Keep going right, and the level ends.
Stage 3-3
The boss this time is the electric Gremlin...the same one that killed Dr. Catheter.
He throws sparks on the floor, which burst into four smaller ones that are difficult to dodge because of how they move around. Keep jumping and throwing paper clips, making sure he doesn't touch you, and he'll go down. If your weapon is powered up, this battle will end in seconds.
When he leaves the screen, you'll get the bow and arrow that shoots pencils.
You'll get another cutscene. Just like in the movie, Billy captures the electric Gremlin in the telephone. Yes!
Also, the Billy in the game looks so much like the Billy in the movie it's scary. Just thought I'd mention that.
PrinceWatercress plays Gremlins 2: The New Batch for NES - Part 2 of 5
Not only did I have to get a lot of practice under my belt, but I also have to deal with someone calling the home phone and somebody blasting their stereo at the very end.
Stage 2-1
The match is better than the tomato you had in the last level. It still shoots straight, but you have longer range and a bigger projectile size, too. It's slightly faster, too, which kinda helps.
The spiked balls that move from side to side are indestructible. Wait for them to stop moving or jump over them.
The red things that look like ladybugs are really motion sensor bombs. When you get close enough, they start moving. Move away from them so they'll explode without damaging you. Funny how it still says "Bomb" when they explode. Oh, you Japanese, you.
When you finally reach the fork in the road, go right. Jump over the electrified wires, then carefully time your way through the two spiked balls with the pit in-between. After the two bombs, go left to find the door to Master Wing's shop.
This time around, you'll find a blue cylinder with a P on it. If you have 50 CB, grab it. It powers your weapon up.
When you shoot the match, you'll be able to shoot things directly next to you...on both sides! Now that's useful!
Go right, jumping over spiked balls, spike pits and bottomless pits until you see a passage going up. Stay to the side, avoiding the pits in the floor and the spiked balls. Shoot the spider down, and avoid the baby spiders if possible. In this level, they turn into three baby spiders into two. If you can shoot them down and grab the crystal balls, great.
You'll soon have a choice of whether to go left or down. Go left; you won't have that much further to go.
Stage 2-2
Now you're in the basement of Clamp Center. There's a lot of spikes in the floor and even more bottomless pits...I wouldn't want to be here in case I'd have to reset the circuit breaker or something.
The enemies you see here are brand new...you finally start fighting normal Gremlins! Some of these guys will fly around; those fall after two hits. Some, however, breath fire. If you jump and hit them, their fireballs won't hit you, as they only breathe it in one diagonal direction. LOL @ violations of the laws of perspective!
After defeating that first fire-breathing Gremlin, go up and jump on the moving platform. Defeat the flying Gremlin, go right, then move back after you see that Gremlin jumping around. This jumping Gremlin takes four hits to kill. Thankfully, you have a pit separating you and him.
You'll soon see a Gremlin on a skateboard. He zooms around throwing bombs. Fortunately, if you stay out of his range of movement, you'll have a chance.
After some rather interesting overhead platform-jumping action, you'll find the door to Master Wing's shop again. Buy a 1-Up (or whatever single item you need - you can't get more than one at any single time), then move on.
After the visit to Master Wing's, head up, take the platform, then stay just out of range of the skateboard Gremlin. Hopefully, his bombs will miss you while you clobber him. There'll be another one right after that, so move away first when you see him.
The pipes near two spiked balls act as walls. Might as well go ahead and mention that.
There will be two more skateboard Gremlins. The first one's easy, but the second one is well-positioned and you'll have to get up close and personal to defeat him.
Thankfully, that's all for this level after some more spikes and bottomless pits.
Stage 2-3
It's a boss level!
This Gremlin will burst out of a cocoon. He'll then jump towards you and try to claw you as well. Hope you have the power-up, because this makes it a lot easier. Hit him when you can, especially when he's standing still (it's best to hit him when he's still if you don't have the power-up). The rule of thumb here is to keep moving, so you won't get jumped on.
After you hit him enough times, he flashes, jumps away and then you receive a new weapon - the Paper Clip. Grab it to end the level.
Thursday, July 28, 2016
PrinceWatercress plays Gremlins 2: The New Batch for NES - Part 1 of 5
Now it's MY turn to play through the game.
Stage 1-1
Alright! Thanks to your old pal Billy, you're free!
What kind of office building has bottomless pits in the middle of the floor? I'd hate to work at that place, since those pits couldn't possibly be covered by worker's comp.
The first enemies you meet are rats. Thankfully, they're really easy to pelt with the tomatoes.
The next enemies you'll see are giant tomatoes with a mind of their own that bounce all over the place. Thankfully, they only move in a set pattern. The bats fly around erratically and are hard to hit at times, on the other hand. They're still on the easy side, though.
Be sure to pick up the crystals that enemies drop, as you'll need these to buy extra lives and health refills.
Now we have a pit with a platform moving back and forth. It's easy, but it makes me wonder why such as office building with bottomless pits is allowed to exist in any parallel universe.
After the pit, you have a chance to go up or down. Go up, and you'll find a door. Go into it, and you'll find Master Wing's shop. Apparently, he's come back from the dead (why? I don't know) to give you power-ups...if you have enough crystals. The ones to save up for are the Gizmo doll (which gives you an extra life) and the pink heart (which you'll see later; it maximizes your health to four hearts, which gives you eight hit points). Both are 100 CB apiece.
As you move from the beginning of each level to the end, keep a look out for both the Flash Bulb and the Pogo Stick. The Flash Bulb destroys all the enemies on the screen at once (kinda weird, since the Gremlins serve as level bosses instead of regular enemies) and the Pogo Stick lets you become invincible and bash through enemies without taking damage for a few seconds.
It won't be long until you reach the elevator after you leave Master Wing's shop.
Stage 1-2
Wow, we have tiles instead of carpet. It's still not any more hospitable than that lab area you just escaped from.
The spiders are annoying. They can shoot at you, unlike the other enemies you've seen so far, and when you destroy it splits into two baby spiders. Thankfully, the babies take one hit, but they're a bit faster than the big ones. The Flash Bulbs don't kill the big ones entirely; instead, it causes them to split into baby spiders.
Now you'll see spike pits in-between bottomless pits. Whoever this Clamp guy is, he must be some sort of corporate psychopath.
If you keep to the right wall after those spikes, you'll find Master Wing's shop again. You can now get the Heart Tab, which gives you four hearts (eight hit points). Unfortunately, that's the maximum health you're allowed to have, but anything you can get at this point can definitely help later on.
After that maze of cubicles, you'll reach another bottomless pit. How is anybody supposed to get any work done at Clamp Tower with office conditions like this?!?
Once you're past the pit, defeat the bats for some easy Crystal Balls, then jump the spike pits and head north to the cubicle. You'll get the Match! Congratulations, you no longer have that clunky, genetically altered super tomato for a weapon!
Once you complete the first level, you get a cutscene that tells what happens next. Not only do the cutscenes remain faithful to the storyline, but they give the classic Ninja Gaiden trilogy some competition! Sunsoft didn't screw this up...joy!
Anyway, Gizmo accidentally gets wet while exploring the lab and spawns four Mogwai clones. These guys, unfortunately, have a mind of their own, hate Gizmo, and immediately make up their minds to toss him into the ventilation system before closing the grate behind him.
Wednesday, July 27, 2016

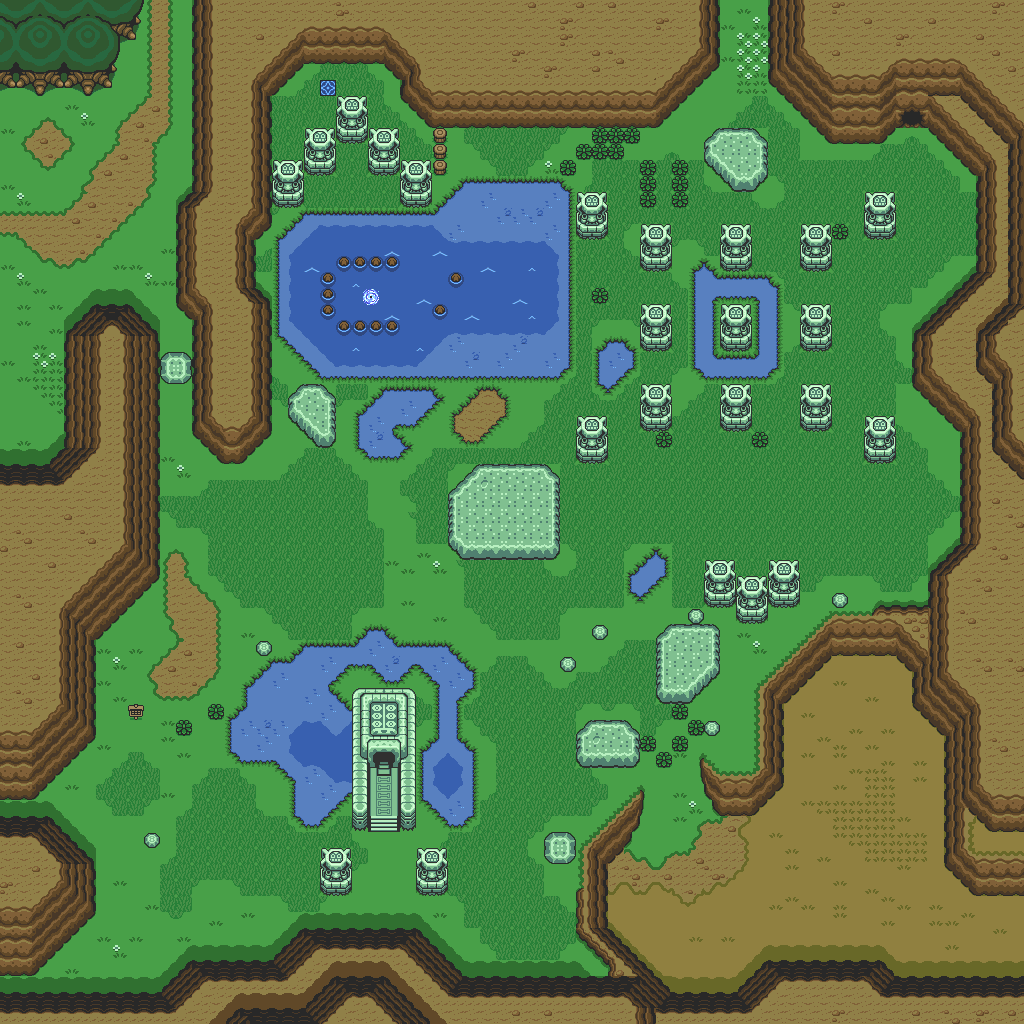
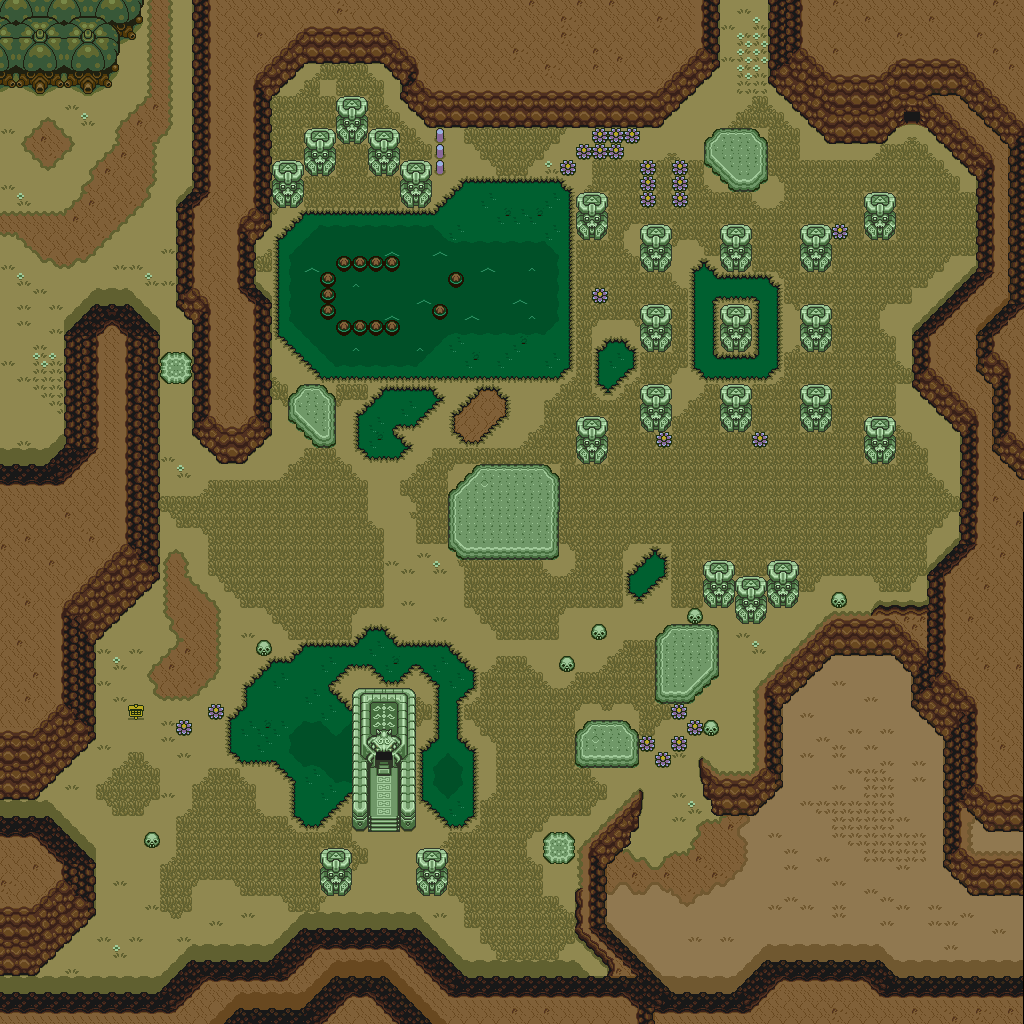
HCBailly plays The Legend of Zelda: A Link to the Past - Part 25 of 26
Here we go: it's the final battle against Ganon!
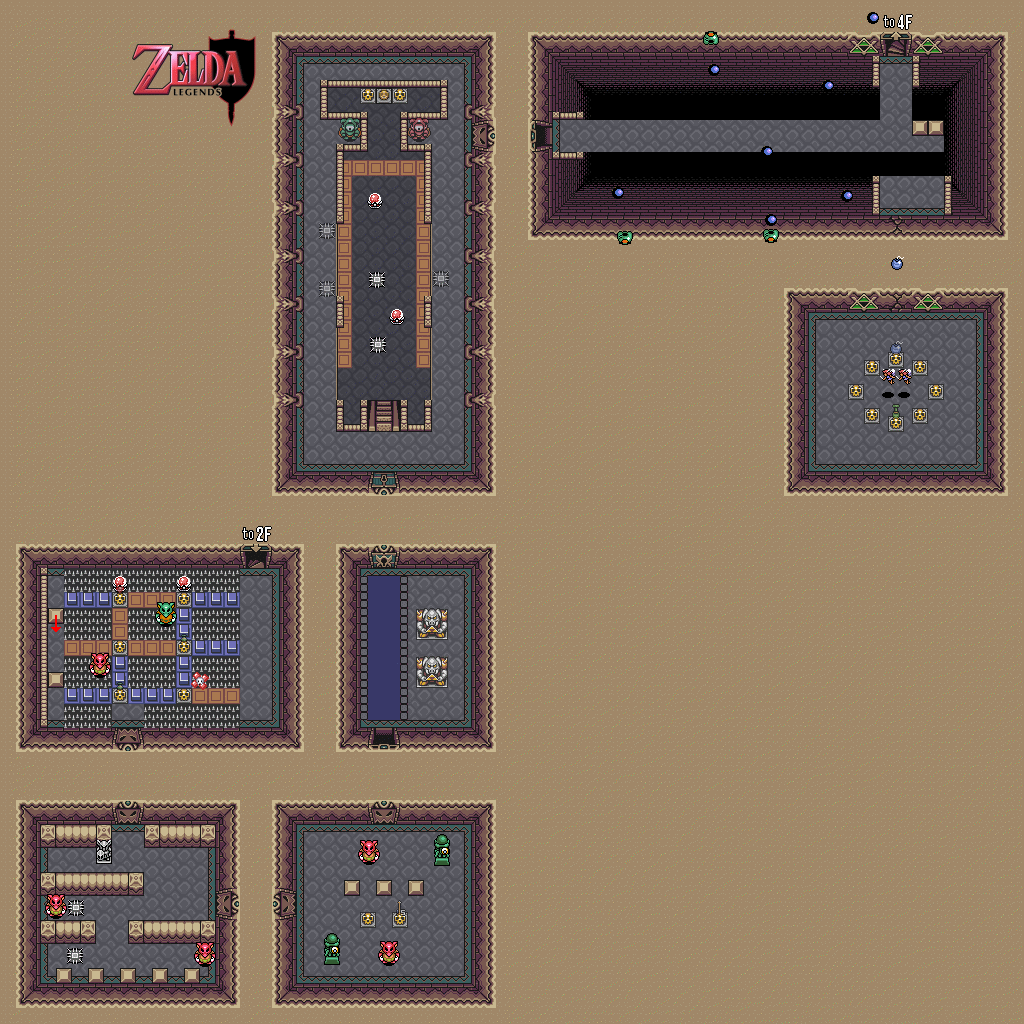
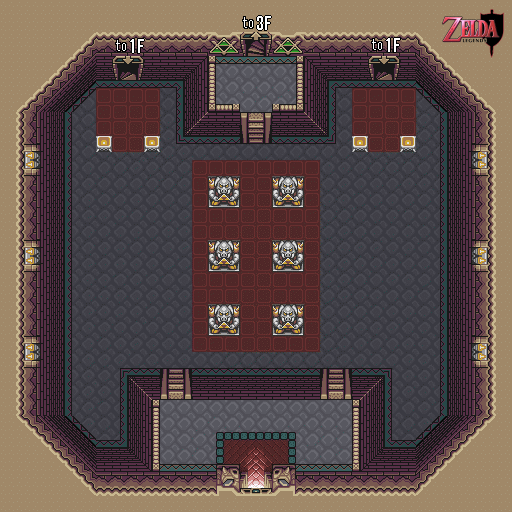
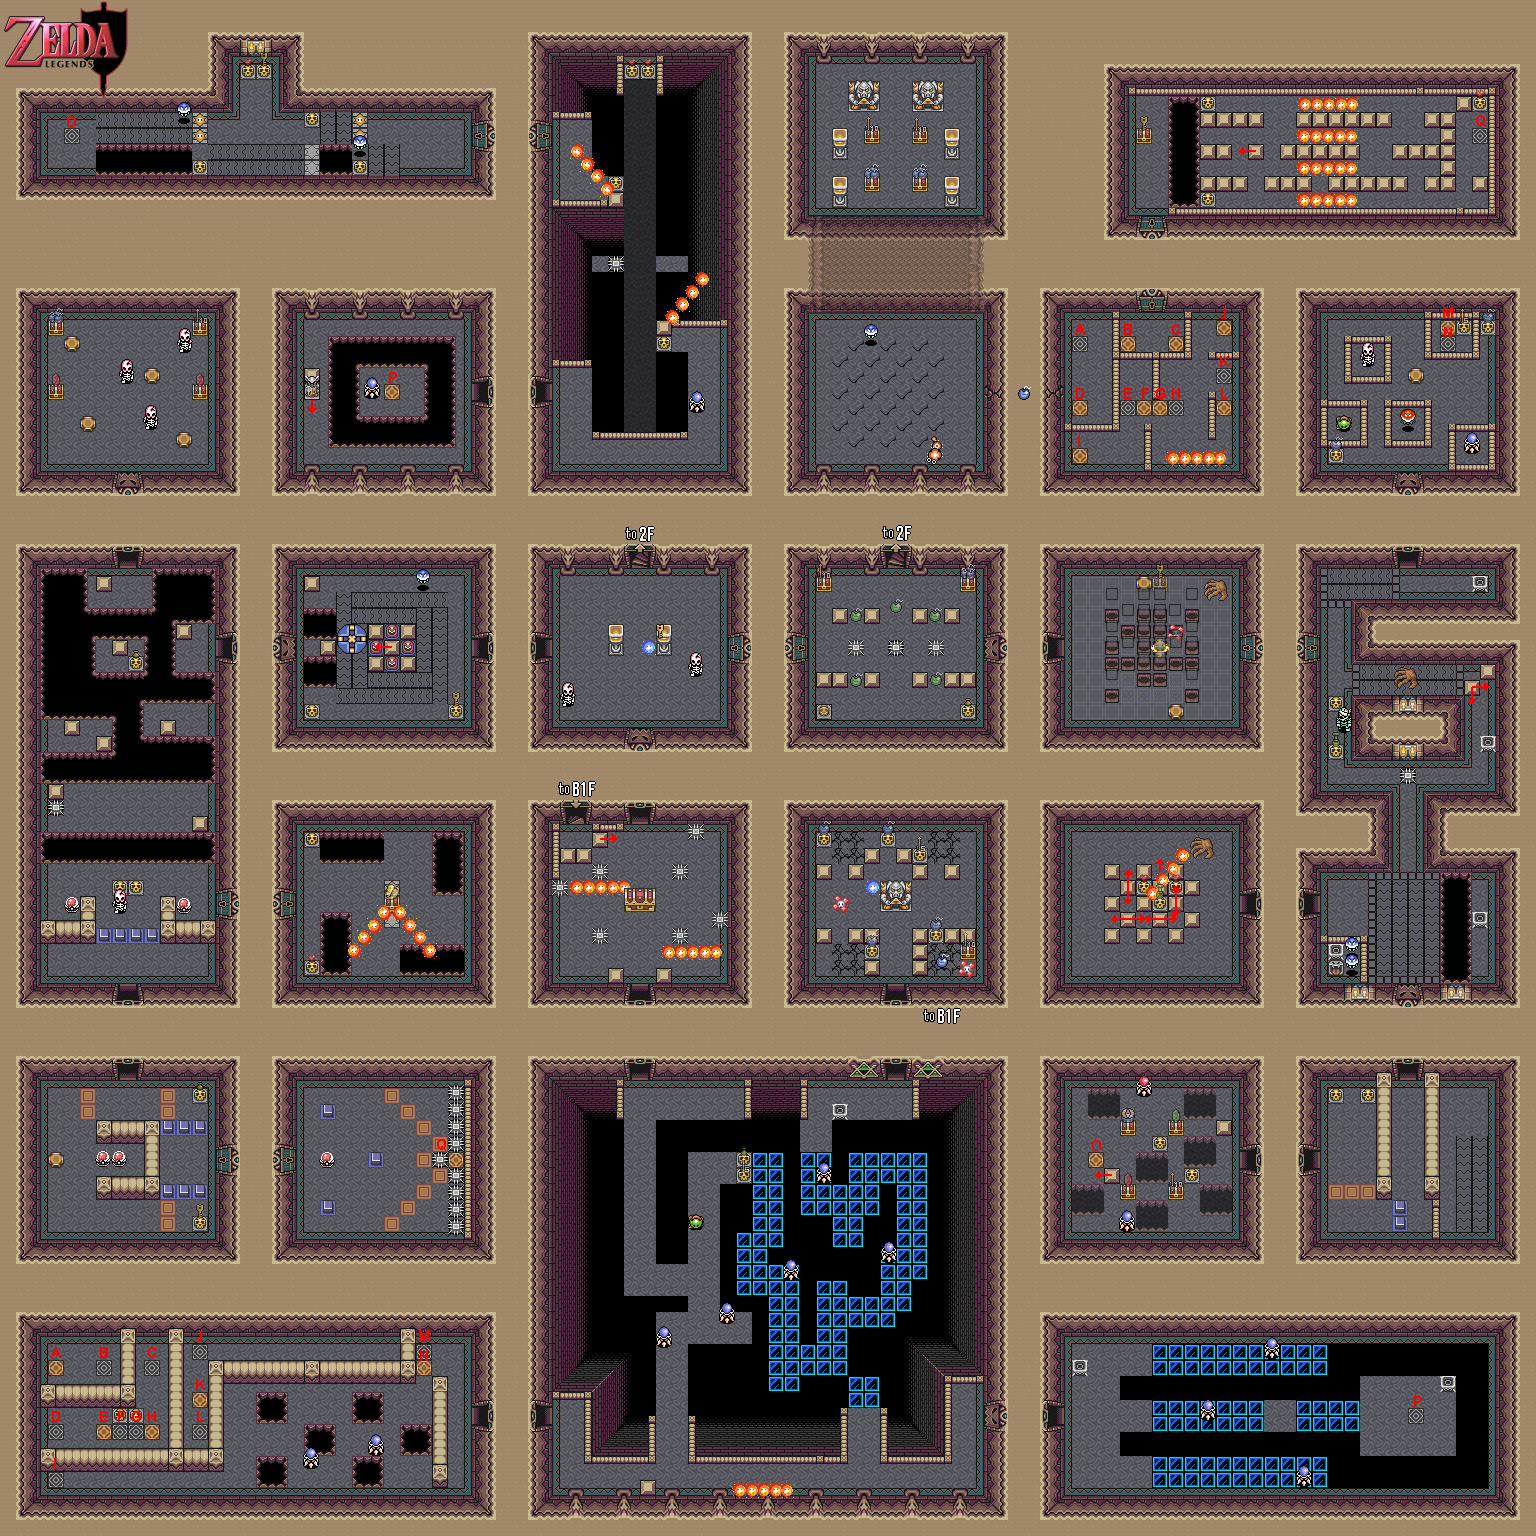
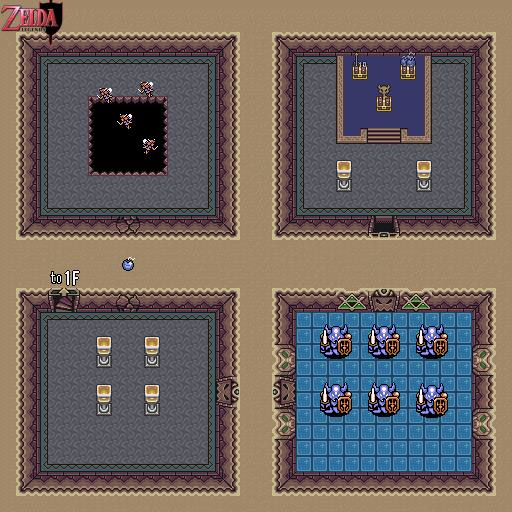
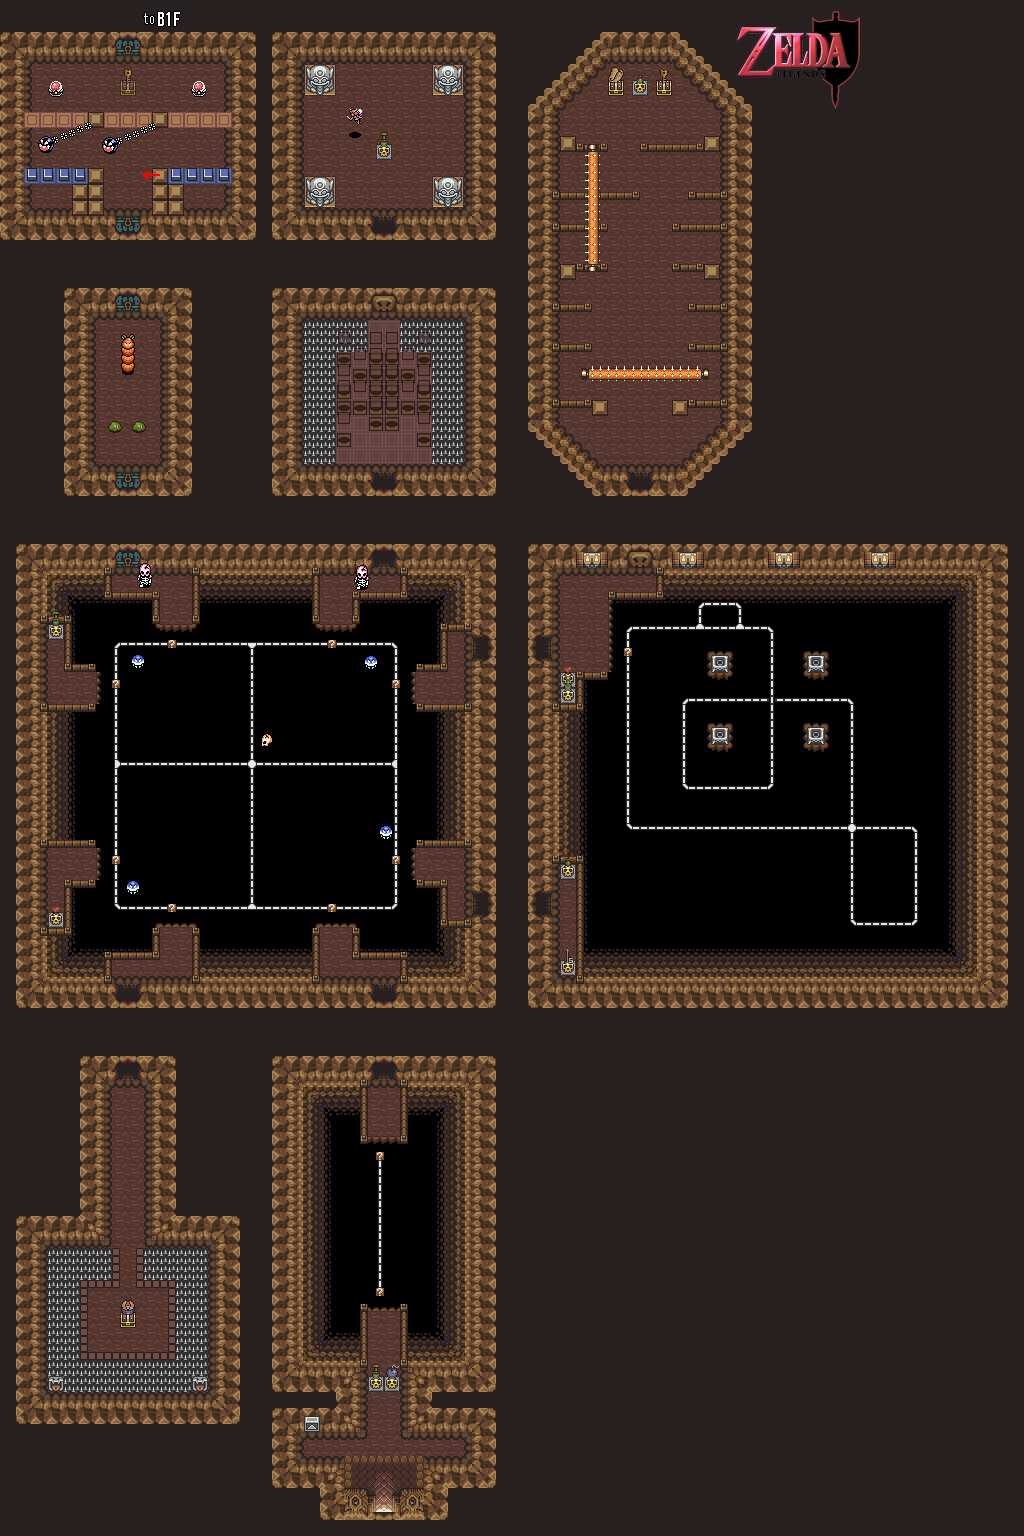
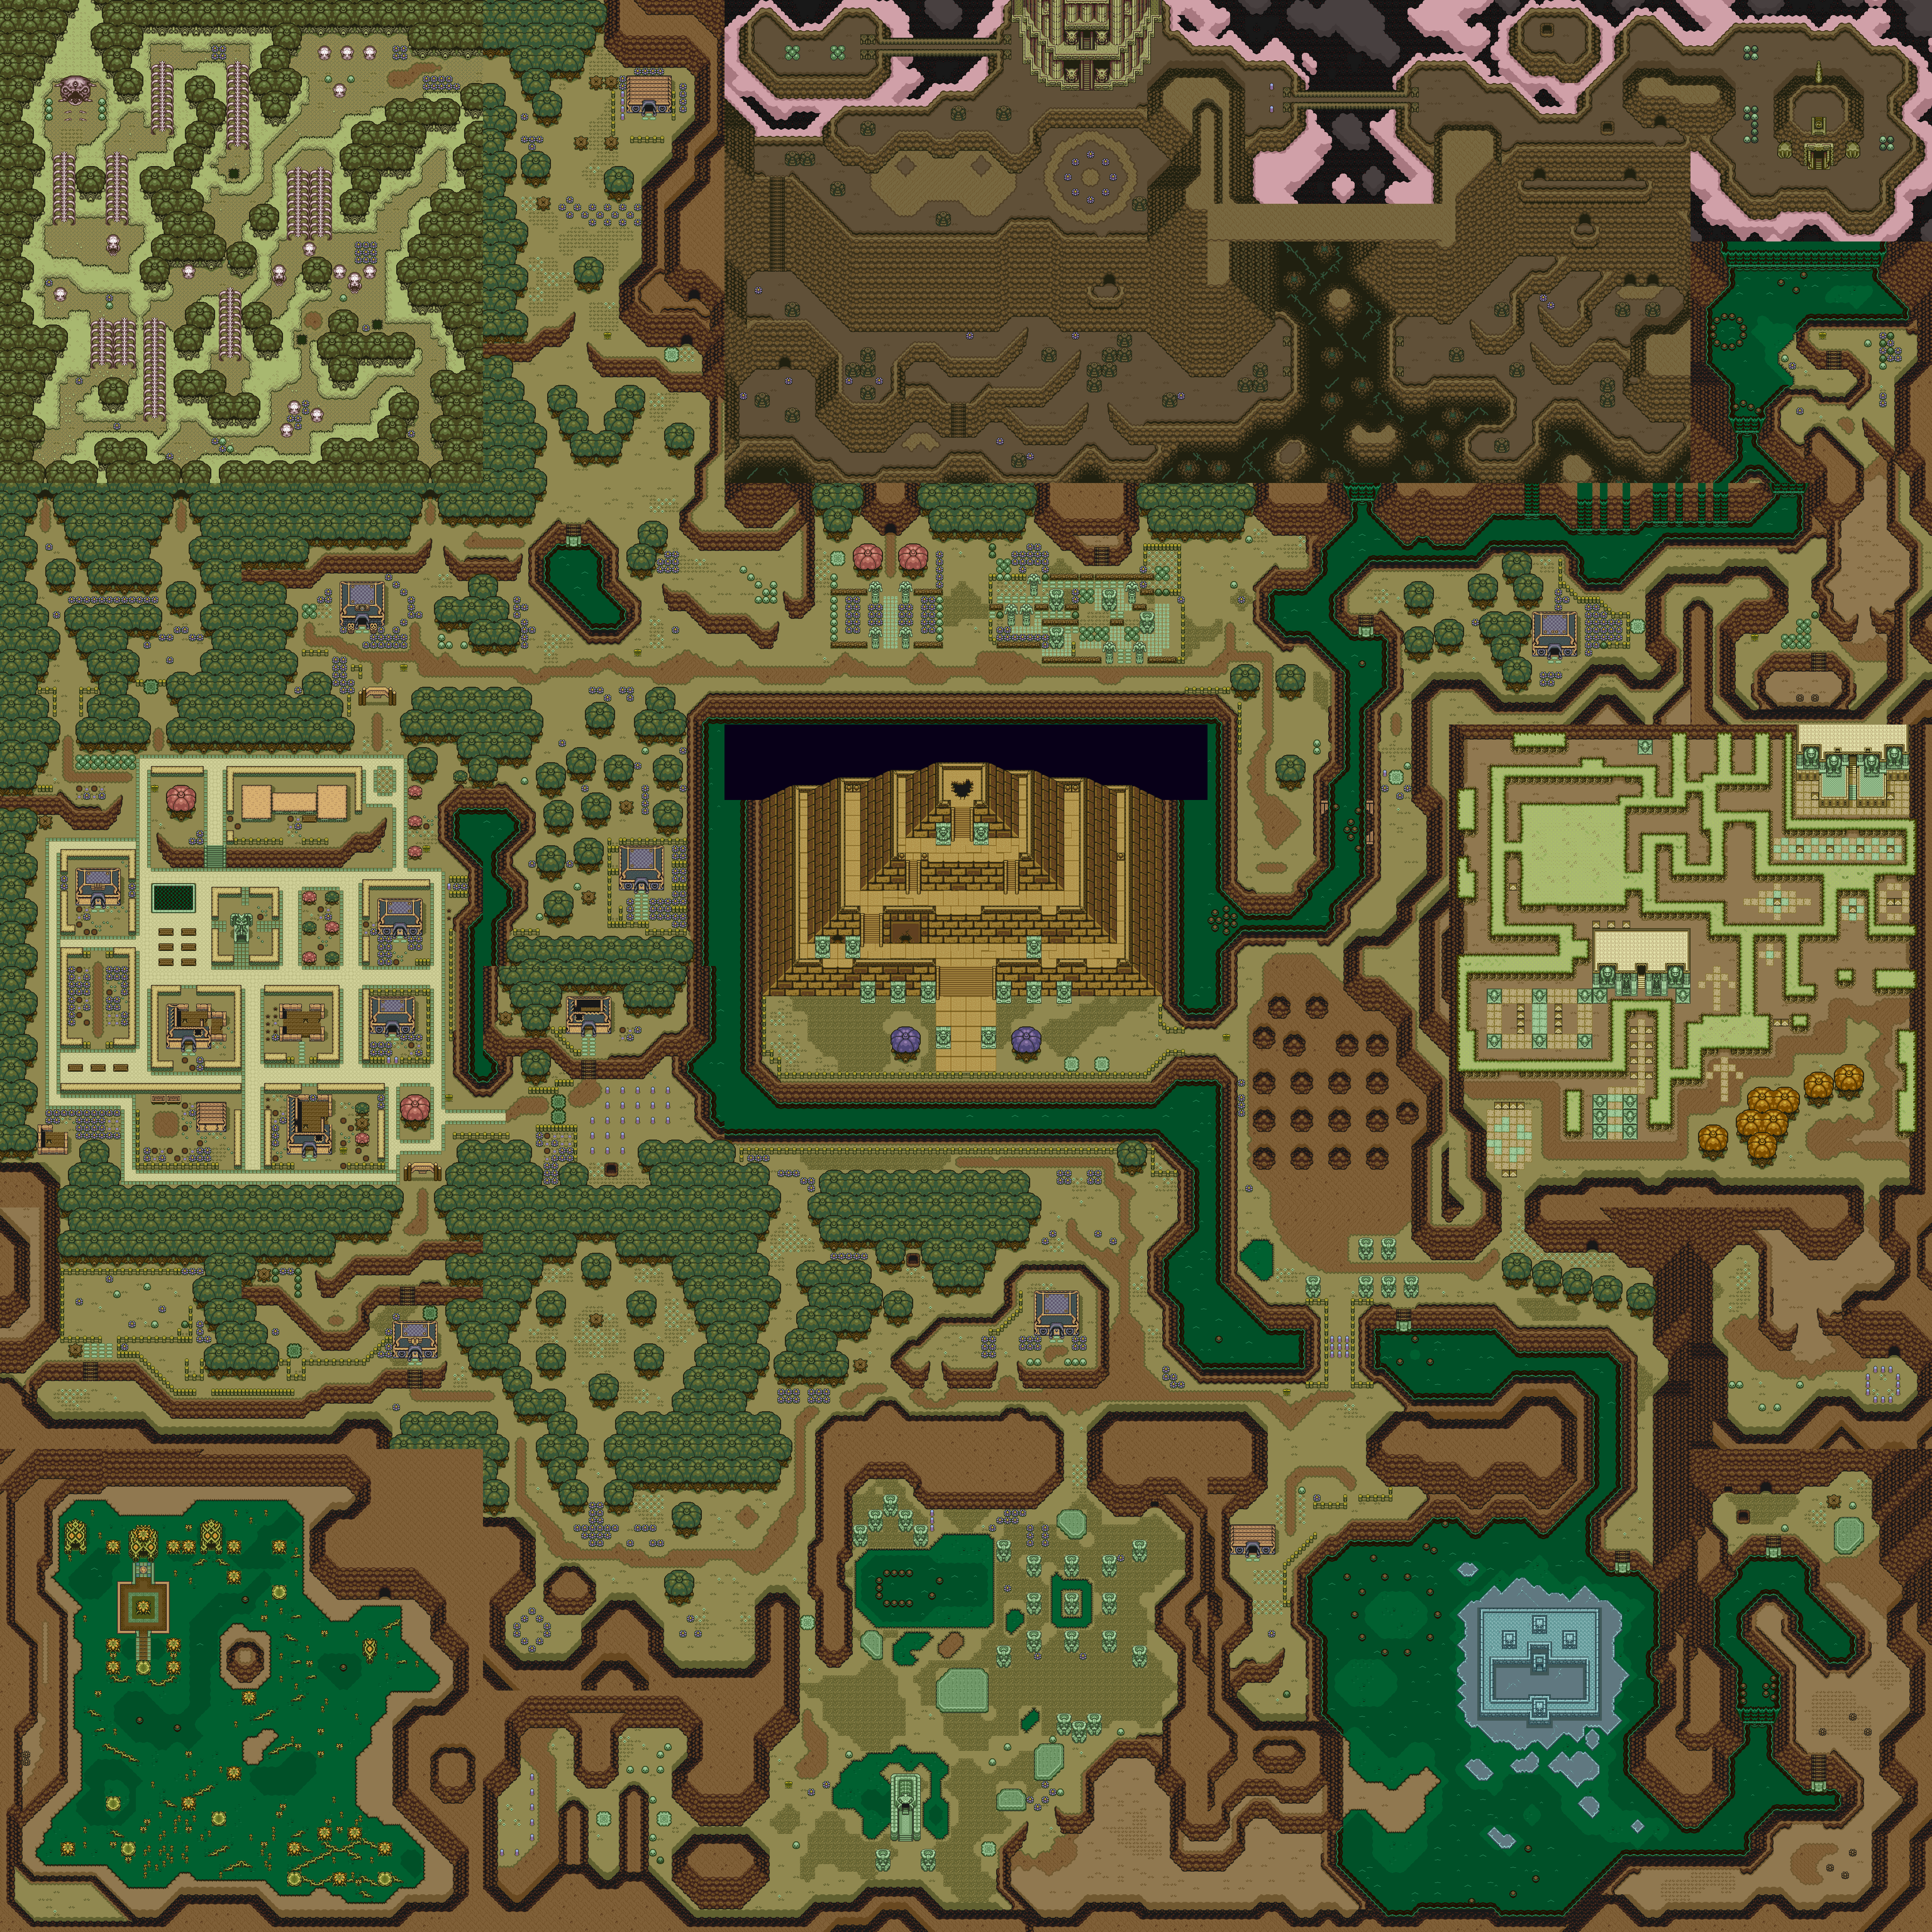
All maps by Iron Knuckle.
You'll be dealing with a few more lantern-lighting puzzles that require the Fire Rod, but there's really nothing to them.
You'll fight Moldorm from the Eastern Palace again. Stay near one of the walls and whack Moldorm in the tail with a whirlwind slash. Since you have the Level 4 Sword, this will kill him immediately.
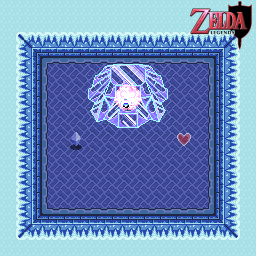
The boss is Agahnim. This time around, he splits into three and teleports around the room, sending a salvo of fireballs at you that you can send back at him. The clones are translucent and can't be damaged, while the real one is opaque and has a darker shadow than the other two. This allows you to hit Agahnim multiple times whenever possible. When you beat him, Agahnim will fall and a blue bat will pop out of his body. This is Ganon. Link will use the Ocarina and the Bird will drop him off at the top of the pyramid in the center of the Dark World, which is weird considering that the bird only appears in the Light World.
The bat will fall through the base of the pyramid and make a huge hole in the ground that you can fall through.
When you drop down, you'll finally meet Ganon. PROTIP: Walk forward and hit Ganon with the Sword before he speaks. You'll get a free hit in.
You'll need the Cane of Byrna for most of this fight. Ganon can throw his trident and also shoot fire around him, sending angry phoenixes in your direction and also creating a spiral of fire in front of him.
As you fight, he'll shake the floor and cause tiles to disappear. The floor tiles nearest the wall will fall into nothingness one side at a time. If you fall into the pit, you'll enter another part of the pyramid. You'll find a telepathic tile here telling you to hit Ganon with a Silver Arrow when he's stunned. Of course, you'll also have to start the battle over when this happens.
When the room goes dark, light both lanterns in the room with the Fire Rod. You'll be able to see Ganon again and continue the fight. Watch out for the phoenixes he shoots at you!
At this point, once you've lit the lanterns and hit Ganon, he'll be frozen for a few seconds. Immediately switch to the Bow and Silver Arrows and hit him with it. After a few arrows, it's over. A door will open in the wall to the north. Go in and put the controller down. You've done it.
Tuesday, July 26, 2016
HCBailly plays The Legend of Zelda: A Link to the Past - Part 24 of 26
More dungeon exploration abounds as we continue through the biggest dungeon in the game!
All maps by Iron Knuckle.
There's a switch on one of the walls in the first floor. It doesn't do anything you'd like it to do, so leave it alone.
The room with the evil floor tiles also has a Ceilingmaster, so hiding in the doorway to avoid the tiles is a little harder this time. Since you have the Level 4 Sword, hide in the doorway and power up the Whirlwind Slash. When the Ceilingmaster is in range, smack it with the whirlwind slash to get rid of it!
To light the four lanterns in the next room up, you'll have to move a block out of the way near one of them and then light them from top to bottom. To hit the colored block switch afterward, you'll have to toss a Bomb to the conveyor belt that moves towards it as quickly as possible. There's no other way. From there, open the upper-left chest last. It contains the Compass and also opens up a bunch of pits in the floor when you get it.
After the conveyor belts (which is self-explanatory; go get the key in the nook to the north wall), get to the other side of the bridge before the floor collapses with the help of the Magic Cape. In the next room, move the statue to find the secret pit-moving tile that allows you to touch the teleporter tile. You're now back to the big room near the Big Chest.
Trying to make it to the cracked wall near the chasm? Run into the blocks with the Pegasus Boots. When you're knocked back, you'll be sent to the other side before you hit the ground. You can refill your life and magic here.
The laser-shooting statues will soon be on conveyor belts as you ascend the tower. Use the Bombos Medallion to take down all the enemies in these rooms so you can breeze through them.
You'll fight the desert worms from the Desert Palace again. The same tactics apply, but since you have the Level 4 sword, you can kill all three worms with two whirlwind slashes.
HCBailly plays The Legend of Zelda: A Link to the Past - Part 23 of 26
Just when you thought it was time to take on Ganon, you have one last thing to do...
All maps by Iron Knuckle.
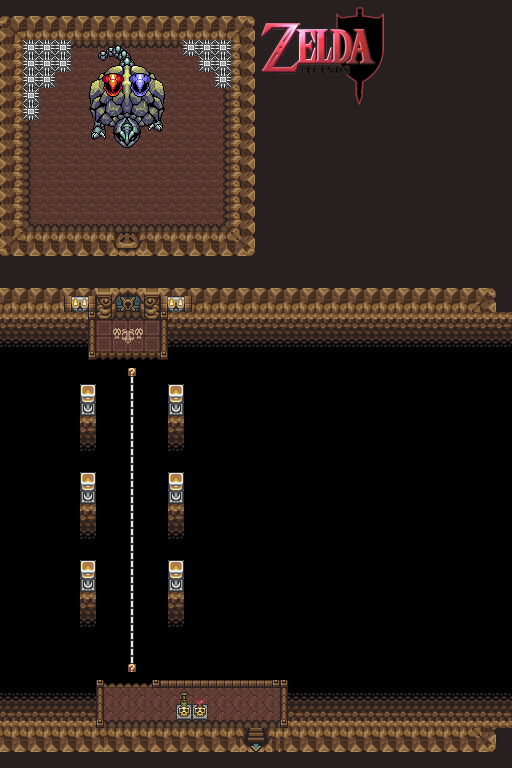
The boss of Turtle Rock is a...rock turtle. It has two heads on its back, one red and one blue. The red head has a fire breath and can be stunned with the Ice Rod, while the blue head has a ground-freezing ice breath and can be stunned with the Fire Rod. Use the corresponding Rod to stun the two heads and finish them off with the sword. The turtle's own head will lunge at you as it moves around and tries to follow you.
When you destroy these two heads, the turtle's body explodes and it turns into a fast-moving stone worm. Equip and use the Cane of Byrna and hit the flashing center segment with the whirlwind slash as it flies around.
You'll get the last Heart Container of the game when you beat the boss, as well as the last crystal. Instead of one of the other Maidens, Zelda will be inside. She and the other maidens will be able to break the seal on Ganon's Tower, which is the flashing tower that you passed a couple of videos ago. It'll be marked on the map so you'll know where to find it.
.png)
.png)
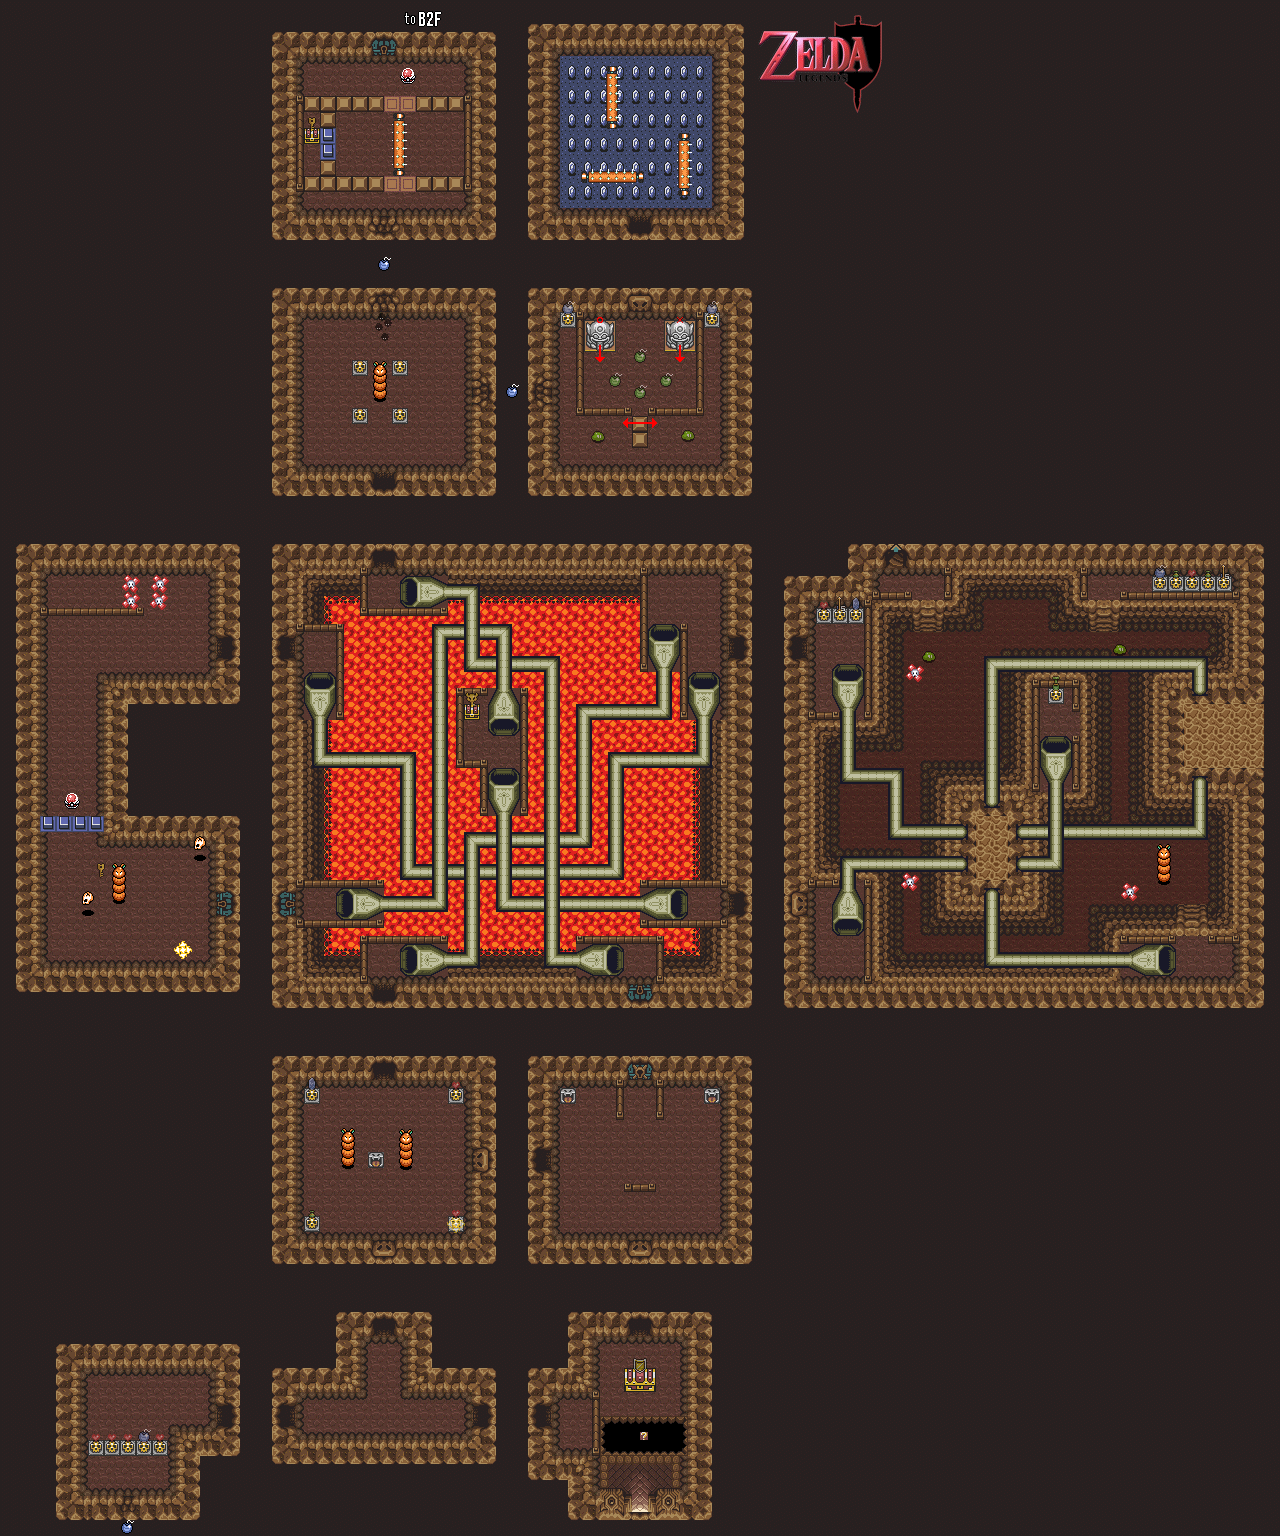
Maps by Alex Foster.
The four-legged manticore-like creatures with the white manes will back away from you and spit fireballs at you, moving around like the bow and arrow soldiers in the Light World. You can now block the fireball type that they shoot out with the Mirror Shield.
Go straight west to the glowing tower. When you stand in front of it, the crystal will break the spell, and the tower will stop flashing before it opens up to you.
Ganon's Tower
All maps by Iron Knuckle.
You'll enter at the second floor. Go down one of the side staircases first, as that takes you to the first and basement floors of the tower. These contains some good treasures, including the Big Key. You'll really need the Big Key here, since the Big Chest treasure is worth taking.
The teleporter maze is really easy, since all you have to do is step on one and you'll be able to plot your path just by going to the closest teleporter that takes you where you'd want to be in the other room.
There's another invisible path maze, but instead of using the Ether magic to light the way, just light the lantern to the right with the Fire Rod. This will automatically reveal the path until the lantern's light burns out.
This tower is also a boss rush of sorts, and you'll find the bosses from the Light Palace dungeons here. The giant Armos Knights from the Eastern Palace can be taken down with one hit each now that you have the Silver Arrows, so go ahead and use those. Not even the ice physics in the room can stop you now!
The door to the north of them contains the Big Key, and you'll find a shortcut to the Big Chest nearby. Inside the Big Chest is the Red Mail, which provides even more protection than the Blue Mail.
Monday, July 25, 2016
HCBailly plays The Legend of Zelda: A Link to the Past - Part 22 of 26
In this entry, we finally take on Turtle Rock.
The telepathic message tile at the beginning tells you that if you don't have the Medicine of Magic, then you shouldn't go any further.
Agreed.
Turtle Rock
All maps by Iron Knuckle.
When you enter the dungeon, you'll be faced with a bottomless pit with very little clue as to how to get anywhere. If you have the Cane of Somaria, you can use it on the question mark block at the very end of the dotted line and use it to create a platform. Step on, and you'll be able to move to the other side of the room.
You can only make a platform at the question marks, and you can only change directions at the junctions in the dotted lines.
The door that leads to the compass disappears when you face it after entering the room. Even worse, the eye above the door will fire lasers. If you turn away from the wall by powering up for the Whirlwind Slash and move towards it, the door will appear again. It also makes it so the eyes above the doors won't fire lasers. Nice.
To open the door activated by lighting the four torches, make a platform and equip the Fire Rod. Light the upper-right lantern, then light the bottom ones at the same time. You can then get the upper-left one and make it into the doorway.
The spiked crushers inside can be avoided with the Magic Cape. You could use the Cane of Byrne, but the Magic Cape lets you move through them, which makes things a lot simpler.
The leaping orange caterpillars can be best taken out with the whirlwind slash.
Here's an interesting enemy: the Chain Chomps from the Mario games. They would be friendly in Link's Awakening, but here they're enemies. All you can do is avoid them.
The pipes whisk you away to another part of a room. Just walk in and the game takes care of the rest.
At one point in the dungeon, you'll be able to blow up a crack in the wall and reappear in a cliff on Death Mountain that you couldn't normally reach. Keep in mind that while you're blowing a hole in this cracked wall, some eyes will fire lasers when you look at them while some fire lasers when you look away from them. This dungeon actually has a decent security system, believe it or not.
.png)
.png)
When you're at this cliff, go all the way to the cave entrance to the right and use the Magic Mirror. You'll reappear at a part of the mountain in the Light World that you can't otherwise reach. Go inside this cave, take aim with your Bow and Arrow to take out all the monsters and you'll find the 24th and last Heart Piece in the game.
Return to the Dark World and head into the Cave. If you've explored the entire dungeon up to this point, you'll have the Big Key ready to open up the Big Chest here. Inside is the Mirror Shield, which allows you to deflect the beams shot at you by the eyes.
One of the rooms has nothing but three crushers and 270 Rupees. That's 45 blue Rupees in six rows with nine each. Fill up your Magic, don the Magic Cape and get rich quick in case you're low on money and need to fill up on potions after this dungeon is over.
In one room, you'll be riding around in a platform you'll make with the Cane of Somaria...in the dark. The door in the lower left leads to some chests guarded by eyes that fire lasers when you get close enough. Face south and charge up the sword to block the lasers that come from the right to guard against the lasers now that you have the Mirror Shield. If they're at the left, face north before doing this.
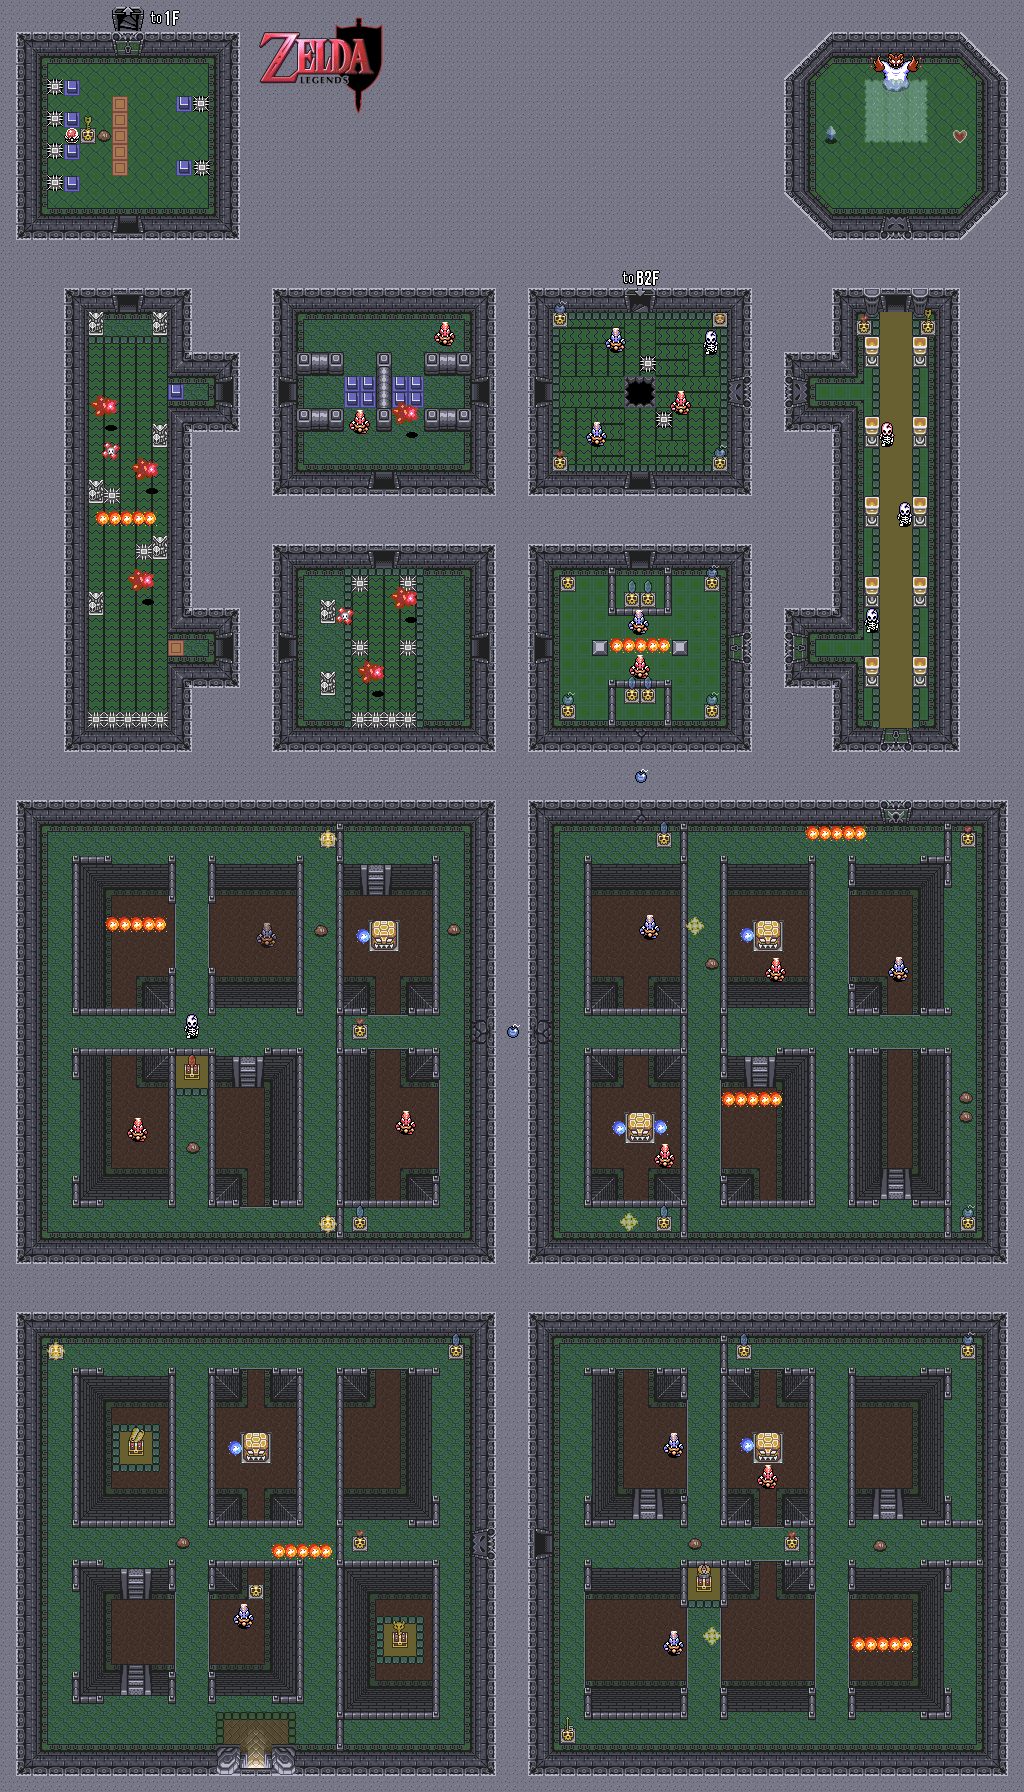
HCBailly plays The Legend of Zelda: A Link to the Past - Part 21 of 26
Well, there's only one dungeon left. We haven't seen it yet, though...
The Path to Turtle Rock
Since you've beaten the first six dungeons (you only need to beat the fifth and sixth), you'll be able to do something a little interesting.
Head to where Link's House is in the Dark World. This is the Bomb Shop, and you'll find a big pink bomb. This is the Super Bomb. Pay the 100 Rupees for the Super Bomb and it will follow you around. Much like the chest you had to give to the guy in the desert, press A when you want it to stop following you around. Of course, if it stands there, the countdown will start underneath your life bar, and once it goes to zero, it explodes.
Take it all the way back to the Pyramid at the center of the Dark World. You may have noticed a huge crack that wouldn't budge with your regular bombs or with the Pegasus Boots. As it turns out, the Super Bomb is the only thing that will do the trick. Lay the Super Bomb there, and you'll finally bust the crack wide open!
When you go inside, you'll find the Dark World's equivalent of the Well of Wishing. First things first, throw your sword in there. The fairy that pops up will be changed by the magic of the Dark World, but she's still a fairy. Tell her you threw the sword in there, and you'll get the Level 4 Sword, which is the most powerful in the game!
Before you leave, make sure you throw the Bow in there as well. When she asks if you threw it in, say yes. She'll tell you that she has something important that will give Ganon his last moments, and that she knows that the Golden Power is to blame for her looking like she does. She then tells you to defeat Ganon.
Light World Death Mountain maps by JonLeung.
Dark World Death Mountain maps by Alex Foster.
Head back to the Light World and return to Death Mountain. Use the teleporter near the Tower of Hera, then drop down the edge to the south. Go inside the cave you land near, and use the Magic Cape to get past all the spikes and obtain the Cane of Byrna. (You could have gotten this earlier after getting the Magic Cape and the Magic Hammer, if you wished.) This cane produces a force field that protects Link as long as he has Magic Power.
Head east and stop at the dead end, then use the Magic Mirror to return to the Light World. Now that you have the Hookshot, you can make your way past the huge gap in the bridge. The dark-colored rock at the southern-most tip of this area contains a teleportation tile.
Use the tile to go back to the Dark World, then go northeast. There are two caves. Enter the one on the left, and go west. Go up the stairs, follow the path and fall into the pit. Push the block and go up the stairs. Go down the pit to the east, and go up the stairs to the east. Go down any of the three pits, but keep in mind that the bottom-most pit will give you access to the two chests, which contain Bombs and 10 Rupees. Go up the nearby stairs. Follow the path. You'll be back outside.
From there, pick up the rock near the cave you just came out of and throw it. This uncovers a secret passage. Go in and use the Ether Medallion to uncover the secret paths in the bottomless pits (remember where they are!). Go across from where you entered, bomb the crack in the wall, then bomb the crack in the left wall. Head out and you'll be in an isolated part of Death Mountain. Head to an open space and warp back to the Light World with the Magic Mirror. You'll find a Piece of Heart. From there, head back to the Dark World and drop down. You're ready to head to Turtle Rock.
Head east, and you'll find the entrance. To enter, you'll have to stand near the dungeon and use the Magic Mirror to return to the Light World again. Grab and throw the big dark-colored rock, then use the Magic Hammer and pound the right, center and left posts...in that order. This will trigger a teleportation tile. Stand on it, and you'll be on the top of the Turtle Rock dungeon. Use the Quake Medallion on the Quake Medallion icon on the ground, and the turtle's head will disappear, opening up the dungeon.
Sunday, July 24, 2016
HCBailly plays The Legend of Zelda: A Link to the Past - Part 20 of 26
What lies deeper into the Ice Palace?
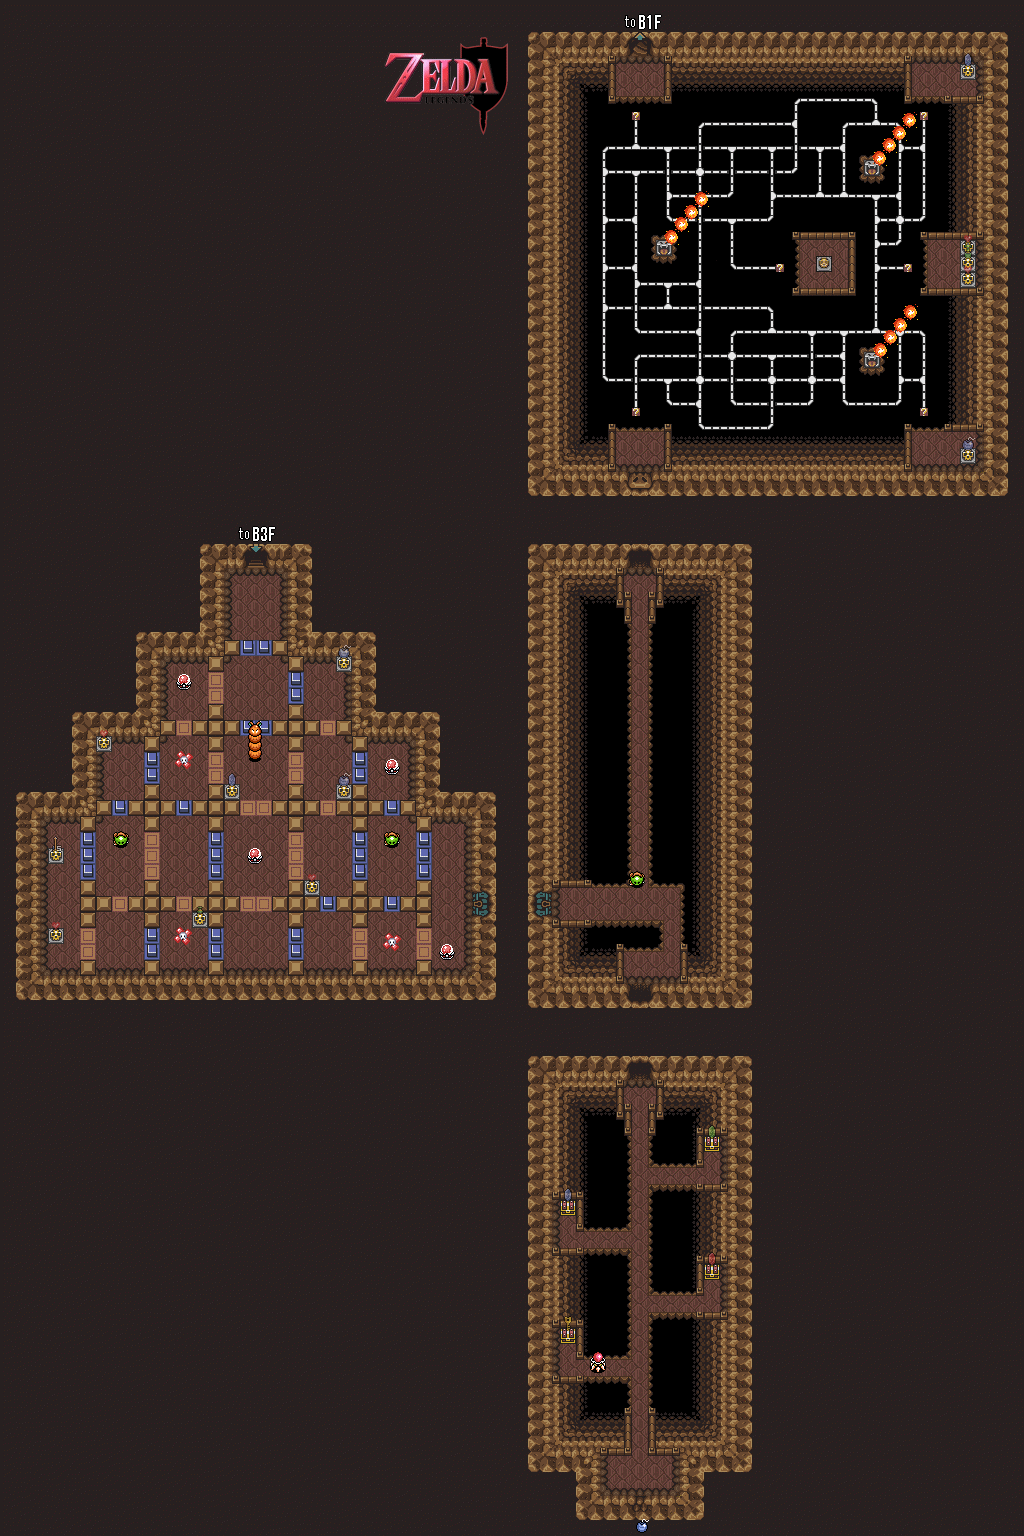
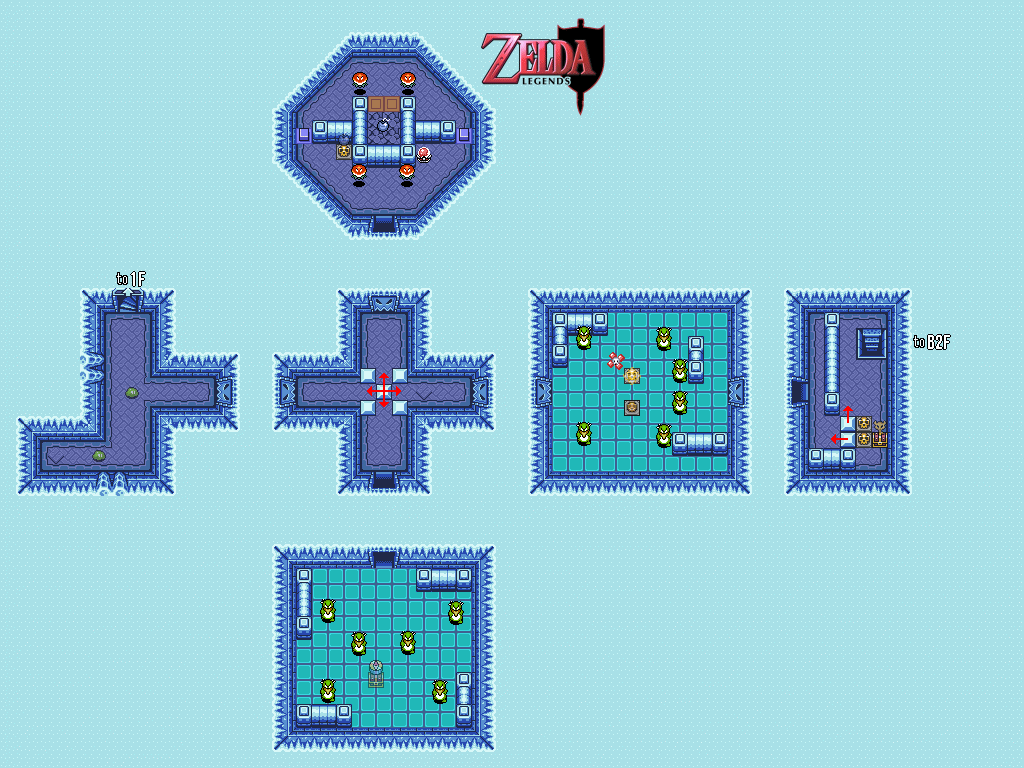
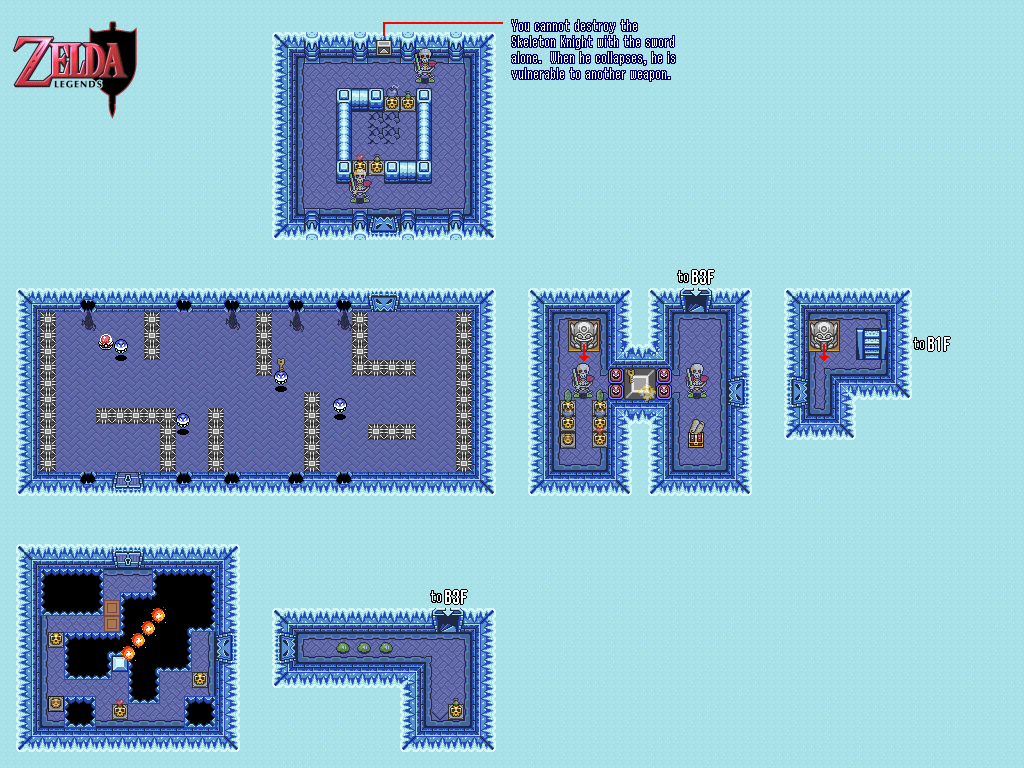
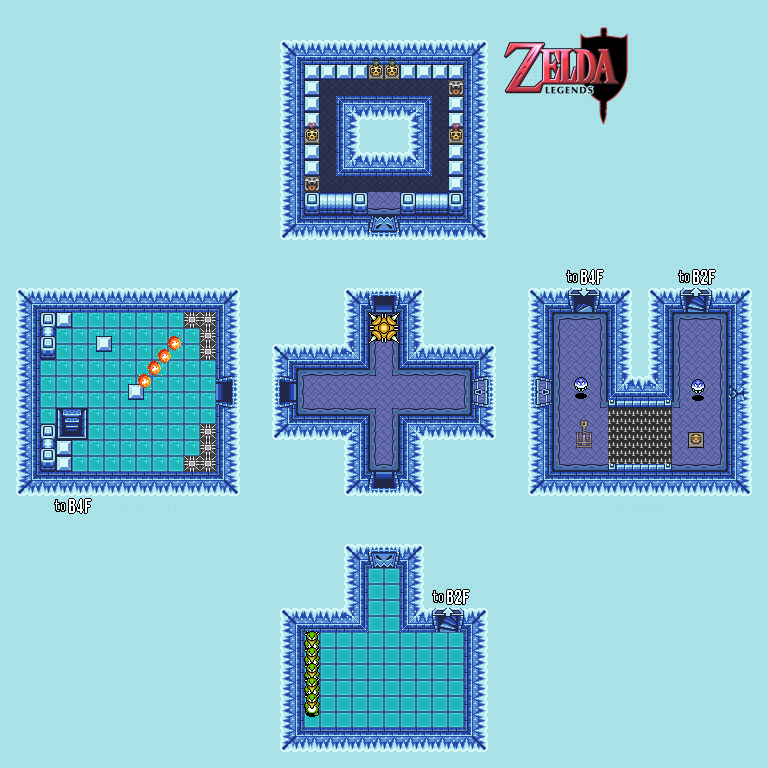
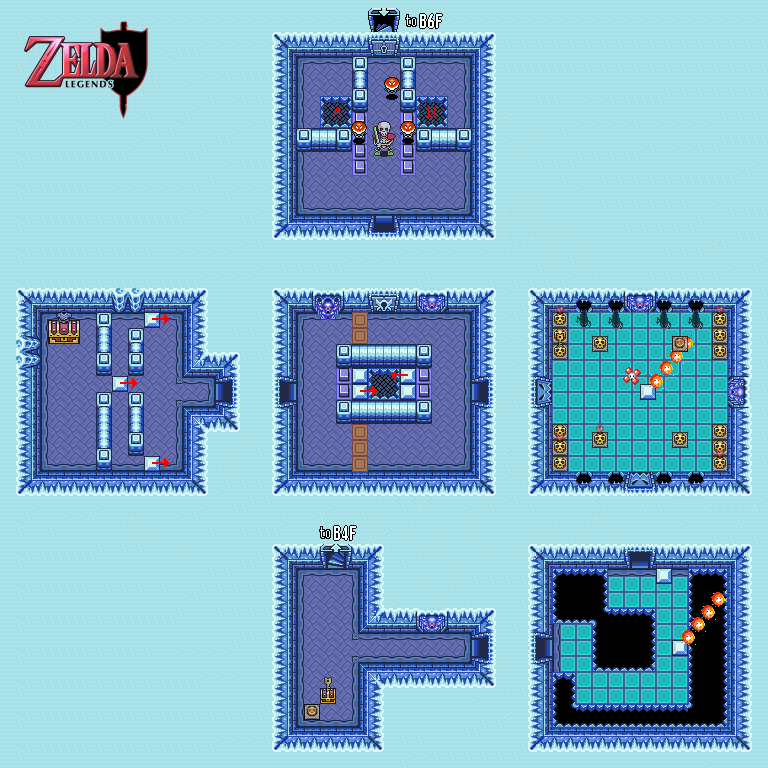
Ice Palace maps by Iron Knuckle.
Stalfos Knights, that's what.
The telepathic message tile you'll see when they make their first appearance tells you that you'll need another weapon to finish them off. To take them out, hit them with the sword, then destroy them with a Bomb while they lay lifeless on the ground like a pile of bones.
The next room is another conveyor belt amassed with spikes, those blue flying things that electrify themselves and black lizards crawling from one hole in the wall to ther other.
Watch out shortly after you reach the third basement floor. You'll see another spiked yellow monster come straight for you when you enter the first door. Hide near the door and it won't hit you.
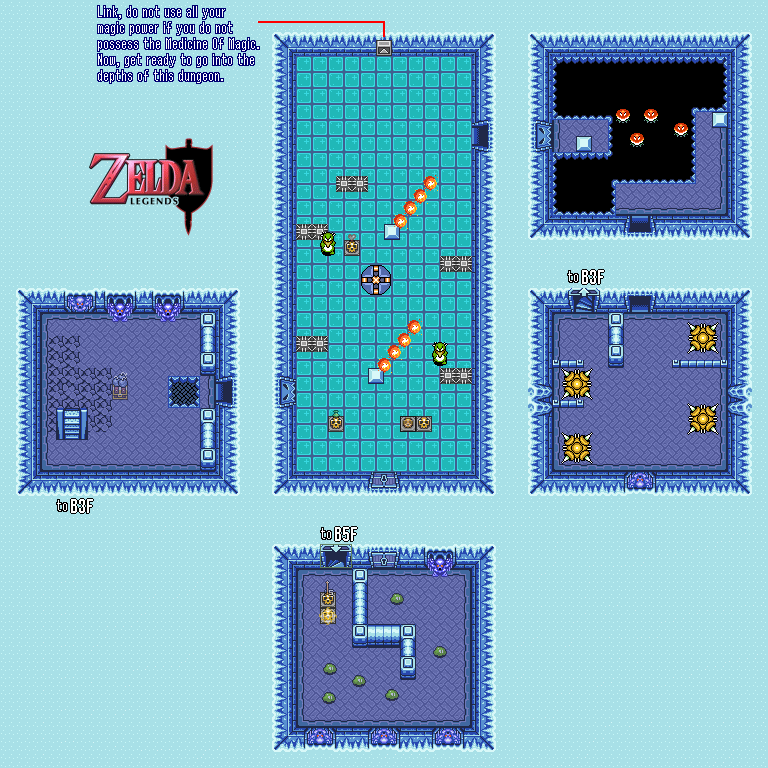
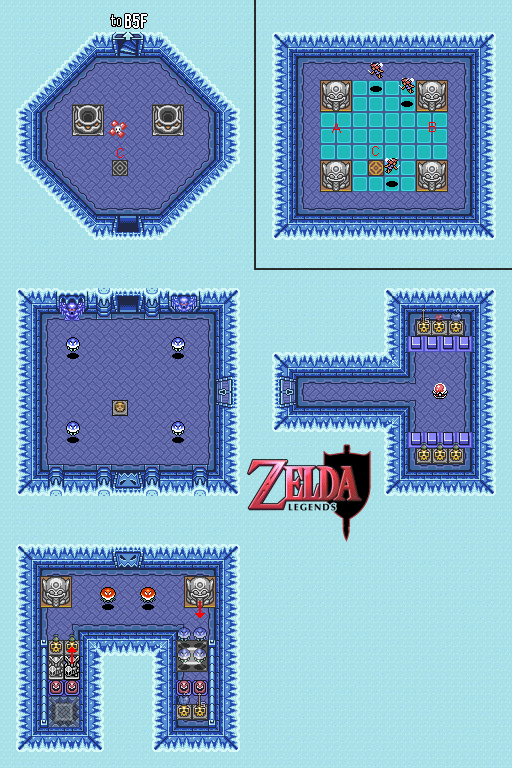
When you drop down to the fourth basement floor, the telepathic message tile will tell you not to use all your magic if you don't have the Medicine of Magic. This is crucial, because you will need several refills on magic for this dungeon.
Some of the statues are faces with tongues sticking out. Sometimes, you can pull the tongue out to either open doors or find other things. Try it out.
The stairway that leads to the fourth basement floor that isn't a door has some floor that you can bomb. Bomb it to get the Big Chest...which contains the Blue Mail. This reduces the damage you receive slightly. (Believe it or not, I could never find this when I played the game for some reason, and I ended up making it almost to the end with the Green Mail. How you're supposed to know that you can do this besides the help of a Player's Guide is beyond me.)
The boss is reachable via a hole from the sixth dungeon floor. The boss here is a one-eyed cloud encased in ice, and you're going to need all the magic you can get for this one.
You could melt the ice the boss is encased in with the Fire Rod, but if you use the Bombos Medallion, this becomes a moot point. All you have to do know is avoid the falling ice as well as the boss itself. Thankfully, the boss is easy: just keep whacking the boss and all the clones it creates with the whirlwind slash.
HCBailly plays The Legend of Zelda: A Link to the Past - Part 19 of 26
Two dungeons left! What shall we do now?
.png)
.png)
All Misery Mire maps by Iron Knuckle.
You can get to the Big Chest without the Hookshot, but just barely. Inside the Big Chest is the Cane of Somaria. This lets you create a red block that can be pushed around in lieu of a statue. If you use the wand while the red block is onscreen, it splits into four fireballs that can damage enemies.
In one of the dark rooms, there will be a bunch of black mice grouped together that run out of the north wall and towards the south. They can easily be destroyed, but if you're not paying attention, they won't be easy to see coming.
The boss is a giant eye with a bunch of smaller ones grouped around it. You'll have to destroy all the smaller eyes with your sword while avoiding the lightning blast from the big one (the big eye peeps out of the water just before it blasts you). Whatever you do, don't let the smaller eyes touch you, as they can do three hearts' worth of damage.
Once you destroy all of the smaller eyes, the big eye will come after you itself. Keep it away from you (it does three hearts' worth of damage much like the smaller eyes) and keep attacking it with your sword.
The Maiden here will tell you that Zelda is waiting for you inside Turtle Rock.
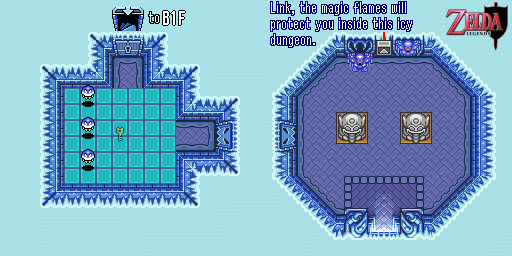
The Ice Palace
Now that you're done with this dungeon, you'll want to go to the dungeon at the Lake of Ill Omens. To do that, however, you'll have to head back to the Light World.
From here, go back to Lake Hylia and grab the dark-coloured rock near the Well of Wishes. This rock hides another teleporter to the Dark World. Stand on it, and you'll be in a part of the Ice Island that you've been unable to access up until now. This is the entrance to what [b]should[/b] be the fifth dungeon.
Ice Palace maps by Iron Knuckle.
You're going to need the Flame Rod and plenty of magic power if you want to complete this dungeon. The telepathic message tile at the entrance even says that the magical flames will protect you. If you don't have the Flame Rod yet, get it before you come back here.
Some of the blue monster statues on the walls will come to life and chase after you when you get close enough. The Fire Rod is the only way to kill them.
The light blue tiles make Link slip and slide around, so be careful when you walk or fight monsters on them.
The green penguins can be killed with the whirlwind slash, but they can also be killed easily with the Bombos Medallion if you're dealing with a large group of them.
The yellow balls of light from Blind's Dungeon also appear here, and they can be killed with either the Magic Powder or the Bombos Medallion if they're still underneath a skull.
You'll be bombing a few cracked floors as you make your way down this massive dungeon. There are eight floors in all, counting the entrance.
Saturday, July 23, 2016
HCBailly plays The Legend of Zelda: A Link to the Past - Part 18 of 26
We find some more Heart Pieces and tackle the sixth dungeon!
Misery Marsh
It's time to head into the dungeon in the lower-left corner of the Dark World. The only catch is getting there, and since you can't enter that area on foot like you could the Light World, here's how to get there.
Return to the Light World. Play the Ocarina, and choose number 6 for the landing location. From there, pick up the rock to the right where you land and you'll find a teleporter underneath. Congratulations, you're finally at the secluded marshlands area.
When you enter the building to the left of the dungeon entrance, move the blocks around so you can open both chests. (It's pretty easy.) From there, you can get another Piece of Heart.
Also, walk to the upper-right corner and you'll find a nook that doesn't exist in the desert in the Light World. Walk into this area, use the Magic Mirror, and lift the Rock to find a hidden passage. Go inside to find another Piece of Heart.
The building to the right contains a large Faerie that completely refills your health.
The enemies in the mire can be easily defeated with the whirlwind slash.
You'll see the Ether Medallion symbol near what should be the entrance. Use the Ether Medallion here and you'll stop the rain, causing the dungeon entrance to appear.
Misery Mire Dungeon
All Misery Mire maps by Iron Knuckle.
You can make it across the pit at the beginning without the Hookshot. To do that, just run into the block near the pit and hold Right on the Control Pad when you're knocked back.
The Wizzrobes rear their ugly heads here, and they'll shoot beams at whatever direction they see you in. They're limited to four directions, however, and having the Level 3 Sword, especially at full health, makes them much easier to kill.
You'll also start seeing the lamps spit fireballs at you now.
The slugs not only do three hearts' worth of damage to the touch, they also drop bombs at random intervals. Take them out with the whirlwind slash.
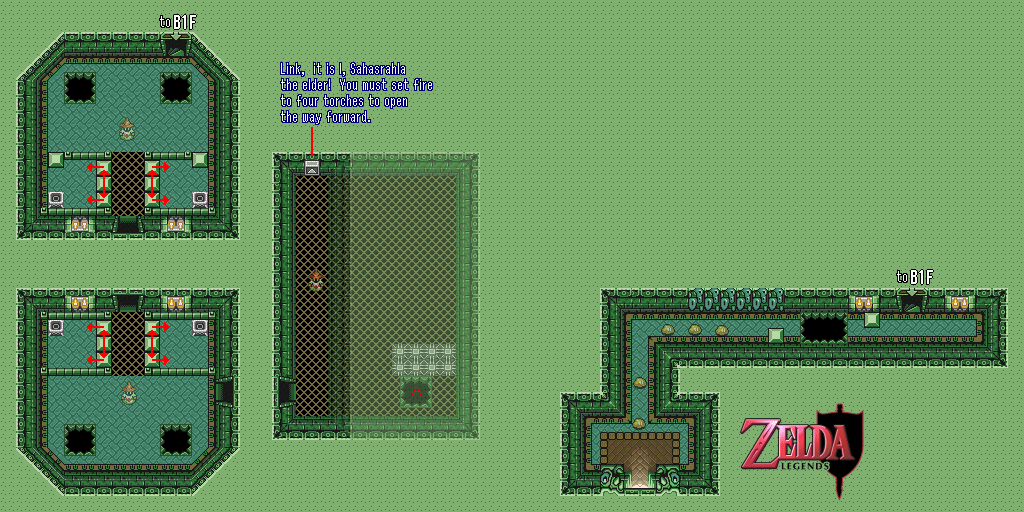
There is a telepathic message tile with a message from Sahasrahla saying to light the four torches to continue. This is in reference to the two rooms that come before this one, where you have to light the four torches in both rooms to move a wall and find a passage to another part of the dungeon. If you move any of the blocks in either of these two rooms in the wrong direction, just go back down a floor and then return.
The big yellow square-shaped monster with spikes on each corner is a larger version of the spiked squares that you see in the dungeons. They can move in any direction and will move rush you when they sense you.
HCBailly plays The Legend of Zelda: A Link to the Past - Part 17 of 26
After cleaning house in the Swamp Palace, we move on to the Skull Woods and carry on with our maiden-rescuing ways there. The only problem is: where do we start?
The Forest Dungeon
Skull Woods dungeon maps by Iron Knuckle.
Turns out, there are a couple of entrances to this dungeon in the Skull Woods, and there's no correct one. Some are inside skulls, while others are holes in the ground. So go ahead, pick one and look around.
The entrance in the center of the Skull Woods will take you straight to the Big Key, so go ahead and take that one first.
The Ceiling Masters are the giant hands that come out of sky and fall on Link, taking him back to the dungeon entrance he last used if they catch him. Thankfully, you can hear the sound of something following as well as see the Ceiling Master's shadow before hand. If you kill one, you'll still have to deal with another one. Just pay attention whenever you're doing something so you won't get caught off guard.
When you open the chest containing the Compass, you'll cause pits to form all over the floor.
One of the entrances to the dungeon is underneath some bushes. Find it, go in, and you'll be able to pull the switch to open up a wall and access the Big Chest. Inside the Big Chest is the Fire Rod, which you'll really need here. It works like the Ice Rod, only it shoots fire instead of ice.
The mummies take a good bit of abuse, but now that you have the Fire Rod, you won't have to worry about that. If you have multiple mummies on-screen, you can kill them with the Bombos Medallion.
The Star Tiles from the Mountain Tower in the Light World make a return appearance here, and you'll have to hit them in order to move some pits around and reach areas that you wouldn't be able to get to normally.
You'll eventually find a giant, monster-like skull in the ground with a giant bone sticking out of where the mouth should be. Use the Fire Rod on this stick and you'll set it on fire, burning it out of existance and opening up another entrance that leads to another part of the dungeon.
There is a chest at the beginning when you enter this area, but you'll have to get past some walls hidden underneath the bridge in order to reach it.
You'll need the Fire Rod to light all four torches and open the door in time.
You can actually slash the vines that cover parts of the walls. One of them, not surprisingly, hides a door that leads to the boss.
The boss is a giant moth. As you fight it, the floor moves like a conveyor belt and some of the spikes move into different positions. You can fight this thing with the Fire Rod, your sword, and the sword beams, but you can also use bees on it. Yes, bees work on this boss, and they do quite a bit of damage before they finally fly away.
Friday, July 22, 2016
HCBailly plays The Legend of Zelda: A Link to the Past - Part 16 of 26
We finally go deep into the Swamp Palace!
.png)
.png)
All Swamp Palace maps by Iron Knuckle.
You'll have to swing through the wall in order to hit the color switch behind the locked door and activate the nearby floodgate. Once you trigger the switch, raise the blue blocks up again. You'll need this for one of the pits on the first floor...and real soon, too, otherwise you'll have to go all the way back and do what you should have done before you left the room.
If you have the orange blocks down, then congratulations! You can get the Big Key!
The Big Chest contains the Hookshot, which makes its series debut in this game and has appeared in many Zelda games since. Use it to grapple onto pots, skulls and other things that can acts as hooks from a long distance and scale pits and gaps in a hurry!
One of the rooms has a couple of waterfalls. The waterfall second to the right is a door to another room, but unless you looked at your map, you wouldn't know this.
The boss of this dungeon is a bunch of clouds. Use the Hookshot to drag one of the clouds to you, and destroy it with your sword. When you destroy all the clouds, the flying one-eyed monster that the clouds were hiding will leap up and land on the ground before bouncing off the walls at 45-degree angles. If you have the Level 3 sword, you can defeat the boss with two whirlwind slashes and get the Heart Container and Crystal easily.
The Skull Woods
Well, you're done here, so head back for the woods at the upper-left corner of the World. If you want to get there faster, just use the Magic Mirror and head there with the Ocarina. Go north from Kakariko Village to the woods and use the teleportation tile behind the dark-colored rock. You'll now be near the Skull Woods.
There are multiple entrances to the dungeon here...but which one should we use? Stay tuned!
HCBailly plays The Legend of Zelda: A Link to the Past - Part 15 of 26
That's two dungeons down...and now that we have the Titan's Mitt, there's a bunch of stuff that's ripe for the taking!
Romancing The Sword (Again)
You could use the Titan's Mitt to get the Magic Cape as intended, but since it's easier to do the Magic Mirror thing to get it, it's a moot point now.
You may have noticed the ghosts with the lanterns floating around in earlier videos. They're just the Dark World's version of the ghosts from the cemetery.
One of the houses in the Village of Outcasts has 300 Rupees. Nice.
You can now go east of the village. If you pound all of the posts with the Magic Hammer, the tree stump to the south of them all will turn into an underground passage. Go inside and you'll find a Heart Container.
If you go south of the village and go to the east near the south village entrance, you'll find a frog in a blue tunic hopping around. Now that you have the Titan's Mitt, you can rescue the guy and talk to him. He is from Kakariko Village, and he wonders how his partner is doing without him. He'll then want you to take him to his partner.
From here, use the Magic Mirror to go to the Light World and head back to the Smithy's house. When you return to the Light World, the frog will change shape and will turn into an old man that looks exactly like the Smithy. Now that the Smithy's partner is back, walk out and walk back in. They'll offer to temper the Master Sword for a huge discount of just 10 Rupees. Take it. You're going to need the extra strength.
Also, if you use the Magic Hammer on whatever the Smithies are working on, they'll politely ask you not to do that.
Since your sword is being tempered, you're going to be running around without a sword as you leave; offscreen the smithee's house and come back. If you want, you can walk outside and roam around for a few minutes. If you have to attack any enemies, use your Magic Hammer as a weapon. (Yes, you can do that with just about every normal enemy in the game.) Pressing B will allow you to swing your hand around as if you have a sword, and you can even perform the whirlwind slash minus the sword. Strange.
Anyway, go back to the Smithees and the Master Sword will have a red blade. This is the Level 3 sword, and it's pretty powerful.
Now that you've got the Level 3 sword, head back to the Dark World and return to where the Smithies's house was. Now that you've got the Level 3 sword, you can find a chest in this abandoned house. If you touch it, you'll find out that since the key is locked inside the chest, you can't open it.
*record scratch*
Okay, first of all, how do you know this? Does Link just look at the chest, peek inside and find the key? I can picture that being the most logical scenario. But then the chest follows you as if by magic. What, is there some invisible chain between Link and the chest? Or stranger still, did the chest tell Link "Hey, my key is inside me!" with the same magic that just lets it follow Link wherever, especially when you use the Ocarina to warp wherever you want in the Light World?
Anyway, you have to take this chest to the old man near the desert entrance. You'll have to teleport all the way to the Light World and then give it to the man sitting near the sign. While you're doing this, you'll stop moving the chest around when you press the A button. If you do that, just move over the chest and it'll follow you again. The old man at the desert will ask you to keep the fact that he used to be a thief a secret, and if you do, he'll open the chest. Inside will be the fourth and last Magic Bottle!
The Magic Hammer will allow to grab the rock behind the posts at the Swamp, and you'll find a teleporter underneath it. This will allow you to warp to the Dark World's version of the Swamp, which is the same area where the second Dark World dungeon will be.
Swamp Palace
All maps by Iron Knuckle.
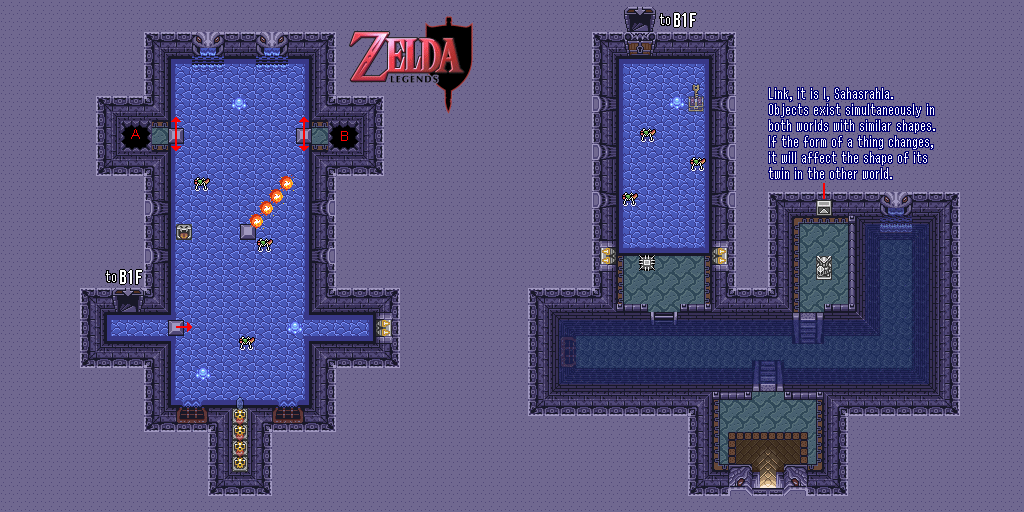
When you enter the dungeon, you'll find out that you won't be able to get anywhere in this dungeon. The only thing you can reach is a telepathic message tile. It's a message from Sahasrahla, telling you that objects exist in both world with similar shapes, and if you change something in one world, it'll change the same thing in the other.
Go back to the Light World with the Magic Mirror near the Swamp Palace, and enter the Swamp Palace there. Drain the water, and head back out. Go through the portal back to the Dark World that the Magic Mirror left, and the water will be drained in the Dark World as well. Go back into the Swamp Palace there and the chasm near the entrance will be filled with water, allowing you to swim to the ladder and explore the dungeon.
The ring-shaped monsters that look like they have green noses are easily destroyable, but the blue monsters that almost blend in with the shallow water on the floor are something else. They're pretty fast and both travel and bounce off the walls at 45-degree angles. You'll be spending more of your time avoiding them than anything else. You can destroy them, but they just disappear when your sword hits them, and they keep respawning no matter what.
The brown square-like object with holes on each side shoot fireballs similar to what the Zoras spit at you whenever you swing your sword. The fireballs track you, but these brown things can't fire at you diagonally, so they're not much of a problem.
Those grey things that look like turnstiles are really the switches for the floodgate. Walk up to the right side and keep walking into the stick-like part of these switches to push them and activate the switch to release the floodgates.
The dark holes in the walls contain orange fish-like monsters that come out of the holes and swim around the room. Like the ring monsters, they're easily destroyable.
Thursday, July 21, 2016
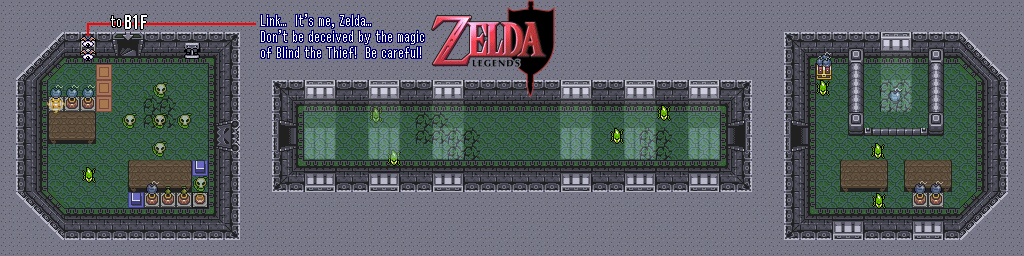
HCBailly plays The Legend of Zelda: A Link to the Past - Part 14 of 26
Instead of going straight to the second dungeon, we go straight into the dungeon at the Village of Outcasts. What obstacles await us there?
Blind's Dungeon
Maps by Iron Knuckle.
The first item you're going to need is the map, and you'll be able to find it in a chest right after you enter the dungeon.
There are men with horse heads that walk around in the stage much like the skeletons. The red ones spit fireballs at you when they see you.
The red blobs pop out of the ground and follow you around, but they're not that hard to deal with.
Some of the pots in this dungeon contain a yellow magical wisp. The wisp will follow you, and if you run away from it long enough or it runs into a wall, it will disappear. If it touches you, however, Link will turn back into the bunny, and the Moon Pearl will be negated for a few seconds. It doesn't last very long, though, so more often than not you won't have to worry about running into a situation where your bunny form will render you helpless.
You'll also see these wisps when you pass through certain areas in the lower level of the first basement floor, so keep an eye on your surroundings if you have to go under for anything.
You'll be able to enter the boss room right away as soon as you find the Big Key. There's just one problem: the boss isn't in there at all and it's just an empty room that you can enter and leave as you please.
The conveyor belts come back with a vengeance, and there are rooms in this dungeon where the floors are nothing but conveyor belts that move you in a random direction depending on where you're standing.
The translucent red blobs have a solid red core inside of them, which they shoot out a few feet before traveling back to it. If you hit the core with the whirlwind slash, you'll get rid of the blob itself.
Apparently, if you have a fairy onscreen at the same time as one of the yellow blobs, the fairy is translucent just like the blob. I'm not sure if this is an emulation error of if this is actually part of the game.
In the telepathic message tile, Zelda tells you not to be deceived by Blind's magic.
The green lizards just follow the walls like the rats; the only difference is that they take more damage before dying.
You'll see a crack in the wall awash in sunlight from a nearby window. Throw a bomb at it and let it break the cracks in the floor. You'll need this hole for later.
The huge version of the dungeon pushblocks can be picked up and grabbed with the A button. They're like the large rocks, so you'll be stuck in one place before you throw it.
If you have the Big Key, you can open the jail doors much like you did in Hyrule Castle when you rescued Zelda. At the last door will be a young woman, who seems to look like one of the Maidens. She'll ask you to take her outside.
You'll need the Magic Hammer to get to the Big Chest, which isn't much of a problem at all. When you open the Big Chest, you'll get the Titan's Mitt. This works just like the Power Glove, except this time you'll be able to lift the dark-colored rocks and gain access to more areas and secrets. Just be quick near the chest, because the floor will start to crumble away in a clock-wise pattern from the top-left after you enter the room.
If you go to the exit, she tells you not to go this way. Before you actually throw up your Yao Ming face, remember the boss room. You're actually supposed to head there instead. Since you've bombed the crack in the wall that was covered by the sunlight, there will now be a swath of sunlight in the center of the room. Put the girl in the sunlight, and you'll fight some red monster. I'm assuming this is Blind the Thief.
He'll float around and shoot lasers out of his eyes as well as multiple Zora-style fireballs. Hit him in the head with the whirlwind slash a few times, and his white shirt will fall to the ground, causing only his floating head to remain. Another Blind head will pop out of the shirt and you'll be dealing with the head and Blind himself. Attack the new Blind like normal. Now you'll have two heads floating around. After a few more hits, Blind will be out of commission.
You'll get another heart container before saving another Maiden.
A Link To The Past - The Super Famicom Commercial
I actually forgot this existed until I needed an intermission.
Wednesday, July 20, 2016
HCBailly plays The Legend of Zelda: A Link to the Past - Part 13 of 26
We find six Pieces of Heart in fifteen minutes as soon as we're done with the first dungeon, crossing a whole bunch of awesome secrets to find in this game off the list.
Heart Hunt
Unlike the Light World, where you can enter the desert area, you won't be able to enter the Dark World's equivalent unless you have certain items. If you do head to it the normal way, you'll find something that you've probably noticed earlier in the game: a stone tablet that looks just like the one that gave you the Ether Medal. Stand inside the area where the posts are and use the Magic Mirror to go back to the Light World. You'll now be on top of the rock wall. Go west and you'll finally reach this tablet. Use the Book of Mudora on it and you'll receive the Bombos Medal. This medal sets all onscreen enemies on fire and kills them, but just like the other medals, this requires a good amount of magic to use.
This is one of the earliest puzzles that requires using something in one world to reach it in the other...and it won't be the last.
The trees in the Dark World look like they have faces. Of course, Nintendo has to think of everything, and there's two near the forest that has eyes that actually move. If you run into its mouth, it spits out a bomb. One of them just tells you to watch where you're going, especially when you dash. The other tells you that there is a magic teleporter in the Lost Woods, and that the two forests may be connected to each other.
Remember the forest area where that young man was playing the ocarina? Well, enter that area in the Dark World. You'll find a creature here, and it turns out that this was the guy with the ocarina that went to the Golden Land in search of the Golden Power and never returned.
He buried the ocarina with some flower seeds, and he hands you a shovel so you can go get it if you agree to help him out. While you could just go back to the Light World's version of this area with the Magic Mirror, you can have some fun with it beforehand by equipping the shovel and digging in the dirt to find Rupees and other power-ups.
The ocarina is in the upper-left corner of the area where the guy is playing the Ocarina. When you get the ocarina, however, you lose the shovel and you'll never be able to use it again. That disappointed me as a kid, and thankfully the next game, Link's Awakening, actually has a shovel that you keep permanently once you find it.
Go back to the Dark World and talk to the creature. He isn't able to play the ocarina anymore, so he lets you keep it. He tells you to give it to a tired old man in Kakariko Village. He then asks you to play the ocarina one last time. Do that, and he'll transform into a tree.
Go back south and go to the southwest corner of this area. Stand in the circle of bushes and use the Magic Mirror to reach another cave that you couldn't normally reach. There's another Piece of Heart here. Head back to the Dark World.
There is a village like Kakariko Village in the Dark World, but it's full of enemies. The maze game is replaced with a shoveling game. For 80 rupees, you can get a shovel, go behind the guy running the game, and use a shovel on the entire field behind him and keep whatever treasures you find. This is a nice substitute, but I'd like to do this wherever I want, bah gawd. Once again, refer to a few paragraphs back to where I reference Link's Awakening.
Believe it or not, there is something worth getting in this game. Keep playing the game and keep digging until you find another Piece of Heart. Yes, there's a Piece of Heart here, and it's in a random spot every time, so be ready to dig...and dig...and dig. It's not the only one you're going to find in this village, as you'll soon see. You'll make a good amount of Rupees and easily recoup what you've paid while playing this game, but you can also get a little more than that if you're lucky, so don't worry about running out of money.
There's also another game where you can pay the guy at the counter some Rupees and shoot at targets with your Bow and Arrow. Guess what? When you get the timing down to a science (which is really easy to do), it's the easiest way to rake in big prizes. You won't win a Heart Piece here, but if you're in need of some Rupees, this is one of the best ways to go as well as one of the most fun.
The dark rock behind the Bow and Arrow mini-game house will be in your way, so use the Magic Mirror to return to the Light World.
To the right of the village is the Smithy's House as well as another well. If you go inside and talk to the Smithy, you won't be able to do much as his partner has gone missing. Hit the stump next to the house with the Magic Hammer, then drop down into the well.
Go north after you drop down to find some jade-colored statue of two hands holding a bowl with some sort of red liquid in it. Sprinkle Magic Powder on it, and you'll unleash a demon. He's ticked that you've woken him up, and he's going to curse you. This is actually curse you're going to want anyway, and you're going to get it whether you want it or not, as it cuts your Magic Power consumption by half! This is going to be very useful later on when it comes to using the Medallions and the Ice Rod. My only question is...what's with the bat when he speaks? It's like they predicted Fluttershy in My Little Pony: Friendship Is Magic almost twenty years beforehand and used her passive mannerisms as the basis for how the bat speaks.
Go back to the village cafe and use the Ocarina on the old man sleeping. He'll find out what's happened to his son (who turned into that creature in the woods area we talked to), and if you talk to him again, he'll tell you to play the flute in front of the bird at the village square.
Go to the village square and play the Ocarina. The bird statue will explode and a real, live bird will fly out of it.
Play the flute again. The bird will fly towards you and Link will grab on when it touches him. (Make sure you're lined up with the bird, because the bird doesn't return, forcing you to play the ocarina again after several seconds.) From here, you'll get the World Map, and you can choose one of eight places to drop Link off at. Number three, obviously, is Kakariko Village.
Go north from the upper-left corner of the village, then go into the woods, go east, then south. Pound the post with the Magic Hammer and grab the rock here to find the Magic Teleporter the tree told you about. This will allow you to enter the Dark World's version of the forest.
Don't do that just yet, though. Instead, enter the teleporter, then go through the bushes and head back to the village...or whatever it is in the Dark World. This is the Village of Outcasts, sometimes known as the Thieves' Town. There's nothing friendly about this town at all, and some of the buildings are completely destroyed.
There is a chest mini-game here...and there are a lot of chests to open. One of them is a Piece of Heart, which will be in a random chest every time you play the mini-game. You'll have to pay, play, and return over and over until you finally get this Piece of Heart, but it's so worth it.
The bird statue is a statue of a demon holding the pitchfork. Pull on the pitchfork to lift it up and open a dungeon entrance. We'll be going here later on.
The guys in blue that looks like they have fox ears are like the thieves that used to be in the Lost Woods before the fog lifted. Don't let them get near you if you prize your Rupees and arrows!
Head to where the cemetery is in the Light World. You'll be able to enter the upper-right corner of the fenced in area at last, and you can use the Magic Mirror to enter this area in the Light World earlier than usual. Dash into the grave to reveal a hidden cave with a chest inside. This chest contains the Magic Cape, which turns Link invisible and into nothing more than a shadow when he wears it. With this cape, you can also pass through enemies and not take damage The longer you wear it, however, the more Magic Power you use, and the invisibility wears off when you run out of Magic Power, so be careful.
There is also a staircase to a low cliff that wasn't in the Light World. Climb up it and use the Magic Mirror to reach a cave in the Light World that you couldn't access before. Inside is another Piece of Heart behind the crack in the north wall.
Go back to where the mountain entrance is in the Light World. Now, you're supposed to have another item when you go up the stairs: the Hookshot, which you'll find in the Swamp Palace. However, you can easily slink up the upper-left edge of the pit, grab the skull, throw it down and continue on your way. Then, use the Magic Cape to walk through the bumper, and you'll be able to get the Piece of Heart on the other side.
Go back to where the lumberjack's house is in the Light World and use the Magic Mirror to return to the Light World. Remember the tree they were trying to cut down? Well, they're gone, and the leaves are a lighter shade of green. Dash into the tree to take out all the leaves and find a huge gaping hole inside the tree. Jump in and you'll find four Faeries as well as yet another Piece of Heart.
Subscribe to:
Posts (Atom)