Showing posts with label part 23. Show all posts

Monday, July 20, 2026

PrinceWatercress plays Space Station Silicon Valley - Part 23 of 32


This level was by far the hardest part of the entire Let's Play.


Evo's Escape


This level is the third of the EVO shellsuit levels, and not only is it the hardest of those levels, it's also one of the hardest levels in the entire game.

In this level, you're shooting down enemies after EVO takes control of a chameleon and runs off before Dan finds a flying security camera with a gun on it. The Control Stick moves the camera, A shoots and B button speeds the camera up. You have to shoot down as many animals as possible, as different animals have different point values, in order to face EVO and shoot him down to get the shellsuit piece.

Why is this level so hard? Because it's atrocious in execution. You can move the camera and aim, but the lack of a target reticle on the screen makes it a gamble to guess where you're aiming, so you're better off continuously firing at all times. Because of this, it's hard to hit just about every enemy that's here unless you have a rough idea of what you're doing, and even then, that doesn't feel like enough. It doesn't help that the camera moves at one speed and you can't hold another button to fine-tune aiming and rotate more slowly. There's a shooting gallery section midway through, but good luck hitting anything with a high point value.

There are power-ups such as double arrow shots missiles that do more damage, but once again, good luck hitting anything. All I could do was just hold A and move the camera around to shoot everything I could, and if you want to get the bare minimum of 12,100 points that you need to trigger the part where you shoot at EVO and get the arms, you have to shoot just about every animal down and destroy them. That also includes the two parrots at the end, which are worth 1000 points each, and all the chameleons before that, which are 500 points each. I also made sure to shoot every piranha, as they are 500 points a pop, as well as the two turtle tanks that are also worth 500 points each. Lions are worth 300, but even near the end, every little bit is going to help.

If you get anything less than 12,100 points, the level will end and you'll have to play it again. If you get 12,100 or above, EVO will show up in his chameleon form and you'll have to shoot him down. EVO leaves a footprint trail wherever he goes, and you can use that to aim the camera and keep shooting to take him out. The boss battle doesn't end until you beat EVO, so take your time and keep shooting and aiming to bring EVO down and get the arms.

Saturday, February 7, 2026

PrinceWatercress plays Super Mario Odyssey - Part 23 of 92


We head to the Metro Kingdom...then head back to take care of some loose ends in previous kingdoms.


Now that we have all of the Power Moons that we can get our hands on in the Lost Kingdom, we can throw our hat on the globe, repair the Odyssey and head to the Metro Kingdom. However, as soon as we land, I go. Turns out we're able to head out to earlier areas again despite Bowser and the Broodals being in the Metro Kingdom, and I decide to tie up some loose ends.

Also, if you leave the Lost Kingdom and come back, the vulture will show up and kidnap Cappy again. You'll have to get to the nearby three-platform see-saw with the ground pound symbol on all three platforms and do the ground pound to take out the vulture again and get Cappy back.

Cloud Kingdom Moons


1. Picture Match: Basically a Goomba - There is a pipe in the center of the kingdom when you return, and it takes you to a Picture Match mini-game. You'll need to place the parts of the picture of the . Y and B let you rotate pieces while the left analog stick lets you move then, and ZL lets you place the pieces. When you place a piece, however, it will disappear, so remember where you put everything! Talk to the Toad when you're done You'll need to get at least 60 points, and the more accurate you are, the more points you'll get. Hitting the 60-point threshold nets you a Power Moon.

Lost Kingdom Moons


13. Caught Hopping in the Jungle! - You'll need to leave the Lost Kingdom and come back to get this Power Moon. Near the Swamp Hill checkpoint, there is a bunny bouncing around on the spinning propellor-shaped platform nearby. You can hit it with your hat, or you can capture one of the nearby Tropical Wigglers and run into it with the body extension move. The latter is easier, and I show it off in a later video.

Sunday, December 14, 2025

PrinceWatercress plays Brave Fencer Musashi - Part 23 of 33


In this entry, we approach the Ice Palace, which is our toughest challenge yet...


Go to the castle library and talk to Scribe Shanky. You can learn about Allucaneet, Shogi and the Empire now, if you want.

The Gold can be moved one space in any direction, except diagonally.

The Knight can be moved two spaces up and one space right or left.

The Lance can be moved any number of spaces up.

Remember the endless forest maze that you went into with Leno earlier in the game? Well, you're heading there again in order to do this next part. You'll have to Assimilate the Hop move from that pink flower and jump over those thorns again.

If you ever get lost, go down.

The correct route is left, up, up, right, up, up, right, up, up, left, then up until you reach the hideout. If you go in the right direction, you'll start seeing rocks and eventually snow.

You'll reach the Frozen Palace. Inside you'll meet Gingerelle, but you won't get much out of the conversation. You'll be seeing her again soon, though.

You'll slide a little further when you stop due to the ice.

The hopping ice flowers will Poison you if they touch you. However, if you Assimilate one of them, you'll get the Map ability, which allows you to access a map of the place for 8 BP. This is the only area where the Map ability will work. Destroying an ice flower does give a random drop of a poison cure.

The treasure box to the right of the stairs is a Memory Box.

You won't be able to go up the stairs yet, so you'll be stuck on the first floor for a while. Stay away from any slopes, as you won't be able to go up them, only down.

There are penguin enemies around here that walk back and forth. Some of them will dive at you like, well, penguins, but others will shoot lasers at you. If you behead them, they will start shooting lasers from where their heads used to be.

In the room where the penguins push the ice cubes into the pit, jump onto the ice blocks and jump to the other side before they fall into the pit. Climb up the boxes and rescue Chef Julienne. Visit him at the castle and you'll be able to get rice balls at the grocery store in the village.

The gray guys that hop around with their eyes raised up will leap at you if you're too close. Assimilating them gives you D-Kick, which allows you to perform a drop kick for 4 BP.

Near where you found Chef Julienne is another door. Enter the area and kill off all the penguins. This will cause a chest to spawn. Open it to get the RedEye. Use it to open the locked door at the far left side of the entry room.

Wednesday, November 12, 2025

PrinceWatercress plays Legacy of Kain: Soul Reaver - Part 23 of 28


In this entry, we defeat our fourth and final brother Dumah.


In the room that we start in, there is a valve and a lever. Turn the valve first, then pull the lever. You'll blow a hole in the wall behind you. 

1:44 - Going through that wall and following the path leads to more block pushing. You'll need to stack the blocks up, then push them so that you can access a different room. When you see the lantern on the ceiling of the archway of that path, you'll know you're going in the right direction. 

3:42 - You'll need to shift between the realms in the next section in order to get to the lever. Shift to the physical realm, get to the lever, go to the other side of the lever to shift back to the material realm, then high jump and glide back to the lever so you can pull it. This lowers a drawbridge.

5:54 - At the other end, drag the box out of the wall, then use it to get to the area above. Shift between the realms to glide from one column to the next, then glide to the spire in the . There is a spot where you can press Square to topple the spire and open up a door. Behind the door is...

8:11 - ...Dumah. If you go to the spiritual realm, you can get some easy-to-miss dialogue out of him. You'll then need to run away and phase back to the material realm so you don't get attacked.

9:30 - Remove the pikes stuck in Dumah's body and lay them down. When the third is removed, Dumah comes back to life in the material realm. 

After the dialogue, you'll need to run away from him, and you'll need to run back to the room with the crank and the lever from the start of this video. Also, keep the camera so that it is looking behind Raziel every so often, as you want him to keep chasing you the entire time. It makes it easier to tell when he stops to punch the floor, which causes an earthquake that will stun you unless you somehow jump ahead of time. Dumah does grunt before he performs this attack, but it can be hard to hear. If he catches up to you, he will stop you with a band of constricting energy and drain your health unless you get far enough away from him.

If you take a wrong turn or get too far away from Dumah, the frantic music will stop playing, and you'll have to head back to the throne room and do the whole chase over again. 

Once you get him in the room with the valve and the lever, get to the valve and turn it, then get to the lever and pull it. When Dumah enters this room, he will stop chasing you and will stand in the center platform, waiting to be immolated and destroyed. Beating Dumah and absorbing gives you the ability of Constriction, which will allow you to rotate certain spires by running around them. 

Thursday, February 20, 2025

PrinceWatercress plays Wario Land II - Part 23 of 51


The level objective is easy, but if you take your time and explore this level, you can get a ton of coins.


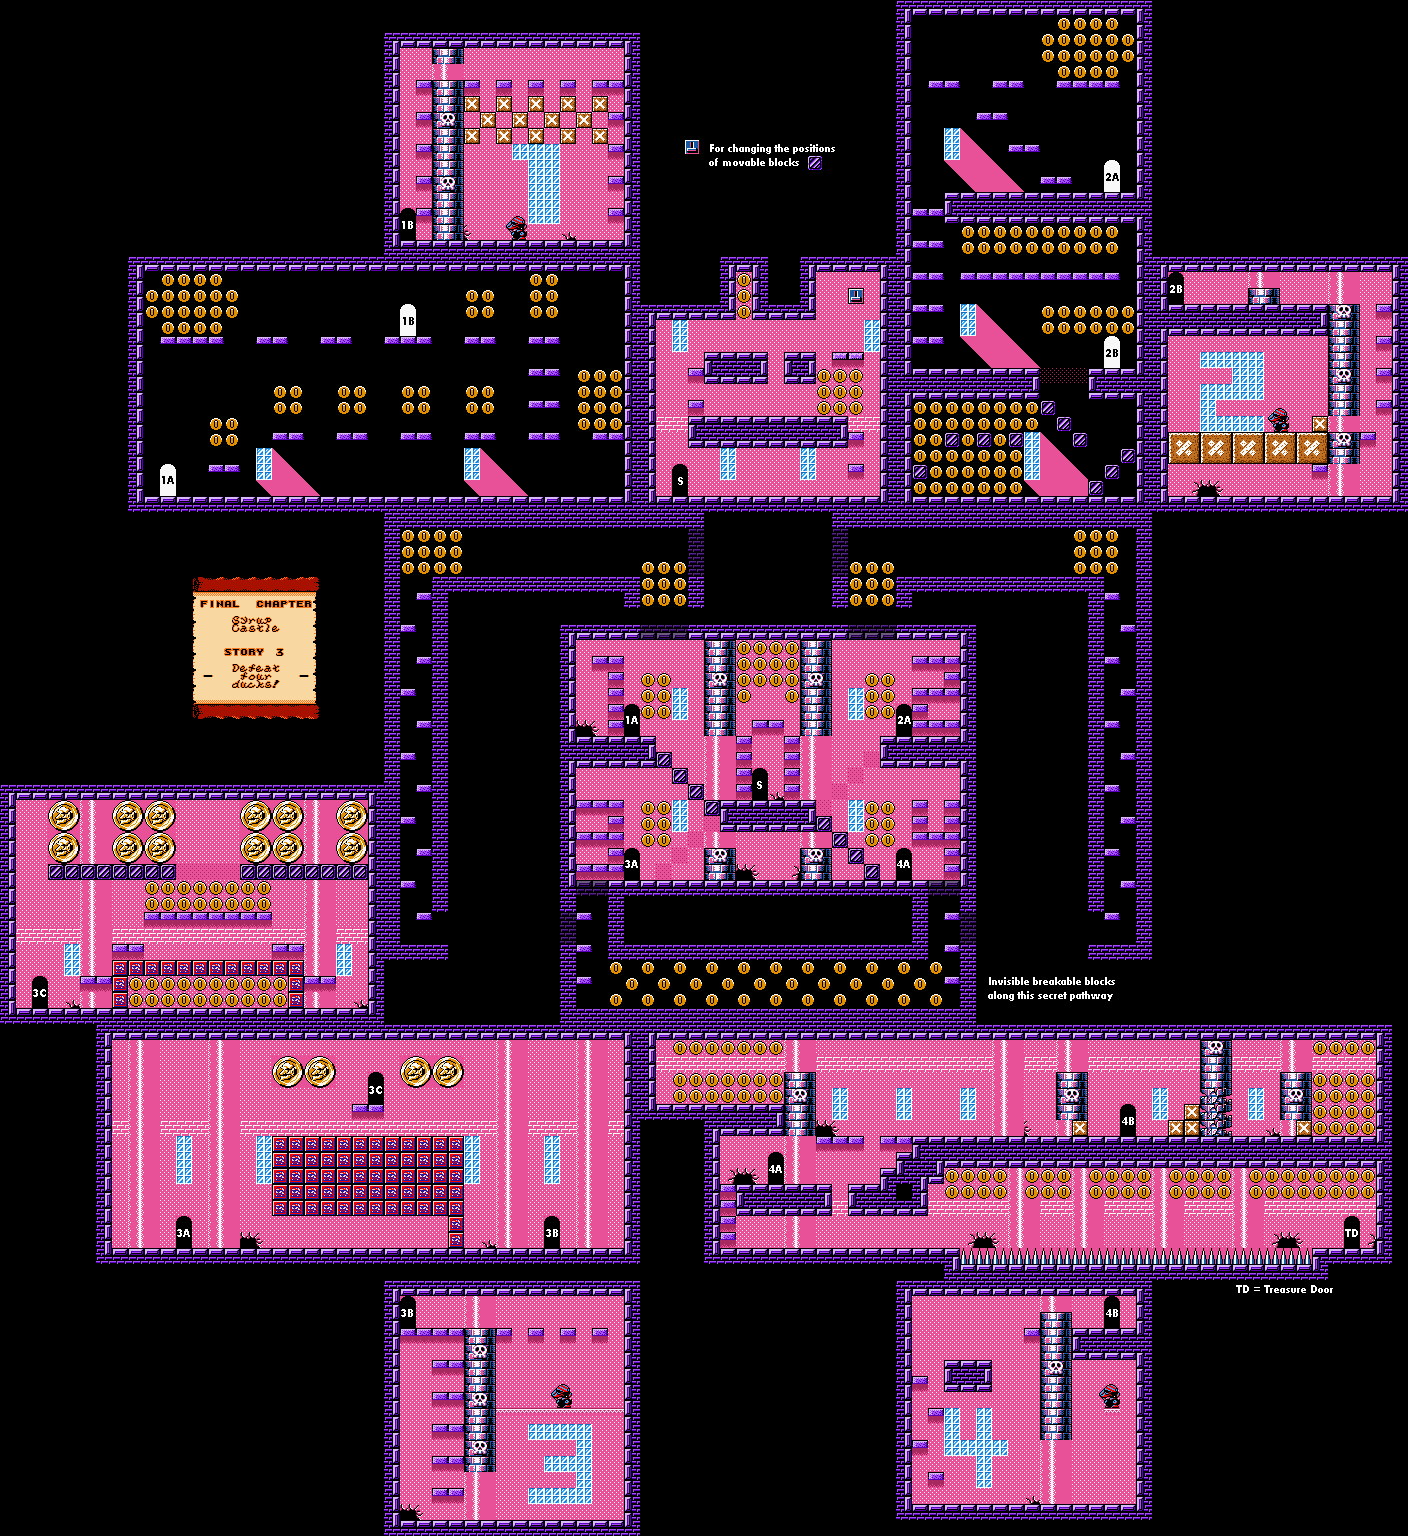
Final Chapter: Syrup Castle

Story 3: Defeat Four Ducks!


In the main hallway, be ready to butt stomp floors and tackle walls to find some free coins. You'll be able to find a lot before you enter any of the four individually numbered rooms. The door in the center contains a switch that will let you switch from accessing Rooms 1 and 4 and accessing Rooms 2 and 3. Just watch out for those bird enemies.

The first room is full of ghosts who will turn you into Zombie Wario and send you all the way back to the bottom. You'll need to avoid them to reach the first duck and defeat it like you would any normal enemy to get credit for part of your mission objective. The same is true for Mission 2, but you'll need to be Zombie Wario to reach the second duck as well as the treasure trove of coins at the bottom.

For Room 3, you'll need to use the block in the room to get through to the duck on the other side. If you can make a path to the top of the room, you'll be able to get a ton of coins. There are coins above where the two Spear Goons are, but you'll need to have the switch in its default position to get to them. The Spear Goons in the Spear Goon room will be gone permanently if you defeat them (unless you start the level over again).

For Room 4, you'll need to leap on the rats to get past all the spikes. To make your way to the right, you'll need to keep leaping off the left side of the rats; to go left, you'll need to keep leaping off the right side. You'll need to do this to get to the treasure room, where you can win a crystal ball, as well as to get the rest of the coins before the fourth and final duck, which you'll need to bring down with the block in order to defeat it. Once the four ducks are defeated, you'll head on to the next level.

Sunday, December 1, 2024

PrinceWatercress plays Great Greed - Part 23 of 28


The end of the game is almost in sight. In this entry, we head to the royal castle and save the king and queen.


Now that we're a bit stronger, let's head east of Burger to Greene Castle.


When you enter the castle, you'll be met by Microwave, who will tell you to look for King and Queen Greene, who should be somewhere in the castle.

The Joker is weak against Flame magic. It can cast Speed to be a little faster, but it won't do much good given how much more powerful we are now. It gives 1048 Experience and 60 Gold, and it can potentially drop a Med 3-10 scroll. At this rate, be ready to get far more gold than experience. Hope you've been farming outside of every town!

Spike is a pretty vanilla enemy. It gives 400 Experience and 96 Gold.

Headcook is strong against Bolt magic and can cast Bolt 4. It gives 391 Experience and 74 Gold.

Be careful which chests you open in the castle, as a good amount of them contain Trash. Some of them contain useless weapons that do no damages, useless armor that barely protects you or useless items which have no use at all, but at least you can sell those. Some of them are worth quite a bit of money.

Huntress can cast Thunder 2 and Confuse. It gives 395 Experience and 77 Gold, and has a chance of dropping a Regain 2.

Dicey is much like Chopper in that it has no MP. It is weak against Bolt Magic and gives 440 Experience and 93 Gold. Once again, another vanilla enemy, but at least this one has an elemental weakness.

The debris on the floor, assuming there is any on the floor of the current room you are in, cannot be walked through.

Dracette is weak against Freeze Magic and can cast Poison 2. It gives 474 Experience and 113 Gold, and has a chance of dropping an Epee, which is completely useless compared to whatever weapon you have now.

Once you make it to the throne room, head upstairs and you'll find out that the King and Queen are being held hostage. You'll soon face the Megagrem. Megagrem has 2000 HP, but all he can really do is attack and cast Shove. Cast Power and slash away, and heal yourself if you go below 200 HP. He gives 5000 Experience and only 10 Gold upon defeat. 

Afterwards, Megagrem will try to blow up the castle, but Microwave blows him away and stops him from doing it. Use the pot to heal your HP and MP. The King will thank you and ask you to catch Bio-Haz on your own. The Queen will tell you that Cup Cake and Truffle have penetrated into Bio-Haz's town to the south, and that you'll need the Royal Family's treasure to get there. Open the chests to get the Knights Sword, Knights Helmet, Knights Armor and Knight's Shield, which are the third best of everything in the game. Equip them all, as you'll need them to get past the flower garden coming up. If you have any of the Platinum armors and weapon, save those for afterwards.

With this, you can now leave the castle. With the Megagrem defeated, there will be no more enemies roaming the castle, so you can open any chests that you missed. After leaving the castle, you can head back to Burger and sell off all the useless stuff.

Saturday, September 21, 2024

PrinceWatercress plays Chrono Trigger (Super NES) - Part 23 of 70


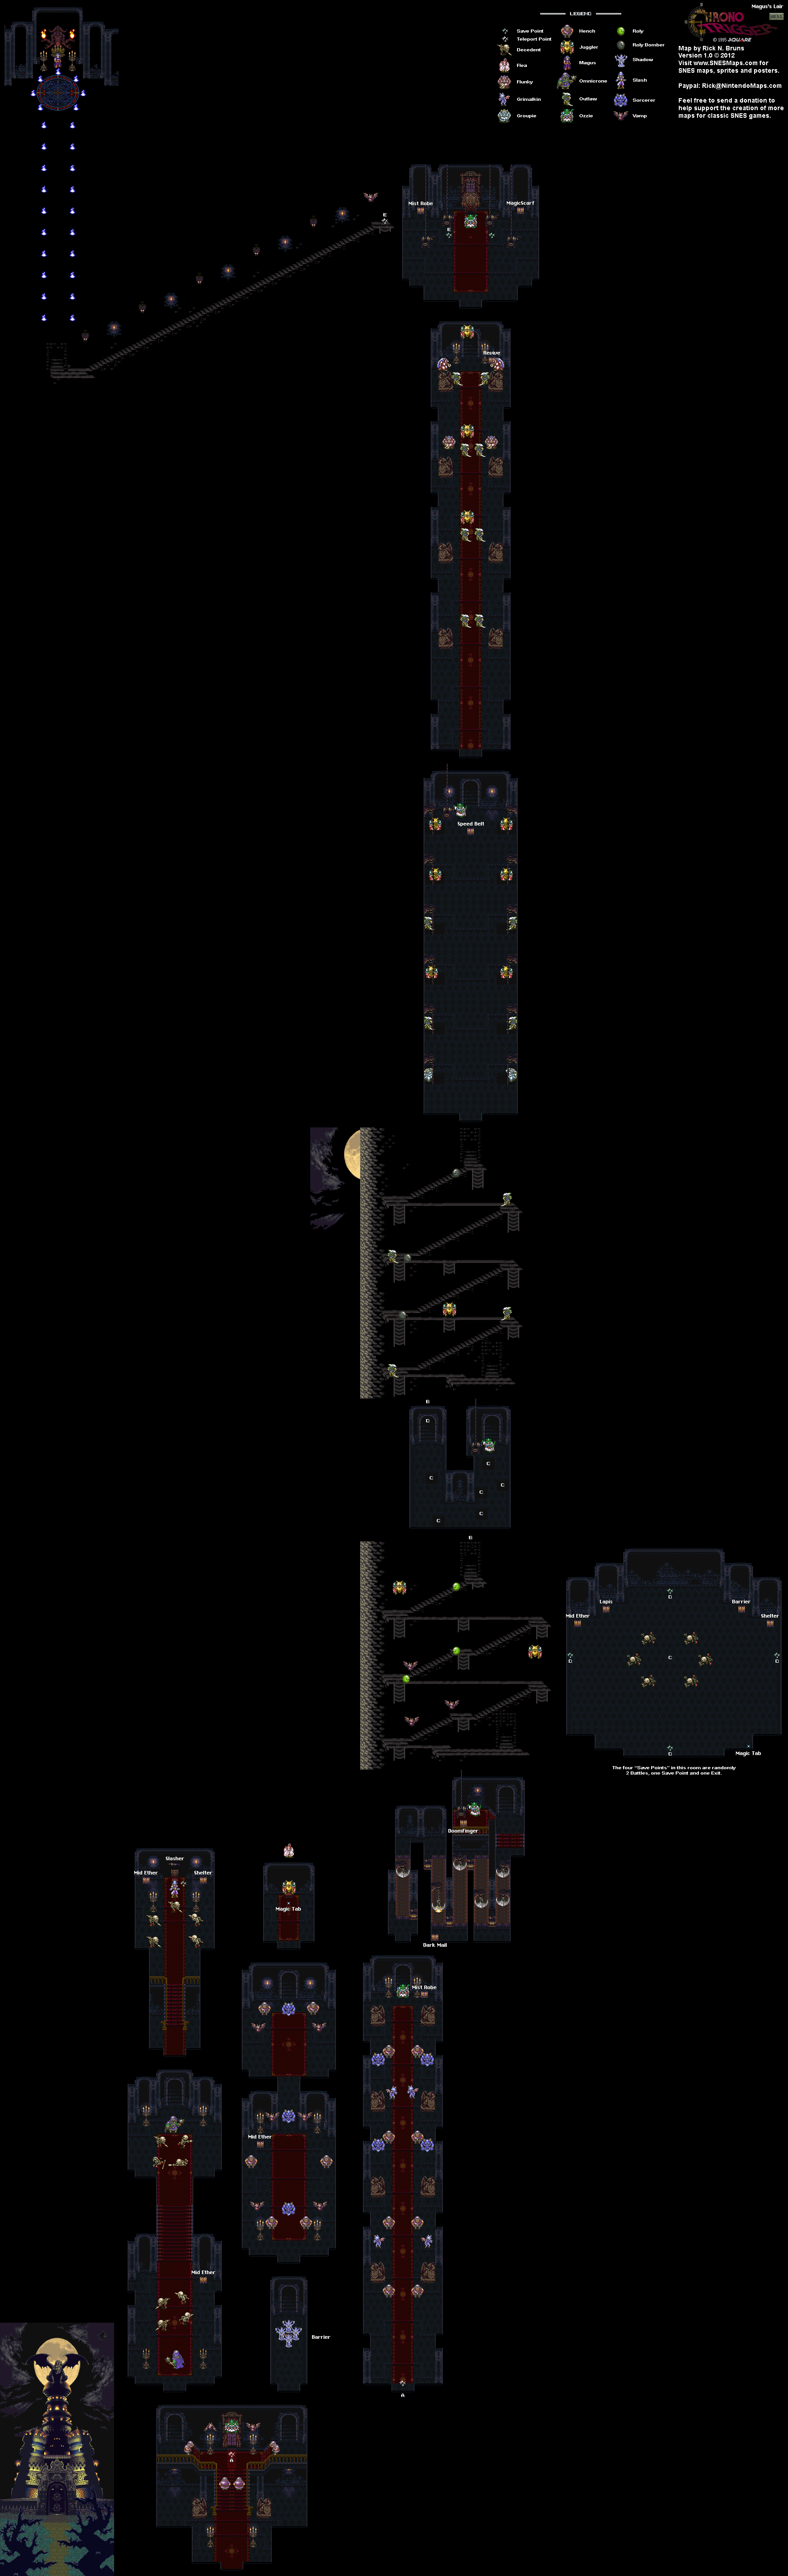
If we want to get further into Magus' Lair, we'll need to beat some of Magus' lieutenants.


In the left wing, you'll face Omnicrones and Decedents, which you've faced before. Interestingly, magic does not work on the Omnicrones, though it can wipe the Decedents out.

When you get to the end of the left wing, you'll fight some more Decedents before facing Slash. Slash has multiple single-target attacks that can do some good damage to your party, so you'll want to hit him hard with Double and - if you have any - Triple Techs.

When you defeat Slash, he will pull the sword off the wall and fight with it. With the sword, he is a bigger threat, as he can attack two party members with Slash and he can tear you apart for more damage than he could the first time, especially with the "Yes indeed!" attack.

When you beat Slash the second time, you'll beat him for good, and you can get the Slasher for Crono. You can also save your game and heal up at the save point.

In the right wing, you'll deal with Henches, Vamps and Sorcerers. Once again, only use Fire, for all other types of magic will heal the Sorcerers. At the end, you'll fight a monster that should supposedly be Flea, but isn't. It won't take long to tear it apart before the bat that has been following you around this whole time transforms into the real Flea, who actually is male despite appearing female both in the game and in official character art. Just like with Slash, you'll also need to fight Flea if you want to get to Magus.

Flea is the harder of the two flunkies you'll need to defeat before opening the lair up further. Flea's attacks include Waltz of the Wind, which inflicts Chaos on one party member; a kiss attack that can be counter-attacked; The Stare, which causes Crono to attack his fellow party members and deals damage to them as well as Crono; Rainbow Storm, which inflicts Poison on the Party; and Prism Beam, which inflicts Blind on the party. Be ready to use Heals and keep your party's health high, and hit Flea with the most powerful attacks you have. After you beat Flea, you'll be able to pick up a Magic Tab.

Once you beat Slash and Flea, you'll see the save point in the entry room again. If you touch it, you'll teleport further into Magus' Lair...

Saturday, June 15, 2024

PrinceWatercress plays Ratchet and Clank: Going Commando - Part 23 of 54


It's time to go back to advancing the story, so in this entry, we're heading to Joba.

First | Previous | Next | End

2:23 - Shooting twelve of these birds nets you a Skill Point. Also, there are quite a few lights and boxes you can destroy at the start for bolts.

4:38 - Two new weapons! The Plasma Coil lets you fry enemies with electricity, and the Spider-Bot Glove lets you shoot out a mechanical spider that you can control for thirty seconds and blow up near enemies.

7:02 - The Swingshot allows you to head to the hoverbike race in Joba. We'll do these later.

10:12 - You'll need to use the Dynamo on the outside and long jump to get to the Nanotech Boost.

12:51 - The turret. Get on it so you can easily mow down the enemies around you. The left stick moves and Circle fires. The turret can also get rid of some of the doors around here, which you'll need to do to progress. Also, while you're on the turret, you're invincible, so fire away with reckless abandon!

15:40 - Well, that's one way to get a skill point.

17:55 - Use the Swingshot here to fight your way to a Platinum Bolt.

20:08 - Use the Dynamo here for some Super Mario Bros.-style platforming.

25:20 - It's the guy with the RYNO from the first game? You'll need to give him 20,000 bolts for the Levitator, which allows you to levitate off Levitator Pads. Hold X to fly upwards. There is a gauge to the right, and when it runs out, you'll be falling to the abyss below.

Before heading to the next area, which leads to the Joba battle arena, go up the tower to the left for a Platinum Bolt.

28:59 - As soon as you enter the battle arena, you'll be fighting some enemies immediately. Some enemies will be familiar, but there will be some new ones as well as enemies from this planet showing up as well. Winning here will net you the Gravity Boots, which allows you to walk on magnetic surfaces.

34:00 - The Cage Match with the Infiltrator. Jump in the area with the blue lights to fight on the wall so the lava doesn't envelop you. From here, you can fight enemies on the wall. Watch out for the rocks rising up from the lava. If possible, allow them to smash the enemies for you. Winning here nets you the Infiltrator. It's much like the Trespasser from the first game, but unlike the first game, the Infiltrator puzzles are a little different.

37:07 - Here, you'll need to use the left analog stick to move along the paths and go to six points on the circuit. You only have a very short amount of time to complete the circuit and get through. For this one, you'll want to go left, down-right, down, up-right, right, up-right. From here, you can return to the start of Joba.

Skill Points:

Bye Bye Birdies: Shoot down twelve of the white birds flying around on Joba.

Controls:

As Ratchet:

Control Pad/Left Analog Stick: move
Right analog stick: move camera

X:
  • Jump and double jump (hold button after double jump to use Heli-Pack or Thruster Pack)
  • Wall jump (near certain walls)
Square: strike with wrench
Circle: pull out/shoot currently equipped gun
Triangle: 
  • quick select (hold and use in conjunction with Control Pad or left stick to switch guns; menu can be customized in Quick Select on the pause menu
  • double tap to switch between two most recently equipped weapons/items
  • interrupt on-screen messages

Select: open map
Start: Pause menu
  • Control Pad: select option
  • X: confirm option choice

L1:
  • center camera behind Ratchet (tap button to center)
  • first-person view (hold button and use left stick or D-Pad to look around; let go of L1 to move camera back behind Ratchet)
  • Square: wrench boomerang
  • Circle: fire gun
  • R1/R2: zoom in and out (Pulse Rifle only)
L2/R2: strafe (hold while moving)
L3: see health and Bolt totals
R1/R2: crouch (hold down)
  • Square: wrench boomerang
  • X: high jump
    • long jump (hold crouch button and jump while running to perform)
R3: open map

In water:
  • Square: dive and descend
  • X: surface and ascend
  • R1: accelerate with Hydro-Pack

As Clank:

Control Pad/Left Analog Stick: move
Right analog stick: move camera

When hanging off platforms:
  • Control Pad/Left Analog Stick: move
  • Forward+X: vault up
  • Back+X: drop down

Square: punch
X: Jump (press and hold in the middle of a jump to glide with Heli-Pack)
Triangle: command menu (hold and use in conjunction with Control Pad or left analog stick to choose commands)

Monday, May 20, 2024

DeceasedCrab plays Earthbound - Part 23 of 53


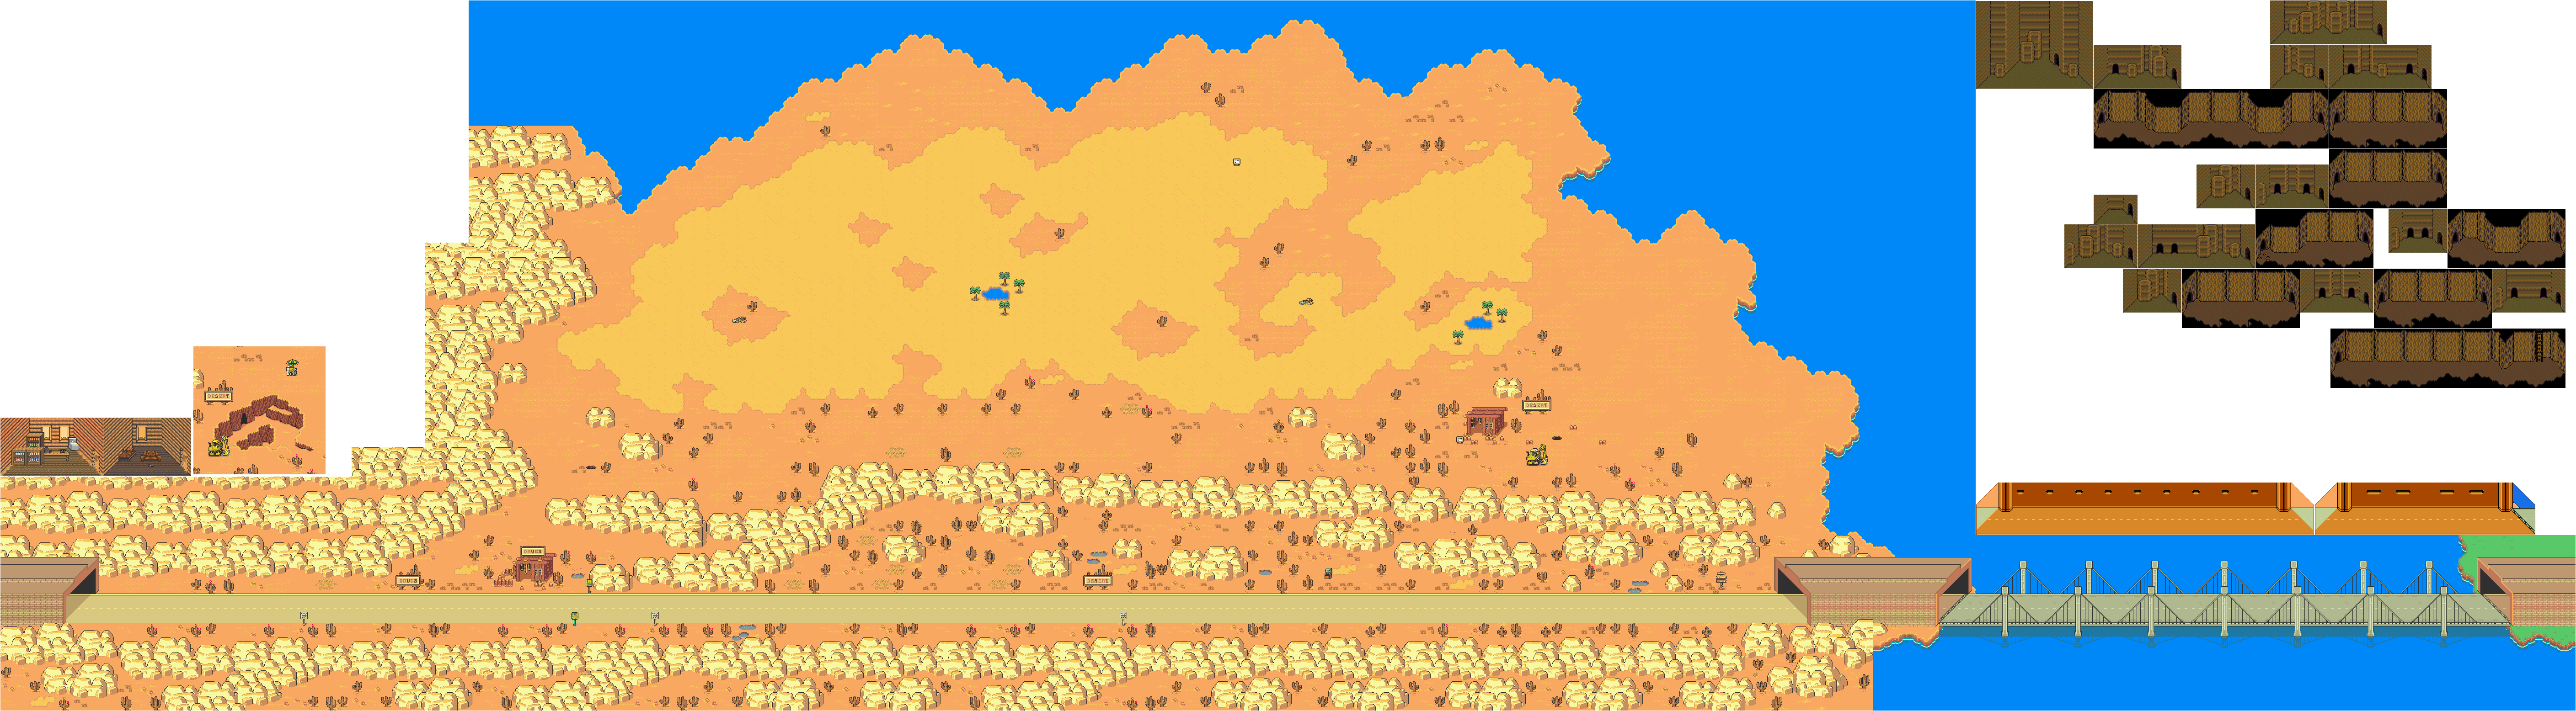
We go further into the desert maze and fight off the Guardian Diggers in order to help out The Runaway Five once again.


Paula will learn at Freeze Theta at Level 31. This will allow you to freeze multiple targets.

The Teddy Bear is nice, but at this point in the game, don't be surprised if it gets torn up sooner than you think.

You'll find Exit Mice in the center of the maze; be sure to get an Exit Mouse if you can. From there, there will be three Guardian Diggers to face: one to the west, one to the north and one to the south. You'll have to find ladders to other areas to find the other two.

Ness will learn Shield Beta at Level 34.


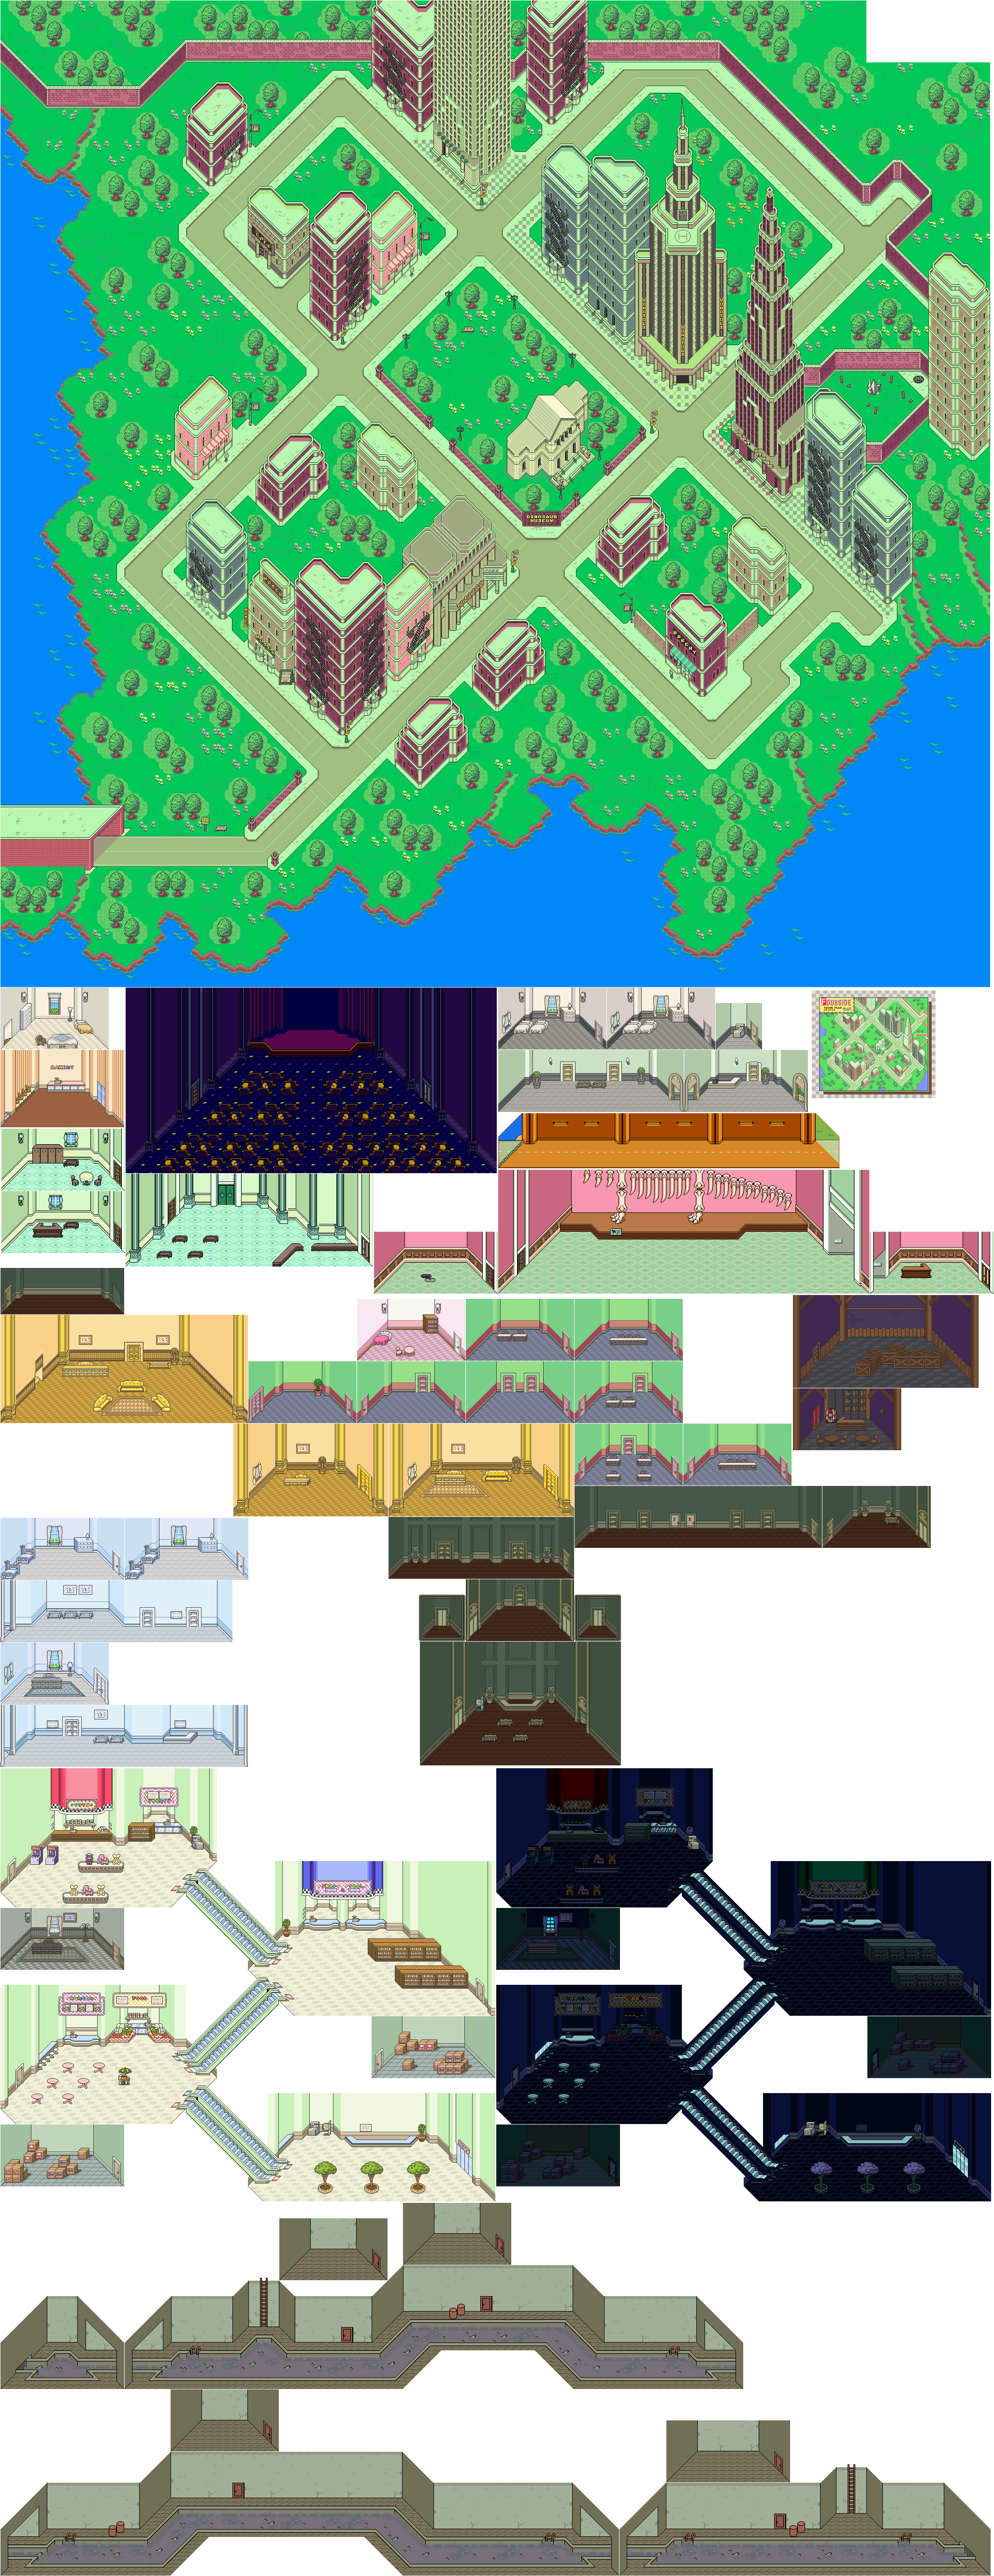
When you beat all five Guardian Diggers, the desert music will play again, and all of the monsters will disappear. When you get out, you'll be met by the photographer on the way back up. Head back up and talk to the guy near the excavator, and he will tell you he will be able to start digging. From here, head back to the nearby shack, heal up and save and head back to Fourside. On the way there, you'll be met by George, who will tell you that his brother Gerardo is in the mine you just came out of and will hand you a diamond that Gerardo found. 

Monday, May 13, 2024

PrinceWatercress plays Drill Dozer - Part 23 of 28


Now that we have the main game as well as the secret areas completed, it's time to mop up what's left and finish this game once and for all.


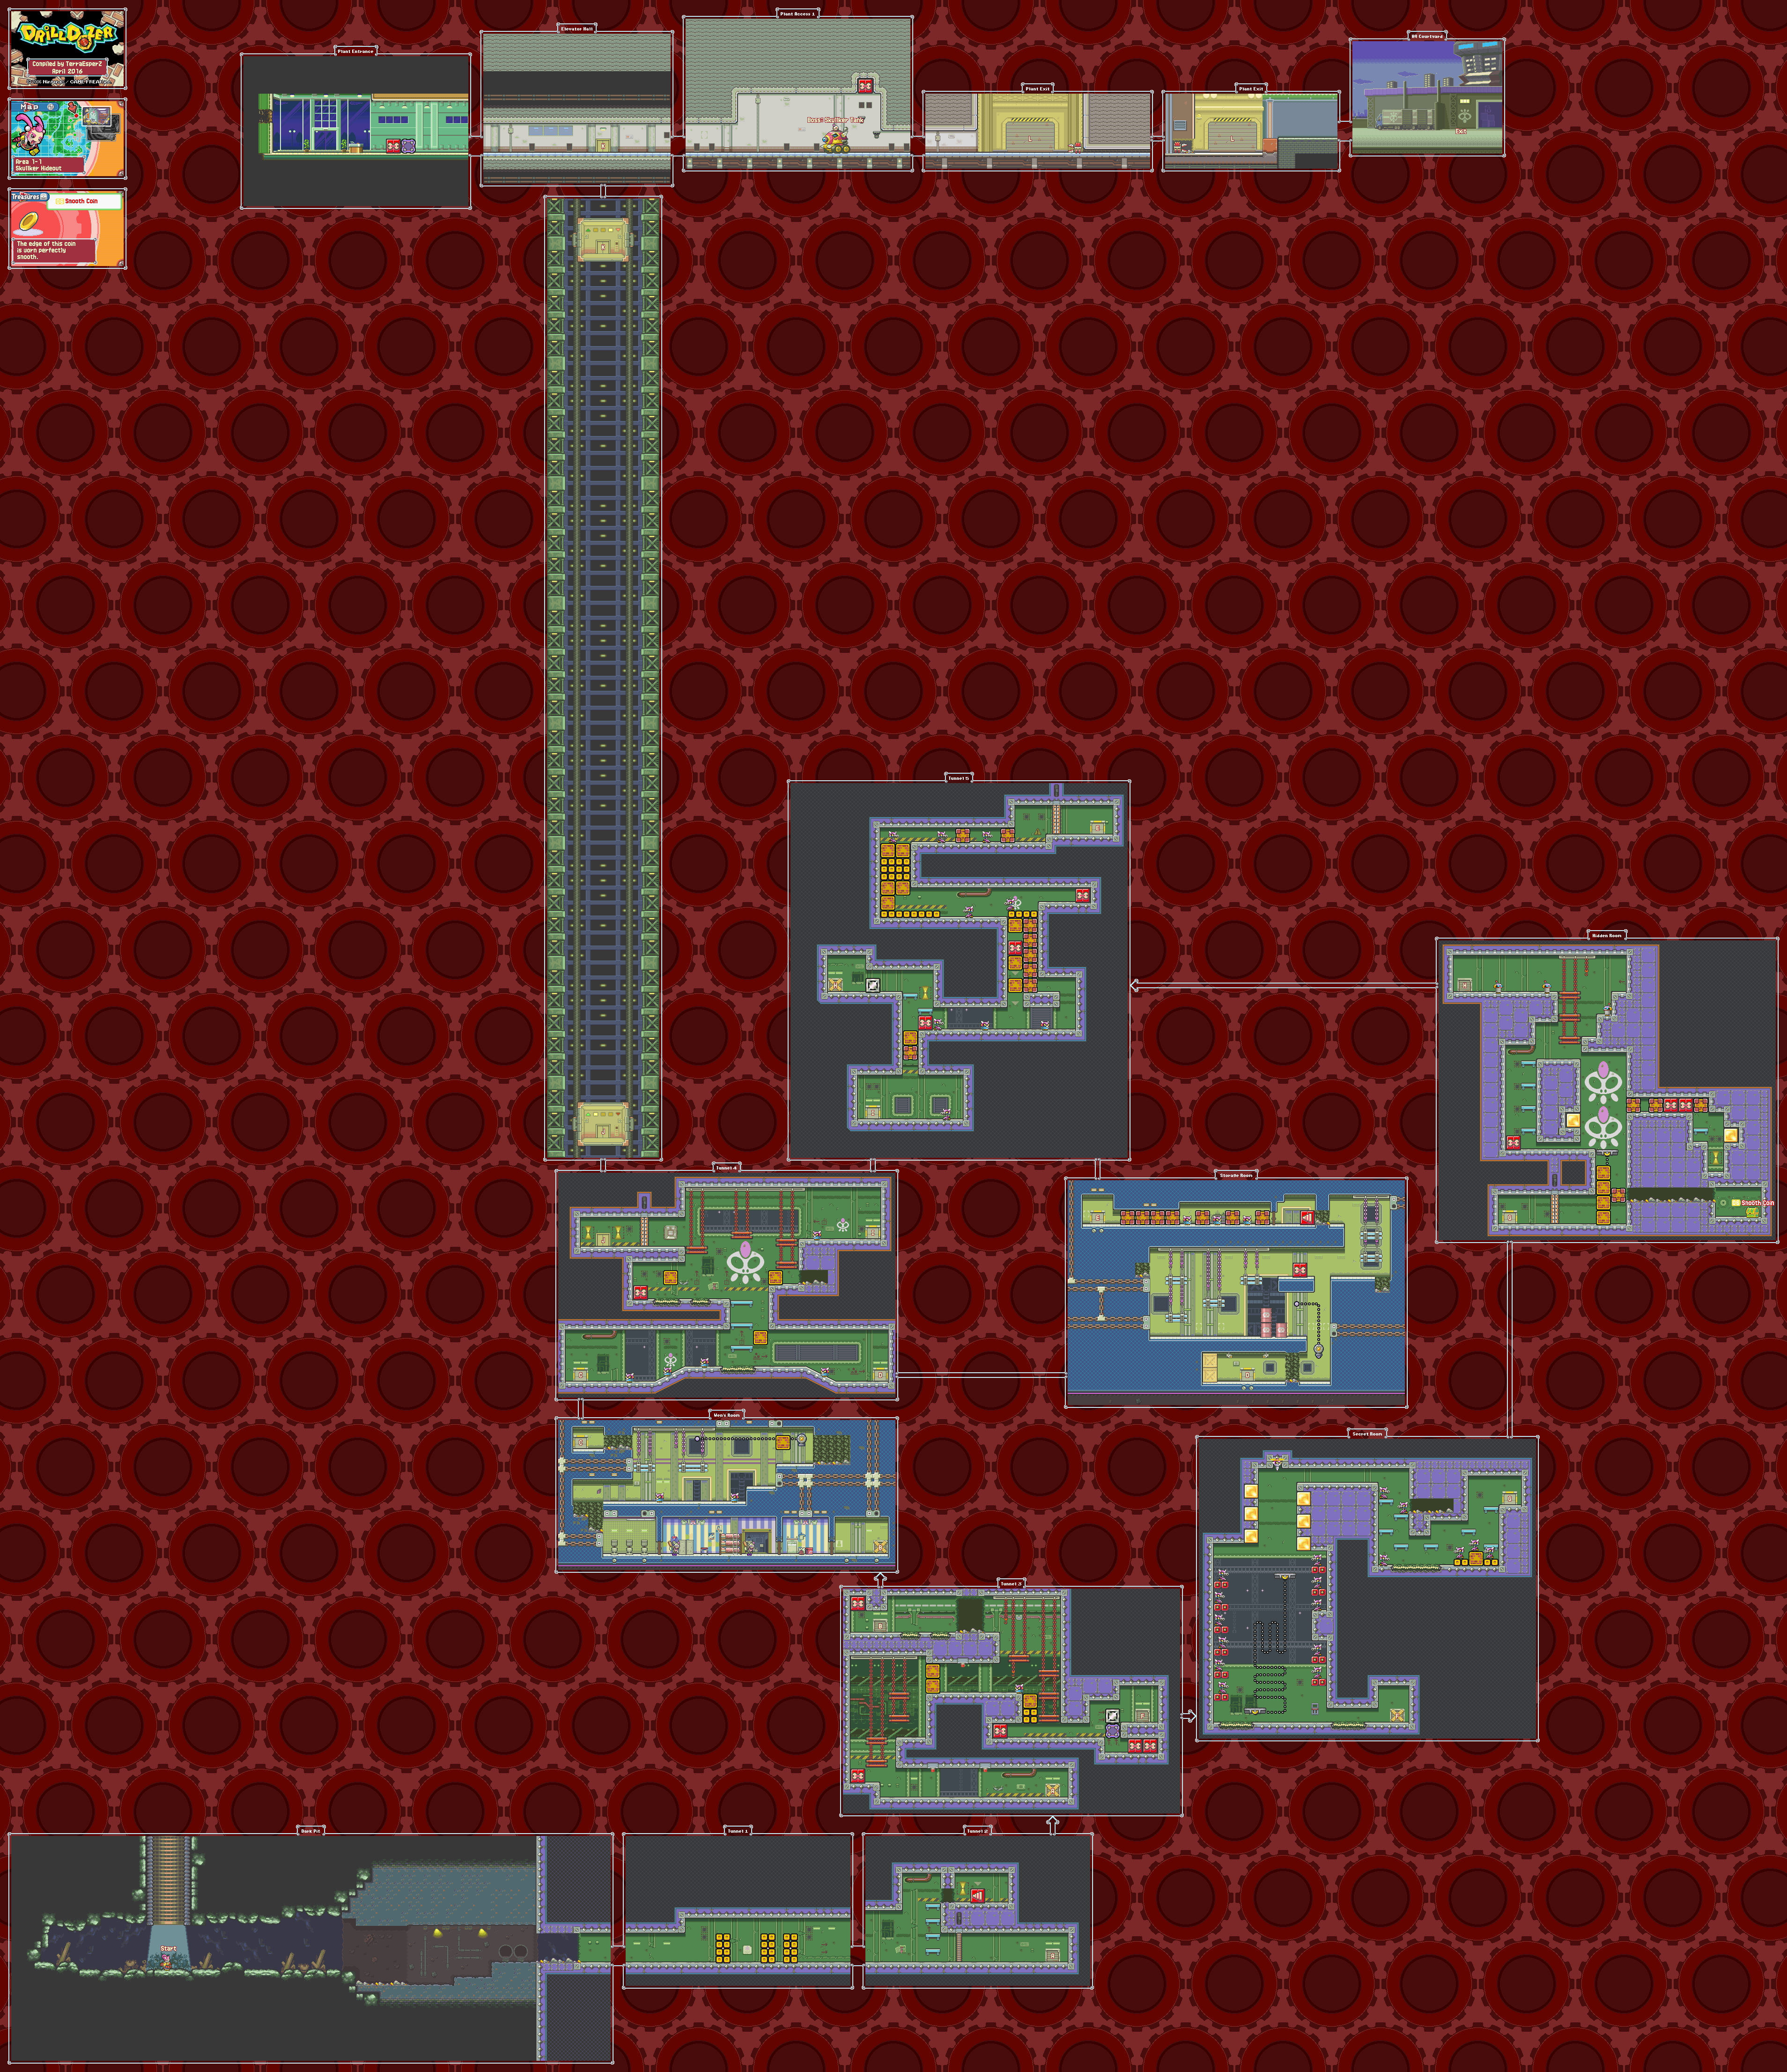
Now that we're done with the main game as well as all of the secret areas, we're now going back to the main levels to pick up the treasures that we missed. Compared to the main game and the secret levels, this was perhaps the easiest part of the Let's Play by far.

Area 1-1: Skullker Hideout


3:17 - Now that we can break through the metal boxes, we can access this path. Break through the broken wall to get third gear, then enter the door you see afterwards and break the wall behind the sole brick block with the padded corners. You'll find the Smooth Coin on the other side.

Also, you can exit a level through the pause menu and still get credit for the treasure.

Area 1-2: Skullker Factory


9:31 - Hey, remember this route? Now that you can break metal blocks, you can take it all the way to the end! You'll find the Soundstone past the metal block.

Wednesday, March 20, 2024

PrinceWatercress plays Ka-Blooey - Part 23 of 25


Things are getting a little more interesting as we near the end of the game...


Level 116

Go left, left, up and detonate the small bomb. Detonate the small bomb to the left, then go left. Hit the switch, then detonate the nearby small bomb on the rivet tile. Hit the switch after the cracked tile twice, then enter the teleporter. Detonate the small bomb and go down. Go to the nearby switch on the left while killing the enemy. Hit the switch on the left end, go clockwise to the south end, detonate the swell bomb when it is small and move left. Hit the switch and place the large bomb on the slot tiles on the northern-most slot tile. Hit the nearby switch, detonate the small bomb on the slot tiles and move down. Go west across the cracked tile to the small bomb near the medium bomb, then detonate the small bomb and move either down or right. Hit the nearby switch, detonate the small bomb in the lower left corner. Detonate the separated small bombs. Detonate the remaining small bomb and move left.

Level 117

Go to the slot tiles in the upper left corner. Move the small bombs on the slot tiles away from the small bomb on the rivet tile. Detonate the small bomb on the river tile, then move up. Hit the switch. Move a small bomb on th slot tiles to the lower right small tile of the "square," then go to the lower right area. Move the medium bombs on the slit tile away from the small bomb on the rivet tile. Detonate the small bomb on the rivet tile, then move down. Hit the switch. Move the small bomb from earlier to the right-most tile in the lower right corner, then place a medium bomb near the lone bomb in the upper left corner and place the nearby small bomb on the tile south of it. From there, place the small bomb from earlier next to the other medium bomb in the lower right corner (if you haven't already). Detonate the small bomb in the lower right corner, then hit the switch in the lower left corner. Hit the new switch in the upper right corner. Detonate the small bomb in the upper left corner, then move left or right.

Level 118

Move the medium bomb on the slot tiles near the start to the upper right-most slot tile, put the small bomb left of it, and hit the nearby switch. Detonate the small bomb. Hit the switch to the right. Enter the nearby teleporter. Detonate the small bomb near the large mine. Hit the switches on the other end. Hit the new switch near the new teleporter, then enter the new teleporter. Make a path for the red guy to the teleporter, then hit the switch in the upper right corner of that area. Take the red guy into the newly-spawned meddle medium bomb. Enter the teleporter on "Large Bomb Island." Head to the "new" teleporter and hit the switch, then enter the "new" teleporter. Take the large aerial bomb (or any bomb on Large Bomb Island) and place it near the teleporter, detonate it and enter the teleporter. Detonate the small bomb and move right.

Level 119

Enter the teleporter. Detonate the small bomb. Hit the switch in the upper right corner. Make a small-medium-medium-large bomb line from the upper right tile to the teleporter. Enter the slot tile teleporter. Hit the "lower left switch," place the large bomb in the lower right slot tile, leave a one-tile gap to the left, place two medium bombs to the left of the gap, leave another one-tile gap to the left, place a medium bomb to the left of that gap, leave another gap in the corner slot tile, then a medium bomb and a large bomb to the north of that gap. Enter the teleporter. Detonate the medium bomb in the lower right corner and enter the nearby teleporter.

Level 120

Head to the slot tiles. Place the large bomb at the top tile, the small bomb in the center, and the medium bomb on the title south of the small bomb. Hit the switch, detonate the small bomb and enter the teleporter. Head to the lower left corner, hit the switch, move the small bomb to the medium bomb on the upper left tile and detonate. Hit the switch twice, move the small bomb to the lower left slot tile, detonate and move down. Hit all the switches in the lower right corner, detonate the newly-spawned small aerial bomb and go right. Hit the upper right switch in the lower right corner twice, move up to the small bomb, detonate the small bomb and move down. Go back, hit the switch, then hit the switch in the upper left corner. Detonate the small bomb when the swell bomb is at medium, then move left.

Friday, October 27, 2023

Jerry Martin plays Strong Bad's Cool Game For Attractive People - Part 23 of 53


It's time for Episode Three. At this point, the episodes start getting more interesting.


Episode 3: Baddest of the Bands

At the start of Episode 3, Strong Bad plays Limozeen's Hot Babelian Odyssey on the Fun Machine. We finally have our Limozeen reference. Up and Down let you move, while Right fires and left shoots bombs. The CTRL key shoots out a tractor beam. As you play, however, the game will glitch up, and the Fun Machine will malfunction before bats fly into the room. Afterwards, Strong Bad realizes the Fun Machine is broken and that he will have to take it to Bubs to get it repaired. From here, you have control.

Get the Black Metal Detector before you do anything else. This time around, it comes with its own shovel detachment, allowing you to immediately dig up anything that you find at the start of the game.

You'll also have a microphone in your inventory, and you can use it in various places to get various things done. If you head to the basement and use the microphone there, a box will magically appear and you'll get the Sloshy Shirt for the photo booth as soon as you examine it.

If you examine the couch in the TV room to the east, you'll find the leopard print pants for the photo booth.

Back on the main floor, check the couch near the window, also known as the Luxo-Lounger. You'll find the Larry Palaroncini shot glass, the first of four Limozeen shot glasses in the episode.

Further to the right is the kitchen. If you examine it, Strong Bad will shock himself. (This is for a new achievement called "Strong Bad Abuse," and you'll need to do this to get credit for it.)

Further to the right still is the front door and the mailbox. If you go to the mailbox and use the microphone there, another box will pop up containing the Perry Palaroncini shot glass.

Back in Strong Bad's house, check the fridge and click on the aerosol cheese. Take it. You'll need this for later.

Upstairs and to the right is Strong Bad's computer room. Take the lighter; you'll need it later. Also, examine the plug. When you unplug it, Strong Bad will shock himself again. You can also examine the Ordinary Light Switch to turn the lights on and off to get the cover for the Limozeen's Hot Babelian Odyssey game.

Left of the computer room is Strong Sad. Talk to him about bats once, and he will mention "the Von Blaudbloods," a rich lineage of fruit bats that Strong Sad is raising from his bat hutch. If you talk about the bats again, you'll find out that the hutch is indoors because the bats love the delicate mixture of dank and damp in his room. 

Further to the left of Strong Sad's room is the bathroom and Strong Mad's room. On the dresser is an album cover defaced by Strong Bad with a woman carrying a sword and a giant dinosaur. 

Go to the map. Place Bubs' Concession Stand on the map wherever you want, then head there.

If you click on the contest entry form on the concession stand, Strong Bad will take it and read it. It seems that Limozeen need a new album cover and that they are holding a sweepstakes to see who can send a cool enough photo. Whoever gets their photo chosen gets to spend a whole day with the band, much to the delight of Strong Bad.

If you use the Black Metal Detector on the right side of Bubs' Concession Stand, you'll find the Two-o-Duo page of the Limozeen game manual. 

OUTFITS:
NEW! Sloshy Shirt: Use mic in downstairs laundry room.
NEW! Leopard Print Pants: Examine couch in downstairs TV room.

STRONG BAD ABUSE:
NEW! Examine the microwave in the kitchen.
NEW! Examine the Lappy Plug in Strong Bad's computer room.

LIMOZEEN SHOT GLASSES:
NEW! Larry Shot Glass: Examine Luxa-Lounger.
NEW! Perry Shot Glass: Use mic near Strong Bad's mailbox.

LIMOZEEN MANUAL PAGES:
NEW! Cover: Use the Ordinary Light Switch in Strong Bad's computer room.

RARE BAND POSTERS:
NEW! Two-o-Duo: Use the Black Metal Detector on the right side of Bubs' Concession Stand.

EXPRESSION OF AFFECTION:
NEW! Talk to Strong Sad about bats twice.

Sunday, June 18, 2023

PrinceWatercress plays Bugs Bunny & Taz: Timebusters - Part 23 of 23


It's now time to beat the Count, get the Time Gem and ultimately save the day!


0:45 - The first crate.

1:04 - Stay away from the suits of armor as you walk under the  chandeliers to get them to come down. One of them leads to a switch Taz has to spin on to open up access to the gold gear on the other end. Behind the gold gear is a switch. Kick it to get into the rest of the castle.

2:37 - A vampire with a giant feather.

From here, get Taz on top of the pot, then kick the vampire and grab the feather that the vampire character dropped and tickle the three dragons quickly. Switch to Taz, then get on the platform when the pot lid rises up to grab a gold gear, jump on a button to bring down a bubble gum machine, and hit two switches to remove the locks on the door leading further into the castle.

4:26 - The bubble gum machine allows you to enter the cubby holes above for some gears as well as the second crate.

6:32 - The third crate is to the left of the stairs. 

7:18 - Here is a pattern that you'll need to remember sooner rather than later. The skull candles have a different colored base, and if you light them in the right order, you'll open something up.

8:06 - The final out-of-time character.

9:06 - The fourth crate. Apparently it was here after all.

9:57 - Grabbing the torch and lighting the skulls. Watch out for the hands in the floor that smack you, and be ready to jump when you see them so the torch doesn't get smacked away from you. Lighting the skull candles in the proper order opens up the final area.

14:15 - Getting the crystal gear in the Ghost Town. We need to grab this before we complete the game.

16:07 - The fifth crate. Apparently it was here after all.

16:55 - Meeting the Count.

18:06 - To beat the Count, you'll need to jump on the tile that he pulls out of the ground. The Count will then fly through a window. Find the broken window and get Taz near it, then jump off Taz with Bugs to find a gargoyle. Teleport Taz to the gargoyle, then switch to Taz and push the gargoyle to the coffin.

The Count will return and break another window in the process. Keep on the move to avoid the swoop attack, then run to him when he lands and kick him. Get to the next broken window and move the gargoyle over to the coffin.

On the third phase, the Count will be on a chandelier. Wait for the shadow of the chandelier to appear where you are, then move away from it and kick the Count when he comes down. Go to the newly broken window and move the gargoyle to the coffin.

On the fourth phase, the Count will dive three more times. Kick him when he is on the ground, then get to the last gargoyle and push it to the coffin. You'll open up the coffin and find the Time Gem.

Daffy will go for the Time Gem, but Taz and Bugs teleport away with it before he can get to it. Taz and Bugs head back to Granwich, and everything is as it should be again. As for Daffy, the Count has his way with him, but he is teleported back to Granwich, albeit in a much smaller size. The entrances to the eras are now closed, and normalcy is restored! Congratulations!

Sunday, April 16, 2023

PrinceWatercress plays Sly Cooper: Thieves In Time - Part 23 of 48


In this entry, we not only find the last thirty Clue Bottles, but we also get five more Sly Masks.


You'll need to get the Thief Costume before going for the Clue Bottles, as you'll need the costume for a few of the bottles.

The safe is near the hideout, so finding it is incredibly easy. Inside is The Guru's Staff Piece, which reduces all damage taken by half.

If you have the Cane Push, you can hit an enemy, back up to avoid getting hit, move back forward, use the Cane Push again, back up, move forward, repeat, you can easily beat the flashlight guards here.

25:13 - There is a crawlspace here that leads to a hidden area known as the Lazy Trunk Spa and Lounge. If you go inside, you'll find Miss Decibel's hiding spot,  which is a spa and lounge. You can't get near here, though. You can get some treasures off the rats here, and you can also find a Sly Mask (see below).

1 | 2 | 3 | 4 | 5 | 6 | 7 | 8 | 9 | 10 | 11 | 12 | 13 | 14 | 15 | 16 | 17 | 18 | 19 | 20 | 21 | 22 | 23 | 24 | 25 | 26 | 27 | 28 | 29 | 30 | Safe

Achievements:

Airborne: Paraglide for at least ten seconds without using a geyser. The best way to do this one is to get to a high tower or the top of the tallest arch, then paraglide for as long as possible from there.

Check Please: Open the safe in Episode 5.

Collectibles:

Sly Mask #44 - You'll need to use the Archer Costume near the hideout to find a Sly Mask.

Sly Mask #45 - You'll need the Thief Costume to slow down time and climb up this crystal chain without it breaking in mid-climb. At the top is another Sly Mask.

Sly Mask #46 - You'll need to make a Paraglide from a tall tower to a building with a green roof to get this Sly Mask.

Sly Mask #47 - Jump on this giant cushion in the Lazy Trunk Spa and Lounge to get this Sly Mask.

Sly Mask #48 - You'll need to Paraglide underneath this bridge to find a Sly Mask.

Controls:

Left analog stick: move
Right analog stick: move camera
X: Jump and double jump (hold X on second jump for hover jets as Bentley)
Square: attack
Circle: 
  • interact (usually with anything that has sparkles) (Sly)
  • steal from enemies (from behind) (Sly, Bentley, any of Sly's ancestors)
Triangle:
  • knock enemies upwards (from behind; press Square to slam enemies down for stealth slam) (Sly, any of Sly's ancestors)
    • press Circle after knocking enemy upward to perform Silent Obliteration (Sly; replaces Stealth Slam; must buy on ThiefNet)
    • press Square for Stealth Slam (any of Sly's ancestors)
  • spin attack (hold to charge) (Sly)
  • throw bombs (Bentley)
  • Thunder Flop (in mid-air) (Murray)
  • spin attack (hold to perform) (Murray)
    • control with left stick (must buy on ThiefNet)
  • Raging Inferno Flop (in air; Murray; must be bought on ThiefNet)

L1: 
  • bomb aim (Bentley)
  • smoke bomb/flash bomb (Sly; must buy on ThiefNet)
  • aim/strafe mode (Carmelita; must hold button down)
    • left analog stick: move
    • R1: shoot (can only shoot in strafe mode)
L2:
  • hold for costume select menu (Sly)
    • hold down to stay in menu; use D-Pad or left stick to make selection
  • hold for weapon select menu (Bentley)
    • hold down to stay in menu; use D-Pad or left stick to make selection
  • hold for fist select menu (Murray)
    • hold down to stay in menu; use D-Pad or left stick to make selection
  • hold for shot select menu (Carmelita)
    • hold down to stay in menu; use D-Pad or left stick to make selection

L3: activate compass
R1: run (hold while moving to perform)
  • Paraglide (Sly; in air; must buy on ThiefNet)
    • Square: Paraglide Dive Attack (during Paraglide; must buy on ThiefNet)
  • Adrenaline Burst (Bentley; double tap to activate; must buy on ThiefNet)
  • Clothesline (Murray; double tap and steer with left stick; must buy on ThiefNet)
  • Cane Push (Sly; double tap; must buy on ThiefNet)
R2:
  • Trigger Bomb (Bentley; must have bomb on field to detonate manually; must buy on ThiefNet)
R3: Binocucom
  • Right analog stick: move
  • Left analog stick: zoom in and out
  • R1: take picture (when applicable) (Sly, Bentley)

Start: pause menu
Select: map
  • Left analog stick: zoom in and out, switch between map and status
  • Right analog stick: move map
  • Circle: back

Saturday, February 25, 2023

PrinceWatercress plays Blood Omen: Legacy of Kain - Part 23 of 41


Our journey takes us to Dark Eden...and the area it is in is most inhospitable.


1:20 - The scarecrows. The flame sword works best on them. The crows can hurt you, but they have a limited range.

2:36 - There are two secrets where these pick-ups are (see below).

4:32 - The Hearts of Darkness human sacrifice in action.

6:33 - By going north of the village of Uschtenheim, we'll run into some new territory as well as some dangerous new enemies. Some of them are red humanoids who shoot spikes out of their bodies and cause a lot of pain, while the big slug enemies will poison your blood and force you to use an antidote. Use Implode to get rid of the slug enemies. Repel will work wonders here. We also get to look at the Signet Ring.

10:01 - A blood fountain! Your magic energy recovers even faster once you feed from here!

12:05 - A volcanic cave. Do not touch the lava while grabbing things; it will hurt you.  Use Control Mind on the enemy in the corner so you can trigger a switch. Hitting that switch triggers a secret (see below) and make it easier to get one more secret.

16:22 - We have made it to Dark Eden. There is a gate to the west, but it only opens during a full moon. Head north for now.

19:12 - The land has become twisted, but now there is lava. Also, there are a few human enemies around here in case you need to get some health. There are houses around here, but you cannot enter any of them.

24:06 - Using Control Mind to hit that switch makes it easier to get around and head further north.

26:36 - We are finally at Dark Eden. You won't be able to enter the nearby cave yet, so just enter Dark Eden and head west to save your game.

Secrets

75 and 76. - There are two secrets where these pick-ups are.

77. - A volcanic cave. Do not touch the lava while grabbing things; it will hurt you.  Use Control Mind on the enemy in the corner so you can trigger a switch. Hitting that switch triggers a secret and make it easier to get one more secret.

Sunday, January 29, 2023

PrinceWatercress plays The Bugs Bunny Crazy Castle 4 - Part 23 of 27


Stage 11-8 is the worst level in the game up to this point due to its complex series of indoor paths as well as a few doors that lead to either dead ends or rooms that paths that loop in on themselves. And guess what? The game gets even nastier from here.


Stage 11-7

There are going to be quite a few Wile E. Coyotes chasing after you at the start of the level, so when you make your moves, make them quickly.

Stage 11-8

Out of all the levels in Stage 11, this one is the absolute dirt worst.

First of all, you'll need to get the sledgehammer as quickly as you can so you can break all the blocks in the stage. All of the doors with the keys are blocked by sledgehammer blocks. Get the pick-axe quickly, too, because you're really going to need it, too. Second, you'll need to spend time memorizing where all the doors leading to the indoor areas lead, because it is the only way you can do anything until you get the sledgehammer and the pick-axe. Not surprisingly, some of the indoor areas lead to dead ends, and I was in circles to the point of complete and utter frustration.

Wednesday, July 13, 2022

PrinceWatercress plays Sly Cooper and the Thievius Raccoonus AGAIN - Part 23 of 23


And now for the last of the Master Thief Sprints. Believe it or not, I did all the Sprints for the fourth chapter of the game in only twenty minutes. And that's the game finished...again!


A Perilous Ascent

This was the last Master Thief Sprint that I did in my initial playthrough during my months-long PlayStation 2 marathon, and it was the hardest. Once again, I do this one first just to get it out of the way. For this one, you won't be rolling a whole lot. The only real strategy that will come in handy here is to use the double jump in the falling icicle segments without getting hit. As for the searchlight section where you have to cross the narrow platforms, you'll have to do those the old-fashioned way, as using the shortcut there will be fatal. Use the double jump in the icicle sections; you'll save the most time there.

Flaming Temple Of Flame

For this one, memorizing the level is essential, as it can be easy to get confused as to where you need to go, especially when you're inside the building where all the disciples are training. As for that fireworks platform with the searchlight on it, I hit it first, then I get on it right as it ascends so I don't get caught. Once you have those two things in particular down, you're good to go. Just remember to double jump where the narrow pathways with the searchlights are when you need to if you need to save even more time.

Duel By The Dragon

After having to go through this one for the Clue Bottles and again for the Vault, you should have an idea as to how to get through this one. You'll want to make sure that you're good with your platforming, and that you don't waste time hitting the fireworks. When you make it to the end, you'll want to run around the stone hand while swinging the cane around so you can easily hit all those firecrackers to trigger the exit. Once the exit is in sight, you'll have no time to waste. Get to it immediately.

The Unseen Foe

Ah, yes. The last one. This is the one Master Thief Sprint where the power to turn invisible gets the chance to shine. Don't forget that you can press the Circle button to go invisible when you need to, especially when you have no way of avoiding a laser or an enemy's spotlight. As for the conveyor belt you have to run against to defeat the enemy at the end, get on the conveyor belt and move forward as the enemy moves his spotlight to one side. Once you're close enough, whack him. For the drop at the end, there is a shortcut where you can go into the middle at one point and then move forward through the lasers to get to the exit, but I take a different approach: jumping to the second platform, then skipping straight to the exit.

And with that, we have 100%. Enjoy the rest of this run, and enjoy the developers' video that comes afterward. Be sure to pay attention, as things are different colors and some enemies and objects have different appearances due to all the footage coming from a pre-final version of the game. 

Friday, April 1, 2022

PrinceWatercress plays Bugs Bunny: Lost In Time - Part 23 of 23


In this entry, we finally play "Train Your Brain!", get the last of the collectibles and get Bugs home.


1:32 - After kicking the switch to get rid of the barrier, you'll be playing Simon Says with a barrier. The Martian will jump on the colors, and you have to jump on them in the same order. Jump on six colors without messing up to get the clock and continue on. If you mess up, you're starting over and you're doing this until you get it right.

From here, kick the nearby switch and continue on.

4:42 - For this game, you'll need to jump on a green button. The 4x4 grid will show a pattern briefly, and you'll need to recreate it. Jump on a tile once to turn it red, twice to turn it green and three times to make it clear again. Don't forget the golden carrots behind the teleporter.

6:51 - Great, it's these platforms again.

7:21 - Be careful on the platforms. The green and yellow platforms are safe, while the red ones burn you. Some of them will turn clear, meaning there is no platform on that tile at all.

8:03 - You have to be moving towards this switch while kicking it to make it work. Use the platforms to get to the center and kick the second switch like you did the first. Kick the switch at the end and go back to the start of the section for another teleporter.

11:00 - This golden carrot is very easy to miss.

11:45 - The memory tiles, aka Acme Mind. Use R1 to change the color of the tiles. The colors go in this order: blue, cyan, pink, yellow, purple, orange, red, green. The same color will not appear twice in the combination. You only have six guesses. If you guess the combination right, you'll be able to continue. If not, you're playing this until you do.

Start with the first four colors and see what sticks. If a crown appears on that color, you got that tile right. Keep it that way on all future guesses.

15:21 - Rotate the camera to find the final golden carrot.

16:01 - Use Left and Right to steer the bike, and hold the Circle button as you approach the pole. Hold it as you get to the top, and make sure you're swinging towards the next platform when you let go of Circle, and use the D-Pad to ensure you're going where you need to. Watch which direction you're spinning to make things easier. This can be a lot harder than you would think. At least you have infinite lives.

Along with making sure you get to the finish line before the Martian does, you'll also need to ensure that you use every speed boost and that you don't fall off the edges of the tracks.

It is possible for The Martian to fall off the track if you're near them at the pole, but it's hard to do.

Once you make it to the teleporter, you can grab one more clock. From here, you can go back to the present day on the era select and end the game.

29:19 - The good ending for getting 100%. You did it!

Saturday, January 8, 2022

Kikoskia plays Silent Bomber - Part 23 of 23


In this entry, we beat Benoit, then see what happens after the events of the game are over.


Whenever you defeat a bishop or a rook, you'll get a 10% health pick-up. Take it; you're gonna need it.

If you're having trouble defeating the chess pieces, especially the queens, the power-up bombs from throughout the game work well here, especially the lightning and gravity bombs.

For the queens, you'll need to run around in a circle and either plant bombs on the ground or use the Lock-On Unit. Power-up bombs really work against these things, as they make the queens easier to hit.

The last queen gives you 50% health. After you beat the last queen, you'll face Benoit.

Use the Lock-On Unit to hit Benoit with multiple bombs as he runs around. If three Benoits show up, stay away from the bombs that they drop. The Benoit with the darker green glow (as opposed to the yellow glow on the other two) is the real one; use the Lock-On Unit to target him, shower him with bombs and blow him up.

If you see the huge Benoit hologram show up, jump away to avoid being grabbed. If you do get grabbed, use the Lock-On Unit and explode bombs on the hologram to escape.

After the battle, Benoit reminds Jutah of his first mission - the tutorial from the beginning of the game - saying he was there and observed his every move, then reveals that he was Jutah's commanding officer on that day and the one who taught him how to fight, survive and kill. He then activates the self-destruct mechanism as he lays dying.

Jutah tells Annri and his team to get out, and tells Annri that he can get out on his own. Annri is reluctant when Jutah tells her to get out with the rest of her team, but Annri orders Jutah to get out in one piece. The Dante eventually explodes, and Annri fears that Jutah is dead. 

We then flash forward three years later. Annri has resigned from the military after the events of the game, having become disillusioned with the military following the destruction of the Dante. She wonders how the rest of the team are doing as she types on a typewriter, then speaks into her nearby headset as if she was actually talking to Jutah. Suddenly, the headset beeps, and it is implied that Jutah walks through the door, having survived the Dante explosion. With that, Silent Bomber comes to a close.

Friday, December 17, 2021

HCBailly and JB play Secret of Mana - Part 23 of 41


When we head to Northtown, we find out that Phanna is here and trying to brainwash a kid. Also, there are ruins, because The Empire.


In Northtown, buy the Frosty Ring and the Tiger Cap for everyone, and get the Tiger Bikini for Purim and the Tiger Suit for Randi and Popoie. Watts will be downstairs at the inn if you need to forge something.

To the northwest is the entrance to the castle. You won't be able to do anything yet, but the music here is absolutely amazing.

One of the NPCs will mention that Phanna gave her some candy and that she can will give her more if she meets her at the ruins. Keep this in mind very soon.

To the northeast is the ruins. At the entrance will be Phanna, who says that she and Dyluck are happy being together. Purim strikes Phanna in anger, knocking Phanna out, and Krissie shows up to take her to the doctor before telling the party to help Dyluck.

Northtown Ruins

The Ghouls can Poison you, and can cast Speed Up on themselves and Speed Down on your party.

The Wizard Eyes can Moogle your party and spawn Weepy Eyes, and they can also cast Level 6 Cure Water.

The Grave Bats are just more powerful versions of the Blats; they just can't cast Balloon on your party.

The Tomato Men make a return from the Pandora Ruins.

The chest on the left balcony contains a Spear's Orb. To get to it, go through the door in the northwest corner of the entry room and follow the path. The Halberd has a chance of confusing enemies with Silence upon impact.

The Imps are the nastiest enemies here. They can cast Level 5 versions of all of Salamando's Popoie spells as well as Level 5 Cure Water.

The chest on the right balcony contains a Bow's Orb. The door at the northeast past the entrance will take you to it. The Bow of Hope is effective on evil/non-living enemies, which makes it the perfect weapon to go through here.