Showing posts with label part 27. Show all posts

Friday, July 24, 2026

PrinceWatercress plays Space Station Silicon Valley - Part 27 of 32


Completing the mission objectives is easy-ish. Getting everything is a tad more difficult.


Borassic Park


Aside from getting a kangaroo again, you have to locate four archaeological discoveries. So we're doing some sightseeing and fossil hunting this time around? Nice.

You start off as an armed desert fox. Touch the four camera near the lizard holes, the giant footprints, the mosquito covered in amber, and the skulls with the eyes and teeth. On the way to the last one, watch out for the enemies that come out of the holes. The red and purple ones can spit fire and hurt you. Congratulations, you just found four archaeological discoveries. I'm not sure what kind of joke the developers were going for here.

From here, you want to head to the nearby area with all the holes, the stairs and the narrow paths. Watch out for the fire breathers again. Use the health around you to minimize damage when necessary. At the end, you'll find a kangaroo. Keep your distance from all the dinosaurs and watch your health as you shoot the kangaroo down. From here, you'll be able to exit...and do everything else.


However, you're not done yet. You'll need to jump across the top of the rib cage bones where you first saw the dino enemies, and you'll need the wind to kick in and blow with you. You'll find two vultures, and you'll need to take out at least one of them in order to find everything in this level. Once you do, you'll be able to clear this place out and exit. The exit teleporter will be on the top of a huge hand fossil.

If you're looking for elevation to the higher areas with the vulture, use the wind at the rib cage bones. As for the Power Cells you can only see as the vulture, you'll need a super high elevator, and you'll need to travel the perimeter of the level in both directions.

Power Cells


Wednesday, February 11, 2026

PrinceWatercress plays Super Mario Odyssey - Part 27 of 92


Our Power Moon hunt in the Metro Kingdom continues...


If you've done everything involving the Sand Kingdom tourist so far, you'll meet him on Main Street across from the Odyssey landing pad. Talk to the guy for a Power Moon, then talk to him again. This time, he'll want to see the biggest waterfall ever. This is a clue that he's heading to the Cascade Kingdom, and that you'll need to head there to meet him again.


Another seed goes in a flower pot near the slot machine mini-game. Just wall jump up the buildings nearby to find it.

There is Hint Art at the side of the triangle-shaped building. If you look at it, you'll find out that Poochie has been to the Lake Kingdom and has found a Power Moon remember that for later.

Believe it or not, you can replay the festival whenever you want. Just talk to the guy who is not dancing and is standing off to the side, and you can do it. That's good, because there's a Power Moon that's easy to miss. 

Power Moons


11. Glittering Above the Pool - For this one, you'll need to climb up the New Donk City Hall Rooftop, then long jump to the building with the pool off the top. Bounce off the nearby umbrella to get the Power Moon above the pool.

12. Dizzying Heights - Believe it or not, you can climb up the spire of the New Donk City Hall building. You'll need to do a little bit of jumping onto the corners of the spire before you can grab onto the spire properly, but you can do it. At the top of the spire is a Power Moon.

19. Metro Kingdom Timer Challenge 1 - On the west side of the city near the slot machine mini-game building, there is a scarecrow. Throw your hat at it, then use the tilting of the platforms to your advantage as you run to the Power Moon to get it before everything disappears.

20. Metro Kingdom Timer Challenge 2 - At the top of the New Donk City Hall rooftop, there is a P switch you can hit. Get on the nearby scooter and drive onto it, then drive across the checkerboard platform that materializes and grab the key followed by the Power Moon before time runs out and everything disappears.

29. Jump-Rope Hero - In the park near the Main Street entrance, you'll see two citizens of the city hosting a jump-rope mini-game. Jump right in and jump over the rope 30 times (thankfully, the game keeps count) to get this Power Moon. This one is easy, but it does get a little faster by the time you reach 30.

30. Jump-Rope Genius - For this one, you'll need to jump over the jump rope at the park near Main Street 100 times. Compared to the 30-jump mode, you'll be tapping the A button as lightly as possible to get the jumps, as it gets pretty fast.

36. Celebrating in the Streets! - At the upside down section of the festival, jump on top of the ? blocks to find two more invisible blocks. Jump on those and then jump to the pipe at the bottom. Go down it, and you'll find a Power Moon.

41. Moon Shards Under Siege - On Main Street, there is a taxi cab that you can possess with Cappy. From there, holding the left analog stick in any direction will take you to another area. From here, you can take control of a Sherm and shoot down multiple enemies as well as Blocks to find five Moon Shards. If a Moon Shard is in mid-air, you can shoot at it with the Sherm to collect it.

52. A Tourist in the Metro Kingdom! - You must collect "The Hole in the Desert" in the Sand Kingdom and complete the festival to get this one, in addition to talking to  the guy taking the taxi in the Sand Kingdom. Across from the Odyssey's landing pad, you'll see the tourist from the Sand Kingdom as well as the taxi driver. Talk to the tourist for a Power Moon.

Regional Coins


Thursday, December 18, 2025

PrinceWatercress plays Brave Fencer Musashi - Part 27 of 33


In this entry, we save the village - again - and find out that there's more to the mines than we thought.


Now that you have the Fire Scroll, head down to that cavern in that dried-out part near where the Water Crest was. Travel to the end and use the Fire Scroll on the Fire Crest. This will blast a hole in the ceiling, allowing you to climb out of here by using the L-Brace on the nearby wall.

You'll pop out in a new area. If it's 10 PM, you'll find a Minku near the hole.

Climb up the nearby wall with the L-Brace and you'll be able to get the Wind Scroll. This Scroll allows you to create cyclones, spin slash at enemies and dig holes in certain places.

Since you won't be able to go back down the way you came, use the Wind Scroll on the floor. You'll drop down to the floor...and fall unconscious before overhearing Bubbles and Gingerelle. When they try to take Lumina, Musashi wakes up and startles them. Bubbles accidentally shoots Musashi with a Bincho gun, and they teleport out when Bubbles threatens to tell on Gingerelle to Fuhrer Flatski. They have you captured, but since it's difficult for the Empire to break Bincho Fields, they don't even bother taking you to the Empire themselves. That's competence for you.

Press Triangle to break out when they leave. Your maximum BP will go up by 50. Now that Musashi is aware of the Thirstquencher Empire's desire for Lumina, it's time to continue on. Head south to leave. You'll be back in front of the entrance to the forest maze, so assimilate Hop from the nearby flower enemy to leap over the spikes.

When you head to the village, you'll find out that the music has changed.

When you look around, you'll find out that the two kids in the village are jumping up and down near the diner. When you talk to them, you're going to find out that there is a giant ant trying to attack the Gondola office to eat the pea soup and syrup. If it stays there, the gondola won't be able to come down. Musashi has an idea, and it involves heading back to the castle.

Do it. Head back to the castle and take the gondola. The gondola will strike the giant ant, causing it to break a hole in the top of the metal grate above the office. You'll have to climb up to it and go down the hole.

When you drop down, you'll find out the ant is dead and that the path to the right has some poisonous purple clouds. If you go to the left, you'll approach a dead end. If you head down here late at night, you'll find another Minku.

Now that you're done with the Minku, it's time for that poison gas. Walking into it obviously poisons you, so you'll want to charge up the Wind Scroll and blow that gas away with your spin slash.

You'll soon head to a fork in the road, with the left path containing the blue mushroom enemies from the mine. Take that path so you can rescue Cook Chiffonade. Talk to him at the castle, and you'll be able to get Rice Balls at the store.

The path to the right contains the Rip-off enemies from the mine. You'll also see a spike pit you won't be able to jump across. There is, however, a bunch of boulders in the background near the pit. Use the Earth Scroll to break the background walls and make a bridge out of the boulders.

Grab the narrow wooden rods on the weights to continue. Watch for the enemies that drop down the gaps.

The next area has a bunch of halted elevators. You'll want to avoid touching the black parts where the elevator platforms are supposed to come out of, but also the liquid bincho pit at the very bottom.

You'll want to head to the top and head to the right.  Use the Wind Scroll to get past the wind, and assimilate the Hop ability from the flower to climb the slopes and cross the spikes. The next room has a Minku, and you can also get the Antidote ability from the worm enemies here.

Congratulations! You have now found all thirteen Minkus and reached the maximum HP value of 500!

Sunday, November 16, 2025

PrinceWatercress plays Legacy of Kain: Soul Reaver - Part 27 of 28


It's time for the final puzzles in the game!


0:36 - A statue of Moebius the Time Streamer.

Behind you is a clock. By dropping down, you'll find a symbol all over the wall, and you'll need to pull on the two levers to move the dials on the clock to two symbols: one at the bottom, the other at the top. These two symbols combine to make the symbol you saw at the bottom, and by doing this, you can move the lights around and open up a new area below.

2:49 - For this area, you'll need to use Constriction to move the blocks around. The colors of the symbols indicate which color light needs to face the center, and by combining blue and red, you can get purple. You'll then need to use Constriction on the device in the center to hit the rest of the lights and enter the next door.

5:21 - You'll soon be able to go downstairs. Take out the enemy, then pay attention to the symbols and the colors behind them. The three pillars, which you can control with Constriction, have a different color on the end, and they all control a hand on the clock below. Match the hand for each color to each symbol they represent, and you'll soon open the next door.

10:00 - After dealing with a few more enemies, you'll need to get some gears moving. Move the blocks out of the way to get them to come alive again. You'll get some pistons moving, and you can ride on them as platforms. These pistons will take you to the next area.

13:15 - You'll notice some blocks on the way to the next area. Take care of the enemies, then get ready to push and flip blocks around so that they match the same positions as the parts of the design on the floor that they represent. You'll need to push the blocks you saw across from the cage walls down with your projectiles in order to bring them down and finish the puzzle. That opens another door.

20:30 - After dropping down to the next section, you'll see three symbols on a nearby wall. Remember those symbols for later. Take out the enemies, then use the Constriction ability to move the bottoms of the symbols with their tops. Platforms will start swinging back and forth; ride them to the switches at the top and flip the switches. When you flip all three switches, you'll open yet another door. This will lead to the final battle...

Monday, February 24, 2025

PrinceWatercress plays Wario Land II - Part 27 of 51


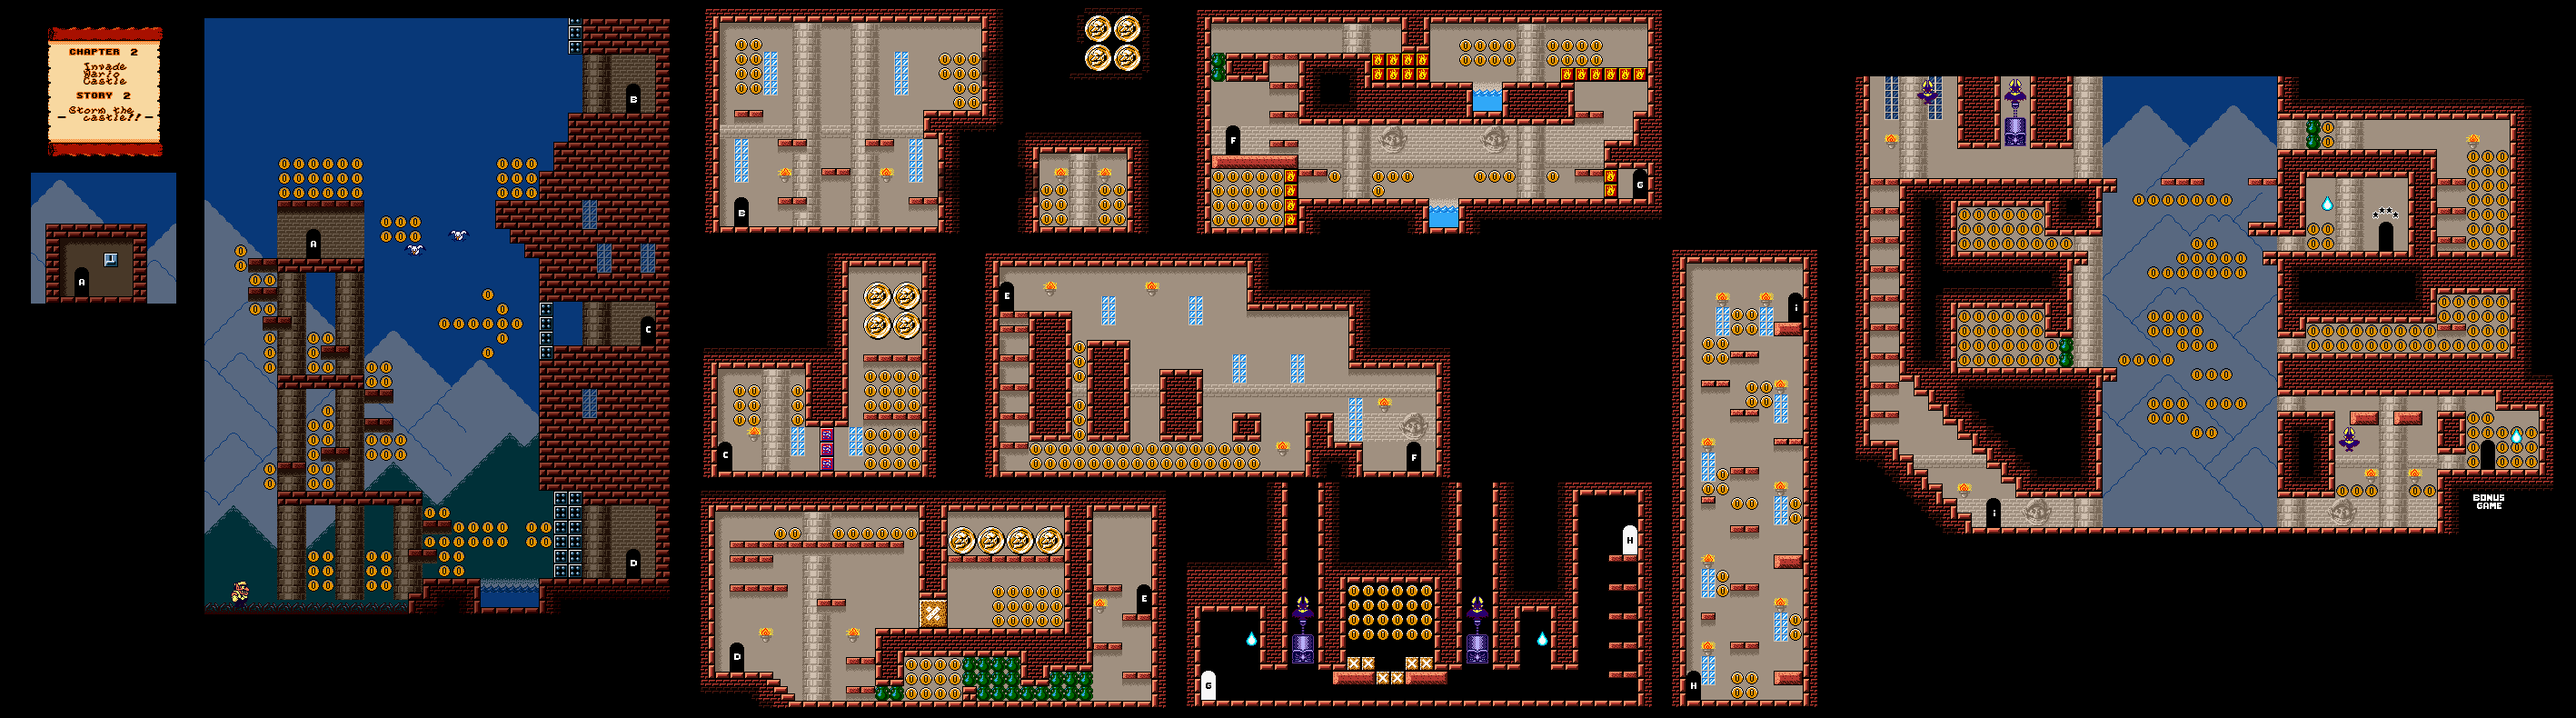
In this entry, we make our way into the castle in this rather short level. The end of this level allows for some fun with Flat Wario, but you'll need to get used to moving around to get to the exit as well as the treasure room.


Chapter 2: Invade Wario Castle

Story 2: Storm the castle!!


In order to get into the castle, you'll need to make your way up the tower at the start, go into the door, and hit the switch. Before you do that, jump to the right off the seagulls to get a bunch of coins while avoiding flying spiked skulls. The only breakable walls in the entire level will be to the right of where you enter, and they both just lead to more coins.

With those coins out of the way, you can then lower the drawbridges. The middle entrance leads to two ducks and a couple of big coins if you can use the ducks as springboards, and the lower entrance leads into the castle proper.

Slide down the slope at the beginning to get into the area full of jars so you can smash your way through and continue, then use the Spear Goon in the upper area as a springboard to get a few hard-to-reach big coins.

After an area where you will have to avoid flying spiked skulls to get to the next room, you'll need to set yourself on fire in order to open up the entire room. On the upper-right corner, jump into the wall near the water so you don't fall in. This allows you to get everything in the lower-left corner. In the next room, use the water droplet in case you get smashed, and leave the breakable blocks so you can get all the coins in the middle.

After a climb with a helmet guy and platforms that fall, you'll need to be Flat Wario not just to get all the coins in the room, but to reach the exit as well as the treasure room, where you can win a crystal ball. Don't be surprised if you go have to go down one level at a time just to get to where you want to go. 

Thursday, December 5, 2024

PrinceWatercress plays Great Greed - Part 27 of 28


In this entry, we beat Bio-Haz, then check out the game's infamous ending.


Before you go into the final room of the game, fight the enemies around here until you have 8000 Experience or less needed for the next level. Once you do that, refill your HP and MP and go in. If you have the Platinum or Duramet Sword equipped, replace it with the Knights Sword, as it is the only weapon that will even damage Bio-Haz.

You'll soon face Bio-Haz, who is disappointed by the gap in values between himself and Sam. For the first battle, use Power and Guard to strengthen up and protect against the occasional critical hit, then start striking with physical attacks. If your HP ever goes under 300, use Heal 4. Bio-Haz will have 2200 HP, can will be able to cast Speed, Freeze 4, Flame 4, Bolt 4 and Power. 

If you don't level up after the battle, you will have enough time to use Heal 4 for the second battle, but just barely. This is why you want the level up between phases.

Once you beat Bio-Haz, he will power-up. Citrus shows up all of a sudden and saves Candy from Bio-Haz's power, and she will show up to do some additional damage, however much it might help, during the battle. In the second battle, Bio-Haz has 4000 HP. He will be able to cast all of the same spells as last time with the addition of Heal 2, so be sure to cast Power and Guard immediately before going at it with physical attacks. Once again, always heal with Heal 4 if your HP ever goes under 300. Eventually, Bio-Haz will just keep casting nothing but Heal 2 more often than not. When that happens, watch your health, keep striking, heal when you need to, and see if you can get a critical hit that will definitely drive Bio-Haz into defeat.

After the battle, Bio-Haz admits defeat and acknowledges the differences between his and Sam's worlds, and admits that one can only abuse one's home for so long before telling Sam not to repeat his mistake. Citrus mentions that she saved herself by falling into a pool of water at the bottom of the cliff where we left her, and that she was able to climb out of the pit on her own. After this, Gum Drop, Truffle and Cup Cake all show up just as the castle is about to collapse. Everyone automatically leaves the castle and gets away on a balloon back to the castle made by Truffle.

Back at the castle, King Greene extends his thanks to Sam for ending the war against Bio-Haz and his forces, and asks you to listen to everyone's words of appreciation. Talk to everyone in the room, then talk to the King, who will reward you by allowing you to marry one of his daughters. If you want, you can save the game here so you can marry not just one of his daughters, but anyone in the room. This is the most infamous part of the game as well as the one reason why anyone would barely known You can marry anyone in the room: any of the princesses, Microwave, Time Out, Lunch Break, the queen and even the king himself. After you make your choice, you'll get a few dancers, then you will be able to talk to your future wedding partner before teleporting back to the real world for any unfinished business. You'll return back to the forest where the other guy who was with you - Sam's father - is waiting for you. Sam and his father will leave, then Microwave will show up and state that there is hope for both worlds before disappearing. You'll then roll credits, where life goes on in the game's world.

Whoever you marry will stand next to you at the end of the game. You can also leave the room and marry no one, and if you do that, Sam's father will be at Sam's side at the ending, indicating that he went to the land of Greene with Sam upon Sam's return.

If you marry Cup Cake, you will be told that you will have to wait until Cup Cake is of legal age, but you will still be able to marry her nevertheless. Even the King and Queen will be briefly hesitant before accepting your choice. You can even marry Gum Drop even though she is in love with someone else!

After the credits, you'll then get the Extra Files. Inside is a sound test, where you can listen to all of the music and sounds in the game, a Monster Book that lets you see the stats of all the enemies in the game, and a Profile section that lets you see character profiles for the members of the Greene royal family. We'll check those out in the next video.

Wednesday, September 25, 2024

PrinceWatercress plays Chrono Trigger (Super NES) - Part 27 of 70


In this entry, we fight Azala and find out how Lavos ended up on the earth. We also find a Gate leading to the Ice Age...but why?


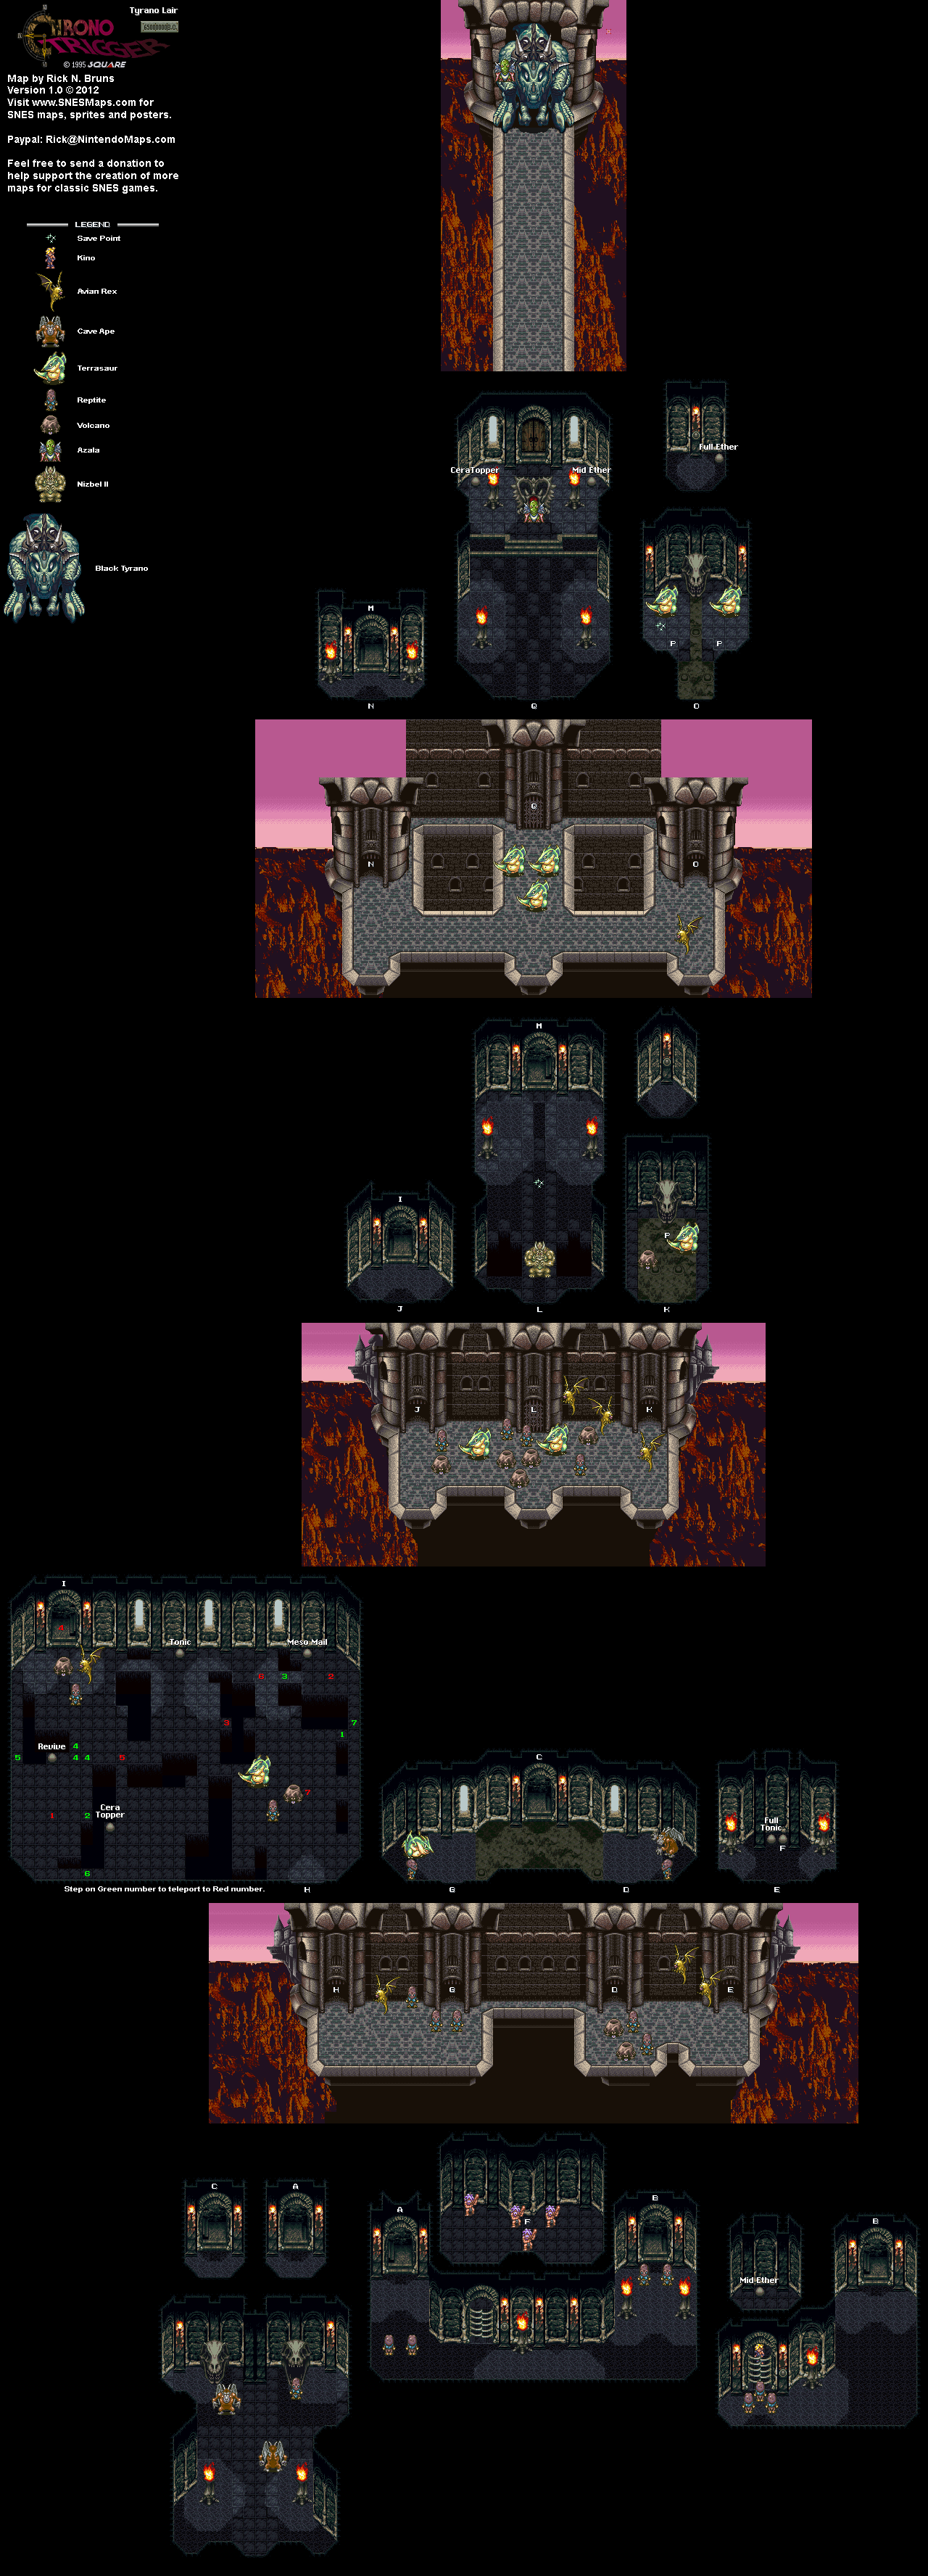
When you head past where you fought Nizbel, you'll be back outside. There will be a locked gate to the right and the switch you need to hit (and a Full Ether) further to the right. You'll have to fight three Terrasarus (one in the first battle, two in the second) before you can finally face Azala.

When you meet Azala, he will have you following him to the final battle between the humans and the Reptites, which is really just you and the team of Azala and Black Tyrano. Azala will tell the nearby moving red star - the one you've seen at the Dactyl Nest - to fall and stain the earth red.

Azala has a lot less HP than Black Tyrano (who has over 10,000), so take care of him first so he doesn't throw rocks at you or puts you to sleep. You'll want to hit him with very powerful strikes, such as Crono and Ayla's Falcon Hit (which does the job wonderfully and also hits Black Tyrano). When you defeat Azala, he will hit the party with Azala Break, which will slowly lower the party's HP one hit point at a time.

That leaves Black Tyrano. When you see the message stating that defense is being lowered and that power is being stored, start hitting Black Tyrano with your most powerful attacks. Black Tyrano will count down from five, and when he hits zero, he will hit everyone in the party with a powerful fire breath attack. If that happens, heal up your party, preferably with Ayla and Frog's Slurp Kiss. Black Tyrano's defense will then get back to normal until he lowers his defense and stores power again.

Believe it or not, charming Azala gives you a Magic Tab, while charming the Black Tyrano will net you a Power Tab. I didn't find this out until after making this video.

After winning the boss battle, Azala will mention in his last moments that an ice age is coming and that the Reptites are doomed to die, anyway. Kino shows up with the pterodactyls and rescues everyone, but Azala refuses rescuing, resigning himself to being hit by the red star - which ends up being a meteor - that completely destroys the Tyrano Lair and leaves a crater in its wake. This meteor is named "Lavos" - "big fire" - by Ayla, and it becomes very apparent that Magus was telling the truth about summoning Lavos and that Lavos was, in fact, the meteor that crashed into the earth 65 million years ago. Afterwards, Crono and company will discuss what they have learned before the game switches back to the overworld.

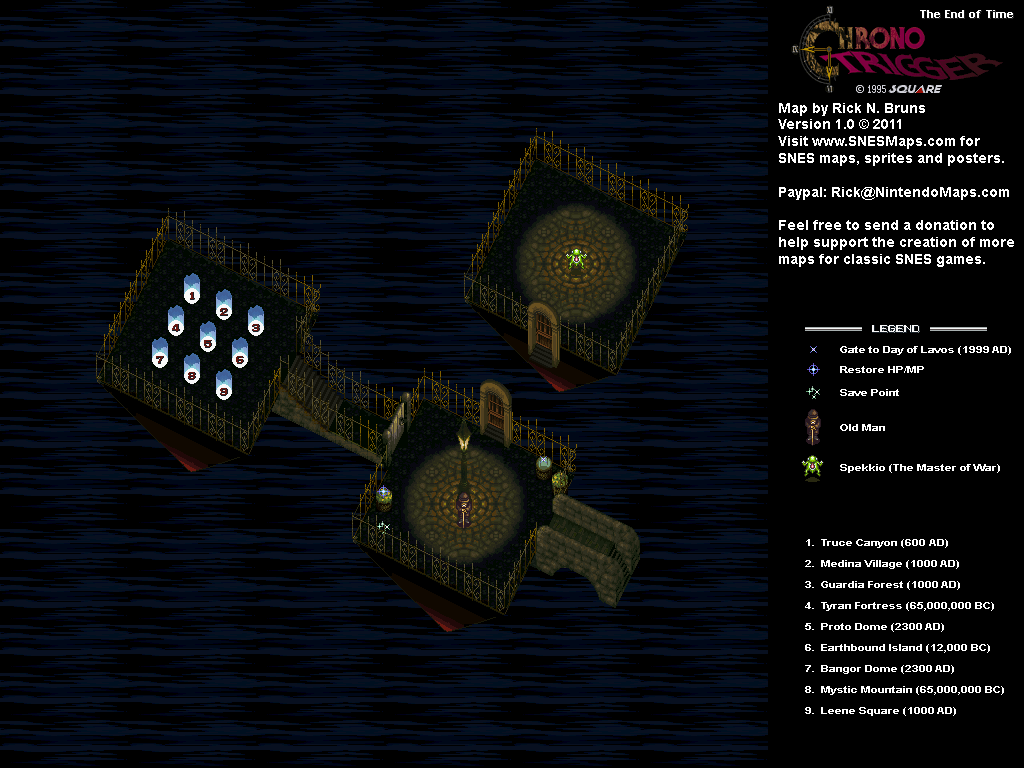
From here, enter the crater. You'll find that there is a Gate, and when you enter it, it will take you to 12,000 B.C., which is in the middle of the ice age.

If you party is above Level 30, Spekkio will take the form of an Omnicrone at The End of Time.

Wednesday, June 19, 2024

PrinceWatercress plays Ratchet and Clank: Going Commando - Part 27 of 54


In this entry, we continue the story by heading to Todano...and what we learn is shocking.

First | Previous | Next | End

2:11 - New weapons! The bouncer shoots out a bouncing ball that, upon contact with an enemy, explodes into a bunch of smaller balls that bounce on the ground and explode on contact with the enemy. The explosions can do quite a bit of damage, but wait until this bad boy gets evolved. Also, the Hoverbomb shoots floating orbs that can do quite a bit of damage when they explode. 

3:00 - As the robots take a tour, there will be rabid squirrels ready to pounce on you - and the tourist robots - and rockets to destroy. If you destroy the four rockets at the starting area, you'll get a Skill Point for it. 

5:22 - At the end of the tour, wait for the robot Fizzwidget to head towards the wall for a Platinum Bolt. The tour also loops back to its beginning, so if you want to listen to robot Fizzwidget again, you can. 

8:52 - If all of the robot tourist make it through the tour without even one of them getting destroyed, you'll get a Skill Point.

11:42 - Electrolyzer time.

12:44 - You can smash the heads off all the posts here for bolts.

13:21 - The last rocket we destroyed actually lifted off...and it blows up here.

14:21 - For this Infiltrator puzzle, go up, up, down-left, left, down-left, down-left, down, down-right.

14:54 - The Bouncer in action. Watch out for the globes in the ground, as they will raise out of the ground and shoot out a ring of shocking electricity that goes a short distance, which you'll want to avoid.

17:23 - You'll need to use the Infiltrator here to call an elevator. For this, you'll want to go down, down-left, down, down, up-right, down, down-left, down, down-left, up, up-left, down, down, down. The elevator will lead to a Nanotech boost.

As for the next room, enemies will spawn in up to a certain point as you keep fighting inside of it, so be ready to use weapons that will take care of multiple enemies easily.

19:53 - Another Infiltrator section. For this one, go left, down, right, down, down, down-right, up, down-right, up.

20:36 - At the end, you'll get a message from the tall female Ratchet, whose name is Angela Cross. She will tell you that Thugs-4-Less has taken over her flying lab, now that someone has made them a better offer, and that the experiment is known as "the Protopet." You'll then get a video for the Protopet, which Megacorp is more or less dying to give away as a pet. Clank says that he and Ratchet must get to Mr. Fizzwidget and warn him. Angela mentions that Fizzwidget is on planet Bolden, but has misgivings about whether or not you will be able to get Fizzwidget to come to his senses.

23:18 - We'll be going here next time, but in the meantime, we can get some more bolts.

Skill Points:

Nothing To See Here: Destroy the four large rockets in the beginning area of Todano.

You're My Hero: Protect all ten tourists from squirrels in the beginning area of Todano so that they all get through a tour. Thankfully, you can get the tour to loop back to the beginning and try again, so you don't have to do this on the first shot.

Controls:

As Ratchet:

Control Pad/Left Analog Stick: move
Right analog stick: move camera

X:
  • Jump and double jump (hold button after double jump to use Heli-Pack or Thruster Pack)
  • Wall jump (near certain walls)
Square: strike with wrench
Circle: pull out/shoot currently equipped gun
Triangle: 
  • quick select (hold and use in conjunction with Control Pad or left stick to switch guns; menu can be customized in Quick Select on the pause menu
  • double tap to switch between two most recently equipped weapons/items
  • interrupt on-screen messages

Select: open map
Start: Pause menu
  • Control Pad: select option
  • X: confirm option choice

L1:
  • center camera behind Ratchet (tap button to center)
  • first-person view (hold button and use left stick or D-Pad to look around; let go of L1 to move camera back behind Ratchet)
  • Square: wrench boomerang
  • Circle: fire gun
  • R1/R2: zoom in and out (Pulse Rifle only)
L2/R2: strafe (hold while moving)
L3: see health and Bolt totals
R1/R2: crouch (hold down)
  • Square: wrench boomerang
  • X: high jump
    • long jump (hold crouch button and jump while running to perform)
R3: open map

In water:
  • Square: dive and descend
  • X: surface and ascend
  • R1: accelerate with Hydro-Pack

As Clank:

Control Pad/Left Analog Stick: move
Right analog stick: move camera

When hanging off platforms:
  • Control Pad/Left Analog Stick: move
  • Forward+X: vault up
  • Back+X: drop down

Square: punch
X: Jump (press and hold in the middle of a jump to glide with Heli-Pack)
Triangle: command menu (hold and use in conjunction with Control Pad or left analog stick to choose commands)

Thursday, May 23, 2024

DeceasedCrab plays Earthbound - Part 27 of 53


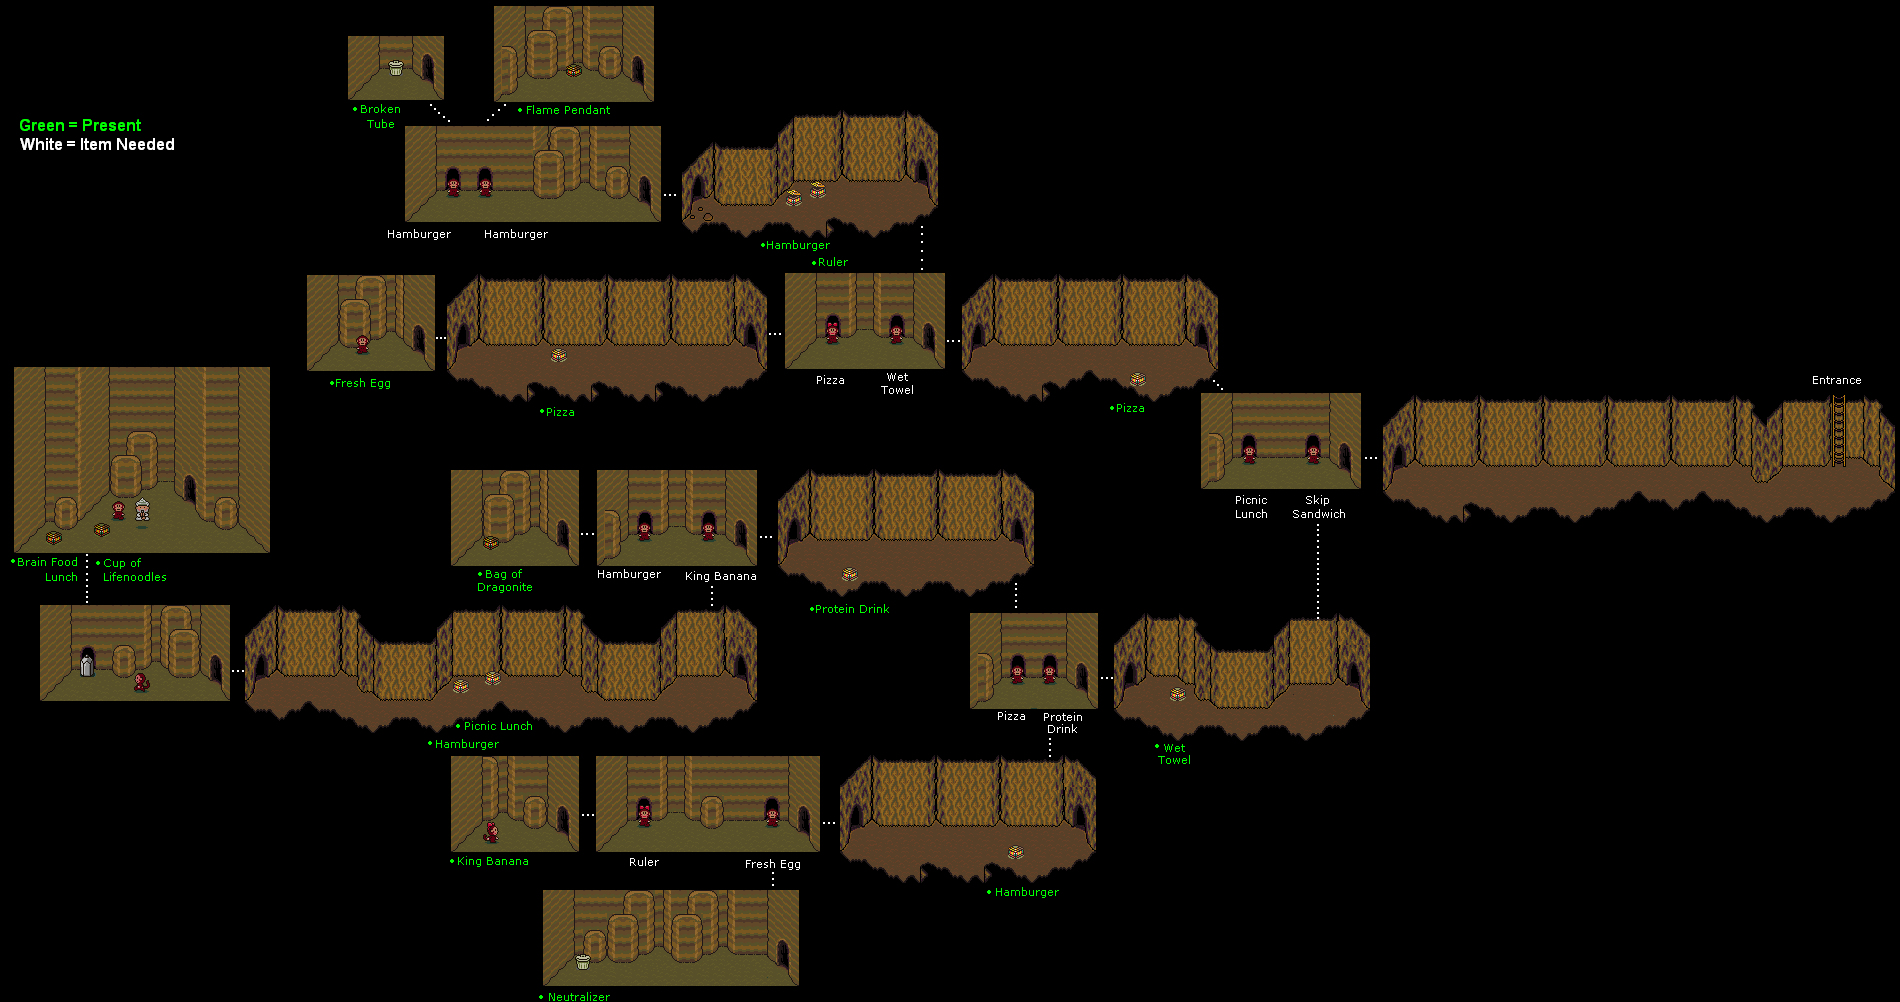
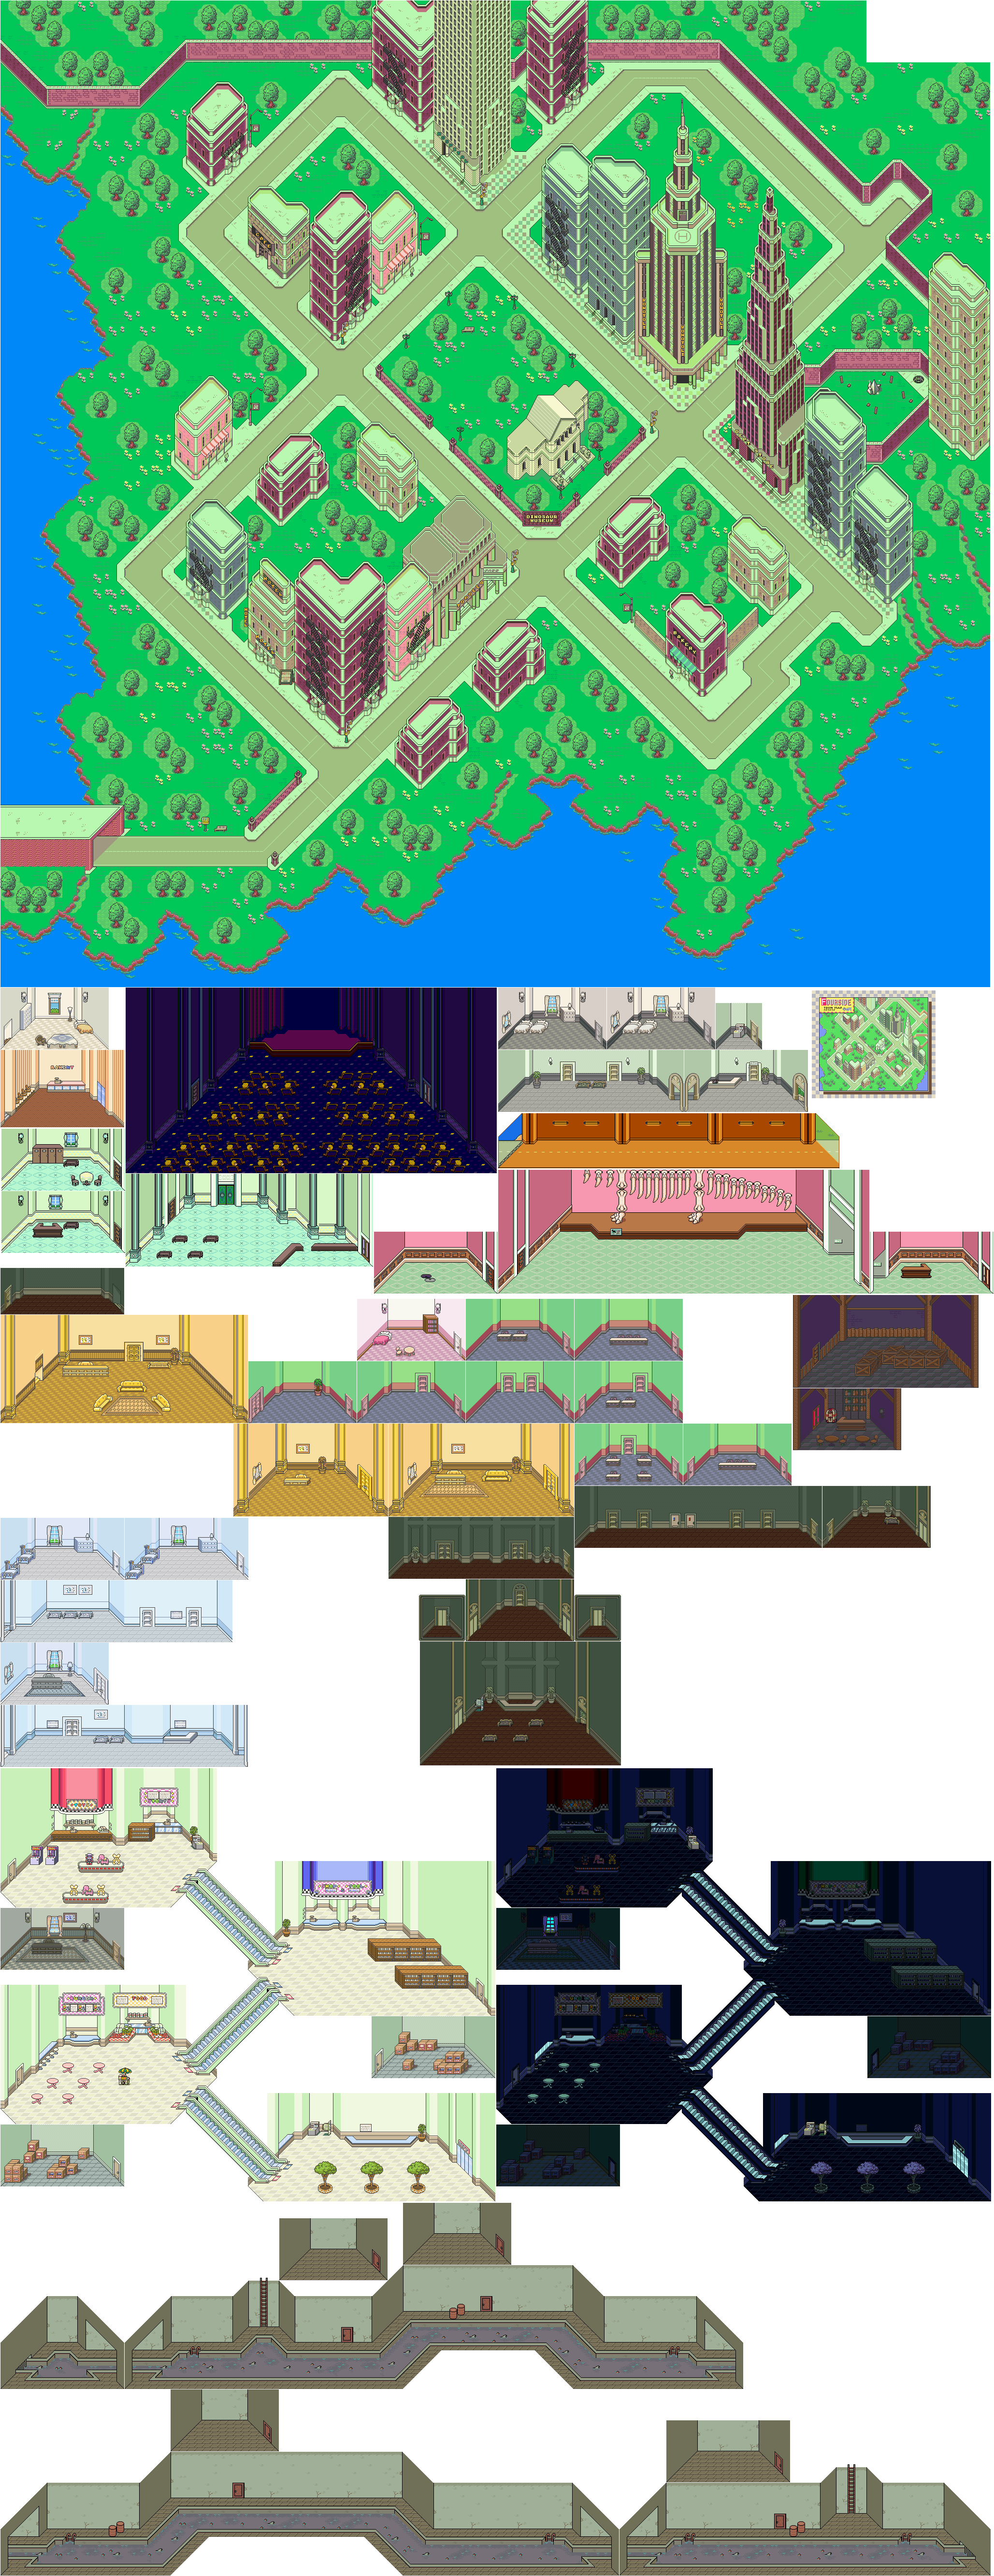
We make our way through a maze of monkeys to not only meet Talah Rama, but to get the Yogurt Dispenser!


You'll need the Skip Sandwich and the Picnic Lunch to get past the first two rooms. The rest of the rooms can be blazed through with the things you find in this maze.

Monkonna is a Madonna reference, for those who didn't catch it.

The Flame Pendant reduces damage from fire-based attacks.

King Banana is an item that is exclusive to this maze and can only be used to get past one of the rooms for a Neutralizer. As the item description indicates, it is not edible, so you can only use it to get into one room in the maze.

"Mon K. Mon" is most likely pronounced like "Monkey Man" with a thick British accent. Or something.

When you use the Pencil Eraser to get to the last room, you'll be able get a Cup of Lifenoodles and the Brain Food Lunch, the latter of which recovers 300 HP and 50 PP. You'll also be able to talk to Talah Rama, who will tell you that he has been waiting for you and that the four of you will defeat Giygas and bring peace to the world. He will also give you the Yogurt Dispenser, which you'll need to use in Fourside.

Before you leave, you will be able to learn to teleport by talking to the nearby monkey. When you talk to the monkey, you will have to leave the maze. When you make it back to the entrance, talk to the monkey again and follow it to the desert road to learn Teleport Alpha. This spell will require a bit of running room, and if you run into anything as you do it, it will not work. If it works, you'll be able to teleport to any town you need to get to. You can change direction while building up speed, but watch what you're doing.

From here, call Escargo Express and get rid of the Pencil Eraser, as you won't need it any more for the rest of the game. Getting rid of the Brain Food Lunch for later is also strongly advised. Next stop: Fourside.


The woman needing the Yogurt Dispenser will be outside the Department Store. Talk to her with the Yogurt Dispenser, and she will be able to make trout-flavored yogurt for guests. She will tell you to meet her on the 48th floor of the Monotoli Building.

Friday, May 17, 2024

PrinceWatercress plays Drill Dozer - Part 27 of 28


With one more trip to Clink Prison, we have all of the treasures in the game.

But we still have one more thing to do...


Area 5-1: Clink Prison


7:02 - Once you get Jill back in the Drill Dozer, you'll need to head back to the start and break the metal block to the left of where the enemy gauntlet was. From here, you'll need to time your jumps so you can jump from block to block as they disappear and re-appear to get the Frigid Claw.

With all of the treasure collected, you'll reach the highest rank in the game: Big Boss.

We're not done yet, though. There's still one more metal block to break and one more thing to check out. Stay tuned!

Sunday, October 29, 2023

Jerry Martin plays Strong Bad's Cool Game For Attractive People - Part 27 of 53


In this entry, we try to get Two-o-Duo to reunite, we get Cool Tapes in the battle, and we help make Homestar a star.


By putting the bat hutch in the washer and then using the bleach on the washer afterwards, then clicking on the washer, you'll turn the bat hutch - and the bats - white. (Please don't do this in real life.)

Head back to Marzipan's house and use the bleached bats on the cage. Marzipan will let out an Albino Vegan Bat named Pazquel and join them...after closing the door behind him. Marzipan will also have a change of heart and not do the benefit concert that was already in her plans, as she did not trust the person behind the benefit concert. Use the entry forms on Marzipan, and Cool Tapes will join after Strong Bad says Limozeen will be on their best behavior. Marzipan will fill out the form, then tell Strong Bad that the fee for Bubs will be in the mail.

Head to The Stick! Use the toilet paper on The Stick to wrap the toilet paper around it and vandalize it. When Bubs shows up, Strong Bad will tell him that Coach Z did it, with the logo on the toilet paper to prove it. Bubs will mention that Coach Z hasn't done that since Halloween of 1983. 

Head to the concession stand and click on the diamond-plated record. This will trigger the Bubtronic Security Robot. Click on the red alarm above the robot, and Strong Bad will rip the red light off and deactivate it.

From here, head to The Track and enter the office by clicking on the door. Strong Bad will activate the alarm there, then Bubs will show up and find the homing beacon - and the alarm - and realize that Coach Z still has "the flava." All the while, Strong Bad will hide, and realize that his chances of Two-o Duo will reunite have improved.

Head to Club T-C. Use the aerosol choose on the slow cooker to pour it in and make a cheese fondue. From there, head right and grab the record. You'll find one of Pom-Pom's instrumental piano albums. Finally, use the mic in Club T-C near Homestar to find a box containing a Pom-Pom poster.

Use the Food Related Love album that you just got on the turntable to get a musical moment from Homestar. From here, you have to click on something to get the right lyrics. For the first part, click on the buffalo wings (on the lower-right). For the second part, click on the bottle of merlot (on the upper-left). For the third part, click on the escargot (on the lower-left). For the fourth part, click on the slow cooker with the fondue in it. Pom-Pom will decide to make Homestar a star.

OUTFITS:
- Sloshy Shirt: Use mic in downstairs laundry room.
- Leopard Print Pants: Examine couch in downstairs TV room.
- Head Band: Use mic near brick wall to the right of Bubs.
- Hollywood Boulevard Boots: Use the Black Metal Detector near the picket fence.

STRONG BAD ABUSE:
- Examine the microwave in the kitchen.
- Examine the Lappy Plug in Strong Bad's computer room.
- Use the fake sword on Marzipan.

LIMOZEEN SHOT GLASSES:
- Larry Shot Glass: Examine Luxa-Lounger.
- Perry Shot Glass: Use mic near Strong Bad's mailbox.
- Gary Shot Glass: Use the Black Metal Detector next to Marzipan's Zen Garden.

LIMOZEEN MANUAL PAGES:
- Cover: Use the Ordinary Light Switch in Strong Bad's computer room.

RARE BAND POSTERS:
- Two-o-Duo: Use the Black Metal Detector on the right side of Bubs' Concession Stand.
- Cool Tapes: Check the first locker on the left in the Locker Room.
NEW! Pom Pom: Use the microphone at Club TC.

EXPRESSION OF AFFECTION:
- Talk to Strong Sad about bats twice.
- Talk to Bubs about the Fun Machine.
- Talk to Coach Z about Marzipan twice (before he leaves Locker Room).
- Use Cool Tapes Photo on Marzipan and make out to Strong Bad.
- Use Cool Tapes Photo on Marzipan and make out to Coach Z.
- Talk to Coach Z about Poetry at Marzipan's House.

MUSICAL MOMENTS:
- Offer The Cheat an entry form.
- Offer The Cheat an entry form twice.
- Offer Strong Mad an entry form.
- Talk to Coach Z about the Boom Box at Marzipan's House.

Thursday, April 20, 2023

PrinceWatercress plays Sly Cooper: Thieves In Time - Part 27 of 48


In this entry, we finish the main game once and for all and finally stop Cyril de Paradox. Next stop: post-game activities!


Paris Epilogue

Deja Vu All Over Again!

You'll need to play as Sly to get this job started.

The mission starts with Sly sneaking into Cyril de Paradox's blimp and finding Carmelita. When you approach her, however, Sly is trapped alongside Carmelita by Cyril. Meanwhile, Bentley has all of Sly's ancestors - Rioichi, Tennessee Kid, Bob, Sir Galleth and Salim - gathered together to get their canes and return them back to their proper eras in order to repair the damage Cyril has done. 

First up is Rioichi. You'll need to use the Focus Jump on the blue lights, but watch out for the poisonous gas. Once you get the cane, you'll play as Murray and help Rioichi beat up the rat guards. From there, you'll need to get Bob's cane as Rioichi. In one corner behind some boxes and near a bottomless pit, you'll find a Sly Mask (see below). Once you get that Sly Mask, use the Focus Jump and remember that there are poisonous gas pipes on every other blue light. Once you pick up Bob's cane, Rioichi will be shifted back to Feudal Japan.

From here, Bob will have to get Salim's cane, and to do that, you'll be climbing the ice walls one more time. Watch for the icy blasts that are coming out of the pipes, as they will freeze you and send you back. Once you get Salim's cane, Bob heads back to the prehistoric era.

After this, it's fight time with Murray against the rats. Once you finish off the rats, Salim will have to pull off one last heist to get Sir Galleth's cane. You'll need to use the fast climb once the blasts from the pipes stop firing off, and remember that all the pipes fire in sequence. Once you get Sir Galleth's cane, Salim goes back to Arabia.

Sir Galleth will have to get Tennessee Kid Cooper's cane. This time around, you'll need to use the Catapult Crash to break fuses in order to deactivate the laser traps and continue through his section. Also, there are more poison gas pipes. Once you get Tennessee Kid's cane, Sir Galleth goes back to the medieval times, then Murray will have to fight more rats.

Tennessee Kid will have to use his gun in order to shoot down some targets to make some progress before the chutes on the floor drop down and send him down into the abyss below, On the first pole, jump left for a Sly Mask (see below), then use Crackshot to shoot the wall switches and stop the spinning platforms. Quickly make your way across the platforms before they start spinning again, then be ready for a game of Simon Says. The lights will turn on in a specific pattern, and you'll need to hit the targets in the same order as the lights in order to continue. The first door has three lights, the second door has four and the third door has five. You'll have to get past all three doors in 45 seconds, or else you're starting over.

You'll finally make it to Cyril de Paradox, who plans to send the capsule containing both Sly and Carmelita into a time tunnel that Penelope also managed to make for Cyril and have the two of them drifting endlessly through time for all eternity now that his plan to get rid of the Cooper family line has fallen through. Bentley, Murray and Tennessee Kid show up just in time, with Tennessee Kid shattering the capsule with his gun to free Sly and Carmelita in the process before being taken back by the time stream to the Old West.

In a last-ditch attempt to stop Sly and Carmelita, Cyril inadvertently triggers the time tunnel, and Sly heads off to stop Cyril once and for all while everyone else escapes the blimp. From here, you'll have to spire jump to Cyril until you catch up to him, and when you do, it's QTE time. Press the buttons that the game tells you to press, and if a button moves up and down, that is your cue to press it repeatedly. If you mess up at any point, you'll be starting over again and again until you get it right.  As you do this three times, you'll get to do some damage to Cyril as you go from the blimp to the timestream itself to the top of the burning blimp. Before the third phase, you'll have to some rail sliding and jumping to avoid getting burnt and to catch up with Cyril.

Once you finish off Cyril, Cyril will beg for mercy, and Sly helps him up. Cyril repays Sly by stealing his backpack and paragliding off the blimp only to get hit by a plane, leaving Sly with no way of escaping. (You read this right. Sanzaru sets up a cliffhanger ending that may never be resolved by making Sly look like a complete idiot.) Bentley and Murray look for Sly afterwards, but find no trace of him. Meanwhile, Cyril de Paradox is found and gets locked up by Interpol, and the Thievius Raccoonus is restored, but Sly has yet to come back. In the meantime, Murray becomes a professional wrestler, while Carmelita is as busy as ever at Interpol while also looking into Sly Cooper's disappearance. As for Bentley, he is still looking for Sly and has no idea where - or when - Sly is, but he is sure that Sly will be found.

With that, the game ends, the credits roll, and we get a look at what happened to not only Dimitri and all of Sly's ancestors, but also all the villains after the game: all of them are still in prison, but Penelope has broken out of the most secure prison in Europe and is sending "wish you were here" postcards to Bentley while Miss Decibel is also locked up but looking at the possibility of parole for good behavior. 

Achievements:

Final Chapter?: Beat the game.

Collectibles:

Sly Mask #53 - There is another hidden Sly Mask behind these boxes. Jump over the pit in the floor to reach it.

Sly Mask #54 - On the first pole in the Tennessee Kid Cooper section, jump left for a Sly Mask.

Controls:

Left analog stick: move
Right analog stick: move camera
X: Jump and double jump (hold X on second jump for hover jets as Bentley)
X + Circle: climb wall (Bob)
  • left analog stick: climb
  • Left/Right + X: leap over gaps
  • R1: slide down
Square: attack
Circle: 
  • interact (usually with anything that has sparkles) (Sly)
  • steal from enemies (from behind) (Sly, Bentley, any of Sly's ancestors)
Triangle:
  • knock enemies upwards (from behind; press Square to slam enemies down for stealth slam) (Sly, any of Sly's ancestors)
    • press Circle after knocking enemy upward to perform Silent Obliteration (Sly; replaces Stealth Slam; must buy on ThiefNet)
    • press Square for Stealth Slam (any of Sly's ancestors)
  • spin attack (hold to charge) (Sly)
  • charge attack (Sir Galleth)
  • throw bombs (Bentley)
  • Thunder Flop (in mid-air) (Murray)
  • spin attack (hold to perform) (Murray)
    • control with left stick (must buy on ThiefNet)
  • Raging Inferno Flop (in air; Murray; must be bought on ThiefNet)

L1: 
  • bomb aim (Bentley)
  • smoke bomb/flash bomb (Sly; must buy on ThiefNet)
  • aim/strafe mode (Carmelita; must hold button down)
    • left analog stick: move
    • R1: shoot (can only shoot in strafe mode)
L2:
  • hold for costume select menu (Sly)
    • hold down to stay in menu; use D-Pad or left stick to make selection
  • hold for weapon select menu (Bentley)
    • hold down to stay in menu; use D-Pad or left stick to make selection
  • hold for fist select menu (Murray)
    • hold down to stay in menu; use D-Pad or left stick to make selection
  • hold for shot select menu (Carmelita)
    • hold down to stay in menu; use D-Pad or left stick to make selection

L3: activate compass
R1: run (hold while moving to perform)
  • Paraglide (Sly; in air; must buy on ThiefNet)
    • Square: Paraglide Dive Attack (during Paraglide; must buy on ThiefNet)
  • Adrenaline Burst (Bentley; double tap to activate; must buy on ThiefNet)
  • Clothesline (Murray; double tap and steer with left stick; must buy on ThiefNet)
  • Cane Push (Sly; double tap; must buy on ThiefNet)
R2:
  • Trigger Bomb (Bentley; must have bomb on field to detonate manually; must buy on ThiefNet)
  • Focus Jump (Rioichi; hold and press X to perform Focus Jump when arrow appears while standing on spire)
  • Crackshot technique (Tennessee Kid; hold button to draw gun and focus, release button to fire)
    • right stick: aim
  • guttural roar (Bob)
  • Catapult Crash (Sir Galleth; hold to charge)
    • X: press while holding R2 to perform Catapult Crash
    • Triangle: press while holding R2 to disconnect from hook
  • Fast Climb (Salim; must be on rope, hold to perform)
  • Super Jump (Carmelita; hold and press X to perform; must buy on ThiefNet)
R3: Binocucom
  • Right analog stick: move
  • Left analog stick: zoom in and out
  • R1: take picture (when applicable) (Sly, Bentley)

Start: pause menu
Select: map
  • Left analog stick: zoom in and out, switch between map and status
  • Right analog stick: move map
  • Circle: back

Wednesday, March 1, 2023

PrinceWatercress plays Blood Omen: Legacy of Kain - Part 27 of 41


Before going to the cathedral, the in-game clock caused me to take a detour. We do get some stuff out of it, though.


0:52 - Instead of entering the cathedral, I go back to the gate on the way to Abernus that only opens on a full moon and go through it.

1:07 - When you enter this maze, you'll have to move around and find switches to move the turnstiles around and open up more of the maze. The first switch to hit is to the right of where you start, and it triggers a secret (see below). Thankfully, the path through the maze is pretty linear as long as you pay attention to what you are doing. Be sure to look around fully, too, as you can find two rune triangles and a blood vial.

8:20 - The Lightning spell. This spell uses a lot of magic power, but destroys all on-screen enemies.

12:38 - Not much else to mention here, so...enjoy this cutscene? The rest of this video is me trying to get back to Abernus Cathedral.

Secrets

83. - When you enter this maze, you'll have to move around and find switches to move the turnstiles around and open up more of the maze. The first switch to hit is to the right of where you start, and it triggers a secret.

Thursday, February 2, 2023

PrinceWatercress plays The Bugs Bunny Crazy Castle 4 - Part 27 of 27


All well that ends...WHADDYA MEAN THIS IS A RETREAD OF THE THIRD GAME


Stage 13-1

Welcome to the final level! In this one, you'll be running from Taz as well as the miniature tornadoes that he shoots at you. The miniature tornadoes have limited range but they also explode when they go as far as they can go, too. You'll need to run from door to door like your life depends on it, and once you get the eight keys here, you must immediately get to the bottom center of the level in order to escape Taz.

Once you make it to the exit, Bugs will find a chest and Lola Bunny will be inside. The game's ending straight up copies the last game, except with less effort. I did all this for that. Wow. Wonderful. But at least this game is over, and so is this blog series.

Sunday, December 19, 2021

HCBailly and JB play Secret of Mana - Part 27 of 41


Now that we can fly to just about any place that we want, we head to the town of Mandala. You'll have to come here quite a few times just to figure out where to go next.


Mandala


The armor here (Magical Armor, Ivy Amulet, Circlet) is pretty good, especially the Ivy Amulet, which can protect you against Sleep Flower.

By talking to the NPC's, you can learn about Sage Joch and his disciple Jehk in the Lofty Mountains. You'll be seeing them later on. The house in the southwest corner houses Watt if you need to forge weapons.

Going north takes you to an ancient temple which is mentioned by some of the NPC's. If you enter the temple, there will be some orbs, and you can interact with them to see visions of the time of the Mana Fortress war, which seems to be our present day 1993 before the Mana Fortress war destroyed civilization to the point that it had to be rebuilt. One of the orbs is a reference to Jeopardy! (which is replaced with "Who Wants To Be A Millionaire?" in the 2010s remake).

Lofty Mountains


To the south is the Lofty Mountains. The Trap Flower will cast Sleep Flower and Energy Absorb on your party, while the Bomb Bee is a more powerful version of the Buzz Bee from Gaia's Navel whose pincer shots will explode upon hitting the ground.

Shortly after the entrance is a cave. This is the entrance to the Palace of Darkness, but you won't be able to go there until later.

The Eggatrices are bird enemies that hatch out of the eggs that are here, should you touch the eggs. Thankfully, they cannot cast spells, and they have to be right next to you to do any real damage.

You can find Neko near the end, but only if there are less than three enemies currently on-screen.

At the top of the mountain, you'll meet a red, bird-like creature. If you talk to him, you'll find out that Sage John when to the Palace of Darkness, which we just went to. If you don't know where to go, talk to this guy. You'll find out where you need to get next.

Palace of Darkness


The Fierce Head will spit lasers at you and will also spawn Grave Bats.

The Dark Knights will cast Wall, which sends any magic spells used against it back at the spell caster. Thankfully, they are as easy to hit as the Armored Men from the Imperial Palace.

The Dark Ninjas from the Imperial Palace make a return appearance here, as does the Emberman.

Thursday, November 25, 2021

PrinceWatercress plays Sly 3: Honor Among Thieves - Part 27 of 42


In this episode, Bentley and Penelope find the treasure map in a chest, but the chest is lined with a trap that puts Penelope in peril. It won't be the last time something befalls her, either.


Sly's Shadow Power Level 2 is the same as Level 1, except you can move faster and attack while invisible.

Bentley's Reduction Bomb makes enemies smaller if it hits them, just like in the second game. This bomb is laid down like the Triangle button bomb and requires special weapon energy to work, but if you can shrink down your enemies, they get weaker and easier to defeat.

Dynamic Duo

You'll need to play as Bentley to start the mission.

Bentley and Penelope will launch a hover-spectrometer into the air to scan for metal structures that resembles a safe or chest. Unfortunately, one of the pirates shoots it down with a musket, breaking it into seven pieces. Since Penelope's gear is designed to self-destruct if anyone gets their hands on it, Bentley proposes a way to read the data on the hover-spectrometer without touching it. Since Penelope's RC car has the same code base as the hover-spectrometer, she can easily download the contents from the hover-spectrometer's matrix.

There's no timer here and there's no way to fail the mission via somebody taking the hover-spectrometer parts, feel free to take your time and use L3 to find the seven parts. Be ready to build up speed to launch off ramps to get to where some of the parts are, and use your guns to destroy any enemies in your way.

After you get all seven pieces of the hover-spectrometer, Bentley and Penelope find out there is a massive chest near the top east facing windows of Captain LeFwee's keep, and head off towards the castle. Get to the waypoint, and you'll get a cutscene where Bentley and Penelope get to know each other a little more as Bentley proposes that they look for an escape route after all of the bridges to keep are up. You'll need to cross a bridge to the beach and land on crates and other platforms to get to the castle.

At the door, blow up the wooden support beams with Triangle button bombs to open a path leading up to the roof of the keep. Bentley and Penelope will notice Captain LeFwee, and spy on him as he forcefully replaces his Captain of the Guard, who doubles the patrols on LeFwee's command. Equip the Reduction Bomb and use it on the enemies nearby to defeat them more easily, then you'll have to open a double-button lock. You'll find a chest on the other side of the door.

As Bentley gets Penelope's tools, Penelope studies the chest only to find a blinding powder inside. From here, you'll have to use the Grapple Cam to help Penelope get back to the safehouse. The controls for the Grapple Cam are the same as ever, but it now has one of the turrets off Penelope's RC car, and you can fire at enemies with R1. Be sure to hold it down to get rid of enemies, and use it to shoot the bridge down near Penelope's initial whereabouts. You don't have a heat gauge, so don't worry about the turret overheating. Thankfully, Also, pressing Circle lets you call out for Penelope by making bird calls. If Penelope responds immediately after you press Circle, that means that she is not too far away from the Grapple Cam and will be able to find your position. Keep her close to the Grapple Cam and use L3 to find the safe house. Once you get her to the safe house, the job is done.

Controls:

D-Pad/left analog stick: Move
X: jump/double jump
Square: attack
Circle: use to interact with sparkles, steal from enemies (from behind; with Sly), grab objects and stunned enemies (with Murray; press Circle afterwards to grab enemy out of air and press again to shake them, or press Square to throw them)
Triangle:
  • charge up cane, knock enemies into the air (from behind; with Sly, use Square afterwards to slam enemy down/use Silent Obliteration)
  • drop bombs (Bentley)
  • uppercut (Murray; press Circle afterwards to grab enemy out of air and press again while holding enemy to shake them, or press Square afterwards to knock enemy out while in mid-air)

Select: access Gadget Grid
D-Pad/Left analog stick: select gadget/ability
L1, L2, and R2 buttons: assign gadget to button pressed; gadget can then be used with that button

Start: Pause/unpause
  • D-Pad/left analog stick: choose options
  • X: confirm choice
  • Triangle: back out of choice

L3: bring up waypoint

R3: use Binocucom
  • Left analog stick/D-Pad: look around
  • Right analog stick: move in and out
  • R1: take picture

R1: run (hold down)
  • use Paraglide (as Sly; hold down to use, must purchase first)

Right analog stick: move camera

As Carmelita:

  • Left analog stick/D-Pad: move
  • Right analog stick/D-Pad: move camera/aim
  • Triangle: toggle between strafe mode and free movement
  • Square: kick
  • Circle: mega jump
  • X: jump and double jump
  • R1: shoot

As The Guru:

  • L1 (hold): transform
  • Circle (in mid-air, behind an enemy): mind control
    • Left analog stick/D-Pad: steer enemy
    • X: jump off enemy and launch enemy forward
    • Square: attack

Grapple cam controls:

  • D-Pad/Left Analog Stick: aim camera
  • X: shoot/grapple with hook
  • Circle: distract enemies
  • Square: self-destruct (hold down)
  • R1: fire turret

Hacking mini-game controls:

  • Left analog stick: move
  • Right analog stick: aim and fire gun

As The Panda King:

  • Square: flame chop
  • L1: hold to load fireworks, release to attack with stored fireworks
    • Right analog stick: sweep over multiple targets

Thursday, October 28, 2021

HCBailly plays Final Fantasy II AGAIN - Part 27 of 65


In this entry, we get our hands on a pirate ship on our way to find the Dragoons.


Altair


Talk around. You'll find out Deist is on a distant island east of the snow plains. All you need to do is take a ship from Paloom and sail south.

Talk to Gordon in the throne room to Learn a new keyword: Dragoon. Ask him about Dragoons, and he'll tell you that they are the only ones to understand the language of the Wyverns. Learn "Wyvern." A Wyvern might still exist.

It'll take a while to head down to Deist, since you can't walk to it. Head to Paloom.

Be sure to get a few Antidotes and a Cottage before you leave.

Paloom


When you head to Paloom, you'll see a girl near the entrance. Talk to her. This is Leila, and her ship is about to head over there. She'll wait outside the town for you.

Leave Palm and head to the ship that's directly east of the town. In the middle of your voyage, she tells you to give her all your stuff and she'll spare you. She then sics her entire crew on you. The Pirates are really, really easy. When you beat them all, she gives up and asks you to kill her quickly. Your party has other ideas, and asks her to join your party. She agrees.

The GoldPin Leila has equipped is really useful, so put it in your inventory if you actually want to power her up. It increases the wearer's Agility by 10, has a light weight and has no Magic Penalty.

Equip weapons into Leila's left hand in case you give her a shield, so her attack power doesn't seriously suffer. If you have the Trident, equip it on her. She also has a Bolt spell that will come into play against a few creatures.

Salamand


The isle of Deist is just east of Bafsk, but before you go there, head to Salamand and buy a Warp tome.

The Helldivers can be met on the Dreadnought, but you can meet them on the way to Deist. They are Magic Beast-type enemies, and the Wing Sword will do a lot of damage against them.

The KillrFish (KillerFish) have around 100 HP each, and you can easily kill them with lightning spells.

The SeaSnake is a Rank 4 enemy with 300 HP. It is weak to lightning-based spells.

Bafsk


Be sure to use Bafsk as a quick place to heal and take care of stuff for this point in the game. Also, the villagers say new stuff if you've destroyed the Dreadnought.

Thursday, July 22, 2021

PrinceWatercress plays Bio Menace - Part 27 of 37


In case it isn't obvious, Episode Three starts hard and stays that way. This is true even on easy difficulty.

Fort Entrance

Now that you're inside the fort, you're still going to have to jump over mines and shoot down monsters and turrets. The big robot shortly after the start will shoot bombs, and you'll see a few of them throughout the stage. You will have to deal with plenty of enemies and turrets as you climb to the top after reaching the far right end of the stage.

The upper-right corner of the stage has a 1-Up behind the door.

One of the doors has a cyan shard. You'll need that shard to get the hostage in the upper-left corner of the stage, and you'll have to annihilate one of those bomb-shooting robots to get to them.

The 50,000 point icon leads to a spike pit of death, so don't even go for it.

Monday, June 14, 2021

PrinceWatercress plays Ratchet and Clank - Part 27 of 38


Oltanis Orbit is the longest area so far in the game. Be prepared to spend a lot of time here just completing it.

Gemlik Base - Oltanis Orbit

When you head to Oltanis Orbit (or anywhere else at this point), Drek will command Captain Qwark to get rid of Ratchet and Clank in a starfighter once and for all. By the time Ratchet and Clank head to the base, Drek's ship is nowhere to be seen, and Ratchet and Clank decide to find a faster ship to catch up with Drek.

This is going to be a long area to get through; as a matter of fact, it will be the longest area to get through at this point in the game.

The pulsing towers with the multi-colored lights at the top that you'll see throughout the base control the force fields. You'll need to fire the Devastator or Visibomb Gun at them to disable the force fields.

You'll have the usual flying enemies that will drop down and try to bite you when you get close enough showing up again. Also, the humanoid enemies here will fire flamethrowers with limited range out of their guns.

The guys with the turret guns can only be taken out from behind. Thankfully, when you destroy them, they will never re-spawn.

7:47 - For this Invinco-Lock, the laser on the inner ring needs to be at 6 o'clock. For the middle ring, the two lasers need to be at 8 o'clock and 10 o'clock, putting the blocker at 6 o'clock. For the outer ring, you'll need the laser at 3 o'clock and pointing at nothing, putting the blockers at 1 o'clock and 3 o'clock.

9:06 - For the inner ring, you'll need the lasers at 1 o'clock and 6 o'clock. For the middle ring, put the laser at five o'clock, keeping the blocker next to it at 6 o'clock. For the outer ring, you'll need a blocker at 3 o'clock and the laser at 10 o'clock.

If you see any ships, take them out, preferably from far away and with the Visibomb.

The green canisters will explode when you hit them, and if any enemies are near the explosions, they will go down.

Once you're "inside," you'll see pools of acid that rise and fall. Make sure not to touch the acid, especially when using the Swingshot. Make sure the acid is all the way down for the Swingshot part. Also, watch out for the orange wall of what seems like lava at the Magneboots area. At least they don't automatically kill you.

19:46 - For the inner ring, place the laser at 3 o'clock. This puts a blocker at 11 o'clock. For the middle ring, put the lasers at 1 o'clock and 4 o'clock. For the outer ring, put the lasers at 5 o'clock and 6 o'clock. This will put blockers at 2 o'clock and 3 o'clock. Now you can take out the turret guys behind the door.

Shortly after this, look into the portholes in the wall and fire the Devastator through them to get rid of more turret guys.

Near the end, there will be a vast room full of enemies of both the humanoid variety and the winged creature variety. Destroy the enemy generators as you run around the room so you have all of the enemies in one place. With this going on, you'll have the humanoid enemies doing a lot of the work for you. With that out of the way, you'll be able to approach the end of the planet.

When you reach the end, you'll see Captain Qwark, who will challenge you to a space duel. You'll soon find a ship, and you'll chase him. The D-Pad or left stick moves, X accelerates (and you'll want to hold it the whole time), R1 is the machine guns, and Circle is the missile launcher. Shoot down the thrusters on the back of the ship as you follow him, and avoid the mines, When he sucks you towards him, shot down the missiles. As always, your health and the radar is in the lower-right corner.

When he sends ships after you, keep holding X and shoot the ships down one by one so you can damage Qwark again. As the ships go down, they will leave crates with either crosses on them (that give you health) or G's on them (with give you missiles). Sadly, the crates give you so little health back, so you have to take as little damage as possible or else you're starting this whole battle over.

Once you beat Qwark, you'll find a new ship and an Infobot that tells you that Drek's forces have already bombed Oltanis. Ratchet soon realizes the gravity of the situation and starts taking what is going more seriously.

At the end of the area, there is a place where you can wall jump upwards to a elevator where you can get the Gold versions of the following weapons: The Glove of Doom, the Blaster, the Bomb Glove, the Pyrocitor and the Suck Cannon. If you have enough Bolts [b]and[/b] Gold Bolts, you can improve one of these weapons.

I get the Gold Glove of Doom here. This makes the robots that come out of it bigger and more destructive.

Controls

As Ratchet: 

Control Pad/Left Analog Stick: move
Right analog stick: move camera

When hanging off platforms:
  • Control Pad/Left Analog Stick: move
  • Forward+X: vault up
  • Back+X: drop down

X: Jump and double jump
  • R1: stomp (must have Thruster-Pack)
Square: strike with wrench
Circle: pull out/shoot currently equipped gun/use gadget
Triangle:
  • quick select (hold and use in conjunction with Control Pad or left stick to switch guns; menu can be customized in Quick Select on the pause menu
  • double tap to switch between two most recently used Circle button weapons/gadgets

Select: Map
  • Left stick/D-Pad: move map
  • Right stick: Zoom in/out
  • X: view missions
  • Circle: play Infobot for planet
  • L1: previous map
  • R1: next map
  • Triangle: Exit
Start: Pause menu
  • Control Pad: select option
  • X: confirm option choice

L1: tap to quickly center camera; hold for first-person view (hold button and use left stick or D-Pad to look around; let go of L1 to move camera back behind Ratchet)
  • Square: wrench boomerang
  • Circle: fire gun
L3: see health and Bolt totals
R1/R2: crouch (hold down)
  • Square: wrench boomerang
  • Left+X or Right+X: side somersault
  • Down+X: backflip
  • X (while running): long jump (must have Heli-Pack/Thruster-Pack)
  • X: high jump (must have Heli-Pack/Thruster-Pack)
  • Double tap: hover (must have Thruster-Pack equipped)
    • L2: strafe left (while hovering)
    • R2: strafe right (while hovering)
    • X: exit hover mode (while hovering)

In water:
  • Square: dive and descend
  • X: surface and ascend
  • R1: turbojets (must have Hydro-Pack)

Trespasser:
D-Pad or Left Analog Stick:
  • Up and Down: switch rings
  • Left and Right: rotate rings
Triangle: leave Invinco-Lock screen

As Clank:

Control Pad/Left Analog Stick: move
Right analog stick: move camera

When hanging off platforms:
  • Control Pad/Left Analog Stick: move
  • Forward+X: vault up
  • Back+X: drop down

Square: punch
X: Jump (press and hold in the middle of a jump to glide with Heli-Pack)
Triangle: command menu (hold and use in conjunction with Control Pad or left analog stick to choose commands)
Sunday, March 28, 2021

PrinceWatercress plays Gex 3: Deep Cover Gecko - Part 27 of 32


Now that I've gotten used to how My Three Goons is...let's do this, shall we?


0:30 - The third pawprint coin.

3:33 - The first bonus coin and the fourth pawprint coin. The gangster on the car needs to shoot the barrels, and you need to jump straight up while on top of them to avoid getting hit and get the pick-ups. If you miss out, you can aim and shoot at the pick-ups with the fireball power-up and it will still count.

6:52 - By shooting down all these windows, you can open up the path to one of the remotes and take out a whole bunch of goons. Some of the windows may require the tommy gun from one of the enemies to break.

8:01 - The second stack of funny money.

8:15 - The third stack of funny money, which is just near the second one, and an accidental fall to the fourth pawprint coin.

11:10 - The fifth pawprint coin.

12:00 - The sixth pawprint coin. The second barrel and the seventh, eighth and ninth pawprint coins are all on the other end. Dead bodies can be used as platforms to reach two of them.

14:10 - This is where Cuz is held. Freeing him by breaking the lock with a fireball will net you the ability to play as Cuz in a few levels and the level's third remote.

15:35 - Near one of the fly coins in this area is the second bonus coin in a sewer pipe.

15:49 - Despite wearing concrete shoes, these guys will still leap at you and grab you if you are on the surface of the water. There are also plenty of piranhas to kill and safes to break in the water, too.

18:38 - The third barrel.

19:47 - You'll need to make a wrap-around jump to get this fly coin.

20:29 - The third bonus coin. You'll need to be able to shoot fireballs to get it.

21:47 - Getting the coin, and the fourth barrel.

23:00 - The fifth barrel and the fourth and fifth piles of funny money.

29:48 - When in doubt, roast pigeons.

35:14 - The most annoying fly coin. I collect the funny money remote.

36:07 - The cutscene for getting one remote in Gangster TV/My Three Goons.