Showing posts with label FreezingInfernos. Show all posts

Thursday, January 24, 2019

FreezingInferno plays Castlevania: Dracula X - Part 5 of 5


And now, those places we didn't go during our hunt for Dracula.

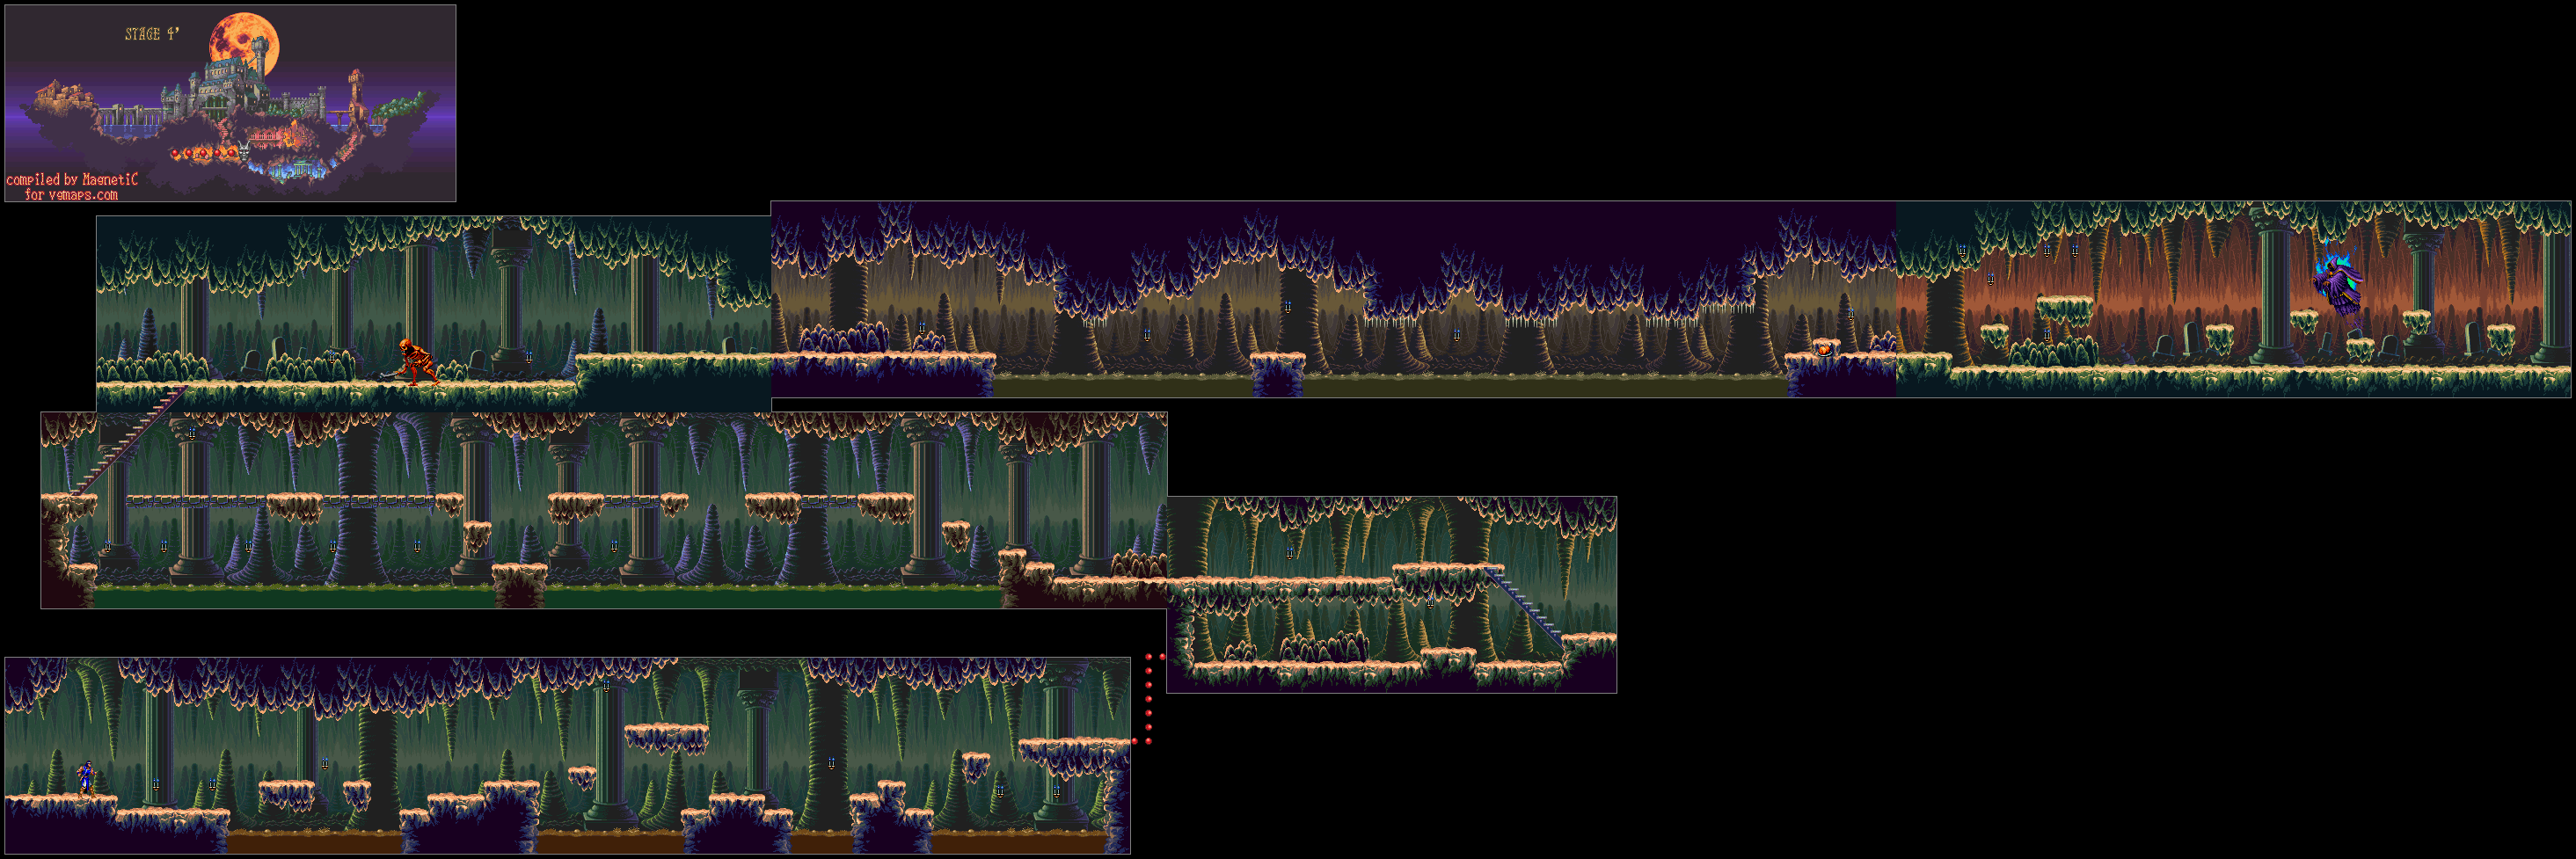
Stage 4'


If you fall down the pit in the room full of columns in Stage 3, you'll end up here. You'll also get the bad ending. Yay!

The mud pits will slow you down, cause you to sink if you stay in it long enough and contain mudmen that will pop out, so watch out. Also, there are plenty of jumping skeletons in the first sections. 

The Stopwatch uses five hearts to use and stops time - and enemy movement - for a brief time. Beware: there are some enemies that it has no effect on. The Item Crash is a clock shield that will damage any enemies unlucky enough to take it on.

In the second section, have the red Ax Armor come to the right and strike it repeatedly when it hits the wall so you don't have to deal with it anymore.

In the third section, don't jump on the rectangular platforms unless you have a death wish, as they will tilt and send you tumbling into the green mud below, which will eat at your health. This makes positioning yourself in such a way as to defeat all the bats essential. To avoid the last bat, jump onto the stairs. The ax won't work unless the bat is flying.

The big red skeleton throws his bone, dashes and swings, then jumps at you. Stay away from both attacks, then stay a bit close to him to stay under it when he jumps. Keep striking the mid-boss whenever possible, and move appropriately.

In the fourth section, you'll be using the mud floor to your favor. To get past the ceiling spikes, sink a little lower than usual so you jump out when Richter is halfway covered in mud. That way, your jump out of the mud isn't as high. You can destroy the rock in the ground to get some wall meat at the end if you need it.

In the fifth section, you'll get a bunch of hearts as well as a dagger. There is a hidden candle with a cross hidden in the ceiling between the entrance and the shorter platform.

You'll then face the boss. The boss is basically a dark magician, who I'm assuming is Shaft, Do not let the orbs touch you or fly around for a while, then will curse you if they touch you. Thankfully, you can strike them to get rid of them. Also, watch out for the skeletons that he can summon.

This boss also has a second form. The tombstones he creates will do some damage, but you can get rid of them. Both forms can easily be taken care of with the ax.

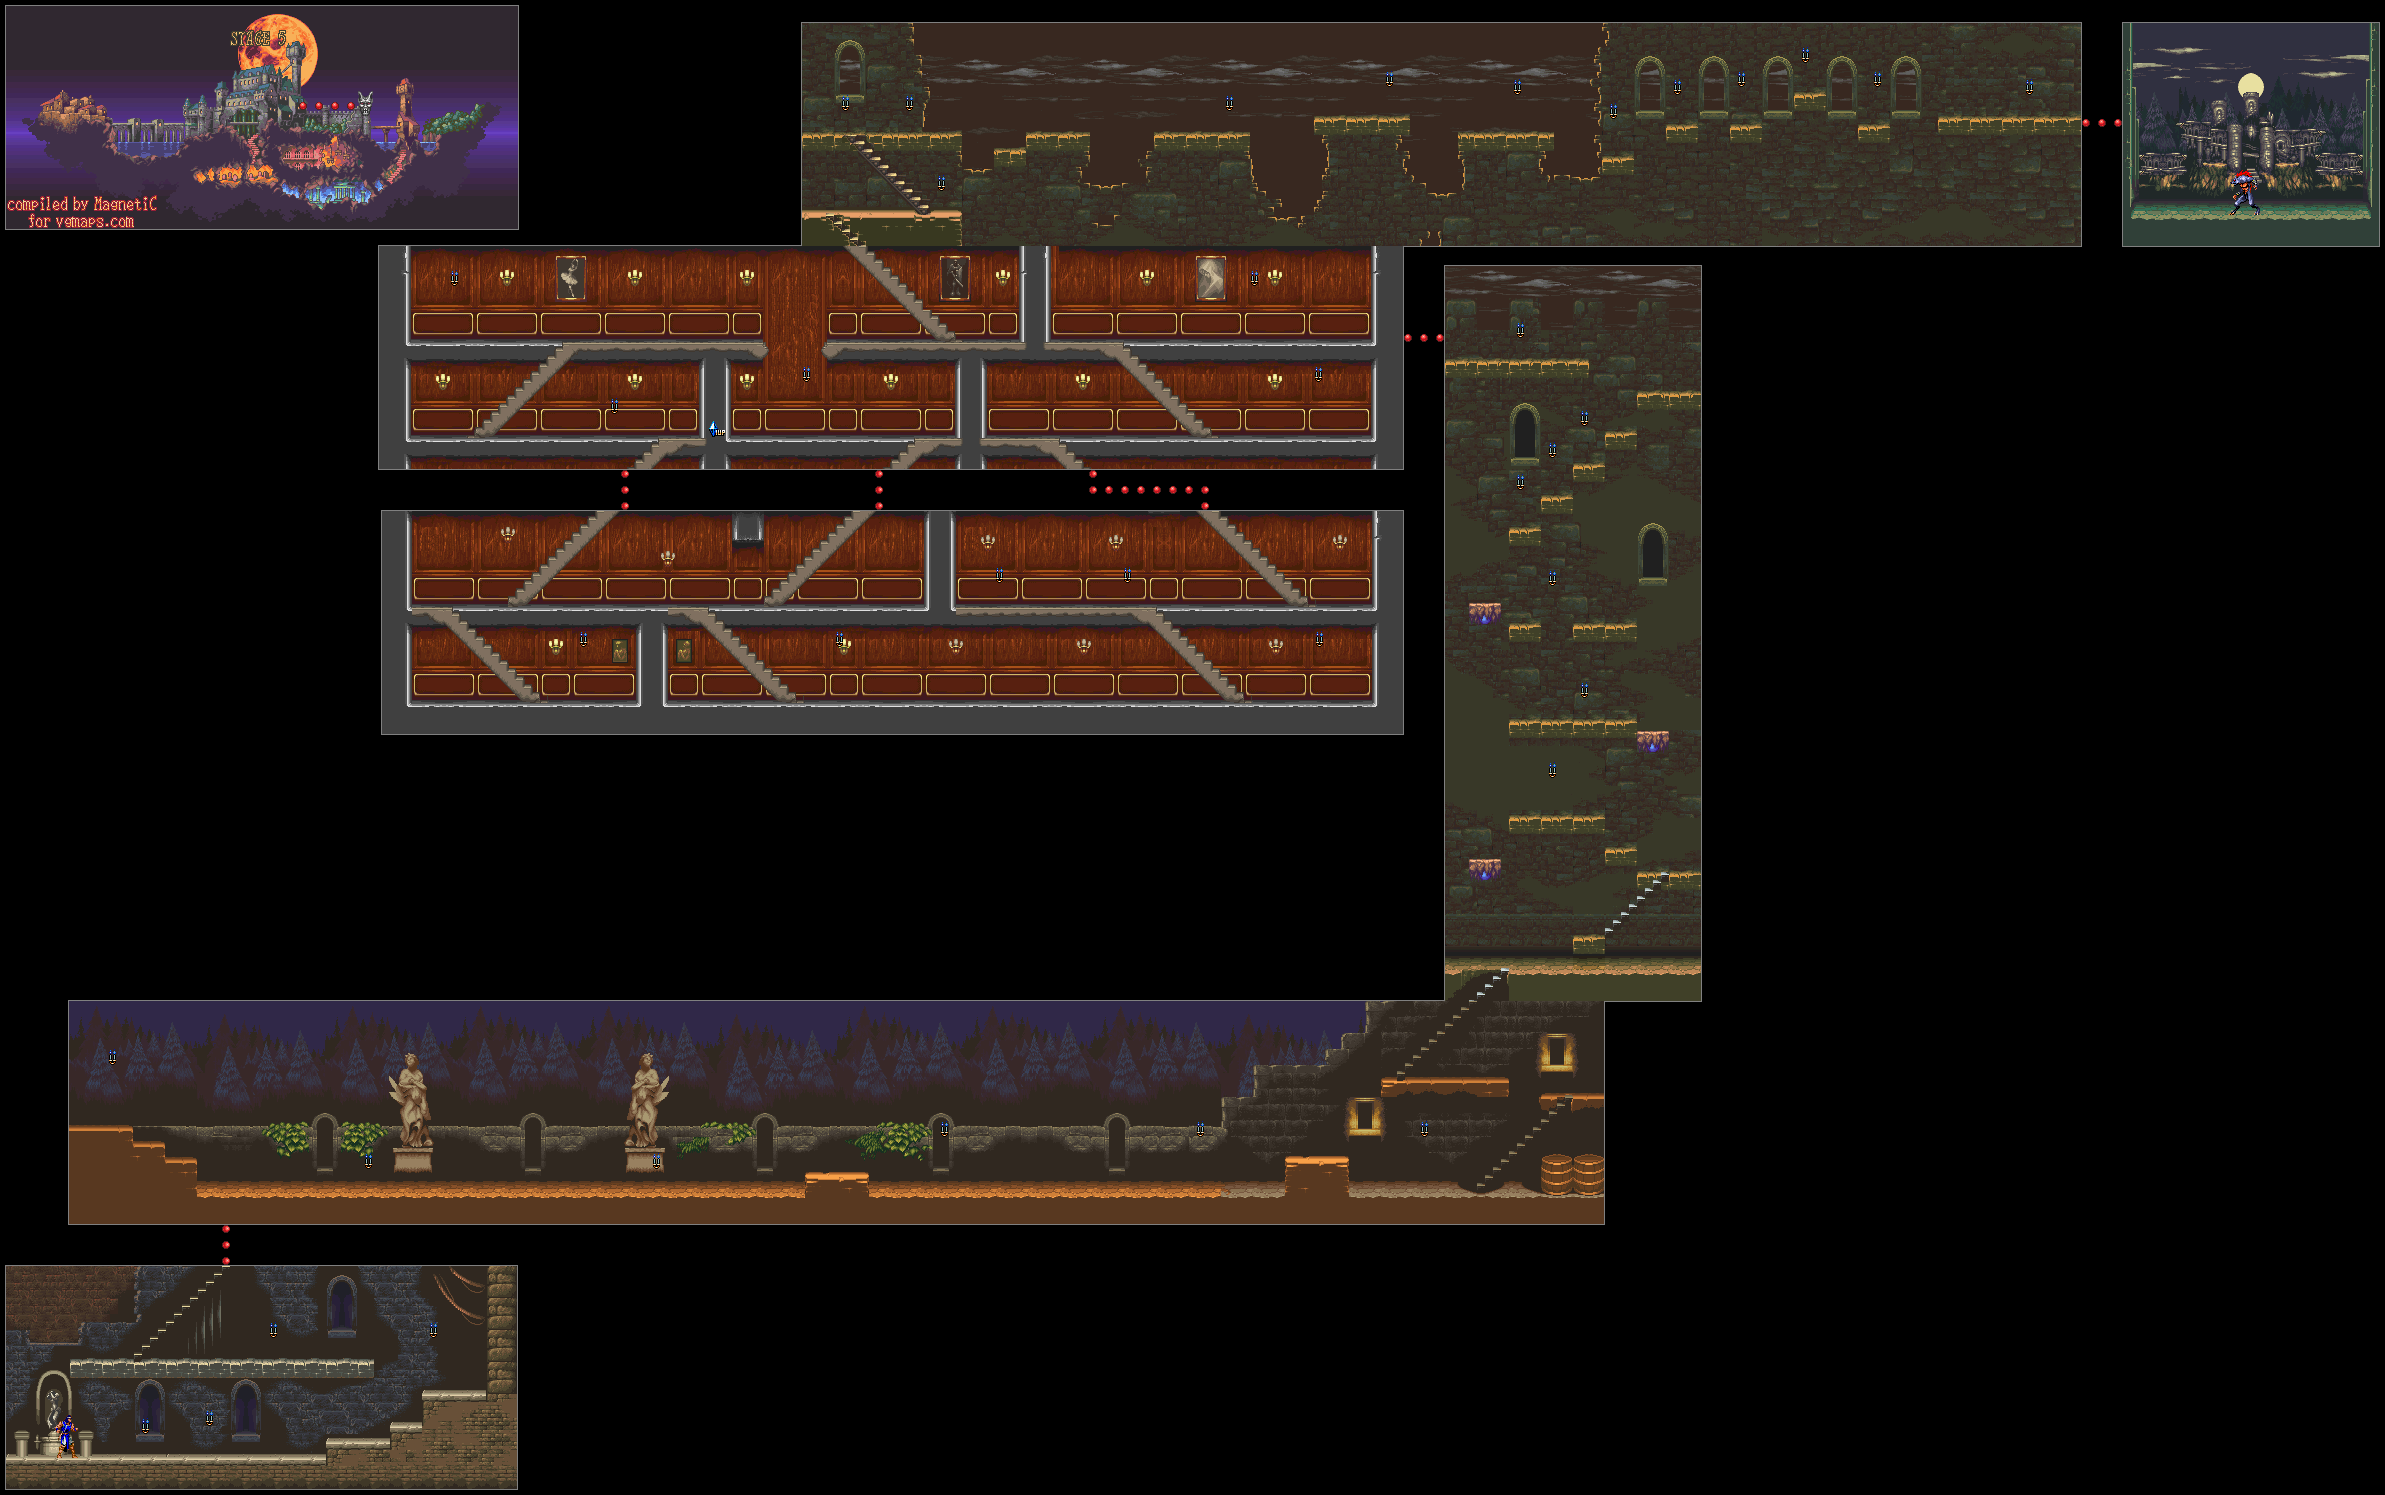
Stage 5


Hey, it's Opus 13!

In the second section, you'll not only see flea men, but also giant bats that drop flea men! If you have the ax, you'll have an easier time clearing the skies even though the bats will drop the flea men pretty fast.

The third section is a vertical climb, except the stationary platforms crumble as you stand on them. You have to be light on your feet to keep on jumping as well as take on the flying enemies that will try to knock you off. Thankfully, the platform at the top does not fall apart.

The fourth section is full of wood panel walls and Spear Knights. Watch out below when you take out the first one, then move forward get the other two to back off. You'll then meet some Sword Knights, but they are easy to take care of if you keep your distance and dodge when they move their swords upwards.

There are a few staircases to the left of the Spear Knights go down and to the left to get the meat. If you go up the stairs, go back down and strike the candle that has re-spawned, you can get the meat again!

Take the stairs going up and to the left after the Sword Knights. You'll have three more Spear Knights to deal with. At least you'll face two out of three on the lower level. At the gap with the fourth Spear Knight, you will have to time ax throws to get rid of the Spear Knight.

In the fifth section, it will be platforming, birds that swoop at you and blue Ax Armors that slow you down. At least the platforms don't break.

The boss here is a werewolf. Stand just to the side of center for a few free hits, then keep your distance. If he ducks, be ready to jump over a slide. If he jumps to the wall, get back when reaches to the jump. If he jumps all the way up in the center, be ready to move around and strike to avoid the pinball attack. When he runs out of health, he turns into a naked man and disappears.

Stage 4


Remember that boss we skipped to head to Stage 5'? Here's how you fight it in case you lost the key and/or did not save Annette.

The boss will be different here if you did not save Annette, Annette (or a girl who looks just like her; I'm assuming it's Annette) gets consumed in some way by a giant skull and gets turned into a succubus. The ax and the cross are pretty good sub-weapons to use here. Just watch out for the eyes when they turn into fireballs; they will home in on you. They can also turn into blue and orange orbs that move around in more or less a straight line. They can also turn blue and shoot lightning downward. Watch out when lightning moves up and down the eyes; that means lightning is about to strike.

If you fail to save Annette and/or Maria, you'll get a different screen at the end where Richter Belmont looks back on the village on horseback.

But hey, you finally beat Dracula X! Congratulations!


FreezingInferno plays Castlevania: Dracula X - Part 4 of 5


We've got the good ending, but it's not over yet. An alternate ending will be shown in the next entry!

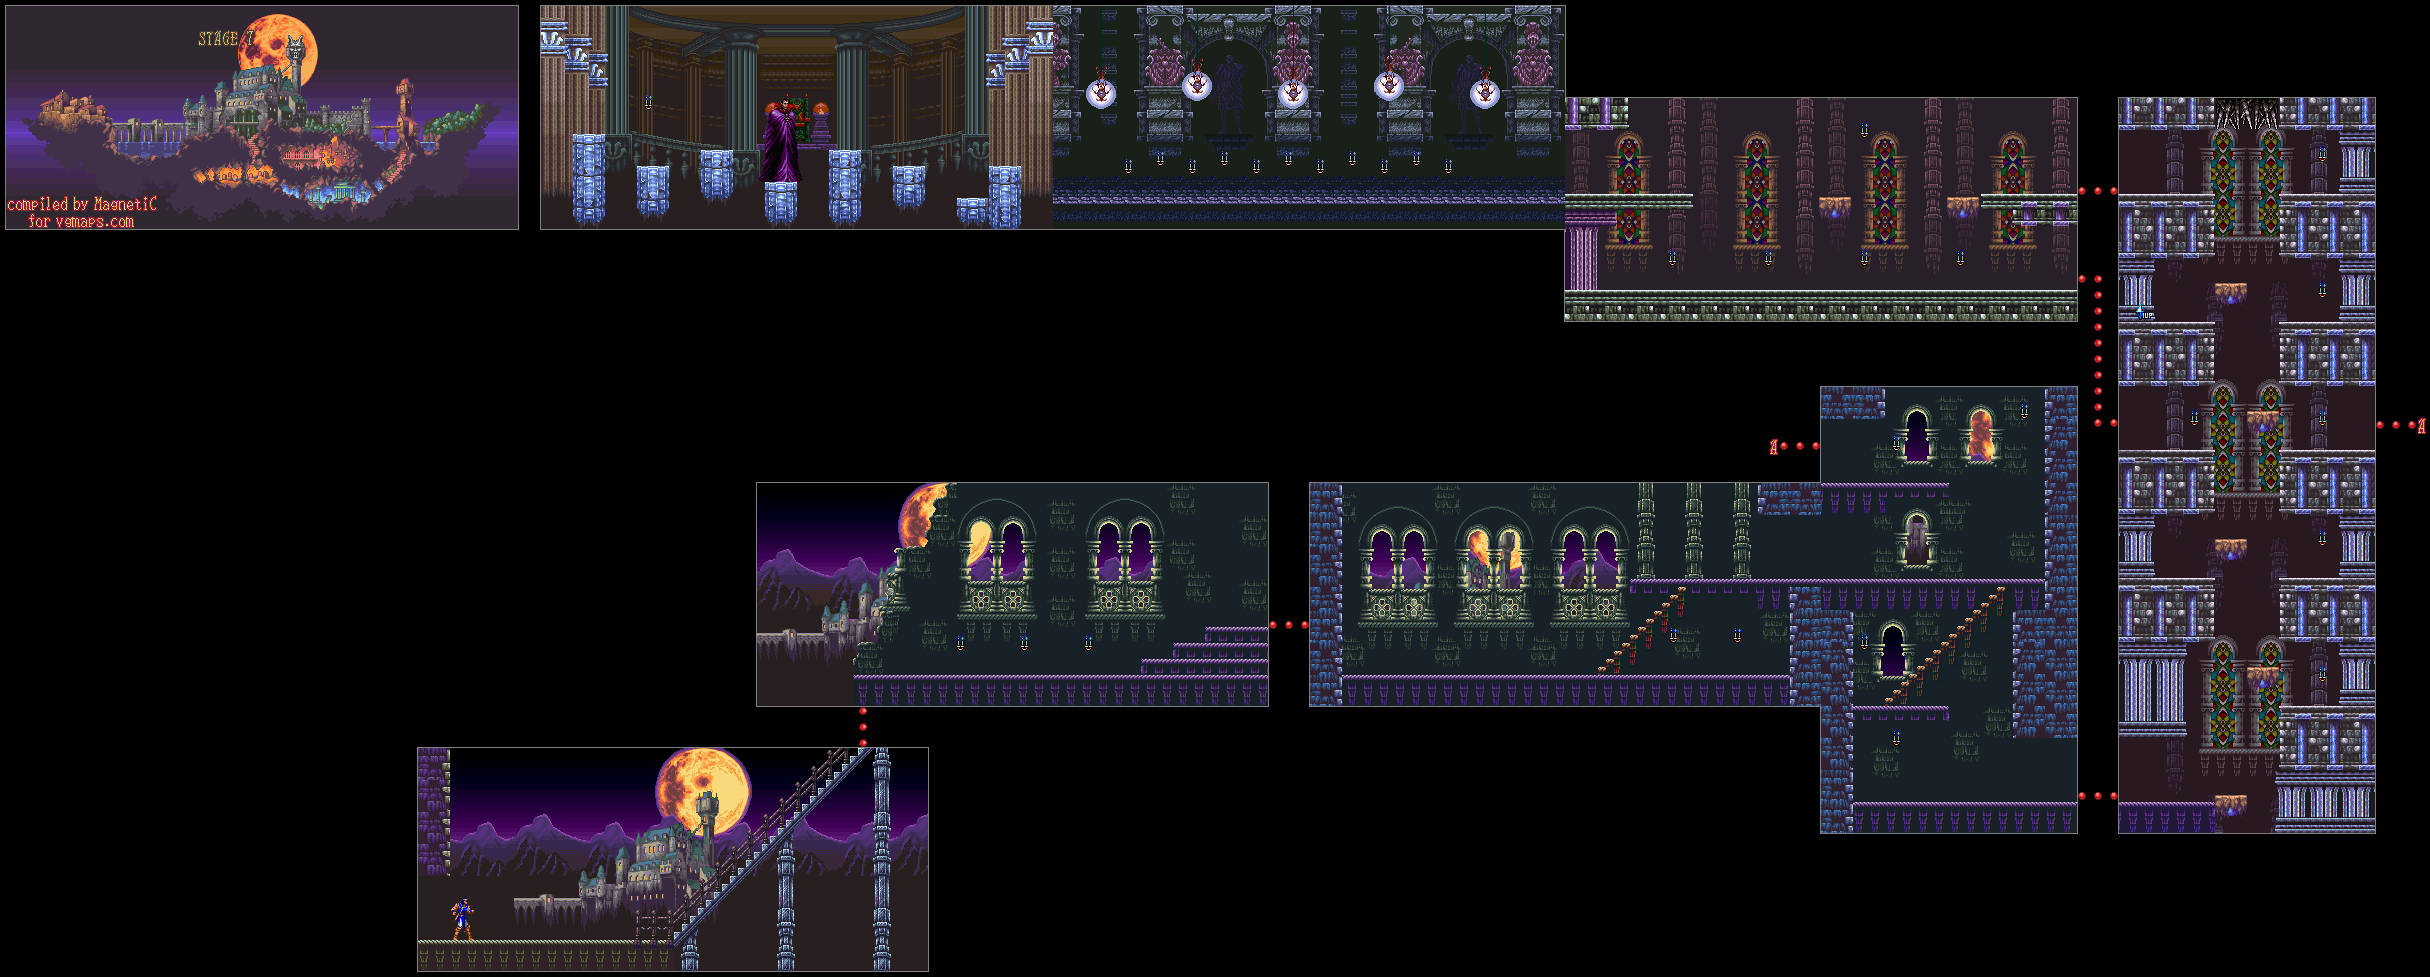
Stage 7


As soon as you make your way up to the right and go up the stairs, you'll be making your way into the castle while fighting zombies, Bone Pillars and a Bone Dragon. Make your way down after the Bone Dragon, then you'll be taking some moving platforms up while dealing with Spear Knights and Medusa heads.

Midway up, you'll have a choice between left and right. Left leads to a dead end but also gives you candles you can whip for things. The right leads to more power-ups, but if you drop down, you're going to be backtracking for a little while back to the vertical section with all the moving platforms.

Above that left path, you can strike the column to the left multiple times with the whip to find a hidden 1-Up.

All the way to the top to the left is the area above the dead end. Be ready to jump. If you can hit the candle up top, grab the jug on invincibility, land back on the platform and somehow make your way to the left, you can take out the Ax Armor that awaits on the other side.

The candles in the next section give you multiple sub-weapons as well as some big hearts. Get the Ax, you're going to need it.

The next room is Dracula, and the floor is full of columns and instant death pits. The candle all the way to the left contains health-replenishing meat, so save it until you really need it.

There are five platforms in Dracula's room. Standing on the center platform gives you a good way to hit Dracula from afar. If he is on the platform left of center or the far right platform, you can jump up and hit Dracula in the head - his weak point - with the Ax. Be careful on the far left platform; it is too easy to hit the meat candle.

Dracula can spawn right on top of you, but the good news is that he doesn't hurt you by touch until he materializes all the way. Because of that, you can jump away from him and hit him in the head with the whip.

If you hear Dracula laugh, but cannot see him, move to the side so his fireballs don't spawn.

Dracula has two fireball attacks: a three-way shot that can easily be jumped over on a higher platform (or ducked under on a lower one) and two big fireballs that advance somewhat slowly and can be ducked on a lower platform. All the fireballs can easily be destroyed with the sub-weapons (especially the Ax).

When you beat Dracula is his usual vampire form, he will turn into a demon and fly around. Demon Dracula has two moves: firing fireballs diagonally downwards at you and two energy waves that he sends towards both sides of the arena. If you keep throwing axes at him, you can mostly deal with his fireballs and you can easily kill him off, assuming you have enough hearts to do it.

After this, Dracula is done. Carefully jump your way to the center column and let the magic orb come to you. You're done. Dracula will get hit by the sun and turn into a puff of smoke.

Since you've saved Maria and Annette, you'll see both of them in the background of the credits screen.

Wednesday, January 23, 2019

FreezingInferno plays Castlevania: Dracula X - Part 3 of 5


We're getting close to Dracula, but before we can face him, we have to face Death like we've done in every other Castlevania game ever.

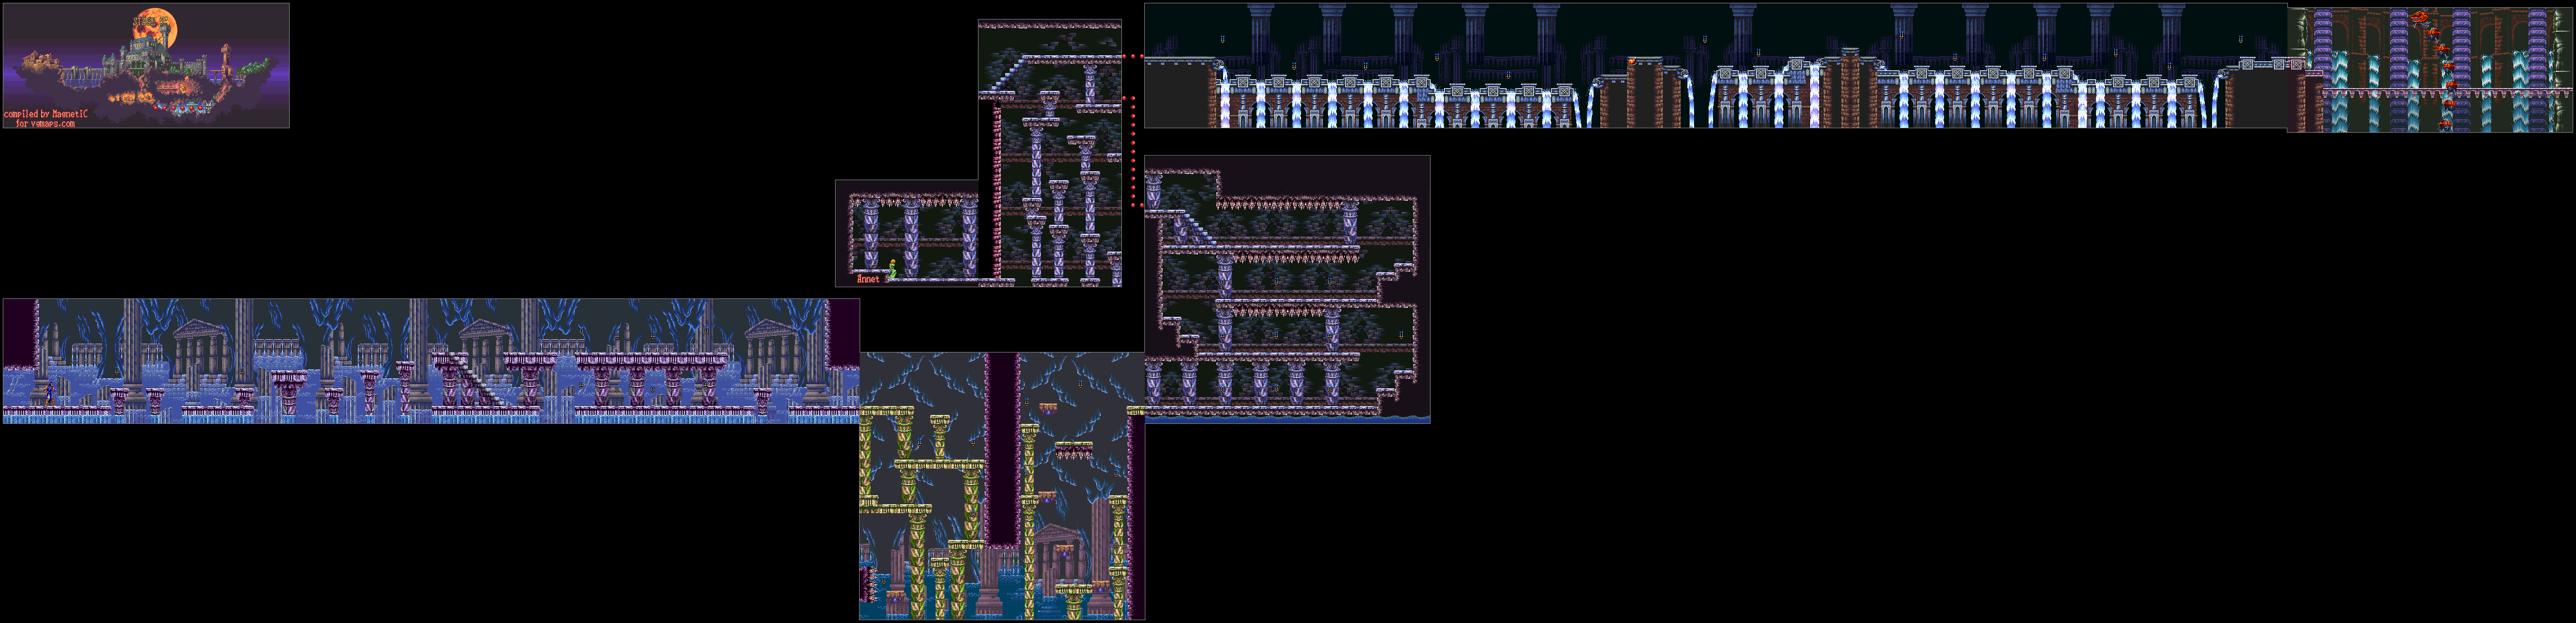
Stage 5'


The first section starts out in what looks like the ruins of Atlantis. Besides the mermen, there are water skulls that come out of the water and slowly home in towards you, and while they go down easily. they can be a pain in the keister when you're dealing with other enemies. Watch out for the Bone Dragon at the end.

The second section has some more arches and platforms to drop down from. The mermen and the water skulls are back, and this time you'll be doing some vertical platforming as well. Watch out for the spikes when on moving platforms.

The third section auto-scrolls upwards, and if you get caught at the bottom, you'll either drown or deal with water skulls. Thankfully, there's only a few floors of this. Watch out for ceiling spikes, and be ready to fight some Bone Dragons.

In the fourth section, you have another fork in the road. If you go up and to the right, you'll face the boss, but you won't get the good ending. If you whip the water spout in the wall to the left a few times to get rid of it, then go further down, you'll be leaping down some platforms to the right, then to the left and to the right again before finding Annette. She will tell you to be careful as Count Dracula grows more powerful by the minute. You'll be able to get the good ending, and your health will be refilled. Now you can go up and to the right.

In the fifth section, you'll be on a waterway facing even more water skulls and mermen. Be ready to take out the crow when you start seeing lizard skulls spitting out water.

The boss is a giant red dragon that jumps in and out of the water. Be ready to jump over him and get the occasional hit, but for best results, come in here with the cross as well as a ton of hearts to him the boss with the Item Crash tree times. Watch out for the fireballs when its head stops high up in the air, and when you beat the dragon, watch out for a tornado of water from below, as that is the dragon going for one last desperation attack. Grab the orb. It's time for Stage 6.

Stage 6


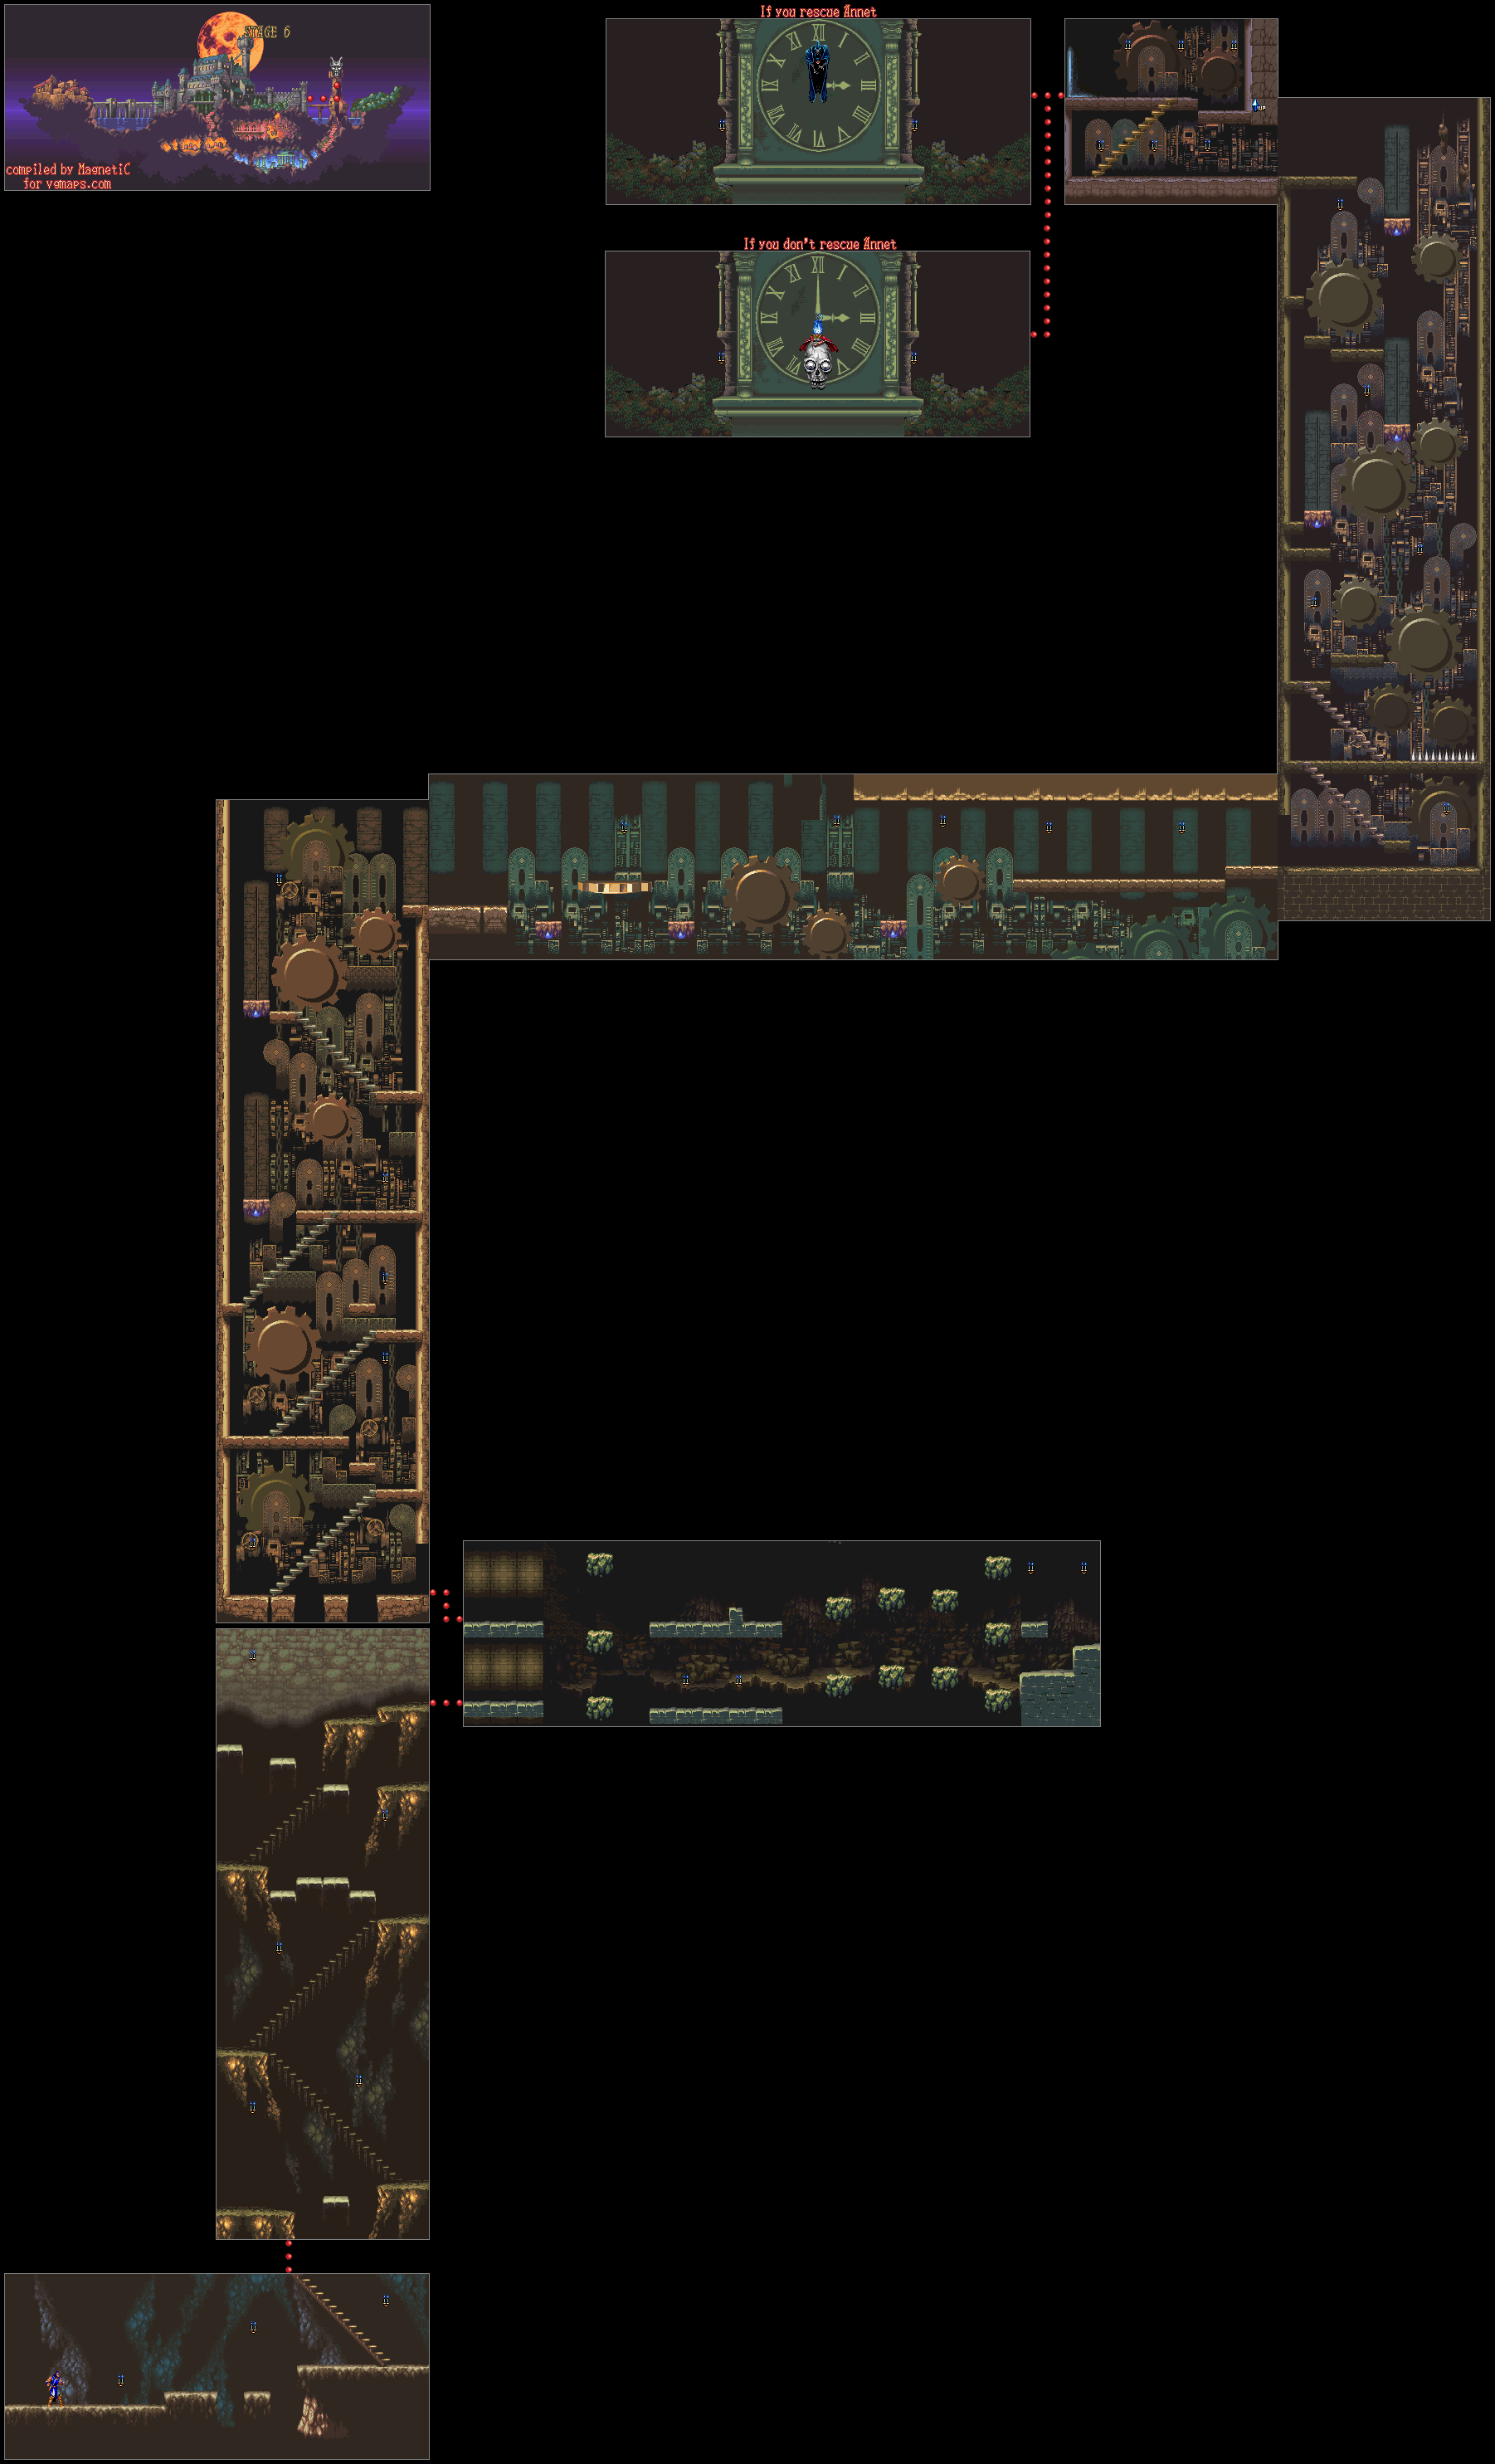
In the first section, be ready to fight some Blood Skeletons as you make your way up the stairs. In the second section, you'll be fighting crows that swoop down at you while also getting Bone Pillars out of your way. Take out the Ax Armor at the top and head on to the next section.

If you make your way to the right in the third section, you'll be able to get some wall meat, but you'll have to contend with some Spear Knights in order to get it. If you make your way up and to the left at the start, you'll enter the clock tower.

Here, you'll be going up stairs, taking on Spear Knights, You'll be leaping onto giant gears to reach some of the platforms, and you'll also have to watch out for a Spear Knight or two from below. Also, watch the sides for bats that fly in to make getting up the tower a rag.

The fifth section has more gears, but a few of them lay horizontal and also move you to the left or the right if you stay on them for long enough. When you get on the big gear following the flat spinning one, let it move you to the small gear to the right; otherwise, you're gonna die.

The sixth section is another vertical climb, except with more Medusa heads, more floor spikes and more platforms moving up and down. When you start seeing the platforms that move up and down, strike the candle to the left to get some health-replenishing meat.

Head to the left in the next section to face the boss, but before you do, strike the wall to the right of the doorway to find a hidden 1-Up.

The boss you fight at the top of the clock tower depends on whether or not you saved Annette in Stage 5'. If you saved Annette, you'll face Death himself. Do what you can to get rid of or avoid the scythes, and be ready to strike Death when he shows up. He may swoop in from below, so watch out. When he starts circling around a little bit, that is your best chance to strike him with the whip.

After enough damage, Death goes into his second form. Stand just at the "VII" on the clock face, duck down and whip to the right to get some hits in on Death's second form. Be ready to head to the right and duck down to avoid the attack where he jumps back and swoops towards the floor, then be ready to hit him again. If you have an Item Crash, use it here to do some big damage. After this, it's on to Stage 7.

Tuesday, January 22, 2019

FreezingInferno plays Castlevania: Dracula X - Part 2 of 5


Richter Belmont's redacted adventure continues through a mansion and into a cave. This should be fun.

Stage 3


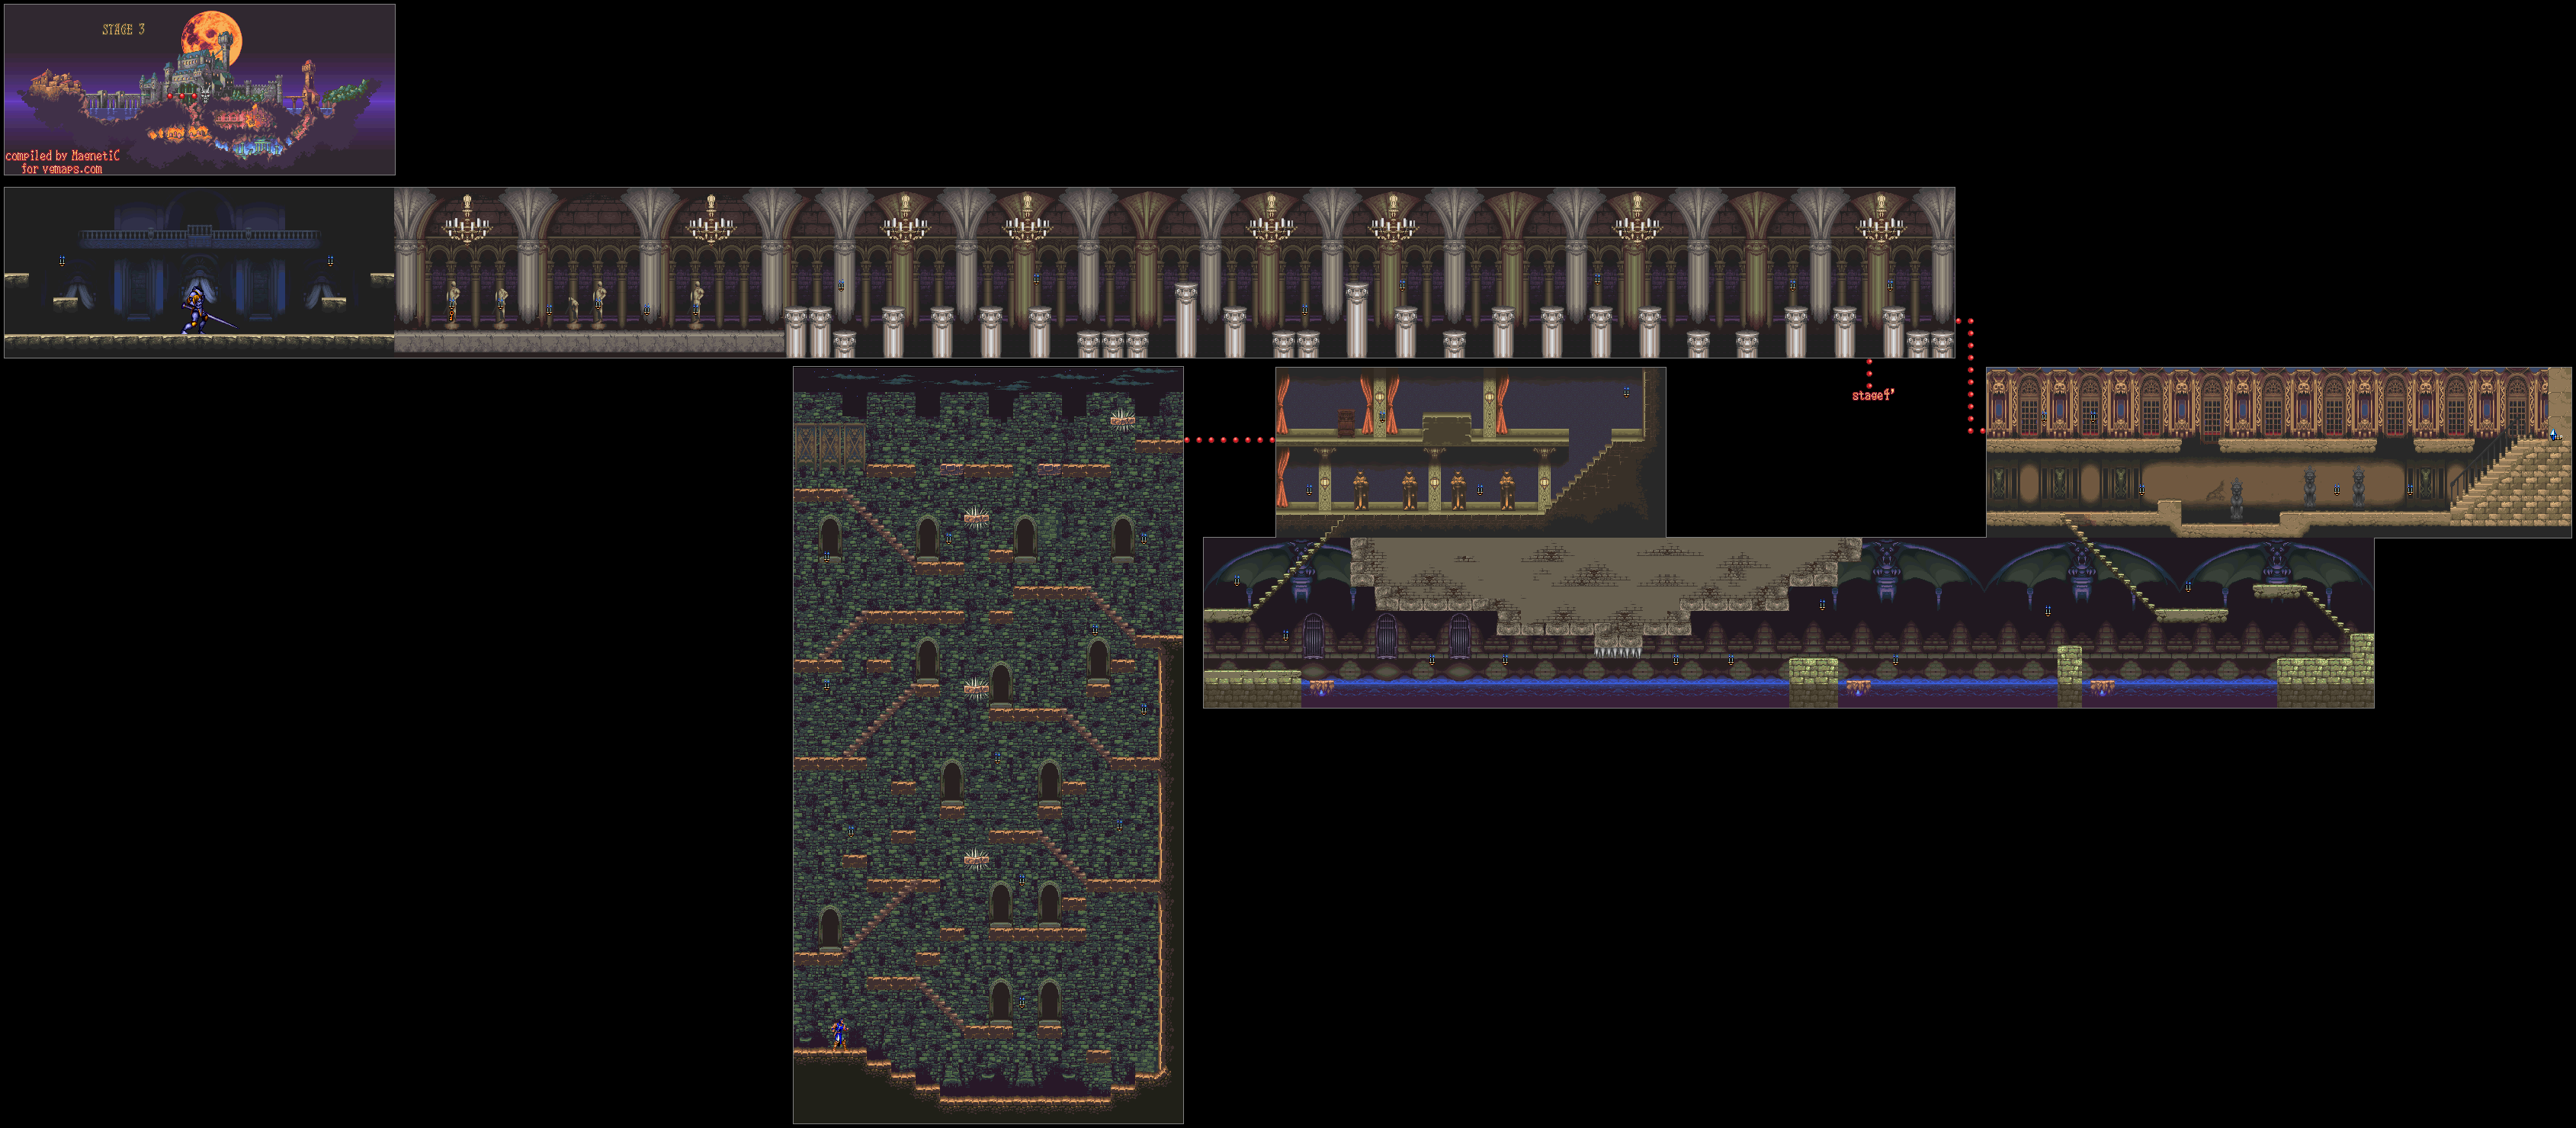
This stage starts with a rather vast room. Be careful, as there floating platforms with spikes on both the top and bottom. Use the backflip to get somehwere, if you have to, and take out the Medusa heads if they get in your way. Watch out for the platforms that will rotate and send you down when you land on them!

The second section brings back the Spear Knights. This part is simple.

The holy water takes three hits to use and creates a short trail of energy that travels forward for a few seconds. The Item Crash is Hydro Storm, a short rainfall of holy water that covers the screen and makes a return appearance in Symphony of the Night. Nice.

The third section has a platform moving across a bottomless pit of water. If you do not get on the platform immediately, you will have to wait for it. When you get on, duck down to avoid the low ceiling spikes, and watch out for mermen. After a few more moving platforms on the water, you'll be taking down a few more mermen.

The fourth section has a few fireball-spitting Bone Pillars as well as an Ax Armor. Whip the wall repeatedly after going all the way to the right to get a hidden 1-Up.

The fifth section is a series of pillars, bottomless gaps and chandeliers. Use the Ax to clear out the Bone Pillar walls. If you fall into any of the pits at anytime, this takes you to a different level and will give you the bad ending. Believe it or not, this game has more than one ending. If you make it to the other side, however, you'll take on an even bigger challenge.

At the other end of the pillar section is a bunch of candles, and the left-most one contains a key. You must keep the key - which takes up the sub-weapon slot - and take it to the door that it unlocks later on.

That means that you must carry it around in lieu of a sub-weapon when you fight the boss here: Dullahan. He is a much larger version of the Spear Knight, and not only does he have a longer reach and a jumping downward stab, he can slso send three giant lances at you through the floor. You can get away from them by backing away for long enough, and by that time, they will disappear back into the floor.

Dullahan can also throw his head into the air, and if his head touches you, Richter will be cursed and he will not more slowly than usual. He also has another attack that sends rocks down from the ceiling, but it is not seen here.

When you beat Dullahan, he will throw his head up into the air and shoot out a desperation seven-way shot before exploding. Grab the magical orb and head on to the next stage.

Stage 4


The first section has you fighting zombies. Go up the stairs, and make sure not to grab any sub-weapons so you don't run the risk of losing the key. You can do an Item Crash for exactly zero hearts that will make Richter jump into the air like he's about to do Hydro Storm only to come back down with a thought bubble containing a question mark appearing near his head. Using it like a special weapon makes Richter thrust the key forward. You can do massive damage by hitting an enemy that way, but don't press your luck.

The third section has spike pits and metal platforms with spikes on the bottom that are pulled up by chains before crashing down into the pits. Thankfully, you can jump onto the tops of these platforms to get around, and the spikes on the bottom won't kill you on impact if your health is high enough.

Watch out for the red ax armor enemy. Jump straight up when he charges at you. 

The fourth section has platforms pulled by ropes and gears. Take out the floating skulls as you see them. There will be a door to the right, but if you have the key, you can open it up and find Maria Renard. Sadly, you cannot play as her like you could in Rondo of Blood. She thanks you, then tells you Annette is somewhere else and to go save her.

You'll get your health back after saving Maria, which is nice. However, you'll still have to fight your way to the end and you will still need to use the key for something else.

If you manage to find a rosary necklace with a cross on it, grab it. It destroys all on-screen enemies instantly.

In the fifth section, you'll be going left and facing the fleaman, a Castlevania staple. You'll also face the blood skeletons, red skeletons who will pull themselves back together and come back to life upon being struck. For the fleamen, wait for them to hit the bottom before ducking and whipping them if you're on their level.

The sixth section is the fork in the road. The left path leads to the boss, but up and to the right is another door that requires the key. If you open this door to the key, it will take you to Stage 5'. (Yes, that's an apostrophe next to the stage number.) Going there leads to the good ending, so if you have the key, take it if you want it.

FreezingInferno plays Castlevania: Dracula X - Part 1 of 5


For those wondering what this is, this is basically a pared-down version of Rondo of Blood with fewer alternate levels, redesigned levels, a different art style and Richter Belmont being the only playable character.

For the longest time, this was the best the West had, since Rondo of Blood never showed up officially in the West until it received a Virtua Console release in the West in 2010.

This game is known as Akumajo Dracula XX in Japan and Castlevania: Vampire's Kiss in Europe. Interestingly, the European version has a very interesting logo.

The story takes place in 1792. Lord Dracula is back, and he has exacted revenge on 19-year-old Richter Belmont, the direct descendant of Simon Belmont, who destroyed him several centuries earlier. He kidnaps Richter's girlfriend Annette and her sister Maria while sending a legion of unholy beings out to attack the town. Richter leaves with the Vampire Killer in hand and heads to Dracula's castle to defeat the Lord of Darkness once and for all!

Stage 1


Gotta love the background where Mode 7 fire swirls around the town.

Just like in past Castlevania games, you can move left and right, jump, crouch, use sub-weapons and strike things with your whip. Also like in past Castlevania games, hitting candles will give you hearts to give you ammunition for said sub-weapons and also allow you to obtain said sub-weapons proper.

Unlike in Super Castlevania IV, however, the whip attack works more like it did in the games prior to that; you can only attack left and right instead of the eight directions that Super Castlevania IV allowed. 

The heads up display shows your health in the red bar and the boss' health in the blue bar below it at the upper-left corner of the screen. To the left of the two bars is the current sub-weapon in your possession. In the upper-right corner of the screen, you can see how many hearts you have. Small hearts are worth one heart, while big ones are worth five.

The knife lets Richter Belmont throw two knives forward, and costs one heart to use.

Enemies here include slow moving, ape-like skeletons that are a breeze to destroy, bats that fly at you when you get close enough, quicker human skeletons, bone pillars that spit fireballs at you, and Medusa heads that fly around in a sine wave pattern, slow moving zombies. The bone pillars spit fireballs, but those fireballs can easily be destroyed with the whip. 

Pressing Up and Down on the Control Pad near stairs allows you to move up and down stairs. You can land on stairs while in mid-air with Up and Left or Up and Right, but unlike Super Castlevania IV, you cannot moonwalk up or down stairs. You can also drop off stairs by holding Down and pressing B.

The ax is thrown upwards to take care of stuff above Richter, and costs one heart to use. To use a sub-weapon, hold Up on the Control Pad and press Y.

You can carry only one sub-weapon at a time, and unlike past games (including Super Castlevania IV), if you accidentally take another one, you have a short amount of time to pick the one you carried last back up. This would feature in future games.

In this game, you can backflip. Hold down on the Control Pad, then press B and Richter will perform a backflip. It goes pretty far, and it may prove useful.

Money bags give you points when collected.

In the third section, you'll see a slightly darker-colored platform that is short and different from the rest. When you leap on it, leap to the right immediately so you aren't dropped into the spikes, which are instant death if you touch them.

The fourth section has bottomless pits. Watch out.

At the beginning of the fifth section, you will be chased by a demonic ram-like beast. Keep heading to the right while fighting off the zombies. When you reach a pit, jump forward off the very edge or use the backflip to clear it. Watch out near the end; there are two platforms that will drop you right into the final pit if you don't jump forward immediately after sticking the landing. When you reach the end, the beast dies.

The boomerang is a cross-shaped boomerang that flies forward before returning to you, and cost one heart to use.

In the sixth section, the fire is blue and a little bit lower. Collect more hearts from the candles if you need them, and head to the right. Strike a part of the stone stairway before the wooden platforms to find a piece of wall meat (floor meat?) to refill your health if you need to. When you make it to the wooden platforms, you'll face Cerberus. Stay under it when it jumps around, and when it shoots a fireball, jump over the fire when it travels towards you on the floor. The cross is probably the best weapon to use, as you can get multiple hits in.

When you beat Cerberus, an orb will drop down. Grab it, and you'll clear the stage. As you see the number of bonus points you get based on how much health and how many hearts you have, you'll also get a password in the background. Hearts, axes and holy waters will make up the passwords, but each icon also comes with a different-colored flame - hearts have green, axes have blue, holy waters have pink and blank spots have red - so you can always tell what icon you're looking at. Nice one, Konami.

Points are useful, by the way; you'll get your first points-based extra life at 20,000 points.

Stage 2


In this stage, you are crossing a bridge leading to the castle.

You'll be jumping gaps, and as you do this, mermen will jump up from the pit at the bottom. To make things worse, some of the platforms are unstable and must be jumped off of immediately, and the thin gray bridge also starts falling apart as soon as you put your weight on it. Use the Cross to get the best results, as you will need it to get rid of all the mermen in your way at this point. You'll then reach the drawbridge. Into the castle!

Some of the ape-like skeletons will throw barrels at you when you get into the castle.

In the third section, you'll meet some new enemies: the Evil Eye, a small eyeball monster which flies around and hits you with its tail and an Ax Armor that hides behind a shield and throws axes at you. The Ax armor will throw axes upwards just like you. Hitting one with the whip a few times will knock away the shield, allowing you to hit the enemy with 

In the fourth section, you'll meet a panther-like skeleton enemy as well as the Spear Knights. The Spear Knights are the worst, as they can spin their spears around for some quick damage and they can attack you from above or below in addition to in front of you. Thankfully, Frezno uses his Item Crash. Hold X to use the Item Crash, and if the number of hearts you have is flashing, you can use a couple of hearts to do a damaging attack. If you have the cross and you perform an Item Crash, you can destroy all on-screen enemies at the cost of fifteen hearts. (The Item Crash ability would also show up in Symphony of the Night, which is a direct sequel to Rondo of Blood.)

In the last section, there will be a type of skeleton that will throw bones at you and attack you by extending its neck out. The latter attack has a rather short difference, but the former can still only go so far.

At the stairs, beat up both Evil Eyes before destroying the bottom of the stairs for some wall/floor meat to refill your health with.

The boss here is a giant bat that splits into a bunch of smaller bats. Strike the bat when it is big, then get on the platform to the left and backflip to the right over all the bats when they are below you. When you strike from the right, get on the lower of the two platforms to strike the giant bat, then face right and backflip to the left immediately.

You can still attack the giant bats when they are split up into smaller bats, and the Item Crash with the cross can save you from unnecessary damage while also hitting the giant bat. After that, grab the orb. It's on to Stage 3.

Friday, April 6, 2018

FreezingInferno plays ActRaiser 2 - Part 15 of 15


Hey, we have some passwords that we can use for some miscellaneous fun times!


For the first password, you must set the difficulty to Hard in the Options menu, or else it will not work. From there, go to Password and enter "BJQX YRKC DLSZ." From there, you'll go to the intro...but this time you can control the Master! You'll face the Pegasus mini-boss again, then you'll face Tanzra as seen in the opening cutscene.

Tanzra is pretty easy. Downstab to avoid the red projectiles in the double helix pattern, use your shield to block the fire from the heart, then stab the heart as much as you can while it's exposed. He will eventually go down, then you'll start a normal game...on Hard mode.

You'll have to set the difficulty back to Normal for the next two passwords.

The second password is "Xxxx Yyyy Zzzz." Use the "Page" button to switch between upper-case and lower-case letters. This will give you the final battle from the first ActRaiser game, except you're playing as the Master from the second game. Here's the strategies, ripped straight from my notes for the first game.

Same strategies from the first game apply to some extent, except you move more slowly and have a slightly more advanced moveset with the ability to do a jumping downstab and the ability to stab upwards, which really helps with the second form projectiles.

First Form


Tanzra's first form isn't that bad.

He'll attack with his own version of Magical Stardust, except the projectiles are blue and slightly bigger. Go all the way to the right and duck, so it won't hit you.

If you're too close to the right side of the screen, go all the way to the left and jump when the Magical Stardust comes at you.

After this, Tanzra will drop down and shoot projectiles at you. If you stand at the right distance, face him and duck, you'll be able to attack him with the waves of light while the projectiles will fly around you in a sine wave pattern, missing you completely.

Yes...you have that power-up again for this battle. Give 'im hell!

Second Form


Biggest. Life Bar. Ever.

He'll shoot three fireballs at you and they'll attack from above and below, closing in on the same spot you are. Stay on the move and they won't hurt you.

The chest cavity that protects the blue orb in his body opens up. As he draws energy from it to shoot a lightning bolt, wail away at it with the waves of light. When he fires it, stop attacking and duck!

He'll then shoot two crackling balls of energy - one blue and one red - from his mouth twice. The blue one is always in the air, while the red one is underneath the "floor." Destroy the blue ones, you'll more than likely take out the red ones while attack him after he shoots the fireballs again, making it a priority to take as little damage as possible against Tanzra's first form.

His attack pattern will repeat itself, but if you can stay alive, you can take him down in no time!

Once you beat him, enjoy your kick back to the title screen. Yeah, no credits this time.

The third is "MTkM SkTk HNSH." It gives you a special dev team picture.

FreezingInferno plays ActRaiser 2 - Part 14 of 15


There's a mini-boss rush AND a boss rush? Oh, come on...

Death Heim


When you try to enter Death Heim, you'll learn that the wall surrounding the castle is too thick. The only way to break it is to crash the sky castle into it.

When you finally get inside, however, you'll see a slew of dead angels. You'll talk to one of your men only for him to be killed from a distance. You'll find out that seven demons have been revived. There will be another guy you'll talk to not long after, and before he dies, he lends you his power. You lose all your magic scrolls, but in return, you'll be able to shoot projectiles out of your sword, just like in the first game. Joy!

You'll then take on all seven Sins in the following order: Sloth, Envy, Gluttony, Wrath, Greed, Lust, and Pride. Same strategies apply...kinda. The Sins are far easier to take down the second time around.

Be sure to stick to the right at the beginning of the battle against Wrath, so you can get an extra life.

When you beat Wrath, you'll face Greed immediately afterwards. Fighting Greed is nasty because he can stay at the top of the screen where you can't hit him.

After beating Pride, you'll talk to one more angel, who gets destroyed when you talk to him. He gives you the password that takes you back to Death Heim (in case you need it) before he dies. Also, when the angel characters you talk to die, they lose their halo upon death. That's a nice touch.

After he dies, keep walking to the right. When the screen fades to black, stop. Otherwise, you'll bump into Tanzra.

To beat Tanzra, simply stand underneath his chin, face left, shoot at the projectiles he spits out, do a downward stab if you need to, then hit the blue heart with your sword when the chest cavity opens up and block the huge fireballs that it shoots out. That's it.

If you die to Tanzra, you won't have to worry about the boss rush again.

Once you whack at the heart enough, Tanzra's done. You don't even get a second form. That's it. You've beaten ActRaiser 2! Watch as the people remember your name forever and the statue you used to take some sort of form down on Earth gets weathered away by the elements. Oh, and put your name in for the high score, too.

Thursday, April 5, 2018

FreezingInferno plays ActRaiser 2 - Part 13 of 15


Sister, don't you jog it all away. Sister, don't you run it all off. I don't know why you do, what has come over you? What an idea of fun to get it on the run.

Remember Humbleton? Head back there.

Humbleton


If you thought it was a bit quiet in Humbleton, you were right. Turns out the people of Humbleton are trying to ascend to godhood and become Masters themselves and ascend to godhood by constructing a tower to the Sky Temple.

Tower of Souls


Inside this tower, there are many man-made machines as well as the Master they created to worship.

This tower will be a vertical climb of epic proportions. There are robots with humanoid forms that can shoot lasers than can bounce off walls, floors and clings. Some are on wheels and either shoot at you or charge at you with drills in front.

The machines will be proving a very treacherous way of moving forward. Stand on the gears to make your way forward, and watch out for rogue electricity. Thankfully, the gears don't move you around like in, say, Super Mario Land 2.

There are also cars on tightropes that act as platform. Thankfully they have a little bit of wiggle room for when you're able to stand on them. When you're done wit all of them, watch out for the flower creature with the spiked ball tail. He can catch you by surprise if you're not ready.

Next up is a mini-boss gauntlet. You'll face the plant boss from Industen, the snake boss, the vulture mini-boss from Modero, the Pegasus Knight from Death Field, the Dream World mini-boss and the goat-man. The main difference is that they're all in empty rooms like in the Mega Man series, except there are platforms to the side. Some of these battle may be easier. Some won't. Either way, they still have the same attack patterns.

When facing the Pegasus Knight, remember that the platforms are to the sides. Stand on those and wait for him to charge. Also, it's possible to trap the goat-man in the corner if you can keep him from hitting you there.

After the mini-boss gauntlet, you'll finally meet Pride, who is in the form of a giant mechanical Wheel of Misfortune (patent pending). The lance at the bottom is what the "wheel" will land on. The clock will stop you for eight seconds. The globe shoots out lightning orbs that you'll have to destroy with your sword. The engine shoots out fireballs in eight directions, and it's possible to stand in between two of the lines of fire. The crossbow shoots out three homing shots that you'll want to both avoid and destroy with your sword. The bomb shoots a bunch of bombs nearby that you'll want to get away from immediately. To hit Pride, you'll have to hit the statue-like center.You can do it with your sword, but you can also use the energy orbs to speed this battle up. Just watch out for the time stop attack that shows up often in an otherwise easy battle.

After this rough battle (and beating all Seven Deadly Sins), Death Heim opens up in the center of the map. It's time to take on Tanzra!

FreezingInferno plays ActRaiser 2 - Part 12 of 15


Now that we know where the king is, let's give him a piece of our mind.

Stormrook


The castle is full of gold...and demons. That's not surprising.

The first enemy you'll see originally appeared in Gratis, but they show up at the start of the level in full force. The floating blue magicians will fly around in a sine wave pattern and shoot lightning bolts at you when you're both lined up. They appear a lot in the first section along with the horned demons that throw the boulders.

You'll soon meet the snake mini-boss from Benefic. He's above a bottomless pit, forcing you to make your sword slashes count, but he fights the same way.

The second section is inside the golden castle. You'll meet soldiers in gold armor that throw axes at you, and you'll see arrow-shooting traps in the wall as you make your way up. The soldiers can only be attacked when they move their shield to throw axes, making them vulnerable. If they're really becoming a nuisance, use your flamethrower spell to roast them.

The crab platforms that try to attack you also make a return appearance in the second section, too. Just before the second one, you can go up to get an extra life.

The goat-man makes his third appearance. Apparently he didn't learn after Gratis. Same strategies apply.

The third section is more linear, but also more of the same...almost. Near the end, you'll have to beat a rising floor full of spikes to the top of the tower.

The fourth section takes you back outside. This time around, you'll be using platforms that help you get further to the other side of the castle. The sandworms from the ice palace are back here.

At the end, you'll fight Greed. Greed takes the form of a gold and black dragon. Stay at the bottom when he blows you back, and use your magical orbs at him whenever he gets close. He does breathe fire in close, but the orbs will make quick work of him that it's barely an issue.

When you beat Greed, you'll find out King Kolunikus made a deal with the demon Doom to get a lot of money. Doom then poisoned his mind and turned him into a dragon, making his people unhappy as he became the living personification of greed.

When you head back to Leon, life will return to normal there. They're struggling for money, which caused all the trouble here in the first place.

You'll also find there is some unclean air to the east.

Wednesday, April 4, 2018

FreezingInferno plays ActRaiser 2 - Part 11 of 15


What is with all the corrupted royalty in this game?

At the south end of the map is Humbleton.

Humbleton


Due to the lack of faith within the people of Humbleton, you won't be able to figure out what they're up to. To the northwest is Leon.

Leon


Leon was not a rich country, but at least the people are good. Unfortunately, the new king raised the taxes in Leon and forced people to pay. Those who couldn't were taken to Gratis, the ironically-named underground prison. The people must be released.

Gratis


To the south of Leon is Gratis, as signified by the hole in the ground. Guess what? It's a maze!

When you enter, you'll find a sign reading "Welcome Master To Your Doom!!" Wow, the ones running the prison must really hate us.

Go through the door to the right, then drop down until you see the spike pit. Go right, then drop down the next chasm until you see the huge spider enemy. Kill the spider, then continue to drop down to the spike pit, then go right, using the cages to get over the spike pit. Enter the doorway to the right.

From here, jump over the chasm to the right, then drop all the way down the next one. Take the platform to the right and use the platforms to keep going right. (Make sure to glide!) Take the platform up, then enter the door to the right before you hit the ceiling spikes.

From here, the maze is over. Make your way up and you'll fight the goat-man mini-boss from the Lovaous. Same strategies apply. Once you beat him, you can drop down, replenish 5 HP and head through the door to the left.

Go to the right, and you'll soon see the spike-laden ceiling and floor section. Move when the spikes are not in your way. Thankfully, this isn't so hard.

The boss here is the Goblin King. He'll float around and has a few attacks. He'll dive down and try to charge at you, and he also uses an orb shield that you'll have to break with multiple hits if you want to damage him. He can also shoot a giant beam either forwards or downwards, and he'll stop before he fires it out. Smack him with your sword when he gets close enough, don't be afraid to go forward, jump up and hit him while he flies away from you, and preserve your magic if your health is low. He'll eventually go down in no time.

You'll find out that the jail was full of demons, and the king may have known about it and made a deal with them.

Head back to Leon. People are freed, but are still paying taxes. The king of the town, King Kolunikus, lives to the west in Stormrook, and people say that the sound of a dragon can be heard from there.

Tuesday, April 3, 2018

FreezingInferno plays ActRaiser 2 - Part 10 of 15


This is where the game gets really, really interesting. Hope you know how to glide and double jump.

Almetha


If you don't defeat Fury, you'll have another king and war just like in Justania. So get down there!

Aside from the gargoyles that you'll have to bait out one at a time, you'll have enemies that pop out of the walls that you can attack if you know where they're going to be ahead of time. You'll also have boulder-tossing one-eyed cyclops and flying skulls that move up and down as they float across the screen. There are also boulders that will drop down from the top of the screen and lava waterfalls to jump over. Use the bridges that pop up every now and then to get past the longer stretches of lava.

When you enter the second section, you'll enter a vertical section where you'll jump from one platform to another to get to the top. This is where your double jumping and gliding skills will be put to the ultimate test. Again, some platforms will pop up, just like with the longer stretches of lava in the first section. 

When you reach the top of the second section, you'll be able to go to the third section, where you'll jump from one falling rock to another.  The smaller ones will break if you stand on them long enough, and to make matters worse there will be a ton of them. Watch out for the lightning bolts that will rain down from the sky at a moment's notice.

After that harrowing platforming section, you'll finally meet Fury/Wrath. Use your diving magic to get rid of the fire shields protecting him instantly instantly, then attack him until he recreates his fire shield again. Keep attacking him when necessary to get rid of him in no time. When he holds a fireball in front of him, you'll want to double jump just before he launches it at you.

After this, go back to Justania and Favorian. Both cities will be peaceful again.

FreezingInferno plays ActRaiser 2 - Part 9 of 15


There are two towns left, and the next stop is the Death Field between Justania and Favorian.

To the west of Tortoise Isle and Devote is the desert town of Justania. It has a well-known armor, but the king has been controlled by a demon who has commanded him to attack Favorian, further to the west. Between them is the Death Field, and the king will be there. You'll have to put him in a deep sleep before he can cause more chaos.

Death Field


When you drop down, you'll see fire and ruins everywhere. You'll see men that rush at you with spears that require a downward stab, spearmen mounted on dinosaurs, fireballs that shoot flames at you, fire pits, and gargoyles that travel on both land and air and have a multitude of weapons such as spears, bows and daggers.

The really big orange spark recovers ten hit points if you need it. You probably will, since the enemies can hit you from farther distances than you can hit them, even if you don't want them to.

At the end of the first section is a series of platforms above a long fire pit. These platforms will crumble when you land on them, and you'll have to use your dive to get from one platform to another and reach the winged platform at the end that takes you to the second section.

The second section takes places on a series of airships. Take down all the enemies as you jump from ship to ship so you don't get hit as you move around. The winged platforms here will tkae you from one ship to another, but they fall after a certain point and if you're on them when that happens, bad things will happen.

You'll eventually meet the mini-boss: a Pegasus knight with a spear. Get close and wait for him to drag his front foot and charge at you, then jump up and hit him with a downward stab as it passes. Keep this going until he dies. When he's gone, dive off the last ship to enter the third section.

Here, you'll be going down a castle. Gong down the left end will really help you get somewhere. If you charge your magic and then release the button while standing still, you can shoot out a flame and hit stuff from afar in case monsters are keeping you from jumping from one platform to another. It's a bit of a maze, but when you reach the stone platforms, you'are at the end.

The boss here is the king. Use your Phoenix dive as well as your energy orbs whenever necessary, and stay away from him and his energy orbs that can bounce off the walls.

When you beat the King, the king is asleep (or dead, if that's what you want to believe) and the war between the two towns has ended. Head to Favorian, and you'll find out Almetha Volcano to the east has suddenly become active. You'll be heading there next.

Monday, April 2, 2018

FreezingInferno plays ActRaiser 2 - Part 8 of 15


In this episode, we take on the demon Envy.

Altheria


The queen that lived in this castle was conquered by the demon Jealousy (also known as Envy). Destroying the flame of her jealousy is the only way to defeat the demon.

Once again, you're underwater. As you head right, you'll see a head floating around in the background. It does nothing, thankfully.

All of the enemies from Tortoise Island show up here, and there aren't any new ones to speak of. Make it a priority to save your magic, since you'll need it when facing Envy.

To clear the long spike pit at the beginning of the third section, be sure to hit your head on the ceiling as you glide to the other side.

You'll eventually fight the huge head you saw at the beginning of the level. This is Envy. Just keep whacking the head back whenever it gets near, and you'll eventually take on the real boss fight.

Instead of Envy's head, you have to attack the flame of jealousy in the middle of the huge statue in the room. Hit the ghost heads that surround Envy with the downward stab, then use the Energy Orb magic to attack the flame. The flame will go down after a few successful casts.

When you beat Envy/Jealousy, the land around the temple returns...and so does the nearby town of Devote! Turns out the queen grew suspicious of her lover, and felt the land she ruled upon was too small. Her jealousy soon consumed everything, including herself.

There are now two places left to go...

FreezingInferno plays ActRaiser 2 - Part 7 of 15


Envy is next on FreezingInferno's hit list, and the first half of this is an easy yet interesting level.

To the west of Industen is a diamond shaped island surrounded by water. This is Tortoise Isle. Head down here if you want to take on Envy.

Tortoise Isle


The town of Devote was here, but it's underwater as the turtle-shaped island has submerged. You'll have to head down there and see what's going on.

When you go down there, you'll find out the whole town is submerged and all the people have been turned to stone as they screamed in agony. Strangely, the underwater setting does not affect your mobility in any way.

The fish men will run away when you strike them and chase after you when you turn your back. Use this to your advantage to hit them again and get rid of them for good. The big fish take multiple hits and do nothing but charge at you. The blue ones just move forward while the pink ones stop and shoot out three fireballs before moving again. The sharks will dive at you when they're close enough, but when they do that is a bit random. The pink shell enemies, on the other hand, are the worst. They take one hit, but they explode and create an eight-way projectile attack immediately upon being destroyed. Be prepared to block it with your shield. Then there are the seahorses, which shoot projectiles as they stop to change direction as they move up and down.

You'll eventually walk on a long, fish-like backbone. When you see the large discs with the orange jewel in them, stop and duck down, then attack the orange jewel so the spikes in them will stop popping in and out. There is a lower path where you can find some useful power-ups, especially some health replenishments.

When the spinal column turns flesh pink, the think you've been walking on all this time awakens. Go all the way to the right and attack the orb in this thing's body with downward thrusts and the Phoenix magic. To use the Phoenix magic, hold the Y button to charge your magic, then perform a diving attack and release Y in the middle of the attack. You'll dive down like a fiery comet, doing more damage than usual. You'll want to finish this thing off as quickly as possible while avoiding the tentacle-like appendage that protects that orb, as the orb itself will fire shots that will home in on you and turn you into stone for a brief amount of time - enough time to deal some damage. Thankfully, this is one of the easier bosses.

Oh, and don't touch the spiked part of its body past the orb. It's instant death.

When you beat the boss here, you'll raise the island back from the see and save all the people. To the east of this area is Altheria, a temple in the middle of the water. Something is happening there...

Sunday, April 1, 2018

FreezingInferno plays ActRaiser 2 - Part 6 of 15


It's time to fight Gluttony and bring nourishment back to the people of Temponia.

Demon's Cave


To the east of Temponia there is a cave where you'll take on Gluttony himself.

It's not just a cave, it's a giant ant colony full of giant ants. You'll have to use low strikes and downward stabs to attack both the ants that move back and forth on the floors as well as and the some of the larvae. You'll have to jump to hit the ants moving back and forth on the ceilings. Some of the larvae will fly...and so will the winged ants, which are pretty quick.

The eggs take two hits to destroy and give you a slight point bonus.

Use either the range of your sword or your magic to get past the spiders.

The downward stabs will damage all the ants in one hints.

The caterpillars can only be attacked when they uncurl and lunge at you. They also shoot fireballs at you, too.

At the end is Gluttony, who was taken the form of a queen ant. If you hold Down on the Control Pad and release the button after your magic attack is charged, you'll use a force field spell that will do damage to Gluttony whenever he is nearby. This will do a ton of damage and will take him out in no time, larva army and all.

When you take down Gluttony, Temponia will be free and life will be normal there again, even though the people of the town are a little wiser for the wear. But there's something going down northwest of here...

Saturday, March 31, 2018

FreezingInferno plays ActRaiser 2 - Part 5 of 15


In this short video, FreezingInferno heads south and east to take on Gluttony's forces.

South of Diligience is the town of Temponia.

Temponia


Temponia was once known for its abundance of food, but now the demon Gluttony has devoured everything. People are now starving and fighting one another for anything that's left.

Meanwhile, in the nearby desert of Modero, Cules has been attacking travelers.

Modero


Modero is to the east, and the people there have been turned into demons that are now part of Cules. There are also a lot of cliffs here.

When you start this area, you'll find out it's a literal graveyard. The eye monsters take one hit to weaken, but it's where you hit them that counts. Hitting them in the face will cause their legs to come at you. The legs will explode if they either follow you for long enough or if you strike them. If you strike the legs with a low attack, their upper bodies will leap at you with the use of their arms.

The spike pits are actually hungry demons that chomp their teeth repeatedly.

The giant birds will block your path. There is also a vulture that acts as a mid-boss, but you can easily defeat it with the orbs as long as you duck down when it dives.

The pit afterwards leads to the second section. You'll take an elevator ride where you can stab the mouths that spit fireballs at you. Watch out for the spikes that block your path as well as any other enemies that pop up such as the flying skulls.

The boss is a giant eye monster. Use the platforms to get close to this guy and attack him. Take out the eye monsters he summons, as well as the eyes that he creates. Use the energy orb magic to hit this guy from a distance and do a lot of damage, making this battle a lot easier.

When you clear Modero, the dead can now rest in piece and Temponia begins to flourish again. Your work here is not yet done, though. There is now an army of large ants taking all of the food and attacking the city now, and people are rioting. You'll have to stop the ants to save the town.

FreezingInferno plays ActRaiser 2 - Part 4 of 15


Time to take down Lust once and for all!

Palace


You'll have to go into the Palace and into the king's mind in order to fight Lust/Deception.

Enemies here include ghosts that leap forward at you and follow you, balls of light that try to track where you are, floating skulls that fly around in wide sine wave patterns, giant ghosts that punch at you and take multiple hits to kill.

The first section is straightforward and has a lot of enemies, but the second one has a whole bunch of platforms and spans infinitely in all directions. You have to look for a doorway, indicated by a tall rectangle with a black and blue-ish hue.

You'll face a mini-boss which happens to be a purple version of the big ghosts from the first section. He just tries to punch you and send out purple versions of the tiny ghosts that leap forward and follow you. He takes even more hits, but if you use the energy orbs at the beginning, he goes down in no time.

You'll then be able to enter the third section, where you ride on a platform of clouds and use the Control Pad to move through this strange cavern. The picture throbs back and forth and the whole area rotates constantly, rotating your controls around with it, making this harder than you would expect. The door to the boss is a long rectangle with a reddish-black hue.

You'll face Deception/Lust in the next area. Lust will teleport himself - and you - around. Avoid the spikes as you look for him, and use your energy orbs to do the most damage on him. Your dive attack also works. When you finally defeat Deception, you'll save the king.

Beating Lust will free the king's mind from a very dark force, and when you visit Lovaous, the people will learn the truth about Deception/Lust. There is another town to the southeast that you can save.

Friday, March 30, 2018

FreezingInferno plays ActRaiser 2 - Part 3 of 15


From here on out, you can play the levels in any order you want.

Of course, FreezingInferno's fan vote decrees he plays the ice level immediately. Well, we might as well get it out of the way...

On the west coast, there is an icy area. There is a town called Lovaous. Head over there.

Lovaous


It turns out that the land was turned to ice after a demon defeated the king here, and since then, the king has lied sleeping until he can be woken up somehow.

Just northwest of Lovaous is the Palace. Head down there to fight off some demons.

Palace


You'll find out that the place is frozen. This is definitely going to be an ice level, so you'll have to be careful here.

Even though this place is pretty, there is quite a bit of danger, such as the ice worms that will pop up from the bottom of the screen. Hit then with ducking slashes to hit them. As for the flying green demon faces, stay away from the mace and strike it until it goes away, then go for the demon itself.

The demons that bounce back and forth are golems, who will stop to uncurl themselves. Use this as an opportunity to attack them. Check out the spaces to the sides to find HP and MP if you need them. The ghosts will move towards you in a sine wave pattern.

The crabs on the spikes act as platforms, but they'll stop and attack you with their claws every so often. Attack them with your downward stab to de-claw them.

Every now and then, there are ice platforms that appear and disappear. You have only a short amount of time to use them to get to where you need to go before they disappear.

There are a lot of power-ups in the second section. Most of them will be of the HP and MP-restoring variety.

The mid-boss here is a goat-man with wings who attacks you with a sword and shield. He flies around and tries to drop onto you, and he can even shoot fireballs at you. It is possible to trap him in a corner and wail on him until he dies.

The third section is short, but there are a lot of ice platforms and ice worms. Patience will win the day here, as well as skillful use of gliding and diving.

The boss here is an ice queen. Attack her when she gets close, then stay away from her as she turns into an ice crystal and separates into pieces that fly around and try to fly into you. The best attacks to use are the Phoenix magic as well as the energy balls that you used against Fatigue in Industen. To use the Phoenix magic, charge up your magic, then perform a dive and release Y when you see the Phoenix in the box in the top center. As for the energy balls, lure her over to the lower-right corner of the room and shoot them at her when she gets close. You may have to do some ice crystal dodging, but not as much as you would have if you used your regular attack alone.

When you conquer the Palace, you'll melt the ice...but the king is still sleeping. It turns out the demon Lust has entered the mind of the king, causing him to enter an eternal sleep. Strangely, Lust is known as Deception in the Western version of the game. Thanks for the unnecessary censorship, Nintendo.

FreezingInferno plays ActRaiser 2 - Part 2 of 15


There's still trouble in the town of Diligence. One of the Seven Deadly Sins must be stopped!

Benefic


When you head to Benefic, you'll find out that you need to defeat the demons there in order to cleanse the water there.

New enemies include worm-like creatures with spikes on their heads that spit fireballs, bats that home in on your position and fish monsters that will leap at you when you're close enough.

Be very careful treading the waterfalls, as they will push you backwards and into nearby spikes if you don't force your way forwards.

The blue spiked creature that moves back and forth will spit projectiles upwards. Hold Up on the Control Pad to block these projectiles with your shield.

The gargoyles will ascend a little bit before they quickly divebomb you. Be ready to strike them with an upward slash.

The mini-boss here is a snake. Jump over the fireballs and hit them with the diving attack to do more damage in less time.

The short second section has a bunch of fish monsters sliding down the waterfall. If you jump to the platforms halfway through and float to the left, you'll be able to refill health if you take to much death.

The boss here is a giant snail, based on the deadly sin of sloth. All of the major bosses are based on the Seven Deadly Sins, due to the influences of Paradise Lost and The Divine Comedy. Hold up to block the boulders that drop from the ceiling, then get up close to Sloth and hit it with the orb attack that you used against Fatigue. Sloth will go down in three hits.

When you beat Sloth in Benefic, Diligence will return to its former glory, but you'll hear a sad voice calling from the West Sea. This is your clue for where you want to go next, though at this point in the game you can take on any of the areas in any order that you want.

Thursday, March 29, 2018

FreezingInferno plays ActRaiser 2 - Part 1 of 15


Ah, the sequel. The black sheep of the two ActRaiser games. Prepare for a bumpy ride.

The game begins with The Master, now with wings and a shield, watching over everyone from the heavens. Suddenly, Tanzra, the final boss from the previous game, shows up and attacks. The Master has a shield and a pair of wings now, and he has a couple of new moves to ward off Tanzra's offense, taking him down. But this is the icing on the cake: Tanzra's forces have struck again, forming a legion and ressurecting him. Now the legion of 13 deadly demons have been sent by Tanzra to terrorize the world.

"Again" may be a bit of a stretch, according to Wikipedia:

The storyline relation of ActRaiser 2 is not explicitly revealed; however, many plot details suggest that ActRaiser 2 may actually be a prequel to the original ActRaiser, or take place in another universe entirely. Otherwise, the given story draws concepts from the famous religious epics Paradise Lost and the Divine Comedy.

Unlike the original game, which alternately combined platform game sequences and god game sequences, ActRaiser 2 is only a platform game. It is believed that this game was made by request from Enix of America to Quintet, and that they also requested that the simulation segments be removed because players would not "get" them.

Yeah, the Sim Mode from the first game was totally as complex as Advanced Calculus. Thanks, Enix. Assholes.

The World


Once you start the game, you'll be introduced to the story. Tanzra's been resurrected by his minions, and now these minions are unleashed upon the world.

Just like last time, you have an angel that acts as an assistant, who will tell you what's going on in whatever location you're in.

You'll start out above the town of Diligence. Select it and you'll see what's going on over there.

Diligence


The town of Diligence was once a source of pride. The forest was beautiful, the air pure. But one day the people not only lost the desire to work but also to live. To find out why, you'll have to head to the town of Industen.

Industen is in the circle in the middle of the huge forest to the west. Go up to it, then select it when you see the name Industen. When you head there, you'll see that a strange cloud appears, drops rain, then disappears. But why? We'll have to head down there to find out.

Industen


You'll be in a huge forest complete with larger-than-life-size mushrooms when you enter this place.

You can now strike upwards by holding Up on the Control Pad and pressing Y to swing the sword. Sadly, crouching and swinging does not seem to give you a slightly longer range like in the last game.

You can also do some stuff in the air, too. You can double jump. To do that, press B twice.
When you double jump, you can also slow your descent on the second jump to make platforms a bit easier. Just hold Up and press B when you perform the second jump, then hold B down and move left or right. While you're gliding, you can dive downwards, slashing through enemies on the way down. To do that, Hold Down while gliding and you'll perform the dive. Press Y as you're diving and you'll be able to attack enemies on the way down. You can stop, of course, but you'll skid a little bit when you land, so be careful.

If you hold Down on the Control Pad and press Y while in mid-air, you can perform a downward stab like in Zelda II: The Adventure of Link.

You have a shield this time around, and assuming you're facing the projectiles and said projectiles hit the shield, you'll be protected from them. To do that, just stand still. You can block low just by crouching. Holding Up on the Control Pad will allow to block things dropping from above.

The enemies here are pretty easy: there are worms that come out of holes in the ground that can be stabbed with a crouching strike. Wasps will fly towards you, and flea-like men will walk back and forth, providing the perfect sword fodder.

The small columns that look like a home stereo speaker work like the statues that gave you power-ups in the first game. The first one that you'll come across contains a small orange sphere that flies around in a circle. If you pick it up, you'll get two hit points back. There are other sparkles, such as a small blue one that gives you one HP and a big orange one that gives you five.

You start out with twenty hit points and three magic points in this game, assuming your playing on Normal. (Easy starts you with five MP and five lives, and Hard starts you with two of each and gives you less time to beat the stages.) You also start with three lives. Just like the last game, you don't have all the time in the world, either. The timer at the top center of the screen shows how much time you have left.

Not long after that HP pick-up, you'll face the first boss: some sort of Venus Flytrap-like monster. Jump over it when it charges, and when it shoots a three-way shot, duck down to block the low projectile and duck the other two.

To attack it, you can either perform the diving attack after double jumping over it when it charges, or you can jump over it and stab it as it shoots fireballs. It quickly rears back before spitting fireballs, so you can easily block the shots with your shield by pressing Up on the Control Pad.

The boss is easy, but the stage isn't: even if you beat the mid-boss here, you will be sent back to the beginning of the level if and when you die. This is where the game becomes discouraging: the game does not give you checkpoints, it removes the Sim mode that helped make the first game so awesome in the first place, and it's much harder than the first ActRaiser overall.

After the mini-boss, you'll be jumping on mushroom platforms that move back and forth to cross the muddy water here, which is crawling with frogs that will leap out and try to headbutt you. If you get sent into the water here, it will hurt you quite a bit.

To get to the entrance leading into the tree, you'll have to dive down towards it. Once you land on it, any frogs that may be following you (and there will be) will be destroyed. From there, you'll have to jump your way up the tree, fighting off archers. Block their arrows with your shield and strike them three times. The first statue you see here will give you an extra magic point, but more than likely, you'll be getting more practice with your upward stab and seeing how it works. Even the tip of the sword can do damage, so utilize that range on your way.

When you reach the top, you'll face the boss: some skeletons with scythes on a cloud. This is the demon Fatigue. Fatigue will throw scythes at you, and will also command his cloud to expand and blow wind at you. You definitely don't want to touch either of them or the scythes that Fatigue throws at you.

To block the wind currents that the cloud shoots out, face away from the boss and duck down. You'll block the low shots and duck the rest.

The best way to beat the boss is with your magic: hold Y to charge up your magic. The Master will glow red, and the timer will be replaced with a symbol. That symbol will be different depending on what you're doing. Your best weapon for fighting Fatigue is with the orb, which you can use while holding Up on the Control Pad and the Y button simultaneously. Just hold Up to look up, charge it up with Y, then keep holding Up and release Y to chuck three orbs upwards and forwards. You will use one magic point for every time you use the orbs, so be careful and time your orb throws carefully so that they hit them when Fatigue is right in front of you. Fatigue's energy, which is underneath the high score, will quickly be drained and he will go down in no time.

When you beat Fatigue, you'll find out that the rainfall, which was released by the cloud that Fatigue rode on, brought on the corruption of Diligence and drained the nature of the people. Diligence is back to normal, and if you go back to Diligence, you'll find that the people there are hard at work. However, your assistant is concerned about the upper part of the river that runs near town. Your work in Diligence isn't quite over yet, for at the very north end of the river is another area, Benefic, which seems to be just as ironic as the name "Industen."

If you select any place on the map that isn't a town, you'll get another assistant that will give you a password. Get one as soon as you beat a stage and copy the password down so that you can assure your progress is saved.