Show 'em how it's done, MrWhitman.
Showing posts with label King's Quest. Show all posts
Showing posts with label King's Quest. Show all posts
Saturday, March 29, 2014

Friday, March 28, 2014
Dilandau3000 plays King's Quest II: Romancing the Throne - Part 10 of 10
Well, we're on an island. There's a tower in the distance. Could it be...?
All maps by Dan_.
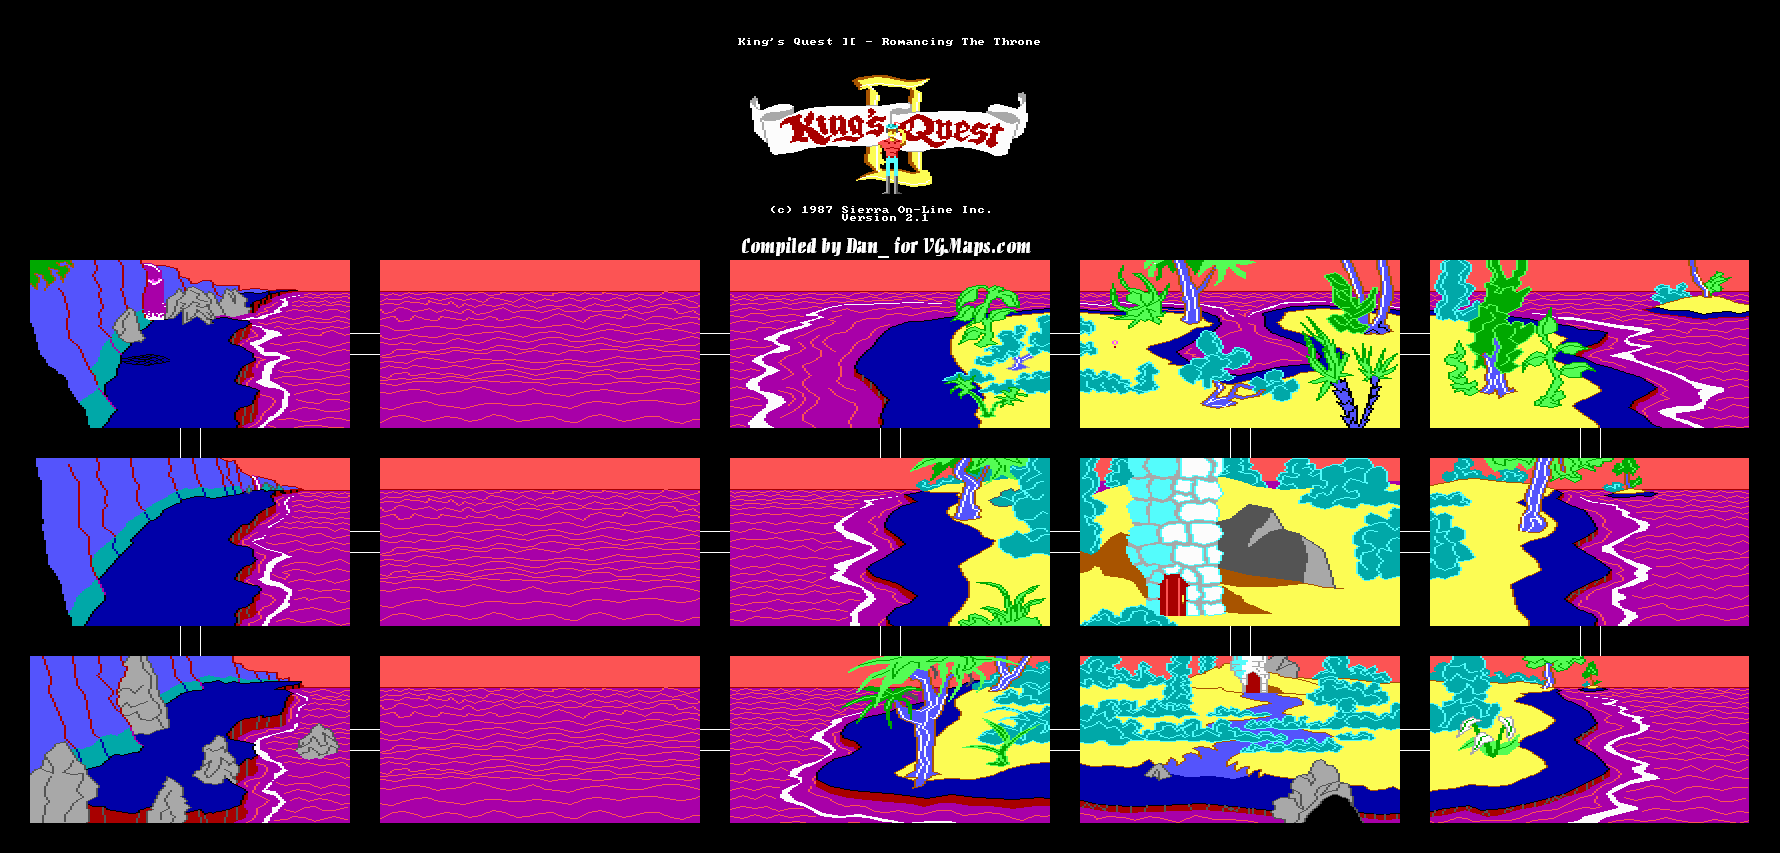
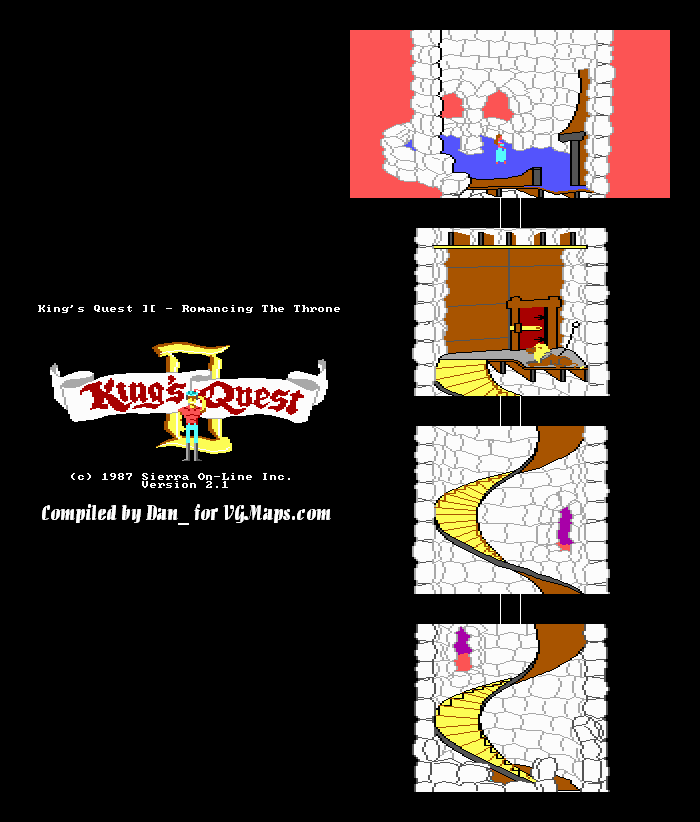
Tower Map
Upon exploring this island, you'll find a tower. Head towards the tower entrance, and go north of the door. You'll find an amulet on the ground. Pick it up. You'll notice that on one side it says the word "Home" on it. Type in the command "say home" to return to Daventry...but don't do that just yet! Doing so will give you the bad ending where Graham returns to the castle without a bride...and you don't want that.
There's nothing else to do here, so head back to the front door of the tower. Open the door, go in, and carefully make your way to the top. (Be sure to save everytime you go up a screen.) When you go up two screens, you'll make it to the top...and to a ferocious lion! But you have the smoked ham from Dracula's Castle, so throw it to the lion and the lion will eat it. It will fall asleep, and you'll be able to open the door next to it.
You'll finally meet the girl in the tower, whose name is Valanice. Talk to her, and she'll ask you your name. Type in "Graham" and she'll thank you. Type "kiss girl," then she'll ask you to come closer. Do that, and you'll both kiss. From this point, type in "say home." Now that you have Valanice, you'll both head to the altar and wed! (I'm still trying to figure out why on earth a shark is sitting in the pew of the church, as well as all the monsters in Kolyma...weren't they trying to do you wrong the whole game? Also, Dracula is strangely alive again. What the crap, Sierra?)
Well, if you did everything mentioned in the blog series (and remembered to put on the cross the monk gave you), you should have all 185 points! Congratulations! You did it!

Dilandau3000 plays King's Quest II: Romancing the Throne - Part 9 of 10
Now that we've gotten rid of Dracula, let's finish this game off!
All maps by Dan_.
Head back to the locked chest. Unlock it with the silver key and open it. You'll find a diamond and sapphire tiara. Take it. From there, get out of the castle and get back onto the boat.
Map
Head back to the bridge across the chasm. You'll be crossing it for the seventh and final time. If you were expecting to do something special to cross it more than six times, you're right. It's called getting the third gold key. XD
If you cross it an eighth time, you'll die. No turning back now.
Go to the door and unlock it. Finally, you get something awesome: a portal to a world you've never seen before.
New World Map
What is this? The Bermuda Triangle? The Daventry Triangle? Another dimension? Another planet?!? Who knows? All that is known, however, is that something big is here.
Go north and you'll find a fishing net. Take it, then go back to the previous screen and go south again. It seems like you can't get anywhere, and if you swim in the ocean, you'll drown. Here's what you do: use the fishing net by typing the command "fish" and pressing Enter a few times. On the third try, you'll use the net, and you'll get a large golden fish. Take it, then throw it back in the ocean. It will show its gratitude by offering you a chance to ride it across the ocean. Take the ride, and you'll end up on an island.
Thursday, March 27, 2014
Dilandau3000 plays King's Quest II: Romancing the Throne - Part 8 of 10
We now explore the castle in the middle of the poisoned lake...
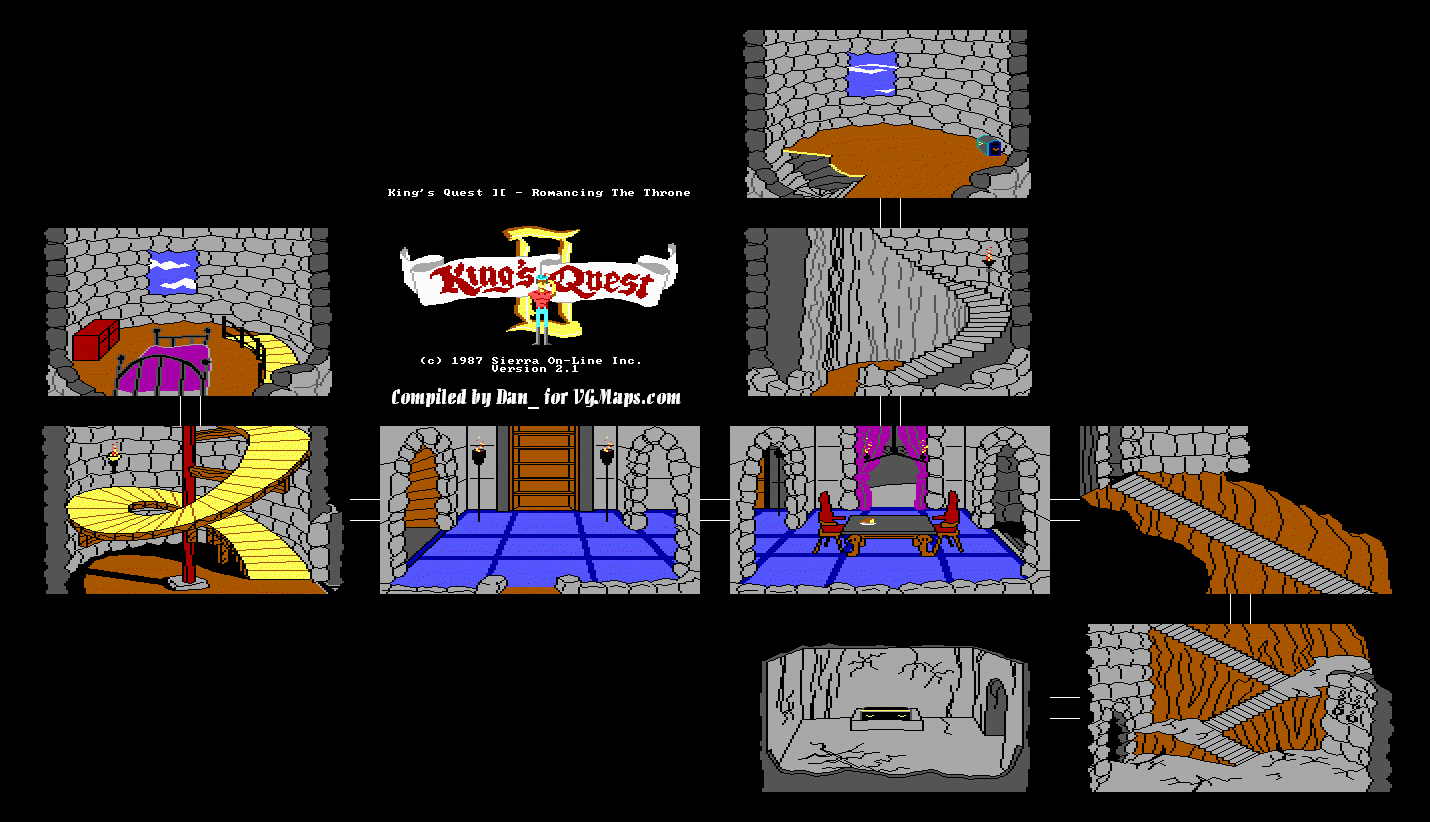
Dracula's Castle Map
Open the door, and you'll be in the castle.
Let's go west first. This leads to a spiral staircase. Be careful not to fall as you make your way up. Open the dresser drawer and you'll find a candle inside. Take it.
Go down the spiral staircase, and walk up to the torch on the wall that's halfway between upstairs and downstairs. Light the candle with it. Your candle is now illuminated. Let's now go to the room east of the entrance.
There is a smoked ham on the table. Take it. DO NOT EAT THE HAM. Go north and take care as you go up the stairs. Hugging the non-existant wall on the lower half of it and the wall in the background on the upper half makes this a lot easier. It should be noted that compared to Graham, the chairs and table are fucking gigantic.
Go right when you make it upstairs, and you'll be able to walk up to the chest. Unfortunately, you'll need a key to unlock it, so you'll have to head back downstairs. Be careful on your way down, as it is very easy to fall on your death as soon as the game transitions to the bottom of the stairway.
Head back to the dining room and go east. You'll see some more stairs, and these are much easier to cross than the ones up to the locked chest. Since the candle is lit, you'll be able to see stuff.
When you make it to the bottom, go into the room to the west. You'll find a coffin. If it's open, leave the room and come back. Open the coffin, and you'll finally find out who "C.D" is: Count Dracula! Quickly type in "kill Dracula," and you'll hammer away at him with the mallet and stake. Get the key he leaves behind when he turns into a pile of dust.
Remove the pillow from inside the coffin, and you'll find the third...and last...gold key! Take it!
Dilandau3000 plays King's Quest II: Romancing the Throne - Part 7 of 10
Now that you have the second door open, there's only one place to go...
All maps by Dan_.
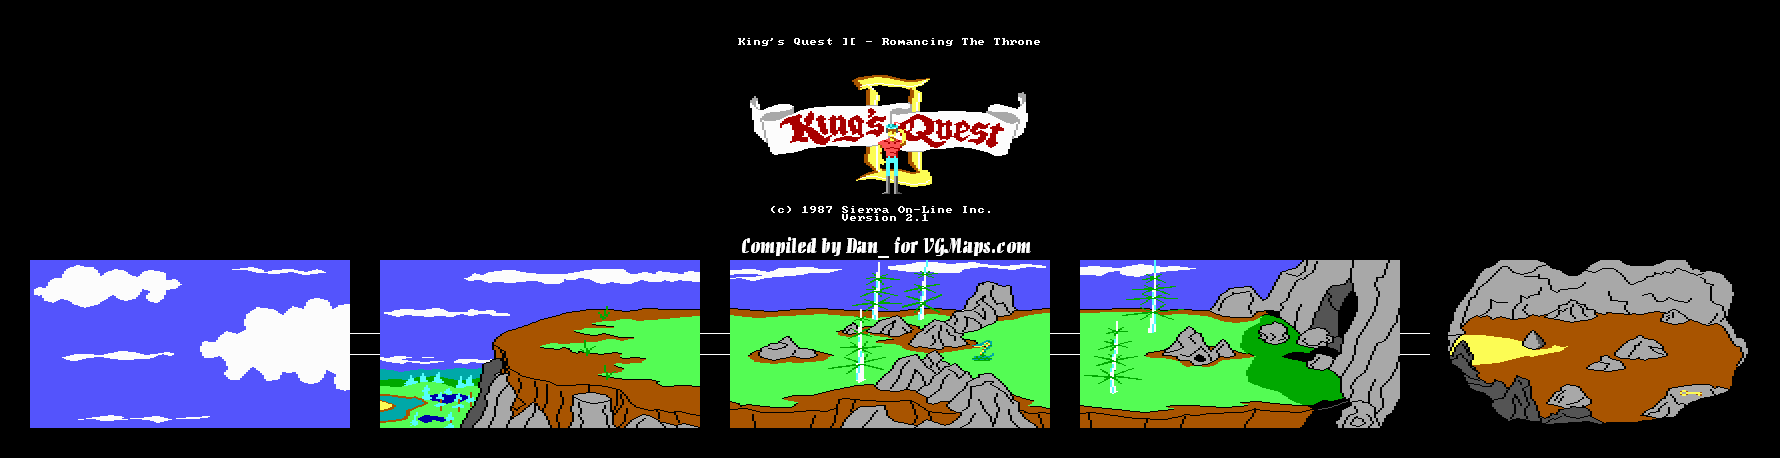
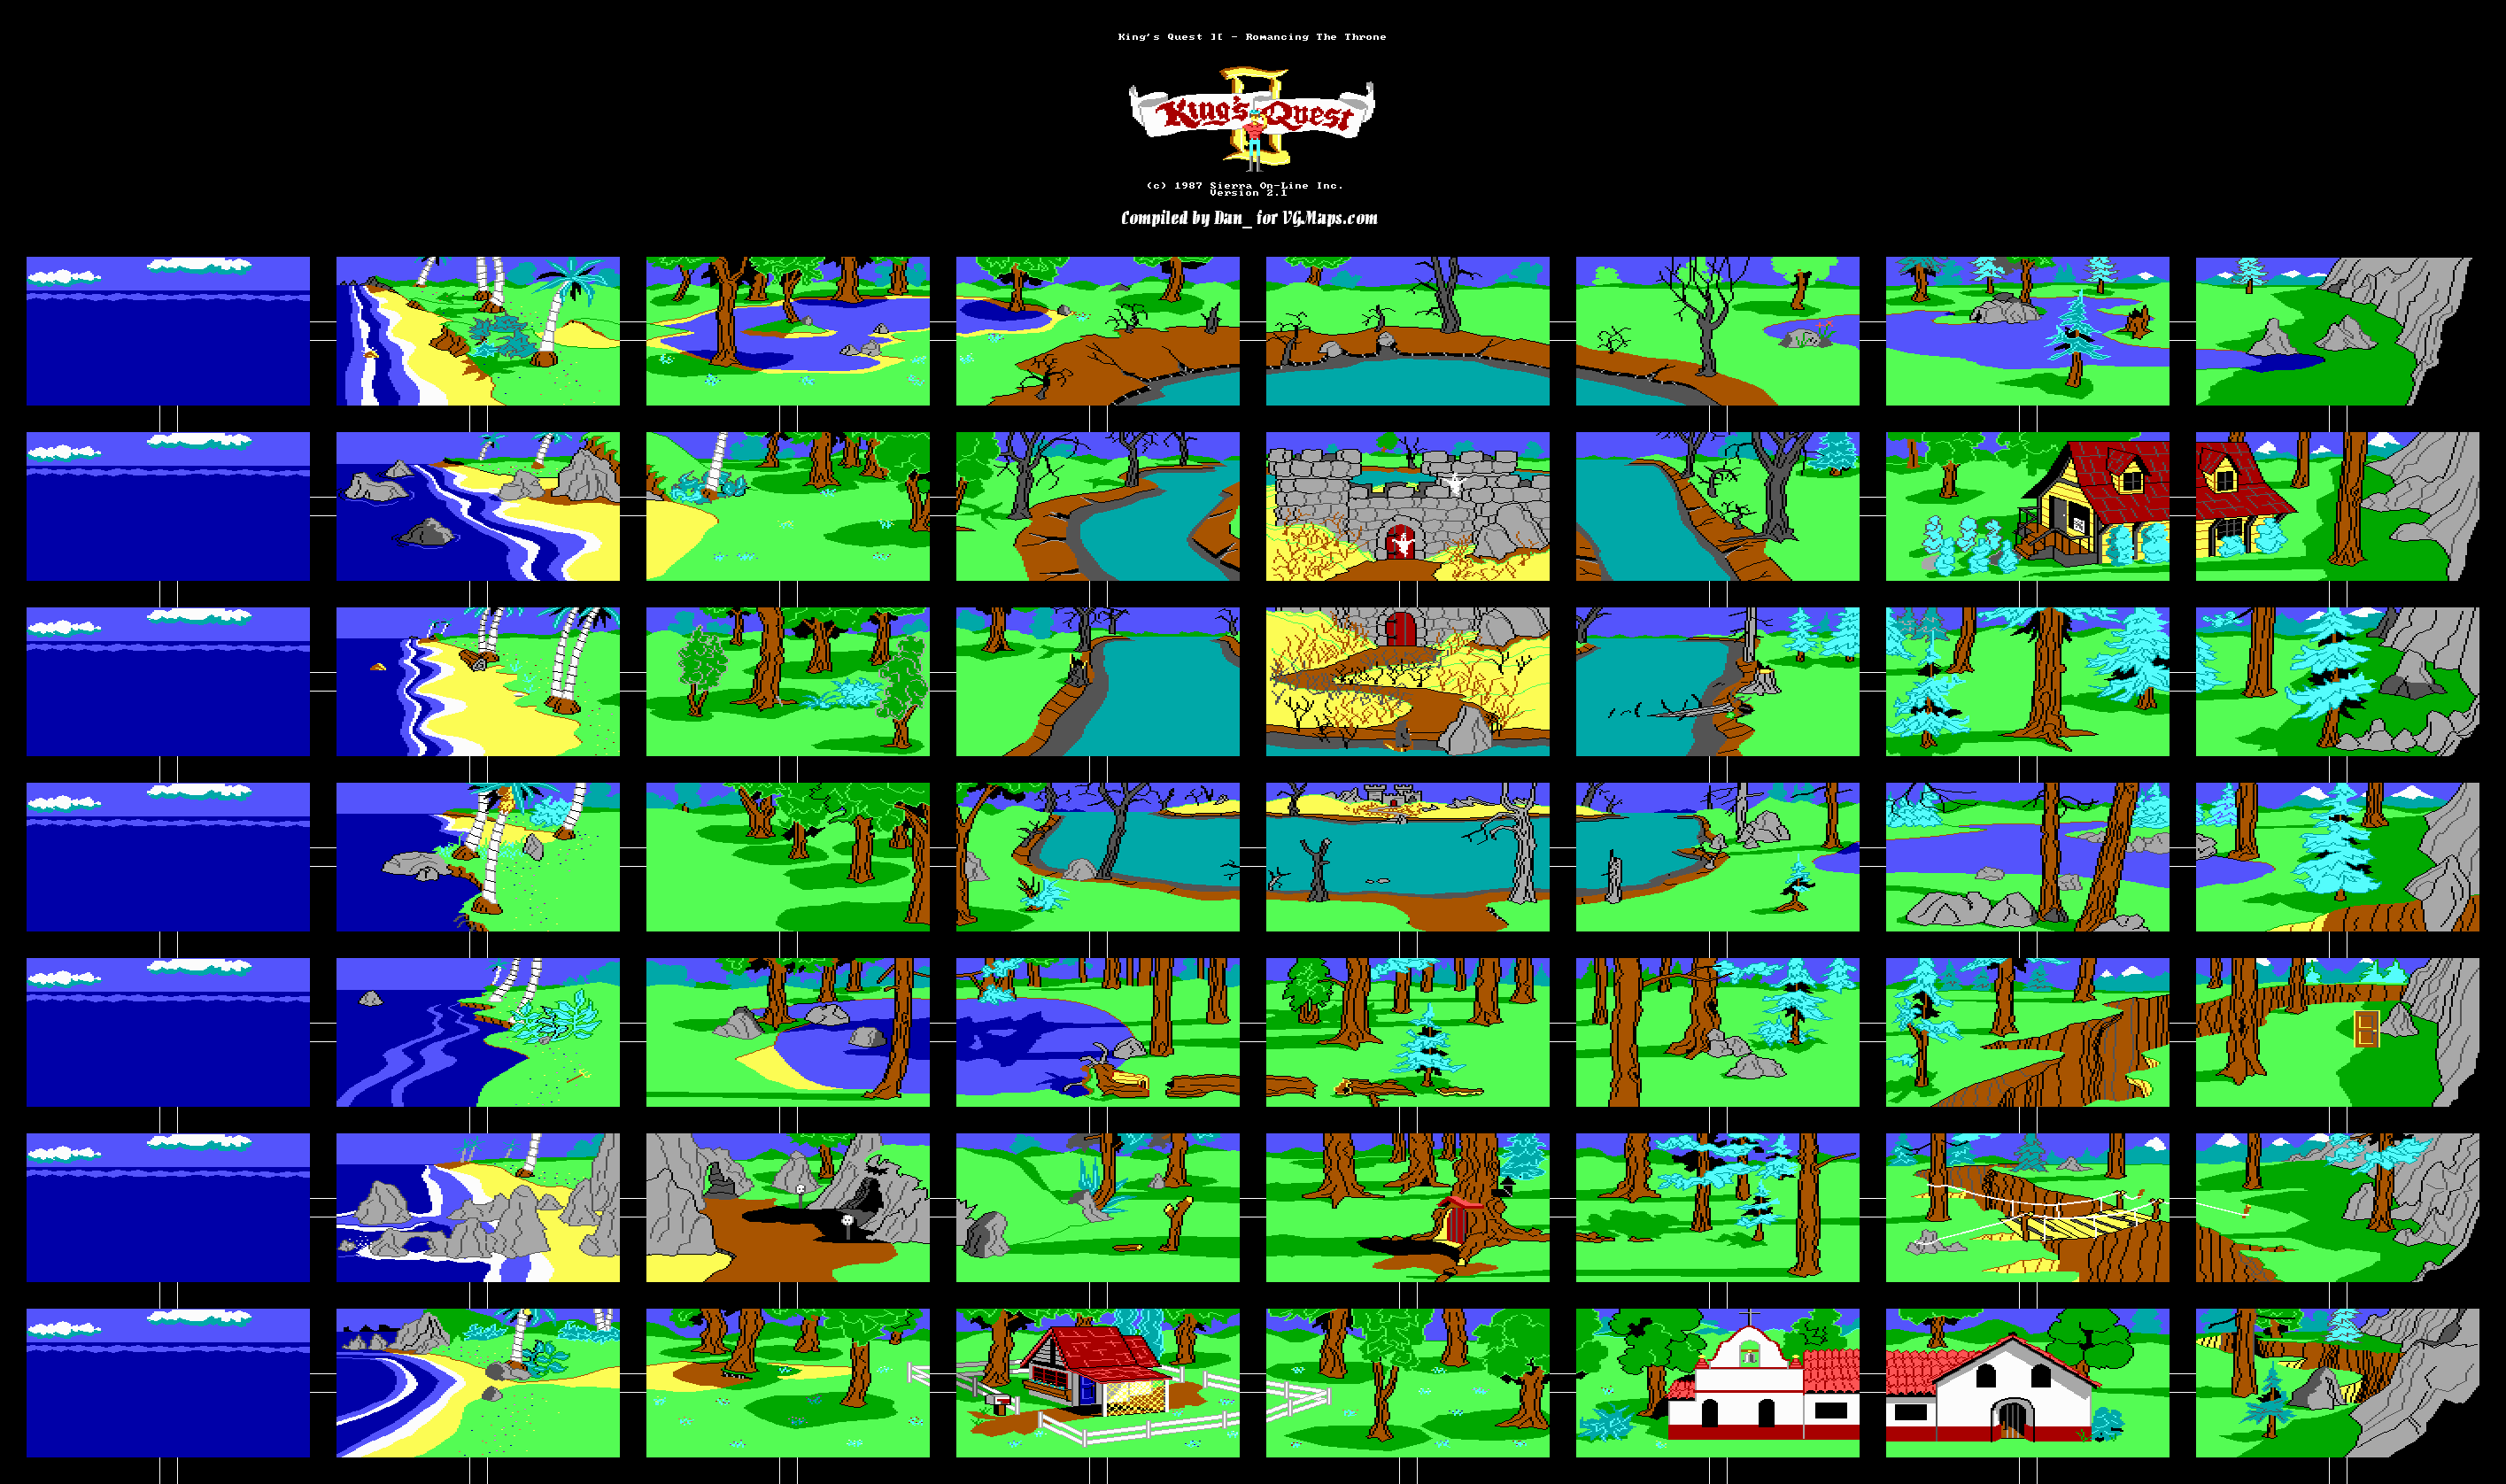
As soon as you enter the cave, you'll find the second key. Go up to it and pick it up.
Kolyma Map
Walk out of the cave and ride the carpet again. The carpet will take you back to the antiques shop. Head back to the bridge, cross it, and unlock the door with the key. Read the inscription of the third door before doing anything else: "Whosoever chooses to seek the last key must have a stout heart." I wonder what [b]that[/b] means...?
Return to the part of the poisoned lake where you see the castle in the distance. You'll see some black shrouded guy who looks like Charon, the ferryman of the River Styx on a boat. He only shows up if you read the third inscription, so if you didn't do that, you just made the game unwinnable. Congratulations.
Anyway, don't deal with him just yet. Instead, go two screens west and one screen north. There's a stake leaning against a tree. Take it.
Go back to the guy on the boat. Put on the cloak and ring. This way, you'll be able to get on the boat and actually gain three points instead of losing a bunch of points for giving the ferryman one of the treasures.
This next part is going to be painful...unless you eat the magic sugar cube. You can do this without the magic sugar cube (my sister actually did this back in the day, so that's how I know) by being careful and saving at the corners. Touching the brambles that line the sides of the road to the castle equals instant death.
Good lord, it's like that Irritating Stick game from Japan...except even more annoying.
When you make it to the door, either keep the cloak and ring on, or wear the cross the monk gave you. If the ghosts touch you without either of these things equipped, the ghosts will possess you and send you into the brambles. When this happens, the magical sugar cube is negated and you'll die from touching the brambles. Thanks, game.
You're better off eating the sugar cube, though, as eating it gives you one point. Nice.
Wednesday, March 26, 2014
Dilandau3000 plays King's Quest II: Romancing the Throne - Part 6 of 10
The quest for the second key is about to begin!
Map
As soon as you return the nightingale to the old lady at the antique shop, she'll give you the oil lamp and close shop. (She must really love that bird...)
When you rub the oil lamp, you'll find out that it is indeed a magic lamp and the genie inside will give you a magic carpet. Rub it again and you'll get a sword. Rub the lamp yet again and you'll get a leather bridle. The lamp will then disappear after a third rub.
Anyway, take a ride on the carpet. This will take you to the mountaintop.
Map
As soon as you go west from here, you'll see a poisonous snake. If you type in "Hi snake," the snake actually speaks. How about that? Also, getting too close will obviously kill you.
Instead of killing the snake with the sword, you can throw the leather bridle on it. (How this makes sense as well as how we're supposed to figure this out without using the official hint book, I'll never know.) This not only gives you more points, you also change the snake into a winged horse. You can greet the horse like you did the snake, but if you talk to it, it will thank you for breaking the evil enchanter's spell and give you a magic sugar cube that protects against poisonous brambles before it flies away.
Going west from here takes you to a cave. Before you go in, look in the hole in the rock in front of it. You'll get a preview of the first Space Quest game. Thanks, Two Guys From Andromeda.
Tuesday, March 25, 2014
Dilandau3000 plays King's Quest II: Romancing the Throne - Part 5 of 10
Now that we've gone underwater, how do we climb the mountains? We're about to find out!
Map
Going east from here will take you back to the poisonous lake. Apparently, the fairy appears again, so if you lost the protective spell that she gave you, she can give it to you again. She always shows up near the monastery, so if you're looking for her, check around there.
Go south, then east. You'll find another building. This building is an antique shop. If you read the sign, you'll find out the shop is open. Go on in. (After reading the sign, of course. Otherwise, you won't be able to enter.)
Talk to the old lady inside, and she'll motion towards the oil lamp on the table. You want it? It's yours, my friend, as long as you have...the nightingale. Turns out that nasty old Hagatha stole the nightingale from her. Since giving her the nightingale is better than giving her two treasures, let's go for it. Head back to Hagatha's cave and get the nightingale.
Be careful around the antique shop, as an evil enchanter runs around in Kolyma as well.
It appears we forgot about the bottle. If you look at the bottle, you'll notice a large cloth inside. Pull it out of the already-opened bottle.
Head back to Grandma's House, then head to Hagatha's cave. If you head inside and see Hagatha, leave the cave and re-enter. She should be gone. Drape the cloth over the cage to quiet the nightingale (this gives you some very easily missed points, by the way), then take the nightingale.
Now that you have the nightingale, it's time to head back to the antique shop. But first, head east and then north. Look inside the stump and you'll find a necklace with...you guessed it...diamonds and sapphires. Take it.
Go east two screens and you'll notice a sizable hole in one of the trees. Get to the side of the tree to look in the hole, and you'll find a mallet. Go ahead and take it. If you have the protective spell, the dwarf shouldn't bother you here.
Dilandau3000 plays King's Quest II: Romancing the Throne - Part 4 of 10
If I hear that "Under The Sea" song from The Little Mermaid one more time...
All maps by Dan_.
When you take the clamshell, you'll find a diamond and sapphire bracelet underneath. Take the necklace.
If you open the clamshell, you'll find out it's empty.
North of the clamshell screen is a mermaid. You'll get nothing if you talk to her after swimming up to her, so give her the bouquet of flowers instead. She'll summon a seahorse. Take a ride on it, and you'll go underwater.
Underwater Map
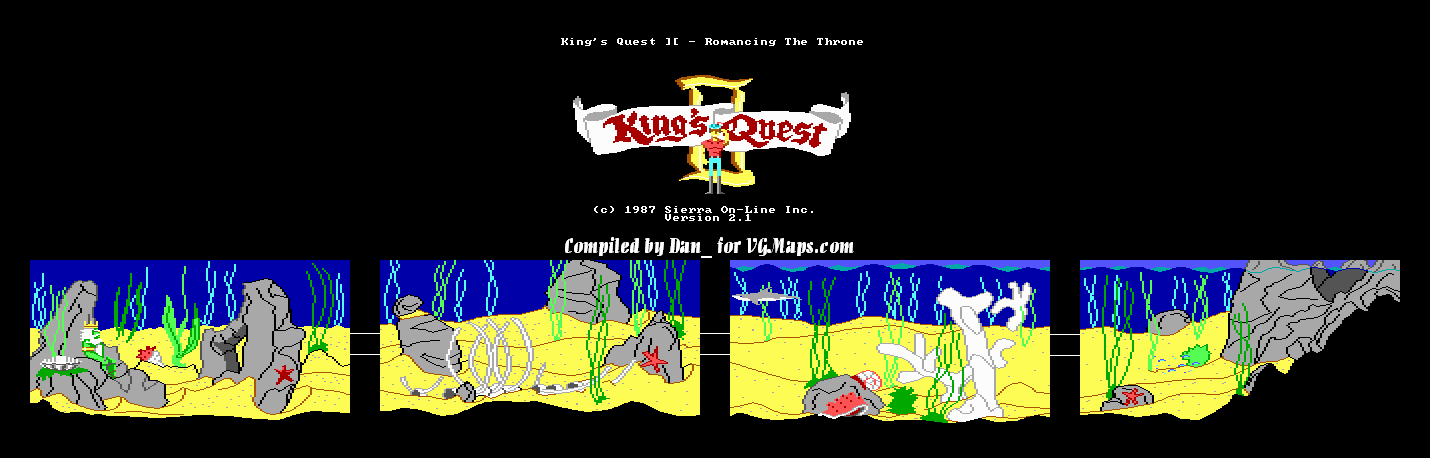
Go west until you meet King Neptune. Get to the middle of the screen and give him the Trident. He'll give you a bottle, and he'll also open a large clamshell which gives you a golden key. Position King Graham so he's right next to the key, and take the key. Congratulations! You have the first key!
Map
Once you're back on dry land, head two screens west and you'll see the poisoned lake. We've seen it before, but this time around, Dilandau3000 goes into detail about it. If you even do so much as drink the water of the poisoned lake, you'll die.
Follow the poisoned lake, and you'll see it encompasses around an island with a castle on it.
Two screen west of where you saw the castle, and you'll see a complete change in scenery from the poisoned lake. There's nothing special here, though, but if you go west again, you'll be near the chasm. Go back to the bridge and unlock the door with the key. You'll find another door. Read the inscription on the door before you do anything else: "Whosoever chooses to seek the key for this door should set their sights high."
Now that this is out of the way, let's cross the bridge and head south from the monastery entrance. Look inside the hole in the boulder and you'll find a diamond and sapphire brooch...which matches the earrings and bracelet perfectly! I wonder...
Anyway, take the brooch.
Monday, March 24, 2014
Dilandau3000 plays King's Quest II: Romancing the Throne - Part 3 of 10
We cover more territory in Kolyma and even pick up a few items along the way...
All maps by Dan_.
If you read the inscription on the door, you'll get the message "Whosoever chooses to seek the key for this door will undoubtedly make a splash."
It should be noted that you must read the inscription on the doors, or else you won't be able to get the key for that door. Therefore, the game forces you to cross the bridge seven times, when it collapses after six. Hmmm...
The screen west of the bridge has a dwarf if you're not lucky enough. He'll steal an item from your inventory just like the dwarf in the last game, except you can actually retrieve this item, so don't fret. He usually shows up near the dwarf's house, which you'll see next.
Dwarf's House Map
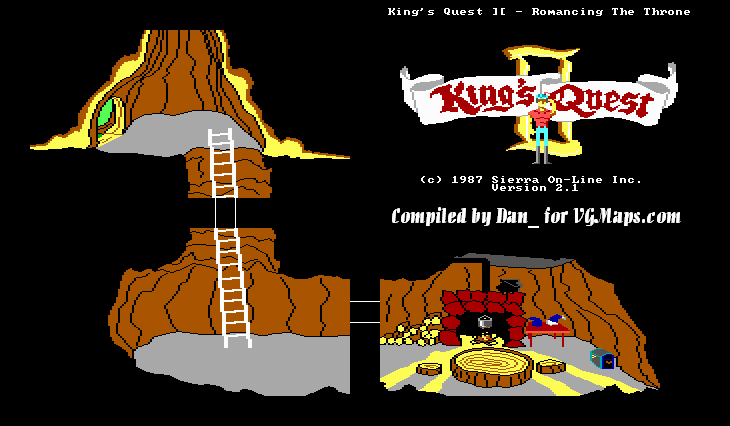
West of this screen is a tree with a door in it. If you open the door, you'll find a ladder. Climb down the ladder, and be careful when you do, as you can die from the fall if you're too high up.
West of here is a dwarf's house. Open the trunk, and take out the earrings. Remember, if the dwarf steals anything from you at any point in the game, come back to this trunk and take it from him. You can also take the pot of chicken soup from above the fire in the fireplace. DO NOT EAT THE SOUP. Now get out of there.
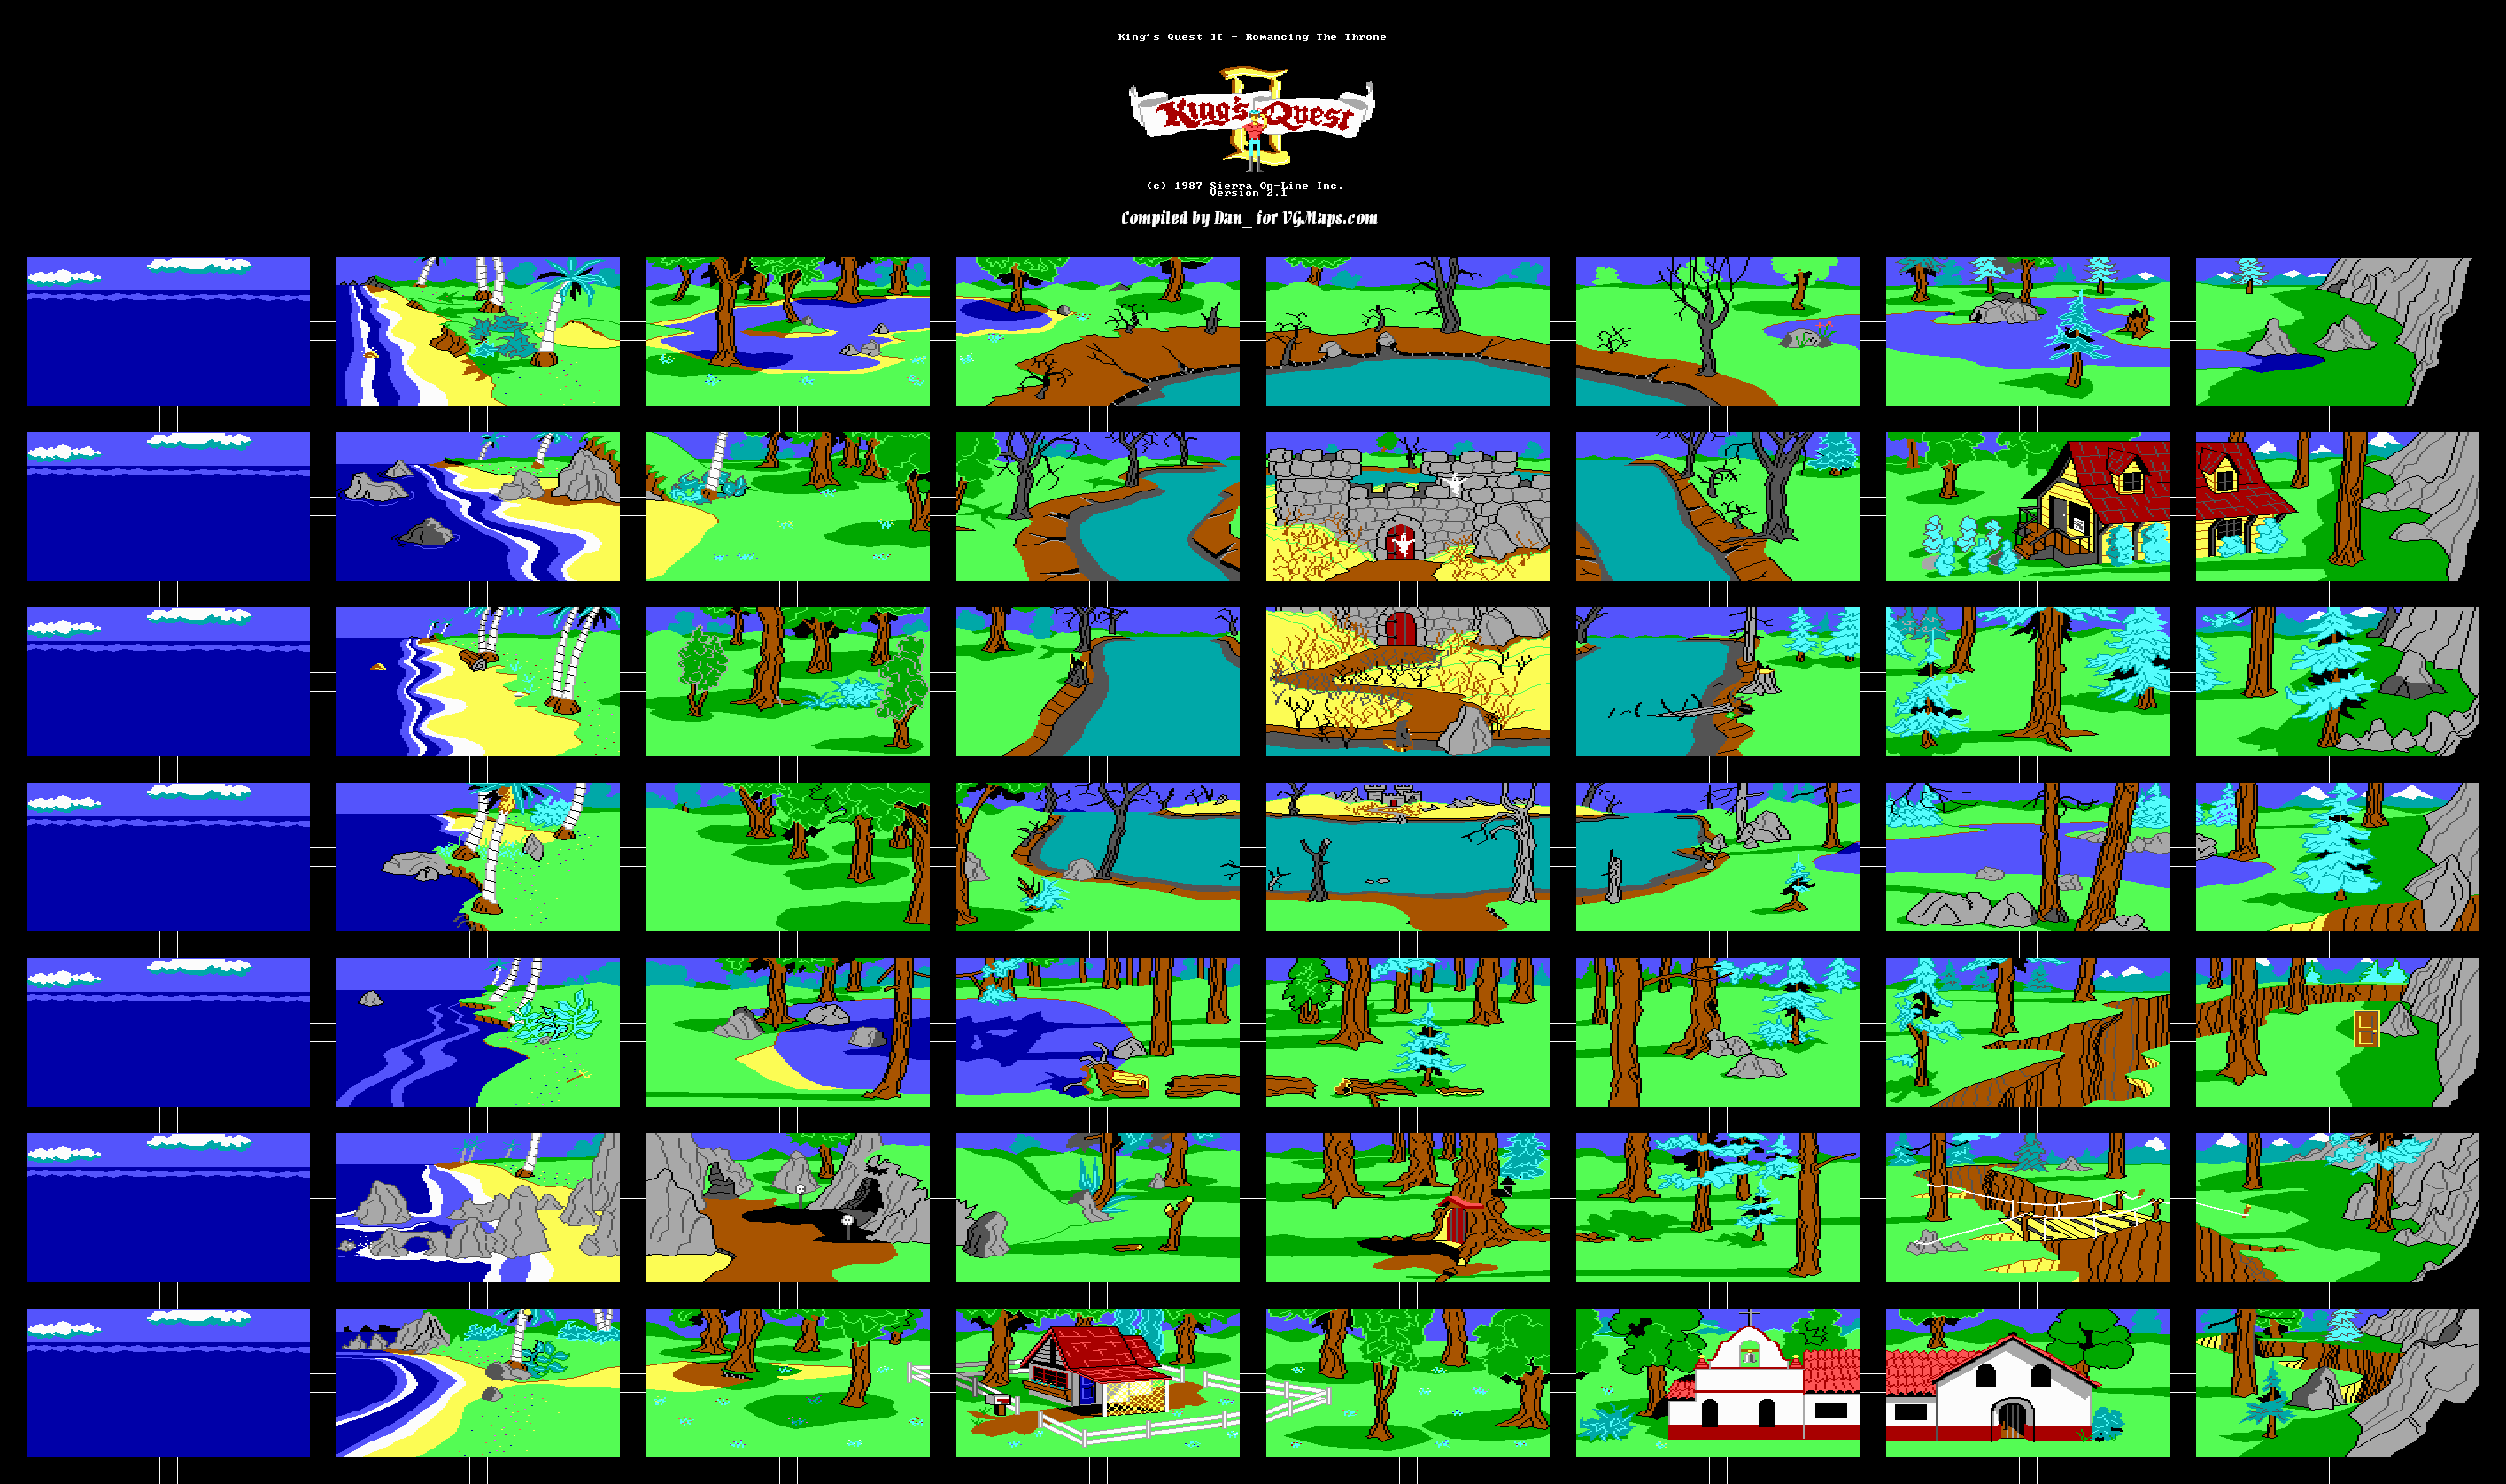
Kolyma Map
Go south of the Dwarf's house and you'll be back at Grandma's. Give the chicken soup to Grandma, and she'll tell you to look under the bed. You'll find a large ruby ring and a black cloak. Take them both. If you look at the ring, you'll find out that the initials "C.D" are engraved in it. If you look at the cloak, you'll notice it would better fit a man taller than Graham. Hmmm...
The screen directly north of Grandma's house can be dangerous. If Hagatha, the old hag, shows up, stay away! She will catch you and cook you!
West of here is Hagatha's cave. If you're lucky, you'll see the Batmobile ride back and forth and even hear the Batman theme! I'm not kidding!
Anyway, if you go inside the cage, you'll find a nightingale in a cage. Don't take it just yet. Get back out and go west. You'll be at the beach again. Go north of here and you'll find a trident. Take it. Two screens north take you to a clamshell, which you should also take.
Dilandau3000 plays King's Quest II: Romancing the Throne - Part 2 of 10
Well, we didn't do a lot in the last entry. That'll change soon enough!
Kolyma Map
If you give her the basket of goodies, she gives you her bouquet of flowers before happily skipping around. (She appears in a couple of screens near Grandma's House, so she isn't that hard to find if she doesn't show up where you found her.)
Two screens east of Grandma's House is the monastery. If you're lucky, a fairy might show up here. She will cast a spell that protects you from evil elements, much like the Fairy Godmother from the first game. Just like in the last game, it doesn't last forever...
Anyway, the door to the monastery is one screen further to the east. Go inside, type "pray" to pray at the cross and the monk will finally ask you your name. Type in "Graham," and he will give you a necklace with a silver cross on it. It will protect you from evil. Put it on to get some points, which are pretty easy to miss (Dilandau3000 misses these.)
When you go east from the monastery entrance, you'll find out that the world doesn't loop from east to west like in KQ1. It still does it from north to south, though.
The last screen on this row is a pit. Nothing special here.
North of the monastery entrance is a bridge. (Love how Dilandau3000 comes this close to falling off.) You can only cross the bridge six times before the center falls out from below you and causes you to tumble to your death...and get six points from all the times you cross it. Cruelest. Death. Ever. Nice one, game.
This bridge is particularly nasty. You have to cross the bridge seven times, and if you cross it twice without doing anything, you make the game unwinnable. It's like the dwarf taking the treasures in the first game, except completely cruel.
Anyway, if you cross the bridge, go east to the other side and go north, you'll find the door. Yes, the magical door mentioned in the prologue. (I told you this bridge was evil.)
Sunday, March 23, 2014
Dilandau3000 plays King's Quest II: Romancing the Throne - Part 1 of 10
Alright, we have another prelude to watch before we can do anything.
Okay, now that we have this out of the way...
thegameulost: "Let me get this straight: King Graham is setting out on a dangerous journey, risking life and limb, without a sword or his indestructible shield, to rescue a woman whose image he saw for no more than a minute or two, and marry her, despite never having met or talked to her in person. Sounds completely asinine. Let's go for it! (and hope that the kingdom of Daventry has a damn good marriage counselor."
So, what became of our good friend Sir Graham after he became king about twenty-five blog series ago (give or take)? Let's find out.
So, what became of our good friend Sir Graham after he became king about twenty-five blog series ago (give or take)? Let's find out.
All maps by Dan_.
All right! Let's do this!
Go east two screens from the starting point. You'll find a house with a mailbox that is inexplicably bigger than King Graham. (I'm so totally making perspective jokes again.) If you open it, you'll find a basket of goodies. Go ahead and take it, and perform the biggest twist in morals since the beginning of the series, where there weren't any twisting of morals. DO NOT EAT THE GOODIES. If you knock on the door and then enter, you'll meet Grandma, who lives in this house. (Definitely a Little Red Riding Hood reference.)
There's a 50/50 chance that if you go inside, you'll meet the Wolf instead. If he's in there, get out of there and enter again. Grandma might be in there.
If you go east another screen, wait a little while and you'll meet up with Little Red Riding Hood. If you talk to her, you'll find out that her basket of goodies has been stolen while she was picking flowers.
Sunday, September 22, 2013
Saturday, September 21, 2013
Dilandau3000 plays King's Quest 1: Quest For The Crown - Part 12 of 12
We're done! Now it's time to head to the throne room and become the new king!
-Daventry.png)
-LeprechaunCave.png)
Now that you're done here, go west and eat the mushroom when you're near the hole in the wall. You'll be able to climb out of here and return to the outside world.
When you go back to the castle, you'll notice the guards are gone. Open the door. You'll notice the courtyard is empty. You're done. Enjoy the ending, with 157 out of 158 points earned. (It should be 158, but he didn't guess the gnome's name right on the first try.)
For those of you confused with that last sentence, if you do everything you're supposed to according to the guide and get the gnome's name right on the first try, you'll get all 158 points. There, now I won't have to edit this blog.

When you go back to the castle, you'll notice the guards are gone. Open the door. You'll notice the courtyard is empty. You're done. Enjoy the ending, with 157 out of 158 points earned. (It should be 158, but he didn't guess the gnome's name right on the first try.)
For those of you confused with that last sentence, if you do everything you're supposed to according to the guide and get the gnome's name right on the first try, you'll get all 158 points. There, now I won't have to edit this blog.

Dilandau3000 plays King's Quest 1: Quest For The Crown - Part 11 of 12
This video does not contain Hornswoggle.
Alright, now we can go down there.
No sooner do you explore the caves that you'll come face-to-face with a man-eating rat! He looks far more menacing here than he does in the original 1984 version. If you get too close, he'll reach out and get you, putting an end to your adventure. Instead, wait for him to tell you to come closer, then give him the cheese. He'll disappear, letting you open the door.
When you open the door, you'll meet two leprechaun guards with spears. If they catch you, you'll be spending the rest of your days peeling potatoes for the Leprechaun King...unless you've picked up the four-leaf clover earlier in your travels. For that, they'll leave you alone. But you don't get any points for that. Instead, play the fiddle. They'll dance themselves out of the room and you'll earn three points for your efforts.
The next room will be full of leprechauns. Thanks to your fiddle playing, they'll be dancing around. When they're gone, get the magic shield and the scepter.
No sooner do you explore the caves that you'll come face-to-face with a man-eating rat! He looks far more menacing here than he does in the original 1984 version. If you get too close, he'll reach out and get you, putting an end to your adventure. Instead, wait for him to tell you to come closer, then give him the cheese. He'll disappear, letting you open the door.
When you open the door, you'll meet two leprechaun guards with spears. If they catch you, you'll be spending the rest of your days peeling potatoes for the Leprechaun King...unless you've picked up the four-leaf clover earlier in your travels. For that, they'll leave you alone. But you don't get any points for that. Instead, play the fiddle. They'll dance themselves out of the room and you'll earn three points for your efforts.
The next room will be full of leprechauns. Thanks to your fiddle playing, they'll be dancing around. When they're gone, get the magic shield and the scepter.
Friday, September 20, 2013
Dilandau3000 plays King's Quest 1: Quest For The Crown - Part 10 of 12
Now that we've taken care of the giant, what trials and tribulations await us further into the Land of the Clouds?
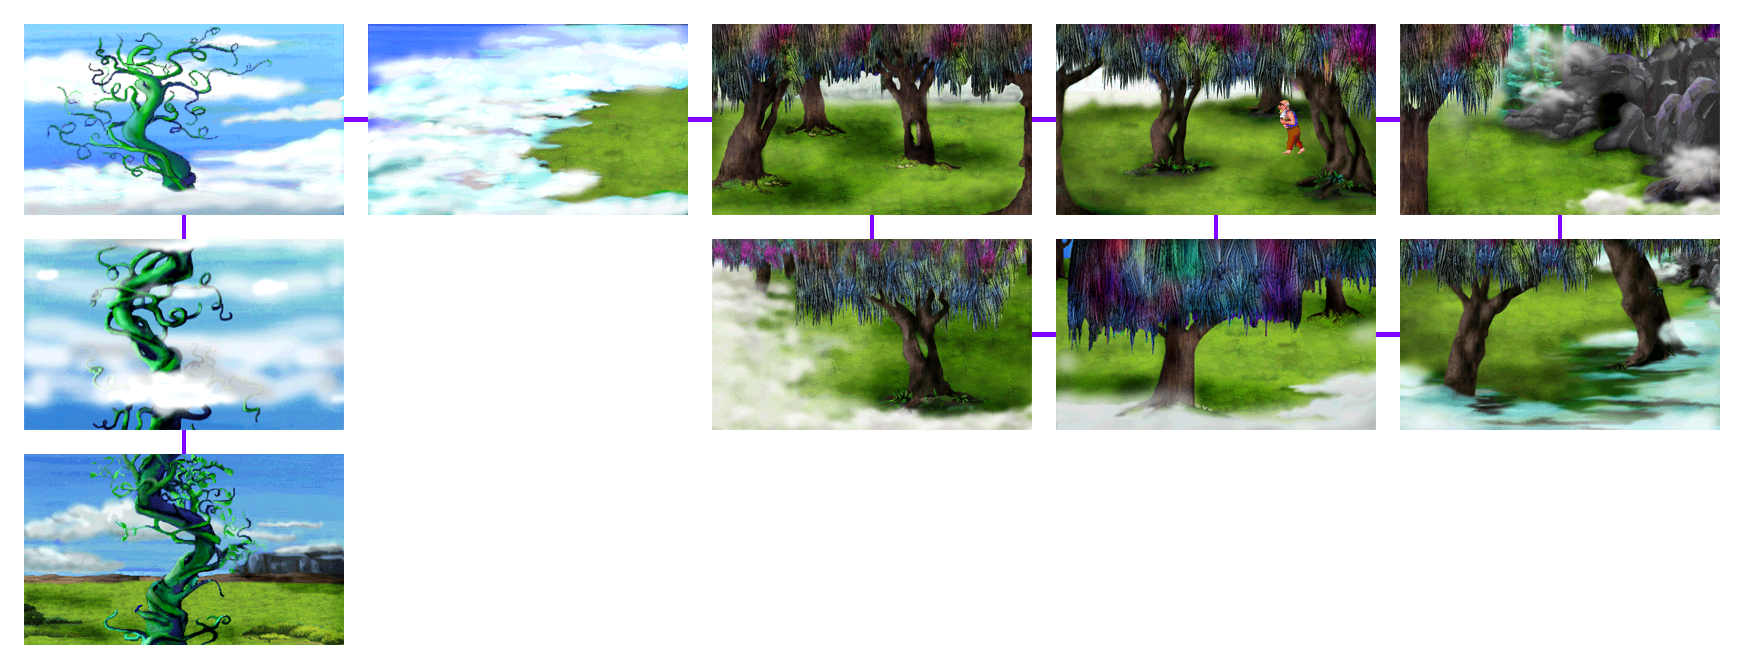
Good news! The chest here is the chest we've been looking for all along! Now let's slip away and go east.
We've already noticed it before, but there's a cave here. Let's go inside.
We've already noticed it before, but there's a cave here. Let's go inside.
-SkyCave.png)
In the original version, there were stairs that you had to walk up, and they were a bit difficult. In the VGA remake, you have it made (kinda). Here, you have catwalks which give you a little bit more room to manuever. Just be careful not to fall off.
Unfortunately, you may encounter the dwarf again here. If you do, restore your game and start over, since he can steal one of the magic treasures and make the game unwinnable. If you still have enough juice in the ring, put in on and rub it again, then take it back off once you go through the tunnel on the first cavern screen.
From there, keep following the catwalks and you'll come across a door. When you touch it, it vanishes. Go through it and you'll end up at the cave with the door on it. The door will then lock from behind you.
Unfortunately, you may encounter the dwarf again here. If you do, restore your game and start over, since he can steal one of the magic treasures and make the game unwinnable. If you still have enough juice in the ring, put in on and rub it again, then take it back off once you go through the tunnel on the first cavern screen.
From there, keep following the catwalks and you'll come across a door. When you touch it, it vanishes. Go through it and you'll end up at the cave with the door on it. The door will then lock from behind you.
Go to the screen north of the right side of the goat pen. You'll find a large bird flying around. If you jump at the right spot at the right time, you'll be able to grab onto the bird and be taken to the other side of the raging river.
When you land, you'll be near a large hole. Don't go down there yet. Instead, go west. You'll finally be able to get the Magic Mushroom. Congratulations.
Dilandau3000 plays King's Quest 1: Quest For The Crown - Part 9 of 12
Just when you thought this was all there was to the game...
-SkyLand.png)
Go back to either the wildflower field or the place where you found the bowl and plant the magic beans. A beanstalk will crawl out of the ground. Climb the beanstalk, and be careful not to fall off! Keep your hands on the stalk at all times and save often. You'll be doing this for two screens, but it's the hardest two screens you'll probably be dealing with in the entire game.
When you make it to the top, you'll climb off of the beanstalk automatically. You can still fall off the north end of this cloud, so be sure to save once you get here.
Three screens to the east and you'll meet a giant. If you take too long, the giant will jump on you and squish you into the ground. You can either kill him or put him to sleep. Put him to sleep, since it gives you more points.
If you go south of the second screen east after the beanstalk, go south, then go two screens further east, you'll find a tree with a hole in it. Look in the hole and you'll find a slingshot. Take the slingshot.
You could go one screen north and one screen back west to deal with the giant using the slingshot, but that obviously doesn't give you the most points. Instead, you'll have to come in from the west and hide behind the tree on the east side of the screen with the giant, and make it so that he falls asleep before he catches you. If you need help with that, put the ring on and rub it. You'll turn invisible. Since you're invisible, the giant won't be able to see you, and you'll be able to stand there long enough to have the poor guy wear himself out. When he does that, he'll get in front of a tree and lie on it. Regardless of how you deal with him, he'll drop a treasure chest when he goes down. Go up to it and take it.
When you make it to the top, you'll climb off of the beanstalk automatically. You can still fall off the north end of this cloud, so be sure to save once you get here.
Three screens to the east and you'll meet a giant. If you take too long, the giant will jump on you and squish you into the ground. You can either kill him or put him to sleep. Put him to sleep, since it gives you more points.
If you go south of the second screen east after the beanstalk, go south, then go two screens further east, you'll find a tree with a hole in it. Look in the hole and you'll find a slingshot. Take the slingshot.
You could go one screen north and one screen back west to deal with the giant using the slingshot, but that obviously doesn't give you the most points. Instead, you'll have to come in from the west and hide behind the tree on the east side of the screen with the giant, and make it so that he falls asleep before he catches you. If you need help with that, put the ring on and rub it. You'll turn invisible. Since you're invisible, the giant won't be able to see you, and you'll be able to stand there long enough to have the poor guy wear himself out. When he does that, he'll get in front of a tree and lie on it. Regardless of how you deal with him, he'll drop a treasure chest when he goes down. Go up to it and take it.
Thursday, September 19, 2013
Dilandau3000 plays King's Quest 1: Quest For The Crown - Part 8 of 12
Remember that note from the witch's house?
Finally, we go further east since we stop by the rock near the castle on the way there.
There's a mushroom on the other side of the raging river, but you won't be able to get it quite yet.
Anyway, let's get back to the goat pen. Get near the goat and show him the carrot. He'll start to follow you. Now go back to the troll with the goat at your side and the goat will knock him away. The goat then walks off. You're free to cross the bridge.
When you do, you'll meet a gnome that is spinning hay into gold. Get close to him and he'll ask you what his name is. If you don't guess it right, you'll get the golden key that fits into that cave door. If you do get it right, you'll get some magic beans. You're better off getting it right the first time, as you'll get the most points for doing so. The gnome's name is "Ifnkovhgroghprm" (which is how you had to do it in the original) but in the VGA version you can use the much simple "Nikstlitslepmur" (Rumpelstiltskin spelled backwards). The original clue is not just spelling it backwards, but using a backwards alphabet:
There's a mushroom on the other side of the raging river, but you won't be able to get it quite yet.
Anyway, let's get back to the goat pen. Get near the goat and show him the carrot. He'll start to follow you. Now go back to the troll with the goat at your side and the goat will knock him away. The goat then walks off. You're free to cross the bridge.
When you do, you'll meet a gnome that is spinning hay into gold. Get close to him and he'll ask you what his name is. If you don't guess it right, you'll get the golden key that fits into that cave door. If you do get it right, you'll get some magic beans. You're better off getting it right the first time, as you'll get the most points for doing so. The gnome's name is "Ifnkovhgroghprm" (which is how you had to do it in the original) but in the VGA version you can use the much simple "Nikstlitslepmur" (Rumpelstiltskin spelled backwards). The original clue is not just spelling it backwards, but using a backwards alphabet:
ABCDEFGHIJKLMNOPQRSTUVWXYZ
ZYXWVUTSRQPONMLKJIHGFEDCBA
How you're supposed to know that the note in the witch's house applies to this, I have no idea.
Also, if you make a wrong guess on the first try, you lose a point. So guess it right the first time!
Now that we have the beans, remember that eating the beans makes you lose both the beans and points and makes the game unwinnable, as you cannot get the beans back.
Also, if you make a wrong guess on the first try, you lose a point. So guess it right the first time!
Now that we have the beans, remember that eating the beans makes you lose both the beans and points and makes the game unwinnable, as you cannot get the beans back.
Dilandau3000 plays King's Quest 1: Quest For The Crown - Part 7 of 12
We meet some new monsters and save a woodcutter and his wife from ruin. Just another day in Daventry.
Going west takes to you to a natural rock bridge. Unfortunately, when you try to cross it, you'll meet up with that blasted troll again.
trollface.jpg
Let's go north and look at that man-made bridge. Looks rather nice. Since you can't go west here, let's go east. You'll see a lake where the raging river starts. Going east again takes you to an old cabin. Finally, signs of life.
Go in and you'll meet a woodcutter and his wife. His wife is gravely ill, and her sad husband is afraid that she may die soon.
Unlike the original version, where you could fall into the hole in the floor that keeps you from getting the violin, there's no way to die in here in the VGA remake. Anyway, do not give him any treasures or the carrot. You will lose points and the item. Instead, say fill to fill up the ceramic bowl, then give the bowl to the woodcutter. He'll let you take the fiddle as thanks.
Leaving the house and going east takes you to the back of the house, where there isn't really much of anything. A further screen to the east takes you to a gloomy forest clearing. If you move around while in this gloomy forest, you may attract an ogre! If you do, get away! He'll kill you if he grabs you! Also, you may attract an evil sorcerer who will try to cast a spell on you if he gets a hold of you. A dwarf may also show up as well and steal one of your items, usually one of the three magic treasures. You lose something to the dwarf and you lose it forever.
Go south and go west. You'll come across a rock with a hole in the base. There's a feint greenish glow if you look into it, but there's not much else here.
Wednesday, September 18, 2013
"What in the world is the PCjr?"
Yeah, I know you're probably wondering what it was, besides the fact that it's an old computer and King's Quest was a tech demo for it.
Dilandau3000 plays King's Quest 1: Quest For The Crown - Part 6 of 12
"It turns out real trolls are almost as annoying as Internet trolls."
No shit.
...
trollface.jpg
No shit.
...
trollface.jpg
Let's head back to the witch's gingerbread house and go west.
Here, you'll see a tree with a bird's nest on it, complete with mother and baby birds. Nothing important here. One screen west is the raging river. If you jump into it, you will die. If you go west again, you'll see a bridge. If you try to cross it, you'll meet a troll.
trollface.jpg
DO NOT GIVE HIM ANY OF THE TREASURES, YOU WILL LOSE POINTS AND QUITE POSSIBLY MAKE THE GAME UNWINNABLE. ALSO, DO NOT THROW THE DAGGER AT THE TROLL, YOU WILL LOSE POINTS AND THE DAGGER. ALSO, EQUIPPING AND RUBBING THE RING TO MAKE YOURSELF INVISIBLE DOES NOT HELP.
Now that this disclaimer is out of the way, let's avoid him and go west. Nothing important here. Go west another screen and look at the ground. You'll notice a bowl. Pick it up. For some reason, when you look at it in the inventory (which gives you an easy-to-miss point), it says "fill" just under the rim. If you type in the command "say fill," the bowl magically fills up with some sort of stew. Save the stew for later.
INFINITE FOOD
Problems?
trollface.jpg
Go west again, and you'll come across a walnut tree. Take one of the walnuts that are on the ground. Open it up, and you'll find a small nugget of pure gold. If you're near the walnut tree, you'll see squirrels run back and forth onscreen. Nice.
Going west takes you to a spooky looking part of the forest. There's nothing here, and going west again takes you back to the gingerbread house. Let's go north.
Going north takes you to some weeping willows and a lake. There is also a snake on top of one of the trees, but it doesn't seem to do anything other than move it's head around when you move left and right.
There is another meadow west of here. There's nothing to do here, though.
Subscribe to:
Posts (Atom)