Showing posts with label brickroadbrickroad. Show all posts

Tuesday, June 6, 2023

Brickroad plays Kid Icarus: Of Myths and Monsters - Part 4 of 4


In this video, Orcos is defeated, then the long wait for Uprising begins.


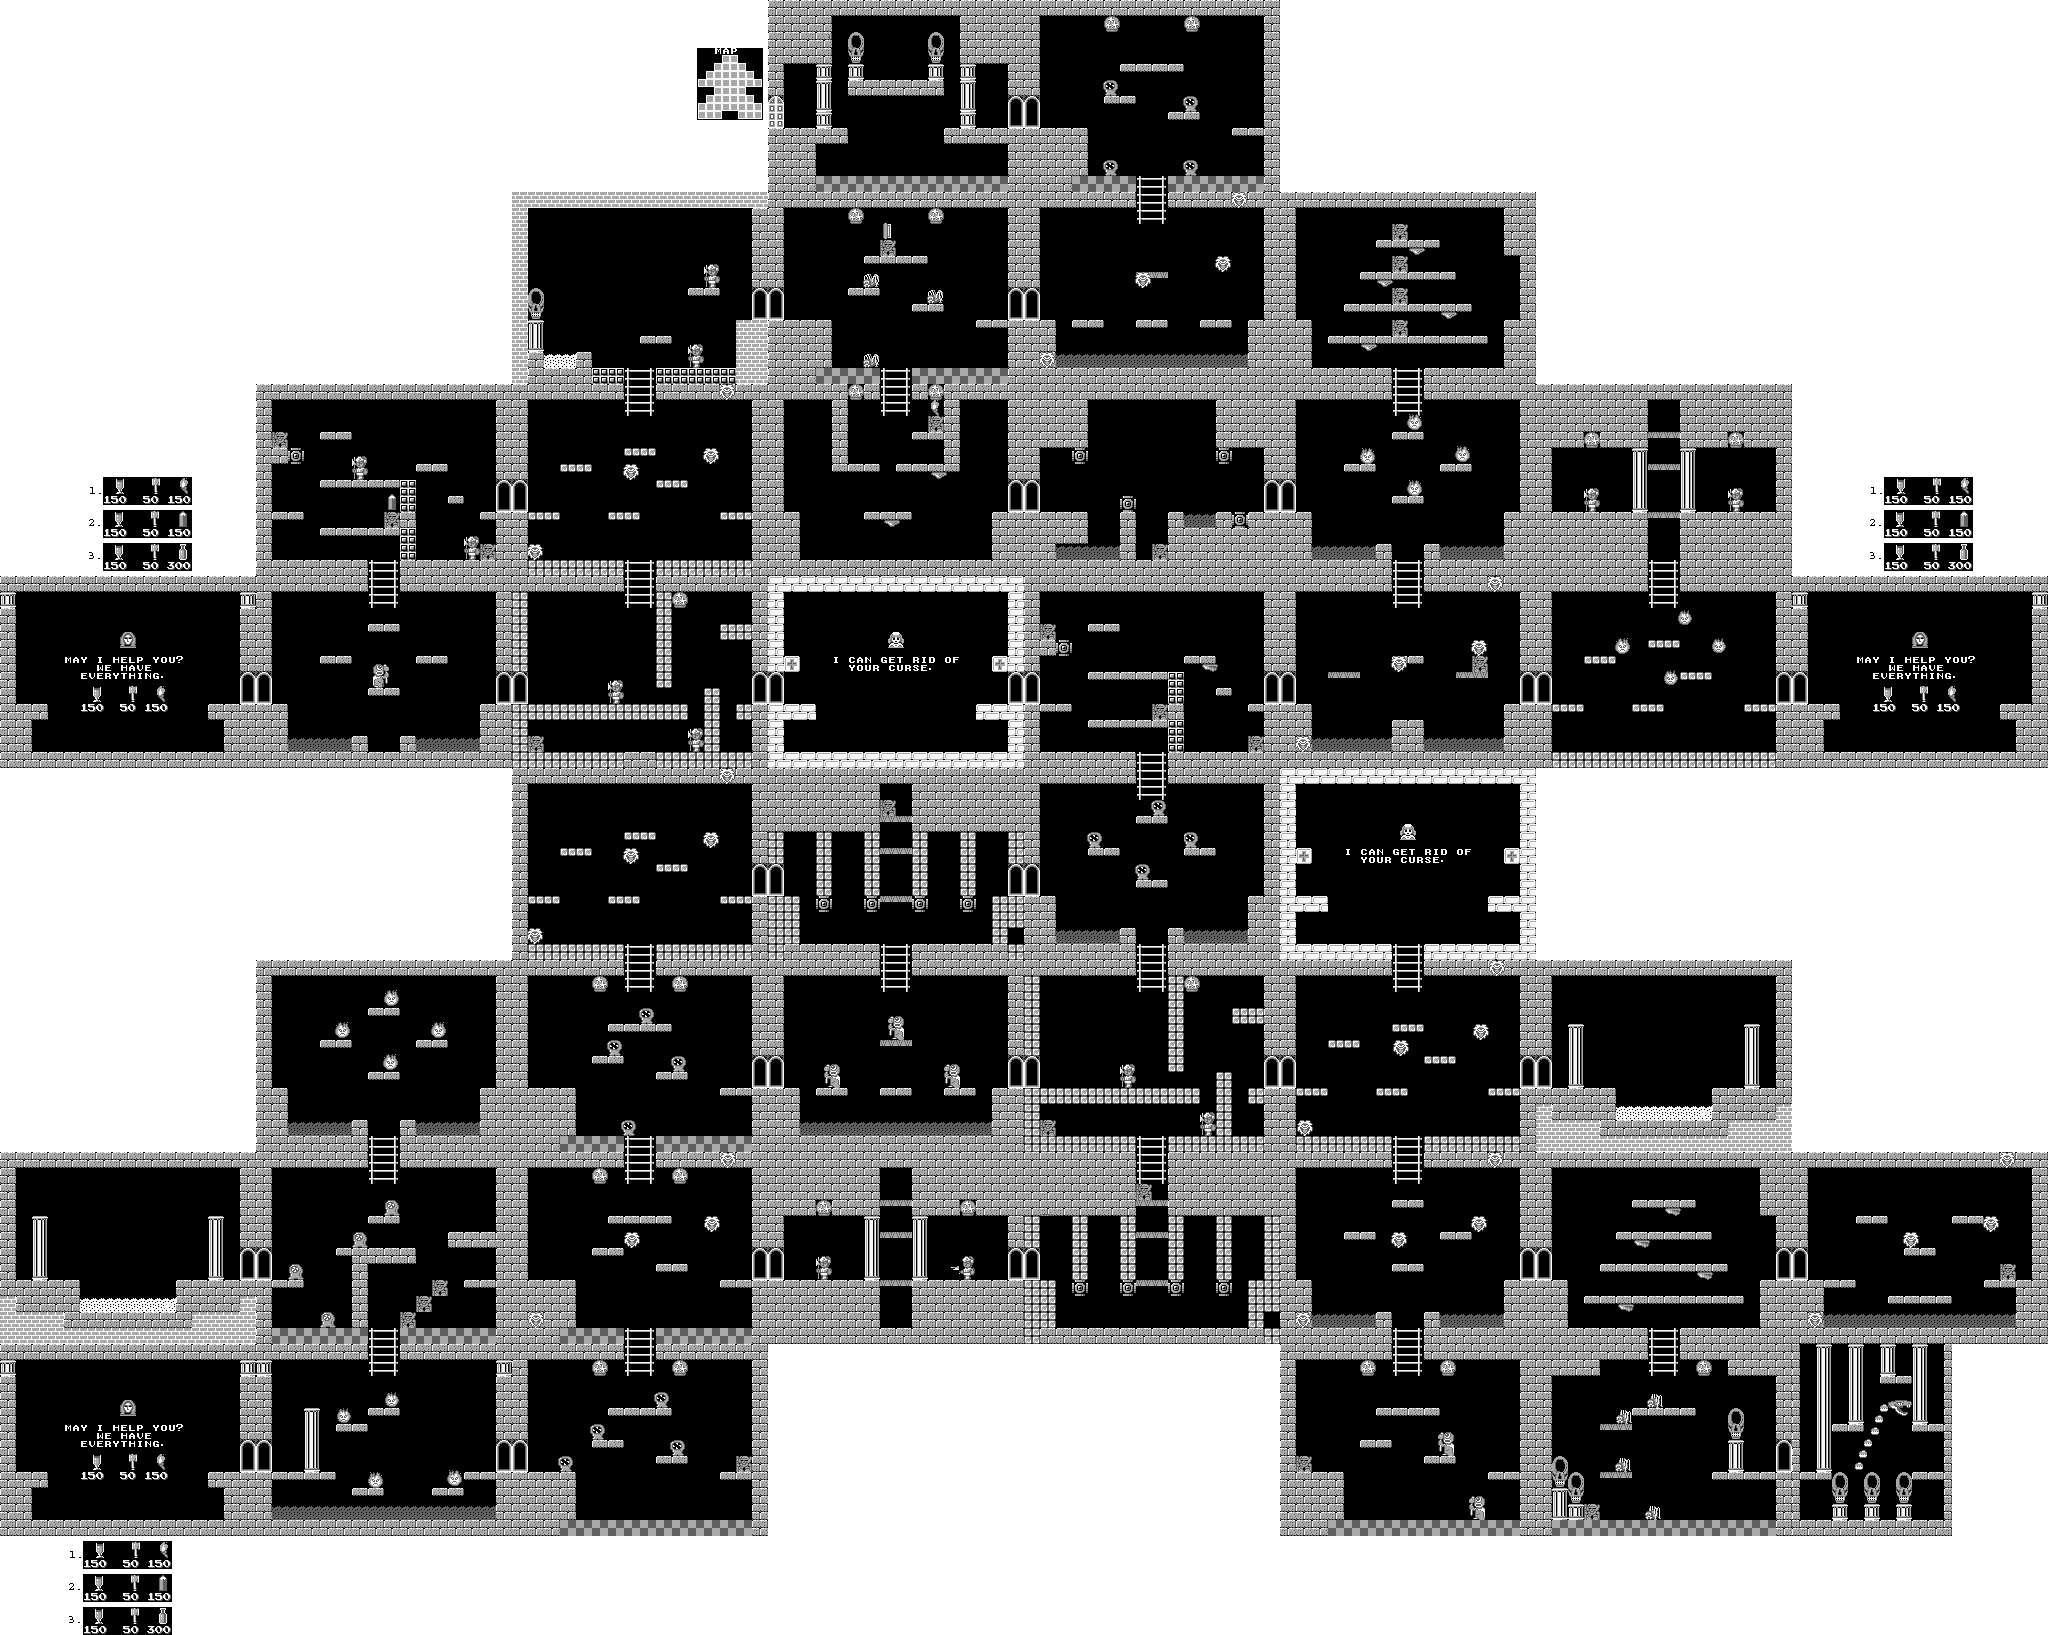
World 4


The guys on the floor that look like old men will throw projectiles upwards and forwards. Also, the bees will fly at you, and when they hit you, they will fly around in circles.

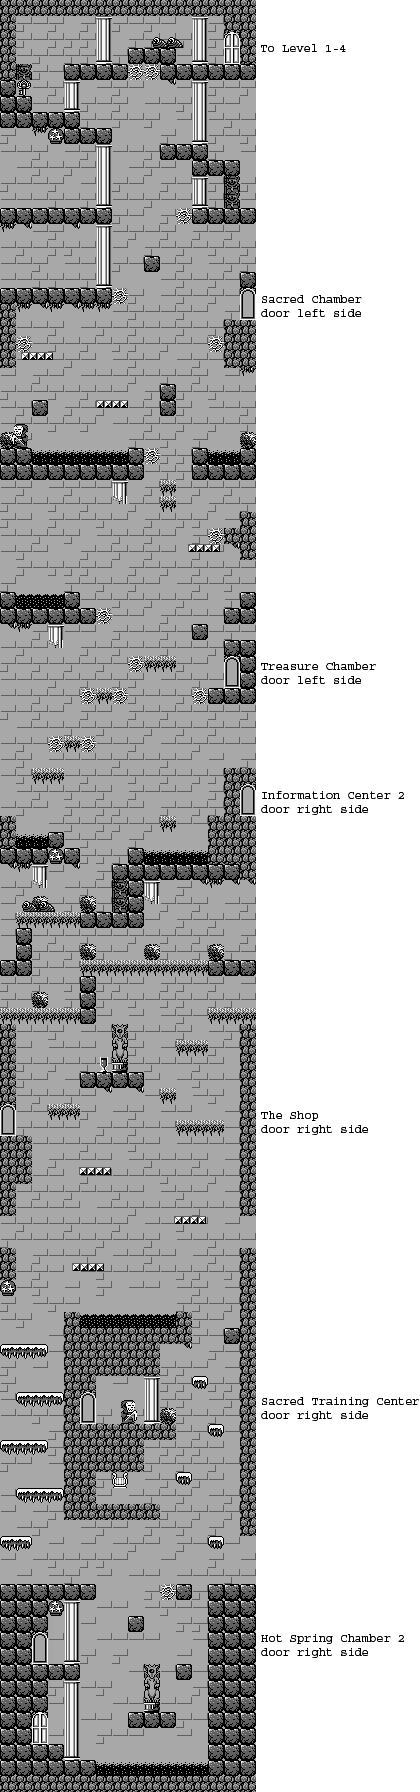
The first door is at the top, above the chalice. It takes you to an information room. The person inside will tell you to use hammers to find doors.

Search the bottom of the maze afterwards to find a hot springs chamber.

After the first lava pit is a shop. After the third lava pit is a bat chamber. Past all the thorns, spikes and lava you'll need to avoid is a sacred training center. Underneath the training center is a path leading to another hot spring. You'll need to break the wall after the last lava pit to get to it.

In World 4, if you can complete a sacred training center, you can get one of the sacred weapons. The best way to complete them in World 4 is just go all the way to the top and stay up there with your wings. The second and third options will be the treasures you need if you have just the wings. The plain looking arrow actually lets you fire lasers, while the armor is, well, armor.

The black and white masks that fly up and down will split in half, with the split halves flying at you once you shoot at it. Shoot at the halves to destroy them for good.

You'll need to break through the walls to get to another shop. Further to the right is another hot spring and another bat chamber, but once again, you'll need to break walls to get to them.

The enemy soldiers move up and down as they fly towards you. Watch out for the arrows that they fire.

Before the spike maze, there is yet another hot spring chamber you'll need to break the nearby wall with hammers to get to. At the end of the spike maze is another training chamber. Just before the exit, buried in bricks, is one more hot spring.

You'll then face Orcos. For the first phase, you'll need to stay away from Orcos as he flies around and avoid the fireballs from his three-way shots. Make sure to keep your health high you can deal more damage  Orcos from a distance, and keep a good eye on where he flies.

Once you do enough damage, you'll face the second phase, which is a giant Orcos. You'll need to get up and shoot him in the face, but you'll need to avoid the many attacks first. There are the fireballs that split into an eight-way spread shot, you'll have the fireballs that fire upwards from the tail, and you'll have the multiple bats that fly from his hand. After all that, you'll get a chance to shoot Orcos in the face. Stay in the air with the big fireballs, and go all the way down for the tail fireballs. As for the bats, just stay up top while shooting at or staying out of the way of them. Just like with the last phase, keep your health at two bars or higher or else you'll have to get closer to do damage.

After you do enough damage, Orcos is defeated for good and Palutena is saved. You'll then see all of the game's enemies as you fly into the air before getting too close to the sun and losing your wings because of it. You've just beaten Kid Icarus: Of Myths and Monsters!

Brickroad plays Kid Icarus: Of Myths and Monsters - Part 3 of 4


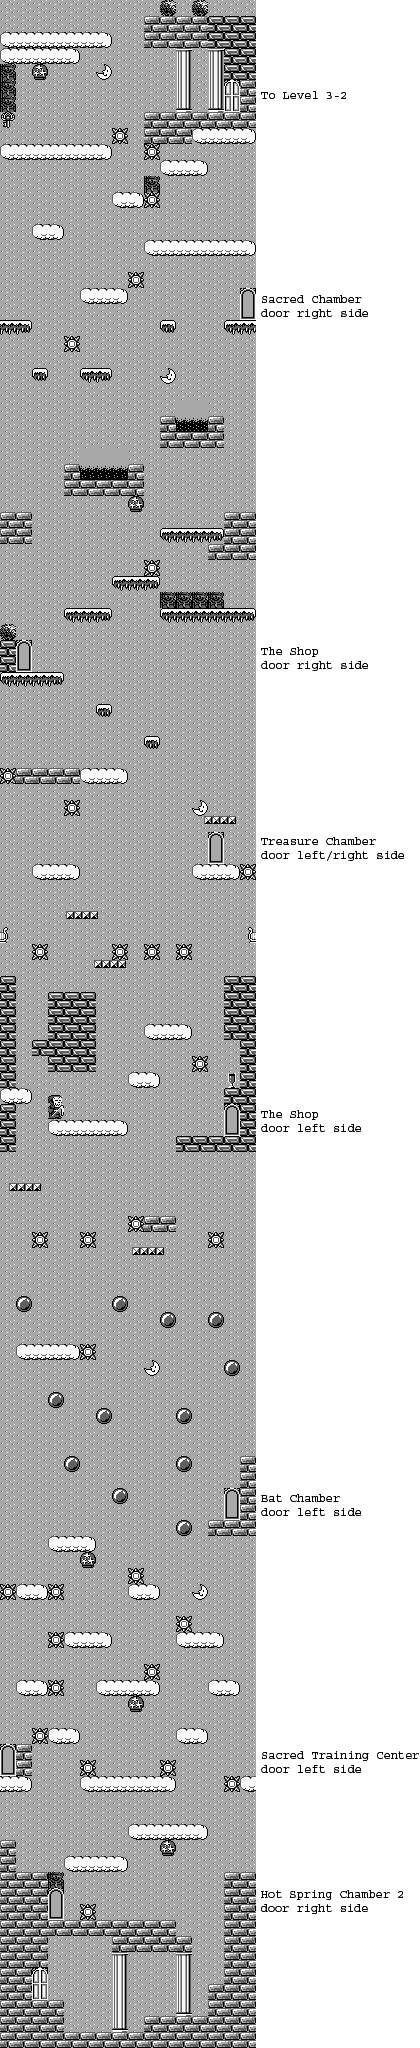
In this world, we go back to moving vertically, but once again, the end of the game is in sight.


World 3-1


With World 3, you're back in the vertical stages again.

There is a hot spring chamber just above the exit, to the left of the spike.

When you start seeing more spikes, you'll find a sacred training chamber.

The blobs with the wings seem to have frowny faces and move back and forth, but they also move diagonally as they do. It's easy to anticipate where 

When you start seeing the balls, you'll find a bat chamber.

There is a shop to the right of the Grim Reaper, below the full chalice.

After the first two horizontally moving platforms, you'll find the treasure chamber. Shortly after that, you'll find another shop.

There is another Sacred Chamber just after the two pools of lava.

World 3-2


Just after the start is a shop as well as a bat chamber.

After the platforms, there will be a treasure chamber. The octopi nearby will fly around in a triangular pattern.

Near the second snake pot is another bat chamber.

After the Grim Reaper is a Black Market.

The men with the shields will throw spears at you if they see you. Amazingly, their shields do not protect them from being hit. You'll also find a hot spring chamber after dealing with them.

The evil smiley faces spit projectiles, but the smiley faces do not move, and both the monster and the projectiles can easily be shot down.

The stairs leading up to a snake pot also lead to a bat chamber.

There is a sacred chamber underneath the pool of lava.

You can get a fourth block of health somewhere around 17,000 points.

World 3-3


You'll have to break a wall near the big pit of lava at the start with hammers to get to the hot spring chamber. Of course, to get there, you'll have to break the wall to the left of the lava.

Shortly after the small cloud platforms is a shop.

After the horizontally moving platforms, you'll find an information center. It's more hot spring info, this time about the one in the level.

At the tall columns, you'll find a treasure chamber. 

Shortly after the treasure chamber, you'll find a sacred chamber. It's just before the full chalice that is out in the open. Shortly after that chalice is another shop.

After the men with the shields, you'll find another treasure chamber. 

There is a black market near where you deal with the ball platforms and the smiley faces.

There is a bat chamber near the small pool of lava near the end.

World 3-4


The route to get to the boss is right, down, left, left, down, down, right, right, down, down, right, down, right, down and right. For the part where you have to go through the one-room gap, you'll need to be hit with the Eggplant Curse to go right from the gap. From there, you'll need to go up to see the nurse, then you can get back on track.

The spiders move back and forth, but they also jump rather high at regular intervals.

The fireballs will fly towards you. If you have the barrier, they will run right into it.

To beat the Fire Serpent, you'll want to stay at the bottom and hit the serpent in the face while avoiding the three-way fireball shot. If your attack has a long range, this will be more doable. Winning the battle gives you the third and final treasure.

Afterwards, you'll meet Palutena. Depending on how well you did at the training, you can get anywhere from just one treasure (the wings of Pegasus) to all three. If you get less than three, you can get the other two treasures in the next level. After you are rewarded with the treasure(s), Orcos will show up and turn Palutena to stone and kidnap her, and the only way to free Palutena is to defeat Orcos.

Sunday, June 4, 2023

Brickroad plays Kid Icarus: Of Myths and Monsters - Part 2 of 4


It's time to go horizontal as we play the second world of the game.


World 2-1


Just like in the NES game, the second world is horizontal level. You're also going to have an easier time.

There is a hot spring above the start.

There is a shop just before the second snake pot.

The stuff that looks like moving plants are spikes that you do not want to fall into.

The falling feet drop straight down drop ten hearts when shot. The enemies that look like clouds move up and down. You'll also have spikes on the sides of some of the platforms.

To the left of the fourth snake pot is a treasure chamber, and you'll have to jump your way to it. There will also be another one after it.

Above the lava is another sacred training center where you can power up your arrows if you've been killing all the monsters to this point.

Underneath the fifth snake pot is another bat chamber. After that pot is the black market, where you can buy some more items...if you have even more cash. If you have the credit card, you can buy one item for free. To get a credit card, you'll have to complete a treasure chamber without getting the God of Poverty. Among the items you can carry is the barrel, which allows you to carry multiple Waters of Life to revive yourself with. To the right of the black market entrance is a couple of statues you can break with your hammers. Unlike the regular stores, however, you cannot change the contents of the black market by pressing Down.

World 2-2


There are a lot of spikes at the bottom, so you'll really be platforming around here.

At the first snake pot is a hot spring. If you jump your way up and to the right after it, you'll find a treasure chamber. You'll need to break the wall to the right of the pit where the snakes land to enter it.

To the right of that, above the second snake pot, is where you can find some more information. It's just the hot spring I mentioned earlier.

To the right of that is another sacred training chamber where you can power up your arrow if you've destroyed enough monsters.

Up and to the right of the land platforms above the spikes is another shop. The little white guy with the angry face just moves back and forth, but unless you have some power-ups, he's hard to kill.

Back down at the bottom to the left of the two snake pots that are together is a bat chamber. If you can get up in the air between those pots, you can find a sacred chamber.

The things that look like thumbs with grasshopper legs will jump back and forth while homing in on you. They're easier to hit when they are on the ground.

Up and to the right of the second set of land platforms is another black market.

If you can get around 8,000 points or so, you can get a third health bar.

World 2-3


First spikes, now lava.

The door just past the start is a bat chamber.

Past the second platform that moves up and down is a treasure chamber if you make your way up to the top.

Above where the second snake pot is is another bat chamber. If you stay up to the top, you'll find yet another bat chamber above the third snake pot.

The bird enemy with the sunglasses moves up and down while it moves back and forth.

A shop will be at the fourth snake pot where the full chalice will be.

To the left of the pair of snake pots after that is another shop (where the full chalice is).

After the white columns, you'll be able to make your way up and to the left to another hot spring chamber. Further to the right is the black market.

There is one more bat chamber before the exit, and you'll have to look up high to find it.

World 2-4


The way out is right, up, left, up, up, up, up, right, up, right, right, down, down, right, up, up, and right. Thankfully, there is a nurse nearby in case you get eggplanted by the eggplant wizards near the end, and you'll also find a shop along the way.

The shiny looking blocks are actually ice, and you'll slide around on them when you move.

The guy with the spears will slowly move towards you when you are on their level.

To beat Skull Wing, shoot at the skull as Skull Wing flies clockwise around the room and watch for the fireballs that drop down from above. The fireballs will not go through the platforms, so if you stand underneath one, you can protect yourself against some of the fireballs. Once Skull Wing goes down, you'll get the second treasure.

Brickroad plays Kid Icarus: Of Myths and Monsters - Part 1 of 4


Believe it or not, there was a second Kid Icarus game. It was also the last one we had for years until Uprising came out for the 3DS.


Goddess Palutena, the ruler of Angel Land, had a vivid dream of an evil force invading their beautiful world.

She called the valiant warrior, Pit, and sent him into a program of intense training for the upcoming attack.

Pit must now find the three sacred treasures hidden in Angel Land.

Be brave, Pit!

Your long mission is just beginning!

This game is the sequel to Kid Icarus. Amazingly, despite the original game being released on the Famicom Disk System, this game did not get released officially in Japan until 2012, as the series proved more popular in the West than it did there. This time around, the main antagonist is the demon Orcos (based on the underworld god Orcus who punished broken oaths), who has invaded Angel Land.

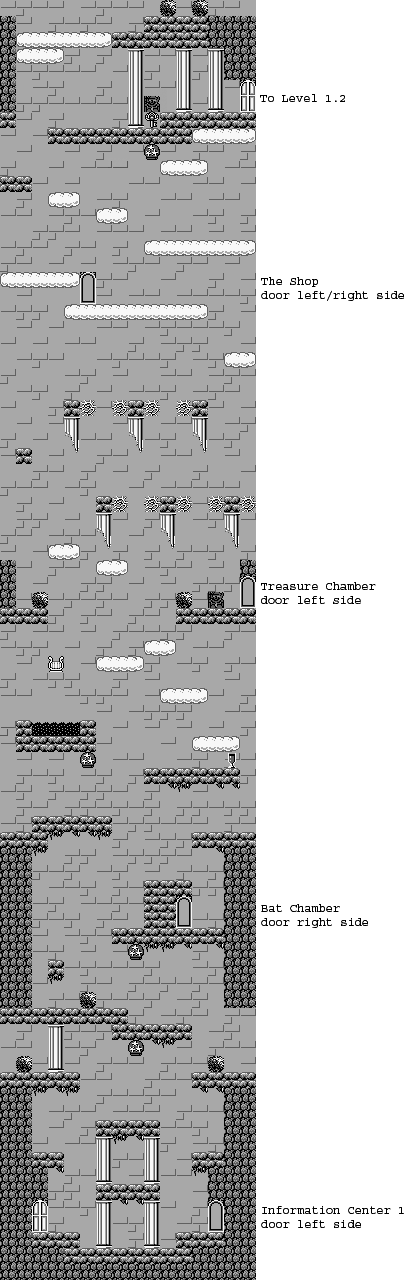
World 1-1


The game plays much like its NES counterpart, but you can flap Pit's wings in mid-air to slow him down as he descends by double-tapping the jump button A. As always, Left and Right moves around, you can duck with Down, aim upwards with Up, and fire arrows (and use hammers) with B. You can also use the D-Pad to look around where you are if you pause the game with Start, and if you press Start again, you'll enter the item menu that was present in the first game. A, B, Select and Start simultaneous resets the game, but also saves your progress, and if you hold Left, Select and B on the title screen, you can erase your saved game.

Also, the vertical stages in this game play much like the ones in the NES game, but due to the screen size and resolution of the Game Boy, going in one direction continuously eventually allows you to loop around the stage endlessly.

The door at the start contains a man who will tell you that you can break some walls with hammers to find secrets. Once you exit a room, you can't re-enter it unless you have a key.

The little serpent-looking creatures are back as normal enemies, and you can beat them up for hearts and points. You'll need the hearts and points in order to get stronger and be as prepared as you can for the final battle, as well as to buy items that will make getting through the game easier, so destroy your enemies and get those hearts! The snake enemies will keep popping up, but they won't pop up infinitely and you'll eventually run out. Take out as many as you can to get started at getting stronger.

The door after the upside-down jar full of tiny serpents is your first bat chamber. Fight off the bats for points and hearts as well as the occasional powerups, such as the half chalice that will refill some health. A full chalice will refill even more.

The skulls will fly at you and will give you five hearts for each one you kill. 

Once again, the harp temporarily turns enemies into hammers for as long as you have the audio cue playing in the background.

The next door leads to a treasure chamber. Thankfully, there is a way to uncover everything without getting the God of Poverty to pop up and cause you to lose everything else, and it's covered early in AstroBlue's guide on GameFAQs (just Ctrl + F and look for "Treasure Chamber," it's pretty early in the guide). Also, you don't have to shoot all the jars to get all the items. Here, you can get quite a few hearts and hammers if you know what you're doing. Just keep in mind that it takes five hearts to shoot a pot down and break it; if you have less than five, you won't be able to break one.

Watch out for the thorns as you jump from platform to platform, as they will hurt.

You'll soon find a shop. While things such as the hammer (which let you free soldiers and find secrets), chalice (health re-fills), Waters of Life (the bottles that provide auto-revives) are here, you'll also find a key. The key allows you to re-enter any room you've already visited once. The numbers below each item show how many hearts you need to buy an item. Also, if you press Down, you can get a different set of three items every time you do, so if you need health or a hammer, you can keep pressing Down until what you want is for sale.

The next room is the exit. When you enter the exit room, your score for the current level will be tabulated into your total score. You can also save your game from this room before heading to the next stage. You'll need 4,350 points for your first health extension, so fight off those enemies!

Palutena's Key is in the statue at the end, and can be found near the exit of all the normal, non-dungeon areas. The key will usually be found in a statue. Finding and grabbing it will re-open all the doors in the area.

World 1-2


The first door is another bat chamber. Once again, fight the enemies that you meet here for health, hearts and hammers.

The black liquid is lava that hurts you, so don't fall into it.

The second door, on the other hand, has white liquid that acts as a hot spring. Stay in the hot spring to quickly - as opposed to slowly in the first game - refill all your health.

The third door is another store.

Once again, the Grim Reaper enemies show up, and if they see you, they will send Mini-Reapers at you and the music will change while they are panicking. You can destroy the big Reaper for a full heart and the smaller ones for some smaller extra hearts. The door near him will contain another treasure chamber.

Once again, there are moving platforms. Watch them as they move so you can land on them.

If you can get into the door blocked by the solidified Centurion soldier with a hammer, you'll find a sacred chamber where you can get an arrow power-up. By fighting enemies, entering doors, collecting hearts and doing the best you can, you can power up your arrows for stronger attacks.

The monsters that pop up out of the ground to spit fireballs pop up near the exit, and once again, you can fight them before you leave for more points and hearts.

World 1-3


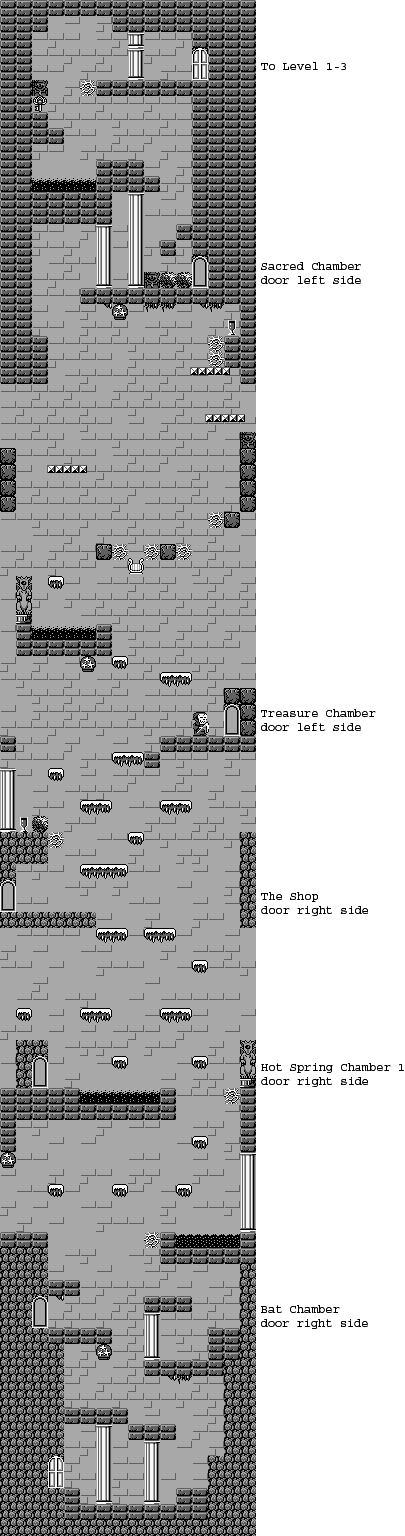
The first door is just above where you start and it contains a hot spring. You'll need two hammers to break the wall hiding the door leading into it; as a matter of fact, you'll need hammers to break the wall where it is hidden behind. If you can do that while you have low health, it is worth it. Since you don't regain health when you progress between levels, this is useful. In order to use this hot spring, you'll need to jump to a high platform and float over the totem enemies that shoot at you. When you land in the hot spring, the totem enemies will disappear.

The next door is behind the first Grim Reaper and contains a Sacred Training Center. Here, you'll be in one of those rooms where you shoot down those spinning tiles, and if you do well enough, you can get a choice between one of the extra weapons: the fire arrow, which gives you flaming arrows if you have at least two blocks of health; the long bow, which extends the distance of your arrows as long as you have at least three blocks of health; and the protective crystals that act as a revolving shield and show up if you have at least four blocks of health. It helps to get them early. For best results, come in with high health, stay in the center and keep shooting upwards. Also, stay out of the lava.

The leaping enemies can be easily taken out and you can easily anticipate where they are going to jump.

The door to the left of the full chalice takes you to another shop. Amazingly, the chalice will re-spawn when you come back.

The worms with the one eye will duck to avoid your shots. Take them out from a further distance to hit them.

The next door hints at the hot spring at the start that was mentioned earlier. If you need to go back, keep in mind that you can drop down from certain platforms (the ones that don't look like solid blocks) by holding Down and A.

If you die, you'll have to use one of your credits to get back in the game. When you run out of credits, the game is over, and you'll have to restore from the last area you saved from.

Shortly after that door is another treasure chamber.

The door after the second Grim Reaper contains another area where you can power up your arrows again if you're doing fine. You should be at arrow strength 3 (out of 6) at this point

The wall made of the two statues near the exit contain two half chalices, which you can get for health.

World 1-4


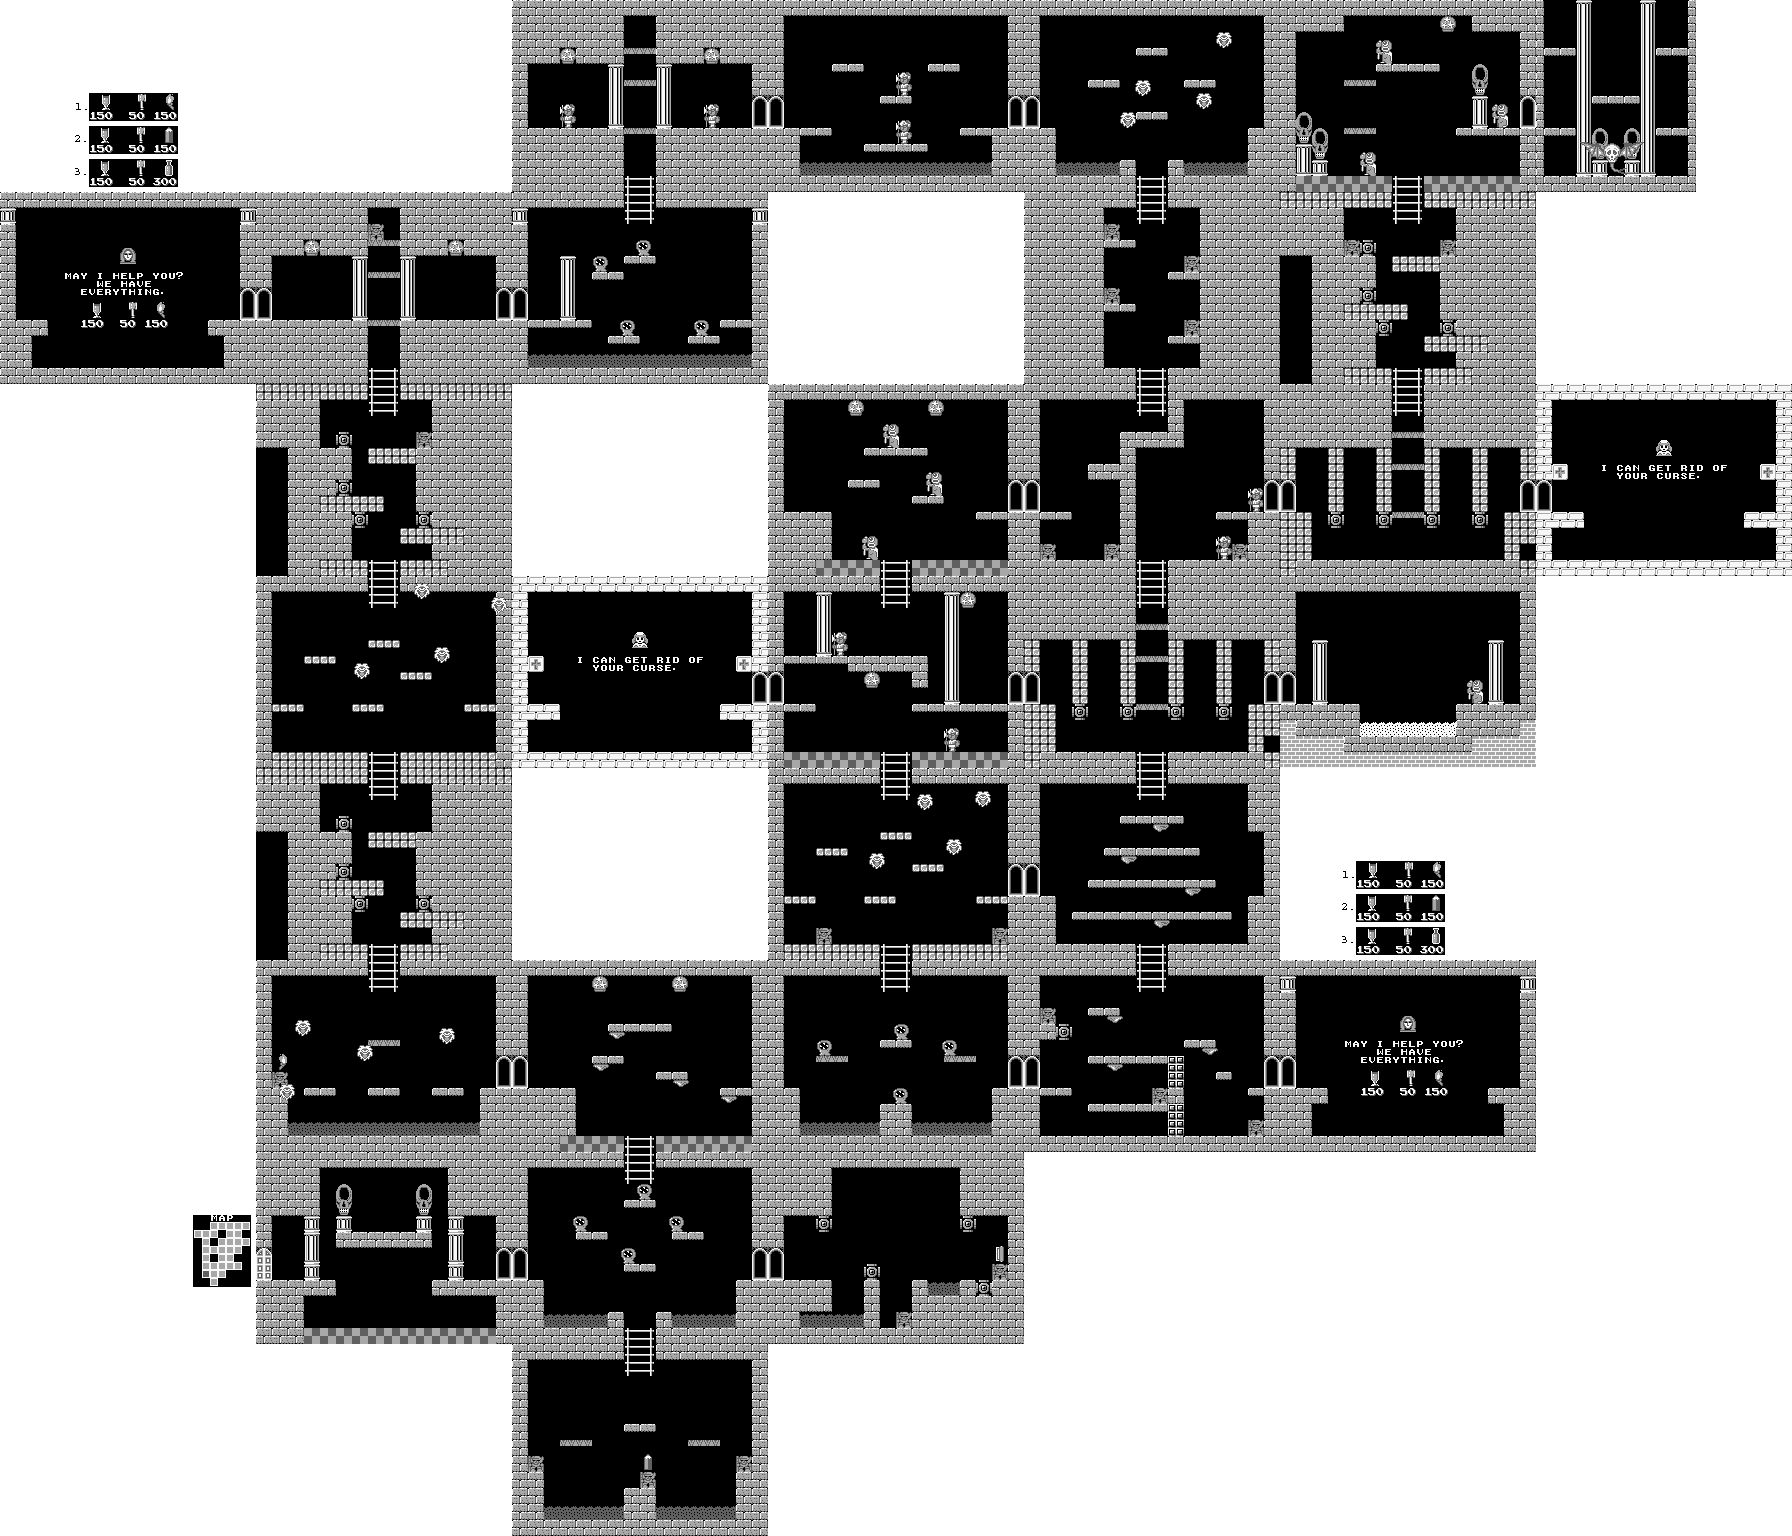
The last stage of every world is a labyrinth. Just like in the first game, you'll have the map, the torch and the pencil to map out your progress, show your position on the map and see where you've already been respectively, but once again, the Internet has made them obsolete, so you might as well use that if you need to.

Once again, the Eggplant Wizards show up, and if the eggplants they throw at you hit you, you'll be hit with the Eggplant Curse, which turns you into an eggplant with legs. You won't be able to attack, and you'll need to find a hospital to remove the curse and turn back to normal (which is thankfully at no cost). Thankfully, the Eggplant Wizards are easier to fight.

If you go off the beaten path, you can find rooms that contain hot springs 

To get out, you'll need to go right, up, up, left, down, left, up, up, up, right, right, right, down, down and then right from the start.

Some of the statues will contain the usual power-ups, but they can also contain monsters.

Most of the enemies are pretty simple to figure out. The mouth enemies just move back and forth, and the ghosts will move from right to left in diagonals. The slimes can move up and down and stick to floors and ceilings.

The narrow gap on the way to the end can only be entered if you're eggplanted and hit with the curse, and the path leads to the hospital. Of course, you'll need to take another way around to get back to where you need to go, and you'll have to be careful not to get eggplanted again.

The boss here is the Minotaur, who throws skulls in groups of four at an arc. Avoid the skulls and shoot at him with your arrows. The more powerful your arrows are, the better. Every once in a while, he will turn into a fireball and teleport somewhere else in the room, and you'll need to find him to attack him again. You'll have to move back and forth to avoid the skulls and hit him when you can, as appealing as it is to get right up to him and mash the B button to do even more damage (which you'll only want to do if your health is high). This makes it easier to play it safe.

Once you beat the Minotaur, it's on to World 2.

Tuesday, August 5, 2014

brickroadbrickroad plays DuckTales 2 - Part 8 of 8

Finally, we properly end this game with an all-too-simple boss fight!

Bermuda Again


You know that one steel wall that was blocking you at the beginning of the level? Well, it's gone now. Go past it and climb up and go right. You'll meet Glomgold again.

Only thing is, that isn't Glomgold. He's really the D-1000, and he grabs onto the ceiling and tries to kick at you. Avoid the kicks and pogo the D-1000 on the head when he comes back down to ground level. If you have maximum health, you can just pogo his head and just keep pogoing in that spot, finishing him off with little effort even though you'll take at least three hits.

When you beat him, you'll get your treasures back, you'll rescue Webby, and you'll add to your own legacy of being the richest duck in the world! Congratulations!


Monday, August 4, 2014

brickroadbrickroad plays DuckTales 2 - Part 7 of 8

Well, we finally play this stupid level again!

Scotland


When you finally finish the level proper, you fight the same boss from the Under Ground level. Instead of fireballs, he shoots down lightning at you, and he'll sometimes appear at the very left or very right end of the room, making you work to get towards him. He's not much harder though.


When you've beaten all six stages, the ship will be upright, Webby will be kidnapped and you'll have to face Glomgold again!

brickroadbrickroad plays DuckTales 2 - Part 6 of 8

After finding all the pieces of the map, we get...this.

Underground


Well, since we've just been to Scotland, there's not much new here aside from platforms that fall when you land on them and moving hooks.

When you make it to the end, you'll finally meet that Magician Duck that guards the Eternal Flame. He'll teleport somewhere and try to zap you. Jump over it and pogo him on the head. Five hits later, you'll get what looks like a magic gem.


There are two paths: a lower path and an upper path. The upper path is easier, but the lower path has even more treasure and whatnot. Nice.

Sunday, August 3, 2014

brickroadbrickroad plays DuckTales 2 - Part 5 of 8

Scotland!

But if this is Scotland, why are we near both Mu, Egypt and Bermuda?

Scotland


This Scottish castle is the spiritual successor to the original's Transylvania level: there are loads of treasure, multiple branching paths and lots of secret areas.

The frogs are just vanilla enemies, while the gloves carrying the lanterns slowly float downwards and can prove themselves an annoyance at times. Some of the suits of armor are also alive. If they're grey, they're enemies.


When you find the treasure map piece, you'll leave the level. This is the last treasure map piece, and when you complete the map, you'll finally enter another area.

Saturday, August 2, 2014

brickroadbrickroad plays DuckTales 2 - Part 4 of 8

Pharoah Man's stage, this is not.

Egypt


Avoid the quicksand and pogo the dragonflies as you make your way into the pyramid. You won't be able to hit that chest, as you'll fall through a fake floor as soon as you reach it.

This level has a lot of fake walls and has even more puzzles than Mu does.

Once you're inside, you'll also be dealing with jumping Pharoah statues. Latch onto the platform with a hook to lower it. From there, jump on top of it to reach a treasure box. The blocks underneath it can be broken to find a fake floor. Talk to your nephew, and you'll get a clue: 1 is 3, 3 is 2, 4 is 1, 2 is 4.

The squares with the down arrow can be stood on to open up platforms in the walls.

You'll then see the four numbered blocks that you'll have to pogo. Hit 1 three times, 3 two times, 4 once and 2 four times. You'll open up the door and get a piece of the treasure map.

The snakes pop out of the quicksand and try to leap at you. They don't have much jumping height, though.

In a hidden room, you'll find a ray of light and a mirror. Drag the mirror into the light to uncover a hole in the floor. Going down there will give you another million-dollar treasure.

To get those two seemingly unreachable treasure boxes that involve getting into the quicksand and walking left, break the invisible block that blocks your way with the golf swing first. Yeah, there's a block there.

The boss here is a Pharoah Duck. Watch out for the lightning zap that comes out of his staff, then hit him before he sinks back into the quicksand. He's pretty easy if you're quick enough.


Beating him gives you a million-dollar scimitar.

brickroadbrickroad plays DuckTales 2 - Part 3 of 8

Illusion of Gaia, this is not.

Mu


We have a blue nephew? Finally! Took Capcom four years!

Shortly after the beginning, you'll break a big chest that hides a vine that takes you upward. Taking this vine takes you to Gyro, who will give you your last cane upgrade. This lets you pull the big stone pillars that block your path.

Use your pull ability on the flower to get past the pit.

The Stone Duck Maoi blocks just jump up and down, while the Merducks move towards you and throw spears.

You'll soon see three green blocks and two yellow ones underneath stones. Remember where the yellow blocks are.

When you meet Launchpad, go past him (don't take that ride) and jump left into the wall. Remember where the yellow blocks were in that one part of the level we saw earlier. Break the stones in those spots and drag the steel barrels into the water where the stones used to be. You'll drain the water that blocks your path below. You'll be able to access a ladder that takes you to a scepter, which gives you another cool million. Keep going to the right and you'll find another piece of the treasure map.

The boss here is a big Stone Golem Duck. Avoid the blocks he sends down from the ceiling and duck under his seemingly robotically-launching arm, then send the rock that still stands on the floor at him. From there, hit the red center that floats above his crumbled body with the pogo attack before he pulls himself back together. After five hits, you'll get the sacred tablet of Mu and another million.


Another Special Energy will be available at the shop. Go ahead and get it.

Friday, August 1, 2014

brickroadbrickroad plays DuckTales 2 - Part 2 of 8

Our adventure continues in the Bermuda Triangle! Will Scrooge McDuck get the Mermaid's Teardrop and make it back? Stay tuned!

Bermuda Triangle


Be sure to hit the barrels to find treasures, but be careful! Mice will scurry out of some of them and rush right into you as they flee.

Talk to one of your nephews at the start of the stage and a lightning bolt will break the wall blocking your path through the mast.

Use the dragging ability on the cannon to shoot a cannonball. This will help you break walls that block your path.

The drag ability can also be used on switches. Just hold the D-Pad down and you'll be able to control the conveyor belt.

Here's a weird thing about the birds that carry the bombs. They never drops the bombs on you. Instead, they drop them right in front of you. If one is nearby, just stay still and you'll unintentionally avoid its attack.

Shortly after dealing with the bomb-dropping birds, go to the right. There's not one, not two, but three secret passages! The third passages takes you to another part of the map.

Grab onto the hooks with the weights on the other end to lift them up off the ground and out of your way. You can pogo bounce off the second one to get past it.

Talking to Gyro will give you an enhanced golf swing. This makes your golf swing a little more powerful. That's nice.

Use the switch for the second conveyor belt to move the treasure box all the way to the left. From there, pogo off the treasure box to get an extra life.

The boss is a pirate captain. To beat him, pogo attack him on the head and hang on to one of the hooks and stay out of his way. Wait for him to stop flashing, then pogo him again. After five more hits, the Mermaid's Teardrop is yours.


Since we've bought the Special Energy, it's replace with a Treasure Map piece. Go buy it.

brickroadbrickroad plays DuckTales 2 - Part 1 of 8

Well, here's the sequel. This one isn't much longer, and it's sadly underrated.

Niagara Falls


After choosing whichever of three difficulties you want to play on (brickroad plays on Difficult), you'll go to the level select screen. The first one that's highlighted is Niagara Falls, and that's where we're going.

Believe it or not, Scrooge has a few new moves. The first one is the ability is to get behind a barrel or something you can hit with the golf swing and pull it backwards. This is a really nice addition and makes finding some things easier. Another one is the ability to use the cane to grab on to rings and hooks on the wall.

Jump into the waterfalls to the right of your nephew. You'll find some hidden platforms as well as some hidden treasures.

The first map piece is near the start. Just bring the barrel you find as soon as you drop underground to the left wall, then jump up, break the chests to get the treasure, and keep on going. Break the blocks in your path with the golf swing and break open the big chest. This contains the first piece of the map. You'll need all of these to unlock the final level and beat the game.

You'll then be trapped by a wall that drops down from out of nowhere. Thankfully, Bubba comes to your rescue and breaks the wall down.

Climb down the rope near Webby and hit the block to your left to turn it into a raft. Golf swing the right wall when you're on it to take yourself to Gyro. Talk to him, and he'll make your pogo attack stronger, allowing you to break blocks that you couldn't before, such as brick blocks.

Unlike the last game, you have three Power Items that you can carry at any given time that do all sorts of stuff, such as save all your money that you've collected in the level when you die or refill all of your health. There's a shop at the end of every level, so you'll have plenty of opportunities to get some.

The enemies here are pretty easy. The only real enemy you have is the mole, who can only be defeated when he pops up from under the ground.

The boss here is some sort of fire duck. Hit him with the pogo attack as he flies around, and watch out for his fireballs. When you beat him, you'll get another piece of the map as well as a flower that costs a cool million.


The shop gives you five items to choose from. The cake refills your health bar when used, the safe keeps you from losing your money when you die, the Good Mojo Doll is a 1-up, the Continue Globe gives you a continue, and the Special Energy increases your maximum HP.

Thursday, July 31, 2014

DuckTales 150 Percent Speed Run

The whole game at 150 percent speed. You're welcome.

brickroadbrickroad plays DuckTales - Part 6 of 6

...and now for the epic confrontation!

The Finale


You remember how to get through Transylvania, right? Just go through that fake wall again and go through the mirror on the right, then head to the boss like normal.

Don't worry about collecting any treasure, there isn't any here.

The boss here is Dracula Duck. Bounce off the bats he sends at you with the pogo attack, then pogo him on the head. He's really easy, but that's not the end when you beat him! You'll have to race Flintheart Glomgold to the treasure box at the top of the room so he won't replace you as the richest duck in the world!

When you make it to the top before Glomgold, you did it! Enjoy the ending!


Wednesday, July 30, 2014

brickroadbrickroad plays DuckTales - Part 5 of 6

This is the part where we go on the moon and do moon things.

The Moon


Oh, my. As the gravity allows for higher jumps on the moon's surface, you'll be taking on moon squids (I guess), robot moon ducks, aliens and more.

One of the chests contains the UFO Key. You'll need this to walk past the locked door and get the remote control, which allows Gizmo to blow up the wall that blocks your path to the underground when you leave the UFO and go right. If you go up from where the remote control is, you'll find Mrs. Beakley again. That's really nice if you're needing the health. Thanks, game.

The top of the UFO leads you to a hidden treasure if you can make it all the way to the right. Inside the chest is a golden tile (or something) that gives you another cool million.

The boss here is a rat. He'll either run to one of the lower corners or jump to one of the higher corners. He has no set pattern, so start pogoing and do this the entire time. After five hits with the pogo attack, you'll get a piece of green cheese worth one million. At over $2.5 million, this is probably the biggest haul in the game.


When you beat all five lands, you'll have to return to Transylvania to get all your treasures back! A new challenger...comes!

brickroadbrickroad plays DuckTales - Part 4 of 6

We now go through the Amazon, which not only has a toll booth near the end of the stage...but also a warp!

The Amazon


Despite the cheery music here, this level can be annoying, so don't be surprised if you choose this as your first level because it's the first choice and you get slightly frustrated.

Hit every tree trunk at ground level with the golf swing, as they all contain diamonds.

The snakes can extend their heads upwards when you get close, which can make hitting them with the pogo attack a pain.

When you go underground, pogo up to the top of the statue and pogo again to the left. You'll find a secret area with some treasure and ice cream. From there, go back to the right side of the room, pogo to the left and you'll find another secret area. Here, you can find some more treasure as well as an extra life.

The bees move around in a sine wave pattern. Thankfully, once you have the speed and the pattern down, they're not a big deal.

If you jump left from where Launchpad is (don't take that ride!) you'll find another secret area.

The treasure box near the beginning of the section with the spear-throwing guys takes you to a secret vine that lets you bypass the statue that wants you to pay $300000 of the money you've collected to pass. Regardless of which path you choose, you'll have to face the statue boss anyway.


This boss is really easy. Hit him when he's on the ground and watch out for that jump of his. Five hits scores you a million-dollar scepter.

Tuesday, July 29, 2014

brickroadbrickroad plays DuckTales - Part 3 of 6

We go to the African Mines, but sadly, we don't learn anything about how to mine an Africa.

African Mines


When you go to the African Mines, you'll find out that you'll need a key to go in. You'll be taken back to Transylvania. From there, enter the first mirror you see and open the chest to get the skeleton key for the mine. You'll then return to the world select screen, so go to the African Mines again.

The slugs are vanilla enemies, the bats try to dive into you as soon as you pass by, and the man-eating plants are basically invulnerable to your pogo attack. The bats can be taken care of with a golf swing to a nearby rock (assuming the rock connects), but you can wait for them to dive down, move out of the way so they miss and pogo them from there.

Look around for secret passageways and fake walls. You'll be able to find quite a few extra lives if you know where to look.

When you whack one of the rocks into that giant boulder, move out of the way!

Somewhere in the mine, you can find Mrs. Beakley, who will throw four ice creams your way so you can refill your health. The pit there might seem endless, but jump all the way to the right and use your pogo attack, and you'll bounce off four green guys who jump right out of the pit and act as a bridge. Once you make it past this pit, break the chest you find open and take the magic ring. You'll get an extra million.


The boss is the King of the Terra-Firmians. Wait for him to roll around the room and move out of his way, then pogo him on the head. When you beat him, you'll get a gemstone that's worth a million dollars. Congratulations, you just robbed $2.2 million out of an abandoned mine shaft.

Monday, July 28, 2014

brickroadbrickroad plays DuckTales - Part 2 of 6

We go to Translyvania, deal with the undead, and ride minecarts.

Transylvania


This level can be very confusing unless you know where to go.

The rocks can be destroyed with the pogo attack, as can the enemies: skeleton ducks (which can only be hit when they're in motion) and the heads of suits of armor. Ghosts are hard to avoid and somewhat track your horizontal position.

At the beginning of the level, you'll meet Webby, who tells you that Huey has been kidnapped.

Whenever you see a coffin, hit it with your gold swing. You may be able to find some treasure. Watch out, as you may find enemies, too! Be sure to use it on the suits of armor as well. Either the head will fall off or the head will change into a treasure box.

The rope you see after meeting Webby will take you to Huey when you go left. Take out the Beagle Boy and talk to Huey, and he'll tell you about the "illusion wall" in the house. Turns out there's a fake wall in this level.

The mummies are restricted by the ball and chain locked on them. Take them out of their misery by using the golf-swing on the ball to get them out of your way. You can also pogo onto their heads if you can.

Keep going right in the same area with Huey and the mummies and you'll find a fake wall. The chest inside has another star, which will bring your HP to the maximum of five hits. Don't even bother golf swinging the coffins here, as both of them have ghosts.

The rope just before the fake wall area takes you to a seemingly unattainable chest in mid-air. Hit the rock to the left of it with the golf swing and it'll rocket into the chest, giving you an extra life. The mirror to the right takes you to the first mine cart segment. Duck to avoid any low-hanging ceilings. Jumping out is simple: just hold the direction you want to go and jump.

There's another fake wall below the mirror that takes you to another room with two mirrors. This is the "illusion wall" that Huey must have been talking about. The mirror to the left takes you back to the beginning, while the one to the right takes you to the boss.

The boss here is Magica de Spell. She turns herself into a bird, then drops down and tries to zap you with lightning bolts. When she stops before she drops down, be ready to jump and hit her with the pogo attack. Sometimes, she'll fly low enough for you to pogo her without having to wait.


When you beat her, you'll get a gold coin and another cool million.

brickroadbrickroad plays DuckTales - Part 1 of 6

Another blog, another Capcom game! Fortunately for us, it's one of those Disney licenses done right!

The Himalayas


There are five levels you can choose from at the start. We're starting with The Himalayas because that's exactly what brick is doing.

To attack enemies, press Down while in mid-air so you can land on them cane-first. Then, take the treasure they leave behind! You'll need to get money to get the best ending! You also have a golf swing that you can use to push blocks around as well as break some of them. Just move into a block, hold forward on the D-Pad and press B. That's all there is to it.

When you attack or move into certain spots, you'll find some hidden treasure chests. Hit them to break them open and find even more treasure!

Scrooge McDuck dolls give you extra lives. You won't find them a lot, but when you find one, go for it.

Collect ice cream and other foods to refill your life. You have three hits, so be careful!

As you move through the worlds, you'll meet other characters from the show. They give you hints as to what to do in the level. They don't say very much, mostly because they're relegated to three lines of screen space (usually).

Once you're underground, watch out for icicles that fall from the ceiling. As you move around, you'll find that using the pogo stick attack also helps you jump higher than usual. You'll definitely want to make use of that, since you're going to be using it the entire game.

When you find Bubba the Caveman encased in ice, move the steel can to the left wall so you can pogo into him. He'll open up a wall which contains a chest. Inside is a little starburst shaped item, which gives you an additional hit on your health meter.

There are a few secret areas here. One of them involves pogoing into the air and jumping through the gaps in the ceiling, while another involves pogoing left off of a Beagle Boy and pushing those steel cans away. The first one contains an extra life if you jump all the way to the left.

The hockey ducks knock blocks into you, with their hockey swing acting like your golf swing. After that, they're pretty easy to deal with. The spiders are just annoying and get in your path unless you jump low, and the bunnies are just vanilla enemies. Ditto for the Beagle Boys.

Move out of the way of the boulder as you climb the rope.

If you talk to Launchpad, you can go back to Duckberg and choose another level. If you select Yes and you have a 7 in the ten-thousandth place of the amount of money you've collected in the level, you'll get a bonus level before you return to the level select screen. Here, you'll be moving to the left as Gyro Gearloose flies in that direction and drops gems for you to pick up. You won't get a lot of money if you collect all the gems, but it's still something.

The boss here is the yeti. To beat him, hit him in the head with the pogo attack and avoid the snowballs that come down when he punches the wall before hitting him again. He's pretty easy. He'll go down after five hits, like all the other bosses.


When you beat a boss, you'll get a treasure chest. Open it up and you'll find a treasure unique to that level - in this case, it's a crown that's worth $1000000. You'll also get money for every second you have left on the clock.

Sunday, December 29, 2013

brickroadbrickroad and SovanJedi play Secret of Evermore - Part 88 of 88


Everything finally comes to an end in this entry!

The Boy and The Dog get everyone back, and everyone returns to the real world. The Dog is back in his real form when they return to Podunk.

The Boy wonders if everything they went through was real, then return to the theater and find that the movie currently playing is called "The Secret of Evermore."

Meanwhile, the others are back at Professor Ruffleberg's abandoned mansion, wondering what will become of Evermore.

Strong Heart is the new leader of Fire Eyes' Village, Madronius is the new leader of Nobilia, and the King now rules Ebon Keep. We also see the Windwalker one last time, and the evil robot clones are now part of Percival Plank's exhibit.

When you wait a while after it says "The End," you'll find that Carltron is now a docile robot...or is he?

If you wait a while after the credits (about 30 minutes), you'll find out that Brian Fedrauh is credited for "Dolly Grip." If you wait a little longer after that (another five minutes), you'll get the message "It's Bill's fault."