Showing posts with label part 61. Show all posts

Tuesday, March 17, 2026

PrinceWatercress plays Super Mario Odyssey - Part 61 of 92


In this entry, we wrap up the Cap Kingdom and head to the Cascade Kingdom.


Hey! That wasn't there before! When you activate Moon Rocks, Moon Rock pipes with square openings will pop up in places where they were not before. Enter them for a shot at another Power Moon or two.

Hitting a boombox with your cap will net you some songs for the Music List if you're looking for them.

Power Moons

Cap Kingdom


20. Under the Big One's Brim - This Power Moon is floating in the air below the top of Top Hat Tower (where you met the Broodals for the first time). You'll need to drop onto it from above to collect it.

21. Fly to the Edge of the Fog - To collect this Power Moon, you'll need to capture a Para-Goomba and fly to the flog in the northeast corner of the kingdom. Use your map and the compass to find it.

24. Fog-Shrouded Platform - Near the door leading to the "Searching the Frog Pond" and close to the Moon Rock Pipe in Central Plaza, there is a platform in the fog with a glowing light in the center. Ground pound that light for a Power Moon.

28. Cap Kingdom Timer Challenge 2 - In the southeast corner of Central Plaza, there will be a scarecrow. Throw your cap at it to activate some platforms. Get on the platforms as they are moving upwards to get the key and then get back to the Power Moon before time runs out.

29. Cap Kingdom Master Cup - You'll need to complete the Regular Cup and activate the Moon Rock to get this one. Once you do both of those things, talk to the Koopa at the Koopa Freeracing board to start this race. It's the same as before, but the Gold Koopa will roll across the bridge. Beat him at his own game by ground pounding when you jump the barricade, then roll along the bridge yourself, capture the Para-Goomba on the other side and fly towards the goal. When you're near the goal, get out of the Para-Goomba, triple jump up the hill and get to the goal.

30. Roll On and On - West of Central Plaza will be a Moon Rock pipe. Go down it, and once you go down the hill, Mario will start rolling. Avoid the Spinys, stay on the ground without falling off and make it to the end for a Power Moon.

31. Precision Rollings - Shortly after the start of where you find Power Moon #30, take the small side path to the left and stay on it for a hard-to-get Power Moon.

Cascade Kingdom


21. Peach in the Cascade Kingdom - Peach will be at the top of the 8-bit area in the Cascade Kingdom when she travels the world. Talk to her for a Power Moon.

22. Cascade Kingdom Regular Cup - Koopa Freeracing will be near the Odyssey. For this race, you'll need to get over the bridge with long jumps and triple jumps, then you'll need to make your way up the mountain to where the 8-bit area is. If you need to plot a course for whatever reason during these races, you can press the Minus button and look at the map to see where the goal is.

23. Caveman Cave-Fan - After defeating Bowser, there will be a citizen of the Cap Kingdom where you faced Madam Broode. Talk to him with the Caveman Headwear and the Caveman Outfit equipped for a Power Moon.

25. Sphynx Travelling to the Waterfall - Near the Odyssey, use the viewfinder to look high in the sky for the Sphynx on a balloon. Zoom in on him and look at him long enough for a Power Moon.

Tuesday, October 29, 2024

PrinceWatercress plays Chrono Trigger (Super NES) - Part 61 of 70


Another video, another Lavos battle. This time around, we throw Robo into the mix, which made things a little bit harder. After that, we get another weird ending.


For the next ending, you'll need to beat Lavos after returning to 600 A.D. from the Telepod portal, but before you get the Hero Medal.

This time around, I throw a fully-equipped Robo into the mix. It's fun, but he took more damage than I expected him to. Thankfully, healing him was pretty easy, and Super Volt does a ton of damage when it counts.

When you beat Lavos at this point in the game, Robo and Atropos will recreate Crono running into Marle in Leene Square in 2300 A.D., then Tata heads to Magus' castle to fight Crono, Marle and Lucca. Why the present day king is at the castle in 600 A.D. and not the actual king from that time period, we'll never know.

Monday, November 15, 2021

HCBailly plays Final Fantasy II AGAIN - Part 61 of 65


In this entry, we finally enter Pandemonium.


There is a shopkeeper hidden behind the waterfall. If you've got the Gil, this guy will sell you some of the best spells in the game: Death, Berserk, Haste and Flare. You'd have to spend some good free time powering them up before you can really make use of them, though.

After the hidden shopkeeper, there are three doors. The third door is the one you want to go through.

The Aegis Shield, Dragon Armor and Holy Lance are really good. The Aegis Shield is the best shield in the game for Evasion and has all the resistances of the WhiteRobe. The Dragon Armor is the same as the Aegis Shield, but has all the resistances of the BlackRobe. The Dragon Armor is very heavy, however, so you're better off giving it to somebody with very high Agility and a very strong physical fighter. The Holy Lance is the best spear in the game and is strong against Dragon-type enemies.

The Yoichi Bow is guarded by a Red Dragon (R.Dragon). Thankfully, he's not that much more difficult than the other dragons you've seen as long as you Curse it, Osmose its MP and you protect yourself according. The Yoichi Bow can be used as an item in battle to cast Berserk 3.

When you reach a narrow, sandy path, you're almost there...but then you'll reach a dead end. On the way to aforementioned dead end, you'll find a Protect Ring in a chest. You can also run into G. Dragons as random encounters, too.

You'll have to stand on the left tile of the center of the dead end to be transported into a castle. Welcome to Pandaemonium.

Tuesday, May 28, 2019

HCBailly plays Final Fantasy IV (Super Famicom) - Part 61 of 70


Before taking care of business, we take on an optional boss.


On the moon, head to the Mansion of the Lunarians. Before you do anything else, hand Kain's new Genji equipment to Cecil, and give all of Cecil's Diamond equipment to Kain along with the Defender and the Aegis Shield, since Cecil won't be the one Jumping around. From here, go to the teleporter title in the room with the eight Crystals and step on it. You'll head to the Core.

Lunar Subterranean Valley/Lunar Underground


The Dark Gear increases Agility by three, and is better than the Genji Armor for Edge.

The Sage Staff increases Will by 15, and is a huge boost for Rosa. Keep the Artemis Arrows around for Dragon enemies.

The floating katana is a boss fight. Heal your party and cast Levitate on everyone before interacting with the katana. You'll fight the White Dragon. Beserk Edge and Cecil with a Bacchus's Wine, have Rydia summon Bahamut, have Kain use Jump and have Rosa cast Cure 4 on everyone. WhiteDragon will cast Slow and will eventually attack you with Earthquake, but that's what casting Levitate before the battle is for. By beating the WhiteDragon, you'll get the Murasame for Edge, which is much more powerful than and increases Strength, Vitality and Wisdom by five and decreases Agility and Will by five. Keep the Full Moon boomerang around for flying enemies.

The Fire Bute is one of the most powerful whips, but it decreases Wisdom and Will by 5 while increasing Strength, Agility and Vitality by five.

The Dragon Shield is a useful shield for Kain.

Saturday, June 16, 2018

HCBailly plays Terranigma - Part 61 of 75


In this episode, we finally enter Dr. Beruga's lab to figure out what's going on and put a stop it it once and for all.

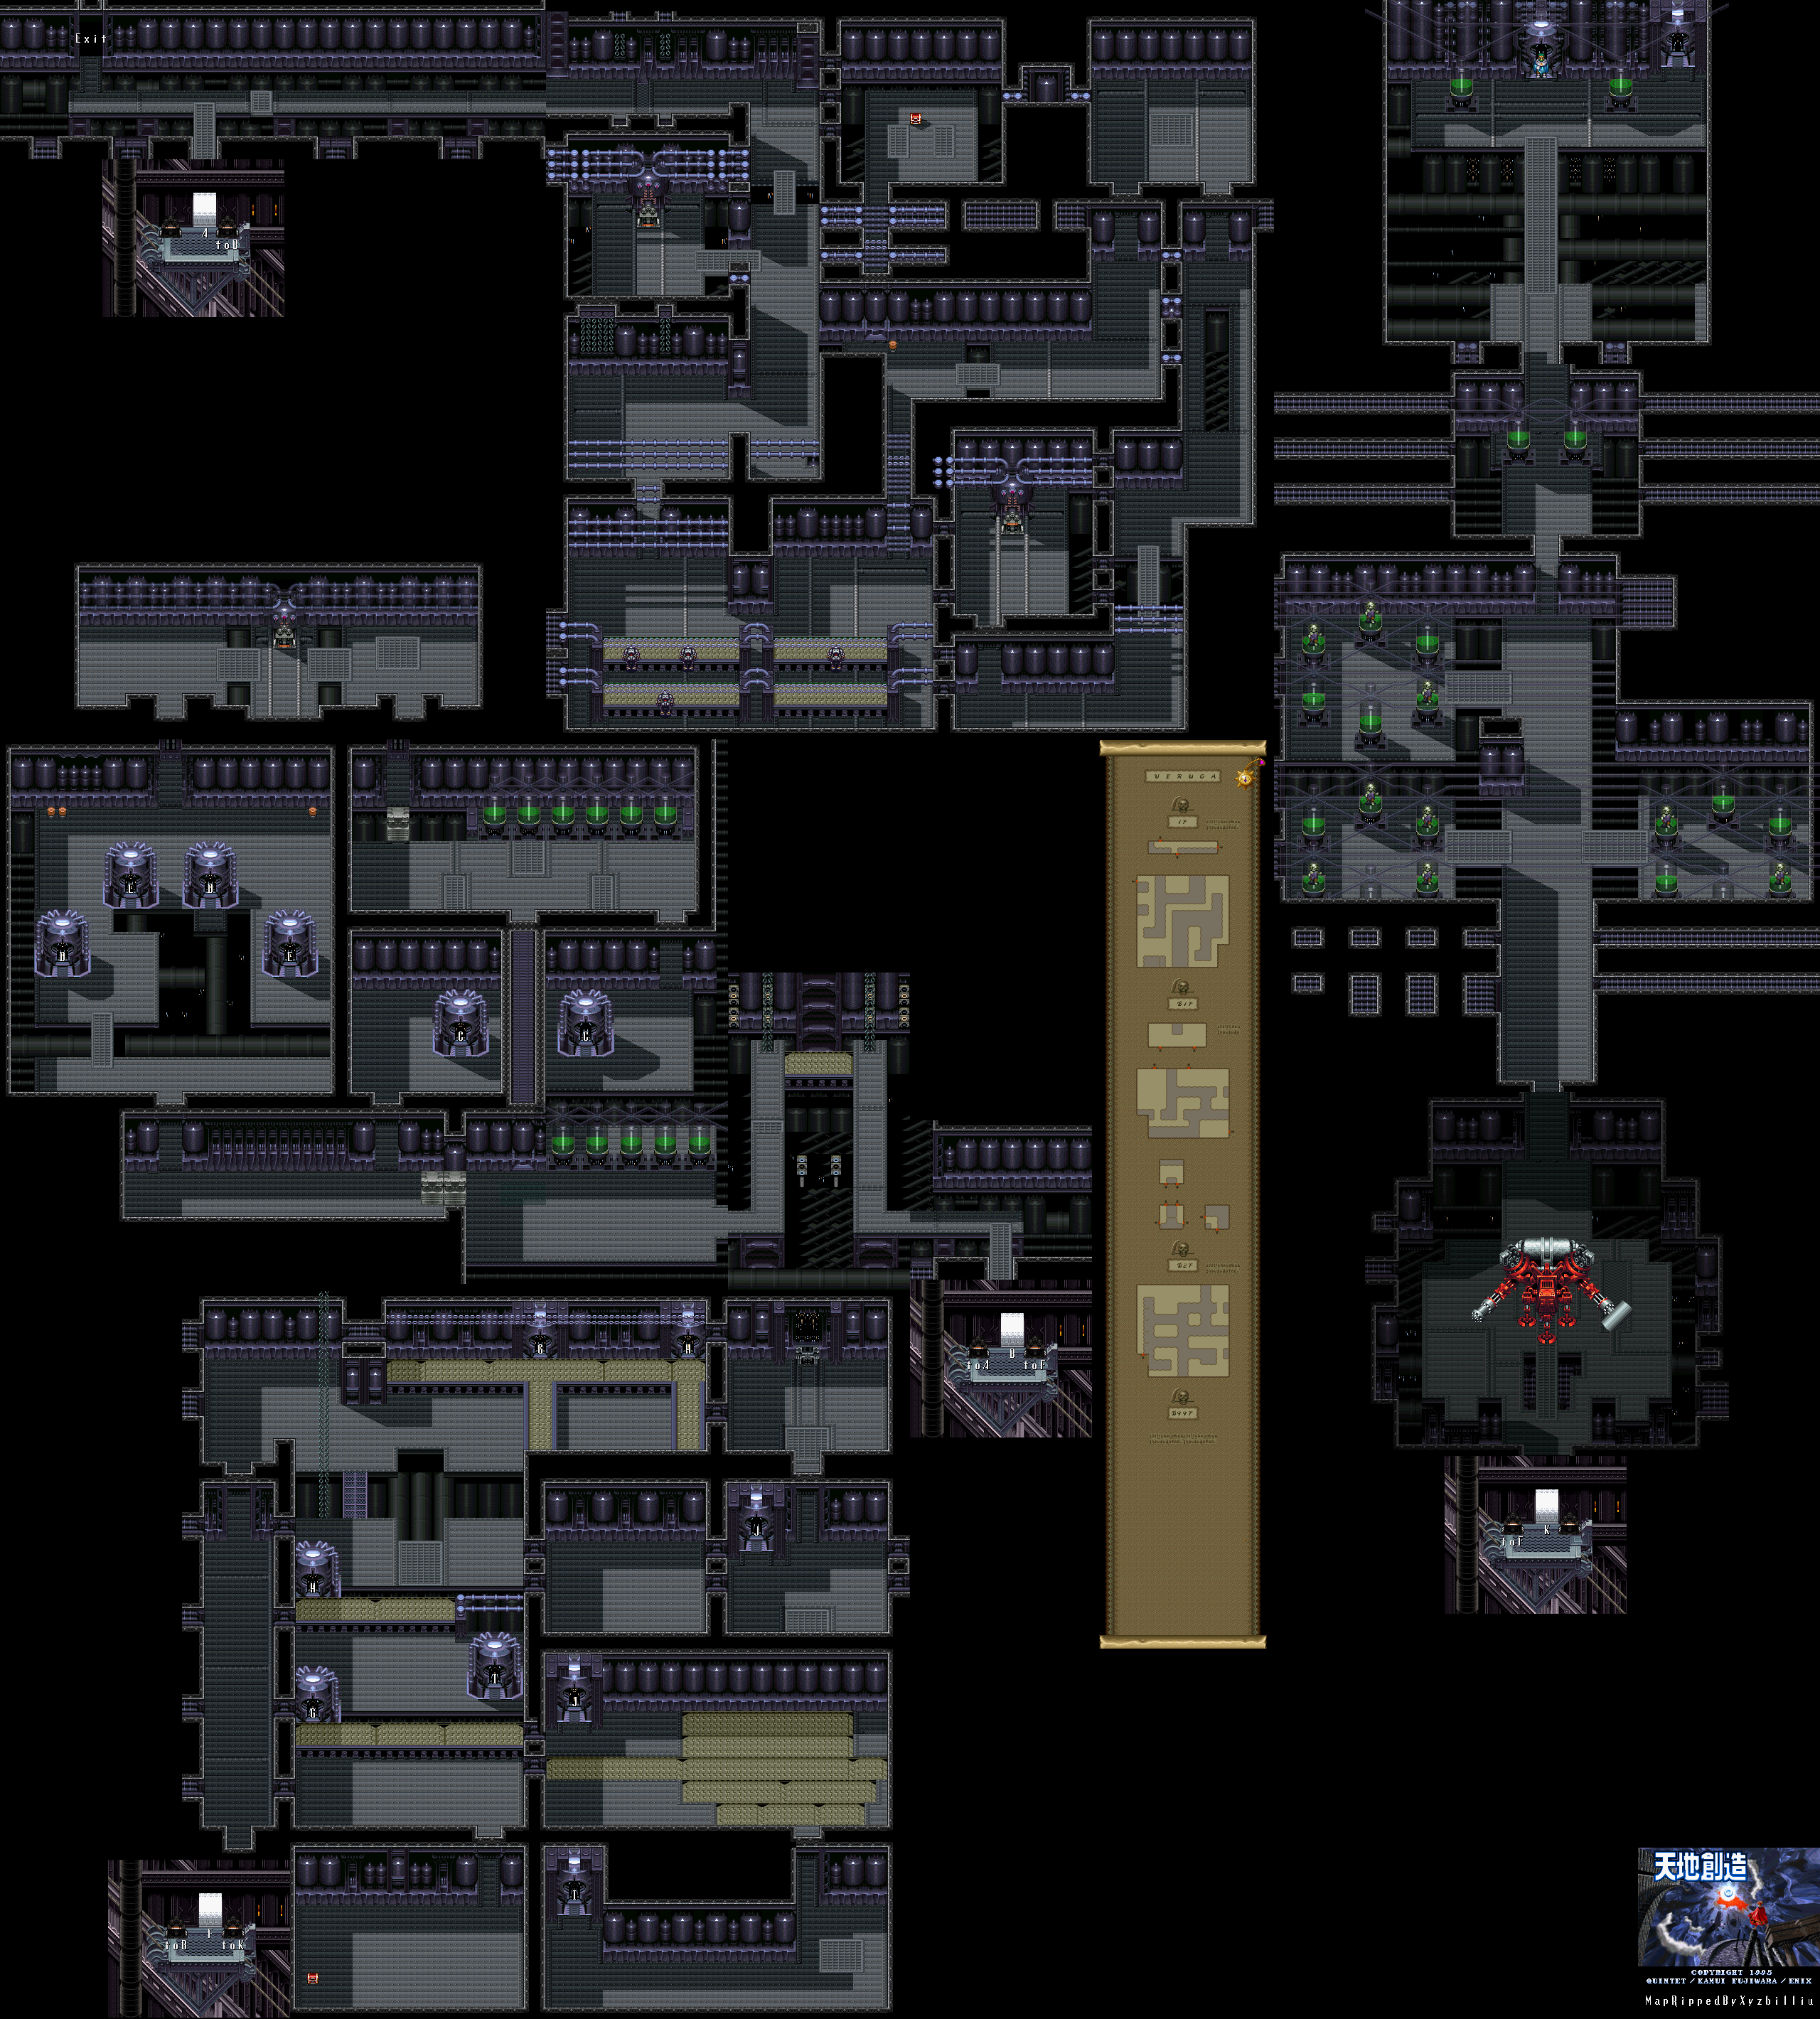
World map by Tropicon. Mosque map by Amir Azadur. Beruga's Lab map by xyzbilliu.


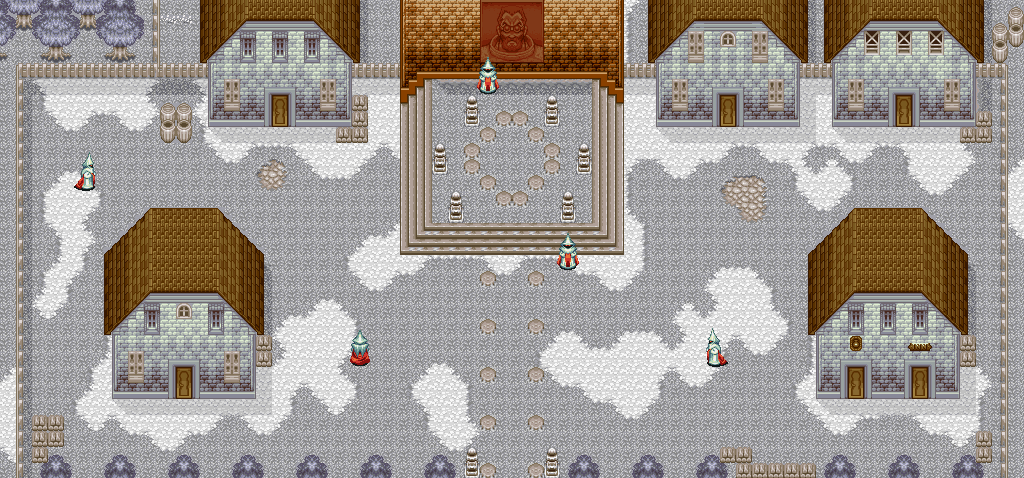
Mosque


The house in the lower-left corner houses a woman and child. You'll learn that the guys in the white robes are the White Disciples. They serve directly under Beruga, and the position is considered a great honor. Not surprisingly, the woman and child have been fed propaganda.

The inn is in the lower-right corner of the town. You'll learn that the Red Armor will increase your strength here.

In the upper-right corer is what appears to be an empty house, but if you enter the door to the north, you'll find Magirock #83 in plain sight. To the left of that house, you'll learn that Beruga is waiting quiety in the castle he built himself, and when he comes out, he will supposedly save his believers. The woman in the bed says she does not fear Death as she believes Beruga will defeat death.

Beruga's lair is to the south, but we're not heading there just yet. Instead, we're heading to a cave to the northeast in the snow. In the cave will be the BlockRod, which changes strength into defense. 

From the cave, head back to Mosque and go south to Dr. Beruga's lab.

Dr. Beruga's Lab


From the start, head to the east. On the next screen, keep going east until you can't anymore, then go south until you see a path to the west. Go there, and flip the switch to turn the lights on. From there, go back to the east and follow the path that you see. Climb underneath the pipes leading north from the machines, then pick up the brown cork-like thing, toss it away, and go into the crawl space it was blocking. This leads to a chest containing the SoulArmr, which you will definitely want to equip as it increases your maximum HP by 40.

Go back through the crawlspace and head east. You'll eventually fight some robots, but if you have the 3 Part Rod equipped, you can take them all out with a dashing attack...just be sure not to let them do one of their own. They will stand there stunned and eventually explode before they die. If you have the Geostaff equipped, you can do a little bit damage to the robots than you can can with the 3 Part Rod.

At the end of the path is another switch. Press it, then head back to the machines. You'll see some chains moving as you make your way back. If you go back to the conveyor belts, you'll see robots working on them.

Go all the way back to the start. Enter the path to the south nearest the entrance. This leads to an elevator. Press the switch to the right and you'll make your way down to the next level.

The next few screens are pretty self-explanatory. You'll eventually come across some tubes with some sort of green liquid in them. To the west of all of them is a crawl space. Go through it, and you'll find another switch. Use your dashing attack to take down the jetpack guys (don't let them shoot you, it hurts), then go to the east, take the doorway to the south and enter the teleporter.

At the other end, go south. Take out the jetpack guys. The blocks here can be pushed out of the way so you won't have to use the teleporter again, if necessary. From there, head west, then north. There are some teleporters. Don't take them, they all lead to dead ends.

Destroy the jetpack guys and head north. There are more jetpack guys. Destroy them all, then press the switch and enter the door at the other end. Push the block out of the way, then destroy the jetpack guys. You're now where you were before you used that first teleporter. Go back through the crawlspace that led you here, then head back to the elevator. You can now go down another level.

Thursday, March 15, 2018

skorch82 plays Brave Fencer Musashi - Part 61 of 70


This is it. We've finally reached end game.

There isn't much left to do in the land of Allucaneet.

If you talk to the Maid after rescuing her, you'll learn Dashing Pierce. When running, press Square to stab your opponent. You'll be running when dust clouds follow you when you move. (You can get it that quickly, but skorch82 didn't get it until now.)

Talking to CookA (Cook Mary-Nade) after saving Bailiff Jerky will allow you to grow rice, which makes rice available at the grocery store. This in turn will allow you to buy rice at the grocery store, talk to CookB (Cook Chiffonade), and make rice balls available.

Farmer McRice is the guy with the tall hat, the scythe, the green shirt, the brown pants and the sandals. Talking to him will give you a clue: there is a part of the forest where it only rains on Skyday. Hmmmm...

Saturday, December 14, 2013

brickroadbrickroad and SovanJedi play Secret of Evermore - Part 61 of 88


Click here for a forest maze, a pink poodle with a green axe blade for a head, mneumonic devices and a spoon factory.

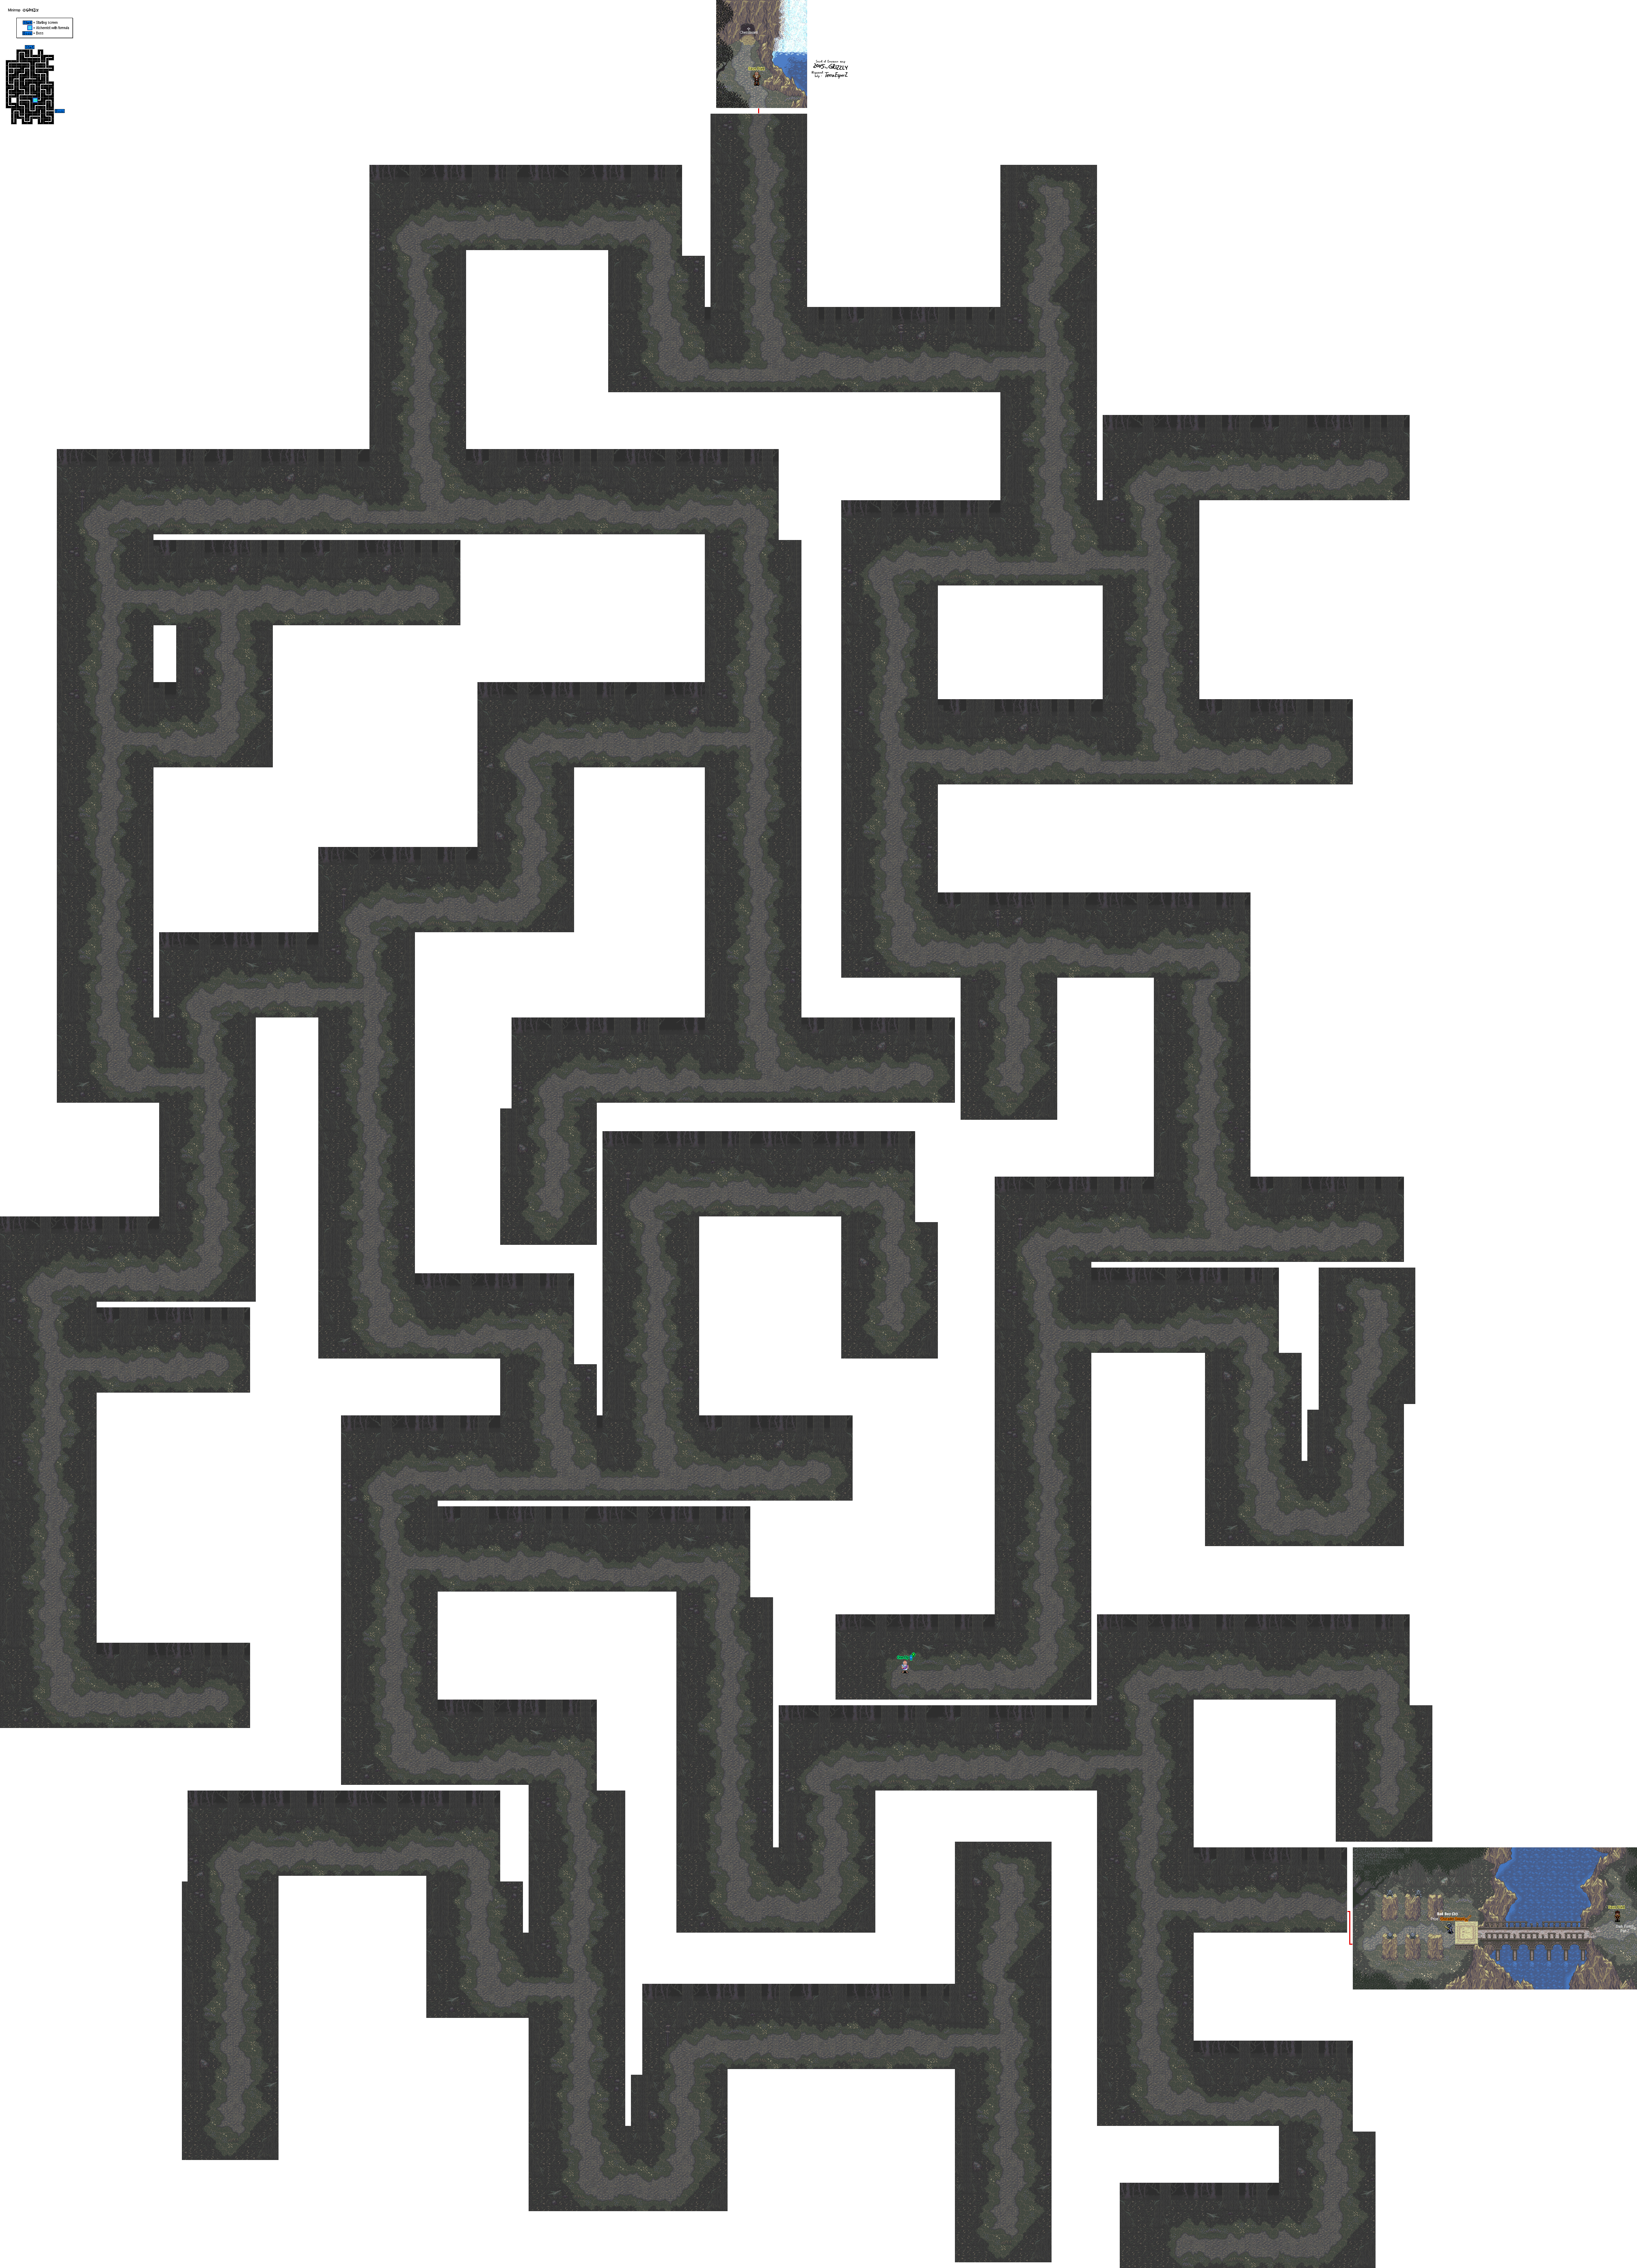
All maps by Grizzly.

Dark Forest


Map 1

You'll be fighting a couple of Dragoyles and other creatures on your away around this forest.

If you see a Greeble (those little black evil-looking guys hiding in the trees) in the foreground, you're going the right way.

You can read signs if you come across them on the north wall of certain parts of the path. Some will tell you you're going the wrong way, one tells you that you're halfway there, and others contain hilarious messages of no importance (one of them tells you about a Souvenir Spoon factory).

There is an alchemist that has the One Up formula if you find him. Keep in mind that he's not on the right path, so you'll be doing some detouring...and backtracking...in order to get to this guy and return to where you were.

One Up

1 Feather, 1 Root

This one is pretty interesting, since it restores a lot of your HP in one cast. Unfortunately, it takes Feathers. This guy does sell alchemy ingredients, but it still takes 1000 gold coins to buy five Feathers.