Showing posts with label part 64. Show all posts

Friday, March 20, 2026

PrinceWatercress plays Super Mario Odyssey - Part 64 of 92


In this entry, we head back to the Sand Kingdom, activate the Moon Rock and sweep through the area for more Power Moons. We're now down to ten...


The Moon Rock in the Sand Kingdom is near Tostarena Town between the town and the ruins. Hitting it with your cap will increase the maximum amount of Power Moons for the kingdom from 69 to 89.

66. Sand Kingdom Regular Cup - The race starts at the Tostarena Northwest Reaches, where you'll need to go to trigger the race in the first place. Long jump to start, and ride the Jaxi at the start and take it to town to easily get this Power Moon. 

70. Mighty Leap from the Palm Tree! - At the Desert Oasis, there is a Power Moon above a palm tree. For best results, use the Desert Oasis checkpoint, then check the nearby tree that will be directly behind Mario when he warps to the checkpoint. You'll find it there.

73. In the Skies Above the Canyon - To get this Power Moon, you'll need to ride the moving platform near the Tostarena Ruins Round Rower checkpoint. Before the first platform drops down, you'll need to leap towards the Power Moon to get it.

74. Island in the Poison Swamp - This Power Moon will be on a small island in the southwest corner of the poison pond in the Jaxi Ruins area. Use the checkpoint to get straight to a Jaxi, then ride your way to it.

75. An Invisible Gleam - In the Moe-Eye Habitat, you'll need to get to the top of the pillar maze and ground pound the second pillar. The gleam is invisible unless you are looking through your sunglasses as a Moai. Ground pounding where the gleam is, invisible or not, nets you this Power Moon.

78. Poster Cleanup - At the Northwest Tostarena Ruins building, there will be a ton of posters for Bowser's failed wedding to Peach plastered on the walls. If you talk to the Tostarenan near the building, the will tell you that the building has more or less been desecrated by these things - seventeen, to be exact. Throw your hat at all of the posters to remove them and get a Power Moon as soon as you remove the last one. To get rid of the higher posters, you'll need to perform a backflip followed by a wall jump off the wall before throwing your hat.

81. Love at the Edge of the Desert - To get this Power Moon, you'll need to warp to the Tostarena Ruins Entrance, capture a Goomba, then head to the Tostarena Northwest Reaches area by foot as the Goomba. At the edge of the kingdom is a Goombette; walk up to her as the Goomba for a Power Moon.

83. Sand Kingdom Master Cup - After activating the Moon Rock and completing the Sand Kingdom Regular Cup, you can take on the Master Cup. The same strategy of using the Jaxi from the Regular Cup still applies, but the Gold Koopa will also use the Jaxi, and as a result, it will be right on top of you. Just watch for the column of light in the sky and move towards it to ensure you get to it, and make sure not to run into anything.

84. Where the Transparent Platforms End - There is a Moon Rock Pipe near Tostarena Town. Go down it, then take control of the Moe-Eye and use the ability to see invisible platforms to get to the Power Moon at the end. You'll be moving across several smaller invisible platforms before avoiding the invisible walls while riding one big platform. You'll need to do this as the Moe-Eye, and you'll need to quickly switch between wearing the sunglasses and not wearing the sunglasses in order to see the walls while remaining fast enough to get through the invisible maze you'll need to get through to the end without being pushes off the platform. The Power Moon will be at the end.

85. Jump Onto the Transparent Lift - While you're in the Moon Rock Pipe area at Tostarena Town, drop off the long platform that stays away from the other two short ones at the start. If you're using the Moe-Eye, this will be easy to figure out if you're looking through the sunglasses and moving the camera around to look for stuff. From that platform, fall to the right, and you'll land on a platform with a key. The platform is invisible if you're not looking through the sunglasses with the Moe-Eye at the start. Grab the key, then stay on the platform for a ride back to the start and the Power Moon that you just revealed.

86. Colossal Ruins: Dash! Jump! - There is now a Moon Rock Pipe at the Tostarena Ruins Entrance checkpoint. Enter it, then capture the spark pylon. When you get to the other side, the area you're at will slowly start sinking towards - and into - the poison below. You'll need to use the rocket flowers to get to the other end of the area and reach the Power Moon.

87. Sinking Colossal Ruins: Hurry! - While you're rushing towards Power Moon #28, you'll need to take a detour on the lower part of the ramp to get a key. Grab the key, then get to Power Moon #86. When you collect Power Moon #86, you'll open up a path back to the start, and since you have the key, Power Moon #87 will be there.

Friday, November 1, 2024

PrinceWatercress plays Chrono Trigger (Super NES) - Part 64 of 70


This time around, we have Frog in the party for the final battle. This makes things a little interesting...


For the next ending, you'll need to fight Lavos after you give the Masamune to Frog and before you fight Magus.

Since I sold all of Frog's weapons NOT named the Masamune for a big stock of HyperEthers for the final battle with Lavos, I made things a little harder for myself. Somehow, I managed to save myself a little bit with a good use of Frog Squash or two.

The next ending has Frog heading back to 600 A.D. after the defeat of Lavos to face Magus.

Wednesday, November 17, 2021

HCBailly plays Final Fantasy II AGAIN - Part 64 of 65


The game throws in its own equivalent of the Warmech and pits you against a whole bunch of demons in the final stretch of the game.


Beelzebub (Beelzbub) is best fought by Cursing it and hitting it with Flare and Scourge. Beelzebub does absorb Fire and resist Ice. Be sure to use Shell and Haste on your party, too. Beelzebub can fast Flare, Blink, Dispel, Fire, Stun and Confuse, all at Level 16.

Get Body, Poison- and Death resistance on all your party members as much as possible before opening the chest containing the Ribbon, as it also contains an Astaroth. Get Curse on Astaroth and wail on it with Flare, and get Barrier on everyone for Fire resistance. From there, get Haste on your party and cast Scourge on Astaroth.

The IrnGiant (Iron Giant) is a very powerful foe and one that is hard to find, as it only found near the end of Pandaemonium and the chances of running across it are 1 in 64. Since he's too fast to Curse, buff up your party and use your best spells on it. It can cast Poison Mist, but it shouldn't be an issue if you're protected against a lot of attack types. It is weak to Ice and Thunder, so keep that in mind. Be ready to heal, too, as its physical attacks are very powerful.

The Iron Giant can also drop an Excalibur as well as any parts of the Genji equipment.

The Beast Demon (BstDemon) can cast Fog 6, Dispel 8, Bolt 10 and Stop 8, but they can be wiped out pretty easily at this point. They are also Rank 7, which makes them great for experience gains.

You'll eventually find yourself on a floor that goes forever. Just go south until you reach a wall, then keep going left and you'll find the teleporter. That's all there is to it.

In the next room, just go north and you'll meet the Emperor again. You might fight Roundworms on the way north. Prepare for the final battle!

Wednesday, May 29, 2019

HCBailly plays Final Fantasy IV (Super Famicom) - Part 64 of 70


If you thought that was it with the boss-style enemies, think again.


Near the end of the cave part of this area, there is an invisible bridge to the west that you have to cross in order to get anywhere.

You'll then see a warp tile. Once you do, the path will be very straightforward and will also lead to a chest that contains another Defense Ring that you'll want to give to Rosa.

After the save point, you'll have another boss to contend with when you find another sword. You'll face the Dark Bahamut, who will cast Mega Flare before you can even cast Reflect. Cast Reflect as quickly as possible, and have Rydia summon Ashura and Sylph with the hope of healing everybody. Have Rosa cast Cure 4 on everyone, just in case. Have Kain attack with Jump and have Cecil and Edge attack with swords after using a Bacchus' Wine or a Berserk spell on them. You'll get Ragnarok for winning this battle, and it is Cecil's most powerful weapon. It also increases his Vitality by 15.

The Minerva Jumpsuit prevents the Paralyze ailment and increase Strength, Agility and Vitality by 15, but decreases Wisdom and Will by 15.

To beat Plague. equip Kain with the Gunge Lance, Rosa with the Sage Staff and Edge with the Full Moon. Plague will cast Death Sentence at the start of the battle. Kain and Edge will use regular attacks. Have Rydia summon Bahamut to cast Mega Flare, and have Rosa cast Holy. You'll win the battle and get the Holy Lance. 

Monday, June 18, 2018

HCBailly plays Terranigma - Part 64 of 75


Now for the dream that the fortune teller spoke of...

World map by Tropicon.


To the west of the stopover area is a cave. Inside is a chest containing 961 Gems.

To the south of the stopover area is Penginea, a town of nothing but penguins. You won't be able to talk to any of them very well, even though they're smart enough to wear hats, make sleds, hang fish, go fishing, own and use their own furniture, use a kettle, sleep in a bed and even have a seal pull one of their sleds along.

There are six igloos, three on the left side and three on the right side, and you can only go into them if you crawl into them. If you enter the lower-left igloo, you'll find Magirock #84.

Once you get the Magirock, equip the Pretty Flower. Be sure you have nine of them, and use them on the penguin near the lower-right igloo. You'll exchange one of them for the second Starstone.

You're done here. Head back to the stopover and fly back to South America. From there, sail to the west coast. Go north, and you'll find Astarica. Interact wtih the pots, and a voice will tell you to take the goblet on the avatar. Ark will drink from it, then eventually black out.

Four ghosts will surround you. They will tell you that Astarica is a holy land that observes the growth of humans. Upon awakening, you shall be witness to an odd vision.

When you wake up, the temple will be lit up, and you'll meet Meilin and Perel...sorry, Meilia and Pela. They are priests seving Lord Meila. Pela will tell you to go hear what Lord Meila has to say. Lord Meila will be just in front of the entrance, and he looks like Meihou.

Meila will tell you that a holy ceremony is held yearly as per Astarica's custom. Night dew collects in the six goblets on the altar for a year, and one of them is said to bring the drinker closer to the god. All the drinker does is drink one of the goblets and spends a year without food or drink. The wrong goblet means death, but the right goblet means that a god has been born within the tribe. It has been one year since the last ritual. Two priests have gone to inspect everything, but have not returned. He asks you to go look for them.

Go up to the statue at the north end of the temple and push it to the side to reveal a secret passage. Push the statues to the north and push them into the gaps in the wall at the north end. This opens a door. Go in.

The path here is very linear. Destroy the spiders as you go along. You'll find a chest containing the Holy Suit near the start, but it's not that good compared to what you have now. Don't forgot to face away from the flying eye monsters so you can use the jump attack to defeat them.

You'll also find Magirock #85 as you go along. Thankfully, it's very easy to get to.

When you reach the end, you'll see Royd, Fyda and Princess Elle, who are Roy, Fyla and...Elle. Turns out, Roy and Fyla are the priests, and Elle was the one who drank the right goblet and became a god. The year felt like centuries, but she knows now the true significance of a god. She then says that humans are pathetic creatures driven by desires and living in misery, and that a ritual like this is only for gaining power over other tribes. She has had enough of people, and if they all disappeared, everything would be peaceful. Elle then uses her powers to kill Roy and Fyla and make them gods of death. Roy shows Fyla a human quality known as love, and Roy and Fyla embrace before they are killed.

Talk to Elle. She will ask if you come seeking an immortal body. Ark comes to the conclusion that people have two faces: the external soul and the internal soul, and that the goblet just brings out the internal soul. Elle will tell you to drink from the goblet. Interact with the one that was behind her in the cutscene. She will say that the end of the human race is trite. After that, you'll be out of the dream and back in Astarica.

There will be a chest in the room that wasn't there before. Inside is the third Starstone.

Friday, March 16, 2018

skorch82 plays Brave Fencer Musashi - Part 64 of 70


Now that we're done with the flying stuff, the confusing part begins.

You'll be in what looks like an empty room. After heading to the right, the screen will flash. The Fire Scroll symbol will be on the other side of the door. Go through it.

From here, you'll see multiple doors. The Calendar will tell you what the order you're supposed to go through this.

Go right. Skip the first door, then enter the second. Equip the Earth Scroll, then use it to hit the switch and create a bridge across the water. At the wall, hit the column that has the top that looks like the switch that triggered the switch. After lowering that column four times, the wall to the right opens up. Enter the door there.

Go right, use the Sky Scroll to float over the spikes, skip the first door, then float over the spikes until they disappear. Enter the door in front of you.

Swing up the poles to get to the next door.

Light the torches to the right with the Fire Scroll, then hop onto the top of the crusher and head left. Enter the door in front of you.

Use the Water Scroll to extinguish the torches to your left. Use the Water Scroll to land on top of the water below, then go right and enter the next door.

Go left, then enter the next door. Equip the Wind Scroll, activate it, and jump the pit while you're spinning to get to the final door.

Get to the platform below you, then use the Sky Scroll to go right and float over both the spikes and the water. Head to the left and you'll face Ed of Leader's Force. Ed tells you he's the leader before you fight.

Walk around in a counter-clockwise pattern to avoid the fire blast that Ed shoots out, double jumping over it when you need to. When he gets tired, whack him!

Ed will then teleport. The orange balls will split into giant fireballs that go in eight directions. The purple ones let him teleport. If you can hit him before he can teleport again, it will make this battle a bit faster.

After beating Ed, take the elevator. You'll be able to save your game at this point.

Monday, December 16, 2013

brickroadbrickroad and SovanJedi play Secret of Evermore - Part 64 of 88


After more forest exploration, namedropping both Mr. T and Seanbaby and a failed expedition to find the Bearded Boy, we finally fight the next boss.

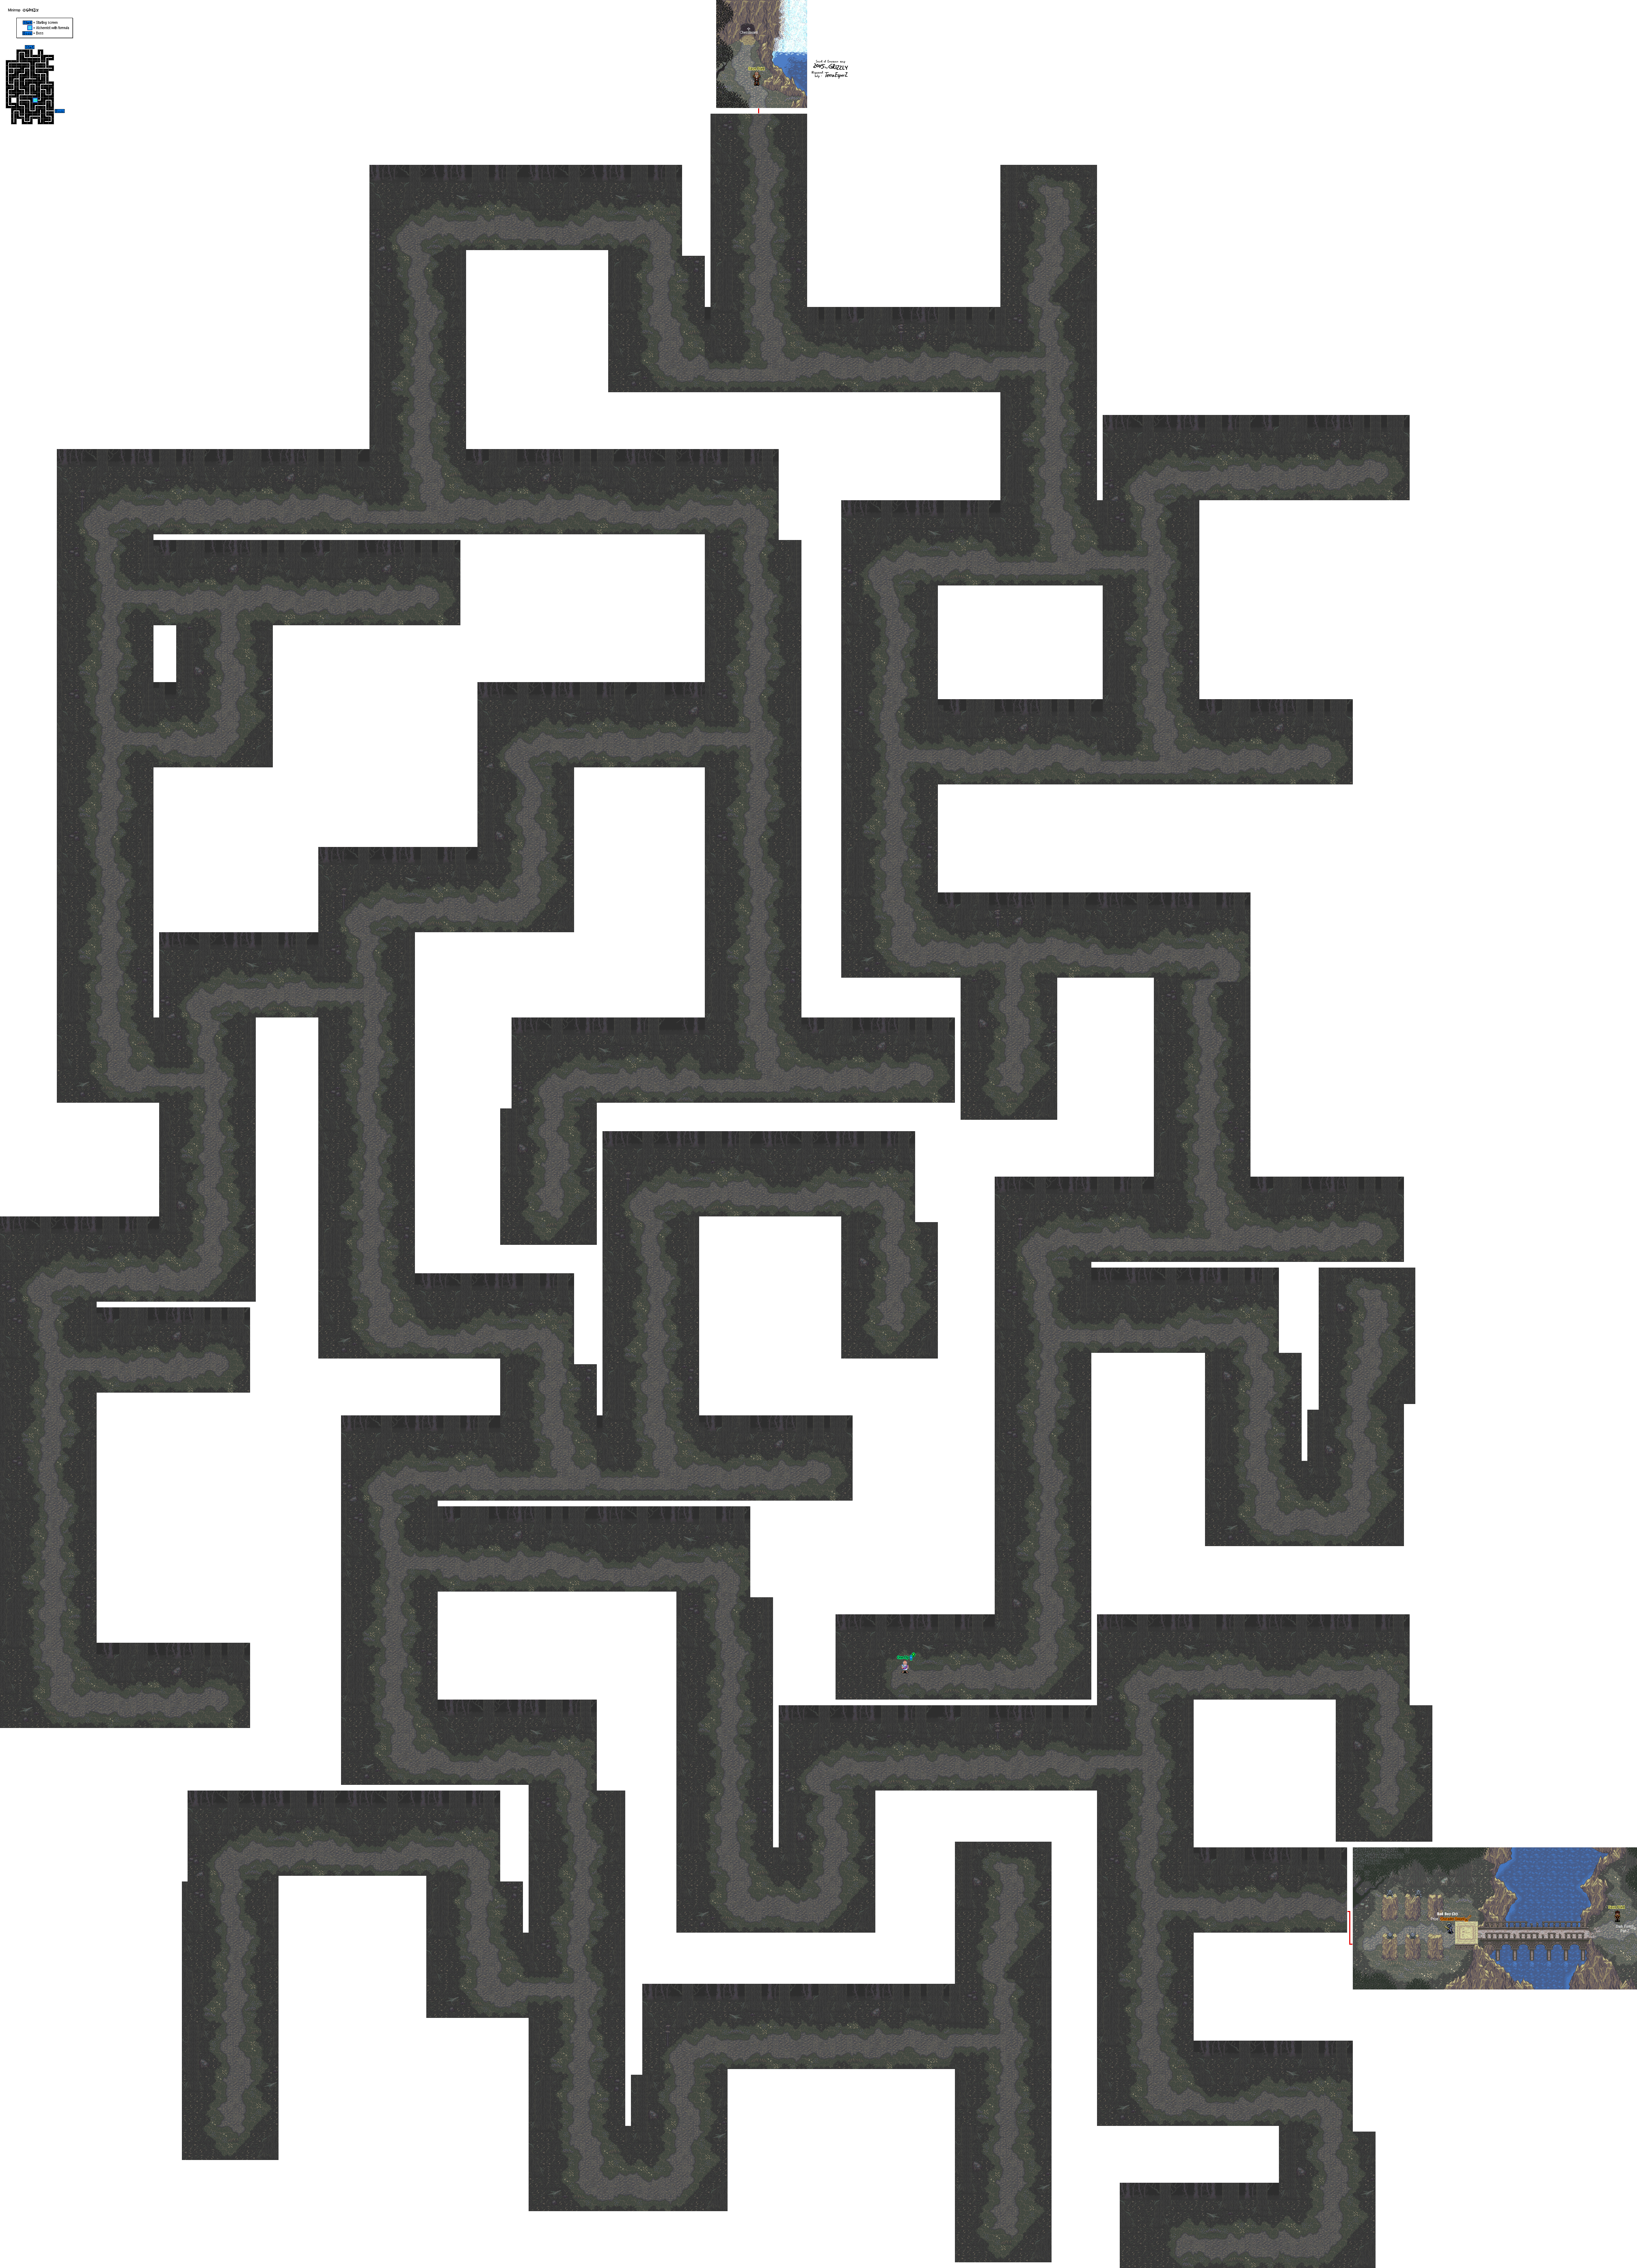
All maps by Grizzly.

Forest Bridge


Map 1

When we reach the end of the first section of the Dark Forest, we'll meet the mini-boss.

Boss: Bad Boys


You'll reach an open, more well-lit clearing where six Greebles guard a bridge. Two by two, they'll combine and turn into evil clones of The Boy. These guys fight like the boy and are equipped with a sword. They also perform the Lightning Storm and Nitro spells. They're not really that hard if you pound them with leveled-up strikes and alchemy spells.

When you win, you'll be awarded with the Crusader Sword, your first new weapon from Gothica.

You'll fight three of these before you'll be able to cross the bridge. Despite what Brick says, there's a boy on the other side that does save your game.