Showing posts with label part 62. Show all posts

Wednesday, March 18, 2026

PrinceWatercress plays Super Mario Odyssey - Part 62 of 92


In this entry, we activate the Moon Rock in the Cascade Kingdom and pick up all but two of the unlocked moons.


The Moon Rock in Cascade Kingdom is near where you faced Madame Brood for the first time. Activating it by attacking it will unlock Moon Rocks 26-40.

Power Moons


26. Bottom of the Waterfall Basin - This Power Moon will be underneath the column that you had to knock down during your first visit to this kingdom. Just get in the water and look for the glowing spot, then ground pound the glowing spot to get it.

27. Just a Hat, Skip and a Jump - Near the 8-bit area, there are some hat clouds leading to a platform with a Power Moon. Hit the hat clouds with your cap and be both quick and careful to turn them into platforms so you can get to this Power Moon.

28. Treasure Under the Cliff - Near the Stone Bridge checkpoint, there are some hat clouds. Turn them into platforms with your cap so you can wall jump to this Power Moon.

29. Next to the Stone Arch - At Fossil Falls Heights, this Power Moon will be mid-air next to a bridge. You'll have to drop down from the side of the bridge to get it.

30. Guarded by a Colossal Fossil - At Fossil Falls Heights, get on top of the huge Triceratops skull, then get to the nose and throw your hat at it. Hold the button down at the glowing spot to get a Power Moon.

31. Under the Old Electrical Pole - To get this Power Moon, you'll need to take control of the big Tyrannosaurus Rex in the level, take him back to the Odyssey and knock down the electrical pole before you lose control of him. Knocking down the pole reveals a light in the ground, and ground pounding it reveals a Power Moon.

33. Inside the Busted Fossil - At Fossil Falls heights, use a Chain Chomp near the Triceratops skull to break one of the fossil walls for a Power Moon.

34. Caught Hopping at the Waterfall! - There will now be a rabbit near the Crazy Cap Shop; catch it to get this Power Moon. Stay close and take a right immediately after it jumps off the cliff to easily get it.

35. Taking Notes: Hurry Upward - Head back to the 8-bit area to find a treble clef. Pick it up and get all the notes before time runs out to get a Power Moon.

37. Across the Mysterious Clouds - There is now a Moon Rock Pipe at the Stone Bridge checkpoint. Go down it and be ready to create hat cloud platforms and long jump on seesaw platforms when they lean to one side to get to the end and get this Power Moon. Those last few hat cloud platform jumps are tricky; you'll need to jump to the hat clouds, then throw your cap at them when you're right in front of them to get on the platform and save yourself.

38. Atop a Wall Among the Clouds - After the "grid" of hat cloud platforms that you have to create, you'll need to get on top of the ? Block and the bricks that you see and jump above the ? Block to reveal an invisible block. This will take you to two more hat cloud platforms that you'll have to make to open a path to this Power Moon.

39. Across the Gusty Bridges - Across from the column that you had to turn into a bridge, there is a Moon Rock pipe. Enter the Moon Rock Pipe, hit switches, avoid being blown around and avoid falling off to get to the Power Moon at the end. 

40. Flying Far Away from Gusty Bridges - In the Moon Rock Pipe area, there is a switch that seems to be out of reach. Throw your cap into the nearby wind gust to hit and trigger the switch, and you'll lower another bridge. At the platform that you've just given yourself access to, throw your cap when both wind gusts are blowing to hit another switch and get this Power Moon.

Wednesday, October 30, 2024

PrinceWatercress plays Chrono Trigger (Super NES) - Part 62 of 70


For the first time in the Let's Play, I put Robo in the party for the final battle. Let's see how that goes.


For the next ending, you'll need to beat Lavos after you get the Hero Medal and before you head to 65,000,000 B.C. to get the Dreamstone and get the Gate Key stolen. For the first time here, I put Robo in the party to make things a little more interesting.

In the ending, you'll just see some scenes involving characters in 65,000,000 B.C. as well as some other random scenes. That's it, really.

Tuesday, November 16, 2021

HCBailly plays Final Fantasy II AGAIN - Part 62 of 65


Get ready for some powerful enemies in the final stretch of the game.

Pandaemonium


If you use Warp at the start to get out of Pandaemonium, you'll return to Pandaemonium. Use Teleport instead.

Take care to equip yourself with armor that will protect you from elements and status ailments whenever possible.

Mantis Devils (MntisDevil) can paralyze you with their physical attacks and can cast Fire 16 on a single target. They can absorb Fire attacks and are strong against Ice attacks, and have no elemental weaknesses. They are also Spellcaster-type enemies.

Death Riders (DthRider) can drain your HP with their physical attacks, and are also Spellcaster-type enemies. There is also a chance that they can drop Elixirs after a battle, and they can also drop Thunder Spears.

The Queen Lamia returns as a normal enemy here, and can be surrounded by Lamias. Don't forget that they can put you to Sleep with their physical attacks. They can also drop a GoldPin, if you need one.

Mythril Golems (M.Golem) are not Giant-type, but they are Spellcaster-type. They have really high attack and defense. They are weak to Thunder and strong against everything else.

Coeurls show up as random enemies here (as opposed to only inside of chests).

The diamonds in the floor act as transporters.

Tuesday, May 28, 2019

HCBailly plays Final Fantasy IV (Super Famicom) - Part 62 of 70


Are you ready for more items?


The Dragon Helmet is for Kain, as is the Dragon Mail and Dragon Gauntlet. Equip them all on Kain; they're the best stuff you can get for him.

The BlueDragon has no elemental weakness. Cast your most powerful spells on it, and have Rydia cast Flare and Rosa cast Holy.

The Zombiesaur is weak to fire, and will also try to Curse your party members. The Artemis Arrows work very well against them, too.

The Gold Dragons are similar to the Silver Dragons, though they do have a counter-attack. Take them out first in case they're paired with Silver Dragons.

You'll also get the White Fang in one of the treasure boxes in this dungeon.

The Stardust Rod increases Wisdom by 15. Give it to Rydia.

The Red Dragon is weak to ice, so cast Ice 3 on it if you can.

The Crystal Shield is better than the Aegis Shield for Cecil and increases Will by 3.

The Defense Ring increases Vitality by 15 in addition to doing wonders for defense.

Sunday, June 17, 2018

HCBailly plays Terranigma - Part 62 of 75


We head further into Dr. Beruga's lab...

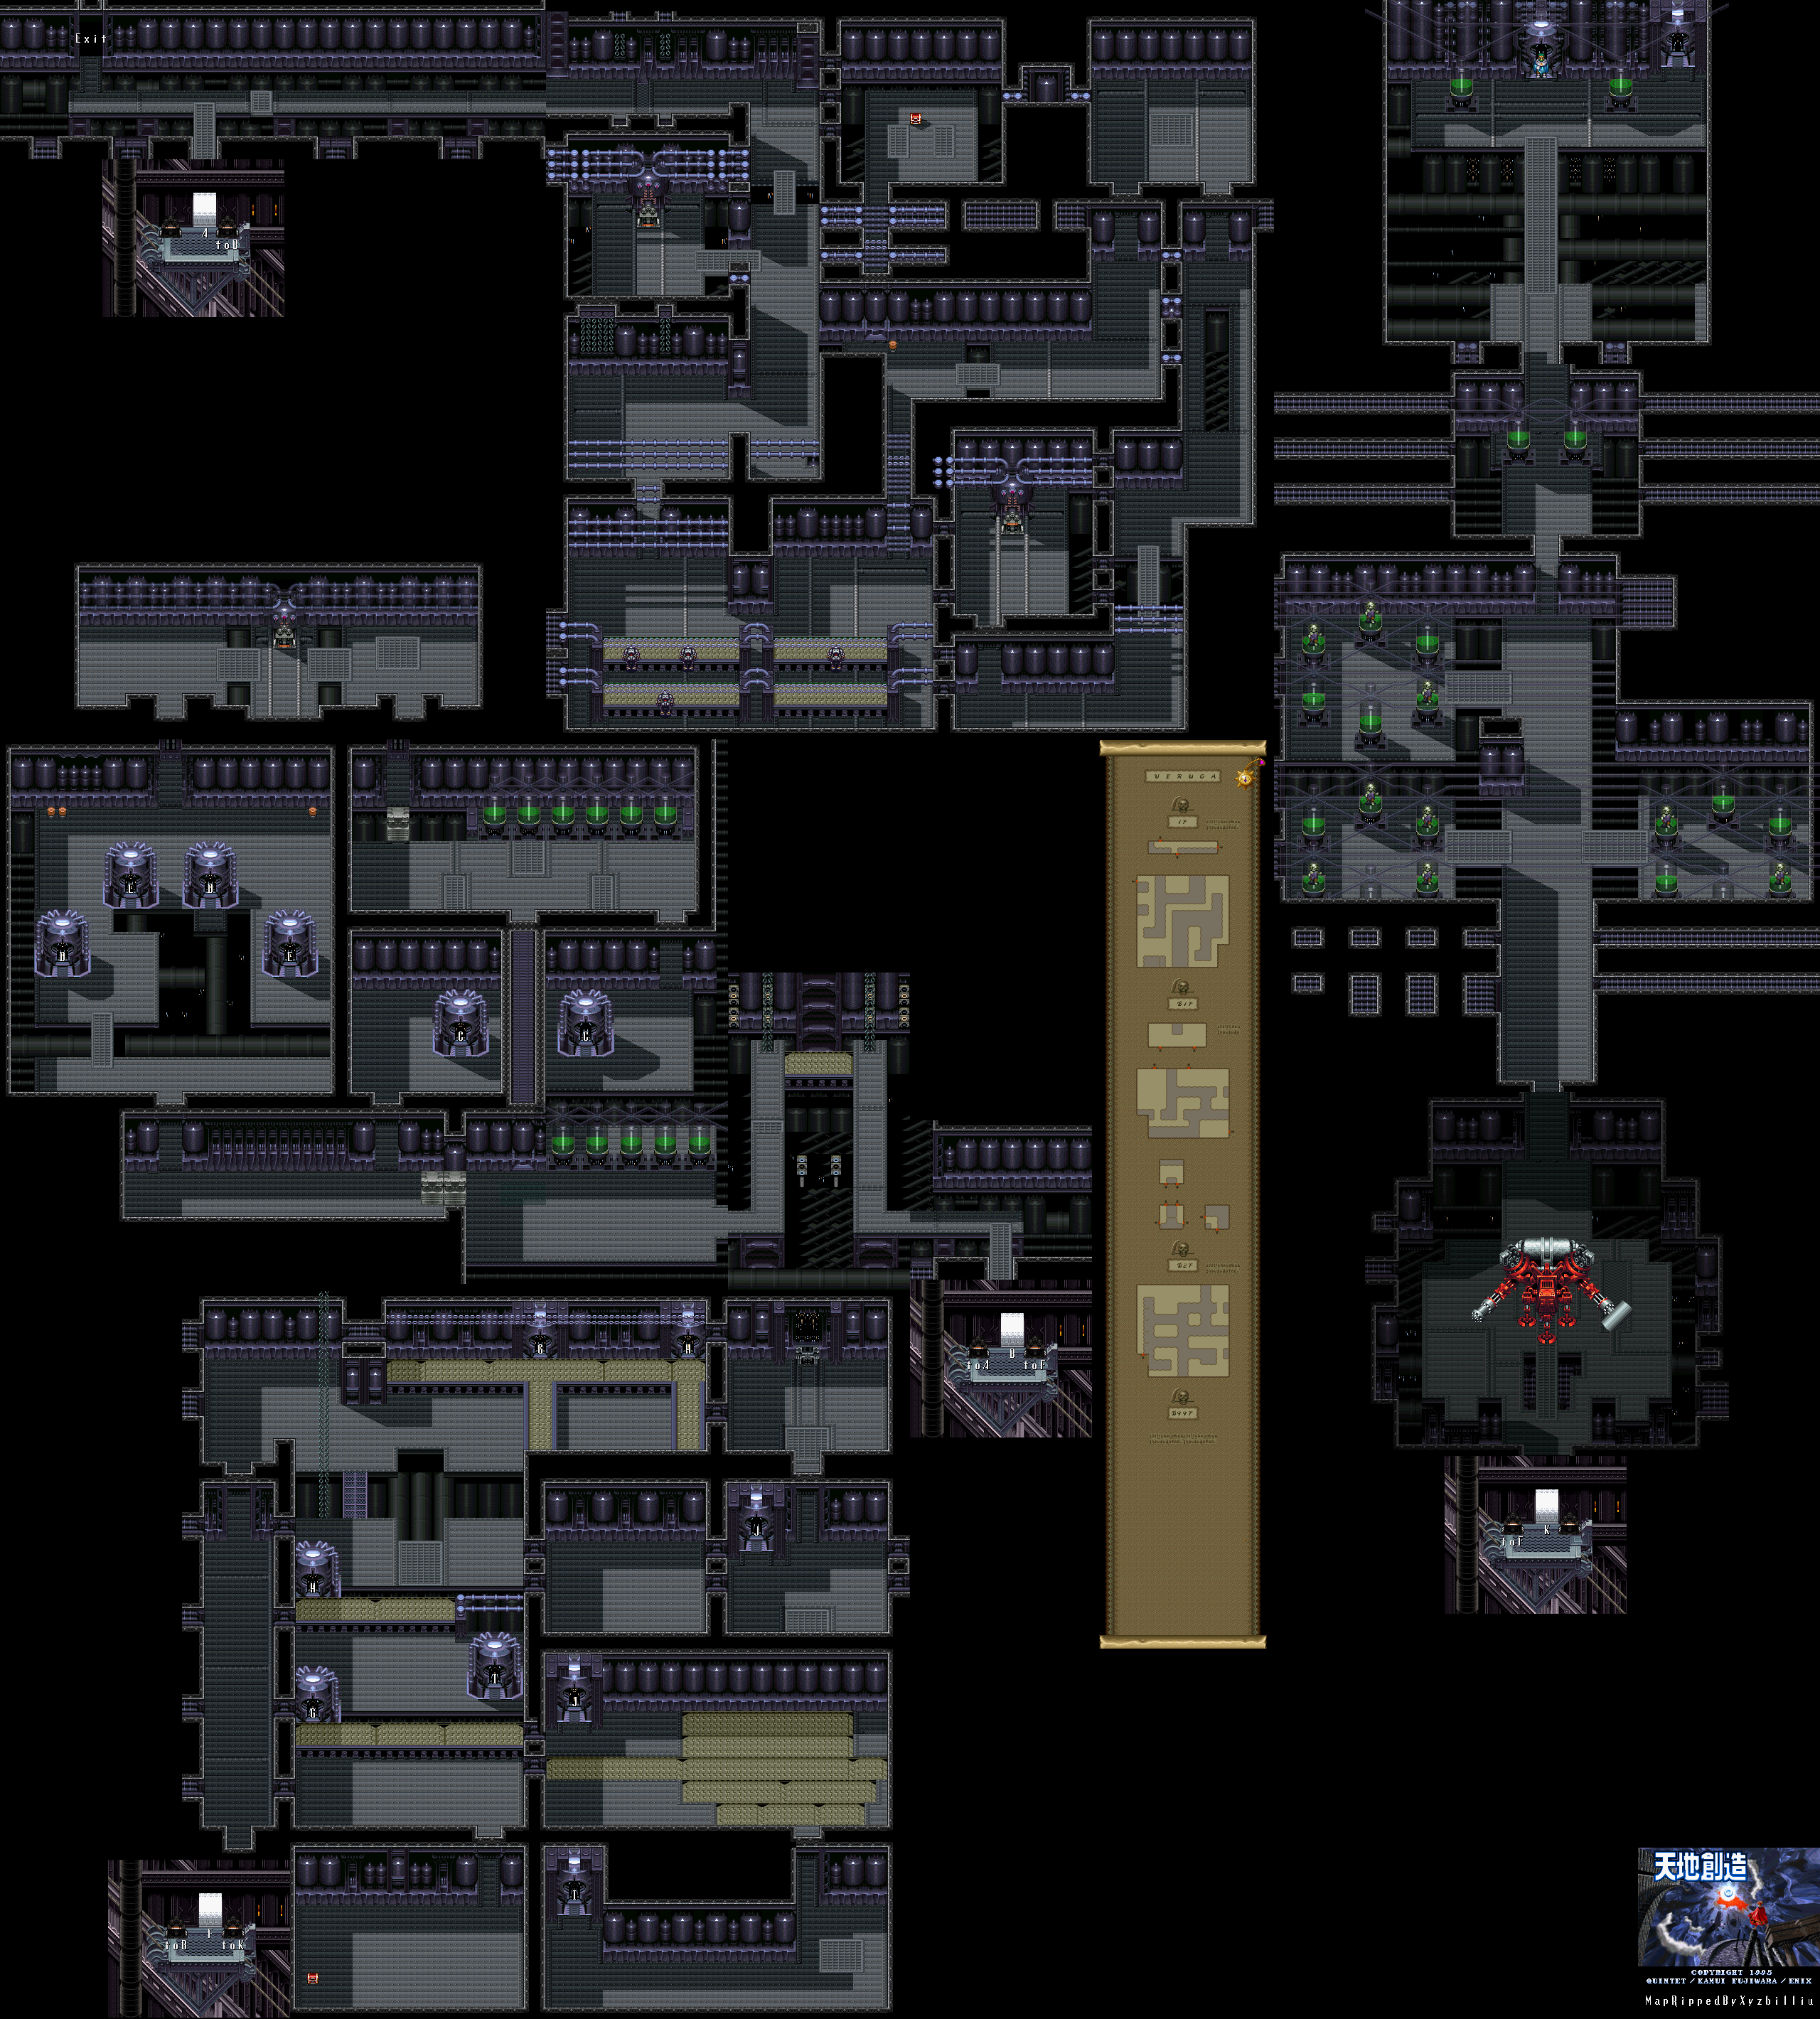
Dr. Beruga's Lab map by xyzbilliu.

Dr. Beruga's Lab


At the next level, you'll see giant cubes moving back and forth. The dashing attack does the most damage.

When you enter the bottom level, jump onto the conveyor belt and take the left teleporter. To the south is a treasure chest that contains a DEF Potion. Go back to the teleporter and take the other one. There is one just southeast of the one you came out of; take it.

Follow the path and you'll come across multiple conveyor belts, and take the teleporter at the end. Go north and you'll come across a computer. You won't be able to do anything on it, and Yomi will show up to tell you that the password is in place to shield the data, and will tell you to input "BLOODY MARY." Use the computer again, and Ark will put the password in. This will disengage the elevators and cold sleep device, which basically wakes up Dr. Beruga. After putting in the password, however, Ark will wonder why Yomi would know the password in the first place.

You'll connect to the database, and you have access to two section: Past History and Lab. In Past History, you can learn about the dawn of humankind, cold sleep and Earth's last day. The last one is pretty important, as you'll learn how the world pretty much died: a deadly airborne virus known as Asmodeus struck and decimated the human race. Some were saved by Dr. Beruga's work, but the survivors starved to death.

In the Lab section, you can learn about the lab's objective, vaccines and the facilities. You'll learn that the lab is around for research and development of groundbreaking technology, and robots are exclusively used due to the work being highly hazardous. You'll learn that a vaccine for Asmodeus was created in the lab to stop the plague, and was mostly successful. However, it was only available to a select few.

As for the facilities, you'll learn that the first floor is the robot assembly plant and the basement floors are the bio-lab. There are other basement floors, but they are under construction.

From the computer, jump back into the teleporter to enter it, then head back to the elevator. Take it down, and you'll go all the way to the 99th basement floor. You'll then take on a giant security mech with a chaingun and a hammer.

Take out the boss's three feet first. When the boss jumps into the air, keep running. When it lands, you'll be able to avoid the missiles. From there, you want to stay in front of the center of the robot, and use your dashing attack to destroy all three of the robot's feet. Staying to the left will subject you to a whiplash attack, and staying on the right will subject you to shock waves that travel diagonally. You'll be dealing with these attacks every so often, so stay close to the center of the robot and be ready to make your move when you can.

When you beat the boss, you'll finally enter the 99th basement floor. If you look around before you go north, you'll find some tubes with green liquids containing people who look much like the zombies in Louran. Something sinister is afoot.

Thursday, March 15, 2018

skorch82 plays Brave Fencer Musashi - Part 62 of 70


Once you use the Wind Crest in that one part of the forest near the village, there's no turning back...

Head to the part of the forest where all those pipes were. There is a climbable wall you made with the Earth Scroll that takes you a Wind Crest. Climb up that wall and head to the Wind Crest. At 7:00 on Skyday, use the Wind Scroll on the Wind Crest.

No turning back now.

You'll be a beautiful sky fortress of sorts. This is the Tower of Sky. The water that drops down from tthe fountain at the bottom explains why it rains (maybe). Equip the Earth Scroll, then use it to hit the four Earth Scroll switches. You'll have to jump back to the spinning platform in order to reach all four of them.

After hitting all four Earth Scholl Switches, you'll open a door at the base. Use the Water Scroll to get into the door, then equip the Fire Scroll and light up the bases with the Fire Scroll symbol. At the top, you'll find the Sky Scroll, which allows you to fly in the air for a limited amount of time. (In Musashi's Book of the Five Rings, this was Air.)

After getting the Sky Scroll, you'll reach the Thirstquencher Empire's Soda Fountain. A pipe will latch on to the Tower of Sky, and you'll be greeted by Colonel Capricciola. The Colonel wants Lumina, but Musashi refuses to give it to him. Capricciola asks him if he'd rather lose either Lumina or Princess Fillet. He leaves as Musashi tries to go after him, and the pipe that latched on to the Tower of Sky sucks the Binchotite out of it, causing it to completely lose power and crash land in the forest. Musashi travels along the pipe to enter the inner workings of Soda Fountain.

Sunday, December 15, 2013

brickroadbrickroad and SovanJedi play Secret of Evermore - Part 62 of 88


Well, there's not much progress to this one...

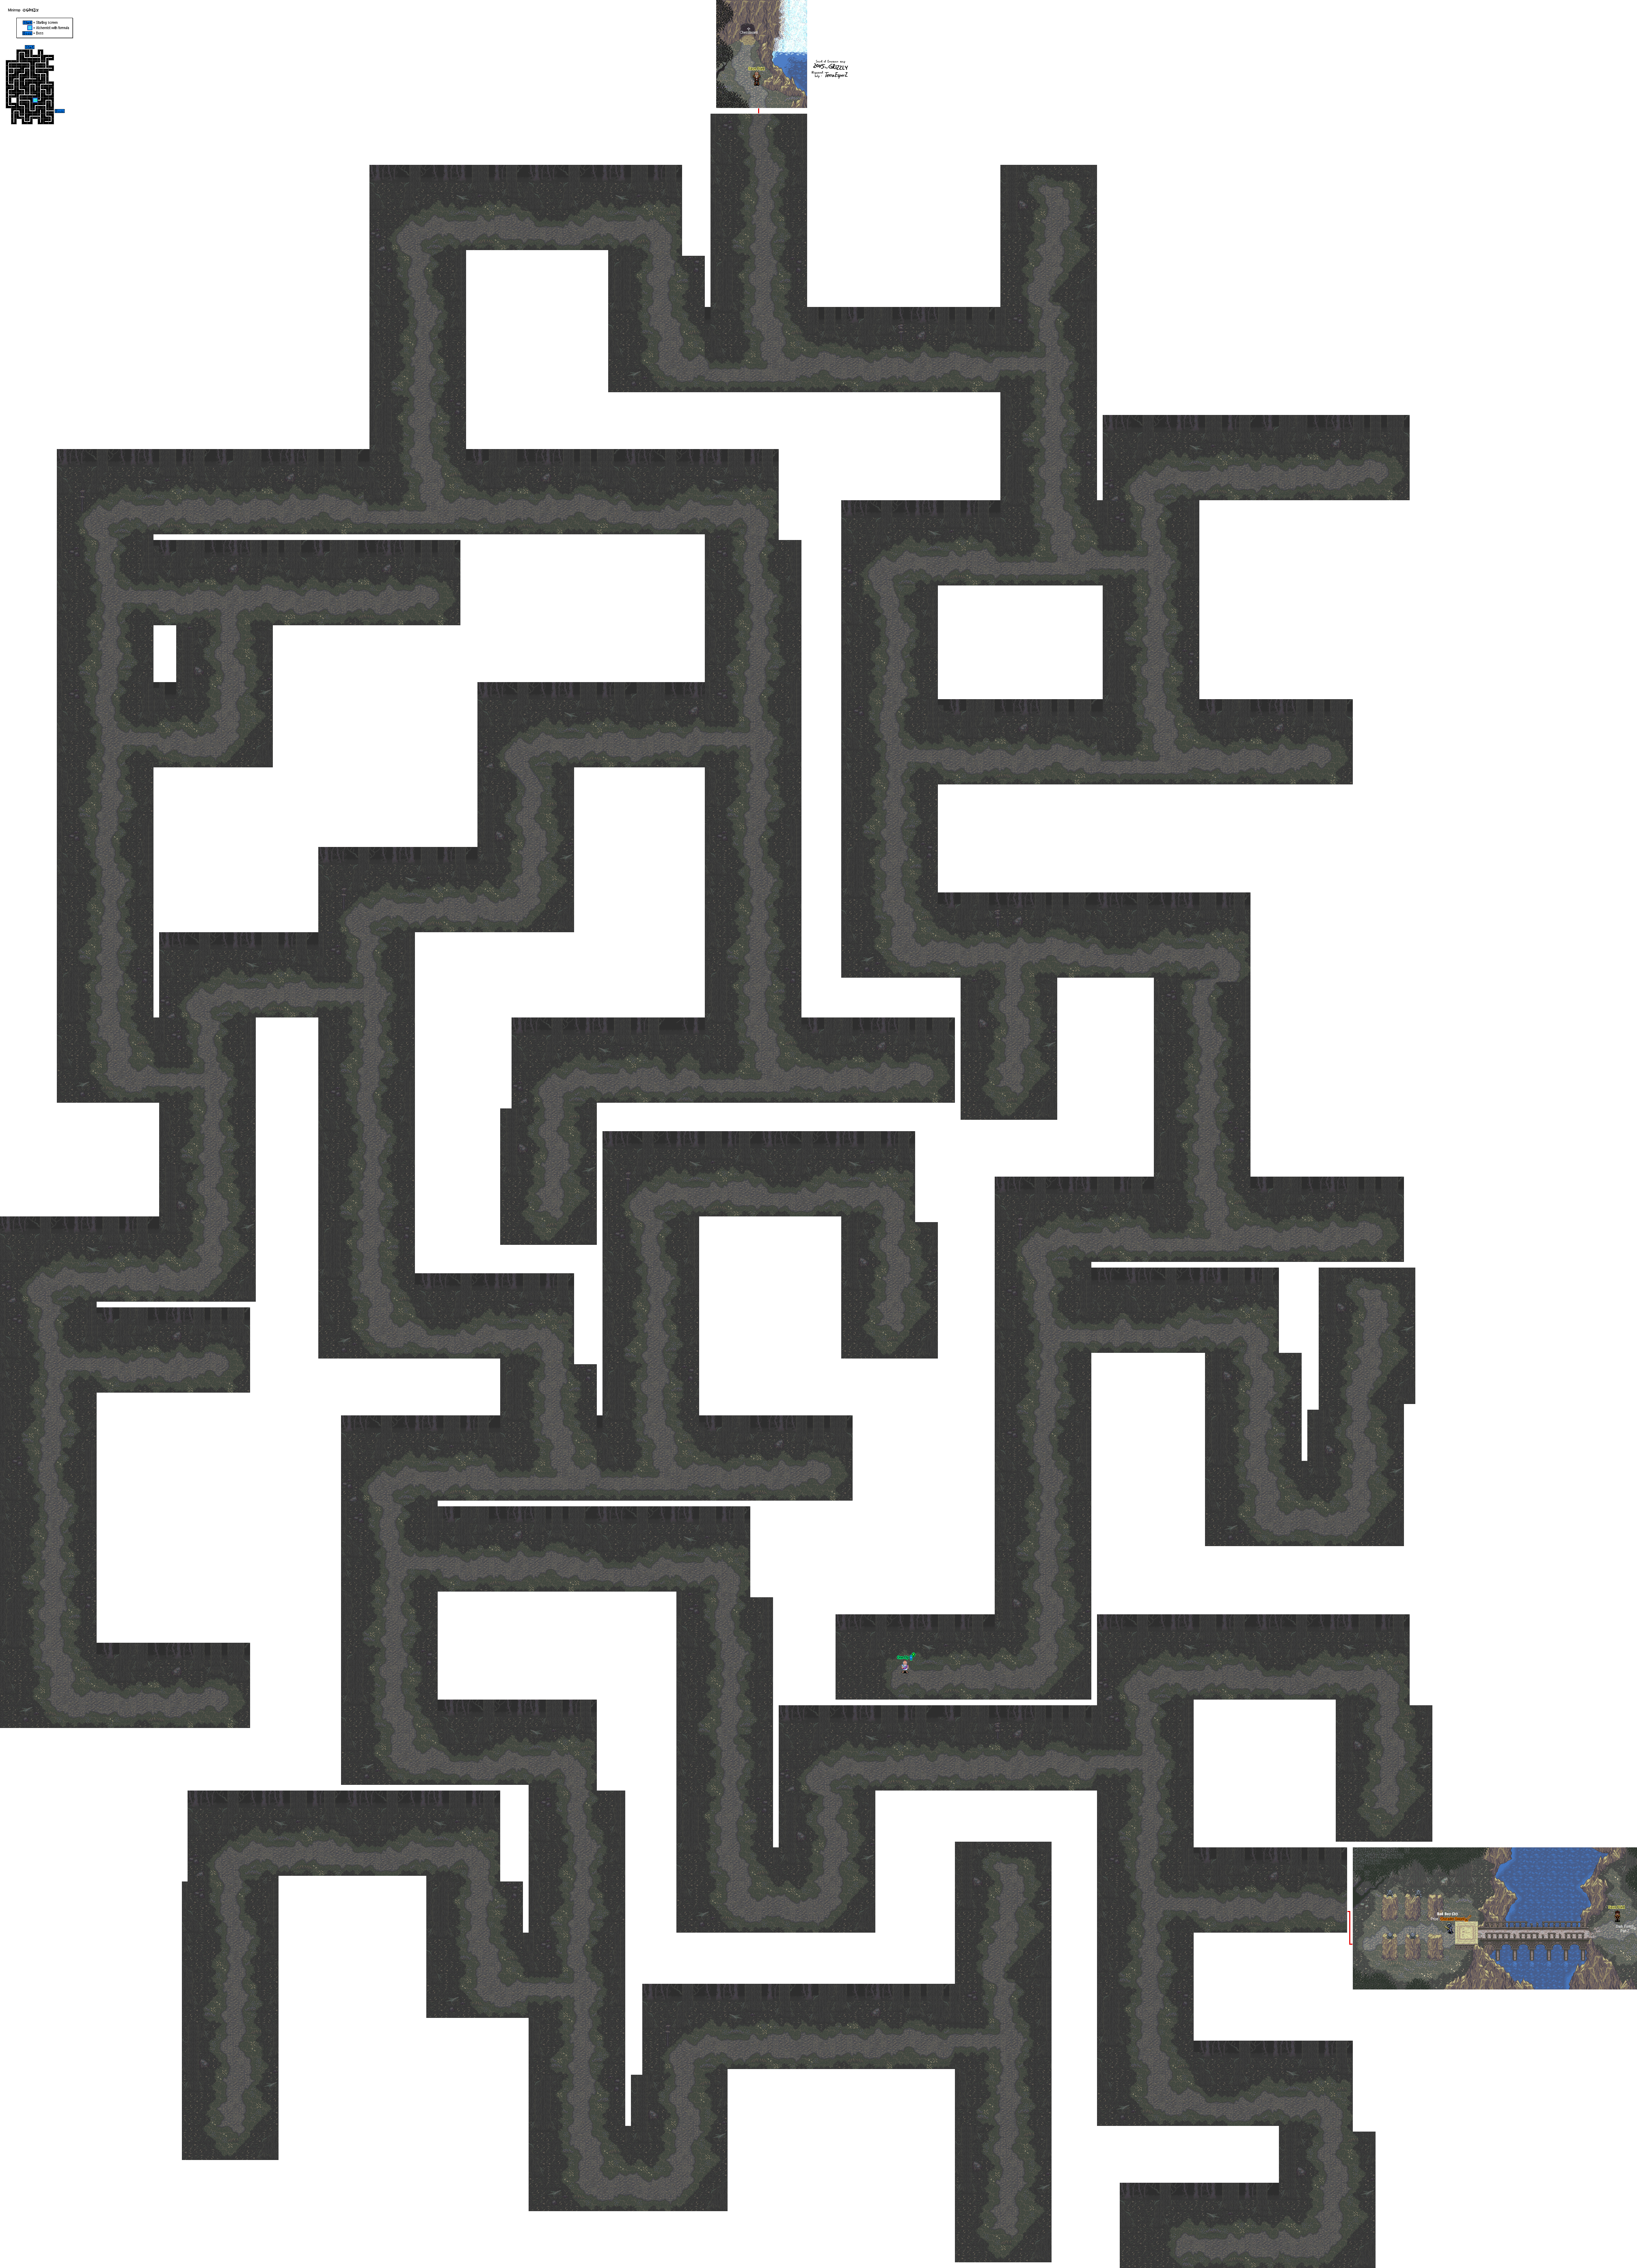
All maps by Grizzly.

Dark Forest


Map 1

Since there's not much going on here, I might as well make this whole blog about the signs.

Some of them are just weird. I mean, come on. One of them says that the Souvenir Spoon Pounding Factory is five furloughs away...why can't I go there? Damn you, Square Enix. I wanna see how Souvenir Spoons are made and you just killed it for me. Another one mentions Lake Limpopo or someplace like that.

Some of them are actually useful. If you see one that tells you that you're going the wrong way (examples include "I'd turn back if I were you" and "Take heed and go no further"), you might wanna listen to them, because it's true. Of course, failing to go the wrong way will keep you from getting the One Up spell as well as meeting the Oglin you freed from the well at the beginning of Gothica (We'll meet him later. I told you it was worth it, guys). There's another sign that tells you that you're halfway through the maze, which is actually pretty thoughtful to see in the game.