Showing posts with label part 53. Show all posts

Monday, March 9, 2026

PrinceWatercress plays Super Mario Odyssey - Part 53 of 92


While we have access to the Mushroom Kingdom now, we still have some unfinished business on the moon...so let's take care of it, shall we?


While we have access to the Mushroom Kingdom, we still have unfinished business on the moon. Some moons will now be available now that Bowser is defeated.

When you return to the moon, you'll find out that the Moon Rock is glowing. This will also be happening in all of the kingdoms. We won't be messing with the Moon Rocks yet, however.

The Crazy Cap Shop will finally be available near the Odyssey, so you can buy a Power Moon and spend the Regional Coins you found here. You can also buy Power Moons in bulk, ten at a time, if you have the money. This is the only way to get 999 Power Moons, but as promised, all the Power Moons that can be found through exploring the game will get found before I take advantage of this.

There will also be a ton of costume pieces that will be available now that Bowser has been beaten. If anything has the word "Special" near it, it is a costume piece from the game's digitally downloaded updates from around the time the game came out in 2017 and 2018. I will be buying all of these things as well. You'll want to get the Doctor Headwear and the Doctor Outfit, since we'll be needing it later.

You'll see people from various Kingdoms near the Odyssey looking at the Earth in the background. Now that Bowser is gone, everyone is free to travel without having to deal with Bowser and his shenanigans.

If you meet the tourist from Tostarena here, you'll find out he's going to the Mushroom Kingdom next after you get the Power Moon he gives you.

Luigi will now show up in all of the kingdoms when you beat Bowser. He has a mini-game called Balloon World, and it involves Internet connectivity. You pick a balloon that has been placed by another player who has the game, and if you can find it within a time limit, you'll get coins. If you fail to find it, however, the player who placed it will get coins. You can also place your own balloon and challenge others place to come find it. This is a pretty good way of getting coins - assuming that the servers for this are still working when you come across this guide - if you can place it in a spot that not many people will be able to find it. If your balloon does get found, however, you'll have to place it in another location.

There are two portraits near where you fought Bowser. One of them is empty and will be filled in with something later, but the other has a picture of Bowser. If you jump into it, you can play the final stretch of the game again.

There is Hint Art in the Wedding Hall when you enter now. It shows Poochy in the Wooded Kingdom near a corner near a scarecrow. Remember that for later.

15. Sneaking Around in the Crater - Near the Odyssey, there is a moving, glowing bump in the crater. Throw your hat at the bump to stun it, then ground pound it to get this Power Moon.

16. Found on the Moon, Good Dog! - There is now a dog near the Crazy Cap shop. Take the dog down the ramp leading downward and take it to the corner with the platform with the scarecrow on it. The dog will find this Power Moon.

17. Moon Shards on the Moon - There are five Moon Shards near the Wedding Hall. Some are on the ground, and others are on the roof and will require the frog to collect. Find them all to reveal a Power Moon above the entrance.

18. Moon Quiz: Amazing! - After getting Power Moon #24 (see below), you need to answer the rest of the Sphynx's questions. Answering all five correctly nets you a Power Moon. Here are the answers:

What type of flower did the traveler offer the bride? Rocket Flower

Which animal can't be found in this land? Sheep

The objects that fell on all the kingdoms of the world were what kind of rock? Moon

Where is the secret entrance to the Wedding Hall in this kingdom? Below the bell

How did I travel to this place? Floated by airship sail

20. Shopping in Honeylune Ridge - Once the Crazy Cap Shop is available on the Moon, you can buy this Power Moon.

21. Walking on the Moon! - Near a large crater near the rolling rock columns, you'll find a Koopa Trace-Walking mini-game. You'll need to earn 80 points or more to earn this Power Moon. I still can't figure out how I scored 89.

23. Doctor in the House - There is a Shiverian in the Wedding Hall who has a stomachache from overeating. If you talk to him while wearing the Doctor Headwear and Doctor Outfit, he will give you a Power Moon.

24. Sphynx's Hidden Vault - The Sphynx has more questions when you beat Bowser. Here are the answers:

What type of flower did the traveler offer the bride? Rocket Flower

Which animal can't be found in this land? Sheep

The objects that fell on all the kingdoms of the world were what kind of rock? Moon

Where is the secret entrance to the Wedding Hall in this kingdom? Below the bell

How did I travel to this place? Floated by airship sail

If you answer one of them correctly, the Sphynx moves aside, and you an go in and open the treasure chest with your cap to get a Power Moon.

25. A Tourist in the Moon Kingdom! - You'll need to beat Bowser and collect "A Tourist in the Luncehon Kingdom!" to get this Power Moon. Once you do, the taxi, the taxi driver and the tourist from Tostarena will be near the Odyssey, and you'll be able to get this one.

Monday, October 21, 2024

PrinceWatercress plays Chrono Trigger (Super NES) - Part 53 of 70


In this episode, we get done with the Black Omen (at least for the Let's Play), and after that, we'll be taking care of some miscellaneous stuff before taking on Lavos for real.


After the final save point, you'll enter a room similar to the final one in the Ocean Palace. There will be light pillars containing images of all the playable characters (except for Magus), and at the end will be a destroyed Mammon Machine. Zeal will appear, and you'll have to fight her.

The best party for this whole set of battles is Ayla, Frog and Magus, from what I can gather.

When the battle starts, Zeal will hit the party with Halation, which sends all three of your party members to 1 HP. If you have Ayla and Frog in your party, you can hit here with Dino Tail and Frog Squash, respectively, for max damage, then heal with a MegaElixir with the third character. You can also get a MegaElixir from winning this battle as well as from hitting Zeal with Charm and getting one from her, so that's two you can get from this battle. By hitting with both of those attacks and then healing with a MegaElixir, Zeal will only fight using Halation, and her other two attacks - the energy balls that are similar to Dalton's as well as the MP-absorbing Death Kiss - will never be seen. You can just repeat the Dino Tail-Frog Squash-MegaElixir combo and she will quickly go down.

After that battle, Zeal will then throw you into the Mammon Machine, and you'll have to fight it. If you Charm it with Ayla, you can get yet another MegaElixir. That's good, because you'll need to heal as soon as you start the battle. At the start of the battle, the Mammon Machine will increase its attack power with your magic attacks and increase its defense with your physical attacks. Bringing Frog into here is useful, because if he has the revived Masamune equipped, he can absorb the power of the Mammon Machine and heal himself while powering the Mammon Machine down. Eventually, the Mammon Machine will discharge its energy, and if you've powered its attack up a lot, it will hurt. Having Frog attack it with the revived Masamune will make the power of the energy discharge drastically go down. The Mammon Machine will eventually stand still and occasionally hit individual party members with the Fire-based Point Flare attack (which doesn't do much damage) before storing energy again. As the Mammon Machine stands still, you can smack it around with magic and not have to worry about consequences until it starts storing energy from your attacks again.

Eventually, the Mammon Machine will go down, and you'll face Queen Zeal one more time. If you have Magus in your party, you'll get some additional dialogue between him and Zeal, and Magus' theme will play during the battle instead of the alternate boss battle theme you usually hear when facing Son of Sun, Masa & Mune, and other bosses.

Having Ayla is essential for this battle if you want to get some cool stuff. Charming the left hand will get you a Prism Dress, while Charming the right hand will net you a Prism Helm. You'll want to be ready to help Ayla out when you do these things, though, as the left hand will always counterattack with Life Shaver (which brings the attacker's HP to one) and the right hand will always counterattack with MP Buster (which absorbs the attacker's MP). Charming the face will net you another MegaElixir.

In this battle, always attack the face with powerful single-target Techniques, regardless of whether they are Single, Dual or Triple. Dark Bomb does damage for a single-target attack and doesn't hit the hands (amazingly), and Frog and Ayla's Drop Kick can do over 3000 HP if everyone's levels is in the mid-50's. It also helps that the face does not counter-attack upon being hit, unlike the hands, althought it does have powerful attacks such as the water-based Hexagon Mist and the Shadow-based Shadow Gears that target the whole party and the Skygate that does Lightning-based damage to one party member. It can also cast MP Buster and Halation on occasion, so watch out for that.

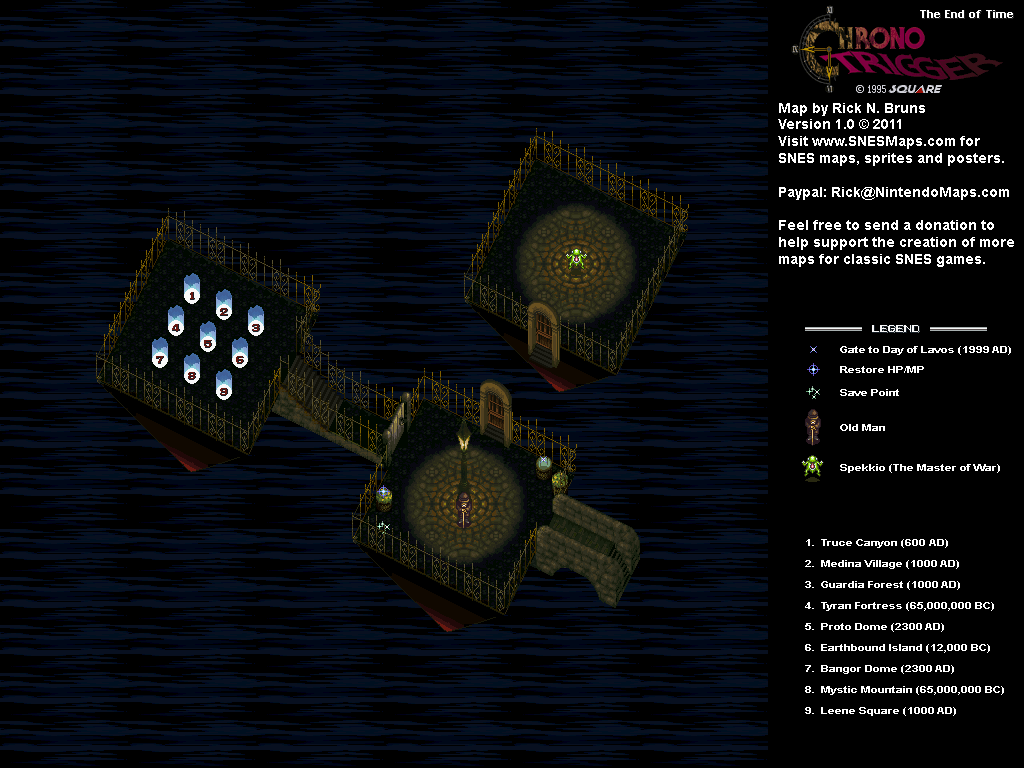
When you defeat the head, the hands follow, and the battle is over. The Black Omen will dissipate, and you'll face Lavos. If you haven't defeated Lavos yet, you'll face his final form just like in the Ocean Palace. If you already have, you'll just go in and you'll have the option to save your game and take the portal back out to The Edge of Time, where Epoch will be waiting. If you conquered the Black Omen in 1000 A.D., you can conquer it again in 600 A.D. and a third time in 12,000 B.C. and fight both forms of Zeal and the Mammon Machine all over again and Charm the second hands for Prism Helms and Prism Dresses a second and third time to fully deck out the entire party.

Monday, July 15, 2024

PrinceWatercress plays Ratchet and Clank: Going Commando - Part 53 of 54


We have two more Platinum Bolts to grab, and once we do...we truly get everything.

First | Previous | Next | End

We're finally heading to Yeedil. Here we go.

3:02 - There is a Platinum Bolt above the bridge at the start. Cross the bridge, then grind down the left side to get it.

4:21 - The Hypnomatic will get you from one robot to another in this makeshift maze. Making it to the end brings up some Swingshot targets, which leads to another maze-like area. Thankfully, you can get through this area on foot. Just ready yourself for the tanks.

8:00 - You'll have to switch from one robot to another with the Hypnomatic here in order to survive and eventually open the path to the teleporter to Megacorp HQ. 

9:30 - Let's check our stuff, lock and load, and...uh...

10:41 - Good thing the game saved our progress before the lock-up, because now we can return to where we left off.

13:08 - It was at this moment that I feared the game would break again.

16:01 - Not again.

17:24 - Bust out the Dynamo and watch your shadow as you jump and glide. Make sure you have the Kilonoids at your sides.

19:31 - For this final Infiltrator puzzle, you'll want to go up, down-left, down-left, down, down-left, up, up, down-left, left, down-left, down-left. Afterwards, use the Thermanator to take out all of the Protopets on the icy floor all at once. Afterwards, use the Tetrabomb Gun to wipe out the two tanks.

At this point, we're near the end. Use the Electrolyzer to get the platform up and running after one more mini-game involving those sparks on the circuit paths.

24:23 - Pulling this bridge down with the Swingshot leads to the end. We're not heading there yet.

Instead, there is a column you can move with the Tractor Beam. Grind on the rails and jump over the flashing rings to get the 40th and final Platinum Bolt of the game.

27:05 - With all 40 Platinum Bolts in hand, we play through the grinding section at Clank's apartment in Endako to get to the third and final weapons mod station. Thankfully, this grinding section is surprisingly easy and doesn't have a Skill Point attached. 

Here are all of the mods, what they do, and where you can get them. Thankfully, you can buy all of the mods with all 40 Platinum Bolts.

Acid Mods have acid rounds attached to the weapons they are for, and they will do poison damage when shots connect. The poison does eventually fade away, but it does damage until it does.

Lock On Mods allow you to lock on with the weapons that have them by holding L2 and R2 simultaneously. With lock-on, all shots will be directed at that enemy, and Ratchet will also be able to strafe while holding the button. You'll also be able to see how much health an enemy has left.

Shock Mods allow weapons that have them to shock enemies that are nearby the enemies that has been shot at, much like the Plasma Coil and Plasma Storm.

Tabora Vendor

  • Chopper/Multi-Star Acid Mod (2 Platinum Bolts)
  • Pulse Rifle/Vaporizer Shock Mod (2 Platinum Bolts)
  • Blitz Gun/Blitz Cannon Acid Mod (2 Platinum Bolts)
  • Minircket Tube/Megarocket Cannon Acid Mod (2 Platinum Bolts)
  • Lancer/Heavy Lancer Lock On Mod (3 Platinum Bolts)
  • Bouncer/Heavy Bouncer Lock On Mod (1 Platinum Bolt)
  • Miniturret Glove/Megaturret Glove Shock Mod (2 Platinum Bolts)

Endako Vendor

  • Chopper/Multi-Star Lock On Mod (1 Platinum Bolt)
  • Seeker Gun/HK22 Gun Shock Mod (2 Platinum Bolts)
  • Seeker Gun/HK22 Gun Lock On Mod (1 Platinum Bolt)
  • Blitz Gun/Blitz Cannon Lock On Mod (1 Platinum Bolt)
  • Lancer/Heavy Lancer Shock Mod (2 Platinum Bolts)
  • Gravity Bomb/Mini-Nuke Acid Mod (2 Platinum Bolts)
  • Gravity Bomb/Mini-Nuke Lock On Mod (1 Platinum Bolt)

Boldan Vendor

  • Hoverbomb Gun/Tetrabomb Gun Acid Mod (3 Platinum Bolts)
  • Hoverbomb Gun/Tetrabomb Gun Lock On Mod (1 Platinum Bolt)
  • Minirocket Tube/Megarocket Cannon Lock On Mod (2 Platinum Bolts)
  • Plasma Coil/Plasma Storm Acid Mod (2 Platinum Bolts)
  • Plasma Coil/Plasma Storm Lock On Mod (1 Platinum Bolt)
  • Lava Gun/Meteor Gun Acid Mod (2 Platinum Bolts)
  • Lava Gun/Meteor Gun Lock On Mod (1 Platinum Bolt)
  • Bouncer/Heavy Bouncer Acid Mod (3 Platinum Bolts)
  • Spiderbot Glove/Tankbot Glove Acid Mod (2 Platinum Bolts)

There is also a Lock On Mod for the R.Y.N.O II, which you can buy at the Gadgetron Store in Barlow. You can buy this at any of the three weapon mod vendors.

Also, for some reason, you can buy all of the mods from the Endako vendor on Tabora, and vice versa, which threw me for a loop.

Controls:


As Ratchet:

Control Pad/Left Analog Stick: move
Right analog stick: move camera

X:
  • Jump and double jump (hold button after double jump to use Heli-Pack or Thruster Pack)
  • Wall jump (near certain walls)
Square: strike with wrench
Circle: pull out/shoot currently equipped gun
Triangle: 
  • quick select (hold and use in conjunction with Control Pad or left stick to switch guns; menu can be customized in Quick Select on the pause menu
  • double tap to switch between two most recently equipped weapons/items
  • interrupt on-screen messages

Select: open map
Start: Pause menu
  • Control Pad: select option
  • X: confirm option choice

L1:
  • center camera behind Ratchet (tap button to center)
  • first-person view (hold button and use left stick or D-Pad to look around; let go of L1 to move camera back behind Ratchet)
  • Square: wrench boomerang
  • Circle: fire gun
  • R1/R2: zoom in and out (Pulse Rifle only)
L2/R2: strafe (hold while moving)
L3: see health and Bolt totals
R1/R2: crouch (hold down)
  • Square: wrench boomerang
  • X: high jump
    • long jump (hold crouch button and jump while running to perform)
R3: open map

In water:
  • Square: dive and descend
  • X: surface and ascend
  • R1: accelerate with Hydro-Pack

As Clank:

Control Pad/Left Analog Stick: move
Right analog stick: move camera

When hanging off platforms:
  • Control Pad/Left Analog Stick: move
  • Forward+X: vault up
  • Back+X: drop down

Square: punch
X: Jump (press and hold in the middle of a jump to glide with Heli-Pack)
Triangle: command menu (hold and use in conjunction with Control Pad or left analog stick to choose commands)

Wednesday, June 5, 2024

DeceasedCrab plays Earthbound - Part 53 of 53


And now, the game ends. What a journey.


In this video, we visit Dalaam before heading to Onett.

Poo will be in the throne room in Dalaam, where he will ask you to stay for a little while.

Frank will be working in the Burger Shop in Onett if you head there.

Back at Pokey's house, Picky will have different dialogue, and Pokey and Picky's mom will have another man in Mr. Prettyman.

Liar X. Aggerate will be underground, pretending that he too has saved the world before.

The woman at the library counter will give you a kiss if you return the Shyness Book at the library.

The game ends when you talk to Ness' mom and say "Yes" when she asks if you've done everything you wanted to do. Ness walks in place like an NPC, and you'll see his family one last time before you see the cast of characters, the credits roll and you see the pictures from the photo album made possible by the photographer.

After the credits, there is another knock on the door late at night. You'll have control of Ness again. If you answer the door, Picky will show up with a letter from Pokey addressed to Ness, daring Ness to come get him. With this, the game ends. You've just beaten Earthbound!

Sunday, November 12, 2023

Jerry Martin plays Strong Bad's Cool Game For Attractive People - Part 53 of 53


There's not much left to do, and once we do it, we bring the fifth episode - and the game - to a close.


If you keep going to the Cool Car and shooting that Redcoat ghost, you can keep getting 100 points for each time you do it. When you get 800 points, you'll get an in-game achievement for it.

Back at the House of Strong, you can play Gel-Arshie's Fruitboarder on the Fun Machine. If you can score 20,000 points or more on the game, you'll get an in-game achievement for it. You have the CTRL button to jump, and the arrow keys will help perform stunts when pressed in certain combinations. Each trick will have a bonus mulitplier tied to it, and you can find out more here. Your main goal is to pull off tricks, grab all the fruit, and avoid the pineapple slices.

If you pull off 100% of everything you can do in the final episode, you'll get the Strong Bad Shirt for the photo booth automatically.

This brings the fifth and last episode - and the entire game - to a close! Thanks for reading!

GOOD GRAPHICKETEERS CARDS:
- Carpal Tunnel Connie: Examine Strong Sad's bookcase.
- Trick Card 1: Use Gel-Arshie on Strong Bad's mailbox.
- Trick Card 2: Take a picture of the ghost to the left of the photo booth.
- Anti-Social Angus: Underneath the box in Peasantry Inn.

PARTY MEMBERS:
- The Algebros: Talk to The Algebros on the brick wall.
- Snake Boxer: Talk to the Snake Boxer in the Crates area and talk to him.
- Performing Bear: Click on the Space Circus Catastrophe game in the Mainframe.
- Gel-Arshie: Get the killscreen in Gel-Arshie's Fruitboarder.
- Innkeeper: Talk to the Innkeeper about repairing Limozeen's Spaceship.
- Mista Fixit: Use ??? on the bucket in the Crates area.
- Limozeen: Use the Innkeeper on Limozeen's Spaceship.
- Strong Mad: Grab the trophy and use it on Strong Mad.
- Rather Dashing: Use Scorpion Bait on Strong Sad and talk to Rather Dashing.
- Peasants: Obtained when heading towards Trogdor's Cave.

OUTFITS:
- EGA Hat: Smash the crate near Bubs with Snake Boxer.
- Stinkoman Boots: Take a picture of the ghost in the Strong House bathroom.
- Stinkoman Gloves: Use Gel-Arshie on Bubs' Concession Stand.
- Trogdor Shirt: Line up Trogdor with Cottage on the code wheel and use Gel-Arshie on it. (You need to do this before going to Peasant's Quest.)
- Elf Boots: Underneath the box in Peasantry Forest.
- Mista Fixit: Use Mista Fixit on the Cool Car.
- Stinkoman Hair: Use Mista Fixit on the leftmost broken ladder in Stinkoman 20X6.
NEW! Strong Bad Shirt: Automatically given to you when you get 100%.

GAME BOXES:
- Halfathon Box: After obtaining the Light Musket, return and destroy the crate again.
- Lady Crate Ape Box: Underneath then box in Strong Bad's front yard.
- Fruitboarder Box: Use Gel-Arshie on the Brick Wall.
- Spirits of '76: Take a picture of the ghost to the left of the scorpion cave in Peasantry.

GHOSTS TO FREE:
- John Hancock: Give the feather quill to him in Strong Mad's Room.
- Samuel Adams: Give the tea bag to him near the stairs leading to the basement.
- Paul Revere: Give the lantern to him in the TV Room.
- Benjamin Franklin: Give the key to him in the computer room.
- ???: In the picture in the right side of the TV room.
- ???: In the picture in the bathroom near the tub.
- ???: In the picture near the left side of the photo booth.
- ???: In the picture in Peasantry Forest, left of the cave.

CHEAT COMMANDOS FIGURINES:
- Swampslash: Take a picture of the ghost in the TV Room.
- Dryghost: Use the Quest Item on the Munchox before using the Scorpion Food.
- Subtlefuge: Use Gel-Arshie on the lava pool in Halfathlon.
- Fudgeclank: Use the Peasants on the Mysterious Bush. (Extended Play)

PEASANTS BURNED:
- Use the Innkeeper on Limozeen's Spaceship.
- Use the Peasants on Ultimate Trogdor.
- Use the Peasants on the top-left pedestal.
- Use the Peasants on the bottom-left pedestal.
- Use the Peasants on the bottom-right pedestal
- Use the Peasants on the top-right pedestal.

- Score over 10,000 points on Trogdor's 3D-Ungeon.
NEW! Score 800 points killing escaped Redcoats
NEW! Score 20,000 points or more on Gel-Arshie's Fruitboarder

Thursday, November 11, 2021

HCBailly plays Final Fantasy II AGAIN - Part 53 of 65


Finding out what is causing this cyclone is not going to be easy...


The Lamias are Rank 6 enemies and are weaker than the Queen Lamia from earlier in the game, but they can still Confuse you. Powering your party up with Bsrk against the Lamia is a good strategy, since they attack somewhat like the VmpGirls as they can Charm and Confuse you.

The W. Golems (Wood Golems) are Rank 7, and they are pretty tough unless you increase your party members' offense, as their defense is pretty high, even though he is weak to Fire. The Corpses (known as Bodyguards in later versions) are actually not undead enemies. If you've powered up Bsrk enough, you can kill a Golem in one hit with it, which makes it easier than killing it with Blaze.

The Guards are Rank 6, and they can Envenom you with their physical attacks.

Eyemoebas are Rank 6, and they can Envenom you with their physical attacks, much like the Guards. They are also strong against all status ailments.

The Defender Sword increases your Evasion by 8%, which is really nice if you have somebody mastering Swords.

A General is in the chest with the Diamond Armor. He can be pretty tough due to a 10x hit multiplier and a high attack power, but if you've powered up Toad and/or Mini, you have a good chance of taking him out in one hit. If not, Curse him and cast Osmose, and cast Protect on your party. The General also has some potential item drops, such as Dragon Mail, which is a heavier version of the BlackRobe, as well as the Rune Axe, which is the most powerful ax weapon in the game. There are also some Diamond item drops, but the first two are the ones to go for.

Thursday, May 23, 2019

HCBailly plays Final Fantasy IV (Super Famicom) - Part 53 of 70


It's time for some sidequests!


Talk to King Jiott. With Golbez in possession of all eight Crystals, the only hope is the legend of the Magical Ship. According to King Jiott, it was a huge ship used long, long ago. There is the legend of "one born from the mouth of a dragon," Cecil recognizes this as the Mysidian Legend, and regards the town of Mysidia. Jiott finally learns that Mysidia actually exists above ground, and Cecil mentions the village elder praying for his sacred light. Jiott and Cecil both realize that the elder of Mysidia is trying to bring back the magic ship, and Cecil now has to head back to Mysidia.

With all possible paths back to the surface gone, Cid shows up and announces that he has attached a drill to the nose to the Falcon to get back to the overworld. During a cutscene where the drill is attached to the airship - and Edge tries to hit on Rydia before Cid and Edge argue - Cid collapses. At the medical room, Cid mentions that he cannot fight with the party. Nevertheless, you'll be able to make it back to the surface.

Teleport out of the castle and get on the Falcon, then head to the hole where you entered. You'll be back in the surface world.


From here, head back to the Enterprise, take the Hovercraft and head back to Silvera. To the southeast is the Adamant Cave. Head over there.

Adamant Cave


Talk to the guy in red. He will tell you that his father loves mining down here and that he also loves collecting animal tails. Talk to the guy in blue and give him the Rat Tail. In return, you'll get some Adamant.

From here, go back underground and head back to Blacksmith Kukuro's home in the southeast corner of the underworld.

Blacksmith Kukuro's Home


Talk to Kukuro in the upstairs bedroom and give him the Adamant. He will take the Legendary Sword and forge it. You will have to come back later to get your new sword.

Head back to Mysidia.

Mysidia


When you enter the town, you'll automatically head back to the Tower of Prayer after talking with the Elder. You'll see the Mysidian Legend, then you'll be at the tower where the elder and some wizards pray for the light to summon the magic ship. A whirlpool will form in the sea near Mysidia, and the Magical Ship will rise from the depths.

The Elder will then tell you that a voice came to him, and that is is asking Cecil to come to moon as it has so much to tell Cecil about himself as well as his father. He also mentions that the Magical Ship is a vessel to the moon, and aside from a switch to control normal flight, there is also a Crystal of Flight that lets the ship go to the moon at will.

Before getting on the ship, there are still things we can do. Head to Fabul and talk to Yang's wife.

Fabul


Find Yang's wife and talk to her. When she finds out that Yang is unconscious in the Cave of Sylphs, he hands you the Frying Pan of Love and to hit him with it to wake him up. 

Tuesday, June 12, 2018

HCBailly plays Terranigma - Part 53 of 75


We check out the expanded Litz before heading to Loire to expand the town again.

World map by Tropicon. Litz and Loire maps by Amir Azadur.


Let's head to Litz again!

Litz


This place is a little different from before the expansion...which is the only one that the town has.

The hospital is near the original entrance, and when you enter, you'll see that the inside looks a lot nicer. If you talk to the doctor, he'll tell you he got more patients when the town expanded.

You'll learn that the church has stained glass and that it is one of Litz's specialties along with tinned sardines if you talk to the townspeople.

At the upper-right corner of the town is the inn. If you enter the room to the right, you can eat some sardines.

The upper-left most house next to the church houses a sailor who spoke with Columbus, and learned about the village of Storkolm in Norfest (one can assume).

Believe it or not, you can walk to the west past all the northern-most buildings to get Magirock #71.

The church is near where you got the Magirock, and can be distinguished from the rest of the town by its stained glass windows. You'll learn that the chuch has gotten bigger thanks to the town expansion. If you go into the room to the left, you'll also learn that Litz has invented compulsory education.

Further to the west of the church is another house. This is the Crafts building. Pick up the gray pots and toss them out of the way to get Magirock #72, then go to the room in the lower left. You'll find out that the guy making all these pots now has apprentices thanks to the town expansion.

You'll also see a coffee booth. For ten Gems, you can try some coffee.

The Cannery is in the house to the west of the hospital. Thanks to you and the town expansion, business is booming and the guy selling the sardines is now enlisting his neighbors' help to keep up with all the orders. Keinz will also be standing near the door here.

There's also an exit out of the town to the south.

From here, head to Loire and talk to the four people in the town who gave you items and asked you to take them around the world - Matis, Marilly, Pierre and the bartender at the winery. Once you do, leave the town, go to another region, come back, and Loire will be expanded for a second and final time.

Loire


Loire has changed...big time.

Pierre's house is the right door on the left building to the west of the entrance. Pierre has now had to employ people to keep up with work orders as his cameras are now available around the world.

To the left of Pierre's house is Matis' studio. When you talk to him, he says he now works like a machine for money chased by time and doesn't seem to like fame anymore as he is no longer painting what he wants to paint.

To the east of the entrance is the inn.

To the north is another screen...and more homes and businesses! The door below the man on the balcony is an apartment house, and the door to the right is for a vacant apartment. To get it, you'll have to inquire within at Loire Realty.

Loire Realty is to the building to the right of the apartment. Just enter the door on the right and talk to the guy at the counter, and tell him you want an apartment. If you have 800 Gems, an apartment is yours and you'll get the Apartment Key. You'll be able to enter the room.

The door to the left of Loire Realty is the furniture store. Here, you can buy furniture for your new apartment (which you must have in order to buy anything here). Just interact anything and you'll see how much it costs, and then you can decide whether or not you want to buy it. Everything is 100 Gems, and when you buy anything, it'll go directly to the apartment you just got. From there, you can enter your own apartment. If you have the table, you can save your game in the apartment, and if you have the bed, you can sleep here, too.

Saturday, March 10, 2018

skorch82 plays Brave Fencer Musashi - Part 53 of 70


Why.

When you talk to the storekeepers, you'll find out that the Princess has stolen all their money from them as she escaped.

Head back to the castle and talk to Steward Ribson. Not only will Steward Ribson find out what's going on, but you'll also find out form him that you can take the gondola as it is now fixed. You can now select it when you're outside the castle to go straight to the village.

When you return to the village, you'll find out that steam is traveling around in the air again. Climb up and take the shorcut to Steamwood. Fores is down. Talk to him and he'll give you Handle #0 and tell you he locked the Princess in Steamwood. She ordered him to take her to Steamwood, then beat him up. In revenge, he locked her in. Now Steamwood's gone berserk, and as soon as you stop taking to him, you have a 24-hour timer.

In case you didn't get that last part: YOU HAVE TO DO THIS AGAIN. It's the same pressure gauge as last time, so if you remember how you did it here, you'll be able to do it again the second time around.

When you go in, you'll see the Princess talking to herself. Her voice is clearly different. When Musashi confronts her, he finds out she has a tail and pulls on it. It's Topo from Leader's Force of the Thirstquencher Empire, who was behind this all along. She teleports out, leaving a bag. Inside is the profits from the village shops.

This time around, you'll have to look around the place for some of the handles in addition to turning off the valves. After all, Valves 1, 4 and 8 are missing, and how are you going to turn the valves off if the handles aren't there?!? At least the geography of the place as well as the location of all eight valves hasn't changed.

Saturday, February 25, 2017

Chilean Retrogamer plays Wario Land 2 - Part 53 of 57


Thank you, game. Thank you for the very useful advice. YOU MIGHT AS WELL TELL ME COWS GO MOO.

Final Chapter: Uncanny Mansion

Story 4: Coming back is difficult


0:07 - There's not much you can do aside from getting some coins. The door to the next room is in the sunlight on the other side of the room.

0:34 - There's some more coins you can get around here before entering the door not far from where you came in.

1:11 - More coins, as well as the door to the next area on the other side of the room.

1:34 - The door at the lower-right leads to the next area.

1:53 - A switch! Trigger it, get the coins, then go back out.

2:00 - Aside from the blocks switching positions, this room is dark in the lower portion and there are now enemies everywhere. Now it's time to go backwards.

2:44 - Other than pelicans, there's not much else...save for another door that you can now reach near the left end. Enter it.

3:06 - Break the dresser in the upper-right corner and let the ghost turn you into Zombie Wario so you can continue. That way, you can get the coins in this room.

3:33 - Now to break the enemy blocks, get some more coins and head back to the left side of the room.

4:32 - You'll now be able to enter the treasure room in the lower portion of this room and win a bottle of wine. Just avoid the ghosts as you make your way back to the door near the upper-left corner.

5:59 - The exit is at the beginning. Take the time to go up and get the last of the coins, and avoid the ghosts as you do so.

7:33 - One more to go...

Tuesday, December 10, 2013

brickroadbrickroad and SovanJedi play Secret of Evermore - Part 53 of 88


"Nope! We're not! Derpity derp!"

All maps by Grizzly, except for the Underground Maze map by yoji00.
Alright, let's get out of here.

Pyramid


Now that we're out of the cave, let's follow the path that used to be a river to the west. Keep on going, and you'll be underneath the makeshift bridges in Horace's camp. Keep going north and you'll find a hole. Drop down.

Underground Maze


You'll mostly be fighting