Showing posts with label part 55. Show all posts

Wednesday, March 11, 2026

PrinceWatercress plays Super Mario Odyssey - Part 55 of 92


Our Power Moon collection in the Mushroom Kingdom continues...


In the 8-bit area inside the well, you'll need to stay in the black area to stay in 2D; otherwise, you'll turn back to 3D and fall down a bottomless pit. For the flag stair blocks, you'll need to hold the run button to speed over the gaps. As for the final part of all that, don't hold the run button while jumping to give yourself an easier time. You'll then enter rotating 2D areas, and you'll need to rotate the left stick in order to keep up with it and not revert back to 3D while avoiding the Black Fuzzys. The area you need to get to is an upside-down pipe; this takes you to one final section that will take you to a Power Moon. 

Power Moons


2. Pops Out of the Tail - There is a tree near the Odyssey with a branch that looks like the tail on Raccoon Mario from Super Mario Bros. 3. Throw your hat at the branch and hold the button down for a Power Moon.

4. Gardening for Toad: Garden Seed - Bring this seed to the pots in the garden and get the Power Moon when it matures.

5. Gardening for Toad: Field Seed - Bring this seed to the pots in the garden and get the Power Moon when it matures.

9. Mushroom Kingdom Timer Challenge - Northeast of the castle is a scarecrow. Throw your hat at the scarecrow, then get on the nearby scooter and get the Power Moon before time runs out. You'll want to keep the scooter within a hat toss' reach of the scarecrow for best results.

31. Secret 2D Treasure - You'll need to get through the entire 8-bit area inside the well in one shot to get this Power Moon.

32. 2D Boost from Bullet Bill - In the 8-bit area inside the well, you'll need to jump off a Bullet Bill to get a Power Moon. 

23. Picture Match: Basically Mario - Northeast of the castle (or near the brown dirt area, or near the Toad with the tent who tells you that Captain Toad is at the Crazy Cap Store, depending on which is easier to remember), there is a Mini Rocket. Throw your hat at it to teleport yourself to a picture match puzzle where you have to recreate a picture of Mario. You'll have to score at least 60 points to get this Power Moon. Keep in mind that when you place something on the picture, it disappears.

24. Picture Match: A Stellar Mario! - Once you get Power Moon #23, you can get this Power Moon. This time, you need no less than 80 points, and this time, you'll have only the base outline for Mario to work with and nothing else. I had to draw on my TV screen with a Sharpie much like NintendoCapriSun did just to make this one easier, then wash it off with water (thankfully, it came off).

Regional Coins


Wednesday, October 23, 2024

PrinceWatercress plays Chrono Trigger (Super NES) - Part 55 of 70


It's time to fight Lavos! Here's everything you need to know.

Also, I forgot to get the Gold Rock! I'll get it in the New Game Plus videos!


Since there's nothing else to do in the game, it's time to fight Lavos.

When you enter Lavos' shell (or crash into Lavos with Epoch), you'll soon face the alien inside of Lavos, which is connected to a bunch of tubes inside the chamber inside the shell.

First things first: during these battles, be ready to heal yourself and the party at a moment's notice. Lavos hits hard during this set of fights that make up the final battle, so come in with plenty of big-time healing items such as Full Tonics, HyperEthers, Elixirs and MegaElixirs. Also, change your accessories to stuff that can give you an edge, such as a Gold Stud, a FrenzyBand or the PrismSpecs.

You have the body, the left arm and the right arm to deal with. You'll want to deal with the arms first before they can do some really nasty things, as they can attack with crescent-shaped projectiles and revive the body as well as inflict Stop on the party. They can also cast Protective Seal, which voids any and all immunities to status ailments, negating even the effects of the Prism Helms, Magus' Amulet and the Nova Armor can't save you from status ailments.

The left hand (which is on the right) has more HP than the one on the right (which is on the left). The left has 12,000 HP, while the right has 8,000 HP. If you want to take out Lavos without having to worry about getting hit with Protective Seal, work on the hand on the right side of the screen first until it's down at least 4000, then take both arms out with multi-target at the same time. If you're quick enough, you can easily take them down before things get worse.

As for the body, its defense will drop when the arms are gone. When both arms are around, Lavos can use the arms to open up its body for the Laser Beams of Doom, which damages all party members. Obstacle can cast Chaos on anyone unprotected from status ailments, while Shadow Slay will cast Poison. Flame Battle is just a weak fire blast that hits one party member. Shadow Doom Blaze is the last attack Lavos' body will cast before it cycles back to After that, Lavos will cast Evil Emanation, which silently causes its attack to go up. The longer the battle goes, the worse it will get. 

Once you defeat the body, you're not done yet. Another alien being will stand where the body of Lavos used to be and produce two pods. This is the Lavos Core, and this is the absolute final battle.

The left pod should be your first target. It has 2000 HP, and can take all physical attacks but absorb all magic attacks. Ayla's Triple Kick and Crono's Confuse, among powerful regular physical attacks, will definitely have a hand in destroying this thing. You'll want to do that, as it can attack any target it wants to, absorb MP from a single target, and cast Protective Seal on one party member in addition to healing the center pod. Once it is destroyed, the right pod's defense will go down.

The pod on the right is the true target and the one you must destroy to win the battle. Unlike the left pod, magic can actually damage it. The right pod is responsible for Time Warp (which changes the scenery in the background and hits everyone for 1 HP), lowering its own defense (which hits everyone for 2 HP) in addition to raising it back up, reviving the left and center pods (which hits everyone for 10 HP), and casting "Active Bit." If you see the message for Active Bit, the party's defense will be lowered. It's much like Evil Emanation, but instead of Lavos getting stronger, you're getting weaker. Once again, the longer this goes, the worse it gets.

When the right pod lowers its defense, this is when you want to attack it. If you attack it while its defense is up and all three parts are alive, the left and right pods will hit you with X Strike.

It should also be mentioned that if all three pods are around, you'll get hit with Invading Light, which inflicts Slow on the party (very bad if Protective Seal has hit someone). 

However, you also want to destroy the center pod, which is the alien with the arms and legs. Aside from smacking one party member like a ton of bricks, it can also cast random status ailments by singing (which is bad if someone's been hit with Protective Seal), Evil Star (which cuts the party's HP by half), Grand Stone (which is Lavos' ultimate physical attack), Crying Heavens (a lightning strike that hits one person for a lot of damage) and Dreamless (the ultimate magical attack).

Believe it or not, the attack you get depends on what the scenery is in the time warp. 65,000,000 B.C. (the Hunting Range) allows for Grand Stone, 12,000 B.C. (the Mammon Machine) allows for Invading Light if all three parts of the Lavos Core are alive, 600 A.D. (Magus' Castle) allows for Evil Star, 1000 A.D. (Leene Square) allows for Spell and the randomly inflicted status effects, and 2300 A.D. (city ruins) allows for Dreamless. Crying Heavens and the slap can hit whenever.

When you destroy the right pod, the battle is over, and you'll save Earth from an omnipotent threat that threatened the past, present and future. If the left and center pods are there when the right pod is defeated, they will be defeated, too.

In the ending, you'll be woken up by a soldier from Guardia Castle, who tells Crono that his stay of execution is over (despite being put on probation when you talked to the King before the whole Rainbow Shell side-quest). When Crono finally meets King Guardia, who considers what to do with Crono even as Marle shows up and protests, King Guardia reveals he knows what has been going on the entire game and thanks you for saving humanity's future. Kino, King Guardia XXI and Doan appear to also thank you, and you'll find out that these people are Marle's ancestors and descendants. (If you see the FMV epilogue on PlayStation and beyond, you'll find out that Ayla put a ring on Kino, which makes her an ancestor as well.) King Guardia XXXIII dedicates the Moonlight Parade on the final night of the Millennial Fair to Crono's victory.

You'll then be at Leene Square at night. A Blue Imp will walk around the square with a cat, while young girls will blow you kisses and dance around while festive music plays. You can talk to everyone from Truce Village if you like, but you'll need to get to the Telepod on the north end. If you saved Lara from the machine in the Sunken Desert sidequest, she will be here; if you rescued the real, present-day Chancellor with the Yakra Key in the Rainbow Shell sidequest, he will be there, too.

The screen before the Telepod has dead ends on both the west and east ends, so all you can do there is head to the Telepod.

When you head to the Telepod, everyone will say their goodbyes. Ayla will leave with Kino after hinting that she is now in a relationship with him and telling everyone that she had fun, Frog leaves with King Guardia XXI after getting a kiss from Marle, Magus leaves without saying a word to search for Schala (if he's spared after the escape from the Blackbird), and Robo leaves with Doan to an unknown but bright future.

If Magus was defeated after the escape from the Blackbird, Frog will no longer be a frog and will be back in human form as Glenn. If Glenn is still a frog in the ending with Epoch, you'll see him with the King, Queen Leene and some soldiers on Zenan Bridge where Frog notices Epoch; if he is human, you'll see the creation of the Guardia Castle prison in 600 A.D. with Glenn watching from an outside walkway.

Afterwards, it's just Crono, Lucca and Marle. The next part depends on whether or not Epoch is in one piece. If you didn't use Epoch to ram into Lavos' shell to fight Lavos' body and core, Crono's mom will show up and chase the cats into the Telepod Gate, and the gang will have to fly Epoch to find her. If you rammed Epoch into Lavos in 1999 A.D., this does not occur.

Afterwards, you'll be met by a soldier, who tells Marle that her father is looking for her. Go back to the previous screen to talk to the King, and Leene's bell will be replaced by a silver bell known as Nadia's bell. As The King helps raise it up, he gets stuck hanging onto the bell and cannot get down. If you got Crono's mom to show up, the gang leaves The King hanging to man Epoch and find Crono's mom. If she didn't show up, Marle tries to help her father, but gets carried away by the balloons. Crono jumps up to grab her, but he gets carried away with Marle. Regardless of what happens, Taban shows up and fires off some fireworks. From there, you'll either see Epoch (if Epoch survived) or Crono and Marle on the ballons (if Epoch didn't) in Mode 7 during the ending as the credits roll.

Friday, November 12, 2021

HCBailly plays Final Fantasy II AGAIN - Part 55 of 65


In this entry, we finally head to Palamecia.

Fynn


Go back to Paul's house. Paul will be there, but he will tell you that Cid tried to go through the Cyclone and that it didn't go very well. You'll find Cid near the bed. Talk to Cid. He'll go to bed and tell you to take care of the Airship before he finally kicks the bucket. If you talk to Paul again, he will tell you that Cid wanted you to have the Airship.

If you ask Paul about Palamecia, he will tell you that you can fly over there to get there, and that you'll need an Airship to get there.

Head back to Poft, but don't enter town. The Airship will be parked right outside. Commandeer it and head to Palamecia. It'll be the castle that's in the mountain, and it'll be northeast of the Arena. Park on the top of the tower on the right side of the castle and you'll automatically enter.

There are new enemies in the desert southwest of Palamecia. The Sandworm can cast Quake 10 and have 1200 HP, and are also Earth and Magic Beast-type enemies.

You can also meet Blades here. There is nothing extraordinary about them.

Palamecia


Enter the door to the north. Keep going north and you'll fall to the first floor. There. Now you're unstuck. You're welcome.

Friday, May 24, 2019

HCBailly plays Final Fantasy IV (Super Famicom) - Part 55 of 70


Our adventures on the mood leads us to new places, new enemies and even a new ally.


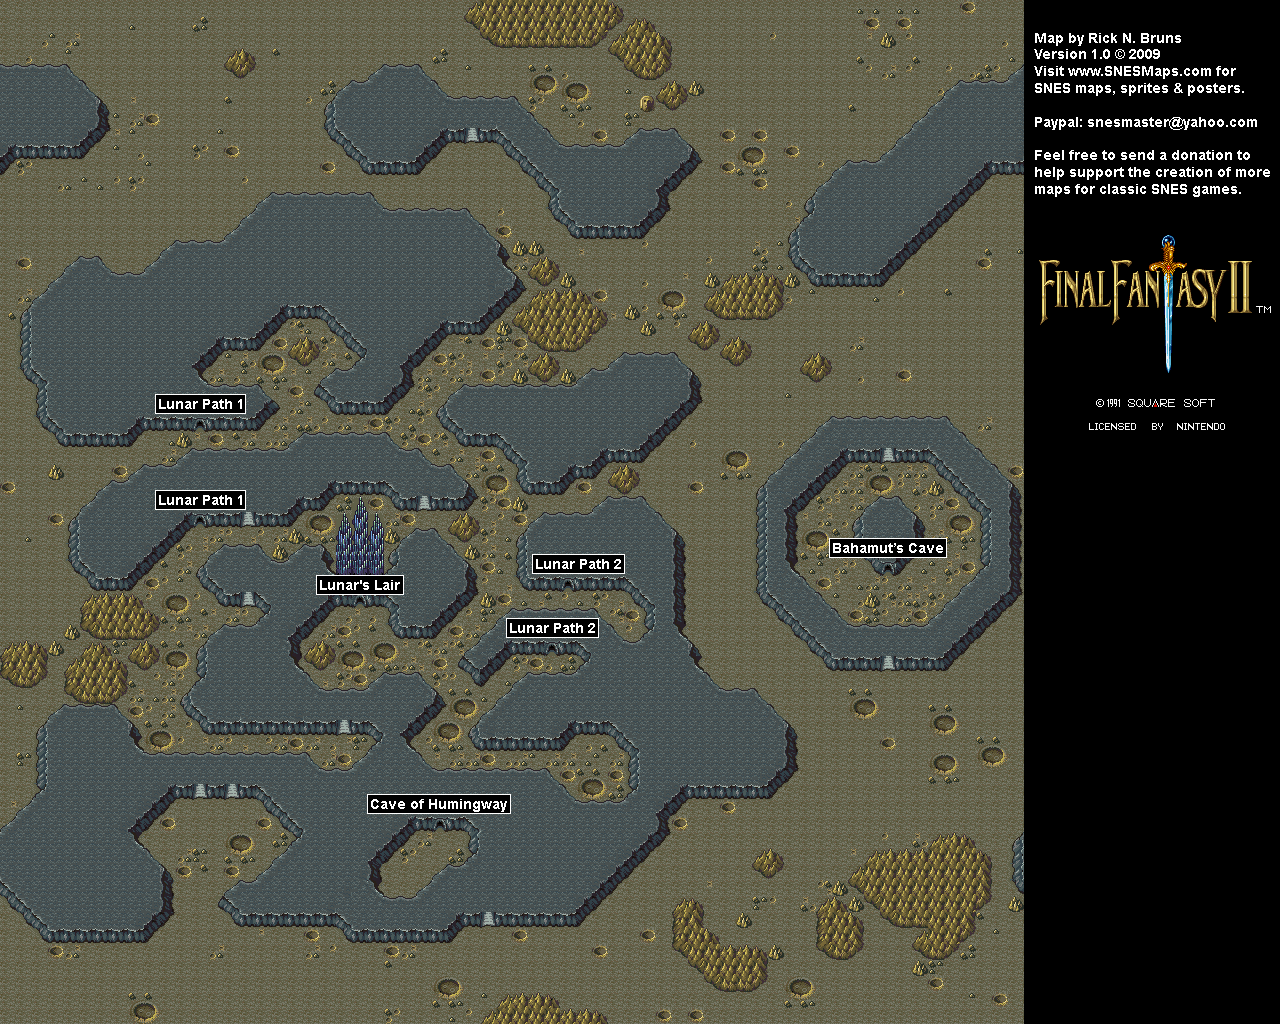
Just southwest of where you landed is an opening into the Lunar Underground Pass.

Lunar Underground Path/Lunar Corridors


The Procaryotes and Eucaryotes are run-of-the-mill enemies that have the potential to Poison you, but if you cast Quake on them with Rydia, you'll be able to beat them and get a Golden Apple.

The Abyss Worm is weak to Fire, and the Dark Grenade (Dk. Grenade) is another Bomb enemy that you can get the Bomb summon from. If you hit a Dark Grenade with a weak Bolt spell, the Dark Grenade will cast Chain Explosion, which allows it to take other surrounding enemies with it.

The Moon Curtain reflects magic for longer than the Light Curtain, and the Stardust is used to cast a weak version of Meteo.

The Luna Virus and the Puddings are vanilla enemies, though the Puddings have physical defense.

You'll be going in and out of the lunar surface world en route to the crystal palace, but the corridors look exactly the same. You'll eventually reach the crystal palace.

Home of the Lunarians/Mansion of the Lunarians


The tile to the far right of the entrance restores your MP, while the tile to the far left restores your HP and cures status ailment.

There is a hidden chest to the south of the HP/status ailment tile that contains two Demon Soldiers that love to cast Stone Gaze a whole lot. HCBailly doesn't even consider them important.

By approaching the altar in the center room, you will be welcomed by an old man named FuSoYa, guardian of the Lunarians. He explains that the Lunarians are people from a long-destroyed planet between the fourth and fifth planet of the solar system, and in their planet's final days, they built a ship and traveled to the main characters' world. They were forced to hibernate to survive, but when it was clear that the creatures of the third planet - also known as the Blue Planet - were still evolving, they created another moon and kept on sleeping. Unfortunately, one of the Lunarians refused to sleep and wanted to purge the third planet of all living beings so the Lunarians could settle there, even going so far as to create the Tower of Bab-il to give mankind the power to destroy itself. Even though FuSoYa forced him into a slumber, the man's mind was still awake, and his psychic powers were ever-increasing and became powerful enough to destroy living things. That man is now sealed below, and uses his powers to control those with a dark soul. That man is Zemus, and the man in his control is Golbez.

FuSoYa then explains that the Crystals are the Lunarians' source of energy, and Zemus used their power to operate the Dimensional Elevator in the Tower of Bab-il. With all eight Crystals gathered, the elevator will bring down mankind's doom: the Giant of Bab-il. Thankfully for us, the rest of the Lunarians did not share Zemus' beliefs, and wanted to wait until the people of the Blue Planet were advanced enough to be able to speak with them, in order to share their culture.

As for the Magical Ship, KluYa, FuSoYa's younger brother, made the ship to go to the Blue Planet. KluYa, having fallen in love with the planet, wanted to aid in its evolution, which in turn lead to the creation of the Devil Road, the handing down of the technology to build airships, and the founding of Mysidia, where the legends taught there would make the Lunarians' dream a reality. However, it was also on the Blue Planet that KluYa fell in love with a woman on the planet and had two children. One of them was Cecil, while the other one was Golbez, meaning that Golbez and Cecil are brothers.

Cecil then learns that the voice that he heard on Mt. Ordeals was that of KluYa's spirit, and FuSoYa notices the resemblance between Cecil and a young KluYa. He also learns that he has the power to stop Zemus, and that he must return to the Tower of Bab-il to stop the giant from being unleashed. FuSoYa then joins the party, having the ability to neutralize the barrier surrounding the tower (which explains why the tower is glowing at this point in the game).

FuSoYa has every White and Black spell in the game, though he only has 190 MP. He can also cast Meteo and Flare. Replace the Energy Staff with the Fairy Rod to boost his Wisdom to power up his Black Magic, and move him to the back row along with Rydia and Rosa.

Wednesday, June 13, 2018

HCBailly plays Terranigma - Part 55 of 75


We go deeper into the Great Lakes cave. What will we find...?

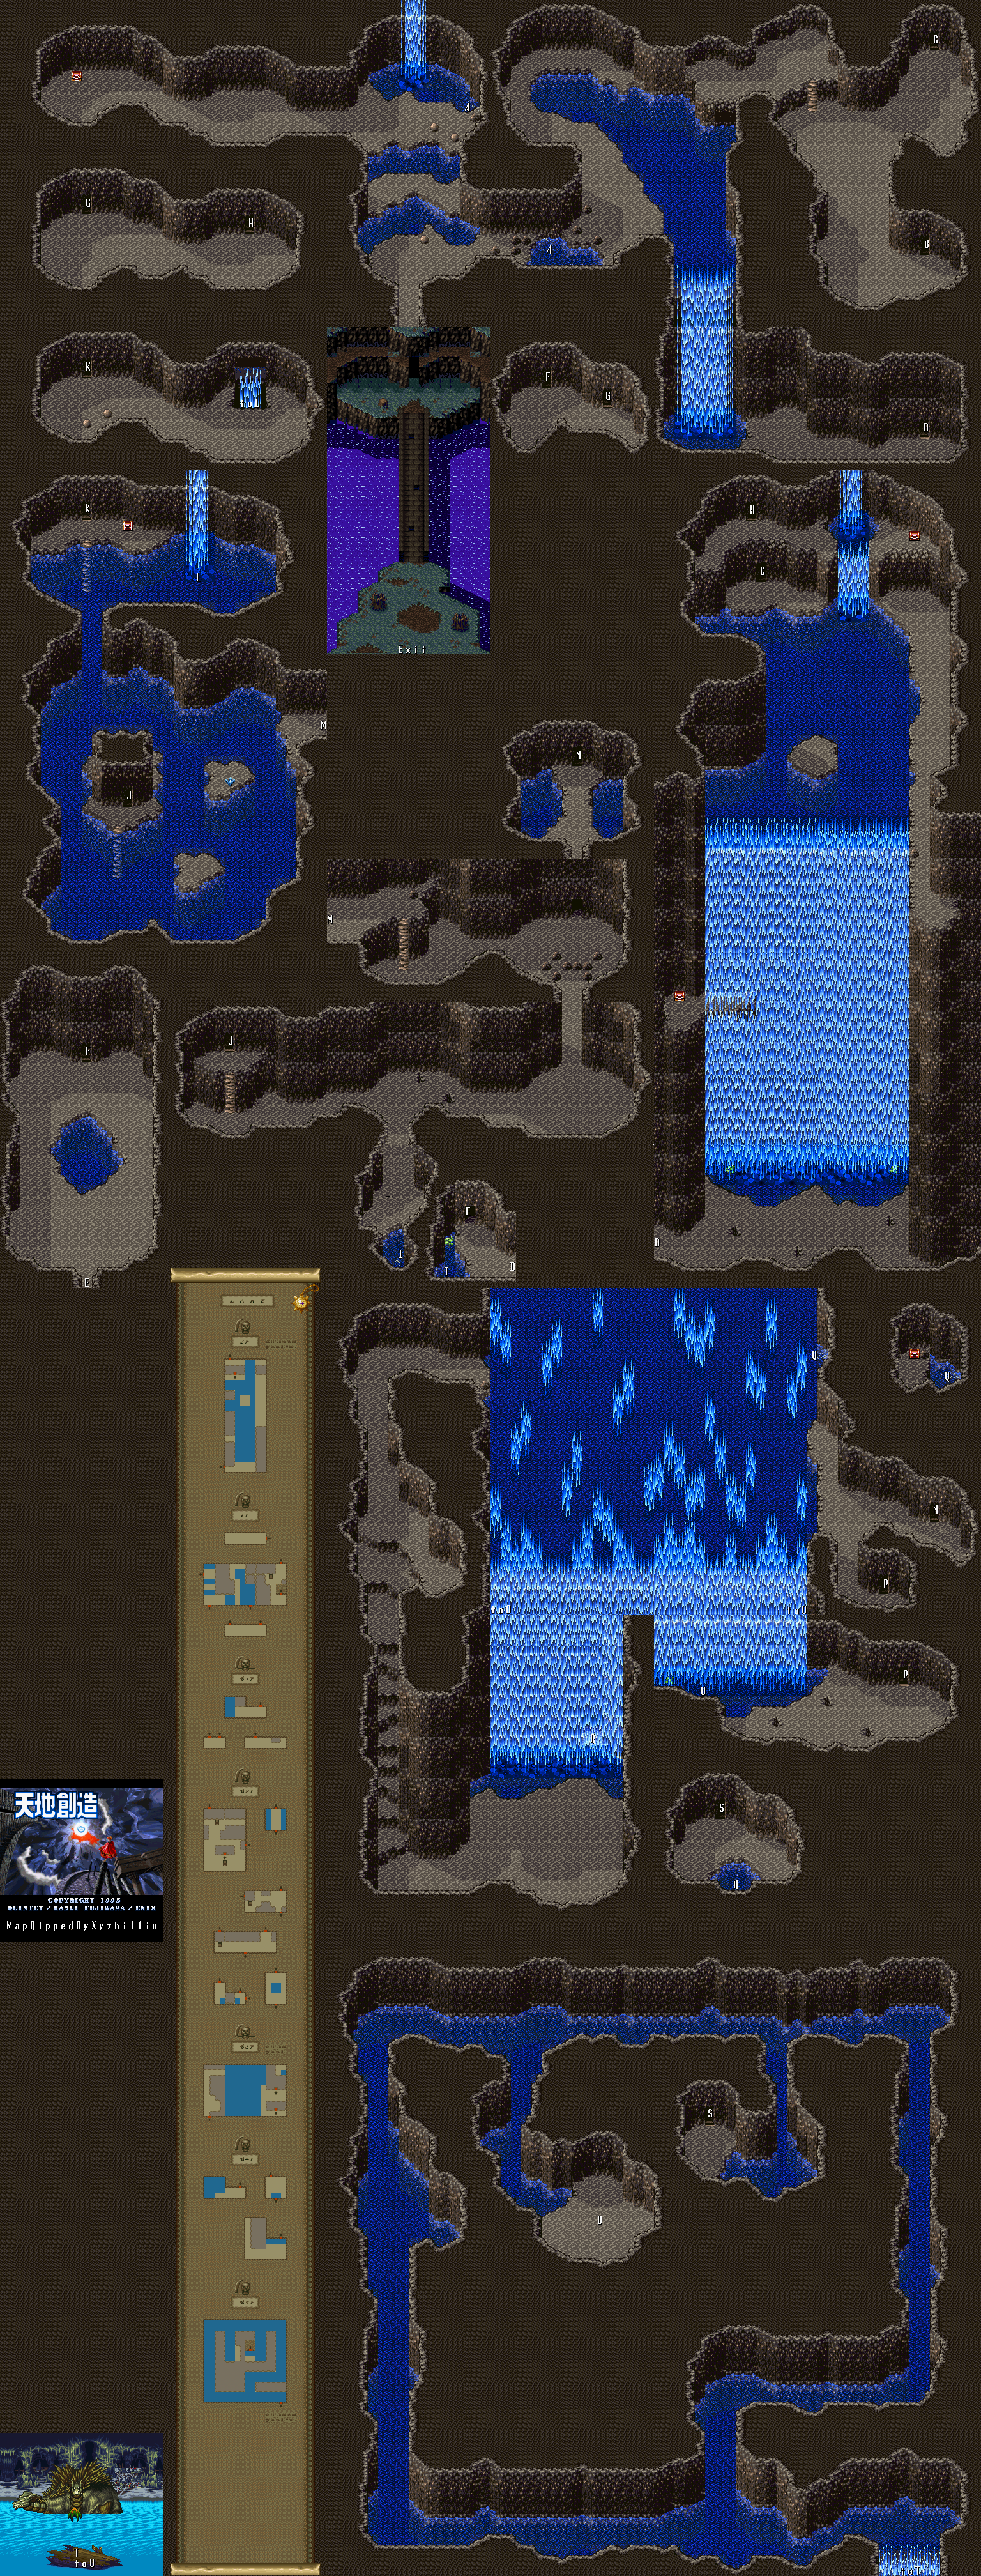
Great Lakes Cavern by xyzbilliu.

Great L.


The green balls with the purple tentacles are called Pupila. They fight just like the Mermaid Tower boss: just face away, then immediately turn towards them and hit them with the dashing attack when their eyes open. You can also use your jumping attack if you don't have a lot of room. You're better off just using that move anyway, since it's far more effective.

From the Pupila, go left and then enter the door first. Follow the path from here and you'll be able to get 753 Gems. Make sure not to fall off the ledge trying to get it!

Head back to the area left of the bottom of the waterfall and go through the underwater passage. Head to the left and go up the stairs here. You'll fight some more Doumas. There's a Magirock here, but we'll have to do some stuff in order to reach it. For now, head north and open the chest near the stairs to get the GeoStaff, which has Earth elemental properties.

Go up the stairs and head to the right. You'll see some water trickling from a wall. Throw a rock at the wall and you'll cause the water to shoot right out. Drop down from where the waterfall is, and you'll finally be able to get the Magirock - Magirock #73 - that we had to pass by earlier. 

The red status symbol is Confusion. Use a WindPin or leave the area to get rid of it.

From Magirock #73, head to the right and go into the opening in the wall. Follow the path again, and you'll be at another waterfall. Equip the Magic Anchor and use it to go north to find a secret passage to the right. This leads to a chest containing the Dragon Mail, which protects against Thunder. You won't be able to get this without the Magic Anchor, as the current here is pretty strong.

From the Dragon Mail chest, head to the west and go south. Go down the stairs and fight off all the monsters and go into the right side of the waterfall you see. Go into the door and swim your way to the lower-right corner of this maze.

You'll meet the Hitoderon. Fight off the starfish monsters with your dashing attack. If any starfish latch on, the Hitoderon will breathe fire at it to get it off of you. By killing the starfish, the Hitoderon - named Gossie - will give you the HornPin, which shields you from attacks and comes with 4 Magirocks, bringing you to 77 if you haven't missed any so far. Ark will then sense that Gossie wants to help him. You'll be back at the opposite end of where you entered the water maze from. 

You'll finally meet Will. Talk to him, and he'll thank you for rescuing him. He crashed into the Great Lakes on a test flight and was attacked by starfish until Gossie saved him. He then says that the Lake God - the one mentioned by a few people in Nirlake - really exists. He asks you to come with him so he can repay you.

You'll both end up back at Will's house in Nirlake. He needs to get the parts again, and the only way to get new parts is through the Lon Trade in Yunkou, who began buying up metal for the parts. Until the price of metal comes down, he's stuck. Looks like Yunkou is our next stop.

Sunday, March 11, 2018

skorch82 plays Brave Fencer Musashi - Part 55 of 70


So if you're trapped in a Bincho Field, how do you stay alive? Is it because of the Bincho? At least we know that the people trapped in the fields aren't stuck in suspended animation, but still...

Climb up the nearby wall with the L-Brace and you'll be able to get the Wind Scroll. This Scroll allows you to create cyclones, spin slash at enemies and dig holes in certain places.

Since you won't be able to go back down the way you came, use the Wind Scroll on the floor. You'll drop down to the floor...and fall unconscious before overhearing Bubbles and Gingerelle. When they try to take Lumina, Musashi wakes up and startles them. Bubbles accidentally shoots Musashi with a Bincho gun, and they teleport out when Bubbles threatens to tell on Gingerelle to Fuhrer Flatski. They have you captured, but since it's difficult for the Empire to break Bincho Fields, they don't even bother taking you to the Empire themselves. That's competence for you.

Press Triangle to break out when they leave. Your maximum BP will go up by 50. Now that Musashi is aware of the Thirstquencher Empire's desire for Lumina, it's time to continue on. Head south to leave. You'll be back in front of the entrance to the forest maze, so assimilate Hop from the nearby flower enemy to leap over the spikes.

When you head to the village, you'll find out that the music has changed.

Sunday, February 26, 2017

Chilean Retrogamer plays Wario Land 2 - Part 55 of 57


And now for the end of this crazy story...but we're not done yet.

Final Chapter: Uncanny Mansion

Final Story: Capture the ghost!

(continued)

To beat the ghost, simply jump up and tackle it when it's made its way down...and don't let it grab you unless you want to start the battle over. The ghost gets faster with every hit, but it's still a (mostly) easy battle.

The puzzle piece here will be the last, and the picture was...a treasure map! The map leads to Captain Syrup's treasure trove, which is now ripe for the taking for Wario.

Wario tackles Captain Syrup and her goons, but falls into a trap door before he can get his treasure. He falls down a pit, then we find out it was a dream the whole time.

Wednesday, December 11, 2013

brickroadbrickroad and SovanJedi play Secret of Evermore - Part 55 of 88


Hedgehogs in knight helmets. Greatest. Idea. Ever. I want one. Nao.

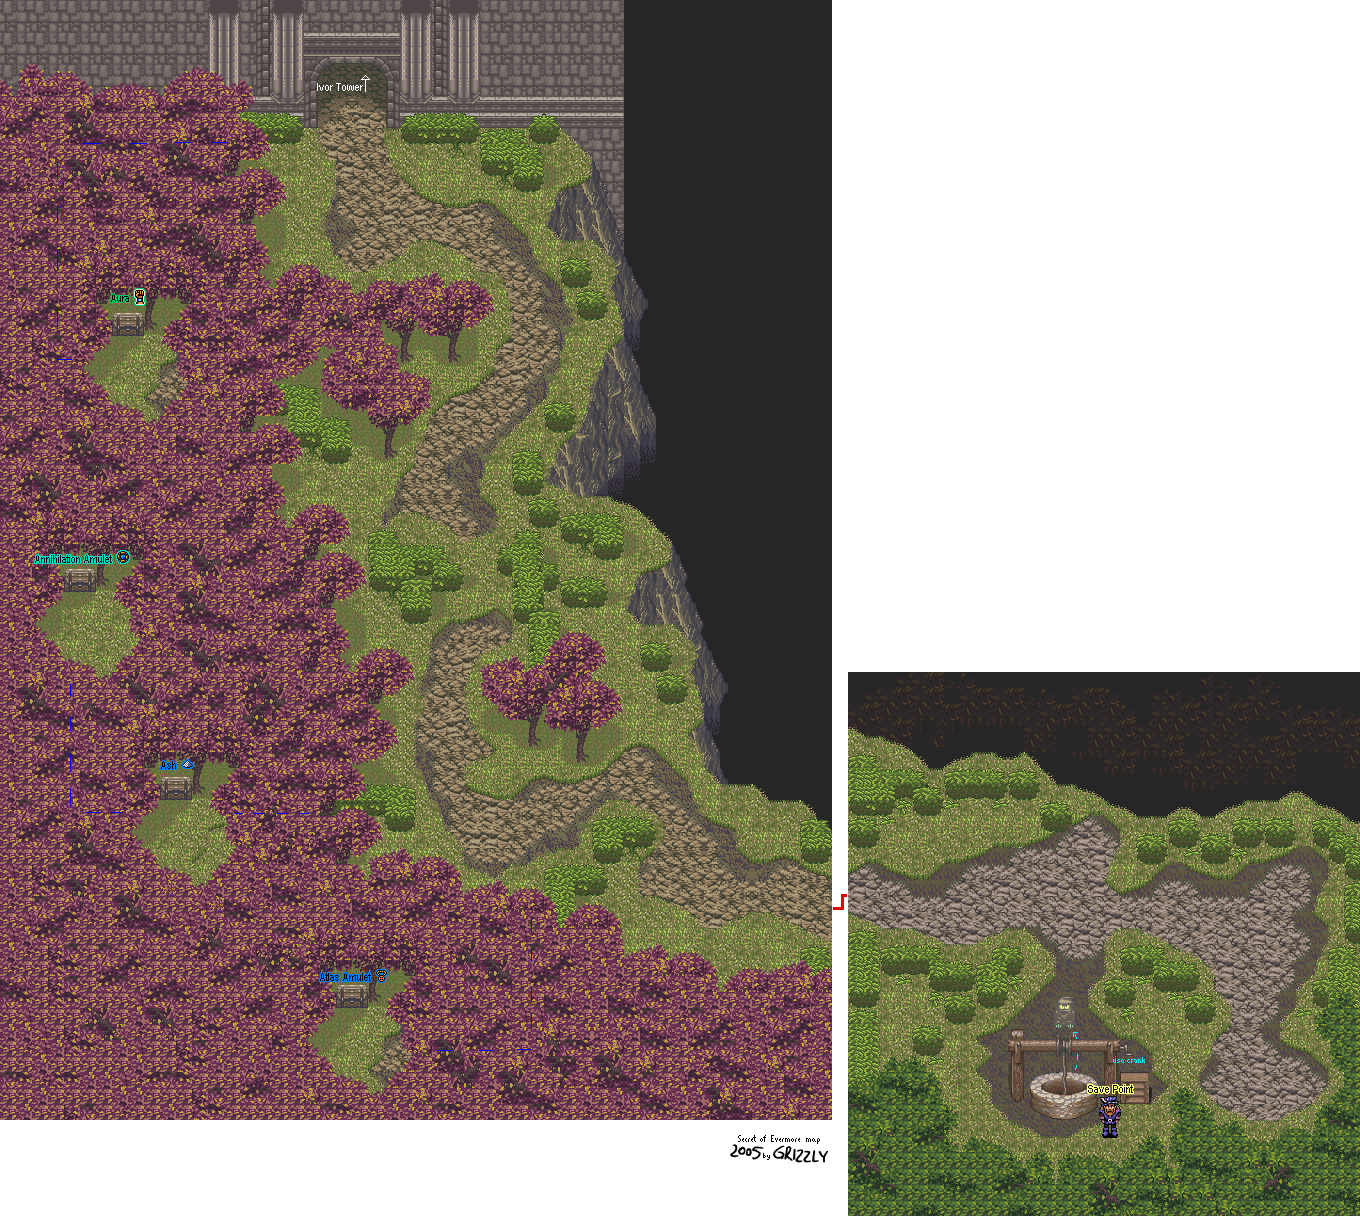
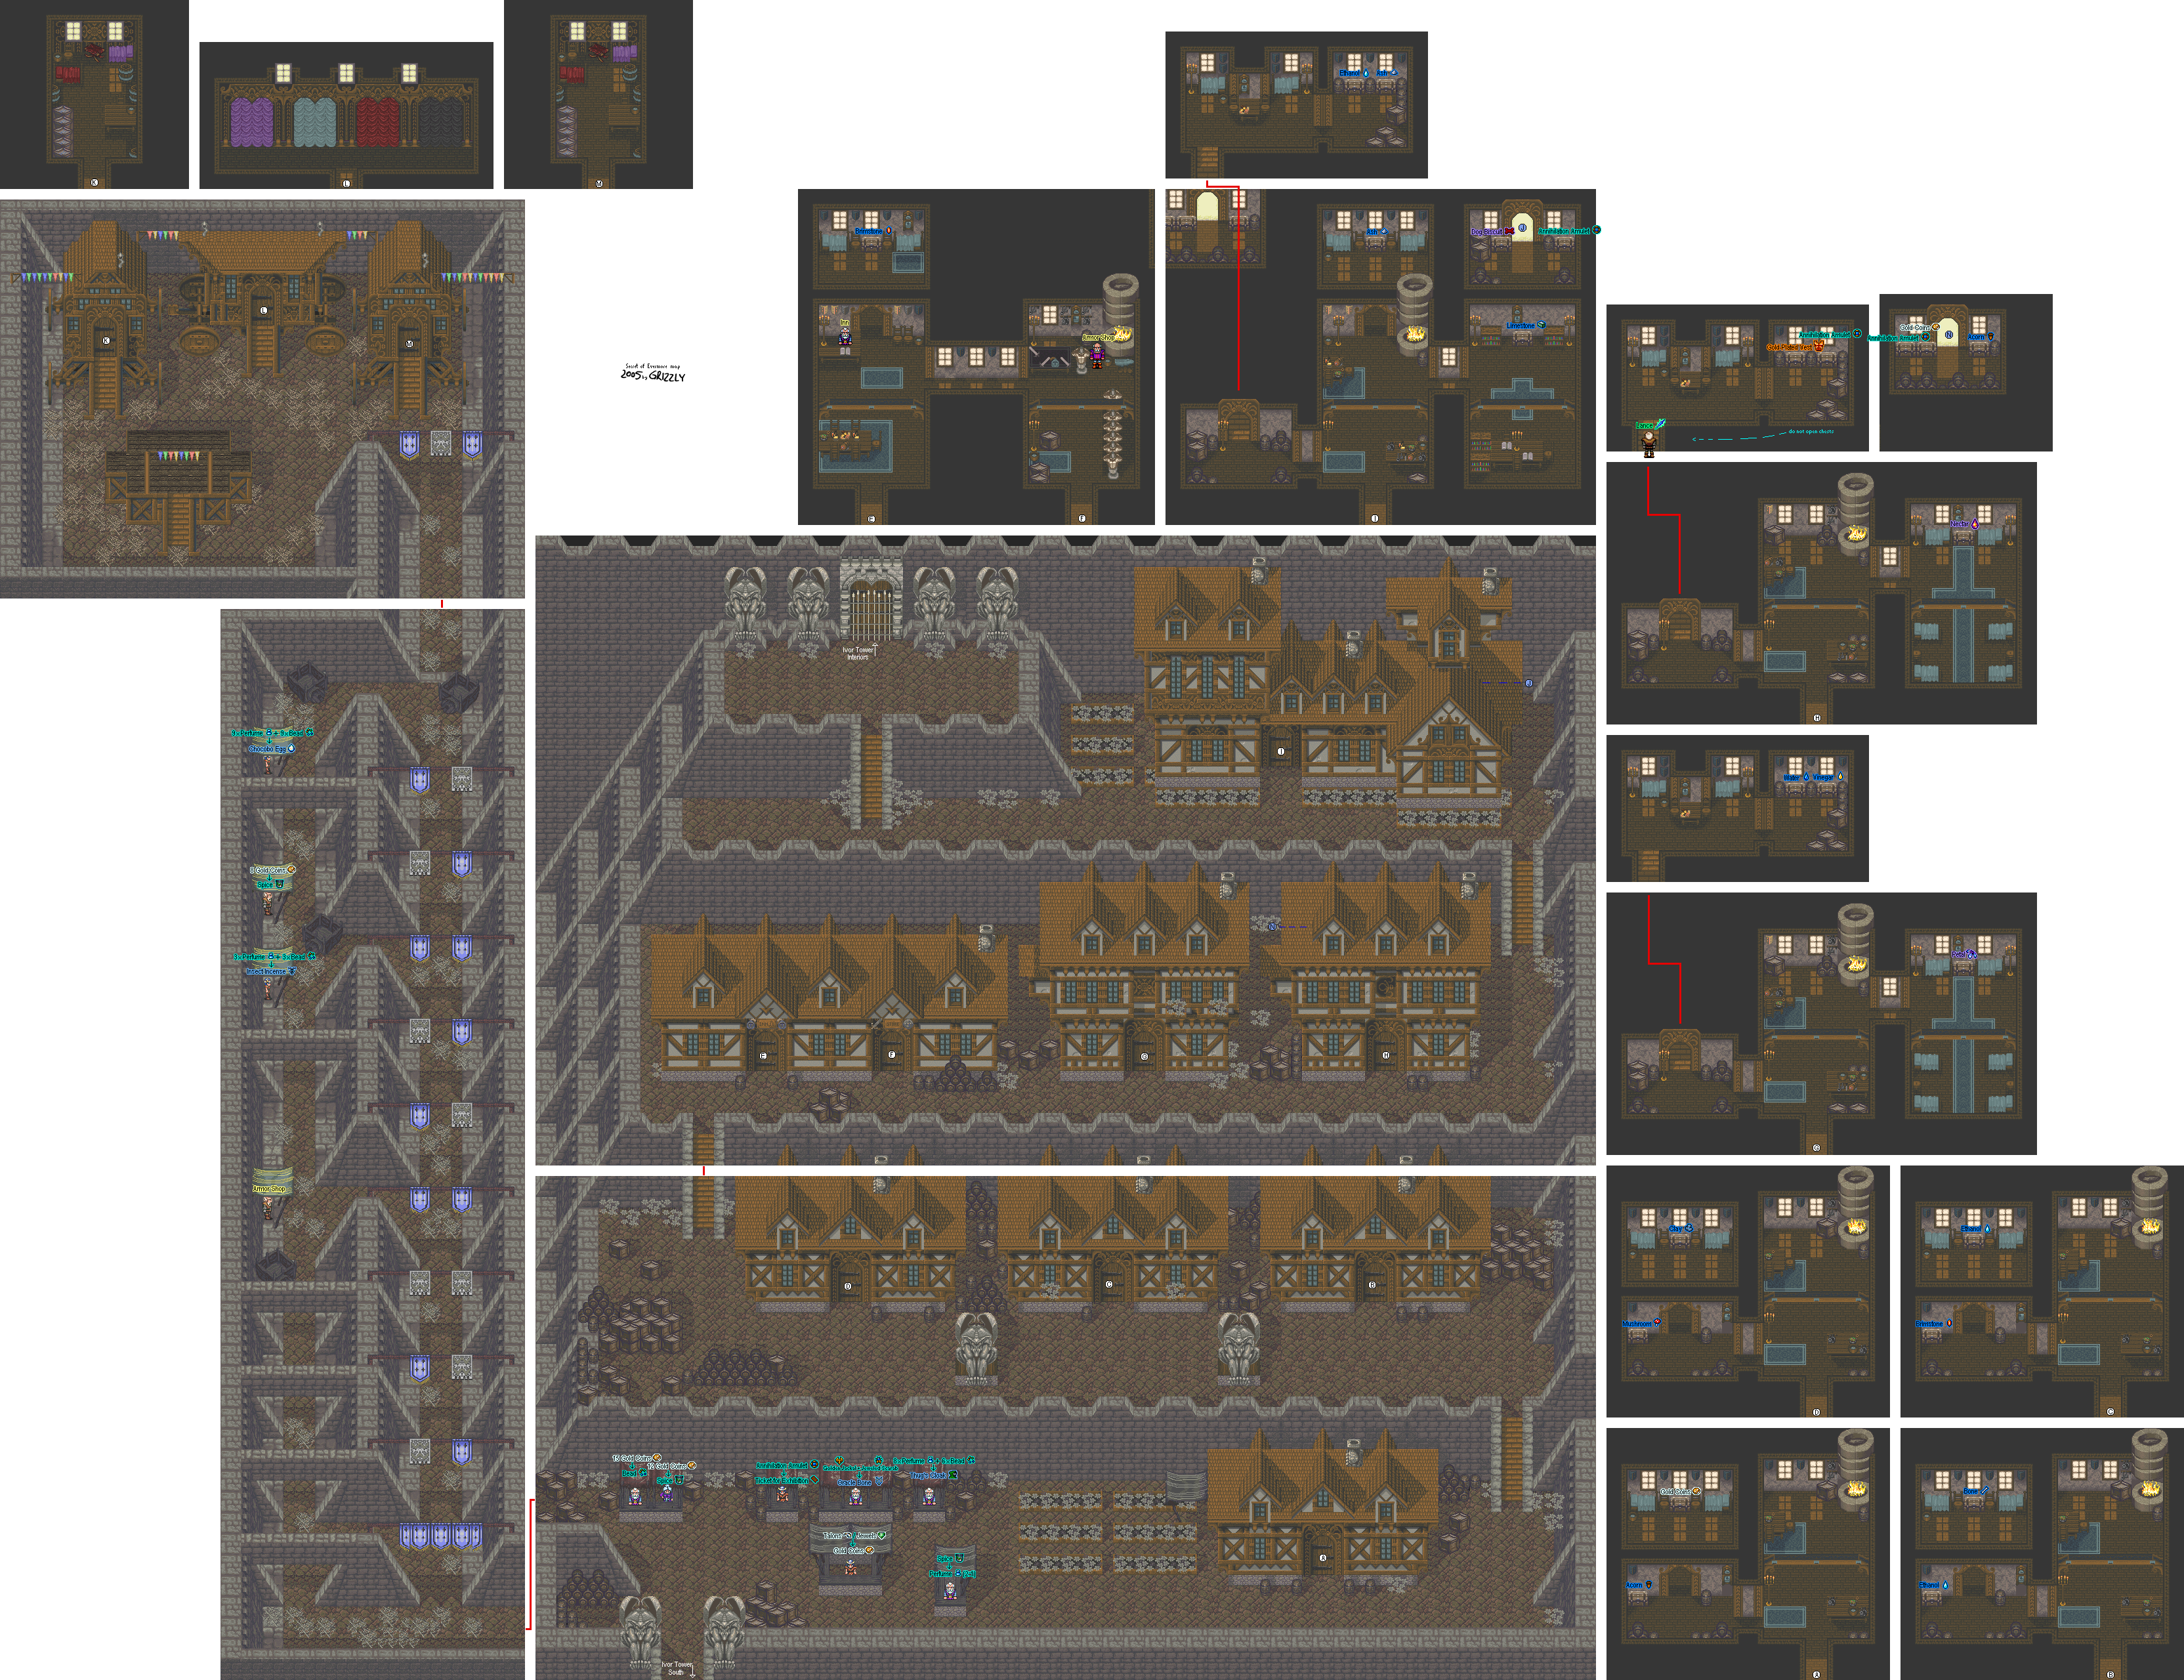
All maps by Grizzly.

Ivor Tower South


As soon as you go west, you'll meet up with more of those Blue Goos as well as hedgehogs in knight helmets. I want one.

Search the trees lining the path in this section, and you'll find some hidden nooks where you can find some wooden chests. One of them has the Aura spell, which you can use if you have Call Beads and check out Horace's abilities.

Ivor Tower Town


Map

Thankfully, the path isn't long.

The first thing you'll notice is all the storefronts north of the entrance. This is a market that is somewhat like what you saw in Nobilia. One of the booths sells tickets to Percival Plank's Exhibition of Oddities, the freak show in town, and tickets cost one Amulet of Annihilation. You'll need the ticket in order to continue on with the game, so get that first!

You'll also notice you'll have to get some new currency...again. In Gothica, the local currency is Gold Coins, so be prepared to exchange your Jewels for Gold Coins. You can also buy the Oracle Bone for a Jeweled Scarab and a Golden Jackal. Buy it, because you're going to need the Oracle Bone later.

There are also booths west of the entrance. One of them gives you a second chance to buy back the charms you got rid of earlier, so you should definitely not pass that up. There is also an armor dealer here. If you have the money and three Amulets of Annihilation to throw around, get the armor here. You definitely won't regret it!

If you look behind the houses, you'll find hidden entrances to parts of houses you usually wouldn't be able to access normally. You'll be able to find three Amulets of Annihilation this way, so make good use of it.

North of the western part of the market is the freak show. When you use your ticket to go in, The Dog will have to be left behind. The Dog will chase after a cat, but somebody will grab The Dog and kidnap him for who knows what.

One of the houses belongs to the alchemist known as Lance. You'll find out which one it is by entering houses and talking to people. When you're in it, go inside and look around, but [b]don't...touch...anything![/b] When you leave, Lance will come up the stairs and ask you what you're doing. Because you didn't take anything, he'll give you a new spell that is really, really awesome: Lance.

Lance

1 Iron, 1 Acorn