Showing posts with label part 65. Show all posts

Saturday, March 21, 2026

PrinceWatercress plays Super Mario Odyssey - Part 65 of 92


In this entry, we finish up the Sand Kingdom. Next time, we start cleaning out the Wooded Kingdom.


62. Secret Path to Tostarena! - This Power Moon is on the floating island in the sky to the southwest. There are two ways to get to it depending on where you went during the first fork in the road the game throws at you during the main game.

If you went to the Lake Kingdom first, you'll find the painting with the portal leading to the Power Moon in a small pool of water in the Courtyard of the Lake Kingdom.

If you went to the Wooded Kingdom first (like I did), the painting with the portal will be located behind an iron block on the iron wall near the Secret Flower Field in the Wooded Kingdom, which you can reach by going up the wall from the Station 8 checkpoint. You can also go straight to it from the Observation Deck via Glydon, which is the strategy that I use.

71. On the North Pillar - There is a tall pillar in the north side of the kingdom. The quickest way to get to it is the pylon going from the top of the Tostarena Ruins Round Tower to the Inverted Pyramid, and then the pylon towards the pillar. There are other pills leading here from the Northwest Reaches and the Moe-Eye Habitat, but this is the quickest one. Once you're above the Power Moon, you'll need to press ZL or ZR and maneuver yourself to the pillar as you drop down.

72. Into the Flowing Sands - There is a ramp of flowing sand in the western part of the Tostarena Ruins. You'll need to approach that ramp from the top and slid down to the Moon, but I give myself an advantage by warping to the top of the Round Tower.

76. On the Eastern Pillar - At the Tostarena Ruins, you'll need to lure a Bullet Bill to the pillars between the Tostarena Ruins and the Jaxi Ruins, capture it, and fly to the easternmost pillar, constantly shaking the controller of your choice while in Bullet Bill form the whole time. This took a bit of practice to pull off just the way I wanted to do it.

77. Caught Hopping in the Desert - West of Tostarena Town, there will be three rabbits near where the Moon Rock used to be. One of them has the Power Moon, and you'll need to chase that bunny to get it.

79. Taking Notes: Running Down - Near the southwest corner of the kingdom, there is a treble clef. Head down there with a Jaxi, then use the Jaxi to get the treble clef and all the notes that appear within the time limit. You'll get a Power Moon.

80. Taking Notes: In the Wall Painting - There will now be a treble clef in the 8-bit area in the Tostarena Ruins Round Tower where the Bullet Bills fire out in pairs. Grab the treble clef, then grab all the notes for a Power Moon.

82. More Walking in the Desert! - Head back to the Koopa who hosts the Koopa Trace-Walking minigame for a second round. You'll need to score at least 90 points to get a second Power Moon from him.

88. Through the Freezing Waterway - At the northeast edge of the kingdom, there is a Moon Rock Pipe. Go down it, then use the Gushens to get all the way to the right to the exit and this Power Moon.

89. Freezing Waterway: Hidden Room - At the first moving platform in the area where you find Power Moon #88, head up, then left. Get to the end of the corridor without hitting the poison or running out of water to get this hidden Power Moon.

Saturday, November 2, 2024

PrinceWatercress plays Chrono Trigger (Super NES) - Part 65 of 70


Man, Frog Flare is powerful if you know what you're doing.


For the next ending, you'll need to fight Lavous after you beat Magus, but before you beat Azala. I do this before getting Ayla back in the party at the Dactyl Nest to further ensure that I get this ending.

It's amazing what the PrismSpecs can do. Frog Flare can do a ton of damage if Frog's HP is low enough.

When you beat Lavos, you'll get a re-telling of the intro where all the humans are Reptites. The Green Ambler ends up being a human, but why they're not a caveman is beyond me.

Wednesday, November 17, 2021

HCBailly plays Final Fantasy II AGAIN - Part 65 of 65


In this episode, we face and defeat the Emperor! Thanks for reading!


Walk up to the Emperor to trigger the final battle. Make sure you're as well-equipped as you can be.

If you have Blood Swords, use them. They drain a percentage of HP from enemies based on how much HP they have, and you'll be draining quite a bit from him. 3000+ HP damage on the first blow? Works for me!

Ribbons and Gold Hairpins make the best headgear here. Ribbons protect from all status ailments, while the Gold Hairpins raise Agility by 10.

The elemental shields as well as the Gold Shield are the best shields for this battle.

The Masamune should be used as an item in this battle, as it can caste Haste 11 on the entire party, and you want to do as much damage on the Emperor as possible before he can strike. If you've made it powerful enough, cast Berserk on everyone as well, since it'll definitely help with the Blood Sword damage.

The Emperor can Curse you. He can also cast Meteos 10, but it's not going to do much damage if you're prepared.

If you don't have a bunch of Blood Swords and a powerful Berserk spell, Try to Curse the Emperor and use Osmose to drain his MP, then cast Protect and Shell on your party. From there, use your most powerful physical (in case the Emperor gets Cursed) and magic attacks.

He has a magic defense and an attack evasion of 70%, and he can drain HP with his physical attacks. He is strong against all elemental spells and will absorb Matter- and Death-elemental spells, and has quite a few spells such as Flare and Dispel at Level 16.

There is a glitch where you can cast Wall on the Emperor and then cast Toad to instantly kill him, as the spell will still manage to go through the Wall and glitch out.

When you take down the Emperor, you've done it! The world can now be rebuilt!

Thursday, May 30, 2019

HCBailly plays Final Fantasy IV (Super Famicom) - Part 65 of 70


The optional boss rush continues with dinosaurs and...the Masamune. Nice.


Equip Rosa with the Sage Staff and Edge with the Flame Claw before going into the room with the two chest. You'll fight two Lunasaurus. Have Kain Jump the one in the back, and have Cecil and Edge wail on the one in the front. Rosa can attack the one in the back with Artemis Arrows if you so choose, but she'll be healing more often. Have Rydia summon Bahamut to hit both Lunasaurus enemies with Mega Flare. The Lunasaurus will be attacking with Flame repeatedly, but if you can keep everyone's HP high, you should be good to go.

Beating the two Lunasaurus will give you access to two Ribbons. Give one to Rosa and another to Edge; Rydia will still need her Gold Band and Rosa and Edge will need the defense.

In this game, stat gains are fixed up until Level 70; past 70, they will be random and can go either up or down. So be careful.

When you approach the Masamune, you'll face Tidarithian, which will hit you with Big Tsunami and Flare. Have Rydia use Sylph and Rosa use Cure 4, and have Kain use Jump on every turn. Have Cecil and Edge attack normally. If you need to, throw a Hell Wind Shuriken. When you beat Tidarithian, the Masamune will be yours. It's the best sword in the game for Edge, so give it to him. It can also cast Fast when used as an item and increases Agility by three.

Monday, June 18, 2018

HCBailly plays Terranigma - Part 65 of 75


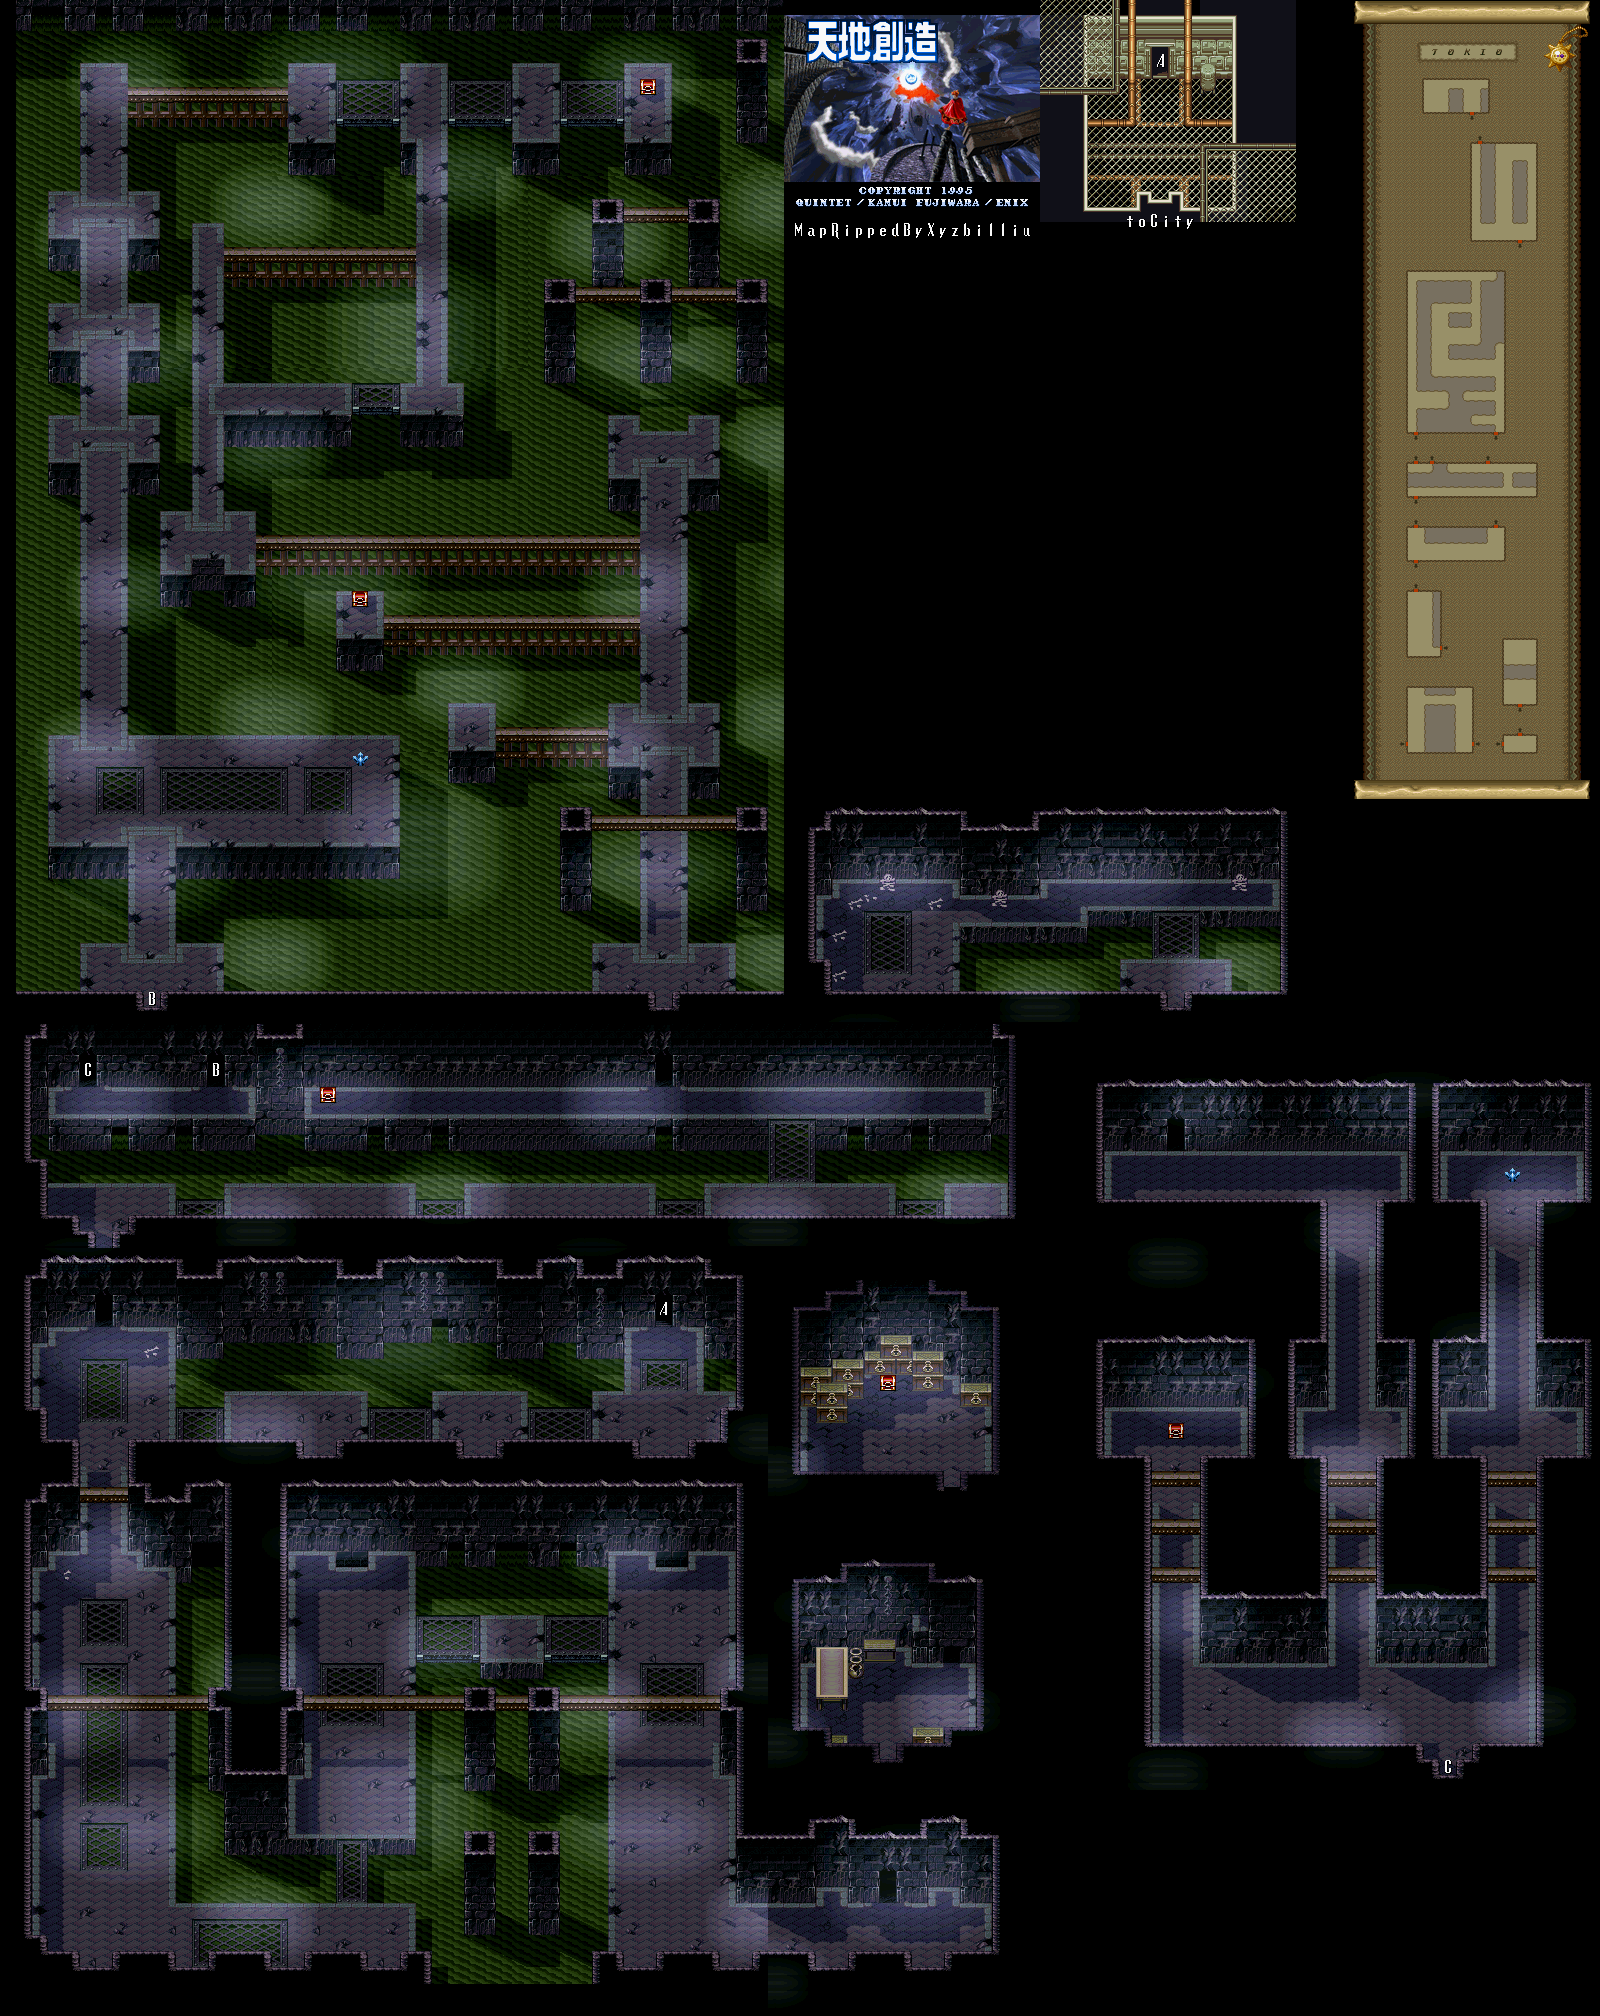
The only "ruins" we know of is Neotokio. Time to head there for that last Starstone.

World map by Tropicon. Neotokio map by Amir Azadur. Neotokio Sewers map by xyzbilliu.


Head back to Airsrock in Australia and climb up to the top, and talk to the guy you meet there. He will tell you he is watching for the end of the world from here, and asks if you would listen to him. Say "sure." He'll tell you a certain race revered this grand view and vast nature as god, but today, modern societies make a racket about preserving nature. He asks how man thought they were so powerful as to protect gods, and thinks that the beginning of the end started there. As he watched, he paid heed to a voice that spoke to him about an older boy that appears bearing a rod - which is obviously you - to whom the Starstone must be given. He'll give you the fourth Starstone.

From there, head back to Japan and go to Neotokio.

Neotokio


Head up the stairs in the northwest corner of town and enter the police station. You'll hear what sounds like a phone ringing in the desk in the corner. Go up to the desk and interact with it. You'll find the Transceiver in the desk drawer, and Ark will take it.

You'll then hear a girl cry for help from the Transceiver. Yomi shows up and tells you that the girl doesn't seem to know how to operate the unit. Yomi will also ask if you hear the sound behind the girl. It's the sound of flowing water, and there is no river in this town. The girl has to be in the sewer...but where is the sewer.

Leave the police station and enter the small building near the stairs. The first lone door with the metal grate right in front of it will now be unlocked. This is the sewers entrance.

Sewers


The beginning of the sewers is linear, for the most part. You'll be fighting the Slimes again, and you'll also fight some ghosts that not only shoot fireballs at you, but also crumble for a few seconds if you don't kill them right away. There is a door near the beginning of the path, but it's locked. You'll have to find a way to unlock it in order to continue.

For now, go south from this door. Watch out for the enemies with the guns, as they will steal your money if you get too close. You'll eventually find another door at the end of the path. Go inside, and you'll hear the Transceiver noise again. The girl will cry for help again, then scream. Go into the crawl space nearby and open the chest you find to get the Sewer Key.

Head back to the locked door and use the Sewer Key on it. As you make your way to the door, the girl will say that a lion is chasing her. When you open the door, you'll finally meet the girl...and the lion. Take down the spinning guns as you get to the chest with the H. Water, then enter the doorway in the upper-right corner, and you'll enter a very linear maze area that is much like the sewer areas of Dragoon Castle. You'll find a Luck Potion in a chest near the start, as well as the Fauchard off the beaten path. You'll want to equip this, since it's a pretty good weapon at this point.

Saturday, March 17, 2018

skorch82 plays Brave Fencer Musashi - Part 65 of 70


We're now on the ground of Soda Fountain itself...time to destroy!

In the third section of Soda Fountain, you'll be above ground. The brown robots will shoot homing missiles, and the blue one's shoot three-way shots. You can Assimilate their respective abilities and use them whenever necessary.

The Homing ability will make quick work of the helicopters here.

The Fuhrer Flatski statues will give you health replenishments if you destroy them. They can shoot lasers at you that are similar to the laser cannons you'll meet fairly soon.

The green robots will drop bombs that will do quite a bit of damage if you step on them.

Use Homing on the laser cannons at the gates to get rid of them if you need to. From there, keep attacking the gate doors and you'll bust it open. Just step out of the way when the laser guns home in on your position. Destroying the doors first will get rid of the laser turrets next to them.

The red walkers will shoot a closer-range flamethrower if you're in front of them. Walk circles on them and keep attacking from the side or behind in order to finish them off.

You'll want to be very careful in this section, as there are few opportunities to heal yourself.

You'll then enter a maze. The red robots here have swords. Make quick work of them with the Shish Kebab attack. When you do enough damage to them, they'll drop their sword, allowing you to go after them rather easily due to the fact that they'll run back to their sword and pick it up when disarmed. The bad news about them (and the rest of the robots here) is that they re-spawn when killed. At least they can't attack you through the wall.

Despite the size of the maze, it is pretty easy to find your way through this maze and just as easy to memorize the twists and turns to the finish as well as where the power-ups are.

Once you make it out of the maze, the sun will be setting and you'll be meeting the same enemies that you did at the beginning of the section. There's a nice twist here: some of the bushes open up and turn into laser cannons much like the ones near the gates.

The laser generators that move up and down the walls can be destroyed easily, causing the laser that can hurt you to be deactivated.

Monday, December 16, 2013

brickroadbrickroad and SovanJedi play Secret of Evermore - Part 65 of 88


Click here for talking oglins and dogs wearing boy masks.

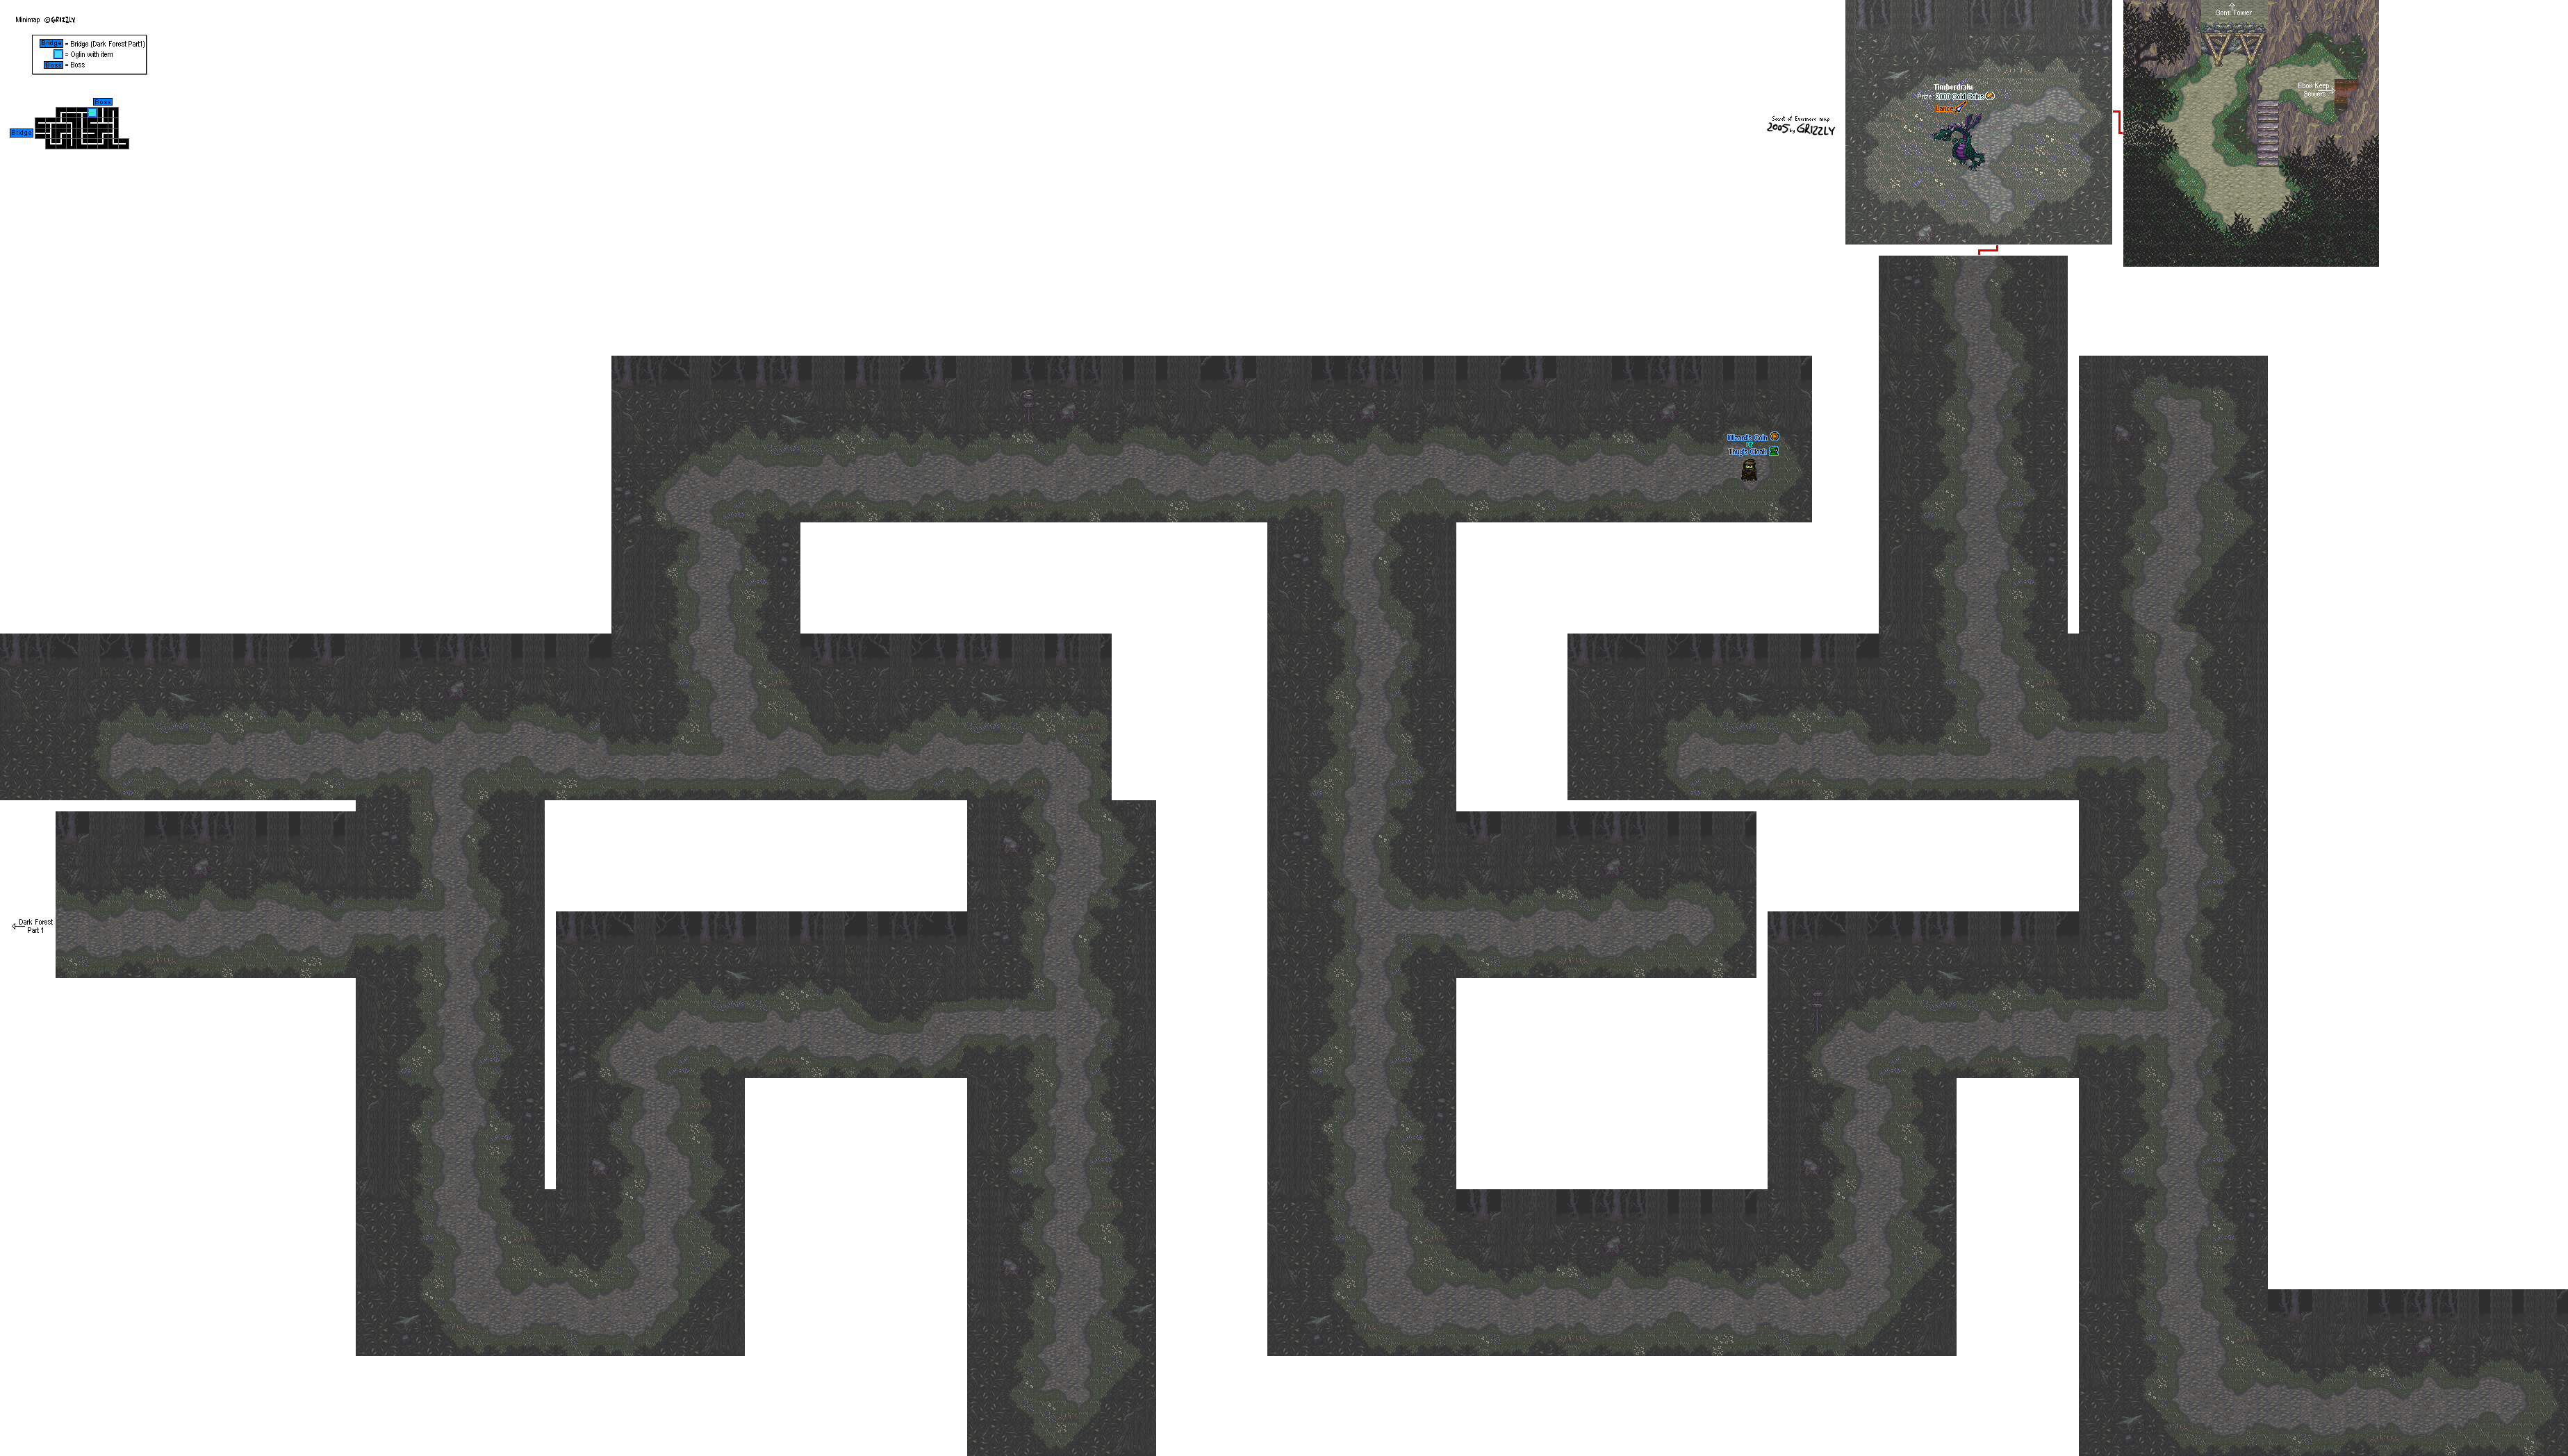
All maps by Grizzly.

Dark Forest


We have a new section of forest to go through. Thankfully, the second half of the Dark Forest isn't as long.

The Oglin that Brick keeps mentioning is the same one we rescued from the well near Ivor Tower by turning the well crank. If you've gotten the Thug's Cloak from the Ivor Tower marketplace, he'll give you the Wizard's Coin. Otherwise, he'll just give you the Thug's Cloak.