Showing posts with label part 54. Show all posts

Tuesday, March 10, 2026

PrinceWatercress plays Super Mario Odyssey - Part 54 of 92


I found nearly all of the Regional Coins in this area. It won't be long until my search for them comes to an end.


It's time for the Mushroom Kingdom. Once again, it should be mentioned that the Power Moons are in the shape of Power Stars from Super Mario 64. Nevertheless, they will be referred to as Power Moons.


If you talk to the Toad in the top hat at the castle entrance, you'll find out that Princess Peach has gone missing again. This triggers the flag that causes Princess Peach to appear in all the other kingdoms you've been in, which will lead to a load of Power Moons.


If you talk to the Archivist Toadette at the throne, she will tell you that she is keeping track of her achievements throughout the game, and you'll unlock a ton of Power Moons as a result. She'll give you the one for rescuing Princess Peach for free. You won't get any of the other achievement-based Power Moons until you talk to her again.


Moon Kingdom


19. Thanks, Captain Toad! - Captain Toad will be near all the other people near the Odyssey. Talk to him for a Power Moon.

27. Found with Moon Kingdom Art - You'll need the Hint Art from the Wedding Hall to find this one. Head back to the beginning of the mountain and head off to the side where the Scarecrow is, then pound the ground in the corner for this Power Moon.

Snow Kingdom


33. Secret Path to Shiveria! - There are two ways to get this Power Moon, and it depends on which choice you made on the second forth.

If you pick the Snow Kingdom over the Seaside Kingdom, you'll find the portal to this in a portrait in the ground between some trees near the Odyssey in the Mushroom Kingdom. This is the path that I take.

If you pick the Seaside Kingdom over the Snow Kingdom, you'll find the portal in a portrait behind the left building at the Main Courtyard Entrance in Bowser's Kingdom. You won't be able to access this Power Moon until after you beat Bowser in the main game, however. It's at one of the two tiny buildings surrounded by sand, and I found this picture frame before. Had I picked Seaside Kingdom first, I would have been able to use it.

Mushroom Kingdom


3. Caught Hopping at Peach's Castle - There is a bunny hopping around in the garden to the east. Catch it for a Power Moon.

8. Grow a Flower Garden - There are two circles of sprouts near the garden. Throw your hat around in a circle to grow them all in one fell swoop and get a Power Moon.

11. Taking Notes: Around the Well - West of the castle is the well. Around it is the 8-bit area. Go in, grab the treble clef, run all the way back out and get the notes along the way, then get the notes outside before time runs out to get this Power Moon.

18. Forever Onward, Captain Toad! - Captain Toad will on the roof of the Crazy Cap Shop. Talk to him for a Power Moon.

20. Shopping Near Peach's Castle - Buy a Power Moon from the Crazy Cap Shop in the Mushroom Kingdom.

25. Light from the Ceiling - Inside the castle, stand on the sun rug in the center and look up at the sun on the ceiling. Instead of being taken to another world to unlock the Wing Cap, you'll get a Power Moon in a nice reference to Super Mario 64.

40. A Tourist in the Mushroom Kingdom! - You'll need to have collected "A Tourist in the Moon Kingdom!" in the Moon Kingdom for this one. When you have, the taxi, the driver and the tourist will all be here, and you can get this Power Moon. This Power Moon is the last in the chain involving the taxi and the tourist, and after this, the tourist will head back to the Sand Kingdom.

44. Rescue Princess Peach - Talk to the Archivist Toadette at the throne in the castle for the first time to get this one.

Regional Coins


Tuesday, October 22, 2024

PrinceWatercress plays Chrono Trigger (Super NES) - Part 54 of 70


Cats? Cats.

"How many cats are you willing to home and take care of?"

"Yes."


For the first time ever, I try to get multiple cats for Crono's house in this video.

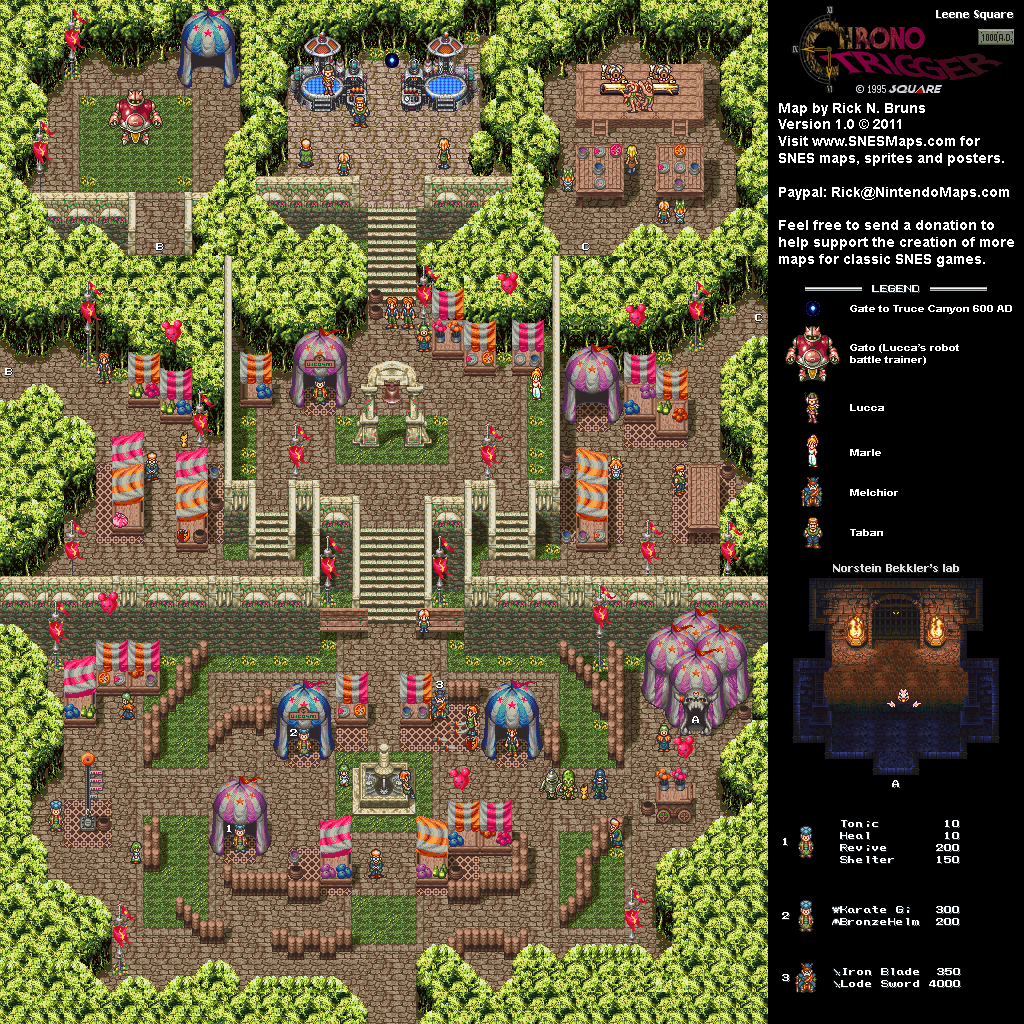
At Norstein Bekkler's tent, play the 80 Silver Points game. Here, you'll have to shoot at three Kilwalas while also making sure that one of your party members isn't lowered into one of the torches on the back wall; if that happens, it's game over. Thankfully, there will be a sparkle that pops up at the left side that you can run to and press A to raise the other person back up.

You'll want to be fast in order to take out the Kilwalas. If you're fast, you can take out two of the Kilwalas before the first sparkle shows up, and you can easily take out the third one from there.

The first time you win it, you'll win a second cat for Crono's house. Every subsequent time you win it, you'll win a bag of cat food, which contains 20 ounces of cat food. You can see how many ounces of cat food you have by going to Crono's house, moving up to the brown bowl in Crono's room upstairs and pressing A.

You'll be able to play the game twice in a row before you have to get more Silver Points. I didn't know this until I started doing this for the Let's Play, but the most Silver Points you can have at any point is 200; when you reach that point, the game will not let you have any more. Once you play the game twice, you'll have to get more Silver Points. Fighting Gato repeatedly is the quickest way to get back to the maximum of 200, and the game will tell you if you can't collect any more Silver Points.

When you get enough cat food, you'll be able to get another cat. I found out more information on how to do this here and here. As a matter of fact, these are the 

Simply put, a little bit of cat food is exhausted whenever you enter the first screen of Leene Square, and it will be anywhere between zero to three ounces. You want to keep the amount of cat food you have high so you can not only make it easier to get another cat, but also make it harder to lose a cat by having a cat randomly run away. Because of this, I keep the amount of times I enter that screen to an absolute minimum. When you have enough cat food (which is at least 60 ounces), you have a random chance of getting another cat. If you don't get another cat at first, keep getting more Silver Points and more cat food until you do. The maximum amount of cats you can have is eleven: six downstairs and five upstairs in Crono's room.

Tuesday, July 16, 2024

PrinceWatercress plays Ratchet and Clank: Going Commando - Part 54 of 54


After so many videos, this is how it all ends.

First | Previous | End

8:50 - Bringing the bridge down.

9:30 - The female robot gets blasted as she warns us as Angela Cross shows up, and we find out that Captain Quark is not only still around, but he also fabricated this entire mess in order to become the Bogon's Galaxy new hero, restore his reputation and frame Ratchet, Clank and Angela for the whole thing. Unfortunately, when Quark uses the Helix-o-Morph to take down all of the Protopets, he only makes the original Protopet bigger and more dangerous.

From here, you'll have to Swingshot over to the evil Protopet, then you'll have to bust out the R.Y.N.O. II and stay away from it as it moves around while blasting it with the Lock On Mod. Easiest final boss ever.

You can also go between the ship and the final battle with the teleporters here once you reach this point. Fun.

Once you beat the evil Protopet, you'll be thanked by the real Mr. Ambercrombie Fizzwidget, and you'll also find out that the battery in the Helix-o-Morph is in backwards, hence the nasty transformation. As Angela and Fizzwidget head off to cure the rest of the Protopets, Ratchet holds the blasted female robot in his arms.

During the credits, the female robot will be repaired, then you'll find out that Captain Quark is working at Megacorp and testing things that nobody else will test. 

From here, you can play Challenge Mode. In this mode, not only do you have a harder version of the game, but you have a bolt multiplier that goes up to 20x which easily raises the amount of bolts you get from fighting enemies the longer you don't get hit, you'll be able to buy the Mega version of Weapons in the Megacorp vendors and evolve them again to the Ultra versions to do even more damage, and you'll also be able to bring a lot of your collectibles over to Challenge mode so you don't have to collect them again. All weapons not directly tied to the story, armor upgrades, collected Platinum Bolts, collected Crystals and collected Moonstones are carried over. Slim Cognito's Ship Shack is available at the start, the Charge Boots are retained, and the Barlow Gadgetron Weapons are available anywhere. Some levels' enemy setups, like the Coral City Promenade, have reduced numbers. All special menu tabs are retained, some optional objectives stay done, and all special non-story items such as the Box Breaker and the Armor Magnetizer, are retained. (Gadgets and Wrench Upgrades must be re-earned, however.)

But I've played this game for more than nine months, and I've been writing this guide for around four, and I think I've covered everything that I wanted to cover...at least...I thought I did. There's one more thing that I want to show off...but I'll need to make the video first and I'll need to make the guide for it as well...

Controls:


As Ratchet:

Control Pad/Left Analog Stick: move
Right analog stick: move camera

X:
  • Jump and double jump (hold button after double jump to use Heli-Pack or Thruster Pack)
  • Wall jump (near certain walls)
Square: strike with wrench
Circle: pull out/shoot currently equipped gun
Triangle: 
  • quick select (hold and use in conjunction with Control Pad or left stick to switch guns; menu can be customized in Quick Select on the pause menu
  • double tap to switch between two most recently equipped weapons/items
  • interrupt on-screen messages

Select: open map
Start: Pause menu
  • Control Pad: select option
  • X: confirm option choice

L1:
  • center camera behind Ratchet (tap button to center)
  • first-person view (hold button and use left stick or D-Pad to look around; let go of L1 to move camera back behind Ratchet)
  • Square: wrench boomerang
  • Circle: fire gun
  • R1/R2: zoom in and out (Pulse Rifle only)
L2/R2: strafe (hold while moving)
L3: see health and Bolt totals
R1/R2: crouch (hold down)
  • Square: wrench boomerang
  • X: high jump
    • long jump (hold crouch button and jump while running to perform)
R3: open map

In water:
  • Square: dive and descend
  • X: surface and ascend
  • R1: accelerate with Hydro-Pack

As Clank:

Control Pad/Left Analog Stick: move
Right analog stick: move camera

When hanging off platforms:
  • Control Pad/Left Analog Stick: move
  • Forward+X: vault up
  • Back+X: drop down

Square: punch
X: Jump (press and hold in the middle of a jump to glide with Heli-Pack)
Triangle: command menu (hold and use in conjunction with Control Pad or left analog stick to choose commands)

Friday, November 12, 2021

HCBailly plays Final Fantasy II AGAIN - Part 54 of 65


There is an intact dungeon in a cyclone. How does this work.


You'll be seeing brick walls after a while. Apparently, there's a castle inside of a whirlwind. wut

The chest with the WindFlute (which casts Aero 13 on all enemies) contains a Green Dragon (G.Dragon). At this point, Mist 16 does negligible damage. You can just hit it with powerful attacks and a powerful Holy spell. Make sure you have protection against Poison for this battle. 

The Healing Staff is bugged in the Famicom version; it is supposed to deal more damage to Undead enemies, but it doesn't exactly do that.

When you go up the stairs to the left of the chest, you'll finally meet Emperor Paramekia. When you approach him, he sics his guards on you, which are total crap. After those two battles, you'll face the Emperor, two Corpses and a Golem.

You'll have no problem getting through the enemies to reach the Emperor in the back. Amazingly, you can hit the Emperor with Toad or Mini, and he won't be able to do much if you suck the MP out of him with Osmose. The Emperor can caste Haste, Bolt 10, Slow 9, Blink 8, Barrier 8.

For some reason, if you have an effect on your weapon when Haste is cast on you, the game will re-calculate your status if you switch weapons in the middle of the battle, yet Haste will stay with you. Ironically, Berserk does not transfer between weapons.

After the battle, the Emperor will die and you'll return to Fynn.

Castle Fynn


You'll return to the castle to rejoice the Emperor's defeat, but news comes that the Dark Knight has become the new Emperor. Even better...Leon was the Dark Knight the whole time! (Totally saw that coming.)

Talk to Hilda. The Emperor may have been controlling him with black magic, but there's only one way to know for sure: head for Palamecia Castle. Learn "Palamecia," then head into town.

Friday, May 24, 2019

HCBailly plays Final Fantasy IV (Super Famicom) - Part 54 of 70


Golbez is heading to the moon. We gotta get there, too.


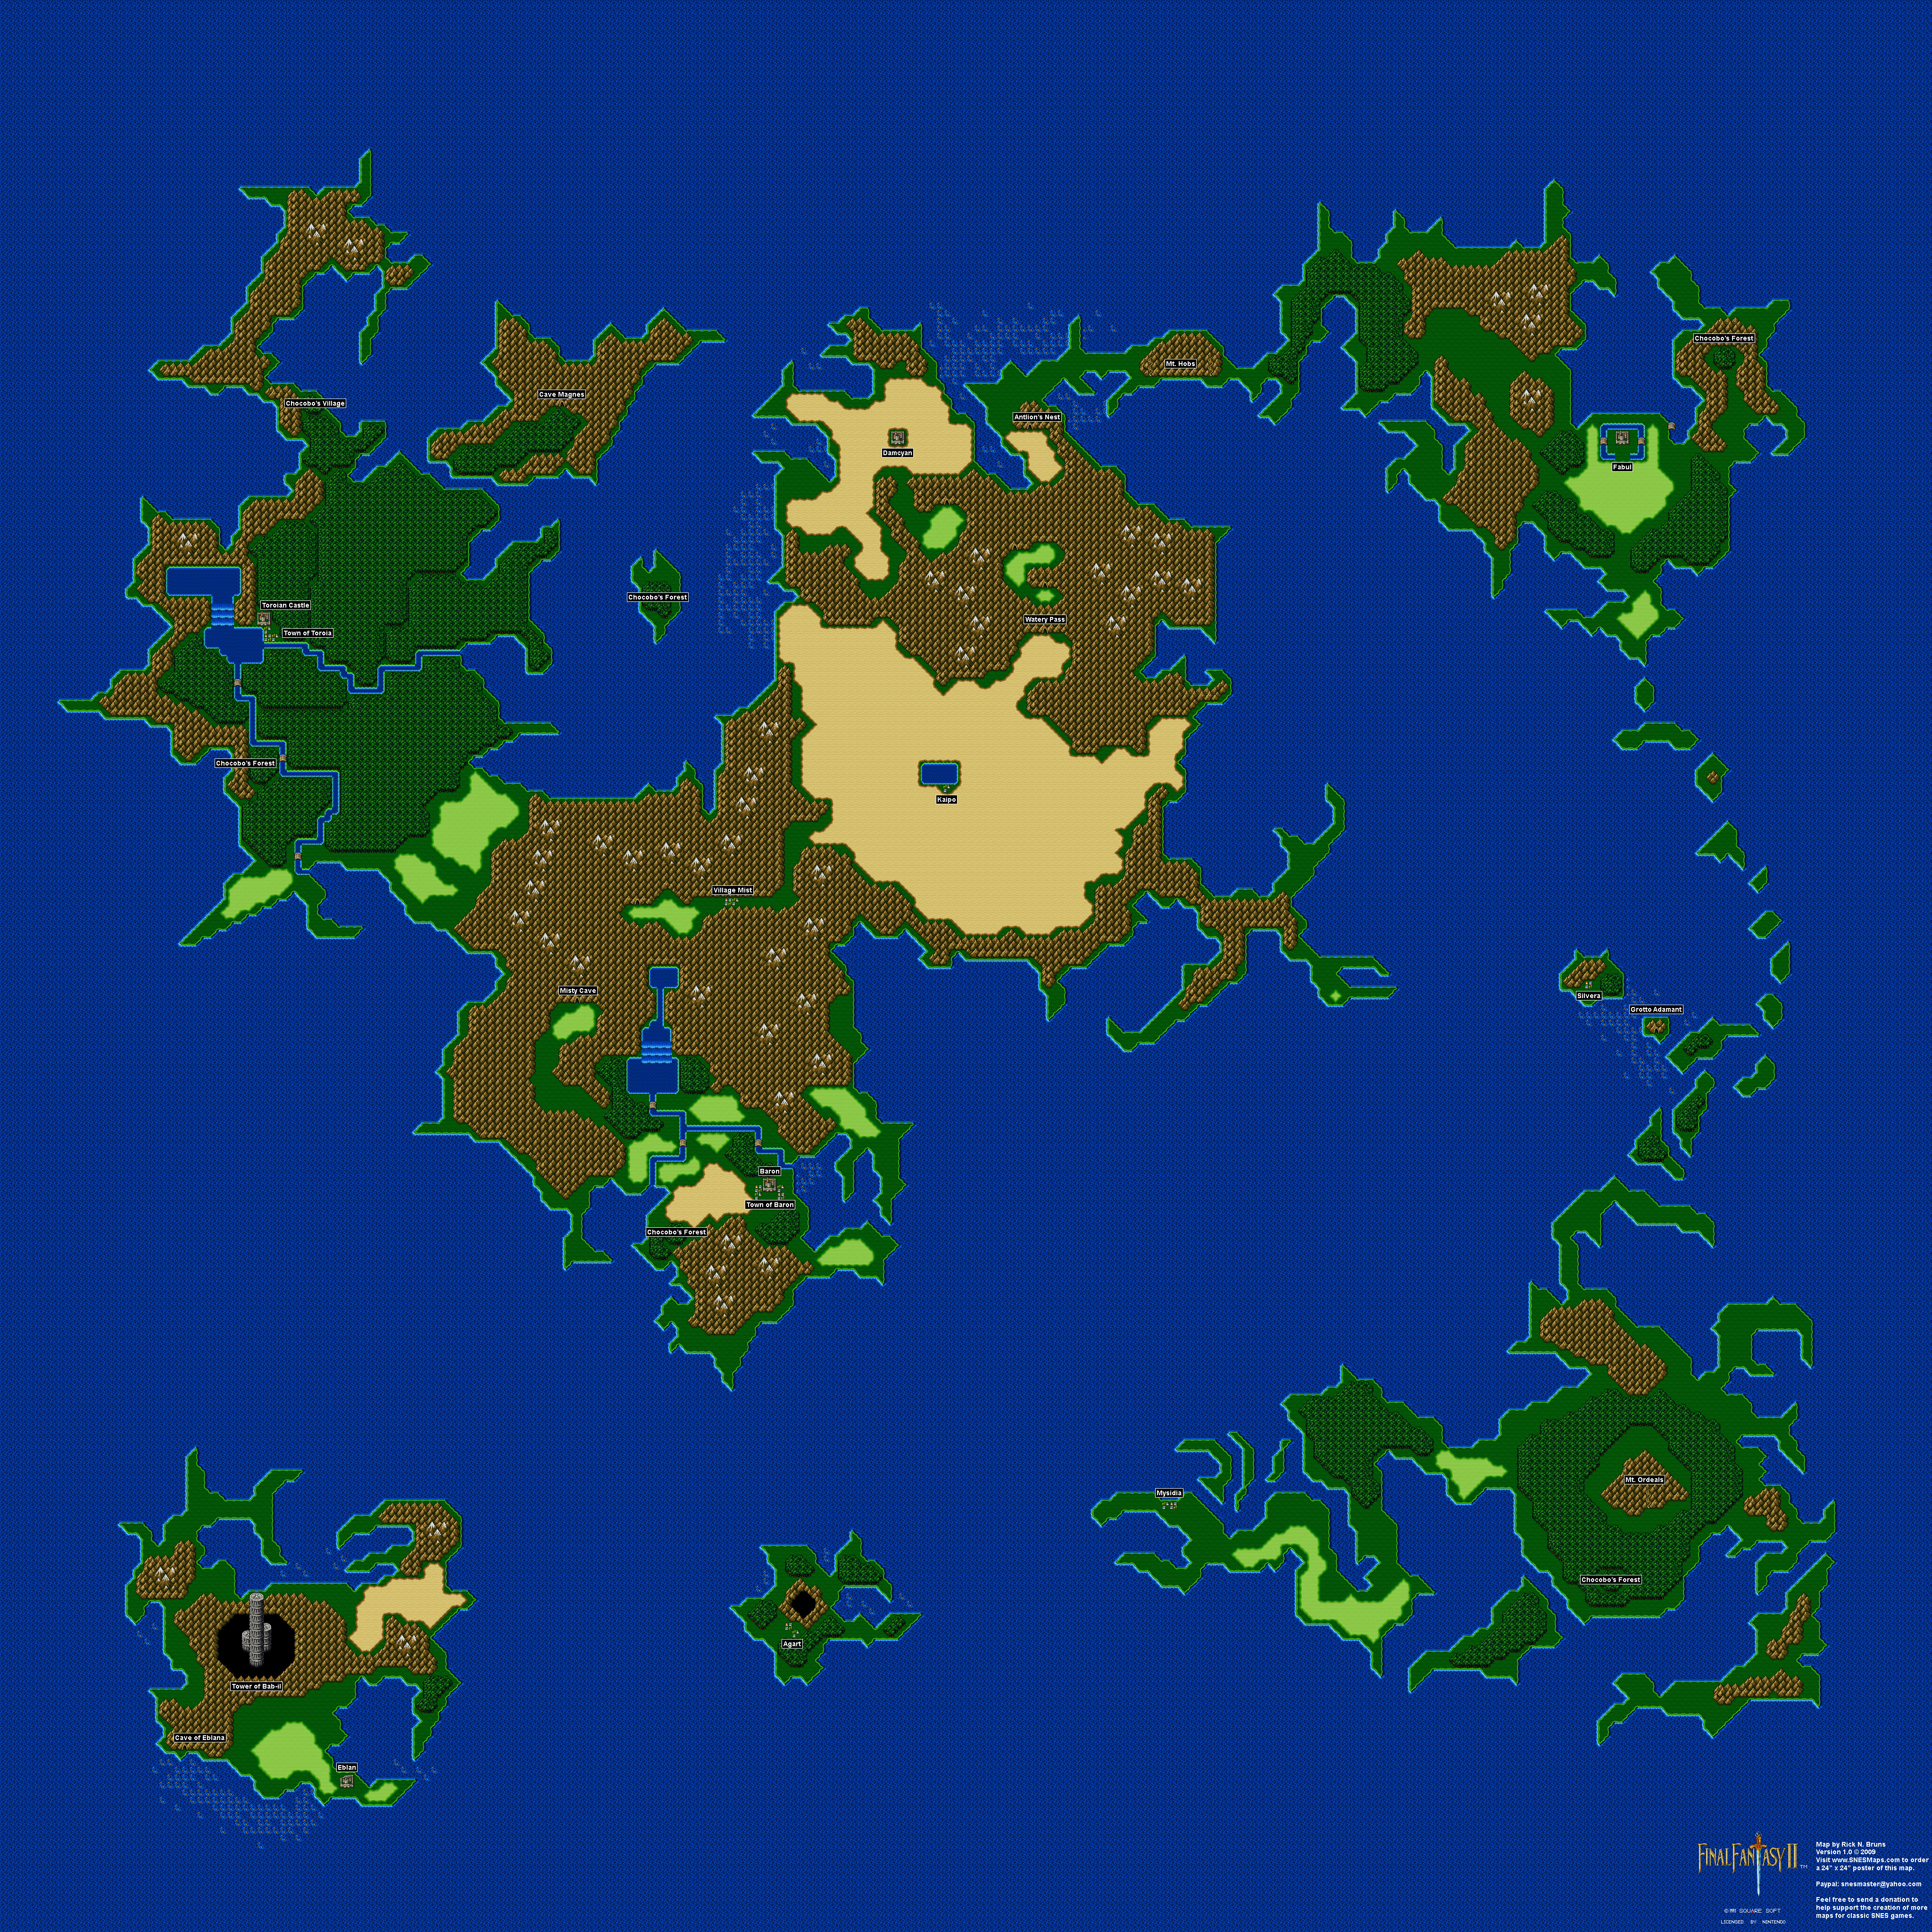
Head back to Kukuro's house in the southeast corner of the underworld. You'll be able to get the Holy Sword Excalibur now that you have the Magical Ship. Equip it on Cecil; he will need the attack power.

Be ready to equip Ruby Rings, as you're going back to the Sylph Cave in the northwest corner of the underworld.

Sylvian Cave/Cave of Sylphs


Head back to the Sylphs' house and use the Frying Pan on Yang to wake him up. Yang will finally come to, and tell you that the Sylphs saved him from death. The Sylphs also offer their aid by becoming a summon for Rydia, and when called upon, they absorb a small amount of enemy health and give it to the party.

Head back to Fabul.

Fabul


Talk to Yang's wife again. Hand her the Frying Pan, and you'll get the Meat Cleaver in return. Believe it or not, it is one of the best weapons in the game. You can only use it as an item in battle, and it deals 9,999 HP worth of damage to anyone you throw it at.

Head back to Baron Castle, since you've met the Phantom World.

Baron Castle


Head back to the hidden throne where you found the ghost of King Baron. Now that you've been to the Phantom World, King Baron will show up again, and reveal that he became the soul of a Phantom Beast upon death. He offers aid as a summon for Rydia, but you must beat him first.

You'll then face Odin. Have Edge cast Raijin, have Rosa use the Blue Fang, and have Rydia cast Bolt 3. The faster you kill Odin, the less likely that your party will be wiped out. When you win, you'll be able to summon Odin in battle with Rydia.

Head back to Mysidia and get on the Magical Ship.

Magical Ship


There are rejuvenating chambers that act as a free inn to the south as well as a Fat Chocobo.

The helm at the north end of the ship lets you fly around like you would with the two airships from earlier in the game, while the red crystal is the Crystal of Flight that will take you to the moon when interacted with.

The Moon


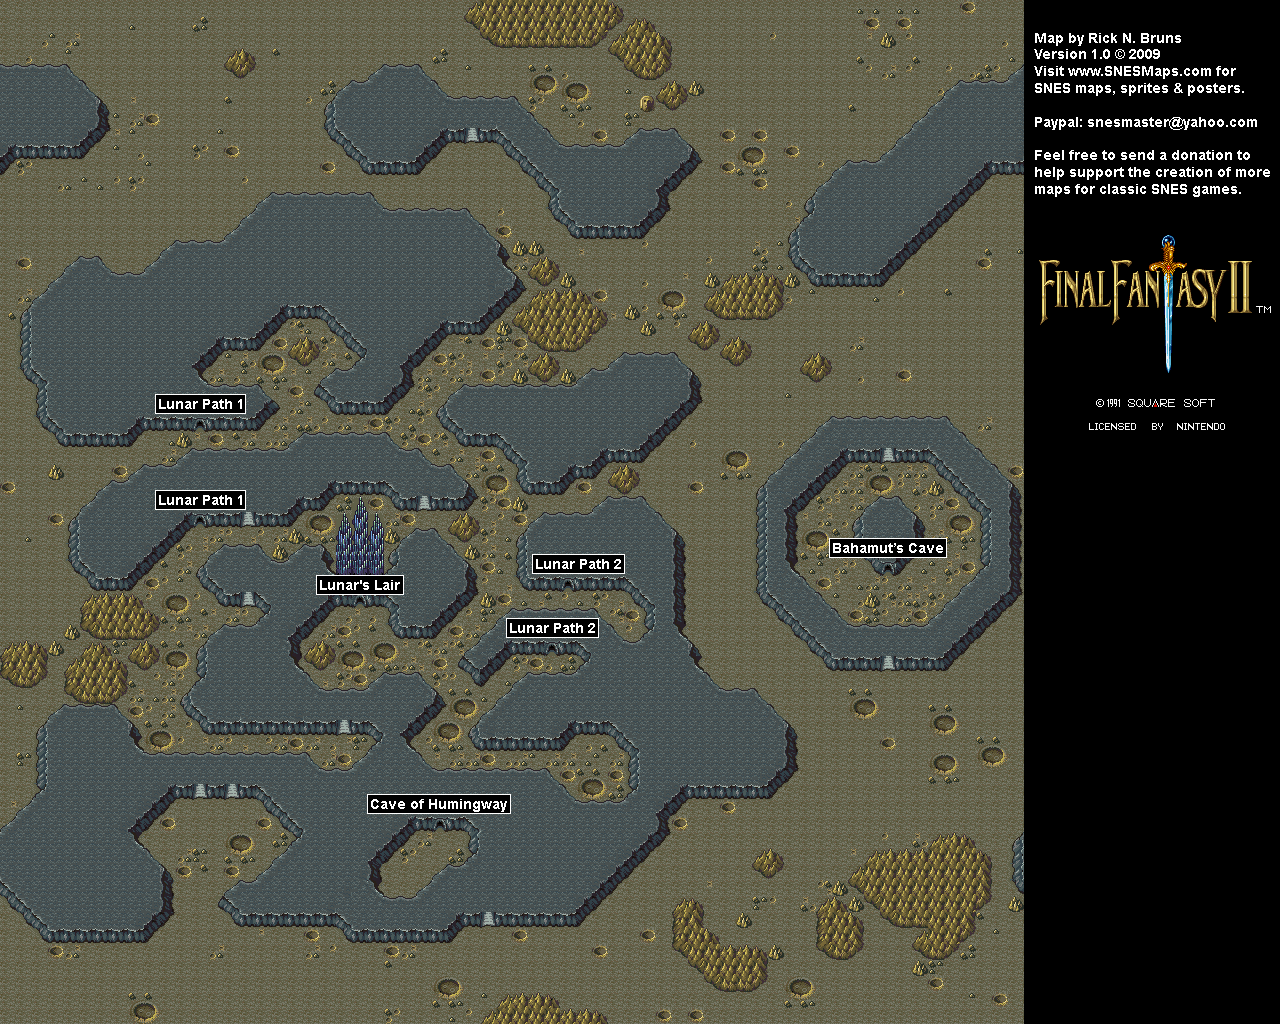
There isn't much to the lunar world. South of the castle is the Cave of Hummingway, which is surrounded by mountain. Park the Magic Ship there and go inside.

Hummingway's Cave/Cave of Hummingway


There are a ton of Hummingways that look like Namingway, and one of them sells things when you talk to them. The Flute allows you to summon the Fat Chocobo anywhere in the world, but at this point, you have one on the magical ship.

One of them is actually a Namingway, strangely enough.

The Hummingways at the north have speial palletes, and the one on the left mentions the Namingway that went to the earth.

From here, get on the mountain area and land north of the castle that you see. You'll be heading there next.

Tuesday, June 12, 2018

HCBailly plays Terranigma - Part 54 of 75


We check out the rest of Loire before getting back to advancing the game's story. We still have a world to revive, you know.

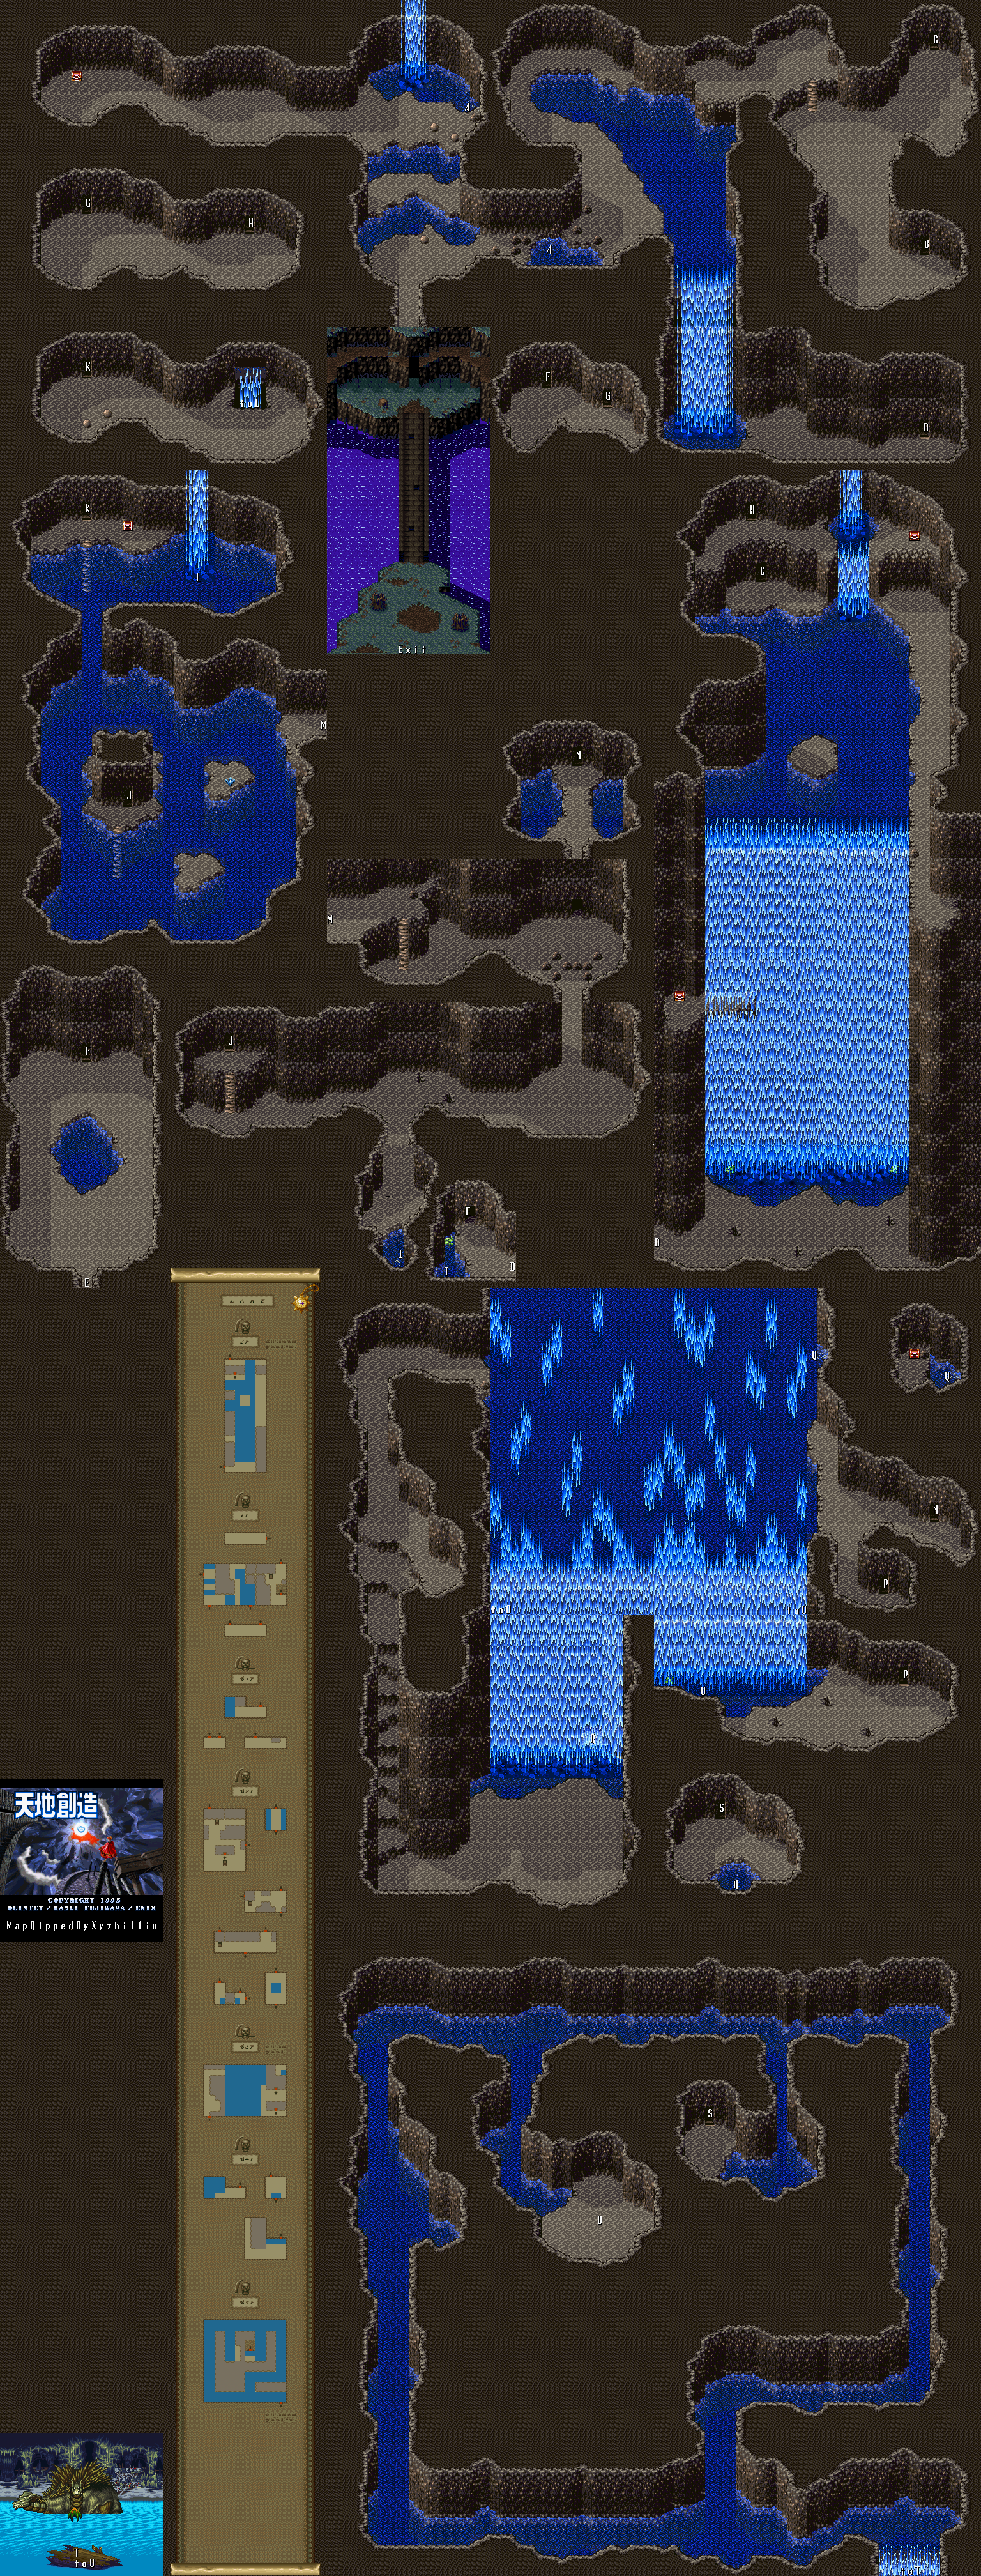
World map by Tropicon. Loire and Nirlake maps by Amir Azadur. Great Lakes Cavern by xyzbilliu.


Loire


The building to the left of your apartment is that one family who had the grandmother. Sadly, the grandmother passed away between expansions. To the right of them is Mifta, who used to have a terrible job and can't go without a hat because of it.

There are some more buildings on the northern end. The one in the upper-left corner is the tourism office, and to the right of it is Marily's boutique. You can buy some suits, but they don't provide a lot of defense. Marily will be a different color palette than everyone else, and if you talk to her, she'll tell you that lots of orders have been coming in after she gave you the clothes and she can finally run her own boutique.

To the right of Marily's is the guy selling the croissants, who is standing next to Mme. Papilo's boutique. The woman doing window shopping there says the clothes are expensive and that the designs look old fashioned. If you go in and talk to her, she will refuse to close her shop down to the bitter end. Sucks to be her!

Next to Papilo's shop is the winery. Business is booming and the guy behind the counter can't keep up with demand.

The lower-right building is Jean's house. You'll find out that Jean has opened his doors to anyone who wants to make the town better. Jean himself will tell you that people's happiness cannot be measured by material possessions, and that he wants to help people live better, fuller lives.

That's pretty much it for Loire.

Head back to the northeast and go to the poultry farm. You'll find out the guy running it opened a race track. It will be to the north, and you can beat on the winner. The woman near the counter will give you a tip for the next race for 10 Gems, and you can bet 50 Gems on who will win. The maximum Gems you can get from a race is 500.

Great L.


And with all that...it's time to progress the plot. Back to Nirlake! Head to the Great L. Cave and use the Engagement Ring on Servas. He'll find out what happened, and says he will go see her...by disappearing. From there, you can enter the cave from the north.

The rocks are very useful against the fish, and so is the Enbu Pike.

The Doumas near the beginning will spit bubbles at you. You'll want to stay away from those as you fight them.

You'll want to start this cave by going north, then west to open the chest that contains the Air Herb. The Air Herb is needed to take advantage of the bubbles that come out of the water in certain locations. If you see bubbles bubbling out of the water near walls, press A to dive into them and take a secret passage to another part of the cave. You'll need to do this to continue into the rest of the cave, and the only way to do it is with the Air Herb.

From there, take the waterfall down and take the stairs to the right, then head north through another stair case. The Slimes will come back with a vengeance, but they'll go down easy. Also, the red flower enemies can hit you with Deadly Poison if you run into them. You'll then see a shadow in the water nearby, and Ark will wonder what it is before hearing a cry for help. The shadow then moves away.

If you ever see water bubbles in the middle of the water, stay away. Those are sea serpents diving in and out of the water, and they can hurt you. From where you saw the shadow in the water, keep all the way to the left and go down the waterfall from the extreme left side. You'll land on a platform on the way down and you'll find a chest containing the Magic Anchor. From there, drop all the way down.

Sunday, March 11, 2018

skorch82 plays Brave Fencer Musashi - Part 54 of 70


Finally, we no longer have to turn any valves in Steamwood. Now to get on with the rest of the game...

Once you turn all eight valves again, you will never have to deal with this Steamwood stuff ever again.

When you exit Steamwood, you'll meet the Mayor, who now knows what's going on with the whole fake Princess deal. Musashi will also give the profits back to the mayor.

Head back to the mine and take the left path on both forks. Go back into the well and use the Water Scroll to go all the way to the lower-left corner of the cavern. There is a small island with a chest on it. Open it, and you'll get the Legendary Vest (L-Vest), which increases your attack power and decreases the amount of time to charge the Lumina gauge.

Now that you have the Fire Scroll, head down to that cavern in that dried-out part near where the Water Crest was. Travel to the end and use the Fire Scroll on the Fire Crest. This will blast a hole in the ceiling, allowing you to climb out of here by using the L-Brace on the nearby wall.

You'll pop out in a new area. If it's 10 PM, you'll find a Minku near the hole.

Saturday, February 25, 2017

Chilean Retrogamer plays Wario Land 2 - Part 54 of 57


Capture a ghost? But what about Captain Syrup?

This will take two videos to do. The first one shows everything prior to the boss, while the second is just the boss battle and the fifth ending.

Final Chapter: Uncanny Mansion

Final Story: Capture the ghost!


0:07 - The upper corners at the start leads to some big coins.

0:32 - There are two doors to the right. The one on the platform has a switch inside that moves the blocks around yet again. Use the old stove up top to reach it.

0:54 - The door to the right of the switch room leads to a bunch of coins and enemy blocks. There are some big coins at the top.

2:19 - The door to the right of the entrance leads to nothing, so you might as well go back.

2:27 - Now that you've triggered the switch, you can reach the doors below. Go down the stairs and enter the door on the platform to trigger the switch again. Watch out for the snowman.

2:46 - The boss door is in plain view as soon as you enter the door to the right, but we're not using it until the next video. There are even more big coins at the bottom of this room.

5:08 - After a bunch of needless backtracking, the switch is triggered on the lower level, allowing for access to the lower left corner of the room.

5:17 - Get whatever coins you can, then tackle the old stove top over the pit at the top to get to the door on the lower left corner of the room.

6:29 - Another switch, which you'll need to trigger to continue. Do that.

6:46 - From there, you can use the stove top to access the upper left corner, which takes you to the last treasure room of the game. Here, you'll win a skull. It's now time to head to the boss room.

Tuesday, December 10, 2013

brickroadbrickroad and SovanJedi play Secret of Evermore - Part 54 of 88


All right, let's get out of Ancient Rome here and OH SWEET JESUS WHY IS MY DOG A PINK FROU-FROU THING

All maps by Grizzly, except for the Underground Maze map by yoji00.

Underground Maze


Boss: Aquagoth


Oh, lord, this guy can be such a pain in the ass.

Avoid the tentacles (good luck watching out for those, there's a ton of them) and let the Dog go after them (The Dog can't hit Aquagoth), and hit Aquagoth himself with The Boy. Crush will work well here, as will Fireball if you've leveled it up enough.

Also, watch out for the shiny, electric sparks running through the floor. You can't destroy them and they will damage you.

Aquagoth can cast Lightning Storm, but if you're strong enough, it won't be too much of a pain. It can still be annoying, though, so keep your health high as always.

Sometimes, an Oglin will join the fight. Let The Dog go after it.

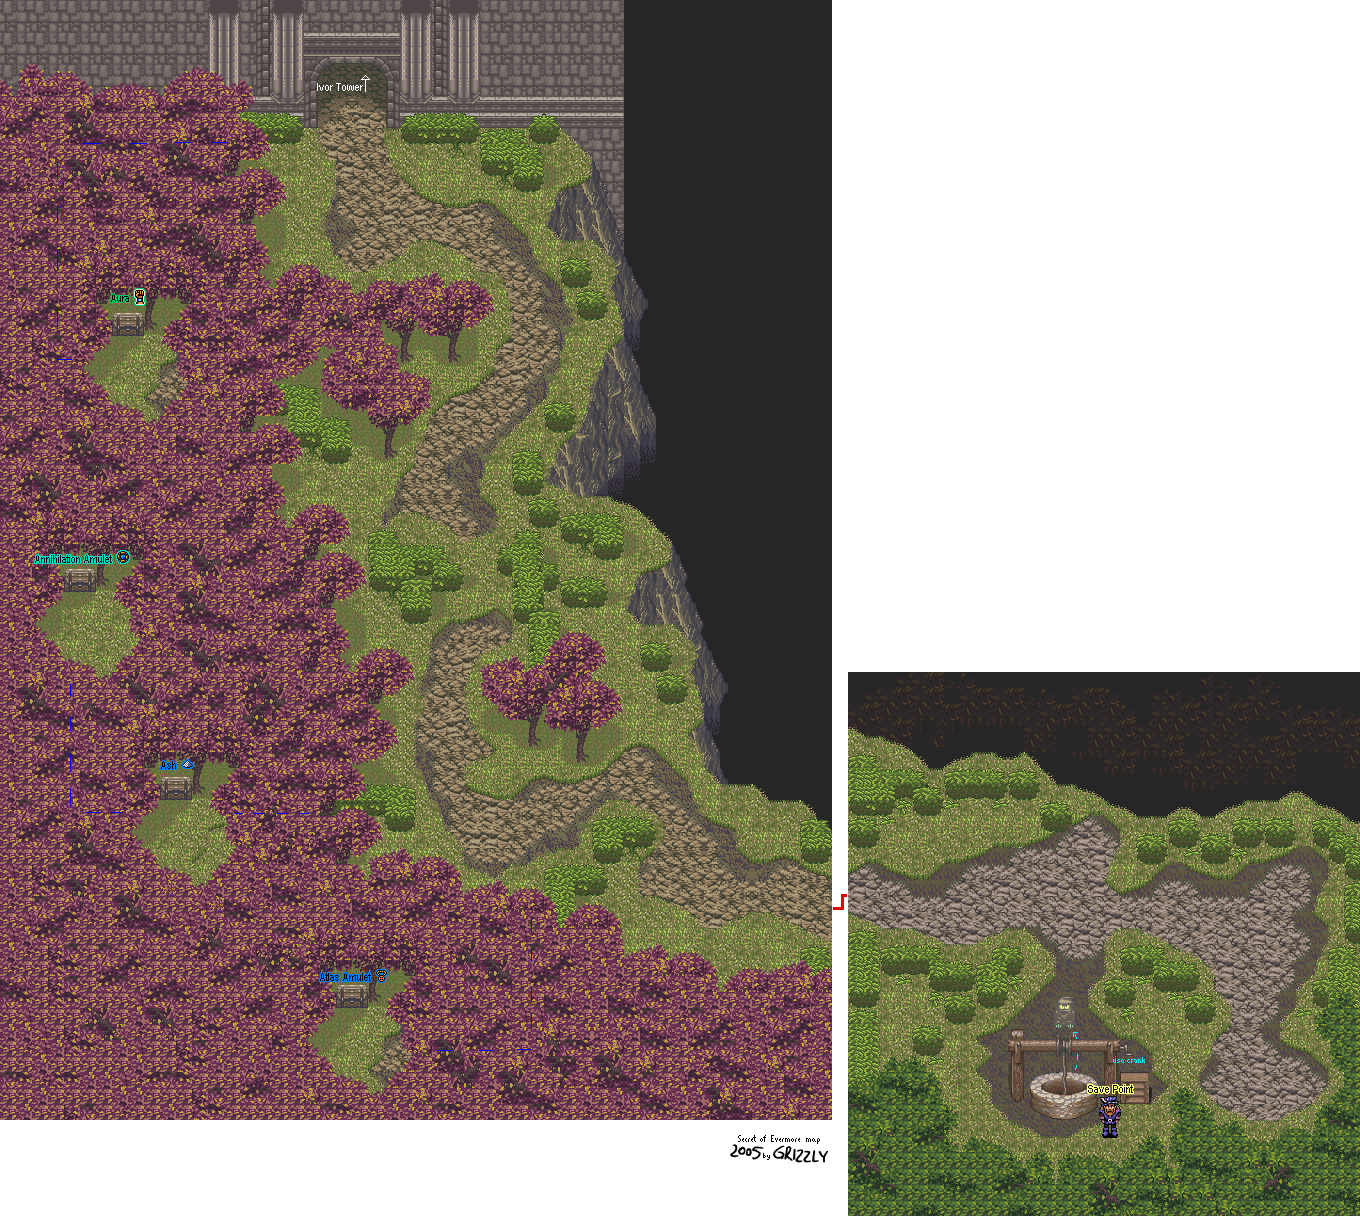
Ivor Tower South


Map

When you beat Aquagoth, you'll get 5000 Jewels and some Honey. As I mentioned earlier, the Honey refills all your HP (like the Royal Jelly in [i]Secret of Mana[/i]), so keep that stuff handy! A man will then talk to you through the ceiling, asking you to get in the bucket. He'll pull The Boy out through the bucket first. When he pulls The Dog out afterwards, you'll find out he's changed. Again. This time, he's a pink poodle, complete with his own animation where he stands on his hind legs.

julie-su.png

He tells you that the Aquagoth was the source of the well drying up, and that you're now south of Ivor Tower, the queen's new castle. Welcome to Gothica. The man at the well will also let you save your game. Do it.

By the way, if you play with the crank to the well, an Oglin will pop out. You'll need this to get a certain spell later in the game.