It's time to head to two important places this time. Besides the Face Shrine that will net us another instrument, we also have the Dream Shrine, which harbors a deep secret...
Remember the maze we didn't go to until later in the game with all the rocks we had to pull out in order to get anywhere? Well, if you go south in the southeast corner of the maze, there is another maze with a lot of Armos Knight Statues. Believe it or not, you can take them out easily with the boomerang. One of them hides a staircase that leads to a chest. It has 20 Rupees at this point, but it you went here without the Level 2 Sword, you'll get a Secret Seashell.
All the way on the west side of the maze is the Dream Temple. When you go in there, you'll fight a big Armos Knight. Equip the Bow and stay away from him and his jumping attacks while pelting him with arrows. By beating him you'll get the Face Key for the Face Shrine. Continue to the north, and you'll find a mural which basically explains that Koholint Island is an illusion and only exists in the sleeping world, which basically means that the island is the product of the Wind's Fish sleep.
When you leave the Shrine, the Owl will show up. He neither confirm nor denies what you have seen is true, that only the Wind Fish knows the answer for sure, and that you're going to have to find the answer on your own.
The Face Shrine is where the island with the two Armos Knights are. Move the one to the left, get in the underground stairway, use the Hookshot to get over the gap, then use the Face Key on the Keyhole to get in.
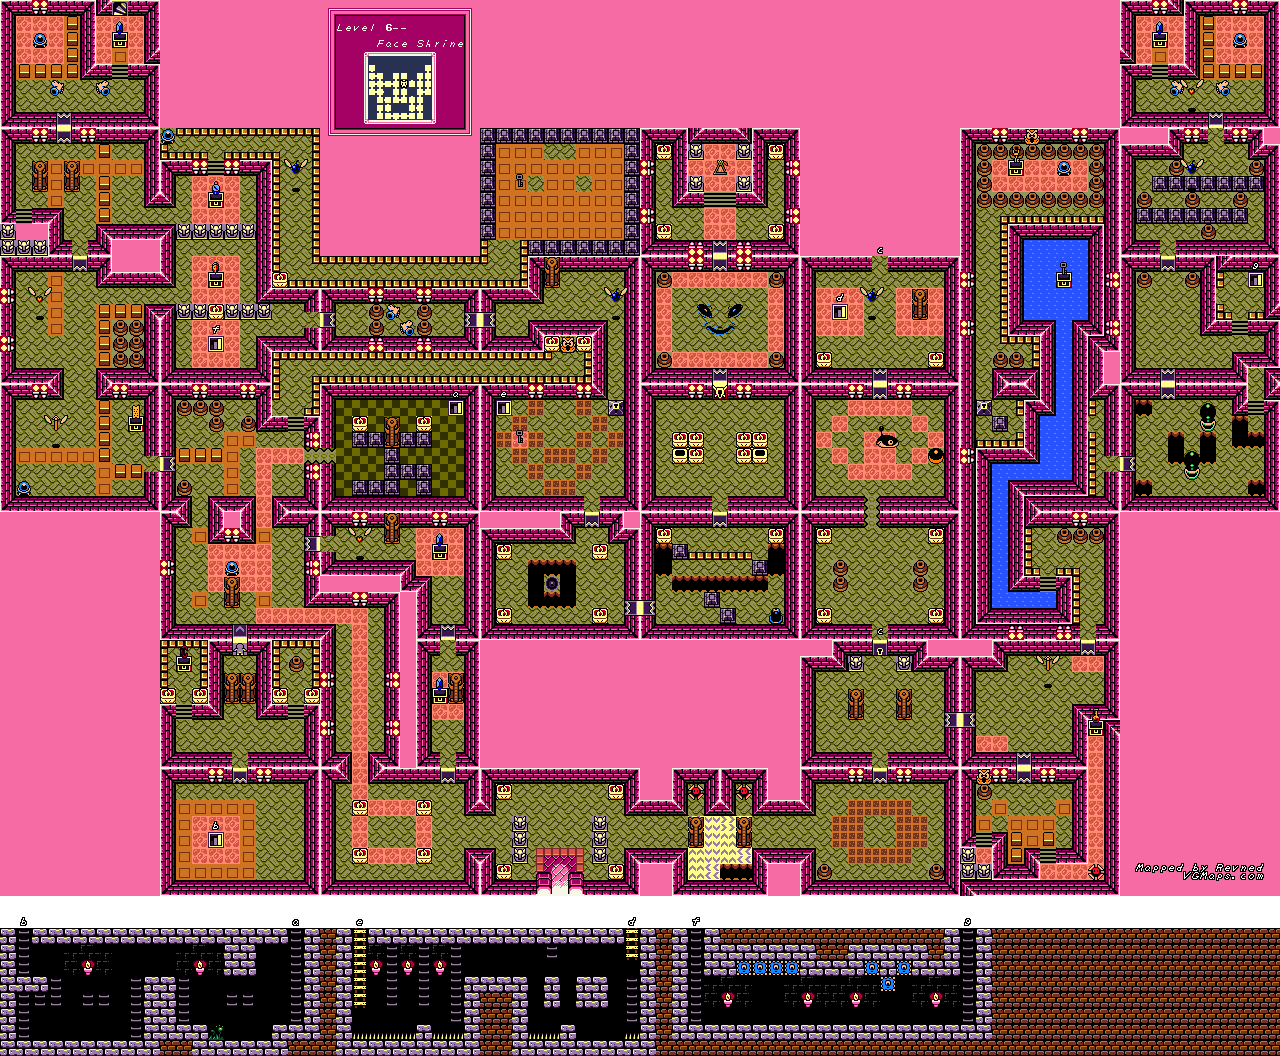
Face Shrine
The first thing of importance that you'll see is the Wizzrobes. Their hats pop up, then you'll see them entirely, shooting beams of magic at you. You need Bombs to kill them. There is an interesting thing you can do, though. Put the bow and arrow on one button and the Bombs on the other. You'll drop the bomb and shoot the arrow at the same time, and the Bomb will move with the arrow, creating an exploding bomb. Not sure if this is intentional or an actual glitch, but this is the only game where you can do this, and it's really wonderful. An exploding arrow will take care of a group of Wizzrobes when they're close together.
You can also use the Boomerang or the Magic Powder to stun a Wizzrobe, then manually lay a bomb right next to it. But who has time for that?
The spark creatures that move along the walls can be destroyed with the Boomerang. I did not know this until now.
The Shy Guy acts kinda weird. It moves in the opposite direction that you do. Take advantage of this by turning your back so it turns its back on you, then hit it with the Whirlwind Slash.
Believe it or not, the "eyes" on the map are actually rooms. To reach the left "eye" place a bomb between the two torches on the wall on the screen west of it. Defeat the enemies inside, get through the side-scrolling section without being hit by those large blinking spheres, take out the worm and those Wizzrobes, then go north and get the Level 2 Power Bracelet. This lets you pick up the large elephant statues in this dungeon, along with other things. You can also find a Fairy in this room if you need it.
Go north, and you'll be back in the Shy Guy room. Pick up the elephant statue and throw it at the door to the east to get the 100 Rupees. You can open the door to the south the same way you got in here.
You can stun the Wizzrobes with the Boomerang, believe it or not. Too bad the sword will still fail to work on them.
The horse heads have to be tossed so that they land right-side up. Sadly, there isn't a trick to it. You just have to keep trying.
One of the staircases leads above ground, to an isolated platform in the raft mini-game maze. You'll be able to find another 20 Rupees here (if you haven't found the minimum of Secret Seashells).
The tiles that flew off the floor and rocketed right at you from A Link to the Past are much easier this time around. Just block them all with your shield.
One of the chests has the secret medicine, if you haven't gotten it from Crazy Tracy's.
The mini-boss in the right "eye" is some sort of slug that tosses a metal ball at you. Throw the metal ball back at him with the Power Bracelet until he's destroyed.
The room to the north loops to the bottom of the map if you keep going north from there, so use the Power Bracelet to pick up the left statue and find a hidden passage. Go through the side-scrolling section here and you'll find a path to another side-scrolling section. Use the Pegasus Boots to get past the mini-Thwomps, and when you make it to the end and go back up, you'll take on the Pols Voice. Yep, they're back again. You can use the Ballad of the Wind Fish to take them all out at once.
South of the Pols Voice room is that pair of worms again. Just plant the Bombs in their mouths to blow them up. Go left from here, and you'll find a chest that you seemingly can't open. Throw a pot at it with the Power Bracelet to get the Nightmare's Key.
You know those statues with the eye from A Link to the Past that rotated around it, looked forward and shot a laser at you when you were in its direct line of sight? Well, there's a one-eyed creature just like it near the end of this dungeon, and it attacks the exact same way.
The room with the Nightmare Key door has two unlit torches. If you light them up with the Magic Powder, the two monsters inside the room will turn into Fairies.
The boss here is the floor. Really, it's the floor. When its face shows up, blow it up with a Bomb. Be sure to equip the Shield on the other button, so you can protect yourself from the floor tiles and pots that come out of the ground. When he's out of ammunition, he'll start making tile-sized holes in the floor that you don't want to fall into. Luckily, this guy is a real cakewalk, and he falls after a few Bomb explosions.
You'll be rewarded with the Coral Triangle, and your next destination for another Instrument is the mountain.
No comments:
Post a Comment