We have a lot more ground to cover now that we have the Power Bracelet...so let's do it!
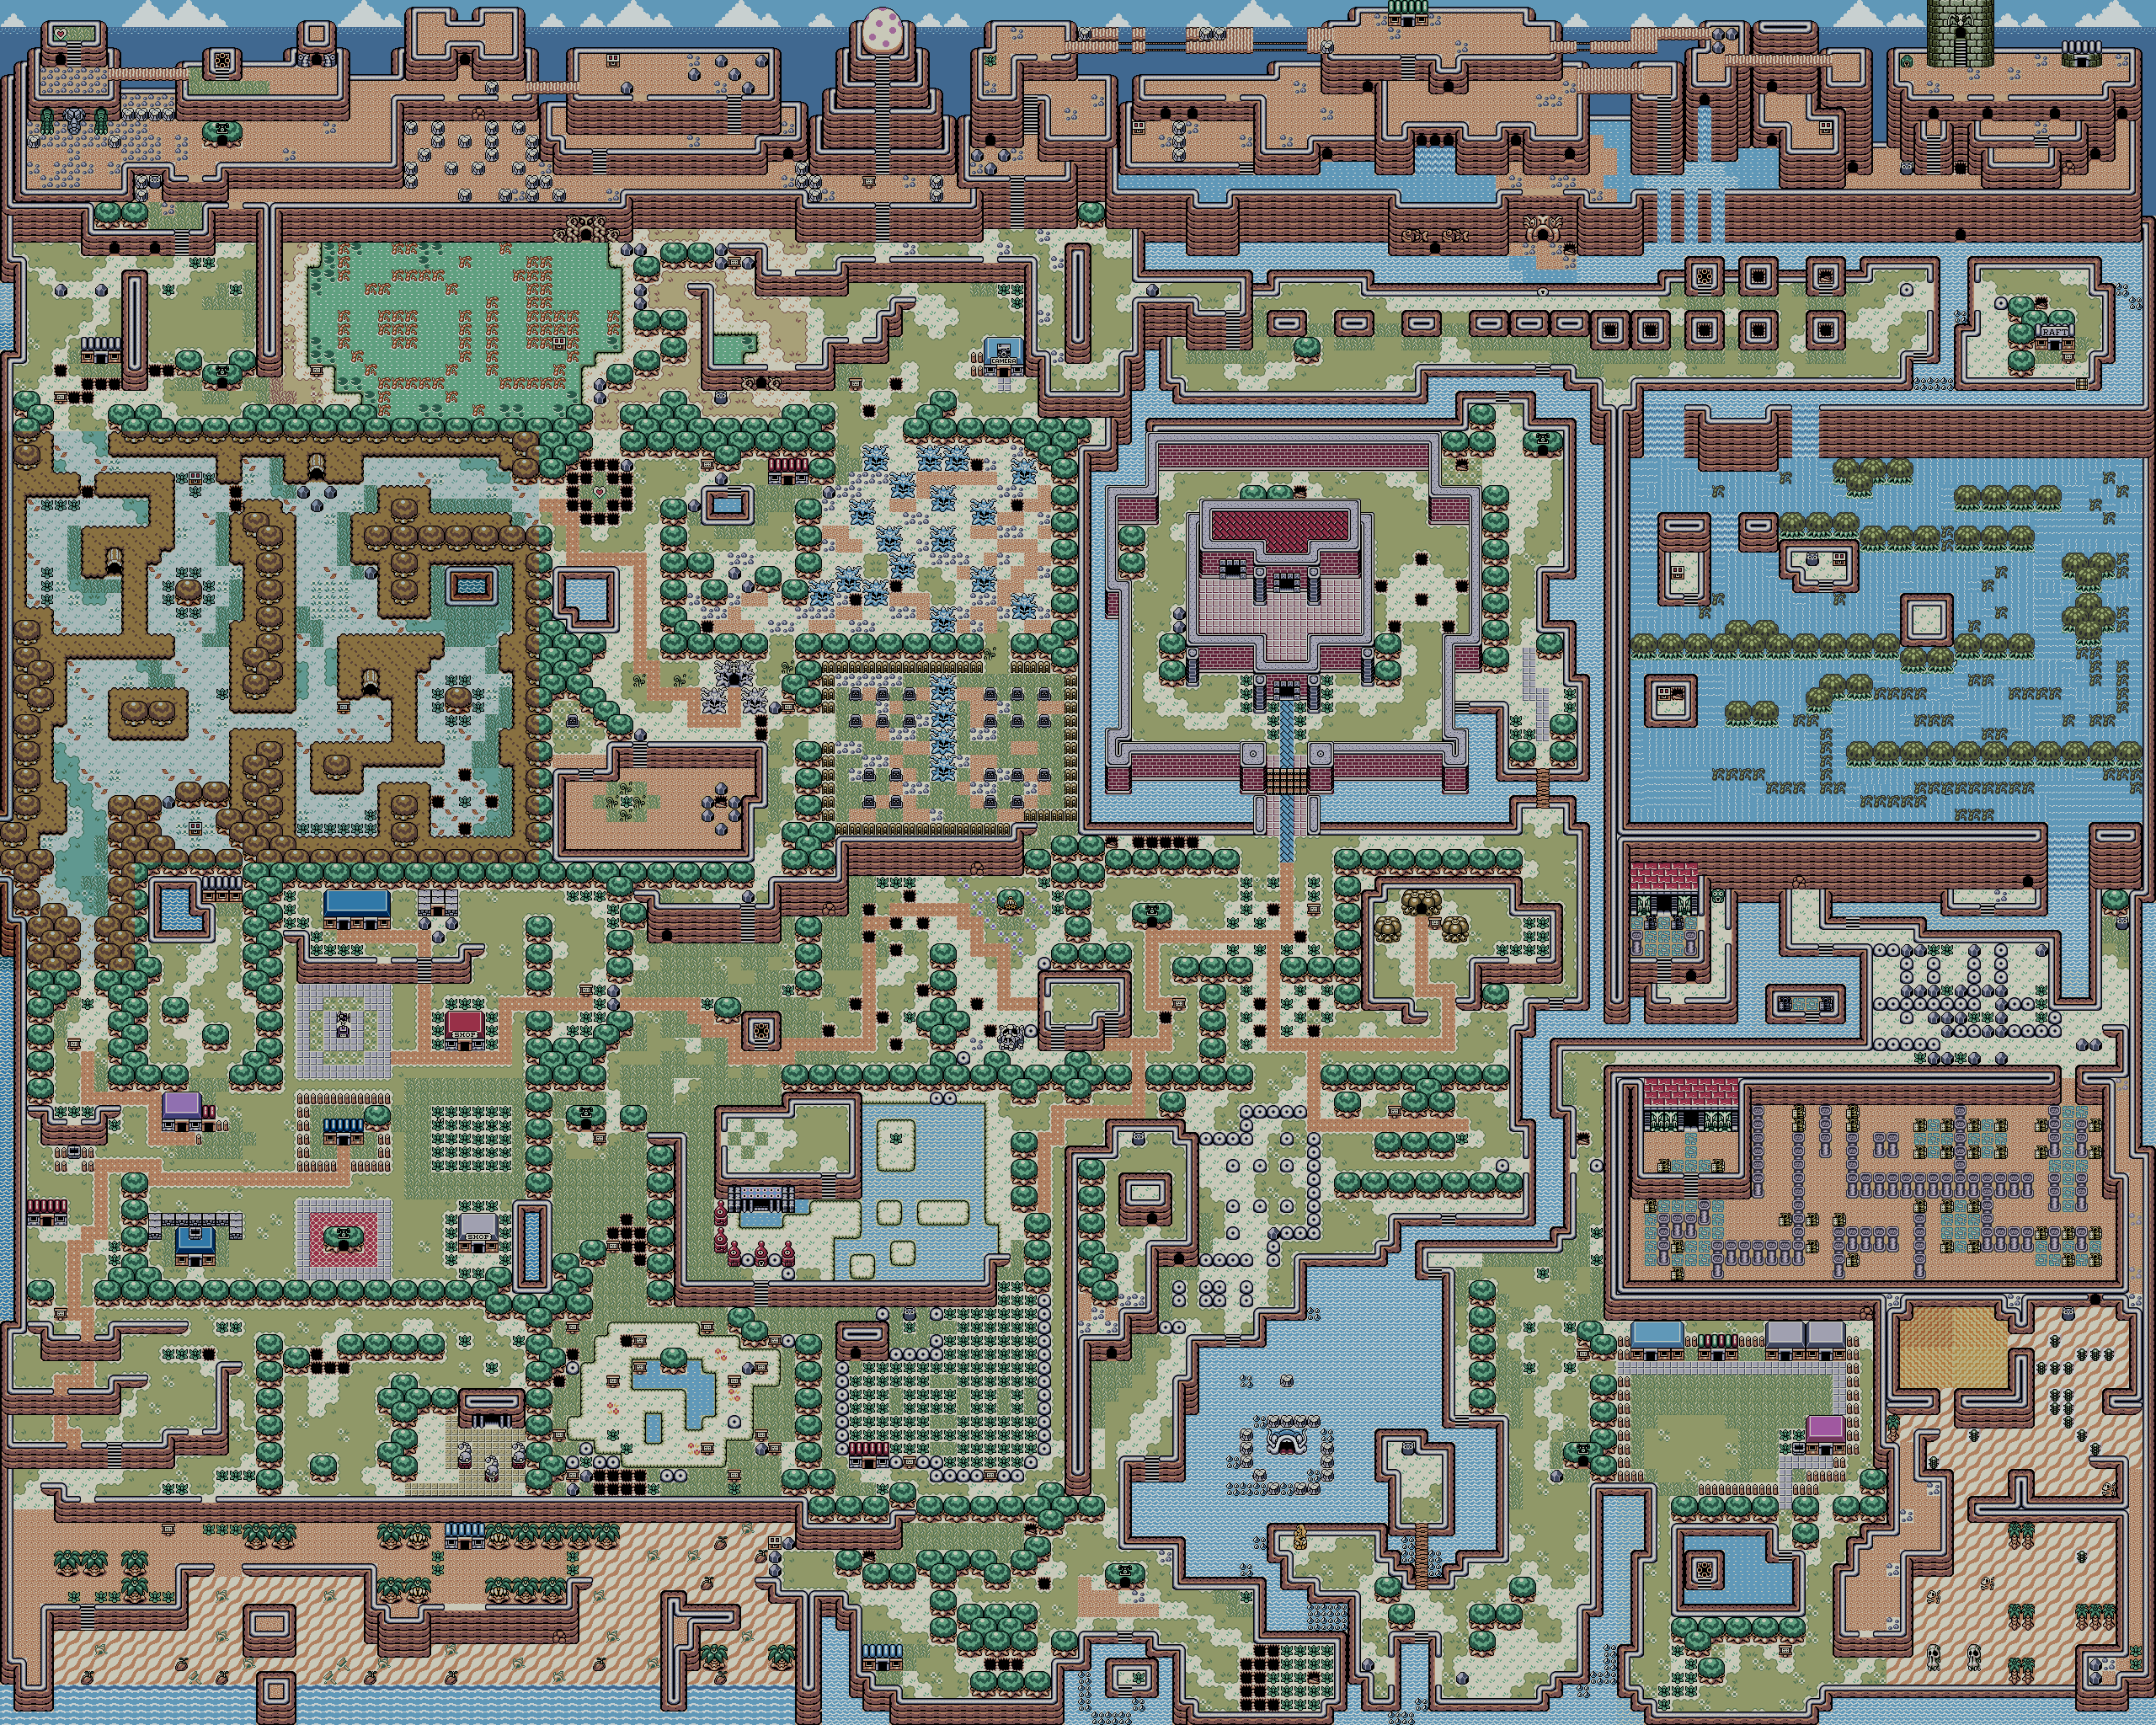
Now that we have the Power Bracelet, the map is blown wide open.
Since I have the money, I not only buy the bombs from the village shop, but I also buy the shovel, which will come in handy. Of course, once I buy the shovel, I can buy the bow...but that will prove expensive at 980 Rupees.
The Dream Shrine north of the shop is now accessible, but we still won't be able to do anything here yet. This is a good thing, as the monsters that mirror your moves do three hearts' worth of damage if you touch them.
Using the shovel in the doghouse next to Meow Meow's house will net you a Secret Seashell.
There's not much else to do, so I head east. Not far from the village is not only an Octorok with wings (either use the Whirlwind Blade, or hold out the sword while you're charging the move up and then run the sword into them), but a teleporter pad. There are four of these in the game, but it will take a while to find them.
To the south is a Slime Keyhole, but we will not be able to do anything with it yet. Going north takes you over to the Mysterious Woods and Graveyard area. You may remember seeing a lone gravestone. Going south from it and using the shovel in the space where the bush is will net you another Secret Seashell.
To the right is a staircase leading underground. There is a Heart Piece on the other side, but it will be a while before you can get to it. The nearby stairs lead back up to the graveyard.
You can now also access Crazy Tracy's Day Spa. If you have enough Rupees, you'll be able to get a bottle of medicine from Crazy Tracy that will revive you fully if you die during the game. It only works once, and if you use it, you'll have to go back to Crazy Tracy to get it again. The first purchase is 28 Rupees, and every subsequent purchase is 56 Rupees.
By following the dirt path, you'll face worms that strike at you if you get too close to some of the holes in the ground. Along the way, there is a cave you cannot do anything at, as you cannot get rid of the crystals that are in your way.
You'll also find a beehive, but you won't be able to do anything with it yet. The cave that you can blow up the entrance to hides a Fairy Queen that will
To the south is a giant skull. You'll need to use a bomb to get rid of it. From here, you'll see flying mushroom-shaped enemies that will drop bombs on you...and they hurt!
By going north, you can go to a castle, but you won't be able to access it quite yet. In the meantime, avoid the spiders that come out of the holes and you'll find a maze-like area. There is a rock you can pull up to find a Secret Seashell underneath. Watch out for the pig men; they can fire arrows at you.
When you find five Secret Seashells, don't get any more. There is a reason for this that I will mention later.
There is a cave in the west end of the maze area, and there is a spot you can place a bomb to find a hidden room. If you hold A and walk into a wall, and tap the wall to hear a tinny noise, that wall can be blown up. Watch out for the skulls, as there are enemies hidden in them that will charge at you and hurt you if you get too close. If you can push the blocks, you can go up the cliff near the pig-man maze. There is a secret you can find here, but we're not going to look for it yet, as it involves a Secret Seashell.
Taking the normal path takes you south of the pig-man maze. Again, there's not much you can do here, either.
You are not able to swim in water yet. If you move into it, you will lose health and be placed back on dry land.
East of the pig-man maze entrance is a hidden staircase, but you can't get to the stairs on the other side. Ditto on dry land, as a gap with water blocks your path.
If you go south after the skull and follow the dirt road east, you'll find the Seashell Mansion. Bring Secret Seashells here, and you might get rewards If you go in with exactly five Secret Seashells, you'll get a sixth one.
If you go east of the Seashell Mansion and cut the bushes, you'll find a secret Seashell.
If you drop down from there and go north, you'll meet a monkey who will want your bananas. If you give the monkey your bananas, he and his monkey friends will build a bridge to the north. There will be a stick left over. Take it; you'll need it to continue the trade sequence. You'll now have access to the castle grounds to the north. You won't be able to much there yet.
Let's go back up to the cliff above the pig-man maze and go north. By doing so and using the shovel, we can find yet another Secret Seashell.
The path leading south out of the cave past the pig maze that we skipped earlier leads to a bunch of screens. There is not much we can do south past the pig-man maze cave...not yet. However, on one screen, you can see a mermaid statue. Thankfully, you can cut the bush to find yet another Secret Seashell.
It's time to go south on the screen after the skull we had to blow up. There is a whole area full of bushes and grass, and there is also an area with islands in the water we can jump to. At least here, we can reach the Slime Dungeon, but we still don't have the key. The area with bushes and grass can be accessed, and to do so, you'll need to enter the nearby house. When you enter this house, you'll meet Richard. He's the prince and main (friendly) rival in a Japanese-only Nintendo game known as "Kaeru no Tame ni Kane wa Naru." The frogs in the room are also a reference to him and the game he's from.
Anyway, he'll help you out with getting the key to the dungeon in Ukaku Prairie. To do that, you'll have to head to the castle and find the Five Golden Leaves. He will tell you that you will need the shovel for this. The castle is northeast of Richard's Villa.
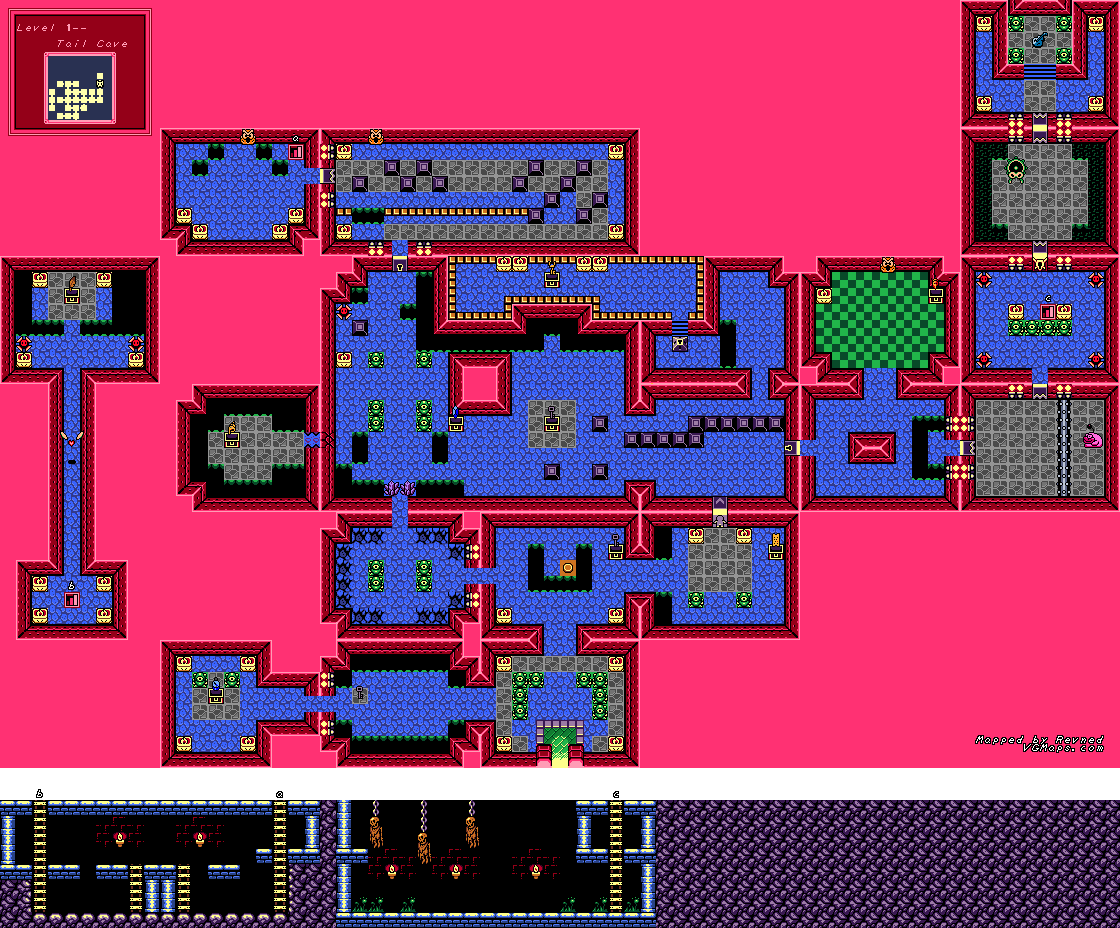
After all of this exploration, I head back to the Tail Cave. Why? Because there was a wall that I could not bomb simply because I did not have any bombs. Go back there with a bomb and blow up the cracked wall. You'll find a room that contains a Secret Seashell in a chest.
When you have ten Secret Seashells, stop looking for Secret Seashells and go to the Seashell Mansion. You'll get your eleventh Secret Seashell if you do.
Secret Seashells
3. Go back to the doghouse near Madame Meow Meow's house where you got the Ribbon, and use the Shovel. You'll find a Secret Seashell in one spot.
4. The screen south of the lone grave contains a Secret Seashell underneath the bush.
5. In the pig-man maze just southwest of the Seashell Mansion, lift the rock with the Power Bracelet to get another Secret Seashell.
6. When you collect five Shells, don't collect any more until you enter the Seashell Mansion. You'll get a sixth one. This one is pretty easy to screw up at getting if you're overly eager to explore Koholint Island.
7. Go one screen east of the Seashell Mansion and cut the bushes. You'll find another one.
8. Go into the cave in the pig maze. Go one screen west and use a bomb on the small nook on the west end of the room to find a staircase. Go up and get out of the cave from there, then go north. Use the shovel on the ground where the owl head is to find another Secret Seashell.
9. On the other side of the screen with the mermaid statue is a lone bush. Cut it with the sword to get another Shell.
10. The crack in the wall in the Tail Cave requires a bomb to open up. Going inside takes you to a chest with a Secret Seashell.
11. Come back to the Seashell Mansion with exactly ten shells. You'll get another Secret Seashell. Just like the sixth, being too eager to explore the island will cause you to miss out.
No comments:
Post a Comment