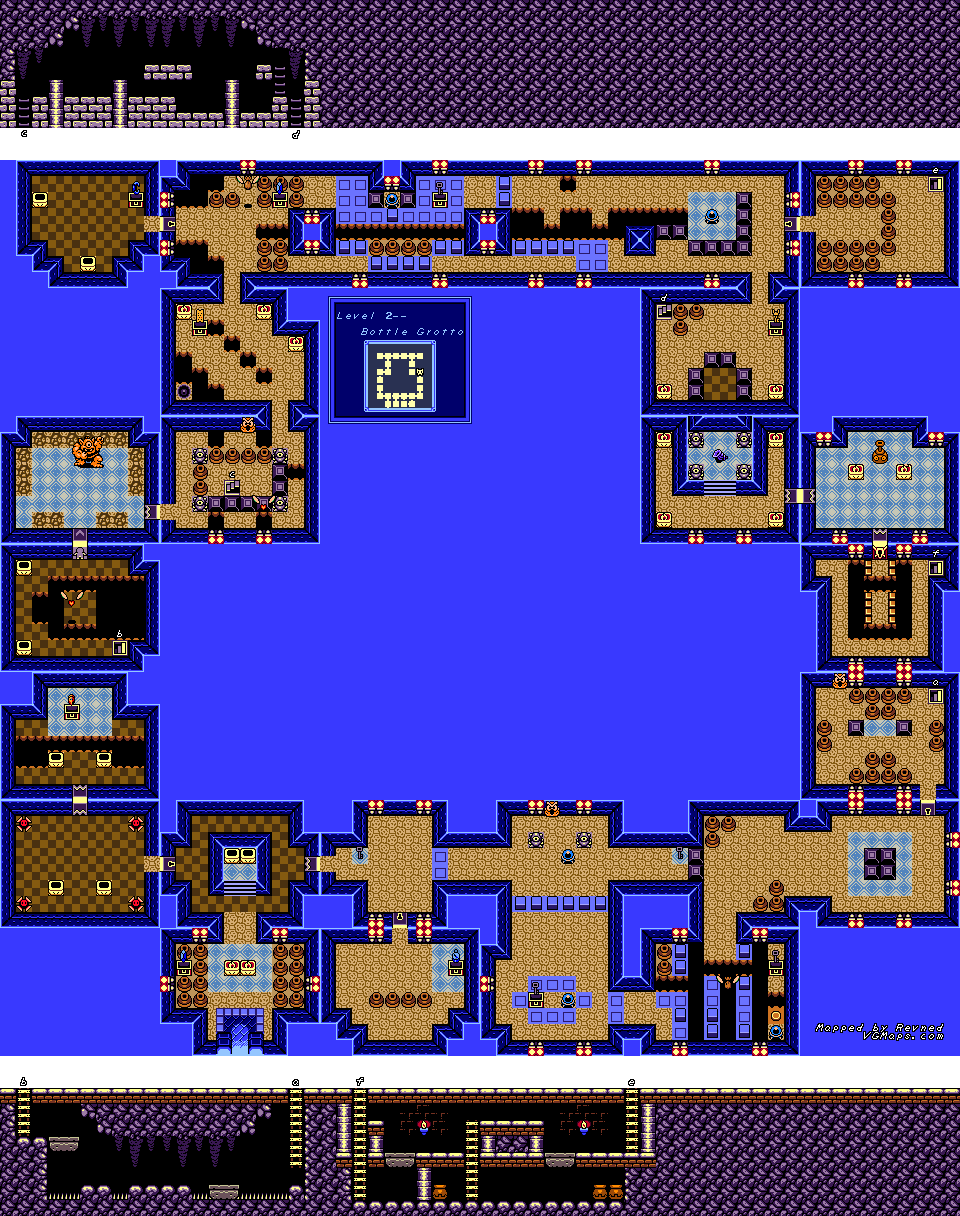
Not long after going through the first dungeon, we take on the second one!
This dungeon brings us a new kind of puzzle: light up all the lanterns with the Magic Powder to open the door to the next room. You'll see this one a few times here and also throughout the game.
The room in the upper-left corner of the map contains the Power Bracelet. This lets you not only pick up bottles with the button you equipped it on, but you'll be able to move those rocks stuck in the ground, too.
Some of the Stalfos Knights are a little faster, and when you swing at them, they'll try to pounce on you. Be careful!
Remember the crystals in A Link to the Past that turned from blue to orange when you hit them? Well, they're back in this game (except they're all in one color). Hit the crystal with your sword, and some blocks in the ground will be raised up like a big protective wall that blocks your path while others lower.
To the right of the first crystal you see are a pair of Shy Guys. They go in the same direction you do. To beat them, hit them from behind with the Whirlwind Slash. It'll take some clever navigation, but it can easily be done.
The hooded Stalfos with the sword and shield can be easily taken care of with a Whirlwind Slash, much like the Moblins with the sword and shield. They basically act the same way, too, so there's nothing new here.
The mini-boss here is one of those one-eyed guys from the Dark World in A Link to the Past that throws bombs at you. Yep, he's been elevated to mini-boss status. Avoid those bombs and whack him with your sword.
After the mini-boss, you'll meet a vortex-like hole in one of the corners of the room. This guy will try to suck you into the pit. He also sucks the enemies towards him, which can be both a gift and a curse.
To take out the Boo Buddies, light up one of the lanterns. This will cause them to freak out and turn black. From there, you can hit them with your sword.
There is a room with a Pols Voice, a bat and a hooded Stalfos. Defeat the Pols Voice (the thing that looks like a hopping bunny) first, then the bat, then the Stalfos. You'll get the Nightmare's Key.
The side-scrolling section with the lowering platforms is pretty interesting. The first one goes down to the lower level easily, but the second one requires some work. Equip the Power Bracelet and pick up a pot, then walk back up and stand on the platform. Since you weigh more due to that pot you're carrying, the platform has no choice but to budge.
The boss here is a genie. To beat the boss, hit the bottle with your sword while the bottle is moving and then throw the bottle into the wall with the Power Bracelet. In the meantime, avoid the fireballs that the genie throws at you.
Once you break the bottle, he'll teleport everywhere before throwing a fireball at you. When he starts following you, hit him. After enough damage, he'll die. You'll get another Heart Container as well as the Conch Horn. Your next destination is the prairie.
Now that you have the Power Bracelet, there is a secret staircase you can reveal and enter now that you can pick up and throw away rocks. Inside is an altar that you can sprinkle Magic Powder on, and if you do that, you can double the carrying capacity of your arrows, your bombs or your magic powder. If you don't want a certain upgrade, just select "No" until you get the one you want. There are three in all, so you'll be able to get all three upgraded eventually.
You can also get the Heart Piece on the way to the mushroom, now that you have the Power Bracelet. There is also a chest you access with the Power Bracelet, which will give you a Secret Seashell.
There is another place you can get to that leads to a chest, but you'll need an item from much later in the game to get it.
If you talk to Madame Meow Meow at this point, you can return Bow Wow.
Secret Seashells
2. The chest blocked by a rock in the Mysterious Forest contains another Shell.
No comments:
Post a Comment