This is the point where the game gets even harder.
Cell
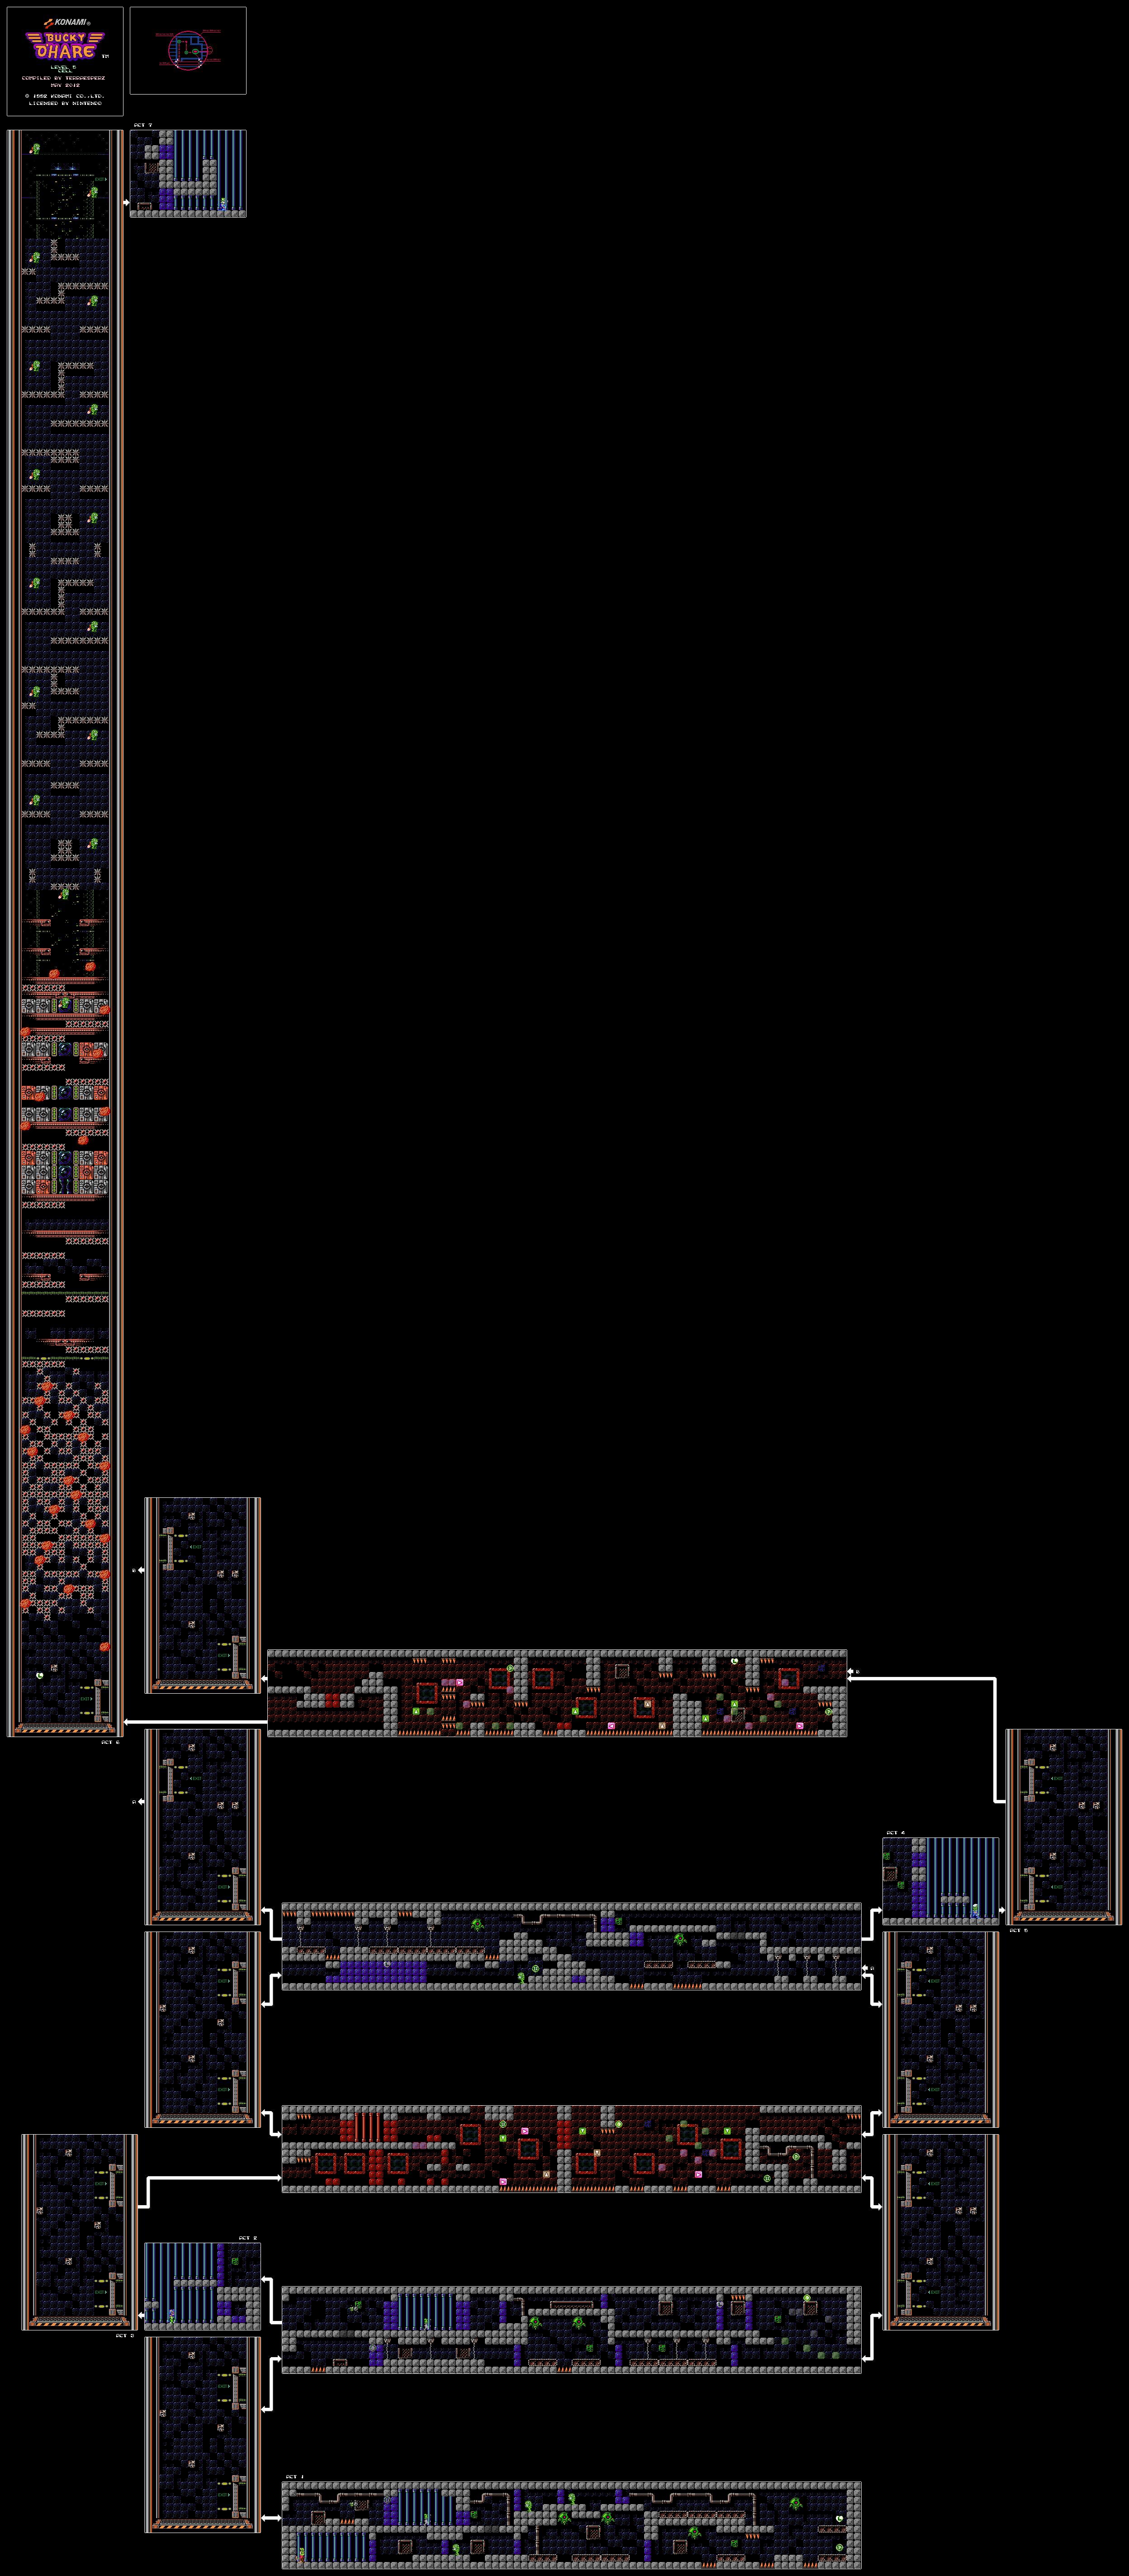
Since it is very much possible to get slightly lost and accidentally backtrack, I found a map. So there's that.
Use Blinky to bust out of the cell at the start. Watch out for conveyor belts as well as the turrets that you can shoot down. There will be plenty of spikes as well; don't hit those.
When on the upper level of a hallway, there will be some false floors that you can fall through, sending you back to the lower level. Use Blinky's jetpack to get past those.
If you run into any prisoners in the cells, don't shoot them or else they will pace back and forth like crazy.
The flying security droids just fly forward.
There will be plenty of elevators that you can take up and down. Use them to get further into the level.
The electric barriers that are fired from the small gray ceiling turrets take off quite a bit of ceiling turrets.
There will be blocks that move back and forth making whirring noises much like the Youku blocks in the Mega Man games, and you can recognize their patterns after watching for long enough.
You'll eventually find Jenny, but when you approach, she gets hypnotized by the Air Marshal. She will pace back and forth at the bottom of the cell twice, then get on the middle platform and shoot an energy ball. She will then get on the top floor and pace back and forth twice, go back to the middle, shoot an energy ball, then shoot an energy ball at the bottom of the cell before restarting the pattern. Avoid her lasers, and stay all the way to the right to avoid the energy ball, which will disappear before it can even get to you. When she gets to the bottom of the cell, plug away at her and stay away from her when she walks towards you.
Eventually, you'll get Jenny back and you'll be able to select her again. When that happens, you can't go back from where you came in. Instead, you'll have to head left to get on an elevator and continue on.
The light-colored blocks on some floors are fall-away and will take you back down to the lower level, while the dark-colored blocks can be destroyed with Blinky's weapon.
The green and pink blocks with the triangle blocks move around when you stand on them. Pink are horizontal, while green are vertical, and if a block flashes in both directions, they go in multiple directions and have a pattern.
There will be some pink Youku blocks in tandem with the green ones after the first rescue, so be careful.
To beat the hypnotized Willy, shoot at him as the Air Marshal hypnotizes him, then continue to shoot at him while jumping over his beams. Willy will only shoot at you when he is looking towards you. When he gets on the platform in the middle of the cell, be ready to jump low and continue shooting him. When he walks off the top platform, he will fire at you as soon as he lands. This is probably the easiest battle out of the three when it comes to getting your comrades back.
Once you get Willy back, go right. After that, your memorization skills will be put to the ultimate test. Good thing there are infinite continues in this game, and when you [b]do[/b] continue, you start back at the beginning of the act where you died. After you reach the end, go down by blowing up the dark-colored floor with Bucky, then switch to Bucky to shoot down all the flashing spikes above your head on the elevator you'll be taking. The spikes are instant death, but the boulders that fall down are not. Once you get past the maze of spikes, there will be lines of spikes extending towards the center of the screen. Get in the center, face the block you're trying to shoot at and aim upwards. If spikes touch the floor at you go up, those spikes won't be able to kill you. You'll have another section of spikes that you'll be forced to avoid, as you cannot shoot them down, but they are far easier to avoid and the Toads on jetpacks that confront you in that part are the only real threat.
After that elevator, you'll meet Deadeye. Destroy the top and middle rows of the dark blue blocks in front of you. Approach the cell as Willy so that Deadeye gets brainwashed, then stand on the blocks that are left and shoot fully-charged shots at him. This allows you to deal damage without getting hit. When Deadeye climbs to the upper nook of the cell, switch to Bucky and jump and shoot at him from the outside of the cell from there. Deadeye will eventually return to the bottom of the cell; when that happens, switch back to Willy and plug away as Deadeye's movement and attack pattern begins anew. When Deadeye finally snaps out of it, you'll complete the level.
After the Cell level, the crew cooks up an escape plan: follow the salvage chute down to the center and blow up the magma tanks.
Salvage Chute
To defeat the Toad bot at the beginning, switch to Willy and blow him away with charged shots. These bots can also split into three, and you'll have to use everybody's special abilities to take them down.
To get past the floor spikes, you'll have to make some very good jumps. I end up using Blinky's jetpack for them, even though you can jump over them.
In the second act, you'll have to deal with crushing walls. You'll have to get between them and then figure out where to go to drop further down in this section, and if you get caught between these crushing spiked walls, you will lose a life. Just go right and stay there, for the first set of three; go to the left for the second set of three.
In the third act, switch to Blinky. His smaller hitbox allows you to avoid some damage from the bugs that will lunge in and out of the floors and ceilings. After that, there will be bugs that go up and down the screen in straight vertical lines. Be patient and wait for them to get out of your way as you progress. Watch out for the Toads at the end.
In the fourth act, take out the slugs that stick to the ceiling; otherwise, they will latch onto your head and make jumping across pits absolutely impossible until you jump into ceiling spikes and impale the slugs on them. Use Jenny's energy ball to take a few of them down if you need to, as well as Deadeye's gun.
In the fifth act, watch out for the spiked crushers that move up and down as you make your way to the right. To take out the last Toad before the end, you'll have to press A and B simultaneously to jump and shoot at the same time.
In the sixth through eighth acts, the lights will go out after a short amount of time, and the only source of light will be the fireflies flying from right to left across the screen. You'll have to keep still and use their light to figure out where the platforms are, then anticipate where you have to go as well as where and when to jump to keep from falling into the water below and losing a life. You'll be switching to Blinky and using his jetpack for all of these sections once the room goes dark.
After three whole sections of this, you'll have to ride some narrow platforms across some sludge. There will by some enemies that will swallow you if you land either dead center or close to dead center. If you jump exactly onto the edge, you're safe. Your best bet is to be close to the monsters before you jump over them. That way, getting eaten won't be an issue. If you land in the sludge, keep mashing the A button to get out and hopefully get on a narrow platform.
You'll then face the boss. It is a Toad mech that jumps in and out of the room from the top of the screen. Its weak spot is the purple globe on the underside of the mech, and you'll have to shoot it down while avoiding tons of missiles. After three salvos of the missiles, the mech ducks down and shoots two instant death lasers to the sides that you will have to duck under to avoid. After that, it leads back up to the top of the screen, and you'll have to anticipate where it will land. If you manage to be at the sides of it, you can shoot at the purple orb with Deadeye's three-way shot. If you get caught directly beneath the center of the mech, you'll have to use Jenny's energy ball to attack the orb and then duck down when the much does, because if any part of the mech touches you, it's instant death. Strangely, there is a method to where the mech lands when, and if you can get the landing pattern down, you can do as much damage as possible without the battle being super-difficult.
Once the purple orb is gone, the mech's weak point will be the Toad head on the top. Switch to Jenny, and aim the energy ball at the head. If you get caught directly between the mech's legs when it lands from jumping to the top of the screen, do not panic. Charge up the energy ball so that the power meter is full, then let go of B and use the Control Pad to keep the energy ball on the head as long as possible. If you can't destroy the boss after three missile salvos, be ready to duck until the mech leaps up so you don't die. If you die at any point, you're starting this whole boss battle over. This one is difficult, but it can be done.
After the battle, you'll be in the Magma Core. The Righteous Indignation gang prepares to blow the tanker up...
No comments:
Post a Comment